1
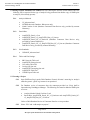
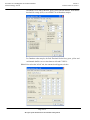
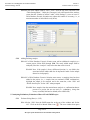
Procedure for GeneMapper® ID for DNA Database
Forensic Biology Section
Version 1
Effective Date: 09/13/2013
Procedure for GeneMapper® ID for DNA Database
1.0
Purpose – This procedure specifies the steps for performing analysis on DNA samples using
GeneMapper® ID (GMID) software.
2.0
Scope – This procedure applies to DNA Database Forensic Scientists in the Forensic Biology Section
who perform DNA analysis using GMID.
3.0
Definitions
•
•
•
•
•
•
•
•
•
•
•
•
•
•
•
•
•
•
•
4.0
Equipment and Materials
•
•
•
5.0
Amelogenin - Gender-determining short tandem repeat (STR) locus.
Artifact - See Forensic Biology Section DNA Database Autosomal DNA STR Interpretation
Procedure.
Bin - An expected location for a particular allele within a locus; a binset is a collection of expected
locations for alleles at loci amplified as a set.
Consensus Allele - An allele that conforms to an incremental repeat pattern at an STR locus.
Electropherogram (egram) - The computer generated electronic/visual result from an analysis
performed by electrophoresis.
.fsa File - A raw data file generated during sample electrophoresis as part of a run; only viewable
through GMID software (or equivalent).
Heterozygote Peak Imbalance - A difference of greater than approximately 50% between two
peaks of a single source sample at a given locus.
Identifiler™ - A commercially produced amplification kit which contains the following STRs:
CSF1PO, FGA, THO1, TPOX, vWA, D3S1358, D5S818, D7S820, D8S1179, D13S317, D16S539,
D18S51, D21S11, D2S1338, D19S433, and Amelogenin.
Injection - See Forensic Biology Section Autosomal DNA STR Interpretation Procedure.
LIZ Sizing Standard - A commercially produced set of DNA fragments of known size, used to
determine the size of DNA fragments in an electrophoresed sample.
Locus (plural, loci) - See Forensic Biology Section Autosomal DNA STR Interpretation Procedure;
also referred to as a marker.
Microvariant - See Forensic Biology Section Autosomal DNA STR Interpretation Procedure.
Off Ladder Allele - See Forensic Biology Section Autosomal DNA STR Interpretation Procedure.
Overblown/Off-Scale Data - See Forensic Biology Section Autosomal DNA STR Interpretation
Procedure.
Panel - A collection of markers specific to an amplification kit (i.e., Identifiler™).
Project - A set of data saved as a single entity in GMID.
Relative Fluorescence Units (RFUs) - A unit of measurement used in electrophoresis when
fluorescence detection is utilized; determines peak height.
Run - See Forensic Biology Section Autosomal DNA STR Interpretation Procedure.
Split Peaks - See Forensic Biology Section Autosomal DNA STR Interpretation Procedure.
Computer with GeneMapper® ID (version 3.2.1 or most current) software
Microsoft Excel, Word
Print2PDF software
Procedure
Page 1 of 14
All copies of this document are uncontrolled when printed.
Procedure for GeneMapper® ID for DNA Database
Forensic Biology Section
Version 1
Effective Date: 09/13/2013
5.1 Setting Analysis Parameters for GMID: Each user shall import from the Section Shared Drive the
following files as required for the type of analysis being performed into his/her copy of GMID prior
to analysis (if not already present):
5.1.1
Analysis Methods:
•
•
•
5.1.2
G5_Advanced.xml
NCSBI Robot.xml (Database Robot runs only)
North Carolina v2.xml (Database Contractor Data Review only, provided by contract
laboratory)
Panels/Bins:
•
•
•
AmpFLSTR_Panels_v2.txt
AmpFLSTR_Panels_v2_AmpFLSTR_Bins_v2_bins.txt
AmpFLSTR_Panels_NC_v2_Panels.txt (Database Contractor Data Review only,
provided by contract laboratory)
AmpFLSTR_Panels_NC_v2_AmpFLSTR_Bins_NC_v2_bins.txt (Database Contractor
Data Review only, provided by contract laboratory)
•
5.1.3
Size Standards:
•
5.1.4
GS500LIZ_Advanced.xml
Tables and Plot Settings:
•
•
•
•
•
•
•
SBI Casework Table.xml
AmpFLSTR Sizing plot.xml
Case Allele Table.xml
Overlay LIZ plot.xml
AmpFLSTR Genotyping plot.xml
AmpFLSTR Table.xml
CODIS Export Table.xml
5.2 Creating a Project
5.2.1
Open GMID and log in under DNA Database Forensic Scientist’s name/log-in. Analysis
under the generic “gmid” log-in name is not permitted.
5.2.2
For Database review of contractor data, the contractor-provided .ser file(s) shall be
imported using GeneMapper Manager. The following files must be added to GMID prior
to review:
•
•
Analysis Method: North Carolina v2.xml
Panels/Bins: AmpFLSTR_Panels_NC_v2_Panels.txt and AmpFLSTR_Panels_NCv2_AmpFLSTR_Bins_NC_v2.bins.txt
Refer to DNA Database Review of Contractor Data for review procedure.
5.2.3
Select “File” and “Add samples to project.”
Page 2 of 14
All copies of this document are uncontrolled when printed.
Procedure for GeneMapper® ID for DNA Database
Forensic Biology Section
Version 1
Effective Date: 09/13/2013
5.2.4
Locate the run folder containing the samples to be added to the project under the “Files”
tab. Highlight the run folder (or select the specific samples to be analyzed) and select
“Add to List.” The file(s) then appears on the right-hand side. Select “Add.”
5.2.5
In the Samples pane, the category “Sample Type” shall have the samples labeled as
follows when amplified with Identifiler™:
•
•
•
•
•
5.2.6
The remaining categories shall be filled out as follows:
•
•
•
•
•
5.2.7
Ladder: Allelic Ladder
9947A (Positive Amplification Control): Positive Control
Negative Amplification Control: Negative Control
All other samples shall be “Samples”
Note: Sample File names appear by well number (i.e., A12) followed by the sample
name as entered by the DNA Database Forensic Scientist prior to electrophoresis.
Also, until the samples are analyzed, the “Status” icon to the left of the Sample File
name has the unanalyzed icon (
) present next to it. If no “Status” category or
icons are present, verify that the table setting (in top center of the main GMID
window) is set to “AmpFLSTR Table.”
Specimen Category: no export
Analysis Method: G5_Advanced or NCSBI Robot (for Robot runs)
Panel: Identifiler_v2
Size Standard: GS500LIZ_Advanced
Instrument Type: ABI3130, or similar (note: automatically filled in by the software
and instrument)
Once all samples and categories are properly labeled and identified, select the “Analyze”
icon ( ) to analyze the data. When prompted, create a project name for the set of
samples and select “Save.”
5.2.7.1 Note: GMID auto-saves data after every 10 samples have been processed.
5.2.7.2 Note: The Genotypes tab becomes available in the main GMID window once
analysis is complete.
5.2.7.3 Note: If any sample displays a solid red “stop” sign icon ( ) on the right-hand
side of the GMID window, assess the data as described in 5.3.
5.2.8
Analysis and Plot Settings
5.2.8.1 Access the Analysis Method Editor by selecting “Analysis” from the menu in the
main GMID window, and then select “Analysis Method Editor.” Note that the
user must have a single sample in the main GMID window selected in order to
access the Editor.
5.2.8.2 Select the “Peak Detector” tab, and ensure that the settings are as seen below
when the samples have been amplified with Identifiler™. Note that the Peak
Page 3 of 14
All copies of this document are uncontrolled when printed.
Procedure for GeneMapper® ID for DNA Database
Forensic Biology Section
Version 1
Effective Date: 09/13/2013
Threshold is set to 100 for the blue, green, yellow and red channels. Note that the
threshold for orange (LIZ) is set to 80 RFU for all Database samples.
For Database robot samples, the Peak Threshold for the blue, green, yellow and
red channels shall be set at a value between 100 and 175 RFUs.
5.2.8.3 Next select the “Allele” tab; the contents should appear as below:
Page 4 of 14
All copies of this document are uncontrolled when printed.
Procedure for GeneMapper® ID for DNA Database
Forensic Biology Section
Version 1
Effective Date: 09/13/2013
5.2.8.4 In the main GMID window, select “Tools” from the top menu, and then select
“Table Setting Editor.” Under the “Genotypes” tab, at the bottom of the window,
ensure that the “Number of Alleles” under “Allele Settings” is set to at least 12.
DNA Database Forensic Scientists may adjust this number if necessary (i.e., to
maximum number of called allele at any locus).
5.2.9
Adding/Deleting samples
5.2.9.1 If a DNA Database Forensic Scientist must add an additional sample(s) to a
current project, follow 5.2.3 through 5.2.8. The newly added sample shall be
analyzed (select the “Analyze” icon) before the data can be viewed.
5.2.9.1.1 Note: if the sample is from a different injection (i.e., run folder), the
associated Allelic ladder shall also be imported in order for the sample
data to be sized properly.
5.2.9.2 If a DNA Database Forensic Scientist must remove a sample(s) that has been
added to the project (i.e., a sample from an unrelated CODIS confirmation),
highlight the sample to be removed and in the menu bar, select “Edit” and
“Delete from Project.” Select “OK” when prompted.
5.2.9.2.1 Note: samples from the samein-house analysis or confirmation that are
present in a project but are not used (i.e., redundancy, sizing data
issues, or similar) shall not be deleted (refer to 5.3.2.3.2).
5.3 Analyzing/Preliminary Evaluation of Data of Each GMID Project
5.3.1
Evaluate Sizing Data (i.e., LIZ)
5.3.1.1 Select “Edit” from the GMID menu bar at the top of the window and “Select
All.” Click on the Size Match Editor icon ( ). The new window that opens
Page 5 of 14
All copies of this document are uncontrolled when printed.
Procedure for GeneMapper® ID for DNA Database
Forensic Biology Section
Version 1
Effective Date: 09/13/2013
displays the LIZ sizing data for all selected samples; scroll through each one and
confirm that all sizing peaks are correct (75, 100, 139, 150, 160, 200, 300, 340,
350, 400, and 450- base pairs). Close this window.
5.3.1.1.1 Note: If all peaks are not called, the analysis range may need to be
extended: view the Analysis Settings in 5.2.8. 2 and change the analysis
range to “Full Range” in the “Peak Detector” tab.
5.3.1.2 Again select all the samples in the main GMID window and select the “Display
Plots” icon ( ). This opens the Sample Plot window for all selected samples.
Change the Plot Setting to “Overlay LIZ” by selecting it from the dropdown
menu in the top left portion of the Sample Plot window. Zoom in to the area near
the 250-base pair peak (bp) by holding the mouse just above the horizontal scale,
indicating bp size, and then clicking and dragging to zoom.
5.3.1.2.1 Note: the 250-bp peak was not defined by the manufacturer in the size
standard. The purpose of checking this sizing peak is to determine if
the 250-bp peak within the samples and controls are within +/- 0.5 bp
of the 250-bp sizing peak of the allelic ladder they were injected with.
Therefore, no sample or control run in-house shall be used for analysis
if its 250-bp peak falls outside of this window in relation to the allelic
ladder. Any sample or control that exceeds the window shall be reinjected (refer to the Forensic Biology Section Procedure for Use of the
3130XL Genetic Analyzer for reinjection requirements).
5.3.1.3 Highlight the 250-bp peak and hold down the Ctrl and “S” key on the keyboard
to select all samples at the 250-bp peak. The sizing table then displays the 250-bp
peak size for all selected samples. If any sample has a 250-bp peak which is
greater than +/- 0.5 bp from the 250-bp peak in the associated allelic ladder, refer
to 5.3.1.2.1.
5.3.1.4 If any sample or control in the project indicates “no sizing data” (i.e., LIZ
failure), then that sample or control shall not be used for comparison and shall be
re-injected to achieve proper sizing information. This information shall be noted
on the Casework Table Worksheet. If there is no sizing data for an allelic ladder,
then no data associated with that ladder can be sized and the entire set shall be reinjected.
5.3.2
Assess Overall Quality of Data
5.3.2.1 Allelic Ladders and Controls
5.3.2.1.1 In the main GMID window, select the allelic ladder(s) and open the
sample plot window by selecting the “Display Plots” icon. In the
Samples Plot window, ensure that the Plot Setting is set to
“AmpFLSTR Genotyping.”
Page 6 of 14
All copies of this document are uncontrolled when printed.
Procedure for GeneMapper® ID for DNA Database
Forensic Biology Section
Version 1
Effective Date: 09/13/2013
5.3.2.1.2 Scroll through each of the color channels (blue, green, yellow, and red)
and verify that all the alleles are sized and labeled correctly according
to the expected calls for the Identifiler™ Allelic ladder. All expected
peaks must be present and above the appropriate analytical threshold.
Close this Sample Plot window.
5.3.2.1.3 In the main GMID window, select the positive and negative
amplification and extraction controls if used. Open the sample plot
window as described previously.
5.3.2.1.4 Examine the positive control(s) for the expected allelic results and to
ensure that the negative controls meet the required interpretive
guidelines (see the Forensic Biology Section Procedure for DNA
Database Autosomal DNA STR Interpretation). Remove any artifacts
as described in 5.3.2.2.1.1. Close the Sample Plot window.
5.3.2.2 Samples
5.3.2.2.1 Examine all samples in the manner as described for the allelic ladders
and controls.
5.3.2.2.1.1 Artifacts: If any peaks are to be removed from
consideration as true alleles due their presence as a known
artifact (i.e., pull-up, dye-blob, stutter, spike), highlight the
sizing box associated with the peak and right-click the
mouse. Select “Delete Allele(s)” (multiple peaks can be
deleted simultaneously by selecting them at the same
time—when the warning dialog box appears, select “OK”).
When prompted by the “Delete Allele Comment,” type in
“artifact” and the DNA Database Forensic Scientist’s
initials.
5.3.2.2.1.2 Microvariants: If a microvariant is present in a sample and
GMID has not automatically assigned it an allelic value,
DNA Database Forensic Scientists shall document the
proper sizing of the microvariant as follows:
5.3.2.2.1.2.1 In the main GMID window, select the allelic
ladder followed by the sample(s) containing
the microvariant.. Display Plots. Zoom in to
the locus containing the microvariant; the
Sample Plot displays the allelic ladder in the
top half of the Plot window and the sample is
in the bottom half.
5.3.2.2.1.2.2 Highlight the microvariant in the sample,
along with the alleles in the allelic ladder that
lie the closest in size to the microvariant (to
Page 7 of 14
All copies of this document are uncontrolled when printed.
Procedure for GeneMapper® ID for DNA Database
Forensic Biology Section
Version 1
Effective Date: 09/13/2013
select peaks simultaneously, hold down the
Ctrl key on the keyboard while selecting).
Select the sizing table icon (
). Select Ctrl
+ S to make the sizing table display the
selected alleles.
5.3.2.2.1.2.3 Based upon the sizing information provided in
the table, determine the appropriate allele call
for the microvariant. For CODIS eligibility,
refer to the Procedure for CODIS.
5.3.2.2.1.2.3.1 Note: the correct allele call for
the microvariant is dependent
upon the microvariant’s base
pair size when compared to the
allelic ladder.
5.3.2.2.1.2.3.2 Note: microvariants that vary
by less than the consensus
repeat unit for that locus must
be designated as an integer of
that variation (i.e., the 9.3
allele at TH01).
5.3.2.2.1.2.4 Rename the allele by right-clicking on it and
selecting “Rename Allele.” If the correct
allele call is not already present in the
subsequent drop-down list, select “Custom”
and enter the call in the “Create Custom Allele
Name” box. When prompted by the “Edit
Allele Comment” box, type in “microvariant”
and the DNA Database Forensic Scientist’s
initials.
5.3.2.2.1.2.5 With the alleles highlighted in 5.3.2.2.1.2.2
still present in the sizing table (remove any
extraneous), select “File” and “Print” and
select “Print2PDF.”
5.3.2.2.1.2.6 If a microvariant is observed re-amplification
or re-extraction of the sample shall be at the
DNA Database Forensic Scientist’s discretion
(see the Forensic Biology Section DNA
Database procedures).
5.3.2.2.1.3 Off Ladder Alleles: If a sample(s) contains an off ladder
allele that is not an artifact, the DNA Database Forensic
Page 8 of 14
All copies of this document are uncontrolled when printed.
Procedure for GeneMapper® ID for DNA Database
Forensic Biology Section
Version 1
Effective Date: 09/13/2013
Scientist shall assign the allele to the correct locus if possible
(see below). For CODIS eligibility, refer to the Forensic
Biology Section Procedure for CODIS.
5.3.2.2.1.3.1.1 If the allele in question lies between two
loci, the DNA Database Forensic Scientist
shall attempt to determine which locus the
allele should be assigned to based upon the
presence or absence of heterozygosity at the
loci in question.
5.3.2.2.1.3.1.2 If one locus exhibits homozygosity and the
second heterozygosity, the off ladder allele
shall be assigned to the homozygous locus.
5.3.2.2.1.3.1.3 If both loci exhibit homozygosity or
heterozygosity, the DNA Database Forensic
Scientist shall document either on the allele
call table or the electropherograms that the
allele was observed, but not assign the allele
to a particular locus, and mark the allele as
inconclusive (INC). The called (non off
ladder) alleles at these loci shall be reported
and uploaded into CODIS.
5.3.2.2.1.3.1.4 When a locus contains three alleles (one of
which is off-ladder) and the adjacent locus is
homozygous, the DNA Database Forensic
Scientist shall call the off-ladder allele
inconclusive. This will not preclude the
scientist from reporting and uploading the
remaining on-ladder alleles to CODIS.
5.3.2.2.1.3.2 If the off ladder allele can be assigned to a locus,
the allele must be designated as either greater than
(>) or less than (<) the last respective allele for that
locus called by the allelic ladder. For CODIS
eligibility, refer to the Forensic Biology Section
Procedure for CODIS.
5.3.2.2.1.3.3 Follow the steps outlined for microvariants for
assigning a value to the off ladder allele, as well as
the printing format, with the exception that the
“comment” shall be “off ladder allele” instead of
“microvariant.”
Page 9 of 14
All copies of this document are uncontrolled when printed.
Procedure for GeneMapper® ID for DNA Database
Forensic Biology Section
Version 1
Effective Date: 09/13/2013
5.3.2.2.1.3.4 If an off ladder allele occurs, re-amplification or reextraction shall be at the DNA Database Forensic
Scientist’s discretion (see 5.3.2.2.1.2.6).
5.3.2.2.1.3.5 If the GMID software does not allow the DNA
Database Forensic Scientist to assign a value to the
off ladder allele, the DNA Database Forensic
Scientist shall follow the same procedure for
documentation and assignment of microvariants.
The DNA Database Forensic Scientist shall be
required to print out the sizing table/egram
combination and manually write the proper sizing
designation to the off ladder allele along with the
DNA Database Forensic Scientist’s initials. These
pages shall then be scanned into PDF format.
5.3.2.2.1.3.5.1 Note: the Allele Call Table
Worksheet also needs to be
changed to reflect the proper allele
call for the off ladder allele that
cannot be exported through the
GMID software.
5.3.2.2.1.4 Sizing Shifts: If any allele at any locus has been sized outside
of the appropriate bin which results in an “off ladder” call by
GMID, the sample shall be re-injected (or re-amplified, if
necessary) in order to size the allele(s) properly if the DNA
Database Forensic Scientist wants to use the results at that
locus. Shifted alleles/loci shall not be used for comparison in
any control, ladder or sample.
5.3.2.2.1.5 Overblown/Off-scale Samples: The use of overblown
samples in Database samples shall be at the discretion of the
DNA Database Forensic Scientist based upon the training and
experience of the DNA Database Forensic Scientist.
5.3.2.2.1.6 Tri-alleles: The sample shall be re-extracted except in
CODIS confirmations.
5.3.2.3 Printing Egrams Electronically
5.3.2.3.1 All egrams shall be printed using the Print2PDF printer, with the
exception of 5.3.2.2.1.3.5. The egrams for each GMID project shall
exist as its own PDF file.
5.3.2.3.1.1 Note: GMID projects are added to the FA case record
object repository (or equivalent folder on the server if
analysis is not part of a case record) by exporting the
Page 10 of 14
All copies of this document are uncontrolled when printed.
Procedure for GeneMapper® ID for DNA Database
Forensic Biology Section
Version 1
Effective Date: 09/13/2013
projects: in GMID, select “Tools,” “GeneMapper
Manager,” select the applicable project and select “export.”
The file is exported/saved as an .ser file.
5.3.2.3.2 Any individual sample/control/ladder that is not used for comparison
purposes (i.e., LIZ failure, redundancy, further analysis) shall be
printed in PDF format. Such samples/controls/ladders shall appear in
the Casework Table explaining it was not used for comparison (e.g.,
LIZ failure, redundancy, re-analysis).
5.3.2.3.2.1 Note: Even if not used for comparison purposes, all .fsa
files associated with such samples/controls/ladders shall be
present in the run folder containing the electronic data in
the FA case record object repository (or equivalent folder
on the server if analysis is not part of a case record).
5.3.2.3.2.2 Note: For any sample/control/ladder that is not used for
comparison purposes, corrections (labeling of artifacts) are
not required.
5.3.2.3.3 If an entire run or project is not used for comparison purposes, it shall
be printed as Print2PDF and added to the case record object repository
(or equivalent folder on the server if analysis is not part of a case
record). Corrections (i.e., labeling of artifacts) are not required in this
instance. A Casework Table shall be generated for this instance and the
reason for not using the entire run/project shall be noted on this page
(also Print2PDF; see 5.4.1). An Allele Call Table is not required for
such runs/projects.
5.3.2.3.4 The LIZ sizing standard shall be printed (Print2PDF) as a separate set
of egrams which may be added to the overall egram PDF file for each
project, or kept separately as an independent document. The LIZ must
be present for all samples/controls/ladders and all peaks (75 through
450) must be visible.
5.3.3
View Raw Data
5.3.3.1 In order to verify the addition of amplification kit primers to all negative controls
and negative samples (which includes instances of LIZ or injection failure), the
raw data for such samples from each project must be present in each case record
object repository (or equivalent folder on the server if analysis is not part of a
case record).
5.3.3.1.1 In the main GMID window, highlight the negative control or negative
sample and select “Raw Data” from the “View” option in the main
GMID menu.
Page 11 of 14
All copies of this document are uncontrolled when printed.
Procedure for GeneMapper® ID for DNA Database
Forensic Biology Section
Version 1
Effective Date: 09/13/2013
5.3.3.1.2 The subsequent window displays the raw data on the right-hand side
and the sample and run information on the left-hand side. Expand the
left-hand window so that the full run file name (including run number)
is clearly visible. The right-hand window shall show the maximum
vertical and horizontal axis.
5.3.3.1.3 Using the Alt + Print Screen buttons on the computer, take a
“snapshot” of the raw data window. Open up a Word document and
paste this “snapshot” into the document. Repeat this process for all
negative samples and negative controls in each project.
5.3.3.1.3.1 This raw data Word document header shall contain at least
the project name (refer to DNA Database Procedure), DNA
Database Forensic Scientist’s initials, and the date.
5.3.3.1.4 The Word document(s) containing the “snapshots” of the raw data shall
be included in the scanned or Print2PDF notes.
5.4 Exporting and Creating Tables
5.4.1
Casework Table
5.4.1.1 In the main GMID window, select the “SBI Casework Table” from the Table
Setting menu.
5.4.1.2 Select all samples and under “File” in the main GMID menu, select “Export
Table.” Save the table to a location easily located by the DNA Database Forensic
Scientist (i.e., desktop or thumb drive). Ensure the file is exported/saved in the
“Tab- and Comma-delimited Text” (.txt) format.
5.4.1.3 Open Excel; open the .txt file saved in the previous step (note: the DNA
Database Forensic Scientist may have to change the “files of type” to “All Files”
in order for the software to access the .txt file).
5.4.1.4 When the Text Import Wizard opens, select “Finish.”
5.4.1.5 Adjust the columns to accommodate the full text for each line.
5.4.1.6 Select “Page Setup.” Under the “Page” tab, select “landscape”; under the
“Header/Footer” tab, select “Custom Header”—at a minimum, the DNA
Database Forensic Scientist shall enter the batch number, initials, and the date;
under the “Sheet” tab, select only the “Gridlines” box. Finish by selecting “OK.”
5.4.1.7 DNA Database Forensic Scientists shall note on this page any samples that are
not to be used for comparison and why, or those that are to have additional
analysis performed on them (see 5.3.2.3.2).
5.4.1.8 Print the Casework Table Worksheet by using the Print2PDF printer. The
Casework Table Worksheet shall exist independently of the egrams and the
Allele Call Table Worksheet(s). It may be merged with the set-up sheet.
Page 12 of 14
All copies of this document are uncontrolled when printed.
Procedure for GeneMapper® ID for DNA Database
Forensic Biology Section
Version 1
Effective Date: 09/13/2013
5.4.1.9 Note: For CODIS confirmations only samples and controls specific to the CODIS
confirmation shall be present in the Casework Table.
5.4.2
Allele Call Table
5.4.2.1 In the main GMID window, select the “Case Allele Table” from the Table
Setting menu. With all samples selected, select the “Genotypes” tab in the main
GMID menu.
5.4.2.2 Under the “File” menu in the main GMID window, select “Export Table.” Save
the table to a location easily located by the DNA Database Forensic Scientist on
his/her computer (i.e., desktop or thumb drive). Ensure the file is exported/saved
in the “Tab- and Comma-delimited Text” (.txt) format.
5.4.2.2.1 Note: the DNA Database Forensic Scientist may need to add additional
information to the .txt file name in order to avoid copying over the
Casework Table file.
5.4.2.3 Open Excel; open the .txt file saved in the previous step (note: the DNA
Database Forensic Scientist may have to change the “files of type” to “All Files”
in order for the software to access the .txt file).
5.4.2.4 When the Text Import Wizard opens, select “Finish.”
5.4.2.5 Open the Allele Call Table Excel file in the Forensic Biology Shared Folder. For
Robot runs, use the Robot Allele Call Table. For manual runs performed in the
database, either the Robot Allele Call table or manual allele call table may be
used. Copy and paste the allele calls generated from the .txt file in 5.4.2.4 (Select
“All”) into the “Results” tab in the appropriate Allele Call Table Worksheet.
5.4.2.6 Return to the “Allele Call Table” tab (or the “Mixture” tabs if any samples have
more than 2 alleles at any given locus) and verify that the copy and paste
function worked properly.
5.4.2.7 Print the Allele Call Table Worksheet(s) using the Print2PDF printer. This file
must be separate from the file containing the egrams or the Casework Table.
5.4.2.8 Note: For CODIS confirmations only samples specific to the CODIS
confirmation shall be present in the Allele Call Table.
5.4.3
CODIS Table
5.4.3.1
5.4.3.2 Refer to the Procedure for CODIS, Procedure for DNA Database Review
Contractor Data, and the Procedure for DNA Analysis and Technical Review of
Database Samples for CODIS sample export and specimen upload.
6.0
Limitations – GMID cannot be used on computers operating on Windows 7 or higher.
Page 13 of 14
All copies of this document are uncontrolled when printed.
Procedure for GeneMapper® ID for DNA Database
Forensic Biology Section
7.0
Safety – N/A
8.0
References
Version 1
Effective Date: 09/13/2013
Applied Biosystems. GeneMapper® ID Software Version 3.1 User’s Guide. P/N 4338775 Rev. C.
Applied Biosystems. AmpFℓSTR
Rev. B.
®
Identifiler™ PCR Amplification Kit User’s Manual. P/N 4323291
Forensic Biology Section Procedure for DNA Database Autosomal DNA STR Interpretation
Forensic Biology Section Procedure for DNA Database Use of the 3130XL Genetic Analyzer
Forensic Biology Section Procedure for CODIS
Forensic Biology Section DNA Database Procedures
Forensic Biology Section Procedure for DNA Database Review of Contractor Data
Forensic Biology Section Procedure for DNA Database Analysis and Technical Review of Database
Samples
NDIS STR Data Entry Software (accessible by registered CODIS users only)
9.0
Records
•
•
10.0
Identifiler™ Allelic Ladder Expected Results
Identifiler™ 9947A and MJB Expected Results
Attachments – N/A
Revision History
Effective Date
09/13/2013
Version Number
1
Reason
Original Document
Page 14 of 14
All copies of this document are uncontrolled when printed.