1
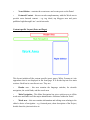
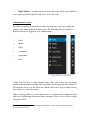
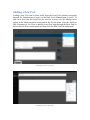
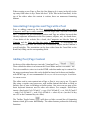
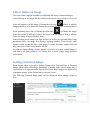
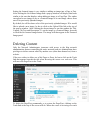
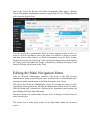
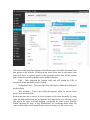
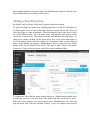
Linc Community Portal User Guide Dimitris Koutsaftikis 10/15/2014 LINC: Everyone matters! Holistic, inclusive, community-building approaches for early and continuous interventions addressing ESL KA2 project 539024-LLP-1-2013-1-GR-COMENIUS-CMP December 2013 - November 2015 This project has been funded with support from the European Commission. This communication reflects the views only of the author, and the Commission cannot be held responsible for any use which may be made of the information contained therein Contents Linc Community Portal ................................................................................................................... 3 System Architecture .................................................................................................................... 3 Getting to Know Linc Community .................................................................................................. 6 Why are administrator tabs different? ......................................................................................... 9 Login ........................................................................................................................................... 9 Adding Site Content .................................................................................................................. 10 Posts versus Pages ................................................................................................................. 10 Viewing the Administrator Layout ........................................................................................ 10 Adding a New Post ................................................................................................................ 11 Associating Categories and Tags with a Post ........................................................................ 12 Adding Post/Page Content ..................................................................................................... 12 Categories .............................................................................................................................. 15 Adding Images and Other Media .............................................................................................. 17 Inserting an Image ................................................................................................................. 17 Edit or Delete an Image ......................................................................................................... 21 Setting a Featured Image ....................................................................................................... 21 Deleting Content........................................................................................................................ 22 Editing the Main Navigation Menu ........................................................................................... 23 Adding a New Menu Item ..................................................................................................... 25 Deleting a Menu Item ............................................................................................................ 26 Users .......................................................................................................................................... 26 Adding a New User ............................................................................................................... 27 Deleting a User ...................................................................................................................... 28 Editing personal Profile ......................................................................................................... 29 References ................................................................................................................................. 30 Linc Community Portal Linc Community Portal is developed and implemented using WordPress. An Open Source software system used by millions of people around the world to create beautiful websites and blogs. The Linc Community as being a fantastic blogging and content management system, will empower learners, teachers, and parents to share their knowledge through social networking, blog posts, digital story telling approaches and multimedia galleries. Through the Portal, we hold the vision to create early on and maintain a supporting, community environment for all participants, with a focus on moral support, stimulation, communication with parents and teachers, and access to educational resources. In other means, the Portal’s goal is to provide an alternate stream for spreading the wealth of information out there. System Architecture Technically, Linc Community Portal takes advantage of Wordpress network of sites feature. Thus, with this feature activated, multiple websites have been created from the same WordPress installation. Essentially, one set of WordPress core files, powers many websites. Users can be shared across many websites. Rather than create users for two, three, or more websites administrators can assign a user to as many websites as they like. Plugins and themes are also shared, however each website has unique directories for media uploads. The same database is also used for all websites, however separate tables are created for each website. There is also an ability to use multisite for discussion forums, project workshops, media libraries, and more. Each area of the websites can be styled in a unique way that distinguishes it from the main website. The Linc Project involves learners, teachers, parents (and administrators) whose native language differs from English and French to Czech, Swedish and even Greek. Therefore, taking advantage of the Wordpress multisite feature, the Linc Community Portal consists of 5 different websites (one for each language), supporting people located in the corresponding country. More thoroughly, these websites are described below: English Website - http://community.linc-project.eu/ The main (landing) site of the Portal that has localized content in English, aggregates all social networking activities through the Project and hosts sitewide information. French Website - http://fr.community.linc-project.eu/ Has localized content in French and hosts information and resources regarding learners, teachers, parents located in France. Czech Website - http://cs.community.linc-project.eu/ Has localized content in Czech and hosts information and resources regarding learners, teachers, parents located in Czech Republic. Swedish Website - http://sv.community.linc-project.eu/ Has localized content in Swedish and hosts information and resources regarding learners, teachers, parents located in Sweden. Greek Website - http://gr.community.linc-project.eu/ Has localized content in Greek and hosts information and resources regarding learners, teachers, parents located in Greece. Apart from hosting 5 separate websites (one for each language) with their own content, users and webspace, there is a common theme/template for styling them, in terms of uniformity, in order to simulate the Linc’s virtual Community websites to serve as one. Getting to Know Linc Community Linc Community has an easy-to-use interface that one can soon be used to navigating around. The main user interface (UI) is divided up into three different layouts. Home – Front Page Layout The home page layout is divided up into five main sections. Each has its own discrete use. They are: • Header area – this area contains the language switcher, for sitewide navigation, the social links, and the search area • Main Navigation - This Main Navigation bar gives quick access to all the work areas and links to all the major administrative functions within the Portal • Work area – this area contains information and editing areas relating to the editor’s choice of navigation – e.g. featured posts, short description of the Project, details about the joint activities etc • News Sidebar – contains the recent news and events posts on the Portal • Featured Content – this area works complementary with the Work area to provide extra featured content – e.g. tag cloud, top bloggers area and posts published right through Linc’s social networks Content specific Layout (Posts and Pages) This layout includes all the content specific (posts, pages, Wikis, Forums etc) site appearance that is not displayed in the front page. It is divided up into five main sections. Each has its own discrete use. They are: • Header area – this area contains the language switcher, for sitewide navigation, the social links, and the search area • Main Navigation - This Main Navigation bar gives quick access to all the work areas and links to all the major administrative functions within the Portal • Work area – this area contains information and editing areas relating to the editor’s choice of navigation – e.g. featured posts, short description of the Project, details about the joint activities etc • Right Sidebar – contains the recent news and events posts on the Portal as well as posts published right through Linc’s social networks Administrator Layout The Main Navigation is grouped into major function tabs, each representing the primary work areas inside the admin screen. The following tabs are loaded by default if the user is logged in as an Administrator: • Posts • Media • Pages • Comments • Appearance • Users The default Administrator Navigation menu in both expanded and collapsed states Under each tab there is often grouped many other sub-sections (or sub-pages) related to that parent tab heading. One can easily view the grouped sub-sections by hovering the cursor over the major tab, which will reveal a fly-out menu offering direct access to each sub-section. When working within any of the major areas, it is displayed as a bluish tab with light icon, and the main navigation menu expands to show a list of all the related sub-pages below1. 1 Coloration and style may change depending on the Wordpress Version (Linc will follow Wordpress updates to the best extent) The size of the main navigation menu may also be minimized by clicking the Collapse menu button, maximizing the size of the work area. When collapsed, only the icons for each tab are displayed, but one can easily view the name and contents of each tab by hovering over the icon, which will reveal a fly-out menu that also offers direct access to each sub-section. Why are administrator tabs different? The logged-in user may notice there are missing tabs that are represented here, when looking at the administration area of his site. Linc Community Portal is designed as a multi-user environment, with many different User Roles (permissions) that can be assigned by the site administrator. If someone’s User Account has a role other than Administrator, he may see a reduced set of tabs in his admin screen. Login Before the user can make any changes to the site, he will need to log in. Prior to clicking the login button, he has to reassure that is on the correct language context (website). This can be done by checking (and swapping accordingly) the language from the language switching menu. The last step of the process includes filling out the user account form and clicking the form-related login button. Adding Site Content Adding content to the Linc Community is an easy process no matter whether a user is creating a Post or a Page. The procedure for both is almost identical. Apart from how they display on the website, which was described earlier, the other main difference is that Posts can associate with Categories and Tags whereas Pages don’t. What’s the difference between categories and tags? Normally, Tags are adhoc keywords that identify important information in the Post (names, subjects, etc) that may or may not recur in other Posts, while Categories are pre-determined sections. If one thinks of the website like a book, the Categories are like the Table of Contents and the Tags are like the terms in the index. Posts versus Pages Linc Community as a Platform, is built around two basic concepts. Posts and Pages. Posts are typically blog entries. A series of articles, listed (usually) reversechronologically. Pages are used for more static content (i.e. content that doesn’t change or changes infrequently). An ‘About us’ page is an example of a Page on a typical website. In most cases the content in the ‘About us’ page doesn’t change all that frequently. Now, one might be thinking, “but I don’t need a blog”. This might be true, but someone can also use the blog concept if he has a website where he needs to display his ‘latest news’ or even just content updates. Basically, any information that gets updated on a semi-regular basis can benefit from the ‘blog’ functionality. Viewing the Administrator Layout As mentioned before, Linc Community Portal is designed as a multi-user environment, with many different User Roles (permissions). Depending on the User’s Account someone might or might not have access to the Administrator Layout accordingly. To navigate to the Administrator Layout one has to hover over the Manage menu option in the Main navigation menu and in the fly-out menu, click the Admin link. Adding a New Post Adding a new Post can be done either from the Front End (without navigating through the Administrator Layout) or the Back End (Administrator Layout). To add a new Post from the Front End, the user has to hover over the Manage menu option in the Main navigation menu and in the fly-out menu, click the Add Post link. Alternatively, for a user to publish a new Post right through the Back End, he has to click the Posts menu option and then click the Add New link underneath. Publishing from the Front End Publishing from the Back End When creating a new Page or Post, the first thing to do is enter in the title in the top entry field where it says “Enter title here” (Post Title in the Front End). At the top of the editor where the content is written, there are numerous formatting buttons. Associating Categories and Tags with a Post Prior to adding content to the Post, associating the Post with one or more Categories and Tags is really essential (whereas Pages don’t associate with either one). Categories are pre-determined sections and Tags are ad-hoc keywords that identify important information in the Post (names, subjects, etc). As stated above, if one thinks of the website like a book, the Categories are like the Table of Contents and the Tags are like the terms in the index, so determining and associating the right ones for a Post, has a tremendous impact on the Platform’s overall usability. The association can be done either from the Frond End or the Back End, filling out the corresponding fields. Adding Post/Page Content At the top of the editor there are two tabs, Visual and Text ( ). These switch the editor view between the Visual Editor and the Text editor. The Text view enables the author to view the HTML code that makes up his content. For the more experienced users this can be helpful at times but for those not familiar with HTML tags, it’s not recommended. So next, we will focus on using the Visual Editor for content creation. The editor used to enter content into a Page or Post is very easy to use. It’s much like using a regular word processor, with toolbar buttons that allow to Bold or Italicize text or enter in Headings or bullet points. One can even use most of the basic keyboard shortcuts used in other text editors. For example: Shift+Enter inserts a line break, Ctrl+C/Cmd+C = copy, Ctrl+X/Cmd+X = cut, Ctrl+Z/Cmd+Z = undo, Ctrl+Y/Cmd+Y = redo, Ctrl+A/Cmd+A = select all, etc. (use the Ctrl key on a PC or the Command key on a Mac). The Toolbar Toggle button ( ) will show or hide a second line of formatting buttons which gives extra functionality. The editor buttons perform the following functions: Add Media – Used to upload and insert media such as images, audio, video or documents Bold – Bold text Italic – Italicise text Strikethrough – Add a strikethrough to the text Bulleted List – Create an unordered (bullet point) list Numbered List – Create an Ordered (numbered) list Blockquote – Used as a way of showing a quote. Horizontal Line – Inserts a horizontal line into the content Align Left – Align text to the left Align Center – Align text in the center of the page Align Right – Align text to the right Insert/edit link – Used to create an html link to another page or website. The desired text or image to be linked needs to be selected first before the button will become active Remove link – Remove the html link from the selected link. The cursor must be sitting on an active link for the button to be active Insert Read More tag – Inserts the More tag into a Page/Post. Most blogs only display a small excerpt of a Post and users are required to click the Post title or a ‘Read more...’ link to continue reading the rest of the article. When inserting a ‘More’ tag into a Post, everything prior to the tag is considered as this excerpt Toolbar Toggle – Used to show or hide the second row of formatting buttons on the editor toolbar Distraction Free Writing – Clicking this button will enlarge the editor so that it fills the browser window. Style – Used to format the Page text based on the styles used by the current Theme Underline – Underline the text Justify – Align text on both the left and right (i.e. justify) Text color – Change the color of text Paste as text – Copying and pasting text from other sites or word processors sometimes leaves the text formatted differently to what is expected. To avoid this, Paste as Plain Text will handle all these formatting issues to the greatest extent Clear formatting – Removes all the formatting (e.g. Bold, Underline, text color etc..) from the highlighted text Special character – Used to insert special characters not easily accessible via the keyboard (e.g. ¼, ½, ¾, ©, €, ö etc.) Decrease indent – Removes one level of indenting Increase indent – Indents text by one level Undo – Undo the last action Redo – Redo the last action Keyboard shortcuts – Displays information about the WordPress Visual Editor along with keyboard shortcuts Categories The user can use categories to define sections of the website and group related posts. The default category is Uncategorized. Pages cannot be associated with Categories. One can only associate Categories to Posts. As with creating Post procedure, there are two ways to add Categories. They can be added whilst navigating through the Front End or the Back End (Administrator Layout). Adding Categories whilst on the Front End, the user has to hover over the Manage menu option in the Main navigation menu and in the fly-out menu, click the Edit Categories link. Alternatively, for a user to add a new Category right through the Back End, he has to click the Posts menu option and then click the Categories link underneath. Adding Categories in the Front End Adding Categories in the Back End Overall, adding Categories option will simply add them to the list of available Categories (displayed when publishing a Post). When clicking on the Categories menu option the user will be shown a list of Categories that have already been added along with some blank fields that allow to add a new Category. To add a new Category, he needs to fill in the blank fields and then click the Add New Category button: Name – The name is how it appears on the website Parent – Categories, unlike tags, can have a hierarchy. One might have a Car category and under that, children categories for Ford, General Motors and Toyota. Totally optional. To create a subcategory, one has to choose another category from the Parent dropdown. Whilst in the Administrator Layout, when a user hovers the cursor over each row in the list of Categories, a few links will appear beneath the Category name. Edit – Allows to edit the Category properties such as Name, Slug, Parent and Description Quick Edit – Allows to quickly edit the Category Name and Slug Delete – Deletes the Category permanently from the list of Categories. After clicking Delete the user will be prompted to confirm his choice. Clicking OK deletes the Category, Cancel retains it. View – This will list all the Posts that are currently using this Category Note: In the Front End though, there are some limitations as only Edit and Delete actions are available. Deleting a Category does not delete the posts in that Category. Instead, posts that were only assigned to the deleted Category are set to the default Category, which is set to Uncategorized by default. Adding Images and Other Media Adding images and other media files such as videos, documents or PDFs is extremely easy within Linc Community Platform. All the user uploaded images and files are stored in the Media Library. Once they are uploaded into the Media Library, it is a very simple matter to insert them into a Page or Post content. In the case of files such as Word Documents or PDFs, if necessary, it is a simple process to create links to those files so that people can then download them. Inserting an Image Using the WordPress media manager, it’s extremely simple to insert, align and link the individual images and image galleries. To insert an image into a Page/Post, the user has to click the Add Media button ( ) and then simply drag his image(s) from wherever they are on his computer, into the browser window. Then, the file(s) will be automatically uploaded. Alternatively, the user can click the Select Files button and then select the file(s) that he would like to upload, using the dialog window that is displayed. It is even possible to simply drag his file straight into the Visual Editor, rather than clicking the Add Media button. No matter whether a user has clicked the Add Media button or simply dragged and dropped his image into the Visual Editor, once the image is uploaded, the Media Library is displayed, which contains all his previously uploaded images. The image(s) that he has just uploaded will be automatically ‘selected’ for easy insertion into a Page or Post. Selected images are shown with a ‘tick’ icon in the top right corner of the image. There are several options within this Insert Media window to help make it easier to add images into a Page or Post. The properties of the currently highlighted image (i.e. The image with the blue border) will be shown on the right-hand side of the Insert Media window. These properties include the filename, the date the file was uploaded and the image size. At this point the user can also change the image Title, Caption, Alt Text and Description for each image, as well as the Alignment, Link and the Size at which the image is inserted. Title – is displayed as a tooltip when the mouse cursor hovers over the image in the browser Caption – is displayed underneath the image as a short description Alt Text – is displayed when the browser can’t render the image. It’s also used by screen readers for visually impaired users so it’s important to fill out this field with a description of the image. To a small degree, it also plays a part in the website Search Engine Optimisation (SEO). Since search engines can’t ‘read’ images they rely on the Alt Text Description – is usually displayed on the attachment page for the media For each image, the user can select how he would like the image aligned, either Left, Center or Right aligned, using the Alignment dropdown list. He can also select None for no alignment which will mean the image will display using the default alignment setting of the installed Theme. The author can also change what the inserted image(s) will link to using the Link To dropdown list. He has the choice of linking to the image’s attachment page by selecting Attachment Page, or he can link to the full size image by selecting Media File. He can also link to any URL by selecting Custom URL. When he does this, a new field will appear that allows him to enter in the custom URL. He can also choose not to link to anything by selecting None. When the image(s) are uploaded, WordPress also creates several copies of each file at various sizes. There is an option to choose which one to insert into the Page or Post using the Size dropdown list. To insert the image at the exact size when uploaded, simply select Full Size. Next to each size listed in this dropdown will be the actual dimensions of the image, in pixels (e.g. 300 x 225). Once selected the images, clicking the Insert into post button will insert the selected image(s) into the Post at the current cursor position (when editing a Page, this button will say Insert into page). Edit or Delete an Image There are various options available for adjusting the layout of inserted images. After clicking on an image that has already been inserted into a Page or Post, two icons will appear over the image. Clicking the left icon ( ) allows to edit the image properties (it is almost the identical procedure like the one described above when uploading a new file). Clicking the right icon ( ) will delete the image from the content. It will only remove the image from the Page or Post, it will not delete the image from the Media Library. When clicking on an image in a Page or Post, as well as the edit and delete icons mentioned above, the image also displays ‘resizing handles’. These are the small squares visible around the edge of the image. To resize an image, simply click and drag one of the corner resize handles will do. As with any image editing software though, if one tries to enlarge a small image, it will tend to get quite pixelated. It is always best to insert a large image and then resize down. Setting a Featured Image Some themes allow to specify a Featured Image for a Page and Post. A Featured Image, often called a Post/Page Thumbnail, is usually some sort of image that is representative for that particular Page or Post. How these images are displayed is dependent entirely on the Theme that is currently in use. The following Featured Image panel will be displayed when editing a Page or Post. Setting the featured image is very similar to adding an image into a Page or Post. After clicking the Set featured image link a pop-up window will display that looks similar to the one that displays when adding an image to a Page/Post. The author can upload a new image to use as a Featured Image or he can simply choose from one of his previously uploaded images. By default, he will be shown a list of the previously uploaded images. If he would like to upload a new image, he has to click on the Upload Files link at the top of the pop-up window. After clicking the chosen image he can then update the Title, Caption, Alt Text and Description. To set the image as a Featured Image, he needs to click the Set featured image button. The image will then appear in the Featured Image panel. Deleting Content Only the Network Administrator (someone with access to the blog network administration features controlling the entire network) and site Administrator have privileges to delete content edited by another user (other than themselves) from a website. If the user wishes to delete one of his Pages or Posts, he has to click on the Trash link that appears beneath the title when hovering the cursor over each row. This will move the Page/Post to the Trash. To delete the Page/Post permanently or to restore the Page/Post, clicking on the Trash link at the top of the screen will do. When the cursor is hovering over each item in the Trash, the Restore and Delete Permanently links appear. Clicking Delete Permanently, permanently removes a single Page or Post. Clicking Restore will restore the Page or Post. If a user would like to permanently delete or restore numerous items at once, he needs to click the checkboxes next to the items he would like to delete or restore and then choose either Restore or Delete Permanently from the Bulk Actions dropdown list at the top of the page. After selecting the appropriate action clicking the Apply button will make the change. Alternatively, clicking the Empty Trash button will delete all the items in the Trash. Editing the Main Navigation Menu Only the Network Administrator (someone with access to the blog network administration features controlling the entire network) and site Administrator have privileges to make modifications to the Main Navigation of a website. This can be done from the Administrator Layout by hovering the cursor over the Appearance menu option in the left hand navigation menu and in the fly-out menu, click the Menus link. Alternatively, clicking on the Appearance menu option and then clicking the Menus link underneath. Wordpress menus can contain links to Pages, Posts, Categories, Custom Links or other content types. The current list of menu items resides in the right hand column on the menu screen. The items in this right-hand column on the Menus page will match the menu items that appear on the website. Clicking on the down arrow next to each menu item name will show an options panel for that particular menu item. In this options panel, there are several items that can be updated/changed. URL – Only displayed for Custom Links and will contain the URL to navigate to when that menu item is clicked Navigation Label – This is the label that will display within the actual menu on the website Title Attribute – This is the tooltip that appears when the mouse cursor hovers over the menu item Each menu item can be moved to a new location in the menu hierarchy by using either the links underneath the Navigation Label input field or by clicking on the title area of the menu item and dragging ‘n dropping the menu to new location. Whilst choosing the drag ‘n drop functionality for reordering menu items, the cursor will turn into a four-pointed arrow when hovering over the correct area. After making updates to the menu items, the Administrator needs to click the Save Menu button at the top or bottom of the screen. Adding a New Menu Item By default, only the Pages, Links and Categories panels are shown To add a new Page as a menu item, Administrators have to tick the checkboxes in the Pages panel, next to each of the Pages that they would like to add. They can select one Page at a time or multiple. After selecting the Pages, they need to click the Add to Menu button. The new menu items will append to the bottom of the current list of menu items. The menu item name will default to the Page name. To change this, simply clicking on the down arrow next to the menu item name to view the options panel and then update the Navigation Label to the preferred name. After making the updates, Administrators need to click the Save Menu button at the top or bottom of the screen. The steps to add a Post, Post Format, Category or Tag as a menu item are exactly the same as adding a Page. To change the order that the menu options appear in, Administrators simply need to place the cursor over the title area of the menu item they would like to move. When the cursor changes to a four-pointed arrow Administrators can click and drag the menu item to its new location. Finally, to save the changes after moving the menu items around, Administrators need to click the Save Menu button at the top or bottom of the screen. Deleting a Menu Item To delete a menu item Administrators need to click on the down arrow next to the menu item name to view the options panel for that item and then click the Remove link. After making the updates, they need to click the Save Menu button at the top or bottom of the screen. Users This screen lists all the existing users for the website. Users with roles other than Administrator will see fewer options when they are logged in. Depending on the Role, one can also add new users as well as manage their Roles. At the top of the screen there are links that allow the Administrator to filter the list of Users based on the User Roles. The number in brackets will advise how many there are for that particular type. The user roles can be grouped in three different sets, all se by the website administrator: Wordpress specific roles Community related roles Forum specific roles Wordpress specific roles Administrator – Somebody who has access to all the administration features Editor – Somebody who can publish and manage posts and pages as well as manage other users' posts, etc. Author – Somebody who can publish and manage their own posts Contributor – Somebody who can write and manage their posts but not publish them Subscriber – Somebody who can only manage their profile Community related roles Roles that apply to Community mostly serve as aliases to the corresponding Wordpress roles. There might be a slight difference between the default Wordpress and the Community’s custom roles only to enhance the overall user experience and secure the proper access to resources. Staff – Somebody who has access to all the administration features, especially the ones that are Community oriented. Wikis, Forums, etc. Teacher – Somebody who can publish and manage posts and pages as well as manage other users' (parents and teacher) posts, etc. Parent – Somebody who can publish and manage their own posts Student – Somebody who can write and manage their posts but not publish them Forum specific roles Keymaster – Can create, edit and delete other users’ forums, topics and replies. Can manage Tags, and moderate a forum with the moderation tools. Has access to global forum settings, tools, and importer. Moderator – Can create and edit forums. Can create, edit and delete other users’ topics and replies. Can manage Tags, and moderate a forum with the moderation tools. Participant – Can create and edit their own topics and replies. Spectator – Can only read topics and replies. Blocked – All capabilities are explicitly blocked. Adding a New User To add a new user, administrator has to click on the Add New link in the left hand navigation menu. Once the above page is displayed, simply fill in the various fields and click the Add New User button. Username – (mandatory) Enter the username of the new user here. This will also be used as the Login name for the user. Once saved, the Username can’t be changed E-mail – (mandatory) Enter a valid email address of the new user here. The email address must be unique for each user. If a published Post or Page is authored by this user and approved comments are made to that post or page, a notification email is sent to this email address First Name - Enter the first name of the new user here Last Name – Enter the last name of the new user in this text box Website – Administrator may enter the new user's website URL in this text box Password – (mandatory, twice) Enter a password for the new user twice here, once in each text box Strength indicator – This indicates if the entered password is Very Weak, Weak, Medium, or Strong (displayed in green). The stronger the password the more secure the login. Hint: The password should be at least seven characters long. To make it stronger, use upper and lower case letters, numbers and symbols like ! " ? $ % ^ & ) Send Password? – Check the box to add the new user without sending an email. Role – Select the desired Role for this user from the dropdown list Deleting a User For now, only the Network Administrator (someone with access to the blog network administration features controlling the entire network) has privileges to delete a user from a website. For this reason, a website Administrator is not granted any permission to delete a user and there is no appropriate action from the user interface to delete a user. Editing personal Profile To edit the personal profile details, the user simply has to click on his user name, when viewing the list of Users or click on the Edit link that appears beneath his user name when hovering the cursor over each row. Alternatively, the user can click on the Your Profile link in the left hand navigation. References Easy WP Guide V2.7 for WordPress 3.9 by Anthony Hortin (easywpguide.com) Official Wordpress User Manual