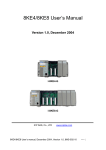
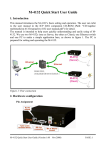
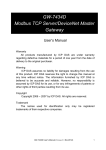
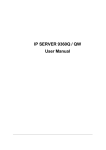
1
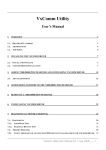
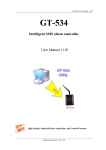
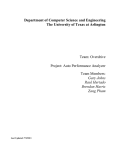
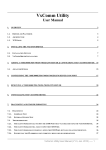
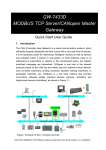
TM M2M-710D User’s Manual Version 1.01 |24 Warranty All products manufactured by ICP DAS are under warranty regarding defective materials for a period of one year from the date of delivery to the original purchaser. Warning ICP DAS assumes no liability for damages resulting from the use of this product. ICP DAS reserves the right to change this manual at any time without notice. The information furnished by ICP DAS is believed to be accurate and reliable. However, no responsibility is assumed by ICP DAS for its use, or for any infringements of patents or other right of third parties resulting from its use. Copyright Copy right 2009 by ICP DAS. All rights are reserved. Trademark The names used for identification only may be registered trademarks of their respective companies. List of Revision Date Author Version Revision 2009/03/13 Jiunan 1.00 2010/1/26 Jiunan 1.01 Release Add VxComm function M2M-710D User Manual (Version 1.01, Jan/2010) PAGE:I Table of Contents 1. Introduction ...................................................................................................................................... 1 1.1 Features .................................................................................................................................. 4 1.2 Hardware Specifications ........................................................................................................ 5 1.3 Statement of connection mode ............................................................................................... 6 1.4 Applications ........................................................................................................................... 6 2. Hardware ....................................................................................................................................... 8 2.1 M2M-710D ............................................................................................................................ 8 2.2 Wiring Instructions ................................................................................................................ 9 2.3 Init Switch and Init Pin ........................................................................................................ 11 2.4 5-Digit 7 Segment LED Display .......................................................................................... 12 3. Configuration and Operation with Web Browser ....................................................................... 17 3.1 Connection Setting ............................................................................................................... 17 3.2 Web Configuration—function menu ................................................................................... 22 3.3 Web Configuration—setup page .......................................................................................... 24 3.3.1 Login .................................................................................................................................. 24 3.3.2 User Account ..................................................................................................................... 24 3.3.3 Standard Config ................................................................................................................. 24 3.3.4 DDNS Config .................................................................................................................... 27 3.3.5 Com Port Config ................................................................................................................ 30 3.3.6 Operation Mode ................................................................................................................. 31 3.3.7 Information ........................................................................................................................ 32 4. Application .................................................................................................................................. 33 5.VxComm Applications(Firmware ver:V13 or latter)...................................................................... 35 5.1 Introduction .......................................................................................................................... 35 5.2 Architecture .......................................................................................................................... 35 5.3 Installing the VxComm Driver ............................................................................................ 36 5.4 VxComm communication test ............................................................................................. 40 6. Troubleshooting .......................................................................................................................... 42 7. FAQ ............................................................................................................................................. 43 8. Dimensions.................................................................................................................................. 46 9. Frame Ground ............................................................................................................................. 48 M2M-710D User Manual (Version 1.01, Jan/2010) PAGE: II 1. Introduction The M2M-710D module is specially designed for the remote maintenance solution. It can be used to maintain the remote machines with other module(ex:M2M-710D、M2M-711D、M4132…etc) through Ethernet. Servicemen can maintain remote machines as real as he has been on the spot. That can not only reduce the business travel cost, but also save the time of waiting for maintaining equipments. The remote maintenance solution redefines maintenance service that we pass understood, and the equipment manufacturer may solve the problem to grasp the customer demand and the opportunity rapidly. M2M-710D also integrates the Virtual com technology. That can resolve the insufficiency of real com port in PC. By applying this technology, the maintenance man can take the remote maintenance or monitor whenever the time is and whatever the place is. Figure 1 frame of maintenance remote machine M2M-710D User Manual (Version 1.01, Jan/2010) PAGE:1 It is more flexible to management the remote machines with M-4132. The application frame is as following: Figure 2 apply with M-4132 Besides the above function, the M2M-710D may help the serial system to upgrade to internet frame without changing any software. Figure 3 example of serial communication The remote system includes a server, and more than one for clients. Server must have physical IP address, and adjust the firewall before the Server module is applied appropriately. Users can provide the remote maintenance service real time under the stable network communication. M2M-710D User Manual (Version 1.01, Jan/2010) PAGE:2 M2M-710D integrates the Virtual com technology. That can resolve the insufficiency of real com port in PC. By applying this technology, the maintenance man can take the remote maintenance or monitor whenever the time is and whatever the place is. M2M-710D User Manual (Version 1.01, Jan/2010) PAGE:3 1.1 Features Provide pair connection (RS-232,RS-485) on network Support Server and Client communication mode Support VxComm function in server mode Be applied with other M2M products (M-4132, M2M-720-A Support RS-232 or RS-485 serial communication ports Built-in self-tuner ASIC chip for RS-485 port Web-based administration Built-in MiniOS7 OS to keep off the computer virus Ethernet Protocol: TCP, UDP, IP, ICMP, ARP, RARP Provide dynamic DNS function Supply static IP/DHCP Supply DDNS(Dynamic DNS) Quick start 5-Digit 7 Segment LED Display EMI, RoHS compliance M2M-710D User Manual (Version 1.01, Jan/2010) PAGE:4 1.2 Hardware Specifications CPU 80186, 80 MHz SRAM 512 KB Flash Memory Flash ROM: 512 KB ; Erase unit is one sector (64 KB) ; 100,000 erase/write cycles EEPROM 16 KB; Data retention: 40 years; 1,000,000 erase/write cycles. Built-in Watchdog Timer Yes Communication Interface COM1 RS-232(RxD, TxD,RTS,CTS,DTR,DSR,GND); None-isolation COM2 RS-485(DATA+, DATA-); None-isolation Ethernet Port 10/100 Base-TX COM Port Formats Data Bit 7, 8: for COM1 and COM2 Parity None, Even, Odd, Mark, Space Stop Bit 1: for COM1, COM2 Baud Rate 115200 bps Max. Mounting Din Rail Mount Yes Wall Mount Yes LED Display 5-Digit 7 Segment LED Display Yes(for D Version) System LED Indicator Yes Mechanism Flammability Fire Retardant Materials (UL94-V0 Level) Dimension ( W x L x H ) 123 mm x 72 mm x 33 mm Operating Environment Operating Temperature -25 ~ +75 °C Storage Temperature -40 ~ +80 °C Power Protection Power Reverse Polarity Protection Required Supply Voltage 10 ~ 30 VDC (non-regulated) Power Consumption 2.7 W for M2M-710D M2M-710D User Manual (Version 1.01, Jan/2010) PAGE:5 1.3 Statement of connection mode M2M-710D has two kind of communication mode. They are Client and Server the mode respectively. Client mode: In this mode, M2M-710D is set as the client mode, which may connect with remote M-4132, M2M-710D or other supporting RM server products. If host name of client is the same one as the setting name in server mode, the communication will build up quickly. Server mode: In this mode, M2M-710D is set as the server mode, which can accept connection from M-4132,M2M-710D or other RM client product. But it just only accepts one client. If multiple clients are set the same host names, the first connection to the server is depending on which connection is to the server firstly. VxComm is provided in this mode. 1.4 Applications Remote Maintenance: Build the remote maintenance system all over the world M2M-710D User Manual (Version 1.01, Jan/2010) PAGE:6 Serial application revolution: Upgrade the original serial application to network Virtual Com: Remote maintenance by Virtual Com technology M2M-710D User Manual (Version 1.01, Jan/2010) PAGE:7 2. Hardware 2.1 M2M-710D Figure 4 Hardware M2M-710D Pin definition Pin Name Description 1 CTS1 Clear to Send 2 RTS1 Request to Send 3 RxD1 Receive Data 4 TxD1 Transmit Data 5 INIT Init Pin 6 DATA+ Data+ of RS-485 7 DATA- Data- of RS-485 8 Vs 9 GND Vs of Power Supply GND of Power Supply 8-PIN of RJ-45 definition Pin Name Description 1 TX+ TX+ output 2 TX- TX- output 3 RX+ RX+ input 4 - N/A 5 - N/A 6 RX- 7 - N/A 8 - N/A RX- input M2M-710D User Manual (Version 1.01, Jan/2010) PAGE:8 2.2 Wiring Instructions The communication interface includes RS-232, RS-485 and Ethernet. The wiring instructions are described in section 2.2.1, 2.2.2 and 2.2.3. 2.2.1 RS-232 connection There are two types of RS-232 ports, DTE (Data Terminal Equipment, like PC, Serial Printers, PLC, and Video Cameras) and DCE (Data Circuit-Terminating Equipment, like modem) type, and that the signal names and pin numbers are the same, but signal flow is opposite! The M2M-710D module is a DTE and the user can uses “3-wire” RS-232 or “5-wire” RS232 to connect. When connecting the M2M-710D to a DCE device, the user just needs to match the signal names. When connecting the M2M-710D to a DTE device, the user needs to use a crossover cable (TX crosses to RX, GND to GND), as shown in the figure. DCE DTE Figure 5 connection of RS-232 with 3-write DCE DTE Figure 6 connection of RS-232 with 5-write 2.2.2 RS-485 connection The RS-485 wiring diagram is shown in figure 7. M2M-710D User Manual (Version 1.01, Jan/2010) PAGE:9 Figure 7 connection of RS-485 2.2.3 Ethernet connection When the M2M-710D works as a client, it should adjust the firewall before the M2M710D module appropriately is used or else the client will not connect to the server. Figure 8 Ethernet connection M2M-710D User Manual (Version 1.01, Jan/2010) PAGE:10 2.3 Init Switch and Init Pin There are an Init switch and Init Pin inside M2M-710D to make it into initial mode. If Init Pin connects to GND or Init Switch is selected for init mode, system will clear all EEPROM information. The M2M-710D will restore originally setting. Figure 9 Init Pin and Init Switch M2M-710D User Manual (Version 1.01, Jan/2010) PAGE:11 2.4 5-Digit 7 Segment LED Display The M2M-710D is built-in 5-Digit 7 segment LED Display. User can get the system information from the starting process. Start Display (server mode): It would show the local IP (if the setting is DHCP ,it will display “DHCP” firstly), port of communication, and the setting of comport. Start Display Information Server Mode Show local IP step by step Show listen port Show Comport configuration C#:1/2,COM1/COM2 Baud Rate: 300 ~ 115200 data: 7 or 8 Parity: 0(None) or 1(Even) or 2(Odd) Stop bit: 1 Listen: When M2M-710D starts successfully in server mode, it would be in listen mode to wait the connecting from the client. Listen Information Listening Serial communication: When the client connects to the M2M-710D, it will display the information of comport. Serial communication Information Port:1 Date:8 Parity: none Stop bit:1 Baudrate:9600 Ex: Server information IP Listen port M2M-710D User Manual (Version 1.01, Jan/2010) 192.168.1.217 443 PAGE:12 Baud rate Date Parity Stop bit 9600 8 none 1 Local IP Listen port Comport port setting M2M-710D User Manual (Version 1.01, Jan/2010) PAGE:13 Start Display (client mode): It would display the local IP(if setting is DHCP, it will display “DHCP” firstly), server IP (M2M-710D can get host IP by server’s name),port of communication, and setting of comport. Start Display Information Client Mode Show local IP step by step Show Server IP step by step Show connected port Show Comport configuration C#:1/2,COM1/COM2 Baud: 300 ~ 115200。 Data : 7 or 8 Parity: 0(None) or 1(Even)or 2(Odd)。 Stop bit: 1 Login server: When M2M-710D starts successfully, it will login the defined server automatically. If it cannot connect to the server, it will reset after 50 seconds. Login Information Connecting: The word “Conn.” twinkled Login: Display the word “Conn.” Serial communication: When the M2M-710D connects to the server, it will display the information of comport. For example. Serial communication Information Port:1 Date:8 Parity: none Stop bit:1 Baudrate:9600 M2M-710D User Manual (Version 1.01, Jan/2010) PAGE:14 Ex: Client information IP Server IP Listen port Baud rate Date Parity Stop bit 192.168.1.217 192.168.1.210 443 9600 8 none 1 Local IP Server IP Connected port M2M-710D User Manual (Version 1.01, Jan/2010) PAGE:15 Comport setting M2M-710D User Manual (Version 1.01, Jan/2010) PAGE:16 3. Configuration and Operation with Web Browser The M2M-710D module is built-in web server, the user can configure and operate the M2M710D by web browser (ex: IE). 3.1 Connection Setting Before you open the web browser to configure the module, it needs to connect the M2M-710D and your PC in the same sub network or same Ethernet Switch (as shown in figure 7) and set network settings (such as IP/Mask/Gateway) of the PC. The example of connection setting will be described below and Microsoft Windows XP Professional SP2 is used. Figure 10 connection architecture Connection steps: Step 1: Open Network Connections 1.Click “start->Settings->Network Connections” Figure 11 click “start->Settings->Network Connections” M2M-710D User Manual (Version 1.01, Jan/2010) PAGE:17 2. Double click “Local Area Connection” icon 3. Click “Properties” button Figure 12 click “Properties” button 4. Select “Internet Protocol (TCP/IP)” and click “Properties” button Figure 13 click “Properties” button M2M-710D User Manual (Version 1.01, Jan/2010) PAGE:18 Step 2: Set “Internet Protocol Properties” and then click “OK” button. The settings must have the same domain and different IP with the M2M-710D. (Ex: M2M710D’s default IP = 192.168.1.217, PC’s IP = 192.168.1.210). Figure 14 set “Internet Protocol Properties Step 3: test connection 1. Click “start->Run...” Figure 15 M2M-710D User Manual (Version 1.01, Jan/2010) click “start->Run...” PAGE:19 2. Key in “cmd” and then click”OK” button Figure 16 key in “cmd” and then click”OK” button 3. key in “ping 192.168.1.217” and click “Enter”. If the response message shows “Request timed out” (figure 14), it means the network settings between PC and the module are not correct. Please check the network is available and the settings are all correct. Figure 17 Ping IP Error If the network settings are correct, it will show “Packets: Sent=4, Received=4, Lost=0“. M2M-710D User Manual (Version 1.01, Jan/2010) PAGE:20 Figure 18 M2M-710D User Manual (Version 1.01, Jan/2010) Ping IP OK PAGE:21 3.2 Web Configuration—function menu Now the PC is set completely and working well with the M2M-710D. Please open web browser (ex: IE, Mozilla, etc.) on PC and key in http://192.168.1.217/main.htm in the Address line and then press “Enter” key to link the M2M-710D, as shown in figure 16. (1) (2) Figure 19 Web Configuration page When the browser connects with the M2M-710D, Figure 16 is the first page. The left side is the function menu and the other is the setup page in the first page. Server and Client is different in the function menu, as shown in the below. Function menu (Server) Login User Account Standard Config DDNS Config Com Port Config Operation Mode Information Information Reboot Function menu (Client) Login User Account Standard Config Com Port Config M2M-710D User Manual (Version 1.01, Jan/2010) PAGE:22 Operation Mode Information Information Reboot The “Reboot” button can provide the user to restart the M2M-710D. M2M-710D User Manual (Version 1.01, Jan/2010) PAGE:23 3.3 Web Configuration—setup page 3.3.1 Login The user login interface Figure 20 User and password 3.3.2 User Account The user account setting limits which user can configure the module settings. The super user (Account, name=”root”, password=”icpdas”) is an only the user that can edit this page. Figure 21 User Account page 3.3.3 Standard Config When the user changes the setting in this page, the user must restart the M2M-710D for an active setting. The system has two kind of mode. Server mode: System Host Name client name Communication Port There are 2 operation modes in M2M-710D. They are “Server” and “Client”. The user can set the M2M-710D to be a server or client in this page. When the M2M-710D plays the role of client, it will try to connect with the server. When the M2M-710D plays the role of server, it will wait the client to link. For the module name Server’s permission name list. The user can set the port number of the server that the client wants to link in this setting. The factory setting is “443”. M2M-710D User Manual (Version 1.01, Jan/2010) PAGE:24 M2M-710D supports two kinds of IP modes; they are Boot Protocol: Static “Static IP” and “DHCP”. The user can choose one of these IP /DHCP modes to set the IP address of M2M-710D. When Boot Protocol is “Static IP”, the user can set IP IP Address address of M2M-710D in this setting. When Boot Protocol is “Static IP”, the user can set subnet Net Mask mask of M2M-710D in this setting. When Boot Protocol is “Static IP”, the user can set Gateway gateway of M2M-710D in this setting. When Boot Protocol is “Static IP”, the user can set DNS DNS Server server of M2M-710D in this setting Client mode: There are 2 operation modes in M2M-710D. They are “Server” and “Client”. The user can set the M2M-710D to be a server or client in this page. When the M2M-710D System plays the role of client, it will try to connect with the server. When the M2M-710D plays the role of server, it will wait client to link. Host Name For the module name Connect to Server by: The setting can provide the client to connect with the IP / DNS server by IP or DNS of the server The user can set the DNS of the server that the client Server name wants to connect to. The user can set the IP address of the server that the client Server IP wants to connect to. The user can set the port number of the server that the Communication Port clients want to link in this setting. The factory setting is “443”. M2M-710D supports two kinds of IP modes; they are Boot Protocol: Static “Static IP” and “DHCP”. The user can choose one of these IP /DHCP modes to set the IP address of M2M-710D. When Boot Protocol is “Static IP”, the user can set IP IP Address address of M2M-710D in this setting. When Boot Protocol is “Static IP”, the user can set subnet Net Mask mask of M2M-710D in this setting. When Boot Protocol is “Static IP”, the user can set Gateway gateway of M2M-710D in this setting. When Boot Protocol is “Static IP”, the user can set DNS DNS Server server of M2M-710D in this setting M2M-710D User Manual (Version 1.01, Jan/2010) PAGE:25 Figure 22 Standard Config page M2M-710D User Manual (Version 1.01, Jan/2010) PAGE:26 3.3.4 DDNS Config When the M2M-710D plays the role of server and Boot Protocol isn’t “Static IP”, the client may not connect with the server, because the IP address of the server is floating, not static. We provide a solution for this situation. That is DDNS service. When IP address of the server is changed, the server will register current IP to website that provides DDNS service. The client can connect with the server by domain name that the user registers. NOTE: Every company that provides DDNS service has different way to register. In order to make it correctly work, we recommend the user to use DDNS service that the DynDNS Company provide. DynDNS website: http://www.dyndns.com/. 1. Create your Dynamic DNS account a. Please open web browser (ex: IE, Mozilla, etc.) on PC and key in http://www.dyndns.com/ in the Address line and then press “Enter” key. b. Key in “user name” and “password” and click “Login” button. If the user has not created user account, please click “Create Account” Hyperlink to create user account and then login user account. Figure 23 DynDNS home page M2M-710D User Manual (Version 1.01, Jan/2010) PAGE:27 c. Click “Services” Hyperlink to enter Services page Figure 24 click ”Services” Hyperlink d. Click “Dynamic DNS” Hyperlink to enter Dynamic DNS page Figure 25 click ” Dynamic DNS” Hyperlink M2M-710D User Manual (Version 1.01, Jan/2010) PAGE:28 e. Click “Get Started” button Figure 26 click “Get started” button f. Key in and select your hostname (ex: icpdas.home linux.com), and key in IP address of the server. Don’t care the other settings and click “Create Host” button. Figure 27 Figure 28 M2M-710D User Manual (Version 1.01, Jan/2010) Add New Hostname Create New hostname success PAGE:29 2. DDNS Config: DDNS Host Name User Name Password Disable / Enable The user can enable or Disable DDNS function by this setting It is the hostname that user creates in DynDNS website (ex: icpdas.homelinux.com) It is the name of the user account in DynDNS website. It is the password of the user account in DynDNS website. Figure 29 DDNS Config page 3.3.5 Com Port Config The user can set com port setting of M2M-710D in this page. If com port setting of the server and client is different, Com port setting of the client will be covered by the server. When the user changes the setting in this page, the user must restart the M2M-710D to active the new setting. RS232 / RS485/Vxcomm Select com port Port connection from RS-232 or RS-485 or Vxcomm. Remote Port Client’s port 1200 / 2400 / 4800 / 9600 / 19200 / 38400 / Baud Rate 57600 / 115200 bps Data Bits 5 / 6 / 7 / 8 data bits Parity None / Odd / Even Stop Bits 1 / 2 stop bits Flow Control None / Hardware / XonXoff M2M-710D User Manual (Version 1.01, Jan/2010) PAGE:30 Figure 30 Com Port Config page 3.3.6 Operation Mode Server Mode: Remote IP(Server only) Port Remote Port(server only) Baud Rate Data Bits Parity Stop Bits Flow Control Get Status Remote client’s IP Select com port connection from RS-232 or RS-485 or Vxcomm. The client’s port 1200 / 2400 / 4800 / 9600 / 19200 / 38400 / 57600 / 115200 bps Select baud rate of com port. Data Bits: 5 / 6 / 7 / 8 data bits Select data bits of com port. Parity: None / Odd / Even Select parity of com port. 1 / 2 stop bits Select stop bits of com port. None / Hardware / XonXoff Select flow control of com port. User can set current communication parameters from this button. M2M-710D User Manual (Version 1.01, Jan/2010) PAGE:31 Figure 31 Operation Mode page 3.3.7 Information 1. OS Version: Show OS version. 2. XS Version: Show application program version. 3. Firmware Version: Show firmware version 4. Current IP: Show current IP. 5. Subnet Mask: Show current subnet mask. 6. Mac Address: Show current Mac address. 7. System state: “Listen” System wait for listen. Server “Communication” Server communicate with client “Initok" System initial “try to connect” Client try to connect server Client “Login” Client Login successful “Communication” Server communicate with client Figure 32 Information page M2M-710D User Manual (Version 1.01, Jan/2010) PAGE:32 4. Application Application with M-4132 M2M-710D can be applied with M-4132. In this application, the M2M-710D is set as Client mode, and then M-4132 have RM Manager server function that can manage several RM client, and each of RM Client have different host name. This frame may apply in various applications more flexibly. Figure 33 Information page A server can accept one or more clients to login, but a server can only connect with the first client in pair connection mode. In this mode, two M2M-710Ds (one as Server, the other as Client) setup a virtual channel over Ethernet or Internet that allow serial (RS-232 or RS-485) data to pass through, as shown in figure. M2M-710D User Manual (Version 1.01, Jan/2010) PAGE:33 Figure 34 Pair connection (one server to one client) M2M-710D User Manual (Version 1.01, Jan/2010) PAGE:34 5.VxComm Applications(Firmware ver:V13 or latter) 5.1 Introduction Using the VxComm (Virtual Com) technology, PC can create virtual Com Ports to map the Com Port of the M2M-710D. To use the VxComm application, users must install a VxComm Driver first. After installation, users can operate the virtual Com Port as a real Com Port in PC to access the serial devices connects to the M2M-710D. By doing this, you can operate the remote com port whatever and whenever you are. Note: VxComm is just provided in server mdoe 5.2 Architecture In Pair connection mode the user can operate the virtual Com Port to access the serial device connects to the M2M-710D Client. M2M-710D User Manual (Version 1.01, Jan/2010) PAGE:35 Figure 35 VxComm Applications 5.3 Installing the VxComm Driver Step 1: The installation software can be obtained from the following location ftp://ftp.icpdas.com/pub/cd/8000cd/napdos/driver/vxcomm_driver/ Please choose the latest version that suits your Windows operation system. VxComm2K_v2.9.13_setup.exe for Windows NT4.0, 2000 /XP/2003 and Vista32 (32-bit) VxComm98.exe for Windows 95/98/ME Step 2: Go the where you download the installation file, and then double-click the file in Windows to execute it. M2M-710D User Manual (Version 1.01, Jan/2010) PAGE:36 Figure 36 VxComm Driver install Step 3: From the Windows Start Menu, go to Program/ICPDAS /VxComm2K/ and click the VxComm Utility. M2M-710D User Manual (Version 1.01, Jan/2010) PAGE:37 Figure 37 VxComm Utility location Step 4: Search and add M2M-710D to VxComm Server. Figure 38 Search and add M2M-710D VxComm Server Step 5: Double click Port1 to open “Port Configuration” dialog and select an appropriate Com Port number. M2M-710D User Manual (Version 1.01, Jan/2010) PAGE:38 Figure 39 Select Com Port number Step 6: Reset VxComm Driver to make the settings effectively Figure 40 M2M-710D User Manual (Version 1.01, Jan/2010) Reset VxComm Driver PAGE:39 5.4 VxComm communication test Step 1: Connect M2M-710D Server, Client and PC, as shown below. Figure 41 Communication Architecture Step 2: Configure M2M-710D Server’s Port1 to PC’s Com2 by VxComm Utility, please refer to section 5.3 for detail. Step 3: Set “Port” = VxComm, “Remote Port” = RS232, select M2M-710D Client and then click “Change setting”. Figure 42 M2M-710D User Manual (Version 1.01, Jan/2010) Web page settings PAGE:40 Step 4: Here we use Send232 Application (the user can download Send232 from http://ftp.icpdas.com/pub/cd/8000cd/napdos /7188e/tcp/pcdiag/source/send232.vb6_2.0.1) to test VxComm communication. Please open 2 Send232 Applications. One uses Com1 (connect with M2M-710D Client), the other uses Com2 (provide by VxComm driver). When the user clicks “Send” button to send the message, the receive text box of the other will show the message. Figure 43 Communication test M2M-710D User Manual (Version 1.01, Jan/2010) PAGE:41 6. Troubleshooting The troubleshooting list can help users to resolve the problems when using the M2M-710D. If the problem still can't be solved, please contact with the technical staff of ICP DAS. Table Errors and solutions Item Trouble state Solution 1 Led stay 2 Client login, but it cannot Pair 1.Inspects the line Connection 2. Is M2M-710D online? 3 Continuously heavy starting Reboot RM710D both server and client 4 The word “Conn.” twinkled Check Server IP Check net M2M-710D User Manual (Version 1.01, Jan/2010) Server name error Check net configuration Check server name Try to use IP PAGE:42 7. FAQ Q1: If I forget the M2M-710D’s IP, how can I set and operate the M2M-710D by web browser? A1: (1) :Please reset system, and IP address will show again. Figure 44 Display IP address (2):Init M2M-710D reference 2.3. Default value of IP address is 192.168.1.217 Q2: Client cannot connect to Server. A2: Please follow the following steps to check that the network configuration is correct. Step 1: Check IP of Server and Client is the only. The IP is not the same with the other network device. Step 2: Please confirm the network configurations are correct. The configurations include IP Address, Net Mask, Gateway and DNS Server. If the configurations are all correct, it should respond to the ping command from PC. Figure 45 Net setting Step 3: Please confirm that the following settings are correct. M2M-710D User Manual (Version 1.01, Jan/2010) PAGE:43 “Server IP” of Client is the same with “IP Address” of Server. “Communication Port” of Server and Client are the same. “Operation Mode” of Client is “Client”. “Operation Mode” of Server is “Server”. Figure 46 Client’s “Standard Config” page Figure 47 Server’s “Standard Config” page Q3: Server and Client can’t establish Com Port connection. A3: Please follow the steps to check below. Step 1: Confirm client’s name is the same as server permission name list. Step 2: Confirm comport setting of server and client. Server comport setting must the same setting as client. M2M-710D User Manual (Version 1.01, Jan/2010) PAGE:44 Figure 48 Comport setting of server Figure 49 Comport setting of client Step 3: Does the inspection wiring have the question? M2M-710D User Manual (Version 1.01, Jan/2010) PAGE:45 8. Dimensions (Unit: mm) M2M-710D User Manual (Version 1.01, Jan/2010) PAGE:46 Installation M2M-710D User Manual (Version 1.01, Jan/2010) PAGE:47 9. Frame Ground Electronic circuits are constantly vulnerable to Electro Static Discharge (ESD), which becomes worse in a continental climate area. M2M-710D module feature a new design for the frame ground, which provides a path for bypassing ESD, allowing enhanced static protection (ESD) capability and ensures that the module is more reliable. It is recommended that the Frame Ground of the M2M-710D module is corrected to the earth ground, such as the ground of an AC power supply, to provide better ESD protection for the module. The M2M-710D module is designed with two Frame Ground contact points, Frame-Ground-A and Frame-Ground-B, as shown in the figure below. When mounted to a DIN rail, FrameGround-B and the DIN rail are in contact. Thus, protection can be achieved by also connecting the DIN rail to earth ground. Figure 50 Frame Ground_BFrame Ground_A M2M-710D User Manual (Version 1.01, Jan/2010) PAGE:48