1
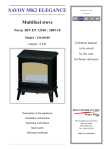
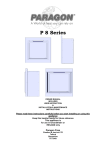
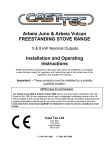
TM
STOVES
USER’S INSTRUCTIONS
Country Kiln 1,2, 3, 4, 5, 6, 7,8,9,10,11,12,14, 17,
21,22,23,24,25,26,27, 31,32,33,34,35,36,37,38, 41, 42. BSV-06,
07, 08, 410X, JA005, JA006, 701,702
PLEASE READ THIS USER’S INSTRUCTIONS CAREFULLY WHEN YOU ASSEMBLE,
INSTALL, OPERATE, AND MAINTAIN YOUR COUNTRY KILN STOVES!
DEALER STAMP
EN13240:2001
TM
STOVES
The user’s instructions are suitable for Country Kiln models ranged
from Country Kiln 1 to BSV702, total 34 models. Please see the
following chart information, and select your models:
Specification
Nominal
Recommended
of cast iron
Heat output
fuels
Kiln 1
grey iron 18#
5kW
67kg
620*155*185 (mm)
Kiln 2
grey iron 18#
7.5kW
Solid mineral
fuels,
peat briquettes,
wood, multifuel
Same above
86kg
560*410*480 (mm)
Kiln 3
grey iron 18#
10kW
Same above
120kg
570*460*690 (mm)
Kiln 4
grey iron 18#
16kW
Same above
168kg
740*560*710 (mm)
Kiln 5
grey iron 18#
7.5kW
Same above
88kg
570*420*480 (mm)
Kiln 6
grey iron 18#
9kW
Same above
116kg
570*390*670 (mm)
Kiln 7
grey iron 18#
10kW
Same above
110kg
620*490*560 (mm)
Kiln 8
grey iron 18#
18kW
Same above
198kg
710*560*850 (mm)
Kiln 9
grey iron 18#
9kW
Same above
95kg
610*420*580 (mm)
Kiln 10
grey iron 18#
8kW
Same above
88kg
580*480*440 (mm)
Kiln 11
grey iron 18#
15kW
Same above
129kg
660*510*750 (mm)
Kiln12
grey iron 18#
15kW
Same above
129kg
660*510*750 (mm)
Models
Weight
Dimension
(H*D*W)
Specification
Nominal
Recommended
of cast iron
Heat output
fuels
Kiln 17
grey iron 18#
5kW
90kg
560*410*530 (mm)
Kiln 21
grey iron 18#
6kW
Solid mineral
fuels,
peat briquettes,
wood, multifuel
Same above
68kg
580*340*440 (mm)
Kiln 22
grey iron 18#
8kW
Same above
81kg
640*390*460 (mm)
Kiln 23
grey iron 18#
8kW
Same above
81kg
620*390*470 (mm)
Kiln 24
grey iron 18#
8kW
Same above
80kg
640*408*440 (mm)
Kiln 25
grey iron 18#
7.5kW
Same above
85kg
620*410*460 (mm)
Kiln 26
grey iron 18#
7kW
Same above
78kg
620*390*470 (mm)
Kiln 31
grey iron 18#
5kW
Same above
67kg
500*440*330 (mm)
Kiln 32
grey iron 18#
7.5kW
Same above
86kg
560*410*480 (mm)
Kiln 33
grey iron 18#
10kW
Same above
120kg
570*460*690 (mm)
Kiln 34
grey iron 18#
16kW
Same above
168kg
740*540*740 (mm)
Kiln 35
grey iron 18#
7.5kW
Same above
88kg
570*420*480 (mm)
Kiln 36
grey iron 18#
9kW
Same above
116kg
570*410*680 (mm)
Kiln 37
grey iron 18#
10kW
Same above
110kg
610*460*570 (mm)
Kiln 38
grey iron 18#
18kW
Same above
190kg
710*560*840 (mm)
Kiln 41
grey iron 18#
15kW
Same above
120kg
650*480*740 (mm)
Kiln 42
grey iron 18#
15kW
Same above
120kg
650*480*740 (mm)
BSV-06
grey iron 18#
8kW
Same above
92kg
540*430*470 (mm)
BSV-07
grey iron 18#
5kW
Same above
76kg
590*360*490 (mm)
410X
grey iron 18#
11kW
Same above
130kg
660*590*590 (mm)
JA005
grey iron 18#
8kW
Same above
90kg
620*420*580 (mm)
JA006
grey iron 18#
12kW
Same above
120kg
610*430*660 (mm)
Kiln 701
grey iron 18#
5kW
Same above
68kg
600*360*420 (mm)
Kiln 702
grey iron 18#
8kw
Same above
125kg
600*440*670 (mm)
Models
Weight
Dimension
(H*D*W)
TM
STOVES
ASSEMBLY
Please assemble your Country Kiln stoves according to the following
instructions:
→ Country Kiln stoves come to you
packaged in a plywood crate.
in plywood crate
↓
→ Remove the top crate and organise
the parts.
↓
→ Gently lower the stove on its back or
prop back so that it rests with it`s back
supported by the pallet at an angle. Unbolt
the protective plywood panel from the
bottom of the stove.
↓
TM
STOVES
→ fix the legs with set screws and washers
supplied. All screws and bolts should be
hand tight torque only.
↓
→ fit the baffle, retainer bar, and
ashpan as shown.
↓
→ Smear liberal amounts of fire cement
round both exit holes. Fix the flue collar
and blanking plate with screws and washers
supplied. Hand tight torque. There are
interchangeable rear and top flue options.
It is essential that your stove is assembled correctly in order for your
stove to burn efficiently. If you have any doubts, please contact
ourselves on 01560483966 or email: [email protected]
Warning! When assembling the appliance, care should be taken to avoid
the possibility of personal injury. Any and all unauthorized
modification of the appliance is strictly prohibited. Do not drag the
stove in case you loosen the top or break the leg bolts.
TM
INSTALLATION
STOVES
It is important that all local regulations, including those referring
to national and European Standards need to be complied with when
installing the appliance. We are not responsible for any fault arising
through incorrect installation, incorrect useage or incorrect firing.
Safety Attentions
Transfer
Necessary facilities must be available for loading, unloading and site
handling.
Fire Cement
Some types of fire cement are caustic and should not touch your skin.
In case of contact, wash immediately with plenty of water.
Metal Parts
Be careful of personal injury when installing or maintaining this
appliance.
Other possible injuries
The stove contains no harmful materials, but if there is a possibility
of using any dangerous materials in the course of installation then
please seek specialist guidance and use appropriate protective
equipment.
Important Warning!
This appliance must not be installed into a chimney shared with any other
heating appliance. There must not be an extractor fan fitted in the same
room as the stove as this can cause an emission of fumes into the room.
Chimney
The chimney must be fitted in accordance with manufacturer’s
instructions and Building Regulations. The chimney height and the
position of the chimney terminal should conform to Building Regulations
and all local regulations, including those referring to national and
European Standards. The chimney must be in good condition, and any
cracks and obstructions are not permitted. The diameter of the flue
should not be less than 125mm and not more than 200mm. If any of these
requirements are not met, the
TM
STOVES
chimney should be lined by a suitable method. The chimney must be swept
before connection to the stove. We also recommend that the chimney be
swept a second time within a month of regular use after installation
and a minimum of annually thereafter.Please consult your local chimney
sweep, if you have any doubts about your chimney.
Flue Draught
A flue draught ranging from 1.2mm to 2.5mm water gauge may keep the
appliance in good performance. If the flue draught exceeds 2.5mm, a
draught stabilizer must be installed in order to control the rate of
burning and prevent over fire. You should check the flue draught when
fire is on high output.
Chimney Connection
You should brick up or seal an existing fireplace opening with a register
plate. A short length of flue pipe of a minimum 125mm diameter may then
be used to connect the stove to the chimney or lining appliances. This
flue pipe should be of vitreous enamelled steel, nominal thickness 1.2mm.
Ensure that the pipe end is no closer than 76mm to the side or rear
chimney walls. Ideally there should be a smooth streamline entry into
the flueway. The length of any horizontal run of flue pipe must not
exceed 125mm.
It is essential that all connections between the stove and chimney-flue
are sealed and made airtight. Both the chimney and flue pipe must be
accessible for cleaning and if ANY parts of the chimney cannot be reached
through the stove(with baffle removed), a soot door must be fitted in
a suitable position to enable this to be done.
Air Supply
A permanent, unobstructed, air opening is not essential for the room
or space containing this appliance, although be guided by local regs
which vary. The air opening should be at least 3625mm2 when a draught
stabilizer is equipped. Due care for air requirements will need to be
taken if any other appliances are permitted to work in the same room
and space.
Safety Clearances
It is suitable for the appliance to be recessed in a prepared fireplace,
but a suitable free air gap (minimum 150mm) must be left around the sides
and top and at least 50mm at the back of the appliance to reach maximum
heat output and for access to the rear of the stove. All non-combustible
walls closer than 300mm to the stove should be at least 75mm thick.
TM
STOVES
In all circumstances the back wall of the fireplace recess and the hearth
should be made of non-combustible material, Allow an apron of a least
300mm at the front of the stove and 150mm on either side. The hearth
on which the stove is to be placed should not be less than 125mm thick
and should be in accordance with the current building regulations.
Care should be taken to level the stove using the adjusting screws in
the feet. The appliance should be installed on floors with an adequate
load-bearing capacity. If an existing construction does not meet this
prerequisite, suitable measures (e.g. load distributing plate) shall
be taken to achieve it. There should be no combustible material within
a distance of 500mm from any surface of the stove
Commissioning and Handover
You should leave an appropriate period of time for fire cement and mortar
to dry out upon completion of the installation. In order to ensure the
smoke and fumes are taken from the stove up the chimney and emitted
safely to the atmosphere, a small fires should be lit first. Do not run
the stove at full output for at least 72hours.
Finishing installation and commissioning, the operating instructions
and tools for your stoves should be kept in hand. It is also important
to know how to use the stove properly and use only the recommended fuels
for this appliance. The user should know how to have smoke or fumes
emitted properly from the stove and be warned to prevent injuries in
case of the presence of children, aged or infirm persons.
Operating Instructions
WARNING!
All local regulations, including those referring to National and
European Standards need to be complied with when installing the
appliance.This appliance is not suitable for installation in a shared
flue system.The firebox and ashpit cover shall be kept closed except
during ignition, refueling and removal of residue material to prevent
fume spillage. It is important to use this appliance correctly so as
to achieve best results.
TM
STOVES
Air Controls
Warning! Parts of the appliance, especially the external surfaces, will
be hot to touch when in operation and due care need to be taken, e.g.
protective gloves should be worn when handling the stove while it is
in operation.
It is essential for the appliance to have a sufficient air supply for
combustion and ventilation.
Primary Air
Primary air is controlled through the assembly on the bottom of the door.
This provides a conventional air draught which passes through the fuel
bed. The primary air intakes can be adjusted (opened or closed)to
control the fire in the combustion chamber.
Secondary Air
This appliance is fitted with an air wash system which can assist to
keep the heat-resistant glass on the fire door clean. This secondary
air is controlled through the fittings on the top of the stove.
The air controls have two types: one is rotary air controls; the other
is sliding air controls. They are operated as follows:
Bottom Grate: Two types of bottom grate are equipped with your Country
Kiln stoves: rotary style or grid style. With the rotary style grate,
you can operate it by dragging the stainless steel rod forward and
backward to de-ash. With the grid style grate, a special hook is supplied
to de-ash. It is highly recommended to de-ash regularly in case any
build-up of ash damages the cast iron fuel bed. You should be careful
of hot parts of a stove in operation.
Ashpan: You should clean up the ashpan regularly as ash built up
touchinh the base of the stove grate may cause damage. Use the supplied
tool to pull the ashpan out of the stove.
TM
STOVES
On solid mineral fuels
Please keep no more than a 30℃ incline of the fuel bed from front to
back, when you put solid mineral fuels on the fuel bed. The height of
loading fuels must not exceed the rear cast iron lining.
The refueling intervals at nominal heat output will be approximately
4 hours. We suggest you refuel regularly so as to get the best possible
results. When using solid mineral fuels, we suggest you keep the
secondary air control in the closed position, which can burn in maximum
efficiency. At this time the primary air controls can adjust the burn
rate of the appliance.
In order to prevent the ash from being stacked against the underside
of the bottom grate, please always flatten the ash or de-ash before
refueling. Once the ash builds up, it can possibly stifle the airflow
and cause the fire to die.
Important!- It is very important to empty the ash pan regularly. If the
ash builds up on the underside of the grate, burnout or distortion of
the grate may be caused.
On wood fuels
The refueling intervals at nominal heat output will be approximately
1.5 hours. You may load wood higher in the stove than solid mineral fuel
but wood or logs are not permitted to touch the baffle plate.
Wood burns best with a layer of ash on the fuel bed with the multifuel
grate removed. Care should be taken to only remove surplus residue from
the stove when required. Care should be taken that logs for fuel are
positioned cut end forward. We recommend you only use dry, seasoned wood
as fuels; the wood should have been cut, split and stacked for at least
one year in circulating air surround to dry out. Wet or unseasoned wood
will cause tar deposits in the stove and unsatisfactory heat output will
occur.
Ignition, Seasoning and Running In
It is better for you to have 2 or 3 small fires before operating your
stove to its maximum heat output. This can help the paint to cure
steadily and to give a long service life of the paint finish. During
the period, there may be an unpleasant smell, you may keep all doors
and windows open for your comfort although the smell is non-toxic.
TM
STOVES
Firstly: load the stove with starting fuel, i.e. paper, dry sticks or
firelighters. Secondly: light the fire at the base keeping the primary
air controls open. Wait until the fuel reaches a steady glow, then build
the fire up step by step, more fuel should be added when you have a nice
fire settled across the grate or bed.
Warning! You need to check for chimney blockage prior to re-lighting
after a prolonged shut down period.
Shutting Down
Firstly, close the primary air controls.
Secondly, close the secondary air controls.
The fire should go out owing to lack of air.
If reviving the fire, it is recommended to open the primary air controls
first, then open the secondary air controls.
Warning! The stove is still hot for some time after the fire has been
extinguished.
Fuels
Fuels vary greatly in quality and performance. Sufficient air supply
and above average fuel bed temperatures are required to maintain best
performance for this appliance.
You should only use authorized smokeless fuels in smoke control areas.
Warning! The use of the appliance as an incinerator and the uses of
liquid fire accelerants, petrol and unsuitable fuels are prohibited.
(please note that Anthracite is used in the smelting process and
improper use of Anthracite or Cite based superfuels can cause damage
to the stove)
If you are having any difficulties or problems regarding fuel, consult
your local approved fuel merchant.
TM
STOVES
Safety guidance
FIRES CAN BE DANGEROUS-Do use a fireguard in the presence of children,
the elderly or the infirm. The fireguard should be consistent with
BS6539-Fireguards for use with solid fuel appliances.
DO NOT OVERFIRE- over firing can be dangerous. If any part of the stove
glows red, it shows that an over fire has occurred. This means the stove
has been taken to a temperature beyond its design capacity. This is not
permitted and can cause damage, you should keep an eye on how it is
burning and adjust the controls accordingly.
FUME EMISSION
Emitted fumes can be avoided if the stove is installed and operated
properly, fumes usually appear from the operations of de-ashing and
refueling. Constant fumes must be assessed.
If fume emissions do persist, then the following measures can be
helpful:
a) Put the fire out, or remove the fuel from the stove safely.
b) Open doors and windows.
c) Check the flue and chimney to prevent blockage and clean if required.
d)Do not try to re-light the fire before the cause has been identified and corrected.
e) If needed, please seek professional assistance.
Warnings! –an extractor fan is prohibited in the same room as this
appliance. Wind, weather and external conditions can alter
the strength of a chimney draw.
IN THE EVENT OF CHIMNEY FIRE.
a. Close all the air controls and stove doors.
b. Let others in the house know.
c. Call the Fire Brigade.
d. Move furniture and rugs away from the fireplace and remove any nearby
ornaments.
e. Place a fireguard in front of the stove.
f. Feel the chimney for signs of excessive heat.
If the wall is becoming hot, move the furniture away. Ensure that the
Fire Brigade can have a command of your roof space in order to check
the area for signs of spread. Regular chimney cleaning helps prevent
chimney fire.
TM
MAINTENACE
STOVES
Stove body
Use a soft brush to clean the stove, cleaning must be given only after
cooling. The finish can be renewed with proprietary stove paint or stove
black.
Baffle plate
Remove and clean the baffle plate once a month to avoid soot or fly ash
blocking the flue ways and producing dangerous fume emission
Fireproof glass
Use a proprietary glass cleaner to clean the glass when cool. You can
not use any materials which may bring glass damage to clean the panel.
Wet logs on heated glass, a badly aimed poker or heavy slamming of the
doors could crack the glass panels. You must be very careful. The glass
is heat resistant but not reinforced.
Stove rope
Stove rope is supplied along with the stove. Inspect the rope around
the door and glass. If the rope is becoming detached, use a proprietary
stove rope glue to reattach it. Please replace the rope in case of poor
condition.
Flue way and Chimney
Keep the chimney, flue way and any connecting flue pipe swept regularly.
For users of smokeless fuels, sweep at east once a year; for wood and
other fuels, at least twice a year. If the stove is fitted in place of
an open fire, then the chimney should be swept one month after
installation to clear any soot falls which may have occurred due to the
difference in combustion between the stove and the open fire.
Troubleshooting:
If No Fire can be burnt
Please check the following measures:
A proper fuel is being used.
The air inlet is unobstructed.
Chimneys and flue ways are clear
Sufficient air supply is into the room.
No extractor fan is working in the same room as the stove.
Fire blazing out of control
Please Check:
A suitable fuel is being used.
The doors are tightly closed.
The air controls are all in the closed position.
The primary air control flap is not wedged in the open position.
The glass retaining clips are not loose.
The door rope seals are in good condition
We suggest users buy replacement and spare parts only from ourselves.
TM
STOVES