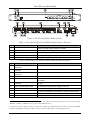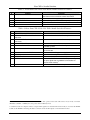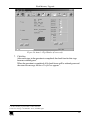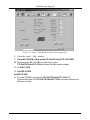
1
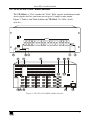
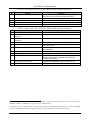
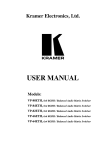
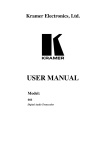
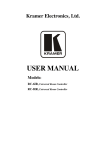
Contents
Figures
Figure 1: VP-81xl 8x1 XGA / Audio Switcher
Figure 2: VP-161xl 16x1 XGA / Audio Switcher
Figure 3: VP-321xl 32x1 XGA / Audio Switcher
Figure 4: Connecting the VP-81xl
Figure 5: Connecting the Balanced Stereo Audio Input/Output
Figure 6: Connecting the Unbalanced Stereo Audio Input/Output
Figure 7: Connecting a PC without using a Null-modem Adapter
Figure 8: Controlling via RS-485
Figure 9: SETUP Dipswitches (Factory Default for Stand-Alone MACHINE # 1)
Figure 10: Dipswitch Settings on 4 VP-81xl, VP-161xl, and/or VP-321xl Units
Figure 11: Three Looped VP-81xl Units Interconnected (Video Connections Shown)
Figure 12: Connecting a Remote Mechanical Switcher Unit to the VP-81xl
Figure 13: Connecting a Remote Unit to a Cascaded Set of Three VP-81xl Units
Figure 14: Operating a 22x1 XGA / Audio Switcher (Three Looped VP-81xl Units)
Figure 15: Splash Screen
Figure 16: Atmel – Flip Window
Figure 17: Open Configuration File Select Window
Figure 18: Atmel – Flip Window (RS-232 Communication)
Figure 19: RS-232 Window
Figure 20: Atmel – Flip Window (Connected)
Figure 21: Atmel – Flip Window (Operation Completed)
4
5
7
11
12
12
13
14
15
16
20
20
21
23
26
27
27
28
28
29
30
Tables
Table 1: Front Panel VP-81xl 8x1 XGA / Audio Switcher Features
Table 2: Rear Panel VP-81xl 8x1 XGA / Audio Switcher Features
Table 3: Front Panel VP-161xl 16x1 XGA / Audio Switcher Features
Table 4: Rear Panel VP-161xl 16x1 XGA / Audio Switcher Features
Table 5: Front Panel VP-321xl 32x1 XGA / Audio Switcher Features
Table 6: Rear Panel VP-321xl 32x1 XGA / Audio Switcher Features
Table 7: Dipswitch Definitions
Table 8: MACHINE # Dipswitch Settings
Table 9: MACHINE ADDRESS # Dipswitch Settings
Table 10: Technical Specifications of the VP-81xl/VP-161xl/VP-321xl
Table 11: VP-81xl/VP-161xl/VP-321xl Hex Codes
ii
4
4
6
6
8
8
15
15
18
31
32
KRAMER: SIMPLE CREATIVE TECHNOLOGY