1
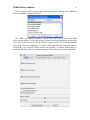
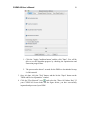
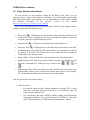
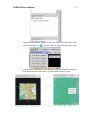
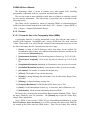
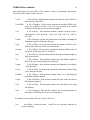
CUENCAS User's Guide
by
Ricardo Mantilla
2009
CUENCAS User’s Manual
2
Contents Table
CHAPTER 1
INTRODUCTION
3
1.1
LICENSING
4
1.2
RUNNING CUENCAS USING JAVA™ WEBSTART
4
CHAPTER 2
THE CUENCAS GRAPHICAL USER INTERFACE (GUI)
6
2.1
THE MAIN GIS GUI
6
2.2
THE TABS BAR
7
2.3
THE MENU BAR
13
2.4
THE MAPS DISPLAY
14
2.5
BASIN MODULES
18
CHAPTER 3
TUTORIALS
20
3.1
REGION SELECTION AND DATA DOWNLOAD
20
3.2
CREATION OF A DATABASE
26
3.3
DATA IMPORT PROCEDURES
27
3.4
RIVER NETWORK EXTRACTION FROM DEM
28
3.5
BASIN SELECTION AND ANALYSIS
32
3.6 RUNNING RAINFALL-RUNOFF SIMULATIONS USING THE LINK-HILLSLOPE
FRAMEWORK
3.7
EDITING MAPS
CHAPTER 4
USERS)
35
38
THE CUENCAS DATABASE STRUCTURE (FOR ADVANCED
39
4.1
THE RASTERS FOLDER
39
4.2
THE SITES FOLDER
45
4.3
THE VECTORS FOLDER
47
4.4
THE LINES FOLDER
47
4.5
THE POLYGONS FOLDER
47
4.6
DOCUMENTATION
48
CUENCAS User’s Manual
3
Chapter 1
Introduction
CUENCAS is a river networks analysis tool. It can be seen as a simplified version of
the original GIS called HidroSig, developed by the Water Resources Department at the
Universidad Nacional de Colombia over the last 10 years.
While HidroSig has evolved to be a full-featured GIS, CUENCAS has kept a narrow
focus on river networks, and it is mainly intended for three tasks: i) river networks
extraction and analysis, ii) numerical simulation environment of rainfall-runoff processes
and iii) data archiving framework.
CUENCAS is meant to be a research tool, rather than a commercial product. This is
reflected in the GNU-GPL license under which the source code is distributed. The
license is discussed in greater detail in section 1.1. The development of CUENCAS since
2001 has been supported by various grants from the National Science Foundation (NSF).
This document is intended for users of the CUENCAS graphical user interface.
CUENCAS uses the Java webstart protocol to run. Notice that CUENCAS is a platform
independent tool since it is developed in Java. Mac OS X users must use Tiger version or
higher that implements Java3D technology. We have successfully run the application in
Windows, Mac OS X, Linux (Red Hat, Fedora, Suse and Devian), and Solaris platforms.
CUENCAS uses the graphics library VisAD to display maps and overlay vectorial
objects and locations. It also allows for many interactions with specific areas of the
display.
The group of tools currently built into CUENCAS can be group as:
•
Advanced visualization tools for DEMs and DEM derived features.
•
Visualization and animation tools for Spatial/Temporal hydro-meteorological
fields (e.g. precipitation, evaporation).
•
Visualization tools for ESRI shape files and USGS DLGs.
•
Import/Export capabilities for Raster, Vector and Site data.
•
River Network Extraction from Digital Elevation Models (DEMs) using the
D8 algorithm.
•
River Network Geomorphologic Analysis including but not limited to:
CUENCAS User’s Manual
4
o Topologic and Geometric Width Function.
o Link’s Concentration Function
o Horton Analysis
o Generalized Horton Analysis (Statistical simple scaling of network
properties)
o Network links analysis (Length, area, slope, etc) including xy-plots for
link properties (e.g. Hack's Law)
o Area-Altitude (Hypsometric Curve)
o Self-similarity network and terrain decomposition based on the
Random Self-similar Network (RSN) model
o Scaling analysis of spatially distributed variables (Precipitation,
Evaporation) in the river network context
•
Link-Hillslope1 based rainfall-runoff model
o 3D view of the basin topography
o Decomposition of basin into links and hillslopes
o Real time flow simulations
1.1
•
Water Balance
•
Time Series Analysis
•
Rainfall Fields Simulator
•
Input-Output tools for the tRIBS hydrologic model
Licensing
CUENCAS is distributed under the GNU-GPL license. The GNU General Public
License is intended to guarantee your freedom to share and change free software and to
make sure the software is free for all its users. This General Public License applies to
most of the Free Software Foundation's software and to any other program whose authors
commit to using it.
The exact terms of the license are distributed with the source code. They can also be
found at http://www.gnu.org/licenses/gpl.html#SEC3.
1.2
Running CUENCAS Using Java™ Webstart
CUENCAS uses the Java™ Webstart technology for the installation and upgrading
process. This simplifies the process of making the most current version available for
users.
1
Note that we use the word Hillslope to denote all the area (portion of the landscape) that drains to the
link. In many contexts this area is called link’s catchment.
CUENCAS User’s Manual
5
CUENCAS requires Java™ 1.5 or higher and Java3D™ installed on your system.
You can download Java for free at http://java.sun.com/2 . It is important that you download
and install the appropriate Java3D™ library for your platform (For Windows and Solaris
platforms go to http://java3d.dev.java.net, for Linux use http://www.blackdown.org). Java3D is a
native library on Mac OS X Tiger (10.4) and above. If you decide to download the JRE
version of Java™ 1.5 make sure you download the JRE version of Java3D.
With these two products installed on your computer you can click the RUN
CUENCAS link at http://www.iihr.uiowa.edu/~ricardo/cuencas/cuencas-download.htm. This site
also contains links to sample databases that can be used by CUENCAS.
2
You can download either the JDK or the JRE. Java is available for all platforms
CUENCAS User’s Manual
6
Chapter 2
The CUENCAS Graphical User
Interface (GUI)
CUENCAS is the graphical user interface for the data in the Cuencas-database. The
database structure and formats are explained in section Chapter 4, however detailed
knowledge of the database is only needed by advanced users.
In the sections that follow we’ll describe the major components of the interface, and in
Section Chapter 3 we’ll guide you through a series of tutorials that will allow you to
create and interact with your own database. The easiest way to get familiar with the
interface is to download a previously built database. A good candidate is the Walnut
Gulch,
AZ
database.
It
can
be
found
at
http://cuencas.colorado.edu/databases/Walnut_Gulch_AZ_database.tar.z
This database contains
several raster maps, ESRI shape files of roads, counties and railroads, information on
locations and gauges in the area.
Once you download and uncompress the directory use the “File → Open Data Base”
menu to find and select the “Walnut_Gulch_AZ_database” directory. The CUENCAS
interface will update itself to reflect all the information available. Please be aware that
CUENCAS is a product in development, so many buttons and menus are not active.
Please report all bugs to Ricardo Mantilla ([email protected]).
2.1
The Main GIS GUI
The Main GUI allows you to interact at a basic level (visualization, small
modifications, and reorganization) with your data. The GUI is designed around raster
maps, thus vector layer (such as blue lines) or locations (will only be displayed on top of
the maps that you have opened). Once you open a “Topography” or “Hydrology” raster
map, you can use several features on the objects Tabs Bar, which is explained in detail in
the next section. The interface has a field with the name of the currently open database.
The database name can be modified directly from the interface by right-clicking over the
database name label and selecting the “Rename Database” option. It also contains a
group of toolbars that give you quick access to some of CUENCAS tools. The menu
provides access to import/export options and direct access to CUENCAS modules.
CUENCAS User’s Manual
2.2
7
The Tabs Bar
Each one of the tabs in the Tabs Bar corresponds to a type of data in the Cuencasdatabase. The data types handled by CUENCAS are: Rasters, Vectors, Lines, Polygons,
Sites, and Documentation.
2.2.1 The Rasters Tab
This tab shows the directories-tree for the Topography and
Hydrology subfolders of the Rasters folder in the database.
There are three actions currently available for the files in
the directory. 1) Single left click displays the metainformation associated to the file in the Metafile text area; 2)
Double left click opens the dialog for displaying the data; and
3) Single right click launches a pop up menu that allows for
direct interaction with the file and to open the File Editor (see
figure below).
CUENCAS User’s Manual
8
The Left-double-click action on a file in the Topography tree launches the “DEM and
Derived Quantities” dialog shown here.
The “DEM and Derived Quantities” dialog allows the user to select what DEM
derived map to display. It gives the option to open several maps (multiple selection using
Ctrl+click). It also lets the user decide if he/she wants to see the 2D or 3D representation
of the map. But most importantly, it contains a link to the Network Extraction Module.
Clicking the “Get Network” button activates this module. A complex tabbed dialog is
displayed that allows the user to select the options for the Network extraction algorithm.
CUENCAS User’s Manual
9
Once the user has selected the tasks to be performed by the Network Extraction
module the user must click the “Apply Conditions” button and then “Start”. The buttons
become inactive while the DEM is processed (The progress bar indicates the percentage
completed), and they become active again when the program has finished.
The right-double-click action on a file in the Hydrology tree launches the
“Hydroclimatic Data Loader” which shows in chronologic order the data files associated
to the meta information for the selected map. The user can open several maps at the time
or use one of the advanced single window interfaces for animations and map
comparisons.
2.2.2 The Vectors Tab
The Vectors Tab is very simple. It displays a list of
Vectorial files in the database (Shape-files and DLG-files).
The list is presented as a series of Checkboxes. When
activated the vector layer will be displayed over all the maps
currently opened as shown in the figure above. Notice that
only the portions of the Vectorial map that surround the raster
will be displayed.
CUENCAS User’s Manual
10
2.2.3 The Polygons Tab
The Polygons tab is similar to the vector tab. However the
polygon objects are more complex since they describe a
bounded region. A future release of CUENCAS will add a
button next to the polygon that invokes the Volume Integral
procedure, which allows the user to select a map and get the
major statistics (mean, total, standard deviation, kurtosis,
skewness) of the map values over the region bounded by the
polygon.
Polygons can be created by writing an ASCII file or by
calling the “Create Polygon for Basin” network tool.
CUENCAS User’s Manual
11
2.2.4 The Sites Tab
The Sites Tab allows the user to interact with the Site objects
in the database. Site objects can be Gauges or Locations. In
order to have a Gauge or Location displayed over a map the user
must click the appropriate “Update List” button and use the popup dialogs to select the desired Sites.
For Gauges the “Gauges Selector” dialog is displayed. It
allows the user to do a filtered search of the gauges that should
be displayed. Gauges can be filtered by Code, Agency, Type,
Stream Name, County, State, or by the geographic coordinates
bounding a region.
The Gauges selected will be added to the GAUGES list in the
Sites Tab and will be displayed in all opened maps.
In addition the “Get Time Series” button will display the time series associated to the
gauge.
For Locations the “Locations Selector” dialog is displayed. It allows the user to do a
filtered search of the locations that should be displayed. Locations can be filtered by
Name, Agency, Type, County, State, or by the geographic coordinates bounding a region.
CUENCAS User’s Manual
12
The Locations selected will be added to the LOCATIONS list in the Sites Tab and will
be displayed in all opened maps. The user can interact with the list by selecting several
locations and clicking the “Get Information” button. This will open the Location viewer.
The location viewer displays the information associated to the Location and shows the
images for the location. Note that images can be retrieved from files (using relative
paths) in the computer or from the Internet using a properly formatted URL.
2.2.5 The Documents Tab
This tab is currently being developed. It is a placeholder for a link to
the file system navigator pointing to the folder (Documents) of the
database. Since that folder is designed to contain miscellaneous data a
system specific file manager will better handle it.
CUENCAS User’s Manual
2.3
13
The Menu Bar
The Menu Bar contains access points to several file administration tools and to the
independent modules in CUENCAS.
The “File” menu contains several options to open files and
databases and tools to import and export information to/from
the Cuencas-database.
The “Open File” item allows the user to open a DEM or a
Hydroclimatic variable that is not part of the database.
The “Import” menu provides access to several tools to populate the database with
DEMs, Hydroclimatic variables and Sites from the USGS gazetteer and the USGS water
resources databases.
The “Options” menu is a placeholder for tools to customize the GUI. Currently the
colors and display features are hard-coded and cannot be changed. However an
upcoming release will activate these menus.
The “Modules” menu opens the independent modules. Currently the Modules can
only be accessed interactively from the Maps Display explained in the next section.
CUENCAS User’s Manual
2.4
14
The Maps Display
Raster maps are displayed in individual windows contained within the main GUI. The
GUI allows for several maps to be open at the same time3.
This is the list of interactions using the projection icons and the mouse:
•
Home Icon [ ]: Clicking this icon will make the map projection come back
to its original state. Use it every time that you lose your map out of sight, or if
you want to quickly return the original display projection.
•
Zoom In Icon [
•
Zoom Out Icon [
•
Left-Button-Drag (click and hold): This action allows you to change the center
of the display. It is useful if the features that you are interested in are outside
the visible range in the display canvas
•
Mouse-Wheel: Zoom in (Wheel forward) and Zoom Out (Wheel backwards).
•
Middle-Button-Click: This action will execute the currently selected behavior.
]: Clicking this icon doubles the current image size.
]: Clicking this icon reduces the current image size by half.
The Behavior is determined by clicking on any of these icons: [
3
] for basin
There is a known issue of the black display getting in front of the GUI components. This is a Java
issue and we are waiting for it to be resolved.
CUENCAS User’s Manual
outlet selection, [
[
•
15
] for tracing flow path, [
] for creating new location, or
] for creating a new map by cutting a section of the current map.
Right-Button-Click: This action will bring up the interface associated to the
“active element” being clicked. Active elements are usually small squares in
the display. We will illustrate the "Basin-Outlet" element in section 2.4.2.
2.4.1 The Maps Display Tool Bar
Each map display has a toolbar that gives access to actions on the map. The Zoom
icons (Home, Zoom In and Zoom out) control the projection explained before. The
Camera button takes a snapshot and creates a JPG file. The P (Print) button sends the
current image to the printer.
The CP button opens the “Raster Viewer Controls”. It allows manipulating the axis of
the map, and the color table used to display it.
CUENCAS User’s Manual
16
Four more tools are activated for DEMs that have been successfully processed. The
Network Tool that allows displaying the river network. The network is color coded by
Horton-Strahler order. Each order is given by a check box so that only desired orders are
displayed over the map.
The Basins Log button contains a list of previously selected basins in the DEM.
The “Select Basin” toggle-button activates the middle-button action to select a basin
outlet by clicking over a spot in the DEM. Finally the “Trace Stream” toggle-button
activates the middle-button action to show the path from any point in the DEM to the
DEM border, the ocean, or an internal lake.
CUENCAS User’s Manual
17
The other two tools are the “Add Location” which allows for interactive creation of a
Location object by clicking with the middle button in the map. Finally the “Cut Section”
button allows the user to select a region in the map and create a new map. To select the
region use the middle button to select the corners of the region. You will need to click
once per corner.
2.4.2 Interacting with Displayed Objects
There are two kinds of objects that allow the user to interactively generate actions
using the right click. The objects are the basin outlet (A small red square) and the
Gauge/Location object.
2.4.2.1 The Basin Outlet Object
When left clicked it launches the Analysis Network tools dialog. This interface
includes access to the Geomorphology Analsis module, the Rainfall-Runoff module and
the tRIBS i/o module. These three modules are detailed in section 2.5. In addition it can
create a polygon file of the basin boundary and a mask file. The latter creates a
CUENCAS raster file with the multi level basin decomposition.
2.4.2.2 The Gauge and Location Objects
When left clicked over a gauge the “Show Time Series” dialog is launched while over
locations the “Location Viewer” is launched.
CUENCAS User’s Manual
2.5
18
Basin Modules
The basin modules are quasi-independent programs of analysis for the basin and/or
river network structure. Currently there are three modules implemented.
2.5.1 The Geomorphology Analysis Module
This module introduces a very sophisticated interface for novel analyses of the river
network structure. It includes some classical analysis like Horton ratios, the width
function and the link concentration function. It also includes a graphical interface for the
generalized Horton laws (Statistical self similarity of distributions).
The module contains a graphical interface for analyzing link-based properties. It
allows analyzing properties as random variables (histograms) or in conjunction (XYplots). This tool allows separating the analysis of interior and exterior link properties.
2.5.2 The Rainfall-Runoff Model Module
This module is an interface to the Link-Hillslope based rainfall runoff model
developed by Mantilla and Gupta (2005).
CUENCAS User’s Manual
19
2.5.3 The tRIBS i/o Module (New)
This is a new module that attempts to create a seamless data interface with the tRIBS
model developed at MIT. Note that tRIBS is not freely distributed so you will need to
own a license in order to run the model. CUENCAS facilitates the creation of the input
parameters and the analysis of the model output, however it does not make direct calls to
the tRIBS executable, as this would constitute a violation of CUENCAS license terms.
For details on obtaining the tRIBS program visit http://www.ees.nmt.edu/vivoni/
CUENCAS User’s Manual
20
Chapter 3
Tutorials
This section is a step-by-step guide to using CUENCAS. It illustrates how to
download data, create a database and process a DEM. For this tutorial you will need to
create two directories in your computer.
Call them “Downloaded_Data” and
“Test_Database”. You will need about 10 Mb of free space in your computer.
3.1
Region Selection and Data Download
3.1.1 DEM and Land Cover
For this exercise we will be working on the Burns Creek basin, a 40 km² basin located
in southeast Kansas, near the town of Burns. We are going to download the 30 meters (1
arcsec) DEM provided by the USGS at http://seamless.usgs.gov/website/Seamless/. CUENCAS
has been extensively tested on these DEMs. We will also download the land cover map
for the region and the Blue Lines from the EROS Data Center at http://edc.usgs.gov/geodata/.
First, we will get the DEM using the software provided by the USGS. It offers two
ways to obtain the portion of terrain of interest: a) using the graphical interface to define
the region or b) by defining the region using the bounding coordinates. We will provide
steps for both this methods (we recommend trying both methods so that you familiarize
with the Seamless Data Distribution System):
STEP 1. Method 1: Defining Region by Coordinates:
•
This is the easiest method. It is very useful if you know in advance the
coordinates of the region "bounding box" where the basin of interest is
embedded.
•
On the Seamless website click on the link (image) that points to "View and
Download United States Data"
•
Once the interface has loaded (it may take 10 seconds or so) select the
icon on the left side of the page, under the "Download " section.
•
Clicking on the icon launches the interface shown below. Type the
following coordinates (bounds of the Burns basin) in the bounding boxes:
LAT: Bottom: 38 01 10 N, Top: 38 07 10 N
LON: Left: 96 57 42 W, Right: 96 51 08 W
CUENCAS User’s Manual
21
•
Click on the Select Area button, and then accept the confirmation request.
This will launch the "SDDS Request Summary Page". (Note: If a window
doesn't pop up, you may have the "Pop Up blocker" feature active. Right
click the window icon at the top of the navigator and select "Allow Popups
from this site".)
•
You can skip STEP 2 and go directly to STEP 3 to complete the
download process.
STEP 2. Method 2: Defining region using the graphic tools:
•
This method requires more time, but it's very useful if you have doubts
about the region covered by the basin you are interested in processing.
•
On the Seamless website select the link (image) that points to "View and
Download United States Data"
•
Once the software has loaded begin by zooming in the area of interest. The
figures below should give you an idea of the zoom levels for the Burns
Creek basin:
•
Zoom Level 0 (Zooming on Kansas)
CUENCAS User’s Manual
•
Zoom Level 1 (Zooming on Emporia Region)
•
Zoom Level 2 (Zooming on Burns Basin)
•
Zoom Level 3 (Final zoom level)
22
CUENCAS User’s Manual
23
•
On the Display tab on your right, expand the Hydrography menu and select
the "National Atlas and NHD Streams" box. Your image should now look
like this
•
Now select the icon "Define Download Area" , and create a bounding box
containing our basin as shown in the figure below. Use the coordinates
displayed in the status bar (at the bottom of the navigator window) as a
guide, and create a box with the following coordinates: Upper left corner:
(83.12,-96.95) and lower right corner (38.02, -96.84).
CUENCAS User’s Manual
•
24
When you finish creating your selection box, the "SDDS Request
Summary Page" will launch. Go to step 3 to complete the download
process.
STEP 3. Getting data from the "SDDS Request Summary Page":
a. If you got to this point it means that you are ready to download the area
that you defined (either by entering the coordinates or by graphically
selecting the region). Notice that if a window hasn't popped up, it means
that you have the "Block Pop-Ups" feature of your navigator active. Right
click the window icon at the top of the navigator and select "Allow Popups
from this site".
b. Before you attempt to download the data select the "Modify Data
Request" link on the "SDDS Request Summary Page" window (shown
below).
c. The "SDDS Request Options Page" (shown below) appears. This screen
will allow you to select the data that you want to download and the data
format. (THIS IS A CRITICAL STEP IN THE PROCESS)
CUENCAS User’s Manual
25
•
Select the "National Elevation Dataset (NED) 1 Arc Second" box, and the
National Land Cover Dataset 1992.
•
Deselect all other boxes.
•
Select the "BIL" option in the “Data Format” menu for both datasets.
Once you are done, scroll down and click the "Save Changes & Return to
Summary" button.
•
Now you can press the "Download" button in each of your datasets. The
USGS system will start processing your order (Attention: You need to
create one order per data set by clicking the download button in both
datasets).
•
Finally, the navigator asks you to open or save the files. Save the files in
the “Downloaded_Data” directory that you created at the beginning of this
tutorial (Note: By default some navigators will put the file in your
computer desktop. Move the file to your “Downloaded_Data” directory).
•
Go to the “Downloaded_Data” directory.
•
For Windows users:
a. If you have winzip installed on your computer, simply right-click
over the zip file, scroll down to the winzip menu and select the
“Extract to here…” option. This will create a directory with the
CUENCAS User’s Manual
26
same name as the zip file in the same directory where the zip files
are located. Do this for the two files that you downloaded.
b. If you don’t have winzip, double click on the file. An Explorer
window will pop-up containing a directory. Drag the directory
into the “Downloaded_Data” directory.
•
For Mac users, just double click the files. It will automatically create the
uncompressed directories.
•
Linux users can “cd” to the “Downloaded_Data” directory and type
“unzip *”
3.1.2 Blue Lines
Now download Blue Lines for this region. Blue lines are vector files containing traces
of the rivers in a particular region. They are usually obtained from aerial photographs.
1. Go to the EROS website at http://edc.usgs.gov/geodata/.
2. Select the "1:100,000 Scale Digital Line Graphs (DLG)" menu.
3. Go to the Alphabetical list.
4. Select the folder "E/", and then find the folder "emporia-w_KS/"
5. Click on the directory "hydrography/".
6. Now download the file "483105.HY.opt.gz". Put it in the same
“Downloaded_Data” directory along with your DEM, and decompress the file
using the procedure described in the previous section.
3.2
Creation of a Database
Now that you have downloaded some data, we will proceed to create and populate our
Hydrologic Database. Follow these steps to create a new database:
1. If you haven’t done so, create a new empty directory called "Test_Database"
wherever is convenient for you (use a directory different to the one where you
downloaded the data). It is a good idea to create it in a place that you can
access later (Ask the system administrator for a place where you can keep
files).
2. Open
CUENCAS
by
clicking
the
RUN
CUENCAS
link
at
http://www.iihr.uiowa.edu/~ricardo/cuencas/cuencas-download.htm.
3. Select the menu File => Create New Database.
4. Once the directory-selection screen form pops up, find and select the directory
"Test_Database" that you created in step 1.
5. Find the “Unamed Database” (Top-left of CUENCAS GUI), and change the
database Legend by right clicking and selecting the “Rename Database” item.
Change the name to “My Database” and hit the “Rename” button.
CUENCAS User’s Manual
27
6. Maximize the CUENCAS window.
3.3
Data Import Procedures
Now we are ready to add some data into our Hydrologic Database. We will add the
DEM, the land cover map and the blue lines.
1. Importing the DEM:
•
On CUENCAS select "File => Import => Import DEM => From USGS
BIL Format"
•
When the “BIL Directory Structure” screen pops up, find and select the
directory where you downloaded and uncompressed the USGS DEM
(make sure you select the directory and press Select, don’t go inside the
directory). It will be a directory named NED_ followed by 10 digits.
•
Select the repository directory for download (use the default directory).
•
If everything went OK, your "Topography Database" tree, on the left
panel of CUENCAS, should look like this (double click the "Elevation
Maps" folder):
2. Importing the Land Use Map:
•
On CUENCAS select "File => Import => Import Hydroclimatic Raster=>
From USGS BIL Format"
•
When the “BIL Directory Structure” screen pops up, find and select the
directory where you downloaded and uncompressed the USGS Land
Cover dataset (make sure you select the directory and press Select, don’t
go inside the directory). It will be a directory named by 10 digits.
•
When the “Output Directory” screen pops-up create a directory called
Land Cover (do this by clicking the new folder icon or by right clicking
and selecting the new folder option). You will need to rename the
directory to “Land Cover”. Select the directory and press Select button.
(Note: some users have reported that this step had to be done outside
CUENCAS using a File-Explorer window).
•
If everything went OK you should be able to expand the "Topography
Database" tree and the “Hydrology Database” tree and see the data that
you downloaded.
CUENCAS User’s Manual
28
3. Importing the Blue Lines:
3.4
•
Move 483105.HY.opt the the directory
"Test_Database" that you previously created.
"Vectors"
inside
the
•
Finally, go to "File => Recent Databases => 0. Test_Database" to refresh
the Database structure.
River Network Extraction from DEM
Here it is assumed that you have successfully downloaded a DEM from the USGS
website.
1. On the "Topography Database" tree, double click the DEM that you imported.
2. The "DEM and Derived Quantities" window should pop up.
4. Click the "Get Network" button. This will activate the "Network Extraction
Options" window.
CUENCAS User’s Manual
29
1. Click the "Apply Condition button" and the click "Start". You will be
able to see the algorithm progress by checking the Optimization and
Extraction progress bars.
2. The process takes about 3 seconds for the DEM we downloaded in step
I of this tutorial.
3. Once it's done, click the "Exit" button, and the hit the "Open" button on the
"DEM and Derived Quantities" window.
4. Click the "Plot Network" icon
and select the "Show All Orders Box". If
your CUENCAS Screen looks like the figure below, you have successfully
imported and processed your DEM
CUENCAS User’s Manual
30
5. As a final step, display the Blue Lines you imported. First, select the "Vectors"
tab in the left panel. Then, check the "483105.HY.dlg" box (located under the
"Available DLG files" frame).
CUENCAS User’s Manual
6. Your screen should now display all your data.
31
CUENCAS User’s Manual
3.5
32
Basin Selection and Analysis
For this exercise we will continue working on the Burns Creek basin. You are
expected to have a fully loaded database at this point. If you had troubles downloading
data and putting together your database, you can download this zip file, which contains
the database developed in the previous sections of this tutorial
(http://www.iihr.uiowa.edu/~ricardo/cuencas/Test_DB.zip).
First, a brief introduction to how to move around CUENCAS map display window
using the projection icons and the mouse:
•
Home Icon [ ]: Clicking this icon will make the map projection come back to its
original state. Use it every time that you lose your map out of sight, or if you want
to quickly return the original display projection.
•
Zoom In Icon [
•
Zoom Out Icon [
•
Left-Button-Drag (click and hold): This action allows you to change the center of
the display. It is useful if the features that you are interested in are outside the
visible range in the display window
•
Mouse-Wheel: Zoom in (Wheel forward) and Zoom Out (Wheel backwards).
•
Middle-Button-Click: This action will execute the currently selected behavior. The
]: Clicking this icon doubles the current image size.
]: Clicking this icon will reduce the current image size by half.
Behavior is determined by clicking on any of these icons: [
[
•
], [
], [
], or
].
Right-Button-Click: This action will bring up the interface associated to the active
element being clicked. Active elements are usually small squares in the display.
We will illustrate the "Basin-Outlet" element later in this tutorial.
Now it's time for River Network Analysis.
1. Basin Selection:
•
If you haven’t done so before, load the database by selecting "File => Open
Data Base" and then choosing the directory “Test_Database” that you
created as part of this tutorial.
•
Go to the Rasters and open a DEM by double clicking your DEM on the
"Topography Database" tree, on the left panel of CUENCAS. Then click
on the "Open" button in the "DEM and Derived Quantities" window.
CUENCAS User’s Manual
•
Once the map has been displayed, select the "Show all orders" box, under
the Plot Network icon [
•
33
]. The box shows up when you click on the icon.
Use the mouse wheel and the left click drag utilities to Zoom into the area
near the intersection of the order 5 (yellow) and the order 4 (green).
CUENCAS User’s Manual
34
•
Make sure that you are close enough to the end of the stream to distinguish
one link from another.
•
Now click on the "Select Outlet" icon [
]. It's the third one after the
"Show Network" icon [ ]. You will notice that when you click on the
icon, it changes to a darker grey color. What this means is while the button
is selected a new behavior for the Middle-Button of your mouse is active.
Do not try to "Box-Zoom" after you have activated this button.
•
Click near the end of the stream with your middle button (see figure
above). A good place to do it, is where the direction changes in the green
stream right before the junction.
•
The software automatically finds all the pixels in the terrain, whose
drainage path crosses the point we defined. Then it outlines the contour
around those points (This contour line is the Basin Divide). Click the
"Home" icon to get a full view of the basin and the basin divide.
•
Deselect the "Select Outlet" icon [
2. River Network Topologic Analysis
].
CUENCAS User’s Manual
•
Once you have defined your basin outlet, CUENCAS performs a number
of geomorphometric analyses on the River network. To access them, RightClick on the red square near the basin outlet. This small square is what we
call an active element in the map. Notice that while the "Select Outlet" icon
[
3.6
35
] is active, you can select many basin outlets as you want in a region.
•
Right-Clicking on the outlet will launch a menu of options. Click on the
"Geomorphology Analysis" button.
•
The "River Network Analysis" module is displayed.
•
Click on the individual tabs to explore the variety of analyses CUENCAS
can do. Check the difference between the Geometric and Topologic Width
Functions, and Horton Ratios for different network properties. (THIS
MODULE IS BEING DEVELOPED - EXPECT A SUMARY OF THE
NETWORK PROPERTIES IN THE "HTML REPORT" TAB).
Running Rainfall-Runoff
Framework
Simulations
using
the
Link-Hillslope
For this exercise we will continue working on the Burns Creek basin. You are
expected to have a fully loaded database at this point. If you had troubles downloading
CUENCAS User’s Manual
36
data and putting together your database, you can download this zip file, which contains
the database developed in the previous sections of this tutorial (click here to download).
Open the Rainfall-Runoff Model Tab
1. Right-Clicking on the outlet (defined in the previous tutorial) will launch a menu
of options.
2. Click on the "Rainfall-Runoff" button. The "Rainfall-Runoff" module is
displayed.
3. Select the "Sample Simulations" tab.
CUENCAS User’s Manual
37
4. Change the values for Runoff intensity and Runoff Duration as desired, and press
the "Constant Velocity Simulation" button.
5. A screen will pop up with a request for the directory where the output file will be
wirtten. Save the files to a convenient directory.
Data file features
6. Two CSV files are created at the location you chose. They both have the same
name of the DEM plus an extension: "Routing_CV.csv" and "wfs.csv"
7. The "Routing_CV.csv" file: This file can be open with Excel or any other
spreadsheet. The file looks something like the figure below.
CUENCAS User’s Manual
38
8. There is a column of information for the end link of every complete stream in the
network (note: order 1 streams are not included in the file).
9. The rows of information include Horton order, upstream area, outlet ID, and
discharge for different moments of time. (TIP: you can sort the information by
selecting all the rows and using the command "Data -> Sort", notice that you need
to specify that the information is in rows and not in columns).
10. The "wfs.csv" file: Contains the width functions for the links same links in the
"Routing_CV.csv". Notice that you can get a nice image of a particular width
function by selecting the row of interest and making a bars plot.
3.7
Editing Maps
The Map Editor is a tool recently added to CUENCAS. On the Raster Tab left click
on a Topography or Hydrology variable and select Edit Map on the pop-up menu.
The spreadsheet will display a 10x10 matrix of values that surrounds the point where
you left click. You can use the mouse wheel feature to get to the area that you need to
edit. When you are done, you can overwrite the original file, create a copy or simply
cancel the operation.
CUENCAS User’s Manual
39
Chapter 4
The CUENCAS Database Structure
(For Advanced Users)
A CUENCAS Database is essentially a well-organized hierarchy of folders in the
computer. This was done to reduce the complexity of accessing and interacting with the
data. The hydroScalingAPI is a java set of libraries that allow high-level interaction with
the database, however files for the database can be created using programs like Matlab,
IDL, etc.
A Folder is considered to be a Cuencas Database if it contains six subdirectories
labeled: Documentation, Lines, Polygons, Rasters, Sites, and Vectors, and 2 files:
logo.jpg and name.txt.
The first file is a standard JPG image with dimensions 500x50 pixels, with the desired
logo for the database, and the second file is a plain text document with the name you
want for the database.
Each directory is meant to hold different types of information with specific file
formats that will be detailed later. It is expected that all information in a given database
have a common integrating idea, which can be a basin location, a region or a country.
Note: The folders structure can be automatically created by CUENCAS by selecting
the menu "File → Create a Data Base" and then selecting an empty folder.
In the following sections details are given about the contents of each of the folders
mentioned above.
4.1
The Rasters Folder
4.1.1 Purpose
This is perhaps the most important folder. This folder contains all the spatially
distributed fields. Data in this folder has been classified in two groups (additional
subfolders): Topography and Hydrology.
The Topography subfolder stores all the information about Digital Elevation Models
(DEMs) and is treated in a special manner by CUENCAS. The folder can contain a single
DEM or a collection of DEMs. These can be organized in multiple subdirectories to
facilitate its use.
CUENCAS User’s Manual
40
The Hydrology folder is meant to contain every other spatial field, including
precipitation, evaporation, land use, vegetation, and temperature fields.
The user can create as many subfolders inside these two folders as needed to classify
its own specific information. The data format is proprietary and is described in the
following section.
This folder can be populated by means of importing DEMs or hydrometeorlogical
fields from other formats using the tools in the menu``File → Import → Import DEM" or
``File → Import → Import Hydroclimatic Raster"
4.1.2 Formats
4.1.2.1 Format for files in the Topography folder (DEMs)
A topography data-file is actually determined by two files with the same name: a
metafile (with extension *.metaDEM) and a binary (XDR) data file (with extension
*.dem). The metafile is an ASCII file that contains all the information necessary to read
the data in the binary data file. Currently there are twelve tags,:
1. [Name]: A string of ASCII characters with a short name for the variable. We
recommend to keep it short, since additional information about the variable can be
given under the [Information] tag.
2. [Southernmost Latitude]: Given in the deg:min:sec format (e.g. 39:33:49.50 N)
3. [Westernmost Longitude]: Given in the deg:min:sec format (e.g. 110:35:49.50
W)
4. [Longitudinal Resolution (ArcSec)]: A float numeric value given in arc-seconds.
5. [Latitudinal Resolution (ArcSec)]: A float numeric value given in arc-seconds.
6. [# Columns]: The number of columns for the data array
7. [# Rows]: The number of rows for the data array.
8. [Format]: A string indicating the data format. It can be either Byte, Integer, Float,
or Double
9. [Missing]: A value identifying missing data
10. [Temporal Resolution]: For DEMs this field is always set to "Fix"
11. [Units]: Use the International System (e.g. m for meters, km for kilometers, etc)
12. [Information]: All the relevant information about this DEM.
The binary file is written in the External Data Representation Standard (XDR). This is
the native format for Java I/O operations. The [Format] tag accepts the values: Byte,
Integer, Float, and Double.
Once a DEM is processed by CUENCAS (see NetworkExtractionModule in section
Error! Reference source not found.), a set of files with the same name as the DEM file
are created in the folder where the DEM resides. These files are binary files with the
CUENCAS User’s Manual
41
same dimensions of the de DEM. They contain a variety of geomorphic information.
The format and contents of these files are:
*.areas
A file of Floats. Each position contains the upstream area (in Km2) of
that location in the DEM.
*.corrDEM
A file of Doubles. Each position contains the modified DEM pixel.
Pixels are modified in such a way that every position in the matrix
contains one and only one lowest nearest neighbor.
*.dir
A file of Bytes. Each position contains a number between 1 and 9
indicating the ``flow'' direction. 1-SW, 2-S, 3-SE, 4-W, 6-E, 7-NW, 8N, 9-NE.
*.dtopo
A file of Integers with the same dimension of the DEM containing the
Maximum Upstream Topologic Distance.
*.gdo
A file of Float. Each position contains the distance (in Km) to the
border of the DEM, the ocean or an internal lake.
*.horton
A file of Bytes. Each position contains the Horton-Strahler order of
the stream in which the pixel is contained.
*.lcp
A file of Floats. Each position contains the longest channel length (in
Km) up to the pixel.
*.ltc
A file of Floats. Each position contains the total channel length (in
Km) of the river network upstream of the pixel
*.magn
A file of Integer. Each position contains the Magnitude (according to
\citet{shre1966)
*.mcd
A file of Floats. Each position contains the Maximum Channel Drop
(in m) along the streams.
*.redRas
A file of Bytes. Each position contains either 0 or 1 indicating the
pixels that contain a channel.
*.slope
A file of Doubles. Each position contains the slope in the direction of
the maximum gradient.
*.tcd
A file of Floats. Each position contains the total drop (in m) along
the channels.
*.tdo
A file of Integers. Each position contains the Topologic Distance to
the border of the DEM, the ocean or an internal lake.
In addition, some auxiliary files are created. These are:
*.ap
Area-Slope of network points. Usefull for the area-slope analysis for
network pruning.
CUENCAS User’s Manual
*.log
42
An ASCII file containing a record of the outlets that have been selected
by the user using the GUI.
Finally, the three files that describe the network topology are: *.stream, *.point,
and *.link.
These files have been developed as an appropriate way to represent a river network
based on the hierarchical ordering structure proposed by Horton (1945), and later
modified by Strahler (1964), known today as the Horton-Strahler ordering scheme.
Horton-Strahler order has been proven to be an ideal parameter to study scale-invariant or
statistical scaling properties of morphometric quantities in river networks. The so-called
Horton laws of drainage composition introduced by Horton (1945) were the very first
representation of scaling in the means of complete order streams. Peckam et al. (1999)
generalized Horton laws from means to rescaling of probability distributions of complete
Horton-Strahler streams in real networks, and called it distributional simple scaling.
Veitzer (2000) introduced a new class of random self-similar networks (RSNs) that were
shown to exhibit distributional simple scaling in drainage areas and stream lengths.
The *.stream file assigns six properties to each complete Horton-Strahler stream in a
network:
•
Head-id: The pixel-ID4
•
Contact-id: The pixel-ID immediately upstream of the junction where the stream
ends.
•
Tail-id: The pixel-ID of the junction where the streams ends.
•
Order: The Horton-Strahler order for this stream.
•
Ini-Link: The position of the first link in the stream in the *.link file.
•
Num-Links: The number of links in this stream.
The *.link file assigns six properties to each link in the network:
4
•
Magnitude: The link magnitude as defined by \cite{shre1967.
•
Head-id: The pixel-ID where the links starts.
•
Contact-id: The pixel-ID immediately upstream of the junction where the link
ends.
•
Tail-id: The pixel-ID of the junction where the link ends.
•
Ini-point: The position of the first pixel in the link in the *.point file.
•
Num-points: The number of points in this link.
The pixel-ID is calculated from the x,y position in the matrix as pixel-ID=y*NC+x, where NC is the
number of columns in the matrix. Notice that x and y can be easily back calculated from the pixel-ID as, x=
pixel-ID mod NC and y=integer(pixel-ID/NC), where mod represents the operation module, and integer
represents the integer part of the ratio. where the streams starts.
CUENCAS User’s Manual
43
Finally the *.point file contains the $pixel-ID$s of all the pixels that contain a
channel, sorted according to the structure described above.
4.1.2.2 Format for files in the Hydrology folder
A hydrology data file is actually a group of two or more files with the same name:
there will always be a metafile (with extension *.metaVHC) and a group of binary (XDR)
data files with extension *.[hhmmss].[dd].[month].[yyyy].vhc.
The metafile is identical to the one described in the previous section. The group of
companion binary files must have the same format, number of columns and rows, and the
same spatial coverage (Southernmost latitude and Westernmost longitude). The extension
holds the key to understand the time variability of the data, and it has to be consistent
with the tag [Temporal Resolution] in the metafile. The [Temporal Resolution] tag
must be followed by the time interval of the data (e.g. 1-minute, 1-second, 1-hour, 1month, 1-year)
The extension of a vhc file can be manipulated to describe almost any kind of time
variability on the data. It will be illustrated by examples to avoid long explanations.
Annual Average
In this case there will only be a single companion file for the metafile. The file
extension should look like this: name.average.vhc
Annual Data
In this case there can be as many companion files as necessary. The file extension
should look like this: name.yyyy.vhc. As an example, for annual accumulated
precipitation values, the group of files would look like this:
precip.1986.vhc
precip.1987.vhc
precip.1988.vhc
precip.1989.vhc
precip.1990.vhc
precip.1991.vhc
precip.1992.vhc
Monthly Averages
In this case there will be 12 companion files for the metafile. The file extension should
look like this: name.month.average.vhc. As an example assume you have evaporation
monthly means, the group of files would look like this:
evap.January.average.vhc
evap.February.average.vhc
evap.March.average.vhc
.
.
.
evap.October.average.vhc
evap.November.average.vhc
evap.December.average.vhc
Monthly Data
CUENCAS User’s Manual
44
In this case there can be as many companion files as necessary. The file extension
should look like this: name.month.yyyy.vhc. As an example, for monthly temperature
values, the group of files would look like this:
temp.January.2002.vhc
temp.February.2002.vhc
temp.March.2002.vhc
.
.
.
temp.October.2002.vhc
temp.November.2002.vhc
temp.December.2002.vhc
temp.January.2003.vhc
temp.February.2003.vhc
temp.March.2003.vhc
.
.
.
temp.Octover.2004.vhc
temp.November.2004.vhc
temp.December.2004.vhc
Daily Averages
In this case there will be 365 or 366 companion files for the metafile. The file
extension should look like this: name.dd.month.average.vhc. As an example, for daily
mean radiation, the group of files would look like this:
radiation.01.January.average.vhc
radiation.02.January.average.vhc
radiation.03.January.average.vhc
.
.
.
radiation.01.February.average.vhc
radiation.02.February.average.vhc
.
.
.
radiation.30.December.average.vhc
radiation.31.December.average.vhc
Daily Data
In this case there can be as many companion files as necessary. The file extension
should look like this: name.dd.month.yyyy.vhc. As an example, for daily wind speed
values, the group of files would look like this:
radiation.01.January.1999.vhc
radiation.02.January.1999.vhc
radiation.03.January.1999.vhc
.
.
.
radiation.01.February.1999.vhc
radiation.02.February.1999.vhc
CUENCAS User’s Manual
45
.
.
.
radiation.30.December.1999.vhc
radiation.31.December.1999.vhc
.
.
.
radiation.01.January.2000.vhc
radiation.02.January.2000.vhc
radiation.03.January.2000.vhc
.
.
.
radiation.01.February.2000.vhc
radiation.02.February.2000.vhc
.
.
.
radiation.30.December.2000.vhc
radiation.31.December.2000.vhc
Hourly, per Minute or per Second Data
In this case there can be as many companion files as necessary. The file extension
should look like this: name.hhmmss.month.yyyy.vhc. As an example, for precipitation
values every 5 minutes, the group of files would look like this:
prec.044000.10.September.1964.vhc
prec.044500.10.September.1964.vhc
prec.045000.10.September.1964.vhc
prec.045500.10.September.1964.vhc
.
.
.
prec.211500.09.September.1964.vhc
prec.222500.09.September.1964.vhc
prec.223000.09.September.1964.vhc
prec.223500.09.September.1964.vhc
prec.224000.09.September.1964.vhc
Notice how there is no need of a data file for each and every moment of time.
Applications in CUENCAS, such as the rainfall-runoff module, will assume every non
existent file as either 0's or missing data.
4.2
The Sites Folder
4.2.1 Purpose
This folder is designed to contain information about locations and gauges in two
subfolders named Locations and Gauges. It is important to those interested in time series
analysis, and it is very useful to create reference points that can be later displayed on top
of maps. An interesting feature is that images can be associated to the locations created.
CUENCAS User’s Manual
46
4.2.2 Formats
Site data has been divided into 2 groups (subfolders) Locations and Gauges. The
reason is that Gauges have additional tags that describe the time series contained in the
file. Files are in ASCII format, however the files are compressed using the LZW
algorithm. Note that text editors such as VI can edit these files directly. In addition Java
includes libraries to read and write compressed files. The specific tags for each type of
file is described in the following sections.
Note that the files can be grouped in directories for different types of time series (e.g
streamflow, precipitation, temperature, etc) however this is not required.
4.2.2.1 Locations
A “Location” is described in an ASCII file by the information associated to tags.
Currently there are ten tags, which are detailed detail here:
1. [type]: An indicator such as City, GPS Location, Survey point, etc.
2. [source]: The source for the data (e.g. USGS).
3. [site name]: The name of the location.
4. [county]: County.
5. [state]: State.
6. [latitude (deg:min:sec)]: Given in the deg:min:sec format (e.g. 39:33:49.50 N)
7. [longitude (deg:min:sec)]: Given in the deg:min:sec format (e.g. 110:33:49.50
W)
8. [altitude ASL (m)]: Altitude above sea level.
9. [images]: A list of images associated to the location. If the image is in a file the
path is given relative to the location of the Location file. The image can also be a
URL. After the path, followd by a semicon there must be a description of the
image.
10. [information]: Any additional information about the site.
4.2.2.2 Gauges
A “Gauge” is described in an ASCII file by the information associated to tags.
Currently there are fifteen tags, which are detailed detail here:
1. [code]: A string of ascii characters with the gauge code. Codes are typically
assigned by the source agency.
2. [agency]: The source agency (e.g. NOAA, USGS, etc)
3. [type]: The type of data contained in the file (e.g. Streamflow, Precipitation,
Temperature).
CUENCAS User’s Manual
47
4. [site name]: A name for the gauge.
5. [stream name]: This tag is mainly for streamflow locations.
6. [county]: County
7. [state]: State
8. [data source]: A brief description of how the data was obtained.
9. [latitude (deg:min:sec)]: Given in the deg:min:sec format (e.g. 39:33:49.50 N)
10. [longitude (deg:min:sec)]: Given in the deg:min:sec format (e.g. 110:33:49.50
W)
11. [altitude ASL (m)]: Altitude above sea level.
12. [drainage area (km2)]: Upstream accumulated area
13. [data units]: use the international units system
14. [data accuracy]: use the international units system
15. [data (yyyy.mm.dd.hh.mm.ss value)]: The actual data.
4.3
The Vectors Folder
4.3.1 Purpose
This folder hold vector information, such as roads, blue lines, etc. The folder accepts
two kinds of formats: Shapefiles and DLGs. More inforamtion about these two data
formats is provided here.
4.3.2 Formats
CUENCAS can read two types of data format. DLGs from the USGS and ESRI
Shapefiles.
4.4
The Lines Folder
4.4.1 Purpose
Similar to vectors, but in this case, additional properties can be assigned to the lines,
for added functionality (not implemented yet)
4.5
The Polygons Folder
4.5.1 Purpose
Similar to vectors, but in this case lines are expected to form a closed polygon.
Polygons are used by CUENCAS to integrate a spatially distributed variable over the
enclosed region the polygon defines. The obvious application is water balances, where
the basin divide defines the polygon and long term mean precipitation and evaporation
fields are integrated to get an estimated mean discharge.
CUENCAS User’s Manual
48
4.5.2 Formats
Polygon files are intended to represent regions enclosed by a poligon line. The basin
divide is the typical example for this kind of data. The file format is ASCII, so they can
be read and modified by any standard text editor (If you are using windows, use wordpad
instead of the notepad).
1. [name]: A string of ASCII characters it can be any name for the variable. We
recommend to keep it short, since additional information about the variable can be
given under the [Information] tag.
2. [coordinates lon/lat (deg)]: The polygon vertices coordinates in decimal degrees.
Western longitudes and southern latitudes need to be negative.
3. [information]: All the relevant information about the polygon file.
4.6
Documentation
4.6.1 Purpose
This is the most flexible directory in terms of data format requirements. Any file that
can be handeled by the system (PDF, JPGs, TXT, DOC) can be trown in here. The idea is
to create a depository for all the documentation in the form of papers, reports, images,
related to the region being treated, but that cannont be direclty linked in an spatial context
to the rest of the information in the database.