1
Page 8
BCS6000B-9
Time and Date Setting
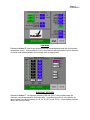
Simultaneously press the upper left and lower left corners of the touchscreen to enter the
screen setup mode then select CLOCK to access the time and date settings. Use the keypad
to enter the desired value then press Sec, Min, Hr, Day, Mon, or Yr as applicable. For
example, to set the month to September, use the keypad to enter 9, then press Mon. Use the
EXIT buttons to return to normal operation.
F. ELECTRONIC VALVE CHARACTERIZATION
WARNING
Adjustment of this equipment by unqualified personnel can result in
fire, explosion, severe personal injury, or even death. This procedure
requires the use of a stack analyzer to properly adjust air/fuel ratio and
optimize burner performance. It is intended for qualified personnel, familiar
with combustion systems and the interpretation of stack emission readings.
Electronic Valve Characterization is designed to provide for minor
adjustments to the air control valve position only. The low fire start position
and overall valve stroke must be set by adjustment of the valve/motor
linkage.
To facilitate burner setup and optimize emissions, the BCS6000 system has been equipped
with Electronic Valve Characterization (EVC). This feature provides for creation of a separate
motor response curve for the air control motor. Regardless of fuel selection, the fuel control
motor directly follows the heat demand output of the temperature controller. For example, 15%
output from the temperature controller will result in the fuel control motor driving 15% open.
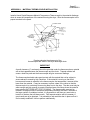
Meanwhile, the air control motor will follow a separate curve established by setting seven
characterization (bias) points (see Figure 1)
100
90
80
70
60
Fuel
50
Air
40
30
20
10
0
0
10
20
30
40
50
60
70
80
90
100
Heat Demand
Figure 1: Example of Air bias settings
BIAS POINT ADJUSTMENT:
Before firing the burner, place the FUEL SELECTOR switch in the OIL position, and then press
the MAIN MENU button followed by the OIL or LP FIRING BIAS POINTS button. Match all
seven air bias points to the fuel settings. Press MAIN MENU again to return to the menu
screen then change the fuel selection to GAS. Now select the GAS FIRING BIAS POINTS
button and again verify that all seven air bias points are set to match the fuel points.