1
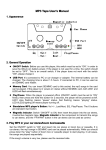
Preset: pKC-STC v1.0.0
IMPORTANT NOTE: If you are new to using
pKComponents and/or MT Player or if you need Support,
please refer to the pKC-General Manual.
SETTINGS
SOFTWARE SETTINGS
MT PLAYER SETTINGS
STC – SCALE TONE CHORDS
COMPONENT OVERVIEW
PAD PARAMETERS
PADS
ENCODER
NAVIGATION
TRANSPORT
X/Y PAD
MISC
KNOBS
MIDI CHANNEL INFO
OTHER APPS
SUPPORT
SETTINGS
SOFTWARE SETTINGS
In order to use this Component’s main controls with your software, you need
to set the software up to receive MIDI from “From MT Player 3”.
For example, with Ableton Live, you’d go to Option-PreferencesMIDI/Sync and turn the Track switch on for “From MT Player 3”.
With Reason, you’d go to Edit-Preferences-Control Surfaces and Keyboards.
You’d click the Add button, select “<Other>” from the Manufacturer list and
select “MIDI Keyboard w Controls” from the Model list. For the In Port,
you’d select “From MT Player 3”.
In order to use this Component’s Transport controls with your software, you
need to set up the Mackie Control as a control surface in your software.
For the control surface’s input, you’ll select “From MT Player 1”. For the
control surface’s output, you’ll select “To MT Player 1”.
MT PLAYER SETTINGS
The first time you use your padKONTROL in MT Player, you will need to
setup the padKONTROL’s ports. You are prompted to do this as soon as a
Preset is selected in MT Player. However, if you bypass those prompts, you
can access the settings by right-clicking on MT Player and selecting MIDI
Settings.
1. From the Port Name menu, select “IN: padKONTROL 1 PORT A”.
2. From the MIDI In port menu, select your padKONTROL’s PORT A
and click OK.
3. Go back into MIDI Settings.
4. From the Port Name menu, select “OUT: padKONTROL 1 CTRL”.
5. From the MIDI Out port menu, select your padKONTROL’s CTRL
PORT and click OK.
6. Click the Restart button.
You can learn more about MT Player in the pKC General Manual.
1
STC – SCALE TONE CHORDS
COMPONENT OVERVIEW
This Component provides immediate access to the 7 Scale Tone Chords for
Major and Minor Scales for any of the 12 Root Notes, transposable over –4 /
+4 Octaves. It also provides the ability to switch between Chord Inversions
and Add Power Chords.
PAD PARAMETERS
ADD POWER – This will add/subtract a Power Chord to the Chords.
SCALE HI/LO – This will switch the Octave of the Scale Pads (Pads 1 –
8). When the LED is off, the Scale will be 1 Octave above the Chords (Hi).
When the LED is on, the Scale will be 1 Octave beneath the Chords (Lo).
FIXED VELO – Turns off the velocity response of the Pads.
NOTE: When Add Power is on, the Scale Pads will always be Hi.
PADS
SCALE – These Pads are assigned to 1 Octave of the Scale.
2
I – VII – These Pads are assigned to the Scale Tone Chords of the Scale.
When you press one of these Pads, the Display will indicate the Inversion of
the Chord that you are currently playing.
R = Root Position
1 = 1st Inversion
2 = 2nd Inversion
INV SLCT – This Pad will cycle through Inversions for the selected Chord.
ENCODER
ROOT – Selects the Root Note (C – B) of the Scale.
SCALE – Selects the Scale Type (Major or Minor). When you press Shift,
the current Scale Type will be shown.
NAVIGATION
OCT -/+ – Move down or up Octaves.
SUS – Sustain the currently held Note(s).
TRANSPORT
PLAY/STOP – Play/Stop playback.
UNDO/REDO – Undo/Redo.
REC – Toggle Arrangement Record.
CLIP REC – Use this to record perfectly cut Clips (Audio or MIDI) at the
current Global Quantization value. For example, if Global Quantization is
set to 2 bars, this will record a perfect 2-bar clip. This function is intended
for the creation of new Clips, so Overdub should be turned off when using it.
REW/FFW – Rewind/Fast-Forward.
PREV M/NEXT M – Jump to Previous/Next Marker.
LOOP – Toggle Arrangement Loop.
CLIP/TRK – Toggle between Clip and Track Views.
NOTE 1: If a Pedal is connected, it will sustain the currently held Note(s).
3
NOTE 2: If you’re using an application other than Ableton Live, please see
the Other Apps section.
X/Y PAD
The X/Y Pad is used to control Pitch Bend and the Mod Wheel.
MISC
X/Y HOLD – Hold the current value of X/Y.
PB ON/OFF – This will turn Pitch Bend on/off for the X-axis.
MOD ON/OFF – This will turn Mod Wheel on/off for the Y-axis.
KNOBS
The Knobs are used to control 8 instrument-level parameters.
KNOB 1 ASGN – Press this Button and the Display will show the
parameter that is assigned to Knob 1. Hold this Button down and use the
Encoder to select which parameter is assigned to Knob 1.
KNOB 2 ASGN – Same as Knob 1 Asgn.
KNOB PARAMETERS
Aft – Channel Aftertouch
PB – Pitch Bend
Mod – Mod wheel
Vol – Volume (CC7)
Cut – Filter cutoff frequency (CC74)
Rez – Filter resonance (CC71)
Att – Amp attack (CC73)
Rel – Amp release (CC72)
MIDI CHANNEL INFO
The Chords are sent on multiple MIDI channels. The highest note of the
Chord is sent on Channel 1. The middle note on Channel 2. The lowest
note on Channel 3.
If Power Chord is on, the highest note of the Power Chord is sent on
Channel 4. The lowest note of the Power Chord is sent on Channel 5.
4
The Notes in the Scale are sent on Channel 6. The Knobs and X/Y Pad
functions are sent on Channel 1.
This allows you to use the Chords in 2 ways; to play a single instrument or
to play multiple instruments in an ensemble.
To play a single instrument, just set the instrument up to receive from All
(aka Any or Omni) MIDI channels.
To play multiple instruments, set up each instrument to receive from an
individual channel. For example:
Flute – Channel 1
Viola – Channel 2
Cello – Channel 3
OTHER APPS
When using this Component with applications other than Ableton Live, the
Transport section will work slightly differently.
Play, Stop, Rec, FFW and REW should all work as described in the
Transport section. The other functions may work, but may perform different
functions than what is described in the Transport section. The Clip Rec
function will definitely not work, that is a Live-specific function.
SUPPORT
Email:
[email protected]
Forum:
Beatwise Network
Copyright 2013 nativeKONTROL. All rights reserved.
This document, as well as the software described in it, is provided under license and may be used or copied only in accordance with
the terms of this license. The content of this document is furnished for informational use only, is subject to change without notice, and
should not be construed as a commitment by nativeKONTROL. Every effort has been made to ensure that the information in this
document is accurate. nativeKONTROL assumes no responsibility or liability for any errors or inaccuracies that may appear in this
document.
All product and company names mentioned in this document, as well as the software it describes, are trademarks or registered
trademarks of their respective owners. This software is solely endorsed and supported by nativeKONTROL
5