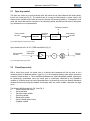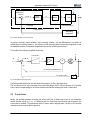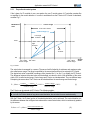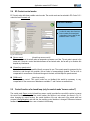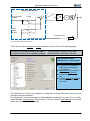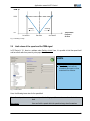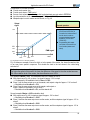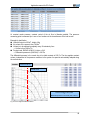
1
Copyright @ ebm-papst Mulfingen GmbH & Co. KG, 2011-2014 All Rights Reserved April 2014 ebm-papst Mulfingen GmbH & Co. KG Bachmühle 2 74673 Mulfingen, Germany http://www.ebmpapst.com [email protected] In this application manual, some products from other manufacturers are listed. In most cases, the product and manufacturer names given are registered trademarks and/or brand names. Application manual for EC-Control Table of contents 1 Safety instructions...................................................................................................3 2 Basis and term definitions for EC-Control ............................................................. 4 2.1 2.2 2.3 Open loop control............................................................................................................................. 8 Closed loop control .......................................................................................................................... 8 P and I factor.................................................................................................................................... 9 2.3.1 Proportional control system .............................................................................................................................................10 2.3.2 PI-control 11 2.4 2.5 2.6 EC-Control control modes ...............................................................................................................13 Control function of a closed loop (only for control mode “sensor control”) ......................................13 Limit values of the speed and the PWM signal ...............................................................................15 3 Setting options and basic functions via MODBUS .............................................. 17 3.1 Networking and assigning addresses to MODBUS nodes ..............................................................17 3.1.1 Automatic address assignment .......................................................................................................................................21 3.2 3.3 Soft On/Off and Motor stop enable .................................................................................................22 Changing the parameter set............................................................................................................23 3.3.1 Configuring separate set values for day/night operation .................................................................................................24 3.4 3.5 3.6 3.7 3.8 3.9 3.10 3.10.1 3.10.2 3.10.3 3.10.4 3.10.5 3.11 4 Fail safe function .............................................................................................................................24 Winter functions ..............................................................................................................................26 Motor settings (alarm relay) ............................................................................................................27 Specification of actual value by sensor via the inputs Ain2 U and Ain2 I ........................................28 Specification of actual value by two sensors ...................................................................................29 Set value input via the inputs Ain1 U and Ain1 I or via EC-Control .................................................30 Curves ............................................................................................................................................31 Input curve .......................................................................................................................................................................31 Inverse curve ...................................................................................................................................................................33 Output curve ....................................................................................................................................................................34 Analogue output : Impulses per revolution ......................................................................................................................35 Motor derating .................................................................................................................................................................35 Run monitoring................................................................................................................................37 Use of EC-Control in customer applications ....................................................... 38 4.1 Refrigeration plantn .........................................................................................................................38 4.1.1 Master-slave Configuration (star-shaped) .......................................................................................................................38 4.1.2 Master-slave Configuration with cascade operation ........................................................................................................43 4.1.3 Reverse operation for cleaning and de-icing the exchanger ...........................................................................................45 4.2 Configuration notes for air flow control in air-conditioning unitsn ....................................................48 4.2.1 Digital setting of values for air flow control, such as day/night switchover ......................................................................50 4.2.2 Analogue setpoint input during air flow control ................................................................................................................52 4.3 Temperature control – any control characteristic with temperature sensor .....................................53 Keyword index .................................................................................................................. 58 1 Application manual for EC-Control Revision history Date 31.03.2011 28.06.2011 09.09.2011 27.09.2012 13.12.2012 Version 1.0 1.01 1.02 2.00 2.01 Change/modification First version of the application manual, German Minor corrections Detail improvement Revising for MODBUS 5 and EC-Control 2.10 Small corrections (Formatting and references/links) 2 Application manual for EC-Control 1 Safety instructions Read through the manual and the application manual carefully before you begin work with EC-Control. It can lead to faults if warnings and these instructions are not followed. Make sure the manual is kept within reach at the place where the software is in use. If the software is sold or passed on to third parties, installation instruction and manual have to be passed on as well. For information on potential dangers and their prevention, the installation instructions can be reproduced and handed out. The software must be handled in accordance with national legislation regarding work safety. Influence through electromagnetic radiation is possible. If unacceptable emission intensities occur when the fan is installed, the user must implement suitable shielding measures. Make sure to avoid accidentally switching on a fan! This is definitely possible in case of careless use of EC-Control. This can cause serious and even fatal health hazards. Operate the fans always with guard grille, and follow the previous safety precautions! This software was not designed for use in safety-critical facilities! This software is not real-time-compatible! Proper use Control and diagnosis of ebm-papst fans with an RS485-based ebmBUS V3 or an ebm-papst standard profile Modbus. Improper use Operating the interface converter on interfaces not designed for such use Operating the interface converter on voltages greater than that stated in the instructions Improper use of the interface converter cable Use in extremely humid environments (heavy rain or high humidity) Operation in explosive atmosphere Commissioning fans via software when their safety features are not active Deactivation of safety features of the fan firmware via improper setting of parameters Using the software in installations in which safety is critical 3 Application manual for EC-Control 2 Basis and term definitions for EC-Control EC-Control enables visualization and configuration of ebmBUS and MODBUS fan networks. In particular, EC-Control allows the following activities: Programming of fan parameters such as control mode, set value and control parameters Changing fan addresses Reading out fan parameters such as the actual speed, the serial number and the production date Reading out fault status and fault memory Monitoring of installations, including the possibility of reporting failures by e-mail Administration of several installations within a program installation (useful for service technicians) Support for RS232/RS485, USB/RS485, Bluetooth/RS485 and Ethernet/RS485 interface converters Simultaneous monitoring of ebmBUS and MODBUS-based system components (requires at least two interface converters) This application manual is a supplemental document to the manual. It should help through real-world examples to use the range of functions of EC-Control V 2.1 completely. Attention: The application manual contains screenshots of EC-Control V 2.1. Illustrations of EC-Control can consequently deviate from your version. Fans with at least MODBUS protocol Version V3.02 (Version 2010-09-01) or newer were used. Devices with older firmware do not offer all features. What does EC-Control V 2.1 look like? The program has the following structure: EC-Control V 2.1 The structure of EC-Control V 2.1 consists of three main points Overview Settings Information The application manual describes the options which the items Overview and Settings offer the user Fig. 1: Overview of EC-Control 4 Application manual for EC-Control The table below gives an overview of the discrete menu items with their subitems. Menu item Settings Subitems Brief description Current parameter set Parameter set Operating mode Parameter set 1 Min PWM [%] and Max PWM [%] parameter set 2 Motor stop enable Two parameter sets enable the user to easily switch the settings, and here, among other things, the control mode and the control function can be selected Control function P-factor [%] I-factor [%] Min. sensor value Max. sensor value Sensor settings Sensor unit Source of control function Settings for actual value specifications through sensor, only relevant in control mode sensor control Control function Input characteristic X1 Input characteristic 1 or Input characteristic 2 Input characteristic X2 Input characteristic Y1 The input characteristic establishes which set value is to be achieved at what input variable (current/voltage) Input characteristic Y2 Function of the analogue output Output curve X1 [%] Output curve Output curve X2 [%] Output curve Y1 [V] Output curve Y2 [V] Setpoint ramp Ramp-up time [s] Run-down time [s] Direction of rotation Direction of rotation Source of rotating direction Fail safe speed function Emergency operation function Set value fail safe speed function Time lag fail safe speed function The terminal strip of the ebm-papst devices has a 0 to 10V output to connect additional devices. The 0 to 10V output can either be assigned to the PWM modulation level 0 to 100% or to the speed Setpoint ramp determines the time that the fan requires in order to reach full speed. Reduced times lead to increased running noise of the motor The direction of rotation (clockwise/counter-clockwise) can be changed here. The methods for changing the direction of rotation can also be selected (RS485/bus vs. terminal) In the case of a broken cable (set value input), the motor continues working with a preset fail safe speed Max speed [rpm] Max. permitted speed [rpm] Limit values Min. permitted PWM [%] Here, the maximum speed can be set and additional limits can be displayed Max. permitted PWM [%] Start PWM [%] 5 Application manual for EC-Control Menu item Settings Communication parameter Motor settings Subitems Brief description Here, the device address can be modified. In factory condition, MODBUS devices have the address 1 Device address Speed limit limitation [rpm] This is the ceiling speed of the motor, and cannot be changed Braking speed [rpm] Braking angle 2 [°] Here, the braking speed and the braking angle are displayed. They cannot be changed and are only for informational purposes. Loading OEM data Backing up data in OEM Activate factory settings Depending on authorisations, configurations can be backed up or loaded Braking angle 1 [°] Brakeing Load/Save The terminal strip of an ebm-papst MODBUSdevice has the following design. There may be deviations, depending on the size and production date: Terminal strip 2 Terminal strip 3 Terminal strip 1 PE Fig. 2: ebm-papst MODBUS device terminal strip 6 Application manual for EC-Control Description of MODBUS terminal strip: Connections 1 Clamp 2 1 3 PE Designation Description L1 L2 Mains supply connection Supply voltage 3~, 380 to 480V AC, 50/60Hz L3 PE Protective earth PE connection 1 Clamp 2 2 3 NC Status relay COM Status relay NO Status relay 1 RSA Bus connection RS485-RSA; MODBUS RTU-D1 2 RSB Bus connection RS485-RSB; MODBUS RTU-D0 3 GND Earth 4 Ain1 U Analogue input 1 (set value) 5 +10V Secondary voltage +10 VDC 6 Ain1 I Analogue input 1 (set value) 7 Din1 Digital input 1 8 Din2 Digital input 2 9 Din3 Digital input 3 10 GND Earth 11 Ain2 U Analogue input 2 (actual value) analogue specification of actual value, for 0 to 10V sensors, also refer to 3.7 12 +20V Secondary voltage +20 VDC Supply voltage for additional external devices, max. 40 mA such as a sensor 13 Ain2 I Analogue input 2 (actual value) analogue specification of actual value, for 4-20 mA sensors, also refer to 3.7 14 Aout Analogue output Output of the current modulation level or the current speed, also refer to 3.10.3 and 3.10.4 Clamp 3 Status message contacts for protection are triggered if: overtemperature motor/electronics, intermediate circuit over/under-voltage, Hall error, lockedrotor protection, phase error, characteristic NC-COM – "break for failure", characteristic NO-COM "make for failure" Reference ground for control interface / Common line for RS485/MODBUS analogue setpoint input for 0-10 V set value devices, such as potentiometers, also refer to 3.9 Supply voltage for additional external devices, such as potentiometers analogue setpoint input for 4-20 mA set value devices, also refer to 3.9 Enabling of electronics Enabling: Open pin or applied voltage 5 to 50 VDC Disabling: Bridge to GND or applied voltage < 1 VDC Change parameter set (P), also refer to 3.3 P1: Open pin or applied voltage 5 to 50 VDC P2: Bridge to GND or applied voltage < 1 VDC Select control function, also refer to 2.5 Positive/heating: Open pin or applied voltage 5 to 50 VDC Negative/cooling: Bridge to GND or applied voltage < 1 VDC Reference ground for control interface / Common line for RS485/MODBUS 7 Application manual for EC-Control 2.1 Open loop control The open loop control is an open functional chain, with which the set value influences the initial quantity, but not vice versa (see Fig. 3). The objective here is to bring the initial quantity x (actual value) to the desired control variable w (set value) by correctly choosing the correcting variable y. A comparison of set value and actual value and the correction of the correcting variable derived from this does not take place. Any interference is not compensated for. Disturbance variable z Control variable/ set value Control equipment w Correcting variable y Line (process) Initial quantity/ Act value x Fig. 3: Block diagram of a open loop control Open closed loop with 0 to 10V / PWM controlled fan (Fig. 4): Control variable/ set value z 0-10V signal/ PWM signal w y M Physical variable Fig. 4: ebm-papst open loop control 2.2 Closed loop control With a closed loop control, the actual value x is detected and compared with the set value w via a measuring device as feedback variable r (see Fig. 5). In the comparing element, these values are used to create the control deviation e . This is the difference between set value and feedback variable, which has to be continuously re-calculated, since the control path is continuously influenced by any disturbance variables z. Unlike the open loop control described above, the closed loop control can balance disturbance variables that arise by using this feedback and thereby make the control variable x approach the target curve. The following definitions apply for Fig. 5 and Fig. 6: w Control variable (set value) e Control deviation u Controller output variable y Correcting variable z Disturbance variable x Control variable (actual value) r Feedback variable 8 Application manual for EC-Control z Comparison element w e=w-r u Rule element Actuator Actuator y x Line - Controller Adjustment device Control device Measuring equipment r Fig. 5: Block diagram of a control system In general, controller output variable u and correcting variable y are not differentiated, but spoken of collectively as correcting variable y. The influence of the measuring device is also often neglected, so that the feedback variable r is frequently designated as the control variable (actual value) x. This results in the following simplified closed loop: z PI controller w + (-) e=w-x y M x (+) CL closed loop speed control CL sensor control x Fig. 6: ebm-papst closed loop control Typical measuring devices for fans are sensors for pressure, air flow, and temperature. The set value w can be set in analogue form or specified digitally via EC-Control software. A PI controller has the task of compensating for the control deviation and thereby achieving set value = actual value. 2.3 P and I factor Ideally, the deviation between set value and actual value with a closed loop control is zero (remaining control deviation e(t)=0 for t→∞). If a difference with the closed loop control shown above appears, the actual value is updated. The proportional share (P share) and the integral share (I share) of the controller determine how accurate or fast the update is. 9 Application manual for EC-Control 2.3.1 Proportional control system If the I share of a PI controller is zero, one speaks of a pure P control system. A P-controller operates like an amplifier for the control deviation e. In order to understand how the P-factor in EC-Control is calculated, consider Fig. 7. sensor range Modulation level cr for low P-factor control range (cr) cr for high P-factor 100% high P-factor low P-factor 0% min. value Set value sensor range max. value sensor range Actual value Fig. 7: P-factor The actual value is measured by a sensor. The sensor itself is limited by its minimum and maximum value, also called sensor range. The range is specified by the sensor itself and has to be entered in EC-Control. The desired set value is specified in analogue form (terminal Ain1 U or Ain1 I) or digitally via EC-Control. The difference between the actual value and the desired set value for which a full modulation of the motor yields 100% is called control range. Control range and P-factor are interdependent. They are different ways of depicting the same value. The P-factor can be calculated from the sensor range and control range. P faktor ( sensorMax sensorMin ) sensor range 100% 100% control range control range (1) The P-factor can be entered via EC-Control. The following applies: too high of a P-factor can lead to continuous vibrations of the closed loop too low of a P-factor leads to long-term control deviation; the set value is never reached exactly With the P-factor, the P share (portion of the absolute deviation) can be achieved. The control deviation e is the difference between the configured set value and the current actual value, which is continuously updated by the sensor. P share P faktor control deviation e(t ) sensor range (2) 10 Application manual for EC-Control If you are now using equation (1) in (2), you will get: P share sensor range control deviation e(t ) control deviation e(t ) 100% 100% (3) control range sensor range control range If control deviation e(t ) control range , the motor runs with a maximum modulation level of 100%. If the control deviation does not reach the configured control range, the modulation level returns 2.3.2 PI-control In place of the P-controller with a purely proportional control; a PI controller with additional integral share is now considered (portion of the total of all deviations). PI controller P-factor P share w e(t) u I-factor x I share Fig. 8: PI controller People talk about a proportional-integral controller. The controller output variable u is composed of the total of the P share and the I share, while the I share tries to keep the control deviation in the chronological medium at zero. Controller output P share I sharel (4) The calculation of the P share is already known. The I share is calculated as follows. I share I factor Control deviation e(t ) sensor range (5) The I-factor is the value that is input by the user in EC-Control. If the difference of the I share per instant of sampling is above a certain range, you will get the following equation upon calculation of the controller output. t Controller output (t ) P share (t ) I share (i) (6) i 0 With the above equations (2) and (5) for the P and I share, the result is: 11 Application manual for EC-Control t e(t ) e(t ) Controller output (t ) P factor I factor sensor range i0 sensor range (7) In order to obtain the conventional view in control engineering, modifications are necessary. Controller output (t ) t P factor I factor e(t ) e(t ) sensor range sensor range i 0 (8) Equation (8) can be carried over into the common equation through the following modifications to a PI controller: Controller output (t ) P factor I factor e(t ) sensor range P factor t i 0 e(t ) (9) With the proportional gain kp P factor sensor range (10) and the relationship of sampling time Ta to integral action time Tn Ta I factor Tn P factor (11) the current equation (12) of a PI controller results from equation (10) and (11): T Controller output (t ) k p e(t ) a Tn t i 0 e(t ) (12) At ebm-papst, the sampling time Ta is 50ms, which for the I-factor results in equation (13). I factor 50ms P factor Tn (13) Generally familiar form of representation: 1 Controller output (t ) k p e(t ) Tn t e(t ) dt (14) o 12 Application manual for EC-Control 2.4 EC-Control control modes EC-Control works with three possible control modes. The control mode can be selected in EC-Control V 2.1 under the item Parameter set. Control modes The selection of the control mode is critical for many other functions Control modes can be assigned independent of each other the two parameter sets P1 and P2 Fig. 9: Control modes Sensor control (closed loop sensor control) The sensor detects the actual value as temperature, pressure or air flow. The set value is preset in the same unit. If there is a control deviation between set and actual value, the fan will try to minimise this despite any interference. Closed-loop speed control Set and actual values are specified directly as speed in rpm. The current speed is measured by the electronics, and through the controller, the set value is correspondingly updated. The fan tries to compensate for occurrences of faults and changes to the load, and this keeps its speed constant. PWM control (open loop control) Pure open loop control. This control mode has no feedback that would be necessary to, say, compensate for the occurrence of disturbance variables. P- and I-factors are omitted here. 2.5 Control function of a closed loop (only for control mode "sensor control") The control mode Sensor control (closed loop sensor control) provides the user with the option to reverse the control function. For the other two control modes, this function is not relevant. As shown in Fig. 10, when changing the control function, the control deviation of the set value and of the actual value are reversed (cooling/Negative) and with that, the resulting control deviation is changed. Differences between feedback variable r and set value x are not made in the following. 13 Application manual for EC-Control z Reverse control function Control variable/ set value cooling w Control variable/ Act value + x e M - x CL sensor control Fig. 10: Reversal of the control function In EC-Control, the terms heating and cooling are used for the control function. The following applies: with positive control function ("heating") this applies: with negative control function ("cooling") this applies: control deviation = set value – actual value control deviation = actual value - set value Control function Heating/positive or cooling/negative The control function decides the leading sign in calculating the control deviation Control function only relevant for control mode sensor control Can be set for both parameter sets The terms heating and cooling are also used with pressure and air flow control Fig. 11: Control function The control function, however, has no influence on the direction of rotation of the motor, rather only on the calculation of the control deviation. The change of the control function becomes understandable by considering the x-axis of Fig. 12. Usually, people talk about cooling/negative, if the actual value > set value. The term heating/positive is, on the other hand, current if the set value > actual value. 14 Application manual for EC-Control PWM 100% "Heating" "Cooling" 0% Act value A Set value Temperature / Pressure / Air flow Act value B Fig. 12: Heating / cooling 2.6 Limit values of the speed and the PWM signal In EC-Control V 2.1, there is a subitem under Settings Limits. Here, it is possible to limit the speed itself and have limits which are preset by ebm-papst shown. Limits Max. speed writeable by customer The remaining limits are only writeable by ebm-papst, no write authorisation for customer Fig. 13: Limit values Here, the following terms arise for the speed limit: Max. allowed speed the preset permitted ceiling speed; the user has no write authorisation here Max. speed User can limit the speed within the permitted range here themselves 15 Application manual for EC-Control Thus it always applies that: Max. allowed speed ≥ Max. speed Max. speed indicates in control mode closed loop speed control the speed value for 10V input voltage (20mA input current) and is only used during scaling. The three additional limits are likewise not to be changed on the normal authorisation level. The start PWM [%] is the value with which the motor begins to turn. It is always larger than the "Min. permitted PWM [%]" in order to overcome the start-up torque. For PWM signals, customer-specific limits can be determined. However, Min PWM [%] and Max PWM are [%] not under the subitem Limits, rather under Parameter set (see Fig. 14). The fan works within the defined PWM modulation limits. Min. allowed PWM ≤ Min. PWM ≤ modulation level ≤ Max. PWM ≤ Max. allowed PWM Min./max. PWM here: PWM limited by user: 15-70% PWM signal Limits ebm-papst (Fig. 13): 5 to 100% PWM signal Fig. 14: Minimum and maximum PWM signal 16 Application manual for EC-Control 3 Setting options and basic functions via MODBUS 3.1 Networking and assigning addresses to MODBUS nodes The requirement for a problem-free network operation for the fans is the correct address setup of the devices. In doing so, there are some basic things to note: Address setup within a MODBUSsegment must be unique An address may only be used once. In other words, no double assignments may be made. The fans have the address 1 by factory settings As a first step during installation, this address is to be set (automatically or manually). Device address Keep address 1 open When replacing a defective device, a new device with the default address 1 can be reassigned in the network Fig. 15: Changing device address manually With MODBUS RTU, an address range of 1 to 247 is provided. However, if you are working in a network, by definition it is possible to handle four communications paths or subnets at the same time. The address space of a subnet can in this way be multiplied. The subnets can be defined via the interface converter, and are designated correspondingly. The example below shows that the communications path is a part of the address. Subnets and communication paths: RS232 / RS 485 1 to 247 Ethernet / RS485 1 to 247 Bluetooth / RS485 1 to 247 would lead to the following physical addresses: 1...247@RS232_Converter_1 1...247@Ethernet_Converter_2 1…247@Bluetooth_Converter_3 17 Application manual for EC-Control Networking the MODBUS node is shown in Fig. 16 and in Fig. 17 (see pages 19/20). The connection diagram Fig. 16 includes the following features: simple twisted pair wire ebm-papst recommends using a simple twisted pair wire. A twisted pair wire is a cable with which the leads of a pair of leads are twisted to one another. Through the twisting, such cables provide protection from symmetrical faults. Common wire The configuration of a joint data line (so-called common lines) is recommended in the MODBUS specification expressly in order to work against transmission problems. In doing so, the GND potentials of the interface components are connected. All systems thus have a common reference potential. Line termination) In the circuit diagram below, in addition to common lines, line terminations in the form of resistors are also used, in order to minimize reflections on the ends of the line and thus obtain a better signal quality. Line termination resistors are at the beginning and the end of the bus, between D0 (RSB) and D1 (RSA). However, more than two resistors – 1xLT at the beginning and 1x LT at the end of the line may not be installed. 120Ω LT resistors with an output of 0.5W are recommended. The connection diagram Fig. 17 includes the following features: shielded twisted pair line For operation in areas prone to failure, MODBUS.org recommends using shielded twisted pair cables. The shielding consists of aluminium foil or braided copper and prevents interference from electromagnetic fields. Common wire See above Line termination See above 18 14 13 12 11 10 9 8 14 Ain2 U +20V Ain2 I GND Ain1 U +10V Ain1 I Din1 NO COM NC 3 4 5 6 7 1 2 3 Pull down L1 L2 L3 1 2 3 Din2 Aout GND RSB 2 PE Din3 RSA 1 NC 3 L3 COM 2 3 NO 1 L2 Din1 2 Ain2 I Ain1 I 6 7 Control unit L1 +20V +10V Control device 1 Ain2 U Ain1 U 4 5 Master computer Fan 2 Aout GND GND Din3 RSB 2 3 Din2 RSA 1 Fan 1 PE 13 12 11 9 10 8 Application manual for EC-Control Common D0 120Ω D1 Pull up 120Ω Mains supply voltage 3/PE Fan n Fan n-1 Fig. 16: Connection of multiple devices to the MODBUS via twisted pair line with 2 pairs of wire 19 14 13 12 11 10 9 8 14 Ain2 U +20V Ain2 I GND Ain1 U +10V Ain1 I Din1 NO COM NC 3 4 5 6 7 1 2 3 Pull down L1 L2 L3 1 2 3 Din2 Aout GND RSB 2 PE Din3 RSA 1 NC 3 L3 COM 2 3 NO 1 L2 Din1 2 Ain2 I Ain1 I 6 7 Control unit L1 +20V +10V Control device 1 Ain2 U Ain1 U 4 5 Master computer Fan 2 Aout GND GND Din3 RSB 2 3 Din2 RSA 1 Fan 1 PE 13 12 11 9 10 8 Application manual for EC-Control Common D0 120Ω D1 Pull up 120Ω Mains supply voltage 3/PE Fan n Fan n-1 Fig. 17: Connection of multiple devices to the MODBUS via shielded twisted pair wire with 2 adapters 20 Application manual for EC-Control 3.1.1 Automatic address assignment With fans new from the factory, there is the option to use an automatic address assignment. This option exists since ebm-papst MODBUS protocol version 5.00. The function of the automatic address assignment is explained in EC-Control user manual (Chapter 3.3.4). What do I have to pay attention to in order to use this function? All fans for a system should be factory-new. If in a system a subnet with factory-new fans is also wired with an ebm-papst MODBUS protocol version older than 5.00, then the automatic address assignment will automatically switch it to the semiautomatic method. You can read about how this functions in EC-Control user manual (Chapter 3.3.5). The fans are to be sorted by serial number in increasing order during installation in a system, because during automatic address assignment, the fan addresses are sorted based on the serial number. This eases identification of individual fans in the system. The serial number is structured as follows: JJWW00XXXX, where JJ is the year of production, WW is the production week and XXXX is a sequential alphanumeric character combination. Aside from your ebm-papst fans, no other MODBUS devices should be connected to the subnet used. 21 Application manual for EC-Control 3.2 Soft On/Off and Motor stop enable Continuously switching EC motors on and off on the mains side places stress on electronic components and shortens their service life. To prevent this, EC motors from ebm-papst have an on-off function (Soft On/Off) for bringing the motor gently to a standstill. This occurs by applying a low signal at digital input 1 (Din1), which leads to a locking of the electronics. There is also the option of activating Motor stop enable, but this is a different approach than switching from Din1 (Soft On/Off). This function is primarily helpful for maintenance purposes, since by doing so you can bypass a configured basic ventilation (Min PWM). Thus the motor can be brought to a standstill with the set value input 0 rpm or 0% PWM, without having to change the value for Min PWM. If Motor stop enable is activated, the motor is also brought to a standstill in normal operation if no air flow is required at the moment (= internal 0% PWM). Motor stop enable Motor stop enable has to be enabled in order to switch off any basic ventilation that is set If the function is disabled, the motor always runs at least with the preset Min PWM value The motor can also be stopped with a low signal on digital input 1 (Din1) ( disabling the electronics) Fig. 18: Motor stop enable Closed loop speed control or PWM control mode If Motor stop enable is activated, the motor speed can be set to zero by entering the set value 0 (speed = 0 rpm or PWM signal = 0%, depending on control mode) Sensor control control mode If the actual value undershoots or exceeds the set value (depending on control function), the motor is brought to a standstill; prerequisite: Motor stop enable is active 100% Motor stop enable is activated (solid line): Motor stops at signal < 0.7 V Motor stop enable is deactivated (dashed line): Motor runs with min. PWM signal Min. PWM Hysteresis: Motor starts with a voltage of 1 V, but does not stop until 0.7 V (if Motor stop enable is activated) 0V 0.7V 1V 10V Fig. 19: Motor stop enable 22 Application manual for EC-Control 3.3 Changing the parameter set MODBUS gives you the ability to save two parameter sets. By selecting a parameter set you can make different pre-adjustments. Each of the two screens for the parameter sets include the following configuration options: Parameter sets P1/P2 Explanation of the parameters Source for parameter set RS485/bus corresponds to the switching through EC-Control, terminal Din2 to the switching via Digital input Din2 of the terminal strip Parameter set If the parameter set RS485/bus is selected as the source, you can change between parameter set 1 and parameter set 2 with EC-Control Operating mode Control mode can be selected for the respective parameter set, independently of each other (see 2.4) Min PWM or Max PWM Limits of the modulation level with which the motor works (see 2.6). Motor stop enable If this function is active, the motor can be stopped (see 3.1.1). Control function (see 2.5) P-factor / I-factor Here, the parameters Phere,control the current parameter canbebeentered. factor and I-factorset can changed if internal/bus is The values influence the control selected as the sourcemodes behaviour in the control sensor control and closed loop speed control (see 2.3). Fig. 20: Parameter set 1 and parameter set 2 If terminal Din2 or terminal Din3 is selected as Source for parameter set, consequently it will no longer be possible to change the parameter sets via EC-Control. Parameter set 1 is selected if Din2 (or Din3) is open or a voltage of >5 V is present. Parameter set 2 can be selected by bridging from Din2 (or Din3) to GND. While the above-mentioned configuration options can be found under the Parameter set subitem, the set value can be entered only under Overview! 23 Application manual for EC-Control 3.3.1 Configuring separate set values for day/night operation To store one set value for each of the two parameter sets, the following settings have to be configured in sequence. It is important here to activate the item after each step by clicking Set. Store set value for both parameter sets Activate parameter set 1 under parameter set 1 Under Overview, activate the function Save set value to EEPROM and enter set value Under parameter set 2 activate parameter set 2 Under Overview, activate the function Save set value to EEPROM and enter set value Fig. 21: Save set value to EEPROM The Save set value to EEPROM function has to be enabled in order not to lose the set value when changing the parameter set 3.4 Fail safe function The fail safe function offers protection against unexpected cable break or malfunctions. If the connection (RS485/bus) to the interface is lost, this function makes it possible for the fan to assume a desired fail safe speed. Information: The fan detects the "bus traffic" and switches to fail safe mode if no "bus traffic" is detected via the RS485 interface. Moreover, a threshold value can be set for the analogue input. If the analogue signal falls below this threshold value, for example at analogue Ain1 , the configured fail safe speed is applied. For MODBUS 5.00 and higher, the direction of rotation can also be configured during fail safe operation. These options are available: Clockwise, Counter-clockwise, Retain direction of rotation. This function can be used to be able to guarantee the configured air performance, even if there is a fault in the source of set values. As soon as the fan detects an analogue set value above the threshold value or a BUS signal again, it continues its "normal" operation with the correct direction of rotation and the last set value or assumes the detected set value. 24 Application manual for EC-Control Fail save function Activate the fail safe speed function by setting the tick mark Enter desired set value fail save speed Enter the time lag after which the fail safe speed function is to be begun Cable break detection voltage Select the direction of rotation that is to be begun in the fail save mode (from MODBUS 5.00) Note special cases Fig. 22: Emergency operation function Special cases: Time lag of 0 seconds Here you must observe that the motor immediately applies the fail safe speed – even without a cable break. If that kind of a short delay is desired, we recommend setting a time of 0.1 s. Cable break at MODBUS interface and the fail safe function is not enabled Motor does not stop, but continues running constantly. The connection to the MODBUS interface is broken and the motor can no longer be controlled. Speed changes can no longer be carried out; also, it is no longer possible to stop the motor. The motor should stop completely in the event of a cable break (fail safe speed = 0 rpm). Prerequisite: Motor stop enable has to be enabled. If the function is not enabled, the motor keeps running with a minimum PWM signal. Cable break detection voltage Prerequisite: Source of set values is set to analogue Ain1. If the voltage at the analogue input selected as the source of set values falls below the voltage specified here, a cable break of the analogue set value device is diagnosed and the fan is switched to the fail safe speed function. Exiting EC-Control, fail safe speed activated If Fail safe speed is activated, the motor applies this also when ending EC-Control. 25 Application manual for EC-Control 3.5 Winter functions Winter functions Activate / deactivate the shakeloose function Max. start PWM shake-loose function establishes with how much % PWM fan level the shake-loose function should be operated at maximum Max. number of startup attempts: With each startup attempt, the PWM level control coefficient is increased In very cold areas, a motor preheater can be enabled. (depending on fan, see the following text) Fig. 23: Winter functions The winter functions, which are available only for MODBUS 5.00 and higher, involve the following two options for ensuring the fan's function in winter: Sheding function: Problem: If ice forms on the impeller, it can block the impeller. The fan detects a block, but still tries to start up. In doing so, however, the impeller can get damaged. If the shake-loose function is enabled, the fan attempts to resume its operation using a duty cycle configured by ebm-papst. If this does not work, the fan tries to turn free in the opposite direction. The number of these attempts can be set with Max. number of start attempts. After each failed attempt, the duty cycle for the startup is increased. With Max. start PWM shake off you can specify the maximum % PWM fan level with which the fan will keep trying to shake loose. If the shakeloose function succeeds, the fan rotates in the correct running direction with the originally desired set value. If the impeller remains locked even after the sheding function, the fan switches to normal locked behaviour. While trying to shake loose, a "W: sheding active" warning is displayed. Motor pre-heating: Problem: If the fan is directly started at a very low operating temperature (for example -60°C), this can lead to damage of the bearings, since their lubricant is designed for temperatures no colder than -40°C. Past a lower temperature limit (for example -60°C) set by ebm-papst, the motor pre-heating is activated and heats the motor and the bearings of the fan. The fan is disabled until the upper temperature limit has been reached. Then the motor pre-heating switches off and releases the fan again for "normal" operation. While the heating is enabled, a "W: preheating function" warning is displayed. This function is possible only for specific fans and currently can be enabled only by ebm-papst. 26 Application manual for EC-Control 3.6 Motor settings (alarm relay) Motor settings With these, you can set how many seconds after an identified error the alarm relay is to be switched. Fig. 24: Motor settings Example "Phase failure": A system includes at least one ebm-papst fan (3-phase device). All outputs of the alarm relay are connected to the control system of this system. There will be a very brief voltage dip at one of the 3 phases. The function of the fans would not be impaired by this, but these detect the voltage dip and switch their alarm relays. This error is detected by the control system and then, possibly, the entire system comes to a standstill. Such briefly occurring errors (as described in the example) can be ignored by setting a drop-out delay of the alarm relay. The time of this drop-out delay should not be too long, however, since otherwise serious failures may be overlooked which in the long run could lead to damage of the fan. The respectively occurring error is signalled, as before, without a time delay via the MODBUS interface. 27 Application manual for EC-Control 3.7 Specification of actual value by sensor via the inputs Ain2 U and Ain2 I Clamp 2 PE 3 L3 2 L2 1 L1 PE 3 NC 2 COM Aout 7 Din1 1 NO Ain2 I 6 Ain1 I Clamp 3 14 +20V 5 +10V 13 11 Ain2 U 4 Ain1 U 12 10 GND 3 GND 9 Din3 2 RSB 8 Din2 1 RSA If the EC motor operates in Closed loop sensor control mode, the actual value is measured by sensors. The sensors can specify pressure, temperature and air flows. To connect the sensor, the terminal strip (KL) is provided with the two analogue ports Ain2 U and Ain2 I (see Fig. 25). Alternatively, terminals Ain1 U and Ain1 I can also be selected. Terminal 12 serves as a power supply with a voltage of +20 VDC. Clamp 1 Fig. 25: Terminal strip, ports for specification of actual value with sensor control Depending on the sensor output, you can choose between two inputs for the specification of actual value: Ain2 U or Ain1 U analogue port 11 or 4 (for sensors with 0 to 10V output) Ain2 I or Ain1 I analogue port 13 or 6 (for sensors with 4 to 20mA output) In principle there are two different connection types, 3-wire and 2-wire (see Fig. 26). 3-wire + 2-wire IN OUT GND + +20V IN OUT Internal in the electronics 100Ω Fig. 26: 3-wire and 2-wire connection types 2-wire sensors are directly connected to the voltage source and deliver a 4 to 20mA signal. The GND connection is established via an internal 100Ω resistor (load) in the fan. On the terminal strip shown in Fig. 25 such a sensor would be connected to Ain2 I and +20V. 3-wire sensors on the other hand, are available with both output signals: current signal (4 to 20mA) and voltage signal (0 to 10V). Depending on the type, use the inputs Ain2 I (terminal 13) or Ain2 U (terminal 11). On the terminal strip shown in Fig. 25 such a sensor would be connected to Ain2 I and Ain2 U, +20V and GND. 28 Application manual for EC-Control 3.8 Specification of actual value by two sensors An additional option for specifying the actual value is to use two sensors simultaneously. In the design photographed below (Fig. 27) two temperature sensors with ebm-papst Art. No. 50005-1-0174 are being used. Two sensors Example photo Two temperature sensors with Art. No. 50005-1-0174 Sensor 1: Ain1 U +20V GND Sensor 2: Ain2 U +20V GND Fig. 27: Connection of two sensors Their sensor range extends from -20°C to +80°C. The Ain1 U and Ain2 U connections are both used here for specifying the actual value. For sensors with a 4 to 20mA output, accordingly, the Ain1 I and Ain2 I terminals have to be used. The following options exist for calculating the actual value from the two measured values: Maximum (Ain1:Ain2) Minimum (Ain1:Ain2) Average (Ain1:Ain2) Higher value of the two sensors serves as actual value Lower value of the two sensors serves as actual value Average of the two sensor values serves as actual value Important for determining actual values using two sensors: The set value has to be digitally input via EC-Control (source of set values: RS485/bus), since both analogue ports are assigned! 29 Application manual for EC-Control Two sensors Sensor settings Sensor range -20°C to 80°C Sensor unit: °C Under Source for sensor value, the actual value determination can be selected by two sensors In doing so, always connect sensor Ain1 U and Ain2 U or Ain1 I and Ain2 I Fig. 28: Determining actual values using two sensors 3.9 Set value input via the inputs Ain1 U and Ain1 I or via EC-Control The set value can be input via analogue Ain1 or RS485/bus, regardless of the control mode. The source can be adjusted under Overview (see Fig. 29). Source of set values Analogue Ain1 or RS485/bus Source of set values: RS485/bus desired set value can be entered digitally in EC-Control Source of set values: Analogue Ain1 Here, a voltage and current signal is applied via terminal strip Ain1 U or Ain1 I Fig. 29: Source of set values analogue or RS485 30 Application manual for EC-Control Clamp 2 PE 3 L3 2 L2 1 L1 PE 3 NC 2 COM Aout 7 Din1 1 NO Ain2 I 6 Ain1 I 14 +20V 5 +10V 13 11 Ain2 U 4 Ain1 U 12 10 GND 3 GND 9 Din3 2 RSB 8 Din2 1 RSA External source of set values has to be connected to KL (for example, potentiometer). In doing so, terminal 5 can be used as an auxiliary voltage source with 10 VDC. Clamp 1 10k potentiometer, linear Fig. 30: Terminal strip, ports for set value input Connections 4 and 6 in Fig. 30 are the analogue ports for the set value input. Here, as with the actual value specification, there are two different inputs: Ain1 U analogue port 1, terminal 4 for 0 to 10V set value device, for example, potentiometer) Ain1 I analogue port 1, terminal 6 for 4 to 20mA set value device 3.10 Curves 3.10.1 Input curve The input characteristic is relevant only for analogue set value input (source of set values: analogue Ain1). If the set value is input via EC-Control (source of set values: RS485/bus), this item has no function. It is possible to define the input curve for source of set values analogue Ain1 via the analogue ports Ain1 U and Ain1 I. The subitems Input curve 1 and Input curve 2 are under Settings For both input curves from Fig. 32, it would be possible to bring the motor to a standstill for 0 V signal only if the Motor stop enable function is enabled. 31 Application manual for EC-Control Input curve Parameter set 1 Ex. parameter set 1: Control mode: closed loop speed control Ex. left: linear gradient of 100 to 700 rpm Input characteristic can be set for both parameter sets, independently of each other. For curve, see Fig. 32 Input curve Parameter set 2 Ex. parameter set 2: Control mode: PWM control Ex. left: only from a 5V input voltage is modulation level > 20% possible Input characteristic can be set for both parameter sets, independently of each other. For curve, see Fig. 32 Fig. 31: Input curve Input characteristic parameter set 1 Input characteristic parameter set 2 Set value Set value 700 rpm 80% PWM 100 rpm 20% PWM 0V 10V Input voltage 0V 5V 8V 10V Input voltage Fig. 32: Examples for input curves from P1 and P2 32 Application manual for EC-Control 3.10.2 Inverse curve With analogue set value input, the input curve also offers the option of generating an inverse curve. This means that the set value increases as the input signal decreases. Inverse curve Curve from Fig. 32 was inverted Ex. input voltage: 0V → 700 rpm 10V→ 100 rpm Increasing the signal reduces the modulation level Fig. 33: Inverse curve The inverse curve becomes clear if you compare the above Fig. 32 with Fig. 34 below. Inverse input characteristic parameter set 1 Set value 700 rpm 100 rpm Input voltage 0V 10V Fig. 34: Example of inverse curve In practice, applications are known with which you can use an inverse curve to guarantee that the fan operates at maximum level when there is a cable break from the analogue set value (→ input signal 0 V). For more information, see Fail safe function (Chapter 3.4). 33 Application manual for EC-Control 3.10.3 Output curve To connect additional slaves to a master fan, the MODBUS terminal strip has an output Aout. Depending on the speed or the PWM signal, the output supplies a voltage signal, which is always output. The source of set values plays no role here. Output curve Function of the analogue output: Act speed [rpm] Co-ordinates of the output curve can be entered here For output curve, see Fig. 36, left The output curve can be oriented to the actual PWM or to the actual speed, depending on function of analogue output Fig. 35: Output curve The output curve arising from this can be adapted individually to the requirements. The Output curve subitem is in the Settings menu item (see Fig. 35). Here, the analogue output function indicates whether the x-axis represents the speed or the PWM signal. The output curve would appear as follows. Function PWM signal Function Act speed Output signal Output signal 10V 10V Actual speed PWM signal 0V 0V 100 rpm 870 rpm If the motor is running with a speed of 870 rpm, there is a voltage on the Aout output of 10V. At speeds ≤ 100 rpm, a 0V signal is generated. Maximum speed is limited to the limits according to the settings dialogue (here, 870 rpm). 0% 100% If the motor is running with a PWM signal of 100%, there is a voltage on the Aout output of 10V. The curve runs in a line. At 0% PWM signal, the output outputs a 0V signal. Fig. 36: Output curve 34 Application manual for EC-Control 3.10.4 Analogue output: Impulses per revolution Output curve Function of the analogue output: Speed monitoring (impulse) Impulses per revolution: Indicates how many pulses per revolution are to be output to Aout Fig. 37: Output curve (impulses per revolution) For MODBUS 5.00 and higher it is possible to output up to 255 impulses per revolution at the analogue output Aout. Use of this function requires a fan whose hardware supports this. However, attention should be given to choosing a reasonable number of pulses. For a very slowly rotating fan, 255 pulses may be required. The faster the fan rotates, the fewer pulses are required. Since the output frequency of the impulses per revolution is limited by hardware, with 255 pulses set and a high fan speed it could happen that the output puts out fewer pulses than anticipated. This function is possible only for specific fans. 3.10.5 Motor derating Motor derating Max. allowed power Is set by ebm-papst Max. power The power requirement can be limited For limitation of module temperature and limitation of motor temperature, see the following diagram: Fig. 39: Derating diagram Fig. 38: Motor power limit 35 Application manual for EC-Control Max. power [W] Max. power depending on module temperature Max. power depending on motor temperature P max P max: Max. power P max DE: Max. power at limitation end P max DE Temperature [°C] 0V T1 T2 T3 T4 T1: Limitation module temperature start T2: Limitation module temp. end T3: Limitation motor temp. start T4: Limitation motor temp. end Fig. 39: Derating diagram This parameter does not necessarily have to be configured. If you have no information about the fan's output limit depending on the temperature, simply ignore this parameter. As can be seen in the diagram in Fig. 39, the maximum power input depending on the module temperature and/or motor temperature can be configured. The process depending on the motor temperature is now described by way of example: T2 was set to 100°C and T4 to 130°C Fan is running with maximum output (P max) e.g. 1191W Motor temperature increases to 100°C (T2) Power input is reduced Motor temperature increases further to 110°C Power input is further reduced Motor temperature reaches 130°C (T4) Power input is limited to maximum output with limitation end (P max DE), e.g. 1006W upon reaching 130°C (T4), the power input stays constant at e.g. 1006W (P max DE). 36 Application manual for EC-Control 3.11 Run monitoring MODBUS 4.00 or higher has the option of an alarm relay allow to release if a minimum rotational speed is not reached. This situation is also shown as a warning on the MODBUS (warning bit) at the same time it is signalled using the relay. Run monitoring Set limit speed for running monitor to the threshold value at which the alarm relay is to release if not reached and the bus is to show that the speed was not achieved. A ceiling speed of 0 switches the function completely off. Fig. 40: Parameter set settings for run monitoring 37 Application manual for EC-Control 4 Use of EC-Control in customer applications The following points provide exemplary configuration notes and electrical connections for typical customer applications. They are recommendations and not required specifications for the specific application. Settings which are applicable to the master are marked by a green background. Settings which are applicable to the slaves are marked in orange. Settings which are applicable to all nodes are green and orange. 4.1 Refrigeration plantn 4.1.1 Master-slave Configuration (star-shaped) Usually, in a refrigeration plant, one fan works as a master and the remaining devices as slaves. In order to be able to set the pressure in such operation, ebm-papst recommends carrying out the following system settings for the master and the corresponding slaves in EC-Control. The objective is to keep the condensing pressure constant. Step 1: Set parameter set Master fan Set control mode: Sensor control Control function: cooling/negative P-factor: 2000% I-factor: 0% pure P-control Source parameter set selection: usually RS485/bus; terminal Din2 and Din3 also adjustable. Fig. 41: Parameter set settings for master of a refrigeration plant 38 Application manual for EC-Control Step 2: Make sensor settings Master fan Fig. 42: Sensor settings for temperature sensor of the master Select sensor range (Max, Min), here: (30, 0) bar, can be taken from the sensor's manufacturing details Sensor unit: bar Connect sensor and select the Actual value source accordingly; Ain2U/Ain2I is provided Source for control function: RS485/bus Control function cooling/negative Control range: 1.5 bar Step 3: Set value input of the master Master fan Activate Save set value to EEPROM Source of set values: RS485/bus Enter set value Set values can only be stored in the active parameter set Fig. 43: Setting input of the master The slaves obtain their set value as a 0 to 10V signal through port Aout of the master via their terminals Ain1 U and GND. The output curve of the master is set as in Fig. 44. The characteristic curve is linear and selected as a function of the analogue output Act PWM. 39 Application manual for EC-Control Step 4: Output curve of the master Master fan Function of the analogue output: Current PWM [%] Output curve, linear 0% corresponds to 0V 100% corresponds to 10V Fig. 44: Output curve for master in refrigeration plants Settings for the slaves (see below): Because no sensor and no two parameter sets are required for the slaves, their system settings are comparatively simple (see Fig. 45). Important for slave settings: The steps 5, 6 and 7 have to be set for ALL slaves. Step 5: Control mode of slaves: PWM control Slave fans Control mode: PWM control For slaves, only one parameter set has to be configured, here P1 Control function and P- and Ifactor in control mode PWM control without significance Activate Motor stop enable 40 Application manual for EC-Control Step 6: Overview, source of set values analogue Slave fans Source of set values: Analogue Ain1 Deactivate Save set value to EEPROM Slaves obtain 0 to 10V signal from the output of the master Step 7: Input characteristic Slave fans Linear input characteristics for slaves Fig. 45: Settings for slave fans Fig. 46 on the next page shows the connection diagram from the master and its slaves in a refrigeration plant. Fans are arranged in the shape of a star The set value is given from the master via the output Aout as a 0 to 10V signal on a patch panel. To this distributor, the source of set values Ain1 U of the corresponding slaves is connected. Control mode master: Closed loop sensor control Control mode slaves: PWM control and source of set values analogue Ain1 Advantage of this star arrangement compared to serial wiring (Series connection) In case of defects, just the corresponding device can be replaced very quickly and without complications, without having to break apart the system. It is, however, problematic at great distances, because significantly more lines have to be used. Alternatively to the pressure sensor used in the example, there are also the 2-wire sensors which do not require a GND connection. Their output signal can be a current signal with 4 to 20mA. In this case, the sensor on the actual value input is Ain2 I and terminal +20V are connected (see also Chapter 3.7) 41 11 Ain2 U +20V Ain2 I Aout 4 Ain1 U 5 +10V 6 Ain1 I 7 Din1 Slave 1 10 11 GND Ain2 U +20V Ain2 I Aout 3 GND 4 Ain1 U 5 +10V 6 Ain1 I 7 Din1 14 Master 13 12 9 Din3 2 RSB 8 Din2 Ain2 I Aout 6 Ain1 I 7 Din1 +20V Ain2 I 5 +10V 6 Ain1 I Aout 11 Ain2 U 4 Ain1 U 7 Din1 10 GND 3 GND 14 13 12 9 Din3 2 RSB 8 Din2 3 NC 2 COM 1 NO 3 NC 2 COM 14 13 12 1 RSA Group alarm (break for failure) 1 RSA 3 NC COM NC COM NC COM NC COM NC GND 0-10V GND 0-10V GND 0-10V GND 0-10V +20V 5 +10V 1 NO 11 Ain2 U 4 Ain1 U Patch panel 2 COM 14 13 12 10 GND 3 GND 9 Din3 2 RSB 8 Din2 1 RSA Pressure sensor 1 NO 3 NC 2 COM 1 NO 10 GND 3 GND 9 Din3 2 RSB 8 Din2 1 RSA Application manual EC-Control Master: Sensor control Slaves: PWM control with analogue source of set values Ain1 U Slave n Slave 2 Fig. 46: Connection diagram, star-shaped master-slave Arrangement for refrigeration plants 42 Application manual for EC-Control 4.1.2 Master-slave Configuration with cascade operation Another option for the master-slave configuration is cascade operation. Via the analogue output Aout, the master forwards its set value in the form of a 0 to 10V signal to the first slave. In contrast to starshaped arrangement from Fig. 46, the slaves here are not parallel, but rather connected in series, and the output curve of all nodes is adapted. Group alarm (break for failure) 14 Aout 7 Din1 13 Ain2 I 6 Ain1 I 12 +20V 5 +10V 11 Ain2 U 4 Ain1 U 10 GND 3 GND 9 Din3 2 RSB 8 Din2 1 RSA 3 NC 2 COM 1 NO 3 NC 2 COM Aout 7 Din1 1 NO Ain2 I 6 Ain1 I Slave 1 14 +20V 5 +10V 13 11 Ain2 U 4 Ain1 U 12 10 GND 3 GND 9 Din3 2 RSB 8 Din2 1 RSA Master Modulation level can be cascaded by adapting the output curve 14 Aout 7 Din1 13 Ain2 I 6 Ain1 I 12 +20V 5 +10V 11 Ain2 U 4 Ain1 U 10 GND 3 GND Din3 2 RSB Din2 1 RSA 3 NC 2 COM 1 NO Ain2 I Aout 6 Ain1 I 7 Din1 14 +20V 5 +10V 13 11 Ain2 U 4 Ain1 U 12 10 GND 3 GND 9 Din3 2 RSB 3 NC 2 COM 1 NO 8 Din2 Slave n 1 RSA Slaves: PWM control with analogue source of set values Ain1 U output curve adapted 8 Master: Any control mode output curve adapted 9 Slave 2 Fig. 47: Connection diagram, cascade operation, master-slave arrangement for refrigeration plants 43 Application manual for EC-Control Prerequisites for cascade operation: Control mode master: any Control mode slaves: PWM control Source of set values slaves: Analogue Ain1 and deactivate save set value to EEPROM Input characteristics of all nodes unchanged (0V/0% and 10V/100%) Adapted output curve for master and all slaves, ex. Fig. 48 Output curve Output signal Cascade operation 10V The standard output curve (0%/0V and 100%/10V) is moved to the bottom area of the fan level in order to generate desired cascade operation (10%/0V and 100%/10V) Programming this output curve has to be carried out for all nodes (master and slave) 2.2V 1.3V PWM signal 0.6V 0V 10% 13% 22% 30% 100% Fig. 48: Output curve for cascade operation Fig. 48 shows an example of curve for which, at a low speed of the master, the slaves themselves take on an even lower speed in sequence. This should also lead to the last slaves in the chain being switched off. For the above output curve, this applies: The higher the speed of the master, the lower the difference of the speed to the other nodes becomes. With full modulation level of the master, the slaves likewise run at 100%. First example: Master = 30%. The modulation level of the master is at 30%. With output curve Fig. 48, on slave 1, a signal of approx. 2.2V is output → Consequently, the modulation level of slave 1 = 22% Slave 1 has the same output curve as the master, and outputs a signal of approx. 1.3V to slave 2 → Modulation level for slave 2 = 13% Slave 2 has the same output curve as the master, and outputs a signal < Switch-on threshold (0.6V) to slave 3 → Modulation level for slave 3 = 0%, and thus stands still Second example: Master = 100% modulation level With output curve Fig. 48, it outputs a signal of approx. 10V to slave 1 → Modulation level for slave 1 = 100% Slave 1 itself has the same output curve as the master, and thus outputs a signal of approx. 10V to slave 2 → Modulation level for slave 2 = 100% Slave 2 itself has the same output curve as the master, and thus outputs a signal of approx. 10V to slave 3 → Modulation level for slave 3 = 100% 44 Application manual for EC-Control Cascade operation should only be implemented with a maximum number of nodes of 3 to 4 slaves. Fig. 49 shows the settings which must be carried out for the input and output curve in a cascade operation according to Fig. 48 in EC-Control. Here, it is important that the input characteristics are not changed and are set to the default settings. In addition to Fig. 49, the control mode PWM control with source of set values analogue Ain1 has to be selected for the slaves. The function Save set value to EEPROM has to be deactivated for the slaves while doing so. Output curve Output curve has to be adapted by the master and all slaves Co-ordinate X1 shifted by 10% in comparison to standard curve Input curve Slave fans Only relevant for slaves Linear input characteristic Input characteristic has to be set to the default by all slaves (0V/0% and 10V/100%) Fig. 49: Output and input characteristic for cascade operation 4.1.3 Reverse operation for cleaning and de-icing the exchanger Reverse operation permits the direction of rotation of a fan to be changed. With devices which are equipped with a MODBUS interface and with a firmware protocol version later than V3.02, it is possible that the user can change the direction of rotation themselves, either via digital input or via bus. 45 Application manual for EC-Control Preferred running direction against the preferred running direction Preferred running direction is preset at the factory; in reverse operation, the running direction is set against the preferred running direction; no information can be provided as to whether the direction of rotation is clockwise or counter-clockwise Fig. 50: Direction of rotation of an axial fan Example: Change between two parameter sets, including reverse operation P1 control mode PWM control, direction of rotation preset according to factory settings P2 control mode closed loop speed control, direction of rotation against the preferred running direction In order to implement this mode, the following steps have to be configured one after another: Step 1: Configure parameter set 1 Source for parameter set: switch terminal Din2 to the direction of rotation and at the same time change parameter set (through bridging Din2 according to GND) Control mode: PWM control P- and I-factor and control function for PWM control are irrelevant Step 2: Select source of set values RS485/Bus Parameter set 1 has to be enabled Source of set values: RS485/bus Activate Save set value to EEPROM Enter set value [%] Fig. 51: Parameter set 1 46 Application manual for EC-Control Step 3: set parameter set 2 Source for parameter set: Is already set to digital input terminal Din2 Control mode: Closed loop speed control P-factor: 50% I-factor: 6.25% Control function for PWM control irrelevant Step 4: Clamp 2 PE 3 L3 2 L2 1 L1 PE 3 NC 2 COM Aout 7 Din1 1 NO Ain2 I 6 Ain1 I 14 +20V 5 +10V Clamp 3 13 11 Ain2 U 4 Ain1 U 12 10 GND 3 GND 9 Din3 2 RSB 8 Din2 1 RSA activate parameter set 2 Activate parameter set 2 by bridging from GND to Din2 Step 5 can only be run if P2 in step 4 is enabled Clamp 1 Step 5: Enter and save set value Parameter set 2 has to be activated beforehand (see step 4) Source of set values: RS485/bus Activate Save set value to EEPROM Enter set value [rpm] Fig. 52: Parameter set 2 47 Application manual for EC-Control Parameter set 1 and preferred running direction: Parameter set 2 and reverse operation: Din2 open or applied voltage 5 to 50V Bridge according to GND or applied voltage < 1V In order to simultaneously change the direction of rotation and the parameter set, the source of rotating direction has to be the same as the source for parameter set (either terminal Din2 or terminal Din3). Step 6: Source of rotating direction Source of rotating direction terminal Din2 The source of the direction of rotation has to be the same terminal as the parameter set source Fig. 53: Reverse operation source of rotating direction Changing the two parameter sets and, at the same time, the direction of rotation is only done by creating a bridge from Din2 to GND. 4.2 Configuration notes for air flow control in air-conditioning unitsn The differential pressureapproach compares the static pressure before the inlet nozzle with the static pressure inside the inlet nozzle of an EC radial fan. The air flow [m3/h] can be calculated from the differential pressure (differential pressure of the static pressure in [Pa]) according to the following equation: V k pw or V pw 2 k 2 In the product catalogue "Plug fans with EC motor" from ebm-papst, you can find the following table for the k-factore, depending on size of the fan. The table refers to backward-curved centrifugal fans. 48 Application manual for EC-Control At constant nozzle pressure, constant control of the air flow is likewise possible. The pressuremeasuring point to measure Δpw is one or four locations at the circumference of the inlet nozzle. Example for clarification: Hall with footprint of 600m2, height of 3m Air volume of the space is thus 1,800m3. Volume is to be replaced completely every 30 minutes by fans → Air flow is thus 3600 m3/h Product used: R3G450-AY86-01, k-factor = 240 → Differential pressure is (3600/240)² = 225 Pa The differential pressure in the nozzle has to be held constant at 225 Pa. The fan supplies constant volume, independent of the pressure conditions in the system. Its speed is automatically adapted along the vertical curve. R3G450-AY86-01 vertical curve Pressure increase in the system ≠ Differential pressure in the nozzle (here, 225 Pa) Fig. 54: Curve diagram R3G450-AY86-01 49 Application manual for EC-Control The configuration notes for EC-Control now result from the anticipated differential pressure in the nozzle. Step 1: Configure parameter set 1 Control mode: Sensor control Source for parameter set: RS485/bus P-factor: 50% I-factor: 6.25% Activate parameter set 1 Fig. 55: Parameter set 1 Step 2: Sensor settings, 0 to 500 Pa With 0 to 500 Pa sensor Min. sensor value: 0 Pa Max. sensor value: 500 Pa Sensor unit: Pa Select Source for sensor value correspondingly Alternative sensor type: 0 to 1000 Pa Set controller function to Heating/Positive for both parameter sets Fig. 56: Sensor settings, pressure sensor 4.2.1 Digital setting of values for air flow control, such as day/night switchover By changing the differential pressure in the nozzle, the air flow can also be changed in accordance with the equation in Chapter 4.2. For the above example with the plug fan R3G450-AY86-01, a k-factor of 240 and a 0 to 500 Pa pressure sensor results from the curve in Fig. 57. For the ratio of differential pressure to sensor voltage, this applies: a differential pressure of a differential pressure of A differential pressure of 500 Pa corresponds to a sensor voltage of 10V. 225 Pa corresponds to a sensor voltage of 4.5V (see Fig. 57, dotted line) 0 Pa corresponds to a sensor voltage of 0 V 50 Application manual for EC-Control Differential pressure in Pa 500 10 Above example: Required air flow of 3 3600 m /h, consequently the set value to be set is 225 Pa, resulting sensor voltage is 4.5V 400 300 8 6 200 4 100 2 0 0 100 700 1300 1900 2500 3100 3700 4300 4900 Volume flow in m³/h Fig. 57: Pressure, volume flow rate curve After all settings from Chapter 4.2 have been made, you can now enter the set value of the differential pressure (225 Pa) under Overview to finish (see Fig. 58). The digital set value input is done via ECControl. Through maintaining a constant pressure of 225 Pa in the nozzle, a constant volume is guaranteed – here, 3,600m³/h. Step 3a: Set value via RS485/bus Set value here: 225 Pa Day switchover Source of set values: RS485/bus Activate Save set value to EEPROM Enter required differential pressure under Set value in order to control constant air flow Set value ≈ Actual value Fig. 58: Digital setting of values parameter set 1, differential pressure 225 Pa, enter set value for day switchover Optionally, a second parameter set can be defined, for example, for a so-called day/night switchover: After the sensor settings were made, you must proceed as follows to store set values for P1 and P2 (clicking Set is necessary after each step): Under parameter set 1, activate parameter set 1 and make settings (see Fig. 55) Under Overview, save the function Save set value to EEPROM (see Fig. 58) Under Overview, enter the set value (see Fig. 58) Under parameter set 2, activate parameter set 2 and make settings (see Fig. 59) Under Overview , activate the function Save set value to EEPROM (see Fig. 60) Under Overview, enter the set value (see Fig. 60) 51 Application manual for EC-Control Step 4: Set parameter set 2 Control mode: Closed loop sensor control P-factor: 50% I-factor: 6.25% Activate parameter set 2 Fig. 59: Parameter set 2 Step 5: Set value via RS485/bus Set value here: 450 Pa Night switching Source of set values: RS485/bus Activate Save set value to EEPROM Enter required differential pressure under Set value in order to control constant air flow Set value ≈ Actual value Fig. 60: digital setting of values for parameter set 2, differential pressure 450 Pa, enter set value for night switching 4.2.2 Analogue setpoint input during air flow control Optionally, for digital setting of values from Chapter 4.2.1, it is possible to prescribe the set value in a similar way via the inputs Ain1 U or Ain1 I. Fig. 61 shows, for example, the connection of a potentiometer for setting of values for the air flow control. Day / night switchover with two different set values is not possible with an analogue source of set values. Steps 4 and 5 in the above example thus are omitted from this chapter. 52 Application manual for EC-Control Pressure sensor for air flow control Potentiometer for analogue setpoint input Fig. 61: Analogue setpoint input via potentiometer during air flow control In EC-Control, additional settings have to be carried out (in addition to the configuration already discussed in Chapter 4.2). The Source of set values has to be changed to Analogue Ain1 in this, and the function Save set value to EEPROM must be disabled. Step 3b: Set value input analogue via Ain1 Source of set values: Analogue Ain1 Deactivate Save set value to EEPROM Set required differential pressure with external source of set values in order to regulate constant air flow Set value ≈ Actual value Fig. 62: Analogue setpoint input, differential pressure 225 Pa, configure set point via potentiometer 4.3 Temperature control – any control characteristic with temperature sensor Temperature-controlled systems are found in many applications. In order to enable the initial operation of such control for the customer, the following subchapters explain setting a control characteristic. In order to measure the actual value with a temperature sensor and, from it, form an individual control characteristic, some settings are to be carried out. The following sensor is used for the example. 53 Application manual for EC-Control Temperature sensor ebm-papst Art. No. 50005-1-0174 Measuring range -20°C to 80°C connect to: +20V Ain2 U GND Fig. 63: Standardised temperature sensor Art. No. 50005-1-0174 For the temperature sensor, you obtain the sensor characteristic curve from Fig. 64. Signal Sensor characteristic curve 10V Temperature 2V -20°C 0-10V signal from the sensor output runs linear to the measuring range (-20°C to 80°C) 0°C 80°C Fig. 64: Sensor characteristic curve for temperature sensors In order to simplify the configuration of the control range for the user, the following formula Control range sensor range 100 % P factor is already contained in EC-Control, as the comparison in Fig. 65 shows. It is valid as soon as the I-factor is 0%. 54 Application manual for EC-Control Step 1: pure P-control Control mode: Closed loop sensor control P-factor 1000% I-Factor 0% for temperature regulation pure P-control Control function: cooling/negative Step 2: Temperature sensor settings Sensor range: -20°C to 80°C Source for sensor value: Ain2U/Ain2I Source for control function: RS485/bus Control range P1: 10°C Control range 80C (20C ) 100% 10C 1000% Fig. 65: Control range and P-factor You can change the control range and the P-factor via two selection windows. Because the two values are dependent on each other, when entering the P-factor, the control range changes automatically and vice-versa. If the I-factor is greater than 0%, the input window is greyed out (see Fig. 65, control range parameter set 2). The significance of the control range of temperature regulation can be explained through the following example settings from Fig. 66. 55 Application manual for EC-Control Step 3 (two ex.): Enter temperature set value Example 1: in [°C] Set value: Actual value: Control deviation: Control range: 20 21.99 1.99 10 with modulation level 20% and speed 574 rpm Upper control deviation: 21.99°C-20.0°C = 1.99°C Lower control deviation: 25.02°C-20.0°C = 5.02°C Example 2: in [°C] Set value: Actual value: Control deviation: Control range: 20 25.02 5.02 10 with modulation level 50% and speed 1,561 rpm Fig. 66: Temperature regulation with control deviation of 2°C and a difference of 5°C By enlarging the control deviation, the modulation level increases. In the above example, the full speed of the motor would be reached if the actual value - in other words, the current temperature measured by the sensor - reached 30°C and the set value would continue to be 20°C. Depending on the control range, the corresponding control characteristics can be generated, as in Fig. 67. The control range of the above example corresponds to control characteristic 2. The two control deviations of 2°C and 5°C are additionally plotted in the illustration. If we would select too large a control range for the above control deviation, for example, control characteristic 4, then the motor would run at the same temperature actual value with a very low speed. 56 Application manual for EC-Control Control range 1 to 4 Duty cycle 100% 1 2 3 4 50% 20% Temperature 0% 20°C 25°C 30°C 40°C Fig. 67: Four example control characteristics for different control rangese 60°C 57 Application manual for EC-Control Keyword index Address setup ................................................ 17 Ain1 ................................................................ 24 Ain1 I .......................................................... 7, 30 Ain1 U ........................................................ 7, 30 Ain2 I .................................................... 7, 28, 41 Ain2 U ........................................................ 7, 28 Air flow control ............................................... 48 Air-conditioning units ...................................... 48 Alarm relay ............................................... 27, 37 analogue setpoint input .................................. 52 Aout ........................................................... 7, 34 Bridge................................................... 7, 23, 48 Cascade operation ......................................... 43 closed loop ....................................................... 8 Closed-loop speed control ............................. 13 Common wire ................................................. 18 Control characteristic ............................... 53, 56 control deviation e ............................................ 8 Control function .............................................. 13 control range .................................................. 10 Control range ........................................... 55, 57 Cooling/negative ............................................ 13 D0 .............................................................. 7, 18 D1 .............................................................. 7, 18 Day/night switchover ...................................... 51 Differential pressure ....................................... 48 Digital setting of values .................................. 50 Din1 ........................................................... 7, 22 Din2 ..................................................... 7, 23, 48 Din3 ..................................................... 7, 23, 48 Fail safe function ............................................ 24 Heating/positive ............................................. 14 I-factor ...................................................... 12, 54 Impulses per revolution .................................. 35 Input curve ..................................................... 31 Inverse curve ................................................. 33 K-factor.......................................................... 48 Limit values ................................................... 15 Line termination resistors .............................. 18 Master-slave ...................................... 38, 42, 43 Max. PWM ..................................................... 16 Min. PWM ...................................................... 16 MODBUS................................................... 6, 17 Motor settings ................................................ 27 Motor stop enable.......................................... 22 open loop......................................................... 8 Operating mode............................................. 13 Output curve .................................................. 34 Output limit .................................................... 35 Parameter set ................................................ 23 P-factor.................................................... 10, 55 PWM control .................................................. 13 Refrigeration plant ......................................... 38 Reverse operation ......................................... 45 RSA ................................................................. 7 RSB ................................................................. 7 Run monitoring .............................................. 37 Save set value to EEPROM .............. 24, 51, 53 Sensor ......................................... 28, 29, 41, 53 Sensor control ............................................... 13 sensor range ................................................. 10 Serial number ................................................ 21 Set value ........................................... 24, 30, 56 Set value input................................... 30, 50, 52 Specification of actual value .................... 28, 29 Start PWM ..................................................... 16 Temperature control ...................................... 53 Terminal strip............................................. 6, 28 Twisted pair ................................................... 18 Winter functions............................................. 26 58