1
Compute (Bridgend) Ltd
Reference and User Guide
SELCOPY/i Release 3.20
8 Merthyr Mawr Road, Bridgend, Wales UK CF31 3NH
Tel: +44 (1656) 65 2222
Fax: +44 (1656) 65 2227
CBL Web Site - http://www.cbl.com
This document may be downloaded from http://www.cbl.com/documentation.php
CBL Ref: z:\cd\sman\i320\SELCOPYi_3.20_Reference_and_User_Guide.pdf
- 2013/11/13 11:39:48 -
SELCOPY/i Reference and User Guide
Contents
Documentation Notes.........................................................................................................................................................................1
Summary of Changes..........................................................................................................................................................................2
First Edition (October 2013)....................................................................................................................................................2
About SELCOPY/i................................................................................................................................................................................5
Getting started with SELCOPY/i.........................................................................................................................................................6
Starting the SELCOPY/i program............................................................................................................................................6
Security Considerations..........................................................................................................................................................6
VSE Systems...................................................................................................................................................................6
MVS Systems..................................................................................................................................................................7
3270 Terminal Emulation........................................................................................................................................................7
3270 Screen Sizes...........................................................................................................................................................7
Keyboard and Mouse Mapping........................................................................................................................................8
Window Concepts...................................................................................................................................................................8
Window Hierarchy............................................................................................................................................................8
Manipulating Windows.....................................................................................................................................................8
Window Format................................................................................................................................................................9
Pressing Buttons............................................................................................................................................................10
Window Focus...............................................................................................................................................................10
Input fields..............................................................................................................................................................10
Changing the focus window....................................................................................................................................10
Window Names..............................................................................................................................................................10
Viewing Window Names.........................................................................................................................................11
Window Class................................................................................................................................................................11
System Menu.................................................................................................................................................................11
Function Keys................................................................................................................................................................12
Default Function Keys (KEYLISTs active)..............................................................................................................12
Default Function Keys (KEYLISTs not active)........................................................................................................12
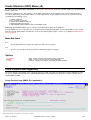
SELCOPY/i Main Window.....................................................................................................................................................13
SELCOPY/i Main Window Menu Bar.............................................................................................................................14
SELCOPY/i Clipboard...........................................................................................................................................................14
SELCOPY/i Interactive Help.................................................................................................................................................14
Window Classes................................................................................................................................................................................17
Storage Display Windows.....................................................................................................................................................17
Storage Window Display Format...................................................................................................................................17
Storage Window Resizing..............................................................................................................................................17
Storage Display Navigation............................................................................................................................................18
Storage Data Manipulation............................................................................................................................................18
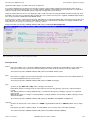
List Windows.........................................................................................................................................................................18
List Window Status Bar..................................................................................................................................................18
List Window Menu..........................................................................................................................................................18
View List Display.....................................................................................................................................................19
Field Descriptor Block (FDB)..................................................................................................................................19
Edit View.................................................................................................................................................................20
Zoom View..............................................................................................................................................................20
Columns Displayed.................................................................................................................................................21
Selecting, Sorting and Filtering......................................................................................................................................21
SELECT Clause......................................................................................................................................................22
The Where Clause..................................................................................................................................................23
The Sort (Order By) Clause....................................................................................................................................24
Sorting with the Cursor..................................................................................................................................................25
List Entry Location.........................................................................................................................................................25
FIND Command......................................................................................................................................................25
LOCATE Command................................................................................................................................................26
S Command............................................................................................................................................................26
List Window Prefix Area.................................................................................................................................................26
Interactive Panel Windows....................................................................................................................................................27
Panel Window Format....................................................................................................................................................28
Panel Window Size & Location......................................................................................................................................29
Panel Window Hierarchy................................................................................................................................................29
Panel Scrollable Display................................................................................................................................................29
Panel Window Views.....................................................................................................................................................30
Scrollable Input/Output Fields........................................................................................................................................30
Input Field Data Recall...................................................................................................................................................31
Embedded Tables..........................................................................................................................................................31
Overview.................................................................................................................................................................31
Table Edit CLI (Primary) Commands......................................................................................................................31
Table Edit Options..................................................................................................................................................31
Table Edit Prefix (Line) Commands........................................................................................................................32
Table Edit PFKeys..................................................................................................................................................32
Table Editing Techniques.......................................................................................................................................32
COLHEADER - SET/QUERY Option......................................................................................................................34
Selection Lists................................................................................................................................................................34
Select Dataset Name (Catalog).............................................................................................................................35
2013-11-13 13:06:41
i
SELCOPY/i Reference and User Guide
Contents
Window Classes
Select Dataset Name (VTOC)...............................................................................................................................35
Select HFS Path Name..........................................................................................................................................36
Select Member Name............................................................................................................................................36
Primary Option Menu (=)...................................................................................................................................................................38
Menu Bar Items.....................................................................................................................................................................38
Options...........................................................................................................................................................................38
Panel Output Fields.......................................................................................................................................................38
Settings (=0).......................................................................................................................................................................................39
Options..................................................................................................................................................................................39
Panel Input/Output Fields..............................................................................................................................................39
Startup Settings (=0.1)..........................................................................................................................................................39
Panel Input Fields..........................................................................................................................................................39
System Settings (=0.2)..........................................................................................................................................................40
Panel Input Fields..........................................................................................................................................................40
Text Edit Settings (=0.3).......................................................................................................................................................40
Panel Input Fields..........................................................................................................................................................40
Structured Data Edit (SDE) Settings (=0.4)..........................................................................................................................41
Options...........................................................................................................................................................................41
Panel Input Fields..........................................................................................................................................................41
COBOL Compiler Options (=0.4.1)................................................................................................................................41
Panel Input Fields...................................................................................................................................................42
PL/1 Compiler Options (=0.4.2).....................................................................................................................................42
Panel Input Fields...................................................................................................................................................42
List Window Settings (=0.5)..................................................................................................................................................42
Panel Input Fields..........................................................................................................................................................42
Batch Settings (=0.6)............................................................................................................................................................43
Panel Input Fields..........................................................................................................................................................43
DB2 Settings (=0.7)...............................................................................................................................................................43
Options...........................................................................................................................................................................43
Panel Input Fields..........................................................................................................................................................43
Execute SQL Settings (=0.7.2)......................................................................................................................................44
Panel Input Fields...................................................................................................................................................44
Program Function Keys (PF key) Settings (=0.8).................................................................................................................44
Panel Input Fields..........................................................................................................................................................44
Options...........................................................................................................................................................................44
Panel Input Fields..........................................................................................................................................................44
Options...........................................................................................................................................................................45
Text Edit (=1)......................................................................................................................................................................................47
Panel Input Fields.................................................................................................................................................................47
Data Edit (=2).....................................................................................................................................................................................49
Structured Data Browse/Edit Panel.......................................................................................................................................49
Menu Bar Items..............................................................................................................................................................49
Panel Input Fields..........................................................................................................................................................50
Structured Data Browse/Edit - Options Panel.......................................................................................................................52
Menu Bar Items..............................................................................................................................................................52
Panel Input Fields..........................................................................................................................................................52
List File Windows (=3).......................................................................................................................................................................54
Options..................................................................................................................................................................................54
List DASD Volumes (=3.1)....................................................................................................................................................54
Panel Input Fields..........................................................................................................................................................54
Prefix Line Commands...................................................................................................................................................55
Columns Displayed........................................................................................................................................................55
List VTOC Files (=3.2)..........................................................................................................................................................56
Panel Input Fields..........................................................................................................................................................57
Prefix Line Commands...................................................................................................................................................57
Columns Displayed........................................................................................................................................................58
List VTOC Extents (=3.3)......................................................................................................................................................58
Panel Input Fields..........................................................................................................................................................59
Prefix Line Commands...................................................................................................................................................59
Columns Displayed........................................................................................................................................................60
Data Set List Utility (=3.4).....................................................................................................................................................61
Panel Input Fields..........................................................................................................................................................61
List Catalog Entries (=3.5)....................................................................................................................................................62
Panel Input Fields..........................................................................................................................................................63
Prefix Line Commands...................................................................................................................................................64
Columns Displayed........................................................................................................................................................65
List CMS Files.......................................................................................................................................................................66
Panel Input Fields..........................................................................................................................................................66
Prefix Line Commands...................................................................................................................................................67
Columns Displayed........................................................................................................................................................67
List Dataset Details (=3.6).....................................................................................................................................................67
2013-11-13 13:06:41
ii
SELCOPY/i Reference and User Guide
Contents
List File Windows (=3)
Panel Input Fields..........................................................................................................................................................68
Prefix Line Commands...................................................................................................................................................69
Columns Displayed........................................................................................................................................................70
List Library Members (=3.7)..................................................................................................................................................71
Panel Input Fields..........................................................................................................................................................72
Prefix Line Commands...................................................................................................................................................73
Columns Displayed........................................................................................................................................................74
List MVS Allocated Files (=3.8).............................................................................................................................................76
Panel Input Fields..........................................................................................................................................................76
Prefix Line Commands...................................................................................................................................................76
Columns Displayed........................................................................................................................................................77
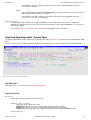
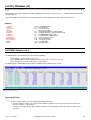
List VSE Standard Labels.....................................................................................................................................................78
Panel Input Fields..........................................................................................................................................................78
Prefix Line Commands...................................................................................................................................................78
Columns Displayed........................................................................................................................................................79
List MVS Enqueues (=3.9)....................................................................................................................................................79
Panel Input Fields..........................................................................................................................................................80
Prefix Line Commands...................................................................................................................................................80
Columns Displayed........................................................................................................................................................80
List MVS Job Enqueues (=3.10)...........................................................................................................................................81
Panel Input Fields..........................................................................................................................................................81
Prefix Line Commands...................................................................................................................................................81
Columns Displayed........................................................................................................................................................81
List Associations (=3.11).......................................................................................................................................................82
Panel Input Fields..........................................................................................................................................................82
Prefix Line Commands...................................................................................................................................................83
Columns Displayed........................................................................................................................................................84
List HFS Path (=3.12)...........................................................................................................................................................84
Panel Input Fields..........................................................................................................................................................84
Prefix Line Commands...................................................................................................................................................85
Columns Displayed........................................................................................................................................................85
File Copy (=5).....................................................................................................................................................................................88
Overview...............................................................................................................................................................................88
Source and Target File Types...............................................................................................................................................88
File Copy Panel.....................................................................................................................................................................89
File Copy.......................................................................................................................................................................89
Menu Bar Items......................................................................................................................................................90
Panel Input Fields...................................................................................................................................................90
File Reformat................................................................................................................................................................94
Menu Bar Items......................................................................................................................................................94
Panel Input Fields...................................................................................................................................................94
PFKeys...................................................................................................................................................................95
File Copy - PDS Copy Statistics............................................................................................................................................95
Summary Format...........................................................................................................................................................95
Copy Statistics Fields.....................................................................................................................................................95
File Search/Update/Copy/Remap.....................................................................................................................................................97
Overview...............................................................................................................................................................................97
Source File Types.................................................................................................................................................................97
Output Report........................................................................................................................................................................97
Unformatted File Search/Update/Copy.................................................................................................................................98
Formatted File Search/Update/Copy/Remap........................................................................................................................99
File Search/Update/Copy/Remap Panels...........................................................................................................................100
Basic File Search Panel......................................................................................................................................................101
FSU: Basic File Search Panel......................................................................................................................................101
Menu Bar Items....................................................................................................................................................101
Panel Input Fields.................................................................................................................................................102
PFKeys.................................................................................................................................................................106
Extended File Search/Update/Copy/Remap Panels...........................................................................................................106
FSU: Extended File Search, Update, Copy & Remap Tasks......................................................................................106
Menu Bar Items....................................................................................................................................................106
Panel Options.......................................................................................................................................................107
FSU: Input File(s) Specification..................................................................................................................................109
Menu Bar Items....................................................................................................................................................109
Panel Fields..........................................................................................................................................................109
FSU (unformatted): Record Selection.........................................................................................................................111
Menu Bar Items....................................................................................................................................................111
Panel Fields..........................................................................................................................................................111
FSU (formatted): Record Selection.............................................................................................................................111
Menu Bar Items....................................................................................................................................................112
Panel Fields..........................................................................................................................................................112
FSU (unformatted): Search records using WHERE expression.................................................................................113
Menu Bar Items....................................................................................................................................................113
Panel Fields..........................................................................................................................................................114
FSU (formatted): Search records using WHERE expression.....................................................................................114
2013-11-13 13:06:41
iii
SELCOPY/i Reference and User Guide
Contents
File Search/Update/Copy/Remap
Menu Bar Items....................................................................................................................................................114
Panel Fields..........................................................................................................................................................115
FSU (unformatted): Search Records using the FIND Command................................................................................115
Menu Bar Items....................................................................................................................................................116
Panel Fields..........................................................................................................................................................116
FSU (formatted): Search Records using the FIND Command....................................................................................116
Menu Bar Items....................................................................................................................................................117
Panel Fields..........................................................................................................................................................117
FSU (unformatted): Change record data using the CHANGE command....................................................................118
Menu Bar Items....................................................................................................................................................118
Panel Fields..........................................................................................................................................................119
FSU (formatted): Change record data using the CHANGE command........................................................................121
Menu Bar Items....................................................................................................................................................121
Panel Fields..........................................................................................................................................................122
FSU: Copy Selected records to an Output File...........................................................................................................124
Menu Bar Items....................................................................................................................................................124
Panel Fields..........................................................................................................................................................124
FSU: Remap Fields in Selected records to an Output File.........................................................................................125
Menu Bar Items....................................................................................................................................................126
Panel Fields..........................................................................................................................................................126
FSU: Copy Selected records to Output Library Members...........................................................................................127
Menu Bar Items....................................................................................................................................................128
Panel Fields..........................................................................................................................................................128
FSU: Remap Fields in Selected records to Output Library Members.........................................................................129
Menu Bar Items....................................................................................................................................................129
Panel Fields..........................................................................................................................................................129
FSU: Report File.........................................................................................................................................................131
Menu Bar Items....................................................................................................................................................131
Panel Fields..........................................................................................................................................................131
File Selection Panels...........................................................................................................................................................132
Multiple Fileid Masks...................................................................................................................................................132
Table View............................................................................................................................................................133
Single Row (Zoomed) View..................................................................................................................................133
Input Values..........................................................................................................................................................133
Select Files to Process...............................................................................................................................................135
Table View............................................................................................................................................................135
Single Row (Zoomed) View..................................................................................................................................136
Input Values..........................................................................................................................................................136
Select Input Members.................................................................................................................................................137
Table View............................................................................................................................................................137
Single Row (Zoomed) View..................................................................................................................................138
Input Values..........................................................................................................................................................138
Select Input Members - FIND.....................................................................................................................................139
Input Values..........................................................................................................................................................139
Generate Formatted Record Expression Panels................................................................................................................140
Major OR Sub-Expressions........................................................................................................................................140
Table View............................................................................................................................................................141
Single Row (Zoomed) View..................................................................................................................................141
Input Values..........................................................................................................................................................141
AND Sub-Expressions................................................................................................................................................142
Table View............................................................................................................................................................142
Single Row (Zoomed) View..................................................................................................................................143
Input Values..........................................................................................................................................................143
Minor OR Sub-Expressions........................................................................................................................................144
Table View............................................................................................................................................................144
Single Row (Zoomed) View..................................................................................................................................144
Input Values..........................................................................................................................................................145
SDE: Select Record-Type...........................................................................................................................................146
SDE: Select Field Name.............................................................................................................................................147
Multiple FIND & CHANGE Specification Panels.................................................................................................................147
Multiple Find Commands (unformatted)......................................................................................................................147
Table View............................................................................................................................................................147
Single Row (Zoomed) View..................................................................................................................................148
Input Values..........................................................................................................................................................148
Multiple Find Commands (formatted)..........................................................................................................................149
Table View............................................................................................................................................................149
Single Row (Zoomed) View..................................................................................................................................150
Input Values..........................................................................................................................................................150
Multiple Change Commands (unformatted)................................................................................................................151
Table View............................................................................................................................................................151
Single Row (Zoomed) View..................................................................................................................................152
Input Values..........................................................................................................................................................152
Multiple Change Commands (formatted)....................................................................................................................154
Table View............................................................................................................................................................154
Single Row (Zoomed) View..................................................................................................................................155
Input Values..........................................................................................................................................................155
2013-11-13 13:06:41
iv
SELCOPY/i Reference and User Guide
Contents
File Search/Update/Copy/Remap
File Search/Update/Copy/Remap Output Output................................................................................................................157
Report Format..............................................................................................................................................................157
Record Type: Command..............................................................................................................................................158
Record Type: Summary...............................................................................................................................................158
Record Type: Hit..........................................................................................................................................................159
Record Type: IOError...................................................................................................................................................161
Record Type: Alias.......................................................................................................................................................161
Record Type: Record...................................................................................................................................................161
Function Keys..............................................................................................................................................................162
File Update Undo................................................................................................................................................................162
Overview......................................................................................................................................................................162
File Update Undo Panel......................................................................................................................................................163
File Update Undo Output....................................................................................................................................................163
Report Format..............................................................................................................................................................163
Report Fields................................................................................................................................................................163
Report Data..................................................................................................................................................................164
Summary Block............................................................................................................................................................164
Sample Terse Report Output.......................................................................................................................................165
Sample EXTENDED Output........................................................................................................................................166
Compare Files/Libraries Menu (=7)................................................................................................................................................168
Options................................................................................................................................................................................168
Compare Files (=7.1)..........................................................................................................................................................168
Overview......................................................................................................................................................................168
Source File Types........................................................................................................................................................168
Output Report..............................................................................................................................................................168
Unformatted Compare.................................................................................................................................................169
Formatted Compare.....................................................................................................................................................169
Hierarchical Compare..................................................................................................................................................170
Record Synchronisation...............................................................................................................................................170
Terminology..........................................................................................................................................................170
Overview...............................................................................................................................................................171
1-TO-1 Synchronisation........................................................................................................................................171
Read-Ahead Synchronisation...............................................................................................................................171
Key Synchronisation.............................................................................................................................................172
Hierarchical Key Synchronisation.........................................................................................................................173
Compare Files Panels..................................................................................................................................................175
Basic Unformatted Compare Panel.............................................................................................................................175
Compare Files: Basic Options.............................................................................................................................175
Compare Type - Formatted/Unformatted ?...........................................................................................................178
Extended Unformatted Compare Panels.....................................................................................................................178
Compare Files (unformatted): New file details and options..................................................................................178
Compare Files (unformatted): Old file details and options....................................................................................180
Compare Files (unformatted): Re-synchronisation options..................................................................................181
Compare Files (unformatted): Specify Key fields.................................................................................................184
Compare Files: Specify Key Pos/Len...................................................................................................................184
Compare Files (unformatted): Output Files.........................................................................................................185
Compare Files (unformatted): Options / Action....................................................................................................186
Formatted Compare Panels.........................................................................................................................................187
Compare Files (formatted): New file details and options......................................................................................187
Compare Files (formatted): Old file details and options........................................................................................188
Compare Files (formatted): Re-synchronisation options......................................................................................190
Compare Files (formatted): Specify Key fields.....................................................................................................192
Compare Files: Specify Key Pos/Len...................................................................................................................193
SELCOPY/i Compare Files - KEY Columns (Record Types List).........................................................................193
SELCOPY/i Compare Files - Select from Field Names List.................................................................................194
Compare Files (formatted): Output Files.............................................................................................................195
Compare Files (formatted): Options / Action........................................................................................................196
SELCOPY/i Compare Files - Select Record Types to Compare..........................................................................197
SELCOPY/i Compare Files - Select Field Names to Compare............................................................................198
SELCOPY/i Compare Files - Select Field Names List..........................................................................................198
Compare Files Output..................................................................................................................................................199
Report Format.......................................................................................................................................................199
Record Type: Command.......................................................................................................................................202
Record Type: Files................................................................................................................................................202
Record Type: Compare | Compare-record_type..................................................................................................202
Record Type: Field...............................................................................................................................................204
Record Type: Summary........................................................................................................................................204
Record Type: Key.................................................................................................................................................205
Function Keys.......................................................................................................................................................205
Compare Libraries (=7.2)....................................................................................................................................................205
Overview......................................................................................................................................................................205
Compare Libraries Panel.............................................................................................................................................205
Menu Bar Items....................................................................................................................................................206
Panel Input Fields.................................................................................................................................................206
Compare Libraries Output............................................................................................................................................207
2013-11-13 13:06:41
v
SELCOPY/i Reference and User Guide
Contents
SELCOPY Debug & Development (=8.1).......................................................................................................................................209
Invoking SELCOPY Debug.................................................................................................................................................209
Load Library Search Chain.................................................................................................................................................212
SELCOPY Loop Break-in....................................................................................................................................................212
SELCOPY Debug Windows................................................................................................................................................213
SELCOPY Debug Main window...................................................................................................................................213
SYSIN Window............................................................................................................................................................214
SYSPRINT Window.....................................................................................................................................................215
SQL Log Window.........................................................................................................................................................216
WTO Log Window........................................................................................................................................................216
Work Area/Current Input Record Window....................................................................................................................217
POS Expression Window.............................................................................................................................................217
@ Pointer Window.......................................................................................................................................................218
Columns Displayed...............................................................................................................................................218
Equates Window..........................................................................................................................................................218
Columns Displayed...............................................................................................................................................219
PCB Window................................................................................................................................................................219
TRACE Window...........................................................................................................................................................219
Point-and-Shoot Popup Menu......................................................................................................................................220
SELCOPY Debug Commands............................................................................................................................................221
BREAKPOINT..............................................................................................................................................................222
EOJ..............................................................................................................................................................................222
GO...............................................................................................................................................................................222
RERUN........................................................................................................................................................................223
STEPINTO...................................................................................................................................................................223
STEPOVER.................................................................................................................................................................223
TRACK.........................................................................................................................................................................224
WINDOW.....................................................................................................................................................................225
SELCOPY Debug Function Keys........................................................................................................................................225
Utilities Menu (=8)............................................................................................................................................................................227
Options................................................................................................................................................................................227
CBLVCAT Interactive (VCI) (=8.2)......................................................................................................................................227
CBLVCAT Interactive Window.....................................................................................................................................227
Prefix Commands.................................................................................................................................................229
Columns Displayed...............................................................................................................................................230
Raw Data Window.......................................................................................................................................................230
Prefix Line Commands.........................................................................................................................................232
Columns Displayed...............................................................................................................................................233
Execute IDCAMS (=8.3)......................................................................................................................................................234
Panel Fields.................................................................................................................................................................235
Prefix Commands........................................................................................................................................................235
Columns Displayed......................................................................................................................................................235
Execute POWER.................................................................................................................................................................236
Panel Fields.................................................................................................................................................................236
Prefix Commands........................................................................................................................................................236
Columns Displayed......................................................................................................................................................237
Define Catalog ALIAS (=8.4)...............................................................................................................................................238
Menu Bar Items............................................................................................................................................................238
Panel Fields.................................................................................................................................................................238
Create Library ALIAS (=8.5)................................................................................................................................................239
Panel Fields.................................................................................................................................................................239
Execute IEBCOPY (=8.6)....................................................................................................................................................240
Panel Fields.................................................................................................................................................................240
DB2 Dynamic SQL..............................................................................................................................................................241
Panel Fields.................................................................................................................................................................244
Favourite Datasets/Commands (=8.7)................................................................................................................................245
Overview......................................................................................................................................................................245
Favourite Datasets/Commands Panel.........................................................................................................................245
Panel Input Fields.................................................................................................................................................245
System Information Menu (=8.8).........................................................................................................................................247
Options.........................................................................................................................................................................247
Operating System Window (=8.8.1).............................................................................................................................247
Menu Bar Items....................................................................................................................................................248
LPA Modules Window (=8.8.2)....................................................................................................................................248
Columns Displayed...............................................................................................................................................249
Link List Window (=8.8.3)............................................................................................................................................249
Columns Displayed...............................................................................................................................................249
APF List Window (=8.8.4)............................................................................................................................................250
Columns Displayed...............................................................................................................................................250
Task List Window (=8.8.5)...........................................................................................................................................250
Columns Displayed...............................................................................................................................................251
Allocated Storage Windows.........................................................................................................................................251
Columns Displayed...............................................................................................................................................251
Loaded Programs Window (=8.8.6).............................................................................................................................251
Columns Displayed...............................................................................................................................................252
SELCOPY/i Storage Statistics Window.......................................................................................................................252
2013-11-13 13:06:41
vi
SELCOPY/i Reference and User Guide
Contents
Utilities Menu (=8)
Heap.....................................................................................................................................................................252
Stack.....................................................................................................................................................................253
Lists......................................................................................................................................................................253
SELCOPY/i Module List Window.................................................................................................................................253
CBLVCAT SVC window (=8.8.7).................................................................................................................................254
CBLNAME Window......................................................................................................................................................254
File Search (=8.9)...............................................................................................................................................................254
Panel Fields.................................................................................................................................................................255
Prefix Line Commands.................................................................................................................................................256
Columns Displayed......................................................................................................................................................257
Search for Library Members (=8.10)...................................................................................................................................257
Overview......................................................................................................................................................................257
Search for Library Members Panel..............................................................................................................................257
Menu Bar Items....................................................................................................................................................258
Panel Input Fields.................................................................................................................................................258
Search for Library Members Output.............................................................................................................................259
Calendar Window (=8.13)...................................................................................................................................................260
Calculator Window (=8.14)..................................................................................................................................................261
Create New Datasets Menu (=8.15)...................................................................................................................................261
Options.........................................................................................................................................................................261
Allocate NonVSAM (=8.15.1).......................................................................................................................................262
Menu Bar Items....................................................................................................................................................262
Define VSAM KSDS/ESDS/RRDS/LDS (=8.15.2/3/4/5)..............................................................................................263
Menu Bar Items....................................................................................................................................................263
Define GDG Base (=8.15.7).........................................................................................................................................264
Menu Bar Items....................................................................................................................................................264
Panel Input Fields.................................................................................................................................................264
Data Set Information...........................................................................................................................................................265
Dataset Information - Non-VSAM................................................................................................................................266
Page 1..................................................................................................................................................................266
Page 2..................................................................................................................................................................268
Page 3-n...............................................................................................................................................................268
Dataset Information - VSAM........................................................................................................................................270
Page 1..................................................................................................................................................................270
Data Component Information................................................................................................................................271
Dataset Date Information......................................................................................................................................271
DEFINE Options...................................................................................................................................................271
Page 2..................................................................................................................................................................272
Page 3..................................................................................................................................................................274
Page 4..................................................................................................................................................................274
Page 5-n...............................................................................................................................................................274
Create Structure (SDO) Menu (=9).................................................................................................................................................276
Menu Bar Items...................................................................................................................................................................276
Options................................................................................................................................................................................276
Create Structure from Copybook(s)....................................................................................................................................276
Create Structure from COBOL/PL1 copybook(s).........................................................................................................276
Options.................................................................................................................................................................277
Panel Input Fields.................................................................................................................................................277
Create Structure - Copybook Library List.....................................................................................................................277
Create Structure - Define Record-Types.....................................................................................................................278
Panel Input Fields.................................................................................................................................................279
Create Structure from XREF File........................................................................................................................................280
Panel Input Fields........................................................................................................................................................280
Display Record Layout........................................................................................................................................................281
Display Record Layout Panel.......................................................................................................................................281
Panel Input Fields.................................................................................................................................................282
Display Record Layout Output.....................................................................................................................................282
Columns Displayed...............................................................................................................................................283
Create File Filter (=10).....................................................................................................................................................................284
Panel Input Fields...............................................................................................................................................................284
Unformatted Selection Criteria............................................................................................................................................286
Panel Input Fields........................................................................................................................................................287
Formatted Selection Criteria...............................................................................................................................................287
FILTER (formatted) - INCLUDE/EXCLUDE record-types............................................................................................287
Filter (formatted) - Selection Criteria............................................................................................................................288
Panel Input Fields.................................................................................................................................................289
Print Data File (=11).........................................................................................................................................................................290
Print Data File - Input..........................................................................................................................................................290
Print Data File - VFMT Options...........................................................................................................................................292
Print Data File - FMT Options.............................................................................................................................................294
Print Data File - Select Record-Types.................................................................................................................................296
Print Data File - Select Field Names...................................................................................................................................297
Print Data File - Field Names List.......................................................................................................................................297
2013-11-13 13:06:41
vii
SELCOPY/i Reference and User Guide
Contents
Print Data File (=11)
Print Data File - CHAR Options...........................................................................................................................................298
Print Data File - UNFMT Options........................................................................................................................................299
Print Data File - Destination................................................................................................................................................300
DB2 Utilities.....................................................................................................................................................................................302
DB2 Primary Option Menu..................................................................................................................................................302
Menu Bar Items............................................................................................................................................................303
Options.........................................................................................................................................................................303
Panel Input/Output Fields............................................................................................................................................303
Execute DB2 Commands....................................................................................................................................................304
Menu Bar Items............................................................................................................................................................305
Field Entries.................................................................................................................................................................305
Execute SQL Statements....................................................................................................................................................305
Menu Bar Items............................................................................................................................................................306
Field Entries.................................................................................................................................................................307
Edit Tables and Views.........................................................................................................................................................307
Menu Bar Items............................................................................................................................................................308
Field Entries.................................................................................................................................................................308
Browse Tables and Views...................................................................................................................................................310
Menu Bar Items............................................................................................................................................................311
Field Entries.................................................................................................................................................................311
Create DB2 Objects............................................................................................................................................................312
Menu Bar Items............................................................................................................................................................312
Options.........................................................................................................................................................................313
Create Storage Group..................................................................................................................................................313
Menu Bar Items....................................................................................................................................................313
Field Entries..........................................................................................................................................................313
Create Work File Database..........................................................................................................................................314
Menu Bar Items....................................................................................................................................................314
Field Entries..........................................................................................................................................................314
Create User Database.................................................................................................................................................315
Menu Bar Items....................................................................................................................................................315
Field Entries..........................................................................................................................................................316
Create Work File Table Space.....................................................................................................................................316
Work File Table Space Values.............................................................................................................................317
Menu Bar Items....................................................................................................................................................317
Work File Table Space Values - Panel Fields......................................................................................................317
Create User Table Space............................................................................................................................................318
Table Space Name & Type...................................................................................................................................319
Menu Bar Items....................................................................................................................................................319
Table Space Name & Type - Panel Fields............................................................................................................319
Table Space Type Attributes................................................................................................................................320
Table Space Type Attributes - Panel Fields.........................................................................................................321
Table Space Partition Attributes...........................................................................................................................323
Table Space Partition Attributes - Panel Fields....................................................................................................323
Table Space Options (1/2)....................................................................................................................................324
Table Options (1/2) - Panel Fields........................................................................................................................324
Table Space Options (2/2)....................................................................................................................................325
Table Options (2/2) - Panel Fields........................................................................................................................326
Create Table................................................................................................................................................................326
Table Name & Location........................................................................................................................................326
Menu Bar Items....................................................................................................................................................327
Table Name & Location - Panel Fields.................................................................................................................327
Table Definition.....................................................................................................................................................328
Table Definition - Panel Fields..............................................................................................................................329
Columns & Constraints.........................................................................................................................................329
Columns & Constraints - Panel Fields..................................................................................................................330
Column Definitions................................................................................................................................................331
Column Definitions - Panel Fields.........................................................................................................................331
Column Definition - FIELDPROC Parameters......................................................................................................338
Primary Key Definition..........................................................................................................................................339
Primary Key Definition - Panel Fields...................................................................................................................339
Unique Constraint Definitions...............................................................................................................................340
Unique Constraint Definitions - Panel Fields........................................................................................................340
Unique Constraint Key Columns...........................................................................................................................341
Unique Constraint Key Columns - Panel Fields....................................................................................................341
Referential Constraint Definitions.........................................................................................................................342
Referential Constraint Definitions - Panel Fields..................................................................................................343
Referential Constraint - Parent Key Columns.......................................................................................................344
Referential Constraint - Parent Key Columns - Panel Fields................................................................................344
Referential Constraint - Foreign Key Columns.....................................................................................................345
Referential Constraint - Foreign Key Columns - Panel Fields..............................................................................346
Check Constraint Definitions................................................................................................................................346
Check Constraint Definitions - Panel Fields.........................................................................................................347
Model using LIKE..................................................................................................................................................347
Model using LIKE - Panel Fields...........................................................................................................................348
2013-11-13 13:06:41
viii
SELCOPY/i Reference and User Guide
Contents
DB2 Utilities
Model on Result Table..........................................................................................................................................349
Model on Result Table - Panel Fields...................................................................................................................349
Result Table Column Name Remap.....................................................................................................................350
Model on Tables/Views (Load Values).................................................................................................................350
Model on Tables/Views - Panel Fields..................................................................................................................351
Materialized Query Definition................................................................................................................................353
Materialized Query Definition - Panel Fields.........................................................................................................353
Implicit TableSpace Options.................................................................................................................................354
Implicit TableSpace Options - Panel Fields..........................................................................................................354
Table Options (1/2)...............................................................................................................................................355
Table Options (1/2) - Panel Fields........................................................................................................................355
Range Partitioning Key Columns..........................................................................................................................357
Range Partitioning Key Columns - Panel Fields...................................................................................................357
Tablespace Range Partitions................................................................................................................................358
Tablespace Range Partitions - Panel Fields.........................................................................................................358
Range Partitioning Key Values.............................................................................................................................359
Range Partitioning Key Values - Panel Fields......................................................................................................359
Table Options (2/2)...............................................................................................................................................360
Table Options (2/2) - Panel Fields........................................................................................................................360
Generate SQL.......................................................................................................................................................361
Generate SQL - Panel Fields................................................................................................................................361
Create View.................................................................................................................................................................362
Menu Bar Items....................................................................................................................................................363
Field Entries..........................................................................................................................................................363
Create Alias.................................................................................................................................................................364
Menu Bar Items....................................................................................................................................................364
Field Entries..........................................................................................................................................................364
Create Synonym..........................................................................................................................................................365
Menu Bar Items....................................................................................................................................................365
Field Entries..........................................................................................................................................................365
Create Distinct Type....................................................................................................................................................366
Menu Bar Items....................................................................................................................................................366
Field Entries..........................................................................................................................................................366
Create Trigger..............................................................................................................................................................367
Menu Bar Items....................................................................................................................................................367
Field Entries..........................................................................................................................................................368
Create Sequence.........................................................................................................................................................370
Menu Bar Items....................................................................................................................................................370
Field Entries..........................................................................................................................................................370
Create Role..................................................................................................................................................................371
Menu Bar Items....................................................................................................................................................372
Field Entries..........................................................................................................................................................372
Drop DB2 Objects...............................................................................................................................................................372
Menu Bar Items............................................................................................................................................................372
Options.........................................................................................................................................................................373
Drop Storage Group.....................................................................................................................................................373
Menu Bar Items....................................................................................................................................................373
Field Entries..........................................................................................................................................................373
Drop Database.............................................................................................................................................................374
Menu Bar Items....................................................................................................................................................374
Field Entries..........................................................................................................................................................374
Drop Table Space........................................................................................................................................................374
Menu Bar Items....................................................................................................................................................375
Field Entries..........................................................................................................................................................375
Drop Table...................................................................................................................................................................375
Menu Bar Items....................................................................................................................................................376
Field Entries..........................................................................................................................................................376
Drop View....................................................................................................................................................................376
Menu Bar Items....................................................................................................................................................377
Field Entries..........................................................................................................................................................377
Drop Alias....................................................................................................................................................................377
Menu Bar Items....................................................................................................................................................378
Field Entries..........................................................................................................................................................378
Drop Index...................................................................................................................................................................378
Menu Bar Items....................................................................................................................................................379
Field Entries..........................................................................................................................................................379
Drop Synonym.............................................................................................................................................................379
Menu Bar Items....................................................................................................................................................380
Field Entries..........................................................................................................................................................380
Drop Type....................................................................................................................................................................380
Menu Bar Items....................................................................................................................................................380
Field Entries..........................................................................................................................................................381
Drop Function..............................................................................................................................................................381
Menu Bar Items....................................................................................................................................................382
Field Entries..........................................................................................................................................................382
Drop Stored Procedure................................................................................................................................................382
2013-11-13 13:06:41
ix
SELCOPY/i Reference and User Guide
Contents
DB2 Utilities
Menu Bar Items....................................................................................................................................................383
Field Entries..........................................................................................................................................................383
Drop Trigger.................................................................................................................................................................383
Menu Bar Items....................................................................................................................................................384
Field Entries..........................................................................................................................................................384
Drop Global Temporary Table.....................................................................................................................................384
Drop Sequence............................................................................................................................................................385
Menu Bar Items....................................................................................................................................................385
Field Entries..........................................................................................................................................................385
Drop Role.....................................................................................................................................................................386
Menu Bar Items....................................................................................................................................................386
Field Entries..........................................................................................................................................................386
Drop Trusted context...................................................................................................................................................386
Menu Bar Items....................................................................................................................................................387
Field Entries..........................................................................................................................................................387
List DB2 Objects.................................................................................................................................................................387
Menu Bar Items............................................................................................................................................................388
Options.........................................................................................................................................................................388
List Storage groups......................................................................................................................................................388
Panel Input Fields.................................................................................................................................................388
Prefix Line Commands.........................................................................................................................................388
List Databases.............................................................................................................................................................389
Panel Input Fields.................................................................................................................................................389
Prefix Line Commands.........................................................................................................................................389
List Table spaces.........................................................................................................................................................389
Panel Input Fields.................................................................................................................................................390
Prefix Line Commands.........................................................................................................................................390
List Tables....................................................................................................................................................................390
Panel Input Fields.................................................................................................................................................390
Prefix Line Commands.........................................................................................................................................391
List Views.....................................................................................................................................................................391
Panel Input Fields.................................................................................................................................................391
Prefix Line Commands.........................................................................................................................................392
List Aliases...................................................................................................................................................................392
Panel Input Fields.................................................................................................................................................392
Prefix Line Commands.........................................................................................................................................392
List Indexes..................................................................................................................................................................393
Panel Input Fields.................................................................................................................................................393
Prefix Line Commands.........................................................................................................................................393
List Synonyms..............................................................................................................................................................393
Panel Input Fields.................................................................................................................................................394
Prefix Line Commands.........................................................................................................................................394
List Distinct Types........................................................................................................................................................394
Panel Input Fields.................................................................................................................................................394
Prefix Line Commands.........................................................................................................................................395
List Triggers.................................................................................................................................................................395
Panel Input Fields.................................................................................................................................................395
Prefix Line Commands.........................................................................................................................................395
List Global Temporary Tables......................................................................................................................................395
Panel Input Fields.................................................................................................................................................395
Prefix Line Commands.........................................................................................................................................396
List Sequences............................................................................................................................................................396
Panel Input Fields.................................................................................................................................................396
Prefix Line Commands.........................................................................................................................................396
List Roles.....................................................................................................................................................................396
Panel Input Fields.................................................................................................................................................397
Prefix Line Commands.........................................................................................................................................397
List Trusted Contexts...................................................................................................................................................397
Panel Input Fields.................................................................................................................................................397
Prefix Line Commands.........................................................................................................................................397
List Columns................................................................................................................................................................397
Panel Input Fields.................................................................................................................................................398
Prefix Line Commands.........................................................................................................................................398
List Volumes................................................................................................................................................................398
Panel Input Fields.................................................................................................................................................398
Prefix Line Commands.........................................................................................................................................398
List Table space parts..................................................................................................................................................399
Panel Input Fields.................................................................................................................................................399
Prefix Line Commands.........................................................................................................................................399
Select DB2 Objects.............................................................................................................................................................399
Select Storage Group..................................................................................................................................................400
Panel Input Fields.................................................................................................................................................400
Prefix Line Commands.........................................................................................................................................400
Select Database...........................................................................................................................................................400
Panel Input Fields.................................................................................................................................................401
Prefix Line Commands.........................................................................................................................................401
2013-11-13 13:06:41
x
SELCOPY/i Reference and User Guide
Contents
DB2 Utilities
Select Tablespace.......................................................................................................................................................401
Panel Input Fields.................................................................................................................................................402
Prefix Line Commands.........................................................................................................................................402
Select Table.................................................................................................................................................................402
Panel Input Fields.................................................................................................................................................403
Prefix Line Commands.........................................................................................................................................404
Select Distinct Type.....................................................................................................................................................404
Panel Input Fields.................................................................................................................................................405
Prefix Line Commands.........................................................................................................................................405
Select Unique Key Constraint......................................................................................................................................405
Panel Input Fields.................................................................................................................................................406
Prefix Line Commands.........................................................................................................................................407
Select Foreign Key Column.........................................................................................................................................407
Panel Input Fields.................................................................................................................................................407
Prefix Line Commands.........................................................................................................................................408
Audit Trail Functions...........................................................................................................................................................408
Menu Bar Items............................................................................................................................................................408
Options.........................................................................................................................................................................408
Audit Log Dataset Options...........................................................................................................................................408
Panel Input Fields.................................................................................................................................................408
Print Audit Report.........................................................................................................................................................409
Menu Bar Items....................................................................................................................................................410
Panel Input Fields.................................................................................................................................................410
List Audit Datasets.......................................................................................................................................................410
Window List (=W)............................................................................................................................................................................411
SELCOPY/i Command Reference..................................................................................................................................................412
ALIAS..................................................................................................................................................................................414
AMS....................................................................................................................................................................................414
AMSDIALOG.......................................................................................................................................................................415
APE.....................................................................................................................................................................................415
AUDPRINT..........................................................................................................................................................................416
BACKWARD.......................................................................................................................................................................416
BOTTOM.............................................................................................................................................................................417
BROWSE............................................................................................................................................................................417
CALENDAR.........................................................................................................................................................................417
CALC...................................................................................................................................................................................418
CBLI....................................................................................................................................................................................418
CBLICANCEL......................................................................................................................................................................418
CBLNAME...........................................................................................................................................................................419
CFOUT................................................................................................................................................................................419
CLOSE................................................................................................................................................................................419
COMMANDLINE.................................................................................................................................................................420
COMPFILE..........................................................................................................................................................................421
COMPLIB............................................................................................................................................................................429
CURSORSELECT...............................................................................................................................................................430
DB2.....................................................................................................................................................................................430
DCMD.................................................................................................................................................................................431
DOWN.................................................................................................................................................................................432
DSINFORMATION..............................................................................................................................................................433
DSQL..................................................................................................................................................................................433
DRAGBORDERMINUS.......................................................................................................................................................434
DRAGBORDERPLUS.........................................................................................................................................................434
EDIT....................................................................................................................................................................................435
EO.......................................................................................................................................................................................436
ERASE................................................................................................................................................................................437
EXECSQL...........................................................................................................................................................................438
FAV.....................................................................................................................................................................................440
FCOPY................................................................................................................................................................................441
FORWARD..........................................................................................................................................................................444
FS........................................................................................................................................................................................444
FSU.....................................................................................................................................................................................445
FSUEND.............................................................................................................................................................................456
FSUOUT.............................................................................................................................................................................456
FSUUNDO..........................................................................................................................................................................457
HELP...................................................................................................................................................................................458
HOME.................................................................................................................................................................................459
IEBCOPYDIALOG...............................................................................................................................................................459
ISPF....................................................................................................................................................................................459
ISPFUTIL............................................................................................................................................................................460
KEYS...................................................................................................................................................................................460
KEYS Dialog................................................................................................................................................................461
KEYS Dialog (KEYLISTs ON)...............................................................................................................................461
KEYS Dialog (KEYLISTs OFF).............................................................................................................................461
KEYLIST.............................................................................................................................................................................462
2013-11-13 13:06:41
xi
SELCOPY/i Reference and User Guide
Contents
SELCOPY/i Command Reference
KEYLIST Dialog...........................................................................................................................................................462
Prefix Line Commands.........................................................................................................................................463
LA........................................................................................................................................................................................463
LAS.....................................................................................................................................................................................463
LC........................................................................................................................................................................................465
LD........................................................................................................................................................................................467
LEFT...................................................................................................................................................................................469
LJQ......................................................................................................................................................................................470
LL........................................................................................................................................................................................470
LLX......................................................................................................................................................................................471
LP........................................................................................................................................................................................473
LQ.......................................................................................................................................................................................474
LV........................................................................................................................................................................................475
LVOL...................................................................................................................................................................................476
LVR.....................................................................................................................................................................................476
LX........................................................................................................................................................................................477
MAXIMISE...........................................................................................................................................................................477
MDINEXT............................................................................................................................................................................478
MDIPREV............................................................................................................................................................................478
MINIMISE............................................................................................................................................................................478
MOVEWINDOW..................................................................................................................................................................479
NEXTMAINWINDOW..........................................................................................................................................................480
NEXTWINDOW...................................................................................................................................................................480
POWER...............................................................................................................................................................................480
PREVMAINWINDOW..........................................................................................................................................................481
PREVWINDOW...................................................................................................................................................................481
QUICKREF..........................................................................................................................................................................482
QUIT....................................................................................................................................................................................482
RENAME.............................................................................................................................................................................482
RESTORE...........................................................................................................................................................................483
RETRIEVE..........................................................................................................................................................................483
RIGHT.................................................................................................................................................................................484
SDATA................................................................................................................................................................................485
SDE.....................................................................................................................................................................................485
SDSF...................................................................................................................................................................................485
SELCOPY...........................................................................................................................................................................486
SETCOLOUR......................................................................................................................................................................487
SETFOCUS.........................................................................................................................................................................488
SHOWPOPUPMENU..........................................................................................................................................................489
SHOWWATTR....................................................................................................................................................................490
SIZEWINDOW....................................................................................................................................................................490
SQL.....................................................................................................................................................................................492
SVC.....................................................................................................................................................................................493
SYSAPF..............................................................................................................................................................................493
SYSCOMMAND..................................................................................................................................................................493
SYSI....................................................................................................................................................................................494
SYSLL.................................................................................................................................................................................494
SYSLPA..............................................................................................................................................................................494
SYSMENU..........................................................................................................................................................................495
SYSPGM.............................................................................................................................................................................495
SYSSTOR...........................................................................................................................................................................495
SYSTASK............................................................................................................................................................................495
TASK...................................................................................................................................................................................496
TOP.....................................................................................................................................................................................496
UP.......................................................................................................................................................................................497
VCAT...................................................................................................................................................................................498
VIEW...................................................................................................................................................................................498
VOLSTATS.........................................................................................................................................................................499
WINDOWLIST.....................................................................................................................................................................500
WINDOWNAMES................................................................................................................................................................500
XMLGEN.............................................................................................................................................................................501
Unix System Services (USS) Commands......................................................................................................................................509
USS CHDIR........................................................................................................................................................................509
USS GETCWD....................................................................................................................................................................509
USS LINK............................................................................................................................................................................510
USS MKDIR........................................................................................................................................................................510
USS REALPATH.................................................................................................................................................................510
USS RENAME....................................................................................................................................................................511
USS RMDIR........................................................................................................................................................................511
USS STAT...........................................................................................................................................................................511
USS UNLINK.......................................................................................................................................................................512
SELCOPY/i VTAM commands........................................................................................................................................................513
MESSAGE..........................................................................................................................................................................513
QUERY...............................................................................................................................................................................513
2013-11-13 13:06:41
xii
SELCOPY/i Reference and User Guide
Contents
SELCOPY/i VTAM commands
STOP..................................................................................................................................................................................514
SELCOPY/i Dump Files...................................................................................................................................................................515
Appendix A - SELCOPY/i Window Classes...................................................................................................................................516
Appendix B - List File Prefix Command Summary.......................................................................................................................517
Command Cross-Reference...............................................................................................................................................519
Glossary...........................................................................................................................................................................................521
2013-11-13 13:06:41
xiii
Documentation Notes
First Edition, October 2013
Information in this document details general features and functionality of the SELCOPY Product Suite 3.20 component,
SELCOPY/i.
This document replaces the previous edition of SELCOPY/i Reference and User Guide applicable to SELCOPY Product Suite
3.10, which is now obsolete.
Copyright in the whole and every part of this document and of the SELCOPY Products Suite system and programs, is owned by
Compute (Bridgend) Ltd (hereinafter referred to as CBL), whose registered office is located at 8 Merthyr Mawr Road, Bridgend,
Wales, UK, CF31 3NH, and who reserve the right to alter, at their convenience, the whole or any part of this document and/or the
SELCOPY Product Suite system and programs.
SELCOPY Product Suite for z/OS, z/VM (CMS) and z/VSE operating systems, which includes SELCOPY, SELCOPY/i and
CBLVCAT, is available for download and install from http://www.cbl.com/selcdl.html.
The following publications for SELCOPY Product Suite and its component products are available in Adobe Acrobat PDF format at
CBL web page http://www.cbl.com/selcdoc.html:
• SELCOPY Product Suite Customisation Guide
• SELCOPY User Manual
• CBLVCAT User Manual
• SELCOPY/i Reference and User Guide
• SELCOPY/i Text Editor (CBLe) Manual
• SELCOPY/i Structured Data Editor Manual
No reproduction of the whole or any part of the SELCOPY Product Suite system and programs, or of this document, is to be made
without prior written authority from Compute (Bridgend) Ltd.
At the time of publication, this document is believed to be correct. Where the program product differs from that stated herein,
Compute (Bridgend) Ltd reserve the right to revise either the program or its documentation at their discretion. CBL do not warrant
that upward compatibility will be maintained for any use made of this program product to perform any operation in a manner not
documented within the user manual.
The following generic terms are used throughout this document to indicate all available versions and releases of IBM mainframe
operating systems:
MVS - z/OS, OS/390, MVS/ESA, MVS/XA, MVS/SP, OS.
VSE - z/VSE, VSE/ESA, VSE/SP, DOS.
CMS - z/VM, VM/ESA, VM/XA, VM/SP.
All
- All MVS, VSE and CMS operating systems.
2013-11-13 13:06:41
SELCOPY/i Reference and User Guide
1
Summary of Changes
This section is a summary of significant new features provided in SELCOPY/i Release 3.20.
First Edition (October 2013)
SELCOPY/i Training Material & Manual
Primary Options panel updated to include "Training" item (T) to guide new users through initialisation of sample test data,
copy books and record selection (filter) data sets for use in conjunction with the "SELCOPY/i Training Manual" publication.
For details, see:
◊ "Primary Option Menu (=)"
ISPF style KeyLists
Introduce definition and management of function keys within SELCOPY/i key list tables in a manner which is analogous to
ISPF panel key lists. Use of key lists is default and is now the preferred alternative to key assignments based on a
SELCOPY/i window's window class.
For details, see:
◊ "Function Key Settings (=0.8)"
◊ "Function Keys"
◊ KEYS
◊ KEYLIST
ISPF SPLIT
SELCOPY/i windows within the application ISPF panel now resize based on the depth of the display area available to the
panel when it is one of the logical sessions involved in an ISPF SPLIT operation. This change overcomes scrolling issues
and potential loss of SELCOPY/i command prompt display when ISPF SPLIT has been actioned at a location within the
3270 display area.
FCOPY and FSU Utility Panels
Both the File Search, Update, Copy and Remap (FSU) utility and File Copy (FCOPY) utility have undergone extensive
changes to improve usability and functionality in what have become very powerful and potentially complex tools.
For details, see:
◊ "File Copy (=5)"
◊ "File Search/Update/Copy/Remap (=6)"
Data Set Information
Detailed information on all types of file objects may now be displayed using data set information panels which have
different contents depending on the type and oraganisation of file object.
For details, see:
◊ "Data Set Information"
◊ "Dataset Information - Non-VSAM"
◊ "Dataset Information - VSAM"
◊ DSINFORMATION
Regular Expressions
Regular expressions may be used as arguments to the FIND and CHANGE parameters of the FSU primary command and
equivalent fields in the File Search/Update/Copy/Remap panel views. These provide string search complex pattern
matching.
For details, see:
◊ "Basic File Search Panel"
◊ "Extended File Search/Update/Copy/Remap Panels"
XML Generation
2013-11-13 13:06:41
SELCOPY/i Reference and User Guide
2
Summary of Changes
First Edition (October 2013)
Introduce support for primary command XMLGEN to generate XML source for formatted data.
For details, see:
◊ XMLGEN
DB2 Object Creation
Introduce new panels for DB2 Tablespace and Table creation. Object modelling has also been introduced for existing DB2
object creation panels.
For details, see:
◊ "Create Work File Table Space"
◊ "Create User Table Space"
◊ "Create Table"
DB2 SQL Execution
New DB2 SQL execution facility (EXECSQL) introduced. Like SPUFI, primary command EXECSQL will execute SQL
statements in a text file and display the output in a text edit view. However, EXECSQL is a lot more flexible than SPUFI
supporting a number of additional options.
For details, see:
◊ EXECSQL
GDG Base Definition
Support panel to define a new GDG Base cayalog entry.
For details, see:
◊ "Define GDG Base (=8.15.7)"
Settings Panels
Settings panels have been updated to include text edit ACTION facility options and Function Key (KeyList) management.
For details, see:
◊ "Text Edit Settings (=0.3)"
◊ "Function Key Settings (=0.8)"
VTOC Extents List
The List VTOC extents panel and primary command (LX) have been enhanced to include a DSN filter.
For details, see:
◊ "List VTOC Extents (=3.3)"
◊ LX
Print File Data Utility
Introduce new panels for Printing formatted or unformatted file data. Includes ammendements to the Primary Options
Menu and Utilities panels.
For details, see:
◊ "Print File Data Utility"
Text Edit Panel
Text Edit panel (=1) reworked. Original version moved to List panel option 4 (=3.4) as the Data Set List utility.
For details, see:
◊ "Text Edit (=1)"
◊ "Dataset List Utility (=3.4)"
2013-11-13 13:06:41
SELCOPY/i Reference and User Guide
3
Summary of Changes
First Edition (October 2013)
Structured Data Edit Panel
Data Edit panel (=2) reworked to provide easier implementation of the different edit techniques and record selection
(filtering) functionality.
For details, see:
◊ "Data Edit (=2)"
2013-11-13 13:06:41
SELCOPY/i Reference and User Guide
4
About SELCOPY/i
System Environment
SELCOPY/i is a full screen 3270 application which executes in any of the following environments:
◊ z/OS TSO/E.
◊ z/OS TSO/E as an ISPF application.
◊ z/OS as a stand-alone, multi-user VTAM application. (See Disaster Recovery below)
◊ z/VSE as a stand-alone, multi-user VTAM application.
◊ z/VM CMS.
General Functionality
The SELCOPY/i environment includes a compendium of tools and facilities that operate within a windowed environment
within the 3270 display. The following is a selection of the supported features:
◊ Function rich text editor (CBLe) with both ISPF Edit and XEDIT compatibility.
◊ Structured data editor supporting COBOL and PL1 Copybooks.
◊ DB2 table editor.
◊ DB2 SQL execution.
◊ List facility includes DB2 objects, Datasets, DASD Volumes, VTOC files/extents, HFS files and ENQs.
◊ File Search and Update including support for copybook map.
◊ File Copy supporting mixed data set organisations and copybook remap.
◊ File and PDS/PDSE library Compare.
◊ SELCOPY interactive development environment and debugger.
◊ CBLVCAT interactive reports and VSAM data set tuning.
SELCOPY/i Environment
SELCOPY/i is a full screen 3270 interface which provides the user with a working environment whereby all tools and
facilities (dialog panels, edit views, data set lists, etc.) are presented in windows within the 3270 display. Like PC
workstation and UNIX based operating systems that support a windowed environment, SELCOPY/i includes the following
features:
◊ Multiple overlapping window views.
◊ Window title and menu bars.
◊ Minimise, Maximise and Resize of displayed windows.
◊ Repositioning of displayed windows.
◊ Point-and-shoot buttons.
◊ Drop down and popup menus.
Disaster Recovery
SELCOPY/i has the same functionality when executing as a VTAM application as it does when running in user's TSO/E
address space. Therefore, customising SELCOPY/i to execute as a stand-alone VTAM application from a recovery
volume, would allow functions such as data editing, job submission, data set allocation and system navigation, even if
ISPF and TSO/E are unavailable.
In addition to functionality included in the SELCOPY and CBLVCAT batch utilities, the systems programmer is provided
with a powerful set of tools to assist in the data recovery process.
2013-11-13 13:06:41
SELCOPY/i Reference and User Guide
5
Getting started with SELCOPY/i
This chapter introduces end users to some basic SELCOPY/i concepts.
Starting the SELCOPY/i program
How SELCOPY/i is started depends on the environment in which it is to be executed.
OS
Environment
Command
TSO/E
Enter SELCOPYI at the READY prompt.
ISPF
Enter TSO %SELCOPYI on an ISPF command line.
Alternatively, SELCOPY/i may have been included as a selectable item in an ISPF menu and/or as an
ISPF command (e.g. SI) by your systems programmer as part of the product install.
MVS
ISPF screen management is used and so SELCOPY/i must have first been defined as an ISPF
application. See SELCOPY Products Suite Customisation Guide for further information on configuring
access to SELCOPY/i in ISPF.
VTAM
Enter LOGON APPLID(SELCOPYI) on a VTAM USS screen.
Note: The SELCOPY/i VTAM session controller program (CBLIVTAM) must be running and the
SELCOPY/i VTAM applid, SELCOPYI, must be active. See SELCOPY Products Suite Customisation
Guide for further information on configuring access to SELCOPY/i as a stand-alone VTAM application.
VSE
VTAM
Enter LOGON APPLID(CBLIVTAM) on a VTAM USS screen.
Alternatively, SELCOPY/i may have been included as a selectable item in the VTAM Application
Selection Menu, VTMUSSTR (SNA) or VTMUSSTB (non-SNA), by your systems programmer as part
of the product install.
Note: The SELCOPY/i VTAM session controller program (CBLIVTAM) must be running in a static or
dynamic partition and the SELCOPY/i VTAM applid, CBLIVTAM, must be active. See CBL Software
Install Guide for VSE Systems for further information.
VM
CMS
Enter SELCOPYI on a CMS command line to execute the SELCOPY/i startup Rexx EXEC.
Security Considerations
VSE Systems
By default, it is assumed that a Basic or Extended Security Manager (BSM or ESM) is operational (SEC=YES) and so SELCOPY/i
authenticates the user logon id and password at startup, and thereafter performs resource access checking for the userid as
required. e.g. For LIBR library lists and member edit.
Before an attempt is made to perform an operation on a resource, SELCOPY/i first checks whether the user has sufficient access
authority for that resource and, if not, does not attempt the operation but instead returns an error message to the user's session.
When running with a security manager, SELCOPY/i processing of POWER queue list entries, displayed in the Execute POWER
command window, is allowed only if the user's logon id matches either the TO or FROM field values.
If no security manager is in effect, then the SELCOPY/i System INI variable SYSTEM.VSESMLogon=No must be set in order to
bypass userid authentication and resource access checking. The user is prompted for a logon id, which gets assigned to the
environment variable %user%, but no password is required.
With no security manager, access to resources (LIBR libraries, members, etc.) will be unrestricted with the exception of POWER
queue list entries where the user may process only queue entries that are password protected and for which the password is
known to the user.
Whether or not a security manager is operational, SELCOPY/i may be customised to restrict its use to only a specified group of
trusted users. Following logon, these users will be prompted for a SELCOPY/i password which may differ from the user's security
manager password.
If the trusted user facility is activated, then no other users will be able to successfully start SELCOPY/i. Trusted users may process
any POWER queue list entry without restriction.
Trusted users may process any POWER queue list entry without restriction.
2013-11-13 13:06:41
SELCOPY/i Reference and User Guide
6
Getting started with SELCOPY/i
VSE Systems
See section Security Manager in document CBL Software Install Guide for VSE Systems for further information.
MVS Systems
On MVS systems, users login to SELCOPY/i using their RACF, or equivalent security package, login id. Under TSO, no
SELCOPY/i login is performed as the user's TSO login id is used instead.
Thereafter, the user's access privilage is verified prior to performing any action on potentially protected resources. e.g. listing
PDS(E) library contents and editing data sets.
In addition to this, the security administrator can restrict users' access to the following SELCOPY/i features using RACF profiles.
Resource Name
SELCOPY/i Feature
System
Access to the z/OS Operating System information available by selecting 'Operating System' from
the Utilities/System menu in the CBLe main window menu bar, or via line commands SYSI,
SYSLPA, SYSLL, SYSAPF, SYSTASK, SYSSTOR, SYSPGM and CBLNAME.
UserTSO
Log on to SELCOPY/i under TSO and ISPF.
UserVTAM
Log on to SELCOPY/i as VTAM application.
SELCOPY
Use of the SELCOPY Debug application.
CBLVCAT
Use of the CBLVCAT Interactive (VCI) application.
DB2
Use of DB2 features.
If these resources have been customised then users must have at least READ access to the specific resource in order to be able to
perform the equivalent operation.
See section Security Considerations in document SELCOPY Product Suite Customisation Guide for further information.
3270 Terminal Emulation
Before SELCOPY/i is started, 3270 terminal session is required. Most installations now use a 3270 emulation software executing
on a workstation rather than a real 3270 terminal.
3270 Screen Sizes
The CBL 3270 screen manager can operate in any 3270 screen size up to a total area of 16384 (16K) with a maximum width or
depth of 255. This 16K area limit is imposed by the 14 bit address format of the 3270 data stream used by SELCOPY/i. The 255
width or depth limit is the result of some components using just 1 byte to store these dimensions.
All 3270 emulation software packages allow the user to configure a 3270 session to emulate hardware terminal models 2/3/4/5
having rows x columns screen sizes of 24x80, 32x80, 43x80 and 27x132 respectively.
Most good 3270 emulators also support the ability to define non-standard terminal sizes (dynamic TN3270 terminals) that allow
users to obtain 3270 screen sizes with dimensions much larger than the standard hardware models.
Note: To configure z/OS non-standard screen sizes, a VTAM dynamic logmode must be defined to your system (IBM supply VTAM
dynamic logmode D4C32XX3 in VTAMLIB.) This logmode may optionally be configured as the default for TN3270 sessions via a
TELNETDEVICE DYNAMIC entry in the TN3270 server configuration data set.
See the IBM Technotes and Tips web page entitled Creating dynamic 3270 screen size definitions for increased productivity for
further information.
When using 3270 emulation software, it is strongly recommended that the largest possible screen size be used to take full
advantage of SELCOPY/i's ablility to display multiple overlapping windows. At CBL, a screen size of 96x160 is regularly used for
TSO sessions (160 being the maximum number of columns supported by ISPF) and 86x190 used for CMS and VTAM sessions
(MVS and VSE).
A selection of popular 3270 emulator packages have been installed and tested at CBL to determine support for dynamic terminal
sizes and other features considered useful to SELCOPY/i operation (Keyboard macros, etc.) A synopsis of results for each product
tested to date may be found at the SELCOPY/i and 3270 Terminal Emulation Software web page.
Sample 3270 emulator configuration files that provide non-standard terminal sizes have been generated for selected 3270
emulation products and are available for download from the SELCOPY/i Downloads web page.
2013-11-13 13:06:41
SELCOPY/i Reference and User Guide
7
Getting started with SELCOPY/i
Keyboard and Mouse Mapping
Keyboard and Mouse Mapping
Configuration of the 3270 emulator software keyboard and mouse is recommended to greatly enhance the user's experience of the
SELCOPY/i window environment. Most good 3270 emulator software packages provide the facility to do this.
Traditionally, 3270 terminal keyboards provide only the 24 programmable function keys (PF01-PF24) whereas 3270 emulation
software provides the facility to map functions and macros to a much wider range of key combinations. (e.g. Ctrl-S may be mapped
to execute a SAVE operation.)
Of most benefit to the use of SELCOPY/i, is the ability to map the mouse left button double-click action to be "position the cursor
here and press <Enter>". Configuring this emulator feature provides quicker window manipulation, button pressing, menu selection,
etc., so allowing the user to operate on SELCOPY/i windows using the mouse in a manner that is intuitive to users of PC or UNIX
workstations.
In addition to sample 3270 session configuration files, CBL provides a library of keyboard macros with recommended keyboard and
mouse map files for 3270 emulator products, IBM Personal Communications and Tom Brennan's Vista3270.
For further information, see the CBL web pages SELCOPY/i and 3270 Terminal Emulation Software and SELCOPY/i Downloads.
Window Concepts
The SELCOPY/i window environment is managed by the CBL3270 screen manager.
In general, CBL3270 managed windows behave in a similar fashion to window GUI environments provided by PC and UNIX
operating systems.
This section provides technical detail on characteristics and concepts shared by all SELCOPY/i windows. It also provides
instructions on how to work with windows in the SELCOPY/i environment.
Window Hierarchy
All windows exist in a hierarchy. At the top of the hierarchy is the desktop window which is automatically created during
initialisation. The desktop window occupies the entire screen and cannot be moved, resized or destroyed. All other windows,
including the SELCOPY/i main window, are dependents of the desktop.
When an application creates a window the new window has to be dependent on an existing window, the parent or owning window.
If the application does not supply an existing window then the desktop window is used by default. This dependency relationship has
two forms:
• Owned window. The dependent window is owned by the existing window which is called its owner. The owned window
can be moved all over the display surface but is always in front of (cannot be obscured by) its owner. Typically owned
windows are used for more complex entities such as MDI frame windows, dialog boxes and help windows.
• Child window. The dependent window is not only owned by, but is also a child of the existing window which is called its
parent. The child window can only exist within the rectangle defined by its parent's client area. Typically, child windows are
used for low level entities such as buttons and input fields.
• MDI (Multiple Document Interface) Child window. The dependent window is an MDI child of the existing MDI parent
(frame) window. Like child windows, the MDI child window can only exist within the rectangle defined by its parent's MDI
client area. However, unlike child windows, each MDI child window has a sizing border, a title bar, a window menu, a
minimise button, and a maximise button.
SELCOPY/i MDI applications include the CBLe text editor and SELCOPY Debugger, each supporting various types of
MDI child windows. e.g. text edit views, SDE edit views, list windows, help windows and IPO panels.
When a window is destroyed, so are all of its dependent owned and child windows.
Manipulating Windows
Moving a window
If a window has a title bar it can be moved with the following procedure:
1. Place the cursor in the title bar of the window.
2. Press the <Enter> key. The window border will be highlighted.
3. Move the cursor to a new position.
4. Press the <Enter> key. The window will move by an amount equal to the displacement of the cursor.
Note that, if configured, double-clicking the left mouse button on the window title bar, then doing the same at the new
location will perform the same action.
Also see line command MOVEWINDOW and, for CBLe text edit document windows only, SET WINPOS.
2013-11-13 13:06:41
SELCOPY/i Reference and User Guide
8
Getting started with SELCOPY/i
Manipulating Windows
Resizing a window
If a window has a border it can be resized with the following procedure:
1. Place the cursor in the border of the window. If the cursor is in the top or bottom border, the window will have its
depth changed. If the cursor is in the left or right border it will have its width changed. If the cursor is in a corner
of the border it will have its width and depth changed.
2. Press the <Enter> key. The window border will be highlighted.
3. Move the cursor to a new position.
4. Press the <Enter> key. The window will be resized by an amount equal to the displacement of the cursor.
Note that, if configured, double-clicking the left mouse button on a window border, then doing the same at the new location
will perform the same action.
Also see line commands SIZEWINDOW, DRAGBORDERMINUS, DRAGBORDERPLUS and, for CBLe text edit document
windows only, SET WINSIZE.
Maximising a window
If a window has a maximise button it can be maximised by moving the cursor to the maximise button and hitting the
<Enter> key or, if configured, double-clicking the left mouse button on the maximise button. The window will then take up
the whole of the 3270 screen. The maximise button will change from a plus sign to a solid vertical bar (representing
restore).
Also see line command MAXIMISE and, for CBLe text edit document windows only, WINDOW MAX.
Minimising a window
If a window has a minimise button it can be minimised by moving the cursor to the minimise button and hitting the <Enter>
key or, if configured, double-clicking the left mouse button on the minimise button. The window will then be removed from
the display and replaced by a small iconic window showing just a portion of its title bar near the botton of the SELCOPY/i
main window. The minimise button will change from a minus sign to a solid vertical bar (representing restore ).
Also see line command MINIMISE, for CBLe text edit document windows only, WINDOW MIN.
Restoring a window
When a window has been maximised or minimised, the maximise/minimise button is replaced restore button.
A maximised or minimised window may be restored to its former location and size by moving the cursor to the restore
button and hitting the <Enter> key or, if configured, double-clicking the left mouse button on the restore button.
Also see line command RESTORE, for CBLe text edit document windows only, WINDOW REST.
Closing a window
A window can be closed by moving the cursor to the close button and hitting the <Enter> key or, if configured,
double-clicking the left mouse button on the close button.
Also see line command CLOSE and, for CBLe text edit document windows only, WINDOW CLOSE.
Window Format
SELCOPY/i windows have a standard format which consists of the following components. Not all windows have all these
components, but where present they occupy the same relative position in the window and have the same function.
The Title Bar
The title bar contains the title of the window.
The System Menu Button
The system menu button is at the left end of the title bar. If pressed the options of the system menu are displayed in a
popup menu.
The Minimise Button
The minimise button is at the right end of the title bar. It is represented as a single "-" (minus sign) in white reverse video.
If the window is minimised then the minus sign is replaced by a solid vertical bar representing restore.
Note that the Minimise button is not present in the SELCOPY/i main window.
The Restore Button
The Restore button is displayed in place of the Minimise or Maximise button when a window is in a minimised or
maximised state respectively. It is represented by a solid vertical bar in white reverse video.
Note that the Restore button is not present in the SELCOPY/i main window.
The Maximise Button
The maximise button is at the right end of the title bar. It is represented as a single "+" (plus sign) in white reverse video. If
the window is maximised then the plus sign is replaced by a solid vertical bar representing restore.
Note that the Maximise button is not present in the SELCOPY/i main window.
2013-11-13 13:06:41
SELCOPY/i Reference and User Guide
9
Getting started with SELCOPY/i
Window Format
The Close Button
The close button is at the right end of the title bar. It is represented as an "x" in red reverse video.
The Menu Bar
The menu bar occupies one or more lines below the title bar. It contains optional items that can be selected by positioning
the cursor on the menu item text and hitting <Enter> or, if configured, double-clicking the mouse left button on the menu
item.
Menu items may display pop-up sub-menu items which may be selected in the same fashion. All menu items have the
3270 unprotected attribute so they can be navigated using the <Tab> key which tabs to enterable fields. Any data entered
into a menu item is ignored.
Menu items may have been enabled or disabled by the SELCOPY/i application. When enabled they are displayed in
white, when disabled they are displayed in blue in which case their selection will have no effect.
The Client Area
The client area of a window is the main body of the window and its contents vary depending on the class of the window.
The Command Line
The command line is an area of the window into which text commands may be entered. Most menu items have a
command line equivalent text command.
Pressing Buttons
The 3270 architecture is such that the host is only informed of user input when a certain class of key is pressed on the keyboard.
These keys are those with attention identifiers and typically consist of the function keys, the enter key, the Program Attention (PA)
keys and a few other specialised keys. Even when operating under the control of a workstation 3270 emulator, the 3270 host
application is not sensitive to mouse movements (except in the case when the emulator allows the user to assign a particular 3270
function to the mouse buttons).
Because of this, 3270 window buttons cannot be pressed in the same way as workstation window buttons. 3270 window buttons
are pressed by positioning the cursor on the button and hitting <Enter> or, if configured, double-clicking the left mouse button on
the button icon.
Window Focus
The focus window is the window which contains the cursor when the 3270 screen is displayed. If the window has a title bar then the
fact that it is the focus window is indicated by colouring the title bar area with blue reverse video. All other windows have a white
reverse video caption bar.
Input fields
The focus window defines the input rectangle which is the only area of the screen where input is enabled. When the focus window
is not a child window the input rectangle is the window itself.
When the focus window is a child window the input rectangle is that defined by its parent. Any input fields outside of the input
rectangle are temporarily disabled. Each field in the input rectangle can be visited by using the cursor tab key (shift+cursor tab key
to reverse the direction).
Changing the focus window
The user can change the focus window in the following ways:
• By placing the cursor in a window and hitting <Enter> or, if configured, double-clicking the left mouse button in the window
display area. This sets the focus to this window.
• WINDOW + (+ is default) or WINDOW - line commands. These commands cycle through all windows in creation
sequence. By default, WINDOW is assigned to function key F4.
• By selecting 'All Windows', from the Window menu in the CBLe main window menu bar, or executing the WINDOWLIST
command to open the Window List window and then selecting the required window entry. The selected window becomes
the focus window.
• By using the SETFOCUS line command to explicitly name the focus window.
Window Names
All the windows defined by a CBL3270 application have a name. The name is supplied by the application when the window is
created and may be changed later during the window's life.
If the name is not supplied by the application then a default name is supplied by CBL3270 made up of the window class name
suffixed with a three digit number which is incremented by 1 for each window of the class created during the CBL3270 session.
2013-11-13 13:06:41
SELCOPY/i Reference and User Guide
10
Getting started with SELCOPY/i
Window Names
The main use of window names is to allow commands entered on the command line of a window to refer to other windows which
are currently part of the application.
Viewing Window Names
The window name associated with each window in the SELCOPY/i session may be displayed in that window's title bar (and
subsequently hidden from view) via the following:
• Select 'Display/Hide Window Names' from the system menu belonging to any open window.
• Enter the line command WINDOWNAMES on the command line of any window.
Either of these operations will display or hide the window names for all open windows in the SELCOPY/i session.
By default, display of window names is suppressed to avoid overcrowding the title bar.
Alternatively, the Window List window may be used to obtain a window's associated window name. The window list displays all
open windows and their associated window names (including MDI window names.)
Window Class
All the windows defined by a CBL3270 application are members of a window class.
A window class is identified by a 1 to 8 character name and defines window behaviour, appearance and functions that are
commmon to windows belonging to that window class.
CBL3270 uses the window class name to associate a processing module (called a Window Procedure) with a window.
All windows in the same class are managed by the same window procedure. The window procedure is called by CBL3270
whenever an event occurs which affects the window. It is the window procedure's responsibility to:
1. Paint the window client area.
2. Establish PFKey definitions for the individual Class Function Keys table.
3. Process any data entered into the window.
4. Respond to any commands issued from the window's menu or command line.
A complete list of SELCOPY/i Windows Classes may be found in Appendix A - SELCOPY/i Window Classes.
System Menu
The system menu is a menu of functions which is available on all windows within a CBL3270 environment.
You access the system menu by pressing the system menu button at the top left of the main window (or any subordinate window
that has a system menu button). The following options are available from the system menu:
Layout
Restore
Minimise
Maximise
Close
Quit
Window List
Next window
Previous
window
Command line
Function keys
Show/Hide
window names
Use ISPF/TSO
2013-11-13 13:06:41
For Storage Display Windows only, displays the options popup menu. (As for SHOWPOPUPMENU.)
Restore a maximised or miminised window to its original size and position.
Minimise the window with the system menu.
Maximise the window with the system menu.
Close the window with the system menu.
Quit the application.
Open a window showing the current list of windows. You can select a window from this list by placing the
cursor on a list element and hitting <Enter> or, if configured, double-clicking the left mouse button. The
selected window will be given the focus.
Give the focus to the next window in the hierarchy of open windows.
Give the focus to the previous window in the hierarchy of open windows.
Open the command line dialog.
Open the functions keys dialog.
Toggle the status of the window names display. Window names are unique window identifiers which can
be used in commands to identify a particular window. If displayed, the window name is displayed in the
title bar as a prefix to the window caption.
When running under TSO/ISPF, this menu command toggles the display from ISPF to TSO format.
SELCOPY/i Reference and User Guide
11
Getting started with SELCOPY/i
Function Keys
Function Keys
For SELCOPYi Rel 3.20 onward, on z/OS systems SELCOPYi maintains its function key definitions in KEYLISTs, analogous to
ISPF keylists.
Use of KeyLists may be controlled using the Function Keys Settings (=0.8) panel, or the KEYLIST primary command.
Default Function Keys (KEYLISTs active)
The SELCOPY/i supplied default Caption (title bar) function keys, defined by KEYLIST=@WINTITL are:
F7
F8
F10
F11
F13
F14
F15
F16
F17
F18
F19
F20
F22
F23
MoveWindow by y=-1
MoveWindow by y=+1
MoveWindow by x=-1
MoveWindow by x=+1
WinX S
WinX R
SizeWindow by w=-20
SizeWindow by w=+20
SizeWindow by d=-20
SizeWindow by d=+20
MoveWindow by y=-5
MoveWindow by y=+5
MoveWindow by x=-5
MoveWindow by x=+5
Drag window up 1 line
Drag window down 1 line.
Drag window left 1 column.
Drag window right 1 column.
Save current browse/edit window size/position.
Restore current browse/edit window size/position.
Decrease window width by 20 columns.
Increase window width by 20 columns.
Decrease window depth by 20 rows.
Increase window depth by 20 rows.
Drag window up 5 lines
Drag window down 5 lines.
Drag window left 5 colums.
Drag window right 5 columns.
The SELCOPY/i supplied default Borders function keys, defined by KEYLIST=@WINBORD are:
F7
F8
F10
F11
F13
F14
F15
F16
F17
F18
F19
F20
F22
F23
DragBorderMinus
DragBorderPlus
DragBorderMinus
DragBorderPlus
WinX S
WinX R
SizeWindow by w=-20
SizeWindow by w=+20
SizeWindow by d=-20
SizeWindow by d=+20
DragBorderMinus 5
DragBorderPlus 5
DragBorderMinus 5
DragBorderPlus 5
Drag top/bottom border up 1 line.
Drag top/bottom border down 1 line.
Drag left/right border left 1 column.
Drag left/right border right 1 column.
Save current browse/edit window size/position.
Restore current browse/edit window size/position.
Decrease window width by 20 columns.
Increase window width by 20 columns.
Decrease window depth by 20 rows.
Increase window depth by 20 rows.
Drag top/bottom border up 5 lines.
Drag top/bottom border down 5 lines.
Drag left/right border left 5 columns.
Drag left/right border right 5 columns.
Default Function Keys (KEYLISTs not active)
For non-z/OS systems (or with KEYLIST OFF in effect), SELCOPY/i maintains function key tables at 5 levels (i.e. WINDOW,
CLASS, DEFAULT, TITLEBARS and BORDERS).
WINDOW function keys are unassigned by default. WINDOW key settings apply to an instance of a particular window, therefore
user updates via the KEYS dialog are not be remembered by the system.
CLASS function keys are assigned defaults according to their class, with user updates via the KEYS dialog being remembered by
the system.
DEFAULT function keys are assigned to the following (unless overridden by the SELCOPY/i System/User INI file):
F1
F2
F3
Top
Bottom
Close
F4
Action
F7
Up
F8
Down
2013-11-13 13:06:41
Display data at the top of a scrollable window.
Display data at the bottom of a scrollable window.
Close the window in which the cursor is positioned. (N.B. not necessarily
the current focus window)
Issue command at the cursor position if prefixed by "<" (less than),
otherwise place text on the command line.
Scroll up the file so that the current focus line becomes the last line of the
display.
Scroll down the file so that the current focus line becomes the first line of
the display.
SELCOPY/i Reference and User Guide
12
Getting started with SELCOPY/i
F9
F10
NextMainWindow
Left
F11
Right
F12
F13
F16
Retrieve ShowPopupMenu
Action Edit
F21
F24
PrevMainWindow
Retrieve +
Default Function Keys (KEYLISTs not active)
Place focus on the next main window in the SELCOPY/i window list.
Scroll the display to the left so that the current focus column becomes the
last column of the display.
Scroll the display to the right so that the current focus column becomes
the first column of the display.
Retrieve the last command issued and place it at the command line.
For storage windows only, display the options popup menu.
Issue command at the cursor position if not prefixed by "<" (less than),
otherwise place text on the command line.
Place focus on the previous main window in the SELCOPY/i window list.
Retrieve the next command issued and place it at the command line.
The SELCOPY/i Caption (title bar) function keys are assigned to the following:
F7
F8
F10
F11
MoveWindow by y=-1
MoveWindow by y=+1
MoveWindow by x=-1
MoveWindow by x=+1
Drag window up 1 line
Drag window down 1 line.
Drag window left 1 column.
Drag window right 1 column.
The SELCOPY/i Borders function keys are assigned to the following:
F7
DragBorderMinus
F8
DragBorderPlus
F10
F11
DragBorderMinus
DragBorderPlus
Move the border on which the cursor is position 1 column and/or row
towards the top left corner of the 3270 display.
Move the border on which the cursor is position 1 column and/or row
away from the top left corner of the 3270 display.
SELCOPY/i Main Window
On starting SELCOPY/i the main window, in which all SELCOPY/i applications execute, is displayed in a maximised state. Note
that this window cannot be resized.
Since the CBLe text editor application is executed automatically on SELCOPY/i startup and the CBLe main window is also opened
in a maximised state, the SELCOPY/i main window is not normally visible until all CBLe text editor windows are closed.
Figure 1. SELCOPY/i Main Window.
The main window contains:
• A title bar. Located at the top of the window, it includes, from left to right:
♦ A system menu button at the extreme left. This button accesses the system menu options.
♦ If WINDOWNAMES is active, the name of the window (VCIWMAIN).
♦ The SELCOPY/i product name, operating environment, release and build level.
♦ The operating system release.
♦ The user's logon id.
2013-11-13 13:06:41
SELCOPY/i Reference and User Guide
13
Getting started with SELCOPY/i
SELCOPY/i Main Window
♦ A close button as the first character from the right.
• The menu bar. Located immediately below the title bar, it lists the SELCOPY/i main window menu bar items.
• The client area. Occupying the body of the window, it contains:
♦ The SELCOPY/i logo, release, copyright notice and CBL contact details.
♦ The operating system name and version.
♦ The user id.
♦ The build level of SELCOPY/i. This information is useful when raising a product query with CBL.
• The command line. This may be positioned at either the top or bottom of the main window.
Commands may be entered at the Command> prompt to invoke SELCOPY/i facilities that duplicate or extend the menu
facilities.
You can launch SELCOPY/i facilities by doing the following:
• Select a SELCOPY/i main menu bar item by positioning the cursor on the menu item text and hitting <Enter> or, if
configured, double-clicking the left mouse button on the menu item.
• Executing a line command.
SELCOPY/i Main Window Menu Bar
The SELCOPY/i main menu bar is located at the top of the SELCOPY/i main window.
The main menu consists of the following item:
Home
Open the CBLe Text Editor application and edit the user's HOME command centre file. This is equivalent to executing the
line command HOME.
All SELCOPY/i facilities may be started from the CBLe Text Editor application and run as a child window of the CBLe
parent window. The exception to this is the SELCOPY Debug application which, although started from CBLe, operates as
a separate, special instance of the CBLe text editor. In some cases, SELCOPY/i facilities require a CBLe text edit
environment to operate successfully. e.g. Structured Edit (SDE), DB2, File Search, Update & Copy.
Because of this, menu items for all available SELCOPY/i facilities are located in the CBLe main window menu bar and not
the SELCOPY/i main window menu bar.
SELCOPY/i Clipboard
SELCOPY/i supports a clipboard facility to allow users to Copy, Cut and Paste data between windows running in the SELCOPY/i
environment that support clip board functions.
At this time, clipboard facilities are only supported in CBLe and SDE edit and browse views. e.g. Data copied to the clipboard from
an edit view in the SELCOPY Debug application may be pasted to an edit view in the CBLe text edit application.
Note that the SELCOPY/i clipboard is not associated with any other clipboard facility offered by the system.
SELCOPY/i Interactive Help
The SELCOPY/i Interactive Help windows are basic HTML browse windows started with links to the SELCOPY/i suite of HTML
help files located via the SELCOPY/i INI variable Help.DefaultPath.
SELCOPY/i Help may be obtained via the following:
• Select 'Help' from the the CBLe main window menu bar.
• Enter command HELP on the command line of any window.
Context sensitive help windows are displayed by performing either of these functions within the appropriate SELCOPY/i window.
e.g. Executing HELP in a Library List window opens the help window for the topic List Library Members.
2013-11-13 13:06:41
SELCOPY/i Reference and User Guide
14
Getting started with SELCOPY/i
SELCOPY/i Interactive Help
Figure 2. SELCOPY/i Main Help Menu window.
Figure 3. Help window for SELCOPY Debug.
Back
Display the HTML page that occurs immediately prior to the current page in the stack of viewed pages.
Forward
Display the HTML page that occurs immediately after the current page in the stack of viewed pages.
Home
Display the defined Home page.
Close
Close the current HTML browse window.
Refresh
2013-11-13 13:06:41
SELCOPY/i Reference and User Guide
15
Getting started with SELCOPY/i
SELCOPY/i Interactive Help
Refresh (reload) the current HTML page.
Find
Open a dialog window to locate lines in the current HTML page that contain a specified string.
Not yet supported.
Source
Open a CBLe text editor window to edit the source for the current HTML page.
Options
Tailor options for the current HTML browse window.
Not yet supported.
Text
Open a CBLe text editor window to edit the current HTML page as plain text with file name UNTITLED.
Help
Display this help page.
Location>
Specify an explicit HTML source fileid. If only a file name is specified, then the HTML browse window will search the
Help.Defaultpath library for that file name.
This allows the user to display any file containing basic HTML tags that is not necessarily associated with the SELCOPY/i
suite of help files.
2013-11-13 13:06:41
SELCOPY/i Reference and User Guide
16
Window Classes
Every SELCOPY/i window belongs to a named window class. Window classes define a set of window characteristics that are
common to all windows assigned the same window class.
These characteristics include the window's appearance such as the existance of a command prompt, menu bar, scroll field, input
fields; if present, the contents of the menu bar; non-KeyList PFKey assignments and the presentation format of data to be
displayed in a window's display area.
A comprehensive list of SELCOPY/i window classes may be found in Appendix A - SELCOPY/i Window Classes.
Characteristics of CBLe Text Edit window classes, including Structured Data Edit document views, are detailed in the SELCOPY/i
Text Editor documentation.
Many window classes are one-to-one with an individual SELCOPY/i feature and their characteristics are documented with that
particular feature. (e.g. window class EDTWSORT is specific to the Text Edit SORT dialog window.) Characteristics and behaviour
of those window classes that are common to more than one SELCOPY/i feature are documented in this chapter.
Storage Display Windows
Storage display windows (window class HEXDUMP, STORAGE and EDTWHEXE) provide a view of an area of storage in dump
format.
SELCOPY/i windows that utilise storage display windows are:
• CBLNAME display window.
• SELCOPY Debug Workarea windows.
• SELCOPY Debug POS windows.
• CBLe text edit line HEX dump views.
Storage Window Display Format
The length of storage data displayed may be restricted by the type of window opened. e.g. The amount of data displayed in a CBLe
HEX window is restricted to be the length of the focus line.
Each row of a storage display window has the following format:
Field Width
Type
Description
8
Hex
Address in storage of the displayed data.
6
UInt
Displacement from the start address of the displayed data.
8,16,32 or 64
Hex
Data in storage in hexadecimal format.
(4, 8, 16 or 32 bytes depending upon window size).
4,8 ,16 or 32
Char
Data in storage in character format.
(Field width adjusts automatically to match hexadecimal display width.)
The format of the display may be updated using the options popup menu which may be opened using the SHOWPOPUPMENU
command or via the system menu button of the storage display window. By default, the SHOWPOPUPMENU command is
assigned to PF5 in storage display windows.
Storage Window Resizing
User resizing of a storage display window's width will always be adjusted by SELCOPY/i to display one of the valid data display
widths. i.e. 1, 2, 4 or 8 words of hexadecimal data plus its equivalent character representation if required.
If the window's width is increased or decreased by one column, the window's width is rounded up or down respectively to equal the
next valid display width. e.g. When using DRAGBORDERPLUS and DRAGBORDERMINUS (assigned to PF8/PF11 and PF7/PF10
respectively) on either of the window's vertical borders.
If the window's width is increased or decreased by more than one column, the window's width is always rounded down to equal the
next valid display width.
2013-11-13 13:06:41
SELCOPY/i Reference and User Guide
17
Window Classes
Storage Display Navigation
Storage Display Navigation
The displacement field in the first row of a storage display window is an enterable field (highlighted in red by default.) This field may
be overwritten with a displacement, from the start address, of the byte that should be displayed first in the storage window's display
area.
Line commands UP CURSOR and DOWN CURSOR may be used to navigate the storage display window. By default, UP
CURSOR is assigned to PF7 and DOWN CURSOR is assigned to PF8.
Storage Data Manipulation
Some storage display window invocations allow the data to be updated simply by overtyping the existing character or hexadecimal
representation and then, to commit the change, hitting <Enter>.
Only areas of storage that are not write protected may be altered. Beware when altering storage as this could adversely affect
programs that utilise the updated area of storage.
List Windows
A list window is a child window with a parent window class of LISTFRAM, LISTFILE, VCIWEXEC or WINWIPO0.
List windows display information as a table of rows and columns. The content of the list columns is described by data elements,
each having a name and data type, and defined by a Field Descriptor Block (FDB).
SELCOPY/i windows that have child list windows include DB2 Object lists, DASD lists, Dataset lists, Execute CBLVCAT and
Execute IDCAMS windows, APF Authorised Library lists and FDB lists.
In addition to any features defined by a list window's parent window class, list windows provide support for features described in
this section.
• List Window Status Bar
• List Window Menu
• Selecting, Sorting and Filtering
• Sorting with the Cursor
• List Entry Location
• List Window Prefix Area
List Window Status Bar
All list windows have a status bar that occupies the last row of the window display area.
The list window status bar displays the following information:
Status bar display
Line c_row of n_rows
Col c_col of n_cols
Views n_views
select_clause <where_clause
<sort_clause> >
Description
Identifies the list current row value (c_row) and the total number of rows in the list
(n_rows).
Identifies the list current column value (c_col) and the total number of list columns,
including non-scrollable list columns, in the list (n_cols).
Identifies the number of saved list views (as described by SELECT, WHERE,
SORT clause combinations) that exist for the current list data. (n_views)
Identifies the current view of the list data.
List Window Menu
All list windows have the following menu items:
View
This is a popup menu which lists all the views which have been made of the current list. You can select a view
from this menu.
Back
Select the previous view. This is equivalent to executing command BAck in the current list window.
Forward Select the next view. This is equivalent to executing command FOrward in the current list window.
FDB
Display the Field Descriptor Block for the list. This is equivalent to executing command FDB in the current list
window.
Text
Open a CBLe text edit window containing a text version of the list. This is equivalent to executing command TEXT
in the current list window.
2013-11-13 13:06:41
SELCOPY/i Reference and User Guide
18
Window Classes
List Window Menu
Refresh Refresh the contents of the list window so that all column fields reflect the current status. This is equivalent to
executing command REFRESH in the current list window.
Help
Open the help window for the list. This is equivalent to executing command HELP in the current list window.
View List Display
A SELECT clause and/or WHERE clause, executed as a CLI command, creates a new view of the list data. On each execution of
one of these CLI commands, the command stream is recorded as a single entry at the end of the list window's View List Display.
This allows the user to select and filter list columns and rows and then easily recall any previous view of the data.
The View List Display is a drop down menu available by selecting the "View" List menu bar item. Any previous view may be
selected by positioning the cursor on the required SELECT and/or WHERE clause entry and hitting <Enter> or, if configured,
double-click the left mouse button on the entry.
Alternatively, the display's view of the data may be switched to view immediately prior to or following the current view by selecting
"Back" or "Forward" respectively from the List menu bar.
Field Descriptor Block (FDB)
The FDB window may be opened using the following:
• Select 'FDB' from the list window menu bar.
• Enter command FDB on the list window command line.
Information about the data displayed under each column of a List window is referenced via an internal SELCOPY/i data structure.
This structure includes, or addresses, fields that define the column data attributes. e.g. column name, column data type, column
data length, etc.
The Field Descriptor Block (FDB) maps this internal structure and so provides information for all fields in the List window.
FDB is primarily used as an aid to performing List window SELECT, SORT and WHERE clause commands.
Figure 4. FDB for Catalog List window.
Name
Specifies the field names that constitute the List window column headers. These entries are used when selecting columns
and sorting/filtering rows to generate new list views.
Type
The data format in which data for that column is stored.
Key
Identifies whether or not the column is a key column.
If the column is a key column and is either the first column in the list or immediately follows another key column, then it is
always in view even when scrolling the list view left or right.
Furthermore, if a key column selected as the first column of a list contains duplicate entries, then, when these entries are
sorted together, only the first, in view occurrence of the key field value will be displayed. Subsequent list rows containing
the duplicate key field values are displayed with ditto/quotation marks (") in the key field. If sorting on a different column
separates these duplicate key field values so that they no longer appear on consecutive list rows, then the field values are
once again displayed replacing the ditto mark. The display of values in all other columns are unaffected by this list window
feature.
Offset
2013-11-13 13:06:41
SELCOPY/i Reference and User Guide
19
Window Classes
Field Descriptor Block (FDB)
The offset within the structure of the column data.
Length
The length of the column data field within the structure. Note that if one or more levels of indirection to the column data
field exist, then the structure contains an address field length 4.
Title
Descriptive name for the field column.
Displen
The length of the longest entry displayed in the column.
Digits
The number of decimal digits (precision) displayed for column data of numerical data type.
Scale
The number of scale digits (fraction digits) displayed for column data of numerical data type.
Because the FDB window is itself a List window with its column data attributes referenced by an internal data structure, it too may
be described by an FDB and is subject to all supported list window functions (SELECT, SORT WHERE, etc.)
Figure 5. FDB for FDB window.
Edit View
The contents of the current list view may be edited and saved to disk.
• Select 'Text' from the list window menu bar.
• Enter command TEXT on the list window command line.
A CBLe text editor window is opened, the list is loaded into CBLe storage and edited. The edited view is given a generic title
"UNTITLED". On saving the text for the first time, the user is prompted to provide a valid "Save as" fileid.
Note that if INSTANCE=SINGLE is set in the (Edit) section of the SELCOPY/i INI file and a CBLe editor window is already open,
then the list will be edited in a new document window of the existing CBLe window.
Zoom View
The contents of a list entry may be displayed vertically in a single entry, zoomed view format. i.e each column value belonging to
the selected entry is displayed in a separate row of the zoomed window view.
• Enter prefix command > against the required list window entry.
The zoomed window view is a separate list window which displays the selected list entry's field names, values are field descriptions
(as reported in the FDB list window view.)
2013-11-13 13:06:41
SELCOPY/i Reference and User Guide
20
Window Classes
Zoom View
Figure 6. Zoom Window View.
Columns Displayed
Name
Type
Description
Name
ALPair
Field name
Value
ALPair
Field Value
Description
ALPair
Field description
Selecting, Sorting and Filtering
Each list has a basic set of column data which is defined by the Field Descriptor Block (FDB) associated with the list. You can view
the list of columns by selecting the FDB menu option or entering the FDB command on the list window command line.
You can modify the display by selecting your own list of columns from this basic list, specifying a filter to restrict the rows displayed
and specifying a sort order. You do this by entering the select command on the list window command line. The select command
syntax is similar to the SQL SELECT statement. It consists of one or more of the following:
• A SELECT clause which determines the columns displayed.
• A WHERE clause which filters the rows displayed by imposing a condition on the values in one or more columns.
• A SORT clause (ORDER BY clause) which displays the rows in an order determined by the values in one or more
columns. (See also Sorting with the Cursor.)
Unlike SQL, these clauses can be given in any order, and any of them can be ommitted. The general syntax is:
>>--+-------------------+--+------------------+--+-----------------+-------><
|
| |
| |
|
+-- select_clause --+ +-- where_clause --+ +-- sort_clause --+
Each time you issue a select command with a select or where clause you create a new view of the list. If you issue only a sort
clause no new view is created, but the sort order is changed for the current view.
SELECT, WHERE and SORT clauses are not cumulative. Therefore, their execution replace any previously executed clause of the
same type. e.g. Execution of a WHERE clause will not perform a logical AND with any previously executed WHERE clause, but will
2013-11-13 13:06:41
SELCOPY/i Reference and User Guide
21
Window Classes
Selecting, Sorting and Filtering
replace it instead. In addition to this, the clauses are hierarchical so that execution of a SELECT clause will undo any active
WHERE and/or SORT clause, execution of a WHERE clause will undo any active SORT clause.
The set of views which you have is listed in the View menu option, from which you can select a view from the ones you have
created with the select command.
SELECT Clause
Syntax:
+------- ALL ----------------------------+
|
|
>>-- SELect ---+-------------------+--+-----------------+-------------------->
|
| |
|
| +----- , -----+ | | +-- , --+
|
| v
| | | |
|
|
+--+- columname -+--+ +-+-------+-- * --+
>-------------+------------------+---+------------------+-------------------><
|
|
|
|
+-| WHERE Clause |-+
+- | SORT Clause |-+
Description:
Specified as a CLI command or as a parameter on WHERE or SORT, the SELECT clause is used to identify field columns for
display and the order in which they appear.
Use of a SELECT clause is not cumulative and so will replace those columns currently selected for display. It also resets any
prevailing WHERE and/or SORT clause specifications.
Note that the last execution of a SELECT clause CLI command is stored and applied to any new List window of the same type
(e.g. Library List window). This occurs whether the list window is opened within the same SELCOPY/i session or opened after the
current SELCOPY/i session is ended and a new session started.
Executing a SELECT clause will add a new entry to the View List Display drop down menu.
Parameters:
ALL
ALL returns all columns.
columname
Name of the list window column to select.
Multiple column names must be separated by commas and/or one or more blanks. Column names may be specified in
any order and any number of times.
*
Display all remaining column names that have not already been selected, in their default order of display.
This is the same as ALL if no other column names are specified.
WHERE Clause
Any valid WHERE clause used to filter list rows.
SORT Clause
Any valid SORT clause used to sort list rows.
2013-11-13 13:06:41
SELCOPY/i Reference and User Guide
22
Window Classes
The Where Clause
The Where Clause
Syntax:
+----+-- AND --+----+
|
|
|
|
|
+-- OR ---+
|
v
|
>>-- WHere ---+---------+---+-------+-----| Filter_Expr |--+--+-------+------->
|
|
|
|
|
|
+-- NOT --+
+-- ( --+
+-- ) --+
>-------------+-------------------+---+------------------+------------------><
|
|
|
|
+-| SELECT Clause |-+
+- | SORT Clause |-+
Filter_Expr:
>--------+-----+-- list_col ---+-------+-- <op> --- value --+-----+--------->
|
|
|
|
|
|
+- ( -+
+-- ~ --+
+- ) -+
+-- ¬ --+
+-- \ --+
+- NOT -+
Description:
Specified as a CLI command or as a parameter on SELECT or SORT, the WHERE clause is used to restrict the rows displayed in
the list.
A WHERE clause is a logical combination of one or more simple filter expressions that define search criteria used to select the
required list rows. When applied to an individual list row, each filter expression in the where clause resolves to either 1 (true) or 0
(false). If the logical result of all the filter expressions is 1, then the row satisfies the where clause criteria. Only those rows which
satisfy the where clause are displayed in the view of the list.
Use of a WHERE clause is not cumulative and so will replace any prevailing filter of rows in the display. It also resets any prevailing
SORT clause specification. Columns displayed by the prevailing SELECT clause, are unchanged.
Executing a WHERE clause will add a new entry, which includes the prevailing SELECT clause, to the View List Display drop down
menu.
Parameters:
(
)
AND
OR
NOT
Logical operators supported by the where clause and supported symbolic equivalents are as follow:
( )
Left and Right Brackets (parentheses - X'4D' and X'5D').
AND
& (ampersand - X'50')
OR
¦ (broken bar - X'6A'),
NOT
~ (tilde - X'BC'),
| (vertical line - X'4F')
¬ (not sign - X'5F'),
\ (backslash - X'E0')
Notes:
1. To avoid confusion, it is recomended that parentheses be used where more than two filter expressions are
specified in order to establish logical AND/OR precedence.
2. Parentheses must be balanced so that there are an equal number of left and right parentheses in the where
clause.
Filter_Expr
A filter expression that tests a single column within the list display.
The contents of list_col are tested against a test value specified by value to establish a TRUE (1) or FALSE (0) condition.
list_col
The name of list column whose contents will be tested in this filter expression.
Where list_col is a numeric field, value must be numeric and an arithmetic compare is performed. Similarly, if
list_col is a character field, then value is treated as a character string with blank padding on the right. Check the
field Type in the FDB to determine whether the field contains numeric or character data.
If the data type of the test value is not compatible with list_col then an error will be returned.
~ | ¬ | \ | NOT
The symbols ~ (tilde), ¬ (not sign) and \ (backslash) represent the logical NOT operator and reverses the TRUE
or FALSE condition established by the comparison operator <op>.
<op>
Comparison operator specified as one of the following:
2013-11-13 13:06:41
SELCOPY/i Reference and User Guide
23
Window Classes
The Sort (Order By) Clause
=
Equals.
<>
Not Equals.
<
Less than.
>
Greater than.
<=
Less than or equals.
>=
Greater than or equals.
<<
Contains.
This operator applies to character columns only and returns TRUE if value is a sub-string of list_col.
>>
Begins.
This operator applies to character columns only and returns TRUE if value is a sub-string at the start of
list_col.
value
The value to be tested against the contents of list_col.
If list_col is a character field, value is treated as a case insensitive character string unless it is enclosed in (')
apostrophes or (") quotation marks. Apostrophes or quotation marks ensure case sensitivity and are mandatory if
value is the same as a list column heading or if it contains any of the comparison operators or blanks.
SELECT Clause
Any valid SELECT clause used to select column headers.
SORT Clause
Any valid SORT clause used to sort list rows.
Example:
where
col1 = 'A'
and
(col2 << 'C' or col3 > 4)
List only those rows for which col1 is equal to A and either col2 contains C as a substring or col3 is greater than 4.
Note: the quotes around the literal strings are not needed unless there are columns in the list with name A or C and that
the blanks separating the elements of the expression are optional.
The Sort (Order By) Clause
Syntax:
+---------- , -------------+
|
+- A -+ |
v
|
| |
>>--+-- SORT -----+---+-- column_name --+-----+--+-------------------------->
|
|
|
|
+-- ORDER BY -+
+- D -+
>-------------+-------------------+---+-------------------+-----------------><
|
|
|
|
+-| SELECT Clause |-+
+- | WHERE Clause |-+
Description:
See also Sorting with the Cursor.
Specified as a CLI command or as a parameter on SELECT or WHERE, a SORT clause is used to modify the order in which the
rows are displayed in the list.
Use of a SORT clause is not cumulative and is based on the list's default sort order. Therefore any prevailing sort order is ignored.
The prevailing SELECT and WHERE clauses are unchanged.
Unlike SELECT and WHERE, a SORT clause specified as a CLI command is not added to the View List Display drop down menu.
Parameters:
column_name
Name of the List Window column on which to sort.
Column names must be supplied in the order in which they appear in the list heading (or in the FDB).
A | D
The sort order is specified with a list of column sort specifications which consist of a column name followed by a sort
direction. The sort direction is given as A for ascending or D for descending.
If the sort direction is not provided, it defaults to ascending.
2013-11-13 13:06:41
SELCOPY/i Reference and User Guide
24
Window Classes
Sorting with the Cursor
Commas must be used to separate multiple column sort specifications whereupon intervening blanks are permitted.
SELECT Clause
Any valid SELECT clause used to select column headers.
WHERE Clause
Any valid WHERE clause used to filter list rows.
Sorting with the Cursor
A quick way of sorting a list view is to place the cursor on the heading of the column on which you want to sort and then press the
<Enter> key. Alternatively, if configured, simply double-click the left mouse button on the list column header.
For fields that contain timestamps and/or datestamps, the first time the sort is actioned on the column header, the data is arranged
in descending order. For all other column fields, the data is initially arranged in ascending order.
Subsequent sorting on a column header using this method will reverse the order in which data in that column was last sorted.
List Entry Location
If the first field column of the list meets the requirements detailed below, then the occurrence of this field in the first row of the
display area (list current row) is marked as being enterable (text is yellow underscore). Simply overtyping this field with the required
field string value will scroll the display so that the first row containing this value becomes the new current row.
1. The column is keyed. (Key=Yes)
2. The column contains character data. (Type=Char)
3. The column's fields are sorted in ascending order.
This information is available from the FDB.
Unless a SELECT clause has been executed which changes the first column of the display, these criteria are usually always met by
list windows of class LISTFILE.
Partial strings may be entered but residue from the overtyped field should be deleted or blanked over, otherwise it is included as
part of the typed string. Similarly, strings entered in lower case are automatically upper cased.
Starting at the row following the list current row, field values occupying the first column are each compared with the string value
entered by the user until one is found which is greater than or equal to this string value.
The target row is the row containing an exact match for the specified field string value or else the row immediately before a row
containing a field value which is greater than the specified value. The list is scrolled so that the target row becomes the list current
row.
Location of list entries is also achieved using the following:
• FIND/RFIND Command
• LOCATE Command
• S Command
FIND Command
Syntax:
>>-- Find -------- string ---------------------------------------------------><
>>-- RFIND ------------------------------------------------------------------><
Description:
Find is used to scroll the display to the next list entry to contain the specified search string anywhere within a field in the the first
column of the display. If no match is found for string then no scrolling occurs.
Following a successful FIND operation, RFIND (assigned to PF5 by default) may be used to repeat the search for the remaining list
entries.
FIND string is only valid if the first column in the display is defined as being a character key field. (Check the FDB for Type=Char
and Key=Yes).
Note that key fields area highlighted and remain at a fixed position within the display when scrolling left and right. If multiple key
field columns exist within the list, then changing the order of the key fields using a SELECT clause, will allow the user to execute
2013-11-13 13:06:41
SELCOPY/i Reference and User Guide
25
Window Classes
FIND Command
FIND/RFIND on the contents of an alternate key field column.
Parameters:
string
A character search string used in the compare against data within fields in the first column of the display.
LOCATE Command
Syntax:
>>-- Locate ------ string ---------------------------------------------------><
Description:
Starting at the first entry and proceding downwards, LOCATE will compare string against data at the start of each field in the the
first column of the display until either a match is found or the field data is greater than string.
If the strings are equal, then the display is scrolled so that this list entry becomes the first row in the display. Otherwise, if the list
entry field data is greater than string, the display is scrolled so that the first row in the display is that which immediately precedes
this list entry.
LOCATE string is appropriate only if the first list column is in ascending sort order and is only valid if the first column in the
display is defined as being a character key field. (Check the FDB for Type=Char and Key=Yes).
Parameters:
string
A character search string used in the compare against data at the start of fields in the first column of the display.
S Command
Syntax:
>>-- S ----------- member ---------------------------------------------------><
Description:
Supported as a CLI line command for Library Lists only, S member will perform the default operation (i.e. Edit) on the specified
library member.
S is also supported as a List window prefix command which applies to all types of List window. In this case, S will execute the
default operation for the particular list entry type. See the relevant prefix command table <Dflt> entry for for each of the supported
Execute CBLVCAT, List and File Search windows.
Parameters:
member
The library member name.
List Window Prefix Area
List windows provide support for a prefix area which is displayed as a one to eight character enterable field occupying the first
column of a list. This field is displayed with underscore characters to indicate that it is enterable.
A command entered in the prefix area of a list entry is actioned when a PFKey or <Enter> is hit. i.e. On a single 3270 I/O. (If
configured, double-clicking the left mouse button will also action the command.)
Only one prefix command may be actioned against a list entry in a single 3270 I/O. However, multiple prefix commands may be
actioned for multiple list entries in a single 3270 I/O. Where prefix commands are entered against multiple list entries, each
command is executed in order from the top of the list to the bottom.
Supported prefix area commands depend on the individual list window application. A decription of supported prefix commands is
documented in the help for each list window application.
A summary of all list prefix commands supported by parent windows of window class LISTFILE and VCIWEXEC, is found in
Appendix B - List File Prefix Command Summary.
2013-11-13 13:06:41
SELCOPY/i Reference and User Guide
26
Window Classes
List Window Prefix Area
Default Action
Whether or not a list has a prefix area, list windows usually have a default action performed when a list entry is selected
as if an item in a menu. i.e. When the cursor is positioned on a list entry and <Enter> is hit or, if configured, the left mouse
button is double-clicked on the list entry. This is equivalent to executing prefix command "S" against a single list entry.
Help documentation for a list window applications that supports this default action includes a description of the default
action as the <Dflt> entry in the application's table of supported prefix commands. e.g. CBLVCAT Interactive, List Dataset
and File Search window prefix command tables.
Note that the default action is disabled if a prefix command is entered against any entry in the list.
Unrecognised Prefix Commands
Entering an unrecognised prefix command will return error ZZSW002E.
However, for file lists, where prefix command "E" (Edit) is supported, command, edit macro or procedure names may be
entered in the prefix area. In this case, where the command entered in the prefix area is not one of the supported prefix
commands, it is passed back through the window hierarchy in the following order. The command is processed by the first
window or environment in which the command is recognised.
1. The CBLe text editor, if the list window is a CBLe List document window. (i.e. a CBLe synonym, command or
macro name.)
2. The SELCOPY/i environment command processor. (i.e. a SELCOPY/i command.)
3. TSO, if SELCOPY/i is started in ISPF or native TSO. (i.e. a TSO command, CLIST or EXEC.)
The full fileid of the entry against which the command is executed, is passed as the only input parameter to the command.
Repeating Prefix Commands
The last prefix command executed in the current list window may be repeated for any list entry by entering "=" in the prefix
command area.
If other list entry prefix commands are executed in the same 3270 I/O before attempting to execute the command for this
entry, then the command executed will be the last command executed for an entry in the list that occurs before this entry.
Otherwise, the prefix command to be repeated is the last one executed on a previous 3270 I/O for the current list window.
Executing Prefix Command on a Block of List Entries
Any command entered in the prefix area may be repeated for each entry in a block of list entries marked by "//" in the
prefix area of the first and last entries of the block. The command (or macro, etc.) to be executed must be specified on
either the first or last entry of the block, following the "//" marker. e.g. "//d" in the prefix area of a file entry and "//" in any
subsequent (or previous) file entry's prefix area defines the start and end of a group of file list entries that will be deleted.
Multiple, non-overlapping blocks of list entries may be marked, each block executing a specified command. If an
unbalanced pair of "//" block markers is found or no command is specified on a block of list entries, execution of all
blocked entry commands is delayed until there are and even number of block markers, each block having an
accompanying command.
Interactive Panel Windows
Interactive panel (IPO) windows are of window class, WINWIPO0, and are used primarily for option, dialog and list windows.
SELCOPY/i functions that utilise interactive panel windows include:
• DB2
• File Copy
• File Compare
• File Search/Update/Copy/Remap
• Favorite Datasets/Commands
• SDE Edit
In addition to standard window features, windows of window class WINWIPO0 support a number of unique features that are
described in this section.
• Panel Window Format
• Panel Window Size & Location
• Panel Window Hierarchy
• Panel Scrollable Display
• Panel Window Views
• Scrollable Input/Output Fields
• Input Field Data Recall
• Embedded Tables
• Selection Lists
2013-11-13 13:06:41
SELCOPY/i Reference and User Guide
27
Window Classes
Panel Window Format
Panel Window Format
In addition to the Command> and Scroll> prompts, an IPO window view may contain any of the following panel elements.
Panel ID
Every IPO window has a unique panel id which is displayed in a non-scrollable line of data at the top of the window
display, below the window menu bar (if present).
Menu Bar
A menu bar may be displayed at the top of the panel display area below the window title bar. If the panel view includes an
embedded list, then these menu items will be as described by the list window menu for the List window class.
Lines n_first-n_last of n_total
If a panel view does not include an embedded table or list, this information is displayed, right-adjusted, on the same
non-scrollable line as the panel id. It identifies the line numbers of the first (n_first) and last (n_last) lines currently on
display, and also the total number of lines (n_total) in the panel view.
e.g. "Lines 1-12 of 24"
This information is displayed because, by default, IPO panel windows are scrollable. The exception occurs where panel
views contain an embedded table or list in which case the table/list entries are scrollable, not the panel display.
Input Fields
Input fields are enterable fields which allow the user to configure the functions performed by the panel. A value entered in
a field must conform to that field's defined data type (e.g. numeric or text).
Where valid input field text can exceed the width of the input field area within the panel display, the input field may be
scrolled and expanded as required. (See Scrollable Input/Output Fields )
Input Fields - Fixed Selectable Values
Text input fields may have been defined so that the specified input value can be only one of a pre-determined list
of values.
If the text entered into an input field of this type does not exactly match one of these values, then the first value in
the list that begins with the inputted text will be selected. If no match is found, then the input text is considered to
be invalid and so a pop-up window is opened from which the user can select one of the valid input values from a
list of possible values.
Input Fields - Variable Selectable Values
One or more interrelated input fields may require values which identify an existing object (e.g. Library DSN and
Member) or values which relate to other information unique to the current operating environment.
For these types of input field, a selection may be made from a list of valid entries. Unlike input fields containing
fixed selectable values, the list of possible input field values is generated at run-time and displayed as a modal
panel window containing an embedded list. Panels of this type are called Selection Lists.
A selection list of valid entries is displayed if either of the following are true:
1. The input field value includes a wild card character '%' (percent) or '*' (asterisk), each representing zero
or more characters.
2. Interrelated input fields represent a file object for which a PDS/PDSE library DSN has been specified
without a member name.
The generated selection list entries are filtered based on values entered in the related input fields. Simply
selecting a row from the list will close the list and populate the appropriate input fields with relevant values from
the selected list entry.
If a value is entered (with or without a wild card character) that identifies a unique entry in the generated selection
list, then display of the selection list window is bypassed and the input field(s) populated accordingly.
Input Fields Initial Values
When a panel is opened, input fields may contain values that have been determined using the following search
sequence:
1. A field input value as specified by the user via a panel invocation primary command. The DB2 primary
command opens a DB2 panel hierarchy and optionally populates panel input fields. e.g. DB2 7.4
CREATOR=ZZS
2. A default field input value as specified in the panel definition source. A default field input value is often
defined to match default values in underlying syntax. e.g. DB2 default precision value for a DECIMAL
field is 5.
3. If the field is configured to do so, the value displayed is that entered in the input field the last time the
panel was opened. The value of each panel field is saved as a SELCOPY/i INI variable when focus is
removed from the panel window, and in the SELCOPY/i User INI file when the SELCOPY/i session is
ended normally.
Output Fields
Output fields display variable data that is not part of the panel's static text and is included in the panel for information
purposes only. These types of field are non-enterable and usually contain values that are generated as a result of
2013-11-13 13:06:41
SELCOPY/i Reference and User Guide
28
Window Classes
Panel Window Size & Location
previously supplied user options or input field entries.
Like input fields, output fields may be scrollable and expanded.
Option Check Boxes
An option check box is a single character input field which is either set on (checked) or off (unchecked). Any non-blank
character may be entered in a check box to select that item, however, when the display is refreshed, the check box
character will displauy as "/" (slash).
Comment text that accompanies a check box, describes the action taken when the box is checked. Further information
may also be found in the panel help.
Radio Buttons
A radio button group is a collection of 2 or more mutually exclusive check boxes, one of which is always checked. When a
radio button is checked, all other buttons in the radio button group become unchecked.
In the event that the user checks more than one radio button in the group before hitting <Enter> (or a PFKey), then the
newly checked radio button that is positioned closest to the bottom right hand corner of the 3270 display, will be selected.
Options Menus
An option menu defines a list of numbered items from which the user may select a single item.
If other input fields exist in the panel view, an option menu usually has an accompanying option menu entry field in which
the user enters a menu selection.
An item is selected using either of the following methods:
◊ Position the cursor on the required item and select <Enter> or, if configured, double-click the left mouse button
on the item.
◊ If present, enter the menu item number in the option menu entry field provided, otherwise, enter the item number
at the command line prompt.
Embedded Tables
IPO windows may include independently scrollable, embedded tables that have similar characteristics to the display of
structured data in an SDE edit view. e.g. Prefix commands and PFKeys assignments that zoom, insert, delete and
replicate table entries.
Embedded tables provide a method of supporting multiple, repeating groups of input/output fields. Unlike embedded lists,
embedded tables may contain editable fields.
Embedded Lists
An IPO window may contain embedded lists based upon input parameters entered by the user. The list entries are not
generated until the user has completed input of, or accepted existing values for the parameter fields and hit <Enter>.
IPO windows that include embedded lists adopt characteristics (menu items, commands, etc.) as provided by list windows.
Panel Window Size & Location
Panel windows may be resized and repositioned using standard SELCOPY/i window manipulation techniques. The last customised
position and size of an IPO panel window is stored in the SELCOPY/i User INI file and is restored to this position and size the next
time the panel is opened.
The stored window size and position persists across subsequent SELCOPY/i sessions.
Panel Window Hierarchy
An IPO panel window may be opened as a dependent window which is owned by another IPO panel. Furthermore, the process
may be recursive so that an owned IPO panel window may itself be the owner of another IPO panel window. In the case of an
expanded input field, the resulting text edit window view is owned by the IPO panel containing the input field.
Although it may still be in view, window focus cannot be placed on an owner IPO panel until the panel it owns is closed.
In addition to being owned, IPO panel windows containing embedded lists for selection of input field values are also modal.
Panel Scrollable Display
Unlike standard dialog windows, panel windows support up/down scrolling of data displayed in the window. Left/right scrolling is
supported for scrollable Input/Output Fields, embedded lists and embedded tables only.
Up/down scrolling is particularly necessary where a window display area is not sufficiently large enough to display the entire
contents of the panel (e.g. following a window resize or for 3270 terminals with a low number of displayed rows.)
2013-11-13 13:06:41
SELCOPY/i Reference and User Guide
29
Window Classes
Panel Scrollable Display
For panel views that do not include an embedded table or list, the lines of the panel currently on display in the window display area,
is reported in a non-scrollable line at the top of the panel. e.g. "Lines 11-36 of 36"
The "Scroll>" input field is used to control scrolling type as described by commands UP and DOWN. Scroll UP and DOWN are
assigned to <PF7> and <PF8> respectively.
Unless positioned Scrolling performed on panel views that include an embedded table or list, will scroll the contents
Panel Window Views
A function associated with an IPO panel window may require a large amount of user input. If so, panel text and user input may
either be displayed in a single, scrollable panel view, or split over a number of separate views within the same panel window, where
each view contains related information.
Each panel window view may be considered an extension to user options and input fields presented in the first (primary) panel
view.
Secondary panel window views are often displayed as a result of selections made in the primary panel view. The VIEW command
may also be used to scroll between panel views. By default, "VIEW +" and "VIEW -" to scroll forwards and backwards through the
panel views are assigned to <PF19> and <PF20> respectively.
Closing a secondary panel view using command, END (assigned to <PF3> by default), will return panel focus back to the primary
panel view. If END is executed at the primary panel view, then the IPO panel window is closed.
Scrollable Input/Output Fields
Scrollable, expandable text input/output fields are supported allowing for input of more text than can be displayed in the field area.
These type of input/output fields are suffixed with a plus (+) and/or minus (-) symbol. The display of these symbols also provide an
indication as to whether the field text in view is at the start ("+" only) or end ("-" only) of the field, or somewhere in between ("-/+").
To scroll the contents of the field, position the cursor within the field data and hit <PF10> to scroll left and <PF11> to scroll right.
The entire contents of the field may be expanded into a CBLe text edit view and so edited using the full functionality of the text
editor, before being placed back in the input field when the text edit view is closed. To do this, position the cursor in the scrollable
field and hit <PF2> which, by default, is assigned to command EXPAND.
The expanded field text edit view displays 50 character portions of the text string on each line of the edit area (i.e. text wraps at
column 50 to column 1 of the next line.) For input fields, any text entered beyond column 50 will be ignored.
The panel and field name associated with the input/output field and the maximum length of the text string is displayed before the
edit display area. Text entered beyond the maximum length of the string will be truncated.
Figure 7. Expanded input field text edit view.
2013-11-13 13:06:41
SELCOPY/i Reference and User Guide
30
Window Classes
Input Field Data Recall
Input Field Data Recall
The last entry entered in a panel input field is stored in the user's SELCOPY/i INI file when the panel is closed.
The next time that panel is opened, the contents of any input field may be restored to its last saved value by positioning the cursor
within the input field and hitting <F16> which, by default, is assigned to command, REMIND.
Embedded Tables
Overview
IPO window embedded tables provide a method by which multiple, repeating groups of input fields may be inserted, updated,
replicated or deleted. An embedded table may also contain non-editable (output) fields which are included in the table display for
information only.
The contents of a table may be populated from other sources governed by panel input fields (e.g. SQL queries, SELCOPY/i
standard lists or other embedded tables.) Where a table contains rows of values to be used in generating the panel's function
parameters, then populated table rows that are not required may be deselected simply by excluding them from the display.
Entries in a column of an embedded table may each represent rows of another embedded table. If so, each column field entry is
coloured, by default, in yellow underscore with a ">" (greater than) prefix with a number of embedded table rows specification (e.g.
> 2 specified.) Placing the cursor on a field entry of this type and pressing <Enter> will display an IPO sub-panel containing the
embedded table represented by the parent table column field. On ending the sub-panel (<PF3>) the parent column entry will be
updated to reflect the number of table rows specified in its child table.
Users should be aware that the order in which the table rows occur are the order in which parameters are generated for the panel's
underlying command syntax. Although always syntactically correct, performance benefits may exist if parameters generated for
table rows are specified in a particular order. e.g. Record key fields provided for Compare Files key synchronisation.
Table row entries may be edited using a set of command line (primary) commands, prefix (line) commands and pre-defined PFKey
assignments that are analagous with structured data edit (SDE) commands and PFKey assignments.
Table Edit CLI (Primary) Commands
The following table contains command line interface (CLI) commands that may be executed by the user to edit tables embedded in
IPO panels. The syntax specification for each command is as documented for the SDE command equivalents.
ALL
BOTTOM
DELETE
DOWN
FLIP
INSERT
LEFT
LESS
MORE
QUERY
REDO
RIGHT
SELECT
SET
TOP
UNDO
UP
WHERE
ZOOM
Synonym for WHERE.
Display the last page of table rows. (Equivalent to DOWN MAX)
Delete table rows. (Default is focus row)
Scroll down through the display of table rows.
Flip disply of excluded and non-excluded table rows.
Insert table rows.
Scroll left through the display of table columns.
Filter (exclude) additional table rows.
Filter (include) additional table rows.
Query current table edit options.
Redo changes to the table that have been undone.
Scroll right through the display of table columns.
Select table columns and their order of display.
Set table edit options.
Display the first page of table rows. (Equivalent to UP MAX)
Undo changes made to the table.
Scroll up through the display of table rows.
Filter table rows.
Zoom a table row to display it in single record view.
Table Edit Options
The following table contains available table edit SET and QUERY options.
COLHEADER
Display descriptive or internal format column header names. (See use of COLHEADER in Table Editing
Techniques below).
COLOUR,
COLOR
COLWIDTH
MSGMODE
Colour specification for individual areas of the display.
2013-11-13 13:06:41
Display width assignment for individual table columns.
Controls display of messages.
SELCOPY/i Reference and User Guide
31
Window Classes
MULTIPOINT
PFKEY
POINT
PREFIX
REFERENCE
SCALE
SHADOW
Table Edit Options
Controls support of >1 line label name assignment for any row.
Function Key assignment.
Line label name assignment.
Prefix area display settings.
Table column field reference header line display.
Table column scale header line display.
Display of shadow lines representing a group of excluded rows.
Table Edit Prefix (Line) Commands
.name
A
B
C(n) CC
D(n) DD
F(n) F*
I(n)
L(n) L*
M(n) MM
R(n) RR(n)
"(n) ""(n)
X(n) X* XX
Z
Set a line pointer (line label name).
Make this row the target for a move or copy (move or copy rows After this row).
Make this row the target for a move or copy (move or copy rows Before this row).
Mark a row or a block of rows for copying. Rows may be copied to another position within the same table
using prefix commands, A or B.
Delete a row or a block of rows.
Include the first n rows of an excluded row group. F* include all excluded rows.
Insert a new row or a block of n new rows.
Include the last n rows of an excluded row group. L* include all excluded rows.
Mark a line or a block of lines for move. Lines may be moved to another position within the same table using
prefix commands, A or B.
Replicate (duplicate) a row or a block of rows n times.
Exclude a row or a block of rows from the display. X* exclude all rows from the current row to the last row of
the table.
Switch to a zoomed ( single record view) display of the row.
Table Edit PFKeys
The following PFKeys are assigned by default when the cursor is within the embedded table display area.
F1
F2
F3
F4
F5
F6
F7
F8
F9
F10
F11
F12
F13
F14
F15
F16
F17
F21
F22
F23
HELP.
SPLIT.
BACK. (GO back to previous panel view.)
WINDOW. (Navigate open windows.)
SELECTALL. (Selects all visible rows.)
SELECTALL DESELECT. (Deselects all visible rows.)
UP. (Scroll up.)
DOWN. (Scroll down)
SWAP.
LEFT. (Scroll left)
RIGHT. (Scroll right)
CRETRIEV.
REMIND. (Reinstate previous value for focus entry field.)
EXPAND. (Display focus entry field in a Text-Edit window.)
END
SHOWPOPUPMENU
ZOOM. (Display a row in single view format.)
SWAP LIST. (Display the ISPF swap list menu.)
UNDO. (Undo a level of table edit changes.)
REDO. (Redo a level of table edit changes undone by the last UNDO operation.)
Table Editing Techniques
The following hints and tips relate to tasks commonly performed on IPO panel embedded table fields
Single Row Display
Default display of an IPO embedded table is multi-row (table) format where UP (<PF7>) and DOWN (<PF8>) scrolls the
table rows and LEFT (<PF10>) and RIGHT (<PF11>) scrolls the table columns.
2013-11-13 13:06:41
SELCOPY/i Reference and User Guide
32
Window Classes
Table Editing Techniques
All column names and values belonging to a single table row, may be displayed in the panle view simply by placing the
cursor on a table row and pressing <PF2> or entering prefix command "Z" to execute ZOOM and so display that row in
single row format. <PF2> again will return to the table display format. Column field values that are ediatble in multi-row
format may also be edited in single row format.
Whilst in single row display format, use <PF10> and <PF11> to scroll backwards and forwards (i.e. LEFT and RIGHT)
respectively through the table rows.
In some instances, the panel table will have been defined so that the zoomed display of the table fields is a formatted
entry form containing explanitory text. This zoomed view of the table row is displayed in another panel view, in which case
the END command (<PF3>) should be executed in order to return to the table view.
Filtering the Table Rows
A number of rows (n) may be manually excluded from display using the prefix (line) command "Xn" or, to mark a block of
rows for exclusion, "XX".
WHERE, MORE, and LESS CLI (primary) commands may also be used to include/exclude multiple table row entries
mechanically, based on the contents of any of the displayed fields. (ALL is a synonym for WHERE.)
These commands operate on structured data (SDE) expressions which support operators, character strings, numeric
values, built-in functions, sub-expressions and field values.
Embedded table field values may be referenced in an expression via the column (field) reference number (e.g. #1, #4) or
via the internally defined column (field) name.
By default, the column reference numbers and internally defined column names are not displayed. This is to maximise the
amount of table data in view and to display more meaningful column headers provided by the column titles.
To display and then remove from display the field reference numbers, use command SET REFERENCE ON/OFF
(abbreviated to REF ON/OFF). Similarly, to alternate the column header display between the column title an its internally
defined name, use command SET COLHEADER NAMES/TITLES (abbreviation COLH N/T).
Examples:
LESS SelectTyp='AN'
Additionally exclude all entries where the value of table field name "SelectTyp" is "AN". Entries that were already
excluded will be unaffected.
WHERE SelectFld >> 'ABC-' or #1 << 'DEF-'
Exclude all entries except those where the value of table field name "SelectFld" begins with literal "ABC-", or the
value of field reference number 1 contains literal "DEF-".
Re-Ordering the Table Columns
By default, table columns are presented to the user in a logical order.
However, the user may suppress and/or change the order of columns displayed using the command SELECT, which
specifies table columns by column (field) reference number or via the internally defined column (field) name. (See filtering
techniques above for display of these column field attributes.
To redisplay columns in their default order, enter "SELECT *".
Adding/Inserting Table Rows
Table rows may be inserted using the INSERT (primary) command, "I(n)" prefix (line) command or by positioning the
cursor on th erow befored the inserted row and pressing <PF1>.
Table rows may be replicated using the "R(n)" or "RR" prefix (line) commands or copied using prefix (line) commands
"C(n)" or "CC" combined with "A" (after) or "B" (before).
The order in which table rows occur may be important. To re-order the table rows, use prefix (line) commands "M(n)" or
"MM" combined with "A" (after) or "B" (before).
Undo/Redo Changes
Edited changes to tables (including field value updates, row inserts, deletions, etc.) may be undone and, if required,
re-applied using the commands UNDO and REDO respectively.
Alternatively, the cursor may be positioned within the table area and then <PF22> or <PF23> pressed to perform UNDO
or REDO respectively.
2013-11-13 13:06:41
SELCOPY/i Reference and User Guide
33
Window Classes
COLHEADER - SET/QUERY Option
Undo levels are maintained for the table even if the panel view is changed and re-visited. However, on closing the panel
the table rows are dropped from storage so that restarting the panel will reinitialise the table rows within the IPO panel
view.
COLHEADER - SET/QUERY Option
Syntax:
>>-+-----------+-- COLHeader -------+-- Name ---+----------------------------><
|
|
|
|
+- SET -----+
+-- Title --+
>>--- Query ------ COLHeader ------------------------------------------------><
Description:
This option controls the display format of the table column names header line.
By default, column are displayed with their descriptive column titles. However, when referencing columns on a SELECT command
or in an expression for WHERE, MORE or LESS row filtering operations, then the column's internal format name or its column field
reference id must be used. For this purpose, SET COLH NAME may be used to display the columns with their internal name
format.
SET Value:
NAME | TITLE
Display all table columns with their internal column name format (NAME) or with their descriptive column title (TITLE).
QUERY Response:
The column header names format (NAME or TITLE).
Selection Lists
Selection lists provide facility to select required input field values from a list of available options.
A list of selectable entries is displayed as an embedded list within a new, modal panel window. The entries themselves are
generated from appropriate system objects (e.g. Catalog/VTOC data sets) and are filtered so that only those entries that satisfy a
provided mask string that includes wild card characters.
Since the panel contains an embedded list, the panel adopts characteristics as provided by list windows . i.e. Display of list window
menu bar items, the ability to select and sort columns, filter list rows and locate entries.
To select an entry, position the cursor on the required list row entry and press the <Enter> key or, if configured, double-click the left
mouse button on the required row entry.
The selection list panel window title includes a short description usually identifying the parent utility panel and the input field to
which the selected entry will apply. e.g. (Create Filter) Structure File. By default, the panel field entries are populated with values
that were entered in the associated input fields belonging to the parent panel.
The following selection lists relate specifically to input fields that reference file objects and may be invoked from many SELCOPY/i
utility panels. (e.g. Compare Files, Create Filter.)
2013-11-13 13:06:41
SELCOPY/i Reference and User Guide
34
Window Classes
Select Dataset Name (Catalog)
Select Dataset Name (Catalog)
Figure 8. SELCOPY/i - Select Dataset Name (Catalog List).
The Select (Cataloged) Dataset Name panel selection list is displayed when a wild card '%' (percent) or '*' (asterisk), both
representing zero or more characters, is specified in a panel DSN input field and no volume id has been specified in the related file
Volume input field.
Name>
Input field in which a new DSN mask may be entered in order to regenerate the selection list.
The DSN mask string may contain one or more of the wild card characters "%" (percent) or "*" (asterisk), each
representing zero or more characters.
Select Dataset Name (VTOC)
Figure 9. SELCOPY/i - Select Dataset Name (VTOC List).
The Select Dataset Name panel selection list which contains only entries for a particular volume (VTOC) is displayed when a wild
card '%' (percent) or '*' (asterisk), both representing zero or more characters, is specified in a panel DSN input field and a volume id
is also specified in the related file Volume input field.
Name>
Input field in which a new DSN mask may be entered in order to regenerate the selection list.
The DSN mask string may contain one or more of the wild card characters "%" (percent) or "*" (asterisk), each
representing zero or more characters.
Volume>
Output field displaying the volume id of the DASD volume VTOC used to display entries that match the DSN mask. This
field is non-enterable.
2013-11-13 13:06:41
SELCOPY/i Reference and User Guide
35
Window Classes
Select HFS Path Name
Select HFS Path Name
Figure 10. SELCOPY/i - Select HFS Path Name ( List).
The Select HFS Path Name panel selection list is displayed when a wild card '%' (percent) or '*' (asterisk), both representing zero
or more characters, is specified in a panel DSN/Path input field and other elements of the input string value invalidate it as being a
DSN (e.g. presence of invalid DSN characters and/or qualifiers of length > 8 characters.)
Path>
Input field in which a new HFS file path mask may be entered in order to regenerate the selection list.
The HFS file path mask string may contain one or more of the wild card characters "%" (percent) or "*" (asterisk), each
representing zero or more characters.
Select Member Name
Figure 11. SELCOPY/i - Select Member Name ( List).
The Select Member Name panel selection list is displayed when a wild card '%' (percent) or '*' (asterisk), both representing zero or
more characters, is specified in a panel Member input field or a PDS/PDSE library DSN is specified in the related file DSN input
field and the panel Member input field is blank.
Library>
Output field displaying the PDS/PDSE library DSN from which the member list has been generated. This field is
non-enterable.
Member>
Input field in which a new member mask may be entered in order to regenerate the selection list.
The member mask string may contain one or more of the wild card characters "%" (percent), representing a single
character, or "*" (asterisk), representing zero or more characters.
2013-11-13 13:06:41
SELCOPY/i Reference and User Guide
36
Window Classes
2013-11-13 13:06:41
Select Member Name
SELCOPY/i Reference and User Guide
37
Primary Option Menu (=)
The Primary Option Menu panel (ZZSGPRIM) is an interactive panel window providing an entry point to all SELCOPY/i panels and
functions.
This panel may be started by enetering "=" (equals) at any command line. A fast path may be specified immediately following the
"=" symbol to directly open sub-panels of the Primary Option menu. (e.g. =0.4.1 for "COBOL Compiler options.")
Menu Bar Items
File
The File drop-down menu contains the single item, Exit, to close the panel.
SwapList
If SELCOPY/i is operating within an ISPF split screen, opens the ISPF task list of active ISPF logical sessions.
Window
Opens the Window List window containing a selectable list of all open windows in the SELCOPY/i session.
Help
Open the general help for the Primary Option menu panel.
Options
0 Settings
1 Text Edit
2 Data Edit
3 List
4 Home
5 Copy/Reformat
6 Search/Update
7 Compare
8 Utilities
9 Structure
10 Filter
11 Print
12 DB2
T Training
WL Window List
X Exit
Set SELCOPY/i options
Edit/View small text-type files
Edit/Browse potentially large data files
List Volumes,VTOCs,Datasets,Members etc
Edit and execute point-and-shoot commands
File Copy with optional copybook reformat
File Search/Update/Copy/Reformat
File/Library Compare Utilities
General utilities
Create structure from copybooks etc
Create record selection filter
Print Dataset (Batch)
Work with DB2, browse/edit tables etc
Setup SELCOPY/i Training Material
Display active windows, select with cursor to switch focus
Exit SELCOPY/i
Panel Output Fields
User:
An output field displaying the user's logon id.
Version:
An output field displaying the version of SELCOPY/i.
Date:
An output field displaying the current date.
Time:
An output field displaying the current time.
OpSys:
An output field displaying the operating system release.
System:
An output field displaying the z/OS system name as defined by the SYSDEF statement in active parmlib member
IEASYMxx.
VM User:
For VM guest operating systems or CMS users, this output field displays the VM userid of the guest machine or CMS
system.
2013-11-13 13:06:41
SELCOPY/i Reference and User Guide
38
Settings (=0)
The Settings panel (ZZSGSET0) is an interactive panel window, opened on selection of option 0. in the SELCOPY/i Primary option
menu.
This panel, and its sub-panels, establish default options and values applicable to the individual user's SELCOPY/i environment.
These values are assigned to variables set in the user's own SELCOPY/i User INI file.
Options
Individual option entries relate to specific functions of the SELCOPY/i environment.
1 Startup
2 System
3 Text Edit
4 Data Edit
5 List
6 Batch
Startup options
System options
Text Editor (CBLe) options
Structured Data Editor (SDE) options
List window options
Panel Input/Output Fields
REXX Macro Library Path:
Fields that together establish the library search chain used to locate a SELCOPY/i REXX macro.
User Library>
An input field allowing the user to enter the fully qualified name of one or more PDS/PDSE SELCOPY/i REXX
macro libraries to appear first in the macro path search chain.
This field may be expanded (using <PF2<) in order to enter any number of blank delimited library data set names
in the order in which they are to appear in the search chain. Close the expanded display (<PF3<) and press
<Enter< to refresh the count of user libraries (#1 of n).
Note that, in any single update of the User Library field, if a non-existant library name is specified, then message
ZZSE062E "Invalid macro path" is returned, the update is not applied and the original User Library field value is
reset to its state prior to attempting the update.
Site Library>
A non-enterable (output) field identifying the DSN of the penultimate library in the macro search path.
This library contains macros that have been developed at the client's installation and made available to all
SELCOPY/i users.
CBL Supplied Library>
A non-enterable (output) field identifying the DSN of the last library in the macro search path.
This library (SZZSDIST.CBLE) contains macros that have been distributed by CBL as part of the SELCOPY
Product Suite and contains macros available to all SELCOPY/i users.
Startup Settings (=0.1)
The Startup Settings panel (ZZSGSET1) is an interactive panel window, opened on selection of option 1. in the SELCOPY/i
Settings panel.
This panel specifies which application windows are to be opened at startup of SELCOPY/i.
Panel Input Fields
Primary Option Menu
Select this option to automatically open the SELCOPY/i Primary Option menu at startup.
Menu Exit
Select this option to fully exit SELCOPY/i (thereby bypassing the SELCOPY/i "logo" screen and saving valuable
keystrokes) if PF3 is pressed at the Primary Option Menu. This option is obeyed only if the option to automatically open
the Primary Option Menu at startup is also selected.
Home File
Select this option to automatically open the the user's HOME command centre (CMX) file at startup.
2013-11-13 13:06:41
SELCOPY/i Reference and User Guide
39
Settings (=0)
Panel Input Fields
System Settings (=0.2)
The System Settings panel (ZZSGSET2) is an interactive panel window, opened on selection of option 2. in the SELCOPY/i
Settings panel.
This panel specifies options relating to SELCOPY/i general operation.
Panel Input Fields
Command Line>
Specifies the location of the command line in all SELCOPY/i windows to the TOP or BOTTOM of the display.
Command Delim>
Identifies the single character interpreted as the command separator used to enter multiple commands from a single
command prompt.
Act-bar Tab>
Specifies whether the keyboard Tab key will position the cursor at the menu bar items displayed on the 3270 screen.
Abend Trap>
Specifies whether the SELCOPY/i abend trap is activated to trap any SELCOPY/i internal system abends and, if possible,
recover from the abend.
If set ON, the abend will be trapped and a formatted dummp written to a SELCOPY/i dump data set. This dump data set
may be requested by CBL for diagnostic purposes.
Dump Prefix>
Specifies the data set name prefix (maximum length 26) to be used for a generated SELCOPY/i formatted dump data set.
Qualifiers of the form '.Dyyyyddd.Thhmmssx', representing the current date and local time, are appended to the dump
data set name prefix qualifiers.
Text Edit Settings (=0.3)
The Text Edit Settings panel (ZZSGSET3) is an interactive panel window, opened on selection of option 3. in the SELCOPY/i
Settings panel.
This panel specifies options relating to the SELCOPY/i text editor.
Panel Input Fields
Interface>
Specifies the default edit interface.
The SELCOPY/i text editor supports edit commands supported by both the ISPF editor and the CMS XEDIT/Windows
KEDIT editors. Some command verbs exist for both editors but can have very different effects (e.g. CHANGE). The
prevailing SELCOPY/i text edit interface dictates the precedence by which common command verbs are interpreted and
also influences the screen display and scrolling.
Size Warning>
Specifies the file size threshold at which the SELCOPY/i text editor will warn the user that it is about to load all records of
a large file into storage. The message also prompts the user to either continue with the load or switch to using structured
data edit which supports edit without all records being loaded in storage.
This value may be specified as a number of bytes (nnn), kilobytes (nnnK) or megabytes (nnnM).
Load Warning>
Specifies the file load warning threshold. During load of a file for text edit, when the number of bytes loaded reaches a
factor of this load warning threshold, then a message is displayed prompting the user to continue or cancel the file load.
This value may be specified as a number of bytes (nnn), kilobytes (nnnK) or megabytes (nnnM).
ISR Macros>
Specifies whether ISPF Rexx Edit macros support is activated for SELCOPY/i text edit. Setting this option to "YES" has
the following effect:
◊ ISREDIT (ISPF Edit) macro commands and assignment statements are intepreted by the SELCOPY/i text editer.
2013-11-13 13:06:41
SELCOPY/i Reference and User Guide
40
Settings (=0)
Panel Input Fields
◊ Following search of the SELCOPY/i macro path libraries, libraries in the SYSUEXEC and SYSEXEC
concatenations are searched for a member name that matches any unrecognised command passed to the
SELCOPY/i text editer.
See ISPF Edit Macros for details.
Action Cursor>
Controls the significance of the first '_' (underscore) as a special character in a line of text processed by the ACTION
facility. If set on, the first '_' is excluded from the command string and identifies the location at which the cursor is to be
positioned if the command string is placed at the command prompt.
Action Delim>
Controls the significance of the '|' (OR symbol) as a special character in a line of text processed by the ACTION facility. If
set on, '|' is excluded from the command string and is treated as a command string delimiter.
Structured Data Edit (SDE) Settings (=0.4)
The Structured Data Edit (SDE) Settings panel (ZZSGSET4) is an interactive panel window, opened on selection of option 4. in the
SELCOPY/i Settings panel.
This panel specifies options relating to the SELCOPY/i Structured Data (SDE) editor.
Options
1 COBOL
2 PL/1
COBOL Compiler and Replacing Options
PL/1 Compiler Options
Panel Input Fields
Load Warning>
Specifies the number of records loaded warning threshold. During load of a file for structured data edit, when the number
of records loaded reaches a factor of this load warning threshold, then a message is displayed prompting the user to
continue or stop the file load. If the load is stopped, then Update-in-place Edit is used.
This value may is specified as a number of records (nnn).
Max Storage>
Specifies the maximum storage available for SDE edit of a single data set.
An SDE edited data set is limited by the lesser of the prevailing MAXSTOR value and the amount of free private area
storage above the 16MB line available within the region at the time of open. This limit is used to determine the SDE edit
technique and data record management used to edit the data set.
This value may be specified as a number of bytes (nnn), number of kilobytes (nnnK) or a number of megabytes (nnnM). A
value of 0 (zero) implies no maximum storage is to be applied.
Aux Dsn HLQ>
Specifies the dataset name prefix (maximum length 26 characters) to be used by SELCOPY/i SDE when allocating the
default Auxiliary Edit data set. Auxiliary edit occurs when editing a non-KSDS data set that is larger than the Max Storage
value or the calculated amount of free private area storage above the 16MB line.
Qualifiers of the form '.Dyyyyddd.Thhmmssx', representing the current date and local time, are appended to the dump
data set name prefix qualifiers.
Default value is %USER%.CBLI.SDEAUX.
Max Window Size>
rows x columns
On initial display of an SDE data edit window, its size will be restricted to the specified number of display rows and
columns.
Once the window is displayed, it may be resized to encompass more rows and/or columns if required.
COBOL Compiler Options (=0.4.1)
The COBOL Compiler Options panel (ZZSGSETC) is an interactive panel window, opened on selection of option 1. in the
Structured Data Edit (SDE) Settings panel.
This panel specifies options relating to the SELCOPY/i Structured Data (SDE) COBOL copybook support.
2013-11-13 13:06:41
SELCOPY/i Reference and User Guide
41
Settings (=0)
Panel Input Fields
Panel Input Fields
COBOL Compiler>
Specifies the full DSN and member name of the COBOL Compiler module (e.g. IGY330.SIGYCOMP(IGYCRCTL).)
SELCOPY/i will invoke the COBOL compiler when generating an internal SDE structure (SDO) from a COBOL Copybook.
Specification of a COBOL Compiler is necessary only if your COBOL compiler program module is not named IGYCRCTL
and is not found in the library search chain.
COBOL Max RC>
Specifies the maximum acceptable COBOL compiler return code for which SELCOPY/i will continue to generate an SDE
structure (SDO).
Where the COBOL compiler return code is greater than this value, the SDE create structure operation fails with an error
message.
COBOL Replacing Options:
References 12 pairs of ('From:' and 'to:') fields that together generate a COBOL REPLACE statement which is inserted in
the temporary source mamber used by SELCOPY/i as input to the COBOL compiler. This REPLACE statement is applied
to all copy books selected for compilation.
The 'From:' field specifies a pseudo-text source string to be replaced. The corresponding 'to:' field specifies a pseudo-text
replacement string.
PL/1 Compiler Options (=0.4.2)
The PL/1 Compiler Options panel (ZZSGSETP) is an interactive panel window, opened on selection of option 2. in the Structured
Data Edit (SDE) Settings panel.
This panel specifies options relating to the SELCOPY/i Structured Data (SDE) PL/1 copybook support.
Panel Input Fields
PL/1 Compiler>
Specifies the full DSN and member name of the PL1 Compiler module (e.g. EL330.SIBMZCMP(IBMZPLI).) SELCOPY/i
will invoke the PL1 compiler when generating an internal SDE structure (SDO) from a PL1 Copybook.
Specification of a PL1 Compiler is necessary only if your PL1 compiler program module is not named IBMZPLI and is not
found in the library search chain.
PL/1 Max RC>
Specifies the maximum acceptable PL1 compiler return code for which SELCOPY/i will continue to generate an SDE
structure (SDO).
Where the PL1 compiler return code is greater than this value, the SDE create structure operation fails with an error
message.
List Window Settings (=0.5)
The List Window Settings panel (ZZSGSET5) is an interactive panel window, opened on selection of option 5. in the SELCOPY/i
Settings panel.
This panel specifies options relating to the SELCOPY/i list windows.
Panel Input Fields
ENTER Key Action>
For file list windows only (window class LISTFILE), identifies the default action on pressing the <Enter> key on a list entry.
Possible actions are:
Edit
View
Browse
2013-11-13 13:06:41
Open a CBLe text edit window to edit the file.
Open a CBLe text edit window to view the file (read-only).
Open a structure data edit (SDE) window to browse the file.
SELCOPY/i Reference and User Guide
42
Settings (=0)
Panel Input Fields
SDE
SDEU
None
Open a structure data edit (SDE) window to perform full function edit of the file.
Open a structure data edit (SDE) window to perform Update-in-place edit of the file.
Disable all actions on the <Enter> key.
Batch Settings (=0.6)
The Batch Settings panel (ZZSGSET6) is an interactive panel window, opened on selection of option 6. in the SELCOPY/i Settings
panel.
This panel specifies options relating to SELCOPY/i batch job generation.
Panel Input Fields
JOB Statement>
Specifies a //JOB statement that will be automatically inserted at the start of any z/OS batch job generated using
SELCOPY/i, or whenever the JOBCARD command is issued from a text-edit session. A maximum of 4 lines may be
specified.
Substitution will automatically occur for any embedded environment variables, which are specified using standard notation
(normally by enclosing the name in per-cent signs) , e.g.
//%fn%
JOB ,,CLASS=A,MSGCLASS=X,MSGLEVEL=(1,1),NOTIFY=&SYSUID
In the example above, the edited library member name is used for the job name.
SYSOUT Class >
Specifies the SYSOUT class that will be specified for //SYSPRINT or //SDEPRINT DD statements in any z/OS batch job
generated using SELCOPY/i.
SDSF FastPath>
Specifies the fast-path that may be entered at the ISPF Primary menu panel in order to start SDSF (or an equivalent
product) in an ISPF environment.
This option is used by SELCOPY/i's OQ and OP commands in order to display JES2/JES3 job queues and the operator
console respectively.
Note that whenever the SUB command is used to submit a batch job from the SELCOPY/i text-editor, OQ is automatically
invoked to display the output from that particular job.
SDE Print File>
Specifies the print output fileid which is allocated to DDname SDEPRINT when the SDE primary command PRINT is
invoked interactively without parameter SYSOUT=outputclass.
DB2 Settings (=0.7)
The DB2 Settings panel (ZZSGSET7) is an interactive panel window, opened on selection of option 7. from the SELCOPY/i
Settings panel.
Options
1 Audit
2 ExecSQL
Audit Log Dataset Options
ExecSQL Output Options
Panel Input Fields
DB2 SubSystem>
Identifies the DB2 subsystem to which a connection will be made. SELCOPYi DB2 functions and panels will operate on
objects defined in this subsystem.
Current SQLID>
The default SQL authorisation ID for any hierarchy of DB2 panels' access to DB2. This value is the initial value of the DB2
special register CURRENT SQLID that is provided on the DB2 connection. See the IBM publication "DB2 SQL Reference"
for further information on CURRENT SQLID and its usage with dynamically prepared SQL statements.
The default value for Current SQLID is the user's TSO or SELCOPY/i VTAM logon id.
2013-11-13 13:06:41
SELCOPY/i Reference and User Guide
43
Settings (=0)
Panel Input Fields
Execute SQL Settings (=0.7.2)
The Execute SQL Settings panel (ZZSGSET1) is an interactive panel window, opened on selection of option 7.2 in the SELCOPY/i
Settings panel.
This panel specifies the out put options for the ExecSQL primary command.
Panel Input Fields
Output Dataset
Specify the name of the output dataset written by ExecSQL. If left blank a dataset name will be generated in the format
prefix.ZZS2ZSQL.Dyyyyddd.Thhmmssx.LST.
Output Structure
Specify the name of the output structure (SDO) dataset written by ExecSQL. If left blank a dataset name will be generated
in the format prefix.ZZS2ZSQL.Dyyyyddd.Thhmmssx.SDO.
Program Function Keys (PF key) Settings (=0.8)
The Program Function Keys Settings panel (ZZSGSET8) is an interactive panel window, opened on selection of option 8. from the
SELCOPY/i Settings panel.
Panel Input Fields
Use KEYLISTs
KEYLIST Mode
YES/NO
PRIVATE/SHARED/PRODUCT
Options
1 KeyList
2 Private
3 Shared
4 Product
5 Reload
6 Title Bars
7 Borders
8 Show All
9 Show Partial
10 Show None
Display/Modify loaded KEYLISTs
Edit your personal Function Key list table
Edit the site-wide Function Key list table
Browse the product supplied Function Key list table
Reload function key definitions from the saved tables.
Display/Modify the Window Title-Bars KeyList
Display/Modify the Window Borders KeyList
Show all Function Keys
Show partial Function Keys
Remove Function Key display
Panel Input Fields
Use KEYLISTs>
YES
Use KeyLists to control function key definitions and enable PFSHOW to display current key settings. KEYLISTs
were introduced with SELCOPYi 3.20 for closer compatibility with ISPF and include default key definitions to
consistently match ISPF standards
e.g. F1=HELP, F2=SPLIT, F9=SWAP, etc.
NO
Revert to the pre-SELCOPYi Rel 3.20 system whereby function keys are defined by window class, and default
key definitions are not specially designed to fit in with ISPF standards. e.g. F9=WINDOW.
KEYLIST Mode>
If KeyLists are active, then this setting determines where they are loaded from and whether or not they are modifiable by
the individual user.
PRODUCT
Definitions will be loaded from the product supplied KeyList table only. Alteration of key definitions using the
KEYS dialog will not be permitted in PRODUCT mode.
SHARED
Definitions will initially be loaded from the product supplied KeyList table, then site-wide overrides will be applied
by loading an installation defined table. Alteration of key definitions using the KEYS dialog will not be permitted
SHARED mode.
2013-11-13 13:06:41
SELCOPY/i Reference and User Guide
44
Settings (=0)
Panel Input Fields
PRIVATE
Alteration of key definitions using the KEYS dialog will be permitted. Definitions will be loaded as for SHARED
with additional personal overrides loaded from (and saved to) the user's own KeyList table.
Options
1. KeyList
This is the equivalent of typing the KEYLIST primary command, which starts a dialog that lists all loaded keylists. The
dialog allows the user to select each keylist for edit, or for use by the focus window.
2. Private
Edits the user's own personal keylist table as stored on disk. This table contains the definitions for each key in every
keylist that is defined at the user level, and is automatically updated when updates are made to a KeyList using the KEYS
dialog. Standard Data Edit techniques may be used to display and/or modify the data. e.g. to show definitions for the F12
only, type:
ONLY PF12 #3
3. Shared
Edits the installation specific SHARED keylist table as stored on disk. This table should be maintained by your systems
programmer in order to define site specific global overrides and will require RACF authority if updates are to be saved.
4. Product
Browses the SELCOPYi PRODUCT supplied keylist table as stored on disk. It should not be modified, but you may find it
helpful to cut/paste from this table into either your PRIVATE or SHARED keylist table, before making global changes.
5. Reload
Reloads active KeyList from the saved tables, as determined by the "KEYLIST Mode" option below. This option is handy
following global updates to the saved tables using Options 1/2, or to revert to previously saved definitions following a
temporary override or corruption. Note that PRIVATE function overrides are written to disk only at the end of the
SELCOPYi session, or if "KEYLIST Mode" is changed from PRIVATE to either SHARED or PRODUCT.
6. Title Bars
Starts the KEYS dialog for the "@WINTITL" KeyList which defines the action of Function Keys pressed while the cursor is
placed within the SELCOPYi window "Title-Bar", or caption area. Defaults include:
F7/F8
Drag the location of the window UP/DOWN x 1 position.
F10/F11
Drag the location of the window LEFT/RIGHT x 1 position.
F19/F20 (i.e. Shift-F7/F8)
Drag the location of the window UP/DOWN x 5 positions.
F22/F23 (i.e. Shift-F10/F11)
Drag the location of the window LEFT/RIGHT x 5 positions.
F15/F16 (i.e. Shift-F3/F4)
Shrink/Stretch window width x 20 positions.
F17/F18 (i.e. Shift-F5/F6)
Shrink/Stretch window depth x 20 positions.
7. Borders
Starts the KEYS dialog for the "@WINBORD" KeyList which defines the action of Function Keys pressed actions while the
cursor is placed within the SELCOPYi window borders (top/bottom/left/right edges or any of the four corners). Defaults
include:
F7/F8
Stretch or shrink the window by dragging the border UP/DOWN x 1 position.
F10/F11
Stretch or shrink the window by dragging the border LEFT/RIGHT x 1 position.
F19/F20 (i.e. Shift-F7/F8)
Stretch or shrink the window by dragging the border UP/DOWN x 5 position.
F22/F23 (i.e. Shift-F10/F11)
Stretch or shrink the window by dragging the border LEFT/RIGHT x 5 position.
F15/F16 (i.e. Shift-F3/F4)
Shrink/Stretch window width x 20 positions.
F17/F18 (i.e. Shift-F5/F6)
Shrink/Stretch window depth x 20 positions.
2013-11-13 13:06:41
SELCOPY/i Reference and User Guide
45
Settings (=0)
Options
8. Show All
This is the equivalent of typing the PFSHOW LONG primary command, which mimics ISPF's feature to display Function
Key definitions at the bottom of the screen.
9. Show Partial
This is the equivalent of typing the PFSHOW SHORT primary command, which mimics ISPF's feature to display Function
Key definitions at the bottom of the screen. This option will suppress the display of function keys defined as TYPE=LONG.
10. Show None
This is the equivalent of typing the PFSHOW OFF primary command, which switches off the display of Function Key
definitions at the bottom of the screen.
2013-11-13 13:06:41
SELCOPY/i Reference and User Guide
46
Text Edit (=1)
Figure 12. SELCOPY/i - Text Edit Entry Panel.
The Text Edit Entry panel (ZZSGEDIT) is an interactive panel window, opened on selection of option 1. in the SELCOPY/i Primary
option menu.
This panel is used to open an existing cataloged or uncataloged data set PDS/PDSE library member or HFS file for CBLe text edit.
For full documentation on text edit sessions, please refer to publication "SELCOPY/i Text Editor (CBLe)".
Panel Input Fields
PDS/PDSE member, Sequential, VSAM or HFS path:
Fields that identify the existing sequential or VSAM data set, HFS file or PDS/PDSE library member to be edited.
Name>
Member>
An absolute or relative HFS Path name or the fully qualified name of a sequential data set or PDS/PDSE library
member. Note that the Member field is ignored if Name field is not a library or contains wildcard characters.
Dataset names must be fully qualified, quotes being unnecessary but permitted.
A selectable list of files will be presented if wildcards '%' (percent) or "*" (asterisk) are entered, or dataset is a
PDS/PDSE library and member is left blank.
Volume>
Specifies a volume serial id mask for an uncataloged data set. (Not applicable to HFS files.)
If an entry exists in this field, then the selectable list of files will be generated from a list of VTOC entries for the
specified volume.
Action:
Identifies the action taken by the panel on pressing the <Enter> key. Mutually exclusive options are as follow:
◊ Edit Records
Open the file with exclusive SPFEDIT ENQ and load all records into available storage for full text edit capabilities.
◊ Read Only Edit (DISP=SHR)
Open the file with shared SPFEDIT ENQ and load all records into available storage before releasing the ENQ.
View supports full text edit capabilities.
Attempts to save changes will fail with message ZZSE045E. However, use of File menu bar option "Save As" will
allow save of the in-storage data as a different fileid. Alternatively, SET FILEID or any other text edit SET
commands that manipulate the fileid assigned to in-storage records, may be used prior to SAVE.
If the new fileid is an as yet unallocated data set, then the relevant Allocate Non-VSAM or Define VSAM
KSDS/ESDS/RRDS/LDS dialog panel will be opened as appropriate.
◊ Edit Records
Open the file with shared SYSDSN ENQ and load only enough records to fill the SDE edit view display area.
Records are loaded and dropped from storage when scrolling occurs. Browse does not allow record editing.
2013-11-13 13:06:41
SELCOPY/i Reference and User Guide
47
Text Edit (=1)
Panel Input Fields
HFS Options:
Identifies options used specifically for editing HFS files. Mutually exclusive options are as follow:
◊ Undefined
End-of-Line (EOL) characters are used to delimit the end of records.
For Undefined HFS files, the Record Length field defines the maximum length of a record within which to identify
the EOL character combination. If the EOL combination is not found, the record is chopped at this length.
Default maximum record length is 32752.
◊ Fixed
HFS file is to be chopped into a number of records of fixed length.
For Fixed HFS files, the EOL Characters field is ignored and Record Length field defines the actual length of
each record. Also, message ZZSE178E is displayed if the file size is not a multiple of the record length.
Default record length is 80.
◊ Record Length>
The maximum record length used for Undefined HFS files or the actual record length used for Fixed HFS files.
Zero (0) implies the default value of 32752 for Undefined and 80 for Fixed.
◊ EOL Characters>
One of the permitted EOL values that represent a 1 or 2 byte end-of-line character combination. Entering a blank
or invalid value in this field will display a selectable list of valid entries.
EOL value elements are as follow:
STD
NL
CR
LF
user
X'15'
X'0D'
X'0A'
-
Any of the standard EOL combinations.
New Line.
Carriage Return.
Line Feed.
A user specified EOL combination.
STD is default so that input data is scanned for any of the standard EOL combinations, stopping when one is
found. This EOL combination is then used for the remainder of the file data.
◊ EOL user string>
If user has been selected from the EOL Characters> field, then this field is used to identify a user defined 1 or 2
byte character or hex string. e.g. '##', X'FF'.
Profile Macro:
Indicates whether or not a text edit profile macro is to be executed when the Edit or View text edit window view is opened
and, if so, the name of the profile macro to be executed.
Mutually exclusive options are as follow:
◊ Use Default.
Use the default text edit profile macro (PROFILE).
◊ Use Specified Macro.
Use an edit profile macro with macro name specified by the Macro Name> field.
◊ Do not use a Profile Macro.
No edit profile macro is to be executed - all edit options are default.
Macro Name>
Applicable only if option Use Specified Macro is selected. This field names the text edit profile macro to be executed when
Edit or View action is used.
2013-11-13 13:06:41
SELCOPY/i Reference and User Guide
48
Data Edit (=2)
Structured Data Browse/Edit Panel
The Structured Data Browse/Edit Panel panel (ZZSGSDE0) is an interactive panel window, used to open an existing file for
Structured Data (SDE) edit.
For full documentation on the Structured Data Editor, please refer to publication "SELCOPY/i Structured Data Editor (SDE)".
The panel may be opened via the following:
• Select option 2. 'Data Edit' in the SELCOPY/i Primary option menu.
• Select 'Structured edit' from the File menu in the main window menu bar.
• Execute the SDE command EDITDIALOG on the command line of an existing SDE window view, or from a SELCOPY/i
text edit view if preceded by SDATA.
• Execute the command SDE with no parameters.
• Execute the prefix command "SD" from an Execute CBLVCAT or file list window.
The SELCOPY/i Structured Browse/Edit panel generates an SDE BROWSE or EDIT command to open an SDE window view in the
current frame window.
Depending on whether the Additional Options option has been set, pressing the <Enter> key or, if configured, double-clicking the
left mouse button, will will either action the data edit or display the Structured Data Browse/Edit - Options panel view.
Figure 13. Structured Data Browse/Edit Panel.
Menu Bar Items
File
The File drop-down menu contains the single item "Exit" which simply closes the panel window. Note that, unlike
CANCEL, CLOSE will save field values entered in the panel so that they may be redisplayed the next time the panel is
opened.
Command
Generate the BROWSE or EDIT command line syntax for specified field entries and display it in a temporary CMX file text
edit view. This command may be executed using ACTION point-and-shoot execution <F16> or copied into the user's
HOME file and saved for future execution.
The user has the opportunity to edit the command prior to its execution and/or copying it to the home (CMX) command
centre for future reference and re-execution.
Structure
Opens the Create Structure (SDO) Menu to generate a SELCOPY/i SDO from a source COBOL or PL1 Copybook or an
XREF file.
Replace
Opens the COBOL Compiler Options panel to review and, if necessary, add COBOL REPLACE "From" and "To"
pseudo-text values to be used in compiling a COBOL copybook.
Values enterd in this panel apply only to the current user. System wide COBOL REPLACE values may also have been
entered in the SELCOPY/i Site INI file. (See the "SELCOPY Product Suite Customisation Guide" for details.)
Help
Display help for this panel view.
2013-11-13 13:06:41
SELCOPY/i Reference and User Guide
49
Data Edit (=2)
Panel Input Fields
Panel Input Fields
By default, field entries are populated with arguments and options that were entered the last time the Structured Edit dialog window
was used.
Many field entries are optional and need to be activated by entering "/" in the preceding field. This provides easy
deactivation/reactivation of a field value without having to clear the field.
PDS/PDSE member, Sequential, VSAM or HFS path:
Input fields which together identify a single existing, sequential or VSAM data set, GDG file generation, HFS file or
PDS/PDSE library member to be edited.
Name>
Identifies the fully qualified data set name or an absolute or relative HFS file path.
A selectable list of data sets or HFS files will be presented if the entered value contains wildcards characters "*"
(asterisk) or "%" (percent).
Member>
If the DSN/Path> field contains the DSN of a PDS/PDSE library, then this field may specify the name of a new or
existing member within that library.
A selectable list of members will be presented if the entered value contains wildcards characters "*" (asterisk) or
"%" (percent), or is blanked out.
Volume>
Specifies the name of the input data set volume. This is required only if output is to an uncataloged data set.
Action:
Select one of the mutually exclusive options that identify the edit technique to be performed.
◊ Browse Data
Browse the data only.
◊ Edit Full
Edit the data with full editing (record insert/delete) capability. Editing techniques employed are KSDS edit for
KSDS data sets otherwise, Auxiliary Edit if the file is too large to be loaded into available storage or standard
in-storage edit.
◊ Edit In-Place
Edit the data with only update capability. Record length may not be changed and records may not be inserted or
deleted. Editing techniques are the same as for Edit Full but that Auxiliary Edit is never employed as, for large
files, records will be loaded and dropped from storage as appropriate.
◊ Edit Full Auxiliary
As for Edit Full but that Auxiliary Edit will be used for edit of non-KSDS files regardless of their size. As such, no
attempt will be made to load all the file's records into storage. This is of benefit when many large files, that would
otherwise be succesfully loaded into available storage, are to be edited concurrently.
◊ Edit Full Read-Only
As for Edit Full but that changes to the data may not be saved using its original DSN or HFS fileid. SAVEAS must
be used instead to save the data to a different (potentially new) fileid.
◊ Edit Full Read-Only & Auxiliary
As for Edit Full Read-Only but with the enforced use of Auxiliary Edit as described by Edit Full Auxiliary.
Structure/Copybook overlay:
If activated this option defines fields which together specify a cataloged structure file (COBOL or PL1 Copybook, ADATA
file or a SELCOPY/i SDO) used to the browsed/edited records. The structure may be a sequential data set or a
PDS/PDSE library member.
If no structure is specified, each data set record will be of the default record type "Unmapped", i.e. a single character field
of length equal to that of the record.
Dsn>
Identifies the fully qualified data set name of a sequential data set or PDS/PDSE library containing a COBOL or
PL1 Copybook, ADATA file or SDO structure.
A selectable list of data sets will be presented if the entered value contains wildcards characters "*" (asterisk) or
"%" (percent).
2013-11-13 13:06:41
SELCOPY/i Reference and User Guide
50
Data Edit (=2)
Panel Input Fields
Member>
If the Dsn> field contains the DSN of a PDS/PDSE library, then this field must reference a member name within
that library which contains a record filter.
A selectable list of members will be presented if the entered value contains wildcards characters "*" (asterisk) or
"%" (percent), or is blanked out.
Type:
Indicate the type of structure (COBOL, PL1, ADATA or SDO).
Recompile> Y/N
If Structure/Copybook overlay refers to a COBOL, PL1 or ADATA source file (not an SDO) then a compile step must be
performed in order to turn the source copybook into SELCOPYi's own internal structure (SDO) format. A temporary SDO
will be created, lasting the duration of the SELCOPYi session, making subsequent reference to the same copybook during
the session much faster.
If, however, the copybook (or any of its included components) is modified during the session, then a recompile of the
source will normally be required.
For performance reasons N (meaning no recompile should occur) is the default.
Specify Y to force a copybook recompile each time the process is run. Alternatively type the primary command:
SD DROP <copybook_name>
Record Selection:
Fields which together identify criteria by which a subset of records from the file are selected for browse/edit. If any record
selection field is activated for data edit, then Edit In-Place is performed regardless of the selected edit technique.
Start>
If activated, the Start> field specifies the first record in the file to be included in the browse/edit. Records
occurring sequentially before the start record will be excluded. If this field is not activated, records are selected
beginning at record 1.
This input field may contain a record number, an RBA number (for ESDS input only), or a key string (for KSDS
input only).
A record/RBA number may be specified as an integer numeric value 123 or as a hexadecimal numeric value
X'7B'. A key string may be specified as a literal abc or 'abc', which will be upper cased before keyed look-up,
character string C'abc' (character case preserved) or a hexadecimal string X'818283'.
Record | Key | RBA
Identifies the type of start value specified in the Start> field. Enter "/" in the appropriate, mutually
exclusive parameter field.
For>
If activated, the For> field specifies the maximum number of records within the file to be browsed/edited. If this
field is not activated, records are selected beginning at start record and ending at the last record in the file.
Filter>
If activated, the Filter> field specifies options to either generate a new record filter or use an existing record filter
file. A record filter will perform further subsetting on input file records selected for processing by the Start> and/or
For> input fields.
Filter options are as follow:
Q
F
On pressing <PF6>, the Quick Filter dialog panel will be opened in order to generate a temporary filter on
the unformatted record data.
Use a permanent filter identified by the sequential data set or member name in the File> field.
On pressing <PF6>, the Create File Filter dialog panel will be opened in order to display the contents of an
existing filter file or create and save a new filter file.
If option "F" is selected, then specifiaction of a filter fileid is mandatory.
File>
Identifies the fully qualified data set name of a sequential data set or PDS/PDSE library containing a
record filter. Quotes are unnecessary but permitted.
2013-11-13 13:06:41
SELCOPY/i Reference and User Guide
51
Data Edit (=2)
Structured Data Browse/Edit - Options Panel
A selectable list of data sets will be presented if the entered value contains wildcards characters "*"
(asterisk) or "%" (percent).
Member>
If the File> field contains the DSN of a PDS/PDSE library, then this field must reference a member name
within that library which contains a record filter.
A selectable list of members will be presented if the entered value contains wildcards characters "*"
(asterisk) or "%" (percent), or is blanked out.
Additional Options:
Select this option only if HFS file record length determination is not a standard End-of-Line character combination.
Similarly if no edit profile macro is to be executed or an edit macro which is not the default (SDEPROF) is to be executed
when the file is edited.
If selected, the Structured Data Browse/Edit - Options panel view will open on pressing <Enter>.
Structured Data Browse/Edit - Options Panel
The Structured Data Browse/Edit - Options panel is opened when Additional Options is selected in the Structured Data Browse/Edit
panel.
This panel is used to specify additional data edit options for initial edit profile macro execution and HFS file record determination.
Figure 14. Structured Data Browse/Edit - Options panel view.
Menu Bar Items
Menu bar items are as described for Structured Data Browse/Edit .
Panel Input Fields
HFS Options:
Options and values that apply to edit of HFS files only.
Undefined | Fixed | Variable
Identify the format of input HFS records.
Undefined indicates that records are terminated by an End-of-Line (EOL) string.
Fixed indicates that all records are of a fixed length as defined by a specified LRECL.
Variable indicates that all records are of variable length as defined by a length field within the data.
Max Record Length>
2013-11-13 13:06:41
SELCOPY/i Reference and User Guide
52
Data Edit (=2)
Panel Input Fields
Applicable to each of the record formats, this value defines the LRECL (maximum length) of input records. A
record longer than this value will be chopped into multiple records.
A 0 (zero) value implies the default which is 32752 for Undefined and Variable record formats and 80 for Fixed
record format.
EOL Characters>
Applicable to Undefined record format only, choose from one of the following EOL character combinations:
STD
CR
LF
NL
CRLF
LFCR
CRNL
user
X'0D'
X'0A'
X'15'
X'0D0A'
X'0A0D'
X'0D15'
-
Any standard line-end.
Carriage Return.
Line Feed.
New Line.
Carriage Return + Line Feed.
Line Feed + Carriage Return.
Carriage Return + New Line.
A 2-byte user string specified in EOL user string>
EOL user string>
Applicable only if EOL Characters> is set to user, this field specifies the user supplied 2-byte EOL string. It may
be specified in character or hexadecimal notation. (e.g. '##', X'FFFF')
Var Length Field>
Applicable to Variable record format only, these fields identify the location of the record length fields within the
data.
(Offset)
Offset of the record length field from the start of the record. Default is 0. (i.e. the length field is at the
start of the record.)
(Length)
Length (number of bytes) of the record length field. Default is 2.
(Data Origin)
Offset into the record data at which the value in the record length field is to be applied. Default is 0. (i.e.
the record length include the length field.)
Profile Macro:
Options that identify the data edit macro to be executed when the file is edited.
◊ Use Default.
Use the default supplied profile data edit macro SDEPROF
◊ Use Specified Macro.
Use the edit macro named in the Macro Name> input field.
◊ Do not use a Profile Macro.
Suppress use of a profile edit macro when the file is edited.
Macro Name>
Identies the edit macro to be executed if option Use Specified Macro is selected. This edit macro must be a member
found in the macro library search path.
2013-11-13 13:06:41
SELCOPY/i Reference and User Guide
53
List File Windows (=3)
The List Menu panel (ZZSGLIST) is an interactive panel window opened on selection of option 3. in the SELCOPY/i Primary option
menu.
SELCOPY/i file lists provide detailed information for DASD files and related system resources. (e.g. ENQs, DASD and Associated
Cataloged objects.)
All list file windows are of window class, LISTFILE, and have common characteristics defined for list window classes.
Options
1 Volumes
2 VTOC
3 Extents
4 Dslist
5 Catalog
6 Dataset
7 Library
8 Allocated
9 Enqueues
10 Job Enqueues
11 Associations
12 HFS
13 DB2
LVOL - List DASD Volumes
LV - List VTOC files
LX - List VTOC Extents
- Data Set List Utilities
LC - List Cataloged datasets (catalog detail)
LD - List Dataset details (catalog & VTOC detail)
LL - List PDS/PDSE Library members
LA - List Allocated files (DD names)
LQ - List Resource Enqueues
LJQ - List Job Enqueues
LAS - List File Assocations
LP - List HFS Paths
LDxx - List DB2 objects
List DASD Volumes (=3.1)
See List Windows for general features and commands common to all list windows.
The DASD Volumes List window may be opened via the following:
• Select option 1. 'Volumes' from the List Menu.
• Select 'DASD Volumes' from the Utilities/List menu in the CBLe main window menu bar.
• Enter command LVOL on the command line of any window.
The DASD Volumes window displays the attributes of DASD volumes defined to your system.
Figure 15. DASD Volumes window.
Panel Input Fields
Volume>
Specify a volume id mask. The mask supports the following wild cards:
* An asterisk indicates that one or more characters within the volume id can occupy that position. An asterisk can
precede or follow a set of characters.
%
A single percent sign indicates that exactly one character can occupy that position. (Up to 6 percent signs can be
specified.)
2013-11-13 13:06:41
SELCOPY/i Reference and User Guide
54
List File Windows (=3)
Panel Input Fields
By default, a volume id mask that is less than 6 characters in length and does not contain an * (asterisk) wild card will be
treated as having an implied trailing * wild card.
Prefix Line Commands
The following prefix line commands are available:
Command Description
<Dflt>
Prefix Line command T.
F
Open the FSU - File Search/Update Window to perform an advanced search and optionally update the
contents of the entry.
T
Open the VTOC list window for the volume.
VC
Open an Execute CBLVCAT window and issue a LISTVTOC operation for the entry.
?
Open the volume statistics window for the volume containing the file.
/
Open a drop down menu containing valid prefix command functions for the list window entry. Position the
cursor on the required function and hit <Enter> to action the command.
Assigned to F16 by default.
>
Open a new window containing a zoomed vertical display of the entry's fields. Particularly useful for list
windows that have a large number of displayed columns.
Assigned to PF2 by default.
Columns Displayed
The data displayed for MVS is:
Name
Type
Description
UNIT
Hex
Unit address
VOL
Char
Volume serial number
FREECYL
UInt
Free cylinders
FREETRK
UInt
Free tracks
FREEXTN
UInt
Free extents
FREEDSCB
UInt
Free DSCBs
MAXCYL
UInt
Largest free extent (CYLs)
MAXTRK
UInt
Largest free extent (TRKs)
VOLPCU
UInt
Volume percent used
VTOCPCU
UInt
VTOC percent used
TOTALCYL
UInt
Total cylinders
TRKCYL
UInt
Tracks per cylinder
TRKLEN
UInt
Track length
UCBTYPE
Hex
Unit type
SMS
Char
SMS managed indicator
VTOCIX
Char
Indexed VTOC
VTOCXTN
UInt
Number of VTOC extents
VTOCTRK
UInt
Number of VTOC tracks
LOWCCHH
Hex
VTOC start CCHH
HIGHCCHH
Hex
VTOC end CCHH
DSCBTRK
UInt
DSCBs per track
FREEVIR
UInt
Number of free VTOC index recs
FRAGINDX
UInt
Fragmentation index
ALTCCHH
Hex
Next available alt track CCHH
ALTREM
UInt
Remaining alternate tracks
MOUNT
Char
Mount usage status
2013-11-13 13:06:41
SELCOPY/i Reference and User Guide
55
List File Windows (=3)
Columns Displayed
DEV
Char
Device type
MODEL
Char
Device model
MODELX
Hex
Device model (hex)
CACHE
Char
Cached device
SHARE
Char
Shareable device
The data displayed for VSE is:
Name
Type
Description
UNIT
Hex
Unit address
VOL
Char
Volume serial number
TYPE
Char
External device type code
FORMAT
Hex
Device format
AVRVTOC
Hex
VTOC address
PUBC
Hex
PUB device type code
DTFC
Hex
DTF device type code
UCBC
Hex
Unit code
DCTPCYL
UInt
Primary cylinders
DCTACYL
UInt
Alternate cylinders
DCTTCYL
UInt
Tracks per cylinder
DCTBTRK
UInt
Bytes per track
DCTTFIX
UInt
Cylinders under fixed head
DCTMAXR
UInt
Maximum physical record size
DCTDEVC
Hex
Device constants
List VTOC Files (=3.2)
See List Windows for general features and commands common to all list windows.
The VTOC File List window may be opened via the following:
• Select option 2. 'VTOC' from the List Menu.
• Select 'VTOC Files' from the Utilities/List menu in the CBLe main window menu bar.
• Enter command LV on the command line of any window.
The VTOC File List window displays data set entry information in a DASD volume's Volume Table of Contents (VTOC).
Note: List VTOC Files is not supported for CMS.
Figure 16. VTOC File List window displaying all entries beginning 'CBL.' on volume 'CBLM01.'
2013-11-13 13:06:41
SELCOPY/i Reference and User Guide
56
List File Windows (=3)
Panel Input Fields
Panel Input Fields
Volume>
The 1-6 character volume id containing the required VTOC.
Filter>
Note: The filter parameter is not supported for VSE.
Select only data sets that match the specified filter mask. The filter mask supports the following wild cards:
*
A single asterisk represents a DSN qualifier, or zero or more characters within a DSN qualifier.
**
A double asterisk represents zero or more qualifiers within a DSN. Double asterisk must be preceded or
followed by either a "." (dot/period) or a blank. It cannot precede or follow an alphanumeric character.
%
A single percent sign represents exactly one character, other than "." (dot/period), within a DSN qualifier.
Up to 8 percent signs can be specified in each qualifier.
A filter field that contains neither "*" (asterisk) nor "**" (double asterisk) wild cards will have a wildcard string of "*.**"
automatically appended and so list all those data sets whose names begin with the filter string.
Prefix Line Commands
The following prefix line commands are available:
Command Description
<Dflt>
Prefix line command M if entry is a PDS/PDSE library, prefix line command E otherwise.
AS
Open an Associations list window to list associated objects for this entry.
AP
Open the DB2 Print Audit Report panel for this entry, using the entry name as the Audit DSN field entry.
B
Open the CBLe text editor to to perform SDATA BROWSE on the entry.
C
Copy the entry.
CF
Open the Compare Files Panel for this entry, using the entry name as the New File field entry.
CL
Open the Compare Libraries Panel for this entry, using the entry name as the New DSN field entry.
D
Delete the entry. User will be prompted to verify the deletion.
E
Open the CBLe text editor to edit this entry.
EU
Open the SDE structured data editor to edit the entry in update mode only.
F
For MVS only, open the FSU - File Search/Update Window to perform an advanced search and optionally
update the contents of the entry.
FO
Open an SDE view to display (browse) the entry as output from the FSU - File Search/Update Window.
FS
If the entry is a PDS(E), open the File Search window for the entry.
I
Open a Data Set Information panel display for the entry.
IC
Open the Execute IEBCOPY panel for this entry, using the entry name as the PDSIn field entry.
ID
Open an IDCAMS Command window and issue an IDCAMS LISTCAT for the entry.
K
Delete (Kill) the entry without prompting for verification.
M
If the entry is a PDS/PDSE, open a Library List window. (Default)
Q
For MVS only, list dataset enqueues (major name SYSDSN) for this entry.
R
Rename the entry.
SD
Open the SDE BROWSE/EDIT Dialog Window to browse or edit the entry's data within a Structured Data
Environment window view.
UT
Opens the general file utilities menu to ultimately generate specific line commands in a temporary CMX file.
V
Open the CBLe text editor to View (edit read/only) this entry.
VC
Open an Execute CBLVCAT window and issue a LISTVCAT operation for the entry.
Z
Perform a compress of an MVS PDS library to reclaim disk space occupied by replaced (back-level) members.
This action performs an IEBCOPY to itself. No action is taken for PDSE entries, however, the IEBCOPY dialog
is opened with an error message if executed against any non-PDS(E) entry.
?
Open the volume statistics window for the volume containing the entry.
2013-11-13 13:06:41
SELCOPY/i Reference and User Guide
57
List File Windows (=3)
Prefix Line Commands
/
Open a drop down menu containing valid prefix command functions for the list window entry. Position the
cursor on the required function and hit <Enter> to action the command.
Assigned to F16 by default.
>
Open a new window containing a zoomed vertical display of the entry's fields. Particularly useful for list
windows that have a large number of displayed columns.
Assigned to PF2 by default.
Columns Displayed
Name
Type
Description
Vol
Char
Volume serial number
Dsn
Char
Dataset name
Org
Enum
Data set organisation
RecFm
Enum
Record format
Lrecl
UInt
Logical record length
Blksz
UInt
Block Size
Alu
Char
Allocation unit
Pri
UInt
Primary space allocation
Sec
UInt
Secondary space allocation
Alt
UInt
Allocation total
Nxt
UInt
Number of extents
Trks
UInt
Tracks allocated
DsnPcu
UInt
Dataset percent used
DsKb
UInt
Dataset space Kilobytes
Created
VTOCDate
Creation date
Referenced
VTOCDate
Last referenced date
Expires
VTOCDate
Expiry Date
SMS
BitFlag
SMS managed dataset
PDSE
BitFlag
PDS extended
HFS
BitFlag
HFS dataset
UnCat
BitFlag
Uncataloged dataset
XFD
BitFlag
Extended format dataset
XAttr
BitFlag
Extended attributes exist
ReBlk
BitFlag
May be reblocked
IsICF
BitFlag
ICF catalog BCS dataset
InICF
BitFlag
Cataloged in an ICF catalog
DSInd
Hex
Dataset indicators (DS1DSIND)
KyL
UInt
Dataset key length
RKP
UInt
Relative key position
TBal
UInt
Bytes remaining on last track
BlKTrk
UInt
Blocks per track
F1Vol
Char
Format 1 DSCB volume serial
VSeq
UInt
Volume sequence number
List VTOC Extents (=3.3)
See List Windows for general features and commands common to all list windows.
The VTOC Extent List window may be opened via the following:
• Select option 3. 'Extents' from the List Menu.
2013-11-13 13:06:41
SELCOPY/i Reference and User Guide
58
List File Windows (=3)
List VTOC Extents (=3.3)
• Select 'VTOC Extents' from the Utilities/List menu in the CBLe main window menu bar.
• Enter command LX on the command line of any window.
The VTOC Extent List window displays all information in a DASD volume's Volume Table of Contents (VTOC) by physical extent.
This includes free extents and volume control areas such as the VTOC and the label area.
Note: Not supported for VSE.
Figure 17. VTOC Extent List window displaying all extents on volume 'CBLM01.'
Panel Input Fields
Volume>
The 1-6 character volume id containing the required VTOC.
Filter>
Note: The filter parameter is not supported for VSE.
Select only data sets that match the specified filter mask. The filter mask supports the following wild cards:
*
A single asterisk represents a DSN qualifier, or zero or more characters within a DSN qualifier.
**
A double asterisk represents zero or more qualifiers within a DSN. Double asterisk must be preceded or
followed by either a "." (dot/period) or a blank. It cannot precede or follow an alphanumeric character.
%
A single percent sign represents exactly one character, other than "." (dot/period), within a DSN qualifier.
Up to 8 percent signs can be specified in each qualifier.
A filter field that contains neither "*" (asterisk) nor "**" (double asterisk) wild cards will have a wildcard string of "*.**"
automatically appended and so list all those data sets whose names begin with the filter string.
Prefix Line Commands
The following prefix line commands are available:
Command Description
<Dflt>
Prefix line command M if entry is a PDS/PDSE library, prefix line command E otherwise.
AS
Open an Associations list window to list associated objects for this entry.
AP
Open the DB2 Print Audit Report panel for this entry, using the entry name as the Audit DSN field entry.
B
Open the CBLe text editor to to perform SDATA BROWSE on the entry.
C
Copy the entry.
CF
Open the Compare Files Panel for this entry, using the entry name as the New File field entry.
CL
Open the Compare Libraries Panel for this entry, using the entry name as the New DSN field entry.
D
Delete the entry. User will be prompted to verify the deletion.
E
Open the CBLe text editor to edit this entry.
EU
Open the SDE structured data editor to edit the entry in update mode only.
2013-11-13 13:06:41
SELCOPY/i Reference and User Guide
59
List File Windows (=3)
Prefix Line Commands
F
Open the FSU - File Search/Update Window to perform an advanced search and optionally update the
contents of the entry.
FO
Open an SDE view to display (browse) the entry as output from the FSU - File Search/Update Window.
FS
If the entry is a PDS(E), open the File Search window for the entry.
I
Open a Data Set Information panel display for the entry.
IC
Open the Execute IEBCOPY panel for this entry, using the entry name as the PDSIn field entry.
ID
Open an IDCAMS Command window and issue an IDCAMS LISTCAT for the entry.
K
Delete (Kill) the entry without prompting for verification.
M
If the entry is a PDS/PDSE, open a Library List window. (Default)
Q
List dataset enqueues (major name SYSDSN) for this entry.
R
Rename the entry.
SD
Open the SDE BROWSE/EDIT Dialog Window to browse or edit the entry's data within a Structured Data
Environment window view.
UT
Opens the general file utilities menu to ultimately generate specific line commands in a temporary CMX file.
V
Open the CBLe text editor to View (edit read/only) this entry.
VC
Open an Execute CBLVCAT window and issue a LISTVCAT operation for the entry.
Z
Perform a compress of an MVS PDS library to reclaim disk space occupied by replaced (back-level) members.
This action performs an IEBCOPY to itself. No action is taken for PDSE entries, however, the IEBCOPY dialog
is opened with an error message if executed against any non-PDS(E) entry.
?
Open the volume statistics window for the volume containing the entry.
/
Open a drop down menu containing valid prefix command functions for the list window entry. Position the
cursor on the required function and hit <Enter> to action the command.
Assigned to F16 by default.
>
Open a new window containing a zoomed vertical display of the entry's fields. Particularly useful for list
windows that have a large number of displayed columns.
Assigned to PF2 by default.
Columns Displayed
Name
Type
Description
Vol
Char
Volume serial number
CC
UInt
Cylinder number (decimal)
HH
UInt
Head number (decimal)
Seq
UInt
Extent sequence
Dsn
Char
Dataset name
Org
Enum
Data set organisation
Alu
Char
Allocation unit
Trks
UInt
Tracks allocated
Nxt
UInt
Number of extents
LoCCHH
Hex
Extent Low CCHH
HiCCHH
Hex
Extent High CCHH
2013-11-13 13:06:41
SELCOPY/i Reference and User Guide
60
List File Windows (=3)
Columns Displayed
Data Set List Utility (=3.4)
Figure 18. SELCOPY/i - Data Set List Utility.
The Data Set List Utility panel (ZZSGOPEN) is an interactive panel window, opened on selection of option 4. 'Dslist' from the List
Menu.
This panel is used to perform tasks on an existing cataloged or uncataloged data set PDS/PDSE library member or HFS file for
CBLe text edit.
Panel Input Fields
Fileid Mask:
Fields that identify the existing sequential or VSAM data set, HFS file or PDS/PDSE library member to be edited.
Dsn/Path>
An absolute or relative HFS Path name or the fully qualified name of a sequential data set or PDS/PDSE library.
Enclosing apostrophes (') may be used to ignore use of the TSO prefix if selected.
A selectable list of data set names or HFS files will be displayed as appropriate if either wild card character "%"
(percent), representing a single character, or "*" (asterisk), representing zero or more characters, is specified. If a
volume id exists in the Volume field, then a list of selectable data sets will be restricted to those contained in that
volume's VTOC.
Volume>
Specifies a volume serial id mask for an uncataloged data set. (Not applicable to HFS files.)
Use (TSO) Prefix
Option field that controls whether the defined TSO prefix is used as the high level qualifier of the data set to be text edited.
Note that the TSO prefix will not be used if the data set name is enclosed in apostrophes (') or the fileid is an HFS file
path.
ENTER Key Action>
Option field that controls the action on pressing the <Enter> key or, if configured, double-clicking the left mouse button on
an entry in the resulting file list.
Acceptable values are as follow:
Edit
Edit using the CBLe Text editor with Read/Write authority.
View
Edit using the CBLe Text editor with Read Only authority.
Browse
Browse data using the SDE Structured Data editor.
SDE
Full Edit of data using the SDE Structured Data editor.
SDEU
Update-in-place Edit of data using the SDE Structured Data editor.
None
No action to be taken. A list prefix command must be used instead.
2013-11-13 13:06:41
SELCOPY/i Reference and User Guide
61
List File Windows (=3)
Panel Input Fields
List Catalog Entries (=3.5)
See List Windows for general features and commands common to all list windows.
The Catalog List window may be opened via the following:
• Select option 5. 'Catalog' from the List Menu.
• Select 'Cataloged Files' from the Utilities/List menu in the CBLe main window menu bar.
• Enter command LC on the command line of any window.
For CMS, the File List window is opened in place of the Catalog List or Dataset List window and displays information about files
residing on accessed mini-disks. Refer to documentation on List CMS Files.
For VSE, the Catalog List window is supported only where the CBL software product CBLVCAT is installed and active. The Catalog
List window uses CBLVCAT to read the specified VSAM catalog records to obtain information about the cataloged files.
For MVS, the Catalog List window displays the basic catalog entry information for ICF cataloged data sets. The Dataset List
window should be used to display more detailed information on cataloged data sets.
Figure 19. MVS Catalog List Window.
Figure 20. VSE Catalog List Window.
2013-11-13 13:06:41
SELCOPY/i Reference and User Guide
62
List File Windows (=3)
Panel Input Fields
Panel Input Fields
Entry>
Specify the fileid mask.
◊ For MVS systems, the fileid mask represents a DSN mask that supports the following wild cards:
* A single asterisk represents a DSN qualifier, or zero or more characters within a DSN qualifier.
**
A double asterisk represents zero or more qualifiers within a DSN. Double asterisk must be
preceded or followed by either a "." (dot/period) or a blank. It cannot precede or follow an
alphanumeric character.
A single percent sign represents exactly one character, other than "." (dot/period), within a DSN
qualifier. Up to 8 percent signs can be specified in each qualifier.
If the last character of the fileid mask is "." (dot/period), then this marks the end of the low level DSN qualifier
within the fileid mask. The trailing "." is stripped and no wildcard string is appended to the fileid mask. e.g.
%
DEV*.
DEV.OEM.TRSPAN*.
DEV.*.*SAMP%%.
becomes:
becomes:
becomes:
DEV*
DEV.OEM.TRSPAN*
DEV.*.*SAMP%%
If the last character of the fileid mask is not "." (dot/period), then a default trailing wild card string is automatically
appended to the fileid mask as follows:
1. If the fileid mask is a single qualifier or the last character of the fileid mask is "*" (asterisk), then a
wildcard string of ".**" is appended. e.g.
DEV
DEV*
DEV.OEM.TRSPAN*
DEV.*.*SPA*
becomes:
becomes:
becomes:
becomes:
DEV.**
DEV*.**
DEV.OEM.TRSPAN*.**
DEV.*.*SPA*.**
2. Otherwise a wildcard string of "*.**" is appended. e.g.
DEV.OEM.TRSPAN
DEV.*.*SPA%
SYS1.*.Z19
becomes:
becomes:
becomes:
DEV.OEM.TRSPAN*.**
DEV.*.*SPA%*.**
SYS1.*.Z19*.**
Note that a warning message is displayed if the high level qualifier of the fileid mask is "*" (asterisk) or "**"
(double asterisk). A fileid mask of this type would result in all catalogs being searched which would take some
time to execute and would use a large amount of system resources.
◊ For VSE systems, the fileid mask is a valid CBLVCAT LISTCAT KEY parameter string. i.e. entries with file name
beginning with the specified string or, if prefixed by "/" (slash), entries with file name containing the specified
string. (See the CBLVCAT User Manual.)
If no fileid mask is specified, all entries will be selected.
Note that wild cards are not supported within the VSE fileid mask, however, "*" (asterisk) is tolerated if placed at
the end of the fileid mask.
Catalog>
Nominate a specific catalog in which to search for the requested entry.
For MVS systems, this is a catalog DSN. Specifying a catalog DSN is unneccessary if an alias exists for the fileid mask
high level qualifier (HLQ) in the master catalog. In this case, the appropriate catalog DSN will automatically be inserted in
this field. If the HLQ contains a wild card, then all matching aliases are interrogated, the required catalogs are searched
and the last catalog searched placed in the Catalog> field.
For VSE systems, this is a disk label assigned to the VSAM catalog for which entries are to be listed.
If no catalog file label is specified, the Catalog List window displays all user catalogs cataloged in the master catalog.
Default is the master catalog.
Types>
Specify the catalog entry types required. Default is all types. One or more of the following types may be specified with no
intervening blanks:
A
B
C
G
H
R
X
U
L
W
2013-11-13 13:06:41
non-VSAM (or VSAM SAM) data set.
MVS - Generation data group.
Cluster.
Alternate Index.
MVS - Generation data set.
VSAM PATH.
Alias.
User catalog connector entry.
MVS - Tape volume catalog library entry.
MVS - Tape volume catalog volume entry.
SELCOPY/i Reference and User Guide
63
List File Windows (=3)
Prefix Line Commands
AllVols>
Specify "Y" or "N" to control whether repeated display of the same entry occurs for multi-volume data sets. If "N" is
specified, then only the primary volume entry is displayed.
Prefix Line Commands
For MVS systems, the following prefix line commands are available:
Command Description
<Dflt>
Prefix line command M if entry is a PDS/PDSE library, prefix line command E otherwise.
AS
Open an Associations list window to list associated objects for this entry.
AP
Open the DB2 Print Audit Report panel for this entry, using the entry name as the Audit DSN field entry.
B
Open the CBLe text editor to to perform SDATA BROWSE on the entry.
C
Copy the entry.
CF
Open the Compare Files Panel for this entry, using the entry name as the New File field entry.
CL
Open the Compare Libraries Panel for this entry, using the entry name as the New DSN field entry.
D
Delete the entry. User will be prompted to verify the deletion.
E
Open the CBLe text editor to edit this entry.
EU
Open the SDE structured data editor to edit the entry in update mode only.
F
Open the FSU - File Search/Update Window to perform an advanced search and optionally update the
contents of the entry.
FO
Open an SDE view to display (browse) the entry as output from the FSU - File Search/Update Window.
FS
Open the File Search window for the entry.
I
Open a Data Set Information panel display for the entry.
IC
Open the Execute IEBCOPY panel for this entry, using the entry name as the PDSIn field entry.
ID
Open an IDCAMS Command window and issue an IDCAMS LISTCAT for the entry.
K
Delete (Kill) the entry without prompting for verification.
M
If the entry is a PDS/PDSE, open a Library List window. (Default)
Q
List dataset enqueues (major name SYSDSN) for this entry.
R
Rename the entry.
SD
Open the SDE BROWSE/EDIT Dialog Window to browse or edit the entry's data within a Structured Data
Environment window view.
T
Open an Execute CBLVCAT window and issue a LISTVCAT TUNE DEFINE operation for the entry.
UT
Opens the general file utilities menu to ultimately generate specific line commands in a temporary CMX file.
V
Open the CBLe text editor to View (edit read/only) this entry.
VC
Open an Execute CBLVCAT window and issue a LISTVCAT operation for the entry.
Z
Perform a compress of an MVS PDS library to reclaim disk space occupied by replaced (back-level) members.
This action performs an IEBCOPY to itself. No action is taken for PDSE entries, however, the IEBCOPY dialog
is opened with an error message if executed against any non-PDS(E) entry.
?
Open the volume statistics window for the volume containing the entry.
/
Open a drop down menu containing valid prefix command functions for the list window entry. Position the
cursor on the required function and hit <Enter> to action the command.
Assigned to F16 by default.
>
Open a new window containing a zoomed vertical display of the entry's fields. Particularly useful for list
windows that have a large number of displayed columns.
Assigned to PF2 by default.
For VSE systems, the following prefix line commands are available:
Command Description
D
Delete the entry. User will be prompted to verify the deletion.
K
Delete (Kill) the entry without prompting for verification.
R
Rename the entry.
2013-11-13 13:06:41
SELCOPY/i Reference and User Guide
64
List File Windows (=3)
Columns Displayed
T
Open an Execute CBLVCAT window and issue a LISTVCAT TUNE DEFINE operation for the entry.
VC
Open an Execute CBLVCAT window and issue a LISTVCAT operation for the entry.
>
Open a new window containing a zoomed vertical display of the entry's fields. Particularly useful for list
windows that have a large number of displayed columns.
Assigned to PF2 by default.
Columns Displayed
For MVS systems, the data displayed is:
Name
Type
Description
Entry
Char
Entry name
Vol
Char
Volume serial number
VSeq
UInt
Volume Sequence number
DevC
Char
Device Class
FSeq
UInt
File Sequence number
T
Char
Catalog entry type code
EType
Char
Catalog entry type
DSType
Char
Dataset type
UnitType
Hex
Unit type
UnitName
Char
Unit name
DataClas
Char
SMS Data Class
StorClas
Char
SMS Storage Class
MgmtClas
Char
SMS Management Class
For VSE systems, the data displayed is:
Name
Type
Description
ALLOCP
Char
Defined Primary Allocation
ALLOCS
Char
Defined Secondary Allocation
ALLOCT
Char
Current Total Space Allocation
ALLOCU
Char
Unused Allocated Space
AVRL
Char
Defined Average Record Length
BLKSIZE
Char
Defined VSAM SAM Block Size
BUFSP
Char
Defined Buffer Space (BUFSP)
BUFSP/IXL
Char
Defined BUFSP or INDEX levels
CATALOG
Char
Catalog File Name
CI/CA
Char
Number of Control Intervals/Control Area
CISIZE
Char
Defined Control Interval Size
COMPONENT
Char
VSAM Object Component Name
DEFINED
Char
Date the File was Defined
DSN
Char
Fileid
ENTRY
Char
VSAM Component Entry Name
EXCPS
Char
Number of Executed Channel Programs
EXPIRES
Char
Expiry Date
FREEBYTES
Char
Free Space Bytes Value
FRSP
Char
Defined Freespace (Bytes/CI and CI/CA)
HIALLRBA
Char
Current High Allocated RBA
HIUSERBA
Char
Current High Used RBA
IMB/REP
Char
Defined Index Attributes (IMBED and/or REPLICATE)
2013-11-13 13:06:41
SELCOPY/i Reference and User Guide
65
List File Windows (=3)
List CMS Files
IXL
Char
Number of INDEX Levels
KL
Char
Defined KEY Length
KL/BLK/IMB
Char
Merge KL, BLK and IMB/REP Values
LMAX
Char
Defined Maximum Record Length
NRECS
Char
Current Number of Records
NSEC
Char
Number of Allocated Extents Minus One
PCNT
Char
Calculated Amount of Used Space
PHYREC
Char
Physical Record Size allocated by VSAM
RECSTATS
Char
Number of Records Deleted, Inserted, Updated and Read
RKP
Char
Defined Relative KEY Position
S/C
Char
Defined Local Share option and the Primary Space Class
SEVL
Char
CBLVCAT's Highest Severity Level Massage Reference for the File
SHR
Char
Defined Local (Cross Region) and Cross System Share Options
SPLITCA
Char
Number of CA Splits to Date.
SPLITCI
Char
Number of CI Splits to Date.
TIMESTMP
Char
Time Stamp of VSAM object (Last Closed)
TYPE
Char
File Type
VOLUME
Char
Defined Primary Volume Serial Number
List CMS Files
See List Windows for general features and commands common to all list windows.
Supported for CMS systems only, the File List window may be opened via the following:
• Enter command FL (synonym for LC) or LD on the command line of any window.
For CMS, the File List window is opened in place of the MVS/VSE Catalog List or Dataset List windows and displays information
about files residing on accessed disks.
Figure 21. CMS File List window displaying all files on mini-disk A.
Panel Input Fields
File>
Specify the CMS fileid mask.
The fileid mask may consist of up to 3 qualifiers representing a filename filetype filemode combination where qualifiers are
separated by one or more blanks or a "." (dot/period).
2013-11-13 13:06:41
SELCOPY/i Reference and User Guide
66
List File Windows (=3)
Panel Input Fields
A single "*" (asterisk) wild card may be used to represent an entire qualifier or zero or more characters at a particular
position within the qualifier. Wild card "*" may be specified more that once, anywhere within a qualifier.
Default filemode qualifier is "A", default filetype qualifier is "*".
Prefix Line Commands
The following prefix line commands are available:
Command Description
<Dflt>
Prefix line command E.
C
Copy the entry.
D
Delete the entry. User will be prompted to verify the deletion.
E
Open the CBLe text editor to edit this entry.
F
Open the file search window for the PDS.
K
Delete (Kill) the entry without prompting for verification.
R
Rename the entry.
V
Open the CBLe text editor to View (edit read/only) this entry.
VC
Open an Execute CBLVCAT window and issue a LISTVCAT operation for the entry.
/
Open a drop down menu containing valid prefix command functions for the list window entry. Position the
cursor on the required function and hit <Enter> to action the command.
Assigned to F16 by default.
>
Open a new window containing a zoomed vertical display of the entry's fields. Particularly useful for list
windows that have a large number of displayed columns.
Assigned to PF2 by default.
Columns Displayed
Name
Type
Description
nBlks
UInt
Number of blocks.
nRecs
UInt
Number of records.
Entry
Char
File id.
Fm
Char
File mode.
Fmt
Char
Record format.
Fn
Char
File name.
Ft
Char
File type
Label
Char
Disk label.
LRecL
UInt
Record length.
TimeStamp
Char
Last update date and time.
List Dataset Details (=3.6)
See List Windows for general features and commands common to all list windows.
The Dataset List window may be opened via the following:
• Select option 6. 'Dataset' from the List Menu.
• Select 'Dataset Details' from the Utilities/List menu in the CBLe main window menu bar.
• Enter command LD on the command line of any window.
For CMS, the File List window is opened in place of the Catalog List or Dataset List window and displays information about files
residing on accessed mini-disks. Refer to documentation on List CMS Files.
The Dataset List window is not supported on VSE systems.
The Dataset List window displays the basic catalog entry information together with the details of their geometry obtained either from
the catalog or the VTOC for cataloged data sets.
2013-11-13 13:06:41
SELCOPY/i Reference and User Guide
67
List File Windows (=3)
List Dataset Details (=3.6)
Figure 22. Dataset List window displaying all Cluster and AIX entries beginning 'CBL.'
Panel Input Fields
Entry>
Specify the fileid mask.
The fileid mask represents a DSN mask that supports the following wild cards:
*
A single asterisk indicates that either a qualifier or one or more characters within a qualifier can occupy
that position. An asterisk can precede or follow a set of characters.
**
A double asterisk indicates that zero or more qualifiers can occupy that position. A double asterisk
cannot precede or follow any characters; it must be preceded or followed by either a dot or a blank.
A single percent sign indicates that exactly one character can occupy that position. (Up to 8 percent
signs can be specified in each qualifier.)
If the last character of the fileid mask is "." (dot/period), then this marks the end of the low level DSN qualifier within the
fileid mask. The trailing "." is stripped and no wildcard string is appended to the fileid mask. e.g.
%
DEV*.
DEV.OEM.TRSPAN*.
DEV.*.*SAMP%%.
becomes:
becomes:
becomes:
DEV*
DEV.OEM.TRSPAN*
DEV.*.*SAMP%%
If the last character of the fileid mask is not "." (dot/period), then a default trailing wild card string is automatically
appended to the fileid mask as follows:
1. If the fileid mask is a single qualifier or the last character of the fileid mask is "*" (asterisk), then a wildcard string
of ".**" is appended. e.g.
DEV
DEV*
DEV.OEM.TRSPAN*
DEV.*.*SPA*
becomes:
becomes:
becomes:
becomes:
DEV.**
DEV*.**
DEV.OEM.TRSPAN*.**
DEV.*.*SPA*.**
2. Otherwise a wildcard string of "*.**" is appended. e.g.
DEV.OEM.TRSPAN
DEV.*.*SPA%
SYS1.*.Z19
becomes:
becomes:
becomes:
DEV.OEM.TRSPAN*.**
DEV.*.*SPA%*.**
SYS1.*.Z19*.**
Note that a warning message is displayed if the high level qualifier of the fileid mask is "*" (asterisk) or "**" (double
asterisk). A fileid mask of this type would result in all catalogs being searched which would take some time to execute and
would use a large amount of system resources.
Catalog>
Nominate a specific catalog in which to search for the requested entry.
This is a catalog DSN. Specifying a catalog DSN is unneccessary if an alias exists for the fileid mask high level qualifier
(HLQ) in the master catalog. In this case, the appropriate catalog DSN will automatically be inserted in this field. If the
HLQ contains a wild card, then all matching aliases are interrogated, the required catalogs are searched and the last
2013-11-13 13:06:41
SELCOPY/i Reference and User Guide
68
List File Windows (=3)
Panel Input Fields
catalog searched placed in the Catalog> fields.
Default is the master catalog.
Types>
Specify the catalog entry types required. Default is all types. One or more of the following types may be specified with no
intervening blanks:
A
B
C
G
H
R
X
U
L
W
non-VSAM (or VSAM SAM) data set.
MVS - Generation data group.
Cluster.
Alternate Index.
MVS - Generation data set.
VSAM PATH.
Alias.
User catalog connector entry.
MVS - Tape volume catalog library entry.
MVS - Tape volume catalog volume entry.
AllVols>
Specify "Y" or "N" to control whether repeated display of the same entry occurs for multi-volume data sets. If "N" is
specified, then only the primary volume entry is displayed.
Prefix Line Commands
The following prefix line commands are available:
Command Description
<Dflt>
Prefix line command M if entry is a PDS/PDSE library, prefix line command E otherwise.
AS
Open an Associations list window to list associated objects for this entry.
AP
Open the DB2 Print Audit Report panel for this entry, using the entry name as the Audit DSN field entry.
B
Open the CBLe text editor to to perform SDATA BROWSE on the entry.
C
Copy the entry.
CF
Open the Compare Files Panel for this entry, using the entry name as the New File field entry.
CL
Open the Compare Libraries Panel for this entry, using the entry name as the New DSN field entry.
D
Delete the entry. User will be prompted to verify the deletion.
E
Open the CBLe text editor to edit this entry.
EU
Open the SDE structured data editor to edit the entry in update mode only.
F
Open the FSU - File Search/Update Window to perform an advanced search and optionally update the
contents of the entry.
FO
Open an SDE view to display (browse) the entry as output from the FSU - File Search/Update Window.
FS
Open the File Search window for the entry.
I
Open a Data Set Information panel display for the entry.
IC
Open the Execute IEBCOPY panel for this entry, using the entry name as the PDSIn field entry.
ID
Open an IDCAMS Command window and issue an IDCAMS LISTCAT for the entry.
K
Delete (Kill) the entry without prompting for verification.
M
If the entry is a PDS/PDSE, open a Library List window. (Default)
Q
List dataset enqueues (major name SYSDSN) for this entry.
R
Rename the entry.
SD
Open the SDE BROWSE/EDIT Dialog Window to browse or edit the entry's data within a Structured Data
Environment window view.
T
Open an Execute CBLVCAT window and issue a LISTVCAT TUNE DEFINE operation for the entry.
UT
Opens the general file utilities menu to ultimately generate specific line commands in a temporary CMX file.
V
Open the CBLe text editor to View (edit read/only) this entry.
VC
Open an Execute CBLVCAT window and issue a LISTVCAT operation for the entry.
2013-11-13 13:06:41
SELCOPY/i Reference and User Guide
69
List File Windows (=3)
Prefix Line Commands
Z
Perform a compress of an MVS PDS library to reclaim disk space occupied by replaced (back-level) members.
This action performs an IEBCOPY to itself. No action is taken for PDSE entries, however, the IEBCOPY dialog
is opened with an error message if executed against any non-PDS(E) entry.
?
Open the volume statistics window for the volume containing the entry.
/
Open a drop down menu containing valid prefix command functions for the list window entry. Position the
cursor on the required function and hit <Enter> to action the command.
Assigned to F16 by default.
>
Open a new window containing a zoomed vertical display of the entry's fields. Particularly useful for list
windows that have a large number of displayed columns.
Assigned to PF2 by default.
Columns Displayed
Name
Type
Description
Entry
Char
CAT - Catalog Entry Name (usually a DSN)
Org
Enum
DS - Data Set Organiz'n PS|PO|DA|VS|etc
Trks
UInt
Alc - Total Tracks
Pri
UInt
Alc - Primary units
Alu
Char
Alc - Allocation units: C|T|B=Cyl|Trk|Blk
Sec
UInt
Alc - Secondary units
Nxt
UInt
Alc - Number of extents
Alt
UInt
Alc - Total units
Blksz
UInt
DS - Block Size
Lrecl
UInt
DS - Logical record length
RecFm
Enum
DS - Record format
PDSE
BitFlag
SMS - Partitioned dataset Extended Y|N
DsnPcu
UInt
Alc - Percent of allocated space used
DsKb
UInt
Alc - Data space used in Kilobytes
VSeq
UInt
Vol - Sequence number (Cat) 1 = First
Vol
Char
Vol - Volid
Referenced
VTOCDate
Date - Last Referenced
Created
VTOCDate
Date - Created
Expires
VTOCDate
Date - Of Expiry
BlkTrk
UInt
Alc - Blocks per track
CKDKeyL
UInt
Alc - CKD Physical Key Length
RKP
UInt
Alc - CKD Relative Key Position
DevC
Char
Alc - Device Class DASD|TAPE|etc
UnitName
Char
Alc - Device Unit Name
UnitType
Hex
Alc - Device Unit type
FSeq
UInt
Alc - Tape File Sequence number
EType
Char
CAT - Entry Type blank=NONVSAM
T
Char
CAT - Entry Type Code
DSInd
Hex
DS - Dataset flags (DS1DSIND) (hex)
RACF
BitFlag
DS - Dataset is RACF defined Y|N
DSType
Char
DS - Dataset type PDSE|KSDS|ESDS|RRDS|etc
LastVol
BitFlag
DS - Last vol holding data for dset Y|N
TBal
UInt
DS - TrackBalance: Bytes free on last trk
DCOB
BitFlag
SMS - DASDM CREATE originated blksize Y|N
DataClas
Char
SMS - Data Class
XATTR
BitFlag
SMS - Extended attributes exist Y|N
2013-11-13 13:06:41
SELCOPY/i Reference and User Guide
70
List File Windows (=3)
Columns Displayed
XFD
BitFlag
SMS - Extended format dataset Y|N
HFS
BitFlag
SMS - HierarchicalFileSystem Y|N
MgmtClas
Char
SMS - Management Class
ReBlk
BitFlag
SMS - May be reblocked Y|N
SMi
Hex
SMS - SMS indicators (DS1SMSFG) (hex)
StorClas
Char
SMS - Storage Class
SMS
BitFlag
SMS - System managed dataset Y|N
InICF
BitFlag
VS - Dataset cataloged in ICF catlg Y|N
IsICF
BitFlag
VS - Dataset is an ICF catalog Y|N
VS
Hex
VS - VSAM indicators (DS1OPTCD) (hex)
VTot
UInt
Vol - Total no of volumes
F1Vol
Char
Vol - Volid of 1st volume (Format 1 DSCB)
VOLSq
UInt
Vol - Sequence number (VTOC) 1 = First
List Library Members (=3.7)
See List Windows for general features and commands common to all list windows.
The Library List window may be opened via the following:
• Select option 7. 'Library' from the List Menu.
• Select 'Library Members' from the Utilities/List menu in the CBLe main window menu bar.
• Enter command LL on the command line of any window.
The Library List window displays members of a PDS/PDSE (MVS) or LIBR (VSE) library.
Figure 23. Library List window displaying VSE libraries beginning 'PRD'.
Figure 24. Library List window displaying VSE library 'CBLLIB2' sub-libraries beginning 'CB'.
2013-11-13 13:06:41
SELCOPY/i Reference and User Guide
71
List File Windows (=3)
List Library Members (=3.7)
Figure 25. Library List window displaying all members of VSE sub-library 'CBLLIB2.CB070128'.
Figure 26. Library List window displaying members of MVS PDSE 'CBL.JCL' whose names begin with "S".
Panel Input Fields
Library>
The name of the library for which the contents are to be listed.
◊ For MVS the library parameter is a PDS (or PDSE) dataset name and optionally one or more member name
mask.
A member name mask supports the following wild cards:
*
A single asterisk represents an entire member name or zero or more characters within a
member name mask.
%
A single percent sign represents exactly one character within a member name mask. Up to
8 percent signs can be specified in each member name mask.
If specified, the member name mask must immediately follow the PDS(E) DSN and be enclosed in "( )"
(parentheses). Multiple member name masks, all specified within the single set of parentheses, must be
separated by one or more blanks and/or a "," (comma). e.g.
LL
DEV.OEM.CBL202.CBLI.HELP.HTML(S*AN%
WIN*, *R)
◊ For VSE the library parameter can be:
1. A library name. In this case the statistics for the library are listed. e.g.
LL
CBLLIB
2. A library name and sublibrary name. In this case the sublibrary name may be a mask containing "*"
(asterisk) wild cards as supported by VSE Librarian. The statistics for all sublibraries which fit the
sublibrary name mask are listed. e.g.
LL
2013-11-13 13:06:41
CBLLIB.TEST*
SELCOPY/i Reference and User Guide
72
List File Windows (=3)
Panel Input Fields
3. A library name, sublibrary name and member name and type. In this case the member name and type
may be a mask containing "*" (asterisk) wild cards. The statistics for all members which fit the mask are
listed. e.g.
LL
CBLLIB.TEST01.*.Z
Prefix Line Commands
For MVS systems, the following prefix line commands are available:
Command Description
<Dflt>
Prefix line command E.
A
Open the Create Alias dialog window.
B
Open the CBLe text editor to to perform SDATA BROWSE on the entry.
C
Copy the entry.
CF
Open the Compare Files Panel for this entry, using the entry name as the New File field entry.
CL
Open the Compare Libraries Panel for this entry, using the entry name as the New DSN field entry.
D
Delete the entry. User will be prompted to verify the deletion.
E
Open the CBLe text editor to edit this entry.
EU
Open the SDE structured data editor to edit the entry in update mode only.
EX
Execute the entry. (Invokes the TSO command, EXECUTE, using the entry name as input.
F
Open the FSU - File Search/Update Window to perform an advanced search and optionally update the
contents of the entry.
FS
Open the File Search window for the entry.
IC
Open the Execute IEBCOPY panel for this entry, using the entry name as the PDSIn field entry.
J
Submit the entry to batch. Executes the CBLe CLI SUBMIT command using the entry name as input. (A CBLe
frame window must be active for this operation to suceed.)
K
Delete (Kill) the entry without prompting for verification.
R
Rename the entry.
SD
Open the SDE BROWSE/EDIT Dialog Window to browse or edit the entry's data within a Structured Data
Environment window view.
UT
Opens the general file utilities menu to ultimately generate specific line commands in a temporary CMX file.
V
Open the CBLe text editor to View (edit read/only) this entry.
/
Open a drop down menu containing valid prefix command functions for the list window entry. Position the
cursor on the required function and hit <Enter> to action the command.
Assigned to F16 by default.
>
Open a new window containing a zoomed vertical display of the entry's fields. Particularly useful for list
windows that have a large number of displayed columns.
Assigned to PF2 by default.
For VSE systems, the following prefix line commands are available when a list of VSE libraries or sublibraries is displayed:
Command Description
<Dflt>
Prefix line command M.
M
Opens another Library List window containing the library/sub-library contents.
L
Lock the VSE LIBR member. (VSE Only)
/
Open a drop down menu containing valid prefix command functions for the list window entry. Position the
cursor on the required function and hit <Enter> to action the command.
Assigned to F16 by default.
>
Open a new window containing a zoomed vertical display of the entry's fields. Particularly useful for list
windows that have a large number of displayed columns.
Assigned to PF2 by default.
For VSE systems, the following prefix line commands are available when a list of VSE sublibrary members is displayed:
Command Description
2013-11-13 13:06:41
SELCOPY/i Reference and User Guide
73
List File Windows (=3)
Prefix Line Commands
<Dflt>
Prefix line command E.
D
Delete the entry. User will be prompted to verify the deletion.
E
Open the CBLe text editor to edit this entry.
FS
Open the File Search window to search the contents of this entry. Not supported for VSE LIBR library entries.
J
Submit the entry to batch. Executes the CBLe CLI SUBMIT command using the entry name as input. (A CBLe
frame window must be active for this operation to suceed.)
K
Delete (Kill) the entry without prompting for verification.
L
LOCK the member.
R
Rename the entry.
U
UNLOCK the member. A member may only be unlocked by the user that locked it.
V
Open the CBLe text editor to View (edit read/only) this entry.
/
Open a drop down menu containing valid prefix command functions for the list window entry. Position the
cursor on the required function and hit <Enter> to action the command.
Assigned to F16 by default.
>
Open a new window containing a zoomed vertical display of the entry's fields. Particularly useful for list
windows that have a large number of displayed columns.
Assigned to PF2 by default.
Columns Displayed
The data displayed for MVS non-LOAD libraries is:
Name
Type
Description
Member
Char
Member name
Alias
BitFlag
Alias indicator
VV
Int
Version number
MM
Int
Modification level
Created
TimeDec
Creation date
LastMod
TimeDec
Last modified date and time
CurSize
Int
Current size
IniSize
Int
Initial size
Mods
Int
Modified records
User
Char
User id
The data displayed for MVS LOAD libraries is:
Name
Type
Description
Member
Char
Member name
TTR
Hex
TTR
Rent
BitFlag
Renterable
Reus
BitFlag
Reusable
Test
BitFlag
Test module
Refr
BitFlag
Refreshable
Exec
BitFlag
Executable
Big
BitFlag
More than 16M load module
SizeHex
Hex
Contiguous storage required
EPA
Hex
Entry point address
AC
Hex
APF code
RMode
Char
Residence mode
AMode
Char
Main entry point address mode
AAmode
Char
Alias entry point address mode
AliasOf
Char
Name of aliased member
2013-11-13 13:06:41
SELCOPY/i Reference and User Guide
74
List File Windows (=3)
Columns Displayed
AOEPA
Hex
Entry point of aliased member
SSILvl
Hex
SSI change level
SSIFlg
Hex
SSI flag
SSISer
Hex
SSI member serial number
LMSize
Int
Large module size
LMEPA
Hex
Large module main entry point
LMAEPA
Hex
Large module alias entry point
Page
BitFlag
Page alignment required
LFmt
BitFlag
Linear format
Ovly
BitFlag
Overlay structure
Load
BitFlag
Only loadable
Scat
BitFlag
Scatter format
1Blk
BitFlag
No rld items and 1 text block
Flvl
BitFlag
Ony linkage editor F
NRLD
BitFlag
Contains no RLD items
Nrep
BitFlag
Cannot be reprocessed
TstC
BitFlag
Contains TEST cards
LnkF
BitFlag
Created by linkage editor F
Alias
BitFlag
Alias indicator
The data displayed for VSE libraries is:
Name
Type
Description
Lib
Char
Library file name
SubLib
Char
Sublibrary name
CreDate
Char
Creation date
CreTime
Char
Creation time
Members
Int
Number of members
BlksUsed
Int
Number of library blocks used
Size
Int
Sublibrary size limit
Locked
Int
Number of locked members
The data displayed for VSE sublibraries is:
Name
Type
Description
Lib
Char
Library file name
SubLib
Char
Sublibrary name
Member
Char
Member name
Type
Char
Member type
Recfm
Char
Record format
Records
Int
Number of records or bytes
Lrecl
Int
Logical record length
Blocks
Int
Number of library blocks
UpdDate
Char
Last update date
UpdTime
Char
Last update time
CreDate
Char
Creation date
CreTime
Char
Creation time
SYSIPT
BitFlag
SYSIPT data in procedure
MSHP
BitFlag
Member is MSHP controlled
2013-11-13 13:06:41
SELCOPY/i Reference and User Guide
75
List File Windows (=3)
List MVS Allocated Files (=3.8)
MSHPByP
BitFlag
MSHP control is bypassed
PrintCC
Enum
Printer control characters
MBSTLOCK
Char
Lock identifier
List MVS Allocated Files (=3.8)
See List Windows for general features and commands common to all list windows.
The Allocated Datasets may be opened via the following:
• Select option 8. 'Allocated' from the List Menu.
• Select 'Allocated Files' from the Utilities/List menu in the CBLe main window menu bar.
• Enter command LA on the command line of any window.
The resultant Allocated Datasets window displays all current file allocations defined to the environment running SELCOPY/i. i.e.
MVS TSO
MVS VTAM
DDnames allocated to the TSO Userid.
Files allocated to the SELCOPY/i VTAM application.
Figure 27. List MVS Allocated Datasets window.
Panel Input Fields
DDName>
Select only DDNames that match this ddname mask.
A DDName mask supports the following wild cards:
*
A single asterisk represents the complete MVS DDName or zero or more characters within the
DDName mask.
%
A single percent sign represents exactly one character within the DDName mask. Up to 8 percent
signs can be specified in each DDName mask.
If no wildcards are specified within the DDName mask then all MVS ddnames that begin with the specified DDName
mask are selected.
Prefix Line Commands
The following prefix line commands are available:
Command Description
<Dflt>
Prefix line command M if entry is a PDS/PDSE library, prefix line command E otherwise.
AS
Open an Associations list window to list associated objects for this entry.
2013-11-13 13:06:41
SELCOPY/i Reference and User Guide
76
List File Windows (=3)
Prefix Line Commands
AP
Open the DB2 Print Audit Report panel for this entry, using the entry name as the Audit DSN field entry.
B
Open the CBLe text editor to to perform SDATA BROWSE on the entry.
C
Copy the entry.
CF
Open the Compare Files Panel for this entry, using the entry name as the New File field entry.
CL
Open the Compare Libraries Panel for this entry, using the entry name as the New DSN field entry.
D
Delete the entry. User will be prompted to verify the deletion.
E
Open the CBLe text editor to edit this entry.
EU
Open the SDE structured data editor to edit the entry in update mode only.
F
Open the FSU - File Search/Update Window to perform an advanced search and optionally update the
contents of the entry.
FO
Open an SDE view to display (browse) the entry as output from the FSU - File Search/Update Window.
FS
If the entry is a PDS(E), open the File Search window for the entry.
I
Open a Data Set Information panel display for the entry.
IC
Open the Execute IEBCOPY panel for this entry, using the entry name as the PDSIn field entry.
ID
Open an IDCAMS Command window and issue an IDCAMS LISTCAT for the entry.
K
Delete (Kill) the entry without prompting for verification.
M
If the entry is a PDS/PDSE, open a Library List window. (Default)
Q
List dataset enqueues (major name SYSDSN) for this entry.
R
Rename the entry.
SD
Open the SDE BROWSE/EDIT Dialog Window to browse or edit the entry's data within a Structured Data
Environment window view.
U
Unallocate the DD name.
UT
Opens the general file utilities menu to ultimately generate specific line commands in a temporary CMX file.
V
Open the CBLe text editor to View (edit read/only) this entry.
VC
Open an Execute CBLVCAT window and issue a LISTVCAT operation for the entry.
Z
Perform a compress of an MVS PDS library to reclaim disk space occupied by replaced (back-level) members.
This action performs an IEBCOPY to itself. No action is taken for PDSE entries, however, the IEBCOPY dialog
is opened with an error message if executed against any non-PDS(E) entry.
?
Open the volume statistics window for the volume containing the entry.
/
Open a drop down menu containing valid prefix command functions for the list window entry. Position the
cursor on the required function and hit <Enter> to action the command.
Assigned to F16 by default.
>
Open a new window containing a zoomed vertical display of the entry's fields. Particularly useful for list
windows that have a large number of displayed columns.
Assigned to PF2 by default.
Columns Displayed
Name
Type
Description
DDName
Char
DD name
CSeq
Int
Concatenmation sequence
DsN
Char
Dataset name
Mbr
Char
PDS member
Vol
Char
Volume serial number
Org
Char
Data set organisation
Recfm
Char
Record format
Lrecl
Int
Logical record length
BlkSize
Int
Block size
Disp
Char
Dataset disposition
2013-11-13 13:06:41
SELCOPY/i Reference and User Guide
77
List File Windows (=3)
Columns Displayed
List VSE Standard Labels
See List Windows for general features and commands common to all list windows.
The VSE Standard Label window may be opened via the following to display all permanent and temporary file labels:
• Select 'Allocated Files' from the Utilities/List menu in the CBLe main window menu bar.
• Enter command LA on the command line of any window.
Where information for individual fields are uninitialised, then the null indicator (-1) is displayed. e.g. If EXTNO field is null, then no
extents have been associated with the label.
Figure 28.List Standard Labels Window for VSE.
Panel Input Fields
DDName>
Select only VSE label names that match this DDName mask.
A DDName mask supports the following wild cards:
*
A single asterisk represents the complete VSE label name or zero or more characters within the
DDName mask.
%
A single percent sign represents exactly one character within the DDName mask. Up to 8 percent
signs can be specified in each DDName mask.
If no wildcards are specified within the DDName mask then all VSE labels that begin with the specified DDName mask
are selected.
Prefix Line Commands
The following prefix line commands are available:
Command Description
ID
For VSAM cataloged files only, open an IDCAMS Command window and issue an IDCAMS LISTCAT for the
entry.
VC
For VSAM cataloged files only, open an Execute CBLVCAT window and issue a LISTVCAT operation for the
entry.
/
Open a drop down menu containing valid prefix command functions for the list window entry. Position the
cursor on the required function and hit <Enter> to action the command.
Assigned to F16 by default.
>
Open a new window containing a zoomed vertical display of the entry's fields. Particularly useful for list
windows that have a large number of displayed columns.
Assigned to PF2 by default.
2013-11-13 13:06:41
SELCOPY/i Reference and User Guide
78
List File Windows (=3)
Columns Displayed
Columns Displayed
Name
Type
Description
ADisp
Char
Abend disposition
BLKSIZE
Int
SAM CKD DTFSD BLKSIZE override
BUFND
Int
VSAM ACB BUFND override. Number of Data buffers
BUFNI
Int
VSAM ACB BUFNI override. Number of Index buffers
BUFSP
Int
VSAM ACB and IDCAMS DEFINE BUFSP override
CISIZE
Int
SAM FBA DTFSD CISIZE override
DSN
Char
File dataset name
ExpDate
VTOCDate
Expiration date
ExtAlloc
Int
Number of allocated tracks/blocks
ExtNo
Int
Extent Sequence Number
ExtStart
Int
Start of extent (relative track/block number)
File
Char
File name
FBA
BitFlag
FBA Device Indicator for OPEN
LogUnit
Char
Assigned System or Programmer Logical Unit
O
Char
Open code for file type
ODisp
Char
Open disposition
PriAlloc
Int
VSAM/SAM RECORDS primary allocation
PN
Char
Partition name
PT
Char
Perm/Temp
RetPeriod
Int
Retention period in number of days. (Default 7)
RECSIZE
Int
VSAM/SAM Record size
SecAlloc
Int
VSAM/SAM RECORDS secondary allocation
TDisp
Char
Termination disposition
Vol
Char
Volume serial of this extent
VSAMCat
Char
VSAM catalog
List MVS Enqueues (=3.9)
See List Windows for general features and commands common to all list windows.
The Enqueue List window may be opened via the following:
• Select option 9. 'Enqueues' from the List Menu.
• Select 'Enqueues' from the Utilities/List menu in the CBLe main window menu bar.
• Enter command LQ on the command line of any window.
The Enqueue List window displays outstanding MVS enqueues by major name and minor name (queue name and resource name).
Note: Not implemented for VSE.
2013-11-13 13:06:41
SELCOPY/i Reference and User Guide
79
List File Windows (=3)
List MVS Enqueues (=3.9)
Figure 29. Enqueue List window displaying outstanding enqueues with resource name beginning 'SYS1' in queue SYSDSN.
Panel Input Fields
Queue Name>
The major name (queue name) of the ENQ resource. This is a 1-8 character upper case name. For example, dataset
allocations are ENQueued with resource name SYSDSN .
Resource Name>
This is a 1-256 character, case sensitive minor name (resource name). You need only enter the prefix of the resources
you are interested in. All resources for the given queue with resource beginning with this value are listed.
Prefix Line Commands
The following prefix line commands are available:
Command Description
/
Open a drop down menu containing valid prefix command functions for the list window entry. Position the
cursor on the required function and hit <Enter> to action the command.
Assigned to F16 by default.
>
Open a new window containing a zoomed vertical display of the entry's fields. Particularly useful for list
windows that have a large number of displayed columns.
Assigned to PF2 by default.
Columns Displayed
Name
Type
Description
JOB
Char
Job name
QNAME
Char
Enqueue Major Name (Queue)
STATUS
Char
Status of Enqueue
SCOPE
Char
Scope of Enqueue
RSV
Char
Reserve
MC
Char
Must complete
OWN
Int
Number of owners
WTEX
Int
Number of waiters exclusive
WTSH
Int
Number of waiters shared
RNAMEL
Int
Rname length
RNAME
VChar
Enqueue Minor Name (Resource)
2013-11-13 13:06:41
SELCOPY/i Reference and User Guide
80
List File Windows (=3)
Columns Displayed
List MVS Job Enqueues (=3.10)
See List Windows for general features and commands common to all list windows.
The Job Enqueue List window may be opened via the following:
• Select option 10. 'Job Enqueues' from the List Menu.
• Select 'Job Enqueues' from the Utilities/List menu in the CBLe main window menu bar.
• Enter command LJQ on the command line of any window.
The Job Enqueue List window displays outstanding MVS enqueues held by a given job.
Note: Not implemented for VSE.
Figure 30. Job Enqueue List window displaying outstanding enqueues for Job 'LAC'.
Panel Input Fields
JobName>
The name of the job for which the ENQueues are to be listed.
Prefix Line Commands
The following prefix line commands are available:
Command Description
/
Open a drop down menu containing valid prefix command functions for the list window entry. Position the
cursor on the required function and hit <Enter> to action the command.
Assigned to F16 by default.
>
Open a new window containing a zoomed vertical display of the entry's fields. Particularly useful for list
windows that have a large number of displayed columns.
Assigned to PF2 by default.
Columns Displayed
Name
Type
Description
JOB
Char
Job name
QNAME
Char
Enqueue Major Name (Queue)
STATUS
Char
Status of Enqueue
SCOPE
Char
Scope of Enqueue
RSV
Char
Reserve
MC
Char
Must complete
OWN
Int
Number of owners
2013-11-13 13:06:41
SELCOPY/i Reference and User Guide
81
List File Windows (=3)
Columns Displayed
WTEX
Int
Number of waiters exclusive
WTSH
Int
Number of waiters shared
RNAMEL
Int
Rname length
RNAME
VChar
Enqueue Minor Name (Resource)
List Associations (=3.11)
See List Windows for general features and commands common to all list windows.
The Associations List window may be opened via the following:
• Select option 11. 'Associations' from the List Menu.
• Select 'Associations' from the Utilities/List menu in the CBLe main window menu bar.
• Enter command LAS on the command line of any window.
• Enter the prefix command AS against a data set item in a list type window.
The Associations List window displays all components associated with the selected cataloged entries. e.g. A VSAM Cluster entry
may display its Data, Index and any Altenate Index objects with which it is associated.
Note: Not implemented for CMS and VSE.
Figure 31. Associations List Window.
Panel Input Fields
Entry>
Specify the fileid mask that includes at least one cataloged object.
The fileid mask represents a DSN mask that supports the following wild cards:
*
A single asterisk represents a DSN qualifier, or zero or more characters within a DSN qualifier.
**
A double asterisk represents zero or more qualifiers within a DSN. Double asterisk must be preceded or
followed by either a "." (dot/period) or a blank. It cannot precede or follow an alphanumeric character.
A single percent sign represents exactly one character, other than "." (dot/period), within a DSN qualifier.
Up to 8 percent signs can be specified in each qualifier.
If the last character of the fileid mask is "." (dot/period), then this marks the end of the low level DSN qualifier within the
fileid mask. The trailing "." is stripped and no wildcard string is appended to the fileid mask. e.g.
%
DEV*.
DEV.OEM.TRSPAN*.
DEV.*.*SAMP%%.
becomes:
becomes:
becomes:
DEV*
DEV.OEM.TRSPAN*
DEV.*.*SAMP%%
If the last character of the fileid mask is not "." (dot/period), then a default trailing wild card string is automatically
appended to the fileid mask as follows:
1. If the fileid mask is a single qualifier or the last character of the fileid mask is "*" (asterisk), then a wildcard string
of ".**" is appended. e.g.
DEV
DEV*
DEV.OEM.TRSPAN*
DEV.*.*SPA*
becomes:
becomes:
becomes:
becomes:
DEV.**
DEV*.**
DEV.OEM.TRSPAN*.**
DEV.*.*SPA*.**
2. Otherwise a wildcard string of "*.**" is appended. e.g.
DEV.OEM.TRSPAN
DEV.*.*SPA%
2013-11-13 13:06:41
becomes:
becomes:
DEV.OEM.TRSPAN*.**
DEV.*.*SPA%*.**
SELCOPY/i Reference and User Guide
82
List File Windows (=3)
Panel Input Fields
SYS1.*.Z19
becomes:
SYS1.*.Z19*.**
Note that a warning message is displayed if the high level qualifier of the fileid mask is "*" (asterisk) or "**" (double
asterisk). A fileid mask of this type would result in all catalogs being searched which would take some time to execute and
would use a large amount of system resources.
Catalog>
Nominate a specific catalog in which to search for the requested entry.
This is a catalog DSN. Specifying a catalog DSN is unneccessary if an alias exists for the fileid mask high level qualifier
(HLQ) in the master catalog. In this case, the appropriate catalog DSN will automatically be inserted in this field. If the
HLQ contains a wild card, then all matching aliases are interrogated, the required catalogs are searched and the DSN of
the last catalog searched is placed in the Catalog> field.
Types>
Specify the catalog entry types for which associations will be reported. Default is all types. One or more of the following
types may be specified with no intervening blanks:
A
B
C
G
H
R
X
U
L
W
non-VSAM (or VSAM SAM) data set.
MVS - Generation data group.
Cluster.
Alternate Index.
MVS - Generation data set.
VSAM PATH.
Alias.
User catalog connector entry.
MVS - Tape volume catalog library entry.
MVS - Tape volume catalog volume entry.
Prefix Line Commands
The following prefix line commands are available:
Command Description
<Dflt>
Prefix line command AS.
AS
Open an Associations list window to list associated objects for this entry.
B
Open the CBLe text editor to to perform SDATA BROWSE on the entry.
C
Copy the entry.
CF
Open the Compare Files Panel for this entry, using the entry name as the New File field entry.
D
Delete the entry. User will be prompted to verify the deletion.
E
Open the CBLe text editor to edit this entry.
EU
Open the SDE structured data editor to edit the entry in update mode only.
F
Open the FSU - File Search/Update Window to perform an advanced search and optionally update the
contents of the entry.
FO
Open an SDE view to display (browse) the entry as output from the FSU - File Search/Update Window.
I
Open a Data Set Information panel display for the entry.
ID
Open an IDCAMS Command window and issue an IDCAMS LISTCAT for the entry.
K
Delete (Kill) the entry without prompting for verification.
M
If the entry is a PDS/PDSE, open a Library List window. (Default)
Q
List dataset enqueues (major name SYSDSN) for this entry.
R
Rename the entry.
SD
Open the SDE BROWSE/EDIT Dialog Window to browse or edit the entry's data within a Structured Data
Environment window view.
T
Open an Execute CBLVCAT window and issue a LISTVCAT TUNE DEFINE operation for the entry.
UT
Opens the general file utilities menu to ultimately generate specific line commands in a temporary CMX file.
V
Open the CBLe text editor to View (edit read/only) this entry.
VC
Open an Execute CBLVCAT window and issue a LISTVCAT operation for the entry.
Z
Perform a compress of an MVS PDS library to reclaim disk space occupied by replaced (back-level) members.
This action performs an IEBCOPY to itself. No action is taken for PDSE entries, however, the IEBCOPY dialog
is opened with an error message if executed against any non-PDS(E) entry.
2013-11-13 13:06:41
SELCOPY/i Reference and User Guide
83
List File Windows (=3)
Prefix Line Commands
?
Open the volume statistics window for the volume containing the entry.
/
Open a drop down menu containing valid prefix command functions for the list window entry. Position the
cursor on the required function and hit <Enter> to action the command.
Assigned to F16 by default.
>
Open a new window containing a zoomed vertical display of the entry's fields. Particularly useful for list
windows that have a large number of displayed columns.
Assigned to PF2 by default.
Columns Displayed
Name
Type
Description
Assoc
Char
Associated entry name
A
Char
Associated entry type code
Entry
Char
Entry name
T
Char
Entry type code
List HFS Path (=3.12)
See List Windows for general features and commands common to all list windows.
The HFS Path List window displays the contents of the specified HFS directory path and optionally its sub-directories. It may be
opened via the following:
• Select option 12. 'HFS' from the List Menu.
• Select 'HFS Path Details' from the Utilities/List menu in the CBLe main window menu bar.
• Enter command LP on the command line of any window.
• Enter command LD with an HFS path argument on the command line of any window.
The HFS Path List window displays file, directory and link names contained in the specified HFS path, together with stored
information for each directory entry.
Note: List HFS Path is not supported for CMS or VSE.
Figure 32. HFS Path List window.
Panel Input Fields
HFS Path>
Specify the absolute or relative HFS path name.
The name portion of the HFS path is the character string at the end of the path that follows the last "/" (slash) of the fileid,
or is the entire path name if "/" is not specified.
The following wild cards may only be specified within the name portion of the HFS path.
*
2013-11-13 13:06:41
A single asterisk represents zero or more characters.
SELCOPY/i Reference and User Guide
84
List File Windows (=3)
Panel Input Fields
A single percent sign represents a single character.
%
Recurse>
Enter "YES" to recursively list the contents of all sub-directories found within the HFS path specification.
Default is "NO".
CaseIgn>
Enter "YES" to bypass case sensitivity for the name portion of the specified HFS path.
Default is "NO".
Prefix Line Commands
The following prefix line commands are available:
Command Description
<Dflt>
Default action depends on the list entry as follows:
• For a directory entry or a symbolic link to a directory, open a new List HFS list window to display the
the contents of the directory.
• For all other entries, a CBLe text editor view is opened to edit the data.
(Equivalent to prefix command "E").
B
Open the CBLe text editor to to perform SDATA BROWSE on the entry.
C
Copy the entry.
CF
Open the Compare Files Panel for this entry, using the entry name as the New File field entry.
D
Delete the entry (file, link or directory). User will be prompted to verify the deletion.
E
Open a CBLe text editor view to edit this entry.
EU
Open the SDE structured data editor to edit the entry in update mode only.
F
Open the FSU - File Search/Update Window to perform an advanced search and optionally update the
contents of the entry.
K
Delete (Kill) the entry without prompting for verification.
R
Rename the entry.
SD
Open the SDE BROWSE/EDIT Dialog Window to browse or edit the entry's data within a Structured Data
Environment window view.
UT
Opens the general file utilities menu to ultimately generate specific line commands in a temporary CMX file.
V
Open the CBLe text editor to View (edit read/only) this entry.
/
Open a drop down menu containing valid prefix command functions for the list window entry. Position the
cursor on the required function and hit <Enter> to action the command.
Assigned to F16 by default.
>
Open a new window containing a zoomed vertical display of the entry's fields. Particularly useful for list
windows that have a large number of displayed columns.
Assigned to PF2 by default.
Columns Displayed
Name
Type
Description
Name
ALPair
Filename
T
Enum
Dir entry type
Size
UInt
Bytes Used
Modified
Date
Data Modified Timestamp
Permission
Char
Permissions as displayed by the LS shell command.
Path
ALPair
Path
Owner
Char
Owner name
Group
Char
Group name
Fmt
Enum
File Format
Links
Int
Number of links
Mode
Int
HFS Mode (nnn)
2013-11-13 13:06:41
SELCOPY/i Reference and User Guide
85
List File Windows (=3)
Columns Displayed
UidX
BitFlag
Set user ID on execution
GrpX
BitFlag
Set group ID on execution
Sticky
BitFlag
Sticky Bit
INode
Hex
File Serial Number (INode)
Dev
Hex
Device ID
DevMaj
Hex
Major Device number
DevMin
Hex
Minor Device number
Uid
Int
Owner ID
Gid
Int
Group ID
Changed
Date
File Stat Chg Timestamp
Accessed
Date
Last Accessed Timestamp
Created
Date
File Creation Timestamp
BlkSz
UInt
File Block Size
AuditId
Char
RACF File ID for auditing
AA1
Hex
Auditor audit byte 1
AA2
Hex
Auditor audit byte 2
AA3
Hex
Auditor audit byte 3
AA4
Hex
Auditor audit byte 4
UA1
Hex
User audit byte 1
UA2
Hex
User audit byte 2
UA3
Hex
User audit byte 3
UA4
Hex
User audit byte 4
rU
BitFlag
Read permission for User(Owner)
wU
BitFlag
Write permission for User(Owner)
xU
BitFlag
Exec permission for User(Owner)
rG
BitFlag
Read permission for Group
wG
BitFlag
Write permission for Group
xG
BitFlag
Exec permission for Group
rO
BitFlag
Read permission for Others
wO
BitFlag
Write permission for Others
xO
BitFlag
Exec permission for Others
NoDel
BitFlag
Files should not be deleted
ShrLib
BitFlag
Shared Library
NoShrs
BitFlag
No shareas flag
Auth
BitFlag
APF authorized flag
PgmC
BitFlag
Program controlled flag
ExtLink
BitFlag
External Symbolic Link
NoDelM
BitFlag
(Mask) Files should not be deleted
ShrLibM
BitFlag
(Mask) Shared Library
NoShrsM
BitFlag
(Mask) No shareas flag
AuthM
BitFlag
(Mask) APF authorized flag
PgmCM
BitFlag
(Mask) Program controlled flag
ExtLinkM
BitFlag
(Mask) External Symbolic Link
AclAccess
BitFlag
Access ACL exists
AclFModel
BitFlag
File Model ACL exists
AclDModel
BitFlag
Directory Model ACL exists
Set
Hex
Flag bytes 1-4
2013-11-13 13:06:41
SELCOPY/i Reference and User Guide
86
List File Windows (=3)
Columns Displayed
FTag
Char
File Tag
BlksH
UInt
Blocks Allocated (High Order)
BlksL
UInt
Blocks Allocated ( Low Order)
Opq
Hex
Opaque attribute flags
OpqM
Hex
(Mask) Opaque attribute flags
M1
Hex
HFS Mode byte 1
M2
Hex
HFS Mode byte 2
M3
Hex
HFS Mode byte 3
RefT
UInt
Reference Time
Id
Hex
File Identifier
CTime
UInt
Ctime Micro_Seconds
SecLabel
Char
Security Label
Res
Char
Reserved
Res1
UInt
Reserved
Res2
Char
Reserved
Res3
Char
Reserved
2013-11-13 13:06:41
SELCOPY/i Reference and User Guide
87
File Copy (=5)
Overview
File Copy (FCOPY) is an advanced copy utility supporting copy and optional remap of records between 2 files of potentially
different data set organisations and geometry (RECFM, LRECL, BLKSIZE).
Features include:
• Use of structures to remap fields in source records to fields of the same name in destination records. Structures may be
specified as an SDE structure, COBOL or PL1 copybook or a COBOL or PL1 ADATA file.
• Specification of a start record and/or a number of records to be copied so defining a subset of records to be
copied/remapped.
• Append to or overwrite records in an existing target data set.
• Choose a pad character to be used to pad short records that are copied to longer fixed format records (e.g. copying an
ESDS to RECFM=F; RECFM=V to RRDS or RECFM=F LRECL=80 to RECFM=F LRECL=100). Default pad character is
blank (X'40).
File Copy supports copy of multiple PDS/PDSE library members to another new or existing library (Library Copy). This type of
copy/remap is performed if the source file is a PDS/PDSE library, specified with or without a member mask, and the target file is a
PDS/PDSE library with no member name specified. Note that a target PDS/PDSE library DSN with no member name is valid only
for library copy.
File Copy:
Where the target file is not a PDS/PDSE library member, file copy supports copy of multiple PDS/PDSE library members to a single
target file.
File Copy invokes the File Search/Update/Copy/Remap Utility (FSU) to copy or remap records and, on completion, returns the
following summary message:
ZZSD356I FCOPY Summary: COPY - n records of m files.
y I/O Errors.
x Remap Errors.
Library Copy:
Library copy will use the IEBCOPY facility whenever possible to perform the copy operation. It will also include copy of any member
name aliases, whether or not the alias name matches the supplied member name mask. Similarly, members will be copied if their
alias name matches the member name mask but the member name does not. i.e. the member name group will be copied.
Where use of IEBCOPY is not possible (e.g. libraries are of different geometry or fields in member records are to be remapped),
the File Search/Update/Copy/Remap utility is invoked to copy or remap the records.
On completion of a library copy, one of the following is displayed:
• If IEBCOPY was used to perform the copy, the following informational message is returned:
ZZSD344I FCOPY: (IEBCOPY) IGW01550I n OF m SPECIFIED MEMBERS WERE COPIED
Furthermore, the Execute IEBCOPY window is displayed by default to report all IEBCOPY messages generated by the
operation.
• If the SELCOPY/i File Search/Update/Copy/Remap utility, then, in addition to the ZZSD356I FCOPY Summary message,
the following informational message is returned:
ZZSD333I FCOPY: Members Copied=w, Replaced=x, Not Copied=y, Errors=z.
Furthermore, the FSU - PDS Copy Statistics list window is displayed by default to report members copied and
truncation/remap status of each member's records.
Source and Target File Types
The File Copy utility can copy records between any of the following file types in a single execution:
• Cataloged or uncataloged sequential (including multi-volume) datasets.
• Partitioned dataset (PDS/PDSE) members.
• GDG datasets.
• VSAM (KSDS, ESDS, RRDS, VRDS).
• HFS Files.
2013-11-13 13:06:41
SELCOPY/i Reference and User Guide
88
File Copy (=5)
Source and Target File Types
File Copy Panel
File Copy
The File Copy panel is displayed when the File Copy utility is started interactively.
This panel allows the user to invoke the File Copy utility to copy, and optionally remap, records from files matching a specified fileid
mask to a single output file or multiple members of a PDS/PDSE library. The output file may potentially be of different data set
organisation and geometry to the files identified by the input fileid mask.
See "File Copy Utility" for an overview of functionality.
The File Copy panel window may be started via the following:
• Select option 5. 'Copy/Reformat' in the SELCOPY/i Primary option menu or select option 8. 'Copy' in the Create New
Datasets Menu panel.
• Select 'File Copy' from the Utilities menu.
• Execute the command FCOPY from the command line of any window.
• Execute the prefix command "C" from a file List type window. The resulting File Copy panel window will treat the
corresponding list entry as the "From DSN" field entry.
Figure 33. File Copy Panel View.
By default, field entries are populated with arguments and options that were entered the last time the utility panels were used.
Dialog option fields may be selected or de-selected by entering a non-blank or blank character respectively.
Depending on whether the Reformat using structure/copybook layouts option has been set or the output data set already
exists, pressing the <Enter> key or, if configured, double-clicking the left mouse button, will will either verify the input fields and
action the file copy, display the File Reformat panel view, or open prompts to allocate the new output dataset
Alternatively, the user may select an item from the menu bar.
On pressing the <Enter> key or selecting "Copy" or "JCL" menu items, a check is made to determine whether the target and source
files exist.
• If the source file does not exist, the user is prompted to re-enter a different fileid.
• If the target file does not exist and is not an HFS file, the user is prompted to identify the DSORG of the new data set
(NONVSAM, KSDS, ESDS or RRDS) before being presented with the Allocate NonVSAM or Define VSAM
KSDS/ESDS/RRDS/LDS dialog window as appropriate.
If the selected DSORG is equivalent to that of the source file, then the new data set dialog window will contain values
modelled on the source file. Even where the DSORG is different, dialog Record Length fields will contain an appropriate
value determined from the source file.
2013-11-13 13:06:41
SELCOPY/i Reference and User Guide
89
File Copy (=5)
Menu Bar Items
Menu Bar Items
File
The File drop-down menu contains the single item "Exit" which simply closes the panel window. Note that, unlike
CANCEL, CLOSE will save field values entered in the panel so that they may be redisplayed the next time the panel is
opened.
Help
Display help for this panel view.
Command
Generate the FCOPY command line syntax for field entries specified by the user and display it in a temporary CMX file
text edit view. This command may be executed using ACTION point-and-shoot execution <F16> or copied into the user's
HOME file and saved for future execution.
JCL
Generate a JCL job stream that executes the SDEAMAIN program with input (SDEIN) containing the FCOPY command
generated for the specified panel field values.
The job stream is displayed in a temporary text edit view and may be submitted to batch using the SUBMIT command.
Panel Input Fields
PDS/PDSE Library, Sequential, VSAM DSN mask or HFS path mask:
Fields which together constitiute a fileid mask that identifies one or more files to be copied.
The utility supports use of a fileid mask and will processes all HFS files, sequential, GDG, VSAM and PDS/PDSE data
sets that match the mask.
If the fileid mask contains "*" (asterisk) or "%" (percent) wild card characters, then the Select Files to Process panel will be
displayed which contains a list of selectable fileids that match the specified fileid mask. Furthermore, for PDS/PDSE library
entries, the Select Input Members panel may then be opened to select from a list of matching member names belonging to
that library. <PF5> can be used to redisplay these panels after they have been closed.
Having displayed the Select Files to Process panel, a list of the selected, individual fileids will be passed to the utilty.
Furthermore, if only a single fileid has been selected for processing, then the selected file DSN/Path name will replace the
generic entry in the DSN/Path Mask> field and, if applicable, the selected volume id and member name will replace the
generic entries in the Volume Mask> and Member Mask> fields respectively.
DSN/Path Mask>
An unquoted entry which identifies DSN mask, a completed Fileid mask, a DDName mask or an HFS file path
mask. An entry in this input field is mandatory.
• HFS file path mask
Identified by the presence of "." (dot/period) as the first character or "/" (slash) anywhere within the
mask, an HFS file path mask may be absolute or relative to the current HFS working directory. See USS
PWD in Unix System Services (USS) Commands. "./" should prefix the mask if files in the current HFS
directory are to be selected.
Wild card characters "%" (percent), representing a single characters, and "*" (asterisk), representing
zero or more characters, are supported in the name portion of the HFS file path mask. The name portion
of the HFS path is the character string at the end of the path that follows the last "/" (slash) of the fileid
or is the entire path name if "/" is not specified.
If an HFS file path mask is specified, the contents of the Volume Mask> and Member Mask> fields will
be ignored and HFS Options> settings respected.
• DDName mask
If the value entered is not an HFS file path mask, is of length less than or equal to 8 characters and
does not include "." (dot/period), and no Volume mask has been specified, then the value is considered
to be a DDName mask. A DDName mask may be used to process non-HFS files that are currently
allocated to DDNames that match the DDName mask. (e.g. SYSEXEC)
Wild card characters "%" (percent), representing a single characters, and "*" (asterisk), representing
zero or more characters, are supported in a DDName mask.
If a DDName mask is specified, the enties in the Member Mask> field may still be used to select
matching member names belonging to PDS/PDSE library data sets allocated to matching DDNames.
HFS Options> settings are ignored.
• Completed Fileid mask
If the value entered is not an HFS file path mask but includes a volume mask specification and/or a
member mask specification, then the value is considered to be a completed Fileid mask.
A completed fileid mask is a DSN mask with a volume mask and/or one or more PDS/PDSE member
name masks expressed in the following format:
2013-11-13 13:06:41
SELCOPY/i Reference and User Guide
90
File Copy (=5)
Panel Input Fields
{volmask:}data.set.name.mask{( membmask{ {,} membmask...} )}
Specification of one or more member masks between a single pair of "( )" (parentheses) will restrict
processing to only PDS/PDSE library data sets. Multiple PDS/PDSE member masks must be separated
by a "," (commma) and/or one or more intervening blanks.
Specification of a 1 to 6 character volume mask prefix followed by ":" (colon) restricts processing to only
cataloged or uncataloged data sets that have extents on matching volume ids.
The fileid mask supports wild card characters as described for Volume Mask> and Member Mask> fields
and for a DSN Mask below.
Fileid Mask Examples:
PE1.DEV.SRC.COBOL.CRKSW00(*)
SYS6.JNP*.**
OEM.TEST%%.**.CBLI.**(BOX*,D%T*,*ALL)
Z9RES1:ADCD.**
Z9RES*:ADCD.Z19.P%%%LIB(*)
• DSN mask
If the value entered does not meet the criteria described above for an HFS file path mask, completed
Fileid mask or a DDName mask, then the value is considered to be a DSN mask.
The DSN mask is joined with any member and volume mask specified in the Volume Mask> and
Member Mask> fields respectively to identify a single fileid mask.
The following wild card characters are supported within a DSN Mask:
*
**
%
A single asterisk represents a DSN qualifier or zero or more characters within a DSN qualifier.
e.g. DEV.CBLINS.*.JCL, DEV.CBLINS.TEST*.ISP*LIB, DEV.CBLINS.*.*
Double asterisk represents zero or more qualifiers within a DSN. Double asterisk may only be
preceded or followed by the qualifier separator, "." (dot/period).
e.g. DEV.CBLINS.**, DEV.CBLINS.**.CBLE
A single percent sign represents exactly one character within a DSN qualifier.
e.g. DEV.CBLINS.TEST0%.JCL, DEV.CBLI%%.TEST06.CBLI.%%%
Note that a TSO prefix is not applied to a DSN mask.
Volume Mask>
Optionally specify a volume name mask of maximum length 6-bytes.
Processing will be restricted to only those cataloged or uncataloged data sets that match the DSN mask and also
have extents that exist on a volume that matches the volume mask.
The volume mask supports wild card characters as follow:
*
%
A single asterisk represents a complete volume name or zero or more characters within a volume name.
e.g. CBL*, *RES*
A single percent sign represents exactly one character within the volume mask.
e.g. Z9DB9%, %%XV3%
This field entry is ignored if the DSN/Path Mask> field does not contain a DSN mask.
Member Mask>
Optionally specify one or more PDS/PDSE member name masks separated by a "," (comma) and/or one or more
intervening blanks.
e.g. BLOCK, PROFILE
BOXSEQ
If a member mask is specified, then only PDS/PDSE libraries that match the fileid mask will be selected for
processing. Non-PDS/PDSE library data sets will be excluded.
If a member mask is not specified, then all files that match the fileid mask will be selected for processing and a
default member name mask of "*" will apply to all PDS/PDSE libraries included in this selection.
Processing will be restricted to only those PDS/PDSE data sets that match the DSN mask and only members
with a member name that matches any one of the supplied member masks.
A member mask supports wild card characters as follow:
*
%
2013-11-13 13:06:41
A single asterisk represents an entire member name or zero or more characters within a member name.
e.g. CBL*5, BOX*, D*T*
A single percent sign represents exactly one character within a member name mask.
e.g. H%, D%R*, E%A
SELCOPY/i Reference and User Guide
91
File Copy (=5)
Panel Input Fields
This field entry is ignored if the DSN/Path Mask> field does not contain a DSN mask or a DDNAme mask.
Output PDS/PDSE Library, Sequential, VSAM DSN or HFS path:
Input fields which together identify a single output sequential, VSAM or PDS/PDSE library data set, HFS file or PDS/PDSE
library member.
If the output file is a PDS/PDSE library data set with no member specified, then library copy will occur. In this case, only
input PDS/PDSE library members are selected for processing and any files selected by the input mask that are not library
members are ignored. All selected members are copied to members of the same name in the output library.
DSN/Path>
Identifies the fully qualified data set name or an absolute or relative HFS file path.
A selectable list of data sets or HFS files will be presented if the entered value contains wildcards characters "*"
(asterisk) or "%" (percent).
If a DSN is specified for a data set that does not already exist, a prompt data set dialog will be opened to allocate
the new output file.
Member>
If the DSN/Path> field contains the DSN of a PDS/PDSE library, then this field may specify the name of a new or
existing member within that library.
A selectable list of members will be presented if the entered value contains wildcards characters "*" (asterisk) or
"%" (percent), or is blanked out.
Volume>
Specifies the name of the output data set volume. This is required only if output is to an uncataloged data set.
Replace existing members
This is an option field which affects library copy only. If selected, any existing member in the output library that has the
same name as a member to be copied from an input library, will be overwritten. In the case where members of the same
name are copied from multiple input libaries, then the output library will contain the last member copied.
Strip/Pad Char>
Specifies a single byte pad or strip character implemeted as follows:
1. When copying fixed length records to variable length, contiguous trailing characters at the end of each record
that match the specified character char are to be stripped.
Default is not to strip trailing characters.
2. When copying variable length records to fixed length, records are to be padded with the specified character char.
Default is to pad with the blank character (X'40').
The strip/pad character char may be specified in character, hexadecimal or binary string notation of length 1 byte. (e.g. 'A',
C'a', X'40', B'11110001'.)
Record Selection:
Fields which together identify criteria by which subsets of records from every input file are selected for processing.
Start>
If activated, the Start> field specifies the first record in every file matching the fileid mask at which processing will
start. Records occurring sequentially before the start record will be bypassed. If this field is not activated, records
are selected beginning at record 1.
This input field may contain a record number, an RBA number (for ESDS input only), or a key string (for KSDS
input only).
A record/RBA number may be specified as an integer numeric value 123 or as a hexadecimal numeric value
X'7B'. A key string may be specified as a literal abc or 'abc', which will be upper cased before keyed look-up,
character string C'abc' (character case preserved) or a hexadecimal string X'818283'.
Record | Key | RBA
Identifies the type of start value specified in the Start> field. Enter "/" in the appropriate, mutually
exclusive parameter field.
For>
If activated, then for each file matching the fileid mask, the For> field specifies the maximum number of records
within that file for which processing may occur. If this field is not activated, records are selected beginning at start
record and ending at the last record in the file.
2013-11-13 13:06:41
SELCOPY/i Reference and User Guide
92
File Copy (=5)
Panel Input Fields
Filter>
If activated, the Filter> field specifies options to either generate a new record filter or use an existing record filter
file. A record filter will perform further subsetting on input file records selected for processing by the Start> and/or
For> input fields.
Filter options are as follow:
Q
F
On pressing <PF6>, the Quick Filter dialog panel will be opened in order to generate a temporary filter on
the unformatted record data.
Use a permanent filter identified by the sequential data set or member name in the File> field.
On pressing <PF6>, the Create File Filter dialog panel will be opened in order to display the contents of an
existing filter file or create and save a new filter file.
If option "F" is selected, then specifiaction of a filter fileid is mandatory.
File>
Identifies the fully qualified data set name of a sequential data set or PDS/PDSE library containing a
record filter. Quotes are unnecessary but permitted.
A selectable list of data sets will be presented if the entered value contains wildcards characters "*"
(asterisk) or "%" (percent).
Member>
If the File> field contains the DSN of a PDS/PDSE library, then this field must reference a member name
within that library which contains a record filter.
A selectable list of members will be presented if the entered value contains wildcards characters "*"
(asterisk) or "%" (percent), or is blanked out.
Options:
Member Delim> 0|1|2
Applicable only when copying members from a PDS/PDSE library to a single output file e.g. an HFS, VSAM, or
sequential dataset. This option causes a delimiter record to be written before the data for each member copied.
Enter blank to select from a list describing the available options, the format of the delimiter record depending on
the option selected.
Option
0
1
2
Delimiter Record Format
No delimiter record (Default).
"./ ADD NAME=<member>"
"*>>>>>> DSN=lib.name(member) <<<<<<*"
Reformat using structure/copybook layouts
Select this option only if an input and output structure is to be applied to record data in order to remap of formatted record
fields as the records are copied. Note that a structure may be a COBOL Copybook, PL1 Copybook, COBOL or PL1
ADATA file or SELCOPY/i SDO.
If selected, the File Reformat panel view will open on pressing <Enter>.
Append to existing Output
Applicable to copy to a single output data set only (i.e. not library copy), select this option if the copied records are to be
appended to existing records in the output data set.
Recurse HFS Sub-directories
Set this option on to process matching files within all directories and sub-directories beneath the absolute or relative
directory specified by an HFS file path mask
Ignore HFS fileid case
Set this option on to disable case sensitivity when matching HFS file names with the file name portion of the specified
HFS file path mask. The name portion of the HFS file path is the character string following the last "/" (slash) of the fileid
mask or the entire HFS file path if no "/" is included in the fileid mask.
2013-11-13 13:06:41
SELCOPY/i Reference and User Guide
93
File Copy (=5)
File Reformat
File Reformat
The File Reformat panell view is displayed when option Reformat using structure/copybook layouts is selected in the File Copy
panel.
This panel is used to specify the input and output structures, both of which are mandatory for formatted record field remap.
Figure 34. File Reformat Panel View.
Menu Bar Items
Menu bar items are as described for File Copy .
Panel Input Fields
Input
Structure/Copybook overlay:
Fields which together specify a cataloged structure file (COBOL or PL1 Copybook, ADATA file or a SELCOPY/i SDO)
used to map input records. The structure may be a sequential data set or a PDS/PDSE library member.
Dsn>
Identifies the fully qualified data set name of a sequential data set or PDS/PDSE library containing a COBOL or
PL1 Copybook, ADATA file or SDO structure.
A selectable list of data sets will be presented if the entered value contains wildcards characters "*" (asterisk) or
"%" (percent).
Member>
If the Dsn> field contains the DSN of a PDS/PDSE library, then this field must reference a member name within
that library which contains a record filter.
A selectable list of members will be presented if the entered value contains wildcards characters "*" (asterisk) or
"%" (percent), or is blanked out.
Type:
Indicate the type of structure (COBOL, PL1, ADATA or SDO).
Recompile> Y/N
If Structure/Copybook overlay refers to a COBOL, PL1 or ADATA source file (not an SDO) then a compile step must be
performed in order to turn the source copybook into SELCOPYi's own internal structure (SDO) format. A temporary SDO
will be created, lasting the duration of the SELCOPYi session, making subsequent reference to the same copybook during
the session much faster.
If, however, the copybook (or any of its included components) is modified during the session, then a recompile of the
source will normally be required.
For performance reasons N (meaning no recompile should occur) is the default.
2013-11-13 13:06:41
SELCOPY/i Reference and User Guide
94
File Copy (=5)
Panel Input Fields
Specify Y to force a copybook recompile each time the process is run. Alternatively type the primary command:
SD DROP <copybook_name>
Output Structure/Copybook overlay:
Fields which together specify a cataloged structure file used to map output records. These fields are as described for the
Input Structure/Copybook overlay.
Input record data mapped by fields in the input structure is remapped to potentially different positions and data types in the
output record. These output record field positions and data types are determined by this output structure.
PFKeys
In addition to the standard interactive panel key assignments for scrolling and navigation, the File Copy Search panel supports the
following:
F1
F3
P5
F6
F13
F14
F19
F20
HELP
BACK
SELECT
FILTER
REMIND
EXPAND
BIF
BOF
Display context sensitive help .
Close the panel.
Select from a list of files that match the Fileid mask.
Open the FILTER dialog for the specified filter type.
Display a saved input field value.
Expand an input/output field.
Browse the input file if input fileid mask is a single file.
Browse the output file.
File Copy - PDS Copy Statistics
Summary Format
The PDS Copy Statistics window is displayed following execution of the File Copy (FCOPY) utility if a Library Copy operation is
performed that invokes the File Search/Update/Copy/Remap Utility. If the Library Copy invokes IEBCOPY, the Execute IEBCOPY
window is displayed instead to report all IEBCOPY messages generated by the operation.
If FCOPY is executed in batch (using program SDEAMAIN), then the PDS copy statistics and all other messages are written to
SDEPRINT when the job is submitted. If executed in the SELCOPY/i foreground, the PDS copy statistics are displayed in a list
window (window class LISTFRAM).
Figure 35. PDS Copy Statistics.
Copy Statistics Fields
Member
Library member or alias name from the source library that has been selected for copy to the target library.
Action
Displays the action taken during the copy of the member or alias. Possible actions are as follow:
2013-11-13 13:06:41
SELCOPY/i Reference and User Guide
95
File Copy (=5)
Copy Statistics Fields
Copied
Member or alias was successfully copied.
Replaced
Applicable only if the REPLACE option has been specified, indicates that the copy of a member has successfully
replaced a member or alias of the same name in the target library. If the source library member is an alias, then
this action will occur only if it replaces an alias in the target library belonging to the same member group.
*NoRepl
Applicable only if the REPLACE option has not been specified, this action indicates that the member or alias
name entry cannot be copied as a member or alias of the same name already exists in the target library.
*NoCopy
Indicates that one of the following has occurred:
1. The REPLACE option has not been specified and, although this member or alias name does not exist in
the target library, it has failed to copy since at least one entry belonging to the same member group
already exists in the target library (Action *NoRepl).
2. The REPLACE option has been specified, however at least one entry belonging to the this entry's
member group exists in the target library as an entry of another member group.
*NoAlias
Applicable only to alias entries where the REPLACE option has been specified, this action indicates that the copy
failed because a member (not an alias) of the same name exists in the target library.
*StowErr
Copy of the member or alias entry has failed due to a STOW error in attempting to write to the target PDS/PDSE
library's directory. This may occur if writing a directory entry requires use of a new PDS directory block and none
are available. If this is the case, a PDS library compress of the target library may resolve this problem.
AliasOf
If the entry is an alias, then this field displays the member name for which it is an alias.
This field is blank for non-alias library members.
Truncated
Contains "Y" if truncation of any of the records belonging to the member has occurred.
This field is blank if no truncation has occurred.
RemapError
For copy remap only, this column contains "Y" if a field in of any of the remapped records fails to be remapped due to
attempted conversion of its data to an incompatible data type. If this occurs, processing stops since the incompatibility
between the source and destination record fields will apply to all library members.
This field is blank if no remap error has occurred.
2013-11-13 13:06:41
SELCOPY/i Reference and User Guide
96
File Search/Update/Copy/Remap
Overview
File Search/Update/Copy/Remap (FSU) utility has more advanced functionality than the File Search utility which supports only a
single search string on members of a single PDS(E) library.
Features of the File Search/Update/Copy/Remap utility include:
• Search and optionally update multiple HFS paths or multiple sequential, PDS/PDSE, GDG and/or VSAM data sets.
• Restrict PDS/PDSE library search and/or update to only members with names that match a member name mask.
• Search and optionally update uncataloged data sets by volume id(s).
• Specify the start record for both search and update operations.
• Restrict the number of records read for search and/or update.
• Restrict the search and/or update operation to a specific area of the file records.
• Apply a structure (copybook) overlay to map input file records and optionally restrict search/update to all or specific fields
in records assigned to specific record types. This is known as a Formatted File Search/Update.
• For both Unformatted and Formatted input file records, optionally specify an output file to which all input records will be
copied regardless of whether record data has been changed. This is known as Unformatted/Formatted File Copy.
• For Formatted File Search/Update, optionally specify an output file and output structure (copybook) to remap input
record fields (i.e. alter field data type, re-order and/or delete fields) whether or not record data is changed. This is known
as a Formatted File Remap.
• Update unformatted or formatted character data using different length search and update CHANGE strings.
• Control use of blank padding or blank absorption when character search and update CHANGE strings are of different
length. Note that the CHANGE operation will fail if the length of the updated record is greater than the file's maximum
record length.
Following File Search/Update/Copy/Remap execution, report output is generated in a structured format suitable for presentation to
the user in an SDE window view. To generate this report output and in order to perform advanced record selection and field
compare, functions and features provided by the structured data environment (SDE) are used. Therefore, the File
Search/Update/Copy/Remap utility is only available to users who have a licensed version of SELCOPY installed and operational on
their system.
During execution, a progress window is displayed which allows the user to interrupt processing at any point using the Attention key.
Source File Types
The File Search/Update/Copy/Remap utility can process records from any of the following file types in a single execution:
• Cataloged or uncataloged sequential (including multi-volume) datasets.
• Partitioned dataset (PDS/PDSE) members.
• GDG datasets.
• VSAM (KSDS, ESDS, RRDS, VRDS).
• HFS Files.
• (DB2 Tables planned but not yet supported).
Output Report
The report generated by the File Search/Update/Copy/Remap utility is a structured data file. This is designed to be browsed (not
printed) from within a SELCOPY/i session using a structure definition file ( SDO) which is also generated automatically during
execution of the search/update.
Unless a report DSN is specified, then following execution of the utility in the foreground, the report is generated in storage and
automatically displayed in a SELCOPY/i SDE edit view.
For unformatted or formatted immediate file update (i.e. input file record data is updated), closing the in-storage generated report
will prompt the user to save the report and SDO data sets. This is so a record of file updates may be kept and, if required, may be
used as input to the File Update Undo utility to roll back all updates actioned during this execution.
If required, execute command FSUEND to close the report window and save the in-storage report and SDO files generated for a
file search, copy, non-immediate update or remap operation.
A list of previously generated reports is displayed on selecting "Reports" from the File Search/Update/Copy/Remap menu bar. To
display a report from this list either position the cursor on the required entry then press the <Enter> key or, if configured,
double-click the left mouse button on the required entry. Alternatively, generated reports may be viewed using the FSUOUT
<fsu_report_fileid> command.
See File Search/Update/Copy/Remap Output for a detailed description of the generated output report.
2013-11-13 13:06:41
SELCOPY/i Reference and User Guide
97
File Search/Update/Copy/Remap
Output Report
Unformatted File Search/Update/Copy
Unformatted file search, update or copy is the most commonly used form of the utility, acting on text data files containing
unformatted records.
By definition, Unformatted File Search/Update/Copy operates on records without application of a structure (SDO) or COBOL/PL1
copybook to format record data. i.e. each record is treated as a single character string.
In general, Unformatted File Search/Update/Copy processing proceeds as follows:
1. Sequentially read a record from a file matching an INPUT fileid mask.
2. Check that the record falls within the range of records to be selected for processing as specified by
STARTREC/STARTKEY/STARTRBA and FOR syntax. (Note that a direct read will have been performed for VSAM
KSDS, ESDS or RRDS.)
3. Apply any search criteria on the record as specified by a WHERE expression.
4. Apply any search criteria on the record as specified by one or more FIND operations.
5. Apply any data changes on the record as specified by one or more CHANGE operations.
6. If no OUTPUT fileid is specified and the record data has been changed by a CHANGE operation, then update (replace)
the original input file record with the changed record.
7. If an OUTPUT fileid is specified, then copy the record to this file regardless of whether record data satisfies search criteria
or has been changed.
Processing of the current record stops and continues with the next input record if no OUTPUT fileid is specified (for copy) and the
record's data does not satisfy specified search criteria or if the record is not within the range of records selected for processing.
Note that search and data change functionality is based on the structured data edit (SDE) FIND, WHERE and CHANGE commands
which operate on individual formatted data fields. For unformatted records, the record data occupies a single data field of data type
CHAR and length equal to the file's maximum record length. This field has field reference number #1 and field name "Record",
either of which may be used as a parameter to WHERE, FIND and/or CHANGE.
Unformatted File Search
Unformatted file search uses WHERE and/or FIND operations to specify search criteria and so select then report only
those records that satisfy all of the search criteria.
If both WHERE and FIND criteria are specified, then a record will first have to satisfy the the WHERE expression before
the FIND criteria is checked.
Unformatted File Update
Unformatted file update uses CHANGE operations to change one or more occurrences of a character search string to the
specified character replace string. The changed record is then written back to the input file replacing the original record
read.
Since an update-in-place is performed, the length of the updated record cannot be changed. Any CHANGE operation that
results in a change to the record length will flag an error against that record in the output report.
File update should not be actioned without first performing a test run (FSU parameter NOUPDATE) where no records are
actually updated but an file update output report is still generated. This allows the user to correct or accept any CHANGE
errors before re-running the utility to update the records.
File update will open data sets for update-in-place processing instead of simply for input. An exclusive ENQ will be set
when the data set is opened, and reset when it is closed.
Optional file search criteria, as specified for Unformatted File Search, may be used to filter input records before any
CHANGE operation is performed. If no search criteria is specified then CHANGE operations will apply to all input records.
Unformatted File Copy
Unformatted file copy copies all records within the range of records selected for processing, from all selected input files to
a single output file.
If the output file is a PDS/PDSE library then only input library members will be copied, potentially replacing existing
members of the same name in the output library.
Optional change operations, as specified for Unformatted File Update, may be used to change record data as it is being
copied. Records are copied regardless of whether or not they satify supplied search criteria or have been changed by a
CHANGE operation.
2013-11-13 13:06:41
SELCOPY/i Reference and User Guide
98
File Search/Update/Copy/Remap
Unformatted File Search/Update/Copy
Formatted File Search/Update/Copy/Remap
Formatted file search, update and copy is more advanced than the equivalent unformatted operations and also supports additional
functionality to remap record data. Formatted operations are invoked where an SDE structure ( SDO), COBOL or PL1 copybook,
COBOL or PL1 ADATA file is specified to map input record data fields for use in a search, update, copy or remap operation.
Records are treated as comprising a number of data fields of pre-determined lengths and of various data types. Each field within
the record may be referenced independently (by field name or field reference number) allowing the user to be more descriminate
when selecting records and fields within records to be searched and/or changed.
If a COBOL copybook, PL1 include file or an ADATA file (generated from a COBOL or PL1 compilation) is specified, then this file
will be used to generate a temporary SDO before proceeding with record formatting. Note that a non-temporary SDO may be
generated from the COBOL/PL1/ADATA file using the SDE command, CREATE STRUCTURE.
Each input record is assigned a record type ( RTO), defined by the specified or generated SDO, and the field definitions defined by
that RTO are used to map the data within the record. SDE determines the record type to be assigned to each record based on any
USE WHEN conditions saved in the SDO and the individual record's length. See "Record Type Assignment" in the "SELCOPY/i
Structured Data Editor (SDE)" publication.
In general, Formatted File Search/Update/Copy/Remap processing proceeds as follows:
1. Sequentially read a record from a file matching an INPUT fileid mask.
2. Check that the record falls within the range of records to be selected for processing as specified by
STARTREC/STARTKEY/STARTRBA and FOR syntax. (Note that a direct read will have been performed for VSAM
KSDS, ESDS or RRDS.)
3. Assign a record type (RTO) to the record.
4. Check that the record is assigned the record type specified by VIEW, otherwise the default record type.
5. Apply any search criteria on the record as specified by a WHERE expression.
6. Apply any search criteria on the record as specified by one or more FIND operations. FIND search criteria are restricted
to a list of record data fields specified by SELECT.
7. Apply any data changes on the record as specified by one or more CHANGE operations. CHANGE operations are
restricted to a list of record data fields specified by SELECT.
8. If no OUTPUT fileid is specified and the record data has been changed by a CHANGE operation, then update (replace)
the original input file record with the changed record.
9. If an OUTPUT fileid is specified, then copy the record to this file regardless of whether the record is assigned the record
type specified by VIEW, or whether the record data satisfies search criteria or has been changed.
10. If an OUTPUT fileid and is specified with accompanying SDE structure (SDO), COBOL or PL1 copybook, COBOL or PL1
ADATA file, then copy the record as described in step 9. If, however, the name of an output SDO record type matches that
assigned to the record, then the field structure of the output record type will be used to remap the input record data fields.
Processing of the current record stops and continues with the next input record if no OUTPUT fileid is specified (for copy or
remap) and the record's data does not satisfy specified search criteria, the record is not within the range of records selected for
processing or if the assigned record type does not match that specified by VIEW.
Formatted File Search
Formatted file search uses WHERE and/or FIND operations to specify search criteria and so select then report only those
records that satisfy all of the search criteria.
SDE WHERE and FIND operations apply only to records assigned the default record type, as identified by the VIEW
operation. Fields to be searched may be identified specifically by name or reference number in the WHERE expression
and/or FIND command syntax, however, FIND is restricted to only those fields identified by the SELECT operation.
Formatted search criteria are sensitive to the data type and length of the formatted fields and so appropriate action is
taken when testing a field. e.g. an arithmetic compare for a numeric data field.
If both WHERE and FIND criteria are specified, then a record will first have to satisfy the the WHERE expression before
the FIND criteria is checked.
Formatted File Update
Formatted file update uses CHANGE operations to change one or more occurrences of a search string to the specified
replace string. The changed record is then written back to the input file replacing the original record read.
Since an update-in-place is performed, the length of the updated record cannot be changed. For formatted records, any
CHANGE operation applied to the expanded data that results in a change to the unexpanded record length will flag an
error against that record in the output report.
File update should not be actioned without first performing a test run (FSU parameter NOUPDATE) where no records are
actually updated but an file update output report is still generated. This allows the user to correct or accept any CHANGE
errors before re-running the utility to update the records.
File update will open data sets for update-in-place processing instead of simply for input. An exclusive ENQ will be set
when the data set is opened, and reset when it is closed.
2013-11-13 13:06:41
SELCOPY/i Reference and User Guide
99
File Search/Update/Copy/Remap
Formatted File Search/Update/Copy/Remap
SDE CHANGE operations apply only to records assigned the default record type, as identified by the VIEW operation.
Fields that are eligible for change may be identified specifically by name or reference number in the CHANGE command
syntax these are restricted to only those fields identified by the SELECT operation.
Formatted data CHANGE operations are sensitive to the data type and length of the formatted fields and so appropriate
action is taken when changing field data. e.g. maintain the separate length field of a changed XVARCHAR or VARCHAR
field.
Optional file search criteria, as specified for Formatted File Search, may be used to filter input records before any
CHANGE operation is performed. If no search criteria is specified, then CHANGE operations will apply to all input records
assigned the default record type.
Formatted File Copy
The only difference between formatted and unformatted file copy is in the use of an SDE structure to optionally change
field data. If a copy is to be performed without performing changes to the record data, then Unformatted File Copy may be
used.
Formatted file copy copies all records within the range of records selected for processing, from all selected input files to a
single output file.
If the output file is a PDS/PDSE library then only input library members will be copied, potentially replacing existing
members of the same name in the output library.
Optional change operations, as specified for Formatted File Update, may be used to change record data as it is being
copied. Records are copied regardless of whether or not they are assigned the default record type, satisfy any supplied
search criteria or have been changed by a CHANGE operation.
Formatted File Remap
Formatted file remap copies all records within the range of records selected for processing, from all selected input files to
a single output file. Furthermore, it uses an output SDE structure (SDO), COBOL or PL1 copybook, COBOL or PL1
ADATA file to potentially remap the data fields belonging to those records assigned a record type that also exists in the
output SDO.
For these records only, remap involves building a new output record using the field structure defined by the matching
output record type. i.e The output record will contain all fields defined by this record type with field data initialised to
default values.
Output record fields then inherit values from input record fields of the same name performing conversion between the
input and output field data types as required. This has the effect of filtering, repositioning and reformatting data from input
record fields before writing them to the output file.
Where matching input and output fields are of incompatible data types or where input data is invalid in the output field or
would be truncated, then the output field does not inherit the input field value and a remap error is flagged for that field.
If a remap error occurs, output for the current data set is stopped, an Interrupt record is written to the report and, if output
is to a PDS/PDSE library, processing continues at the next input library member.
Optional change operations, as specified for Formatted File Update, may be used to change data in the input record fields
before it is copied or remapped to the output record. Records are copied or remapped regardless of whether or not they
are assigned the default record type, satisfy any supplied search criteria or have been changed by a CHANGE operation.
File Search/Update/Copy/Remap Panels
The File Search/Update/Copy/Remap panels (ZZSGFSU0) are displayed when the File Search/Update/Copy/Remap Files utility
is started interactively.
These panels allow the user to scan data sets, HFS files and/or PDS/PDSE members for search strings, optionally change data in
selected records and then update the input record, or copy/remap input records to a single output file or multiple members of a
PDS/PDSE library.
See "File Search/Update/Copy/Remap Utility" for a detailed description of functionality.
The File Search/Update/Copy/Remap utility panel views and their sub-panels are interactive panel windows (window class
WINWIPO0) and may be started via the following:
• Select option 6. 'Search/Update' in the SELCOPY/i Primary option menu.
• Select 'File Search/Update/Copy/Remap' from the Utilities menu.
• Execute the command FSU with no parameters from the command line of any window.
• Execute the prefix command "F" from a file List type window. The resulting File Search/Update/Copy/Remap panel
window will treat the corresponding list entry as the INPUT fileid mask.
By default, field entries are populated with arguments and options that were entered the last time the Compare Files Utility panels
were used.
Many field entries are optional and need to be activated by entering "/" in the preceding field.
2013-11-13 13:06:41
SELCOPY/i Reference and User Guide
100
File Search/Update/Copy/Remap
File Search/Update/Copy/Remap Panels
Basic File Search Panel
FSU: Basic File Search Panel
The FSU: Basic File Search panel view is the first displayed when the File Search/Update/Copy/Remap Files utility is started
interactively.
This panel provides facility to perform a search on a single character string or numeric value occurring within records belonging to
one or more files that match a specified fileid mask. Optional record selection criteria may be applied to each of the selected input
files.
The search is actioned using optional parameters supported by the standard edit FIND command.
It also includes an option to start the Extended File Search/Update/Copy/Remap panels to perform more advanced functions
supported by the utility.
Figure 36. Basic File Search Panel.
Depending on whether the Extended File Search/Update/Copy/Remap Tasks option has been set, pressing the <Enter> key or, if
configured, double-clicking the left mouse button, will will either verify the input fields and action the basic file search, or display the
FSU: Extended File Search, Update, Copy & Remap Tasks panel view.
If the basic search is actioned, then as the utility executes a progress window is displayed which allows the user the opportunity to
interrupt processing using the Attention key.
Alternatively, the user may select an item from the menu bar.
Menu Bar Items
File
The File drop-down menu contains the single item "Exit" which simply closes the panel window. Note that, unlike
CANCEL, CLOSE will save field values entered in the panel so that they may be redisplayed the next time the panel is
opened.
Help
Display help for this panel view.
Command
Generate the FSU command line syntax for field entries specified by the user and display it in a temporary CMX file text
edit view. This command may be executed using ACTION point-and-shoot execution <F16> or copied into the user's
HOME file and saved for future execution.
JCL
Generate a JCL job stream that executes the SDEAMAIN program with input (SDEIN) containing the FSU command
generated for the specified panel field values.
Note that batch execution of FSU requires specification of a new or existing output report data set name. See the FSU
REPORT fileid parameter for details.
2013-11-13 13:06:41
SELCOPY/i Reference and User Guide
101
File Search/Update/Copy/Remap
Menu Bar Items
The job stream is displayed in a temporary text edit view and may be submitted to batch using the SUBMIT command.
Panel Input Fields
PDS/PDSE Library, Sequential, VSAM DSN mask or HFS path mask:
Fields which together constitiute a fileid mask that identifies one or more files to be searched.
The utility supports use of a fileid mask and will processes all HFS files, sequential, GDG, VSAM and PDS/PDSE data
sets that match the mask.
To be more selective, press <PF5> to display the Select Files to Process panel which contains a list of selectable fileids
that match the specified fileid mask. Furthermore, for PDS/PDSE library entries, the Select Input Members panel may then
be opened to select from a list of matching member names belonging to that library.
Having displayed the Select Files to Process panel, a list of the selected, individual fileids will be passed to the utilty
instead of the generic fileid mask. Furthermore, if only a single fileid has been selected for processing, then the selected
file DSN/Path name will replace the generic entry in the DSN/Path Mask> field and, if applicable, the selected volume id
and member name will replace the generic entries in the Volume Mask> and Member Mask> fields respectively.
These fields collectively correspond to the FSU parameter INPUT.
DSN/Path Mask>
An unquoted entry which identifies DSN mask, a completed Fileid mask, a DDName mask or an HFS file path
mask. An entry in this input field is mandatory.
• HFS file path mask
Identified by the presence of "." (dot/period) as the first character or "/" (slash) anywhere within the
mask, an HFS file path mask may be absolute or relative to the current HFS working directory. See USS
PWD in Unix System Services (USS) Commands. "./" should prefix the mask if files in the current HFS
directory are to be selected.
Wild card characters "%" (percent), representing a single characters, and "*" (asterisk), representing
zero or more characters, are supported in the name portion of the HFS file path mask. The name portion
of the HFS path is the character string at the end of the path that follows the last "/" (slash) of the fileid
or is the entire path name if "/" is not specified.
If an HFS file path mask is specified, the contents of the Volume Mask> and Member Mask> fields will
be ignored and HFS Options> settings respected.
• DDName mask
If the value entered is not an HFS file path mask, is of length less than or equal to 8 characters and
does not include "." (dot/period), and no Volume mask has been specified, then the value is considered
to be a DDName mask. A DDName mask may be used to process non-HFS files that are currently
allocated to DDNames that match the DDName mask. (e.g. SYSEXEC)
Wild card characters "%" (percent), representing a single characters, and "*" (asterisk), representing
zero or more characters, are supported in a DDName mask.
If a DDName mask is specified, the enties in the Member Mask> field may still be used to select
matching member names belonging to PDS/PDSE library data sets allocated to matching DDNames.
HFS Options> settings are ignored.
• Completed Fileid mask
If the value entered is not an HFS file path mask but includes a volume mask specification and/or a
member mask specification, then the value is considered to be a completed Fileid mask.
A completed fileid mask is a DSN mask with a volume mask and/or one or more PDS/PDSE member
name masks expressed in the following format:
{volmask:}data.set.name.mask{( membmask{ {,} membmask...} )}
Specification of one or more member masks between a single pair of "( )" (parentheses) will restrict
processing to only PDS/PDSE library data sets. Multiple PDS/PDSE member masks must be separated
by a "," (commma) and/or one or more intervening blanks.
Specification of a 1 to 6 character volume mask prefix followed by ":" (colon) restricts processing to only
cataloged or uncataloged data sets that have extents on matching volume ids.
The fileid mask supports wild card characters as described for Volume Mask> and Member Mask> fields
and for a DSN Mask below.
Fileid Mask Examples:
PE1.DEV.SRC.COBOL.CRKSW00(*)
SYS6.JNP*.**
OEM.TEST%%.**.CBLI.**(BOX*,D%T*,*ALL)
2013-11-13 13:06:41
SELCOPY/i Reference and User Guide
102
File Search/Update/Copy/Remap
Panel Input Fields
Z9RES1:ADCD.**
Z9RES*:ADCD.Z19.P%%%LIB(*)
• DSN mask
If the value entered does not meet the criteria described above for an HFS file path mask, completed
Fileid mask or a DDName mask, then the value is considered to be a DSN mask.
The DSN mask is joined with any member and volume mask specified in the Volume Mask> and
Member Mask> fields respectively to identify a single fileid mask.
The following wild card characters are supported within a DSN Mask:
*
**
%
A single asterisk represents a DSN qualifier or zero or more characters within a DSN qualifier.
e.g. DEV.CBLINS.*.JCL, DEV.CBLINS.TEST*.ISP*LIB, DEV.CBLINS.*.*
Double asterisk represents zero or more qualifiers within a DSN. Double asterisk may only be
preceded or followed by the qualifier separator, "." (dot/period).
e.g. DEV.CBLINS.**, DEV.CBLINS.**.CBLE
A single percent sign represents exactly one character within a DSN qualifier.
e.g. DEV.CBLINS.TEST0%.JCL, DEV.CBLI%%.TEST06.CBLI.%%%
Note that a TSO prefix is not applied to a DSN mask.
Volume Mask>
Optionally specify a volume name mask of maximum length 6-bytes.
Processing will be restricted to only those cataloged or uncataloged data sets that match the DSN mask and also
have extents that exist on a volume that matches the volume mask.
The volume mask supports wild card characters as follow:
*
%
A single asterisk represents a complete volume name or zero or more characters within a volume name.
e.g. CBL*, *RES*
A single percent sign represents exactly one character within the volume mask.
e.g. Z9DB9%, %%XV3%
This field entry is ignored if the DSN/Path Mask> field does not contain a DSN mask.
Member Mask>
Optionally specify one or more PDS/PDSE member name masks separated by a "," (comma) and/or one or more
intervening blanks.
e.g. BLOCK, PROFILE
BOXSEQ
If a member mask is specified, then only PDS/PDSE libraries that match the fileid mask will be selected for
processing. Non-PDS/PDSE library data sets will be excluded.
If a member mask is not specified, then all files that match the fileid mask will be selected for processing and a
default member name mask of "*" will apply to all PDS/PDSE libraries included in this selection.
Processing will be restricted to only those PDS/PDSE data sets that match the DSN mask and only members
with a member name that matches any one of the supplied member masks.
A member mask supports wild card characters as follow:
*
%
A single asterisk represents an entire member name or zero or more characters within a member name.
e.g. CBL*5, BOX*, D*T*
A single percent sign represents exactly one character within a member name mask.
e.g. H%, D%R*, E%A
This field entry is ignored if the DSN/Path Mask> field does not contain a DSN mask or a DDNAme mask.
HFS Options>
Specify options that govern HFS file selection.
Recurse Sub-directories
Set this option on to process matching files within all directories and sub-directories beneath the
absolute or relative directory specified by the HFS file path mask
This field corresponds to the FSU HFS Options parameter RECURSE.
Ignore fileid case
2013-11-13 13:06:41
SELCOPY/i Reference and User Guide
103
File Search/Update/Copy/Remap
Panel Input Fields
Set this option on to disable case sensitivity when matching HFS file names with the file name portion of
the specified HFS file path mask. The name portion of the HFS file path is the character string following
the last "/" (slash) of the fileid mask or the entire HFS file path if no "/" is included in the fileid mask.
This field corresponds to the FSU HFS Options parameter CASEIGN.
These field entries are ignored if the DSN/Path Mask> field does not contain an HFS file path mask.
Search Options:
Fields which together constitiute an edit FIND command used to search unformatted input file records.
These fields collectively correspond to the FSU parameter FIND.
Op>
Identify the relational operator used when comparing the record data against the search value.
If testing for a non-equality relationship using a character string search value, then the EBCDIC values assigned
to characters in the search string and record data determine the relationship. (e.g. GT, LT)
Enter "/" to display a list of valid entries and a brief description.
String>
Specify the search value. This may be one of the following:
1. An unquoted numeric value.
2. A quoted character string (case insensitive search). e.g. 'John Doe' is the same as 'JOHN DOE'.
3. A quoted character string prefixed with "C" (case sensitive search). e.g. C'John Doe'.
4. A quoted hexadecimal string prefixed with "X". e.g. X'00'.
5. A quoted picture string prefixed with "P". e.g. P'USER###'.
See the FIND command for details on supported picture string special characters.
6. A quoted unix-style "Regular Expression" string prefixed with "R". e.g. R'[Pp][Ff](:d#)'
See Regular Expressions for details on supported regular expression string special characters.
Limit>
The maximum number of hits (records hit) to report per file, or library member.
Specify a value of zero (0) to report all hits.
Efficiency gains may be achieved by specifying Limit=1 where it is required only to establish whether or not each
member contains a particular string, since once the first hit is reported further processing for that member will be
bypassed.
Bounds>
Optionally activate the Bounds> input fields to specify the record columns between which the search will occur. If
not activated, the search will include all columns within the length of the input records.
Start Column
Specifies the start (or only) record column from which the scan for the search string will begin. Record
data in positions or fields that occur before this start column value is not searched.
This field corresponds to SDE FIND parameter pos1.
End Column
Specifies the end record data column beyond which no part of the search value may be found. Only
record data between the start and end columns will be searched.
If a 0 (zero) end column is specified then the end column is the start column number plus the length of
the search value minus 1. i.e. the search string will only be found if it begins in the start column.
This field corresponds to SDE FIND parameter pos2.
As>
Enter "/" in the appropriate radio button field to apply restrictions to the position of the search string within record
data as follow:
Unrestricted
Word
2013-11-13 13:06:41
The search value may be found anywhere within the specified column bounds of
the input records.
The search value may only be found if it is complete word which falls within the
specified column bounds of the input records. i.e. the value must either be
preceded by a non-alphanumeric character or begin at the start column bound, and
either precede a non-alphanumeric character or finish in the end column bound.
SELCOPY/i Reference and User Guide
104
File Search/Update/Copy/Remap
Panel Input Fields
Prefix
The search value may only be found if it occurs at the start of a word and falls
within the specified column bounds of the input records. i.e. the value must either
be preceded by a non-alphanumeric character or begin at the start column bound,
and be followed by an alphanumeric character.
Suffix
The search value may only be found if it occurs at the end of a word and falls within
the specified column bounds of the input records. i.e. the value must be preceded
by an alphanumeric character and must either precede a non-alphanumeric
character or finish in the end column bound.
These option fields correspond to SDE FIND parameters PREFIX, SUFFIX and WORD.
Record Selection:
Fields which together identify criteria by which subsets of records from every input file are selected for processing.
Start>
If activated, the Start> field specifies the first record in every file matching the fileid mask at which processing will
start. Records occurring sequentially before the start record will be bypassed. If this field is not activated, records
are selected beginning at record 1.
This input field may contain a record number, an RBA number (for ESDS input only), or a key string (for KSDS
input only).
A record/RBA number may be specified as an integer numeric value 123 or as a hexadecimal numeric value
X'7B'. A key string may be specified as a literal abc or 'abc', which will be upper cased before keyed look-up,
character string C'abc' (character case preserved) or a hexadecimal string X'818283'.
This field corresponds to the FSU parameters STARTREC recno, STARTRBA rba and STARTKEY key.
Record | Key | RBA
Identifies the type of start value specified in the Start> field. Enter "/" in the appropriate, mutually
exclusive parameter field.
For>
If activated, then for each file matching the fileid mask, the For> field specifies the maximum number of records
within that file for which processing may occur. If this field is not activated, records are selected beginning at start
record and ending at the last record in the file.
This field corresponds to the FSU parameter FOR.
Filter>
If activated, the Filter> field specifies options to either generate a new record filter or use an existing record filter
file. A record filter will perform further subsetting on input file records selected for processing by the Start> and/or
For> input fields.
Filter options are as follow:
Q
F
On pressing <PF6>, the Quick Filter dialog panel will be opened in order to generate a temporary filter on
the unformatted record data.
Use a permanent filter identified by the sequential data set or member name in the File> field.
On pressing <PF6>, the Create File Filter dialog panel will be opened in order to display the contents of an
existing filter file or create and save a new filter file.
If option "F" is selected, then specifiaction of a filter fileid is mandatory.
File>
Identifies the fully qualified data set name of a sequential data set or PDS/PDSE library containing a
record filter. Quotes are unnecessary but permitted.
A selectable list of data sets will be presented if the entered value contains wildcards characters "*"
(asterisk) or "%" (percent).
Member>
If the File> field contains the DSN of a PDS/PDSE library, then this field must reference a member name
within that library which contains a record filter.
A selectable list of members will be presented if the entered value contains wildcards characters "*"
(asterisk) or "%" (percent), or is blanked out.
Extended File Search/Update/Copy/Remap Tasks:
2013-11-13 13:06:41
SELCOPY/i Reference and User Guide
105
File Search/Update/Copy/Remap
PFKeys
Select this option to bypass execution of the the file search when <Enter> is pressed and instead display a list of FSU
utility functions ordered by task.
PFKeys
In addition to the standard interactive panel key assignments for scrolling and navigation, the Basic File Search panel supports the
following:
PF1
PF2
PF3
F16
PF5
PF6
PF17
HELP
EXPAND
END
REMIND
SELFILES
FILTER
COMMAND
Display context sensitive help .
Expand an input/output field.
Close the panel.
Display a saved input field value.
Select from a list of files that match the Fileid mask.
Open the FILTER dialog for the specified filter type.
Display the generated FSU command.
Extended File Search/Update/Copy/Remap Panels
FSU: Extended File Search, Update, Copy & Remap Tasks
The FSU: Extended File Search, Update, Copy & Remap Tasks panel view is displayed when the Extended File
Search/Update/Copy/Remap Tasks option has been selected in the Basic File Search panel.
This panel provides a list of selectable tasks that may be performed using the FSU utility. Selecting one of these tasks will begin a
sequence of panel views which prompt the user for required and optional parameters, used to generate an FSU command stream.
On completing entries in these panel views, the generated command may be executed in the foreground, inserted in a JCL job
stream for batch execution or displayed in an edit view in a format suitable for execution using the ACTION facility.
Following selection of one of these options, the associated task description is displayed in all subsequent panel views.
Figure 37. FSU: Extended File Search, Update, Copy & Remap Tasks.
Menu Bar Items
File
The File drop-down menu contains the single item "Exit" which simply closes the panel window. Note that, unlike
CANCEL, CLOSE will save field values that have been entered in the panel views so far. These values may be
redisplayed the next time the panel is opened.
Help
Display help for this panel view.
2013-11-13 13:06:41
SELCOPY/i Reference and User Guide
106
File Search/Update/Copy/Remap
Panel Options
Panel Options
File Search, Update, Copy and Remap utility operations may be grouped as applying to unformatted or formatted file records.
Record data is considered to be formatted if they are mapped by a structure (COBOL or PL/1 Copybook or SELCOPY/i SDO).
1. Unformatted File Search (FIND)
Like the basic search panel, this option will generate a report of file records that satisfy a FIND operation search value.
Additional features include:
1. Specification of multiple input file masks allowing a mixture of input HFS files, sequential, VSAM and GDG data
sets and library members.
2. Additional HFS file input record formats.
3. Specification of multiple FIND operations and control of whether a record must satisfy any or all of the FIND
operations.
4. Optional write of report output to DASD data set.
2. Unformatted File Search (WHERE)
This option is similar to Unformatted File Search (FIND) except that, instead of using FIND operations, the record search
identifies records to be reported using an edit WHERE operation which specifies an SDE expression.
This task may optionally perform additional FIND operations on records selected by the SDE expression so that only
records that satisfy both the SDE expression and FIND search criteria are reported.
3. Unformatted File Change+Update
This option performs one or more edit CHANGE operations on selected input records and, if data is changed, perform an
in-place update on the input record. If multiple CHANGE operations are specified, the option is provided to attempt all
CHANGE operations or to stop following the first successful CHANGE operation.
This task may optionally perform additional FIND and/or WHERE search operations to ensure that only records that satisfy
these operations' search criteria are satisfied before attempting to perform a CHANGE on a record's data.
Note that record update does not allow a change to a record's length so any CHANGE operation that would result in a
record length change will fail.
4. Unformatted File Copy
Like File Copy this option will copy records from selected input files to a single output sequential, VSAM or GDG data set,
HFS file or PDS/PDSE library member.
Additional features include:
1. Specification of multiple input file masks allowing a mixture of input HFS files, sequential, VSAM and GDG data
sets and library members.
2. Specification of HFS file input record formats.
3. Optionally, display report output and/or write it to a DASD data set.
5. Unformatted File Change+Copy
This option is similar to Unformatted File Copy except that records may be changed as they are copied to the output file.
As detailed under Unformatted File Change+Update, one or more edit CHANGE operations may be specified with optional
FIND and/or WHERE search operations to provide additional record vetting.
Unlike update, copy allows changes to a record's length so, unless the operation extends the record length beyond the
defined maximum, a CHANGE operation that results in a record length change will succeed.
6. Unformatted Library Copy
This option is similar to Unformatted File Copy except that only input PDS/PDSE library members are selected for
processing and the output data set must be a PDS/PDSE library DSN. Any files selected by the input mask that are not
library members are ignored. All selected members are copied to members of the same name in the output library.
Options exist to allocate the output library data set modelled on the first input library processed and to replace existing
members if necessary.
Library copy has advantages over IEBCOPY in that members can be copied between libraries of different DCB geometry.
7. Unformatted Library Change+Copy
This option is similar to Unformatted Library Copy, except that, like Unformatted File Change+Copy, records may be
changed as they are copied to the output file.
8. Formatted File Search (FIND)
2013-11-13 13:06:41
SELCOPY/i Reference and User Guide
107
File Search/Update/Copy/Remap
Panel Options
This option provides similar functionality to Unformatted File Search (FIND) with the following differences:
1. Specification of an input structure file is mandatory. A structure may be a COBOL or PL1 Copybook, ADATA data
set or a SELCOPY/i SDO structure.
2. Specification of an individual record-type mapping defined within the specified structure file is mandatory. Only
input data records that are assigned this record-type mapping are searched. Input data records not assigned this
record-type mapping are bypassed.
3. Whether specifying a single or multiple FIND operations, the column bounds, which restrict the search to a
specific area of the input records, are denoted by a start and end field names instead of character positions.
4. Arithmetic comparisons are performed for numeric search values when tested against numeric fields regardless
of their source data type.
9. Formatted File Search (WHERE)
This option provides similar functionality to Unformatted File Search (WHERE) but with the same differences as described
by Formatted File Search (FIND) above.
Unlike Unformatted File Search (WHERE), the specified SDE expression may perform tests on specific fields within the
formatted records.
10. Formatted File Change+Update
This option is similar to Unformatted File Change+Update but with the additional, mandatory specification of input
structure data set and record-type.
The specified CHANGE operation search and replace values apply to individual fields and are sensitive to field data-type.
Likewise, column bounds are specified using field names.
Any record vetting using FIND and/or WHERE, performed prior to execution of a CHANGE operation, also apples to
individual fields and is sensitive to field data-type.
11. Formatted File Change+Copy
Like Unformatted File Change+Copy, this option allows records to be changed as they are copied to the output file.
The specified CHANGE operation search and replace values apply to individual fields and are sensitive to field data-type.
Likewise, column bounds are specified using field names.
Any record vetting using FIND and/or WHERE, performed prior to execution of a CHANGE operation, also apples to
individual fields and is sensitive to field data-type.
12. Formatted File Remap
Like Unformatted File Copy, this option will copy records from selected input files to a single output sequential, VSAM or
GDG data set, HFS file or PDS/PDSE library member. However, input record data mapped by fields in the input structure
is remapped to potentially different positions and data types in the output record. These output record field positions and
data types are determined by an output structure.
Specification of an input and output structure file is mandatory. A structure may be a COBOL or PL1 Copybook, ADATA
data set or a SELCOPY/i SDO structure. Note that specification of a record-type mapping is not necessary for remap.
13. Formatted File Change+Remap
This option provides the same functionality as Formatted File Remap with the added ability to change data in fields as it is
remapped to the output file.
Unlike Formatted File Remap, specification of a record-type mapping is mandatory to identify to identify the records to
which the specified CHANGE, and optionally FIND and/or WHERE, operations are to be applied.
Note that CHANGE, FIND and WHERE operations are applied to the record data following remap. i.e. using the
record-type definition belonging to the output structure.
14. Formatted Library Change+Copy
Like Unformatted Library Change+Copy, this option will only copy PDS/PDSE library members that have been selected for
processing and the output data set must be a PDS/PDSE library DSN.
Like Formatted File Change+Copy, CHANGE, and optionally FIND and/or WHERE, operations may be applied to the
selected formatted records as they are copied to the output library member.
15. Formatted Library Remap
This option is similar to Formatted File Remap except that only selected input records belonging to PDS/PDSE library
members are copied and remapped to members of the same name in an output PDS/PDSE library.
16. Formatted Library Change+Remap
This option provides the same functionality as Formatted Library Remap with the added ability to change data in fields as
it is remapped to the output members.
2013-11-13 13:06:41
SELCOPY/i Reference and User Guide
108
File Search/Update/Copy/Remap
FSU: Input File(s) Specification
Specification of a record-type mapping is mandatory to identify to identify the records to which the specified CHANGE, and
optionally FIND and/or WHERE, operations are to be applied.
Note that CHANGE, FIND and WHERE operations are applied to the record data following remap. i.e. using the
record-type definition belonging to the output structure.
FSU: Input File(s) Specification
The FSU: Input File(s) Specification panel view is common to all the utility tasks and is always the first view displayed in the
sequence.
Figure 38. FSU: Input File(s) Specification.
Menu Bar Items
File
The File drop-down menu contains the single item "Exit" which simply closes the panel window. Note that, unlike
CANCEL, CLOSE will save field values that have been entered in the panel views so far. These values may be
redisplayed the next time the panel is opened.
Help
Display help for this panel view.
Panel Fields
Fileid Mask Specification
Choose between 2 mutually exclusive options which identify the method by which input files will be selected:
Specify Multiple fileids or fileid masks:
Select this option to open the Multiple Fileid Masks panel to enter more than one fileid mask. For each fileid
mask, further selection and deselection may be performed on the list of files and library members that match that
mask.
The list of fileid masks may contain any combination of HFS file path masks, Completed Fileid masks, DDName
masks and DSN masks. See the DSN/Path Mask> field in the the FSU: Basic File Search panel for a description
of these different types of fileid mask.
If this option is selected, <PF5> or <Enter> will display the Multiple Fileid Masks panel. When a list of fileid
masks has been entered and closed, <PF5>, may be used to redisplay the panel.
Specify Single fileid mask:
Select this option if only one fileid mask is needed to identify all the required input files.
If selected, the contents of the DSN/Path Mask>, Member Mask> and Volume Mask> fields are used to
constitute the generated fileid mask. See description of PDS/PDSE Library, Sequential, VSAM DSN mask or
HFS path mask: in the FSU: Basic File Search panel for details.
2013-11-13 13:06:41
SELCOPY/i Reference and User Guide
109
File Search/Update/Copy/Remap
Panel Fields
Press <PF5> to display the Select Files to Process panel which contains a list of selectable fileids that match the
specified fileid mask. Furthermore, for PDS/PDSE library entries, the Select Input Members panel may be
opened to select from a list of matching member names belonging to that library.
HFS Options:
Options and values that apply to all input HFS files. These are ignored for non-HFS input files.
Undefined | Fixed | Variable
Identify the format of input HFS records.
Undefined indicates that records are terminated by an End-of-Line (EOL) string.
Fixed indicates that all records are of a fixed length as defined by a specified LRECL.
Variable indicates that all records are of variable length as defined by a length field within the data.
Max Record Length>
Applicable to each of the record formats, this value defines the LRECL (maximum length) of input records. A
record longer than this value will be chopped into multiple records.
A 0 (zero) value implies the default which is 32752 for Undefined and Variable record formats and 80 for Fixed
record format.
EOL Characters>
Applicable to Undefined record format only, choose from one of the following EOL character combinations:
STD
CR
LF
NL
CRLF
LFCR
CRNL
user
X'0D'
X'0A'
X'15'
X'0D0A'
X'0A0D'
X'0D15'
-
Any standard line-end.
Carriage Return.
Line Feed.
New Line.
Carriage Return + Line Feed.
Line Feed + Carriage Return.
Carriage Return + New Line.
A 2-byte user string specified in EOL user string>
EOL user string>
Applicable only if EOL Characters> is set to user, this field specifies the user supplied 2-byte EOL string. It may be
specified in character or hexadecimal notation. (e.g. '##', X'FFFF')
Var Length Field>
Applicable to Variable record format only, these fields identify the location of the record length fields within the data.
(Offset)
Offset of the record length field from the start of the record. Default is 0. (i.e. the length field is at the start of the
record.)
(Length)
Length (number of bytes) of the record length field. Default is 2.
(Data Origin)
Offset into the record data at which the value in the record length field is to be applied. Default is 0. (i.e. the
record length include the length field.)
Recurse Sub-directories
Set this option on to process matching files within all directories and sub-directories beneath the absolute or relative
directory specified by the HFS file path mask
This field corresponds to the FSU HFS Options parameter RECURSE.
Ignore fileid case
Set this option on to disable case sensitivity when matching HFS file names with the file name portion of the specified
HFS file path mask. The name portion of the HFS file path is the character string following the last "/" (slash) of the fileid
mask or the entire HFS file path if no "/" is included in the fileid mask.
This field corresponds to the FSU HFS Options parameter CASEIGN.
2013-11-13 13:06:41
SELCOPY/i Reference and User Guide
110
File Search/Update/Copy/Remap
FSU (unformatted): Record Selection
FSU (unformatted): Record Selection
The FSU (unformatted): Record Selection panel view provides the opportunity to enter unformatted record selection criteria to be
applied to every selected input file.
Any specified filter must operate on unformatted record data. i.e. areas of the record may be tested based only on data position and
length within the record.
Figure 39. FSU (unformatted): Record Selection.
Menu Bar Items
File
The File drop-down menu contains the single item "Exit" which simply closes the panel window. Note that, unlike
CANCEL, CLOSE will save field values that have been entered in the panel views so far. These values may be
redisplayed the next time the panel is opened.
Help
Display help for this panel view.
Panel Fields
Input Records:
Fields which together specify the master subset of selected records on which subsequent filtering and processing will
occur. These field values are applied to every input file. Input records that fall outside the range of records selected by this
subset will not be processed.
See the FSU: Basic File Search panel for description of the Start> and For> input field values.
For these fields to take affect, they must first be activated by selecting the appropriate option field(s).
Record Filter:
Specifies a record filter to perform further subsetting on input file records selected for processing by the Start> and/or
For> input fields.
See the FSU: Basic File Search panel for description of the Filter>, File> and Member> input field values. The Volume>
field allows specification of a DASD volume for uncataloged Filter data sets.
FSU (formatted): Record Selection
The FSU (formatted): Record Selection panel view provides the opportunity to enter formatted record selection criteria to be
applied to every selected input file.
Any specified filter must operate on formatted record data. i.e. individual, named fields within the formatted record may be tested.
2013-11-13 13:06:41
SELCOPY/i Reference and User Guide
111
File Search/Update/Copy/Remap
FSU (formatted): Record Selection
Figure 40. FSU (formatted): Record Selection.
Menu Bar Items
File
The File drop-down menu contains the single item "Exit" which simply closes the panel window. Note that, unlike
CANCEL, CLOSE will save field values that have been entered in the panel views so far. These values may be
redisplayed the next time the panel is opened.
Help
Display help for this panel view.
Panel Fields
Input Records:
Fields which together specify the master subset of selected records on which subsequent filtering and processing will
occur. These field values are applied to every input file. Input records that fall outside the range of records selected by this
subset will not be processed.
See the FSU: Basic File Search panel for description of the Start> and For> input field values.
For these fields to take affect, they must first be activated by selecting the appropriate option field(s).
Input Structure/Copybook File & Record-Type Mapping:
Fields which together specify a cataloged structure file (COBOL or PL1 Copybook, ADATA file or a SELCOPY/i SDO) and,
if WHERE, FIND and/or CHANGE operations are to be performed, a mandatory record-type as defined within the
structure. The structure may be a sequential data set or a PDS/PDSE library member.
If a record filter is to be generated, this structure will be passed to the appropriate panel.
Dsn>
Identifies the fully qualified data set name of a sequential data set or PDS/PDSE library containing a COBOL or
PL1 Copybook, ADATA file or SDO structure.
A selectable list of data sets will be presented if the entered value contains wildcards characters "*" (asterisk) or
"%" (percent).
Member>
If the Dsn> field contains the DSN of a PDS/PDSE library, then this field must reference a member name within
that library which contains a record filter.
A selectable list of members will be presented if the entered value contains wildcards characters "*" (asterisk) or
"%" (percent), or is blanked out.
Type>
Indicate the type of structure (COBOL, PL1, ADATA or SDO).
2013-11-13 13:06:41
SELCOPY/i Reference and User Guide
112
File Search/Update/Copy/Remap
Panel Fields
RecType>
Identifies the name of a record-type record mapping defined within the structure. Records that satisfy this
record-type selection criteria will be assigned this record-type and will be included in any WHERE, FIND and/or
CHANGE operations.
The SDE: Select Record-Type panel will be automatically opened to display a selectable list of record-types if the
structure contains multiple record types. Otherwise the single record-type will be inserted automatically.
Recompile> Y/N
If Structure/Copybook overlay refers to a COBOL, PL1 or ADATA source file (not an SDO) then a compile step must be
performed in order to turn the source copybook into SELCOPYi's own internal structure (SDO) format. A temporary SDO
will be created, lasting the duration of the SELCOPYi session, making subsequent reference to the same copybook during
the session much faster.
If, however, the copybook (or any of its included components) is modified during the session, then a recompile of the
source will normally be required.
For performance reasons N (meaning no recompile should occur) is the default.
Specify Y to force a copybook recompile each time the process is run. Alternatively type the primary command:
SD DROP <copybook_name>
Record Filter:
Specifies a record filter to perform further subsetting on input file records selected for processing by the Start> and/or
For> input fields.
See the FSU: Basic File Search panel for description of the Filter>, File> and Member> input field values. The Volume>
field allows specification of a DASD volume for uncataloged Filter data sets.
FSU (unformatted): Search records using WHERE expression
The FSU (unformatted): Search records using WHERE expression panel view is displayed only if the option to search
unformatted records using an SDE expression has been requested. This may be for a search and report of matching records with
or without a subsequent FIND operation, or as a record vetting operation prior to actioning a CHANGE operation.
The specified SDE expression must operate on unformatted record data. i.e. areas of the record may be tested based only on data
position and length within the record.
Figure 41. FSU (unformatted): Search records using WHERE expression.
Menu Bar Items
File
The File drop-down menu contains the single item "Exit" which simply closes the panel window. Note that, unlike
CANCEL, CLOSE will save field values that have been entered in the panel views so far. These values may be
redisplayed the next time the panel is opened.
Help
Display help for this panel view.
2013-11-13 13:06:41
SELCOPY/i Reference and User Guide
113
File Search/Update/Copy/Remap
Panel Fields
Panel Fields
WHERE Expression Specification
Choose between 2 mutually exclusive options which identify the method by which a WHERE expression is to be specified:
Use generated WHERE expression (unformatted data):
Select this option to open the Unformatted Selection Criteria panel to generate an expression consisting of one or
more sub-expressions separated by logical AND and/or logical OR operators.
The sub-expressions will test field position and length within unformatted record data. SELCOPY/i supports more
complex expressions and function use than can be generated by this panel (see SDE Expressions.) If more
complex expression is required, this panel may be used to generate the basic expression and later modified on
editing the generated FSU utility command.
If this option is selected, <PF5> or <Enter> will display the Unformatted Selection Criteria panel. When a
WHERE expression has been entered and the panel closed, <PF5>, may be used to redisplay the panel.
Use WHERE expression entered below:
Select this option to manually enter the required WHERE expression.
WHERE>
Enter a valid SDE expression. Beware that not validation is performed on this field.
<PF2> may be pressed to expand an input field and so enter a value which is longer than the visible
input field area.
Execute additional FIND on records satisfying this WHERE expression.
Select this option if FSU is to perform a FIND operation on records that satisfy the supplied WHERE expression.
This allows an extra level of record searching for file search operations or for file change record vetting.
FSU (formatted): Search records using WHERE expression
The FSU (formatted): Search records using WHERE expression panel view is displayed only if the option to search formatted
records using an SDE expression has been requested. This may be for a search and report of matching records with or without a
subsequent FIND operation, or as a record vetting operation prior to actioning a CHANGE operation.
The specified SDE expression must operate on the formatted data belonging only to records that are assigned the nominated
record-type. i.e. individual, named fields within the formatted record may be tested.
Figure 42. FSU (formatted): Search records using WHERE expression.
Menu Bar Items
File
The File drop-down menu contains the single item "Exit" which simply closes the panel window. Note that, unlike
CANCEL, CLOSE will save field values that have been entered in the panel views so far. These values may be
2013-11-13 13:06:41
SELCOPY/i Reference and User Guide
114
File Search/Update/Copy/Remap
Menu Bar Items
redisplayed the next time the panel is opened.
Help
Display help for this panel view.
Panel Fields
WHERE Expression Specification
Choose between 2 mutually exclusive options which identify the method by which a WHERE expression is to be specified:
Use generated WHERE expression (formatted data):
Select this option to open the Formatted Record Expression panel to generate an expression involving formatted
record fields as mapped by the record-type nominated in the FSU (formatted): Record Selection panel view.
SELCOPY/i supports more complex expressions and function use than can be generated by this panel (see SDE
Expressions.) If more complex expression is required, this panel may be used to generate the basic expression
and later modified on editing the generated FSU utility command.
If this option is selected, <PF5> or <Enter> will display the Formatted Record Expression panel. When a
WHERE expression has been entered and the panel closed, <PF5>, may be used to redisplay the panel.
Use WHERE expression entered below:
Select this option to manually enter the required WHERE expression.
WHERE>
Enter a valid SDE expression. Beware that not validation is performed on this field.
<PF2> may be pressed to expand an input field and so enter a value which is longer than the visible
input field area.
Execute additional FIND on records satisfying this WHERE expression.
Select this option if FSU is to perform a FIND operation on the formatted records fields for records that satisfy the supplied
WHERE expression.
This allows an extra level of record searching for file search operations or for file change record vetting.
FSU (unformatted): Search Records using the FIND Command
The FSU (unformatted): Search Records using the FIND Command panel view is displayed only if the option to search
unformatted records using one or more FIND operations has been requested. This may be for a search and report of matching
records, or as a record vetting operation prior to actioning a CHANGE operation.
The specified FIND search values will operate on the unformatted record data. If column bounds are specified, these must
correspond to positions within the input records.
Figure 43. FSU (unformatted): Search records using the FIND Command.
2013-11-13 13:06:41
SELCOPY/i Reference and User Guide
115
File Search/Update/Copy/Remap
Menu Bar Items
Menu Bar Items
File
The File drop-down menu contains the single item "Exit" which simply closes the panel window. Note that, unlike
CANCEL, CLOSE will save field values that have been entered in the panel views so far. These values may be
redisplayed the next time the panel is opened.
Help
Display help for this panel view.
Panel Fields
FIND Command Specification
Choose between 2 mutually exclusive options which identify the method by which FIND command(s) are to be specified:
Specify Multiple FIND commands:
Select this option to open the Multiple Find Commands (unformatted) panel to enter more than one FIND
command operating on the unformatted record data.
The search values are compared with the unformatted record data and any specified column bounds are
expressed as numeric positions in the record data. All generated FIND operations are applied to an input record
and logical operator AND or OR is specified to indicate whether all or any of the FIND operations must be
successful in order for the record to be selected.
If this option is selected, <PF5> or <Enter> will display the Multiple Find Commands panel. When a list of FIND
commands has been entered and closed, <PF5>, may be used to redisplay the panel.
Specify Single FIND command:
Select this option if only one FIND command is required. The fields that follow together constitiute an edit FIND
command used to search unformatted input file records.
See description of Search Options: in the FSU: Basic File Search panel for details of the Op>, String>,
Bounds> and As> input fields.
FSU (formatted): Search Records using the FIND Command
The FSU (formatted): Search Records using the FIND Command panel view is displayed only if the option to search formatted
records using one or more FIND operations has been requested. This may be for a search and report of matching records, or as a
record vetting operation prior to actioning a CHANGE operation.
The specified FIND commands will operate on the formatted data belonging only to records that are assigned the nominated
record-type. The search values apply to individual fields and are sensitive to field data-type. If column bounds are specified, these
must correspond to field names within the formatted input record.
Figure 44. FSU (formatted): Search records using the FIND Command.
2013-11-13 13:06:41
SELCOPY/i Reference and User Guide
116
File Search/Update/Copy/Remap
Menu Bar Items
Menu Bar Items
File
The File drop-down menu contains the single item "Exit" which simply closes the panel window. Note that, unlike
CANCEL, CLOSE will save field values that have been entered in the panel views so far. These values may be
redisplayed the next time the panel is opened.
Help
Display help for this panel view.
Panel Fields
FIND Command Specification
Choose between 2 mutually exclusive options which identify the method by which FIND command(s) are to be specified:
Specify Multiple FIND commands:
Select this option to open the Multiple Find Commands (formatted) panel to enter more than one FIND command
operating on the formatted record data.
The search values are compared with the individual formatted fields within the record data and any specified
column bounds are expressed as field names. All generated FIND operations are applied to an input record and
logical operator AND or OR is specified to indicate whether all or any of the FIND operations must be successful
in order for the record to be selected.
If this option is selected, <PF5> or <Enter> will display the Multiple Find Commands panel. When a list of FIND
commands has been entered and closed, <PF5>, may be used to redisplay the panel.
Specify Single FIND command:
Select this option if only one FIND command is required. The fields that follow together constitiute an edit FIND
command used to search formatted input file records.
Op>
Identify the relational operator used when comparing the field data against the search value.
If testing for a non-equality relationship using a character string search value, then the EBCDIC values
assigned to characters in the search string and record data determine the relationship. (e.g. GT, LT)
Enter "/" to display a list of valid entries and a brief description.
String>
Specify the search value. This may be one of the following:
1. Applicable to fields of any data type, an unquoted numeric value. For numeric fields, the
numeric search value and source field data are converted so that they are of the same data
type prior to performing an arithmetic comparison.
2. Applicable only to character fields, a quoted character string (case insensitive search). e.g.
'John Doe' is the same as 'JOHN DOE'.
3. Applicable only to character fields, a quoted character string prefixed with "C" (case sensitive
search). e.g. C'John Doe'.
4. Applicable only to character fields, a quoted hexadecimal string prefixed with "X". e.g. X'00'.
5. Applicable only to character fields, a quoted picture string prefixed with "P". e.g. P'USER###'.
See the FIND command for details on supported picture string special characters.
6. Applicable only to character fields, a quoted unix-style "Regular Expression" string prefixed
with "R". e.g. R'[Pp][Ff](:d#)'
See Regular Expressions for details on supported regular expression string special characters.
Bounds>
Optionally activate the Bounds> input fields to specify the named record columns (fields) between
which the search will occur. If not activated, the search will include all fields within the length of the input
records.
Start Column
Specifies the start (or only) record field from which the scan for the search value will begin.
Record data in fields that occur before this start column value is not searched.
This field corresponds to SDE FIND parameter field_col/field_col1.
End Column
2013-11-13 13:06:41
SELCOPY/i Reference and User Guide
117
File Search/Update/Copy/Remap
Panel Fields
Specifies the end record field. Only record data between the start and end columns will be
searched.
If a 0 (zero) end column is specified then only the start column field is searched.
This field corresponds to SDE FIND parameter filed_col2.
As>
Applicable only to character fields (data-type "AN"), enter "/" in the appropriate radio button field to apply
restrictions to the position of the search string within the field as follow:
Unrestricted
Word
The search value may be found anywhere within the character field.
The search value may only be found if it is complete word within the
character field. i.e. the value must either be preceded by a non-alphanumeric
character or begin at the first character of the field, and either precede a
non-alphanumeric character or finish in the last character of the field.
Prefix
The search value may only be found if it occurs at the start of a word within
the character field. i.e. the value must either be preceded by a
non-alphanumeric character or begin at the first character of the field, and be
followed by an alphanumeric character.
Suffix
The search value may only be found if it occurs at the end of a word within
the character field. i.e. the value must be preceded by an alphanumeric
character and must either precede a non-alphanumeric character or finish in
the last character of the field,
These option fields correspond to SDE FIND parameters PREFIX, SUFFIX and WORD.
FSU (unformatted): Change record data using the CHANGE command
The FSU (unformatted): Change record data using the CHANGE command panel view is displayed only if the option to change
data in unformatted records has been requested.
The specified CHANGE search and replace values will operate on the unformatted record data. If column bounds are specified,
these must correspond to positions within the input records.
Figure 45. FSU (unformatted): Change record data using the CHANGE command.
Menu Bar Items
File
The File drop-down menu contains the single item "Exit" which simply closes the panel window. Note that, unlike
CANCEL, CLOSE will save field values that have been entered in the panel views so far. These values may be
redisplayed the next time the panel is opened.
Help
Display help for this panel view.
2013-11-13 13:06:41
SELCOPY/i Reference and User Guide
118
File Search/Update/Copy/Remap
Panel Fields
Panel Fields
Change Command Specification
Choose between 2 mutually exclusive options which identify the method by which CHANGE command(s) are to be
specified:
Specify Multiple CHANGE commands:
Select this option to open the Multiple Change Commands (unformatted) panel to enter more than one CHANGE
command operating on the unformatted record data.
The search values are compared with the unformatted record data and any specified column bounds are
expressed as numeric positions in the record data. All generated CHANGE operations are applied to an input
record and logical operator AND or OR is specified to indicate whether all CHANGE operations or only the first
successful CHANGE operation is to applied to the record data.
If this option is selected, <PF5> or <Enter> will display the Multiple Change Commands panel. When a list of
CHANGE commands has been entered and closed, <PF5>, may be used to redisplay the panel.
Specify Single CHANGE command:
Select this option if only one CHANGE command is required. The fields that follow together constitiute an edit
CHANGE command used to search for then replace a string value within unformatted input file records.
Op>
Identify the relational operator used when comparing the record data against the CHANGE operation
search value.
If testing for a non-equality relationship using a character string search value, then the EBCDIC values
assigned to characters in the search string and record data determine the relationship. (e.g. GT, LT)
Enter "/" to display a list of valid entries and a brief description.
From>
Specify the CHANGE operation search value. This may be one of the following:
1. An unquoted numeric value which will be processed as a character string.
2. A quoted character string (case insensitive search). e.g. 'John Doe' is the same as 'JOHN
DOE'.
3. A quoted character string prefixed with "C" (case sensitive search). e.g. C'John Doe'.
4. A quoted hexadecimal string prefixed with "X". e.g. X'00'.
5. A quoted picture string prefixed with "P". e.g. P'USER###'.
See the CHANGE command for details on supported search value picture string special
characters.
6. A quoted unix-style "Regular Expression" string prefixed with "R". e.g. R'[Pp][Ff](:d#)'
See Regular Expressions for details on supported regular expression string special characters.
Bounds>
Optionally activate the Bounds> input fields to specify the record columns between which both the
search and replace values must occur in order to perform a successful CHANGE operation.
If not activated, the search will include all columns within the length of the input records. If an in-place
update is to be performed, the replace string must not result in a change to the record length. However,
if records are to be copied the replace string may extend the length of the record to a value not greater
than the defined maximum record length.
Start Column
Specifies the start (or only) record column from which the scan for the CHANGE operation
search string will begin. Record data in positions or fields that occur before this start column
value is excluded from the CHANGE operation.
This field corresponds to SDE CHANGE parameter pos1.
End Column
Specifies the end record data column beyond which no part of the search value may be found
and no part of the replace string may occupy. Only record data between the start and end
columns will be searched and potentially replaced.
If a 0 (zero) end column is specified then the end column is the start column number plus the
length of the search value minus 1. i.e. the search value will only be found if it begins in the
start column.
This field corresponds to SDE CHANGE parameter pos2.
2013-11-13 13:06:41
SELCOPY/i Reference and User Guide
119
File Search/Update/Copy/Remap
Panel Fields
As>
Enter "/" in the appropriate radio button field to apply restrictions to the position of the search string
within record data as follow:
Unrestricted
The search value may be found anywhere within the specified column
bounds of the input records.
Word
The search value may only be found if it is a complete word which falls within
the specified column bounds of the input records. i.e. the value must either
be preceded by a non-alphanumeric character or begin at the start column
bound, and either precede a non-alphanumeric character or finish in the end
column bound.
Prefix
The search value may only be found if it occurs at the start of a word and
falls within the specified column bounds of the input records. i.e. the value
must either be preceded by a non-alphanumeric character or begin at the
start column bound, and be followed by an alphanumeric character.
Suffix
The search value may only be found if it occurs at the end of a word and falls
within the specified column bounds of the input records. i.e. the value must
be preceded by an alphanumeric character and must either precede a
non-alphanumeric character or finish in the end column bound.
These option fields correspond to SDE CHANGE parameters PREFIX, SUFFIX and WORD.
To>
Specify the CHANGE operation replace value. This may be specified in any of the formats described for
the search value above.
For a replace value specified as a quoted picture string, see the CHANGE command for details on
supported replace value picture string special characters.
If the CHANGE operation search value was specified as a regular expression involving tagged
sub-expressions, then the replace string may contain tag references to these tagged sub-expressions.
Source>
Identifies the format of the record source character data:
DATA
Indicates that records are to be treated as data so that inserting the replace value performs no
special treatment of any multiple, consecutive blanks that occur to the right of the replaced
data.
If the length of the replace value is greater than that of the search value, all data to the right of
the replaced data will be shifted right.
If the length of the replace value is less than that of the search value, all data to the right of the
replaced data will be shifted left.
TEXT
Indicates that records are to be treated as formatted character text so that, in an effort to
maintain the record positions of non-blank text to the right of the changed text, when inserting
the replacement text, consecutive blanks that occur to the right of this text are absorbed or
added as approriate.
If the length of the replace value is greater than that of the search value, consecutive balnks to
the right of the replaced text will be absorbed before non-blank text is shifted right. Note that
blank delimitation of non-blank text is preserved.
If the length of the replace value is less than that of the search value, then blanks will be
inserted immediately before the first blank character occurring to the right of the replaced text.
The number of blanks inserted will be equal to the difference between the lengths of the search
and replace values.
Occurs>
Identifies the occurrence of the search value within the input record to which the CHANGE operation will
apply:
ALL
Attempt to change all occurrences of the search value found within the input record.
FIRST
Attempt to change only the first occurrence of the search value found within the input record.
LAST
Attempt to change only the last occurrence of the search value found within the input record.
File Update:
2013-11-13 13:06:41
SELCOPY/i Reference and User Guide
120
File Search/Update/Copy/Remap
FSU (formatted): Change record data using the CHANGE command
Applicable only to File Change and Update, this option indicates whether or not the input files are to be updated when the
utility is executed.
If this option is set to "Yes", the utility will indicate perform the update in place of changed record data in the input files.
Note that, before the panel executes the utility, a pop-up message box will warn the user of the impending record updates
and allow the operation to be cancelled. To recover record updates, please see the File Update Undo (FSUUNDO) utility.
If this option is set to "No", the utility report output will indicate which input records would be updated without actually
performing the file update. It is recommended that this is option is seleceted first in order to review the utility report before
performing the actual update operation.
Search Records First:
If record vetting is to be performed on selected records prior to attempting the CHANGE operations, select one or both of
the record search methods to be used.
Execute WHERE expression
If this option is selected, the FSU unformatted Search records using a WHERE expression panel will be
displayed next.
Execute FIND Command(s)
If this option is selected, the FSU unformatted Search records using the FIND command panel will be displayed
next.
If both options are selected, the Execute WHERE expression panel will be displayed first.
FSU (formatted): Change record data using the CHANGE command
The FSU (formatted): Change record data using the CHANGE command panel view is displayed only if the option to change
data in formatted records has been requested.
The specified CHANGE commands will operate on the formatted data belonging only to records that are assigned the nominated
record-type. The search and replace values apply to individual fields and are sensitive to field data-type. If column bounds are
specified, these must correspond to field names within the formatted input record.
If record data is also being remapped, then the CHANGE operations will apply to the data in the remapped output record, i.e. not
the source input data record.
Figure 46. FSU (formatted): Change record data using the CHANGE command.
Menu Bar Items
File
The File drop-down menu contains the single item "Exit" which simply closes the panel window. Note that, unlike
CANCEL, CLOSE will save field values that have been entered in the panel views so far. These values may be
redisplayed the next time the panel is opened.
Help
Display help for this panel view.
2013-11-13 13:06:41
SELCOPY/i Reference and User Guide
121
File Search/Update/Copy/Remap
Panel Fields
Panel Fields
Change Command Specification
Choose between 2 mutually exclusive options which identify the method by which CHANGE command(s) are to be
specified:
Specify Multiple CHANGE commands:
Select this option to open the Multiple Change Commands (formatted) panel to enter more than one CHANGE
command operating on the formatted record data.
The search values are compared with the individual formatted fields within the record data, any specified column
bounds are expressed as field names and replace values are converted into a data type that matches that of the
source field. All generated CHANGE operations are applied to an input record and logical operator AND or OR is
specified to indicate whether all CHANGE operations or only the first successful CHANGE operation is to
applied to the record data.
If this option is selected, <PF5> or <Enter> will display the Multiple Change Commands panel. When a list of
CHANGE commands has been entered and closed, <PF5>, may be used to redisplay the panel.
Specify Single CHANGE command:
Select this option if only one CHANGE command is required. The fields that follow together constitiute an edit
CHANGE command used to search for then replace a string value within formatted input file records.
Op>
Identify the relational operator used when comparing the field data against the CHANGE search value.
If testing for a non-equality relationship using a character string search value, then the EBCDIC values
assigned to characters in the search string and record data determine the relationship. (e.g. GT, LT)
Enter "/" to display a list of valid entries and a brief description.
From>
Specify the CHANGE operation search value. This may be one of the following:
1. Applicable to fields of any data type, an unquoted numeric value. For numeric fields, the
numeric search value and source field data are converted so that they are of the same data
type prior to performing an arithmetic comparison.
2. Applicable only to character fields, a quoted character string (case insensitive search). e.g.
'John Doe' is the same as 'JOHN DOE'.
3. Applicable only to character fields, a quoted character string prefixed with "C" (case sensitive
search). e.g. C'John Doe'.
4. Applicable only to character fields, a quoted hexadecimal string prefixed with "X". e.g. X'00'.
5. Applicable only to character fields, a quoted picture string prefixed with "P". e.g. P'USER###'.
See the CHANGE command for details on supported search value picture string special
characters.
6. Applicable only to character fields, a quoted unix-style "Regular Expression" string prefixed
with "R". e.g. R'[Pp][Ff](:d#)'
See Regular Expressions for details on supported regular expression string special characters.
Bounds>
Optionally activate the Bounds> input fields to specify the named record columns (fields) between
which the CHANGE operation will occur.
If not activated, the operation will include all columns within the length of the input records. If an in-place
update is to be performed, the replace string must not result in a change to the record length. However,
if records are to be copied/remapped the replace string may extend the length of the record to a value
not greater than the defined maximum output record length.
Start Column
Specifies the start (or only) record field from which the scan for the CHANGE operation search
string will begin. Record data in fields that occur before this start column value is not included.
This field corresponds to SDE CHANGE parameter field_col/field_col1.
End Column
Specifies the end record data field column. Only record data between the start and end
columns will be searched and potentially replaced.
If no end column is specified then only the start column field is searched.
This field corresponds to SDE CHANGE parameter filed_col2.
2013-11-13 13:06:41
SELCOPY/i Reference and User Guide
122
File Search/Update/Copy/Remap
Panel Fields
As>
Applicable only to character fields (data-type "AN"), enter "/" in the appropriate radio button field to apply
restrictions to the position of the search value within the field as follow:
Unrestricted
Word
The search value may be found anywhere within the character field.
The search value may only be found if it is complete word within the
character field. i.e. the value must either be preceded by a non-alphanumeric
character or begin at the first character of the field, and either precede a
non-alphanumeric character or finish in the last character of the field.
Prefix
The search value may only be found if it occurs at the start of a word within
the character field. i.e. the value must either be preceded by a
non-alphanumeric character or begin at the first character of the field, and be
followed by an alphanumeric character.
Suffix
The search value may only be found if it occurs at the end of a word within
the character field. i.e. the value must be preceded by an alphanumeric
character and must either precede a non-alphanumeric character or finish in
the last character of the field,
These option fields correspond to SDE CHANGE parameters PREFIX, SUFFIX and WORD.
To>
Specify the CHANGE operation replace value. This may be specified in any of the formats described for
the search value above. For numeric fields, the replace value will be converted into the appropriate
source data format.
For a replace value specified as a quoted picture string, see the CHANGE command for details on
supported replace value picture string special characters.
If the CHANGE operation search value was specified as a regular expression involving tagged
sub-expressions, then the replace string may contain tag references to these tagged sub-expressions.
Source>
For character fields only, these options identify the format of the source character data:
DATA
Indicates that character fields are to be treated as data so that inserting the replace value
performs no special treatment of any multiple, consecutive blanks that occur to the right of the
replaced data.
If the length of the replace value is greater than that of the search value, all data to the right of
the replaced data will be shifted right.
If the length of the replace value is less than that of the search value, all data to the right of the
replaced data will be shifted left.
TEXT
Indicates that character fields are to be treated as formatted character text so that, in an effort
to maintain the position of non-blank text which appear to the right of the changed text, when
inserting the replacement text, consecutive blanks that occur to the right of this text are
absorbed or added as approriate.
If the length of the replace value is greater than that of the search value, consecutive balnks to
the right of the replaced text will be absorbed before non-blank text is shifted right. Note that
blank delimitation of non-blank text is preserved.
If the length of the replace value is less than that of the search value, then blanks will be
inserted immediately before the first blank character occurring to the right of the replaced text.
The number of blanks inserted will be equal to the difference between the lengths of the search
and replace values.
Occurs>
Identifies the occurrence of the search value within the input record to which the CHANGE operation will
apply:
ALL
Attempt to change all occurrences of the search value found within the input record fields.
FIRST
Attempt to change only the first occurrence of the search value found within the input record
fields
LAST
Attempt to change only the last occurrence of the search value found within the input record
fields
2013-11-13 13:06:41
SELCOPY/i Reference and User Guide
123
File Search/Update/Copy/Remap
FSU: Copy Selected records to an Output File
File Update:
Applicable only to File Change and Update, this option indicates whether or not the input files are to be updated when the
utility is executed.
If this option is set to "Yes", the utility will indicate perform the update in place of changed record data in the input files.
Note that, before the panel executes the utility, a pop-up message box will warn the user of the impending record updates
and allow the operation to be cancelled. To recover record updates, please see the File Update Undo (FSUUNDO) utility.
If this option is set to "No", the utility report output will indicate which input records would be updated without actually
performing the file update. It is recommended that this is option is seleceted first in order to review the utility report before
performing the actual update operation.
Search Records First:
If record vetting is to be performed on selected records prior to attempting the CHANGE operations, select one or both of
the record search methods to be used.
Execute WHERE expression
If this option is selected, the FSU formatted Search records using a WHERE expression panel will be displayed
next.
Execute FIND Command(s)
If this option is selected, the FSU formatted Search records using the FIND command panel will be displayed
next.
If both options are selected, the Execute WHERE expression panel will be displayed first.
FSU: Copy Selected records to an Output File
The FSU: Copy Selected records to an Output File panel view is displayed following specification of any WHERE, FIND and
CHANGE operation parameters and when records are to be copied to a single output file. The output file may be a sequential,
VSAM or GDG data set, an HFS file, or a PDS/PDSE library member.
Figure 47. FSU: Copy Selected records to an Output File.
Menu Bar Items
File
The File drop-down menu contains the single item "Exit" which simply closes the panel window. Note that, unlike
CANCEL, CLOSE will save field values that have been entered in the panel views so far. These values may be
redisplayed the next time the panel is opened.
Help
Display help for this panel view.
Panel Fields
PDS/PDSE member, Sequential, VSAM or HFS path:
Input fields which together identify a single output sequential or VSAM data set, HFS file or PDS/PDSE library member.
2013-11-13 13:06:41
SELCOPY/i Reference and User Guide
124
File Search/Update/Copy/Remap
Panel Fields
Name>
Identifies the fully qualified data set name or an absolute or relative HFS file path.
A selectable list of data sets or HFS files will be presented if the entered value contains wildcards characters "*"
(asterisk) or "%" (percent).
If a DSN is specified for a data set that does not already exist, the Allocate non-VSAM data set dialog will be
opened to allocate the new output file.
Member>
If the Name> field contains the DSN of a PDS/PDSE library, then this field specifies the name of a new or
existing member within that library.
A selectable list of members will be presented if the entered value contains wildcards characters "*" (asterisk) or
"%" (percent), or is blanked out.
Volume>
Specifies the name of the output data set volume. This is required only if output is to an uncataloged data set.
Strip/Pad Char>
Specifies a single byte pad or strip character implemeted as follows:
1. When copying fixed length records to variable length, contiguous trailing characters at the end of each record
that match the specified character char are to be stripped.
Default is not to strip trailing characters.
2. When copying variable length records to fixed length, records are to be padded with the specified character char.
Default is to pad with the blank character (X'40').
The strip/pad character char may be specified in character, hexadecimal or binary string notation of length 1 byte. (e.g. 'A',
C'a', X'40', B'11110001'.)
Output Options:
Miscellaneous options for output to a single file.
Append output records to existing file data.
Append copied records to existing data in the output file.
Delimit library members written to the output file.
Applicable only when copying members from a PDS/PDSE library to the output file. This option causes a
delimiter record to be written before the data belonging to each member copied.
Enter blank to select from a list of available options, each describing the format of the delimiter record to be
inserted.
Option
0
1
2
Delimiter Record Format
No delimiter record (Default).
"./ ADD NAME=<member>"
"*>>>>>> DSN=lib.name(member) <<<<<<*"
FSU: Remap Fields in Selected records to an Output File
The FSU: Remap Fields in Selected records to an Output File panel view is displayed following specification of any WHERE,
FIND and CHANGE operation parameters and when fields in formatted records are to be remapped to records in a single output
file. The output file may be a sequential, VSAM or GDG data set, an HFS file, or a PDS/PDSE library member.
Specification of an output structure is mandatory so that fields of matching field name belonging to record-type definitions of
matching record-type name within the input and output structures can be remapped.
A record-type field definition in the input structure that corresponds to an equally named record-type and field definition in the
output structure may be of different source data types and may be located at different offsets within the record.
2013-11-13 13:06:41
SELCOPY/i Reference and User Guide
125
File Search/Update/Copy/Remap
FSU: Remap Fields in Selected records to an Output File
Figure 48. FSU: Remap Fields in Selected records to an Output File.
Menu Bar Items
File
The File drop-down menu contains the single item "Exit" which simply closes the panel window. Note that, unlike
CANCEL, CLOSE will save field values that have been entered in the panel views so far. These values may be
redisplayed the next time the panel is opened.
Help
Display help for this panel view.
Panel Fields
PDS/PDSE member, Sequential, VSAM or HFS path:
Input fields which together identify a single output sequential or VSAM data set, HFS file or PDS/PDSE library member.
Name>
Identifies the fully qualified data set name or an absolute or relative HFS file path.
A selectable list of data sets or HFS files will be presented if the entered value contains wildcards characters "*"
(asterisk) or "%" (percent).
If a DSN is specified for a data set that does not already exist, the Allocate non-VSAM data set dialog will be
opened to allocate the new output file.
Member>
If the Name> field contains the DSN of a PDS/PDSE library, then this field specifies the name of a new or
existing member within that library.
A selectable list of members will be presented if the entered value contains wildcards characters "*" (asterisk) or
"%" (percent), or is blanked out.
Volume>
Specifies the name of the output data set volume. This is required only if output is to an uncataloged data set.
Output Structure/Copybook File for Record Remap:
Mandatory input fields which together specify a cataloged structure file (COBOL or PL1 Copybook, ADATA file or a
SELCOPY/i SDO.) The structure may be a sequential data set or a PDS/PDSE library member.
Record-type mappings defined in this structure, which have the same name as record-types defined in the input structure,
will be used to remap field data in records to which they are assigned.
Dsn>
Identifies the fully qualified data set name of an existing sequential data set or PDS/PDSE library containing a
COBOL or PL1 Copybook, ADATA file or SDO structure.
A selectable list of data sets will be presented if the entered value contains wildcards characters "*" (asterisk) or
"%" (percent).
2013-11-13 13:06:41
SELCOPY/i Reference and User Guide
126
File Search/Update/Copy/Remap
Panel Fields
Member>
If the Dsn> field contains the DSN of a PDS/PDSE library, then this field must reference a member name within
that library which contains a record filter.
A selectable list of members will be presented if the entered value contains wildcards characters "*" (asterisk) or
"%" (percent), or is blanked out.
Type>
Indicate the type of structure (COBOL, PL1, ADATA or SDO).
Recompile> Y/N
If Structure/Copybook overlay refers to a COBOL, PL1 or ADATA source file (not an SDO) then a compile step must be
performed in order to turn the source copybook into SELCOPYi's own internal structure (SDO) format. A temporary SDO
will be created, lasting the duration of the SELCOPYi session, making subsequent reference to the same copybook during
the session much faster.
If, however, the copybook (or any of its included components) is modified during the session, then a recompile of the
source will normally be required.
For performance reasons N (meaning no recompile should occur) is the default.
Specify Y to force a copybook recompile each time the process is run. Alternatively type the primary command:
SD DROP <copybook_name>
Strip/Pad Char>
Specifies a single byte pad or strip character implemeted as follows:
1. When copying fixed length records to variable length, contiguous trailing characters at the end of each record
that match the specified character char are to be stripped.
Default is not to strip trailing characters.
2. When copying variable length records to fixed length, records are to be padded with the specified character char.
Default is to pad with the blank character (X'40').
The strip/pad character char may be specified in character, hexadecimal or binary string notation of length 1 byte. (e.g. 'A',
C'a', X'40', B'11110001'.)
Output Options:
Miscellaneous options for output to a single file.
Append output records to existing file data.
Append copied records to existing data in the output file.
Delimit library members written to the output file.
Applicable only when copying members from a PDS/PDSE library to the output file. This option causes a
delimiter record to be written before the data belonging to each member copied.
Enter blank to select from a list of available options, each describing the format of the delimiter record to be
inserted.
Option
0
1
2
Delimiter Record Format
No delimiter record (Default).
"./ ADD NAME=<member>"
"*>>>>>> DSN=lib.name(member) <<<<<<*"
FSU: Copy Selected records to Output Library Members
The FSU: Copy Selected records to Output Library Members panel view is displayed following specification of any WHERE,
FIND and CHANGE operation parameters and when input members are to be copied to members of the same name in an output
PDS/PDSE library. i.e. Library Copy.
2013-11-13 13:06:41
SELCOPY/i Reference and User Guide
127
File Search/Update/Copy/Remap
FSU: Copy Selected records to Output Library Members
Figure 49. FSU: Copy Selected records to Output Library Members.
Menu Bar Items
File
The File drop-down menu contains the single item "Exit" which simply closes the panel window. Note that, unlike
CANCEL, CLOSE will save field values that have been entered in the panel views so far. These values may be
redisplayed the next time the panel is opened.
Help
Display help for this panel view.
Panel Fields
PDS/PDSE library data set:
Input fields which together identify a single output PDS/PDSE library to which input library members will be copied.
Name>
Identifies the fully qualified data set name of a new or existing PDS/PDSE library.
A selectable list of data sets will be presented if the entered value contains wildcards characters "*" (asterisk) or
"%" (percent).
If the Allocate the new output library modelled on the prime input library option is not set and the DSN specified
is for a data set that does not already exist, then the Allocate non-VSAM data set dialog will be opened to
allocate the new output library.
Volume>
Specifies the name of the output data set volume. This is required only if output is to an uncataloged library data
set.
Strip/Pad Char>
Specifies a single byte pad or strip character implemeted as follows:
1. When copying fixed length records to variable length, contiguous trailing characters at the end of each record
that match the specified character char are to be stripped.
Default is not to strip trailing characters.
2. When copying variable length records to fixed length, records are to be padded with the specified character char.
Default is to pad with the blank character (X'40').
The strip/pad character char may be specified in character, hexadecimal or binary string notation of length 1 byte. (e.g. 'A',
C'a', X'40', B'11110001'.)
Output Options:
Miscellaneous options for output library members.
Allocate the new output library modelled on the prime input library
2013-11-13 13:06:41
SELCOPY/i Reference and User Guide
128
File Search/Update/Copy/Remap
Panel Fields
If the output library does not already exist, allocate it modelled on the input library.
If members are copied from more than one library, then the output library will be modelled on the first input library
read
Replace output library members with input members of the same name.
If an existing member in the output library has the same name as a member to be copied from an input library, it
will be overwritten. In the case where members of the same name are copied from multiple input libaries, then
the output library will contain the member copied last.
FSU: Remap Fields in Selected records to Output Library Members
The FSU: Remap Fields in Selected records to Output Library Members panel view is displayed following specification of any
WHERE, FIND and CHANGE operation parameters and when fields in formatted library member records are to be remapped to
records in members of the same name in an output PDS/PDSE library. i.e. Library Remap.
Specification of an output structure is mandatory so that fields of matching field name belonging to record-type definitions of
matching record-type name within the input and output structures can be remapped.
A record-type field definition in the input structure that corresponds to an equally named record-type and field definition in the
output structure may be of different source data types and may be located at different offsets within the record.
Figure 50. FSU: Remap Fields in Selected records to Output Library Members.
Menu Bar Items
File
The File drop-down menu contains the single item "Exit" which simply closes the panel window. Note that, unlike
CANCEL, CLOSE will save field values that have been entered in the panel views so far. These values may be
redisplayed the next time the panel is opened.
Help
Display help for this panel view.
Panel Fields
PDS/PDSE library data set:
Input fields which together identify a single output PDS/PDSE library to which records from input library members will be
remapped.
Name>
Identifies the fully qualified data set name of a new or existing PDS/PDSE library.
A selectable list of data sets will be presented if the entered value contains wildcards characters "*" (asterisk) or
"%" (percent).
If the Allocate the new output library modelled on the prime input library option is not set and the DSN specified
is for a data set that does not already exist, then the Allocate non-VSAM data set dialog will be opened to
allocate the new output library.
2013-11-13 13:06:41
SELCOPY/i Reference and User Guide
129
File Search/Update/Copy/Remap
Panel Fields
Volume>
Specifies the name of the output data set volume. This is required only if output is to an uncataloged library data
set.
Output Structure/Copybook File for Record Remap:
Mandatory input fields which together specify a cataloged structure file (COBOL or PL1 Copybook, ADATA file or a
SELCOPY/i SDO.) The structure may be a sequential data set or a PDS/PDSE library member.
Record-type mappings defined in this structure, which have the same name as record-types defined in the input structure,
will be used to remap field data in records to which they are assigned.
Dsn>
Identifies the fully qualified data set name of an existing sequential data set or PDS/PDSE library containing a
COBOL or PL1 Copybook, ADATA file or SDO structure.
A selectable list of data sets will be presented if the entered value contains wildcards characters "*" (asterisk) or
"%" (percent).
Member>
If the Dsn> field contains the DSN of a PDS/PDSE library, then this field must reference a member name within
that library which contains a record filter.
A selectable list of members will be presented if the entered value contains wildcards characters "*" (asterisk) or
"%" (percent), or is blanked out.
Type>
Indicate the type of structure (COBOL, PL1, ADATA or SDO).
Recompile> Y/N
If Structure/Copybook overlay refers to a COBOL, PL1 or ADATA source file (not an SDO) then a compile step must be
performed in order to turn the source copybook into SELCOPYi's own internal structure (SDO) format. A temporary SDO
will be created, lasting the duration of the SELCOPYi session, making subsequent reference to the same copybook during
the session much faster.
If, however, the copybook (or any of its included components) is modified during the session, then a recompile of the
source will normally be required.
For performance reasons N (meaning no recompile should occur) is the default.
Specify Y to force a copybook recompile each time the process is run. Alternatively type the primary command:
SD DROP <copybook_name>
Strip/Pad Char>
Specifies a single byte pad or strip character implemeted as follows:
1. When copying fixed length records to variable length, contiguous trailing characters at the end of each record
that match the specified character char are to be stripped.
Default is not to strip trailing characters.
2. When copying variable length records to fixed length, records are to be padded with the specified character char.
Default is to pad with the blank character (X'40').
The strip/pad character char may be specified in character, hexadecimal or binary string notation of length 1 byte. (e.g. 'A',
C'a', X'40', B'11110001'.)
Output Options:
Miscellaneous options for output library members.
Allocate the new output library modelled on the prime input library
If the output library does not already exist, allocate it modelled on the input library.
If members are copied from more than one library, then the output library will be modelled on the first input library
read
Replace output library members with input members of the same name.
If an existing member in the output library has the same name as a member to be copied from an input library, it
will be overwritten. In the case where members of the same name are copied from multiple input libaries, then
the output library will contain the member copied last.
2013-11-13 13:06:41
SELCOPY/i Reference and User Guide
130
File Search/Update/Copy/Remap
FSU: Report File
FSU: Report File
The FSU: Report File panel view is the last view displayed in the sequence. It provides the opportunity to optionally suppress
generation of the utility output report, suppress automatic display of the output report following execution and to select the
destination of the output report.
The FSU report is a structured data file designed to be browsed (not printed) using a SELCOPY/i structure definition object (SDO),
which is also generated by the utility.
The associated SDO fileid is constructed simply by adding '.SDO' to the DSN of the sequential or PDS/PDSE DSN used for the
report output. The report DSN is therefore restricted to 40 bytes in length. e.g. If fileid is
ZX1234.SELCOPYI.FSU.REPORT(XYZ001), the allocated SDO is ZX1234.SELCOPYI.FSU.REPORT.SDO(XYZ001).
Pressing <Enter> in this panel will execute the generated FSU command in the foreground.
Figure 51. FSU: Report File.
Menu Bar Items
File
The File drop-down menu contains the single item "Exit" which simply closes the panel window. Note that, unlike
CANCEL, CLOSE will save field values that have been entered in the panel views so far. These values may be
redisplayed the next time the panel is opened.
Help
Display help for this panel view.
JCL
Generate a JCL job stream that executes the SDEAMAIN program with input (SDEIN) containing the FSU command
generated for the specified panel field values.
The job stream is displayed in a temporary text edit view and may be submitted to batch using the SUBMIT command.
Command
Generate the FSU command line syntax for field entries specified by the user and display it in a temporary CMX file text
edit view. This command may be executed using ACTION point-and-shoot execution <F16> or copied into the user's
HOME file and saved for future execution.
Panel Fields
Report Output Specification
Choose between 3 mutually exclusive options which identify how the output report is to be created:
Generate temporary report output.
Select this option to write report output and its accompanying SDO to temporary, in-storage files of DSN
"user.FSU.Dyyyyddd.Thhmmss" and "user.FSU.Dyyyyddd.Thhmmss.SDO" respectively.
Neither file is written to DASD volume unless the user elects to do so on exit of the report using FSUEND.
Write report output to library member or sequential data set:
2013-11-13 13:06:41
SELCOPY/i Reference and User Guide
131
File Search/Update/Copy/Remap
Panel Fields
Select this option to write report output and its accompanying SDO to a sequential DASD data set or PDS/PDSE
library member. This option should be used if generating JCL for batch SDEAMAIN execution.
If the specified report file and/or its accompanying SDO file do not already exist, then they will automatically be
allocated by FSU relying on SMS ACS to select a suitable storage group of eligable DASD volumes. The report
file is allocated using DCB geometry RECFM=VB, LRECL=32756, BLKSIZE=0 and a space allocation of
TRACKS(150,75). The SDO file is allocated using DCB geometry RECFM=VB, LRECL=16380, BLKSIZE=0 and
a space allocation of TRACKS(2,2).
Input fields which together identify a single output sequential data set or PDS/PDSE library member.
Name>
Identifies the fully qualified data set name of length no longer than 40 characters.
A selectable list of data sets or HFS files will be presented if the entered value contains wildcards
characters "*" (asterisk) or "%" (percent).
Member>
If the Name> field contains the DSN of a PDS/PDSE library, then this field specifies the name of a new
or existing member within that library.
A selectable list of members will be presented if the entered value contains wildcards characters "*"
(asterisk) or "%" (percent), or is blanked out.
Volume>
Specifies the name of the report output data set volume. This is required only if output is to an
uncataloged data set.
Suppress generation of report output.
Select this option to suppress generation of report output. This may only be of practical use when performing a
copy or remap task without changing data.
Report Options:
Miscellaneous options for report output.
Limit>
The maximum number of hits (records hit) to report per file, or library member.
Specify a value of zero (0) to report all hits.
Efficiency gains may be achieved by specifying Limit=1 where it is required only to establish whether or not each
member contains a particular string, since once the first hit is reported further processing for that member will be
bypassed.
Suppress display of the output report following execution.
This option suppresses display of the report during and after execution and should not be used if report output is
to a temporary, in-storage file.
File Selection Panels
Multiple Fileid Masks
The Multiple Fileid Masks panel view (ZZSGFSU3) is displayed when an option is taken to specify multiple fileids or fileid masks
for the File Search/Update/Copy/Remap (FSU) utility.
This panel is an interactive panel window (window class WINWIPO0) and includes an embedded table.
Standard table edit primary and line commands must be used to insert, delete or exclude table rows as appropriate. The table
entries each identify a fileid mask which may identify one or more sequential or VSAM data sets, HFS file paths and/or PDS/PDSE
library members.
For each table entry, the Select Files to Process panel may be displayed containing a list of selectable fileids that match the
selected fileid mask. Furthermore, for each PDS/PDSE library entry in the Select Files to Process list, the Select Input Members
panel may then be opened to select from a list of matching member names belonging to that library.
Having displayed the Select Files to Process panel for a fileid mask, a list of the selected, individual fileids will be passed to the
utilty instead of the generic fileid mask.
On completing entries in this panel view, press <PF3> to close the panel and return to the utility panel view.
2013-11-13 13:06:41
SELCOPY/i Reference and User Guide
132
File Search/Update/Copy/Remap
Table View
Table View
The panel initially displays the embedded table with column names Sel, DSN/HFS Mask, Member Mask and Volume Mask.
Place the cursor on the required table entry and press the <Enter> key or, if configured, double-click the left mouse button to
display the Select Files to Process panel.
If the input column area is not large enough to accomodate the required entry value, display the table row in zoomed format and
expand the field entries as required. To display a table row in single row (zoomed) format, place the cursor on the required table
entry and press <PF2>.
Figure 52. Multiple Fileid Masks.
Single Row (Zoomed) View
This panel displays the table column entries for an individual table row as panel input fields. Input fields may be expanded, by
placing the cursor in the required field and pressing <PF2>, in order to enter values that exceed the width of the input field area.
Press <PF5> to display the Select Files to Process panel from this panel.
Press <PF3> to return to the table view.
Figure 53. Enter Fileid Mask (Zoomed View).
Input Values
Fields which together constitiute a fileid mask that identifies one or more files to be processed by the utility.
Sel>
Corresponds to zoomed panel option "Select this File Mask for Processing>". Enter "S" (or any non-blank value) in this
field to select the entry for processing. If left blank, processing for the fileid mask identified by this table entry is bypassed.
2013-11-13 13:06:41
SELCOPY/i Reference and User Guide
133
File Search/Update/Copy/Remap
Input Values
DSN/HFS Path Mask>
An unquoted entry which identifies DSN mask, a completed Fileid mask, a DDName mask or an HFS file path mask. An
entry in this input field is mandatory.
◊ HFS file path mask
Identified by the presence of "." (dot/period) as the first character or "/" (slash) anywhere within the mask, an HFS
file path mask may be absolute or relative to the current HFS working directory. See USS PWD in Unix System
Services (USS) Commands. "./" should prefix the mask if files in the current HFS directory are to be selected.
Wild card characters "%" (percent), representing a single characters, and "*" (asterisk), representing zero or more
characters, are supported in the name portion of the HFS file path mask. The name portion of the HFS path is the
character string at the end of the path that follows the last "/" (slash) of the fileid or is the entire path name if "/" is
not specified.
If an HFS file path mask is specified, the contents of the Volume Mask> and Member Mask> fields will be
ignored and HFS Options> settings respected.
◊ DDName mask
If the value entered is not an HFS file path mask, is of length less than or equal to 8 characters and does not
include "." (dot/period), and no Volume mask has been specified, then the value is considered to be a DDName
mask. A DDName mask may be used to process non-HFS files that are currently allocated to DDNames that
match the DDName mask. (e.g. SYSEXEC)
Wild card characters "%" (percent), representing a single characters, and "*" (asterisk), representing zero or more
characters, are supported in a DDName mask.
If a DDName mask is specified, the enties in the Member Mask> field may still be used to select matching
member names belonging to PDS/PDSE library data sets allocated to matching DDNames. HFS Options>
settings are ignored.
◊ Completed Fileid mask
If the value entered is not an HFS file path mask but includes a volume mask specification and/or a member
mask specification, then the value is considered to be a completed Fileid mask.
A completed fileid mask is a DSN mask with a volume mask and/or one or more PDS/PDSE member name
masks expressed in the following format:
{volmask:}data.set.name.mask{( membmask{ {,} membmask...} )}
Specification of one or more member masks between a single pair of "( )" (parentheses) will restrict processing to
only PDS/PDSE library data sets. Multiple PDS/PDSE member masks must be separated by a "," (commma)
and/or one or more intervening blanks.
Specification of a 1 to 6 character volume mask prefix followed by ":" (colon) restricts processing to only
cataloged or uncataloged data sets that have extents on matching volume ids.
The fileid mask supports wild card characters as described for Volume Mask> and Member Mask> fields and for
a DSN Mask below.
Fileid Mask Examples:
PE1.DEV.SRC.COBOL.CRKSW00(*)
SYS6.JNP*.**
OEM.TEST%%.**.CBLI.**(BOX*,D%T*,*ALL)
Z9RES1:ADCD.**
Z9RES*:ADCD.Z19.P%%%LIB(*)
◊ DSN mask
If the value entered does not meet the criteria described above for an HFS file path mask, completed Fileid mask
or a DDName mask, then the value is considered to be a DSN mask.
The DSN mask is joined with any member and volume mask specified in the Volume Mask> and Member Mask>
fields respectively to identify a single fileid mask.
The following wild card characters are supported within a DSN Mask:
*
**
%
A single asterisk represents a DSN qualifier or zero or more characters within a DSN qualifier.
e.g. DEV.CBLINS.*.JCL, DEV.CBLINS.TEST*.ISP*LIB, DEV.CBLINS.*.*
Double asterisk represents zero or more qualifiers within a DSN. Double asterisk may only be preceded or
followed by the qualifier separator, "." (dot/period).
e.g. DEV.CBLINS.**, DEV.CBLINS.**.CBLE
A single percent sign represents exactly one character within a DSN qualifier.
e.g. DEV.CBLINS.TEST0%.JCL, DEV.CBLI%%.TEST06.CBLI.%%%
Note that a TSO prefix is not applied to a DSN mask.
2013-11-13 13:06:41
SELCOPY/i Reference and User Guide
134
File Search/Update/Copy/Remap
Select Files to Process
Volume Mask>
Optionally specify a volume name mask of maximum length 6-bytes.
Processing will be restricted to only those cataloged or uncataloged data sets that match the DSN mask and also have
extents that exist on a volume that matches the volume mask.
The volume mask supports wild card characters as follow:
*
%
A single asterisk represents a complete volume name or zero or more characters within a volume name.
e.g. CBL*, *RES*
A single percent sign represents exactly one character within the volume mask.
e.g. Z9DB9%, %%XV3%
This field entry is ignored if the DSN/Path Mask> field does not contain a DSN mask.
Member Mask>
Optionally specify one or more PDS/PDSE member name masks separated by a "," (comma) and/or one or more
intervening blanks.
e.g. BLOCK, PROFILE
BOXSEQ
If a member mask is specified, then only PDS/PDSE libraries that match the fileid mask will be selected for processing.
Non-PDS/PDSE library data sets will be excluded.
If a member mask is not specified, then all files that match the fileid mask will be selected for processing and a default
member name mask of "*" will apply to all PDS/PDSE libraries included in this selection.
Processing will be restricted to only those PDS/PDSE data sets that match the DSN mask and only members with a
member name that matches any one of the supplied member masks.
A member mask supports wild card characters as follow:
*
%
A single asterisk represents an entire member name or zero or more characters within a member name.
e.g. CBL*5, BOX*, D*T*
A single percent sign represents exactly one character within a member name mask.
e.g. H%, D%R*, E%A
This field entry is ignored if the DSN/Path Mask> field does not contain a DSN mask or a DDNAme mask.
Select Files to Process
The Select Files to Process panel view (ZZSGFSU1) is displayed when a user elects to display the individual sequential, VSAM
or PDS/PDSE library data sets or HFS files selected by a specific fileid mask.
This panel is an interactive panel window (window class WINWIPO0) and includes an embedded table.
Standard table edit primary and line commands may be used to delete or exclude table rows as appropriate. Alternatively,
select/deselect entries for processing by inserting/removing "S" from the Sel column. The table entries each identify the fileid of a
sequential or VSAM data sets, HFS file paths or PDS/PDSE library.
For each PDS/PDSE library table entry, the Select Input Members panel may be opened to select from a list of members that
match the member name mask entered in the Member Mask column.
Having displayed the Select Input Members panel for a library member mask, a list of the selected, individual member names will
be passed to the utilty instead of the generic library member mask.
On completing entries in this panel view, press <PF3> to close the panel and return to the utility panel view.
Table View
The panel initially displays the embedded table with column names Sel, FileName, Member Mask, Volume, Org, VSAM, GDG,
RecFm, Lrecl, BlkSz and Select Members. Scroll left/right (using <PF10> and <PF11> respectively) to view columns that are not
in view.
Only columns Sel and Member Mask are enterable. All other column entries are included for information only.
For library entries (identified as having and entry in the Member Mask column) place the cursor on the required table entry and
press the <Enter> key or, if configured, double-click the left mouse button to display the Select Input Members panel for the
specified member mask(s).
If the input member mask column area is not large enough to accomodate the required entry value, display the table row in zoomed
format and expand the field entry as required. To display a table row in single row (zoomed) format, place the cursor on the
required table entry and press <PF2>.
2013-11-13 13:06:41
SELCOPY/i Reference and User Guide
135
File Search/Update/Copy/Remap
Table View
Press <PF6> to select or deselect all table entries.
Figure 54. Select Files to Process.
Single Row (Zoomed) View
This panel view displays the table column entries for an individual table row as panel input fields. Input fields may be expanded, by
placing the cursor in the required field and pressing <PF2>, in order to enter values that exceed the width of the input field area.
Press <PF5> to display the Select Input Members panel from this panel.
Press <PF3> to return to the table view.
Figure 55. Select Files to Process (Zoomed View).
Input Values
Fields which identify the file to be processed by the utility.
Sel>
Corresponds to zoomed panel option "Select File for Processing>". Enter "S" (or any non-blank value) in this field to select
the entry for processing. If left blank, processing for the fileid identified by this table entry is bypassed.
File Name:
A non-enterable field identifying the DSN of a sequential, VSAM or PDS/PDSE library data set or an HFS file path
selected by the supplied fileid mask.
Volume:
Contains a value only if the specified fileid mask includes a volume mask.
2013-11-13 13:06:41
SELCOPY/i Reference and User Guide
136
File Search/Update/Copy/Remap
Input Values
This is a non-enterable field identifying the volume id of the primary volume on which the file extents exist.
Member Mask:
An enterable field in which one or more PDS/PDSE member name masks, separated by a "," (comma) and/or one or more
intervening blanks, may be entered. By default, this field contains the member mask supplied in the fileid mask, otherwise
"*" (asterisk).
See Member Mask in the description of the Multiple Fileid Masks panel for details.
Organisation:
A non-enterable field which identifies the data set organisation of the file. e.g. PS (Physical Sequential), PO (Partitioned
Organised), VS (VSAM) or HFS.
VSAM Type:
Applicable to VSAM data sets only, a non-enterable field which identifies the type of VSAM data set organisation.
GDG Base:
A non-enterable field which identifies whether or not the file is a GDG base. Possible values are Y (Yes) or N (No).
RECFM:
Applicable to sequential and PDS/PDSE library data sets only, a non-enterable field which identifies the defined record
format of the file.
LRECL:
Applicable to non-HFS files only, a non-enterable field which identifies the defined maximum record length of the file.
BLKSIZE:
Applicable to sequential and PDS/PDSE library data sets only, a non-enterable field which identifies the file's defined block
size.
Select Members
Displayed as a column in table view only.
Applicable to PDS/PDSE library data sets only, a non-enterable field which identifies the number of member selected after
the Select Innput Members panel has been displayed.
Select Input Members
The Select Input Members panel view (ZZSGFSU2) is displayed when a user elects to display the individual library members
selected by a specific member mask.
This panel is an interactive panel window (window class WINWIPO0) and includes an embedded table.
Standard table edit primary and line commands may be used to delete or exclude table rows as appropriate. Alternatively,
select/deselect entries for processing by inserting/removing "S" from the Sel column. The table entries each identify the name of a
PDS/PDSE library member.
On completing entries in this panel view, press <PF3> to close the panel and return to the parent panel view.
Table View
The panel initially displays the embedded table with column names Sel, Member, Alias, Created, LastMod, Cursize, Inisize,
TTR, User and AliasOf. Scroll left/right (using <PF10> and <PF11> respectively) to view columns that are not in view.
Only column Sel is enterable. All other column entries are included for information only.
Press <PF6> to select or deselect all table entries.
2013-11-13 13:06:41
SELCOPY/i Reference and User Guide
137
File Search/Update/Copy/Remap
Table View
Figure 56. Select Input Members.
Single Row (Zoomed) View
This panel view displays the table column entries for an individual table row as panel input fields.
Press <PF3> to return to the table view.
Figure 57. Select Input Members (Zoomed View).
Input Values
Fields which identify the member to be processed by the utility.
Member Mask>
An enterable field in which one or more PDS/PDSE member name masks, separated by a "," (comma) and/or one or more
intervening blanks, may be entered. By default, this field contains the member mask supplied in the Member Mask field of
the Select Files to Process panel.
See Member Mask in the description of the Multiple Fileid Masks panel for details.
Sel>
Corresponds to zoomed panel option "Select Member for Processing>". Enter "S" (or any non-blank value) in this field to
select the entry for processing. If left blank, processing for the member identified by this table entry is bypassed.
Member Name:
A non-enterable field identifying the name of the library member selected by the supplied member mask.
2013-11-13 13:06:41
SELCOPY/i Reference and User Guide
138
File Search/Update/Copy/Remap
Input Values
Alias:
A non-enterable field indicating whether the member is an alias of another library member. Possible values are Y (Yes) or
N (No).
Date Created:
For non-load libraries, a non-enterable field identifying the date on which the member was created.
Date Modified:
For non-load libraries, a non-enterable field identifying the date an time at which the member was last modified.
Initial Size:
For non-load libraries, a non-enterable field identifying the number of records in the member when it was first saved.
Current Size:
For non-load libraries, a non-enterable field identifying the number of records in the member when it was last saved.
TTR:
A non-enterable field identifying the TTR (track offset/record number) of the member data. The TTR value is displayed as
a 3-byte hexadecimal value where byte 1 and 2 represent the track offset, byte 3 the record number.
User Id:
For non-load libraries, a non-enterable field identifying the userid of the user who created the member.
Alias Of:
For load libraries, a non-enterable field identifying the member name for which the member is an ALIAS.
Select Input Members - FIND
The Select Input Members - FIND panel view (ZZSGFSU9) is displayed when primary command FIND is executed in an FSU
Select Input Members list and may be used to condense the list of displayed members. Only those members that contain at least
one record which satisfies the find operation are included.
Following execution of the find operation, the FIND panel remains open to allow further find/condense operations on the list of
members.
This panel is an interactive panel window (window class WINWIPO0).
Figure 58. Find/Condense Input Members.
Press <PF3> to close the panel and return to the parent member list panel view. To reset the list of members following a condense
operation, simply re-enter a value in the Member Mask field.
Input Values
Find string ==>
Specify the search value. This may be one of the following:
1. An unquoted numeric value.
2. A quoted character string (case insensitive search). e.g. 'John Doe' is the same as 'JOHN DOE'.
3. A quoted character string prefixed with "C" (case sensitive search). e.g. C'John Doe'.
4. A quoted hexadecimal string prefixed with "X". e.g. X'00'.
5. A quoted picture string prefixed with "P". e.g. P'USER###'.
See the FIND command for details on supported picture string special characters.
Limit ==>
The maximum number of hits (records hit) to report per library member.
Specify a value of zero (0) to report all hits.
Efficiency gains may be achieved by specifying Limit=1 where it is required only to establish whether or not each member
contains a particular string, since once the first hit is reported further processing for that member will be bypassed.
Scope ==>
Enter restrictions to be applied to the location of the search string within record data as follow:
2013-11-13 13:06:41
SELCOPY/i Reference and User Guide
139
File Search/Update/Copy/Remap
Input Values
CHARS
The search value may be found anywhere within the specified column bounds of the input
records. i.e. No restriction.
WORD
The search value may only be found if it is complete word which falls within the specified
column bounds of the input records. i.e. the value must either be preceded by a
non-alphanumeric character or begin at the start column bound, and either precede a
non-alphanumeric character or finish in the end column bound.
PREFIX
The search value may only be found if it occurs at the start of a word and falls within the
specified column bounds of the input records. i.e. the value must either be preceded by a
non-alphanumeric character or begin at the start column bound, and be followed by an
alphanumeric character.
SUFFIX
The search value may only be found if it occurs at the end of a word and falls within the
specified column bounds of the input records. i.e. the value must be preceded by an
alphanumeric character and must either precede a non-alphanumeric character or finish in
the end column bound.
These options correspond to SDE FIND parameters PREFIX, SUFFIX and WORD.
Start column ==>
Specifies the start (or only) record column from which the scan for the search string will begin. Record data in positions or
fields that occur before this start column value is not searched. A value of 0 (zero) implies all columns are included.
This field corresponds to SDE FIND parameter pos1.
End
column ==>
Specifies the end record data column beyond which no part of the search value may be found. Only record data between
the start and end columns will be searched.
If a 0 (zero) end column is specified then the end column is the start column number plus the length of the search value
minus 1. i.e. the search string will only be found if it begins in the start column.
This field corresponds to SDE FIND parameter pos2.
Start record ==>
Specifies the first record number in every member at which processing will start. Records occurring sequentially before the
start record will be bypassed.
This field corresponds to the FSU parameter STARTREC recno.
Number of records ==>
Specifies the maximum number of records within each member for which FIND processing may occur. If a 0 (zero) value
is specified, then records are selected beginning at start record and ending at the last record in the file.
This field corresponds to the FSU parameter FOR.
Relational operator ==>
Identify the relational operator used when comparing the record data against the search value.
If testing for a non-equality relationship using a character string search value, then the EBCDIC values assigned to
characters in the search string and record data determine the relationship. (e.g. GT, LT)
View report ==>
Select "Yes" or "No" to determine whether a File Search utility report will be displayed for the FIND operation.
Condense member list ==>
Select "Yes" or "No" to determine whether the FIND operation will condense the displayed member list.
Generate Formatted Record Expression Panels
Major OR Sub-Expressions
The Major OR Sub-Expressions panel view (ZZSGEXP0) is displayed when an option is taken to generate an SDE expression for
formatted record fields belonging to a specified record-type definition.
This panel is an interactive panel window (window class WINWIPO0) and includes an embedded table.
Standard table edit primary and line commands must be used to insert, delete or exclude table rows as appropriate. The table
entries each identify an SDE expression. In the generated expression, these entries will occur in the order specified and will be
separated by the OR logical operator. e.g. For 3 expression table entries represented by A1, A2 and A3
2013-11-13 13:06:41
SELCOPY/i Reference and User Guide
140
File Search/Update/Copy/Remap
(A1)
OR
(A2)
OR
Major OR Sub-Expressions
(A3)
For each table entry, the AND Sub-Expression panel must be displayed to specify one or more ANDed sub-expressions.
On completing entries in this panel view, press <PF3> to close the panel and return to the utility panel view.
Table View
The panel initially displays the embedded table with column names OR, NOT and AND Sub-expressions.
Place the cursor on the required table entry and press the <Enter> key or, if configured, double-click the left mouse button to
display the AND Sub-Expressions panel.
To display a table row in single row (zoomed) format, place the cursor on the required table entry and press <PF2>.
Figure 59. Major OR Sub-Expressions.
Single Row (Zoomed) View
This panel displays the table column entries for an individual table row as panel input fields.
Press <PF5> to display the AND Sub-Expressions panel from this panel view.
Press <PF3> to return to the table view.
Figure 60. Enter Major OR Sub-Expression (Zoomed View).
Input Values
Fields which together identify a single SDE expression.
2013-11-13 13:06:41
SELCOPY/i Reference and User Guide
141
File Search/Update/Copy/Remap
Input Values
Structure:
A non-enterable field which identifies the DSN of the structure data set to be used for field name reference.
Member:
If Structure is a library member, a non-enterable field which identifies the member name of the structure to be used for
field name reference.
Type:
A non-enterable field which identifies the structure source type: Cob (COBOL Copybook), Pl1 (PL1 Copybook), Ada
(COBOL or PL1 ADATA file) or Sdo (SELCOPY/i Structure Definition Object).
Record-Type:
A non-enterable field which identifies the name of the record-type mapping, defined within the structure, to be used for
field name reference.
OR
A non-enterable field which indicates that the expressions corresponding to each row of the table will be logically ORed
together.
NOT
An enterable field which allows negation (logical NOT) of the result of the expression identified by the table entry. This
option corresponds to the "Negate Boolean condition set by this OR expression" option input field in the zoomed view.
AND Sub-Expressions
Having displayed the AND Sub-Expressions panel, this field identifies the number of ANDed sub-expressions which
constitute the table row expression.
AND Sub-Expressions
The AND Sub-Expressions panel view (ZZSGEXP1) is only displayed when an entry in the Major OR Sub-Expression panel has
been selected for configuration.
This panel is an interactive panel window (window class WINWIPO0) and includes an embedded table.
Standard table edit primary and line commands must be used to insert, delete or exclude table rows as appropriate. The table
entries each identify a single SDE sub-expression which together are seperated by a logical AND operator to constitute the single
Major OR expression in the parent panel. e.g. For the ORed expressions in the Major OR example above:,
• A1 has two ANDed sub-expressions (represented by B1, B2).
• A2 has one sub-expression.
• A3 has four ANDed sub-expressions (represented by B3, B4, B5 and B6).
(B1 AND B2)
OR
(A2)
OR
(B3
AND
B4
AND
B5
AND
B6)
For each table entry, the Minor OR Sub-Expression panel must be displayed to specify one or more ORed sub-expressions.
On completing entries in this panel view, press <PF3> to close the panel and return to the utility panel view.
Table View
The panel initially displays the embedded table with column names AND, NOT and AND Sub-expressions.
Place the cursor on the required table entry and press the <Enter> key or, if configured, double-click the left mouse button to
display the Minor OR Sub-Expressions panel.
To display a table row in single row (zoomed) format, place the cursor on the required table entry and press <PF2>.
2013-11-13 13:06:41
SELCOPY/i Reference and User Guide
142
File Search/Update/Copy/Remap
Table View
Figure 61. AND Sub-Expressions.
Single Row (Zoomed) View
This panel displays the table column entries for an individual table row as panel input fields.
Press <PF5> to display the Minor OR Sub-Expressions panel from this panel view.
Press <PF3> to return to the table view.
Figure 62. Enter AND Sub-Expression (Zoomed View).
Input Values
Fields which together identify a single SDE expression.
Structure:
A non-enterable field which identifies the DSN of the structure data set to be used for field name reference.
Member:
If Structure is a library member, a non-enterable field which identifies the member name of the structure to be used for
field name reference.
Type:
A non-enterable field which identifies the structure source type: Cob (COBOL Copybook), Pl1 (PL1 Copybook), Ada
(COBOL or PL1 ADATA file) or Sdo (SELCOPY/i Structure Definition Object).
Record-Type:
A non-enterable field which identifies the name of the record-type mapping, defined within the structure, to be used for
field name reference.
2013-11-13 13:06:41
SELCOPY/i Reference and User Guide
143
File Search/Update/Copy/Remap
Input Values
AND
A non-enterable field which indicates that the expressions corresponding to each row of the table will be logically ANDed
together.
ANOT
An enterable field which allows negation (logical NOT) of the result of the sub-expression identified by the table entry. This
option corresponds to the "Negate Boolean condition set by this AND expression" option input field in the zoomed view.
AND Sub-Expressions
Having displayed the Minor OR Sub-Expressions panel, this field identifies the number of ORed sub-expressions which
constitute the table row expression.
Minor OR Sub-Expressions
The Minor OR Sub-Expressions panel view (ZZSGEXP2) is only displayed when an entry in the AND Sub-Expression panel has
been selected for configuration.
This panel is an interactive panel window (window class WINWIPO0) and includes an embedded table.
Standard table edit primary and line commands must be used to insert, delete or exclude table rows as appropriate. The table
entries each identify a single SDE sub-expression which together are seperated by a logical OR operator to constitute the single
AND expression in the parent panel. e.g. For the ANDed expressions in the AND example above:,
• B1 has three ORed sub-expressions (represented by C1, C2 and C3).
• B2 has two ORed sub-expressions (represented by C4 and C5).
• B3, B4, B5 and B6 each have a single sub-expressions.
((C1 OR C2 OR C3) AND (C4 OR C2))
OR
(A2)
OR
(B3 AND B4 AND B5 AND B6)
On completing entries in this panel view, press <PF3> to close the panel and return to the utility panel view.
Table View
The panel initially displays the embedded table with column names OR, Field Name, Ref#, Fmt, Pic, ROp and Value/Field
Enter a value in the Field Name column to open the SDE: Select Field Name panel and select a single entry from a list of formatted
record fields. Enter a test value in the Value/Field column which is valid for the data type of the source field.
The Value/Field may also contain a field reference to test the source field against the contents of this test field. To enter a field
reference, first display the table row in singe row (zoomed) view to select the field option then enter a value for the Term 2 Field
Name to select from the list of possible fields.
To display a table row in single row (zoomed) format, place the cursor on the required table entry and press <PF2>.
Figure 63. Minor OR Sub-Expressions.
Single Row (Zoomed) View
This panel displays the table column entries for an individual table row as panel input fields.
Press <PF3> to return to the table view.
2013-11-13 13:06:41
SELCOPY/i Reference and User Guide
144
File Search/Update/Copy/Remap
Single Row (Zoomed) View
Figure 64. Enter Minor OR Sub-Expression (Zoomed View).
Input Values
Fields which together identify a single SDE expression.
Structure:
A non-enterable field which identifies the DSN of the structure data set to be used for field name reference.
Member:
If Structure is a library member, a non-enterable field which identifies the member name of the structure to be used for
field name reference.
Type:
A non-enterable field which identifies the structure source type: Cob (COBOL Copybook), Pl1 (PL1 Copybook), Ada
(COBOL or PL1 ADATA file) or Sdo (SELCOPY/i Structure Definition Object).
Record-Type:
A non-enterable field which identifies the name of the record-type mapping, defined within the structure, to be used for
field name reference.
OR
A non-enterable field which indicates that the expressions corresponding to each row of the table will be logically ORed
together.
Term 1 (Field):
Fields that identify the formatted record field that constitutes the left term (term 1) of the expression.
Field Name / Field Name>
An enterable field that identifies the name of a formatted record field belonging to the specified records-type.
This is a selectable value. Enter any value in this input field to select from a list of record-type fields.
Ref# / Ref#:
A non-enterable field that displays the field reference number of the selected field.
Level:
A non-enterable field that displays the group nesting level of the selected field.
Fmt / Data Format:
A non-enterable field that displays the data format of the selected field.
Pic / Pic:
Applicable only to COBOL or PL1 defined field that have an associated picture string, this is a non-enterable field
that displays the picture string value of the selected field.
ROp / Operator>
The relational operator defining the compare operation to be performed on the two expression terms.
Enter any invalid entry to select from a list of possible operators.
2013-11-13 13:06:41
SELCOPY/i Reference and User Guide
145
File Search/Update/Copy/Remap
Input Values
Value/Field / Term 2:
Fields that identify the right term (term 2) of the expression. This may be a character string, numeric value or field
reference which is a compatible data type with the term 1 field reference.
If a field reference is required, the table row must first be displayed in single row (zoomed) view.
In single row view, choose between 2 mutually exclusive options which identify term 2 as either a character string/numeric
value or a field reference.
String Value>
Select this option to specify the term as a character string or numeric value that is compatible with the data type
of the term 1 field. This may be one of the following:
1. Applicable to fields of any data type, an unquoted numeric value. For numeric fields, the numeric value
and term 1 field data are converted so that they are of the same data type prior to performing an
arithmetic comparison.
2. Applicable only to character fields, a quoted character string (case insensitive search). e.g. 'John Doe' is
the same as 'JOHN DOE'.
3. Applicable only to character fields, a quoted character string prefixed with "C" (case sensitive search).
e.g. C'John Doe'.
4. Applicable only to character fields, a quoted hexadecimal string prefixed with "X". e.g. X'00'.
Field Name>
Select this option to specify the term as a formatted record field reference which is of a data type compatible with
the term 1 field.
The field name value is an enterable field that identifies the name of a formatted record field belonging to the
specified records-type. This is a selectable value. Enter any value in this input field to select from a list of
record-type fields.
The Ref#, Level, Data Format and Pic values, which correspond to the selected field, are displayed in
non-eneterable fields as described for Term 1 above.
SDE: Select Record-Type
The SDE: Select Record-Type panel view (ZZSGSRT0) is displayed whenever a value in a selectable panel field is entered to
select a record-type mapping from a specified structure.
This panel is an interactive panel window (window class WINWIPO0) and includes an embedded list window with all the features
supported by this window class.
All fields displayed in each list entry are non-enterable and describe the field's characteristics. See the SDE DISPLAY RECTYPES
command output for an overview of the displayed fields.
Enter "S" in the command prefix area of the required record-type definition to select it. Alternatively, place the cursor on the
required list entry and press the <Enter> key or, if configured, double-click the left mouse button to select the required record-type
definition.
Figure 65. SDE: Select Record-Type.
2013-11-13 13:06:41
SELCOPY/i Reference and User Guide
146
File Search/Update/Copy/Remap
SDE: Select Field Name
SDE: Select Field Name
The SDE: Select Field Name panel view (ZZSGSFN0) is displayed whenever a value in a selectable panel field is entered to
select a formatted record field from a structure record-type mapping.
This panel is an interactive panel window (window class WINWIPO0) and includes an embedded list window with all the features
supported by this window class.
All fields displayed in each list entry are non-enterable and describe the field's characteristics. See the SDE DISPLAY
STRUCTURE command output for an overview of the displayed fields.
Enter "S" in the command prefix area of the required field definition to select it. Alternatively, place the cursor on the required list
entry and press the <Enter> key or, if configured, double-click the left mouse button to select the required field definition.
Figure 66. SDE: Select Field Name.
Multiple FIND & CHANGE Specification Panels
Multiple Find Commands (unformatted)
The Multiple Find Commands panel view for FIND operations on unformatted record data (ZZSGFSU4) is displayed when the
option is taken to Specify Multiple FIND commands from the FSU (unformatted): Search Records using the FIND Command panel
view of the File Search/Update/Copy/Remap (FSU) utility panels.
This panel is an interactive panel window (window class WINWIPO0) and includes an embedded table.
Standard table edit primary and line commands must be used to insert, delete or exclude table rows as appropriate.
The table entries each identify an edit FIND operation. In the generated FSU command, these entries will occur in the order
specified and will all be separated by either an AND or an OR logical operator. AND/OR logical operators indicate that either all
FIND operations or at least one of the FIND operations respectively must be true in order for the record to be selected.
On completing entries in this panel view, press <PF3> to close the panel and return to the utility panel view.
Table View
The panel initially displays the embedded table with column names Rop, Find, Value, Scope, Left Bnd and Right Bnd.
To display a table row in single row (zoomed) format, place the cursor on the required table entry and press <PF2>.
2013-11-13 13:06:41
SELCOPY/i Reference and User Guide
147
File Search/Update/Copy/Remap
Table View
Figure 67. SELCOPY/i - Multiple FIND Commands.
Single Row (Zoomed) View
This panel displays the table column entries for an individual table row as panel input fields.
Press <PF3> to return to the table view.
Figure 68. SELCOPY/i - Find Operation (Zoomed View).
Input Values
Logical Operator>
Specifies the logical operator (AND or OR) used to separate each of the specified FIND operations.
Op>
Identify the relational operator used when comparing the record data against the FIND search value.
If testing for a non-equality relationship using a character string search value, then the EBCDIC values assigned to
characters in the search string and record data determine the relationship. (e.g. GT, LT)
Enter "/" to display a list of valid entries and a brief description.
Find Value / Value>
Specify the search value. This may be one of the following:
1. An unquoted numeric value.
2. A quoted character string (case insensitive search). e.g. 'John Doe' is the same as 'JOHN DOE'.
3. A quoted character string prefixed with "C" (case sensitive search). e.g. C'John Doe'.
4. A quoted hexadecimal string prefixed with "X". e.g. X'00'.
2013-11-13 13:06:41
SELCOPY/i Reference and User Guide
148
File Search/Update/Copy/Remap
Input Values
5. A quoted picture string prefixed with "P". e.g. P'USER###'.
See the FIND command for details on supported picture string special characters.
Left/Right Bnd / Bounds:
Specify the record columns between which the search will occur. If the left bound value is 0 (zero), the search will include
all columns within the length of the input records.
Left Column>
Specifies the start (or only) record column from which the scan for the search string will begin. Record data in
positions or fields that occur before the left bound column value is not searched.
This field corresponds to SDE FIND parameter pos1.
Right Column>
Specifies the end record data column beyond which no part of the search value may be found. Only record data
between the left and right bound columns will be searched.
If a 0 (zero) right bound column is specified then the right bound column is the left bound column number plus the
length of the search value minus 1. i.e. the search string will only be found if it begins in the left bound column.
This field corresponds to SDE FIND parameter pos2.
Scope / As>
This field identifies restrictions to be applied to the position of the search string within record data.
In table view, enter "/" in this field to select from a list of possible values: CHAR (Unrestricted), WORD, PREFIX or
SUFFIX.
In single row (zoomed) view, enter "/" in the appropriate radio button field.
Unrestricted
The search value may be found anywhere within the specified column bounds of the input
records.
Word
The search value may only be found if it is complete word which falls within the specified
column bounds of the input records. i.e. the value must either be preceded by a
non-alphanumeric character or begin at the start column bound, and either precede a
non-alphanumeric character or finish in the end column bound.
Prefix
The search value may only be found if it occurs at the start of a word and falls within the
specified column bounds of the input records. i.e. the value must either be preceded by a
non-alphanumeric character or begin at the start column bound, and be followed by an
alphanumeric character.
Suffix
The search value may only be found if it occurs at the end of a word and falls within the
specified column bounds of the input records. i.e. the value must be preceded by an
alphanumeric character and must either precede a non-alphanumeric character or finish in
the end column bound.
These option fields correspond to SDE FIND parameters PREFIX, SUFFIX and WORD.
Multiple Find Commands (formatted)
The Multiple Find Commands panel view for FIND operations on formatted record data (ZZSGFSU8) is displayed when the
option is taken to Specify Multiple FIND commands from the FSU (formatted): Search Records using the FIND Command panel
view of the File Search/Update/Copy/Remap (FSU) utility panels.
This panel is an interactive panel window (window class WINWIPO0) and includes an embedded table.
Standard table edit primary and line commands must be used to insert, delete or exclude table rows as appropriate.
The table entries each identify an edit FIND operation. In the generated FSU command, these entries will occur in the order
specified and will all be separated by either an AND or an OR logical operator. AND/OR logical operators indicate that either all
FIND operations or at least one of the FIND operations respectively must be true in order for the record to be selected.
On completing entries in this panel view, press <PF3> to close the panel and return to the utility panel view.
Table View
The panel initially displays the embedded table with column names Rop, Find, Value, Scope, Left Column and Right Column.
If a FIND operation is to be restricted to an individual column or range of columns then enter a value in the Left Column and Right
Column fields as appropriate to open the SDE: Select Field Name panel and select a single entry from a list of formatted record
2013-11-13 13:06:41
SELCOPY/i Reference and User Guide
149
File Search/Update/Copy/Remap
Table View
fields.
To display a table row in single row (zoomed) format, place the cursor on the required table entry and press <PF2>.
Figure 69. SELCOPY/i - Multiple (formatted) FIND Commands.
Single Row (Zoomed) View
This panel displays the table column entries for an individual table row as panel input fields.
Press <PF3> to return to the table view.
Figure 70. SELCOPY/i - (formatted) Find Operation (Zoomed View).
Input Values
Logical Operator>
Specifies the logical operator (AND or OR) used to separate each of the specified FIND operations.
ROp / Op>
Identify the relational operator used when comparing the field data against the search value.
If testing for a non-equality relationship using a character string search value, then the EBCDIC values assigned to
characters in the search string and record data determine the relationship. (e.g. GT, LT)
Enter "/" to display a list of valid entries and a brief description.
Find Value / Value>
Specify the search value. This may be one of the following:
2013-11-13 13:06:41
SELCOPY/i Reference and User Guide
150
File Search/Update/Copy/Remap
Input Values
1. Applicable to fields of any data type, an unquoted numeric value. For numeric fields, the numeric search value
and source field data are converted so that they are of the same data type prior to performing an arithmetic
comparison.
2. Applicable only to character fields, a quoted character string (case insensitive search). e.g. 'John Doe' is the
same as 'JOHN DOE'.
3. Applicable only to character fields, a quoted character string prefixed with "C" (case sensitive search). e.g.
C'John Doe'.
4. Applicable only to character fields, a quoted hexadecimal string prefixed with "X". e.g. X'00'.
5. Applicable only to character fields, a quoted picture string prefixed with "P". e.g. P'USER###'.
See the FIND command for details on supported picture string special characters.
Left/Right Column / Bounds:
Optionally specify the name record columns (fields) between which the search will occur. If the left bound value is blank,
the search will include all columns within the length of the input records.
Left/Start Column
Specifies the start (or only) record field from which the scan for the search value will begin. Record data in fields
that occur before this start column value is not searched.
This field corresponds to SDE FIND parameter field_col/field_col1.
Right/End Column
Specifies the end record field. Only record data between the start and end columns will be searched.
If no end column is specified then only the start column field is searched.
This field corresponds to SDE FIND parameter filed_col2.
As>
Applicable only to character fields (data-type "AN"), enter "/" in the appropriate radio button field to apply restrictions to the
position of the search string within the field as follow:
Unrestricted
Word
The search value may be found anywhere within the character field.
The search value may only be found if it is complete word within the character field. i.e. the
value must either be preceded by a non-alphanumeric character or begin at the first
character of the field, and either precede a non-alphanumeric character or finish in the last
character of the field.
Prefix
The search value may only be found if it occurs at the start of a word within the character
field. i.e. the value must either be preceded by a non-alphanumeric character or begin at
the first character of the field, and be followed by an alphanumeric character.
Suffix
The search value may only be found if it occurs at the end of a word within the character
field. i.e. the value must be preceded by an alphanumeric character and must either
precede a non-alphanumeric character or finish in the last character of the field,
These option fields correspond to SDE FIND parameters PREFIX, SUFFIX and WORD.
Multiple Change Commands (unformatted)
The Multiple Change Commands panel view for CHANGE operations on unformatted record data (ZZSGFSU6) is displayed when
the option is taken to Specify Multiple CHANGE commands from the FSU (unformatted): Change record data using the CHANGE
command panel view of the File Search/Update/Copy/Remap (FSU) utility panels.
This panel is an interactive panel window (window class WINWIPO0) and includes an embedded table.
Standard table edit primary and line commands must be used to insert, delete or exclude table rows as appropriate.
The table entries each identify an edit CHANGE operation. In the generated FSU command, these entries will occur in the order
specified and will all be separated by either an AND or an OR logical operator. AND/OR logical operators indicate that either all
CHANGE operations will be actioned or only the first successfully executed CHANGE operation will be actioned respectively.
On completing entries in this panel view, press <PF3> to close the panel and return to the utility panel view.
Table View
The panel initially displays the embedded table with column names Rop, FROM:, TO:, Scope, Occur, Src, Left Bnd and Right
Bnd.
To display a table row in single row (zoomed) format, place the cursor on the required table entry and press <PF2>.
2013-11-13 13:06:41
SELCOPY/i Reference and User Guide
151
File Search/Update/Copy/Remap
Table View
Figure 71. SELCOPY/i - Multiple Change Commands.
Single Row (Zoomed) View
This panel displays the table column entries for an individual table row as panel input fields.
Press <PF3> to return to the table view.
Figure 72. SELCOPY/i - Change Operation (Zoomed View).
Input Values
Logical Operator>
Specifies the logical operator (AND or OR) used to separate each of the specified CHANGE operations.
Rop / Op>
Identify the relational operator used when comparing the record data against the CHANGE operation search value.
If testing for a non-equality relationship using a character string search value, then the EBCDIC values assigned to
characters in the search string and record data determine the relationship. (e.g. GT, LT)
Enter "/" to display a list of valid entries and a brief description.
FROM: / From>
Specify the CHANGE operation search value. This may be one of the following:
1. An unquoted numeric value which will be processed as a character string.
2. A quoted character string (case insensitive search). e.g. 'John Doe' is the same as 'JOHN DOE'.
3. A quoted character string prefixed with "C" (case sensitive search). e.g. C'John Doe'.
4. A quoted hexadecimal string prefixed with "X". e.g. X'00'.
2013-11-13 13:06:41
SELCOPY/i Reference and User Guide
152
File Search/Update/Copy/Remap
Input Values
5. A quoted picture string prefixed with "P". e.g. P'USER###'.
See the CHANGE command for details on supported search value picture string special characters.
TO: / To>
Specify the CHANGE operation replace value. This may be specified in any of the formats described for the search value
above.
For a replace value specified as a quoted picture string, see the CHANGE command for details on supported replace
value picture string special characters.
Left/Right Bnd / Bounds:
columns between which both the search and replace values must occur in order to perform a successful CHANGE
operation. If the left bound value is 0 (zero), the search will include all columns within the length of the input records.
If an in-place update is to be performed, the replace string must not result in a change to the record length. However, if
records are to be copied the replace string may extend the length of the record to a value not greater than the defined
maximum record length.
Left Column
Specifies the left (or only) record column from which the scan for the CHANGE operation search string will begin.
Record data in positions or fields that occur before this column value is excluded from the CHANGE operation.
This field corresponds to SDE CHANGE parameter pos1.
Right Column
Specifies the end record data column beyond which no part of the search value may be found and no part of the
replace string may occupy. Only record data between the left and right bound columns will be searched and
potentially replaced.
If a 0 (zero) right bound column is specified then the right bound column is the left bound column number plus the
length of the search value minus 1. i.e. the search value will only be found if it begins in the left bound column.
This field corresponds to SDE CHANGE parameter pos2.
Scope / As>
This field identifies restrictions to be applied to the position of the CHANGE search string within record data.
In table view, enter "/" in this field to select from a list of possible values: CHAR (Unrestricted), WORD, PREFIX or
SUFFIX.
In single row (zoomed) view, enter "/" in the appropriate radio button field.
Unrestricted
The search value may be found anywhere within the specified column bounds of the input
records.
Word
The search value may only be found if it is a complete word which falls within the specified
column bounds of the input records. i.e. the value must either be preceded by a
non-alphanumeric character or begin at the start column bound, and either precede a
non-alphanumeric character or finish in the end column bound.
Prefix
The search value may only be found if it occurs at the start of a word and falls within the
specified column bounds of the input records. i.e. the value must either be preceded by a
non-alphanumeric character or begin at the start column bound, and be followed by an
alphanumeric character.
Suffix
The search value may only be found if it occurs at the end of a word and falls within the
specified column bounds of the input records. i.e. the value must be preceded by an
alphanumeric character and must either precede a non-alphanumeric character or finish in
the end column bound.
These option fields correspond to SDE CHANGE parameters PREFIX, SUFFIX and WORD.
Src / Source>
Identifies the format of the record source character data:
DATA
Indicates that records are to be treated as data so that inserting the replace value performs no special treatment
of any multiple, consecutive blanks that occur to the right of the replaced data.
If the length of the replace value is greater than that of the search value, all data to the right of the replaced data
will be shifted right.
2013-11-13 13:06:41
SELCOPY/i Reference and User Guide
153
File Search/Update/Copy/Remap
Multiple Change Commands (formatted)
If the length of the replace value is less than that of the search value, all data to the right of the replaced data will
be shifted left.
TEXT
Indicates that records are to be treated as formatted character text so that, in an effort to maintain the record
positions of non-blank text to the right of the changed text, when inserting the replacement text, consecutive
blanks that occur to the right of this text are absorbed or added as approriate.
If the length of the replace value is greater than that of the search value, consecutive balnks to the right of the
replaced text will be absorbed before non-blank text is shifted right. Note that blank delimitation of non-blank text
is preserved.
If the length of the replace value is less than that of the search value, then blanks will be inserted immediately
before the first blank character occurring to the right of the replaced text. The number of blanks inserted will be
equal to the difference between the lengths of the search and replace values.
Occur / Occurs>
Identifies the occurrence of the search value within the input record to which the CHANGE operation will apply:
ALL
Attempt to change all occurrences of the search value found within the input record.
FIRST
Attempt to change only the first occurrence of the search value found within the input record.
LAST
Attempt to change only the last occurrence of the search value found within the input record.
Multiple Change Commands (formatted)
The Multiple Change Commands panel view for CHANGE operations on unformatted record data (ZZSGFSU7) is displayed when
the option is taken to Specify Multiple CHANGE commands from the FSU (formatted): Change record data using the CHANGE
command panel view of the File Search/Update/Copy/Remap (FSU) utility panels.
This panel is an interactive panel window (window class WINWIPO0) and includes an embedded table.
Standard table edit primary and line commands must be used to insert, delete or exclude table rows as appropriate.
The table entries each identify an edit CHANGE operation. In the generated FSU command, these entries will occur in the order
specified and will all be separated by either an AND or an OR logical operator. AND/OR logical operators indicate that either all
CHANGE operations will be actioned or only the first successfully executed CHANGE operation will be actioned respectively.
On completing entries in this panel view, press <PF3> to close the panel and return to the utility panel view.
Table View
The panel initially displays the embedded table with column names Rop, FROM:, TO:, Scope, Occur, Src, Left Column and
Right Column.
If a CHANGE operation is to be restricted to an individual column or range of columns then enter a value in the Left Column and
Right Column fields as appropriate to open the SDE: Select Field Name panel and select a single entry from a list of formatted
record fields.
To display a table row in single row (zoomed) format, place the cursor on the required table entry and press <PF2>.
2013-11-13 13:06:41
SELCOPY/i Reference and User Guide
154
File Search/Update/Copy/Remap
Table View
Figure 73. SELCOPY/i - Multiple FIND Commands.
Single Row (Zoomed) View
This panel displays the table column entries for an individual table row as panel input fields.
Press <PF3> to return to the table view.
Figure 74. SELCOPY/i - Find Operation (Zoomed View).
Input Values
Logical Operator>
Specifies the logical operator (AND or OR) used to separate each of the specified CHANGE operations.
Rop / Op>
Identify the relational operator used when comparing the field data against the CHANGE operation search value.
If testing for a non-equality relationship using a character string search value, then the EBCDIC values assigned to
characters in the search string and record data determine the relationship. (e.g. GT, LT)
Enter "/" to display a list of valid entries and a brief description.
FROM: / From>
Specify the CHANGE operation search value. This may be one of the following:
1. Applicable to fields of any data type, an unquoted numeric value. For numeric fields, the numeric search value
and source field data are converted so that they are of the same data type prior to performing an arithmetic
comparison.
2013-11-13 13:06:41
SELCOPY/i Reference and User Guide
155
File Search/Update/Copy/Remap
Input Values
2. Applicable only to character fields, a quoted character string (case insensitive search). e.g. 'John Doe' is the
same as 'JOHN DOE'.
3. Applicable only to character fields, a quoted character string prefixed with "C" (case sensitive search). e.g.
C'John Doe'.
4. Applicable only to character fields, a quoted hexadecimal string prefixed with "X". e.g. X'00'.
5. Applicable only to character fields, a quoted picture string prefixed with "P". e.g. P'USER###'.
See the CHANGE command for details on supported search value picture string special characters.
TO: / To>
Specify the CHANGE operation replace value. This may be specified in any of the formats described for the search value
above. For numeric fields, the replace value will be converted into the appropriate source data format.
For a replace value specified as a quoted picture string, see the CHANGE command for details on supported replace
value picture string special characters.
Left/Right Column / Bounds:
Optionally specify the name record columns (fields) between which the CHANGE operation will occur. If the left bound
value is blank, the search will include all columns within the length of the input records.
Left/Start Column
Specifies the start (or only) record field from which the scan for the CHANGE operation search value will begin.
Record data in fields that occur before this start column value is not included.
This field corresponds to SDE CHANGE parameter field_col/field_col1.
Right/End Column
Specifies the end record field. Only record data between the start and end columns will be searched and
potentially replaced.
If no end column is specified then only the start column field is searched.
This field corresponds to SDE CHANGE parameter filed_col2.
Scope / As>
Applicable only to character fields (data-type "AN"), this field identifies restrictions to be applied to the position of the
CHANGE search value within the formatted record field data.
In table view, enter "/" in this field to select from a list of possible values: CHAR (Unrestricted), WORD, PREFIX or
SUFFIX.
In single row (zoomed) view, enter "/" in the appropriate radio button field.
Unrestricted
Word
The search value may be found anywhere within the character field.
The search value may only be found if it is complete word within the character field. i.e. the
value must either be preceded by a non-alphanumeric character or begin at the first
character of the field, and either precede a non-alphanumeric character or finish in the last
character of the field.
Prefix
The search value may only be found if it occurs at the start of a word within the character
field. i.e. the value must either be preceded by a non-alphanumeric character or begin at
the first character of the field, and be followed by an alphanumeric character.
Suffix
The search value may only be found if it occurs at the end of a word within the character
field. i.e. the value must be preceded by an alphanumeric character and must either
precede a non-alphanumeric character or finish in the last character of the field,
These option fields correspond to SDE CHANGE parameters PREFIX, SUFFIX and WORD.
Src / Source>
For character fields only, these options identify the format of the source character data:
DATA
Indicates that character fields are to be treated as data so that inserting the replace value performs no special
treatment of any multiple, consecutive blanks that occur to the right of the replaced data.
If the length of the replace value is greater than that of the search value, all data to the right of the replaced data
will be shifted right.
If the length of the replace value is less than that of the search value, all data to the right of the replaced data will
be shifted left.
TEXT
2013-11-13 13:06:41
SELCOPY/i Reference and User Guide
156
File Search/Update/Copy/Remap
File Search/Update/Copy/Remap Output Output
Indicates that character fields are to be treated as formatted character text so that, in an effort to maintain the
position of non-blank text which appear to the right of the changed text, when inserting the replacement text,
consecutive blanks that occur to the right of this text are absorbed or added as approriate.
If the length of the replace value is greater than that of the search value, consecutive balnks to the right of the
replaced text will be absorbed before non-blank text is shifted right. Note that blank delimitation of non-blank text
is preserved.
If the length of the replace value is less than that of the search value, then blanks will be inserted immediately
before the first blank character occurring to the right of the replaced text. The number of blanks inserted will be
equal to the difference between the lengths of the search and replace values.
Occur / Occurs>
Identifies the occurrence of the search value within the input record to which the CHANGE operation will apply:
ALL
Attempt to change all occurrences of the search value found within the input record fields.
FIRST
Attempt to change only the first occurrence of the search value found within the input record fields
LAST
Attempt to change only the last occurrence of the search value found within the input record fields
File Search/Update/Copy/Remap Output Output
Report Format
The report generated by the file Search/Update/Copy/Remap utility is a structured data file designed to be browsed (not printed)
using a structure definition object (SDO) within a SELCOPY/i session.
The associated SDO is automatically generated when the utility is executed. The SDO dataset name is always the DSN of the
report with a suffix of ".SDO".
If a report output file DSN has been specified by the user, then the data set must be an already allocated, sequential data set. If not
specified, the default DSN for the report and SDO data sets is "prefix.FSU.Dyyyyddd.Thhmmss" and
"prefix.FSU.Dyyyyddd.Thhmmss.SDO" respectively. The high level qualifier, prefix, is the value assigned to
System.UserDSNPrefix in the SELCOPY/i User INI file.
If the utility is run in the background as a batch job, then specification of a report output DSN is mandatory. If the job stream JCL is
generated via the File Search/Update/Copy/Remap Panel, then DD statements with DISP=NEW will be generated for the specified
report file DSN and SDO structure data sets, if they do not already exist.
If the utility is run in the foreground of a SELCOPY/i session, then the output report file is generated in storage only and is
displayed and updated automatically as the utility executes. The display is refreshed every second allowing the user to view the
progress and, if necessary, interrupt the execution using the Attention key.
When closing an in-storage report, the user will be prompted to save the report file and accompanying SDO structure if either of the
following are true:
• File update processing has occurred with the immediate UPDATE option set. Following an UPDATE, it is strongly
recommended that the user save these files, so providing an audit trail and, if required, the necessary input to the File
Update Undo facility which reverses changes to updated records.
• A READ or UPDATE I/O error occurs before the run has completed. This ensures that the audit trail exists even if control
is not returned from the system routine.
In all other circumstances, the user will not be prompted to save a permanent copy of the in-storage report unless FSUEND is
executed to close the report window. If the user chooses to save the report, the report file will be saved as a VSAM ESDS data set
and the accompanying SDO as a physical sequential data set.
Following execution of the utility (in batch or in the foreground) the saved report file may subsequently be browsed from your
SELCOPY/i session using any of the following methods:
• Issue the command FSOUT report_file_name.
• Issue the prefix command FO against the report DSN in a data set list or VTOC list window.
• From the File Search/Update/Copy/Remap Panel, select menu item "Reports" and press the <Enter> key or, if configured,
double-click the left mouse button on the required report file.
2013-11-13 13:06:41
SELCOPY/i Reference and User Guide
157
File Search/Update/Copy/Remap
Report Format
Figure 75. File Search/Update/Copy/Remap Output Output.
In the FSU output displayed in Figure 75., the user has hit the PF2 key on the Summary record, to display the record's fields in
single view, and also executed the following SDE SELECT command to restrict the fields displayed in records of record type Hit:
SELECT
zMember, zT, zRecord
FROM Hit
The FSU report output consists of 5 record types: 1 Command record, 1 Summary record, 0 or more Hit records, 0 or more IOError
records and 0 or more Alias records.
Record Type: Command
Contains information of the FSU command stream use to execute the File Search/Update/Copy/Remap utility.
Timestamp
The date and local time at which the FSU command was executed to generate this report.
Command
A character field containing the FSU command executed (directly or via the File Search/Update/Copy/Remap Panel). The
Command record is located at the top of the output report.
Record Type: Summary
Contains statistical fields providing totals for the File Search/Update/Copy/Remap Output execution as follow:
RunType
Describes the type of execution of the File Search/Update/Copy/Remap Output utility and so governs the format of the Hit
records.
Operation
Unformatted/Formatted Search
Unformatted/Formatted Update
Unformatted/Formatted Copy or Remap
2013-11-13 13:06:41
RunType
FIND
UPDATE or NOUPDATE
COPY
SELCOPY/i Reference and User Guide
158
File Search/Update/Copy/Remap
Record Type: Summary
For Update operations, RunType is "NOUPDATE" if update has been suppressed by the FSU command NOUPDATE
(default) parameter or "Immediate UPDATE" has been deactivated in the utility panel.
RecordsTot
The total number of input records successfully read from all selected files.
FilesTot
The total number of files that match the supplied fileid mask(s).
Hits
For RunType "FIND", this is the total number of occurrences of the FIND search string(s) found within the input records
that satisfy the logical combination of FIND conditions. e.g. FIND ( ('A') AND ('B') ) will increment the Hit total for
every occurrence of 'A' and 'B' in records that contain both 'A' and 'B'.
For RunType "NOUPDATE" and "UPDATE", this is the total number of occurrences of the CHANGE search string(s) found
within the selected input records (i.e. input records that satisfy the VIEW, WHERE and/or FIND criteria.)
RecordsHit
For RunType "FIND", this is the total number of input records that satisfy the supplied WHERE clause and/or FIND search
string criteria.
For RunType "NOUPDATE" and "UPDATE", this is the total number of selected input records that satisfy the CHANGE
search string criteria.
RecordsHit corresponds with the number of input records that are of the record type "Hit Records" and so are displayed in
the report output.
FilesHit
The total number of files that contains at least one record that includes a hit.
RemapErrors
For Formatted Remap operations only, the total number of files for which an error has occurred on attempting to remap
source fields of one data type to target fields of a different data type.
IOErrors
The total number of files for which I/O errors that have occurred during execution. An IOError record is displayed for each
ChgErrors
The total number of CHANGE errors. i.e. the total number of occurrences of a CHANGE search string, within all selected
records, that cannot be updated with the CHANGE replace string.
For RunType "FIND", this value is aways 0 (zero).
ChgRecsErr
The total number of selected input records for which a CHANGE error has occurred.
For RunType "FIND", this value is aways 0 (zero).
ChgFilesErr
The total number of files that contain at least one record for which a CHANGE error has occurred.
For RunType "FIND", this value is aways 0 (zero).
StructureName
The DSN and member name of the structure (SDO) specified on the USING field/parameter for Formatted File
Search/Update/Copy/Remap Output.
For Unformatted File Search/Update/Copy/Remap Output, this field value is always blank.
Record Type: Hit
The format of the Hit records depend on the Summary record "RunType" field, as follows:
1. For RunType "FIND" or "COPY" where search criteria have been specified, this field displays every record that satisfies all
the specified search criteria. i.e. the VIEW record type (for Formatted File Search/Update/Copy/Remap Output), the
WHERE clause and the FIND search string(s). Note that no CHANGE operation has been specified.
2. For RunType "NOUPDATE", "UPDATE" or "COPY" where a CHANGE operation has been specified, this field displays a
pair of records for every input record that satisfies the CHANGE arguments. The first record of the pair displays the
original, unaltered record data, the second displays the record data after the CHANGE operation(s) have been executed.
2013-11-13 13:06:41
SELCOPY/i Reference and User Guide
159
File Search/Update/Copy/Remap
Record Type: Hit
Depending on whether the CHANGE operation(s) are successful, the prefix area of the line displaying the updated record
will contain the line flag "==CHG>" or, if an error has occurred, "==ERR>".
For update operations with NOUPDATE in effect, this allows the user the opportunity to check the changed data before
re-running the utility with UPDATE to action the changes.
The Hit record type contains 2 group fields, "z" and "zRecord", where "z" includes information fields relating to the record, and
"zRecord" includes all the record data field(s). The Hit record type has been designed this way so that the user can suppress or
include all fields within either field group by specifying the group field name as the argument of a SELECT command. e.g. SELECT
zRecord will display only the field data and suppress the information fields.
The Hit record type field structures are as follow:
z
The structure including all the information fields.
zDsn
The DSN (or HFS path name) containing the reported record.
zMember
The PDS/PDSE member containing the reported record.
This field is only present if at least one PDS/PDSE data set is included by the input fileid mask(s). For
non-PDS/PDSE data sets, this field contains blanks.
zRecNo
The record number of the record within the data set.
zHitNo
The hit count number of the record within the data set. The "zHitNo" field is incremented by one for each new
record within the data set that satisfies the search criteria for the particular RunType. The "zHitNo" count is reset
to zero for each new input data set. Use WHERE zHitNo=1 to display a list of all data sets (and library
members) containing at least one hit.
zLrecl
The record length of the record within the data set.
zHits
The total number of occurrences of the search string(s) within the record.
For all RunType "FIND"/"COPY" Hit records or RunType "NOUPDATE"/"UPDATE"/"COPY" Hit records with "zT"
field flag set to "B", this is the number of FIND search string occurrences.
For all RunType "NOUPDATE"/"UPDATE"/"COPY" Hit records with "zT" field flag set to "A", this is the number of
CHANGE search string occurrences.
zErrs
For RunType "NOUPDATE", "UPDATE" and "COPY" involving a CHANGE operation, the total number of
occurrences of a CHANGE search string within the record that cannot be updated with the CHANGE replace
string.
For RunType "FIND", this field is omitted.
ZT
Included only for RunType "NOUPDATE", "UPDATE" and "COPY" involving a CHANGE operation, this field
displays the record image flag which may be one of the following:
B
Indicates that the record data that follows represents the record data Before the CHANGE operation(s) are
applied.
A Indicates that the record data that follows represents the record data After the CHANGE operation(s) are
applied.
Note that the record data will be unchanged if the values in the fields "zHits" and "zErrs" are equal.
For RunType "FIND", this field is omitted.
zRecord
The structure including all the record data fields.
For Unformatted File Search/Update/Copy/Remap Output, the "zRecord" field contains the unexpanded record data as a
single character field of length equal to the record length.
2013-11-13 13:06:41
SELCOPY/i Reference and User Guide
160
File Search/Update/Copy/Remap
Record Type: IOError
For Formatted File Search/Update/Copy/Remap Output, the "zRecord" field contains the expanded record data mapped
with the field names defined by the record type (RTO).
Record Type: IOError
Contains information relating to an I/O error that has occurred when opening, reading or updating the file. IOError records are
located amongst the Hit records, as I/O errors are encountered.
zDsn
The DSN (or HFS path name) for which the I/O error occurred.
zMember
The PDS/PDSE member for which the I/O error occurred.
This field is only present if the at least one PDS/PDSE data set is included by the input fileid mask(s). For non-PDS/PDSE
data sets, this field contains blanks.
EnqErr
1 if the error occurred when attempting to obtain an exclusive SPFEDIT ENQ for UPDATE on the file, otherwise 0.
OpenErr
1 if the error occurred when attempting to open the file, otherwise 0.
ReadErr
1 if the I/O error occurred when attempting to read a block of data from the file, otherwise 0.
UpdErr
1 if the I/O error occurred when attempting to re-write (update-in-place) a record to the file, otherwise 0.
OutErr
1 if the I/O error occurred when attempting to write a block of data to the OUTPUT file, otherwise 0.
RecordsRead
The number of records successfully read before the I/O error occurred.
RecordsUpd
The number of records successfully updated before the I/O error occurred.
Record Type: Alias
Contains information relating to aliases of library members. An Alias report record is generated for every member and member
alias that contains a hit for WHERE/FIND search criteria or a CHANGE operation.
When processing PDS/PDSE library members, member records may be searched or changed having been accessed via the
original member name or a member alias name. Once the member records have been processed, they will not be processed again
via another alias name or their member name.
zDsn
The DSN of the PDS/PDSE library.
zMember
The PDS/PDSE member or member alias name.
zAliasOf
The PDS/PDSE member name for which this library entry is an alias.
zHitRef
The member or alias name for which associated "Hit" report records contain the search or change results applicable to the
alias or member name identified by this "Alias" report record.
Record Type: Record
Contains a single, variable length character field "Record" displaying any error messages that have been generated by the File
Search/Update/Copy/Remap utility.
2013-11-13 13:06:41
SELCOPY/i Reference and User Guide
161
File Search/Update/Copy/Remap
Function Keys
Function Keys
<PF1>
Display context sensitive help.
Display the report record in a new window in single format (vertical) view.
<PF2>
In single format view, use <PF10>/<PF11> to display the previous/next report record respectively.
Display the SDE Edit/Browse utility menu.
<F16>
This includes show and hide of report records based on their type, and alter the display of report record
fields.
Applicable to report records of record type Hit or IOError only, <PF1> edits the file(s), referenced by "zDSN"
and "zMember" fields in the focus report record, and scrolls directly to the reported record.
<PF6>
If the input records were formatted using an SDE structure ( SDO), COBOL or PL1 copybook, COBOL or
PL1 ADATA file to map the record data fields, then SDE EDIT is performed using the existing or generated
SDO structure.
For unformatted records, the SELCOPY/i text editor is used to edit the records.
File Update Undo
Overview
The File Update Undo utility (FSUUNDO) allows the user to restore updated records from any accidental or erroneous execution of
the File Search/Update/Copy/Remap utility (FSU) where update of record data has occured.
When FSU is executed to change and immediately UPDATE data set records, the original record data, before execution of the
change operation(s), is recorded in the FSU output report data set. FSUUNDO uses these report records as part of its processing
and so will only operate successfully if the FSU report data set exists.
Therefore, it is strongly recommended that, when prompted on exit from the report data set, users elect to save the report and its
accompanying SDE structure (SDO), for audit purposes and also for subsequent execution of FSUUNDO if required.
FSU report output reflecting FIND or NOUPDATE run types need not be saved. If used as input to FSUUNDO, FSU report output of
run type FIND will return an error.
FSUUNDO generates a SELCOPY control statements that performs the following:
1. Input the FSU report records.
2. For each "Hit" record "Before" and "After" pair reported in the FSU output, identify the DSN, PDSE(E) member name (if
applicable) and record number at which the updated record may be found.
3. Sequentially read records from the data set or PDS(E) member until the required record number is found.
4. Verify that the input record matches the record "After" data reported in the FSU output.
5. Optionally UPDATE the data set record with the record "Before" data reported in the FSU output, thus restoring the record
to its original status.
6. Generate an entry in the File Update Undo report.
7. Repeat all steps until all "Hit" record pairs in the FSU output report have been processed.
Error checking is also performed for conditions which include record not found or containing unexpected data. These conditions are
reported in the FSUUNDO output report.
This SELCOPY job may be executed in the Foreground (TSO) or displayed as a JCL job, suitable for submission to batch. Using
either method, options exist to generate an Expanded or Terse report, an optional Diagnostic SELCOPY execution report and,
most importantly, options to Verify or Update changed records.
It is strongly recommended that users execute FSUUNDO with options VERIFY (the default) and EXTENDED, and then review the
FSUUNDO output report before executing FSUUNDO again with option UPDATE.
Beware that record data that has been changed between the time of execution of the original File Search/Update/Copy/Remap job
and this execution of FSUUNDO, will not be updated but will be reported as an error. Processing will continue with input of the next
"Hit" record pair. Records that have already been restored as a result of a previous execution of FSUUNDO UPDATE, will be
reported as a match and no error returned.
If SELCOPY ends with a return code other than 0 (zero - successful execution, no error conditions) or 112 (errors condition(s)
detected), then re-run with option DIAGNOSE to establish the cause of the SELCOPY error.
The most likely cause of an unxpected return code will be if a selection (run) time error (RC=44) has occured. Usually caused by an
OPEN error for an input data set (e.g. if an exclusive ENQ already exists for the data set.) In this event, SELCOPY processing ends
immediately and all data sets opened by SELCOPY are automatically closed.
2013-11-13 13:06:41
SELCOPY/i Reference and User Guide
162
File Search/Update/Copy/Remap
Overview
File Update Undo Panel
The File Update Utility Undo panel view may be started by executing command FSUUNDO from the command line of any window.
Field options may be selected or de-selected by entering a non-blank or blank character respectively in the option field.
Figure 76. FSUUNDO - File Update Utility Undo Panel.
File Update Undo Output
Report Format
Report output is generated on every execution of the File Update Undo utility (FSUUNDO).
If FSUUNDO is executed with parameter BACKGROUND (JCL) to generate JCL output, then the output report is written to
SYSPRINT when the job is submitted. By default, SYSPRINT is allocated to SYSOUT=*. Furthermore, if DIAGNOSE parameter
was specified, then the SYSPRINT output will also contain diagnostic information for the SELCOPY run before and after the printed
report output.
If FSUUNDO is executed with parameter FOREGROUND to execute in TSO, then an output report data set is opened in a CBLe
edit view and report records are inserted. The DSN of this data set is equal to the FSU report DSN with the additional low level
qualifier "UNDOV" for VERIFY reports, or "UNDO" for UPDATE reports. e.g.
NBJ2.DEV.FSU.D2008346.T162607.UNDO
If this data set already exists, then the report records will be appended to the existing report data and the edit display positioned at
the start of the latest report output. On exit of this data set the user will be prompted to save and, if necessary allocate, the data set
with suitable space attributes.
Report Fields
Dataset
The up to 44 character DSN of the data set or PDS/PDSE processed.
Member
For PDS/PDSE libraries only, the name of the member being processed.
RecordNumber
The record number at which an FSUUNDO error has occurred.
For EXTENDED output, this field also contains the record numbers of records that have been successfully updated.
Message Text
Message indicating success or failure to locate and update records referenced by the FSU report. All possible messages
are as follow:
= = File Updated = =
= = Member Updated = =
One or more records within the reported data set or PDS/PDSE member were successfully updated.
For EXTENDED output only, this message is repeated for each record that has been successfully updated. Also,
up to 100 bytes of the record data before and after the update is printed on the report lines that follow.
## Member not found ##
The member name within the PDS/PDSE library referenced by the FSU report line, no longer exists. The
member has been deleted or renamed.
Return Code 112 is set and the error count incremented by one for each missing member.
## Record not found ##
The record number of the data set or member record referenced by the FSU report line, no longer exists. This
message is repeated for each missing record within a data set or member.
2013-11-13 13:06:41
SELCOPY/i Reference and User Guide
163
File Search/Update/Copy/Remap
Report Fields
For EXTENDED output only, up to 100 bytes of the expected record data is also printed on the report lines that
follow.
Return Code 112 is set and the error count is incremented by one for each missing record.
### Data Mismatch ###
--WARNING--
The record data at the required record number within the data set or member, does not match the record data as
it was following the FSU update. (i.e. the data has been altered since the FSU update was executed.) This
message is repeated for each mis-matching record within a data set or member.
For both EXTENDED and TERSE output, up to 100 bytes of the found record data, followed by up to 100 bytes
of the expected record data, is also printed on the report lines that follow.
Return Code 112 is set and the error count is incremented by one for each missing record.
<<< Already Undone >>>
This message is generated for EXTENDED report output only. TERSE report output does not report instances
where no record update is required.
The record data at the required record number within the data set or member, matches the record data as it was
prior to the FSU update. (i.e. the record has already been restored.)
This message is repeated for each already restored record within a data set or member and the records already
undone count is incremented by one. Up to 100 bytes of the record data is also printed on the following report
lines.
Report Data
For EXPANDED output or where a data mismatch error has occurred, record data is reported in the FSUUNDO output.
The data lines are preceded by a brief description of the record. Where two contrasting records are to be displayed, the description
line also reports the position within the record data of the first difference found. Furthermore, if this difference occurs beyond the
record description and within the first 100 bytes, a marker ">*<" is positioned above the mis-matching character.
The record data follows the description line for a length equal to the lesser of the record length value and 100. The data is
displayed in both character and vertical hexadecimal notation. (Equivalent to SELCOPY's TYPE=B print output.)
A scale line is written following the record data.
Record Found: (1st Diff at Pos
049)
>*<
EDTFCLR0 0720 MEMFLSTE >>>>>>>>>>AZZElement
Test
3 117ADA10 117BFAC8 00000..
CCECCDDF4FFFF4DCDCDEEC46666666666CEEC98989A44444E8AA44444444444444444444444F4FFFCCCFF4FFFCCCCF4FFFFF
54363390007200454632350EEEEEEEEEE1995354553000003523000000000000000000000003011714110011726138000000
Record Expected:
EDTFCLR0 0720 MEMFLSTE >>>>>>>>>>AZZElement
3 117ADA10 117BFAC8 00000..
CCECCDDF4FFFF4DCDCDEEC46666666666CEEC98989A44444444444444444444444444444444F4FFFCCCFF4FFFCCCCF4FFFFF
54363390007200454632350EEEEEEEEEE1995354553000000000000000000000000000000003011714110011726138000000
....,....1....,....2....,....3....,....4....,....5....,....6....,....7....,....8....,....9....,...10
Figure 76. Record Data Output.
Summary Block
The summary block reports the totals of:
1. Records undone
2. Records already undone
3. Files updated
4. Errors
Where FSUUNDO errors have occured, the Errors total has the additional eye-catcher "###" following.
2013-11-13 13:06:41
SELCOPY/i Reference and User Guide
164
File Search/Update/Copy/Remap
Sample Terse Report Output
Sample Terse Report Output
------------------------------------- Start of FSUUNDO Report ---------------------------------------Output From:
FSUUNDO
NBJ2.DEV.FSU.D2008357.T132545
FOREGROUND
VERIFY
TERSE
** Verify Only - No data sets will be updated. **
-------------------------------------------Dataset
-------------------------------------------NBJ.JCL.FSU
NBJ.JCL.FSU
NBJ.JCL.FSU
NBJ.JCL.FSU
NBJ.JCL.FSU
-------- ---------------------------------Member
RecordNumber
2008/12/22 13:27
PAGE
1
-------- ---------------------------------CBLINST
= = Member Updated = =
CBLINS01
= = Member Updated = =
CBLINS01
188 ## Record not found ##
EQAWIVP1
= = Member Updated = =
IEBCOPY1
51
### Data Mismatch ### --WARNING--
Record Found: (1st Diff at Pos
046)
>*<
//GETMEMS
EXEC PGM=IEBCOPY,REGION=0M
## Get ###
66CCEDCDE444CECC4DCD7CCCCDDE6DCCCDD7FD4444444774C8A47774444444444444444444444444
11753454200057530774E9523678B957965E040000000BB07530BBB0000000000000000000000000
Record Expected:
//GETMEMS
EXEC PGM=IEBCOPY,REGION=0M
66CCEDCDE444CECC4DCD7CCCCDDE6DCCCDD7FD444444444444444444444444444444444444444444
11753454200057530774E9523678B957965E04000000000000000000000000000000000000000000
....,....1....,....2....,....3....,....4....,....5....,....6....,....7....,....8
NBJ.JCL.FSU
IEBCOP02
= = Member Updated = =
-------------------------------------Records undone:
4
Records already undone:
0
Files
updated:
5
Errors:
2###
-------------------------------------** Verify Only - No data sets have been updated. **
*** Warning:
SELCOPY execution ended with RC=112 ***
One or more data sets have been altered between the time of execution of
the original File Search/Update job and this execution of FSUUNDO.
Figure 76. FSUNDO TERSE Output with VERIFY.
2013-11-13 13:06:41
SELCOPY/i Reference and User Guide
165
File Search/Update/Copy/Remap
Sample EXTENDED Output
Sample EXTENDED Output
------------------------------------- Start of FSUUNDO Report ---------------------------------------Output From:
FSUUNDO
NBJ2.DEV.FSU.D2008357.T132545
-------------------------------------------Dataset
-------------------------------------------NBJ.JCL.FSU
FOREGROUND
UPDATE
EXTENDED
-------- --------------------------Member
RecordNumber
2008/12/22 13:35
-------- --------------------------CBLINST
42 = = Member Updated = =
-------PAGE
1
--------
Record Old: (Changed data starts at Pos
037)
//LOAD
EXEC PGM=IEBCOPY,REGION=4M
66DDCC444444CECC4DCD7CCCCDDE6DCCCDD7FD444444444444444444444444444444444444444444
11361400000057530774E9523678B957965E44000000000000000000000000000000000000000000
Record New:
//LOAD
EXEC PGM=IEBCOPY,REGION=0M
66DDCC444444CECC4DCD7CCCCDDE6DCCCDD7FD444444444444444444444444444444444444444444
11361400000057530774E9523678B957965E04000000000000000000000000000000000000000000
....,....1....,....2....,....3....,....4....,....5....,....6....,....7....,....8
-------------------------------------------Dataset
-------------------------------------------NBJ.JCL.FSU
-------- --------------------------Member
RecordNumber
2008/12/22 13:35
-------- --------------------------CBLINS01
119 = = Member Updated = =
-------PAGE
1
--------
Record Old: (Changed data starts at Pos
037)
//LOAD
EXEC PGM=IEBCOPY,REGION=4M
66DDCC444444CECC4DCD7CCCCDDE6DCCCDD7FD444444444444444444444444444444444444444444
11361400000057530774E9523678B957965E44000000000000000000000000000000000000000000
Record New:
//LOAD
EXEC PGM=IEBCOPY,REGION=0M
66DDCC444444CECC4DCD7CCCCDDE6DCCCDD7FD444444444444444444444444444444444444444444
11361400000057530774E9523678B957965E04000000000000000000000000000000000000000000
....,....1....,....2....,....3....,....4....,....5....,....6....,....7....,....8
NBJ.JCL.FSU
CBLINS01
188
## Record not found ##
Record Expected:
//GETMEMS
EXEC PGM=IEBCOPY,REGION=4M
66CCEDCDE444CECC4DCD7CCCCDDE6DCCCDD7FD444444444444444444444444444444444444444444
11753454200057530774E9523678B957965E44000000000000000000000000000000000000000000
....,....1....,....2....,....3....,....4....,....5....,....6....,....7....,....8
-------------------------------------------Dataset
-------------------------------------------NBJ.JCL.FSU
-------- --------------------------Member
RecordNumber
2008/12/22 13:35
-------- --------------------------EQAWIVP1
124 = = Member Updated = =
-------PAGE
1
--------
Record Old: (Changed data starts at Pos
046)
//COMPILE EXEC PGM=IGYCRCTL,PARM=(''),REGION=4M
66CDDDCDC4CECC4DCD7CCECDCED6DCDD747756DCCCDD7FD444444444444444444444444444444444
113647935057530774E97839333B7194EDDDDB957965E44000000000000000000000000000000000
Record New:
//COMPILE EXEC PGM=IGYCRCTL,PARM=(''),REGION=0M
66CDDDCDC4CECC4DCD7CCECDCED6DCDD747756DCCCDD7FD444444444444444444444444444444444
113647935057530774E97839333B7194EDDDDB957965E04000000000000000000000000000000000
....,....1....,....2....,....3....,....4....,....5....,....6....,....7....,....8
NBJ.JCL.FSU
EQAWIVP1
203
= = Member Updated = =
Record Old: (Changed data starts at Pos
043)
//LKED
EXEC PGM=HEWL,PARM='MAP',REGION=4M
66DDCC4444CECC4DCD7CCED6DCDD77DCD76DCCCDD7FD444444444444444444444444444444444444
113254000057530774E8563B7194ED417DB957965E44000000000000000000000000000000000000
Record New:
//LKED
EXEC PGM=HEWL,PARM='MAP',REGION=0M
66DDCC4444CECC4DCD7CCED6DCDD77DCD76DCCCDD7FD444444444444444444444444444444444444
113254000057530774E8563B7194ED417DB957965E04000000000000000000000000000000000000
....,....1....,....2....,....3....,....4....,....5....,....6....,....7....,....8
-------------------------------------------Dataset
-------------------------------------------NBJ.JCL.FSU
Record Found:
2013-11-13 13:06:41
(1st Diff at Pos
046)
-------- -----------Member
RecordNumber
-------- -----------IEBCOPY1
51
----------------------2008/12/22 13:35
PAGE
1
----------------------### Data Mismatch ### --WARNING--
>*<
SELCOPY/i Reference and User Guide
166
File Search/Update/Copy/Remap
Sample EXTENDED Output
//GETMEMS
EXEC PGM=IEBCOPY,REGION=4M
## Get ###
66CCEDCDE444CECC4DCD7CCCCDDE6DCCCDD7FD4444444774C8A47774444444444444444444444444
11753454200057530774E9523678B957965E440000000BB07530BBB0000000000000000000000000
Record Expected:
//GETMEMS
EXEC PGM=IEBCOPY,REGION=4M
66CCEDCDE444CECC4DCD7CCCCDDE6DCCCDD7FD444444444444444444444444444444444444444444
11753454200057530774E9523678B957965E44000000000000000000000000000000000000000000
....,....1....,....2....,....3....,....4....,....5....,....6....,....7....,....8
-------------------------------------------Dataset
-------------------------------------------NBJ.JCL.FSU
-------- --------------------------Member
RecordNumber
2008/12/22 13:35
-------- --------------------------IEBCOP02
7 = = Member Updated = =
-------PAGE
1
--------
Record Old: (Changed data starts at Pos
037)
//UNLOAD
EXEC PGM=IEBCOPY,REGION=4M
66EDDDCC4444CECC4DCD7CCCCDDE6DCCCDD7FD444444444444444444444444444444444444444444
11453614000057530774E9523678B957965E44000000000000000000000000000000000000000000
Record New:
//UNLOAD
EXEC PGM=IEBCOPY,REGION=0M
66EDDDCC4444CECC4DCD7CCCCDDE6DCCCDD7FD444444444444444444444444444444444444444444
11453614000057530774E9523678B957965E04000000000000000000000000000000000000000000
....,....1....,....2....,....3....,....4....,....5....,....6....,....7....,....8
-------------------------------------Records undone:
5
Records already undone:
0
Files
updated:
4
Errors:
2###
-------------------------------------*** Warning:
SELCOPY execution ended with RC=112 ***
One or more data sets have been altered between the time of execution of
the original File Search/Update job and this execution of FSUUNDO.
Figure 76. FSUNDO EXTENDED Output with UPDATE.
2013-11-13 13:06:41
SELCOPY/i Reference and User Guide
167
Compare Files/Libraries Menu (=7)
The Compare Files/Libraries Menu panel (ZZSGCOMP) is an interactive panel window opened on selection of option 7. in the
SELCOPY/i Primary option menu.
SELCOPY/i data object compare features can be accessed via this panel.
Options
1 Compare Files
2 Compare Libraries
COMPF - Compare Files
COMPL - Compare Libraries
Compare Files (=7.1)
Overview
The Compare Files utility (COMPFILE) provides a set of both basic and extended features that allow the user to compare records
in NEW and OLD versions of a file.
Basic features include:
• Specify the start record.
• Restrict the number of records compared.
• Restrict the number of differences to be reported.
• Restrict the comparison to a specific area of the file records.
• Strip trailing characters prior to record compare.
Extended features include:
• All basic feature options but with separate specifications for the NEW and OLD files where sensible.
• Apply a structure (copybook) overlay to map records, and optionally restrict the comparison to specified record-types
and/or named fields. This is known as a formatted compare.
• Control how re-synchronisation of record pairs should occur following detection of an inserted or deleted record.
• For formatted or unformatted compare, specify key segments (at the record-type level) that allow the utility to identify
synchronised pairs of records.
• Formatted compare supports application of different structures to the NEW and OLD files, with comparison restricted to
only those fields that exist in both structures. This allows comparison of NEW and OLD file records where corresponding
fields are at different locations within the records and maybe of different data-type or length.
Following Compare Files execution, report output is generated in a structured format suitable for presentation to the user in an SDE
window view. To generate this report output and in order to perform advanced record selection and field compare, COMPFILE
utilises functions and features provided by the structured data environment (SDE). Therefore, the COMPFILE utility is only
available to users who have a licensed version of SELCOPY installed and operational on their system.
Source File Types
COMPFILE can process records from any combination of the following file types:
• Cataloged or uncataloged sequential (including multi-volume) datasets.
• Partitioned dataset (PDS/PDSE) members.
• GDG datasets.
• VSAM (KSDS, ESDS, RRDS, VRDS).
• HFS Files.
• (DB2 Tables planned but not yet supported).
Output Report
The report generated by the compare files utility is a structured data file. This is designed to be browsed (not printed) from within
a SELCOPY/i session using a structure definition file ( SDO) which is also generated automatically during execution of the
compare.
Following execution of the compare utility, records are flagged as being matched or as having been inserted, deleted or
changed.
Matched
Records that exist in both the NEW and OLD files forming a synchronised record pair for which the compared data is
unchanged (matches).
2013-11-13 13:06:41
SELCOPY/i Reference and User Guide
168
Compare Files/Libraries Menu (=7)
Output Report
Inserted
Records that previously did not exist in the old file and so have been inserted into the NEW file.
Deleted
Records that no longer exist in the NEW file and so have been deleted from the OLD file.
Changed
Records that exist in both files forming a synchronised record pair in which the compared data has been changed (i.e
does not match).
Determination of synchronised record pairs is achieved by the compare file utility using record synchronisation techniques.
In order to improve readability, the report of consecutive records flagged as having been deleted are grouped together, and
similarly for records flagged as having been inserted.
See Compare Files Output for a detailed description of the generated output report.
Unformatted Compare
Unformatted compare is the most commonly used format for text files containing unformatted records.
By definition, unformatted compare operates on records without application of a structure (SDO) or COBOL/PL1 copybook to
format record data. i.e. each record is treated as a single character string.
Basic Unformatted Compare
Basic unformatted compare specifically relates to unformatted compare where selected options apply to both files
involved in the compare operation. These options are:
◊ The compare data start position within the record.
◊ The compare data length.
◊ The trailing character to be stripped before comparing the data.
◊ The first record to be compared. (Nominated by record number, key or RBA.)
◊ The number of records to be compared.
Furthermore, record synchronisation technique employed is restricted to 1-TO-1 or read-ahead with a read-ahead limit of
100 records and read-ahead matching record count of 1.
The Compare File utility panel view and input field options relating to basic unformatted compare are described in "Basic
Unformatted Compare Panel".
Extended Unformatted Compare
Extended unformatted compare allows specification of the same options as basic unformatted compare but with potentially
different values for each of the two files in the compare operation. In addition to this, extended unformatted compare
allows specification of the following:
◊ Record synchronisation techniques Sorted Keyed and Unsorted Keyed which involves specification of key
segments.
◊ For read-ahead record synchronisation, non-default values for limit and matching record count. Also the option to
allow synchronisation on blank records.
◊ The option to perform case-insensitive compare.
◊ Report output options to exclude display of changed, inserted and/or deleted records. Also allows specification of
a non-default report file DSN.
◊ Output file DSNs into which to copy records flagged as being matched, changed, inserted and/or deleted. A
separate data set name may be specified for NEW and OLD file records that are attributed these flags.
The Compare File utility panel views and input field options relating to extended unformatted compare are described in
"Extended Unformatted Compare Panel".
Formatted Compare
More advanced than unformatted compare, formatted compare is invoked where an SDE structure ( SDO), COBOL or PL1
copybook overlay is specified to map record data fields for use in the compare files operation.
Records are treated as comprising a number of data fields of pre-determined lengths and of various data types. Each field within
the record may be referenced independently (by field name or field reference number) allowing the user to be more descriminate
when selecting records, and fields to be compared.
If a COBOL copybook, PL1 include file or an ADATA file generated from a COBOL or PL1 compilation is specified, then this file will
be used to generate a temporary SDO before proceeding with record formatting. Note that a non-temporary SDO may be
generated from the COBOL/PL1/ADATA file using the SDE command, CREATE STRUCTURE.
Each input record is assigned a record type ( RTO) defined in the specified or generated SDO and the field definitions defined by
that RTO are used to map the data within the record. SDE determines the record type to be assigned to each record based on any
USE WHEN conditions saved in the SDO and the individual record's length. See "Record Type Assignment" in the "SELCOPY/i
Structured Data Editor (SDE)" publication.
2013-11-13 13:06:41
SELCOPY/i Reference and User Guide
169
Compare Files/Libraries Menu (=7)
Formatted Compare
Formatted compare may be selected via the Compare File utility panel by first selecting Extended options from the Compare Files
Basic Options view. Compare File utility panel views and input field options relating to formatted compare are described in
"Formatted Compare Panel".
Hierarchical Compare
Hierarchical compare is not selected explicitly but is implied when both of the following conditions are true:
1. Formatted compare is used incorporating records assigned to different record types in the SDO.
2. KEY synchronisation is performed with key segments specified as formatted record field names or field reference
numbers.
The compare files command, COMPFILE, generated by the dialog panel or entered manually by the user, specifies synchronisation
key fields for one or more record types in the specified SDO. The order in which these record types occur in the COMPFILE
command also define the levels of record type hierarchy. i.e. The record type synchronisation key definition occurring first identifies
the level-1 (highest level) record type, the second definition identifies the level-2 (level-1 child) record type, etc.
Record types with no synchronisation key are the lowest level in the record type hierarchy, i.e. rated lower than any record type that
has been defined with a synchronisation key.
Hierarchical compare is sensitive to the level of record type assigned to a record. All records that immediately follow the current
record which are assigned record types lower in the record type hierarchy than that of the current record, are treated as being
descendants of the current record. These records are grouped with the current record so that record synchronisation does not
exceed the bounds of the current hierarchical record group.
This type of compare ensures that only record pairs that belong to the same hierarchical parent record pair can be synchronised.
For details on the synchronisation criteria and the synchronisation process, see "Hierarchical Key Synchronisation".
Record Synchronisation
The process of comparing records requires that a pair of records, one from NEW file and one from the OLD file, are first
synchronised before the data compare can take place.
Terminology
Before learning the different methods of synchronisation, a user should become familiar with the following terms:
Record Pair
Refers to one record from the NEW file and one from the OLD file.
Synchronised Record Pair
A record pair for which the records satisfy synchronisation criteria and so are eligible to be compared.
See the different record synchronisation techniques which identify synchronisation criteria.
Current Record Pair
Identifies the record pair for which synchronisation will occur.
The current record pair is usually the next record pair read following processing of a synchronised record pair. Unless
End-of-Data is encountered, re-synchronisation processing will invariably change one of the records selected for the
current record pair.
Compare Data
The compare data is identified as belonging to those areas of the record for which the compare operation will be actioned.
Record data that falls outside these areas is not compared.
Unformatted compare data areas are specified via the Compare File panel "Compare Position/Length:" fields or the
COMPFILE command STARTCOL/COMPARELEN parameters (or their derivatives).
Formatted and Hierarchical compare data areas are specified via the Compare File sub-panel "Select Field Names to
Compare" or the COMPFILE command SELECT field_col parameter.
By default, compare data is all data in the record.
Keyed Record
Applicable only to file compare with KEY synchronisation, a keyed record is a record for which one or more compare files
synchronisation key field segments have been defined.
For unformatted or formatted compare where key segments are specified using fixed field positions and lengths, this
applies to all records in the NEW and OLD files.
2013-11-13 13:06:41
SELCOPY/i Reference and User Guide
170
Compare Files/Libraries Menu (=7)
Terminology
For formatted compare where key segments are specified using formatted record field names, this applies only to records
in the NEW and OLD files that are assigned record types for which a key has been defined.
Unkeyed Record
Applicable to compare of formatted or unformatted files, unkeyed records are records not defined a compare files
synchronisation key field.
For hierarchical compare, an unkeyed record is a record assigned a record type for which no synchronisation key has
been defined. Unkeyed records are of record types which are lowest level in the record type hierarchy.
Overview
Following input of a record pair, the compare files utility must use the rules defined by the specified synchronisation technique to
determine whether the current record pair is a synchronised record pair.
If the current record pair is not a synchronised record pair, then record synchronisation is performed for one or both of the records
in the current record pair. With the exception of 1-TO-1 synchronisation, this involves reading additional records from the NEW
and/or OLD files in order to synchronise with a record in the current record pair.
If a synchronised record pair is established, then the compare of record data is performed so that the records in the record pair are
flagged as being either matched or changed. Following the compare, the next record pair is read sequentially from the NEW and
OLD files and the synchronisation process begins again.
Records in the NEW file that are been skipped as a result of record synchronisation are flagged as having been inserted. Similarly,
skipped records in the OLD file are flagged as having been deleted.
The possible record synchronisation techniques are described below.
1-TO-1 Synchronisation
All current record pairs are synchronised record pairs so no attempt will ever be made to synchronise records. Mismatching record
pairs are flagged as a record change and only additional records in the NEW or OLD files will be flagged as being inserted or
deleted respectively.
This also applies to formatted compare so even records of different record types are considered to be a synchronised record pair.
This technique corresponds to the COMPFILE command parameter SYNC 1TO1.
Read-Ahead Synchronisation
Read-Ahead synchronisation is suitable where the NEW and OLD files are predominantly comprised of equal records, although
some may have been updated, inserted and/or deleted.
Read-ahead synchronisation criteria requires that the compare data within the records that constitute the current record pair must
match.
Note that, for formatted compare, read-ahead synchronisation will consider only record pairs of the same record type as being
potential synchronised record pairs.
If the current record pair is not a synchronised record pair, then records are read sequentially from one or both files in order to
identify a record that constitutes a synchronised record pair with one of the records in the current record pair.
Read-ahead synchronisation for unformatted or formatted compare proceeds as follows:
1. From the OLD file, a specified number of records are read as defined by the read-ahead limit (default 100) until one is
found that matches the NEW file record in the current record pair. If found, this record becomes the OLD file record in the
current record pair.
The read-ahead match value (default 1) identifies the total number of consecutive matching record pairs that must exist,
starting at the current record pair, before the current record pair can be considered a potential synchronised record pair.
By default, matching pairs of blank records are not included in the read-ahead match count of consecutive matching
record pairs. This avoids erroneously synchronising on blank records within inserted or deleted blocks of records. If blank
records are to be included in the read-ahead synchronisation, then this may be set in the compare files panels or by
specifying parameter SYNCONBLANK on the COMPFILE line command.
If the read-ahead number of consecutive matching pairs is not satisfied, then the read-ahead synchronisation process
continues for the records in the OLD file until End-of-Data or the read-ahead limit is reached.
2. Employing the same conditions, the read-ahead process is repeated for records in the NEW file in order to identify a
potential synchronisation record pair with the OLD file record in the original current record pair.
3. If only one possible synchronised record pair is identified, then this becomes the new synchronised record pair.
2013-11-13 13:06:41
SELCOPY/i Reference and User Guide
171
Compare Files/Libraries Menu (=7)
Read-Ahead Synchronisation
If read-ahead in the OLD and NEW files identify different potential synchronised record pairs, then synchronisation will
occur at the record pair with the fewer number of records between it and the current record pair. If this number of
intervening records is equal for both record pairs, then synchronisation occurs for the synchronised record pair found in
the read-ahead of the NEW file.
4. If no potential synchronised record pairs are identified, then the current record pair constitutes a record mismatch
corresponding to a NEW file record insert and an OLD file record delete. The compare operation continues at the next
record pair read sequentially from both files.
This synchronisation technique corresponds to the COMPFILE command parameter SYNC READAHEAD(ralimit ramatch).
Key Synchronisation
Key synchronisation is suitable where an exact match on only data in specified key segments within the records of a record pair is
necessary to identify it as a synchronised record pair. The data contained in the key segments need not be unique and records
containing these key fields need not have been sorted into ascending order based on data in the key segments.
If the files contain records of different record type having synchronisation key segments that are not common to all record types,
then Hierarchical Key Synchronisation must be used.
Key segments in these records are collectively known as the synchronisation key and are defined when invoking the compare files
facility. Segments of the synchronisation key need not necessarily be included within the compare data.
For unformatted compare, the synchronisation key segments must be specified as key field positions and lengths.
For formatted compare that involves records of different record types but with each record containing the same synchronisation key
(e.g. KSDS records), the synchronisation key segments should be specified as a key field positions and lengths. In doing so, the
compare files utility will ignore the applied record structure when performing key synchronisation.
Formatted compare involving only records of the same record type may specify the synchronisation key segments using the
formatted record field names or field references.
Formatted compare involving records of different record types with synchronisation key segments specified using formatted record
field names or field references forces hierarchical key synchronisation.
Key Synchronisation criteria requires that data must match in all key segments defined within the records comprising the current
record pair.
Unsorted Key Synchronisation
Where the keyed records are not sorted by the synchronisation key in ascending order, unsorted key synchronisation
should be used.
Unsorted key synchronisation employs a read-ahead policy to synchronise record pairs, including use of a read-ahead
limit and read-ahead matching record count.
Unsorted key synchronisation criteria is similar to read-ahead synchronisation except that the areas of matching data
within records comprising the current record pair, are defined by the synchronisation key as opposed to the compare data.
Unsorted Key synchronisation proceeds as described for read-ahead synchronisation above.
This synchronisation technique corresponds to the COMPFILE command parameters SYNC UNSORTED KEY
READAHEAD(ralimit ramatch).
Sorted Key Synchronisation
Where the keyed records are sorted by the synchronisation key in ascending order, sorted key synchronisation should be
used.
Sorted Key synchronisation proceeds as follows:
1. The synchronisation key segments of the current record pair are checked to determine whether synchronisation
criteria are satisfied. If so, the compare data in this synchronised record pair is compared and flagged as being
matched or having been changed as appropriate.
2. If not a synchronised pair, then records that follow the current record pair are read sequentially from the file
containing the record with the lower synchronisation key value. Reading stops when End-of-Data is encountered
or a record is found that has synchronisation key data that matches, or is greater than, the synchronisation key
data of the other record in the current record pair.
3. If End-of-Data is encountered then all records in both files, starting at the records in the current record pair up to
the End-of-Data, are flagged as being inserts or deletes as appropriate.
4. If a record with a matching or greater synchronisation key is found then this record becomes the new record in
the current record pair and all records between it and the original current record are flagged as having been
either inserted or deleted as appropriate.
Note that the record in the original current record pair with the higher synchronisation key, remains in the current
record pair.
The synchronisation process is repeated for the new current record pair.
2013-11-13 13:06:41
SELCOPY/i Reference and User Guide
172
Compare Files/Libraries Menu (=7)
Key Synchronisation
This synchronisation technique corresponds to the COMPFILE command parameters SYNC KEY.
Hierarchical Key Synchronisation
Hierarchical key synchronisation is performed automatically for Hierarchical Compare.
Hierarchical key synchronisation is suitable where a hierarchy exists between formatted records or record segments of different
record types in the same file. e.g. A file may be arranged in a hierarchy of records or record segments detailing ORDERS, ORDER
ITEMS and ITEM PARTS so that ORDERS base record segments are followed by a number of ORDER ITEMS record segments
followed by a number of ITEM PARTS record segments.
Note that, if no hierarchical relationship exists between formatted records assigned different keyed record types within the same
file, then a separate non-hierarchical compare files operation should be performed instead, one each for records assigned the
same record type.
The record hierarchy is maintained by key fields defined to at least one of the record types. Key fields in these records are
collectively known as the synchronisation key and are defined when invoking the compare files facility. Fields defined in the
synchronisation key need not necessarily be included within the compare data.
The record type synchronisation key hierarchy is established by the order in which synchronisation keys are specified for each
record type. The first record type to be defined a synchronisation key is attributed the highest level (level-1) entry in the hierarchy,
the next key definition is attributed the level-2 entry, etc. Record types with no defined synchronisation key are equally attributed
the lowest level entry in the synchronisation key hierarchy.
Data contained in the synchronisation key need not be unique and records containing a synchronisation key do not have to be
sorted into ascending order based on data in the synchronisation key fields.
Hierarchical Key Synchronisation criteria requires that the following conditions are true in order identify the current record pair as a
synchronised record pair:
• Keyed or unkeyed records that comprise the current record pair must be of the same record type.
• Keyed records that comprise the current record pair must have matching data in all synchronisation key fields.
• Unkeyed records that comprise the current record pair must have matching compare data and satisfy the read-ahead
matching record count. (True for both sorted and unsorted hierarchical key synchronisation.)
The defining feature of both unsorted and sorted hierarchical key synchronisation processing, is that input of records from the NEW
and/or OLD files stops when a keyed record is read which is rated higher in the synchronisation key hierarchy than the record being
synchronised in the current record pair.
This ensures that records cannot be synchronised with records of the same record type but belonging to a different parent record
type.
This rule applies equally to records comprising the current record pair. i.e. synchronisation will not be attempted for a record within
the current record pair if that record is rated lower in the synchronisation key hierarchy than the other record in the current record
pair.
Unsorted Hierarchical Key Synchronisation
Unsorted hierarchical key synchronisation processing is the same as for unsorted key synchronisation of formatted
records but with the following additional conditions:
1. The read ahead of records from the OLD and NEW files is restricted, not only by the defined read-ahead limit
(keyed records only) and End-of-Data conditions, but also by input of a record which is rated higher in the
synchronisation key hierarchy than that of the record being synchronised.
2. On attempting synchronisation of a keyed record, the read-ahead matching record count value is ignored. This is
because a matching keyed record pair may often be followed by different child record types.
3. Synchronisation of unkeyed records is described in "Hierarchical Key Synchronisation of Unkeyed Records"
below.
4. If no potential synchronised record pairs are identified, then additional processing occurs as described in
"Unsynchronised Hierarchical Record Pair" below.
This synchronisation technique corresponds to the COMPFILE command parameter SYNC UNSORTED KEY
READAHEAD(ralimit ramatch).
Sorted Hierarchical Key Synchronisation
Sorted hierarchical key synchronisation may only be used if all keyed records are sorted in ascending order by their
synchronisation key data.
The sorted hierarchical key synchronisation processing is the same as for sorted key synchronisation of formatted records
but with the following additional conditions:
1. If the current record pair is comprised of records assigned record types of different levels in the synchronisation
key hierarchy, then synchronisation occurs for the record with the key rated higher in the synchronisation key
hierarchy.
2013-11-13 13:06:41
SELCOPY/i Reference and User Guide
173
Compare Files/Libraries Menu (=7)
Hierarchical Key Synchronisation
The record with the lower rated key and all records up to the next synchronised record pair will be flagged as
being inserted or deleted as appropriate.
2. Input of records from the file with the lower synchronisation key is restricted, not only by the End-of-Data
condition, but also by input of a record which is rated higher in the synchronisation key hierarchy than that of the
record being synchronised.
3. Synchronisation of unkeyed records performs read-ahead synchronisation as described in "Hierarchical Key
Synchronisation of Unkeyed Records" below.
4. If no potential synchronised record pairs are identified, then additional processing occurs as described in
"Unsynchronised Hierarchical Record Pair" below.
This synchronisation technique corresponds to the COMPFILE command parameters SYNC KEY.
Hierarchical Key Synchronisation of Unkeyed Records
Hierarchical compare (both sorted or unsorted key synchronisation) supports records tha are assigned a record type
defined without a synchronisation key. For key synchronisation purposes, these unkeyed records are considered to be
lower in the synchronisation key hierarchy than any keyed record.
Synchronisation processing for unkeyed record pairs is identical for both sorted and unsorted hierarchical key
synchronisation and will only be attempted if both records of the current record pair are unkeyed. This is because
synchronisation of an unkeyed record is not attempted if the other record in the current record pair is keyed.
Whether or not records comprising the unkeyed record pair is assigned the same record type, standard read-ahead
synchronisation processing is performed with the following exceptions:
1. The read-ahead limit is ignored for both sorted and unsorted hierarchical synchronisation. The records read will
be limited by the End-of-Data condition and input of a keyed record.
2. Unlike standard sorted key synchronisation, sorted hierarchical key synchronisation supports a read-ahead
matching record count in order to comply with read-ahead synchronisation of unkeyed records.
Unsynchronised Hierarchical Record Pair
For sorted hierarchical key synchronisation only, encountering End-of-Data before a synchronised record pair can be
established will simply flag the records in the current record pair up to the End-of-Data for both files, as having been
inserted or deleted as appropriate.
If, for any other reason, sorted or unsorted hierarchical key synchronisation identifies no potential synchronised record
pairings for records in the current record pair, then different processing occurs depending on the records that comprise the
current record pair:
Unkeyed Record Pair
If both records are unkeyed then this constitutes a record mismatch corresponding to a NEW file record insert
and an OLD file record delete. The compare operation continues at the next record pair read sequentially from
both files.
Keyed Record - Record Type Different
If at least one of the records is keyed and the records are of different record types, then processing proceeds as
follows:
1. Records are read from the same file as the record assigned a record type with the lower level
synchronisation key until one of the following is encountered.
♦ The End-of-Data condition.
♦ For unsorted hierarchical key synchronisation only, the read-ahead limit.
♦ A record of the same record type or one which is rated higher in the synchronisation key
hierarchy.
2. If End-of-Data is encountered then all records in both files, starting at the records in the current record
pair up to the End-of-Data, are flagged as having been inserted or deleted as appropriate.
3. For unsorted hierarchical key synchronisation only, if the read-ahead limit is reached then the compare
file operation terminates with with error ZZSD410E.
4. If a record of the same record type or one with a higher level synchronisation key is found then this
record becomes the new record in the current record pair. All records between this record and the
original current record are flagged is having been either inserted or deleted as appropriate.
Note that the record in the current record pair with the higher level key, remains in the current record
pair.
If the new current record pair is not a synchronised record pair, then hierarchical key syncronisation
processing occurs.
Keyed Record - Record Type Same
If the records are of the same keyed record type, then processing proceeds slightly differently for sorted and
unsorted hierarchical key synchronisation.
2013-11-13 13:06:41
SELCOPY/i Reference and User Guide
174
Compare Files/Libraries Menu (=7)
Compare Files Panels
For unsorted hierarchical key synchronisation:
1. Records are read from both files until either End-of-Data or the read-ahead limit is encountered, or a
record of the same record type or one with a higher level synchronisation key is read.
2. If End-of-Data is encountered in either of the files, then all records in both files, starting at the records in
the current record pair up to the End-of-Data, are flagged as having been inserted or deleted as
appropriate.
3. If the read-ahead limit is reached then the compare file operation terminates with with error ZZSD410E.
4. If a record of the same record type or one with a higher level synchronisation key is found in both files
then these records become the new current record pair. All records between these records and the
records in the original current record pair are flagged is having been either inserted or deleted as
appropriate.
If the new current record pair is not a synchronised record pair, then unsorted hierarchical key
syncronisation processing occurs.
For sorted hierarchical key synchronisation:
1. Records are read from the file with the higher level synchronisation key until either End-of-Data is
encountered or a record is read that is assigned a record type with a higher level synchronisation key.
2. If End-of-Data is encountered, then all records in both files, starting at the records in the current record
pair up to the End-of-Data, are flagged as having been inserted or deleted as appropriate.
3. If a record with a higher level synchronisation key is found then this record becomes the new record in
the current record pair. All records between this record and the original record in the current record pair
are flagged is having been either inserted or deleted as appropriate.
Note that the record in the current record pair with the lower level synchronisation key, remains a record
of the current record pair.
The new current record pair is not synchronised record pair so sorted key syncronisation processing
occurs.
Compare Files Panels
The Compare Files utility panel views (ZZSGCFO0) and their sub-panels are interactive panel windows (window class WINWIPO0)
and may be started via the following:
• Select 'Compare Files' from the Utilities menu.
• Execute the command COMPFile with no parameters from the command line of any window.
• Execute the prefix command "CF" from a file List type window. The resulting Compare Files panel window will treat the
corresponding list entry as the NEW file.
By default, field entries are populated with arguments and options that were entered the last time the Compare Files Utility panels
were used.
Most field entries are optional and need to be activated by entering "/" in the preceding field.
Basic Unformatted Compare Panel
Compare Files: Basic Options
2013-11-13 13:06:41
SELCOPY/i Reference and User Guide
175
Compare Files/Libraries Menu (=7)
Compare Files: Basic Options
Figure 77. SELCOPY/i - Compare Files: Basic Options.
The Compare Files: Basic Options panel view is the first displayed when the Compare Files utility is started interactively.
It is anticipated that most file compare requirements will be satisfied by this panel view. Therefore, having typed entries in the
required panel fields, simply pressing the <Enter> key or, if configured, double-clicking the left mouse button will will action the file
compare in the foreground.
Alternatively, the user can:
• Press PF5 to generate COMPFILE command line syntax.
• Press PF6 to generate a COMPFILE batch job.
If this panel view does not satisfy the user's compare file requisites, then the Extended Options option field should be selected.
Features of basic unformatted compare are described in "Basic Unformatted Compare".
New/Old File>
Member>
Volume>
Identifies the NEW and OLD files to be compared. Dataset names must be fully qualified, quotes being unnecessary but
permitted.
A selectable list of files will be presented if wildcards are entered, or dataset is a PDS/PDSE library and member is left
blank.
Use Extended Options
Select this option if Extended Unformatted Compare , Formatted Compare or Hierarchical Compare is required.
If selected then the Compare Type - Formatted/Unformatted ? panel view is displayed which is a springboard into the
Extended Unformatted Compare Panels or Formatted Compare Panels.
Apart from the file names which are passed to the extended compare panels, all options an field values entered in the
Compare Files: Basic Options panel view will be ignored. The user will be presented with a sequence of panels that
allow specification of the extended compare options.
Extended Options should be selected only if one or more of the following are required:
◊ Compare Position/Length needs to be specfied separately for the NEW and OLD files e.g. compare positions
1-10 from the NEW file with positions 101-110 from the OLD file.
◊ Record Selection needs to be specified separately for the NEW and OLD files e.g. compare the first 100 records
from the NEW file with the second 100 records from the OLD file.
◊ A record synchronisation technique is required other than 1-TO-1 or Read-Ahead with the default limit value of
100, default matching record count value of 1 and no synchronisation on blank records. e.g. Read-Ahead with a
limit of 20 and matching record count 2, Unsorted Key or Sorted Key synchronisation.
◊ Formatted Compare or Hierarchical Compare is required (both using a structure (SDO) or copy book to map
record data).
◊ Records flagged as having been changed, inserted and/or deleted are to be excluded from the output report.
◊ A specific report DSN and/or output files for NEW/OLD matched/inserted/deleted/changed records are required.
Sync>
Select either Read-Ahead or 1-to-1.
2013-11-13 13:06:41
SELCOPY/i Reference and User Guide
176
Compare Files/Libraries Menu (=7)
Compare Files: Basic Options
The Compare Files: Basic Options panel only offers these record synchronisation techniques. For a greater choice
(including Unsorted Key and Sorted Key synchronisation), select the Use Extended Options option.
Read-Ahead uses default read ahead limit value of 100 records, matching record count of 1 record and bypasses
synchronisation on blank records.
This field corresponds to COMPFILE parameter SYNC.
Limit>
Use this option in order terminate the compare process as soon as the specified number of record mismatches has been
encountered.
Specifying zero or blank indicates that no limit is placed, and therefore the whole of each file (or record selection range) is
processed.
This field corresponds to the COMPFILE parameter LIMIT.
Default is 0 (no limit).
Include Matches
Corresponding records from both NEW and OLD files that match are to be included as matched records in the output
report file.
This field corresponds to the COMPFILE parameter INCMATCHED.
Pos>
Record data from both the NEW and OLD files will be compared from this position onwards, for the specified length, or to
the end of the record if no length is specified.
This field corresponds to the COMPFILE parameter STARTCOL.
Default is 1.
Length>
Record data from both the NEW and OLD files will be compared for this length.
This field corresponds to the COMPFILE parameter COMPARELEN.
Default is the length from the start position, specified in the Pos> field, to the end of the record.
Strip>
Record data from both the NEW and OLD files will have any trailing occurrences of the specified character stripped before
comparison is actioned.
This option is particularly useful when fixed length records of different length are being compared, or when fixed length
records are being compared with variable length records.
The single character may be specified as a literal x or 'x', which will be upper cased before stripping occurs, character
string C'x' (character case preserved) or a hexadecimal string X'nn'.
This field corresponds to the COMPFILE parameter STRIP.
Default is blank (X'40').
Start>
Defines the start record for comparison in both the NEW and OLD files.
User should enter a record number, an RBA number (ESDS only), or a key string (KSDS only).
A record/RBA number may be specified as an integer numeric value 123 or as a hexadecimal numeric value X'7B'. A key
string may be specified as a literal abc or 'abc', which will be upper cased before keyed look-up, character string C'abc'
(character case preserved) or a hexadecimal string X'818283'.
This field corresponds to the COMPFILE parameters STARTREC, STARTRBA and STARTKEY.
There is no default.
Record | Key | RBA
Identifies the type of start value as described by Start above.
For>
Specifies the maximum number of records to be compare from both files.
2013-11-13 13:06:41
SELCOPY/i Reference and User Guide
177
Compare Files/Libraries Menu (=7)
Compare Type - Formatted/Unformatted ?
This field corresponds to the COMPFILE parameter FOR.
Default is 0 (all records).
Compare Type - Formatted/Unformatted ?
Figure 78. SELCOPY/i - Compare Files: Compare Type - Formatted/Unformatted?
Option>
Enter the number corresponding to the type of file compare required. Alternatively, position the cursor on the required type
and press the <Enter> key or, if configured, double-click the left mouse button.
1. Unformatted
Select this option for a extended unformatted compare of record data. Subsequent panels will offer only options
suitable for extended unformatted compare.
2. Formatted
Select this option for a formatted compare of structured records. Subsequent panels will require you to enter a
structure (SDO) or COBOL/PL1 copybook/ADATA data set name.
This option should also be selected if Hierarchical Compare is required.
Extended Unformatted Compare Panels
Compare Files (unformatted): New file details and options
Figure 79. SELCOPY/i - Compare Files (unformatted): New file details and options.
2013-11-13 13:06:41
SELCOPY/i Reference and User Guide
178
Compare Files/Libraries Menu (=7)
Compare Files (unformatted): New file details and options
The Compare Files (unformatted): New file details and options panel view is the first displayed for Extended Unformatted
Compare, following selection of "Unformatted" from the Compare Type - Formatted/Unformatted ? panel view.
Pressing the <Enter> key or, if configured, double-clicking the left mouse button will will proceed to the next Extended Unformatted
Compare panel view, Compare Files (unformatted): Old file details and options.
Differences between Basic and Extended unformatted compare are described in "Extended Unformatted Compare".
Dsn/Path>
Member>
Volume>
Identifies the NEW file to be compared. Dataset names must be fully qualified, quotes being unnecessary but permitted.
A selectable list of files will be presented if wildcards are entered, or dataset is a PDS/PDSE library and member is left
blank.
Pos>
Record data from the NEW file will be compared from this position onwards, for the specified length, or to the end of the
record if no length is specified.
This field corresponds to the COMPFILE parameter NSTARTCOL.
Default is 1.
Length>
Record data from the NEW file will be compared for this length.
If the compared record data in the NEW and OLD files are of different lengths, then a mismatch is inevitable and the
record will be flagged as having been changed, inserted or deleted as appropriate to the employed synchronisation
technique.
This field corresponds to the COMPFILE parameter NCOMPARELEN.
Default is the length from the start position, specified in the Pos> field, to the end of the record.
Strip>
Record data from the NEW file will have any trailing occurrences of the specified character stripped before comparison is
actioned.
This option is particularly useful when fixed length records of different length are being compared, or when fixed length
records are being compared with variable length records.
The single character may be specified as a literal x or 'x', which will be upper cased before stripping occurs, character
string C'x' (character case preserved) or a hexadecimal string X'nn'.
This field corresponds to the COMPFILE parameter NSTRIP.
Default is blank (X'40').
Start>
Defines the record in the NEW file at which records will start to be compared.
User should enter a record number, an RBA number (ESDS only), or a key string (KSDS only).
A record/RBA number may be specified as an integer numeric value 123 or as a hexadecimal numeric value X'7B'. A key
string may be specified as a literal abc or 'abc', which will be upper cased before keyed look-up, character string C'abc'
(character case preserved) or a hexadecimal string X'818283'.
This field corresponds to the COMPFILE parameters NSTARTREC, NSTARTRBA and NSTARTKEY.
There is no default.
Record | Key | RBA
Identifies the type of start value as described by Start above.
For>
Specifies the maximum number of records to be compared from the NEW file. The compare operation stops if this
threshold is encountered even if the equivalent threshold for OLD file records has not been reached.
This field corresponds to the COMPFILE parameter NFOR.
Default is 0 (all records).
Limit>
2013-11-13 13:06:41
SELCOPY/i Reference and User Guide
179
Compare Files/Libraries Menu (=7)
Compare Files (unformatted): Old file details and options
Use this option in order terminate the compare process as soon as the specified number of record mismatches has been
encountered.
Specifying zero or blank indicates that no limit is placed, and therefore the whole of each file (or record selection range) is
processed.
This field corresponds to the COMPFILE parameter LIMIT.
Default is 0 (no limit).
Compare Files (unformatted): Old file details and options
Figure 80. SELCOPY/i - Compare Files (unformatted): Old file details and options.
The Compare Files (unformatted): Old file details and options panel view is displayed following the Compare Files
(unformatted): New file details and options panel view.
Pressing the <Enter> key or, if configured, double-clicking the left mouse button will will proceed to the next Extended Unformatted
Compare panel view, Compare Files (unformatted): Re-synchronisation options.
Dsn/Path>
Member>
Volume>
Identifies the OLD file to be compared. Dataset names must be fully qualified, quotes being unnecessary but permitted.
A selectable list of files will be presented if wildcards are entered, or dataset is a PDS/PDSE library and member is left
blank.
Pos>
Record data from the OLD file will be compared from this position onwards, for the specified length, or to the end of the
record if no length is specified.
This field corresponds to the COMPFILE parameter OSTARTCOL.
Default is 1.
Length>
Record data from the OLD file will be compared for this length.
If the compared record data in the NEW and OLD files are of different lengths, then a mismatch is inevitable and the
record will be flagged as having been changed, inserted or deleted as appropriate to the employed synchronisation
technique.
This field corresponds to the COMPFILE parameter OCOMPARELEN.
Default is the length from the start position, specified in the Pos> field, to the end of the record.
Strip>
Record data from the OLD file will have any trailing occurrences of the specified character stripped before comparison is
actioned.
2013-11-13 13:06:41
SELCOPY/i Reference and User Guide
180
Compare Files/Libraries Menu (=7)
Compare Files (unformatted): Re-synchronisation options
This option is particularly useful when fixed length records of different length are being compared, or when fixed length
records are being compared with variable length records.
The single character may be specified as a literal x or 'x', which will be upper cased before stripping occurs, character
string C'x' (character case preserved) or a hexadecimal string X'nn'.
This field corresponds to the COMPFILE parameter OSTRIP.
Default is blank (X'40').
Start>
Defines the record in the OLD file at which records will start to be compared.
User should enter a record number, an RBA number (ESDS only), or a key string (KSDS only).
A record/RBA number may be specified as an integer numeric value 123 or as a hexadecimal numeric value X'7B'. A key
string may be specified as a literal abc or 'abc', which will be upper cased before keyed look-up, character string C'abc'
(character case preserved) or a hexadecimal string X'818283'.
This field corresponds to the COMPFILE parameters OSTARTREC, OSTARTRBA and OSTARTKEY.
There is no default.
Record | Key | RBA
Identifies the type of start value as described by Start above.
For>
Specifies the maximum number of records to be compared from the OLD file. The compare operation stops if this
threshold is encountered even if the equivalent threshold for NEW file records has not been reached.
This field corresponds to the COMPFILE parameter OFOR.
Default is 0 (all records).
Compare Files (unformatted): Re-synchronisation options
Figure 81. SELCOPY/i - Compare Files (unformatted): Re-synchronisation options.
The Compare Files (unformatted): Re-synchronisation options panel view is displayed following the Compare Files
(unformatted): Old file details and options panel view.
Pressing the <Enter> key or, if configured, double-clicking the left mouse button will do the following:
• If Read-Ahead or 1-to-1 synchronisation is selected, the next Extended Unformatted Compare panel view, Compare Files
(unformatted): Output Files is displayed.
• If Keyed (Sorted) or Keyed (Unsorted) synchronisation is selected, then panel Compare Files (unformatted): Specify Key
fields is displayed.
Read-Ahead ...
Select this option to use read-ahead record synchronisation.
Read-ahead synchronisation technique is suitable where the NEW and OLD files are predominantly comprise equal
records, although some may have been changed, inserted or deleted.
2013-11-13 13:06:41
SELCOPY/i Reference and User Guide
181
Compare Files/Libraries Menu (=7)
Compare Files (unformatted): Re-synchronisation options
When a record mismatch is detected, the compare files utility will attempt to resynchronsise the current, mismatching
records by reading a specified number of records, first from the OLD file then from the NEW file, in order to find a match
on a specified number of consecutive records. If successful, a synchronised record pair may be established and the
compare operation continued from these records.
Records that have been skipped as a result of the read-ahead synchronisation are flagged as having been inserted or
deleted as appropriate.
For a detailed description, see "Read-Ahead Synchronisation".
This option corresponds to COMPFILE parameters SYNC READAHEAD.
a maximum of RALimit rec(s).
The maximum number of records to read-ahead in each file when attempting to establish a synchronised record
pair.
For efficiency, this value should be only one more than the maximum number of expected consecutive
non-matching record pairs.
This field corresponds to the number n1 in the COMPFILE parameters SYNC READAHEAD(n1 n2).
Default value is 100.
Re-sync on RAMatch matching rec(s).
The number of consecutive matching record pairs that are required in order to establish a synchronised record
pair. If satisfied, the first matching record pair is identified as a synchronised record pair.
For text files such as program source, where blank comment lines are common-place, then a match on a single
line is likely to produce a false synchronised record pair that results in a less accurate report. In these
circumstances a higher RAMatch value is advised.
This field corresponds to the number n2 in the COMPFILE parameters SYNC READAHEAD(n1 n2).
Default value is 1.
Use blank lines to re-sync.
Since Read-ahead synchronisation is most commonly used on text type files, where matches on blank records
are likely to produce false synchronised record pairs, then, by default, blank lines are ignored when encountered
as part of the read-ahead synchronisation process. i.e. a matching blank line will require a further match on the
next consecutive, non-blank record pair in order to qualify.
Select this option if you wish to bypass this feature.
This field corresponds to the COMPFILE READAHEAD parameter SYNCONBLANK.
1-to-1
Select this option to use 1-TO-1 record synchronisation.
For 1-TO-1 synchronisation the files are assumed to contain corresponding records, so no attempt is made to
resynchronise.
For a detailed description, see "1-TO-1 Synchronisation".
This option corresponds to COMPFILE parameters SYNC 1TO1.
Keyed (Sorted)
Select this option to use Sorted Key Synchronisation.
Keyed (Sorted) synchronisation type is suitable where the NEW and OLD files are sorted in ascending order based on one
or more key segments within each record.
If this option is selected then a sub-panel will be opened, prompting the user to specify the required key segment(s).
An OLD and NEW file record may then be identified as a synchronised record pair when there is an exact match in all key
segments of the record.
Where data mismatches occur in other parts of the records comprising the synchronised record pair, then the record is
flagged as having been changed.
Records that are not established as being one of a synchronised record pair are reported as having been inserted or
deleted as appropriate.
Sorted key synchronisation of unformatted data occurs by reading records from the file with the lower key data until a
record with matching or higher key data is read. Intervening records are then treated as having been inserted or deleted.
For a detailed description, see "Key Synchronisation".
This option corresponds to COMPFILE parameters SYNC KEY.
2013-11-13 13:06:41
SELCOPY/i Reference and User Guide
182
Compare Files/Libraries Menu (=7)
Compare Files (unformatted): Re-synchronisation options
Keyed (Unsorted)
Select this option to use Unsorted Key Synchronisation.
Like the Keyed (Sorted) option, Keyed (Unsorted) synchronisation type is suitable where the NEW and OLD file records
may be identified as a synchronised record pair by an exact match in all key segments of the record. However, records
are not sorted into ascending order based on these key segments.
Synchronisation of keyed unsorted records occurs using the read-ahead method as described for Read-Ahead
synchronisation above. The difference being that data need only match in the defined key segments to qualify as a
potential synchronised record pair.
The associated read-ahead record limit, number of consecutive matching record pairs and blank line synchronisation may
also be specified for unsorted key synchronisation using the same fields used for Read-Ahead synchronisation. Namely "a
maximum of RALimit rec(s).", "Re-sync on RAMatch matching rec(s)." and "Use blank lines to re-sync."
This option corresponds to COMPFILE parameters SYNC UNSORTED KEY.
Include Matched
Select this option to include matching records in the output report file.
This option corresponds to COMPFILE parameter INCMATCHED.
Exclude Changed
Select this option to exclude changed records from the output report file.
This option corresponds to COMPFILE parameter EXCHANGED.
Exclude Inserted
Select this option to exclude inserted records from the output report file.
This option corresponds to COMPFILE parameter EXINSERTED.
Exclude Inserted
Select this option to exclude deleted records from the output report file.
This option corresponds to COMPFILE parameter EXDELETED.
Perform case-insensitive compare
Select this option to perform a case insensitive compare. For unformatted compare, all data will be translated to upper
case before comparison.
This option corresponds to COMPFILE parameter CASEINSENSITIVE (synonym CASEIGNORE).
Report File:
Dsn>
Member>
Volume>
If the Report File option field is selected, then these fields identify the fileid of the file to which the compare files utility
report records will be written. Dataset names must be fully qualified, quotes being unnecessary but permitted.
The report is a structured data file designed to be browsed (not printed) using an SDE structure definition object (SDO),
which will also be generated by the compare files utility.
The associated SDO fileid is constructed simply by adding .SDO to the report fileid. Therefore, for the DSN of the report
file is restricted to 40 bytes in length.
Report output to an HFS dataset is not currently supported.
If the report file and/or the SDO file do not already exist, then they will automatically be allocated by the compare files
utility, relying on SMS ACS to select a suitable storage group of eligable DASD volumes. The report file is allocated using
DCB geometry RECFM=VB, LRECL=32756, BLKSIZE=0 and a space allocation of TRACKS(150,75). The SDO is
allocated using DCB geometry RECFM=VB, LRECL=16380, BLKSIZE=0 and a space allocation of TRACKS(2,2).
If this option is not specified, fileid defaults to "user.SELCOPYI.COMPFILE.REPORT" with SDO fileid
"user.SELCOPYI.COMPFILE.REPORT.SDO".
A selectable list of files will be presented if wildcards are entered, or dataset is a PDS/PDSE library and member is left
blank.
These fields correspond to COMPFILE parameter REPORT.
2013-11-13 13:06:41
SELCOPY/i Reference and User Guide
183
Compare Files/Libraries Menu (=7)
Compare Files (unformatted): Specify Key fields
Compare Files (unformatted): Specify Key fields
Figure 82. SELCOPY/i - Compare Files (unformatted): Specify Key fields.
The Compare Files (unformatted): Specify Key fields panel view is displayed following the Compare Files (unformatted):
Re-synchronisation options panel view if Keyed (Sorted) or Keyed (Unsorted) synchronisation is selected.
Option>
Enter the number corresponding to the type of key field specification. Alternatively, position the cursor on the required type
and press the <Enter> key or, if configured, double-click the left mouse button.
For unformatted compare, key segments may be specified by position and length only.
A blank in this field will proceed to the next Extended Unformatted Compare panel view, Compare Files (unformatted):
Output Files.
1. Specify Key fields (Position/Length)
A separate panel will be displayed in which the user can enter a table row entry for each required key segment.
Each table row entry consists of the key length, and position in both NEW and OLD file records.
Compare Files: Specify Key Pos/Len
Figure 83. SELCOPY/i - Compare Files - Specify Key Pos/Len.
The Compare Files: Specify Key Pos/Len panel (ZZSGCFKP) is displayed following selection of option 1. from the Compare
Files (unformatted): Specify Key fields panel view.
Standard SELCOPY/i table editing techniques should be used to add a table row entry for each required key segment.
Each table row entry consists of a key length and key start positions in the NEW and OLD file records. Although the key length is
fixed, the key position may differ in NEW and OLD file records.
2013-11-13 13:06:41
SELCOPY/i Reference and User Guide
184
Compare Files/Libraries Menu (=7)
Compare Files: Specify Key Pos/Len
For both unformatted compare and formatted compare, key segments specified using fixed positions and lengths apply to all record
types. For record type specific keys (hierarchical compare), key segments must be selected by column name.
Key segments should be entered in the order in which they constitute the key. This is particularly important when identifying a
record key to be used for sorted key synchronisation. For unsorted key synchronisation, the order in which key segments have
been entered is the order in which the segments will be compared when establishing a synchronised record pair. Performance may
be improved if key segments containing volatile data are specified first.
Pressing <PF3> to exit the panel, will also save the table of key segments and return to the Compare Files (unformatted):
Specify Key fields panel view.
Compare Files (unformatted): Output Files
Figure 84. SELCOPY/i - Compare Files (unformatted): Output Files.
If Keyed synchronisation was specified, the Compare Files (unformatted): Output Files panel view is displayed following the
Compare Files (unformatted): Specify Key fields panel view. Otherwise, this panel view is displayed following the Compare Files
(unformatted): Re-synchronisation options panel view.
Pressing the <Enter> key or, if configured, double-clicking the left mouse button will proceed to the next Extended Unformatted
Compare panel view, Compare Files (unformatted): Options / Action.
The Output Files panel view identifies the output files to which a record from the NEW and/or OLD files are to be copied, based on
its flagged status (matched, changed, inserted or deleted). The output fileid may be an HFS file path, sequential data set or
PDS/PDSE library member.
Data set names must be fully qualified, quotes being unnecessary but permitted.
A selectable list of files will be presented if wildcards are entered, or if a dataset is specified which is a PDS/PDSE library and the
member field is left blank.
If a specified output file is non-HFS and does not already exist, then it will automatically be allocated by the compare files utility,
relying on SMS ACS to select a suitable storage group of eligable DASD volumes. The data set is allocated using DCB RECFM,
LRECL and BLKSIZE geometry that best matches the NEW or OLD file as appropriate.
Changed-New:
Dsn/Path>
Member>
Volume>
If the Changed-New option field is selected, then these fields identify the fileid of the file to which NEW file records,
flagged as having been changed (CN), are to be copied.
This fileid corresponds to the COMPFILE parameter WRITECN cn_fileid.
Changed-Old:
Dsn/Path>
Member>
Volume>
If the Changed-Old option field is selected, then these fields identify the fileid of the file to which OLD file records, flagged
as having been changed (CO), are to be copied.
This fileid corresponds to the COMPFILE parameter WRITECO co_fileid.
2013-11-13 13:06:41
SELCOPY/i Reference and User Guide
185
Compare Files/Libraries Menu (=7)
Compare Files (unformatted): Output Files
Inserted-New:
Dsn/Path>
Member>
Volume>
If the Inserted-New option field is selected, then these fields identify the fileid of the file to which NEW file records, flagged
as having been inserted (I), are to be copied.
This fileid corresponds to the COMPFILE parameter WRITEIN in_fileid.
Deleted-Old:
Dsn/Path>
Member>
Volume>
If the Deleted-Old option field is selected, then these fields identify the fileid of the file to which OLD file records, flagged
as having been deleted (D), are to be copied.
This fileid corresponds to the COMPFILE parameter WRITEDO do_fileid.
Matched-New:
Dsn/Path>
Member>
Volume>
If the Matched-New option field is selected, then these fields identify the fileid of the file to which NEW file records, flagged
as being matched, are to be copied.
This fileid corresponds to the COMPFILE parameter WRITEMN mn_fileid.
Matched-Old:
Dsn/Path>
Member>
Volume>
If the Matched-Old option field is selected, then these fields identify the fileid of the file to which OLD file records, flagged
as being matched, are to be copied.
This fileid corresponds to the COMPFILE parameter WRITEMO mo_fileid.
Compare Files (unformatted): Options / Action
Figure 85. SELCOPY/i - Compare Files (unformatted): Options / Action.
The Compare Files (unformatted): Options / Action panel view is the last of the Extended Unformatted Compare panels and is
displayed following the Compare Files (unformatted): Output Files panel view.
Option>
Enter the number corresponding to the action required. Alternatively, position the cursor on the action description and
press the <Enter> key or, if configured, double-click the left mouse button.
1. Execute Compare Files in the foreground
The compare utility will run from your SELCOPY/i session and the structured output report file will be
automatically displayed in an SDE browse window view.
2013-11-13 13:06:41
SELCOPY/i Reference and User Guide
186
Compare Files/Libraries Menu (=7)
Compare Files (unformatted): Options / Action
2. Generate Compare Files Command Syntax (CMX)
COMPFILE command line syntax to run the compare files utility using the chosen options is generated and
placed in a temporary CMX file. This command may be executed using ACTION point-and-shoot execution
<F16> or copied into the user's HOME file and saved for future execution.
3. Generate Compare Files batch JCL
Creates a JCL job stream that executes the SDEAMAIN program. SDEIN input comprises the COMPFILE
command with parameters reflecting options specified in these panels.
The output report, generated on execution of this batch job, may be viewed from your SELCOPY/i session by
issuing the command CFOUT report_file_name, or by issuing CFOUT as a prefix command against the report
DSN or member name in a dataset list or library list window.
Formatted Compare Panels
The Formatted Compare panels also provide facility to specify field values necessary for Hierarchical Compare.
Compare Files (formatted): New file details and options
Figure 86. SELCOPY/i - Compare Files (formatted): New file details and options.
The Compare Files (formatted): New file details and options panel view is the first displayed for Formatted/Hierarchical
Compare, following selection of "Formatted" from the Compare Type - Formatted/Unformatted ? panel view.
Pressing the <Enter> key or, if configured, double-clicking the left mouse button will will proceed to the next Formatted Compare
panel view, Compare Files (formatted): Old file details and options.
Descriptions of these types of compare may be found under "Formatted Compare" and "Hierarchical Compare".
Dsn/Path>
Member>
Volume>
Identifies the NEW file to be compared. Dataset names must be fully qualified, quotes being unnecessary but permitted.
A selectable list of files will be presented if wildcards are entered, or dataset is a PDS/PDSE library and member is left
blank.
This field is mandatory.
Structure/Copybook overlay
Dsn/Path>
Member>
Volume>
Type
Specifies the structure type ( SDO, COBOL or PL1 Copybook, COBOL or PL1 ADATA output) and structure name
(sequential data set or PDS/PDSE library member) to be used to map record data in NEW file.
A selectable list of files will be presented if wildcards are entered, or dataset is a PDS/PDSE library and member is left
blank.
2013-11-13 13:06:41
SELCOPY/i Reference and User Guide
187
Compare Files/Libraries Menu (=7)
Compare Files (formatted): New file details and options
This field corresponds to the COMPFILE parameter USING SDO/COBOL/PL1/ADATA new_structname.
There is no default.
Recompile> Y/N
If Structure/Copybook overlay refers to a COBOL, PL1 or ADATA source file (not an SDO) then a compile step must be
performed in order to turn the source copybook into SELCOPYi's own internal structure (SDO) format. A temporary SDO
will be created, lasting the duration of the SELCOPYi session, making subsequent reference to the same copybook during
the session much faster.
If, however, the copybook (or any of its included components) is modified during the session, then a recompile of the
source will normally be required.
For performance reasons N (meaning no recompile should occur) is the default.
Specify Y to force a copybook recompile each time the process is run. Alternatively type the primary command:
SD DROP <copybook_name>
Start>
Defines the record in the NEW file at which records will start to be compared.
User should enter a record number, an RBA number (ESDS only), or a key string (KSDS only).
A record/RBA number may be specified as an integer numeric value 123 or as a hexadecimal numeric value X'7B'. A key
string may be specified as a literal abc or 'abc', which will be upper cased before keyed look-up, character string C'abc'
(character case preserved) or a hexadecimal string X'818283'.
This field corresponds to the COMPFILE parameters NSTARTREC, NSTARTRBA and NSTARTKEY.
There is no default.
Record | Key | RBA
Identifies the type of start value as described by Start above.
For>
Specifies the maximum number of records to be compared from the NEW file. The compare operation stops if this
threshold is encountered even if the equivalent threshold for OLD file records has not been reached.
This field corresponds to the COMPFILE parameter NFOR.
Default is 0 (all records).
Limit>
Use this option in order terminate the compare process as soon as the specified number of record mismatches has been
encountered.
Specifying zero or blank indicates that no limit is placed, and therefore the whole of each file (or record selection range) is
processed.
This field corresponds to the COMPFILE parameter LIMIT.
Default is 0 (no limit).
Compare Files (formatted): Old file details and options
2013-11-13 13:06:41
SELCOPY/i Reference and User Guide
188
Compare Files/Libraries Menu (=7)
Compare Files (formatted): Old file details and options
Figure 87. SELCOPY/i - Compare Files (formatted): Old file details and options.
The Compare Files (formatted): Old file details and options panel view is displayed following the Compare Files (formatted):
New file details and options panel view.
Pressing the <Enter> key or, if configured, double-clicking the left mouse button will will proceed to the next Formatted/Hierarchical
Compare panel view, Compare Files (formatted): Re-synchronisation options.
Dsn/Path>
Member>
Volume>
Identifies the OLD file to be compared. Dataset names must be fully qualified, quotes being unnecessary but permitted.
A selectable list of files will be presented if wildcards are entered, or dataset is a PDS/PDSE library and member is left
blank.
This field is mandatory.
Structure/Copybook overlay
Dsn/Path>
Member>
Volume>
Type
If the Structure/Copybook overlay option field is selected, then these fields specify the structure type ( SDO, COBOL or
PL1 Copybook, COBOL or PL1 ADATA output) and structure name (sequential data set or PDS/PDSE library member) to
be used to map record data in OLD file.
These fields are required only if a structure is to be used for the OLD file which is different to that used by the NEW file.
Record type definitions of the same name must exist in both the NEW and OLD structures. Furthermore, only fields of the
same name within these matching record types will be compared. i.e. Only records assigned a record type that is defined
in both structures, are eligible for compare and only record data occupying fields of equal field name are compared.
Fields of the same name will be compared without error even though they may be of different data types. Note that a
character field, when compared with a field of numeric data type, must contain valid numeric data (potentially including
exponent 'E' or 'e', sign and/or exponent sign '+' or '-', decimal point '.' and/or commas ','.)
A selectable list of files will be presented if wildcards are entered, or dataset is a PDS/PDSE library and member is left
blank.
This field corresponds to the COMPFILE parameter USING SDO/COBOL/PL1/ADATA old_structname.
There is no default.
Recompile> Y/N
If Structure/Copybook overlay refers to a COBOL, PL1 or ADATA source file (not an SDO) then a compile step must be
performed in order to turn the source copybook into SELCOPYi's own internal structure (SDO) format. A temporary SDO
will be created, lasting the duration of the SELCOPYi session, making subsequent reference to the same copybook during
the session much faster.
If, however, the copybook (or any of its included components) is modified during the session, then a recompile of the
source will normally be required.
For performance reasons N (meaning no recompile should occur) is the default.
Specify Y to force a copybook recompile each time the process is run. Alternatively type the primary command:
SD DROP <copybook_name>
Start>
Defines the record in the OLD file at which records will start to be compared.
User should enter a record number, an RBA number (ESDS only), or a key string (KSDS only).
A record/RBA number may be specified as an integer numeric value 123 or as a hexadecimal numeric value X'7B'. A key
string may be specified as a literal abc or 'abc', which will be upper cased before keyed look-up, character string C'abc'
(character case preserved) or a hexadecimal string X'818283'.
This field corresponds to the COMPFILE parameters OSTARTREC, OSTARTRBA and OSTARTKEY.
There is no default.
Record | Key | RBA
Identifies the type of start value as described by Start above.
For>
2013-11-13 13:06:41
SELCOPY/i Reference and User Guide
189
Compare Files/Libraries Menu (=7)
Compare Files (formatted): Re-synchronisation options
Specifies the maximum number of records to be compared from the OLD file. The compare operation stops if this
threshold is encountered even if the equivalent threshold for NEW file records has not been reached.
This field corresponds to the COMPFILE parameter OFOR.
Default is 0 (all records).
Compare Files (formatted): Re-synchronisation options
Figure 88. SELCOPY/i - Compare Files (formatted): Re-synchronisation options.
The Compare Files (formatted): Re-synchronisation options panel view is displayed following the Compare Files (formatted):
Old file details and options panel view.
Pressing the <Enter> key or, if configured, double-clicking the left mouse button will will do the following:
• If Read-Ahead or 1-to-1 synchronisation is selected, the next Formatted Compare panel view, Compare Files (formatted):
Output Files is displayed.
• If Keyed (Sorted) or Keyed (Unsorted) synchronisation is selected, then panel Compare Files (formatted): Specify Key
fields is displayed. Note that Keyed synchronisation is required for Hierarchical Compare.
Read-Ahead ...
Select this option to use read-ahead record synchronisation.
Read-ahead synchronisation technique is suitable where the NEW and OLD files are predominantly comprise equal
records, although some may have been changed, inserted or deleted.
When a record mismatch is detected, the compare files utility will attempt to resynchronsise the current, mismatching
records by reading a specified number of records, first from the OLD file then from the NEW file, in order to find a match
on a specified number of consecutive records. If successful, a synchronised record pair may be established and the
compare operation continued from these records.
Note that, before attempting match data in a record pair, Read-ahead synchronisation of formatted records will first verify
that the record pair are of the same record type.
Records that have been skipped as a result of the read-ahead synchronisation are flagged as having been inserted or
deleted as appropriate.
For a detailed description, see "Read-Ahead Synchronisation".
This option corresponds to COMPFILE parameters SYNC READAHEAD.
a maximum of RALimit rec(s).
The maximum number of records to read-ahead in each file when attempting to establish a synchronised record
pair.
For efficiency, this value should be only one more than the maximum number of expected consecutive
non-matching record pairs.
This field corresponds to the number n1 in the COMPFILE parameters SYNC READAHEAD(n1 n2).
Default value is 100.
Re-sync on RAMatch matching rec(s).
2013-11-13 13:06:41
SELCOPY/i Reference and User Guide
190
Compare Files/Libraries Menu (=7)
Compare Files (formatted): Re-synchronisation options
The number of consecutive matching record pairs that are required in order to establish a synchronised record
pair. If satisfied, the first matching record pair is identified as a synchronised record pair.
This field corresponds to the number n2 in the COMPFILE parameters SYNC READAHEAD(n1 n2).
Default value is 1.
1-to-1
Select this option to use 1-TO-1 record synchronisation.
For 1-TO-1 synchronisation the files are assumed to contain corresponding records, so no attempt is made to
resynchronise.
For a detailed description, see "1-TO-1 Synchronisation".
This option corresponds to COMPFILE parameters SYNC 1TO1.
Keyed (Sorted)
Select this option to use Sorted Key Synchronisation or Sorted Hierarchical Key Synchronisation.
Keyed (Sorted) synchronisation type is suitable where the NEW and OLD files are sorted based on one or more key
segments within each record.
If this option is selected then a sub-panel will be opened, prompting the user to specify the required key segment(s).
An OLD and NEW file record may then be identified as a synchronised record pair when there is an exact match in all key
segments of the record.
Where data mismatches occur in other parts of the records comprising the synchronised record pair, then the record is
flagged as having been changed.
Records that are not established as being one of a synchronised record pair are reported as having been inserted or
deleted as appropriate.
In general, synchronisation occurs by reading records from the file with the lower key data until a record with matching or
higher key data is read. Intervening records are then treated as having been inserted or deleted.
For Sorted Hierarchical Key Synchronisation, record types that have been defined a key must be sorted in ascending sort
order within its hierarchical group. e.g. records of sorted keyed record type, ALBUM, has child records of sorted keyed
record type, TRACKS. Records of record type TRACKS are sorted by field Track_Number (the key field) which starts at
Track_Number=1 following each new ALBUM parent record.
For a detailed description, see "Key Synchronisation" and "Hierarchical Key Synchronisation".
This option corresponds to COMPFILE parameters SYNC KEY.
Keyed (Unsorted)
Select this option to use Unsorted Key Synchronisation and Unsorted Hierarchical Key Synchronisation.
Like the Keyed (Sorted) option, Keyed (Unsorted) synchronisation type is suitable where the NEW and OLD file records
may be identified as a synchronised record pair by an exact match in all key segments of the record. However, records
are not sorted into ascending order based on these key segments.
Synchronisation of keyed unsorted records occurs using the read-ahead method as described for Read-Ahead
synchronisation above. The difference being that data need only match in the defined key segments to qualify as a
potential synchronised record pair.
The associated read-ahead record limit and number of consecutive matching record pairs may also be specified for
unsorted key synchronisation using the same fields used for Read-Ahead synchronisation. Namely "a maximum of
RALimit rec(s)." and "Re-sync on RAMatch matching rec(s)."
This option corresponds to COMPFILE parameters SYNC UNSORTED KEY.
Include Matched
Select this option to include matching records in the output report file.
This option corresponds to COMPFILE parameter INCMATCHED.
Exclude Changed
Select this option to exclude changed records from the output report file.
For a formatted compare only, reporting a record which is flagged as having been changed will not only display the
formatted record data from the NEW and OLD files, but also a number of Field records which identify the name of each
changed field.
Note that, opting to exclude these records may result in a significant performance improvement since the process of
comparing field-by-field is terminated at the first mismatch in each record.
2013-11-13 13:06:41
SELCOPY/i Reference and User Guide
191
Compare Files/Libraries Menu (=7)
Compare Files (formatted): Specify Key fields
This option corresponds to COMPFILE parameter EXCHANGED.
Exclude Inserted
Select this option to exclude inserted records from the output report file.
This option corresponds to COMPFILE parameter EXINSERTED.
Exclude Inserted
Select this option to exclude deleted records from the output report file.
This option corresponds to COMPFILE parameter EXDELETED.
Perform case-insensitive compare
Select this option to perform a case insensitive compare. For a formatted and hierarchical compare, character (AN) fields
will be translated to upper case before comparison.
This option corresponds to COMPFILE parameter CASEINSENSITIVE (synonym CASEIGNORE).
Report File:
Dsn>
Member>
Volume>
If the Report File option field is selected, then these fields identify the fileid of the file to which the compare files utility
report records will be written. Dataset names must be fully qualified, quotes being unnecessary but permitted.
The report is a structured data file designed to be browsed (not printed) using an SDE structure definition object (SDO),
which will also be generated by the compare files utility.
The associated SDO fileid is constructed simply by adding .SDO to the report fileid. Therefore, for the DSN of the report
file is restricted to 40 bytes in length.
Report output to an HFS dataset is not currently supported.
If the report file and/or the SDO file do not already exist, then they will automatically be allocated by the compare files
utility, relying on SMS ACS to select a suitable storage group of eligable DASD volumes. The report file is allocated using
DCB geometry RECFM=VB, LRECL=32756, BLKSIZE=0 and a space allocation of TRACKS(150,75). The SDO is
allocated using DCB geometry RECFM=VB, LRECL=16380, BLKSIZE=0 and a space allocation of TRACKS(2,2).
If this option is not specified, fileid defaults to "user.SELCOPYI.COMPFILE.REPORT" with SDO fileid
"user.SELCOPYI.COMPFILE.REPORT.SDO".
A selectable list of files will be presented if wildcards are entered, or dataset is a PDS/PDSE library and member is left
blank.
These fields correspond to COMPFILE parameter REPORT.
Compare Files (formatted): Specify Key fields
Figure 89. SELCOPY/i - Compare Files (formatted): Specify Key fields.
Option>
2013-11-13 13:06:41
SELCOPY/i Reference and User Guide
192
Compare Files/Libraries Menu (=7)
Compare Files: Specify Key Pos/Len
Enter the number corresponding to the type of key field specification. Alternatively, position the cursor on the required type
and press the <Enter> key or, if configured, double-click the left mouse button.
Formatted compare key segments may be specified by position and length or by formatted column name. Hierarchical
compare key segments must be specified by formatted column name.
A blank in this field will proceed to the next Extended Formatted Compare panel view, Compare Files (formatted): Output
Files.
1. Select Key Columns by fixed Position/Length
A separate panel will be displayed in which the user can enter a table row entry for each required key segment.
Each table row entry consists of the key length, and position in both NEW and OLD file records.
2. Select Key Columns by Name
A separate panel will be displayed containing a list of record types defined by the NEW structure (SDO) or
copybook. For informational purposes only, each record type is accompanied by its USE WHEN condition, where
specified, which enables SDE to identify each particular record type.
From this panel, select those record types to which key segments are to be defined. A panel will be opened for
each selected record type allowing the user to exclude and re-order the field columns, leaving only those to be
used as key segments.
Compare Files: Specify Key Pos/Len
Figure 90. SELCOPY/i - Compare Files - Specify Key Pos/Len.
The Compare Files: Specify Key Pos/Len panel (ZZSGCFKP) is displayed following selection of option 1. from the Compare
Files (formatted): Specify Key fields panel view.
Standard SELCOPY/i table editing techniques should be used to add a table row entry for each required key segment.
Each table row entry consists of a key length and key start positions in the NEW and OLD file records. Although the key length is
fixed, the key position may differ in NEW and OLD file records.
For both unformatted compare and formatted compare, key segments specified using fixed positions and lengths apply to all record
types. For record type specific keys (hierarchical compare), key segments must be selected by column name.
Key segments should be entered in the order in which they constitute the key. This is particularly important when identifying a
record key to be used for sorted key synchronisation. For unsorted key synchronisation, the order in which key segments have
been entered is the order in which the segments will be compared when establishing a synchronised record pair. Performance may
be improved if key segments containing volatile data are specified first.
Pressing <PF3> to exit the panel, will also save the table of key segments and return to the Compare Files (formatted): Specify
Key fields panel view.
SELCOPY/i Compare Files - KEY Columns (Record Types List)
2013-11-13 13:06:41
SELCOPY/i Reference and User Guide
193
Compare Files/Libraries Menu (=7)
SELCOPY/i Compare Files - KEY Columns (Record Types List)
Figure 91. SELCOPY/i - Compare Files - KEY Columns (Record-Types List)
The Compare Files - Key Columns (Record Types List) panel (ZZSGCFKC) is displayed following selection of option 2. from the
Compare Files (formatted): Specify Key fields panel view.
If more than one record type is displayed in this list (i.e. the structure contains multiple record type definitions), then selecting key
segment fields for any of these record types will imply Hierarchical Compare.
Select each record type for which key columns are to be specified by entering 'S' against the record type in the Sel column or by
positioning the cursor on the required record type then either pressing the <Enter> key or, if configured, double-click the left mouse
button. To deselect the record type key field definition, remove the 'S' against its entry in the 'Sel' column.
For each selected record type, the Compare Files - Select from Field Names List panel (ZZSGCFOF) is opened displaying a list of
fields comprising that record type. The list of field names should be edited so that only the required key fields are diplayed in the
correct order.
On return from the selectable field list, the Fields Selected column will be updated to indicate the number of fields included in the
key.
For Hierarchical Compare it is imperative that the list of record types are ordered so that the level 1 (highest priority) keyed record
type occurs first in the list, followed by the level 2 keyed record type, etc. Use standard SELCOPY/i table editing techniques to
re-order the record types as required.
Pressing <PF3> to exit the panel, will also save the table of selected keyed record types and return to the Compare Files
(formatted): Specify Key fields panel view.
SELCOPY/i Compare Files - Select from Field Names List
Figure 92. SELCOPY/i - Compare Files - Select from Field Names List.
The Compare Files - Select from Field Names List panel (ZZSGCFOF) is displayed for each record type selected from the
Compare Files - Key Columns (Record Types List) panel.
2013-11-13 13:06:41
SELCOPY/i Reference and User Guide
194
Compare Files/Libraries Menu (=7)
SELCOPY/i Compare Files - Select from Field Names List
A list of field names, defined by the selected record type, is presented to the user as an editable table. Standard SELCOPY/i table
editing techniques should be used to exclude and re-order the fields so that only fields which comprise the key are displayed and in
the correct order.
Only included entries are used to define the key, therefore a field name may be excluded (as opposed to deleted) in order to
remove it from the key. This has the benefit that it may easily be included again later if necessary. For example, the following
commands may be executed to filter (include) specific table rows:
WHERE SelectFld >> 'ABC-' or #1 << 'DEF-'
Exclude all entries except those where the Field Name begins with literal "ABC-", or "DEF-". Note that the Field Name
column is field reference number 1.
LESS SelectTyp='AN'
Exclude all entries where the Field Type is AN. (Entries that were already excluded will be unaffected.)
Key field segments should occur in the order in which they constitute the key. This is particularly important when identifying a
record key to be used for sorted key synchronisation. For unsorted key synchronisation, the order in which key fields have been
entered is the order in which the key fields will be compared when establishing a synchronised record pair. Performance may be
improved if key fields containing volatile data are specified first.
Pressing <PF3> to exit the panel, will also save the table of selected key field names and return to the Compare Files - Key
Columns (Record Types List) panel.
Compare Files (formatted): Output Files
Figure 93. SELCOPY/i - Compare Files (formatted): Output Files.
If Keyed synchronisation was specified, the Compare Files (formatted): Output Files panel view is displayed following the
Compare Files (formatted): Specify Key fields panel view. Otherwise, this panel view is displayed following the Compare Files
(formatted): Re-synchronisation options panel view.
Pressing the <Enter> key or, if configured, double-clicking the left mouse button will proceed to the next Formatted/Hierarchical
Compare panel view, Compare Files (formatted): Options / Action.
The Output Files panel view identifies the output files to which a record from the NEW and/or OLD files are to be copied, based on
its flagged status (matched, changed, inserted or deleted). The output fileid may be an HFS file path, sequential data set or
PDS/PDSE library member.
Data set names must be fully qualified, quotes being unnecessary but permitted.
A selectable list of files will be presented if wildcards are entered, or if a dataset is specified which is a PDS/PDSE library and the
member field is left blank.
If a specified output file is non-HFS and does not already exist, then it will automatically be allocated by the compare files utility,
relying on SMS ACS to select a suitable storage group of eligable DASD volumes. The data set is allocated using DCB RECFM,
LRECL and BLKSIZE geometry that best matches the NEW or OLD file as appropriate.
Changed-New:
Dsn/Path>
Member>
Volume>
If the Changed-New option field is selected, then these fields identify the fileid of the file to which NEW file records,
flagged as having been changed (CN), are to be copied.
2013-11-13 13:06:41
SELCOPY/i Reference and User Guide
195
Compare Files/Libraries Menu (=7)
Compare Files (formatted): Output Files
This fileid corresponds to the COMPFILE parameter WRITECN cn_fileid.
Changed-Old:
Dsn/Path>
Member>
Volume>
If the Changed-Old option field is selected, then these fields identify the fileid of the file to which OLD file records, flagged
as having been changed (CO), are to be copied.
This fileid corresponds to the COMPFILE parameter WRITECO co_fileid.
Inserted-New:
Dsn/Path>
Member>
Volume>
If the Inserted-New option field is selected, then these fields identify the fileid of the file to which NEW file records, flagged
as having been inserted (I), are to be copied.
This fileid corresponds to the COMPFILE parameter WRITEIN in_fileid.
Deleted-Old:
Dsn/Path>
Member>
Volume>
If the Deleted-Old option field is selected, then these fields identify the fileid of the file to which OLD file records, flagged
as having been deleted (D), are to be copied.
This fileid corresponds to the COMPFILE parameter WRITEDO do_fileid.
Matched-New:
Dsn/Path>
Member>
Volume>
If the Matched-New option field is selected, then these fields identify the fileid of the file to which NEW file records, flagged
as being matched, are to be copied.
This fileid corresponds to the COMPFILE parameter WRITEMN mn_fileid.
Matched-Old:
Dsn/Path>
Member>
Volume>
If the Matched-Old option field is selected, then these fields identify the fileid of the file to which OLD file records, flagged
as being matched, are to be copied.
This fileid corresponds to the COMPFILE parameter WRITEMO mo_fileid.
Compare Files (formatted): Options / Action
Figure 94. SELCOPY/i - Compare Files (formatted): Options / Action.
2013-11-13 13:06:41
SELCOPY/i Reference and User Guide
196
Compare Files/Libraries Menu (=7)
Compare Files (formatted): Options / Action
Option>
Enter the number corresponding to the action required. Alternatively, position the cursor on the action description and
press the <Enter> key or, if configured, double-click the left mouse button.
1. Select Record Types for comparison
By default records of any record type are included in the compare process. Use this option to restrict the
compare process to records assigned the specified record types only.
A separate panel will be displayed containing a list of record types defined by the NEW structure (SDO) or
copybook. For informational purposes only, each record type is accompanied by its USE WHEN condition, where
specified, which enables SDE to identify each particular record type.
From this panel, select those record types to included in the compare process.
2. Select Column Names for comparison
By default all fields (from all selected record-types) are included in the compare process. Use this option to
restrict the compare process to a subset of field names identified within those record types selected for compare.
A separate panel will be displayed containing a list of record types defined by the NEW structure (SDO) or
copybook. For informational purposes only, each record type is accompanied by its USE WHEN condition, where
specified, which enables SDE to identify each particular record type.
From this panel, select those record types for which fields are to be excluded from the compare process. Another
panel will be opened for each selected record type allowing the user to exclude and field columns from the
compare.
3. Execute Compare Files in the foreground
The compare utility will run from your SELCOPY/i session and the structured output report file will be
automatically displayed in an SDE browse window view.
4. Generate Compare Files Command Syntax (CMX)
COMPFILE command line syntax to run the compare files utility using the chosen options is generated and
placed in a temporary CMX file. This command may be executed using ACTION point-and-shoot execution
<F16> or copied into the user's HOME file and saved for future execution.
5. Generate Compare Files batch JCL
Creates a JCL job stream that executes the SDEAMAIN program. SDEIN input comprises the COMPFILE
command with parameters reflecting options specified in these panels.
Following The output report, generated on execution of this batch job, may be viewed from your SELCOPY/i
session by issuing the command CFOUT report_file_name, or by issuing CFOUT as a prefix command against
the report DSN or member name in a dataset list or library list window.
SELCOPY/i Compare Files - Select Record Types to Compare
Figure 95. SELCOPY/i - Compare Files - Select Record-Types.
The Compare Files - Select Record Types to Compare panel (ZZSGCFOV) is displayed following selection of option 1. from the
Compare Files (formatted): Options / Action panel view.
This panel contains a list of all record types defined by the NEW structure (SDO) or copybook presented to the user as an editable
table. Any USE WHEN condition, used to determine whether record data fits the record type definition, is also displayed.
Records assigned a record type that is included in this list will be eligible for compare. Use standard SELCOPY/i table editing
techniques to exclude or delete record types from this list and so exclude records assigned these record types from being
2013-11-13 13:06:41
SELCOPY/i Reference and User Guide
197
Compare Files/Libraries Menu (=7)
SELCOPY/i Compare Files - Select Record Types to Compare
compared. For example, the following command may be executed to exclude all rows except those where the record type name
begins with literal "ABC-":
WHERE
ViewRT >> 'ABC-'
Pressing <PF3> to exit the panel, will also save the table of selected keyed record types and return to the Compare Files
(formatted): Options / Action panel view.
This panel corresponds to the COMPFILE parameter VIEW rectype.
Default is to include all records in the NEW and OLD files in the compare regardless of whether they are assigned a record type in
the NEW structure.
SELCOPY/i Compare Files - Select Field Names to Compare
Figure 96. SELCOPY/i - Compare Files - Select Field Names to Compare.
The Compare Files - Select Field Names to Compare panel (ZZSGCFOS) is displayed following selection of option 2. from the
Compare Files (formatted): Options / Action panel view.
Select each record type for which specific field columns are to be selected by entering 'S' against the record type in the Sel column
or by positioning the cursor on the required record type then either pressing the <Enter> key or, if configured, double-click the left
mouse button. To deselect the record type key field definition, remove the 'S' against its entry in the 'Sel' column.
For each selected record type, the Compare Files - Select from Field Names List panel (ZZSGCFOF) is opened displaying a list of
fields comprising that record type. The list of field names should be edited so that only the required key fields are diplayed. The
order in which these fields occur in this list will be the order in which they are compared.
On return from the selectable field list, the Fields Selected column will be updated to indicate the number of fields included for
compare.
Note that, selecting fields from a record type that has been excluded from the compare in panel Compare Files - Select
Record-Types (ZZSGCFOV), will generate the appropriate COMPFILE syntax but will ultimately have no effect. The record type
must be included for compare in order for its selected fields to be compared.
Pressing <PF3> to exit the panel, will also save the table of selected record types for which selected fields will be compared, and
return to the Compare Files (formatted): Options / Action panel view.
This panel corresponds to the COMPFILE parameters SELECT fieldname, ... FROM rectype
Default is to include all field columns of the same name belonging to record types of the same name in old_structname and
new_structname.
SELCOPY/i Compare Files - Select Field Names List
2013-11-13 13:06:41
SELCOPY/i Reference and User Guide
198
Compare Files/Libraries Menu (=7)
SELCOPY/i Compare Files - Select Field Names List
Figure 97. SELCOPY/i - Compare Files - Select from Field Names List.
The Compare Files - Select from Field Names List panel (ZZSGCFOF) is displayed for each record type selected from the
Compare Files - Select Field Names to Compare panel.
A list of field names, defined by the selected record type, is presented to the user as an editable table. Standard SELCOPY/i table
editing techniques should be used to exclude and re-order the fields so that only fields which are to be compared are displayed in
the order in which they are to be compared.
Only included field name entries are compared, therefore a field name may be excluded (as opposed to deleted) in order to exclude
it from the compare. This has the benefit that it may easily be included again later if necessary. For example, the following
commands may be executed to filter (include) specific table rows:
WHERE (length(strip(SelectFld),'T') > 5)
and
(#3 = 'BN')
Exclude all rows except those where the length of the Field Name entry is greater than 5 and the Field Picture Type is
"BN". Note that the "Field Pic Type" column is field reference number 3.
MORE SelectLev < 3
Include previously excluded entries where the field level is 1 or 2. (Entries that are already included will remain included.)
The order in which the field names occur is the order in which the fields will be compared. Performance may be improved if the
Exclude Changed option is set and fields where differences are expected are specified first in this list.
For Formatted or Hierarchical compare involving sorted or unsorted key synchronisation where key segments are specified as field
names, then the key segment field names may be excluded from the compare. This is because the key segment fields must match
in order to establish the synchronised record pair prior to comparing the remaining record field data.
Pressing <PF3> to exit the panel, will also save the table of selected field names and return to the Compare Files - Select Field
Names to Compare panel.
This panel corresponds to the COMPFILE parameters SELECT fieldname, ... FROM rectype
Default is to include all field columns of the same name belonging to record types of the same name in old_structname and
new_structname.
Compare Files Output
Report Format
The report generated by the compare files utility is a structured data file designed to be browsed (not printed) using a structure
definition object (SDO) within a SELCOPY/i session.
The associated SDO is automatically generated when the compare files utility is run. The SDO dataset name is always the DSN of
the report with a suffix of ".SDO". If the report output is to a PDS/PDSE library member, then the SDO will be written to a library
member of the same name belonging to PDS/PDSE library DSN with suffix ".SDO".
If the report file and/or the SDO file do not already exist, then they will automatically be allocated by the compare files utility, relying
on SMS ACS to select a suitable storage group of eligable DASD volumes. The report file is allocated using DCB geometry
RECFM=VB, LRECL=32756, BLKSIZE=0 and a space allocation of TRACKS(150,75). The SDO is allocated using DCB geometry
RECFM=VB, LRECL=16380, BLKSIZE=0 and a space allocation of TRACKS(2,2).
The default DSN for the report and SDO data sets is "user.SELCOPYI.COMPFILE.REPORT" and
"user.SELCOPYI.COMPFILE.REPORT.SDO" respectively.
2013-11-13 13:06:41
SELCOPY/i Reference and User Guide
199
Compare Files/Libraries Menu (=7)
Report Format
If the compare process is run in the foreground of a SELCOPY/i session, then the output report file is automatically browsed on
completion.
If the compare process is run as a batch job, then the output report file may then be subsequently browsed from your SELCOPY/i
session by issuing the command CFOUT report_file_name, or by issuing CFOUT as a prefix command against the report DSN or
member name in a dataset list or library list window.
In order to display the more of the record data, when a compare files output report is viewed on an 80-character width 3270
terminal, the prefix area and report record type Compare fields zNewRecNo, zOldRecNo and zLrecl are automatically suppressed
from view.
Figure 98. SELCOPY/i - Compare Files - Output Report - 80 column screen.
To view these suppressed fields press <PF2> with the cursor on any report record to see it in vertical format, with all fields
included. (Further useful function key definitions are detailed below.) Alternativeley, issue the command SELect * with the cursor
positioned on any record of record type Compare to reveal the suppressed fields. If necessary, the command PREfix ON n will
provide a prefix area of length n (default is 8).
Figure 99. SELCOPY/i - Compare Files - Output Report - Zoomed view.
A compare files output report is viewed on a 3270 terminal of width greater than 80 characters will include a prefix area with no
report field suppression.
2013-11-13 13:06:41
SELCOPY/i Reference and User Guide
200
Compare Files/Libraries Menu (=7)
Report Format
Figure 100. SELCOPY/i - Compare Files - Output Report - wide-screen.
2013-11-13 13:06:41
SELCOPY/i Reference and User Guide
201
Compare Files/Libraries Menu (=7)
Record Type: Command
The report file is comprised of several different record types detailed below.
Record Type: Command
Timestamp
The date and time (yyyy/mm/dd hh:mm:ss) at which the comparison was run.
Command
This is the COMPFILE command syntax generated by the dialog panels that was used to run the compare files utility.
Record Type: Files
Type
The file reference type ("New" or "Old").
Dataset
The fully qualified dataset name (including library member name) or HFS file path.
Record Type: Compare | Compare-record_type
zID
This field displays one of the following codes which correspond to the data displayed in the zRecord or <field1>, <field2>,
etc. fields.
record in both the NEW and OLD files that is flagged as being matched.
(blank) A
Matching record data in these report records are colour coded BLUE.
D
An OLD file record that is flagged as having been deleted from the NEW file.
Deleted records are colour-coded RED.
I
A NEW file record that is flagged as having been inserted.
Inserted records are colour-coded GREEN.
CN
A NEW file record flagged as having been changed. Report records with a zID field of "CN" are always
followed by a report record with zID field "CO" for the corresponding OLD file record in the record pair.
Changed-New records are colour-coded WHITE.
CO
An OLD file record flagged as having been changed. Report records with a zID field of "CO" are always
preceeded by a report record with zID field "CN" for the coresponding NEW file record in the record pair.
Changed-Old records are colour-coded YELLOW.
H
Applicable to Basic and Extended Unformatted Compare only, a hilight-changes record follows a CN/CO
zID pair of report records, underlining with character "#" (hash) each byte that is different in a record
flagged as having been changed.
Hilight-Changes records are colour-coded PINK.
zNewRecNo
The NEW file record number. (Field source is 4-byte binary numeric).
By default, this field is suppressed in a table format view of the report on an 80-character width 3270 terminal.
zOldRecNo
The OLD file record number. (Field source is 4-byte binary numeric).
By default, this field is suppressed in a table format view of the report on an 80-character width 3270 terminal.
zLrecl
The length of the original NEW or OLD file record. (Field source is 2-byte binary numeric).
By default, this field is suppressed in a table format view of the report on an 80-character width 3270 terminal.
zRecord | <field1> <field2> etc.
For Basic and Extended Unformatted compare, the zRecord field is displayed containing the original OLD or NEW file
record data.
For Formatted and Hierarchical compare, the zRecord field is replaced with each of the fields selected for compare
belonging to the record type assigned to the OLD or NEW file record data.
For formatted NEW file records, the contents of these fields are a faithful copy of the original data. For readability, where
NEW and OLD structures are not identical, formatted OLD file records are remapped to fit the NEW structure, in order to
align like named fields in a table view.
2013-11-13 13:06:41
SELCOPY/i Reference and User Guide
202
Compare Files/Libraries Menu (=7)
Record Type: Compare | Compare-record_type
Figure 101. SELCOPY/i - Compare Files - Output Report - formatted compare.
2013-11-13 13:06:41
SELCOPY/i Reference and User Guide
203
Compare Files/Libraries Menu (=7)
Record Type: Field
Record Type: Field
Report records of this type are only included for Formatted or Hierarchical compare only.
zID
This field displays one of the following codes which corresponds to the field data displayed in other report record types.
Field report record identifies a changed field in the preceeding Compare-record_type report record. A
C This
separate Field report record is written for each changed field.
This Field report record identifies a key field segment in a record type. A separate Field report record is written
for each key field segment in each keyed record type.
K If key segments are specified using absolute position and length (instead of by field name) then Key report
record types are displayed instead.
Field report records identifying key field segments are displayed following the Summary report records.
This Field report record identifies a field specifically selected for compare in a record type. If fields in a
record type have not been specifically selected for compare (COMPFILE syntax SELECT field FROM
record_type), then all fields in the NEW structure record type are selected by default and no "S" Field report
S record is generated for that record type.
A separate Field report record is written for each field specifically selected for caompare in each record type.
Field report records identifying compare fields are displayed following the Summary report records.
zRecType
Identifies the record type name.
zFieldName
Identifies the field name within the record type specified by zRecType.
Record Type: Summary
This report record type provides a report summary of the compare files execution. Only one Summary record exists for any
compare files execution.
SyncType
This field displays the record pair synchronisation technique used for the compare operation. (Read-Ahead, One-to-One,
Keyed or Keyed (unsorted) )
NewRecsTot
The total number of records processed from the NEW file.
OldRecsTot
The total number of records processed from the OLD file.
Matches
The total number of NEW and OLD file records that match.
Changed
The total number of changed records.
Deleted
The total number of OLD file records deleted.
Inserted
The total number of NEW file records inserted.
NewNotSel
For a formatted compare only, the total number of records from the NEW file that were not selected for comparison
because they did not fit any record type selection criteria and so were not assigned a record type.
OldNotSel
For a formatted compare only, the total number of records from the OLD file that were not selected for comparison
because they did not fit any record type selection criteria and so were not assigned a record type.
2013-11-13 13:06:41
SELCOPY/i Reference and User Guide
204
Compare Files/Libraries Menu (=7)
Record Type: Key
Record Type: Key
This report record type displays information about a key specified as absolute record key positions and lengths. A Key report record
is displayed for each segment of the key defined this way.
Length
The Key segment length.
NewKeyPos
The Key segment position in the NEW file.
OldKeyPos
The Key segment position in the OLD file.
Function Keys
<PF1>
Display context sensitive help.
Display the report record in a new window in single format (vertical) view.
<PF2>
In single format view, use <PF10>/<PF11> to display the previous/next report record respectively.
Display the CFUTIL compare files report, multi-function menu.
<F16>
This includes show and hide of report records based on their type, and show Changed fields only in a
separate window.
Applicable to report records of record type Compare or Compare-record_type only, <PF6> edits the file(s)
referenced by the focus report record.
<PF6>
The SELCOPY/i text editor is used to edit the file, and the display is scrolled directly to the record number
referenced in the report focus record.
If the focus is a Matched record, then both the OLD and NEW files will be placed in the edit ring, with focus
passed to the NEW file.
Compare Libraries (=7.2)
Overview
The Compare Libraries (COMPLIB) utility provides a method of performing an unformatted, 1-to-1 compare of records belonging to
selected members of two (NEW and OLD) PDS/PDSE libraries. All record data in selected members of the NEW library are
compared with members of the same name in the OLD library.
The compare process utilises the SELCOPY program with input control statements being read from member ZZSCOMPL of the
distributed sample library SZZSSAM1. The Compare Libraries utility can execute SELCOPY in the foreground (interactively) or may
be used to generate JCL to execute the SELCOPY job in batch.
The SELCOPY report output is written to SYSPRINT so that each report line details the result of the compare between one NEW
and OLD library member pair, and also includes a COMPFILE command to compare the two library members individually. When
the SYSPRINT output is displayed in a SELCOPY/i text edit view, the generated COMPFILE commands may be executed using
the ACTION facility (i.e simply position the cursor on the required COMPFILE command and press the <F16> key.
If the Compare Libraries utility is executed in the foreground, then the result of each member compare is logged to the terminal and
the SYSPRINT output presented to the user in a temporary text edit view.
Compare Libraries Panel
The Compare Library Members utility panel window (ZZSCOMPL) is an interactive panel window (window class WINWIPO0) and
may be started via the following:
• Select 'Compare Libraries' from the Utilities menu.
• Execute the command COMPLIB with no parameters from the command line of any window.
• Execute the prefix command "CL" against a PDS/PDSE library DSN entry of a file List type window. The resulting
Compare Library Members panel window will treat the corresponding list entry as the New DSN.
2013-11-13 13:06:41
SELCOPY/i Reference and User Guide
205
Compare Files/Libraries Menu (=7)
Compare Libraries Panel
By default, field entries are populated with arguments and options that were entered the last time the Compare Library Members
Utility panel was used.
Figure 102. Compare Library Members Panel.
Having typed entries in the required panel fields, simply pressing the <Enter> key or, if configured, double-clicking the left mouse
button will will action the library compare in the foreground.
Alternatively, the user may select an item from the menu bar.
Menu Bar Items
Run
Run the library compare in the foreground.
Command
Generate the COMPLIB command line syntax for field entries specified by the user and display it in a temporary CMX file
text edit view. This command may be executed using ACTION point-and-shoot execution <F16> or copied into the user's
HOME file and saved for future execution.
JCL
Generate a JCL job stream that executes the SELCOPY program. The SYSIN input comprises the SELCOPY control
statements member ZZSCOMPL and a list of member names that match the specified member patterns. The job stream is
displayed in a temporary text edit view and may be submitted to batch using the SUBMIT command.
Panel Input Fields
New DSN>
This input field (LIBRARY1) is mandatory and identifies the NEW PDS or PDSE library DSN to be compared.
Old DSN>
This input field (LIBRARY2) is mandatory and identifies the OLD PDS or PDSE library DSN to be compared.
Select Members(s):
Pattern 1>
Pattern 2>
Pattern 3>
Pattern 4>
These input fields (MEMBER1, MEMBER2, MEMBER3 and MEMBER4) are optional and allow the user to provide up to 4
alternative member name masks for selecting members to be compared from the NEW library. If a NEW library member
name matches any of these masks, then it will be selected for compare.
Member names in the OLD library that match this mask but do not exist in the NEW library will not be included for
compare.
A member name mask supports the following wild cards:
2013-11-13 13:06:41
*
A single asterisk represents an entire member name or zero or more characters within a member name
mask.
%
A single percent sign represents exactly one character within a member name mask. Up to 8 percent
signs can be specified in each member name mask.
SELCOPY/i Reference and User Guide
206
Compare Files/Libraries Menu (=7)
Panel Input Fields
If no member name masks are specified, then all members of the NEW and OLD libraries will be compared.
Strip>
This input field (STRIP) contains either "YES" or "NO" and indicates whether trailing characters that match the specified
strip character, are to be stripped from the longer record, to the length of the shorter record, when the records to be
compared are of different lengths.
Ignore trailing 'char' differences.
This input field (STRIPC) specifies the strip character to be used if the STRIP field conmtains "YES".
Compare Libraries Output
The output generated by the Compare Libraries utility is a report of the compare on each NEW and OLD library member pair for
which the data did not match. This report is displayable EBCDIC text and may be viewed using the SELCOPY/i (CBLe) text editor.
Each line of the output report corresponds to a single member compare.
Figure 103. Compare Libraries Output.
Each output report record is comprised of the following fields:
Status
The status identifies the cause of the unsuccessful member data compare.
Data mismatch
A difference was identified in at least one record of the library members.
On encountering a difference in the record data, no further record matching occurs for that member. Note that the
members may also contain a different number of records but reporting the data mismatch takes precedence.
Old mbr + recs
Data in the NEW and OLD library member pair matches, however, additional records were found in the OLD
library member.
New mbr + recs
Data in the NEW and OLD library member pair matches, however, additional records were found in the NEW
library member.
Old mbr missing
No member exists in the OLD library that matches the NEW library member name.
New mbr missing
No member exists in the NEW library that matches the OLD library member name.
Note that, if a member mask has been used to select a subset of members from the NEW library, then this report
status will never occur.
Compare Command
The Compare Command field contains a COMPFILE command which may be executed to generate a more detailed
report of the differences that exist between the pair of library members. COMPFILE involes the Compare Files utility.
2013-11-13 13:06:41
SELCOPY/i Reference and User Guide
207
Compare Files/Libraries Menu (=7)
Compare Libraries Output
This command syntax also identifies the NEW and OLD library members of the same member name to which the report
line refers.
To execute the COMPFILE command directly from the edited report, simply position the cursor on the command and
press the <F16> key.
2013-11-13 13:06:41
SELCOPY/i Reference and User Guide
208
SELCOPY Debug & Development (=8.1)
SELCOPY/i can invoke the SELCOPY program allowing interactive execution and debug within SELCOPY/i windows.
• Invoking SELCOPY Debug
• Load Library Search Chain
• SELCOPY Debug Windows
• SELCOPY Debug Commands
• SELCOPY Debug Function Keys
Invoking SELCOPY Debug
The SELCOPY Debug application window is a special instance of the CBLe Text Edit application and always opens as an MDI
frame window within the SELCOPY/i main window display area (i.e not as a child window of the invoking CBLe Text Edit main
window.) See SELCOPY Debug Main Window for information on the SELCOPY Debug window environment.
SELCOPY Debug is started via the following:
• Select option 1. 'SELCOPY/debug' from the Utilities Menu
• Select 'SELCOPY Debug/Dev' from the File menu in the CBLe main window menu bar.
• Enter the command SELCOPY on the command line of any window.
See also the CBLe macro, JCLCMX , which is a pre-processor tool used to convert MVS JCL decks containing SELCOPY steps
into a format suitable for input to SELCOPY Debug. Simply edit the JCL deck using CBLe, then key in JCLCMX from the edit
command line to generate command files containing ALLOC commands that correspond to the DD statements; CALL commands
that correspond to EXEC statements; and SELCOPY commands that correspond to EXEC PGM=SELCOPY statements.
A control file name containing the SELCOPY source statements must be provided as SYSIN/SYSIPT input to the SELCOPY Debug
window either as a parameter on the SELCOPY command or via the "Run SELCOPY" dialog window. The control file may be
specified as a complete fileid (DSN) or as a previously allocated filename (DD/FILEDEF/DLBL) which may be a concatenation of
data sets. e.g.
selcopy
-ctl cbl.ssc.ctl(ssdemo01)
Figure 104. Run SELCOPY Dialog Window.
If the specified control file is empty or does not yet exist, then SELCOPY Debug opens an empty SYSIN/SYSIPT CBLe text edit
view and, on performing its initial control statement analysis, reports ERROR 14 "NO INPUT FILE" in the SYSPRINT/SYSLST view
with pop-up message:
SDB002E SELCOPY has ended with control card errors. Return Code 52.
Having selected OK to continue, the user may proceed by adding SELCOPY control statement records to the control file
SYSIN/SYSIPT window. When complete, the changes to the control file should be saved before executing RERUN to begin
debugging the new SELCOPY statements. If the SELCOPY control fileid does not already exist, then for MVS systems, the
Allocate NonVSAM dialog will be opened before the save is actioned.
When SELCOPY Debug starts, the Execute SELCOPY main window is opened together with a CBLe edit view for the control
statement SYSIN/SYSIPT input. If the SYSIN/SYSIPT file name was specified as an explicit fileid (DSN) which is not locked
(ENQ'd) by another process and the user has sufficient authority, the file is edited Read/Write. Where the SYSIN/SYSIPT input file
name was specified as a previously allocated filename (DD/FILEDEF/DLBL), then the data is edited Read/Only.
The SELCOPY program is then executed and stopped following control statement analysis but before actioning the first executable
statement. The user may then begin debugging and stepping through the statements.
Note that interactive execution of SELCOPY using statement stepping and/or break points is not supported if the SELCOPY control
file contains the SELCOPY option NOPRINT, NOP or NOPCTL to suppress print of the SELCOPY control statements. If any of
these options are specified prior to the first control statement, then the job will run to completion without stopping.
2013-11-13 13:06:41
SELCOPY/i Reference and User Guide
209
SELCOPY Debug & Development (=8.1)
Invoking SELCOPY Debug
Any required SELCOPY input or output files must be allocated before execution of SELCOPY Debug. This excludes SYSIN and
SYSPRINT which are handled by the SELCOPY/i window management software. See the CBLe ALLOCATE command and, where
the SELCOPY statements form part of an MVS batch stream, use the CBLe JCLCMX REXX macro to configure the environment
prior to starting SELCOPY Debug.
2013-11-13 13:06:41
SELCOPY/i Reference and User Guide
210
SELCOPY Debug & Development (=8.1)
Invoking SELCOPY Debug
Figure 105. SELCOPY Debug in 58x120 3270 Session.
2013-11-13 13:06:41
SELCOPY/i Reference and User Guide
211
SELCOPY Debug & Development (=8.1)
Load Library Search Chain
Under MVS, interactive execution of IMS SELCOPY programs in DLI and BMP region types is supported.
The following SELCOPY Debug attributes relating to IMS SELCOPY programs may be specified as a parameter on the SELCOPY
command or via the "Run SELCOPY" dialog window.
• The PSB name.
• The IMS region (either DLI or BMP). Default is DLI.
• The Subsystem name of the IMS Region to which the connection should be made. (Optional)
• IMS Application Group name. (Optional)
For IMS DLI regions, IEFRDER, DFSVSAMP must either be allocated or included in the SELCOPY/i System or User INI file for
dynamic allocation by SELCOPY Debug at execution time.
Load Library Search Chain
The location of the SELCOPY program executed and any routines called by the SELCOPY operation, CALL, is determined by the
standard search chain for the current environment.
Note: The SELCOPY CALL operation is used to pass control to an external Assembler, COBOL routine or any MVS program
module developed using Language Environment.
For MVS systems only, SELCOPY Debug provides users with the ability to include additional libraries to the start of the search
chain. This gives the SELCOPY Debug environment an equivalent to the STEPLIB JCL statement, which may occur in SELCOPY
batch jobs.
The included library path may be entered in the "Run SELCOPY" dialog window or via the -LIB parameter on the SELCOPY line
command, as one of the following:
• A DDname which has been pre-allocated to one or more load libraries.
• One or more load library DSNs separated by ',' (commas), ';' (semi-colons) or ' ' (blanks).
Note: If the DSNs are separated by blanks, quotes must also be used to delimit the list of DSNs, not the individual DSNs.
The following SELCOPY line command and "Run SELCOPY" dialog examples illustrate use of LibPath.
selcopy
-ctl INCTL
-lib "SYS3.TEST.LOADLIB
SYS3.NBJ.TEST.EXE"
Figure 106. Run SELCOPY Dialog Window with Load Library Path.
This feature is exploited by the JCLCMX CBLe REXX macro which translates JCL statements from a batch job into the equivalent
SELCOPY/i commands, thus setting up an environment suitable for interactive execution of a SELCOPY batch job.
Where STEPLIB JCL statements are found in EXEC PGM=SELCOPY steps, the library names are included on a -LIB parameter in
the generated, equivalent SELCOPY command.
SELCOPY Loop Break-in
The nature of SELCOPY execution is such that statements are executed sequentially, or as directed by logic flow operations (e.g.
GOTO, PERFORM), until either the last control statement of the SYSIN/SYSIPT input is encountered or a GOTO GET operation is
executed.
When one of these conditions occur and at least one input (e.g. READ) and one output (e.g. WRITE, PRINT, UPDATE) operation
exists, then processing is passed back to the first run-time control statement in the control deck.
2013-11-13 13:06:41
SELCOPY/i Reference and User Guide
212
SELCOPY Debug & Development (=8.1)
SELCOPY Loop Break-in
This looping through the control statements will continue until one of the following occurs:
1. End-of-File condition is encountered following an attempted READ of the prime input file and no IF EOF condition exists
for the file.
2. No further output operations are eligable for execution as a result of a explicit or implicit STOPAFT value. e.g.
STOPAFT=50 is implied for LOG output operations and STOPAFT=1 is implied for operations executed based on a true
IF INCOUNT condition for equality.
3. GOTO EOJ or GOTO CANCEL operation is executed.
4. A Selection Time Error is encountered.
If none of these conditions occur, then it is possible to introduce an infinite loop in SELCOPY control statement processing.
SELCOPY Debug may be used to identify the cause of this situation or any sequence of statements that cause the control
statement stream to loop. It is possible, however, that the user may not know that the loop condition exists until SELCOPY
processing has been restarted without a break point in which case, since SELCOPY is executing in the foreground, the 3270
session becomes unresponsive.
It is for this reason that the SELCOPY default break-in facility exists to allow the user to pre-define a default number of times that
any control statement within the SELCOPY job stream may be executed before a virtual break point is encountered and processing
is paused.
This break-in threshold is controlled via the SELCOPY/i INI option SELCOPY.LoopBreakIn which has a default value of
1,000,000.
When the break-in threshold has been reached, a pop-up message window is opened and control is passed back to the user to
continue debug investigation. This means that there is no need to forcibly end the SELCOPY/i session and restart the SELCOPY
debug process.
Note that a loop break-in may occur even though a loop is not infinite. (e.g. the prime input file may have a number of records
greater than the break-in threshold.)
SELCOPY Debug Windows
SELCOPY Debug Main window
Like the CBLe text editor, SELCOPY Debug is an MDI (Multiple Document Interface) application. An MDI application comprises a
parent (frame) window with a menu bar and a client area within which one or more MDI child windows are displayed. All MDI child
windows are confined to the parent window's client area.
The SELCOPY Debug Main (frame) Window supports all MDI child windows supported by the CBLe frame window (including SDE
Edit). The SELCOPY Debug frame window is actually a CBLe frame window with additional features and characteristics specifically
relating to SELCOPY execution. These features are discussed in this section whereas details on CBLe frame window features may
be found in the CBLe Text Edit documentation.
The SELCOPY Debug Main window must always contain the Control Cards, Output Listing and TRACE Windows. Closing any of
these windows will quit the SELCOPY main window and so end the Debug session.
When a session is started, these 3 child windows are automatically opened, together with a work area storage window, at fixed
locations within the main window client area. The position and size of each window have been pre-determined so that the contents
of each window are easily visible when used with terminals of width greater than 80 bytes. Where the terminal display is of width
less than 80 bytes, the SELCOPY Debug child windows are opened in a maximised state, however, these may be subsequently
restored, resized and repostioned as in Figure 106.
2013-11-13 13:06:41
SELCOPY/i Reference and User Guide
213
SELCOPY Debug & Development (=8.1)
SELCOPY Debug Main window
Figure 107. SELCOPY Main Window in 43x80 3270 Session - Resized Child Windows.
Note that the "Ws" (Window Save) button may be used to save a focus child window's size and location within the parent window
so that it may subsequently be restored using the "Wr" (Window Restore) button. This enables the user to maintain preferred
window size and location across invocations of SELCOPY Debug.
All SELCOPY Debug child windows, other than list and storage windows, are CBLe text edit windows (i.e. Control Cards, Output
Listing, trace and log windows.) This allows the user to edit the data in these windows and to issue CBLe commands and macros
such as FIND, EXCLUDE, CHANGE and SAVE.
In addition to the standard SELCOPY Debug windows, the user can open a CBLe edit view for any other file (e.g. the input data
sets, etc.), thus giving SELCOPY Debug all the features provided by the CBLe text editor. Also, any LIST window opened from a
SELCOPY Debug child window will itself be a child window of SELCOPY Debug.
By default, function key F4 is assigned to line command, WINDOW, and is used to pass focus between the SELCOPY Debug child
windows.
SYSIN Window
The SYSIN window is opened automatically when SELCOPY Debug is started. It may also be opened via the following:
• Select 'Control Cards' from the View menu in the SELCOPY Debug Main Menu.
• Enter the SELCOPY Debug CLI command WINDOW CTL.
The SYSIN window is an edit view that contains the control statement source file as required for execution of SELCOPY Debug.
This window highlights the current operation and allows the user to set and unset break points.
By default, SELCOPY Debug attempts to edit the SYSIN file read/write. If this is not possible, the user is prompted to continue the
session with the file edited in read only mode. In either case, the edit profile macro is executed when the file is loaded. If the CBL
supplied macro PROFILE is set as the default edit profile, then useful edit buttons are added to the menu bar. See the PROFILE
and PROFIRST macros for a description of each button's use.
Note that SELCOPY analyses the control statements prior to execution and it is at this point that SELCOPY Debug associates each
operation in the SYSIN display with its appropriate selection id. Therefore, any alterations made to the SYSIN data during
SELCOPY debugging must first be saved and the job re-started before any further statement execution can take place.
The contents of the window scroll automatically in order to display the current statement in the SELCOPY execution. As for any edit
view, CBLe commands and macros may be used to manipulate, highlight and locate data in the view (e.g. LOCATE, TAG, ALL,
2013-11-13 13:06:41
SELCOPY/i Reference and User Guide
214
SELCOPY Debug & Development (=8.1)
SYSIN Window
CHANGE, SET ZONE, etc.)
In addition to any CBLe edit highlighting, during the course of execution control statements are highlighted as follow:
1. Next executable SELCOPY statement. Default highlight - pink reverse video.
2. Break Point. Default highlight - red reverse video.
Closing the SYSIN window also exits SELCOPY Debug.
SYSPRINT Window
The SYSPRINT window is opened automatically when SELCOPY Debug is started. It may also be opened via the following:
• Select 'Listing' from the View menu in the SELCOPY Debug Main Menu.
• Enter the SELCOPY Debug CLI command WINDOW LIST.
SELCOPY Debug intercepts output to SYSPRINT/SYSLST and displays it in the SYSPRINT window instead. For this reason,
SYSPRINT or SYSLST does not need to be allocated and no output is written to the system spool.
The contents of the SYSPRINT window scroll automatically to display any new output to SYSPRINT/SYSLST. Data written to the
SYSPRINT window is maintained until the SELCOPY Debug session is closed. Therefore, so long as the SELCOPY Debug
session is not closed, the job may be re-run any number of times without loosing the SYSPRINT/SYSLST output from a previous
run.
The SYSPRINT window is an edit view which supports execution of CBLe commands and macros. This allows the user to
manipulate, highlight and locate data in the view (e.g. LOCATE, TAG, ALL, CHANGE, SET ZONE, etc.)
Unless SELCOPY options NOPRINT or NOPCTL are specified in the control statements, the input statements and their selection
ids are also written to SYSPRINT. Similarly, unless SELCOPY options NOPRINT, NOPSUM or NOPTOT are specified in the
control statements, the summary totals are written to SYSPRINT at end of job.
Figure 108. SELCOPY SYSPRINT Window.
2013-11-13 13:06:41
SELCOPY/i Reference and User Guide
215
SELCOPY Debug & Development (=8.1)
SQL Log Window
SQL Log Window
The SQL log window may be opened via the following:
• Select 'SQL log' from the View menu in the SELCOPY Debug Main Menu.
• Enter the SELCOPY Debug CLI command WINDOW SQL.
A SELCOPY job that submits SQL statements to a DB2 data base, also writes detailed information about the SELCOPY SQL
processing to a data set allocated to ddname CBLSQLOG.
SELCOPY Debug intercepts output to CBLSQLOG and displays it in the SQL Log window instead. Because of this, CBLSQLOG
does not need to be allocated to display this information.
The SQL Log window is an edit view which supports execution of CBLe commands and macros. This allows the user to
manipulate, highlight and locate data in the view (e.g. LOCATE, TAG, ALL, CHANGE, SET ZONE, etc.)
Figure 109. SELCOPY SQL Log Window.
WTO Log Window
The WTO log window may be opened via the following:
• Select 'WTO log' from the View menu in the SELCOPY Debug Main Menu.
• Enter the SELCOPY Debug CLI command WINDOW WTO.
SYSLOG output to the Operator's Console, TSO, CMS or ICCF user terminals is intercepted by SELCOPY Debug and is displayed
in the WTOLOG window instead.
The WTO Log window is opened automatically when SYSLOG output is received. This may be warning/error messages returned
by SELCOPY, or output generated by a SELCOPY LOG operation.
The WTO Log window is an edit view which supports execution of CBLe commands and macros. This allows the user to
manipulate, highlight and locate data in the view (e.g. LOCATE, TAG, ALL, CHANGE, SET ZONE, etc.)
Figure 110. SELCOPY WTO Log Window.
2013-11-13 13:06:41
SELCOPY/i Reference and User Guide
216
SELCOPY Debug & Development (=8.1)
Work Area/Current Input Record Window
Work Area/Current Input Record Window
A Work Area/Current Input Record storage display window is opened automatically when SELCOPY Debug is started. Further
storage display windows may also be opened via the following:
• Select 'Work area' from the View menu in the SELCOPY Debug Main Menu.
• Enter the SELCOPY Debug CLI command WINDOW WORKAREA.
The current status of the user work area (or input record buffer if no work area is allocated) is displayed in the Work Area window.
A Work area window is a storage display window.
Note that, if WORKLEN is not supplied, the Work Area window has the title: Current Input Record.
Any number of Work Area windows may be opened and each window may be tailored to display different portions of the work area.
The appearance of the Work Area window may be updated using the storage window display options popup menu. The options
available and methods used to display this menu are documented under the line command, SHOWPOPUPMENU.
The work area position, in the first row of the Work Area window, is an enterable field (highlighted in red by default.) Here, you may
enter the work area position from which data is to be displayed.
Line commands UP CURSOR and DOWN CURSOR may also be used to navigate the Work Area window. By default, UP
CURSOR is assigned to PF07 and DOWN CURSOR is assigned to PF08.
Data in the work area may be altered at any point during the run by overtyping text in either the character or hexadecimal display. A
change to text in the one display will automatically be reflected in the other.
Figure 111. SELCOPY Work Area Window.
POS Expression Window
The POS expression window may be opened using the SELCOPY Debug CLI command WINDOW POS expr. POS expression
windows for special positions POS PARM, DATE, SQLCA, SQLDA and SQLMA may be opened by selecting the "Pos" sub-menu
from the View menu in the SELCOPY Debug Main Menu.
The POS window displays storage in the exactly same way as the Work Area/Current Input Record window with the exception that
the start address of the displayed data is a position in storage evaluated by a valid SELCOPY POS expression instead of position 1
of the work area.
Like the Work Area window, the appearance of the POS expression window may be updated using the storage display window
options popup menu. The options available and methods used to display this menu are documented under the line command,
SHOWPOPUPMENU.
The POS expression is re-evaluated at each break in the SELCOPY execution and the data at the new position displayed in the
POS window.
The POS window title contains the POS expression and the evaluated position in the work area in parentheses. If the evaluated
position falls outside the work area, then (Not in WorkArea) is displayed instead.
Any number of POS windows may be opened.
2013-11-13 13:06:41
SELCOPY/i Reference and User Guide
217
SELCOPY Debug & Development (=8.1)
POS Expression Window
Figure 112. POS Window (inside work area)
Figure 113. POS Window (outside work area)
@ Pointer Window
The @ Pointer window may be opened via the following:
• Select '@ Pointers' from the View menu in the SELCOPY Debug Main Menu.
• Enter the SELCOPY Debug CLI command WINDOW @.
The current status of the @ pointer, LRECL and of all the user @ pointers to be used in the current execution of SELCOPY, is
displayed in the @ Pointer window.
The @ Pointer window has the same characteristics as a SELCOPY/i List window including selecting, sorting and filtering of row
and column data and "point and shoot" sorting on column headers.
Figure 114. SELCOPY @ Pointer Window.
Columns Displayed
Name
Type
Description
PosValue
Int
Value as a position in the work area
PtrName
Char
Pointer Name
Address
Hex
Address in storage of position in work area
Equates Window
The Equates window may be opened via the following:
• Select 'EQUates' from the View menu in the SELCOPY Debug Main Menu.
• Enter the SELCOPY Debug CLI command WINDOW EQUATES.
All equated names and their values, set by the user via an EQU statement and subsequently allocated by SELCOPY during control
statement analysis, are is displayed in the Equates window.
The Equate window has the same characteristics as a SELCOPY/i List window including selecting, sorting and filtering of row and
column data and "point and shoot" sorting on column headers.
2013-11-13 13:06:41
SELCOPY/i Reference and User Guide
218
SELCOPY Debug & Development (=8.1)
Equates Window
Figure 115. SELCOPY EQUates Window.
Columns Displayed
Name
Type
Description
EQUName
Char
Equated name
EQUValue
Char
Equated value
PCB Window
The PCB window may be opened via the following:
• Select 'PCB' from the View menu in the SELCOPY Debug Main Menu.
• Enter the SELCOPY Debug CLI command WINDOW PCB.
This window shows the PCB which was used to execute the most recent IMS call
The PCB displayed will change if different PCBs are used in the SELCOPY program.
Figure 116. SELCOPY PCB Window.
TRACE Window
The TRACE window is opened automatically when SELCOPY Debug is started. It may also be opened via the following:
• Select 'Execution trace' from the View menu in the SELCOPY Debug Main Menu.
• Enter the SELCOPY Debug CLI command WINDOW TRACE.
The TRACE window is a CBLe edit view that contains all the SELCOPY control statements at which processing has been stopped.
i.e a break point was set and encountered. Each logged statement begins with the statement's selection id.
Note that the STEPINTO and STEPOVER commands dynamically set and unset break points to allow stepping through the
SELCOPY job. The STEPINTO command sets a break point on the next control statement to be executed following the current
control statement. Therefore, when repeatedly issuing STEPINTO or STEPOVER, the TRACE window displays a log of all the
statements executed so far.
2013-11-13 13:06:41
SELCOPY/i Reference and User Guide
219
SELCOPY Debug & Development (=8.1)
TRACE Window
Figure 117. SELCOPY TRACE Window.
Point-and-Shoot Popup Menu
All CBLe type SELCOPY Debug windows, including the SYSIN/SYSIPT and SYSPRINT/SYSLST windows, support the
point-and-shoot options popup menu. The popup menu is opened using the SDBPOPUP edit macro defined on F16 by default.
The cursor position within the edited data identifies the focus text to be referenced in items of the point-and-shoot menu when it is
opened.
Figure 118. SELCOPY Point-and-Shoot Popup Menu Window.
The menu enables the user to quickly and easily perform the following, commonly used tasks:
Text-Edit Keys/Debug Keys
Certain default PFKey assignments for CBLe text edit differ to defaults set up for the SELCOPY Debug environment. This
entry enables the user to toggle between the CBLe (Edit) default keys and SELCOPY Debug (Debug) keys as follow:
PFKey
PF1
PF2
PF13
PF14
Edit
SOS LINEADD
DUPLICATE
SOS LINEDEL
SPLTJOIN
Debug
STEPOVER
STEPINTO
GO
BR ON CURSOR PERM
Action> command_string
Execute command_string as determined by text at the focus line and column. See the CBLe ACTION facility for further
information on how command_string is determined.
Watch Pos "expression"
Execute the SELCOPY Debug primary command WINDOW POS expr to open a POS storage display window starting at
the position defined by expression. Show POS entries exist for POS expressions determined by the token on which focus
was placed when the menu was opened. Possible expressions are:
1. The focus token that forms part of a larger positional expression.
2. If applicable, the full positional expression containing the focus token.
Watch Pos "expression" <edit>
Same as the Show Pos entry but instead of executing the WINDOW POS expr command directly, it is placed at the edit
command prompt ready for edit and submission by the user.
2013-11-13 13:06:41
SELCOPY/i Reference and User Guide
220
SELCOPY Debug & Development (=8.1)
Point-and-Shoot Popup Menu
Track "expression"
Invoke the SDBTRACK edit macro which issues the SELCOPY Debug primary command TRACK expr to start or stop
tracking a position in storage referenced by the POS expression. Track entries exist for POS expressions determined as
for "Show Pos".
If a Track entry is selected, another popup menu is opened prompting the user to select the colour to be used for tracking
this POS expression or, alternatively, to turn off tracking for this POS expression.
Figure 119. SELCOPY TRACK Colour Popup Menu Window.
Track "expression" <edit>
Same as the Track entry but instead the generated "SDBTRACK expression" macro invocation is placed at the edit
command prompt ready for edit and submission by the user.
Track List
Open a popup menu displaying a list of all POS expressions that are being tracked. The user can then select an entry to
switch off tracking for that POS expression or select All to switch off tracking of all the POS expression entries.
Figure 120. SELCOPY TRACK List Popup Window.
Break <toggle> (BR)
Toggle a break point on and off for the SELCOPY operation at the focus position.
Restart (RR)
Force immediate End-of-Job and restart the program from the beginning. Processing will break prior to execution of the
first SELCOPY control statement.
Run to next break-point (GO)
Allow the program to run until either a break point or End-of-Job is encountered.
Immediate End-of-Job (EOJ)
Force immediate End-of-Job.
Window Layout
Invoke the SDBWINX edit macro which opens a popup menu enabling the user to control the configuration of windows
within the SELCOPY Debug MDI environment.
The user can save and subsequently restore the characteristics of the current MDI child window or all currently open MDI
child windows. Alternatively, the user can select the default configuration for the current, or all SELCOPY Debug MDI child
windows.
Figure 121. SELCOPY Window Layout Popup Menu.
SELCOPY Debug Commands
You can issue SELCOPY Debug commands from the command line at the Command> prompt. Most SELCOPY Debug main
window menu options have a command line equivalent.
Command
Description
PF Key
BREAKPOINT
Set/unset temporary break points.
PF14
EOJ
Force SELCOPY End-of-Job.
-
GO
Continue processing.
PF13
RERUN
Re-run from the beginning.
-
2013-11-13 13:06:41
SELCOPY/i Reference and User Guide
221
SELCOPY Debug & Development (=8.1)
SELCOPY Debug Commands
STEPINTO
Step (Trace) Into sub-routines.
PF2
STEPOVER
Step (Trace) Over sub-routines.
PF1
TRack
Track a SELCOPY POS expression.
-
Window
Open a specified SELCOPY Debug window.
-
See SELCOPY Debug Function Keys for complete list of default PFKeys.
BREAKPOINT
Syntax:
>>-- BReakpoint -------------------------------------------------------------><
Description:
Use the BREAKPOINT command to set or unset a permanent BReak point at the focus statement in the Control Card window. By
default, BREAKPOINT is assigned to PF06.
If a break point is set at a particular control statement, then processing will be paused on the next attempt to execute that
statement.
Any number of concurrent break points may be active during job execution.
Parameters:
BREAKPOINT has no parameters.
EOJ
Syntax:
>>-- EOJ --------------------------------------------------------------------><
Description:
Use the EOJ command to force SELCOPY to immediately execute a "GOTO EOJ" operation.
The SELCOPY job will end without processing any further control statements and will generate its output summary in the
SYSPRINT window.
Parameters:
EOJ has no parameters.
GO
Syntax:
>>-- GO ---------------------------------------------------------------------><
Description:
Use the GO command to continue processing of the control statements. By default, function key F15 is set to GO.
Processing will continue until a break point or End-of-Job is encountered at which point processing is paused or stopped
respectively.
Parameters:
GO has no parameters.
2013-11-13 13:06:41
SELCOPY/i Reference and User Guide
222
SELCOPY Debug & Development (=8.1)
RERUN
RERUN
Syntax:
>>--+- RErun --+-------------------------------------------------------------><
|
|
+- RR -----+
Description:
Use the RERUN command to Re-Run the job from the beginning. No further statements will be executed from the existing job run.
Storage is cleared and values and break points, set during control statement analysis, are re-initialised. All existing breakpoints are
cleared.
Parameters:
RERUN has no parameters.
STEPINTO
Syntax:
>>--+- STEPInto --+----------------------------------------------------------><
|
|
+- SI --------+
Description:
Use the STEPINTO command to step through the SELCOPY control statements logically one at a time. By default, STEPINTO is
assigned to PF02.
Any branch to a SELCOPY sub-routine via a DO, PERFORM or GOSUB operation will be Stepped Into. i.e. processing is paused
on each control statement in the sub-routine.
STEPINTO and STEPOVER set and then unset temporary break points in the SELCOPY control statements in order to pause
processing.
Parameters:
STEPINTO has no parameters.
STEPOVER
Syntax:
>>--+- STEPOver --+----------------------------------------------------------><
|
|
+- SO --------+
Description:
Use the STEPOVER command to step through the SELCOPY control statements logically one at a time. By default, STEPOVER is
assigned to PF01.
Any branch to a SELCOPY sub-routine via a DO, PERFORM or GOSUB operation will be Stepped Over. i.e. the sub-routine is
executed and processing is paused again on the control statement following the sub-routine call.
STEPINTO and STEPOVER set and then unset temporary break points in the SELCOPY control statements in order to pause
processing.
Parameters:
STEPOVER has no parameters.
2013-11-13 13:06:41
SELCOPY/i Reference and User Guide
223
SELCOPY Debug & Development (=8.1)
TRACK
TRACK
Syntax:
>>-- TRack -- expr ---+--------------+---------------------------------------><
|
|
+--- colour ---+
|
|
+---- OFF -----+
Description:
Use the TRACK command to track the value of a valid SELCOPY POS expression as a position in storage.
The single byte, addressed by the POS expression, is highlighted in all open storage windows in which the position is displayed.
The POS expression is re-evaluated for every break in the SELCOPY execution.
Parameters:
expr
A valid SELCOPY POS expression. This may include EQUated names, @ pointers, LRECL special POS keywords (e.g.
DATE, COMREG), integer values and arithmetic operators "+" (plus) and "-" (minus).
colour
The colour in which the evaluated position is highlighted. This is a two character code defining the colour and, optionally
the extended highlighting, to be used.
Valid colour codes are:
B
G
P
R
T
W
Y
Blue
Green
Pink
Red
Turquoise
White
Yellow
Valid extended highlighting codes are:
B
N
R
U
Blink
None (No extended highlighting)
Reverse Video
Underscore
The default extended highlighting is R (reverse video), the default colour is T (turquoise).
OFF
Switch off tracking for the specified expression.
Examples:
TRACK @A+10
R
Highlight in red (default reverse video) the byte in all storage windows that is referenced by the expression @A+10.
TRACK ARRAY+@X-1
GU
Highlight in green with underscore the byte in all storage windows that is referenced by the expression ARRAY+@X-1.
2013-11-13 13:06:41
SELCOPY/i Reference and User Guide
224
SELCOPY Debug & Development (=8.1)
WINDOW
WINDOW
Syntax:
>>-- Window --+--|
+--|
+--|
+--|
+--|
+--|
+--|
+--|
+--|
+--|
+---
@ ----------+---------------------------------------------><
|
AT----------+
|
Ctl --------+
|
EQuates ----+
|
List -------+
|
PCB --------+
|
POS expr ---+
|
SQL --------+
|
Workarea ---+
|
WTO --------+
|
TRace ------+
Description:
Use the WINDOW command to open and place focus on the nominated window type.
Windows may also be opened via the Window menu of the SELCOPY Debug main window menu bar.
Parameters:
@
AT
Open and place focus on the @ Pointer window.
CTL
Open and place focus on the Control Cards window.
Note that, closing the Control Cards window also exits SELCOPY Debug.
EQUATES
Open and place focus on the Equates window.
LIST
Open and place focus on the Output Listing window.
Note that, closing the Output Listing window also exits SELCOPY Debug.
PCB
Open the PCB window.
POS expr
Open a POS window. A valid SELCOPY POS expression must be specified to define the start address of the storage
display.
SQL
Open the SQL Log window.
WORKAREA
Open a storage window (Work Area window.)
WTO
Open the WTO Log window.
TRACE
Open and place focus on the Trace window.
Note that, closing the Trace window also exits SELCOPY Debug.
SELCOPY Debug Function Keys
You can assign 3270 Program Function Keys (PFKeys) to line commands as applicable to the window class. The KEYS line
command may be used to display and globally assign Function key settings.
SELCOPY Debug PFKeys have default functions assigned as determined by the window's class (i.e. Edit, Storage or List.) In
addition to these, edit views and storage windows have the following PFKey definitions:
PF1
StepOver
2013-11-13 13:06:41
Execute the next SELCOPY operation (step over a sub-routine.)
SELCOPY/i Reference and User Guide
225
SELCOPY Debug & Development (=8.1)
SELCOPY Debug Function Keys
PF2
StepInto
Execute the next SELCOPY operation (step into a sub-routine.)
F16
Macro SdbPopup
Invoke the SDBPOPUP edit macro to display a functions menu (edit views only.)
PF5
ShowPopupMenu
Open the storage display options popup menu (storage display windows only.)
PF13
Go
Continue SELCOPY processing.
PF14
BreakPoint
Toggle a break point on and off at the focus operation (edit views only.)
For edit views only, the default action of the PF1/PF2/PF13/PF14 keys may be governed via the SdbPopup macro which allows the
user to select either "Edit" or "Debug" PFKey configuration.
2013-11-13 13:06:41
SELCOPY/i Reference and User Guide
226
Utilities Menu (=8)
The Utilities Menu panel (ZZSGUTIL) is an interactive panel window opened on selection of option 8. in the SELCOPY/i Primary
option menu.
SELCOPY/i supports a number of general purpose utilities and interfaces to a selection of system utilities that may be accessed via
this panel.
Options
1 SELCOPY/debug
2 CBLVCAT
3 IDCAMS
4 Catalog ALIAS
5 Library ALIAS
6 IEBCOPY
7 Favourites
8 System
9 Search
10 Find Lib Member(s)
11 Compare Files
12 Compare Libraries
13 Calendar
14 Calculator
15 Alloc/Define
SELC - SELCOPY/batch language interactive debug
VCAT - Catalog/VTOC report online excution
AMS - Execute IDCAMS commands interactively
AMSA - Define new Catalog Alias
ALI - Create new PDS/PDSE library member Alias
IEBC - Execute IEBCOPY interactively
FAV - Favourite Datesets/Commands
SY - Display System Information
FS - Basic PDS/PDSE Library string search
LLX - Search for member(s) across multiple libraries
COMPF - Compare Files
COMPL - Compare Libraries
CAL - Basic Calendar
CALC - REXX expression calculator
Create new VSAM or Sequential datasets
CBLVCAT Interactive (VCI) (=8.2)
If a valid software licence key has been applied, SELCOPY/i may invoke the CBLVCAT program to allow interactive execution
within a SELCOPY/i window.
1. CBLVCAT Interactive Window
2. Raw Data Window
CBLVCAT Interactive Window
The Execute CBLVCAT window is used to execute CBLVCAT Interactive and may be opened via the following:
• Select option 2. 'CBLVCAT' from the Utilities Menu
• Select 'CBLVCAT Interactive' from the File menu in the CBLe main window menu bar.
• Enter the command VCAT on the command line of any window.
• Enter the "T" or "VC" prefix command in the prefix area of an existing Execute CBLVCAT window or certain other List type
windows. "T" will generate a CBLVCAT Tune report and IDCAMS DEFINE deck for a VSAM file, "VC" will generate a
CBLVCAT catalog and/or VTOC report for the list entry.
CBLVCAT is used to generate standard and customised reports on VTOC and ICF/VSAM catalog data. It also supports VSAM file
tuning and generation of IDCAMS DEFINE job source.
Details on CBLVCAT output and control statement syntax is found in the CBLVCAT User Manual.
SELCOPY/i loads CBLVCAT and assumes control over its control statement input and report output functions. This allows the user
to specify CBLVCAT input statements directly at the VCAT Command prompt or indirectly via a control statement file and view the
output in a window.
In order to direct input from a control statement file, the fileid should be entered at the VCAT Command prompt and prefixed with a
"<" (less than) symbol.
If you are using the LISTVCAT DEFINE option then the generated IDCAMS control statements are displayed in a CBLe text edit
window and may subsequently be saved to a file.
After execution of CBLVCAT control statements (or control statement file), the SYSPRINT (MVS and CMS) or SYSLST (VSE)
output is presented in the display area of the Execute CBLVCAT window.
The Execute CBLVCAT window display area is a list window with a single column (i.e. SysPrint) and so has charactersitics defined
by the list window class. For example, the Execute CBLVCAT window supports Prefix Commands and filtering, to display new
views of the data.
2013-11-13 13:06:41
SELCOPY/i Reference and User Guide
227
Utilities Menu (=8)
CBLVCAT Interactive Window
Figure 122. CBLVCAT Interactive in 58x120 3270 Session.
2013-11-13 13:06:41
SELCOPY/i Reference and User Guide
228
Utilities Menu (=8)
Prefix Commands
In addition to the standard List window menu items, the Execute CBLVCAT window includes the menu item RAW to open the
CBLVCAT LISTVCAT or LISTVTOC Raw Data window.
CBLVCAT Log Output window is opened only if the CBLVCAT execution has generated SYSLOG output. This usually occurs if an
error has been encountered in which case an information window is also displayed.
Figure 123. CBLVCAT Log Output window.
VCAT Command>
Enter one of the following:
◊ A CBLVCAT command, as you would code it on a CBLVCAT control statement.
◊ <filename, where filename is the name of a CBLVCAT control statement file.
The CBLVCAT command syntax is described in the CBLVCAT User Manual.
VCAT Program>
Specify the name of the CBLVCAT executable MODULE (MVS) or PHASE (VSE). By default, this field contains CBLV.
Prefix Commands
The following prefix area commands are available:
Command Description
<Dflt>
See Note 1 below.
AS
Open an Associations list window to list associated objects for this entry.
B
Open the CBLe text editor to to perform SDATA BROWSE on the entry.
C
Copy the entry.
D
Delete the entry. User will be prompted to verify the deletion.
E
Open the CBLe text editor to edit this entry.
F
Open the FSU - File Search/Update Window to perform advanced file search and optionally update.
FO
Open an SDE view to display (browse) the entry as output from the FSU - File Search/Update Window.
FS
If the entry is a PDS/PDSE, open the file search window for the PDS.
I
Open a Data Set Information panel display for the entry.
ID
Open an IDCAMS Command window and issue an IDCAMS LISTCAT for the entry.
K
Delete (Kill) the entry without prompting for verification.
L
Open a Dataset List window for the entry.
M
If the entry is a PDS/PDSE, open a Library List window.
Q
Open a Dataset Enqueue List window for the entry (major name SYSDSN.)
R
Rename the entry.
SD
Open the SDE BROWSE/EDIT Dialog Window to browse or edit the entry's data within a Structured Data
Environment window view.
T
Open another Execute CBLVCAT window and issue a LISTVCAT with TUNE DEFINE to generate tuned
output for the entry.
V
Open the CBLe text editor to View (edit read/only) this entry.
VC
Open another Execute CBLVCAT window and issue a LISTVCAT and/or LISTVTOC operation (as appropriate)
for the entry. See Note 2.
Z
Perform a compress of an MVS PDS library to reclaim disk space occupied by replaced (back-level) members.
This action performs an IEBCOPY to itself. No action is taken for PDSE entries, however, the IEBCOPY dialog
is opened with an error message if executed against any non-PDS(E) entry.
?
Open the volume statistics window for the volume containing the entry.
Note that this command will only be successful for lines of a LISTVCAT report containing VOLn=volser.
>
2013-11-13 13:06:41
SELCOPY/i Reference and User Guide
229
Utilities Menu (=8)
Columns Displayed
Open a new window containing a zoomed vertical display of the entry's fields. Particularly useful for list
windows that have a large number of displayed columns.
Assigned to PF2 by default.
Notes:
1. The default action on hitting <Enter> or, if configured, double-clicking the left mouse button on a SysPrint line depends on
the contents of the report entry, as follows:
1. If the entry contains the TYPE field "USERCAT" or "ALIAS OF", then prefix command "VC" is default.
2. If the entry contains the TYPE field "PDS" or "PDSE", then prefix command "M" (Member List) is default.
3. If the entry contains a fileid, then prefix command "E" (Edit) is default.
2. The "VC" prefix command performs LISTVCAT/VTOC operations based on the contents of the entry fields, as follow:
1. If the entry contains the TYPE field "USERCAT", then a new report is generated for the entire contents of that
catalog. Otherwise, only list the catalog entries that match the fileid.
2. If the report entry also contains a "VOLn=volser" field, then generate a LISTVTOC report for entries that match
the fileid in the volume's VTOC.
Columns Displayed
Name
Type
Description
SysPrint
Char
VCAT output report line
Raw Data Window
The CBLVCAT Raw window may be opened via the following:
• Select 'Raw' from the menu item of the Execute CBLVCAT window.
• Enter the command LVR on the command line of any window.
Where CBLVCAT arranges data in a printable report format, the CBLV Raw Data window provides a list of all report field data
accumulated by CBLVCAT in order to generate the report.
The CBLVCAT Raw window has the same characteristics as a SELCOPY/i List window including selecting, sorting and filtering of
row and column data and "point and shoot" sorting on column headers.
2013-11-13 13:06:41
SELCOPY/i Reference and User Guide
230
Utilities Menu (=8)
Raw Data Window
Figure 124. CBLVCAT LISTVCAT Raw Data Window.
2013-11-13 13:06:41
SELCOPY/i Reference and User Guide
231
Utilities Menu (=8)
Prefix Line Commands
Figure 125. CBLVCAT LISTVTOC Raw Data Window.
Prefix Line Commands
The following prefix line commands are available:
Command
Description
<Dflt>
Prefix line command "M" if entry is a PDS/PDSE library, prefix line command "E" otherwise.
AS
Open an Associations list window to list associated objects for this entry.
AP
Open the DB2 Print Audit Report panel for this entry, using the entry name as the Audit DSN field
entry.
B
Open the CBLe text editor to to perform SDATA BROWSE on the entry.
CF
Open the Compare Files Panel for this entry, using the entry name as the New File field entry.
CL
Open the Compare Libraries Panel for this entry, using the entry name as the New DSN field entry.
D
Delete the entry. User will be prompted to verify the deletion.
E
Open the CBLe text editor to edit this entry. (Default for non-PDS/PDSE entries)
F
Open the FSU - File Search/Update Window to perform an advanced search and optionally update the
contents of the entry.
FO
Open an SDE view to display (browse) the entry as FSU - File Search/Update Window output.
FS
Open the File Search window for the entry.
I
Open a Data Set Information panel display for the entry.
ID
Open an IDCAMS Command window and issue an IDCAMS LISTCAT for the entry.
K
Delete (Kill) the entry without prompting for verification.
M
If the entry is a PDS/PDSE, open a Library List window. (Default for PDS/PDSE entries)
Q
List dataset enqueues (major name SYSDSN) for this entry.
R
Rename the entry.
SD
2013-11-13 13:06:41
SELCOPY/i Reference and User Guide
232
Utilities Menu (=8)
Columns Displayed
Open the SDE BROWSE/EDIT Dialog Window to browse or edit the entry's data within a Structured
Data Environment window view.
T
Open an Execute CBLVCAT window and issue a LISTVCAT TUNE DEFINE operation for the entry.
UT
Opens the general file utilities menu to ultimately generate specific line commands in a temporary
CMX file.
V
Open the CBLe text editor to View (edit read/only) this entry.
VC
Open an Execute CBLVCAT window and issue a LISTVCAT operation for the entry.
Z
Perform a compress of an MVS PDS library to reclaim disk space occupied by replaced (back-level)
members. This action performs an IEBCOPY to itself. No action is taken for PDSE entries, however,
the IEBCOPY dialog is opened with an error message if executed against any non-PDS(E) entry.
/
Open a drop down menu containing valid prefix command functions for the list window entry. Position
the cursor on the required function and hit <Enter> to action the command.
Assigned to F16 by default.
>
Open a new window containing a zoomed vertical display of the entry's fields. Particularly useful for list
windows that have a large number of displayed columns.
Assigned to PF2 by default.
Columns Displayed
For LISTVTOC Output, the data displayed is:
Name
DSN
CYL/HD
CISIZE
START
ALLOC
USED
TYPE
EXPIRES
BLKSIZE
LRECL
RECFM
CREATED
INFO
VOLUME
ACCESSED
UNIT
Type
Char
Char
Char
Char
Char
Char
Char
Char
Char
Char
Char
Char
Char
Char
Char
Char
Description
Data Set Name
Low and high Cylinder/Head Limits
Control Interval Size
Relative track/block start address
Number of allocated tracks/blocks
Number of used tracks/blocks
Data set type
Expiry date
Blocksize
Logical Record Length
Record Format
Creation date
Informational messages
VTOC volume id
Last Accessed date
Unit (cuu) of DASD volume
For LISTVCAT Output, the data displayed is:
Name
DSN
TYPE
NRECS
PCNT
ALLOCT
ALLOCU
ALLOCP
ALLOCS
FRSP
LMAX
KL/BLK/IMB
CISIZE
BUFSP/IXL
EXCPS
TIMESTMP
NSEC
AVRL
PHYREC
RECSTATS
KL
2013-11-13 13:06:41
Type
Char
Char
Char
Char
Char
Char
Char
Char
Char
Char
Char
Char
Char
Char
Char
Char
Char
Char
Char
Char
Description
Data Set Name
Data set type
Number of records
Percent of allocated space used
Total allocated tracks/blocks
Unused allocated tracks/blocks
Defined Primary allocation (tracks/blocks)
Defined Secondary allocation (tracks/blocks)
Defined Free Space per CI and CA
Defined Maximum Record Length
Duplicate of fields KL,RKP or BLKSIZE or IMB/REP
Control Interval Size
Duplicate of fields BUFSP or IXL
Number of EXecuted Channel Programs
Timestamp that file was last closed
Number of secondary extents
Defined average RECORDSIZE
Physical Record Size
Records deleted, inserted, updated and read
Defined KEYS Length
SELCOPY/i Reference and User Guide
233
Utilities Menu (=8)
RKP
BLKSIZE
IMB/REP
BUFSP
IXL
CI/CA
SHR
S/C
DEFINED
EXPIRES
SPLITCI
SPLITCA
SEVL
VOLUME
GMAX
GVER
GGEN
STD1
STD2
HIUSERBA
HIALLRBA
FREEBYTES
COMPONENT
ENTRY
SMSS
SMSD
SMSM
EXT
CATALOG
Execute IDCAMS (=8.3)
Char
Char
Char
Char
Char
Char
Char
Char
Char
Char
Char
Char
Char
Char
Char
Char
Char
Char
Char
Char
Char
Char
Char
Char
Char
Char
Char
Char
Char
Defined KEYS Position
Block size (VSE/VSAM SAM)
IMBED and/or REPLICATE flags
Defined BUFFERSPACE
Number of Index Levels
Number of Control Intervals per Control Area
Defined SHAREOPTIONS (local and cross system)
Defined SHAREOPTIONS (local only) and USECLASS (primary only)
Date on which file was defined
Date on which file expires
Number of Control Interval splits
Number of Control Area splits
Highest CBLVCAT severity message level
Catalog Volume
GDG Maximum Level
GDG Version number
GDG Generation number
Reserved (blank)
Reserved (blank)
High Used Relative Byte Address
High Allocated Relative Byte Address
Number of unused allocated bytes
DATA or INDEX component DSN
VSAM CLUSTER entry DSN
Defined SMS Storage Class
Defined SMS Data Class
Defined SMS Management Class
Extended Attributes
Catalog DSN
Execute IDCAMS (=8.3)
The IDCAMS Command window may be opened via the following:
• Select option 3. 'IDCAMS' from the Utilities Menu
• Select 'Execute IDCAMS' from the File menu in the CBLe main window menu bar.
• Enter the command AMS on the command line of any window.
• Enter the prefix command "I" where supported by a List type window.
The IDCAMS Command window allows the user to enter any IDCAMS command and view the output in the the window display
area.
The IDCAMS Command window is essentially a List window and has the same charactersitics as List windows. For example
filtering is supported to display new views of the data.
2013-11-13 13:06:41
SELCOPY/i Reference and User Guide
234
Utilities Menu (=8)
Panel Fields
Figure 126. IDCAMS Command window.
Panel Fields
AMSCommand>
Specify valid IDCAMS command syntax.
Prefix Commands
No prefix line commands are supported for IDCAMS Command windows.
Columns Displayed
Asa
Char
ASA print control character
Line
Char
Print line
2013-11-13 13:06:41
SELCOPY/i Reference and User Guide
235
Utilities Menu (=8)
Columns Displayed
Execute POWER
The POWER Command Output window may be opened via the following:
• Select 'Execute POWER' from the File menu in the CBLe main window menu bar.
• Enter command POWER on the command line of any window.
The POWER Command Output window allows the user to enter VSE POWER commands and view the output in the window
display area.
If SELCOPY/i INI variables System.VSESMLogon=No (i.e. no Security Manager is active) and System.TrustedUser=No, then
POWER commands are restricted to PDISPLAY operations only.
The POWER Command Output window is essentially a List window and has the same characteristics as List windows. For example
select, sort and filter to display new views of the data are supported.
Figure 127. POWER Command Output window for PDISPLAY LST.
Panel Fields
POWER Command>
Specify the VSE POWER command. Note that POWER commands relating to cross partition usage (e.g. PDISPLAY
STATUS) are not supported.
Prefix Commands
The following prefix line commands are supported for PDISPLAY (RDR, LST or PUN) output only:
Command Description
<Dflt>
Prefix Line command E.
D
Delete the entry. User will be prompted to verify the deletion.
E
Open the CBLe text editor to edit this entry.
If an entry is password protected, then it may be edited by any user so long as the password is supplied. A
pop-up window will prompt the user for the password.
Non-password protected entries may only be edited if either of the following are true:
• System.TrustedUser=Yes in the SELCOPY/i INI file.
• System.VSESMLogon=Yes in the SELCOPY/i INI file and the TO or FROM attributes match the
current user's userid.
Note that VSE Basic Security Manager (BSM) alone does not impose access restrictions on the VSE
POWER queues.
K
Delete (Kill) the entry without prompting for verification.
2013-11-13 13:06:41
SELCOPY/i Reference and User Guide
236
Utilities Menu (=8)
Columns Displayed
Columns Displayed
The data displayed for PDISPLAY ALL/LST/PUN/RDR is:
Name
Type
Description
JobName
Char
JOB NAME
Number
UInt
JOB NUMBER
Sfx
UInt
JOB SUFFIX NUMBER
Q
Char
QUEUE IDENTIFIER (R, L, P)
Sys
Char
SYSTEM ID. (TARGET/PROCESS.)
Pr
Char
PRIORITY
Disp
Char
DISPOSITION (*..IN EXEC.)
Cl
Char
CLASS
Cards
UInt
NUMBER OF RECORDS SPOOLED
Pg
UInt
NUMBER OF PAGES SPOOLED
Cc
UInt
NUMBER OF COPIES
Form
Char
FORMS IDENTIFIER
To
Char
TARGET DESTINATION USER/REMOTE ID
From
Char
ORIGINATING USER/REMOTE ID
Cn
Char
CENTURY OF CREATION DATE
Date
Char
CREATION DATE OF QUEUE ENTRY
Start
Dec
START TIME (0HHMMSSF)
Stop
Dec
STOP TIME (0HHMMSSF)
PXFMRLEN
UInt
RECORD LENGTH
PXFMTYPE
Hex
RECORD TYPE
PXFMVOL
Hex
TAPE BAM VOLUME NUMBER
PXFMUSER
Char
USER INFORMATION
PXFMFLG1
Hex
CONTROL FLAG 1
PXFMRCFM
Hex
RECORD FORMAT
PXFMSTAT
Char
PAPER STATUS BYTE
PXFMLNE#
UInt
NUMBER OF LINES/CARDS SPOOLED
PXFMFLSH
Char
FLASH IDENTIFIER
PXFMCPYG
Hex
COPY GROUPINGS
PXFMFLG2
Hex
CONTROL FLAG 2
PXFMNSEP
UInt
NUMBER OF SEP. PAGES / CARDS
PXFMJBO#
UInt
ORIGINAL JOB NUMBER
PXFMCMPT
Char
COMPACTION TABLE NAME
PXFMNODE
Char
TARGET DESTINATION NODE NAME
PXFMORGN
Char
ORIGINATING NODE NAME
PXFMSUBS
Char
SUBSYSTEM NAME (EXTERNAL WRITER ID)
PXFMDDND
Char
NEXT DUE DATE
PXFMDDNT
Char
NEXT DUE TIME
PXFMQNUM
UInt
QUEUE ENTRY NUMBER
PXFMSECN
Char
QUEUE ENTRY SECURITY ZONE (SECNODE)
PXFMDIST
Char
OUTPUT DISTRIBUTION CODE
PXFMMACN
UInt
.. NON SHARED ACCESS COUNT
PXFMMAC1
UInt
.. SHARED SYSID 1 ACC. CNT.
PXFMMAC2
UInt
.. SHARED SYSID 2 ACC. CNT.
PXFMMAC3
UInt
.. SHARED SYSID 3 ACC. CNT.
2013-11-13 13:06:41
SELCOPY/i Reference and User Guide
237
Utilities Menu (=8)
Define Catalog ALIAS (=8.4)
PXFMMAC4
UInt
.. SHARED SYSID 4 ACC. CNT.
PXFMMAC5
UInt
.. SHARED SYSID 5 ACC. CNT.
PXFMMAC6
UInt
.. SHARED SYSID 6 ACC. CNT.
PXFMMAC7
UInt
.. SHARED SYSID 7 ACC. CNT.
PXFMMAC8
UInt
.. SHARED SYSID 8 ACC. CNT.
PXFMMAC9
UInt
.. SHARED SYSID 9 ACC. CNT.
The data displayed for other POWER commands is:
Name
Type
Description
Text
Char
Power Display Output
Define Catalog ALIAS (=8.4)
The Define Catalog ALIAS Dialog window may be opened via the following:
• Select option 4. 'Catalog ALIAS' from the Utilities Menu or select option 6. 'Alias' from the Create New Datasets menu
panel.
• Select 'Create Catalog ALIAS' from the File menu in the CBLe main window menu bar.
• Enter command AMSA on the command line of any window.
• Enter the List window prefix command "A" against a non-VSAM data set list entry.
The Define Catalog ALIAS dialog provides a simple interface for the user to supply IDCAMS DEFINE ALIAS characteristics for a
new alias name. Aliases may be defined for non-VSAM data sets and, if the user has sufficient authority, user catalogs. Compare
with the Create Library ALIAS dialog window which creates PDS/PDSE library member aliases.
Select the appropriate menu bar item (see below) to define the new entry.
Fields within this dialog represents the relevant IDCAMS DEFINE ALIAS parameters as appropriate for the entry being defined.
Please refer to "DFSMS Access Method Services for Catalogs" for further information.
Note: Not implemented for CMS and VSE.
Figure 128. Define Catalog ALIAS Dialog window.
Menu Bar Items
Define
Start the VSAM object definition. (Foreground)
Job
Creates and edits the IDCAMS DEFINE statement including job control ready for submission to batch. (See CBLe
command SUBMIT.) (Background)
AMS
Opens a CBLe edit view containing generated AMS command syntax to perform the IDCAMS DEFINE. Execute by
placing the cursor on the first line of the command and hitting <F16> The command may be copied to the user's HOME
command centre for future reference.
Help
Open the help window for the Define Catalog ALIAS dialog window.
Panel Fields
Alias Name>
Name of the ALIAS object to be defined.
2013-11-13 13:06:41
SELCOPY/i Reference and User Guide
238
Utilities Menu (=8)
Panel Fields
Relate Name>
Name of the object to which the ALIAS will relate.
Catalog>
This field entry specifies the catalog in which the alias is to be defined. If the alias is for a user catalog connector, this field
should contain the name of the master catalog. Please refer to section "Catalog Selection Order for DEFINE" in "DFSMS
Access Method Services for Catalogs" for catalog selection when this field is null.
Symbolic>
This field entry may be "Y" or "N" to indicate that the Relate> field is a SYMBOLICRELATE containing system symbols
(i.e. an Extended ALIAS is to be defined.) See "DFSMS Managing Catalogs" for further information.
Create Library ALIAS (=8.5)
The Create Library ALIAS Dialog window may be opened via the following:
• Select option 5. 'Library ALIAS' from the Utilities Menu.
• Select 'Create Library ALIAS' from the File menu in the CBLe main window menu bar.
• Enter command ALIAS -DLG on the command line of any window.
• Enter the List window prefix command "A" against an entry in a Library List.
The Create Library ALIAS dialog provides a simple interface to create a new PDS or PDSE library member alias. Compare with the
Define Catalog ALIAS dialog window which creates cataloged aliases for non-VSAM data sets and user catalogs.
Note that aliases for PDSE load-library members are created using the binder to relink the module being aliased. This will result in
an update to the module's TTR.
Figure 129. Create Library ALIAS Dialog window.
Panel Fields
Library>
The DSN of the PDS(E) library. (This may be a LOAD Library.)
Member>
The library member name for which an alias will be generated.
Alias>
The new alias name to be generated.
Entry>
For load library aliases only, the symbolic name of the entry-point address to be used.
AMode>
For a load library aliases only, the Addressing Mode for the entry point specified in Entry>. Valid arguments are 24, 31 and
ANY.
AType>
For a load library aliasses only, the alias type to be generated. Valid arguments are A=Regular, S=SymLink, P=SymPath.
2013-11-13 13:06:41
SELCOPY/i Reference and User Guide
239
Utilities Menu (=8)
Panel Fields
Execute IEBCOPY (=8.6)
The IEBCOPY Dialog window may be opened via the following:
• Select option 6. 'IEBCOPY' from the Utilities Menu.
• Select 'Execute IEBCOPY' from the File menu in the CBLe main window menu bar.
• Enter command IEBCOPYDIALOG on the command line of any window.
• Enter the List window prefix command "C" against a PDS(E) entry in a Dataset List or Catalog List, or any entry within in a
Library List.
The IEBCOPY Dialog provides an intuitive interface to copy PDS(E) libraries or individual members to a new or existing target
library.
Select "Copy" to perform the IEBCOPY in the foreground or "JCL" to generate a batch job stream in a CBLe text edit view. Having
selected "JCL" the user can issue "JOBCARD" to insert a skeleton JOB statement, before executing SUB to submit the job to
batch.
Note: Unless already positioned on one of the window buttons (Copy, JCL, Cancel or Help), <Enter> will first position the cursor on
the "Copy" button, <Enter> a second time will select (press) the button to action the command.
Any non-zero return code encountered using the foreground "Copy" option will open the Execute IEBCOPY output listing displaying
the SYSPRINT output.
Unless the Output> field value is "YES", if a zero return code is encountered, no output window is opened and a message reporting
the number of members copied is returned.
Figure 130. IEBCOPY Dialog window.
Panel Fields
PDSIn>
Specify the DSN of the source PDS(E) library. (This may be a LOAD Library.)
PDSOut>
Specify the DSN of the target PDS(E) library. This may be the same library DSN specified for PDSIn.
Default is the value specified on the last invocation of the IEBCOPY dialog. Otherwise, the default is the PDSIn value.
OldName>
Source library member name mask identifying members to be copied.
Multiple character and single character wild cards, defined by the MWCC and SWCC values (see below) may be used in
the member mask.
If no value is specified (i.e. unset), the entire library will be copied. This is different to simply specifying wildcard "*"
(asterisk) which copies all members individually. To copy all members of a library, the process is quicker if the value is
blank.
If invoked via the "C" prefix command, default is the value of the Library List "Entry" field or is unset if a Dataset or Catalog
List. Otherwise, the default is the value specified on the last invocation of the IEBCOPY dialog.
NewName>
Target member name. The member name specified in OldName will be renamed to this new name.
This field must be empty if a wildcard character is used in the OldName member mask. Wild cards are not supported for
NewName.
Default is the OldName value.
Replace>
2013-11-13 13:06:41
SELCOPY/i Reference and User Guide
240
Utilities Menu (=8)
Panel Fields
Enter "YES" or "NO" to indicate whether existing members in the target library are to be replaced if the source and target
member names match.
Default is the value specified on the last invocation of the IEBCOPY dialog, otherwise "NO".
Group>
Enter "YES" or "NO" to indicate whether any defined ALIAS entries for the selected library members are to be copied also.
Note that this also applies to Load Library members.
MWCC>
Specifies the Multiple Wild Card Character which represents zero or more characters in the OldName library member
mask.
Default is "*" (asterisk).
SWCC>
Specifies the Single Wild Card Character which represents one character in the OldName library member mask.
Default is "%" (percent).
Output>
Enter "YES" or "NO" to indicate whether the IEBCOPY SYSPRINT output is to be displayed.
Default is "NO".
DB2 Dynamic SQL
The DB2 Dynamic SQL window is a list window, opened on execution of the SQL command.
DB2 Dynamic SQL window may be used to submit SQL commands to a DB2 subsystem and display the resultant messages and/or
table views.
Note that SQL statements may also be executed via the Execute SQL Statements panel as part of the SELCOPY/i DB2 interface.
The DB2 Dynamic SQL capability is available only to MVS sites where SELCOPY is installed. The SELCOPY DB2 interface,
SELCOPQL load module is used to pass SQL statements to the DB2 data base and so must also be available in the SELCOPY
load library.
On startup, the Dynamic SQL window connects the user to the DB2 subsystem using the DB2 subsystem name and plan specified
in the CBLNAME load module.
2013-11-13 13:06:41
SELCOPY/i Reference and User Guide
241
Utilities Menu (=8)
DB2 Dynamic SQL
Figure 131. DB2 Dynamic SQL window.
The contents of the display area may be edited in a new file using the CBLe text editor by selecting Edit from the window menu.
Select Log from the window menu to open the SQL Log output which displays the daignosis information and SQL return codes
passed from the DB2 sub-system.
2013-11-13 13:06:41
SELCOPY/i Reference and User Guide
242
Utilities Menu (=8)
DB2 Dynamic SQL
Figure 132. DB2 Dynamic SQL LOG window.
Select FDB from the window menu to open the Field Descriptor Block which provides detailed information on each field displayed
by an SQL SELECT statement.
2013-11-13 13:06:41
SELCOPY/i Reference and User Guide
243
Utilities Menu (=8)
Panel Fields
Figure 133. DB2 SQL FDB Window.
Panel Fields
DB2 Subsystem>
Specify the DB2 sub-system name to be the target of the CONNECT.
Changing the Subsystem name will cause CBLi to disconnect the user from the current subsystem and reconnect to the
new subsystem.
Default is that defined by the CBLiINI option, DB2.SSN, otherwise the sub-system name specified in the DB2SubSys field
of the CBLNAME load module is used.
Plan>
Specify the SELCOPY (SELCOPQL) DB2 plan name which has been bound to the DB2 sub-system.
This is the name assigned to the SELCOPY plan during the BIND to the DB2 subsystem.
Default is that defined by the CBLiINI option, DB2.Plan, otherwise the plan name specified in the DB2Plan field of the
CBLNAME load module is used.
Select Limit>
Limit the number of rows to be displayed in the Dynamic SQL window following a SELECT transaction. Once the limit
threshold has been reached, a pop-up message window is displayed and no further attempt is made to retrieve selected
rows of data.
The n_rows value is placed in the "Select Limit>" field of the Dynamic SQL window.
The default limit is that defined by the CBLiINI option, DB2.SelectLimit, otherwise no limit is implied.
AutoCommit>
Determine whether a COMMIT is to be automatically issued following every transaction (AutoCommit). If COMMIT=NO,
then the user should issue COMMIT manually to commit any changes made to the data. A commit is executed
automatically when the Dynamic SQL window is closed, regardless of the AutoCommit field setting.
The commit value is reflected in the "AutoCommit>" field of the Dynamic SQL window.
The default is YES.
SQL Statement>
Specify valid SQL statement syntax to be executed either directly or via an input control file.
If an input control file is specified, then the input fileid must be prefixed by "<" (less than). e.g. <
NBJ.SQL.CTL(SYSTABS)
The resulting data or messages are displayed in the window display area.
2013-11-13 13:06:41
SELCOPY/i Reference and User Guide
244
Utilities Menu (=8)
Favourite Datasets/Commands (=8.7)
Favourite Datasets/Commands (=8.7)
Overview
The Favourite Datasets/Commands utility (FAV) enables users to specify a default project hierarchy and also assign file names and
command streams to items of a numbered list. This utility was introduced in order to assist migratation from other productivity
software that offer similar features.
Users may configure numbered items and later reference the file name or execute the command assigned to an item, simply by
entering the item number. This offers users an interface to commonly accessed data sets which be used in addition to commands
entered in the user's HOME command centre (CMX) file.
Favourite Datasets/Commands Panel
The Favourite Datasets/Commands panel window (ZZSFAV00) is an interactive panel window (window class WINWIPO0) and may
be started via the following:
• Select option 7. 'Favourites' from the Utilities Menu.
• Select 'Favourites' from the Utilities menu in the CBLe main window menu bar.
• Enter command FAV on the command line of any window.
By default, field entries are populated with arguments and options that were entered the last time the Search for Favourite
Datasets/Commands panel was used.
Figure 134. FAV - Favourite Datasets/Commands panel.
When <Enter> is pressed, the a command verb and a fileid parameter is constructed from one or more of the DSN/Variable #,
Member Name, Project, Group and Type fields.
The fielid is determined based primarily on the contents of the DSN/Variable # field as follows:
Field Content
null
non-numeric
numeric
Fileid Determination
Use the contents of the Project, Group, Type and Member Name fields.
Use the contents of the DSN/Variable # and Member Name field.
Use the contents of the specified number list item and the Member Name field.
Note that, pressing <Enter> or, if configured, double-clicking the left mouse button on one of the numbered items, is equivalent to
entering the item number in the DSN/Variable # field then pressing <Enter>.
Panel Input Fields
Command/Func:
This input field (ZCOMMAND) allows the user to optionally enter a command to be executed using the contents of the
DSN/Variable # field and, if a PDS/PDSE or GDG DSN, Member Name field as input to the command. If the contents
of the DSN/Variable # field is numeric, referencing one of the numbered list items, then the contents of that list item is
2013-11-13 13:06:41
SELCOPY/i Reference and User Guide
245
Utilities Menu (=8)
Panel Input Fields
used as input to the command.
If, however, the contents of the list item starts with a recognised command verb, then the command entered in the
Command/Func: field is ignored and the list item command stream is executed instead.
If left empty, then the command generated for this field on pressing <Enter> is determined as follows:
Command Executed
none
LA
EDIT
LL
LD
Condition
A command is already included as part of the specified list item number.
The fileid is a single token (qualifier) containing no "." (dot/period) and no leading "/" (slash).
The fileid has an MVS PDS/PDSE DSN with a member name or is an HFS file path.
The fileid is an MVS PDS/PDSE DSN with no member name.
The fileid is not an MVS PDS/PDSE DSN.
DSN/Variable #:
This input field (ZFAVNUM) optionally specifies a complete fileid, the DSN of a PDS/PDSE library or a list item number
that references a fileid or command stream.
If left empty, then a fileid is generated from the Project, Group, Type and Member Name fields.
Entering an invalid list item number in this field will return the following errors:
ZZSP025E Parameter n is invalid in command SaoGet n.
ZZSE043E RC=20 from: SAOSTRING
Member Name:
This input field (ZMEMBER) specifies a library member name to be included as part of the fileid.
For MVS systems only, where this field is not empty, the use of its contents in the resultant fileid is based on whether a
member name has already been specified via the other fields used to resolve the fileid. i.e. If no member name is already
identified within the constructed fileid, then the contents of the Member Name field are enclosed in "( )" (parentheses) and
appended to the fileid.
For VSE and CMS, this member name is used only if the DSN/Variable # field is null, in which case the fileid is built from
the Project, Group, Type and Member Name fields.
Project:
Group:
Type:
Input fields Project, Group and Type (ZPROJECT, ZGROUP, ZTYPE respectively) identify the default fileid tokens
(qualifiers) to be used if the DSN/Variable # field is null.
For MVS, the Project, Group and Type fields represent the first three qualifiers of a DSN.
For CMS, the Project and Type fields represent the FileMode and FileType tokens respectively. The Group field is
ignored.
For VSE, the Project, Group and Type fields represent a LIBR library name, sub-library name and member type
respectively.
Max Entries:
This input field (ZMAXENTRIES) specifies the maximum number of list items to be displayed in the current Favourite
Datasets/Commands panel.
This number of list items may be increased or decreased at any time while the panel is open, so adding list items to or
removing list from the panel's display. A command stream or fileid assigned to a list entry that has been removed, is not
lost and will be redisplayed if the Max Entries value is increased to include this list item. Since panel field values are saved
as SELCOPY/i User INI file variables, list item values can be redisplayed across SELCOPY/i sessions.
Keeping the maximum number of list items low, reduces the amount of storage required to display the Favourite
Datasets/Commands panel and also makes the list more managable.
Default number of entries is 99, the maximum value of this field is 999.
Scroll-H:
Input field Scroll-H (ZSCROLLH) is used for the horizontal scrolling of text in list items. It identifies the first text position
currently in view in all list items. This value may be updated by the user, so scrolling the list item entry fields so that this
text position is the first in view.
Horizontal scrolling of list item text is also achieved using <PF10> (left) and <PF11> (right) from anywhere within the panel
display.
2013-11-13 13:06:41
SELCOPY/i Reference and User Guide
246
Utilities Menu (=8)
System Information Menu (=8.8)
Default value is 1. (i.e. the start of the list item text.)
Columns:
Input field Columns (ZDISPLAYCOLS) specifies the number of list item columns to be displayed on a single line of the
current Favourite Datasets/Commands panel.
Increasing this value will increase the number of list items visible in the panel but will reduce the length of text displayed in
each list field.
Default value is 2 columns per line.
n:
A number of list item (FAV.n) input field entries in which to store commonly accessed fileids and CLI command streams.
The number of list item fields displayed in the panel is defined by the Max Entries input field up to a maximum of 999.
The display of list item entries may be scrolled to a specific list item by overtyping the first item number in the current
display (highlighted with red underscore) with the required list item number.
The entire contents of an individual list item may be expanded using <PF2>, allowing edit of the text data. When the
expanded data view is closed (using <PF3>) the list item displays the updated text.
From anywhere within the panel display, <PF10> and <PF11> will scroll the contents of all list item fields left and right
respectively, whereas <PF7> and <PF8> will scroll the list items up and down respectively.
System Information Menu (=8.8)
The System Information Menu panel (ZZSGSYSM) is an interactive panel window opened on selection of option 8. in the
SELCOPY/i Utilities Menu.
SELCOPY/i supports display of the status information about the environment in which it is running. With the exception of operating
system information windows, system windows are usually only required for diagnostic purposes only.
Option 'About' provides information about the running version of SELCOPY/i including product release and component build levels.
It also identifies the latest PTF level.
Options
1 Operating System
2 LPA
3 Link List
4 APF Libraries
5 Tasks
6 Programs
7 SVC Status
8 About
SYSI - Operating System Details
SYSLPA - List LPA Modules
SYSLL - List Link-List libraries
SYSAPF - List APF authorised libraries
SYST - Task List
SYSP - List loaded programs
SVC - Display status of the SELCOPY/i SVC
ABOUT - Display SELCOPY/i Release and Service Level
Operating System Window (=8.8.1)
The Operating System window may be opened via the following:
• Select option 1. 'Operating System' from the System Information Menu.
• Select 'Operating System' from the Utilities/System menu in the CBLe main window menu bar.
• Enter command SYSI on the command line of any window.
Note: Not implemented for VSE and CMS.
Access to this operating system information and also to LPA, LinkList, APFList, Tasks, Storage and Programs information windows,
may be restricted if RACF (or equivalent) resource checking has been enabled for the SELCOPY/i and the user does not have read
access to the named SYSTEM resource.
2013-11-13 13:06:41
SELCOPY/i Reference and User Guide
247
Utilities Menu (=8)
Operating System Window (=8.8.1)
Figure 135. MVS Operating System window.
Menu Bar Items
LPA
Open LPA Modules Window
LinkList
Open Link List Window
APFList
Open APF List Window
Tasks
Open Task List Window
Storage
Open Allocated Storage Windows
Programs
Open Loaded Programs Window
LPA Modules Window (=8.8.2)
The LPA (Link Pack Area) Modules window may be opened via the following:
• Select option 2. 'LPA' from the System Information Menu.
• Select 'LPA' from the Operating System window menu.
• Enter command SYSLPA on the command line of any window.
The LPA Modules window is a List Window and supports the standard List window features. i.e. Field Descriptor Block, Edit and
Selecting, Sorting and Filtering.
Note: Not valid for CMS and VSE.
Figure 136. LPA Modules window.
2013-11-13 13:06:41
SELCOPY/i Reference and User Guide
248
Utilities Menu (=8)
Columns Displayed
Columns Displayed
Name
Type
Description
Address
Hex
LPDE or CDE element address
Chain
Hex
LPDE or CDE chain pointer
RBP
Hex
RB pointer
Dyn
BitFlag
Dynamic LPA
Name
Char
Module name
EPA
Hex
Entry point address
MjP
Hex
Major name pointer
Use
UInt
Use count
At0
Hex
Attributes 0
SSP
UInt
Storage subpool
At1
Hex
Attributes 1
At2
Hex
Attributes 2
At3
Hex
Attributes 3
At4
Hex
Attributes 4
AliasOf
Char
Aliased name
LoadedAt
Hex
Load point address
LenHex
Hex
Load module length
LenDec
UInt
Load module length
Link List Window (=8.8.3)
The Link List window may be opened via the following:
• Select option 3. 'Link List' from the System Information Menu.
• Select 'LinkList' from the Operating System window menu.
• Enter command SYSLL on the command line of any window.
The Link List window is a List Window and supports the standard List window features. i.e. Field Descriptor Block, Edit and
Selecting, Sorting and Filtering.
The contents of the library is displayed in a List Library Members window on hitting <Enter> or, if configured, double-clicking the left
mouse button, on that library's entry in the list.
Note: Not valid for CMS and VSE.
Figure 137. Link List window.
Columns Displayed
Name
Type
Description
Seq
UInt
Link list sequence number
DsN
Char
Link list library name
2013-11-13 13:06:41
SELCOPY/i Reference and User Guide
249
Utilities Menu (=8)
Columns Displayed
APF List Window (=8.8.4)
The APF (Authorised Program Facility) List window may be opened via the following:
• Select option 4. 'APF Libraries' from the System Information Menu.
• Select 'APFList' from the Operating System window menu.
• Enter command SYSAPF on the command line of any window.
The APF List window is a List Window and supports the standard List window features. i.e. Field Descriptor Block, Edit and
Selecting, Sorting and Filtering.
The contents of the authorised library is displayed in a List Library Members window on hitting <Enter> or, if configured,
double-clicking the left mouse button, on that library's entry in the list.
Note: Not valid for CMS and VSE.
Figure 138. APF List window.
Columns Displayed
Name
Type
Description
DsNL
UInt
APF library name length
DsN
Char
APF library name
Vol
Char
Volume serial
SMS
BitFlag
SMS managed
Task List Window (=8.8.5)
The Task List window may be opened to display the active tasks in the local address space, via the following:
• Select option 5. 'Tasks' from the System Information Menu.
• Select 'Tasks' from the Operating System window menu.
• Enter command SYSTASK on the command line of any window.
The Task List window is a List Window and supports the standard List window features. i.e. Field Descriptor Block, Edit and
Selecting, Sorting and Filtering.
Note: Not implemented for CMS and VSE.
2013-11-13 13:06:41
SELCOPY/i Reference and User Guide
250
Utilities Menu (=8)
Task List Window (=8.8.5)
Figure 139. Task List window.
Columns Displayed
Name
Type
Description
Seq
UInt
Task sequence
Lvl
UInt
Task level
TCB
Hex
TCB address
Pgm
Char
Program name
Allocated Storage Windows
Allocated Storage and Unallocated Storage windows may be opened to display lists of areas of allocated, free and unallocated
storage in the local address space.
Separate storage window lists are available for Private Area (PVT), Common Service Area (CSA), System Queue Area (SQA) and
Local System Queue Area (LSQA) storage. These lists may be opened by selecting the required storage type from a pop-up menu
displayed on selecting 'Storage' from the Operating System window menu.
The storage windows belong to the list window class and support standard list window features. i.e. Field Descriptor Block, Edit and
Selecting, Sorting and Filtering.
Note: Not implemented for CMS and VSE.
Figure 140. Allocated Private Storage window.
Columns Displayed
Name
Type
Description
Type
Char
Storage type
TCB
Hex
Owning TCB
Pool
UInt
Sub pool
Key
UInt
Sub pool storage key
Flags
Hex
Sub pool flags
Status
Char
Storage status
Address
Hex
Storage address
Length
Hex
Storage length
Loaded Programs Window (=8.8.6)
The Loaded Programs window may be opened to display programs that have been dynamically loaded into the local address
space, via the following:
• Select option 6. 'Programs' from the System Information Menu.
• Select 'Programs' from the Operating System window menu.
• Enter command SYSPGM on the command line of any window.
2013-11-13 13:06:41
SELCOPY/i Reference and User Guide
251
Utilities Menu (=8)
Loaded Programs Window (=8.8.6)
The Loaded Programs window is a List Window and supports standard List window features. i.e. Field Descriptor Block, Edit and
Selecting, Sorting and Filtering.
Note: Not implemented for CMS and VSE.
Figure 141. Loaded Programs window.
Columns Displayed
Name
Type
Description
Name
Char
Program name.
EPA
Hex
Entry point address.
Address
Hex
Load address.
Size
UInt
Load module size.
SizeHex
Hex
Load module size (hex).
Use
UInt
Use count.
AMode31
BitFlag
Program is AMODE 31.
Auth
BitFlag
Program is authorised.
Rent
BitFlag
Program is reuseable.
CDLoad
BitFlag
Program loaded with VSE CDLOAD.
Perm
BitFlag
CMS nucleus extension PERM attribute.
Sys
BitFlag
CMS nucleus extension SYSTEM attribute.
Service
BitFlag
CMS nucleus extension SERVICE attribute.
EndCmd
BitFlag
CMS nucleus extension ENDCMD attribute.
ImmCmd
BitFlag
CMS nucleus extension IMMCMD attribute.
SELCOPY/i Storage Statistics Window
The Storage Statistics window may be opened via the following:
• Select 'SELCOPY/i storage stats' from the Utilities/System menu in the CBLe main window menu bar.
• Enter command SYSSTOR on the command line of any window.
The Storage Statistics window displays storage being used by SELCOPY/i at that moment in time. The values in each field will vary
as windows are opened and closed.
The storage allocated by SELCOPY/i is categorised internally as belonging to the Heap or the Stack.
Heap
Heap storage contains structures such as lists, control blocks, etc.
Each structure is an element within the heap and may persist beyond the life of the function that generated it. Each element exists
within a fixed length heap storage block which itself may contain 1 or more elements. When an element is released by SELCOPY/i,
the area within the storage block occupied by that element, is freed.
If possible, SELCOPY/i will utilise these free areas of storage for new elements. However, if an element is generated with a length
that exceeds the available free area within existing storage blocks, a new storage block is allocated from main storage. Similarly, if
2013-11-13 13:06:41
SELCOPY/i Reference and User Guide
252
Utilities Menu (=8)
Heap
all the elements within a storage block are freed, the block is released back to main storage.
Stack
The stack is a fixed area of storage that contains the dynamic storage areas associated with each function that has been called.
A function acquires dynamic storage for local variables from the stack when it is called and frees this storage when it returns control
to its caller.
Thus, the amount of stack storage in use at any time depends on the number of levels of nested function calls and the amount of
storage required by each function. This, in turn, depends on which facilities of SELCOPY/i are in use.
The Stack high water mark represents the maximum amount of stack storage that has been in use in the current SELCOPY/i
session.
Lists
The List insert work area and List container are areas of storage associated with SELCOPY/i listing facilities.
Figure 142. Storage Statistics window.
SELCOPY/i Module List Window
The SELCOPY/i Module List may be opened to display information on all modules that comprise SELCOPY/i, via the following:
• Select 'SELCOPY/i module list' from the Utilities/System menu in the CBLe main window menu bar.
• Enter command APE on the command line of any window.
The Module List window is a List Window and supports the standard List window features. i.e. Field Descriptor Block, Edit and
Selecting, Sorting and Filtering.
Figure 143. Module List window.
2013-11-13 13:06:41
SELCOPY/i Reference and User Guide
253
Utilities Menu (=8)
SELCOPY/i Module List Window
CBLVCAT SVC window (=8.8.7)
The CBLVCAT SVC window may be opened via the following:
• Select option 7. 'SVC Status' from the System Information Menu.
• Select 'SELCOPY/i SVC' from the Utilities/System menu in the CBLe main window menu bar.
• Enter command SVC on the command line of any window.
The CBLVCAT SVC window displays information about the CBLVCAT SVC required to perform CBLVCAT LISTVCAT catalog
listings.
Note: Not valid for CMS and VSE.
Figure 144. CBLVCAT SVC window.
CBLNAME Window
The CBLVCAT SVC window may be opened via the following:
• Select 'CBLNAME' from the Utilities/System menu in the CBLe main window menu bar.
• Enter command CBLNAME on the command line of any window.
The CBLNAME window is a storage display window containing the CBLNAME module loaded by SELCOPY/i.
The CBLNAME storage display window does not display areas of storage outside the loaded CBLNAME module and the data may
not be updated by the user.
Figure 145. CBLNAME window.
File Search (=8.9)
The File Search window may be opened via the following:
• Select option 9. 'Search' from the Utilities Menu.
• Select 'File Search' from the Utilities menu in the CBLe main window menu bar.
• Enter command FS on the command line of any window.
2013-11-13 13:06:41
SELCOPY/i Reference and User Guide
254
Utilities Menu (=8)
File Search (=8.9)
The File Search window displays the lines in a PDS member (MVS), LIBR member (VSE) or CMS file that contain a given string.
For more advanced file search features, use the File Search/Update/Copy utility.
Figure 146. File Search window.
Panel Fields
Dataset>
◊ For MVS, the Dataset parameter is the DSN of a PDS(E) library to be searched which may optionally include a
member name mask to identify a subset of members to be searched.
A member name mask supports the following wild cards:
*
A single asterisk represents an entire member name or zero or more characters within a
member name mask.
%
A single percent sign represents exactly one character within a member name mask. Up to
8 percent signs can be specified in each member name mask.
If specified, the member name mask must immediately follow the PDS(E) DSN and be enclosed in "( )"
(parentheses). A member name mask that is less than 8 characters in length and does not contain an "*"
(asterisk) wild card will have a trailing "*" wild card automatically appended. e.g. To search all members of
"CBP.PGMLIB" whose names start "CBLA":
CBL.PGMLIB(CBLA)
◊ For VSE, the Dataset parameter is the name of the LIBR library and sub-library to be searched. The sub-library
name, member name and member type may include the "*" wild card to represent zero or more characters. e.g.
To search all members of "OEM2.CBL" :
OEM2.CBL.*.*
◊ For CMS, the Dataset parameter is a CMS fileid mask in standard CMS format denoting the files to be searched.
The file name, file type and file mode may each include the "*" wild card to represent zero or more characters.
e.g. To search all "EXEC" file types with file name beginning "SS" on all accessed mini-disks.
SS* EXEC *
2013-11-13 13:06:41
SELCOPY/i Reference and User Guide
255
Utilities Menu (=8)
Panel Fields
Search string>
The character search string.
The search string is not case sensitive and must be enclosed in single or double quotes if it includes blank characteres.
Prefix Line Commands
For MVS systems, the following prefix line commands are available:
Command Description
<Dflt>
Prefix line command E.
A
Open the Create Alias dialog window.
B
Open the CBLe text editor to to perform SDATA BROWSE on the entry.
C
Copy the entry.
CF
Open the Compare Files Panel for this entry, using the entry name as the New File field entry.
CL
Open the Compare Libraries Panel for this entry, using the entry name as the New DSN field entry.
D
Delete the entry. User will be prompted to verify the deletion.
E
Open the CBLe text editor to edit this entry.
EX
Execute the entry. (Invokes the TSO command, EXECUTE, using the entry name as input.
F
Open the FSU - File Search/Update Window to perform an advanced search and optionally update the
contents of the entry.
FS
Open the File Search window for the entry.
IC
Open the Execute IEBCOPY panel for this entry, using the entry name as the PDSIn field entry.
J
Submit the entry to batch. Executes the CBLe CLI SUBMIT command using the entry name as input. (A CBLe
frame window must be active for this operation to suceed.)
K
Delete (Kill) the entry without prompting for verification.
R
Rename the entry.
SD
Open the SDE BROWSE/EDIT Dialog Window to browse or edit the entry's data within a Structured Data
Environment window view.
UT
Opens the general file utilities menu to ultimately generate specific line commands in a temporary CMX file.
V
Open the CBLe text editor to View (edit read/only) this entry.
/
Open a drop down menu containing valid prefix command functions for the list window entry. Position the
cursor on the required function and hit <Enter> to action the command.
Assigned to F16 by default.
>
Open a new window containing a zoomed vertical display of the entry's fields. Particularly useful for list
windows that have a large number of displayed columns.
Assigned to PF2 by default.
For VSE systems, the following prefix line commands are available:
Command Description
<Dflt>
Prefix line command E.
D
Delete the entry. User will be prompted to verify the deletion.
E
Open the CBLe text editor to edit this entry.
FS
Open the File Search window to search the contents of this entry. Not supported for VSE LIBR library entries.
J
Submit the entry to batch. Executes the CBLe CLI SUBMIT command using the entry name as input. (A CBLe
frame window must be active for this operation to suceed.)
K
Delete (Kill) the entry without prompting for verification.
L
LOCK the member.
R
Rename the entry.
U
UNLOCK the member. A member may only be unlocked by the user that locked it.
V
Open the CBLe text editor to View (edit read/only) this entry.
/
Open a drop down menu containing valid prefix command functions for the list window entry. Position the
cursor on the required function and hit <Enter> to action the command.
2013-11-13 13:06:41
SELCOPY/i Reference and User Guide
256
Utilities Menu (=8)
Prefix Line Commands
Assigned to F16 by default.
>
Open a new window containing a zoomed vertical display of the entry's fields. Particularly useful for list
windows that have a large number of displayed columns.
Assigned to PF2 by default.
Columns Displayed
Name
Type
Description
Member
ALPair
Member
RecNo
Int
Record number
HitNo
Int
Hit number
Record
ALPair
File record
Search for Library Members (=8.10)
Overview
The Search for Library Members utility (LLX) provides a method of locating by name, one or more members within a number of
PDS/PDSE libraries.
The utility calls the LL (ListLibrary) command repeatedly for each library with a DSN matching the library DSN mask(s) or
referenced by a DDname or DDname concatenation of libraries. This will identify the existance of any members that match the
specified member name mask(s) within that library.
The Search for Library Members utility executes in the foreground only. To execute in batch, a user can write a simple SELCOPY
routine to read the libraries with parameter DIR and report the library directory entries that match the required member mask. See
sample SELCOPY routine members (ZZI*) in sample library SZZSSAM1 and also "SELCOPY Debug & Development" for
assistance in writing new SELCOPY routines.
The Search for Library Members report output is written to a temporary file and presented to the user in a SELCOPY/i (CBLe) text
edit view.
Unless "Quiet" option has been selected, the library member name search will pause and a popup window opened prompting the
user for a decision to cancel or continue, with or without further prompts, if either of the following conditions are true:
1. No matching member names have been found in the first 10 libraries. The popup window proivides an opportunity to
change the number of libraries to search before this popup is displayed again.
2. A single library contains at least 1000 matching member names. The popup window proivides an opportunity to change
this matching member names threshold.
Search for Library Members Panel
The Search for Library Members utility panel window (ZZSLLX00) is an interactive panel window (window class WINWIPO0) and
may be started via the following:
• Select option 10. 'Find Lib Members(s)' from the Utilities Menu.
• Select 'Search for Library members' from the Utilities menu.
• Execute the command LLX with no parameters from the command line of any window.
By default, field entries are populated with arguments and options that were entered the last time the Search for Library Members
Utility panel was used.
2013-11-13 13:06:41
SELCOPY/i Reference and User Guide
257
Utilities Menu (=8)
Search for Library Members Panel
Figure 147. Search for Library Members Panel.
Having typed entries in the required panel fields, simply pressing the <Enter> key or, if configured, double-clicking the left mouse
button will will action the library member name search in the foreground.
Menu Bar Items
Run
Run the library member name search in the foreground.
Command
Generate the LLX command line syntax for field entries specified by the user and display it in a temporary CMX file text
edit view. This command may be executed using ACTION point-and-shoot execution <F16> or copied into the user's
HOME file and saved for future execution.
Panel Input Fields
Members(s) to locate:
Pattern 1>
Pattern 2>
Pattern 3>
Pattern 4>
These input fields (MEMBER1, MEMBER2, MEMBER3 and MEMBER4) allow the user to provide up to 4 alternative
member name masks to identify the member names to be located.
A member name mask supports the following wild cards:
*
A single asterisk represents an entire member name or zero or more characters within a member name
mask.
%
A single percent sign represents exactly one character within a member name mask. Up to 8 percent
signs can be specified in each member name mask.
If no member name masks are specified, then all libraries selected will be searched for all members. i.e. All members will
be reported for each library.
Libraries to search:
Pattern 1>
Pattern 2>
Pattern 3>
Pattern 4>
These input fields (LIBRARY1, LIBRARY2, LIBRARY3 and LIBRARY4) allow the user to provide up to 4 alternative library
DSN masks, library DDnames and/or library concatenation DDnames which identiy the PDS/PDSE libraries in which to
search.
Note that all libraries referenced within a DDname data set concatenation will be searched.
A library DSN mask supports the following wild cards:
2013-11-13 13:06:41
SELCOPY/i Reference and User Guide
258
Utilities Menu (=8)
Panel Input Fields
*
A single asterisk indicates that either a qualifier or one or more characters within a qualifier can occupy
that position. An asterisk can precede or follow a set of characters.
**
A double asterisk indicates that zero or more qualifiers can occupy that position. A double asterisk
cannot precede or follow any characters; it must be preceded or followed by either a dot or a blank.
%
A single percent sign indicates that exactly one character can occupy that position. (Up to 8 percent
signs can be specified in each qualifier.)
If no library DSN masks or library DDnames are specified, then at least one of the special library concatenation fields
(APF Authorised, Link Listed or SELCOPY/i edit macros) must be selected.
APF Authorised load-libraries
This option field (APFCHK) indicates that all APF authorised load libraries are to be searched.
This list of libraries may be displayed using the APF List Window (command SYSAPF.)
Link Listed load-libraries
This option field (LNKCHK) indicates that all load libraries in the active Link List concatenation are to be searched.
This list of libraries may be displayed using the Link List Window (command SYSLL.)
SELCOPY/i edit macros
This option field (MACCHK) indicates that all libraries in the user's current CBLe text editor macro path are to be
searched.
This list of libraries may be displayed using the CBLe text edit command, QUERY MACROPATH.)
Where>
This input field (WHERE) specifies additional member name filter criteria. Members are reported as being found only if the
information in the PDS/PDSE directory entry for that member also satisfies this additional criteria.
The syntax of a WHERE filter is described by the list window WHERE Clause which supports list field names as described
by the MVS load library and non-load library lists' field descriptor block (FDB). See "List Library Members" for details of
these field names, descriptions and their data types.
Beware that maintenance of a non-load library member's directory information is not enforced by the system. Therefore,
its existance depends on the last application to write data to that member. Missing directory fields have default values: 0 if
numeric (e.g. VV, MM); ' ' (blank) if character (e.g. User) and null if TimeDec (e.g. Created, LastMod.)
Quiet
This option field (QUIET) indicates that the user will not be prompted for a decision to continue the search when library or
member name thresholds are encountered.
Search for Library Members Output
The output generated by the Search for Library Members utility is a temporary CMX command file which gets displayed
automatically in a SELCOPY/i (CBLe) text edit window view. It identifies each of the library names searched, the number of
matching member names in the library, followed by a command to edit each member located in that library.
2013-11-13 13:06:41
SELCOPY/i Reference and User Guide
259
Utilities Menu (=8)
Search for Library Members Output
Figure 148. Search for Library Members Output.
The ONLY text edit macro invocations in lines 2 and 3 may be executed to filter edited lines to display all summary lines (library
DSN and number of matching member names) or only summary lines for which at leasty one member name has been found.
The last line of the file is the LLX command line syntax generated by the Search for Library Members utility for the options
provided.
Any command (prefixed by <) in this file may be executed using the ACTION facility simply by positioning the cursor on the required
command and pressing the <F16> key.
Calendar Window (=8.13)
The Calendar window may be opened via the following:
• Select option 13. 'Calendar' from the Utilities Menu.
• Select 'Calendar' from the Utilities menu in the CBLe main window menu bar.
• Enter command CALendar on the command line of any window.
When opened, the calendar window shows the current month with today's date highlighted. Each day has the day of the month and
the Julian day number displayed in a table.
You can scroll the calendar backwards and forwards by the month or the year or you can enter a specific year or month in the fields
at the top of the window.
To scroll the calendar use the following commands:
Command
Default PF key
Description
SCROLL UP
PF7
Display the previous month.
SCROLL DOWN
PF8
Display the next month.
SCROLL LEFT
PF11
Display the current month in the previous year.
SCROLL RIGHT
PF12
Display the current month in the next year.
2013-11-13 13:06:41
SELCOPY/i Reference and User Guide
260
Utilities Menu (=8)
Calendar Window (=8.13)
Figure 149. Calendar window.
Calculator Window (=8.14)
The Calculator window may be opened via the following:
• Select option 14. 'Calculator' from the Utilities Menu.
• Select 'Calculator' from the Utilities menu in the CBLe main window menu bar.
• Enter command CALC on the command line of any window.
The calculator window allows you to enter a calculation and displays the result of the calculation.
In fact the calculator is a REXX function interpreter. You enter a valid REXX expression and the calculator evaluates it. You are not
restricted to numerical calculations. You can enter any valid REXX expression including for example the conversion functions.
Figure 150. REXX Calculator window.
Create New Datasets Menu (=8.15)
The Create New Datasets Menu panel (ZZSGDEFN) is an interactive panel window opened on selection of option 15. 'Alloc/Define'
from the Utilities Menu.
New files may be defined to the system from within the SELCOPY/i environment.
Note that "Copy" automatically invokes an Allocate Non-VSAM or Deine VSAM object panel to create a new output data set if
required.
Options
1 Non-VSAM
2 KSDS
3 ESDS
4 RRDS
5 LDS
6 ALIAS
7 GDG
8 Copy
2013-11-13 13:06:41
ALLOC - Allocate new Sequential or PDS/PDSE library
AMSK - Define new VSAM KSDS
AMSE - Define new VSAM ESDS
AMSR - Define new VSAM RRDS
AMSL - Define new VSAM LDS
AMSA - Defines new Catalog Alias
AMSG - Defines new GDG Base
FC - Copy an existing dataset
SELCOPY/i Reference and User Guide
261
Utilities Menu (=8)
Options
Allocate NonVSAM (=8.15.1)
The Allocate NonVSAM Dialog window may be opened via the following:
• Select 'Non-VSAM' from the Create New Datasets menu panel.
• Select 'Allocate NonVSAM' from the File menu in the CBLe main window menu bar.
• By any SELCOPY/i utility that requires allocation of an output data set.
• Enter the CBLe command ALLOCATE with no parameters on the command line of any window.
• Perform CBLe or SDE Edit using a new data set name, add some data and SAVE.
• Perform CBLe or SDE Edit of an existing non-VSAM data set, execute SET FILEID to assign a new DSN to the data in
storage then SAVE.
Note that the original data set is unchanged.
The Allocate nonVSAM window allows the user to supply characteristics for a new cataloged non-VSAM data set, then select the
Allocate button or the Define menu item to action the allocation.
Fields within these dialogs represent the relevant TSO ALLOCATE or JCL DD statement parameters as appropriate for a new
cataloged non-VSAM data set. Please refer to the "TSO/E Command Reference" and "MVS JCL Reference" for further information.
The Model> field allows the user to model the new entry's characteristics on an existing cataloged data set entry. On entering a
non-VSAM data set name in the Model field and hitting <Enter>, all other fields are updated automatically to reflect the inherited
values.
Note: Not implemented for CMS and VSE.
Figure 151. Allocate nonVSAM window.
Menu Bar Items
Define
Drop down menu containing the following items:
Foreground
Applicable to operation under TSO and CMS. Allocate the data set in the foreground (Control is temporarily
passed to TSO or CMS).
Foreground+IEBCOPY (Not yet enabled)
As for Foreground but also copy data from the data set specified in the Model field.
Background (Not yet enabled)
Applicable to operation on VSE and MVS. A CBLe view is opened to edit a temporary job containing batch JCL to
allocate/define the data set. The job may be submitted to the batch system using the CBLe command SUB.
Background+IEBCOPY (Not yet enabled)
As for Background but also include JCL to populate the data set with data from the data set specified in the
Model field.
Help
Open the help window for data set allocation.
2013-11-13 13:06:41
SELCOPY/i Reference and User Guide
262
Utilities Menu (=8)
Menu Bar Items
Define VSAM KSDS/ESDS/RRDS/LDS (=8.15.2/3/4/5)
The Define VSAM KSDS/ESDS/RRDS/LDS Dialog windows may be opened via the following:
• Select 'KSDS', 'ESDS', 'RRDS' or 'LDS' as appropriate from the Create New Datasets menu panel.
• Select 'Define KSDS', 'Define ESDS', 'Define RRDS' or 'Define LDS' as appropriate from the File menu in the CBLe main
window menu bar.
• Enter line command AMSDIALOG with option KSDS, ESDS, RRDS or LDS on the command line of any window.
Alternatively, use the synonyms AMSK, AMSE, AMSR or AMSL respectively.
• Perform CBLe or SDE Edit using a new data set name, execute SET DSORG KSDS/ESDS/RRDS/LDS, as required, add
some data and SAVE.
• Perform CBLe or SDE Edit of an existing VSAM data set, execute SET FILEID to assign a new DSN to the data in storage
then SAVE to save the data to a new VSAM data set of the same type.
Note that the original VSAM data set is unchanged.
Define VSAM dialog windows allow the user to supply IDCAMS DEFINE characteristics for a new VSAM CLUSTER.
Select the appropriate menu bar item (see below) to define the new entry.
Fields within these dialogs represent the relevant IDCAMS DEFINE CLUSTER parameters as appropriate for the entry being
defined. Please refer to "DFSMS Access Method Services for Catalogs" for further information.
The Model> field allows the user to model the new entry's characteristics on an existing catalog entry. On entering a VSAM data
set name in the Model field and hitting <Enter>, all other fields are updated automatically to reflect the inherited values.
Note: Not implemented for CMS and VSE.
Figure 152. Define VSAM KSDS window.
Menu Bar Items
Define
Start the VSAM object definition. (Foreground)
Job
Creates and edits the IDCAMS DEFINE statement including job control ready for submission to batch (See CBLe
command SUBMIT.)
AMS
Opens a CBLe edit view containing generated AMS command syntax to perform the IDCAMS DEFINE. Execute by
placing the cursor on the first line of the command and hitting <F16> The command may be copied to the user's HOME
command centre for future reference.
Help
Open the help window for VSAM elements definition.
2013-11-13 13:06:41
SELCOPY/i Reference and User Guide
263
Utilities Menu (=8)
Menu Bar Items
Define GDG Base (=8.15.7)
The Define GDG Base panel (ZZSGAMSG) is an interactive panel window (window class WINWIPO0) and may be started via the
following:
• Select option 7. 'GDG' from the Create New Datasets menu panel.
• Select 'Define GDG' from the File menu in the CBLe main window menu bar.
• Enter line command AMSDIALOG with option GDG on the command line of any window. Alternatively, use the synonym
AMSG.
Figure 153. Define GDG Base Panel.
By default, field entries are populated with arguments and options that were entered the last time the panel was used.
Pressing the <Enter> key or, if configured, double-clicking the left mouse button, will will action the GDG define using values
entered by the user in the panel input fields.
Alternatively, the user may select an item from the menu bar.
Menu Bar Items
File
The File drop-down menu contains the single item "Exit" which simply closes the panel window. Note that, unlike
CANCEL, CLOSE will save field values entered in the panel so that they may be redisplayed the next time the panel is
opened.
Help
Display help for this panel view.
JCL
Generate a JCL job stream that executes the IDCAMS program with input (SYSIN) containing the DEFINE
GENERATIONDATAGROUP syntax generated for the specified panel field values.
The job stream is displayed in a temporary text edit view and may be submitted to batch using the SUBMIT command.
Command
Generate the AMS command line syntax for field entries specified by the user, and display it in a temporary CMX file text
edit view. This command may be executed using ACTION point-and-shoot execution <F16> or copied into the user's
HOME file and saved for future execution.
Panel Input Fields
GDG Name>
The name of a new GDG Base catalog entry.
Model>
The name of an existing GDG Base catalog entry on which to model attributes of the new GDG.
2013-11-13 13:06:41
SELCOPY/i Reference and User Guide
264
Utilities Menu (=8)
Panel Input Fields
On entering a model GDG name, press the <Enter> key to update panel input fields to reflect equivalent values assigned
to the model.
Wild card characters "%" (percent), representing a single character; "*" (asterisk), representing zero or more characters
may be used in the Model GDG entry name to display a selectable list of matching GDG entries.
Owner>
Identfy the owner of the new GDG.
Limit>
Specifies the total number (1-255) of Generation Data Sets (GDS) that can be associated with the new GDG. A non-zero
value in this field is mandatory.
Catalog>
The DSN or Alias which identifies the catalog in which the GDG will be defined. If omitted, the default is defined by the
IDCAMS catalog search order.
Action on Exceeding Limit:
Specify the action to be taken when a GDS associated with the GDG is to be cataloged which will exceed the defined
GDG limit.
Delete (roll off) only the oldest GDS entry belonging to the GDG.
Do not empty the GDG of all existing GDS associations, but remove (roll off) only the oldest GDS entry.
Delete all GDS entries belonging to the GDG. (EMPTY)
Empty the GDG of all existing GDS associations. i.e. Roll off all associated GDSs.
Action on delete (roll off) of GDS entries:
Specify the action to be taken when a GDS associated with the GDG is removed (rolled off).
Uncatalog the GDS but do not scratch it from volumes it occupies.
If the data set is a non-SMS managed data set it is not removed from any of the volumes it occupies. If the data
set is an SMS-managed data set it is recataloged as a non-VSAM data set in rolled-off status, and is no longer
associated with the GDG base. It is not deleted from any of the SMS-managed volumes it occupies.
Uncatalog the GDS and scratch it from volumes it occupies. (SCRATCH)
The GDS is deleted from all volumes it occupies when uncataloged from the GDG base, regardless of whether it
is SMS-managed or not.
Data Set Information
The Data Set Information panels (DSINFONV) are interactive panel windows.
Detailed information on all types of file objects may be displayed using data set information panels which have different contents
depending on the type and oraganisation of file object.
A file's information panel may be displayed using either of the following methods:
1. From a file list, enter prefix command "I" against the required file name.
2. Enter primary command "DSI fileid" where fileid is the name of the required data set or GDG Base catalog entry.
Depending on the data set type, information may span several panel views.
Use the <Enter> key to progress through the panel view pages and primary command BACK (F3 default) to redisplay the previous
panel view.
2013-11-13 13:06:41
SELCOPY/i Reference and User Guide
265
Utilities Menu (=8)
Data Set Information
Dataset Information - Non-VSAM
Figure 154. Data Set Information Panel - PDS.
Menu Bar Items:
The following menu bar items may be displayed depending on the type and organisation of the file.
File
The File drop-down menu contains the single item "Exit" which simply closes the panel window.
Report
Display all information obtained for the file in a single formatted report. This report is generated using hyper-text markup
language (HTML) and is diplayed in SELCOPY/i's HTML browser. The browser includes the menu item "Text" which will
display the report in plain EBCDIC text in a text edit view. This text output may subsequently be saved to DASD and
printed.
RecordCount
Executes a foregroud pass of the file to provide an accurate account of the number of records, the lengths of the longest
and shortest records and the average record length.
Page 1
Dataset: | GDS: | GDG:
Fully qualified name of the selected sequential or PDS/PDSE library data set, GDG data set or GDG Base catalog entry.
Catalog:
Applicable only to GDS data sets, identifies the name of the GDG to which the GDS belongs.
Catalog:
DSN of the catalog in which the data set or GDG base is cataloged.
Owner:
Applicable to GDG Base catalog entries only, this field identifies the GDG owner id.
Generations: (GDG only)
Maximum:
Reports the total number (1-255) of Generation Data Sets (GDS) that can be associated with the GDG.
Active:
Reports the number of currently active Generation Data Sets (GDS) associated with the GDG.
Action at Limit: (GDG and GDS only)
Roll Off:
Identifies the action taken when a new GDS is generated which results in the maximum defined number of GDS
threshold being exceeded. OLDEST indicates that the oldest generation GDS is deleted, ALL indicates that all
2013-11-13 13:06:41
SELCOPY/i Reference and User Guide
266
Utilities Menu (=8)
Page 1
associated GDS are deleted.
Volume Scratch:
Identifies the action taken when a GDS entry is deleted. YES indicates that the GDS will be scratch from the
volume as well as being uncataloged. NO indicates that the GDS will remain on the volume but will be
uncataloged.
General Data:
Volume:
Reports the volume id of the first or only volume on which the data set is saved.
If the dataset spans more than one volume, then the volume ID is followed by a "+" (plus) symbol.
Device Type:
Reports the volume device type. (e.g. 3390)
Organisation:
Reports the data set organisation.
Record Format:
Reports the defined data set record format.
Record Length:
Reports the defined maximum record length.
Block Size:
For data sets of blocked record format, reports the allocated block size.
First Extent Blocks/Cylinders/Tracks:
Reports the number of space allocation units (blocks, cylinders or tracks) that constitute the first extent allocated
on the volume. This is usually equivalent to the defined Primary Allocation value, however, the sytem may use up
to 3 extents to perform a primary allocation.
Secondary Blocks/Cylinders/Tracks:
Reports the number of space allocation units (blocks, cylinders or tracks) that constitute the defined Secondary
Allocation value.
Sripe Count:
Displayed only for extended data sets containing data that is striped across a number of volumes, this field
reports the number of stripe volumes.
Dataset Date Information:
Created:
Reports the date on which the data set or GDG was defined.
Expires:
Reports the date on which the data set expires. This field is not applicable to GDG base entries.
Last Referenced:
Reports the date on which the data set was last opened. This field is not applicable to GDG base entries.
Active: (GDG only)
Lists the data set names of the associated GDS data sets. Press <Enter> on any of these entries to open a data set
information panel for the individual GDS.
Current Allocation:
Number of Tracks:
Reports the total number of allocated tracks.
Number of Extents:
Reports the total number of allocated extents.
Number of Volumes:
2013-11-13 13:06:41
SELCOPY/i Reference and User Guide
267
Utilities Menu (=8)
Page 2
Reports the total number of volumes on which space has been allocated. This number does not include
candidate volumes on which space has not yet been allocated for the data set.
Max Dir Blocks:
Applicable only to PDS data sets, reports the number of allocated directory blocks. Each directory block is 256
bytes in length.
Maximum Pages:
Applicable only to PDSE data sets, reports the number of PDSE 4KB pages allocated to the data set.
Maximum Generations:
Applicable only to GDS data sets, reports the maximum number of GDG generation data sets that may be
associated with the GDG before GDS deletion occurs.
Current Utilisation:
Used Tracks:
Reports the number of tracks used.
Used Extents:
Reports the number of extents used.
Number of Members:
Applicable only to PDS and PDSE data sets, reports the number of library members.
Used Dir Blocks:
Applicable only to PDS data sets, reports the number of used directory blocks.
Used Pages:
Applicable only to PDSE data sets, reports the number of PDSE 4KB pages used.
Percent Used Pages:
Applicable only to PDSE data sets, reports the number of PDSE 4KB pages used as a percentage of the
maximum pages value.
SMS Classes:
Storage:
Reports the SMS storage class assigned to the data set.
Data:
Reports the SMS data class assigned to the data set.
Management:
Reports the SMS management class assigned to the data set.
Page 2
This display lists the volumes allocated to both the data set.
Details including extent information may viewed for each volume by placing the cursor on the volume name then pressing the
<Enter> key.
Volumes:
Total number of volumes allocated to the data set.
Page 3-n
The remaining pages in the sequence display volume information, one page for each volume assigned to the data set.
Dataset:
The fully qualified data set name.
Volume:
The volume sequence number for the data set.
2013-11-13 13:06:41
SELCOPY/i Reference and User Guide
268
Utilities Menu (=8)
Page 3-n
Volume Name:
The volume id.
Device Type:
The volume disk device type (e.g. 3390) followed by the device type code and one of the following in parentheses.
Candidate
The volume is a candidate for storing data set extents.
Primary
The volume is a volume on which data records are stored.
Volume Definition:
Blocks per Track:
The number of physical records that can be written on a track on the volume.
Bytes per Track:
The total number of bytes per track. Note that not bytes may be used for data storage.
First Extent Blocks/Cylinders/Tracks:
Reports the number of space allocation units (blocks, cylinders or tracks) that constitute the first extent allocated
on the volume. This is usually equivalent to the defined Primary Allocation value, however, the sytem may use up
to 3 extents to perform a primary allocation.
Secondary Blocks/Cylinders/Tracks:
Reports the number of space allocation units (blocks, cylinders or tracks) that constitute the defined Secondary
Allocation value.
Dataset Date Information:
Created:
Reports the date on which the data set was defined.
Expires:
Reports the date on which the data set expires.
Last Referenced:
Reports the date on which the data set was last opened.
Extents:
The total number of extents on this volume followed by a table containing information for each extent.
Seq:
The extent sequence number.
Tracks:
The number of tracks in the extent.
Low Cyl:
The cylinder number containing the first track of the extent.
Low Track:
The number of the first track of the extent.
High Cyl:
The cylinder number containing the last track of the extent.
High Track:
The number of the last track of the extent.
Tracks Alloc:
The number of tracks allocated for the data set on this volume.
Tracks Used:
The number of allocated tracks containing data for the data set on this volume.
2013-11-13 13:06:41
SELCOPY/i Reference and User Guide
269
Utilities Menu (=8)
Dataset Information - VSAM
Dataset Information - VSAM
The Dataset Information window may be opened via the following:
• Enter the primary command DSI.
• Enter the line-command "I" where supported from a List type window.
Figure 155. Data Set Information Panel - KSDS.
Menu Bar Items:
The following menu bar items may be displayed depending on the type and organisation of the file.
File
The File drop-down menu contains the single item "Exit" which simply closes the panel window.
Report
Display all information obtained for the file in a single formatted report. This report is generated using hyper-text markup
language (HTML) and is diplayed in SELCOPY/i's HTML browser. The browser includes the menu item "Text" which will
display the report in plain EBCDIC text in a text edit view. This text output may subsequently be saved to DASD and
printed.
IDCAMS
Opens the "Execute IDCAMS" utility window to generate an LISTCAT report for the file.
RecordCount
Executes a foregroud pass of the file to provide an accurate account of the number of records, the lengths of the longest
and shortest records and the average record length.
Page 1
Entry:
Fully qualified name of the VSAM cluster, alternate index or path.
Data:
Fully qualified name of the VSAM data component.
Index:
Fully qualified name of the VSAM index component.
Catalog:
Catalog name.
Data Volume:
Name of the volume containing the data component. If the data is defined across multiple volumes then a "+" (plus sign)
is displayed following the name of the first volume.
Index Volume:
2013-11-13 13:06:41
SELCOPY/i Reference and User Guide
270
Utilities Menu (=8)
Page 1
Name of the volume containing the index component. If the index is defined across multiple volumes then a "+" (plus sign)
is displayed following the name of the first volume.
Data Component Information
Device Type:
Disk device type on which the data component is stored.
Organisation:
Type of VSAM entry - KSDS, ESDS, RRDS, VRDS (Variable-length RRDS), AIX or PATH, followed by EXTENDED and/or
COMP (compressed) if appropriate.
AIX/KSDS/VRDS Key Length:
Length of key for a Alternate-Index (AIX), Key Sequence Dataset (KSDS) or Variable-length Relative record Dataset
(VRDS). For VRDS files the key is always length 4 (representing the file record number) and does not form part of the
record presented by VSAM to the user.
AIX/KSDS/VRDS Key Offset:
Key location (relative to 0) for a Alternate-Index (AIX), Key Sequence Dataset (KSDS) or Variable-length Relative record
Dataset (VRDS). For VRDS files the key is always at offset 0, length 4 (representing the file record number) and does not
form part of the record presented by VSAM to the user.
Average Record Length:
Defined average record length.
To determine the dataset's actual average record length, select RecordCount from the menu-bar.
Maximum Record Length:
Defined maximum record length.
To determine the length of the longest actual dataset record, select RecordCount from the menu-bar.
Dataset Date Information
Created:
Date on which the datset was defined.
Expires:
Date on which the dataset expires.
Last Modifed:
Date and time at which the dataset was most recently modified.
DEFINE Options
Load Option:
VSAM define option (either SPEED or RECOVERY) that specifies whether the data component's control areas are to be
preformatted during initial load.
SPEED
DATA CA's are not preformatted. If the initial load is unsuccessful, you must load the data set again from the
beginning because VSAM cannot determine the location of your last correctly written record.
RECOVERY
DATA CA's are preformatted. If the initial load is unsuccessful, VSAM can determine the location of the last
record written during the load process.
Share Options:
Describes how the dataset is be shared among users, with the first number indicating how it is shared across regions, and
the second how it is shared across systems.
Cross Region
1
The data set can be shared by any number of users for read processing, or the data set can be accessed by only
one user for read and write processing. VSAM ensures complete data integrity for the data set. This setting does
not allow any non-RLS access when the data set is already open for VSAM RLS or DFSMStvs processing. A
VSAM RLS or DFSMStvs open will fail with this option if the data set is already open for any processing
2
The data set can be accessed by any number of users for read processing, and it can also be accessed by one
user for write processing. It is the user's responsibility to provide read integrity. VSAM ensures write integrity by
obtaining exclusive control for a control interval while it is being updated. A VSAM RLS or DFSMStvs open is not
2013-11-13 13:06:41
SELCOPY/i Reference and User Guide
271
Utilities Menu (=8)
DEFINE Options
allowed while the data set is open for non-RLS output. If the data set has already been opened for VSAM RLS or
DFSMStvs processing, a non-RLS open for input is allowed; a non-RLS open for output fails. If the data set is
opened for input in non-RLS mode, a VSAM RLS or DFSMStvs open is allowed.
3
The data set can be fully shared by any number of users. Each user is responsible for maintaining both read and
write integrity for the data the program accesses. This setting does not allow any non-RLS access when the data
set is already open for VSAM RLS or DFSMStvs processing. If the data set is opened for input in non-RLS mode,
a VSAM RLS or DFSMStvs open is allowed.
4
The data set can be fully shared by any number of users. For each request, VSAM refreshes the buffers used for
direct processing. This setting does not allow any non-RLS access when the data set is already open for VSAM
RLS or DFSMStvs processing. If the data set is opened for input in non-RLS mode, a VSAM RLS or DFSMStvs
open is allowed. As for share option 3, each user is responsible for maintaining both read and write integrity for
the data the program accesses.
Cross System
1
Reserved.
2
Reserved.
3
Specifies that the data set can be fully shared. With this option, each user is responsible for maintaining both
read and write integrity for the data that user's program accesses.
4
Indicates that the data set can be fully shared. For each request, VSAM refreshes the buffers used for direct
processing.
Buffer Space:
Minimum space required for buffers.
Write Check:
Indicates whether the cluster or component is to be checked by a machine action called write check when a record is
written into it
Erase on Delete:
Indicates whether data records are to be erased when the entry is deleted from the catalog.
Imbedded Index:
Indicates whether the cluster was defined with the obsolete IMBED parameter, specifying that the index is stored in the
data control area.
Replicated Index:
Indicates whether the cluster was defined with the obsolete RELICATE parameter.
Reuse Option:
Indicates whether the cluster was defined with the REUSE parameter, meaning it can be reloaded.
Spanned Records:
Indicates that logical data records can be longer than a control interval and may span multiple CIs.
Key Ranges Present:
Indicates whether the cluster was defined with the obsolete RELICATE parameter. Detail of any defined key ranges may
be viewed by selecting Report from the menu-bar.
AIX-Unique Keys:
Indicates whether more than one data record (in the base cluster) can contain the same key value for the alternate index.
AIX-Upgrade:
Indicates whether the alternate index is to be automatically kept up to date when its base cluster is modified.
Page 2
Entry:
Fully qualified name of the VSAM cluster, alternate index or path.
2013-11-13 13:06:41
SELCOPY/i Reference and User Guide
272
Utilities Menu (=8)
Page 2
Owner:
The dataset's owner id.
SMS Classes:
Storage:
The name of the SMS Storage class assigned to the cluster.
Data:
The name of the SMS Data class assigned to the cluster.
Management:
The name of the SMS Management class assigned to the cluster.
Current Allocation:
Allocated Tracks:
Total number of tracks allocated to the data component.
Allocated Extents:
Total number of extents allocated to the data component on all volumes.
Volumes:
Total number of volumes allocated to the data component.
KSDS Index Allocation:
Allocated Tracks:
Total number of tracks allocated to the index component.
Number of records:
Total number of records in the index component.
Current Utilisation:
Used Data-Space:
Estimated percentage used, calculated as the High Allocated RBA, divided by the High Used RBA minus Free-Bytes.
Used Extents:
Total number of extents used across all volumes.
Total records:
Total number of records in the data component.
Deleted records:
The number of records that have been deleted from the data component.
Inserted records:
The number of records that have been inserted into the data component.
For a KSDS, the number of records that have been inserted into the data component before the last record. Records
originally loaded and records added to the end are not included in this value.
For RRDS/VRDS, this is the number of records inserted into available slots. The number of records originally loaded are
included in this statistic.
Updated records:
The number of records in the data component that have been updated. This value does not reflect those records that were
deleted, but a record that is updated and then deleted is counted in this value.
Control Area Information:
Physical Record Size:
The number of bytes that VSAM uses for a physical record in the data component.
Records per Track:
The number of physical records that VSAM can write on a track on the volume.
2013-11-13 13:06:41
SELCOPY/i Reference and User Guide
273
Utilities Menu (=8)
Page 3
Tracks per CA:
The number of track per Control-Area.
Retrieved records:
The number of records that have been retrieved from the data component.
Max record number:
Identifies the highest possible valid relative record number, for a relative record data set.
Number of CA Splits:
The number of times a Control-Area was split. i.e. half the data records in the Control-Area were written into a new
Control-Area and then deleted from the old Control-Area.
Control Interval Information:
Size -Data: / -Index:
The number of bytes in a Control-Interval for the Data and Index components.
Number of CIs per CA:
The number of Control-Intervals per Control-Area.
Number of free CIs per CA:
The number of free Control-Intervals per Control-Area.
Percentage free CIs per CA:
The percentage of Control-Intervals kept free per Control-Area to prevent subsequent CI-splits from causing a CA-split.
Percentage free bytes per CI:
Percentage of space to be left free in a Control-Interval for subsequent processing.
Number of CI splits:
The number of times a Control-INterval was split. i.e. half the data records in the Control-Interval were written into a new
Control-Interval and then deleted from the old Control-Interval.
Page 3
This display lists the volumes allocated to both the DATA and INDEX components of the dataset.
Details including extent information may viewed for each volume by placing the cursor on the volume name then pressing the
ENTER key.
Page 4
This display lists the dataset's related entries i.e. each path and/or alternate index
Page 5-n
The following pages display information for each of the DATA and INDEX volumes in turn.
Data: / Index:
Fully qualified name of the DATA or INDEX component as appropriate.
Volume:
The volume's sequence number.
Volume Name:
The volume name.
Device Type:
The volume disk device type e.g. 3390, followed by the device type code and one of the following in brackets.
CANDIDATE
The volume is a candidate for storing the data or index component.
CAND-SPACE
The volume is a candidate for storing the data or index component, and it has a primary extent preallocated (the
data set was defined with a guaranteed-space storage class).
2013-11-13 13:06:41
SELCOPY/i Reference and User Guide
274
Utilities Menu (=8)
Page 5-n
OVERFLOW
The volume is an overflow volume on which data records in a key range are stored. The KEYRANGE begins on
another (PRIME) volume.
PRIME
The volume is the first volume on which data records in a key range are stored.
Volume Definition:
Blocks per Track:
The number of physical records that VSAM can write on a track on the volume.
Tracks per CA:
The number of tracks in a control area for the component being listed. (This value is computed when the entry is defined.
This value reflects the optimum size of the control area for the given device and the nature of the entry, whether indexed,
nonindexed, or numbered.) For a key-sequenced data set with the imbedded attribute, this value includes the sequence
set track.
Physical Record Size:
The number of bytes that VSAM uses for a physical record in the data or index component.
Volume Statistics:
High Used RBA:
The highest RBA (plus 1) within allocated space that actually contains data component, its key range, the index
component, or the sequence set records of a key range. (The RBA of the next completely unused control interval.)
High Allocated RBA:
The highest RBA (plus 1) available within allocated space to store data component, its key range, the index component, or
the sequence set records of a key range.
High Key CI RBA:
RBA of the data CI containing the dataset's high key.
Extents: The total number of extents on this volume.
Seq:
The extent sequence number.
Tracks:
The number of tracks in the extent.
Low Cyl:
The extent's low cylinder number.
Low Track:
The extent's low track number.
High Cyl:
The extent's high cylinder number.
High Track:
The extent's high track number.
Low RBA:
The extent's low relative byte address.
High RBA:
The extent's high relative byte address.
2013-11-13 13:06:41
SELCOPY/i Reference and User Guide
275
Create Structure (SDO) Menu (=9)
The Create Structure (SDO) Menu (ZZSGSDO0) is an interactive panel window, opened on selection of option 9. in the SELCOPY/i
Primary option menu.
SELCOPY/i supports browse, edit, compare, search, update and remap of structured data records. To accurately format these
records, the SELCOPY/i structured data editor uses an internally defined structure (SDO) which may be pre-generated from any
combination of the following sources:
1. COBOL copybook.
2. PL1 copybook (include file).
3. COBOL or PL1 ADATA output file.
4. SELCOPY/i SDO structure file.
5. SDE CREATE STRUCTURE Record Type Definition syntax.
Additionally, the ZZSXREF utility may be used to generate a SELCOPY/i SDO from an XREF file.
This panel allows the user to select the source from which the Structured Data Edit (SDE) structure object (SDO) is to be created.
Enter the relevant option number or position the cursor on the required option and press <Enter> or, if configured, double-click the
left mouse button.
Menu Bar Items
File
The File drop-down menu contains the single item, Exit, to close the panel.
Help
Open the general help for the Create Structure (SDO) Menu option menu panel.
Options
1 Copybook
2 XREF
3 Layout
SDO - Create a structure from COBOL or PL1 copybook(s)
XREF - Create a structure from an existing XREF file
LAYOUT - Display record layouts defined by an SDO/copybook.
Create Structure from Copybook(s)
The Create Structure from COBOL or PL1 copybooks panels assist with generation of a SELCOPY/i structure definition file using
one or more COBOL GROUP and/or PL1 STRUCTURE definitions. Each group/structure generates a single record type (RTO)
mapping within the SDO.
Create Structure from COBOL/PL1 copybook(s)
Figure 156. SELCOPY/i - Create Structure from COBOL/PL1 copybook(s).
2013-11-13 13:06:41
SELCOPY/i Reference and User Guide
276
Create Structure (SDO) Menu (=9)
Create Structure from COBOL/PL1 copybook(s)
The Create Structure from COBOL/PL1 copybook(s) panel (ZZSGSDO1) is an interactive panel window, opened on selection of
option 1. in the Create Structure (SDO) Menu.
Optional field entries must be activated by entering "/" in the preceding field if their values are to be included.
Options
1. Library
2. Record-type
3. Replace
4. Create
5. Batch
Create
Create the SDO structure file in the SELCOPY/i foreground using the current field values.
Batch
Generate a JCL job stream that executes the SDEAMAIN program with input (SDEIN) containing the SDE CREATE
STRUCTURE command generated for the specified panel field values.
The job stream is displayed in a temporary text edit view and may be submitted to batch using the SUBMIT command.
Panel Input Fields
Structure File to Create/Edit:
Fields that identify the SELCOPY/i structure (SDO) data set or PDS/PDSE member name. If the specified data set or
PDS/PDSE member is an existing SDO which was generated using this panel, then panel options and field values will be
re-populated using equivalent fields from the SDO.
Dsn>
Fully qualified name of a sequential data set or PDS/PDSE library. Quotes are permitted but unnecessary.
A selectable list of data sets will be presented if wildcard character "*" occurs anywhere within the specified DSN.
Member>
If DSN is a PDS/PDSE library, specifies the SDO member name.
A selectable list of members will be presented if wildcard character "*" occurs anywhere within the specified
member name or the member name is left blank.
This parameter field corresponds to CREATE STRUCTURE parameter struct-name.
Title>
If activated, specifies an up to 30 character title for the SDO.
This parameter field corresponds to CREATE STRUCTURE parameter TITLE sdo_title.
Description>
If activated, specifies an up to 124 character description of the SDO.
This parameter field corresponds to CREATE STRUCTURE parameter DESCRIPTION sdo_description.
Create Structure - Copybook Library List
2013-11-13 13:06:41
SELCOPY/i Reference and User Guide
277
Create Structure (SDO) Menu (=9)
Create Structure - Copybook Library List
Figure 157. SELCOPY/i - Create Structure - Copybook Library List.
The Create Structure - Copybook Library List panel (ZZSGSDOL) is an interactive panel window, opened on selection of option 1.
in the Create Structure from COBOL/PL1 copybook(s) panel.
Standard SELCOPY/i table editing techniques should be used to add a table row entry for each required copybook source library
DSN.
The table identifies library data sets and the order in which they are to be searched. The library search chain is used to locate each
copybook source member specified in the Create Structure - Define Record Types panel.
Pressing <PF3> to exit the panel, will also save the table of libraries and return to the Create Structure from COBOL/PL1
copybook(s) panel.
These library names corresponds to CREATE STRUCTURE parameter LIBRARY(search_lib ...).
Create Structure - Define Record-Types
Figure 158. SELCOPY/i - Create Structure - Define Record-Types.
The Create Structure - Define Record-Types panel (ZZSGSDOR) is an interactive panel window, opened on selection of option 2.
in the Create Structure from COBOL/PL1 copybook(s) panel.
This panel is used to specify the source member and record type name for each record type definition (RTO) in the generated
SDO.
Standard SELCOPY/i table editing techniques should be used to add a table row entry for each required record type definition.
The specified record-type name must be the name of a COBOL GROUP field or PL1 STRUCTURE defined in the source copybook
member. If the copybook member contains more than one group/structure field, each required to define a separate RTO, then the
2013-11-13 13:06:41
SELCOPY/i Reference and User Guide
278
Create Structure (SDO) Menu (=9)
Create Structure - Define Record-Types
copybook member may be specified in more than one table row.
A record type definition must be defined as being either a primary segment (PRI), mapping an entire logical record or the first
segment of a segmented logical record, or a secondary segment, mapping second and/or subsequent segments of a segmented
logical record. At least one default (DEF) primary segment record type must also be defined.
Having inserted a table row, the user can display the single record view of the row using the ZOOM command (assigned to <PF2>
by default.) The zoom view is required in order to identify the source member as being a PL1 copybook or ADATA output and also
to to specify record type identification (USE WHEN) criteria.
Pressing <PF3> to exit the zoomed view of the panel, will update the record-type definition table row and return to the multi-record
view of the table. Pressing <PF3> again to exit the Define Record-Types panel, will save the table of record type definitions and
return to the Create Structure from COBOL/PL1 copybook(s) panel.
Fields in this table corresponds to CREATE STRUCTURE parameter RECORD (Record Type Def).
Figure 159. SELCOPY/i - Create Structure - Define Record-Types Zoomed View.
Panel Input Fields
Member>
Name of a COBOL or PL1, copybook or ADATA member belonging to a library in the defined library search chain. Note
that, if the member name exists in more than one library in the search chain, then the first occurrence will be used.
This field corresponds to CREATE STRUCTURE parameter SOURCE member_name.
Name>
Name of the record type to be generated in the SDO. The specified name must match the name of a COBOL GROUP or
PL1 STRUCTURE defined in the source member.
This field corresponds to CREATE STRUCTURE parameter NAME record_type.
Type>
Specifies the type (DEF, PRI or SEC) of the record-type to be defined.
PRI indicates that the record type maps an entire logical record or the first (primary) segment of a segmented logical
record.
SEC indicates that the record type definition maps second and/or subsequent (secondary) segments of a segmented
logical record.
DEF indicates that the record type is a default primary record type definition. One and only one DEF record type must be
defined in the SDO.
This field corresponds to CREATE STRUCTURE parameters PRIMARY, SECONDARY and DEFAULT.
Language>
Specifies the format of the source mamber as a COBOL copybook, PL1 include file or ADATA (COBOL or PL1) output
file.
Note that it is possible to combine COBOL, PL1 and ADATA source members in the same SDO generation.
This field corresponds to CREATE STRUCTURE parameter SOURCE COBOL|PL1|ADATA.
2013-11-13 13:06:41
SELCOPY/i Reference and User Guide
279
Create Structure (SDO) Menu (=9)
Panel Input Fields
Offset>
Optional positive (or negative) numeric value specifying the offset into (or before) the record/segment data at which the
record type mapping will begin.
This field corresponds to CREATE STRUCTURE parameter OFFSET <+|-> n_bytes.
Id>
If activated, specifies arguments to a USE IF expression to be saved in the record type definition. The USE IF expression
identifies the criteria, based on record data, for which this record type will be applied.
For non-segmented records or primary record segments (type DEF or PRI), the USE WHEN condition references data
within the current record or segment only. However, a secondary segment (SEC) condition may also reference data in the
primary segment or previous secondary segments.
Furthermore, for all segment types (DEF, PRI and SEC), the record data may be referenced using unformatted record
positions or formatted field names. See information on SDE expressions with particular reference to field value terms and
built-in functions.
When the selection criteria involves testing fields in unformatted, non-segmented record data, the SDE expression should
simply use function SUBSTR() on the record field RECORD. e.g. To assign a record type based on a character string
"A11" at position 11 of the record data, specify the following:
USE IF
SUBSTR(RECORD,11,3) = 'A11'
To test fields in the record data as if already formatted by the record type structure you are attempting to assign, simply
reference the required field names in the SDE expression. e.g. To assign a record type based on values in 2 numeric
fields, SEQUENCE_ID and CUST_REF, both defined within the record type structure...
USE IF
( SEQUENCE_ID > 301
AND
CUST_REF = 10233 )
Note that fields SEQUENCE_ID and CUST_REF may have been defined as packed decimal, integer, floating point, etc. If
the record data is invalid for the assigned data type, the expression will return a "false" condition.
This field corresponds to CREATE STRUCTURE parameter USE WHEN expression.
Create Structure from XREF File
Figure 160. SELCOPY/i - Create Structure from XREF File.
The Create Structure from XREF File panel (ZZSGXREF) is an interactive panel window, opened on selection of option 2. in the
Create Structure (SDO) Menu. This panel provides an interface to the ZZSXREF utility to convert XREF files to SELCOPY/i
structure definition file (SDO).
Panel Input Fields
Existing XREF File:
2013-11-13 13:06:41
SELCOPY/i Reference and User Guide
280
Create Structure (SDO) Menu (=9)
Panel Input Fields
Fields that identify the source XREF data set, HFS file or PDS/PDSE member.
Dsn/Path>
An absolute or relative HFS Path name or the fully qualified name of a sequential data set or PDS/PDSE library.
Quotes are permitted but unnecessary.
A selectable list of data set names or HFS files will be displayed as appropriate if either wild card character "%"
(percent) or "*" (asterisk), both representing zero or more characters, is specified. If a volume id exists in the
Volume field, then a list of selectable data sets will be restricted to those contained in that volume's VTOC.
Member>
If DSN is a PDS/PDSE library, specifies the XREF member name.
A selectable list of members will be presented if wildcard character "*" or "%" occurs anywhere within the
specified member name or the member name is left blank.
Volume>
Specifies a volume serial id mask for an uncataloged XREF file. (Not applicable to HFS files.)
SELCOPY/i Structure (SDO):
Fields that identify the SELCOPY/i structure (SDO) data set or PDS/PDSE member to be generated.
Beware that selecting an existing sequential data set or member will overwrite all existing data in that file.
Dsn>
Fully qualified name of a sequential data set or PDS/PDSE library. Quotes are permitted but unnecessary.
A selectable list of data sets will be displayed if either wild card character "%" (percent) or "*" (asterisk), both
representing zero or more characters, is specified.
Member>
If DSN is an existing PDS/PDSE library, this field specifies the SDO member name.
A selectable list of members will be presented if wildcard character "*" or "%" occurs anywhere within the
specified member name or the member name is left blank.
Volume>
Specifies a volume serial id mask for an uncataloged SDO.
Run Type>
Specifies whether the conversion utility is to be executed in the SELCOPY/i Foreground or will generate a JCL Batch job
as a temporary file displayed in a CBLe text edit view.
The batch job runs SDEAMAIN to execute CREATE STRUCTURE syntax and may be submitted to batch using the
SUBMIT command.
Compiler:
SELCOPY/i requires a COBOL or PL1 compilation ADATA output file in order to generate an SDO structure file.
Therefore, the COBOL or PL1 compiler is invoked to compile all copybook files specified in the XREF file.
Max RC>
Specifies the maximum acceptable return code that may be returned by the COBOL or PL1 compilers in order for
SELCOPY/i to continue generating the SDO from the resulting ADATA file.
Display Record Layout
Display Record Layout Panel
The Display Record Layout panel (ZZSGLAYO) is an interactive panel window, opened on selection of option 3. in the Create
Structure (SDO) Menu. This panel provides an interface to the SDE LAYOUT command used to display the layout of all records
within a record structure (SDO, COBOL/PL1 Copybook or COBOL/PL1 ADATA) file.
2013-11-13 13:06:41
SELCOPY/i Reference and User Guide
281
Create Structure (SDO) Menu (=9)
Display Record Layout Panel
Figure 161. SELCOPY/i - Display Record Layout Panel.
Panel Input Fields
SELCOPY/i Structure (SDO) or Copybook dataset:
Fields that identify the source structure (SDO, Copybook or ADATA) data set or PDS/PDSE member that contain one or
more record structure definitions.
Dsn>
Fully qualified name of a sequential data set or PDS/PDSE library. Quotes are permitted but unnecessary.
A selectable list of data sets will be displayed if either wild card character "%" (percent) or "*" (asterisk), both
representing zero or more characters, is specified. If a volume id exists in the Volume field, then a list of
selectable data sets will be restricted to those contained in that volume's VTOC.
Member>
If DSN is an existing PDS/PDSE library, this field specifies the member name.
A selectable list of members will be presented if wildcard character "*" or "%" occurs anywhere within the
specified member name or the member name is left blank.
Volume>
Specifies a volume serial id mask for an uncataloged data set.
Type:
Specifies the format ( SDO, COBOL or PL1 Copybook, COBOL or PL1 ADATA output) of the record structure
definition file.
Number Width>
Specifies the displayed width of numeric columns: RefNo, Start, End and Length in the layout list output.
The minimum width of these field is 5 characters and so this value need only be increased if it is known that the decimal
display of these field values exceeds this width.
Expand Array Fields
This option field determines whether or not array (OCCURS) fields are expanded to display every repeating instance of a
field within that array.
Display Record Layout Output
The structure layout is displayed in a list window.
For each field, the nested level number of that field is displayed to the left of the field name in the Name column. Furthermore,
indentation occurs within the Name column for each nested level within a Group field.
2013-11-13 13:06:41
SELCOPY/i Reference and User Guide
282
Create Structure (SDO) Menu (=9)
Display Record Layout Output
Figure 162. SELCOPY/i - Display Record Layout Output.
Columns Displayed
Name
Type
Description
Name
ALPair
Field level and name
Picture
ALPair
Field picture and data type
RefNo
Int
Field reference number
Start
Int
Field start position
End
Int
Field end position
Length
Int
Field length
2013-11-13 13:06:41
SELCOPY/i Reference and User Guide
283
Create File Filter (=10)
SDE structured data BROWSE and update in-place EDIT supports use of a filter so that only records that satisfy criteria defined by
the filter clause are eligible for display in the SDE window view.
A filter clause may be passed to the SDE EDIT or BROWSE operation via in-line command syntax or via a filter file. A filter file
contains the filter syntax that would be specified in-line but has the advantage that it may be kept for use in other EDIT and
BROWSE operations.
The Create File Filter panel assists with generation of a filter clause which is ultimately saved to a filter file. The filter file may then
be specified on the FILTER: field of the SDE - Structured Data Browse/Edit panel.
The Create File Filter Dialog panel (ZZSGFLT0) is an interactive panel window and may be started via the following:
• Select option 10. in the SELCOPY/i Primary option menu.
• Select 'Create File Filter' from the Utilities menu.
• Select menu item FILTER from the SDE - Structured Data Browse/Edit panel.
• Execute the command FILTER with no parameters from the command line of any window.
Figure 163. SELCOPY/i - Create File Filter (=10).
Panel Input Fields
By default, field entries are populated with arguments and options that were entered the last time the panel was used.
Filter File:
Fields that together identify the PDS/PDSE library member, sequential data set or HFS file path to be edited, using the
CBLe text editor, and in which a generated filter clause will be copied (replacing any existing data).
This file is not saved to disk before it is displayed, however, the user will be prompted to save it on exit (PF3).
Dsn/Path>
An absolute or relative HFS Path name or the fully qualified name of a sequential data set or PDS/PDSE library.
Quotes are permitted but unnecessary.
A selectable list of data set names or HFS files will be displayed as appropriate if either wild card character "%"
(percent) or "*" (asterisk), both representing zero or more characters, is specified. If a volume id exists in the
Volume field, then a list of selectable data sets will be restricted to those contained in that volume's VTOC.
Member>
If DSN is a PDS/PDSE library, specifies the FILTER file member name.
A selectable list of members will be presented if wildcard character "*" or "%" occurs anywhere within the
specified member name or the member name is left blank.
Volume>
Specifies a volume serial id mask for an uncataloged FILTER file. (Not applicable to HFS files.)
Filter Limit:
The filter limit defines when to stop filtering input records.
Stopaft>
Specifies the maximum number of records to be selected by this filter. If this threshold is reached, then:
2013-11-13 13:06:41
SELCOPY/i Reference and User Guide
284
Create File Filter (=10)
Panel Input Fields
• For an INCLUDE filter, all remaining untested records are excluded.
• For an EXCLUDE filter, all remaining untested records are included.
A value of 0 (zero) removes this filter limit.
Selection Criteria:
Determines whether filtering is to include or exclude records that match the filter clause record selection criteria.
Type>
Specifies either I (INCLUDE) or X (EXCLUDE) to indicate the action performed on records that selected by the
filter clause.
Structure File:
Fields that identify the sequential data set name or PDS/PDSE member name of a file containing record structure
definitions to be used to select formatted field names in the filter clause WHERE expression. (See Action 3. "Specify
Formatted Selection Criteria".)
Dsn>
Fully qualified name of a sequential data set or PDS/PDSE library. Quotes are permitted but unnecessary.
A selectable list of data sets will be displayed if either wild card character "%" (percent) or "*" (asterisk), both
representing zero or more characters, is specified.
Member>
If DSN is an existing PDS/PDSE library, this field specifies the member name.
A selectable list of members will be presented if wildcard character "*" or "%" occurs anywhere within the
specified member name or the member name is left blank.
Volume>
Specifies a volume serial id mask for an uncataloged data set.
Type:
Specifies the format ( SDO, COBOL or PL1 Copybook, COBOL or PL1 ADATA output) of the record structure
definition file.
Action>
Option field specifying the action to be taken when the <Enter> key is pressed.
1. Text-Edit existing filter file.
Opens a CBLe text edit view to display and allow edit of a filter clause specified in an existing file identified by
Filter File.
No new filter is generated as a result of selecting action 1. so the filter expresions that already exist in the file are
preserved.
2. Specify Unformatted Selection Criteria.
Opens the Filter (unformatted) - Selection Criteria panel to build filter clause record selection criteria based on
unformatted record data.
3. Specify Formatted Selection Criteria.
Opens the Filter (formatted) - Selection Criteria panel to build filter clause record selection criteria based on
record data which has been formatted using a Structure File.
This panel will first display a table view of all record structures defined within the structure file. Select the record
structures that are to be included or excluded.
For each of the selected record structures, further record selection criteria may then be specified based on fields
defined within the record structures.
4. Create FILTER object.
Opens a CBLe text edit view to display the generated filter clause in the file identified by Filter File.
When the edit window is closed (<PF3>), the user will be prompted to save the file and, if necessary, open the
Allocate NonVSAM dialog window.
In order to prevent accidental overwrite of data, if the file already exists, then the save will be rejected with
message ZZSE046E. To force the save regardless of the warning, issue command SSave, (or FFile to save and
exit at once).
2013-11-13 13:06:41
SELCOPY/i Reference and User Guide
285
Create File Filter (=10)
Unformatted Selection Criteria
Unformatted Selection Criteria
The FILTER (unformatted) - Selection Criteria panel (ZZSGFLTR) is an interactive panel window, opened on selecting Action 2. in
the Create File Filter panel.
The panel contains a table where each row represents a sub-expression of the single INCLUDE or EXCLUDE sub-clause (WHERE
expression). Each generated sub-expression involves a SUBSTR() built-in function which operates on the unformatted record data
referenced by "record".
The sub-expressions are separated by logical operator AND or OR, where AND is higher in the order of operator precedence than
OR. i.e. A AND B OR C is equivalent to (A AND B) OR C.
Figure 164. SELCOPY/i - Unformatted Selection Criteria.
Standard SELCOPY/i table editing techniques should be used to add a table row entry for each filter sub-expression.
Each table row consists of the logical operator (AND/OR) position and length of the data within the record to be tested, the
relational operator (ROp) and the value to be tested. Enter null or invalid enties in the AND/OR and ROp fields to display and select
permitted entries for these fields.
Since logical operators AND and OR are dyadic, the AND/OR field of the first table row (the first term of the expression) is always
blank and cannot be updated.
Having inserted a table row, the user can display the single record view of the row using the ZOOM command (assigned to <PF2>
by default.)
Pressing <PF3> to exit the zoomed view of the panel, will update the filter sub-expression table row and return to the multi-record
view of the table. Pressing <PF3> again to exit the Selection Criteria panel, will save the table sub-expressions and return to the
Create File Filter panel.
Fields in this table corresponds to the filter WHERE expression.
Figure 165. SELCOPY/i - Unformatted Selection Criteria Zoomed View.
2013-11-13 13:06:41
SELCOPY/i Reference and User Guide
286
Create File Filter (=10)
Panel Input Fields
Panel Input Fields
By default, field entries are populated with arguments and options entered in the table view for that entry.
Logical Operator>
Logical operator that identifies the relationship of this field test sub-expression with the previously specified
sub-expression. If this is the first, then this field is ignored. Permissible operators are AND or OR.
Field Details:
Fields that together identify the location within the input records of the data field to be tested.
Position>
Integer numeric identifying the position of the first byte of the test field within the record data.
Length>
Integer numeric identifying the length of the test field within the record data.
A length of 0 (zero) indicates a length from the start position to the end of the record.
Relational Operator>
Identifies the type of test to be performed on the field data. Enter blank in this field to display a selectable list of supported
relational operator symbols and a brief description of each.
Value>
Specifies the quoted literal string term against which the field data will be tested.
Formatted Selection Criteria
The Formatted Selection Criteria panels relate specifically to generating record selection criteria based on assigned record
structure and, optionally, formatted field data.
FILTER (formatted) - INCLUDE/EXCLUDE record-types
The FILTER (formatted) - INCLUDE/EXCLUDE record-types panel (ZZSGFLTI) is an interactive panel window, opened on
selecting Action 3. in the Create File Filter panel.
The type of filter (INCLUDE or EXCLUDE) is determined by the selection criteria type specified in the Create File Filter panel.
The panel contains a table where each selected and non-excluded row represents an INCLUDE or EXCLUDE sub-clause based on
a record structure defined within the structure file. By default, the table contains one row for each record structure defined within the
structure file.
Figure 166. SELCOPY/i - Formatted - INCLUDE/EXCLUDE record-types.
Standard SELCOPY/i table editing techniques should be used to duplicate, move or exclude table row entries for each
INCLUDE/EXCLUDE sub-clause.
2013-11-13 13:06:41
SELCOPY/i Reference and User Guide
287
Create File Filter (=10)
FILTER (formatted) - INCLUDE/EXCLUDE record-types
Select a record structure table entry for INCLUDE/EXCLUDE by entering "S" in the "Sel" column or placing the cursor on the table
entry and pressing the <Enter> key or, if configured, double-clicking the left mouse button. To de-select a record structure table
entry, simply remove the "S" from the "Sel" column.
<PF5> and <PF6> may be used to alternate between display of only selected rows and all rows in the table respectively. This has
no effect on the generated filter, but is useful as a visual aid.
"Record Type" identifies the record structure name and "Identification Criteria" displays any USE WHEN record type criteria used to
identify when the record structure is assigned to a record. These are output fields may not be updated. "Selection Criteria" indicates
the number of potential field name based sub-expressions defined for the record structure.
On selecting a record structure, the Filter (formatted) - Selection Criteria is opened automatically, giving the user the option to
further specify selection criteria based on named fields within the formatted record.
When the filter is generated, each INCLUDE/EXCLUDE sub-clause is separated by a logical OR operation. Therefore, if required, a
record structure table row entry may be duplicated in order to provide alternative INCLUDE/EXCLUDE sub-clause record selection
criteria based on different values within fields belonging to the same record structure.
Pressing <PF3> to exit the panel, will save the table INCLUDE/EXCLUDE sub-clauses and return to the Create File Filter panel.
Filter (formatted) - Selection Criteria
The FILTER (formatted) - Selection Criteria panel (ZZSGFLTW) is an interactive panel window, opened when a record structure is
selected from the FILTER (formatted) - INCLUDE/EXCLUDE record-types panel.
The panel contains a table where each row represents a sub-expression of the single INCLUDE or EXCLUDE sub-clause (WHERE
expression) generated for the selected record structure. Each generated sub-expression is based on values referenced by one or
more field names defined in the record structure.
By default, the table contains one row for every level of nested field defined within the record structure. These entries may be
duplicated, copied or re-ordered before generating the sub-expression. Note that table entries that do not have a test value will not
be included as part of the generated sub-expression.
The sub-expressions are separated by logical operator AND or OR, where AND is higher in the order of operator precedence than
OR. i.e. A AND B OR C is equivalent to (A AND B) OR C. To filter on fields A AND (B OR C), then two rows should exist for the
same record structure in the FILTER (formatted) - INCLUDE/EXCLUDE record-types table so that one tests fields A AND B and
the other tests fields A AND C.
Figure 167. SELCOPY/i - Formatted Selection Criteria.
Standard SELCOPY/i table editing techniques should be used to update, move, copy and exclude table row entries for each filter
sub-expression.
Each table row contains input fields for logical operator (AND/OR), relational operator (ROp) and the value against which the field
will be tested. Null or invalid enties may be entered in the AND/OR and ROp fields to display and select permitted entries for these
fields.
All other fields are output (non-updatable) fields providing useful information about the field to be tested (i.e. the field's level of
nesting, its name, data type (format) and, if defined, its picture definition.)
Since logical operators AND and OR are dyadic, the AND/OR field of the first table row (the first term of the expression) is always
blank and cannot be updated.
<PF5> and <PF6> may be used to alternate between display of only selected rows and all rows in the table respectively. This has
no effect on the generated filter, but is useful as a visual aid.
2013-11-13 13:06:41
SELCOPY/i Reference and User Guide
288
Create File Filter (=10)
Filter (formatted) - Selection Criteria
The user can display the single record view of the row using the ZOOM command (assigned to <PF2> by default.) As well
providing additional helpful comment information, the single record view allows the user to use the panel EXPAND feature to enter
a Value field entry that is longer than the provided input area.
Pressing <PF3> to exit the zoomed view of the panel, will update the filter sub-expression table row and return to the multi-record
view of the table. Pressing <PF3> again to exit the Selection Criteria panel, will save the table sub-expressions and return to the
FILTER (formatted) - INCLUDE/EXCLUDE record-types panel.
Fields in this table corresponds to the filter WHERE expression.
Figure 168. SELCOPY/i - Formatted Selection Criteria Zoomed View.
Panel Input Fields
By default, field entries are populated with arguments and options entered in the table view for that entry.
Logical Operator>
Logical operator that identifies the relationship of this field test sub-expression with the previously specified
sub-expression. If this is the first, then this field is ignored. Permissible operators are AND or OR.
Field Details:
Informational output fields that describe the formatted field.
Name:
Field name.
Level:
Level of nesting below the first level (GROUP or STRUCTURE) field.
Data Type:
The field's defined data type. See "SDE Data Types" for details of supported data types and their abbreviated
names.
Picture:
If the source field is defined with a COBOL picture string, its representation is displayed in this field.
Relational Operator>
Identifies the type of test to be performed on the field data. Enter blank in this field to display a selectable list of supported
relational operator symbols and a brief description of each.
Value>
Specifies the literal string term against which the field data will be tested.
2013-11-13 13:06:41
SELCOPY/i Reference and User Guide
289
Print Data File (=11)
Print Data File - Input
Figure 169. SELCOPY/i - Print Data File.
The Print Data File utility provides users with the ability to print any sequential, VSAM, library member or HFS file with data having
been formatted using any display formatting supported by an SDE edit/browse view.
Print output may be written to any of the following:
1. An existing sequential or VSAM data set or a PDS/PDSE library member of any RECFM, BLKSIZE and LRECL. The print
page width will default to be the LRECL (or VSAM maximum record length) of the output data set. This type of output data
set may be specified via its DSN (and member name) or a pre-allocated DDName.
2. An HFS file. The print page width default is 133.
3. A SYSOUT data set. The print page width default is 133.
The Print Data File panel view (ZZSGPRT0) is an interactive panel window, opened in selection of option 11. "Print" in the
SELCOPY/i Primary option menu. Its purpose is to generate a job which may be submitted to print the data file in batch.
Pressing the <Enter> key or, if configured, double-clicking the left mouse button will will proceed to the next Print Data File panel
view based on the selected print format.
PF18 may be pressed in any of the Print Data File panels to generate the PRINT File batch job based on the existing values set in
the supporting panel views.
Print Format:
Identifies the type of print that will occur.
Records will be formatted or unformatted in either single record or multi record view and relevant display options applied
prior to printing the file.
Supported print formats are:
VFMT
FMT
CHAR
UNFMT
Vertical Formatted records (multi record view).
Formatted records in single record view.
Unformatted records in multi record view.
Unformatted records in single record view.
PDS/PDSE member, Sequential, VSAM or HFS path:
Input fields which together identify a single existing, sequential or VSAM data set, GDG file generation, HFS file or
PDS/PDSE library member to be printed.
Name>
Identifies the fully qualified data set name or an absolute or relative HFS file path.
A selectable list of data sets or HFS files will be presented if the entered value contains wildcards characters "*"
(asterisk) or "%" (percent).
2013-11-13 13:06:41
SELCOPY/i Reference and User Guide
290
Print Data File (=11)
Print Data File - Input
Member>
If the DSN/Path> field contains the DSN of a PDS/PDSE library, then this field may specify the name of a new or
existing member within that library.
A selectable list of members will be presented if the entered value contains wildcards characters "*" (asterisk) or
"%" (percent), or is blanked out.
Volume>
Specifies the name of the input data set volume. This is required only if output is to an uncataloged data set.
Structure/Copybook overlay:
If activated, this option defines fields which together specify a cataloged structure file (COBOL or PL1 Copybook, ADATA
file or a SELCOPY/i SDO) used to format the printed records. The structure may be a sequential data set or a PDS/PDSE
library member.
If no structure is specified, each data set record will be of the default record type "Unmapped", i.e. a single character field
of length equal to that of the record.
These fields must be selected and contain valid entries if record data is to be formatted before it is printed (print format
VFMT or FMT).
Dsn>
Identifies the fully qualified data set name of a sequential data set or PDS/PDSE library containing a COBOL or
PL1 Copybook, ADATA file or SDO structure.
A selectable list of data sets will be presented if the entered value contains wildcards characters "*" (asterisk) or
"%" (percent).
Member>
If the Dsn> field contains the DSN of a PDS/PDSE library, then this field must reference a member name within
that library which contains a record filter.
A selectable list of members will be presented if the entered value contains wildcards characters "*" (asterisk) or
"%" (percent), or is blanked out.
Type:
Indicate the type of structure (COBOL, PL1, ADATA or SDO).
Record Selection:
Fields which together identify criteria by which a subset of records from the file are selected for browse/edit. If any record
selection field is activated for data edit, then Edit In-Place is performed regardless of the selected edit technique.
Start>
If activated, the Start> field identifies the first record in the file at which printing will start. Records occurring
sequentially before the start record will be excluded. If this field is not activated, records are selected beginning at
record 1.
This input field may contain a record number, an RBA number (for ESDS input only), or a key string (for KSDS
input only).
A record/RBA number may be specified as an integer numeric value 123 or as a hexadecimal numeric value
X'7B'. A key string may be specified as a literal abc or 'abc', which will be upper cased before keyed look-up,
character string C'abc' (character case preserved) or a hexadecimal string X'818283'.
Record | Key | RBA
Identifies the type of start value specified in the Start> field. Enter "/" in the appropriate, mutually
exclusive parameter field.
For>
If activated, the For> field specifies the maximum number of records within the file to be printed. If this field is not
activated, records are selected beginning at start record and ending at the last record in the file.
Filter>
If activated, the Filter> field specifies options to either generate a new record filter or use an existing record filter
file. A record filter will perform further subsetting on input file records selected for processing by the Start> and/or
For> input fields.
2013-11-13 13:06:41
SELCOPY/i Reference and User Guide
291
Print Data File (=11)
Print Data File - VFMT Options
Filter options are as follow:
Q
F
On pressing <PF6>, the Quick Filter dialog panel will be opened in order to generate a temporary filter on
the unformatted record data.
Use a permanent filter identified by the sequential data set or member name in the File> field.
On pressing <PF6>, the Create File Filter dialog panel will be opened in order to display the contents of an
existing filter file or create and save a new filter file.
If option "F" is selected, then specifiaction of a filter fileid is mandatory.
File>
Identifies the fully qualified data set name of a sequential data set or PDS/PDSE library containing a
record filter. Quotes are unnecessary but permitted.
A selectable list of data sets will be presented if the entered value contains wildcards characters "*"
(asterisk) or "%" (percent).
Member>
If the File> field contains the DSN of a PDS/PDSE library, then this field must reference a member name
within that library which contains a record filter.
A selectable list of members will be presented if the entered value contains wildcards characters "*"
(asterisk) or "%" (percent), or is blanked out.
Print Data File - VFMT Options
Figure 170. SELCOPY/i - Print Data File (VFMT Options).
The Print Data File - VFMT Options panel view is displayed after pressing the <Enter> key or, if configured, double-clicking the
left mouse button when Print Format "VFMT" has been selected in the Print Data File panel view.
This panel allows additional SDE view display formatting and record-type based record and field selection on the vertically
formatted file records.
Order>
Where printed lines are longer than the output page width, then this field value determines the action taken on the
overflowing line data.
Unless T (Truncate) is selected, overflow line data is printed on as many continuation pages as is required to accomodate
the longest print line in the current set of print lines. Note that a set of print lines is the number of SDE view lines that may
be displayed for the specified page depth.
A - Across Then Down
Indicates that continuation pages for the current set of lines are to be printed before scrolling down to the next set
of print lines. i.e. Print all pages scrolling across to the right then scroll down to the first page of the next set of
lines and repeat the process.
This option corresponds to parameter ACROSSTHENDOWN of the SDE primary command PRINT.
Because only as many pages are printed to accomodate the longest line in the current set of print lines, the
number of pages printed scrolling across may be different for each set of print lines.
2013-11-13 13:06:41
SELCOPY/i Reference and User Guide
292
Print Data File (=11)
Print Data File - VFMT Options
D - Down Then Across
Indicates that the first page of all sets of print lines are to be printed before printing the next (continuation) page
of all sets of print lines and repeating this process until all contuation pages have been printed. i.e. Print pages
scrolling down, scroll back to the first set of print lines, scroll across to the right once and repeat the process.
This option corresponds to parameter DOWNTHENACROSS of the SDE primary command PRINT and is
suitable only when formatted records of a single record-type are selected for display. (See "Select Record-types
to Print" if the SDO used contains multiple record-type definitions.)
If this option is selected and records of different record-types are displayed concurrently, then the print will fail
with the following message:
ZZSD472E The DOWNTHENACROSS format of the PRINT command requires
that only one record type is visible.
Because only one record-type is used, the number of pages printed scrolling across will be the same for each set
of print lines.
T - Truncate
Indicates that no continuation pages are to be printed so truncating the print lines. Only the first page of all sets of
print lines will be printed.
This option corresponds to parameter TRUNC of the SDE primary command PRINT.
Offset>
Determines the format of the offset field description and scale header, displayed when Show> O and
Show Scale Line> Y is selected.
P
X
R
Displays the location of the start of each field as a decimal position and a decimal scale line.
Displays the location of the start of each field as a hexadecimal offset and a hexadecimal
scale line.
Displays the location of the start of each field as a decimal offset and a decimal scale line.
This option corresponds to the SDE option SET OFFSET.
Show> F=FORMAT/O=OFFSET/P=PICTURE/T=TYPE
Determines the contents of the field description header line.
F
O
P
T
Displays length/format where length identifies the field's length within the unformatted
record, and format identifies the field's data-type in a descriptive form.
e.g. '30/CHAR' indicates an Alpha-Numeric character field of length 30 bytes.
Displays nnnnn representing the field's location within the unformatted record. The format of
the offset display is determined by the Offset> value.
For COBOL or PL1 source structures or SDO structures generated from COBOL or PL1
copy books, this option will display a field's defined PICTURE string.
Displays data-type position:length where position and length identify the field's position
and length within the unformatted record.
e.g. 'AN 111:30' indicates an Alpha-Numeric character field of length 30 bytes starting at
position (decimal) 111 of the unformatted record.
This option corresponds to the SDE primary command SHOW.
Show Hex Data>
Determines whether hexadecimal display of the file record data is on or off.
This option corresponds to the SDE primary command HEX.
Show FILLER fields>
Determines whether unnamed fields (e.g. COBOL FILLER fields) are included in the printed output.
This option corresponds to the SDE option SET UNNAMED.
Show Shadow Lines>
Determines whether shadow lines, used to mark groups of suppressed records (i.e. records assigned a record-type that
has not been selected for view), are included in the printed output.
This option corresponds to the SDE option SET SHADOW.
Translate ASCII>
Determines whether or not character display of the file record data is interpreted as ASCII or EBCDIC.
This option corresponds to the SDE option SET ASCII.
Show TTR/RBA>
Determines whether or not the record identification column is included in the printed output.
2013-11-13 13:06:41
SELCOPY/i Reference and User Guide
293
Print Data File (=11)
Print Data File - FMT Options
For non-VSAM data sets, the record identification is by Relative Volume, Track and Physical Record number (TTR)
followed by an offset within the physical record.
For VSAM data sets, the record identification is by Relative Byte Address (RBA). The column is displayed as a decimal
value with header "RBA".
This option corresponds to the SDE option SET RECINFO ID.
Show Scale Line>
Determines whether or not the scale header line, providing a counting guide for the width of displayed fields, is included in
the printed output.
This option corresponds to the SDE option SET SCALE.
Show Record Length>
Determines whether or not the record (or record segment) length column is included in the printed output.
This option corresponds to the SDE primary command RECLENGTH.
Show Record Number>
Determines whether or not the line prefix area displaying the record number is included in the printed output.
This option corresponds to the SDE option SET PREFIX LEFT 8 PHYSICAL.
Option>
Enter the number corresponding to the action required. Alternatively, position the cursor on the action description and
press the <Enter> key or, if configured, double-click the left mouse button.
1. Select Record-Types to Print
By default records of any record-type are included in the printed output. Use this option to restrict the printed
records to only records assigned the specified record-types.
A separate panel will be displayed containing a list of record types defined by the Structure/Copybook overlay
SDO or copybook. For informational purposes only and where one exists, each record-type is accompanied by its
USE WHEN condition, used by SDE to identify assignment of that particular record-type.
From this panel, select those record types to included in the printed output. (If DOWNTHENACROSS has been
selected, only one record-type can be selected.)
2. Select Column Names to Print
By default all fields (from all selected record-types) are included in the print output Use this option to restrict the
printed output to a subset of field names identified within those record-types selected for print.
A separate panel will be displayed containing a list of record-types defined by the Structure/Copybook overlay
SDO or copybook. For informational purposes only and where one exists, each record-type is accompanied by its
USE WHEN condition, used by SDE to identify assignment of that particular record-type.
From this panel, select those record-types for which fields are to be excluded from the printed output. Another
panel will be opened for each selected record type allowing the user to exclude field columns from the print.
3. Continue
Continue to the Print Data File - Destination view.
Print Data File - FMT Options
2013-11-13 13:06:41
SELCOPY/i Reference and User Guide
294
Print Data File (=11)
Print Data File - FMT Options
Figure 171. SELCOPY/i - Print Data File (FMT Options).
The Print Data File - FMT Options panel view is displayed after pressing the <Enter> key or, if configured, double-clicking the left
mouse button when Print Format "FMT" has been selected in the Print Data File panel view.
This panel allows additional SDE view display formatting and record-type based record and field selection on the single record
view, formatted file records.
Show> F=FORMAT/O=OFFSET/P=PICTURE/T=TYPE
Determines the contents of the field description display.
F
Displays length/format where length identifies the field's length within the unformatted
record, and format identifies the field's data-type in a descriptive form.
e.g. '30/CHAR' indicates an Alpha-Numeric character field of length 30 bytes.
Displays nnnnn representing the field's location within the unformatted record. The format of
the offset display is determined by the Offset> value.
O
P
T
Furthermore, start-end values of character field continuation lines are replaced by an offset
value matching the offset format set for other field entries.
For COBOL or PL1 source structures or SDO structures generated from COBOL or PL1
copy books, this option will display a field's defined PICTURE string.
Displays data-type position:length where position and length identify the field's position
and length within the unformatted record.
e.g. 'AN 111:30' indicates an Alpha-Numeric character field of length 30 bytes starting at
position (decimal) 111 of the unformatted record.
This option corresponds to the SDE primary command SHOW FORMAT/OFFSET/PICTURE/TYPE.
Show> L=LEVEL/N=NUMBER
Determines the contents of the field name display.
L
N
Suppresses display of the field reference numbers assigned by SDE and replaces them with
the field's hierarchical level number as a prefix to the field name. Additionally, the level
number and field name is indented for each increment in level number.
Suppresses display of the field's hierarchical level number and displays the field reference
numbers assigned by SDE instead (e.g. #2)
This option corresponds to the SDE primary command SHOW LEVEL/NUMBER.
Offset>
Determines the format of the offset field description and field contents scale header, displayed when Show> O and
Show Scale Line> Y is selected.
P
X
R
Displays the location of the start of each field as a decimal position and a decimal scale line.
Displays the location of the start of each field as a hexadecimal offset and a hexadecimal
scale line.
Displays the location of the start of each field as a decimal offset and a decimal scale line.
This option corresponds to the SDE option SET OFFSET.
Show Hex Data>
Determines whether hexadecimal display of the file record data is on or off.
This option corresponds to the SDE primary command HEX.
Show FILLER fields>
Determines whether unnamed fields (e.g. COBOL FILLER fields) are included in the printed output.
This option corresponds to the SDE option SET UNNAMED.
Show Group Items>
Determines whether or not each occurrence of a group item is included in the printed output. Group items correspond to
structure, union and root array field names.
This option corresponds to the SDE option SET GROUP.
Translate ASCII>
Determines whether or not character display of the file record data is interpreted as ASCII or EBCDIC.
This option corresponds to the SDE option SET ASCII.
Option>
2013-11-13 13:06:41
SELCOPY/i Reference and User Guide
295
Print Data File (=11)
Print Data File - Select Record-Types
Enter the number corresponding to the action required. Alternatively, position the cursor on the action description and
press the <Enter> key or, if configured, double-click the left mouse button.
1. Select Record-Types to Print
By default records of any record-type are included in the printed output. Use this option to restrict the printed
records to only records assigned the specified record-types.
A separate panel will be displayed containing a list of record types defined by the Structure/Copybook overlay
SDO or copybook. For informational purposes only and where one exists, each record-type is accompanied by its
USE WHEN condition, used by SDE to identify assignment of that particular record-type.
From this panel, select those record types to included in the printed output.
2. Select Column Names to Print
By default all fields (from all selected record-types) are included in the print output Use this option to restrict the
printed output to a subset of field names identified within those record-types selected for print.
A separate panel will be displayed containing a list of record-types defined by the Structure/Copybook overlay
SDO or copybook. For informational purposes only and where one exists, each record-type is accompanied by its
USE WHEN condition, used by SDE to identify assignment of that particular record-type.
From this panel, select those record-types for which fields are to be excluded from the printed output. Another
panel will be opened for each selected record type allowing the user to exclude field columns from the print.
3. Continue
Continue to the Print Data File - Destination view.
Print Data File - Select Record-Types
Figure 172. SELCOPY/i - Print Data File - Select Record-Types.
The Print File - Select Record-Types panel (ZZSGPRTV) is displayed following selection of option 1. from either the Print Data
File - VFMT Options or Print Data File - FMT Options panel view.
This panel contains a list of all record-types, defined by the SDO or copy book specified in Structure/Copybook overlay, which are
presented to the user as an editable IPO table. Any USE WHEN condition, used to determine whether record data fits the record
type definition, is also displayed.
Records assigned a record-type that is included in this list will be selected for print. Use standard SELCOPY/i table editing
techniques to exclude or delete record types from this list and so exclude records assigned these record-types from being printed.
For example, the following command may be executed to exclude all rows except those where the record type name begins with
literal "ABC-":
WHERE
ViewRT >> 'ABC-'
Pressing <PF3> to exit the panel, will also save the table of selected record-types and return to the previous (VFMT or FMT
options) panel view as appropriate.
Default is to include records assigned any of the available record-types.
2013-11-13 13:06:41
SELCOPY/i Reference and User Guide
296
Print Data File (=11)
Print Data File - Select Field Names
Print Data File - Select Field Names
Figure 173. SELCOPY/i - Print Data File - Select Field Names.
The Print Data File - Select Field Names panel (ZZSGPRTS) is displayed following selection of option 2. from either the Print
Data File - VFMT Options or Print Data File - FMT Options panel view.
Select each record-type for which specific field columns are to be selected by entering 'S' against the record type in the Sel column
or by positioning the cursor on the required record type then either pressing the <Enter> key or, if configured, double-click the left
mouse button. To deselect the record type key field definition, remove the 'S' against its entry in the 'Sel' column.
For each selected record type, the Print Data File - Field Names List panel (ZZSGPRTF) is opened displaying a list of fields that
comprise the record-type. The list of field names should be edited so that only the required field names are diplayed. The order in
which these fields occur in this list will be the order in which they appear in the printed output.
On returning from the selectable field list, the Fields Selected column will be updated to indicate the number of fields selected for
print.
Note that, selecting fields from a record-type that has been excluded from the print in panel Print Data File - Select Record-Types
(ZZSGPRTV), will generate the appropriate SELECT field-name syntax but will ultimately have no effect. i.e. The record-type must
be included for print in order for its selected fields to be printed.
Pressing <PF3> to exit the panel, will also save the table of selected record-types for which selected fields will be printed, and
return to the previous (VFMT or FMT options) panel view as appropriate.
Default is to print all field columns belonging to all selected record-types.
Print Data File - Field Names List
Figure 174. SELCOPY/i - Print Data File - Field Names List.
2013-11-13 13:06:41
SELCOPY/i Reference and User Guide
297
Print Data File (=11)
Print Data File - Field Names List
The Print Data File - Field Names List panel (ZZSGPRTF) is displayed for each record-type selected from the Print Data File Select Field Names panel.
A list of field names, defined by the selected record-type, is presented to the user as an editable table. Standard SELCOPY/i table
editing techniques should be used to exclude and re-order the fields so that only required fields are displayed and in the order in
which they are to be printed.
Only included field name entries are printed, therefore a field name may be excluded (as opposed to deleted) in order to exclude it
from the print output. This has the benefit that the field may easily be included again later if necessary. For example, the following
commands may be executed to filter (include) specific table rows:
WHERE (length(strip(SelectFld),'T') > 5)
and
(#3 = 'BN')
Exclude all rows except those where the length of the Field Name entry is greater than 5 and the Field Picture Type is
"BN". Note that the "Field Pic Type" column is field reference number 3.
MORE SelectLev < 3
Include previously excluded entries where the field level is 1 or 2. (Entries that are already included will remain included.)
The order in which the field names occur is the order in which the fields will be appear in the printed output.
Pressing <PF3> to exit the panel, will also save the table of selected field names and return to the Print Data File - Select Field
Names panel.
Default is to print all field columns belonging to all selected record-types.
Print Data File - CHAR Options
Figure 175. SELCOPY/i - Print Data File (CHAR Options).
The Print Data File - CHAR Options panel view is displayed after pressing the <Enter> key or, if configured, double-clicking the
left mouse button when Print Format "CHAR" has been selected in the Print Data File panel view.
This panel allows additional SDE view display formatting on the unformatted, multi record view of file records.
Order>
Where printed lines are longer than the output page width, then this field value determines the action taken on the
overflowing line data.
Unless T (Truncate) is selected, overflow line data is printed on as many continuation pages as is required to accomodate
the longest print line in the current set of print lines. Note that a set of print lines is the number of SDE view lines that may
be displayed for the specified page depth.
A - Across Then Down
Indicates that continuation pages for the current set of lines are to be printed before scrolling down to the next set
of print lines. i.e. Print all pages scrolling across to the right then scroll down to the first page of the next set of
lines and repeat the process.
This option corresponds to parameter ACROSSTHENDOWN of the SDE primary command PRINT.
Because only as many pages are printed to accomodate the longest line in the current set of print lines, the
number of pages printed scrolling across may be different for each set of print lines.
T - Truncate
Indicates that no continuation pages are to be printed so truncating the print lines. Only the first page of all sets of
print lines will be printed.
2013-11-13 13:06:41
SELCOPY/i Reference and User Guide
298
Print Data File (=11)
Print Data File - CHAR Options
This option corresponds to parameter TRUNC of the SDE primary command PRINT.
Offset>
Determines the format of the record contents scale header, displayed when Show Scale Line> Y is selected.
P or R
X
Displays a decimal scale line.
Displays a hexadecimal scale line.
This option corresponds to the SDE option SET OFFSET.
Show Hex Data>
Determines whether hexadecimal display of the file record data is on or off.
This option corresponds to the SDE primary command HEX.
Translate ASCII>
Determines whether or not character display of the file record data is interpreted as ASCII or EBCDIC.
This option corresponds to the SDE option SET ASCII.
Show TTR/RBA>
Determines whether or not the record identification column is included in the printed output.
For non-VSAM data sets, the record identification is by Relative Volume, Track and Physical Record number (TTR)
followed by an offset within the physical record.
For VSAM data sets, the record identification is by Relative Byte Address (RBA). The column is displayed as a decimal
value with header "RBA".
This option corresponds to the SDE option SET RECINFO ID.
Show Scale Line>
Determines whether or not the scale header line, providing a counting guide for the record data, is included in the printed
output.
This option corresponds to the SDE option SET SCALE.
Show Record Length>
Determines whether or not the record length column is included in the printed output.
This option corresponds to the SDE primary command RECLENGTH.
Show Record Number>
Determines whether or not the line prefix area displaying the record number is included in the printed output.
This option corresponds to the SDE option SET PREFIX LEFT 6 PHYSICAL.
Print Data File - UNFMT Options
Figure 176. SELCOPY/i - Print Data File (UNFMT Options).
The Print Data File - UNFMT Options panel view is displayed after pressing the <Enter> key or, if configured, double-clicking the
left mouse button when Print Format "UNFMT" has been selected in the Print Data File panel view.
2013-11-13 13:06:41
SELCOPY/i Reference and User Guide
299
Print Data File (=11)
Print Data File - UNFMT Options
This panel allows additional SDE view display formatting on single record view, unformatted file records.
Offset>
Determines the format of the record contents scale header, displayed when Show Scale Line> Y is selected.
P or R
X
Displays a decimal scale line.
Displays a hexadecimal scale line.
This option corresponds to the SDE option SET OFFSET.
Show Hex Data>
Determines whether hexadecimal display of the file record data is on or off.
This option corresponds to the SDE primary command HEX.
Translate ASCII>
Determines whether or not character display of the file record data is interpreted as ASCII or EBCDIC.
This option corresponds to the SDE option SET ASCII.
Print Data File - Destination
Figure 177. SELCOPY/i - Print Data File Destination.
The Print Data File - Destination panel view is displayed after pressing the <Enter> key or, if configured, double-clicking the left
mouse button from the "CHAR" or "UNFMT" options panel view, or on selection of Option 3. in the "VFMT" or "FMT" options panel
view.
This panel identifies the destination of the printed output.
Type>
Identifies the print output destination type.
F
S
D
Print output is to a FILE specified as a DSN, PDS/PDSE DSN and member name or HFS
fileid.
Print to a system (SYSOUT) data set.
Print to a file or SYSOUT data set allocated to an existing DDName.
Page Width>
Set the print output page width (number of columns).
A page width value of 0 (zero) will use the default page width of 133 for SYSOUT and HFS file output, and the maximum
record length (LRECL) for an output data set or library member.
Note that, for FMT and UNFMT printed output, page width is restricted to a maximum of 255 print columns.
Page Depth>
Set the print output page depth (number of lines).
The page depth value includes the 5 Print header lines so that the number of lines of data printed will be 5 less than the
page depth value.
2013-11-13 13:06:41
SELCOPY/i Reference and User Guide
300
Print Data File (=11)
Print Data File - Destination
Limit>
Limits the amount of output data printed.
The value in this field correspond to a number of units as specified by Limit Unit>. A limit value of 0 (zero) indcates that
there is no limit imposed on the printed output.
Limit Unit>
Identifies the units (LINES or PAGES) represented by the Limit> value.
A PAGE limit corresponds to a number of lines equal to the number of pages multiplied by the page depth value.
Note that a LINE limit includes any blank lines printed on each page to satisfy the page depth specification.
File Options:
Applicable only when print destination type is "File", File options specify parameters used by the PRINT operation to
dynamically allocate a sequential or VSAM data set, PDS/PDSE library member or HFS file.
If a specified DSN does not belong to an existing library, sequential or VSAM data set, the Allocate Non-VSAM panel is
displayed so that a new output print file may be allocated before proceeding to generate the JCL.
Dsn/Path>
Member>
Volume>
Identifies the fileid (DSN) of the sequential or VSAM data set, PDS/PDSE library member or HFS file to be
printed. Dataset names must be fully qualified, quotes being unnecessary but permitted.
A selectable list of files will be presented if wildcards are entered, or dataset is an existing PDS/PDSE library and
member is left blank.
Disp>
Identifies the disposition used when allocating a sequential, VSAM or library DSN for output. Note that output to
an HFS file does not involve dynamic allocation and so, unless DISP MOD is specified, this option is ignored.
D
O
S
M
Use the PRINT utility default disposition for the type of data set being allocated (i.e.
DISP=OLD for sequential and VSAM data sets, DISP=SHR for PDS/PDSE libraries.)
DISP=OLD. Exclusive, unshared ENQ for overwrite of any existing file data.
DISP=SHR. Shared ENQ for overwrite of any existing file data.
DISP=MOD. Exclusive, unshared ENQ for appending output to existing file data. For
HFS file output, "M" is used to indicate write append to the file even though no
dynamic allocation occurs. DISP=MOD is ignored if output is to a PDS/PDSE library
member.
SYSOUT Options:
Applicable only when print destination type is "SYSOUT", SYSOUT options specify parameters used by the PRINT
operation to dynamically allocate a system (SYSOUT) data set.
Class>
Identifies the SYSOUT class.
Copies>
Identifies the number of file copies to be printed (1-255). This parameter corresponds to the SYSOUT allocation
parameter COPIES.
DDName Options:
Applicable only when print destination type is "DDName", DDName options specify the DDName of a pre-allocated data
set only.
DDName>
Identifies an existing DDName.
2013-11-13 13:06:41
SELCOPY/i Reference and User Guide
301
DB2 Utilities
SELCOPY/i DB2 facilities are incorporated within the SELCOPY Product Suite base product and do not require any additional
licensing over and above the SELCOPY product key.
SELCOPY/i DB2 provides a suite of tools to assist working with DB2 data and objects. Command syntax and panels provide
functions that include:
• Edit and Browse of DB2 table data in a SELCOPY/i Structured Data Edit (SDE) view.
• List, Create, Drop and Alter of DB2 objects. (Tables, Indexes, etc.)
• Interactive Execution of DB2 commands and SQL statements.
• Generation of JCL for SQL statement execution and stand-alone DB2 utilities.
SELCOPY/i users may connect to any local DB2 subsystem for which the SELCOPY/i DB2 plan has been bound and the user
granted EXECUTE authority. For successful operation, users must also be granted SELECT access to the subsystem's DB2
catalog tables and, if configured, READ access to the SELCOPYI.DB2 SAF resource. See the "SELCOPY Product Suite
Customisation Guide" for details on enabling SELCOPY/i DB2.
Multiple connections to one or more local DB2 subsystems may exist in the same SELCOPY/i session. Each connection has its
own audit setting (on or off) and audit log data set. The DB2 susbsystem name is displayed in the title bar of any SELCOPY/i DB2
window (panel or SDE edit view) to which that window relates.
All DB2 related features may be accessed via the suite of SELCOPY/i DB2 interactive panel windows (window class WINWIPO0)
that are invoked by selecting the "DB2" drop-down menu item of the "File" main menu, or by executing the DB2 CLI command.
Note that SELCOPY/i panels are window objects within SELCOPY/i and should not be confused with ISPF panels.
DB2 Primary Option Menu
The DB2 Primary Option Menu panel (ZZS2PRIM) is an interactive panel window providing the entry point to all SELCOPY/i DB2
panels, encompassing the DB2 functionality available in SELCOPY/i.
This DB2 panel is the first in a hierarchical chain of DB2 panels (menus, functions, lists) that are opened thereafter. Select an item
from the menu of DB2 related tasks to open the relevant DB2 task panels. Note that, although part of the same DB2 panel
hierarchy, these panels are not owned by DB2 primary options menu panel. Window Focus may be returned to the primary options
panel to select another branch of DB2 task panels in the same hierarchy without having to exit existing DB2 panels.
On selecting an item from this menu panel, or if a PFKey/<Enter> is actioned, an attempt is made to connect to the DB2 subsystem
specified in the DB2 SubSystem field. If the value in this field is subsequently changed, then a new DB2 hierarchy of DB2 panels is
started and a connection is made to the new DB2 subsystem. If no other panel exists in the DB2 hierarchy belonging to the
previously specified DB2 subsystem, then connection to that subsystem is dropped before the new connection is made.
The name of the connected DB2 subsystem is displayed in parentheses in the window title bar of the DB2 primary options menu
and therafter in the title bars of DB2 panels and SDE edit views opened in the DB2 panel hierarchy.
Although DB2 table SDE edit views may be opened via the DB2 panels, these are not included as part of the DB2 panel hierarchy.
This is because a separate DB2 connection is performed and a separate audit file is maintained for each edited results table
allowing updates made to a DB2 table to be isolated from other DB2 tasks (including updates made to other DB2 tables.)
To work with multiple DB2 subsystems concurrently, the command DB2 SSN=name may be executed to open multiple DB2
primary option menu panels each connected to different DB2 subsystems. Each invocation of a new DB2 primary option menu
panel constitutes another hierarchy of DB2 related panels.
Note that if a DB2 primary option menu panel is already open for the SSN=name, then no new connection is made and the DB2
panel hierarchy that exists for that SSN is used instead.
2013-11-13 13:06:41
SELCOPY/i Reference and User Guide
302
DB2 Utilities
DB2 Primary Option Menu
Figure 178. DB2 Primary Option Menu Panel.
Menu Bar Items
File
The File drop-down menu contains the single item, Exit, to close the panel and, if the last panel open in the current DB2
panel hierarchy, close (disconnect) the connection to the relevant DB2 subsystem.
Help
Open the general help for the DB2 Primary Option menu panel.
Options
1. DB2
2. SQL
3. Edit
4. Browse
5. Create
6. Drop
7. List
8. Audit
Execute DB2 Commands
Execute SQL Statements
Edit Tables and Views
Browse Tables and Views
Create DB2 Objects
Drop DB2 Objects
List DB2 Objects
Audit Trail Functions
Panel Input/Output Fields
User:
An output field displaying the user's userid.
Version:
An output field displaying the version of SELCOPY/i.
Date:
An output field displaying the current date.
Time:
An output field displaying the current time.
OpSys:
An output field displaying the operating system release.
DB2 SubSystem>
An input field identifying the DB2 subsystem to which a connection will be made. SELCOPY/i DB2 functions and panels
will operate on objects defined in this subsystem. A connection will not be attempted until <Enter> is hit or the panel
window is repainted (e.g. as a result of actioning a PFKey.)
The ZZS2PRIM internal field name for DB2 Subsystem is SSN.
Current SQLID>
2013-11-13 13:06:41
SELCOPY/i Reference and User Guide
303
DB2 Utilities
Panel Input/Output Fields
An input field that sets the SQL authorisation ID for this particular hierarchy of DB2 panels' access to DB2. This value is
the initial value of the DB2 special register CURRENT SQLID that is provided on the DB2 connection. See the IBM
publication "DB2 SQL Reference" for further information on CURRENT SQLID and its usage with dynamically prepared
SQL statements.
Changing the contents of this input field following connection will change the CURRENT SQLID for subsequent functions
executed via panels in this DB2 panel hierarchy. To do this, the user requires appropriate DB2 authorisation to use the
new value. (See the IBM publication "DB2 Administration Guide" for further information.)
The default value for Current SQLID is the user's TSO or SELCOPY/i VTAM logon id.
The ZZS2PRIM internal field name for Current SQLID is SQLID.
DB2 Version:
An output field displaying the version of DB2 for the connected DB2 subsystem. Note that DB2 version 9 is the earliest
release supported by SELCOPY/i DB2.
Create Audit File>
An option check box that indicates that SELCOPY/i DB2 auditing will occur for actions performed in this DB2 panel
hierarchy. Note that auditing of DB2 table edit views is managed separately and is not affected by this check box setting.
If Create Audit File is selected, an audit log file will be allocated immediately before attempting to connect to the DB2
subsystem and closed when the connection is dropped.
See Audit Trail Functions for details of SELCOPY/i DB2 auditing.
Execute DB2 Commands
The Execute DB2 Commands panel (ZZS2XDB2) is an interactive panel window, opened on selection of option 1. in the DB2
Primary options menu or on execution of the DCMD command.
This panel provides facility to execute DB2 and related commands to the connected DB2 subsystem and view the command
output. (See the IBM publication "DB2 Command Reference" for further information.) The individual user must have the required
level of authority in order to successfully execute a DB2 command.
Output from the DB2 command execution is displayed in a scrollable list window within the panel. The list consists of a single
column with header "Output".
The Output data reports the DB2 command executed; the return and reason code received on execution of the DB2 command; the
instrumentation facility interface (IFI) return and reason code; and the number of bytes returned/not returned. If number of bytes
not returned is greater than zero, then this value indicates the amount of additional buffer space required to display the complete
output from the command.
2013-11-13 13:06:41
SELCOPY/i Reference and User Guide
304
DB2 Utilities
Execute DB2 Commands
Figure 179. Execute DB2 Commands Panel.
Menu Bar Items
See List Window menu for description of menu bar items.
Field Entries
Command>
An input field in which the DB2 command is entered.
The ZZS2XDB2 internal field name for Command is DB2CMD.
Byte Limit>
An input field defining the maximum size of the DB2 command output data buffer.
If set to 0 (zero), then there is no limit to the output buffer size.
Where the length of data returned by the command exceeds the output buffer size, then error message ZZSX016W is
returned indicating the number of bytes of output data returned, and number of bytes not returned by the command.
The ZZS2XDB2 internal field name for Byte Limit is LIMIT.
Execute SQL Statements
The Execute SQL Statements panel (ZZS2XSQL) is an interactive panel window, opened on selection of option 2. in the DB2
Primary options menu or on execution of the DSQL command.
This panel provides facility to execute SQL statements to the connected DB2 subsystem and view the statement output. (See the
IBM publication "SQL Reference" for further information.) The individual user must have the required level of authority in order to
successfully execute a SQL statement.
Note that, whereas the Execute SQL Statements panel uses the SELCOPY/i DB2 plan (default CBLPLAN1) to execute the
prepared SQL statement, the DB2 Dynamic SQL window may be used to perform the same operation using the SELCOPY batch
program DB2 plan (default CBLPLAN0). This alternative method of executing DB2 SQL statements has the additional benefit of
being able to process one or more SQL statements provided via an input contol file.
2013-11-13 13:06:41
SELCOPY/i Reference and User Guide
305
DB2 Utilities
Execute SQL Statements
Output from the SQL statement execution is displayed in a scrollable list window within the panel.
The format of the list output depends on the type of SQL statement executed. Successful execution of SQL query (SELECT)
statements will display the selected results table columns and rows. The list column headers are the results table column names.
All other SQL statements display a report of SQL messages detailing successful or unsuccessful execution. The message text
output are rows of a list with the single column header, "Result".
See the IBM publications "DB2 Messages" and "DB2 Codes" for DSN prefixed messages and SQL error codes.
Figure 180. Execute SQL Statements Panel - SQL Query.
Figure 181. Execute SQL Statements Panel.
Menu Bar Items
See List Window menu for description of menu bar items.
2013-11-13 13:06:41
SELCOPY/i Reference and User Guide
306
DB2 Utilities
Field Entries
Field Entries
Statement>
An input field in which the SQL statement is entered.
The ZZS2XSQL internal field name for Statement SQLCMD.
Row Limit>
Limit the number of rows to selected by an SQL query (SELECT) statement. Once the limit threshold has been reached,
no further attempt is made to retrieve selected rows of data.
If set to 0 (zero), then there is no limit to the number of rows retrieved from the results table.
The ZZS2XSQL internal field name for Row Limit is LIMIT.
Edit Tables and Views
The Edit Object panel (ZZS2EDIT) is an interactive panel window, opened on selection of option 3. in the DB2 Primary options
menu or on issuing prefix command "E" in a DB2 table/view/alias/synonym list.
This panel allows the user to configure DB2 table edit and data management options prior to loading rows from the DB2 results
table and presenting the column data in an SDE edit view. General features of the SDE editor and features specific to SDE DB2
table edit views are documented in detail in the SELCOPY/i Structured Data Editor (SDE) manual.
Having configured the input fields, select "Run" from the menu bar or hit <Enter> to execute the table edit. Prior to editing the table
data, SELCOPY/i will open a new connection to the DB2 subsystem specified by the DB2 Primary option menu panel and, if
selected, will allocate a new audit log data set. This isolates actions specific to the DB2 table edit from all other DB2 actions and
table editing performed on the subsystem.
Figure 182. DB2 Edit Object Panel.
2013-11-13 13:06:41
SELCOPY/i Reference and User Guide
307
DB2 Utilities
Menu Bar Items
Menu Bar Items
File
The File drop-down menu contains the single item, Exit, to close the panel and, if the last panel open in the current DB2
panel hierarchy, close (disconnect) the connection to the relevant DB2 subsystem.
Run
Executes the table edit for the specified input field parameters.
Hitting <Enter> will perform the same action.
Command
Opens a text edit view for a temporary data set containing the SDE EDIT command syntax generated for the selected
input field values. The command text is in a format suitable for execution by positioning the cursor on the first line of the
text and hitting <F16>. (i.e. using the ACTION facility.)
Help
Open the general help for the DB2 Edit Object panel.
Field Entries
DB2 Object:
Fields that together identify the DB2 table or view in the current location which is to be edited.
Owner>
The owner of the required table or view.
Name>
The name of the required table or view.
Row/Column Selection Options:
Fields that together identify the DB2 results table rows and columns to be edited and the order in which they appear.
From>
Specifies the row number of the first row to be displayed for edit in the DB2 results table returned by the SQL
query. This row becomes row 1 within the SDE window edit view. Rows that occur before this row number are
not included within the edit session.
Default is row 1.
For>
Specifies the maximum number of rows to be displayed from the DB2 results table returned by the SQL query.
Rows that fall outside the range of rows identified by the From and For fields are not included within the edit
session.
Default is to display all selected rows.
Select>
Specifies a DB2 SQL SELECT clause to be included in the prepared SQL select statement from which the DB2
results table is derived. See "DB2 SQL Reference" for syntax of the SQL select clause.
Where>
Specifies a DB2 SQL WHERE clause to be included in the prepared SQL select statement from which the DB2
results table is derived. See "DB2 SQL Reference" for syntax of the SQL where clause.
Order By>
Specifies a DB2 SQL ORDER BY clause to be included in the prepared SQL select statement from which the
DB2 results table is derived. See "DB2 SQL Reference" for syntax of the SQL order-by clause.
COMMIT Options:
Identifies when a DB2 COMMIT should be performed for changed table data. Mutually exclusive options are as follow:
◊ Commit on SAVE with no errors
COMMIT when SAVE is executed without errors. This option is default.
◊ Commit on SAVE
COMMIT when SAVE is executed regardless of any save errors.
2013-11-13 13:06:41
SELCOPY/i Reference and User Guide
308
DB2 Utilities
Field Entries
◊ Commit on exit from edit session
COMMIT only when closing the last edit view of the table data.
Load Options:
Options relating to actions performed at load of results table rows.
Skip locked rows
This option field is ignored unless an isolation level of Cursor Stability (CS) or Read Stability (RS) is in effect.
Skip locked rows indicates that any selected rows that are already locked by another process should be skipped
and are not included in the edit display. See "DB2 SQL Reference" for details on the SKIP LOCKED DATA
clause.
Default is to allow display of locked rows whenever possible.
Execute Commit following load
Indicates that a COMMIT is to be performed following the initial load of the results table rows selected for edit,
thus releasing all DB2 table locks performed during load of the data. This includes any explicit table locks that
may have been applied.
Default is not to perform a COMMIT following load of the table rows.
Explicit Table Lock:
Applicable to edit of DB2 base tables only, indicates whether or not a DB2 SQL LOCK TABLE command should be
executed before loading rows from the table and, if so, the mode of lock to be performed.
Note that caution should be taken when selecting a table locking option as other users and applications may be
prevented from accessing the table. If the table is locked then the lock is held until the next COMMIT is actioned. See
"DB2 SQL Reference" for details on the effects of LOCK TABLE options.
Mutually exclusive options are as follow:
◊ None
No explict table locking prior to load. This option is default.
◊ Share mode
Share mode table locking prevents anything other than read-only operations from being performed on the table
whilst the lock is in effect.
◊ Exclusive mode
Unless a process is running with an isolation level of Uncommitted Read (UR) in which case read-only (dirty
read) operations may be performed, exclusive mode table locking prevents another process from performing any
operation on the table whilst the lock is in effect.
Concurrency (Isolation) Options:
Specifies a DB2 SQL isolation-clause to be included in the prepared SQL select statement. See "DB2 SQL Reference" for
details on the SQL Isolation clause and "DB2 Performance Monitoring and Tuning Guide" for details on the effects of
isolation level on concurrency and protection of DB2 table data.
Mutually exclusive options are as follow:
◊ Use DB2 Default Isolation level
The default isolation level as set by the BIND of the SELCOPY/i DB2 package and plan. (See sample job
ZZSDB2B which sets default isolation of Cursor Stability.)
◊ Uncommitted Read
Uncommitted Read (UR) acquires few locks but may result in edit of uncommitted data.
◊ Cursor Stability
Cursor Stability (CS) allows maximum concurrency with data integrity.
This isolation method will realease a lock for a row after it has been read. If an attempt is made to update or
delete a row (on save), then the row is locked, the predicate re-evaluated to ensure that it still qualifies for the
results table and only then, if values match, is the row updated or deleted.
◊ Read Stability
Read Stability (RS) locks only those rows that satisfy the results table predicate, releasing the locks only when a
COMMIT is performed. Rows that do not satisfy the predicate are eligible for update or delete by other
applications. New rows may also be inserted by other applications.
The mode of lock performed on the rows is indicated by the Use/Keep Locks options.
◊ Repeatable Read
Repeatable Read (RR) is most restrictive since it prevents other applications from performing update, insert or
delete even on rows that do not satisfy the results table predicate. Locks on all accessed rows are held until a
COMMIT is performed.
The mode of lock performed on the rows is indicated by the Use/Keep Locks options.
2013-11-13 13:06:41
SELCOPY/i Reference and User Guide
309
DB2 Utilities
Browse Tables and Views
Use/Keep Locks:
Applicable only if isolation level Read Stability or Repeatable Read is selected, this option identifies the mode of lock to be
used and kept on locked pages and rows.
Mutually exclusive options are as follow:
◊ None
Use and keep a row using the default lock mode.
◊ Share
Concurrent processes can read but not change the locked row and may acquire SHARE or UPDATE mode locks
on the row.
◊ Update
Concurrent processes can acquire a SHARE mode lock on the row and may only read the data without acquiring
a page or row lock.
◊ Exclusive
Concurrent processes cannot acquire any mode of lock on the row.
Initial Display Format:
Identifies the initial display format of the DB2 table rows in the SDE window view.
Mutually exclusive options are as follow:
◊ Table
Display the DB2 table rows in tabular multi record view.
◊ Single
Display the DB2 table rows one at a time in single record view.
Miscellaneous Options:
Miscellanneous eidt options.
Create Audit File
Open a new SELCOPY/i DB2 audit data set to record changes to the edited table made during this edit session.
See DB2 Audit Trail Functions for details.
Do not protect Prime Key
If selected, specifies that data occupying columns that comprise the table's primary key is eligible for edit and
update.
Profile Macro:
Indicates whether or not an SDE data edit profile macro is to be executed when the SDE window view is opened and, if
so, the macro to be executed.
Mutually exclusive options are as follow:
◊ Use Default.
Use the default SDE edit profile macro (SDEPROF).
◊ Use Specified Macro.
Use an SDE edit profile macro with macro name specified by the Macro Name> field.
◊ Do not use a Profile Macro.
No SDE edit profile macro is to be executed - all edit options are default.
Macro Name>
Applicable only if option Use Specified Macro is selected. this field names the SDE edit profile macro to be executed when
the table is edited.
Browse Tables and Views
The Browse Object panel (ZZS2BROW) is an interactive panel window, opened on selection of option 4. in the DB2 Primary
options menu or on issuing prefix command "B" in a DB2 table/view/alias/synonym list.
This panel allows the user to configure DB2 table browse options prior to loading rows from the DB2 results table and presenting
the column data in an SDE window view. General features of the SDE editor and features specific to SDE DB2 table browse views
are documented in detail in the SELCOPY/i Structured Data Editor (SDE) manual.
2013-11-13 13:06:41
SELCOPY/i Reference and User Guide
310
DB2 Utilities
Menu Bar Items
Having configured the input fields, select "Run" from the menu bar or hit <Enter> to execute the table browse.
Figure 183. DB2 Browse Object Panel.
Menu Bar Items
File
The File drop-down menu contains the single item, Exit, to close the panel and, if the last panel open in the current DB2
panel hierarchy, close (disconnect) the connection to the relevant DB2 subsystem.
Run
Executes the table browse for the specified input field parameters.
Hitting <Enter> will perform the same action.
Command
Opens a text edit view of a temporary data set containing the SDE BROWSE command syntax generated for the selected
input field values. The command text is in a format suitable for execution by positioning the cursor on the first line of the
text and hitting <F16>. (i.e. using the ACTION facility.)
Help
Open the general help for the DB2 Browse Object panel.
Field Entries
DB2 Object:
Fields that together identify the DB2 table or view in the current location which is to be browsed.
Owner>
The owner of the required table or view.
Name>
The name of the required table or view.
Row Selection Options:
Fields that together identify the DB2 results table rows and columns to be browsed and the order in which they appear.
From>
Specifies the row number of the first row to be displayed for browse in the DB2 results table returned by the SQL
query. This row becomes row 1 within the SDE window view. Rows that occur before this row number are not
included within the browse session.
Default is row 1.
For>
2013-11-13 13:06:41
SELCOPY/i Reference and User Guide
311
DB2 Utilities
Field Entries
Specifies the maximum number of rows to be displayed from the DB2 results table returned by the SQL query.
Rows that fall outside the range of rows identified by the From and For fields are not included within the browse
session.
Default is to display all selected rows.
Select>
Specifies a DB2 SQL SELECT clause to be included in the prepared SQL select statement from which the DB2
results table is derived. See "DB2 SQL Reference" for syntax of the SQL select clause.
Where>
Specifies a DB2 SQL WHERE clause to be included in the prepared SQL select statement from which the DB2
results table is derived. See "DB2 SQL Reference" for syntax of the SQL where clause.
Order By>
Specifies a DB2 SQL ORDER BY clause to be included in the prepared SQL select statement from which the
DB2 results table is derived. See "DB2 SQL Reference" for syntax of the SQL order-by clause.
Initial Display Format:
Identifies the initial display format of the DB2 table rows in the SDE window view.
Mutually exclusive options are as follow:
◊ Table
Display the DB2 table rows in tabular multi record view.
◊ Single
Display the DB2 table rows one at a time in single record view.
Profile Macro:
Indicates whether or not an SDE data edit profile macro is to be executed when the SDE window view is opened and, if
so, the macro to be executed.
Mutually exclusive options are as follow:
◊ Use Default.
Use the default SDE edit profile macro (SDEPROF).
◊ Use Specified Macro.
Use an SDE edit profile macro with macro name specified by the Macro Name> field.
◊ Do not use a Profile Macro.
No SDE edit profile macro is to be executed - all edit options are default.
Macro Name>
Applicable only if option Use Specified Macro is selected. this field names the SDE edit profile macro to be executed when
the table is edited.
Create DB2 Objects
The Create DB2 Object panel (ZZS2C000) is an interactive panel window, opened on selection of option 5. in the DB2 Primary
options menu.
This panel allows the user to select the type of object to be created by entering the relevant option number or by positioning the
cursor on the required option and pressing the <Enter> key or, if configured, double-clicking the left mouse button.
Note that successful creation of some DB2 objects is dependent upon the version of DB2 used by the connected DB2 system to
which this panel applies. An SQL error message will occur if an SQL CREATE parameter field is used which is unsupported by the
DB2 version. Similarly, successful creation of individual DB2 objects is also dependent upon the user's level of authority or granted
privileges. Please refer to the relevant edition of the "z/OS SQL Reference".
Menu Bar Items
File
The File drop-down menu contains the single item, Exit, to close the panel and, if the last panel open in the current DB2
panel hierarchy, close (disconnect) the connection to the relevant DB2 subsystem.
2013-11-13 13:06:41
SELCOPY/i Reference and User Guide
312
DB2 Utilities
Menu Bar Items
Help
Open the general help for the Create DB2 Objects option menu panel.
Options
1. Storage group
2. Work File Database
3. User Database
4. Tablespace
5. Work File Tablespace
6. Base Table
7. Materialized Query Table
8. View
9. Alias
10. Synonym
11. Type
12. Trigger
13. Sequence
14. Role
Create Storage Group
The Create Storage Group panel (ZZS2CSG0) is an interactive panel window, opened on selection of option 1. in the Create DB2
Object options menu. and may be used to create a new storage group in the current server.
Having configured the input fields, select "Run" from the menu bar or hit <Enter> to execute the CREATE STOGROUP statement
in the SELCOPY/i foreground.
Menu Bar Items
File
The File drop-down menu contains the single item, Exit, to close the panel and, if the last panel open in the current DB2
panel hierarchy, close (disconnect) the connection to the relevant DB2 subsystem.
Run
Executes the SQL CREATE STOGROUP generated by the specified input field parameters.
Hitting <Enter> will perform the same action.
Command
Opens a text edit view for a temporary data set containing SQL command CREATE STOGROUP syntax generated for the
selected input field values. The command text is in a format suitable for execution by positioning the cursor on the first line
of the text and hitting <F16>. (i.e. using the ACTION facility.)
JCL
Opens a text edit view for a temporary data set containing JCL that runs program DSNTIAD (via IKJEFT01) to execute the
SQL CREATE STOGROUP statement syntax generated for the selected input field values.
Help
Open the general help for the Create Storage Group panel.
Field Entries
Storage Group Name>
The name of a new storage group to be created at the current server. Maximum length of a storage group name is 128
characters.
Volume Serial Numbers>
A volume ID or a comma separated list of volume IDs to be assigned to the storage group.
If a data set associated with the storage group is to be SMS managed, '*' (asterisk) may be specified as one of the volume
IDs in order to allow SMS to select volumes as appropriate. Use of SMS is highly recommended rather than using DB2 to
allocate data to specific volumes which would require non-SMS usage or an SMS Storage Class with guaranteed space.
Assigning an SMS Storage Class with guaranteed space is not recommended as it reduces the benefits of SMS
allocation.
A volume ID may be specified once only and the maximum number of volumes IDs in a storage group is 133. If one or
more of DATACLAS, MGMTCLAS or STORCLAS is specified, then an entry in this input field is optional and so volume
selection controlled by SMS.
This parameter field corresponds to SQL CREATE STOGROUP parameter VOLUMES
Catalog name or ALIAS>
2013-11-13 13:06:41
SELCOPY/i Reference and User Guide
313
DB2 Utilities
Field Entries
Specifies the ICF catalog in which DB2 data sets will be cataloged.
The ICF catalog name or catalog alias has a maximum length of 8 characters and its specification is mandatory.
This parameter field corresponds to SQL CREATE STOGROUP parameter VCAT.
Associated SMS Classes:
Applicable to SMS controlled volume selection only.
DATACLAS>
The name of the SMS data class to be associated with the DB2 storage group. (Maximum length 8 characters).
This parameter field corresponds to SQL CREATE STOGROUP parameter DATACLAS.
MGMTCLAS>
The name of the SMS management class to be associated with the DB2 storage group. (Maximum length 8
characters).
This parameter field corresponds to SQL CREATE STOGROUP parameter MGMTCLAS.
STORCLAS>
The name of the SMS storage class to be associated with the DB2 storage group. (Maximum length 8
characters).
This parameter field corresponds to SQL CREATE STOGROUP parameter STORCLAS.
Create Work File Database
The Create Work File Database panel (ZZS2CDBW) is an interactive panel window, opened on selection of option 2. in the Create
DB2 Object options menu. Applicable only in a data sharing environment, this panel may be used to create the one and only work
file database in the current DB2 subsystem.
Having configured the input fields, select "Run" from the menu bar or hit <Enter> to execute the CREATE DATABASE AS
WORKFILE statement in the SELCOPY/i foreground.
Menu Bar Items
File
The File drop-down menu contains the single item, Exit, to close the panel and, if the last panel open in the current DB2
panel hierarchy, close (disconnect) the connection to the relevant DB2 subsystem.
Run
Executes the SQL CREATE DATABASE generated by the specified input field parameters.
Hitting <Enter> will perform the same action.
Command
Opens a text edit view for a temporary data set containing SQL command CREATE DATABASE syntax generated for the
selected input field values. The command text is in a format suitable for execution by positioning the cursor on the first line
of the text and hitting <F16>. (i.e. using the ACTION facility.)
JCL
Opens a text edit view for a temporary data set containing JCL that runs program DSNTIAD (via IKJEFT01) to execute the
SQL CREATE DATABASE statement syntax generated for the selected input field values.
Help
Open the general help for the Create Work File Database panel.
Field Entries
Database Name>
The name of the new work file database.
The database name has a maximum length of 8 characters and must not be DSN%%%%% (where '%' is any single
character).
Storage Group name>
2013-11-13 13:06:41
SELCOPY/i Reference and User Guide
314
DB2 Utilities
Field Entries
The name of the default storage group to be used as required when allocating data sets for database table spaces and
indexes.
The maximum length of a storage group name is 128 characters and, if not specified, defaults to SYSDEFLT.
This parameter field corresponds to SQL CREATE DATABASE parameter STOGROUP.
Create for Member>
Specifies the DB2 data sharing member name of the DB2 subsystem for which this work file database applies.
The maximum length of a member name is 8 characters and, if not specified, defaults to the member name of the current
DB2 subsystem.
This parameter field corresponds to SQL CREATE DATABASE parameter FOR.
Buffer Pool names:
Default buffer pools to be used for table spaces and indexes created in the database.
Table Spaces>
Specifies the default buffer pool name to be used for table spaces.
Possible buffer pool names are BPn (n=0 to 49) which correspond to buffer pools of size 4K.
If not specified, the buffer pool specified for user data in installation panel DSNTIP1 is used.
This parameter field corresponds to SQL CREATE DATABASE parameter BUFFERPOOL.
Indexes>
Specifies the default buffer pool name to be used for indexes.
Possible buffer pool names are BPn (n=0 to 49), BP8Kn, BP16Kn (n=0 to 9) and BP32K or BP32Kn (n=1 to 9).
These correspond to buffer pools of size 4K, 8K, 16K and 32K respectively.
If not specified, the buffer pool specified for user indexes in installation panel DSNTIP1 is used.
This parameter field corresponds to SQL CREATE DATABASE parameter INDEXBP.
Create User Database
The Create User Database panel (ZZS2CDBU) is an interactive panel window, opened on selection of option 3. in the Create DB2
Object options menu. This panel may be used to create a user database in the current DB2 subsystem.
Having configured the input fields, select "Run" from the menu bar or hit <Enter> to execute the CREATE DATABASE statement in
the SELCOPY/i foreground.
Menu Bar Items
File
The File drop-down menu contains the single item, Exit, to close the panel and, if the last panel open in the current DB2
panel hierarchy, close (disconnect) the connection to the relevant DB2 subsystem.
Run
Executes the SQL CREATE DATABASE generated by the specified input field parameters.
Hitting <Enter> will perform the same action.
Command
Opens a text edit view for a temporary data set containing SQL command CREATE DATABASE syntax generated for the
selected input field values. The command text is in a format suitable for execution by positioning the cursor on the first line
of the text and hitting <F16>. (i.e. using the ACTION facility.)
JCL
Opens a text edit view for a temporary data set containing JCL that runs program DSNTIAD (via IKJEFT01) to execute the
SQL CREATE DATABASE statement syntax generated for the selected input field values.
Help
Open the general help for the Create User Database panel.
2013-11-13 13:06:41
SELCOPY/i Reference and User Guide
315
DB2 Utilities
Field Entries
Field Entries
Database Name>
The name of the new user database.
The database name has a maximum length of 8 characters and must not be DSN%%%%% (where '%' is any single
character) and must not begin with DSNDB.
Storage Group name>
The name of the default storage group to be used as required when allocating data sets for database table spaces and
indexes.
The maximum length of a storage group name is 128 characters and, if not specified, defaults to SYSDEFLT.
This parameter field corresponds to SQL CREATE DATABASE parameter STOGROUP.
Buffer Pool names:
Default buffer pools to be used for table spaces and indexes created in the database.
Table Spaces>
Specifies the default buffer pool name to be used for table spaces.
Possible buffer pool names are BPn (n=0 to 49), BP8Kn, BP16Kn (n=0 to 9) and BP32K or BP32Kn (n=1 to 9).
These correspond to buffer pools of size 4K, 8K, 16K and 32K respectively.
If not specified, the buffer pool specified for user data in installation panel DSNTIP1 is used.
This parameter field corresponds to SQL CREATE DATABASE parameter BUFFERPOOL.
Indexes>
Specifies the default buffer pool name to be used for indexes.
Possible buffer pool names are BPn (n=0 to 49), BP8Kn, BP16Kn (n=0 to 9) and BP32K or BP32Kn (n=1 to 9).
These correspond to buffer pools of size 4K, 8K, 16K and 32K respectively.
If not specified, the buffer pool specified for user indexes in installation panel DSNTIP1 is used.
This parameter field corresponds to SQL CREATE DATABASE parameter INDEXBP.
Database Encoding:
Default encoding scheme for table spaces created in the database. Mutually exclusive options are as follow:
◊ Default
Data must be encoded using the default CCSIDs as defined by the DEF ENCODING SCHEME value specified in
the installation panel DSNTIPF.
◊ EBCDIC
Data must be encoded using the EBCDIC CCSIDs of the server.
◊ ASCII
Data must be encoded using the ASCII CCSIDs of the server.
◊ UNICODE
Data must be encoded using the UNICODE CCSIDs of the server.
Create Work File Table Space
The DB2 Create Work File Table Space sequence of panel views (ZZS2CTSW) generate an SQL CREATE TABLESPACE
statement to create a new table space in the selected work file database in the current DB2 subsystem.
The DB2 Create Work File Table Space panel views and their sub-panels are interactive panel windows (window class
WINWIPO0) and may be started via the following:
• Select Work File Table Space option 5. in the SELCOPY/i DB2 Create Objects option menu. (DB2 5.5)
By default, field entries are populated with arguments and options that were entered the last time the panels were used.
Field values and options may be selected in the focus panel before progressing to the next panel view in the sequence (NEXT).
Progressing forwards from the last panel view in the sequence will generate the SQL CREATE TABLESPACE syntax.
Options and field entries specified in panel views that have been visited may be changed simply by navigating backwards along the
view sequence (BACK) before proceding forwards again.
2013-11-13 13:06:41
SELCOPY/i Reference and User Guide
316
DB2 Utilities
Work File Table Space Values
Work File Table Space Values
Enter the name of the new work file table space, table space data set attributes, data buffer pool and segment size. Enter a wild
card in to select the work file database in the current DB2 server in which the table space will be created. The current DB2
subsystem is displayed in the panel window title bar.
Having entered the required values, proceed to the Generate SQL panel view which is common to all DB2 create obect panels.
Figure 184. DB2: Create Work File Table Space - Values.
Menu Bar Items
The following menu bar items are common to all Create Table Space panel views and sub-panels.
File
The File drop-down menu contains the single item "Exit" which simply closes the panel and, if the last panel open in the
current DB2 panel hierarchy, close (disconnect) the connection to the relevant DB2 subsystem. Note that, unlike
CANCEL, CLOSE will save field values that have been entered in the panel views so far. These values may be
redisplayed the next time the panel is opened.
Help
Display help for this panel view.
Work File Table Space Values - Panel Fields
Table Space Name>
Mandatory field which specifies the name of the table space to be created.
A table space name has a maximum length of 8 characters.
In Work File DataBase>
Mandatory field which specifies the name of the work file database in which the table space will be created.
The database name may include a wildcard character "%" (percent) or "*" (asterisk) representing zero or more characters,
or wildcard character "_" (underscore) representing a single character of the database name. If this is the case, a Select
Database panel is displayed containing a list of eligible database names which satisfy the database name filter.
Use prefix command "S", or press the <Enter> key on the required entry to select it.
A database name has a maximum length of 8 characters.
Model Table Space>
Optionally specifies the name of a table space from which values for the new table space may be modelled.
The model table space name may include a wildcard character "%" (percent) or "*" (asterisk) representing zero or more
characters, or wildcard character "_" (underscore) representing a single character of the table space name. If this is the
case, a Select Tablespace panel is displayed containing a list of eligible tablespace names which satisfy the model table
space filters.
2013-11-13 13:06:41
SELCOPY/i Reference and User Guide
317
DB2 Utilities
Work File Table Space Values - Panel Fields
Use prefix command "S", or press the <Enter> key on the required entry to select it. Having selected a model table space
name the values assigned to the panel fields will be updated accordingly.
Table Space Data sets:
Enter "/" to select the method by which table space data set will be managed and enter values appropriate to the selected
method. Options are as follow:
◊ DB2 managed
Specifies that DB2 will define and manage the data sets for the table space. Each data set will be defined on a
volume of the identified storage group with primary and secondary allocations sizes defined by the Primary and
Secondary Alloc fields respectively.
◊ User managed
Specifies that table space data sets are to be managed by the user. Table space data sets are linear VSAM data
sets cataloged in an ICF catalog identified by the catalog name/alias degfined by the Catalg Alias field.
Storage Group>
Mandatory field for DB2 managed data sets which specifies the name of a storage group defined in the current DB2
server.
The storage group name may include a wildcard character "%" (percent) or "*" (asterisk) representing zero or more
characters, or wildcard character "_" (underscore) representing a single character of the storage group name. If this is the
case, a Select Storage Group panel is displayed containing a list of eligible storage groups which satisfy the name filter.
Use prefix command "S", or press the <Enter> key on the required entry to select it.
Primary Alloc>
Mandatory field for DB2 managed data sets which specifies the minimum primary allocation size in KB for the table space
data set.
A value of -1 indicates to DB2 that it should use a value based on system defaults. A value other than -1 may be adjusted
by DB2 to satisfy minimum requirements for the associated buffer pool page size.
Secondary Alloc>
Mandatory field for DB2 managed data sets which specifies the minimum secondary allocation size in KB for the table
space data set.
A value of -1 indicates to DB2 that it should use a value based on system defaults.
Action on DROP>
Enter "/" to select whether or not the table space data set will be erased when the table space is deleted on execution of a
utility or dropped using an SQL statement.
Catalog Alias>
Mandatory field for User managed data sets which specifies the name or alias of the ICF catalog in which the table space
data sets are to be cataloged.
The catalog alias name may be selected from the Select Catalog Alias panel.
Buffer Pool>
Specifies the 4K or 32K buffer pool name to be used for the table space and so determines the table space page size.
Enter blanks or any invalid value to select from a list of valid buffer pool names.
Segment Size>
Specifies an integer value (4-64) which defines the size of table space segments. The size corresponds to a number of
pages to be assigned to each segment.
Note that an invalid value will be rounded to a multiple of 4 in the range 4 to 64 inclusive.
Create User Table Space
The DB2 Create User Table Space sequence of panel views (ZZS2CTS0) generate an SQL CREATE TABLESPACE statement to
create a new table space within the selected database of the current DB2 subsystem.
The DB2 Create User Table Space panel views and their sub-panels are interactive panel windows (window class WINWIPO0) and
may be started via the following:
• Select User Table Space option 4. in the SELCOPY/i DB2 Create Objects option menu. (DB2 5.4)
By default, field entries are populated with arguments and options that were entered the last time the panels were used.
The panel views are displayed in a sequence based on choices made in a the panel views. Field values and options may be
selected in the focus panel before progressing to the next panel view in the sequence (NEXT). Progressing forwards from the last
2013-11-13 13:06:41
SELCOPY/i Reference and User Guide
318
DB2 Utilities
Create User Table Space
panel view in the sequence will generate the SQL CREATE TABLESPACE syntax.
Options and field entries specified in panel views that have been visited may be changed simply by navigating backwards along the
view sequence (BACK) before proceding forwards again.
Table Space Name & Type
Enter the name of the new table space, its type and, optionally, the name of the database in the current DB2 server in which the
table space will be created. The current DB2 subsystem is displayed in the panel window title bar.
Figure 185. DB2: Create Table Space - Name & Type.
Menu Bar Items
The following menu bar items are common to all Create Table Space panel views and sub-panels.
File
The File drop-down menu contains the single item "Exit" which simply closes the panel and, if the last panel open in the
current DB2 panel hierarchy, close (disconnect) the connection to the relevant DB2 subsystem. Note that, unlike
CANCEL, CLOSE will save field values that have been entered in the panel views so far. These values may be
redisplayed the next time the panel is opened.
Help
Display help for this panel view.
Table Space Name & Type - Panel Fields
Table Space Name>
Mandatory field which specifies the name of the table space to be created.
A table space name has a maximum length of 8 characters.
In DataBase>
Optional field which specifies the name of the user database in which the table space will be created.
The database name may include a wildcard character "%" (percent) or "*" (asterisk) representing zero or more characters,
or wildcard character "_" (underscore) representing a single character of the database name. If this is the case, a Select
Database panel is displayed containing a list of eligible database names which satisfy the database name filter.
Use prefix command "S", or press the <Enter> key on the required entry to select it. Having selected a database, if no
modelling has occurred, then table space buffer pool name, DB2 storage group and CCSID encoding scheme defaults will
be updated to values defined for the database.
A database name has a maximum length of 8 characters. The default database is DSNDB04.
Model Table Space>
Optionally specifies the name of a table space from which values for the new table space may be modelled.
2013-11-13 13:06:41
SELCOPY/i Reference and User Guide
319
DB2 Utilities
Table Space Name & Type - Panel Fields
The model table space name may include a wildcard character "%" (percent) or "*" (asterisk) representing zero or more
characters, or wildcard character "_" (underscore) representing a single character of the table space name. If this is the
case, a Select Tablespace panel is displayed containing a list of eligible tablespace names which satisfy the model table
space filters.
Use prefix command "S", or press the <Enter> key on the required entry to select it. Having selected a model table space
name the values assigned to the panel fields will be updated accordingly.
Model Database>
Optionally specifies the name of a database which is used in conjunction with the model table space field value to filter the
list of model table space names presented to the user.
Model TSType:
A non-enterable field which identifies the type of table space selected from which the new table space will be modelled.
Possible table space type descriptions are as follow:
◊ Segmented
The selected table space is an exclusively segmented (non-partitioned) table space.
◊ Partitioned.
The selected table space is an exclusively partitioned (non-segmented) table space.
◊ Universal Partition-by-Growth.
The selected table space is a universal (partioned and segmented) partitioned-by-growth table space. Partitions
added as the table space grows.
◊ Universal Partition-by-Range.
The selected table space is a universal (partitioned and segmented) partitioned-by-range table space. All
partitions defined and data clustered based on partitioning key column values.
◊ LOB Table Space
The selected table space is a LOB table space. LOB table spaces must exist in the same database as the
tablespace in which the LOB column is defined.
Table Space Type:
Enter "/" to select the type of table space to be defined.
If modelling has occurred, then this option will match that of the modelled table space but may still be updated by the user.
This allows the user to create a table space of a different type to that of the model table space but still use its attributes
where applicable. e.g. Create a new Universal Partition-by-Growth modelled on values from a Segmented table space for
migration purposes.
Options are as described for Model TSType above.
Table Space Type Attributes
The table space attributes panel view is the next view in the sequence, displayed following the Table Space Name & Type panel
view. The contents of the panel view include only those fields that are applicable to the selected table space type.
The panel view header displays one of the following types:
• Segmented Table Space
• Partitioned Table Space
• Universal Part-by-Growth
• Universal Part-by-Range
• LOB Table Space
2013-11-13 13:06:41
SELCOPY/i Reference and User Guide
320
DB2 Utilities
Table Space Type Attributes
Figure 186. DB2: Create Table Space - Type attributes.
Table Space Type Attributes - Panel Fields
Note that of the panel fields described below, only those that are applicable to the selected table space type will be displayed.
TableSpace:
A non-enterable field displaying the new table space name as supplied in the Table Name & Type panel view.
In DataBase:
A non-enterable field displaying the database in which the new table space will be created, as supplied in the Table Name
& Location panel view.
Data set Size>
Not applicable to exclusively Segmented table space type.
Specifies the maximum size in gigabytes of each table space partition or LOB table space data set. For sizes greater 4G,
the data sets must be associated with an SMS DATACLAS that has been defined with extended format and extended
addressability.
Enter blanks or any invalid value to select from a list of valid data set sizes.
Table Space Data sets:
Enter "/" to select the method by which table space data set will be managed and enter values appropriate to the selected
method. Options are as follow:
◊ DB2 managed
Specifies that DB2 will define and manage the data sets for the table space. Each data set will be defined on a
volume of the identified storage group with primary and secondary allocations sizes defined by the Primary and
Secondary Alloc fields respectively.
◊ User managed
Specifies that table space data sets are to be managed by the user. Table space data sets are linear VSAM data
sets cataloged in an ICF catalog identified by the catalog name/alias degfined by the Catalg Alias field.
Note that this option is not available for Universal Partition-by-Growth table space type.
Storage Group>
Mandatory field for DB2 managed data sets which specifies the name of a storage group defined in the current DB2
server.
The storage group name may include a wildcard character "%" (percent) or "*" (asterisk) representing zero or more
characters, or wildcard character "_" (underscore) representing a single character of the storage group name. If this is the
case, a Select Storage Group panel is displayed containing a list of eligible storage groups which satisfy the name filter.
Use prefix command "S", or press the <Enter> key on the required entry to select it.
Primary Alloc>
Mandatory field for DB2 managed data sets which specifies the minimum primary allocation size in KB for the table space
data set.
A value of -1 indicates to DB2 that it should use a value based on system defaults. A value other than -1 may be adjusted
by DB2 to satisfy minimum requirements for the associated buffer pool page size.
2013-11-13 13:06:41
SELCOPY/i Reference and User Guide
321
DB2 Utilities
Table Space Type Attributes - Panel Fields
Secondary Alloc>
Mandatory field for DB2 managed data sets which specifies the minimum secondary allocation size in KB for the table
space data set.
A value of -1 indicates to DB2 that it should use a value based on system defaults.
Action on DROP>
Enter "/" to select whether or not the table space data set or partition data set will be erased when the table space is
deleted on execution of a utility or dropped using an SQL statement.
Define on CREATE>
Enter "/" to select whether the table space data set or partition data sets will be allocated when the table space is created
(Yes) or delayed until data is inserted into the table space.
Catalog Alias>
Mandatory field for User managed data sets which specifies the name or alias of the ICF catalog in which the table space
data sets are to be cataloged.
The catalog alias name may be selected from the Select Catalog Alias panel.
Buffer Pool>
Specifies the 4K, 8K, 16K or 32K buffer pool name to be used for the table space and so determines the table space page
size.
This field is usually initialised to be a value modelled on the model table space or the database default value. If a defualt
value could not be determined from either of these sources, then "Default" is selected. "Default" will result in no
BUFFERPOOL value being specified in the resultant CREATE TABLESPACE statement.
Enter blanks or any invalid value to select from a list of valid buffer pool names.
Segment Size>
Not applicable to exclusively Partitioned table space type.
Specifies an integer value (4-64) which defines the size of table space segments. The size corresponds to a number of
pages to be assigned to each segment.
Note that an invalid value will be rounded to a multiple of 4 in the range 4 to 64 inclusive.
#Partitions>
Not applicable to exclusively Segmented or Universal Partition-by-Growth table space types.
Specifies an integer value (1-4096) which defines the number of range partitioned table space partitions.
The maximum number of partitions that can be specified depends on the selected buffer pool (page size) and data set
size. Specifying a number of partitions that exceeds the maximum will return an error. See IBM publication "DB2 SQL
Reference", "CREATE TABLESPACE" for partition number limits.
Max Partitions>
Applicable only to Universal Partition-by-Growth table space type.
Specifies an integer value (1-4096) which defines the maximum number of table space partitions that may be allocated as
the table grows.
The maximum number of partitions that can be specified depends on the selected buffer pool (page size) and data set
size. Specifying a number of partitions that exceeds the maximum will return an error. See IBM publication "DB2 SQL
Reference", "CREATE TABLESPACE" for partition number limits.
Partition data set attributes
Not applicable to exclusively Segmented or Universal Partition-by-Growth table space types.
Select this option if attributes are to be specified for individual partition data sets. If this option is not selected, than all
partitions will be allocated with attributes specified under Table Space data sets: in this panel view.
Having selected this option, the Table Space Partition Attributes sub-panel will be displayed. This will occur until at least
one partition's attributes has been configured and that partition selected from the sub-panel.
Primary command SELECT (assigned to F5 by default) will also display this sub-panel and select this option field.
Do not use clustering index (Member Cluster)
Applicable only to exclusively Partitioned table space type.
Select this option if data inserted by an insert operation is not to be clustered by the implicit or explicit clustering index.
DB2 will, instead, locate the data in the table space based on available space (MEMBER CLUSTER).
2013-11-13 13:06:41
SELCOPY/i Reference and User Guide
322
DB2 Utilities
Table Space Partition Attributes
Table Space Partition Attributes
The Table Space Partition Attributes sub-panel is displayed on executing the SELECT primary command or by selecting option
Partition data set attributes in the Table Space Type Attributes panel view.
This sub-panel contains an embedded table of DB2 table space partitions and their data set attributes. The table is for update only
so that rows may not be manipulated using the standard table editing techniques. The table of partition attributes may be reset by
updating the #Partitions field value in the Table Space Type Attributes panel view.
Each table row identifies a partition of the table space. Zoom of an individual row displays a formatted view of the row data.
Figure 187. DB2: Create Table Space - Table Space Partition Attributes.
Table Space Partition Attributes - Panel Fields
TableSpace:
A non-enterable field displaying the new table space name as supplied in the Table Name & Type panel view.
In DataBase:
A non-enterable field displaying the database in which the new table space will be created, as supplied in the Table Name
& Location panel view.
Partition Number: (Ptn)
A non-enterable field displaying the table space partition number.
Sel> (Sel)
Enter "/" (slash) or any non-blank character in this field to include (select) the attributes for the partition number in the
create table space syntax. A blank in this field will exclude (deselect) the partition attributes.
Deselecting a column definition in table view has the same effect as executing the table primary command EXCLUDE (or
line command "X") to exclude the table row.
Table Space data sets: (Using)
A value of STOGROUP or VCAT representing options "DB2 Managed" or "User Managed" respectively.
Options are as described for the Table Space Data sets: field of the Table Space Type Attributes panel view.
Storage Group> (StoGroup/Catalog)
Storage Group value as described for the Storage Group field of the Table Space Type Attributes panel view.
Primary Alloc> (Pri (KB) )
Primary allocation value as described for the Primary Alloc field of the Table Space Type Attributes panel view.
Secondary Alloc> (Sec (KB) )
Secondary allocation value as described for the Secondary Alloc field of the Table Space Type Attributes panel view.
2013-11-13 13:06:41
SELCOPY/i Reference and User Guide
323
DB2 Utilities
Table Space Partition Attributes - Panel Fields
Action on DROP> (Erase)
Data set erase option as described for the Action on DROP field of the Table Space Type Attributes panel view.
Catalog Alias> (StoGroup/Catalog)
Catalog alias name as described for the Catalog Alias field of the Table Space Type Attributes panel view.
Free page frequency> (Free Page)
Number of pages loaded after which a page of free space will be left. This is as described for the Free page frequency
field of the Table Space Options (2/2) panel view.
Percent free/page> (Free Pcnt)
Percentage of space left free per page as described for the Percent free/page field of the Table Space Options (2/2) panel
view.
Track Changes> (Track)
Option to track changes to data as described for the Track Modified Pages option field of the Table Space Options (2/2)
panel view.
Compress Rows> (Comp)
Option to compress table space rows as described for the Compress Rows option field of the Table Space Options (2/2)
panel view.
Group Buffer Pool Caching: (GBP Cache)
For data sharing only, identifies the type of group buffer pool caching as described for the Group Buffer Pool Caching
option field of the Table Space Options (1/2) panel view.
Table Space Options (1/2)
The Table Space Options (1/2) panel view is the next view in the sequence, displayed following the Table Space Type Attributes
panel view. The contents of the panel view reflect the selected table space type.
Figure 188. DB2: Create Table Space - Table Options (1/2).
Table Options (1/2) - Panel Fields
TableSpace:
A non-enterable field displaying the new table space name as supplied in the Table Name & Type panel view.
In DataBase:
A non-enterable field displaying the database in which the new table space will be created, as supplied in the Table Name
& Location panel view.
Logged:
Select this option to record in the log all changes to the table and index data in the table space.
2013-11-13 13:06:41
SELCOPY/i Reference and User Guide
324
DB2 Utilities
Table Options (1/2) - Panel Fields
Close Priority:
Enter "/" to select the priority in which the table data sets belonging to the table space are closed when the limit of open
table space data sets is reached.
Close first (CLOSE YES) indicates that the data sets will be eligible to be closed before data sets belonging to a table
space created with CLOSE NO.
Lock Size:
Enter "/" to select the size of locks used in the table space and so the threshold at which lock escalation occurs. Options
are as follow:
◊ Any size selected by DB2
◊ Tablespace
◊ Table - Applicable only to exclusively Segmented table space type.
◊ Page - Not applicable to LOB table spaces.
◊ Row - Not applicable to LOB table spaces.
◊ LOB - Applicable only to LOB table spaces.
Lock Maximum:
Enter "/" to select whether the maximum number of locks before escalation is to be determined by the user or by the DB2
system.
If user defined, the threshold value (0-2147483647) may be specified in the accompanying field. A value of 0 (zero)
indicates that locks are not to be counted and so no escalation occurs.
Group Buffer Pool Caching:
Applicable only in a data sharing environment, enter "/" to select what pages of the table space or partition are written to
the group buffer pool. In a non-data sharing environment, this option will be ignored. Options are as follow:
◊ Changed data pages
Unless defined in a group buffer pool that is defined to be used only for cross-invalidation, cache only those table
space pages containing table or index data that has been modified.
◊ ALL data pages read
Cache all table space pages as they are read from DASD.
◊ Changed system pages
Applicable only to LOB table spaces, cache only system pages within the LOB table space that have changed. A
system page is a space map page or any other page that does not contain actual data values.
◊ No caching
Do not cache table space pages in the group buffer pool.
Table Space Options (2/2)
The Table Space Options (2/2) panel view is the next view in the sequence, displayed following the Table Space Options (1/2)
panel view.
Figure 189. DB2: Create Table Space - Table Options (2/2).
2013-11-13 13:06:41
SELCOPY/i Reference and User Guide
325
DB2 Utilities
Table Options (2/2) - Panel Fields
Table Options (2/2) - Panel Fields
TableSpace:
A non-enterable field displaying the new table space name as supplied in the Table Name & Type panel view.
In DataBase:
A non-enterable field displaying the database in which the new table space will be created, as supplied in the Table Name
& Location panel view.
Maximum Rows>
Specifies the maximum number of rows (1-255) that the DB2 system will consider placing on each data page for for insert,
LOAD and REORG operations.
Compress Rows>
Enter "/" to select whether or not compression will be performed on rows of the table space or partition. If yes is selected,
rows will not be compressed until the LOAD or REORG utility is run on the table in the table space or partition.
Free page frequency>
For a LOAD or REORG operation, specifies the number of pages (0-255) that will be loaded before a leaving a page of
free space. The count of pages loaded restarts following the free page. A value of 0 (zero) indicates that no free pages are
to be left.
Percent free/page>
For a LOAD or REORG operation, specifies the percentage (0-99) of each page to be left as free space.
CCSID Encoding Scheme:
Enter "/" to select the default encoding scheme (UNICODE, EBCDIC or ASCII) for table stored in the table space. If table
space modelling has not occurred, then this field will be initialised to the encoding scheme assigned to the database in
which the table space is to be created, otherwise the system default defined in install panel DSNTIPF.
Track Modified Pages:
Select this option if DB2 is to track modified pages in the space map pages of the table space or partition. Tracking
modified pages improves the performance of incremental image copy.
Create Table
The DB2 Create Table series of panel views (ZZS2CT00) generate an SQL CREATE TABLE statement which may be used to
create a new DB2 base or materialised query table in the current DB2 subsystem.
The DB2 Create Table panel views and their sub-panels are interactive panel windows (window class WINWIPO0) and may be
started via the following:
• Select Base Table option 6. in the SELCOPY/i DB2 Create Objects option menu. (DB2 5.6)
• Select Materialized Query Table option 7. in the SELCOPY/i DB2 Create Objects option menu. (DB2 5.7)
By default, field entries are populated with arguments and options that were entered the last time the panels were used.
The panel views are displayed in a sequence based on choices made in a the panel views. Field values and options may be
selected in the focus panel before progressing to the next panel view in the sequence (NEXT). Progressing forwards from the last
panel view in the sequence will generate the SQL CREATE TABLE syntax.
Options and field entries specified in panel views that have been visited may be changed simply by navigating backwards along the
view sequence (BACK) before proceding forwards again.
Table Name & Location
Enter the name of the new base or materialized query table and optionally the name of an explicitly defined tablespace within the
current DB2 subsystem in which the new table will be created. The current DB2 subsystem is displayed in the panel window title
bar.
2013-11-13 13:06:41
SELCOPY/i Reference and User Guide
326
DB2 Utilities
Table Name & Location
Figure 190. DB2: Create Table - Table Name & Location.
Menu Bar Items
The following menu bar items are common to all Create Table panel views and sub-panels.
File
The File drop-down menu contains the single item "Exit" which simply closes the panel and, if the last panel open in the
current DB2 panel hierarchy, close (disconnect) the connection to the relevant DB2 subsystem. Note that, unlike
CANCEL, CLOSE will save field values that have been entered in the panel views so far. These values may be
redisplayed the next time the panel is opened.
Help
Display help for this panel view.
Table Name & Location - Panel Fields
Action:
A non-enterable field which describes the current action being performed by the Create Table panel. Possible values are:
◊ Create Base Table
◊ Create Materialized Query Table
Owner>
Optionally specifies the owner (schema) of the table to be created. If this field is left blank, DB2 will assign an owner id
equal to the value of the user's current SQLID special register.
A table oner id has a maximum length of 128 characters.
Name>
Mandatory field which specifies the name of the table to be created.
A table name has a maximum length of 128 characters.
DataBase>
Optionally specifies the name of a database in which the target table space is explicitly or implicitly defined.
The database name may include a wildcard character "%" (percent) or "*" (asterisk) representing zero or more characters,
or wildcard character "_" (underscore) representing a single character of the database name. If this is the case, a Select
Database panel is displayed containing a list of eligible database names which satisfy the database name filter.
Use prefix command "S", or press the <Enter> key on the required entry to select it.
If no database or table space is specified, then the table space is implicitly defined in database DSNnnnnn.
If no database is specified but a table space is specified, then the table space must have been explicitly defined in
database DSNDB04.
A database name has a maximum length of 8 characters.
2013-11-13 13:06:41
SELCOPY/i Reference and User Guide
327
DB2 Utilities
Table Name & Location - Panel Fields
TableSpace>
Optionally specifies the name of a table space in which the new table will be created.
The table space name may include a wildcard character "%" (percent) or "*" (asterisk) representing zero or more
characters, or wildcard character "_" (underscore) representing a single character of the table space name. If this is the
case, a Select Tablespace panel is displayed containing a list of eligible tablespace names which satisfy the table space
and database name filters.
Use prefix command "S", or press the <Enter> key on the required entry to select it. Using this method to select a table
space name will also update the database name field value.
If no table space is specified, then the table space is implicitly defined in the specified database (or DSNnnnnn) with a
table space name derived from the table name.
A table space name has a maximum length of 8 characters.
TSType:
A non-enterable field which identifies the type of table space in which the new table will be created. Possible table space
type descriptions are as follow:
◊ Implicitly defined. (Segmented or Universal Partitioned)
Table space will be defined when the table is created. The new, implicitly defined table space will be segmented
and, depending on the function mode of the DB2 subsystem, a universal partitioned-by-growth or universal
partitioned-by-range.
If the table space is to be implicitly defined, the Implicit TableSpace Options view will be displayed later in the
sequence of DB2 Create Table panel views.
◊ Segmented. (n x mKB pages/segment)
The selected table space is an existing segmented (non-partitioned) table space defined with the displayed page
size (KB) and number of pages per segment. This type of table space is capable of containing more than one
table definition.
◊ Partitioned. (n parts)
The selected table space is an existing, non-universal (i.e. non-segmented) partitioned table space defined as
having the displayed number of partitions. This type of table space is capable of containing only one table
definition.
◊ Universal Partitioned-by-Growth. (Max n parts of max size mGB)
The selected table space is an existing universal (i.e. segmented) partitioned-by-growth table space defined as
having the displayed maximum number of partitions, each of the displayed maximum size (GB). This type of table
space is capable of containing only one table definition.
◊ Universal Partitioned-by-Range. (n parts of max size mGB)
The selected table space is an existing universal (i.e. segmented) partitioned-by-range table space defined as
having the displayed number of partitions, each of the displayed maximum size (GB). This type of table space is
capable of containing only one table definition.
This field is updated following update of the DataBase/TableSpace fields before progressing to the next panel view.
Table Definition
The Table Definitions panel view is the next view in the sequence, displayed following the Table Name & Location panel view.
This view allows the user to select the method by which table column definitions, table constraints and various table options will be
sourced.
2013-11-13 13:06:41
SELCOPY/i Reference and User Guide
328
DB2 Utilities
Table Definition
Figure 191. DB2: Create Table - Table Definition.
Table Definition - Panel Fields
Table Owner:
A non-enterable field displaying the new table owner id as supplied in the Table Name & Location panel view.
Name:
A non-enterable field displaying the new table name as supplied in the Table Name & Location panel view.
Modelling Options
Enter "/" (slash) or any non-blank character against the required entry to select the modelling method to be used to define
columns, constraints and other attributes of the new table. Each of the options are mutually exclusive.
The sequence of panel views to be displayed will depend on the method selected.
◊ Do not model on an existing table.
The table will not be modelled on an existing table in the current DB2 server. Instead, the user will be required to
enter column definitions and any other table attributes manually.
◊ Model on a single table or view using LIKE.
Use the SQL CREATE TABLE LIKE syntax to model the new table on a table or view which exists in the current
DB2 server. See "DB2 for z/OS SQL Reference" for information on table attributes that are not modelled from the
table or view specified using LIKE.
Having selected this option, the Model using LIKE view will be displayed.
◊ Model on a generated result table.
Use the SQL CREATE TABLE AS (fullselect) syntax to model the new table on the result of a query expression.
See "DB2 for z/OS SQL Reference" for table attributes that are not modelled from a result table.
Having selected this option, the Model on Result Table view will be displayed.
◊ Model on one or more tables/views for panel field load.
Populate fields in subsequent Create Table panel views with values modelled on one or more tables and/or views
defined in the current DB2 server.
Having selected this option, the Model on Tables/Views view will be displayed.
EDITPROC>
Optionally specify the name of a table edit procedure to be used to transform table row data on execution of SQL data
change, LOAD or row retrieval operations. Specification of a table edit procedure invalidates definition of LOB, XML,
ROWID, Identity and Security Label columns within the new table.
A procedure name has a maximum length of 8 characters.
Columns & Constraints
The Columns & Constraints panel view is displayed if the user has selected not to model on an existing table or following any table
modelling performed to load panel field values. In the latter case, the column and constraint definitions will have been updated as
appropriate with the modelled column and/or constraint attributes as selected by the user in panel view Model on Tables/Views
(Load Values).
This view allows the user to display column and constraint definition sub-panels to optionally alter/add/delete/select/deselect
individual column and constraint definitions.
At least one column definition must exist and so, regardless of the current sub-panel selection, if no columns have been defined
and selected the Column Definitions sub-panel will be displayed next in the panel sequence.
Having selected, displayed and then closed a definitions sub-panel, the focus returns to this panel view and, by default, the next
definitions sub-panel is automatically selected for display. Also, fields displaying the column/constraint definition totals and
existance of a primary key constraint are updated accordingly.
2013-11-13 13:06:41
SELCOPY/i Reference and User Guide
329
DB2 Utilities
Columns & Constraints
Figure 192. DB2: Create Table - Columns & Constraints.
Columns & Constraints - Panel Fields
Table Owner:
A non-enterable field displaying the new table owner id as supplied in the Table Name & Location panel view.
Name:
A non-enterable field displaying the new table name as supplied in the Table Name & Location panel view.
Table Column and Constraint Definitions:
Enter "/" (slash) or any non-blank character against the columns/constraints definitions sub-panel to be displayed next.
Each of these sub-panel selections are mutually exclusive.
If no definitions sub-panel is selected and at least one column has been defined and selected, then focus will progress to
the next panel view in the sequence (Table Options (1/2).)
On return from a definitions sub-panel, the next definitions sub-panel in the list is automatically selected for display. If the
last sub-panel selected was Check Constraints, then no further sub-panels are selected for display.
◊ Column Definitions.
Display the Column Definitions sub-panel next.
◊ Primary Constraint.
Display the Primary Key Definition sub-panel next.
◊ Unique Constraints.
Display the Unique Key Constraint Definitions sub-panel next.
◊ Referential Constraints.
Display the Referential Constraint Definitions sub-panel next.
◊ Check Constraints.
Display the Check Constraint Definitions sub-panel next.
#columns:
A non-enterable field displaying the total number of columns that have been defined and selected. This value is updated
on return from the Column Definitions sub-panel.
prime key:
A non-enterable field displaying either "Yes" or "No" to indicate whether or not a primary key constraint has been defined
This value is updated on return from the Primary Key Definition sub-panel.
#unique keys:
A non-enterable field displaying the total number of unique key constraints (excluding any primary key constraint) that
have been defined and selected. This value is updated on return from the Unique Key Constraint Definitions sub-panel.
#foreign keys:
A non-enterable field displaying the total number of referential key constraints (parent/foreign key dependencies) that have
been defined and selected. This value is updated on return from the Referential Constraint Definitions sub-panel.
2013-11-13 13:06:41
SELCOPY/i Reference and User Guide
330
DB2 Utilities
Columns & Constraints - Panel Fields
#checks:
A non-enterable field displaying the total number of check constraints that have been defined and selected. This value is
updated on return from the Check Constraint Definitions sub-panel.
Column Definitions
The Columns Definitions sub-panel is displayed on selecting Column Definitions from the Columns & Constraints panel view or if
column definition validation fails when generating the SQL CREATE TABLE statement from the Generate SQL panel view.
This sub-panel contains an embedded table of DB2 table column definitions. Standard table edit primary and line commands must
be used to INSERT, DELETE, COPY, MOVE or EXCLUDE table rows as appropriate, to scroll the table display UP, DOWN, LEFT
and RIGHT and also to ZOOM the display of an individual table row.
In addition to the standard primary table commands, this sub-panel also supports primary command SELECTAll (assigned to
<PF6> by default) to toggle between selection and deselection of all column definitions in the table.
Each table row defines one DB2 table column which incorporates the following column attributes:
1. Name.
2. Type.
3. Data Length or Precision.
4. Data Scale. (DECIMAL only)
5. Default value support.
6. Null value support.
7. Field Procedure name.
8. Field Procedure parameters.
9. Distinct Type Schema & Name.
10. Sub-type. (Character data types only)
11. Implicitly hidden.
On inserting a new column definition, a unique name should be entered in the Column Name field and the Type field should be
updated to reflect the required column type. All subsequent column definition validation is based on the selected column definition
type value.
Following update of a table row (column definition) or on returning to the table view from a zoomed view, validation occurs for the
column attributes entered by the user. Likewise, validation is performed for all column definitions on exiting the Column Definitions
sub-panel. If an error is detected in a column definition that does not relate to the chosen column type, or if an updated column
definition is of column type IDENTITY, RCT, ROWID or SECURITY, then that table row is automatically zoomed. This allows the
user to correct the error or to enter column definition attributes which are not displayed in the table view, before continuing.
If the width of a field in the table view is not sufficient to enter the required input value, then the table row should be zoomed
(default <PF2>) and, if necessary, the appropriate field expanded (default <PF2>) to accomodate the input value.
Zoom of an individual row displays a view of that row containing only those input fields and field options that are pertinent to the
column definition type. e.g. Zoom of a DATE type column will display fields which do not include column data length, field
procedure name nor any other irrelevant input fields and options.
Figure 193. DB2: Create Table - Column Definitions.
Column Definitions - Panel Fields
Field names that follow are as appear in the zoomed view of a table row. Names in parentheses correspond to the equivalent
column name in table view.
2013-11-13 13:06:41
SELCOPY/i Reference and User Guide
331
DB2 Utilities
Column Definitions - Panel Fields
Column Name> (Column Name)
The unique name to be assigned to the column which is automatically upper cased.
A column name has a maximum length of 30 characters.
Column Type: (Type)
Identifies the column data type.
The value selected or entered in this field when in table view governs the view displayed when the table row is
subsequently zoomed. In zoomed view, the contents of this field is non-enterable and is included for display purposes
only.
In addition to the standard DB2 built-in data types, this field supports type DISTINCT if a distinct (user-defined) type is to
be used to define the column.
One of the built-in or DISTINCT column data types should be specified unless the the column is to be defined as an
identity column, a security label or a row change change timestamp column in which case one of the non-standard
columns types of IDENTITY, SECURITY, ROWID or RCT must be specified respectively. The source type of these types
of column, whether built-in or distinct, may be selected when the column definition is viewed in zoomed format.
Restrictions:
1. Graphic (DBCS) types (GRAPHIC, VARG and DBCLOB) are valid only if the table encoding is Unicode or the
DB2 server supports double and mixed byte character sets.
2. Large object (CLOB, DBCLOB and BLOB), XML, ROWID, IDENTITY and SECURITY types are valid only if no
EDIT Procedure has been assigned to the table.
Enter a blank or invalid value in this field to display a scrollable list of valid, selectable entries for this field.
CHAR
A fixed length character column.
Note that type SECURITY should be used if this column is to be a security label column.
VARCHAR
A variable length character column.
CLOB
A character large object column.
GRAPHIC
A fixed length graphic character (DBCS) column.
VARG
A variable length graphic character (DBCS) column.
DBCLOB
A graphic character (DBCS) large object column.
BINARY
A fixed length binary column.
VARBIN
A variable length binary column.
BLOB
A binary large object column.
SMALLINT
A small integer column. The range of a small integer is -32768 to +32767.
Note that type IDENTITY should be used if this column is to be an identity column.
INTEGER
A large integer column. The range of a large integer is -2147483648 to +2147483647.
Note that type IDENTITY should be used if this column is to be an identity column.
BIGINT
2013-11-13 13:06:41
SELCOPY/i Reference and User Guide
332
DB2 Utilities
Column Definitions - Panel Fields
A big integer column. The range of a big integer is -9223372036854775808 to +9223372036854775807.
Note that type IDENTITY should be used if this column is to be an identity column.
REAL
A single precision (32 bit) floating-point column.
DOUBLE
A double precision (64 bit) floating-point column.
DECIMAL
A packed decimal fixed-point column.
Note that type IDENTITY should be used if this column is to be an identity column.
DECFLOAT
A decimal floating-point column. Precision may be 16 or 34.
DATE
A 3-part (year, month and day) Gregorian date column.
TIME
A 3-part (hour, minute and second) 24-hour clock time of day column.
TIMESTMP
A 7-part (year, month, day, hour, minute, second and microsecond) date and time column.
Note that type RCT should be used if this column is to be a row change timestamp column.
XML
A well-formed XML document column.
ROWID
A unique, DB2 maintained table row identifier column.
Validation checking will return an error if more than one ROWID column definition exists and has been selected.
SECURITY
A security label column. Requires that the RACF SECLABEL class is active and that, on executing the generated
SQL statement, its primary authorization ID must have a valid security label.
On selecting type SECURITY, the table row is zoomed so that the underlying CHARACTER data type of fixed
length 8 may be selected as either the built-in type or an equivalent distinct type.
Validation checking will return an error if more than one SECURITY column definition exists and has been
selected.
Corresponds to SQL CREATE TABLE syntax AS SECURITY LABEL.
RCT
A row change timestamp column. The value of this column within an individual DB2 table row is updated by DB2
with the timestamp at which the table row is inserted or any value within it gets updated.
On selecting type RCT, the table row is zoomed so that the underlying TIMESTAMP data type may be selected
as either the built-in type or an equivalent distinct type. Similarly, to set other options relevant to row change
timestamp management.
Validation checking will return an error if more than one RCT column definition exists and has been selected.
Corresponds to SQL CREATE TABLE syntax FOR EACH ROW ON UPDATE AS ROW CHANGE TIMESTAMP.
IDENTITY
An identity column. A column in which an integer value is automatically generated for each inserted DB2 table
row. The generated integer value is determined by a defined sequence.
On selecting type IDENTITY, the table row is zoomed so that the underlying SMALLINT, INTEGER, BIGINT or
DECIMAL (scale zero) data type may be selected as either the built-in type or an equivalent distinct type.
Similarly, to set the sequence parameters and other options relevant to identity column management.
2013-11-13 13:06:41
SELCOPY/i Reference and User Guide
333
DB2 Utilities
Column Definitions - Panel Fields
Validation checking will return an error if more than one IDENTITY column definition exists and has been
selected.
Corresponds to SQL CREATE TABLE syntax AS IDENTITY.
DISTINCT
A user-defined distinct type column which is based on one of the built-in data types.
Note that type IDENTITY, SECURITY, RCT or ROWID should be used if this column is to be an identity column,
security label, row change timestamp or ROWID column respectively.
Default Value/FIELDPROC Name> (Default Value / Field Proc)
Applicable only for Null value / Default value / Field Proc combination codes DD, DF, ND and NF, this field identifies either
the default value constant or the field procedure name as applicable. For all other codes, the contents of this field is
ignored.
If a default value is to be used which is not the default for the column data type, the session user name or current SQLID,
then code DD or ND must be specified and the columns default value constant specified in this field. If the column is a
character data type, then the default value must be enclosed within SQL delimiter characters as defined for the DB2
server. If these character string delimiters have been omitted, then they will be added automatically by the panel, escaping
any delimiter character that exists as data within the string.
Where a field procedure is to be used, then code DF or NF must be specified and the field procedure name specified in
this field.
Field procedure parameters may be specified by the Column Definition - FIELDPROC Parameters sub-panel opened on
selecting FieldProc Parms in table view or selecting the Manage FIELDPROC Parms> option in zoomed view.
Alternatively, a comma separated list of procedure parameters may be specified in parentheses immediately following the
field procedure name within this field. Specification of parameters in this field will override any parameters specified in the
sub-panel.
Validation checking is performed on this field and an error returned if the default value constant does not adhere to the
column type and length or if the field procedure name and its parameteres are invalid.
Corresponds to SQL CREATE TABLE syntax FIELDPROC program-name.
DB2 Generated Values>
Applicable to columns of type IDENTITY, RCT and ROWID only, this option specifies whether, on insert of a table row,
DB2 will always generate the column value or generate one only if no other value is specified.
Not that DB2 will always generate values on an update operation if the DEFAULT clause is specified.
Corresponds to SQL CREATE TABLE syntax GENERATED ALWAYS and GENERATED BY DEFAULT.
Distinct Type Fields
For column types DISTINCT, IDENTITY, SECURITY, RCT and ROWID a user-defined distinct type may be specified.
Fields that follow relate specifically to use of a column distinct type.
On selecting type DISTINCT or selecting distinct type as the source specification for IDENTITY, SECURITY, RCT and
ROWID, the Select a Distinct Type panel is opened displaying a selectable list of distinct types defined in the DB2 server.
This selection list includes only those distinct types that have a source type which is valid for the column type being
defined. e.g. A distinct type used as the source of a column of type SECURITY must itself have a source type of
CHARACTER(8). If no distinct types exist that satisfy the column type, then only error ZZSP077E is displayed without
displaying the selection list.
Corresponds to SQL CREATE TABLE syntax distinct-type-name.
Distinct Type Schema> (DistSchema)
Specifies the schema of the required distinct type.
The distinct schema may include a wildcard character "%" (percent) or "*" (asterisk) representing zero or more
characters, or wildcard character "_" (underscore) representing a single character of the schema. If no schema is
specified, then wildcard character "%" is implied.
Distinct Type Name>
(DistName)
Specifies the name of the required distinct type.
The distinct name may include a wildcard character "%" (percent) or "*" (asterisk) representing zero or more
characters, or wildcard character "_" (underscore) representing a single character of the name. If no name is
specified, then wildcard character "%" is implied.
If more than one distinct type matches the combined schema and name wildcard specification, the Select a
Distinct Type panel is opened.
2013-11-13 13:06:41
SELCOPY/i Reference and User Guide
334
DB2 Utilities
Column Definitions - Panel Fields
Source Type:
A non-enterable field displaying the built-in source type of the distinct type.
Len/Pr:
A non-enterable field displaying the length or precision assigned to the distinct type.
Sc:
A non-enterable field displaying the scale value assigned to the distinct type.
SubType:
A non-enterable field displaying the character subtype assigned to the distinct type. Possible values are blank
(for non-character types), S (SBCS), M (Mixed) or B (Bit).
Hidden> (Hide)
Indicates that the column is to be implicitly hidden so that it is not visible in the result for SQL statements unless it is
explicitly referenced by name.
Corresponds to SQL CREATE TABLE syntax IMPLICITLY HIDDEN.
Identity Column Options
Applicable only to column type IDENTITY, these fields combine to define a sequence of integer values so that, for each
newly inserted table row, this column will be populated with the next value in the sequence.
An IDENTITY column can only contain numeric integer values, therefore the underlying built-in data type can be
SMALLINT, INTEGER, BIGINT or DECIMAL (with scale 0).
Note that identity column values need not be unique unless a unique index is defined which references only the identity
column.
Use start value>
Enter "/" (slash) or any non-blank character in this field to indicate that the specified start value is to be used. The
start value identifies the first value in the sequence and is a positive or negative numeric integer value that
satisfies the column's underlying build-in data type.
In an ascending sequence, the default start value is the specified minimum value or 1 if no minimum value is
defined. In a descending sequence, the default start value is the specified maximum value or -1 if no maximum
value is defined.
Corresponds to SQL CREATE TABLE syntax START WITH numeric-constant.
Increment By value>
Specifies an integer constant that defines the interval between consecutive values in the sequence. A zero or
positive value will define an ascending sequence, a negative value will define a descending sequence.
Corresponds to SQL CREATE TABLE syntax INCREMENT BY numeric-constant.
Use minimum value>
Enter "/" (slash) or any non-blank character in this field to indicate that the specified minimum value is to be used.
The minimum value is a positive or negative numeric integer value that satisfies the column's underlying build-in
data type and is less than or equal to the maximum value.
For an ascending sequence, the minimum value is the value to which the sequence will cycle on reaching the
maximum value. For a descending sequence, the minimum value is the value at which the sequence will either
cycle or stop generating values.
In an ascending sequence, the default minimum value is the specified start value or 1 if no start value is defined.
In a descending sequence, the default minimum value is the minimum value for the column's underlying built-in
data type.
Corresponds to SQL CREATE TABLE syntax NO MINVALUE and MINVALUE numeric-constant.
Use maximum value>
Enter "/" (slash) or any non-blank character in this field to indicate that the specified maximum value is to be
used. The maximum value is a positive or negative numeric integer value that satisfies the column's underlying
build-in data type and is greater than or equal to the minimum value.
For an ascending sequence, the maximum value is the value at which the sequence will either cycle or stop
generating values. For a descending sequence, the maximum value is the value to which the sequence will cycle
on reaching the minimum value.
In an ascending sequence, the default maximum value is the maximum value for the column's underlying built-in
data type. In a descending sequence, the default maximum value is the specified start value or -1 if no start value
is defined.
2013-11-13 13:06:41
SELCOPY/i Reference and User Guide
335
DB2 Utilities
Column Definitions - Panel Fields
Corresponds to SQL CREATE TABLE syntax NO MAXVALUE and MAXVALUE numeric-constant.
Cycle values at Max/Min Value.
Enter "/" (slash) or any non-blank character in this field to indicate that sequence values are to continue to be
generated after reaching the maximum value (ascending sequence) or minimum value (descending sequence).
If this option is set, an ascending sequence on reaching the maximum value will cycle and continue the sequence
from the minimum value. Similarly, a descending sequence on reaching the minimum value will cycle and
continue the sequence from the maximum value.
Corresponds to SQL CREATE TABLE syntax NO CYCLE and CYCLE.
Generate values in order of request.
Enter "/" (slash) or any non-blank character in this field to indicate that sequence values are to be generated in
strict sequential order when this identity column is shared between multiple DB2 members. Selecting this option
may disable the caching of sequence values.
Corresponds to SQL CREATE TABLE syntax NO ORDER and ORDER.
Preallocate sequence values and store in memory.
Enter "/" (slash) or any non-blank character in this field to indicate that a number of sequence values are to be
generated and cached in memory to improve performance of multiple table row insert.
Corresponds to SQL CREATE TABLE syntax NO CACHE and CACHE.
#Cached values>
Specifies the maximum number of identity column sequence value that may be preallocated and cached in
memory. The minimum value is 2.
Corresponds to SQL CREATE TABLE syntax CACHE integer-constant.
Length>/Precision> (Len/Pr)
For columns of character, graphic character and binary types, this field displays as Length> in zoomed views and defines
the length of the data within the column.
For columns of type DECIMAL and DECFLOAT, this field displays as Precision> in zoomed views and defines the
precision (number of decimal digits) represented by the decimal value.
For all other column types, this field is not displayed in zoomed view and, in table view, displays the internal column length
for the chosen data type.
For LOB types only, the length value may be suffixed with K, M or G representing a value wich is a multiple of 1024,
1048576 and 1073741824 respectively.
The range of allowable values for a length field is displayed in parentheses and depends on the column type and, for
variable length fields, the maximum record size and presence of an EDIT procedure.
Manage FIELDPROC Parms> (FieldProc Parms)
Applicable only for Null value / Default value / Field Proc combination codes DF and NF, this field determines display of
the Column Definition - FIELDPROC Parameters sub-panel for this column definition. For all other codes, any entries in
this sub-panel will be ignored.
In table view, the number of selected parameters is displayed. Position the cursor on the FieldProc Parms table column
entry and press <Enter> or, if configured, double-click the left mouse button to dispaly the sub-panel.
In zoomed view, enter "/" (slash) or any non-blank character in this field and press <Enter> to dispaly the sub-panel.
Corresponds to SQL CREATE TABLE syntax FIELDPROC program-name(constant, ..) .
NULL Value / Default Value / Field Procedure: (Def)
A 2 character code combination representing support for null values, default value specification and/or use of a field
procedure.
Not all of the following code combinations are valid for the different columnn types. In table view, if an invalid code is
selected for the column type, an error is returned, the table row is zoomed and the field is set to DX by default.
For type DISTINCT, the generated SQL CREATE TABLE statement will use the distinct type schema and name as the
cast function on any default values.
Enter a blank or invalid value in this field to display a complete scrollable list of selectable code entries for this field.
DX (DX: Allow Nulls, No Default Value.)
2013-11-13 13:06:41
SELCOPY/i Reference and User Guide
336
DB2 Utilities
Column Definitions - Panel Fields
Null values are permitted.
No default value or field procedure is used.
DN (DN: Allow Nulls, Use Default NULL.)
Null values are permitted.
A default value of NULL is used in the absence of a specified value when a row is inserted, updated or loaded.
(WITH DEFAULT NULL)
DD (DD: Allow Nulls, Use Default Value.)
Null values are permitted.
A default value equal to the default value for the column type or, if specified, the value specified in Default
Value/FIELDPROC Name is used in the absence of a specified value when a row is inserted, updated or loaded.
(WITH DEFAULT)
DU (DU: Allow Nulls, Use Default USER.)
Null values are permitted.
A default value equal to the prevailing value of the special register SESSION_USER is used in the absence of a
specified value when a row is inserted, updated or loaded. (WITH DEFAULT USER)
DS (DS: Allow Nulls, Use Default SQLID.)
Null values are permitted.
A default value equal to the prevailing value of the special register CURRENT SQLID is used in the absence of a
specified value when a row is inserted, updated or loaded. (WITH DEFAULT CURRENT SQLID)
DF (DF: Allow Nulls, Use Field Procedure.)
Null values are permitted.
The field procedure specified in Default Value/FIELDPROC Name is used to encode/decode column data.
(FIELDPROC)
NX (NX: Disallow Nulls, No Default Value.)
Null values are not permitted. (NOT NULL)
No default value or field procedure is used.
ND (ND: Disallow Nulls, Use Default Value.)
Null values are not permitted. (NOT NULL)
A default value equal to the default value for the column type or, if specified, the value specified in Default
Value/FIELDPROC Name is used in the absence of a specified value when a row is inserted, updated or loaded.
(WITH DEFAULT)
NU (NU: Disallow Nulls, Use Default USER.)
Null values are not permitted. (NOT NULL)
A default value equal to the prevailing value of the special register SESSION_USER is used in the absence of a
specified value when a row is inserted, updated or loaded. (WITH DEFAULT USER)
NS (NS: Disallow Nulls, Use Default SQLID.)
Null values are not permitted. (NOT NULL)
A default value equal to the prevailing value of the special register CURRENT SQLID is used in the absence of a
specified value when a row is inserted, updated or loaded. (WITH DEFAULT CURRENT SQLID)
NF (NF: Disallow Nulls, Use Field Procedure.)
Null values are not permitted. (NOT NULL)
The field procedure specified in Default Value/FIELDPROC Name is used to encode/decode column data.
(FIELDPROC)
Corresponds to SQL CREATE TABLE syntax NOT NULL, WITH DEFAULT and FIELDPROC.
Scale> (Sc)
Applicable only to columns of type DECIMAL, this field defines the scale (number of fractional digits) represented by the
decimal value. This value must be less than or equal to the precision value.
For all other column types, this field is not displayed in zoomed view and any value entered in this field in table view will be
ignored.
Corresponds to SQL CREATE TABLE syntax DECIMAL(integer,integer).
Sel> (Sel)
Enter "/" (slash) or any non-blank character in this field to include (select) the column definition in the create table syntax.
A blank in this field will exclude (deselect) the column definition.
2013-11-13 13:06:41
SELCOPY/i Reference and User Guide
337
DB2 Utilities
Column Definition - FIELDPROC Parameters
Deselecting a column definition in table view has the same effect as executing the table primary command EXCLUDE (or
line command "X") to exclude the table row.
Table command SELECTALL (assigned to <PF6>) will toggle between selecting and deselecting all table rows (column
definitions).
SubType> (SubType)
Applicable only to columns of character types CHAR, VARCHAR and CLOB, this field specifies the character data
subtype.
Enter a blank or invalid value in this field to display a complete list of selectable subtype entries for this field.
SBCS
Specifies that the column will contain single byte data.
MIXED
Specifies that the column will contain both single and double byte data. This option is valid only if the table
encoding is Unicode or if the DB2 server supports double and mixed byte character sets.
BIT
Valid only for column type CHAR and VARCHAR, specifies that the column will contain non-printable bit data.
Corresponds to SQL CREATE TABLE syntax FOR SBCS|MIXED|BIT DATA.
Name:
A non-enterable field displaying the new table name as supplied in the Table Name & Location panel view.
Table Owner:
A non-enterable field displaying the new table owner id as supplied in the Table Name & Location panel view.
Column Definition - FIELDPROC Parameters
The Column FIELDPROC Parameters sub-panel is displayed on selecting Manage FIELDPROC Parms> or table view entry
FieldProc Parms from the Column Definitions sub-panel.
This sub-panel contains an embedded table of DB2 table column field procedure parameters. Standard table edit primary and line
commands must be used to INSERT, DELETE, COPY, MOVE or EXCLUDE table rows as appropriate and to scroll the table
display UP, DOWN, LEFT and RIGHT.
Entries in this table are ignored if a parenthesised list of comma separated constant values are included in the column definitions
panel field Default Value/FIELDPROC Name>
Each parameter to be passed to the field procedure must be entered, one in each table row in the required order. The defined SQL
delimiter character quote (") or apostrophe (') should be used to enclose values as appropriate.
Figure 194. DB2: Column FIELDPROC Parameters.
2013-11-13 13:06:41
SELCOPY/i Reference and User Guide
338
DB2 Utilities
Primary Key Definition
Primary Key Definition
The Primary Key Definition sub-panel is displayed on selecting Primary Key Constraint from the Columns & Constraints panel
view.
This sub-panel contains an embedded table of DB2 table primary key column definitions. Standard table edit primary and line
commands must be used to INSERT, DELETE, COPY, MOVE or EXCLUDE table rows as appropriate, to scroll the table display
UP, DOWN, LEFT and RIGHT and also to ZOOM the display of an individual table row.
In addition to the standard primary table commands, this sub-panel also supports the following primary commands:
• SELECTAll (assigned to <PF6> by default). This toggles between selection and deselection of all entries in the table.
• RESTORETab (assigned to <PF5> by default). This restores the table entries so that all rows that satisfy the filter criteria
are redisplayed. i.e. reset the table view.
RESTORETAB may be used to include all eligible columns which have been defined or updated since this primary key
constraint sub-panel was last displayed.
Each table row identifies a column definition entered in the Column Definitions sub-panel, which satisfies the primary key column
criteria and is, therefore, eligible for selection as a primary key column. Apart from Sel entry selection field, all fields in this table are
non-enterable and are included for information only.
Select and/or exclude the DB2 column definitions then, if necessary, rearrange them using line command "M" or "MM" so that they
occur in the order required for the primary key constraint definition.
Figure 195. DB2: Create Table - Primary Key Definition.
Primary Key Definition - Panel Fields
Table Owner:
A non-enterable field displaying the new table owner id as supplied in the Table Name & Location panel view.
Name:
A non-enterable field displaying the new table name as supplied in the Table Name & Location panel view.
Name>
Optionally specifies the name of the primary key constraint which is automatically upper cased. If not specified, DB2 will
generate a unique name for the constraint.
A constraint name has a maximum length of 128 characters.
Sel
Enter "/" (slash) or any non-blank character in this field to include (select) the column definition in the create table syntax.
A blank in this field will exclude (deselect) the column definition.
Deselecting a column definition in table view has the same effect as executing the table primary command EXCLUDE (or
line command "X") to exclude the table row.
Column Name
A non-enterable field displaying the name of the column.
Type
2013-11-13 13:06:41
SELCOPY/i Reference and User Guide
339
DB2 Utilities
Primary Key Definition - Panel Fields
A non-enterable field displaying the type of the column. See Column Type for valid column types.
Len/Pr
A non-enterable field displaying the length or precision of the column data.
Scale
A non-enterable field displaying the scale of the column data.
DistSchema
A non-enterable field displaying the schema of the distinct type assigned to the column. If no distinct type is used, this field
will be blank.
DistName
A non-enterable field displaying the name of the distinct type assigned to the column. If no distinct type is used, this field
will be blank.
Unique Constraint Definitions
The Unique Constraint Definitions sub-panel is displayed on selecting Unique Constraints from the Columns & Constraints panel
view.
This sub-panel contains an embedded table of DB2 table unique constraint definitions. Standard table edit primary and line
commands must be used to INSERT, DELETE, COPY, MOVE or EXCLUDE table rows as appropriate and to scroll the table
display UP, DOWN, LEFT and RIGHT.
In addition to the standard primary table commands, this sub-panel also supports primary command SELECTAll (assigned to
<PF6> by default) to toggle between selection and deselection of all entries in the table.
Insert and select table rows to add new unique constraints to the table definition, then, for each new constraint, open the Unique
Constraint Key Columns sub-panel to define the unique key columns.
Figure 196. DB2: Create Table - Unique Constraint Definitions.
Unique Constraint Definitions - Panel Fields
Table Owner:
A non-enterable field displaying the new table owner id as supplied in the Table Name & Location panel view.
Name:
A non-enterable field displaying the new table name as supplied in the Table Name & Location panel view.
Sel> (Sel)
Enter "/" (slash) or any non-blank character in this field to include (select) the unique constraint definition in the create
table syntax. A blank in this field will exclude (deselect) the constraint definition.
Deselecting a constraint definition in table view has the same effect as executing the table primary command EXCLUDE
(or line command "X") to exclude the table row.
2013-11-13 13:06:41
SELCOPY/i Reference and User Guide
340
DB2 Utilities
Unique Constraint Definitions - Panel Fields
Constraint Name
Optionally specifies the name of the unique constraint which is automatically upper cased. If not specified, DB2 will
generate a unique name for the constraint.
A constraint name has a maximum length of 128 characters.
Key Columns
Displays the number of selected key columns. Position the cursor in the row containing the required unique constraint
definition and press <Enter> or, if configured, double-click the left mouse button to display the Unique Constraint Key
Columns sub-panel.
Unique Constraint Key Columns
The Unique Constraint Key Columns sub-panel is displayed on selecting a table row entry in the Unique Constraint Definitions
sub-panel.
This sub-panel contains an embedded table of DB2 table unique constraint key column definitions. Standard table edit primary and
line commands must be used to INSERT, DELETE, COPY, MOVE or EXCLUDE table rows as appropriate, to scroll the table
display UP, DOWN, LEFT and RIGHT and also to ZOOM the display of an individual table row.
In addition to the standard primary table commands, this sub-panel also supports the following primary commands:
• SELECTAll (assigned to <PF6> by default). This toggles between selection and deselection of all entries in the table.
• RESTORETab (assigned to <PF5> by default). This restores the table entries so that all rows that satisfy the filter criteria
are redisplayed. i.e. reset the table view.
Each table row identifies a column definition entered in the Column Definitions sub-panel, which satisfies the unique key column
criteria and is, therefore, eligible for selection as a unique key column. Apart from Sel entry selection field, all fields in this table are
non-enterable and are included for information only.
Select and/or exclude the DB2 column definitions then, if necessary, rearrange them using line command "M" or "MM" so that they
occur in the order required for the unique constraint definition.
Figure 197. DB2: Create Table - Unique Constraint Columns.
Unique Constraint Key Columns - Panel Fields
Table Owner:
A non-enterable field displaying the new table owner id as supplied in the Table Name & Location panel view.
Name:
A non-enterable field displaying the new table name as supplied in the Table Name & Location panel view.
Sel>
Optionally enter blank to deselect this unique constraint definition overriding the selection made in the Unique Constraint
Definitions panel.
Constraint Name>
Optionally override the name of the unique constraint entered in the Unique Constraint Definitions panel.
2013-11-13 13:06:41
SELCOPY/i Reference and User Guide
341
DB2 Utilities
Unique Constraint Key Columns - Panel Fields
Sel
Enter "/" (slash) or any non-blank character in this field to include (select) the column definition in the create table syntax.
A blank in this field will exclude (deselect) the column definition.
Deselecting a column definition in table view has the same effect as executing the table primary command EXCLUDE (or
line command "X") to exclude the table row.
Column Name
A non-enterable field displaying the name of the column.
Type
A non-enterable field displaying the type of the column. See Column Type for valid column types.
Len/Pr
A non-enterable field displaying the length or precision of the column data.
Scale
A non-enterable field displaying the scale of the column data.
DistSchema
A non-enterable field displaying the schema of the distinct type assigned to the column. If no distinct type is used, this field
will display "SYSIBM" or blanks.
DistName
A non-enterable field displaying the name of the distinct type assigned to the column. If no distinct type is used, this field
will display the built-in data type or blanks.
Referential Constraint Definitions
The Referential Constraint Definitions sub-panel is displayed on selecting Referential Constraints from the Columns &
Constraints panel view.
This sub-panel contains an embedded table of DB2 table referential constraint definitions. Standard table edit primary and line
commands must be used to INSERT, DELETE, COPY, MOVE or EXCLUDE table rows as appropriate and to scroll the table
display UP, DOWN, LEFT and RIGHT.
In addition to the standard primary table commands, this sub-panel also supports primary command SELECTAll (assigned to
<PF6> by default) to toggle between selection and deselection of all entries in the table.
Insert and select table rows to add new referential constraints to the table definition. For each new constraint, first open the
Referential Constraint Parent Key Columns sub-panel to identify the parent DB2 table and parent key columns, then open the
Referential Constraint Foreign Key Columns sub-panel to select columns from the new table definition that will constitute the
corresponding foreign key.
On exiting the Column Definitions sub-panel, validation is performed for all selected referential constraint definitions. If no parent
key and/or foreign key columns have been selected or the number of key columns do not match, then the appropriate sub-panel is
opened and an error message returned.
Figure 198. DB2: Create Table - Referential Constraint Definitions.
2013-11-13 13:06:41
SELCOPY/i Reference and User Guide
342
DB2 Utilities
Referential Constraint Definitions - Panel Fields
Referential Constraint Definitions - Panel Fields
Field names that follow are as appear in the zoomed view of a table row. Names in parentheses correspond to the equivalent
column name in table view.
Table Owner:
A non-enterable field displaying the new table owner id as supplied in the Table Name & Location panel view.
Name:
A non-enterable field displaying the new table name as supplied in the Table Name & Location panel view.
Sel> (Sel)
Enter "/" (slash) or any non-blank character in this field to include (select) the referential constraint definition in the create
table syntax. A blank in this field will exclude (deselect) the constraint definition.
Deselecting a constraint definition in table view has the same effect as executing the table primary command EXCLUDE
(or line command "X") to exclude the table row.
Constraint Name
Optionally specifies the name of the referential constraint which is automatically upper cased. If not specified, DB2 will
generate a unique name for the constraint.
A constraint name has a maximum length of 128 characters.
Action> 1. Select Parent Key Columns (Parent Key Columns)
In zoomed view, enter "1" in the Action> field and press <Enter> to display the Referential Constraint - Parent Key
Columns sub-panel for this referential constraint definition.
In table view, the number of selected parent key columns is displayed. Position the cursor on the Parent Key Columns
entry of the required table row and press <Enter> or, if configured, double-click the left mouse button to dispaly the
sub-panel.
Corresponds to SQL CREATE TABLE syntax REFERENCES table-name (column-name, ..) .
Action> 2. Select Foreign Key Columns (Foreign Key Columns)
In zoomed view, enter "2" in the Action> field and press <Enter> to display the Referential Constraint - Foreign Key
Columns sub-panel for this referential constraint definition.
In table view, the number of selected foreign key columns is displayed. This number should match the number of selected
parent key columns. Position the cursor on the Foreign Key Columns entry of the required table row and press <Enter> or,
if configured, double-click the left mouse button to dispaly the sub-panel.
Corresponds to SQL CREATE TABLE syntax FOREIGN KEY (column-name, ..) .
Action on DELETE of Parent Table row: (Delete Action)
Select the action performed on delete of a row in the parent table which has a referential constraint relationship with a row
in the new DB2 table (i.e. delete rule).
In table view, enter a blank or invalid value in this field to display a scrollable list of valid, selectable entries for this field. In
zoomed view, enter "/" (slash) or any non-blank character to select one of the mutually exclusive options.
1. Action defined by CURRENT RULES special register. (Default)
The default action if no explicit delete rule is defined.
2. Delete fails if dependent row exists - check performed immediately. (RESTRICT)
Corresponds to SQL CREATE TABLE syntax ON DELETE RESTRICT.
3. Delete fails if dependent row exists - check performed at end of DELETE. (NOACT)
Corresponds to SQL CREATE TABLE syntax ON DELETE NO ACTION.
4. Dependent rows are deleted. (CASCADE)
Corresponds to SQL CREATE TABLE syntax ON DELETE CASCADE.
5. Nullable columns in the foreign key are set to NULL. (SETNULL)
Corresponds to SQL CREATE TABLE syntax ON DELETE SET NULL.
DB2 Enforced Constraint: (Enf)
Select whether or not the referential constraint is to be enforced by DB2 during normal operations, such as insert, update,
or delete.
2013-11-13 13:06:41
SELCOPY/i Reference and User Guide
343
DB2 Utilities
Referential Constraint - Parent Key Columns
In table view, enter a blank or invalid value in this field to display a scrollable list of valid, selectable entries for this field
(Yes or No). In zoomed view, enter "/" (slash) or any non-blank character to indicate that the constraint is to be enforced
by DB2, otherwise enter blank.
Corresponds to SQL CREATE TABLE syntax ENFORCED or NOT ENFORCED.
Referential Constraint - Parent Key Columns
The Referential Constraint Parent Key Columns sub-panel is displayed on selecting Action 1 or Parent Key Columns in the
Referential Constraint Definitions sub-panel. Alternativley, following validation if no parent key columns have been selected.
This sub-panel contains an embedded table of DB2 table referential constraint parent key column definitions. The table is browsed
so that its contents may not be manipulated using the standard table editing techniques.
The sub-panel also contains fields for parent table name input and/or the name of a unique constraint. Entering the name of a
primary key or unique constraint will automatically populate the embedded table with the constraint's associated column names in
order of sequence. Since the parent key must be a primary or unique key of the parent table, this ensures that the parent key
columns are valid.
Figure 199. DB2: Create Table - Referential Constraint Parent Key Columns.
Referential Constraint - Parent Key Columns - Panel Fields
Parent Table Definition:
Fields that together identify the parent table to be used in the referential constraint relationship.
These field values may include wildcard character "%" (percent) or "*" (asterisk) representing zero or more characters, or
wildcard character "_" (underscore) representing a single character of the parent table owner/name specification. If this is
the case, a Select Table panel is displayed containing a list of eligible DB2 tables which satisfy the table owner/name filter.
Use prefix command "S", or press the <Enter> key on the required entry to select it.
The contents of the parent table input fields are also used as filter fields for constraint name selection.
Owner>
The parent DB2 table owner id.
Name>
The parent DB2 table name.
Constraint Name>
The name of a primary key or unique key constraint associated with the parent table definition. The parent table
primary/unique key columns become the parent key columns in the referential constraint definition.
The constraint name may include wildcard character "%" (percent) or "*" (asterisk) representing zero or more characters,
or wildcard character "_" (underscore) representing a single character of the constraint name. If this is the case, the Select
Unique Key Constraint panel is displayed containing a list of eligible primary and unique key constraint definitions which
satisfy the combined parent table owner/name and constraint name filter. Note that, if a parent table is not specified or
contains wild card characters, then the list will potentially contain constraints from more than one DB2 table.
Use prefix command "S", or press the <Enter> key on the required entry to select it.
2013-11-13 13:06:41
SELCOPY/i Reference and User Guide
344
DB2 Utilities
Referential Constraint - Parent Key Columns - Panel Fields
Selecting an entry from this list will populate the parent table owner and name fields and also insert the associated key
column names and their attributes in the Parent Key Columns table in order of sequence.
Parent Key Columns assigned to the Primary/Unique Key constraint
Embedded table containing a row for each column of the selected primary/unique key.
Parent Key Column
A non-enterable field displaying the name of the column.
Key Col#
A non-enterable field displaying the column sequence number within the key.
Data Type
A non-enterable field displaying the type of the column. See Column Type for valid column types.
Len/Pr
A non-enterable field displaying the length or precision of the column data.
Sc
A non-enterable field displaying the scale of the column data.
Distinct Schema
For data type DISTINCT only, a non-enterable field displaying the schema of the distinct type assigned to the
column. If no distinct type is used, this field will display "SYSIBM" or blanks.
Distinct Name
For data type DISTINCT only, a non-enterable field displaying the name of the distinct type assigned to the
column. If no distinct type is used, this field will display the built-in data type or blanks.
Distinct Type
For data type DISTINCT only, a non-enterable field displaying the source DB2 built-in data type for the distinct
type assigned to the column. If no distinct type is used, this field will display blanks.
Referential Constraint - Foreign Key Columns
The Referential Constraint Foreign Key Columns sub-panel is displayed on selecting Action 2 or Foreign Key Columns in the
Referential Constraint Definitions sub-panel. Alternatively, following validation if no foreign key columns have been selected or the
number of selected foreign key columns does not match the number of selected parent keys columns.
This sub-panel contains an embedded table of DB2 table referential constraint parent key column definitions. The table is for
update only so that rows may not be manipulated using the standard table editing techniques. However, primary command
RESTORETab (assigned to <PF5> by default) may be executed to restore the table entries if required.
One table row exists for each column of the parent key. A foreign key column name from the