1
BreezeMAX™ TDD
Base Station
Installation & Maintenance
Manual
March 2007
P/N 214358
Rev.B
Document History
Document History
Topic
Description
Revision/Date Issued
This is the manual’s first release, supporting the BreezeMAX
Rev. A, October 2006
TDD Base Station only.
H-Bracket for Monopole
New HW
Rev.B, December 2006
New HW
Rev.B, March 2007
16”-20” and 24”-30”
GPS
ii
BreezeMAX Base Station Installation and Maintenance Manual
Legal Rights
Legal Rights
© Copyright 2007 Alvarion Ltd. All rights reserved.
The material contained herein is proprietary, privileged, and confidential and
owned by Alvarion or its third party licensors. No disclosure thereof shall be made
to third parties without the express written permission of Alvarion Ltd.
Alvarion Ltd. reserves the right to alter the equipment specifications and
descriptions in this publication without prior notice. No part of this publication
shall be deemed to be part of any contract or warranty unless specifically
incorporated by reference into such contract or warranty.
Trade Names
Alvarion®, BreezeCOM®, WALKair®, WALKnet®, BreezeNET®, BreezeACCESS®,
BreezeMANAGE™, BreezeLINK®, BreezeConfig™, BreezeMAX™, AlvariSTAR™,
AlvariCRAFT™, BreezeLITE™, MGW™, eMGW™, and/or other products and/or
services referenced here in are either registered trademarks, trademarks or
service marks of Alvarion Ltd.
All other names are or may be the trademarks of their respective owners.
Statement of Conditions
The information contained in this manual is subject to change without notice.
Alvarion Ltd. shall not be liable for errors contained herein or for incidental or
consequential damages in connection with the furnishing, performance, or use of
this manual or equipment supplied with it.
Warranties and Disclaimers
All Alvarion Ltd. ("Alvarion") products purchased from Alvarion or through any of
Alvarion's authorized resellers are subject to the following warranty and product
liability terms and conditions.
Exclusive Warranty
(a) Alvarion warrants that the Product hardware it supplies and the tangible
media on which any software is installed, under normal use and conditions, will
be free from significant defects in materials and workmanship for a period of
fourteen (14) months from the date of shipment of a given Product to Purchaser
(the "Warranty Period"). Alvarion will, at its sole option and as Purchaser's sole
remedy, repair or replace any defective Product in accordance with Alvarion'
standard R&R procedure.
(b) With respect to the Firmware, Alvarion warrants the correct functionality
according to the attached documentation, for a period of fourteen (14) month from
BreezeMAX Base Station Installation and Maintenance Manual
iii
Document History
invoice date (the "Warranty Period")". During the Warranty Period, Alvarion may
release to its Customers firmware updates, which include additional performance
improvements and/or bug fixes, upon availability (the "Warranty"). Bug fixes,
temporary patches and/or workarounds may be supplied as Firmware updates.
Additional hardware, if required, to install or use Firmware updates must be
purchased by the Customer. Alvarion will be obligated to support solely the two (2)
most recent Software major releases.
ALVARION SHALL NOT BE LIABLE UNDER THIS WARRANTY IF ITS TESTING
AND EXAMINATION DISCLOSE THAT THE ALLEGED DEFECT IN THE PRODUCT
DOES NOT EXIST OR WAS CAUSED BY PURCHASER'S OR ANY THIRD
PERSON'S MISUSE, NEGLIGENCE, IMPROPER INSTALLATION OR IMPROPER
TESTING, UNAUTHORIZED ATTEMPTS TO REPAIR, OR ANY OTHER CAUSE
BEYOND THE RANGE OF THE INTENDED USE, OR BY ACCIDENT, FIRE,
LIGHTNING OR OTHER HAZARD.
Disclaimer
(a) The Software is sold on an "AS IS" basis. Alvarion, its affiliates or its licensors
MAKE NO WARRANTIES, WHATSOEVER, WHETHER EXPRESS OR IMPLIED,
WITH RESPECT TO THE SOFTWARE AND THE ACCOMPANYING
DOCUMENTATION. ALVARION SPECIFICALLY DISCLAIMS ALL IMPLIED
WARRANTIES OF MERCHANTABILITY AND FITNESS FOR A PARTICULAR
PURPOSE AND NON-INFRINGEMENT WITH RESPECT TO THE SOFTWARE.
UNITS OF PRODUCT (INCLUDING ALL THE SOFTWARE) DELIVERED TO
PURCHASER HEREUNDER ARE NOT FAULT TOLERANT AND ARE NOT
DESIGNED, MANUFACTURED OR INTENDED FOR USE OR RESALE IN
APPLICATIONS WHERE THE FAILURE, MALFUNCTION OR INACCURACY OF
PRODUCTS CARRIES A RISK OF DEATH OR BODILY INJURY OR SEVERE
PHYSICAL OR ENVIRONMENTAL DAMAGE ("HIGH RISK ACTIVITIES"). HIGH
RISK ACTIVITIES MAY INCLUDE, BUT ARE NOT LIMITED TO, USE AS PART OF
ON-LINE CONTROL SYSTEMS IN HAZARDOUS ENVIRONMENTS REQUIRING
FAIL-SAFE PERFORMANCE, SUCH AS IN THE OPERATION OF NUCLEAR
FACILITIES, AIRCRAFT NAVIGATION OR COMMUNICATION SYSTEMS, AIR
TRAFFIC CONTROL, LIFE SUPPORT MACHINES, WEAPONS SYSTEMS OR
OTHER APPLICATIONS REPRESENTING A SIMILAR DEGREE OF POTENTIAL
HAZARD. ALVARION SPECIFICALLY DISCLAIMS ANY EXPRESS OR IMPLIED
WARRANTY OF FITNESS FOR HIGH RISK ACTIVITIES.
(b) PURCHASER'S SOLE REMEDY FOR BREACH OF THE EXPRESS
WARRANTIES ABOVE SHALL BE REPLACEMENT OR REFUND OF THE
PURCHASE PRICE AS SPECIFIED ABOVE, AT ALVARION'S OPTION. TO THE
FULLEST EXTENT ALLOWED BY LAW, THE WARRANTIES AND REMEDIES SET
FORTH IN THIS AGREEMENT ARE EXCLUSIVE AND IN LIEU OF ALL OTHER
iv
BreezeMAX Base Station Installation and Maintenance Manual
Document History
WARRANTIES OR CONDITIONS, EXPRESS OR IMPLIED, EITHER IN FACT OR BY
OPERATION OF LAW, STATUTORY OR OTHERWISE, INCLUDING BUT NOT
LIMITED TO WARRANTIES, TERMS OR CONDITIONS OF MERCHANTABILITY,
FITNESS FOR A PARTICULAR PURPOSE, SATISFACTORY QUALITY,
CORRESPONDENCE WITH DESCRIPTION, NON-INFRINGEMENT, AND
ACCURACY OF INFORMATION GENERATED. ALL OF WHICH ARE EXPRESSLY
DISCLAIMED. ALVARION' WARRANTIES HEREIN RUN ONLY TO PURCHASER,
AND ARE NOT EXTENDED TO ANY THIRD PARTIES. ALVARION NEITHER
ASSUMES NOR AUTHORIZES ANY OTHER PERSON TO ASSUME FOR IT ANY
OTHER LIABILITY IN CONNECTION WITH THE SALE, INSTALLATION,
MAINTENANCE OR USE OF ITS PRODUCTS.
Limitation of Liability
(a) ALVARION SHALL NOT BE LIABLE TO THE PURCHASER OR TO ANY THIRD
PARTY, FOR ANY LOSS OF PROFITS, LOSS OF USE, INTERRUPTION OF
BUSINESS OR FOR ANY INDIRECT, SPECIAL, INCIDENTAL, PUNITIVE OR
CONSEQUENTIAL DAMAGES OF ANY KIND, WHETHER ARISING UNDER
BREACH OF CONTRACT, TORT (INCLUDING NEGLIGENCE), STRICT LIABILITY
OR OTHERWISE AND WHETHER BASED ON THIS AGREEMENT OR
OTHERWISE, EVEN IF ADVISED OF THE POSSIBILITY OF SUCH DAMAGES.
(b) TO THE EXTENT PERMITTED BY APPLICABLE LAW, IN NO EVENT SHALL
THE LIABILITY FOR DAMAGES HEREUNDER OF ALVARION OR ITS EMPLOYEES
OR AGENTS EXCEED THE PURCHASE PRICE PAID FOR THE PRODUCT BY
PURCHASER, NOR SHALL THE AGGREGATE LIABILITY FOR DAMAGES TO ALL
PARTIES REGARDING ANY PRODUCT EXCEED THE PURCHASE PRICE PAID
FOR THAT PRODUCT BY THAT PARTY (EXCEPT IN THE CASE OF A BREACH OF
A PARTY'S CONFIDENTIALITY OBLIGATIONS).
Disposal of Electronic and Electrical Waste
Disposal of Electronic and Electrical Waste
Pursuant to the WEEE EU Directive electronic and electrical waste must not be disposed of with
unsorted waste. Please contact your local recycling authority for disposal of this product.
BreezeMAX Base Station Installation and Maintenance Manual
v
Document History
Important Notice
This user manual is delivered subject to the following conditions and restrictions:
This manual contains proprietary information belonging to Alvarion Ltd. Such
information is supplied solely for the purpose of assisting properly authorized
users of the respective Alvarion products.
No part of its contents may be used for any other purpose, disclosed to any
person or firm or reproduced by any means, electronic and mechanical,
without the express prior written permission of Alvarion Ltd.
The text and graphics are for the purpose of illustration and reference only.
The specifications on which they are based are subject to change without
notice.
The software described in this document is furnished under a license. The
software may be used or copied only in accordance with the terms of that
license.
Information in this document is subject to change without notice. Corporate
and individual names and data used in examples herein are fictitious unless
otherwise noted.
Alvarion Ltd. reserves the right to alter the equipment specifications and
descriptions in this publication without prior notice. No part of this
publication shall be deemed to be part of any contract or warranty unless
specifically incorporated by reference into such contract or warranty.
The information contained herein is merely descriptive in nature, and does not
constitute an offer for the sale of the product described herein.
Any changes or modifications of equipment, including opening of the
equipment not expressly approved by Alvarion Ltd. will void equipment
warranty and any repair thereafter shall be charged for. It could also void the
user's authority to operate the equipment.
vi
BreezeMAX Base Station Installation and Maintenance Manual
About This Manual
The purpose of this manual is to guide the installing engineer in the installation of
the BreezeMAX 3000 Base Station. The manual provides detailed instructions on
installing and maintaining the Base Station and all its components.
The manual comprises the following chapters:
Chapter 1 - Introduction: Provides an overview of the BreezeMAX Base Station
components and their specifications.
Chapter 2 - Preparations and Precautions - Provides detailed safety guidelines,
ESD precautions and lightning protection.
Chapter 3 - Planning the installation site - Provides guidelines for preparing
the installation site, including guidelines on positioning the ODU, physical
and environmental requirements, cooling requirements, and electrical
requirements. This chapter also lists the tools and materials required for
installation.
Chapter 4 - Inspecting and Unpacking - Describes the items shipped with the
Base Station, with the ODU and with each module.
Chapter 5 - Mechanical Installation - Provides step-by-step instructions for
installing the Base Station in a rack, for installing the various modules in the
chassis, and for installing the AU-ODU on a pole or tower.
Chapter 6 - Connecting the Cables - Describes how to connect the antenna
cable, the IF Cable and the grounding cable, and how to seal the connectors.
Chapter 7 - Connecting to Power - Describes the recommended procedure for
connecting the Base Station to the power in order to avoid damage to the
modules.
Chapter 8 - Connecting to the Network and NMS - Describes how to connect
the Base Station to the network and to the Network Management System.
Document History
Chapter 9 - Power Up Procedure - Describes the operational tests required
after installation, in order to check that the Base Station is in working
condition, and that all local wiring is correct and intact.
Chapter 10 - Commissioning Procedure - Describes the basic configuration
required to enable remote management of the Base Station. The chapter also
describes the upgrade procedure.
Chapter 11 - Maintenance - Provides instructions for AU-ODU, antenna, and
for the Base Station maintenance.
Chapter 12 - Troubleshooting.
Appendix A - Installation Checklist - Provides a recommended checklist for the
entire installation and commissioning process.
Appendix B - Installation Report - Provides a recommended report format to be
filled out by the installer.
Appendix C - Installation of "H" Mounting Bracket for Antennas and ODUs Describes how to install the Antennas Mounting Bracket.
Glossary - Provides a listing of common terms/acronyms and their
explanation.
viii
BreezeMAX Base Station Installation and Maintenance Manual
Contents
Chapter 1 - Introduction
1.1 General ........................................................................................................................... 2
1.1.1 System Architecture ............................................................................................. 3
1.1.2 Modular Base Station Basic Modules .................................................................. 3
1.1.3 Power Feeder....................................................................................................... 6
1.1.4 GPS...................................................................................................................... 7
1.1.5 Installation ............................................................................................................ 8
1.2 The Modular Base Station System Configuration...................................................... 9
1.3 Networking Equipment ............................................................................................... 11
1.4 Network Management ................................................................................................. 12
1.4.1 AlvariSTAR™ ..................................................................................................... 12
1.4.2 AlvariCRAFT™................................................................................................... 13
1.4.3 BreezeMAX Service Manager............................................................................ 14
1.5 Product Specifications ............................................................................................... 15
1.5.1 Radio.................................................................................................................. 15
1.5.2 Base Station 2.X GHz Antennas (Optional) ....................................................... 17
1.5.3 Base Station 3.5 GHz Antennas (Optional)........................................................ 18
1.5.4 AU-IDU to AU-ODU Communication.................................................................. 19
1.5.5 Data Communication (Ethernet Ports) ............................................................... 19
1.5.6 Configuration and Management......................................................................... 20
1.5.7 Environmental .................................................................................................... 20
1.5.8 Standards Compliance, General ........................................................................ 21
1.5.9 Services ............................................................................................................. 22
Contents
1.5.10 Physical and Electrical ....................................................................................... 23
1.5.11 LEDs .................................................................................................................. 28
Chapter 2 - Preparations and Precautions
2.1 Safety Instructions ...................................................................................................... 34
2.2 ESD Precautions ......................................................................................................... 36
2.3 Lightning Protection Guidelines................................................................................ 37
2.3.1 Lightning Protection Principles........................................................................... 37
2.3.2 Lightning Protection System Components ......................................................... 38
Chapter 3 - Planning the Installation Site
3.1 Guidelines for Positioning the ODU .......................................................................... 51
3.2 Guidelines for Positioning the Antenna.................................................................... 52
3.2.1 Scenario 1 .......................................................................................................... 52
3.2.2 Scenario 2 .......................................................................................................... 53
3.2.3 Scenario 3 .......................................................................................................... 54
3.3 IF Cables ...................................................................................................................... 56
3.4 Site Environmental Specification .............................................................................. 57
3.5 Equipment Clearances/Minimum Distances............................................................. 58
3.6 Heat Dissipation .......................................................................................................... 59
3.7 Cooling Requirements ................................................................................................ 60
3.8 Tools............................................................................................................................. 61
x
BreezeMAX Base Station Installation and Maintenance Manual
Contents
Chapter 4 - Inspecting and Unpacking
4.1 Preliminaries................................................................................................................ 64
4.2 Chassis/System........................................................................................................... 65
4.3 AU-ODU/AU-ODU-HP .................................................................................................. 66
4.4 Cards/Modules............................................................................................................. 68
4.5 ODU Power Feeder...................................................................................................... 69
4.6 GPS Module ................................................................................................................. 70
4.6.1 Indoor GPS Adapter........................................................................................... 70
4.6.2 Outdoor GPS Radio ........................................................................................... 70
Chapter 5 - Mechanical Installation
5.1 Installing the Base Station Equipment in a Rack ..................................................... 72
5.1.1 Modular Base Station......................................................................................... 72
5.1.2 ODU Power Feeder............................................................................................ 79
5.1.3 GPS Module....................................................................................................... 82
5.2 Installing the AU-ODU/AU-ODU-HP ........................................................................... 88
5.2.1 Preparing the AU-ODU/AU-ODU-HP ................................................................. 89
5.2.2 Preparing the Antenna ....................................................................................... 89
5.2.3 Mounting the AU-ODU/AU-ODU-HP on a Pole Using Clamps .......................... 92
5.2.4 Mounting the AU-ODU/AU-ODU-HP on a Pole Using Metal Bands .................. 97
5.2.5 Mounting the Antenna on a Pole........................................................................ 99
5.2.6 Mounting the AU-ODU/AU-ODU-HP/Antenna on a Tower .............................. 101
BreezeMAX Base Station Installation and Maintenance Manual
xi
Contents
Chapter 6 - Connecting the Cables
6.1 Connecting the Antenna Cable ................................................................................ 104
6.2 Preparing the IDU-ODU Cable .................................................................................. 107
6.3 Connecting the AU-ODU IF Cable............................................................................ 110
6.4 Connecting the AU-ODU-HP IF Cable...................................................................... 112
6.5 Connecting the GPS Cables..................................................................................... 115
6.6 Connecting the Grounding Cable ............................................................................ 118
6.6.1 Grounding Outdoor Units ................................................................................. 118
6.6.2 Grounding Indoor Units .................................................................................... 119
6.7 Sealing the Outdoor Connectors ............................................................................. 123
Chapter 7 - Connecting to Power
7.1 Preparing a Power Cable .......................................................................................... 126
7.2 Connecting the Power Cable.................................................................................... 128
7.2.1 Modular Base Station....................................................................................... 128
7.2.2 ODU Power Feeder.......................................................................................... 128
Chapter 8 - Connecting to the Network and NMS
8.1 Connecting to the Network....................................................................................... 132
8.2 Connection for Management Purposes .................................................................. 134
8.2.1 In Band (IB) Management ................................................................................ 134
8.2.2 Out Of Band (OOB) Management.................................................................... 134
Chapter 9 - Power Up Test Procedure (Pre-Commissioning)
9.1 General ....................................................................................................................... 138
9.2 System Initial Verification......................................................................................... 139
Chapter 10 - Commissioning Procedure
10.1General ...................................................................................................................... 142
10.2Accessing the Monitor Program ............................................................................. 143
xii
BreezeMAX Base Station Installation and Maintenance Manual
Contents
10.2.1 Connecting via the MON Connector ................................................................ 143
10.2.2 Connecting via Telnet ...................................................................................... 144
10.3Base Station Commissioning .................................................................................. 146
10.3.1 Management Port Definition............................................................................. 147
10.3.2 Data Port Definitions ........................................................................................ 150
10.3.3 Authorized Managers Definition ....................................................................... 151
10.4Base Station Network Connection Testing ............................................................ 153
Chapter 11 - Maintenance
11.1AU-ODU and Antenna Maintenance ........................................................................ 156
11.2BST-SH Maintenance................................................................................................ 157
11.2.1 Replacing the BST Modules............................................................................. 157
11.2.2 Replacing an NPU............................................................................................ 158
11.2.3 Replacing the AVU........................................................................................... 159
Chapter 12 - Troubleshooting
12.1Common Problems ................................................................................................... 164
Appendix A - Installation Checklist
Appendix B - Installation Report
Appendix C - Installation of "H" Mounting Bracket for Antennas and
ODUs
C.1 Overview ....................................................................................................................178
C.2 Product Specifications ............................................................................................. 186
C.2.1 Standards Compliance..................................................................................... 186
C.2.2 Mechanical ....................................................................................................... 186
BreezeMAX Base Station Installation and Maintenance Manual
xiii
Contents
C.2.3 Torques ............................................................................................................ 187
C.3 Safety Instructions .................................................................................................... 188
C.4 Site Preparation......................................................................................................... 189
C.5 Tools........................................................................................................................... 190
C.6 Installing an H-Bracket ............................................................................................. 191
C.6.1 Installing an H-Bracket on a Monopole (3 Sectors, 6”-10” and 10”-14”) .......... 192
C.6.2 Installing an H-Bracket on a Monopole (3 Sectors, 16”-20” and 24”-30”) ........ 198
C.6.3 Installing an H-Bracket on a Monopole (4 Sector) ........................................... 204
C.6.4 Installing an H-Bracket on a Tower Leg ........................................................... 210
C.6.5 Installing an H-Bracket on a Mast .................................................................... 216
C.6.6 Attaching the H-Frame to the Horizontal Arms ................................................ 223
C.6.7 Installing the Radio Equipment Arms and Lightning Protector Rod ................. 225
Glossary
xiv
BreezeMAX Base Station Installation and Maintenance Manual
1
Chapter 1 - Introduction
In This Chapter:
“General” on page 2
“The Modular Base Station System Configuration” on page 9
“Networking Equipment” on page 11
“Network Management” on page 12
“Product Specifications” on page 15
Chapter 1 - Introduction
1.1
General
Alvarion'sBreezeMAX TDD is Alvarion’sa WiMAX-ready platform operating in Time
Division Duplex (TDD) mode. The system is currently available in the 2.3 GHz
(WCS), 2.5 GHz (MMDS and MCS) and 3.5 GHZ frequency bands.
Built from the ground up based on the IEEE 802.16/ETSI HIPERMAN standards,
BreezeMAX is designed specifically to meet the unique requirements of the
wireless Metropolitan Area Network (MAN) environment and to deliver broadband
access services to a wide range of customers, including residential, SOHO, SME
and multi-tenant customers. Its Media Access Control (MAC) protocol was
designed for point-to-multipoint broadband wireless access applications,
providing a very efficient use of the wireless spectrum and supporting difficult
user environments. The access and bandwidth allocation mechanisms
accommodate hundreds of subscriber units per channel, with subscriber units
that may support different services to multiple end users.
The system uses OFDM radio technology, which is robust in adverse channel
conditions and enables operation in non line of sight links. This allows easy
installation and improves coverage, while maintaining a high level of spectral
efficiency. Modulation and coding can be adapted per burst, ever striving to
achieve a balance between robustness and efficiency in accordance with
prevailing link conditions.
A BreezeMAX system comprises the following:
Customer Premise Equipment (CPE): BreezeMAX Subscriber Units and
Alvarion's Voice/Networking Gateways. The CPE is not covered in this manual.
Base Station (BST) Equipment: BreezeMAX Base Station equipment,
including the modular Base Station, Outdoor Radio Units, GPS Receiver and
other components.
Networking Equipment: Standard switches/routers and other networking
equipment, supporting connections to the backbone and/or Internet.
Management Systems: SNMP-based Management, RADIUS server(s), and
other Operation Support Systems.
2
BreezeMAX Base Station Installation and Maintenance Manual
General
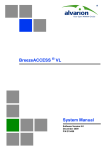
1.1.1
System Architecture
Figure 1-1: System Architecture - with Modular Base Station
1.1.2
Modular Base Station Basic Modules
The Multi Carrier, High Power, Full Duplex Base Station provides all the
functionality necessary to communicate with SUs and to connect to the backbone
of the Service Provider.
BreezeMAX Base Station Installation and Maintenance Manual
3
Chapter 1 - Introduction
The modular Base Station comprises the following elements:
Base Station Chassis - The Base Station Equipment is based on an 8U high
compact Peripheral Component Interconnect (cPCI) shelf designed for
installation in a 19" or 21" (ETSI) rack. This chassis has a total of nine double
Euro (6U high) slots and six single Euro (3U high) slots. All the modules are
hot swappable, and high availability can be provided through multiple
redundancy schemes.
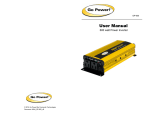
Network Processing Unit (NPU) - The Network Processing Unit is the "heart" of
the BreezeMAX Base Station. The NPU module serves as the central
processing unit that manages the Base Station's components and the SUs
served by it. It also aggregates the traffic from the AU modules and transfers it
to the IP Backbone through a dedicated Gigabit/Fast Ethernet interface.
Figure 1-2: NPU
Access Unit (AU) - The AU comprises an Indoor Unit (IDU) and an Outdoor
Unit (ODU). The double Euro AU-IDU module connects to the AU-ODU via an
Intermediate Frequency (IF) cable. The IF cable carries full duplex data,
control and management signals between the AU-IDU and the AU ODU, as
well as power (48 VDC) and 64 MHz synchronization reference clock from the
AU-IDU to the AU-ODU. The IF Tx and Rx frequencies are 240 MHz and 140
MHz, respectively. IDU-ODU service channel at 14 MHz serves for bidirectional control, status and management signaling.
4
BreezeMAX Base Station Installation and Maintenance Manual
General
Figure 1-3: AU-IDU and AU-ODU
Upto 4 AU-ODUs per sector can be installed on an "H" Mounting Bracket for
Antennas and ODUs (see Appendix C).
Power Interface Unit (PIU) - The PIU filters and stabilizes the Base Station
input power and protects the system from power problems such as over
voltage, surge pulses, reverse polarity connection and short circuits. It also
filters high frequency interference (radiated emissions) and low frequency
interference (conducted emissions) to the external power source.
Figure 1-4: PIU
Power Supply Unit (PSU) - The PSU is a 48 VDC power supply unit. Each Base
Station chassis can contain up to four PSU modules providing N+1
redundancy configurations.
BreezeMAX Base Station Installation and Maintenance Manual
5
Chapter 1 - Introduction
Figure 1-5: PSU
Air Ventilation Unit (AVU) - The AVU includes an integral chamber for inlet
airflow and a fan tray with an internal alarm module. The 2U high, 84 HP wide
AVU includes a 1U high integral chamber for inlet airflow and a 1U high fan
tray with an internal alarm module. To support a high availability Base
Station, the fan tray includes 10 brush-less fans, where 9 fans are sufficient
for cooling a fully loaded chassis. To further support high availability, the
chassis can operate with the hot-swappable fan tray extracted from it for a
period of time sufficient for replacing it (up to 10 minutes).
Figure 1-6: AVU Drawer
1.1.3
Power Feeder
The ODU Power Feeder is used to provide power (-48 VDC) to AU-ODU-HP High
Power ODUs. It transfers transparently all signals between the AU-IDU and the
ODU, while injecting DC power received from an external source. Each ODU
Power Feeder unit can serve up to four High Power ODUs. Up to three ODU Power
Feeder units can be installed in a 1U high Power Feeder panel. For information on
the number of ODUs and Power Feeder modules required for various radio
configurations, refer to the BreezeMAX Base Station System Manual.
6
BreezeMAX Base Station Installation and Maintenance Manual
General
Figure 1-7: Power Feeder
1.1.4
GPS
GPS is used to synchronize the air link frames of Intra-site and Inter-site located
sectors to ensure that in all sectors the air frame will start at the same time, and
that all sectors will switch from transmit (downlink) to receive (uplink) at the same
time. This synchronization is necessary to prevent Intra-site and Inter-site sectors
interference and saturation (assuming that all sectors are operating with the same
frame size and with the same DL/UL ratio).
The GPS clock required is 1PPS with accuracy of 10-11 and maximum jitter of
100ns. These GPS clock requirements can be reached by indoor or outdoor
installed GPS unit when it is synchronized to at least 4 satellites.
1.1.4.1
Outdoor GPS Receiver
The all-outdoor GPS Receiver is a pole mountable GPS receiver and antenna in a
single environmentally protected enclosure. The Outdoor GPS Receiver is powered
by a 12 VDC power source, supplied to it by the NPU via the GPS Adapter. The
RS-422 interface allows installation at distances up to 100m.
1.1.4.2
GPS Adapter Unit
The GPS Adapter connects the different GPS units to the NPU, adapting the
different interfaces. Future versions may include an internal GPS module that will
allow an all-in-one low-cost solution. A future optional addition of OCXO in the
GPS Adapter box may provide an improved hold over solution when the GPS is not
synchronized. The GPS Adapter is powered by 12 VDC supplied by the NPU. The
GPS Adapter is installed in a 1U high panel (the same panel that is used for the
ODU Power Feeders).
BreezeMAX Base Station Installation and Maintenance Manual
7
Chapter 1 - Introduction
1.1.5
Installation
The BST Indoor Unit can be installed in a 19" or 21" (ETSI) rack. See 5.1. For
details on installing the various modules in the BST chassis, refer to 5.1.1.1.
The BST Outdoor Unit and antenna can be mounted on:
A 1" to 4" pole. See 5.2.3 and 5.2.4.
A tower. See 5.2.6.
"H" Mounting Bracket for Antennas and ODUs. See Appendix C.
8
BreezeMAX Base Station Installation and Maintenance Manual
The Modular Base Station System Configuration
1.2
The Modular Base Station System
Configuration
The Base Station Equipment is based on an 8U high cPCI (compact Peripheral
Component Interconnect) shelf designed for installation in a 19" or 21" (ETSI)
rack.
The six single Euro slots are intended for one or two Power Interface Units (PIU)
and up to four Power Supply Units (PSUs). For the number of PSUs (excluding
redundant units) required for various Base Station configurations without NPU
redundancy (one NPU), see Table 1-1.
One of the double Euro slots is dedicated to the Network Processing Unit (NPU)
module, supporting a central networking and management architecture. Another
double Euro slot is reserved for an optional redundant NPU (NPU redundancy
support is planned for future release).
The remaining seven double Euro slots are dedicated mainly for Access Unit (AU)
indoor modules, thus enabling various future redundancy configurations. Each of
these slots will also be able to host a Network Interface Unit (NIU) to allow for
NxE1 or ATM backbone connectivity in future releases.
Additionally, the Base Station chassis contains an air convection and ventilation
fan tray (AVU).
Figure 1-8: Base Station
BreezeMAX Base Station Installation and Maintenance Manual
9
Chapter 1 - Introduction
Table 1-1: PSU Requirements, Configurations with one NPU (excluding PSU redundancy)
10
Number of AU-IDUs
Minimum Required
Number of PSUs
1-2
1
3-4
2
5-6
3
BreezeMAX Base Station Installation and Maintenance Manual
Networking Equipment
1.3
Networking Equipment
The modular Base Station equipment is connected to the backbone through
standard data communication and telecommunication equipment. The NPU
aggregates the traffic from all AUs, connecting to the backbone through a
100/1000 Base-T port.
The point-to-point link from the Base Station to the backbone can be either wired
or wireless.
AlvarionThe Supplier offers the DUET 6004, a V5.2 to SIP Access Gateway
connecting a Class 5 switch over V5.2 to its’ Voice Gateways. For details, refer to
the Base Station System Manual.
BreezeMAX Base Station Installation and Maintenance Manual
11
Chapter 1 - Introduction
1.4
Network Management
The system's end-to-end IP-based architecture enables full management of all
components, using standard management tools. An SNMP agent in the NPU
implements standard and proprietary MIBs for remote setting of operational
modes and parameters of the Base Station equipment as well as all other system
components that are managed by it.
Security features incorporated in BreezeMAX units restrict the access for
management purposes.
A serial RS-232 port supports local configuration, monitoring and debugging.
In addition, the Ethernet WAN can be used to connect to other Operation Support
Systems including servers, Customer Care systems and AAA (Authentication,
Authorization and Admission) tools.
1.4.1
AlvariSTAR™
AlvariSTAR is a comprehensive Carrier-Class network management system for
Alvarion's Broadband Wireless Access products-based Networks. AlvariSTAR is
designed for today's most advanced Service Providers' Network Operation Centers
(NOCs), providing the network Operation, Administration and Maintenance
(OA&M) staff and managers with all the network surveillance, monitoring and
configuration capabilities that they require in order to effectively manage the BWA
network while keeping the resources and expenses at a minimum.
AlvariSTAR is designed to provide the network's OA&M staff with a unified,
scalable and distributable network management system. The AlvariSTAR system
uses a distributed client-server architecture, which provides the service provider
with a robust, scalable and fully redundant network management system in
which all single points of failure can be avoided.
AlvariSTAR provides the following BWA network management functionality:
Device Discovery
Device Inventory
Topology
Fault Management
Configuration Management
12
BreezeMAX Base Station Installation and Maintenance Manual
Network Management
Service Management
Performance Monitoring
Device embedded software upgrade
Security Management
Northbound interface to other Network Management Systems.
Embedded with the entire knowledge base of BWA network operations,
AlvariSTAR is a unique state-of-the-art power multiplier in the hands of the
service provider that enables the provisioning of satisfied customers. AlvariSTAR
dramatically extends the abilities of the service provider to provide a rich portfolio
of services and to support rapid customer base expansion.
For information on installing AlvariSTAR, refer to the AlvariSTAR Installation
Manual.
1.4.2
AlvariCRAFT™
Alvarion's AlvariCRAFT is an SNMP (Simple Network Management Protocol)
application designed for on-line management of BreezeMAX system components.
This utility simplifies the installation and maintenance of small size installations
by easily enabling the change of settings or firmware upgrade for one Base Station
at a time, including the managed device's components and associated SUs.
AlvariCRAFT allows accessing a wide array of monitoring and configuration
options, including:
Device Manager for the selected Base Station, including it's NPU, AUs and SUs
Selected unit configuration modification
Local Service Profiles verification and modification
Local Service Provisioning
Firmware upgrade for the NPU, AUs and SUs
On-line performance data monitoring
Export of configuration details to a CSV file
BreezeMAX Base Station Installation and Maintenance Manual
13
Chapter 1 - Introduction
Support for Telnet cut-through to the Base Station
1.4.3
BreezeMAX Service Manager
BreezeMAX Service Manager provides centralized management of user
authentication and authorization using the industry standard RADIUS protocol.
The BreezeMAX Service Manager receives from the NPU (operating as a NAS) the
authentication details (User Name and Password) upon network entry of a new
CPE, and respond (if authentication if verified by matching details in the
database) by sending properties of the Services that should be granted to the user.
14
BreezeMAX Base Station Installation and Maintenance Manual
Product Specifications
1.5
Product Specifications
1.5.1
Radio
Table 1-2: Radio Specifications
Item
Description
Frequency
Unit/Band
Frequency (MHz)
AU-ODU-HP-2.3
2300 - 2360
AU-ODU-HP-2.3-WCS
2305 - 2315, 2350 - 2360
AU-ODU-HP-2.5-A1
2496 - 2602
AU-ODU-HP-2.5-A2
2590 - 2690
AU-ODU-HP-TDD-3.4a
3399.5 - 3455
AU-ODU-HP-TDD-3.4b
3455 - 3500
AU-ODU-HP-TDD-3.5a
3500 - 3555
AU-ODU-HP-TDD-3.5b
3545 - 3600
Operation Mode
TDD
Channel Bandwidth
3.5 MHz
5 MHz
Central Frequency Resolution
0.125 MHz (actual configurable frequencies depend on the local radio
regulations and allocated spectrum)
Antenna Port (AU-ODU)
N-Type, 50 ohm
Max. Input Power
(at AU-ODU antenna port)
-60 dBm before saturation, -8 dBm before damage
Output Power
(at AU-ODU antenna port)
2.x GHz:
36 dBm +/-1 dB maximum
Power control range: 10 dB
3.x GHz
34 dBm +/-1 dB maximum
Power control range: 10 dB
Modulation
OFDM modulation, 256 FFT points; BPSK, QPSK, QAM16, QAM64
FEC
Convolutional Coding: 1/2, 2/3, 3/4
BreezeMAX Base Station Installation and Maintenance Manual
15
Chapter 1 - Introduction
Table 1-2: Radio Specifications
Item
Description
Typical Sensitivity
(BER=1E-6), 2.x GHz units
Modulation &
Coding
Minimum
SNR (dB)
Sensitivity (dBm)
@ 3.5 MHz BW
Sensitivity (dBm)
@ 5 MHz BW
BPSK 1/2
2.5
-98
-96
BPSK 3/4
4.8
-96
-94
QPSK 1/2
5.9
-95
-93
QPSK 3/4
8.6
-92
-89
QAM16 1/2
11.4
-89
-87
QAM16 3/4
14.8
-86
-84
QAM64 2/3
20
-81
-79
QAM64 3/4
20.9
-80
-78
Modulation &
Coding
Minimum
SNR (dB)
Sensitivity (dBm)
@ 3.5 MHz BW
Sensitivity (dBm)
@ 5 MHz BW
Typical Sensitivity
(BER=1E-6), 3.x GHz units
BPSK 1/2
BPSK 3/4
QPSK 1/2
QPSK 3/4
QAM16 1/2
QAM16 3/4
QAM64 2/3
QAM64 3/4
16
BreezeMAX Base Station Installation and Maintenance Manual
Product Specifications
1.5.2
Base Station 2.X GHz Antennas (Optional)
Table 1-3: Base Station 2.X GHz Antennas, Electrical Specifications
Item
Description
BS ANT 60/2.X V
16.5 dBi minimum in the 2.3-2.7 GHz band, 60°AZ x 7°EL sector antenna, vertical
polarization, compliance with ETSI EN 301 525 V.1.1.1 (2000-06) CS and RoHS
BS ANT 90/2.X V
15.5 dBi minimum in the 2.3-2.7 GHz band, 90°AZ x 7°EL sector antenna, vertical
polarization, compliance with ETSI EN 301 525 V.1.1.1 (2000-06) CS and RoHS
BS ANT 120/2.X V
14 dBi minimum in the 2.3-2.7 GHz band, 120°AZ x 7°EL sector antenna, vertical
polarization, compliance with ETSI EN 301 525 V.1.1.1 (2000-06) CS and RoHS
BS ANT 60/2.X H
16.5 dBi minimum in the 2.3-2.7 GHz band, 60°AZ x 7°EL sector antenna, horizontal
polarization, compliance with ETSI EN 301 525 V.1.1.1 (2000-06) CS and RoHS
BS ANT 90/2.X H
15.5 dBi minimum in the 2.3-2.7 GHz band, 90°AZ x 7°EL sector antenna, horizontal
polarization, compliance with ETSI EN 301 525 V.1.1.1 (2000-06) CS and RoHS
BS ANT 120/2.X H
14 dBi minimum in the 2.3-2.7 GHz band, 120°AZ x 7°EL sector antenna, horizontal
polarization, compliance with ETSI EN 301 525 V.1.1.1 (2000-06) CS and RoHS
BS ANT 60/2.X DP
2 x 17 dBi minimum in the 2.3-2.7 GHz band, 65°AZ x 7°EL sector antenna,
dual slant +/- 45° polarization, compliance with ETSI EN 302 085 CS2 and RoHS
BS ANT 90/2.X DP
2 x 15.5 dBi minimum in the 2.3-2.7 GHz band, 90°AZ x 8°EL sector antenna,
dual slant +/- 45° polarization, compliance with ETSI EN 302 085 CS2 and RoHS
BS ANT 120/2.X DP
2 x 13 dBi minimum in the 2.3-2.7 GHz band, 120°AZ x 8°EL sector antenna,
dual slant +/- 45° polarization, compliance with ETSI EN 302 085 CS2 and RoHS
BreezeMAX Base Station Installation and Maintenance Manual
17
Chapter 1 - Introduction
1.5.3
Base Station 3.5 GHz Antennas (Optional)
Table 1-4: Base Station 3.5 GHz Antennas, Electrical Specifications
Item
Description
BS ANT 60V/3.3-3.8
16.5 dBi minimum in the 3.3-3.8 GHz band, 60° AZ x 10° EL, vertical polarization,
compliant with ESTI EN 302 085 V.1.1.2 (2001-02) CS2.
BS ANT 90V/3.3-3.8
15 dBi typical in the 3.3-3.8 GHz band, 90° AZ x 9° EL, vertical polarization,
compliant with ESTI EN 302 085 V.1.1.2 (2001-02) CSI,CS2,CS3
BS ANT 90V/3.3-3.7
15 dBi typical in the 3.3-3.8 GHz band, 90° AZ x 7° EL, vertical polarization,
compliant with ESTI EN 302 085 V.1.1.2 (2001-02) CSI,CS2,CS3
BS ANT 120/3.5V
14 dBi typical in the 3.3-3.7 GHz band, 120° AZ x 6.7° EL, vertical polarization,
compliant with ESTI EN 302 085 V.1.2.3 (2005-09) CS1.
BS ANT 60/3.5H
16 dBi typical in the 3.4-3.6 GHz band, 60° AZ x 9° EL, horizontal polarization,
compliant with EN 302 085, V1.1.1 CS3
BS ANT 90/3.5H
14 dBi typical in the 3.4-3.6 GHz band, 85° AZ x 9° EL, horizontal polarization,
compliant with EN 302 085, V1.1.1 CS3
BS ANT 60/3.X DP
2 x 16.5 dBi minimum in the 3.3-3.8 GHz band, 65°AZ x 7°EL sector antenna,
dual slant +/- 45° polarization, compliance with ETSI EN 302 085 CS2 and RoHS
BS ANT 90/3.X DP
2 x 15.5 dBi minimum in the 3.3-3.8 GHz band, 90°AZ x 7°EL sector antenna,
dual slant +/- 45° polarization, compliance with ETSI EN 302 085 CS2 and RoHS
BS ANT 120/3.X DP
2 x 13 dBi minimum in the 3.3-3.8 GHz band, 120°AZ x 7°EL sector antenna,
dual slant +/- 45° polarization, compliance with ETSI EN 302 085 CS2 and RoHS
Omni ANT 3.4-3.6
10 dBi typical in the 3.4-3.6 GHz band, 360° AZ x 9° EL, vertical polarization
18
BreezeMAX Base Station Installation and Maintenance Manual
Product Specifications
1.5.4
AU-IDU to AU-ODU Communication
Table 1-5: AU-IDU to AU-ODU Communication
Item
Description
IF Frequency
Tx: 240 MHz
Rx: 140 MHz
Ref Synchronization Frequency
64 MHz
Bi-Directional Control Frequency
14 MHz
IF cable Impedance
50 ohm
Maximum IF cable Attenuation
10 dB @ 240 MHz
7.5 dB @ 140 MHz
8 dB @ 64 MHz
Minimum IF cable Shielding Effectiveness
90 dB in the 10-300 MHz band
Maximum IF cable Return Loss
20 dB in the 10-300 MHz band
Maximum IF cable DC Resistance
1.5 ohm
1.5.5
Data Communication (Ethernet Ports)
Table 1-6: Data Communication (Ethernet Ports)
Item
Description
Standard Compliance
IEEE 802.3 CSMA/CD
Maximum Packet Size
1550 Bytes (including 4 CRC bytes and 4 VLAN tag bytes)
Speed
Data Port
100/1000 Mbps, Full Duplex
Management Port
10/100 Mbps, Half/Full Duplex with Auto
Negotiation
BreezeMAX Base Station Installation and Maintenance Manual
19
Chapter 1 - Introduction
1.5.6
Configuration and Management
Table 1-7: Configuration and Management
Item
Description
Out Of Band (OOB) Management
Telnet via Management port
SNMP via Management port
Monitor port
SNMP
In Band (IB) Management via Data Port
Telnet
SNMP Agents
SNMP ver 1 client
MIB II (RFC 1213), Private BreezeMAX MIBs
Authentication and Authorization
RADIUS
Software upgrade
Using TFTP
Configuration upload/download
Using TFTP
1.5.7
Environmental
Table 1-8: Environmental Specifications
Type
Unit
Details
Operating temperature
Outdoor units
-40°C to 55°C
Indoor equipment
0°C to 40°C
Outdoor units
5%-95% non condensing, Weather protected
Indoor equipment
5%-95% non condensing
Operating humidity
20
BreezeMAX Base Station Installation and Maintenance Manual
Product Specifications
1.5.8
Standards Compliance, General
Table 1-9: Standards Compliance, General
Type
Standard
EMC
ETSI EN 301 489-1/4
ETSI EN 300-385
Safety
EN 60950-1
UL 60 950-1
Environmental
ETS 300 019:
Part 2-1 T 1.2 & part 2-2 T 2.3 for indoor & outdoor
Part 2-3 T 3.2 for indoor
Part 2-4 T 4.1E for outdoor
Radio
ETSI EN 301 753 V.1.1.1
ETSI EN 301 021 V.1.6.1
FCC 04-135
FCC 27.53
BreezeMAX Base Station Installation and Maintenance Manual
21
Chapter 1 - Introduction
1.5.9
Services
Table 1-10: Services
Item
Description
Max number of Services per BST
4,095 (0ne or several services may be defined per subscriber,
one or more subscribers can be supported per SU)
Min number of data connections per Service
2 (1 uplink, 1 downlink)
Max number of data connections per Service
8 (4 uplink, 4 downlink)
Max number of data connections per SU
126
Max number of data connections per AU
3999 - 3 x number of SUs (3 connections are reserved for
each SU)
Max number of SUs per AU
510
Max number of AUs per BST
7
Max number of MAC addresses in Bridging Table
BST: 6,000
SU: 512
(Aging time is configurable. The default is 3 minutes for SU,
10 minutes for NPU)
Max number of VLANs per Service
16
Max number of VLANs per SU
16
Max number of VLANs
(VPL IDs) per BST
1,024
Max number of concurrent voice calls per
Voice/L2 Service
50
Max number of concurrent voice calls per AU
300
22
BreezeMAX Base Station Installation and Maintenance Manual
Product Specifications
1.5.10 Physical and Electrical
1.5.10.1
Mechanical Specifications, Base station Equipment
Table 1-11: Mechanical Specifications, Base Station Equipment
Unit
Dimensions (cm)
Weight (kg)
BST-SH
8U ETSI type shelf, 8U x 43.19 x 24
6.9 (excluding AVU)
PIU
3U x 5HP x 16
0.35
PSU
3U x 8HP x 16
0.7
NPU
6U x 7HP x 16
0.7
AU-IDU-4CH
6U x 7HP x 16
AU-ODU-HP
31.5 x 16 x 16
5.5
AVU
2U x 84HP x 16
1.7
Power Feeder panel
1U ETSI type panel
0.14
Power Feeder Module
15.7 x 14.6 x 3.17
0.6
GPS Adapter
15.7 x 14.6 x 3.17
0.4
Outdoor GPS Receiver
Tubular enclosure, 15.5 D x 12.7 H
0.363
* 1U=44.45 mm (1.75"), 1HP=5.08 mm (0.2")
BreezeMAX Base Station Installation and Maintenance Manual
23
Chapter 1 - Introduction
1.5.10.2
Electrical Specifications, Base station Equipment
Table 1-12: Electrical Specifications, Base Station Equipment
Unit
Details
Power Source
-40.5 to -60 VDC
PIU
16W maximum (active PIU)
PSU
200W maximum output power
Efficiency: 80% minimum
NPU
65W maximum, 44W typical, excluding power that may be required
for GPS Adapter (1.2W maximum) and Outdoor GPS Receiver (6W
maximum)
AU-IDU
46W maximum, 39W typical
AU-ODU-HP-2.x GHz
Tx (DL)
89W maximum, 75W typical
Rx (UL)
15W maximum, 9W typical
Tx (DL)
90W maximum, 62W typical
Rx (UL)
20W maximum, 14W typical
AU-ODU-HP-3.x GHz
AVU
24W maximum, 23W typical
ODU Power Feeder
Power Source: -40.5 to -60 VDC
Power Dissipation: 2W per channel
GPS Adapter
12 VDC from the NPU, 1.2W maximum
Outdoor GPS Receiver
12 VDC from the NPU via the GPS Adapter, 6W maximum
24
BreezeMAX Base Station Installation and Maintenance Manual
Product Specifications
1.5.10.3
Connectors, Base station Equipment
Table 1-13: Connectors, Base Station Equipment
Unit
Connector
Description
PIU
-48V
3 pin/40A D-Type male
Amphenol P/N 717TWA3W3PHP2V4RRM6
NPU
DATA
100/1000Base-T (RJ-45) with 2 embedded LEDs.
Cable connection to a PC: Crossed
Cable connection to a hub: Straight
MGMT
10/100Base-T (RJ-45) with 2 embedded LEDs.
Cable connection to a PC: Crossed
Cable connection to a hub: Straight
GPS/SYNC IN
15-pin micro D-Type jack
GPS/SYNC OUT
15-pin micro D-Type jack
ALRM IN
9-pin micro D-Type jack
ALRM OUT
9-pin micro D-Type jack
MON
3-pin low profile jack
AU-IDU
ODU 1, ODU 2
2 x TNC jack, lightning protected
AU-ODU, AU-ODU-HP
IF
TNC jack, lightning protected
ANT
N-Type jack, 50 ohm, lightning protected
ODU 1 -4
4 x TNC jack, lightning protected
IDU 1-4
4 x TNC jack, lightning protected
Power
3 pin/20A D-Type plug,
Amphenol P/N
BASE STATION INTERFACE
15-pin D-Type jack
IDU GPS CMD
9-pin D-Type jack
IDU GPS 1PPS IN
BNC jack
ODU GPS
RJ-45 jack
ODU Power Feeder
GPS Adapter
(GND)
Outdoor GPS Receiver
Grounding Screw - connection to ground (earth)
12-pin round plug
BreezeMAX Base Station Installation and Maintenance Manual
25
Chapter 1 - Introduction
1.5.10.4
Base Station 2.X GHz Antennas, Mechanical Specifications
Table 1-14: Base Station 2.X GHz Antennas, Mechanical Specifications
Unit
Description
Dimensions (cm)
Weight (kg)
BS ANT 60/2.X V
Downtilt Mounting Kit: 2" to 4.5" pole
109.3 x 21.3 x 12.4
5 maximum
109.3 x 21.3 x 12.2
5 maximum
109.3 x 20.5 x 11.9
5 maximum
109.3 x 21.3 x 12.4
5 maximum
109.3 x 21.3 x 12.2
5 maximum
109.3 x 20.5 x 11.9
5 maximum
100 x 12 x 5
2 maximum
100 x 12 x 5
2 maximum
100 x 17 x 9
5 maximum
Connector: N-Type female
BS ANT 90/2.X V
Downtilt Mounting Kit: 2" to 4.5" pole
Connector: N-Type female
BS ANT 120/2.X V
Downtilt Mounting Kit: 2" to 4.5" pole
Connector: N-Type female
BS ANT 60/2.X H
Downtilt Mounting Kit: 2" to 4.5" pole
Connector: N-Type female
BS ANT 90/2.X H
Downtilt Mounting Kit: 2" to 4.5" pole
Connector: N-Type female
BS ANT 120/2.X H
Downtilt Mounting Kit: 2" to 4.5" pole
Connector: N-Type female
BS ANT 60/2.X DP
Downtilt Mounting kit: 4 to 12 cm pole
Connector: 2 x N-Type female
BS ANT 90/2.X DP
Downtilt Mounting kit: 4 to 12 cm pole
Connector: 2 x N-Type female
BS ANT 120/2.X DP
Downtilt Mounting kit: 4 to 12 cm pole
Connector: 2 x N-Type female
1.5.10.5
Base Station 3.5 GHz Antennas, Mechanical Specifications
Table 1-15: Base Station 3.5 GHz Antennas, Mechanical Specifications
Unit
Description
Dimensions (cm)
Weight (kg)
BS ANT 60V/3.3-3.8
Mounting kit: 2" to 4" pole
50 x 20 x 3
1.5
53.6 x 36 x 3
2.3
53.6 x 36 x 3
2.3
Connector: N-Type female
BS ANT 90V/3.3-3.8
Mounting kit: 2" to 4" pole
Connector: N-Type female
BS ANT 90V/3.3-3.7
Mounting kit: 2" to 4" pole
Connector: N-Type female
26
BreezeMAX Base Station Installation and Maintenance Manual
Product Specifications
Table 1-15: Base Station 3.5 GHz Antennas, Mechanical Specifications
Unit
Description
Dimensions (cm)
Weight (kg)
BS ANT 120/3.5V
Mounting kit: 0.75" to 2" pole
76.2 x 8.3 x 7.6
2.0
48 x 20 x 4
2
60 x 25 x 5.5
2
85.1 x 16 x 6.1
2 maximum
85.1 x 16 x 6.1
2 maximum
68.8 x 17 x 14.5
4 maximum
67.5 tubular, 2 diameter
0.3
Mechanical tilt: 0° to -30°.
Connector: N-Type female
BS ANT 60/3.5H
Mounting kit: 2" to 4" pole
Connector: N-Type female
BS ANT 90/3.5H
Mounting kit: 2" to 4" pole
Connector: N-Type female
BS ANT 60/3.X DP
Downtilt Mounting kit: 4 to 12 cm pole
Connector: 2 x N-Type female
BS ANT 90/3.X DP
Downtilt Mounting kit: 4 to 12 cm pole
Connector: 2 x N-Type female
BS ANT 120/3.X DP
Downtilt Mounting kit: 4 to 12 cm pole
Connector: 2 x N-Type female
Omni ANT 3.4-3.6
Mounting bracket: 30 to 53 mm pole.
Connector: N-Type female
BreezeMAX Base Station Installation and Maintenance Manual
27
Chapter 1 - Introduction
1.5.11 LEDs
Table 1-16: AU-ODU LEDs
Name
Description
Functionality
PWR
Power indication
Off - Power failure
Green - Power to ODU is OK, internal 3.3
VDC power supply is OK.
ALARM
IDU-ODU communication and
synthesizer status indication
Off - IDU-ODU communication is OK,
synthesizer is locked.
Red - IDU-ODU communication failure or
synthesizer is not locked
ETH
Not Used
Table 1-17: AU-IDU LEDs
Name
Description
Functionality
PWR
Power indication
Off - AU-IDU is not powered
Red - AU-IDU power supply failed (low power)
Green - AU-IDU power is OK
ALARM
Alarm indication
Off - AU-IDU is OK
Red - AU-IDU failure
WLINK
Wireless link status indication
Off - No SU is associated
Green - At least one SU is associated
WACT
IDU transmission indication
Off - No IDU transmission
Green - IDU transmission OK
SP
Spare
Not Used
IP
IP activity indication
Off - No downlink (AU to SU) IP activity
Green (blinking) - Downlink (AU to SU) IP activity
ODU1-ODU4
PWR
IDU to ODU Power Indication
Off - No IDU to ODU power output
Red - IDU to ODU power output failed
Green - IDU to ODU power output OK
28
BreezeMAX Base Station Installation and Maintenance Manual
Product Specifications
Table 1-17: AU-IDU LEDs
Name
Description
Functionality
Off - IDU-ODU communication OK
ODU1-ODU4
ALRM
Red - IDU-ODU communication failure
HOT SWAP
IDU readiness for hot swap
removal
Off: Power to the module is not disconnected, the AU-IDU
is not ready for removal.
Blue: Power to the module can be disconnected and the
AU-IDU can be safely removed.
For instructions on using the HOT SWAP handles refer to
11.2.
Table 1-18: NPU LEDs
Name
Description
Functionality
PWR
Power indication
Off - NPU is not powered
Red - NPU power failure
Green - NPU power is OK
ALRM
NPU Alarm indication
Off - NPU is OK
Red - NPU failure
BST ALRM
Base Station chassis alarm
indication
Off - All Base Station modules are OK
Red - Failure in one (or more) Base Station modules
EXT ALRM
External alarm indication
Off - No alarms
Red - Alarm received via the ALRM IN connector
MASTER
Master/Slave operation
indication
Off - Secondary NPU (backup)
Green - Primary NPU
GPS/SYNC
GPS/IF clock synchronization
functionality indication
Off - GPS/IF clock synchronization is disabled
Green - GPS/IF clock is synchronization enabled
HOT SWAP
NPU readiness for hot-swap
removal
Off: Power to the module is on, the NPU is not ready
for removal.
Blue: Power to the module can be disconnected and
the NPU can be safely removed.
For instructions on using the HOT SWAP handles refer to
11.2.
BreezeMAX Base Station Installation and Maintenance Manual
29
Chapter 1 - Introduction
Table 1-19: PIU LEDs
LED Status
PWR
LED Status
MASTER
Off
Off
Chassis is not connected to power.
Red
Off
Power is not connected or power input is out of range or PIU card is damaged.
Chassis is powered by the redundant PIU.
Red
Green
Power input is out of range or PIU card is damaged. Chassis is powered by the
PIU.
Green
Off
Power to PIU is OK. PIU is in redundant mode and the chassis is powered
from the other PIU.
Green
Green
Power to PIU is OK. The chassis is powered from the PIU.
Off: Power from the module to the chassis is not disconnected, the PIU is
HOT SWAP
not ready for removal.
Blue: Power from the module to the chassis can be disconnected and the
PIU can be safely removed.
For instructions on using the HOT SWAP handles refer to 11.2.
Table 1-20: PSU LEDs
LED Status
PWR
Description
ALARM
Off
Off
No power or fatal damage
Off
Red
Power input is out of range or PSU is damaged or PSU is inhibited by NPU.
Green
Off
Power is OK and PSU operates properly.
Table 1-21: AVU LEDs
LED Status
PWR
Description
ALARM
Off
Off
No 5V power input.
Red
Red
12V power failed.
Green
Red
One or more fans have failed.
Green
Off
AVU operates properly.
30
BreezeMAX Base Station Installation and Maintenance Manual
Product Specifications
Table 1-22: ODU Power Feeder LEDs
Name
Description
Functionality
PWR
Input power indication
Off - ODU Power Feeder is not powered
Green - ODU Power Feeder power is OK
ODU PWR 1 - 4
Output power indications
Off - AU-ODU-HP is not connected
Red - Power output problem (short or overload)
Green - AU-ODU-HP is connected and powered
Table 1-23: GPS Adapter LEDs
Name
Description
Functionality
PWR
Input power indication
Off - Power input failure
Green - 12 VDC power supply from NPU is OK
1PPS
1PPS signal indication
Blinking Green - 1PPS signal from GPS Receiver
is detected
Red - 1PPS signal is not detected
Active GPS - ODU
ODU GPS selection indication
Green - indicates that the selected GPS Receiver:
is ODU (Outdoor)
Off - ODU GPS Receiver is not selected
Active GPS - IDU
IDU GPS selection indication
Green - indicates that the selected GPS Receiver:
is IDU (Indoor)
Off - IDU GPS Receiver is not selected
Active GPS - INT
INT GPS selection indication
Green - indicates that the selected GPS Receiver:
is INT (Internal). Internal is not supported in current
release.
Off - INT GPS Receiver is not selected
INT CLOCK
Internal clock source indication
Green - Internal 16MHz clock is ok (not supported
in current release)
Red - Internal clock is not available or clock failure
BreezeMAX Base Station Installation and Maintenance Manual
31
2
Chapter 2 - Preparations and Precautions
In This Chapter:
“Safety Instructions” on page 34
“ESD Precautions” on page 36
“Lightning Protection Guidelines” on page 37
Chapter 2 - Preparations and Precautions
2.1
Safety Instructions
Safety Considerations - DC Powered Equipment
CAUTION
ATTENTION
Risk of electric shock and energy hazard.
Risque de décharge électrique et
d'electrocution.
Disconnecting one Power Interface Unit (PIU)
disconnects only one PIU module. To isolate the
Modular Base Station completely, disconnect
both PIUs.
La déconnection d'un seul module
d'alimentation (PIU) n'isole pas complètement
la Station de Base Modulaire. Pour cela, il faut
impérativement débrancher les deux modules
d'alimentation (PIU).
Restricted Access Area: The DC powered equipment should only be installed in a
Restricted Access Area.
Installation Codes: The equipment must be installed according to the latest
edition of the country national electrical codes. For North America, equipment
must be installed in accordance with the US National Electrical Code and the
Canadian Electrical Code.
Overcurrent Protection: A readily accessible Listed branch circuit overcurrent
protective device, rated 40A for the modular Base Station, must be incorporated in
the building wiring.
CAUTION: This equipment is designed to permit connection between the earthed
conductor of the DC supply circuit and the grounding conductor at the
equipment.
Installation Instructions:
The equipment must be connected directly to the DC Supply System
grounding electrode conductor.
All equipment in the immediate vicinity must be grounded in the same way,
and not be grounded elsewhere.
The DC supply system is to be local, i.e. within the same premises as the
equipment.
There shall be no disconnect device between the grounded circuit conductor of
the DC source (return) and the point of connection of the grounding electrode
conductor.
34
BreezeMAX Base Station Installation and Maintenance Manual
Safety Instructions
Lithium Battery
The battery on the NPU card is not intended for replacement by the customer. The
NPU module should be sent for battery replacement every 8 years.
Caution
To avoid electrical shock, do not perform any servicing unless you are qualified to
do so.
Line Voltage
Before connecting this instrument to the power line, make sure that the voltage of
the power source matches the requirements of the instrument.
Radio
The instrument transmits radio energy during normal operation. To avoid possible
harmful exposure to this energy, do not stand or work for extended periods of time
in front of its antenna. The long-term characteristics or the possible physiological
effects of radio frequency electromagnetic fields have not yet been fully
investigated.
Outdoor Units and Antennas Installation and Grounding
Ensure that outdoor units, antennas and supporting structures are properly
installed to eliminate any physical hazard to either people or property. Make sure
that the installation of the outdoor unit, antenna and cables is performed in
accordance with all relevant national and local building and safety codes. Even
where grounding is not mandatory according to applicable regulation and national
codes, it is highly recommended to ensure that the outdoor unit and the antenna
pole (when using external antenna) are grounded and suitable lightning
protection devices are used so as to provide protection against voltage surges and
static charges. In any event, Alvarion is not liable for any injury, damage or
regulation violations associated with or caused by installation, grounding or
lightning protection.
For additional information on grounding and lightning protection, refer to
Section 2.3 and to Alvarion’s Lightning Protection document, available for
download at www.alvarion.com.
Disposal of Electronic and Electrical Waste
Disposal of Electronic and Electrical Waste
Pursuant to the WEEE EU Directive electronic and electrical waste must not be disposed of with
unsorted waste. Please contact your local recycling authority for disposal of this product.
BreezeMAX Base Station Installation and Maintenance Manual
35
Chapter 2 - Preparations and Precautions
2.2
ESD Precautions
The Base Station includes devices that can be damaged by accidental introduction
of ground or foreign voltages etc.
An electrostatic discharge on a component at a voltage exceeding 600 volt is
sufficient to damage the component, even if mounted on a board.
All electronic components used in BreezeMAX are subject to ESD electrostatic
discharges. Electrostatic discharges at voltage ratings below 4000 volts are not
normally detected or perceived in any other form by the persons causing the
actual discharges.
For example, the natural movements of a person wearing synthetic clothing may
generate electrostatic voltages exceeding 10,000 V!
Components are damaged by an electrical break in the ultra-thin insulating layer
in the integrated circuits (measuring typically 0.0001 mm). The damage may be
serious and cause the immediate function failure or remain latent and occur later,
only after a certain time span has elapsed, which could also be several years!
36
BreezeMAX Base Station Installation and Maintenance Manual
Lightning Protection Guidelines
2.3
Lightning Protection Guidelines
This paragraph provides information for the installation of an effective grounding
and suppression system, for the protection of Alvarion products against lightning.
For a list of required accessories, see Table 3-5.
NOTE
In case of contradiction between this paragraph and the standard requirements of the country in
which the equipment is installed, the more stringent of the standards will always apply.
In case of contradiction between this paragraph and installation instructions provided elsewhere by
Alvarion, refer to the full version of the Lightning Protection document. The full version of the
document can be downloaded from Alvarion's web site www.alvarion.com. It is recommended to
check for updates of this document from time to time.
This section deals primarily with the grounding of the equipment being installed.
It is not concerned with grounding against lightning or the grounding of buildings.
The main role of a Grounding System is to minimize lightning damage.
IMPORTANT
Alvarion does not provide any warranties as to the effectiveness of the suggested measures. The
implementation of the suggested measures is at the customer's own discretion. Under no
circumstances will Alvarion be liable for any consequences resulting from the implementation or
lack of implementation of the suggested measures.
The Grounding System must be maintained and checked periodically in accordance with local
regulations.
2.3.1
Lightning Protection Principles
Lightning protection for Alvarion Outdoor Units (ODU) installed outdoors on
towers or poles, is provided by ensuring minimum pickup of lightning induced
transients, and by the suppression of transient voltages at the input and output
terminals of both the Indoor and Outdoor units.
Minimizing the pickup of induced voltages is accomplished by isolating the
Outdoor Units and cables from the lightning down current, and through the use
of shielded cables with peripheral shield grounding.
The outdoor Radio Units and Antennas are connected mechanically to the tower
or pole, which is in turn grounded in accordance with the requirements of most
safety standards, therefore the Outdoor Units are grounded as well.
Isolating the outdoor units from the tower carrying the lightning down current is
theoretically appealing, however, when the outdoor units are installed on
conducting towers any such isolation will be rendered useless during rain.
BreezeMAX Base Station Installation and Maintenance Manual
37
Chapter 2 - Preparations and Precautions
Therefore, it is recommended to ground the Outdoor Units and the associated
shield/signal grounds of the IF/RF cables to the tower or pole, which in turn, are
grounded themselves in accordance with the requirements of most safety
standards.
In order to limit the amount of lightning current flowing on the shields of the IF
cables, only one grounding point for the shields to the tower or pole is allowed.
This is the point where the Outdoor Units are grounded to the pole. In this way,
the current arriving from the lightning to the earth will prefer the down conductor
from the lightning rod or the structure of the tower or pole, rather than the path
along the shield, thus protecting the Alvarion equipment.
In addition, the IF Cable shields must be grounded (at the other end) to the entry
panel at the facility building.
To further protect the IF cables from lightning-induced voltages, the cables must
be installed inside the tower or pole whenever possible, and must be isolated from
the tower or pole structure and the down conductor. This ensures some degree of
shielding of the IF cables from the effects of electromagnetic fields associated with
lightning strikes, and provides protection against direct strikes to the cables.
2.3.2
Lightning Protection System Components
The components of a typical Lightning Protection System (LPS) are as follows:
Air Terminal
Down Conductor
Outdoor Units Grounding
Earth Termination System
Lightning Protectors
2.3.2.1
Air Terminal
The Air Terminal is the part of the LPS that is intended to intercept lightning
flashes.
The Air Terminal intercepts the downward-moving stepped leader of the lightning
strike, by launching an upward-going attachment spark. Once the attachment is
achieved, the bulk of the lightning current follows the ionized path. In this way, an
Air Terminal diverts the lightning away from personnel and electronic equipment.
38
BreezeMAX Base Station Installation and Maintenance Manual
Lightning Protection Guidelines
If an Air Terminal is not installed at the highest point of the tower or pole, the
radio element connected to the highest point, usually the antenna, is the most
likely attachment point.
The Air Terminal must be constructed of steel with a pointed tip. Referring to
Figure 2-1 below, the height (H) of the Air Terminal tip above the highest Alvarion
element on the tower or pole, typically the antenna, must be at least twice the
distance (2 x d) between the outer surface of the antenna and the tower or pole.
This will ensure a "protection cone" of 60º around the tower or pole. In areas of
high lightning activity, the length (H) should be increased to up to 5 times the
distance.
Figure 2-1: Air Terminal and Position Relative to Topmost Elements
The Air Terminal must be welded to the pole structure and connected to a Down
Conductor.
2.3.2.2
Down Conductor
The Down-Conductor is the part of the external LPS that conducts lightning
current from the Air Terminal system to the Earth Termination system (see
Figure 2-2).
BreezeMAX Base Station Installation and Maintenance Manual
39
Chapter 2 - Preparations and Precautions
Figure 2-2: Down Conductor and Earth Termination
The Down Conductor must be installed straight and vertically in order to provide
the shortest and most direct path to earth. The formation of bends must be
avoided.
The following table defines the minimum dimensions for down conductors
according to IEC 1024-1:
Table 2-1: Down Conductor Minimum Dimensions
Material
Conductor
Cu
16
Al
25
Fe
30
We recommend that the Down-Conductor be at least 50 mm2 or AWG 0 in all
cases.
40
BreezeMAX Base Station Installation and Maintenance Manual
Lightning Protection Guidelines
The grounding of the Down Conductor to earth must be of ground resistance no
higher than 5 Ohm. This is achieved by using Earth Terminations and, wherever
possible, grounding to the steel re-enforcement bars of the concrete base of the
tower.
2.3.2.3
Grounding Outdoor Units
The Alvarion Outdoor Unit, consisting of a Radio Frequency Unit and Antenna,
includes a grounding point for connection to the grounding system. See
Section 2.3.1.
NOTE
For standard communication sites where the pole/tower is grounded, a standard Air Termination
lightning rod is installed, coaxial (IF/RF) cables are grounded at the facility entrance, and the
resistance between the Air Terminal and the Earth Termination is less than 5 : there is no need to
ground the outdoor units (although such grounding will increase the level of protection).
2.3.2.4
Earth Termination System
The Earth Termination System is the part of external LPS that is intended to
conduct and disperse lightning current to earth. See Figure 2-2.
2.3.2.5
Lightning Protectors (Surge Arrestors)
Lightning Protectors provide an additional protection to the Alvarion equipment
embedded protectors, in places where lightning occurs with a high probability.
Electrical surges are composed of two elements: voltage and quantity of charge. A
very high voltage surge can damage electronic equipment by breaking down the
insulating medium between the circuit elements, or between the circuit elements
and ground. In order to protect an electronic circuit from damage, a Lightning
Protector (or Surge Arrestor) must conduct sufficient charge from the surge in
order to lower the surge voltage to a safe level. It must also conduct fast enough in
order to prevent the circuit insulation from breaking down.
Alvarion products contain embedded Lightning Protectors at their IF input ports.
Robust surge protection devices (SPD) are part of internal circuits, and are
mounted on I/O ports connecting Indoor and Outdoor units via outdoor cables.
The Base station's IDU and ODU IF ports, are protected by high current capability
TVSs mounted on board.
If additional protection is required, for example, in high lightning activity
(Keraunic) areas, external Lightning Protectors can be installed at strategic points
at the site.
BreezeMAX Base Station Installation and Maintenance Manual
41
Chapter 2 - Preparations and Precautions
NOTE
Keraunic maps are available at the following link to "Worldwide map of Keraunic levels"
(http://perso.wanadoo.fr/parafoudres.eurema/Surges/WWMKL.htm).
A Lightning Protector will "clip" any excessive surge voltage that may be present
on the center conductor.
For Alvarion IF solutions, only "Gas Gap" Lightning Protectors types, designed to
cover the IF frequency range, must be used. Only "Gas Gap" Lightning Protectors
are capable of passing the DC current required to power the Outdoor Unit.
2.3.2.6
Installation Practices for an IF-Type System
This section relates to Base Station outdoor installation practices. Figure 2-3
shows radio equipment installed on a tower.
Figure 2-3: Radio Equipment Mounted on a Tower
42
BreezeMAX Base Station Installation and Maintenance Manual
Lightning Protection Guidelines
Referring to Figure 2-3, an Air Terminal (Lightning Rod) is attached to the top of
the tower.
The Air Terminal connects to a Down-Conductor that runs to an Earth
Termination at the foot of the tower.
NOTE
The ground system must be maintained and checked periodically in accordance with local
regulations.
The Antenna and Radio Units (two sectors are shown in Figure 2-3) are attached
to the tower with mounting brackets. The Radio Units are connected to the
Antennas via RF Cables. The IF Cables from the Radio Units (to the Indoor Units)
run down the tower through Mounting Blocks, as shown in Figure 2-4.
Figure 2-4: Mounting Blocks and Metal Grounding Plate
Referring to Figure 2-3 and Figure 2-4, the Radio Units' (ODU) ground cables are
connected to a Metal Grounding Plate using Cable Terminals. The Metal
Grounding Plate is connected (welded) to the tower. The Air Terminal Down
Conductor is clamped to the cable that runs down from the Metal Grounding
Plate.
At the entry point to the facility building, the IF Cable shields are physically
attached to another Metal Grounding Plate (with feed through panel mount
coaxial connectors for each cable. See Figure 2-5 below). The building's Metal
BreezeMAX Base Station Installation and Maintenance Manual
43
Chapter 2 - Preparations and Precautions
Grounding Plate is grounded separately from the tower. This ensures that the
lightning current from the tower is diverted from the building.
Figure 2-5: Metal Grounding Plate and Cable Entry to Facility Building
Figure 2-6 shows a similar layout for radio equipment installed on a pole.
44
BreezeMAX Base Station Installation and Maintenance Manual
Lightning Protection Guidelines
Figure 2-6: Radio Equipment Installed on a Pole
In Figure 2-6, an Air Terminal must provide a 60° protection cone, in the same
manner as for the tower scenario described earlier.
The Antenna and Radio Unit (ODU) are attached to the pole with mounting
brackets. The Radio Unit is connected to the Antenna via an RF Cable. The IF
Cable from the Radio Unit (to an Indoor Unit) runs down the pole via Cable
Hangers, and enters the building via a Metal Grounding Plate grounded at the
building wall.
BreezeMAX Base Station Installation and Maintenance Manual
45
Chapter 2 - Preparations and Precautions
The IF Cable shields are physically attached to the building's Metal Grounding
Plate, with feed through panel mount coaxial connectors for each cable. The
building's Metal Grounding Plate is grounded separately from the pole. This
ensures that the lightning current from the pole is diverted from the building. The
Radio Unit's ground cable is attached to a Metal Grounding Plate (welded to the
pole) using Cable Terminals.
The Radio Unit's ground cable, pole and the Air Terminal all run to Earth
Terminations.
NOTE
For information on the attachment of a grounding cable to an Alvarion Outdoor Unit, see
Section 6.6.1.
Figure 2-7 shows radio equipment installed on a tower, with external Lightning
Protectors (Surge Arrestors) installed.
Lightning Protectors are installed on the IF Cables at close proximity to the Radio
Units. The IF Cables run through the Metal Grounding Plate (isolated). The
Lightning Protectors' ground leads are connected to the Metal Grounding Plate
using Cable Terminals.
46
BreezeMAX Base Station Installation and Maintenance Manual
Lightning Protection Guidelines
Figure 2-7: Radio Equipment and Lightning Protectors (Surge Arrestors)
At the facility building entrance, Lightning Protectors are installed on the IF
Cables close to the Metal Grounding Plate apertures. The Lightning Protector
ground lead is connected to an Earth Termination via another Metal Grounding
Plate and cable terminals (see Figure 2-8).
BreezeMAX Base Station Installation and Maintenance Manual
47
Chapter 2 - Preparations and Precautions
Figure 2-8: Lightning Protectors (Surge Arrestors) at Building Entrance
For further lightning protection guidelines and principles, refer to "Alvarion
Lightning Protection" white paper (www.alvarion.com -> Customer Service area ->
"White papers and Technology Tutorials" section.
For details on grounding the ODU and IDU, see Section 6.6.1 and Section 6.6.2
respectively.
48
BreezeMAX Base Station Installation and Maintenance Manual
3
Chapter 3 - Planning the Installation Site
In This Chapter:
“Guidelines for Positioning the ODU” on page 51
“Guidelines for Positioning the Antenna” on page 52
“IF Cables” on page 56
“Site Environmental Specification” on page 57
“Equipment Clearances/Minimum Distances” on page 58
“Heat Dissipation” on page 59
“Cooling Requirements” on page 60
“Tools” on page 61
Before unpacking the Base Station, you will need to select a suitable installation
site. Choose a site that supports the physical characteristics of the unit and is in
accordance with the unit's environmental and power requirements.
Chapter 3 - Planning the Installation Site
CAUTION
ONLY experienced installation professionals who are familiar with local building and safety codes
and, wherever applicable, are licensed by the appropriate government regulatory authorities should
install outdoor units and antennas.
Failure to do so may void the BreezeMAX product warranty and may expose the end user or
Service Provider to legal and financial liabilities. Alvarion and its resellers or distributors are not
liable for injury, damage or regulation violations associated with the installation of Outdoor Units or
antennas.
50
BreezeMAX Base Station Installation and Maintenance Manual
Guidelines for Positioning the ODU
3.1
Guidelines for Positioning the ODU
This section provides key guidelines for selecting the optimal installation locations
for the AU-ODU.
Select the optimal locations for the equipment using the following guidelines:
The ODU can be either pole/tower or wall mounted. Its location should enable
easy access to the unit for installation and testing.
Outdoor units with a connection to an external antenna should be installed as
close as possible to the antenna.
BreezeMAX Base Station Installation and Maintenance Manual
51
Chapter 3 - Planning the Installation Site
3.2
Guidelines for Positioning the Antenna
This section provides Base Station antennas and radio units' site planners and
installers with general guidelines on where to position the antenna. The antenna
should be positioned such that the coverage will not be affected by environmental
conditions of the roof or house on which it is installed. For instructions on
installing the antenna, refer to the manufacturer's installation instructions
provided with the antenna.
The following paragraphs describe the various antenna installation scenarios on
the sector level:
Scenario 1 - The antenna is installed outside the boundaries of the roof.
Scenario 2 - The antenna is installed on the edge of the roof.
Scenario 3 - The antenna is installed toward the center of the roof.
NOTE
When positioning the antenna, follow the radio planning guidelines, if applicable. Otherwise, use the
following guidelines.
The higher the placement of the antenna, the better the achievable link
quality.
The antenna of the Access Unit should be installed so as to provide coverage to
all Subscriber Units within its service area.
NOTE
The recommended minimum distance between any two antennas is 0.5 meters.
The antenna should be installed to provide a direct, or near line of sight with
the coverage area.
3.2.1
Scenario 1
In this scenario, the AU antenna is installed outside the boundaries of the roof.
The antenna may be installed below the rooftop level, or on a pole outside the
boundaries of the roof.
52
BreezeMAX Base Station Installation and Maintenance Manual
Guidelines for Positioning the Antenna
Figure 3-1: Antenna Installed Outside Roof's Boundaries
When the antenna is lower than the roof level or the railing's top, there are two
limitations:
1
The minimum distance between the antenna and the railing or building side is
25 cm.
2
The angle between the antenna and the roof is 22 degrees.
These limitations assure that the antenna pattern is not affected by the reflections
caused by the wall. If the wall is too close to the antenna, the antenna pattern is
affected and the coverage of the site may not be as expected. This may also
increase interferences to other sites.
3.2.2
Scenario 2
In this scenario, the antenna is installed on a pole on top of the railing. The
antenna is not blocked by anything on the roof, or on adjacent roofs. In this
scenario it is essential to maintain a minimum distance of 1.5m between the lower
part of the antenna and the top of the roof, fence or railing, whichever is closer to
the antenna.
BreezeMAX Base Station Installation and Maintenance Manual
53
Chapter 3 - Planning the Installation Site
Figure 3-2: Antenna Installed on the Edge of the Roof
3.2.3
Scenario 3
In this scenario, the antenna is installed on a pole, similar to Scenario 2, and the
pole is installed towards the center of the roof. The antenna may be blocked by
objects on the roof or by the railing or fence. In this scenario it is essential to
maintain a minimum distance between the lower part of the antenna and fence or
railing, in order to minimize disturbance of the antenna's lobe. In this scenario,
the railing or fence would create shading.
54
BreezeMAX Base Station Installation and Maintenance Manual
Guidelines for Positioning the Antenna
Figure 3-3: Antenna Installed at the Center of the Roof
The distance to the roof's floor and the fence depends on the distance of the
antenna from the railing. The farther the horizontal distance of the antenna from
the raising, the larger the vertical distance should be.
BreezeMAX Base Station Installation and Maintenance Manual
55
Chapter 3 - Planning the Installation Site
3.3
IF Cables
The AU-ODU is connected to the AU-IDU via an IF cable carrying both signals and
power. The maximum permitted attenuation of the IF cable at applicable
frequencies, its screening effectiveness and its maximum permitted DC resistance
(the sum of the DC resistance of the inner and outer conductors) are provided in
Table 3-1.
Table 3-1: IF Cables Requirements
Item
Description
Screening Effectiveness
90 dB minimum in the
10-300 MHz band.
IF cable Impedance
50 Ohm
Maximum IF cable
Attenuation
19 dB @ 240 MHz
15 dB @ 140 MHz
8 dB @ 64 MHz
Maximum IF cable DC
Resistance
4.0 Ohm
Maximum IF cable Return
Loss
20 dB in the 10-300 MHz
band
To comply with the required screening effectiveness requirement, it is
recommended to use double shielded cables. Table 3-2 provides details on
maximum length for some popular cables. For lengths above 150m, use a high
quality cable with specifications as detailed in Table 3-1.
Table 3-2: Maximum IF Cable Length (Double Shielded Cables)
56
Cable
Maximum Length
LMR-195
80 meters
LMR-240
150 meters
BreezeMAX Base Station Installation and Maintenance Manual
Site Environmental Specification
3.4
Site Environmental Specification
Table 3-3: Environmental Specifications
Type
Unit
Details
Operating temperature
Outdoor units
-40°C to 55°C
Indoor equipment
0°C to 40°C
Outdoor units
5%-95% non condensing, Weather
protected.
Indoor equipment
5%-95% non condensing, Weather
protected.
Storage/Transportation temperature
Outdoor and Indoor units
-40ºC to +70ºC
Storage/Transportation humidity
Outdoor and Indoor units
5%-95% non-condensing
Operating humidity
BreezeMAX Base Station Installation and Maintenance Manual
57
Chapter 3 - Planning the Installation Site
3.5
Equipment Clearances/Minimum
Distances
No space limitation. See, however, Section 3.4 for site environmental
specifications.
58
BreezeMAX Base Station Installation and Maintenance Manual
Heat Dissipation
3.6
Heat Dissipation
To calculate the heat dissipation of the Base Station:
Use the following formula to calculate the heat dissipation for each Base Station:
[(Module 1 power consumption) + (Module 2 power consumption) + … (Module N
power consumption)] x 2.3884 = BTU
For example, for a Base Station with 1 AU and 1 NPU (and no redundancy), the
heat dissipation is as follows:
[(PIU = 30 Watt) + (PSU = 200 Watt) + (NPU = 65 Watt) + (AU-IDU = 41 Watt) +
(AVU = 24 Watt)] x 2.3884 = 860 BTU
BreezeMAX Base Station Installation and Maintenance Manual
59
Chapter 3 - Planning the Installation Site
3.7
Cooling Requirements
The BreezeMAX chassis is intended for mounting in a cabinet or other rigid
framework which is fixed to the building. A 2.2-meter or 2.6-meter rack can
accommodate up to three BreezeMAX chasses. See Table 3-3 for the operating
temperature range of the indoor equipment.
The BreezeMAX chassis is cooled by the flow of air between the elements mounted
in the cabinet. The fans and air baffles ensure that sufficient air flows between the
elements. The cooling system, including the baffle and fan tray, is supplied with
each chassis and is an integral part of the BreezeMAX chassis. It does not require
separate installation.
See Section 1.1.2 and Section 5.1.1.1 for details relating to the Air Ventilation
Unit (AVU).
60
BreezeMAX Base Station Installation and Maintenance Manual
Tools
3.8
Tools
The following table lists the recommended tools and sealing materials required for
installation.
Table 3-4: Recommended Tools and Sealing Materials
Tool
Description
Spanners
¼"
M3
M8, #13
Flat screwdriver
5.0 x 100
Phillips Screwdriver
2pt x 100
Crimpers
For N-type connectors (antenna connector)
For TNC connectors (IDU-ODU connector)
RJ-45 connector (IDU-ODU, Network cable)
Cable stripping tool
Cutting tools
Cutter, knife, scissors, etc.
Materials
Metal bands
Up to 14 mm width, for mounting the AU-ODU on a pole.
Strips
Plastic cable tie for outdoor use. Minimum width: 4.8 mm
Minimum thickness: 1.3 mm
Isolation material
Any material for isolation. Must be waterproof and resistant to
temperature change (-40°C to 60°C)
Measurement Tools
Cable tester
For testing the cables with N-Type and TNC connectors.
The following table lists the accessories required for lightning protection. These
accessories can be ordered from Alvarion.
BreezeMAX Base Station Installation and Maintenance Manual
61
Chapter 3 - Planning the Installation Site
Table 3-5: Lightning Protectors and Part Numbers
Lightning Protector Description
Part Number
1
LA-IF. IF Triple mode Lightening Arrestor with TNC connectors. For use on IF
cable of AU-A/E and SU-A/E For 12 VDC, coax
Alvarion: 872945
2
IF Lightening Arrestor with female TNC connectors. For use on IF cable of AU
for 48 VDC, coax. For use on BreezeMAX 3000 Access Units only. For device
specifications and installation instructions, please contact sales at:PolyPhaser
Corporation, Tel: (1) 775.782.2511800.325.7170(US only)
PolyPhaser
Model:BMAX-IF-ALVR-B
3
Earth Termination
Alvarion: 872935
4
Protector for Antenna Port ONLY! 2300-2600MHz signals
Alvarion: 872905
5
Baseband protection. For use on BreezeMAX SUs.
Transtector Model:
ALPU-ALVR
Manufacturer: Transtector Systems Inc. Tel: (1) 208.772.8515
800.882.9110(US only)
http://www.transtector.com/peripherals/alvarion/index.html
62
BreezeMAX Base Station Installation and Maintenance Manual
4
Chapter 4 - Inspecting and Unpacking
In This Chapter:
“Preliminaries” on page 64
“Chassis/System” on page 65
“AU-ODU/AU-ODU-HP” on page 66
“Cards/Modules” on page 68
“ODU Power Feeder” on page 69
“GPS Module” on page 70
Chapter 4 - Inspecting and Unpacking
4.1
Preliminaries
Examine the shipping container for damage. If you notice any damage, notify the
carrier that delivered the unit immediately and enter a service call in Alvarion's
SSM (www.alvarion.com > Customer Service area).
Check the items that have been sent against this manual. If any items are
missing, notify your Alvarion agent immediately.
64
BreezeMAX Base Station Installation and Maintenance Manual
Chassis/System
4.2
Chassis/System
Confirm that the BST Chassis is upright before taking it out of the box.
Remove the packing material without damaging it.
The following figure lists the items shipped with the BST Chassis.
NOTE
The slots in the Base Station chassis are initially covered by blank panels. When installing a module
in the chassis, remove only the respective blank panel. Four slots are not covered. These are for the
mandatory modules: NPU, AU, PIU, and PSU. See Figure 5-1.
Figure 4-1: Chassis Packaging
1 - BST Chassis with assembled AVU
2 - Packing material
3 - Cable tray
4 - 2 screws for assembling the cable tray
5 - Cardboard box
BreezeMAX Base Station Installation and Maintenance Manual
65
Chapter 4 - Inspecting and Unpacking
4.3
AU-ODU/AU-ODU-HP
Confirm that the AU-ODU is upright before taking it out of the box.
Remove the packing material without damaging it.
The following figure lists the items shipped with the AU-ODU.
Figure 4-2: AU-ODU
66
BreezeMAX Base Station Installation and Maintenance Manual
AU-ODU/AU-ODU-HP
Figure 4-3: AU-ODU-HP
1 - Pole Mounting Kit (see Table 4-1).
2 - Packing material
3 - AU-ODU/AU-ODU-HP
Table 4-1: Pole Mounting Kit
Component
Description
Qty
MC2304
Rod ¼-20NC 85 mm (L), or
4
M8 150mm (L)
MC2371-01
Mounting Clamp
2
NT1008
Nut Hex
4
WS1027
Flat washer ¼
4
WS1028
Spring lock washer ¼
4
BreezeMAX Base Station Installation and Maintenance Manual
67
Chapter 4 - Inspecting and Unpacking
4.4
Cards/Modules
Remove the packing material without damaging it.
Components susceptible to damage from static electricity are packed in static
resistant bags. Unpack these items in a static-free environment to avoid damage.
Cards contain CMOS devices. All tools, test equipment, metal objects, and
personnel that come into contact with CMOS devices must be electrically
grounded (drawing/photo).
The following figure lists the items shipped with each module. The modules are
packaged separately.
Figure 4-4: Module Items
1 - Cardboard box
2 - Module card
3 - Protective cover
4 - 2.5m DC Cable (with PIU only)/Monitor cable (with NPU only)
5 - CD (with NPU only)
68
BreezeMAX Base Station Installation and Maintenance Manual
ODU Power Feeder
4.5
ODU Power Feeder
Remove the packing material without damaging it.
The following figure lists the items shipped with the ODU Power Feeder.
Figure 4-5: ODU Power Feeder Packaging
1 - A 19” panel (can hold up to three ODU Power Feeder modules) packed
separately.
2 - ODU Power Feeder module
3 - DC power cable
4 - 4 IF cables (0.5 meter)
5 - 4 screws
6 - Cardboard box
7 - Packing material
BreezeMAX Base Station Installation and Maintenance Manual
69
Chapter 4 - Inspecting and Unpacking
4.6
GPS Module
4.6.1
Indoor GPS Adapter
Indoor GPS Adapter
GPS Adaptation Box + 4 screws (M3X5)
Cable Data connecting to the NPU, 2m, 15pin, D-TYPE (Male) Micro-D (Female)
4.6.2
Outdoor GPS Radio
Outdoor GPS Radio
Pole mounting kit (see Table 4-2)
Ant. GPS Surge Protection, including 3 x 1032 screws, 3 flat washers, and 3
spring whashers
Table 4-2: Pole Mounting Kit
70
Component
Description
Qty
1
Bracket Pipe
1
2
“L” shaped bracket
1
3
Clamp
2
4
Grounding screw + washer
+ toothed washer
1+1+1
5
M8 spring washer
4
6
M8 washers
4
7
M8 nuts
4
BreezeMAX Base Station Installation and Maintenance Manual
5
Chapter 5 - Mechanical Installation
In This Chapter:
“Installing the Base Station Equipment in a Rack” on page 72
“Inserting Modules” on page 74
“Installing the AU-ODU/AU-ODU-HP” on page 88
This chapter describes the procedures involved in installing the BST on site
(general antenna alignment procedure). The pictures are for illustrative purposes
only. The actual modules may differ depending on the type used.
Chapter 5 - Mechanical Installation
5.1
Installing the Base Station Equipment in
a Rack
The location of the indoor equipment should take into account its connection to
the power source(s) and to the base station networking equipment.
In addition to the tools specified in Section 3.8, the following items are also
required for installing the Base Station:
Ethernet cable (straight) for connecting the NPU to a Hub/Switch.
NOTE
The maximum length of the Ethernet cable is 100m when operating at 100 Mbps and 70m when
operating at 1 Gbps.
A grounding cable with appropriate terminations for connecting the chassis to
the rack or another ground (earth) connection.
For installation in a 21" ETSI rack: Two 21" ETSI rack adapters
A portable PC for configuring parameters using the Monitor cable (supplied
with the NPU.
5.1.1
Modular Base Station
Before installing the BST-SH in the rack, you need to assemble the Cable Tray.
To assemble the Cable Tray:
1
Position the Cable Tray on the Base Station chassis such that the corner holes
are aligned.
72
BreezeMAX Base Station Installation and Maintenance Manual
Installing the Base Station Equipment in a Rack
Figure 5-1: Positioning the Cable Tray
2
Assemble the Cable Tray on the Base Station chassis. Use a screw at either
corner (the screws are supplied with the chassis (see Section 4.2).
Figure 5-2: Assembling the Cable Tray
To install the BST-SH in a 19" rack:
1
Position the Base Station chassis in the desired location in a standard 19"
rack. To provide sufficient space for the Cable Tray and to allow air flow for
preventing over-heating, leave a free space of at least 1U between the upper
cover of the chassis and other units in the cabinet.
2
Tighten 4 screws on either side until the Base Station chassis is firmly held in
the rack.
3
Connect one end of a grounding cable to the ground terminal located on the
rear panel of the chassis and firmly tighten the grounding screw. Connect the
opposite end of the grounding cable to a ground connection or to the rack.
BreezeMAX Base Station Installation and Maintenance Manual
73
Chapter 5 - Mechanical Installation
Figure 5-3: Installing the Base Station in a 19" Rack
To install the BST-SH in a 21" ETSI rack:
1
Position an adpater on either side of the Base Station chassis such that the
adapter's holes are aligned with the holes on the chassis.
5.1.1.1
2
Tighten 4 screws on either side until the adapters are secure.
3
Proceed to assemble the chassis in the rack.
Inserting Modules
The Base Station modules include special injector/ejector handles for high-force
insertion/extraction of modules. Each of the 6U high modules (NPU, AU-IDU)
includes two such handles, whereas each of the 3U high-modules (PIU, PSU)
includes a single handle at the bottom of the front panel.
The bottom injector/ejector handle of the NPU and AU-IDU modules includes a
micro-switch to support hot-swap control.
The modules installed in the BST chassis are:
AU
74
BreezeMAX Base Station Installation and Maintenance Manual
Installing the Base Station Equipment in a Rack
NPU
PIU
PSU
AVU
The Base Station chassis comprises 6 3U high slots and 9 6U high slots, as shown
in Figure 5-4.
Cable Tray
Air Ventilation
Unit
Figure 5-4: BMAX-BST-SH Chassis Slot Assignments
The Cable Tray should be installed on the top of the chassis front (the installation
kit is supplied with the chassis) to enable convenient routing of cables connecting
to power source(s), outdoor unit(s) and other equipment.
To enable power source and/or Power Interface Unit 1+1 redundancy, two PIU
modules can be installed in the designated slots. If a single PIU module is used, it
can be inserted into either of the two available slots.
The number of installed PSU modules depends on the specific configuration
(number of AUs) and NPU redundancy scheme (see Table 1-1). If less than 4 PSU
modules are used, they can be installed in any of the designated slots.
BreezeMAX Base Station Installation and Maintenance Manual
75
Chapter 5 - Mechanical Installation
The NPU should be installed in slot number 5 (slot numbers are marked on the
Cable Guide). Slot 6 is reserved for a future redundant NPU.
Slots 1-4 and 7-9 can hold up to six AU-IDU modules.
Unused slots should remain covered until required.
All the modules come with ejector handles that hold the module in position.
To insert a module in the BST chassis:
1
Release the top and bottom ejector handles by pressing the red latches and
pulling the ejector handles in the direction of the arrow (see Figure 5-5).
Figure 5-5: Releasing the Ejector Handles
NOTE
The PIU and PSU modules have only one handle.
76
BreezeMAX Base Station Installation and Maintenance Manual
Installing the Base Station Equipment in a Rack
2
Slide the module all the way in its designated position in the BST chassis (see
Figure 5-6) and gently push the module using your fingers only, until the
module's front panel reaches the front chassis rails.
Figure 5-6: Positioning the Module in the BST Chassis
3
Press the handles gently toward each other until the handles' teeth latch into
the top and bottom rails and the module is secure. When inserting an AU,
NPU, or PIU, the blue HOT SWAP LED will briefly turn on, indicating that the
module is being powered up.
BreezeMAX Base Station Installation and Maintenance Manual
77
Chapter 5 - Mechanical Installation
Figure 5-7: Securing the Module
4
Secure the module in place by closing the screws at the top and bottom of the
front panel
78
BreezeMAX Base Station Installation and Maintenance Manual
Installing the Base Station Equipment in a Rack
.
Figure 5-8: Securing the Module
NOTE
If a module is fully inserted without properly locking the handles, it will not become operational.
CAUTION
All of the above steps should be performed carefully. Using force to connect the modules to the
chassis may damage the ejector handles.
5.1.2
ODU Power Feeder
The ODU Power Feeder is used to provide power (-48 VDC) to AU-ODU-HP High
Power ODUs. It transfers transparently all signals between the AU-IDU and the
ODU, while injecting DC power received from an external source. Each ODU
Power Feeder unit can serve up to four High Power ODUs. Up to three ODU Power
Feeder units can be installed in a 1U high Power Feeder panel.
The ODU Power Feeder should be installed as close as possible to the location
where the IF cable(s) enters the building. The location of the ODU Power Feeder
should take into account its connection to the power source and to the Base
Station equipment.
BreezeMAX Base Station Installation and Maintenance Manual
79
Chapter 5 - Mechanical Installation
In addition to the tools specified in Section 3.8, the following items are also
required for installing the ODU Power Feeder:
A grounding cable with appropriate terminations for connecting the unit's
ground terminal to the rack or to a ground connection.
For installation in a 21" ETSI rack: two 21" ETSI rack adapters
Other installation tools and materials
To install the ODU Power Feeder in a 19" rack:
1
The panel is supplied with blank covers. Release the nuts on the rear side of
the panels to remove the blank cover(s) you want to replace with ODU Power
Feeder module(s).
2
Position the Power Feeder in the designated slot of the Power Feeder panel
such that the corner holes on the Power Feeder are aligned with the holes on
the Power Feeder panel.
3
Attach the ODU Power Feeder module(s) to the panel using the four screws
supplied with each module.
80
BreezeMAX Base Station Installation and Maintenance Manual
Installing the Base Station Equipment in a Rack
Figure 5-9: Assembling the Power Feeder on a 1U Panel
4
Position the Power Feeder in the desired location in a standard 19" rack. When
considering the location in the rack, take into account the cable’s length.
5
Tighten 4 screws on either side until the Power Feeder panel is firmly held in
the rack.
BreezeMAX Base Station Installation and Maintenance Manual
81
Chapter 5 - Mechanical Installation
Figure 5-10: Installing the Power Feeder in a 19" Rack
To install the Power Feeder in a 21" rack:
For installation in a 21" cabinet, attach suitable ETSI rack adapters.
5.1.3
GPS Module
GPS is used to synchronize the air link frames of Intra-site and Inter-site located
sectors to ensure that in all sectors the air frame will start at the same time, and
that all sectors will switch from transmit (downlink) to receive (uplink) at the same
time. This synchronization is necessary to prevent Intra-site and Inter-site sectors
interference and saturation (assuming that all sectors are operating with the same
frame size and with the same DL/UL ratio).
The GPS module comprises an outdoor GPS receiver and a GPS Adapter
5.1.3.1
Installing the GPS Adapter
The GPS Adapter connects the different GPS units to the NPU, adapting the
different interfaces. The GPS Adapter is powered by 12 VDC supplied by the NPU
and is installed on the 1U high panel that can be used also for installation of ODU
Power Feeder modules.
82
BreezeMAX Base Station Installation and Maintenance Manual
Installing the Base Station Equipment in a Rack
In addition to the tools specified in Section 3.8, the following items are also
required for installing the GPS Adapter:
A grounding cable with appropriate terminations for connecting the unit's
ground terminal to the rack or to a ground connection
For installation in a 21" ETSI rack: two 21" ETSI rack adapters
Other installation tools and materials.
To install the GPS Adapter in a 19" rack:
1
The GPS Adapter is installed on the 1U high panel that can be used also for
installation of ODU Power Feeder modules. The panel is supplied with blank
covers. Release the nuts on the rear side of the panel to remove the blank
cover you want to replace with the GPS Adapter.
2
Attach the GPS Adapter module to the panel using the four M3x5 screws
supplied with it. Apply torque 0.3 [N*m] (2.9 [lbs*in]).
Figure 5-11: Assembling the GPS Adapter on a 1U Panel
BreezeMAX Base Station Installation and Maintenance Manual
83
Chapter 5 - Mechanical Installation
NOTE
Attach all GPS and ODU Power Feeder modules to the panel prior to installing in the rack.
3
Place the panel with the GPS Adapter (and optionally ODU Power Feeders) on a
shelf/desk or install it in a 19" cabinet, next to the Base Station equipment.
The distance from the Base Station equipment should allow connection of the
2 meters NPU to GPS Adapter cable. Tighten 4 M6 screws on either side until
the panel is firmly held in the rack. Apply torque 6.4 [N*m] (57 [lbs*in]).
Figure 5-12: Installing the GPS Adapter in a 19" Rack
4
Select the GPS Receiver to be used using the GPS SELECT miniature DIP
switches:
To use Outdoor GPS Receiver, move the ODU (leftmost) switch to the ON
(up) position. Make sure that the two other switches are in the OFF (down)
position.
To use an Indoor GPS Receiver, move the IDU (middle) switch to the ON
(up) position. Make sure that the two other switches are in the OFF (down)
position.
The INT (Internal) GPS Receiver option is not available in current release.
To install the GPS Adapter in a 21" rack:
For installation in a 21" cabinet, attach suitable ETSI rack adapters.
84
BreezeMAX Base Station Installation and Maintenance Manual
Installing the Base Station Equipment in a Rack
5.1.3.2
Installing the Outdoor GPS Receiver
1
Place the bracket on a flat surface and thread the supplied pipe through the
bracket hole and into the GPS antenna. Hand-tighten until snug. Do not
over-tighten or use a tool. Make sure the connector (male) is on the open side
of the bracket.
Figure 5-13: Assembling the Outdoor GPS Receiver
2
Assemble the surge protection cable onto the bracket using the supplied
screws, washers and spring washers (2x1032). Apply torque 2.1 [N*m] (19.2
[lbs*in]). Make sure that the female connector faces the antenna.
Figure 5-14: Assembling the Surge Protector Cable
3
Use a 1032 screw, washer and spring washer to connect the surge protector’s
grounding cable to the bracket. Apply torque 2.1 [N*m] (19.2 [lbs*in]).
BreezeMAX Base Station Installation and Maintenance Manual
85
Chapter 5 - Mechanical Installation
Figure 5-15: Grounding the Surge Protector
4
Connect the surge protector cable (female connector) to the GPS antenna
connector (male). Use the groove on the cable connector (indicatd by an arrow)
as a guide. It aligns with the tenon in the connector on the GPS side. Turn the
locking ring on the cable connector clockwise to secure the connection. Do not
over-tighten.
Figure 5-16: Connecting the Surge Protector to the GPS Antenna
5
Use the supplied clamps to assemble the GPS and bracket on a pole. Use the
M8 nuts, washers and spring washers to lock the clamps to the bracket. Apply
torque 9 [N*m] (80 [lbs*in]).
86
BreezeMAX Base Station Installation and Maintenance Manual
Installing the Base Station Equipment in a Rack
Figure 5-17: Pole Mounting the Outdoor GPS Receiver
BreezeMAX Base Station Installation and Maintenance Manual
87
Chapter 5 - Mechanical Installation
5.2
Installing the AU-ODU/AU-ODU-HP
The AU-ODU installation consists of the following steps:
1
On-ground preparation of the AU-ODU/AU-ODU-HP
2
On-ground preparation of the antenna for installation
3
Mounting the AU-ODU/AU-ODU-HP on a pole/tower
4
Mounting the Antenna on a pole/tower.
Before beginning, make sure you have the following items available:
Any of the following AU-ODUs:
Table 5-1: AU-ODU Types
Item
Description
BMAX-BST-AU-ODU-HP-2.3
High Power AU-ODU operating in the 2.3 GHz band
(2300-2360 MHz)
BMAX-BST-AU-ODU-HP-2.3-WCS
High Power AU-ODU operating in the 2.3 GHz band, complying
with WCS limitations (2305-2315, 2350-2360 MHz)
BMAX-BST-AU-ODU-HP-2.5-A1
High Power AU-ODU operating in the 2.5 GHz A1 band
(2496-2602 MHz)
BMAX-BST-AU-ODU-HP-2.5-A2
High Power AU-ODU operating in the 2.5 GHz A2 band
(2590-2690 MHz)
ODU pole mounting kit
Indoor-Outdoor cable - IF cable with two TNC connectors* (for details on IF
cable types and length see Section 3.3).
Grounding cable with an appropriate termination.
RF Cable for connecting the antenna to the ODU
Antenna
Antenna pole mounting kit
Installation tools and material (see Section 3.8).
88
BreezeMAX Base Station Installation and Maintenance Manual
Installing the AU-ODU/AU-ODU-HP
5.2.1
Preparing the AU-ODU/AU-ODU-HP
Prepare the ODU for mounting. Using a flat screwdriver, fasten the four threaded
rods (¼" / M8) to the tapings on the back side of the ODU. See
Figure 5-20-Figure 5-20.
Figure 5-18: Preparing the AU-ODU for
Figure 5-19: Preparing the AU-ODU-HP for
Mounting
Mounting
Figure 5-20: AU-ODU/AU-ODU-HP Ready for Mounting
5.2.2
Preparing the Antenna
Prepare the Antenna for mounting, as follows:
1
Fasten the two main (M8 x 150mm) screws to the Clamp. (MC5021-01), either
manually or by using a spanner (no special torque is required). Use a flat
washer under the screw's head. See Figure 5-21.
BreezeMAX Base Station Installation and Maintenance Manual
89
Chapter 5 - Mechanical Installation
Figure 5-21: Preparing the Clamp
2
Assemble the Holder (MC5022-01) on the 3 studs of the Clamp.
3
Close with the supplied nuts, using the flat and spring washers. Do not
tighten yet.
Figure 5-22: Assembling the Holder onto the Clamp
90
BreezeMAX Base Station Installation and Maintenance Manual
Installing the AU-ODU/AU-ODU-HP
4
Position the base of the Holder on the antenna while aligning the base holes
with the antenna studs.
NOTE
The Holder contains several hole patterns supporting diverse antennas (with different studs
patterns).
Figure 5-23: Positioning the Holder Base on the Antenna
5
Fasten the four nuts, using the flat and spring washers supplied. Apply torque
of 8.5 [N*m] (75 [lbs*in]).
BreezeMAX Base Station Installation and Maintenance Manual
91
Chapter 5 - Mechanical Installation
2 upper metal
band holders
Figure 5-24: Fastening the Holder Base to the Antenna
Figure 5-25: Clamp and Holder Fastened on Antenna - Top View
5.2.3
Mounting the AU-ODU/AU-ODU-HP on a Pole
Using Clamps
NOTE
The instructions detailed in this section are applicable to both AU-ODU and AU-ODU-HP.
Use clamps to mount the AU-ODU on a pole of up to 4" diameter.
1
Lean the AU-ODU vertically on the pole. Pay attention to the 'UP' arrow on the
casing.
92
BreezeMAX Base Station Installation and Maintenance Manual
Installing the AU-ODU/AU-ODU-HP
For AU-ODU-HP, it is recommended to use a harness to lift the unit and
position it on the pole (see Figure 5-26 and Figure 5-27).
Figure 5-26: Lifting the AU-ODU Using a Harness - 1
BreezeMAX Base Station Installation and Maintenance Manual
93
Chapter 5 - Mechanical Installation
Figure 5-27: Lifting the AU-ODU Using a Harness - 2
2
94
Thread the clamp on the two upper studs (concave side toward the pole).
BreezeMAX Base Station Installation and Maintenance Manual
Installing the AU-ODU/AU-ODU-HP
Figure 5-28: Assembling the AU-ODU on a Pole
3
Use two ¼" nuts, washers and spring washers to secure the AU-ODU to the
pole. Do not tighten yet.
BreezeMAX Base Station Installation and Maintenance Manual
95
Chapter 5 - Mechanical Installation
Figure 5-29: Securing the AU-ODU to the Pole
4
Thread the second clamp on the two bottom studs.
5
Use two ¼" nuts, washers and spring washers to secure the AU-ODU to the
pole.
6
Fasten the 4 nuts to firmly secure the AU-ODU to the pole. The two pairs of
nuts should be fastened equally so that the clamp will remain parallel to the
casing. Apply torque of 8.5 [N*m] (75 [lbs*in]).
96
BreezeMAX Base Station Installation and Maintenance Manual
Installing the AU-ODU/AU-ODU-HP
Figure 5-30: AU-ODU Assembled on a Pole
5.2.4
Figure 5-31: AU-ODU-HP Assembled on a Pole
Mounting the AU-ODU/AU-ODU-HP on a Pole
Using Metal Bands
IMPORTANT
For pole sizes up 2 inches, use the pole mounting kit supplied with the ODU's package. The
"metal bands" are required for 2"-4" pole size.
The maximum "metal band" width is 14 mm.
1
Lean the AU-ODU vertically on the pole. Pay attention to the 'UP' arrow on the
casing.
2
Mount the metal band on the two upper metal band holders.
3
Secure the AU-ODU to the pole. Do not tighten yet.
BreezeMAX Base Station Installation and Maintenance Manual
97
Chapter 5 - Mechanical Installation
Figure 5-32: Securing the AU-ODU to the Pole - 1
4
Mount and thread the second metal band on the bottom stud.
Bottom Metal
Band Holder
Figure 5-33: Securing the AU-ODU to the Pole - 2
5
Fasten the screw of each one of the metal bands to firmly secure the AU-ODU
to the pole.
98
BreezeMAX Base Station Installation and Maintenance Manual
Installing the AU-ODU/AU-ODU-HP
Figure 5-34: Securing the AU-ODU to the Pole - 3
To connect the Antenna Cable, refer to Section 6.1.
5.2.5
Mounting the Antenna on a Pole
1
Assemble the pole mount on the pole. Use the Rear clamp (MC4465-01)
2
Point the antenna to the desired direction.
3
Fasten the M8 nuts using the flat and spring washers. Apply torque of 14.9
[N*m] (132 [Lbs*in]).
BreezeMAX Base Station Installation and Maintenance Manual
99
Chapter 5 - Mechanical Installation
Figure 5-35: Assembling the Pole Mount on the Pole
4
Adjust the desired elevation angle of the antenna. For your convenience, use
the angle scale to measure the elevation angle of the antenna.
5
After elevation adjustment is done, fasten the 3 locking elevation (M3) nuts.
Use the flat and spring washers. Apply torque of 0.6 [N*m] (5.2 [Lbs*in]).
Figure 5-36: Adjusting the Elevation Angle
100
BreezeMAX Base Station Installation and Maintenance Manual
Installing the AU-ODU/AU-ODU-HP
5.2.6
Mounting the AU-ODU/AU-ODU-HP/Antenna on
a Tower
To mount the AU-ODU/Antenna on a tower, you need an adapter to standard pole
dimensions. The adapter should be mounted on the tower and the ODU/antenna
should be mounted on the adapter. To mount on the adapter, follow the
instructions for mounting on a pole. See Section 5.2.3 and Section 5.2.4.
The adapter cannot be ordered from Alvarion.
After mounting the AU-ODU and antenna on a pole/tower, proceed to connecting
the cables (Chapter 6).
BreezeMAX Base Station Installation and Maintenance Manual
101
6
Chapter 6 - Connecting the Cables
In This Chapter:
“Connecting the Antenna Cable” on page 104
“Preparing the IDU-ODU Cable” on page 107
“Connecting the AU-ODU IF Cable” on page 110
“Connecting the AU-ODU-HP IF Cable” on page 112
“Connecting the GPS Cables” on page 115
“Connecting the Grounding Cable” on page 118
“Sealing the Outdoor Connectors” on page 123
The pictures are for illustrative purposes only. The actual modules may differ
depending on the type used.
IMPORTANT
When spreading the cables on the roof to inside the building, pay attention to the connectors.
For the IF cables, make sure that the N-Type connector side of the cable remains on the roof and
that the TNC connector side enters the building.
For the GPS cable, make sure that the 12-pin round connector (female) side of the cable remains
on the roof and that the RJ-45 connector side enters the building.
Chapter 6 - Connecting the Cables
6.1
Connecting the Antenna Cable
To connect the antenna cable:
1
Connect the right angle N-Type male connector to the antenna female
connector. Use a spanner to fasten gently. Apply torque of 31 [N*m] 275
[Lbf*in].
Figure 6-1: Connecting the Antenna Cable to the Antenna
2
Connect the other side of the cable to the N-Type connector of the AU-ODU.
Fasten gently. Apply torque of 31 [N*m] 275 [Lbf*in].
104
BreezeMAX Base Station Installation and Maintenance Manual
Connecting the Antenna Cable
Figure 6-2: Connecting the Antenna Cable to the AU-ODU
3
Fix the Antenna cable onto the pole using a cable strip.
a
Use additional cable strips to route the cable such that water can
accumulate on the cable bends, away from the unit.
b
When routing the cable, do not exceed the minimum bending radius in the
cable specifications
BreezeMAX Base Station Installation and Maintenance Manual
105
Chapter 6 - Connecting the Cables
.
Figure 6-3: Fixing the Antenna Cable onto the Pole
106
BreezeMAX Base Station Installation and Maintenance Manual
Preparing the IDU-ODU Cable
6.2
Preparing the IDU-ODU Cable
The indoor-to-outdoor cable is supplied open-ended at the indoor unit end, to
allow the installer to conveniently route it through a hole in the wall. The end that
is to be connected to the outdoor unit is supplied with a crimped connector
(12-pin waterproof round connector). The cable kit includes also two shielded
RJ-45 connectors and a protective cover for the connector.
To prepare the IDU-ODU cable:
1
Assemble an RJ-45 connector with a protective cover on the indoor end of the
IDU-ODU cable. Refer to the pin assignment and color codes in standard
cables described below.
2
Wire color
Pin
Orange/white
1
Orange
2
Brown/white
3
Brown
4
Blue
5
Blue/white
6
Green
7
Green/white
8
Use a standard crimp tool to prepare the wires. Insert them into the
appropriate pins of the RJ-45 connector, and use the tool to crimp the
connector. The figure below shows the wire pair pin-to-pin connections
required for the indoor-to-outdoor cable (see step-by-step instructions on the
back of this page). Make sure to pull back the shield drain wire before
inserting the cable into the RJ-45 connector, to ensure a good connection with
the connector's shield after crimping.
3
Connect the Ethernet cable to the ODU GPS RJ-45 connector located on the
rear panel of the GPS Adapter.
BreezeMAX Base Station Installation and Maintenance Manual
107
Chapter 6 - Connecting the Cables
To assemble the RJ-45 connector:
1
Thread the RJ-45 plastic cover on the cable.
2
Reveal 5 cm of outer sleeve, then reveal 4 cm of the inner sleeve.
3
Release all wires and arrange them in order, then cut them to 1 cm length.
4
Insert the wires into the connector and press it using a standard tool (it is
recommended to solder the shield drain wire to the connector as in the
picture).
5
108
Push the plastic cover into place.
BreezeMAX Base Station Installation and Maintenance Manual
Preparing the IDU-ODU Cable
BreezeMAX Base Station Installation and Maintenance Manual
109
Chapter 6 - Connecting the Cables
6.3
Connecting the AU-ODU IF Cable
The AU-ODU is connected to the AU-IDU via an IF cable carrying both signals and
power. For details on the IF cable requirements see Section 3.3. Before connecting
the IF cable, make sure that the length of the IF cable is sufficient to reach the
AU-IDU. See Table 3-2 for IF Cable length limitation.
To connect the AU-ODU IF cable:
1
Connect the male TNC connector of the IF cable to the female TNC connector
on the AU-ODU (IF connector).
Figure 6-4: Connecting the IF Cable
2
Connect the other end of the coaxial IF cable to the AU-IDU, as follows:
AU-IDU: to the ODU connector at the AU-IDU front panel (see Figure 6-5).
110
BreezeMAX Base Station Installation and Maintenance Manual
Connecting the AU-ODU IF Cable
ODU-IDU cable
Figure 6-5: Connecting the ODU-IDU Cable - Modular Base Station
BreezeMAX Base Station Installation and Maintenance Manual
111
Chapter 6 - Connecting the Cables
6.4
Connecting the AU-ODU-HP IF Cable
The AU-ODU-HP is connected to the ODU Power Feeder via an IF cable carrying
both signals and power. For details on the IF cable requirements see Section 3.3.
Before connecting the IF cable, make sure that the length of the IF cable is
sufficient to reach the AU-IDU. See Table 3-2 for IF Cable length limitation.
To connect the AU-ODU-HP IF Cable
1
Connect the male TNC connector of the IF cable to the female TNC connector
on the AU-ODU (IF connector). See Figure 6-4.
2
Connect the other end of the coaxial IF cable to the ODU connector on the rear
panel of the ODU Power Feeder. To avoid transmissions at undesired
frequencies, verify that the frequency and bandwidth parameters are properly
configured before connecting the IF cables.
Figure 6-6: Connecting the AU-ODU-HP IF Cable to the ODU Power Feeder
To connect the ODU Power Feeder to the BST
1
Connect one end of the IF cable supplied with the module to the IDU
connector(s) on the ODU Power Feeder’s front panel.
112
BreezeMAX Base Station Installation and Maintenance Manual
Connecting the AU-ODU-HP IF Cable
Figure 6-7: Connecting the ODU Power Feeder IF Cable
2
Connect the other end of the IF cable to the appropriate ODU connector(s) of
the AU-IDU(s).
BreezeMAX Base Station Installation and Maintenance Manual
113
Chapter 6 - Connecting the Cables
Figure 6-8: Connecting the ODU Power Feeder IF Cable to AU-IDU
114
BreezeMAX Base Station Installation and Maintenance Manual
Connecting the GPS Cables
6.5
Connecting the GPS Cables
The Outdoor GPS Receiver is connected to the GPS Adapter via a Cat. 5E Ethernet
cable that is crimped on one side only (12-pin waterproof round connector,
female). Before connecting the cable, make sure that the length of the cable is
sufficient to reach the NPU.
To connect the Ethernet cable:
1
Connect the 12-pin round connector (female) of the Cat. 5E Ethernet cable to
the male connector of the surge protector. Use the groove on the cable
connector (indicated by an arrow) as a guide. It aligns with the tenon in the
connector on the surge protector side. Turn the locking ring on the cable
connector clockwise to secure the connection. Do not over-tighten.
Figure 6-9: Connecting the Ethernet Cable to the Outdoor GPS Receiver
2
Fix the cable onto the pole using a cable strip. Route the cable to the location
selected for the indoor equipment.
BreezeMAX Base Station Installation and Maintenance Manual
115
Chapter 6 - Connecting the Cables
Figure 6-10: Fixing the Cable onto the Pole
3
Crimp the other end of the Cat. 5E Ethernet cable with an RJ-45 connector.
Follow the instructions detailed in Section xx. Connect the cable to the ODU
GPS connector located on the rear panel of the GPS Adapter.
116
BreezeMAX Base Station Installation and Maintenance Manual
Connecting the GPS Cables
Figure 6-11: Connecting the Ethernet Cable to the GPS Adapter
To connect the NPU to GPS Adapter cable:
1
Connect one end of the NPU to GPS Adapter data cable to the Base Station
Interface connector located on the front panel of the GPS Adapter. Tighten the
two screws until the cable is held firmly.
Figure 6-12: Connecting the NPU to GPS Adapter Cable to the GPS Adapter
2
Connect the other end of the data cable to the GPS/SYNC IN connector located
on the NPU panel. Tighten the two screws until the cable is held firmly.
BreezeMAX Base Station Installation and Maintenance Manual
117
Chapter 6 - Connecting the Cables
6.6
Connecting the Grounding Cable
6.6.1
Grounding Outdoor Units
When grounding Alvarion Outdoor Radio Units, use the GND (ground) screw on
the unit as a grounding point.
A 16-mm² cable may not easily attach to the "ground screw". Therefore, it is
recommended to crimp a lug onto the end of cable and attach the cable to the
same threaded rods that are used as part of the bracket as shown in Figure 6-13.
Grounding
screw
Impermeability test
screw
Figure 6-13: Alvarion BreezeMAX AU-ODU/AU-ODU-HP Grounding Points
CAUTION
Do not open the impermeability test screw - you may impair the unit's sealing against moisture and
humidity.
The shield (outside conductor) of the coaxial cable must be connected to the
Outdoor Unit chassis ground via the coax connector at the top, and to ground on
entering the building/shelter.
NOTE
It is important for the Alvarion IF product line that only the shield of the cable is bonded to the
grounding points. As there is a DC current flowing on the center conductor of the cable, any
connection to the center conductor would interfere with this DC current.
This includes the insertion of any lightning protection devices.
118
BreezeMAX Base Station Installation and Maintenance Manual
Connecting the Grounding Cable
To connect the grounding cable:
1
Connect the grounding cable to the grounding screw (marked
) located on
the bottom panel of the AU-ODU. Use a Philips screwdriver and apply torque
of 1.2 [N*m] (10.8 [lbs*in]).
Figure 6-14: Connecting the Grounding Cable to the AU-ODU
NOTE
Use cable strips in order to attach all cables to the pole.
Do not pull the cable, avoid stretching it. Leave enough cable length between the strip and the
connection on both sides of the cable.
2
Connect the other end of the grounding cable to a good ground (earth)
connection.
For information on lightning protection, see Section 2.3.
6.6.2
Grounding Indoor Units
6.6.2.1
Base Station
The Base Station indoor equipment should preferably be connected to the
Equipment Earth Grounding Bar (EGB), which is in turn connected to the site
ground. In small sites where there is no EGB, grounding of the BST can be
BreezeMAX Base Station Installation and Maintenance Manual
119
Chapter 6 - Connecting the Cables
achieved via a grounding screw, inserted at the back of the chassis (see
Figure 6-13 and Figure 6-15). Connect one end of the grounding cable to the
ground terminal located on the rear panel and firmly tighten the grounding screw.
Connect the opposite end of the grounding cable to a ground connection or to the
rack.
A grounding wire connects the chassis to the EGB. Double connection must be
avoided in order to eliminate ground loops.
The gauge of the grounding cable must be no less than 18 AWG.
For the GND point connection, use a closed loop terminal crimped to GND wire.
Figure 6-15: BreezeMAX Base Station Chassis - Grounding Screw
For information on lightning protection, see Section 2.3.
6.6.2.2
ODU Power Feeder
1
Connect one end of a grounding cable to the grounding screw located on the
rear panel of each ODU Power Feeder module and firmly tighten the grounding
screw.
120
BreezeMAX Base Station Installation and Maintenance Manual
Connecting the Grounding Cable
Figure 6-16: ODU Power Feeder - Grounding Screw
2
Connect the opposite end of the grounding cable(s) to a ground (earth)
connection or to the cabinet, if applicable.
6.6.2.3
GPS Adapter
1
Connect one end of a grounding cable to the grounding screw located on the
rear panel of the GPS Adapter and firmly tighten the grounding screw. Apply
torque 0.6 [N*m] (5.2 [lbs*in]).
Figure 6-17: GPS Adapter - Grounding Screw
2
Connect the opposite end of the grounding cable to a ground (earth)
connection or to the cabinet, if applicable.
BreezeMAX Base Station Installation and Maintenance Manual
121
Chapter 6 - Connecting the Cables
6.6.2.4
Oudoor GPS Receiver
The bracket of the outdoor GPS Receiver must be grounded. Use an appropriate
grounding cable. You can use the same screw used for grounding the surge
protector.
122
BreezeMAX Base Station Installation and Maintenance Manual
Sealing the Outdoor Connectors
6.7
Sealing the Outdoor Connectors
To seal the connectors:
Use isolation material (such as tar bands) to cover all outdoor connectors to
prevent water penetration into the cables.
We recommend using 3M's cold shrink tube 8426-9 as a solution for sealing. This
solution requires no training or special tools. If you are using the 8426-9 cold
shrink, leave a 10 cm space (see ) to keep the cable flexible.
Use high quality sealing material such as Scotch® 130C Linerless Rubber Splicing
Tape from 3M to ensure IP-67 compliant protection against dust and water.
Figure 6-18: Sealing ODU Connectors
NOTE
The N-Type connectors of the ODU & IDU must be closed without using any tool, only by hand.
The outdoor connectors should be tightened using sleeves.
When routing the coaxial cable, leave a service loop at the antenna so there will sufficient
length of coaxial cable to replace a faulty connector, when necessary.
Secure the coaxial cable so that there is no mechanical stress at the antenna connection.
Follow the superstructure with the coaxial cable to its base to the building.
If the coaxial cable requires suspension from the RFU to the building, use a stranded wire to
support the coaxial cable weight. (The support will prevent a migration of the coaxial cable's
inner conductor to the shield).
BreezeMAX Base Station Installation and Maintenance Manual
123
Chapter 6 - Connecting the Cables
Figure 6-19: Sealed Connectors
124
BreezeMAX Base Station Installation and Maintenance Manual
7
Chapter 7 - Connecting to Power
In This Chapter:
“Preparing a Power Cable” on page 126
“Connecting the Power Cable” on page 128
Chapter 7 - Connecting to Power
7.1
Preparing a Power Cable
A 2.5m DC power cable is supplied with each PIU. Additional DC cables can be
ordered from Alvarion. If necessary, use the following instructions to prepare a DC
cable.
To prepare the power cable:
1
Use a cable capable of supporting a current of at least 40A. Use a cable with 2
x 8AWG (or thicker) wires for the power, plus an additional 8AWG to 20AWG
ground wire.
2
The matching power connector to be used is Amphenol D-type power P/N
177TWA/3W3/SP3Y with high power socket contacts P/N 17DM53744-1.
3
Connect the cable to the power connector as follows:
Pin 1 (RTN): Red (8 AWG/10 AWG min wire)
Pin 2 (-48V): Black (8 AWG/10 AWG min wire)
Pin 3 (
4
): Ground (shield) (8AWG/10AWG-20AWG wire)
Attach suitable terminal rings to the side that connects to the power source.
Figure 7-1 shows the assembly drawing of the power cable.
Figure 7-1: Power Cable
126
BreezeMAX Base Station Installation and Maintenance Manual
Preparing a Power Cable
Table 7-1: Power Cable Components
Item
Qty
P/N
Description
1
1
CPW3W003F01D001
Power pin 3W3 female, contact: Gold Flash, with 40A MIN.
Shell: Nickel plated, Insulator: Black
2
2
MSM3D00210ND001
4-40, Metal Thumbscrew, L=21mm
3
1
SFC30D001
Copper foil 360º Soldered
PVMD40PBK01D1
Molded PVC, UL 94V-0, Color: Black
4
5
1
W64ABK0D2XXXXO2
2C*8AWG + Drain + Braid, Raychem Jacket RFPETM-12-0
or equivalent
6
3
192210225
BCL-8516-PL Copper Terminal Eyelet Style #8
8
1
ST020D001
Heat Shrink Tubing
9
1
ST095D001
Heat Shrink Tubing
BreezeMAX Base Station Installation and Maintenance Manual
127
Chapter 7 - Connecting to Power
7.2
Connecting the Power Cable
7.2.1
Modular Base Station
To connect the power cable:
1
Connect one end of the power cable (with the terminal rings) to the DC power
source.
CAUTION
Before connecting the cable to the PIU, use a Voltmeter to check that the voltage and polarization is
-48 VDC.
2
Connect the other end of the power cable (with the connector) to the PIU.
When two PIUs are used, the power voltage to the master PIU must be at least
1.5V higher that the power voltage to the slave PIU.
7.2.2
ODU Power Feeder
To connect the power cable:
1
Connect the power cord to the ODU Power Feeder’s DC socket, located on the
rear panel.
2
Tighten the cable’s screws using a flat head screwdriver.
Figure 7-2: Connecting the Power Cable
3
128
Connect the other end of the power cord to the -48 VDC power source.
BreezeMAX Base Station Installation and Maintenance Manual
Connecting the Power Cable
BreezeMAX Base Station Installation and Maintenance Manual
129
8
Chapter 8 - Connecting to the Network and
NMS
In This Chapter:
“Connecting to the Network” on page 132
“Connection for Management Purposes” on page 134
The pictures are for illustrative purposes only. The actual modules may differ
depending on the type used.
Chapter 8 - Connecting to the Network and NMS
8.1
Connecting to the Network
Connection to the network is done via the Data port connector on the NPU.
To connect to the network:
1
Use a Category 5E Ethernet cable, straight (8-wire, 24 AWG), STP (Shielded
Twisted Pair)
2
Connect one end of the cable to the Network/Backbone Devices
(router/switch/hub).
NOTE
The Network Device must be 100/1000 Mbps, full duplex.
3
Connect the other end of the cable to the Data Port on the NPU. Verify proper
operation via the upper (orange) LED indication on the 100/1000Base-T
(RJ-45) connector with 2 embedded LEDs, and check LED indicators on the
backbone devices as well.
NPU Data port
Figure 8-1: Connecting to the Network - Modular Base Station
132
BreezeMAX Base Station Installation and Maintenance Manual
Connecting to the Network
4
Configure the Data port to the appropriate Data rate (100/1000 Mbps). See
Section 10.3.2.
BreezeMAX Base Station Installation and Maintenance Manual
133
Chapter 8 - Connecting to the Network and NMS
8.2
Connection for Management Purposes
8.2.1
In Band (IB) Management
IB management is done via the Data port using SNMP or Telnet.
1
Use a category 5E Ethernet cable, (8-wire, 24 AWG), STP (Shielded Twisted
Pair) as follows:
Cross Cable - when connected directly to a PC
Straight Cable - when connected to a Hub/Switch
2
8.2.2
Connect one end of the cable to the switch/hub/PC.
Out Of Band (OOB) Management
OOB management is done via the Management port or Monitor port of the NPU
using SNMP or Telnet. For details on connecting via the Monitor port, refer to
Section 10.2.1.
IMPORTANT
It is highly recommended to use the Management port for local management purposes only.
1
Use a category 5E Ethernet cable, (8-wire, 24 AWG), STP (Shielded Twisted
Pair) as follows:
Cross Cable - when connected directly to a PC
Straight Cable - when connected to a Hub/Switch
The Ethernet interface of the MGMT port in the NPU operates using Auto
Negotiation, enabling communication at either 10 Mbps or 100 Mbps.
2
Connect one end of the cable to the switch/hub/PC.
NOTE
Use Auto Negotiation on the switch/hub/PC when connecting to the Management port.
3
Connect the other end of the cable to the MGMT port of the NPU. Verify proper
operation via the upper (orange) LED indication on the 100/1000Base-T
134
BreezeMAX Base Station Installation and Maintenance Manual
Connection for Management Purposes
(RJ-45) connector with 2 embedded LEDs. Check LED indicators on the
switch/hub/PC as well.
4
Configure the MGMT port parameters. See Section 10.3.1.
NOTE
Authorized Manager(s) must be configured properly to enable remote management using
AlvariSTAR (or other SNMP based applications). See Section 10.3.3.
NPU MGMT port
Figure 8-2: Connecting to the NPU Management Port
BreezeMAX Base Station Installation and Maintenance Manual
135
9
Chapter 9 - Power Up Test Procedure
(Pre-Commissioning)
In This Chapter:
“General” on page 138
“System Initial Verification” on page 139
Chapter 9 - Power Up Test Procedure (Pre-Commissioning)
9.1
General
The power-up tests procedure assumes that the Installation procedure has been
completed. These tests demonstrate that the Base Station has been correctly
assembled and installed on site, all its components are functioning properly and it
is now ready for commissioning.
After the power-up procedure has completed successfully, the Base Station is
ready for basic network definition.
138
BreezeMAX Base Station Installation and Maintenance Manual
System Initial Verification
9.2
System Initial Verification
Verify that the Base Station is connected to an AC power source as described in
Chapter 7. After power up, the Base Station automatically starts a self-testing
procedure to verify that everything is working properly. During the self-test, the
LEDs indicate the working status of the various components. See Section 1.5.11.
Upon completion of the internal test and booting up (up to 5 minutes), verify that
the following LEDs are lit as follows:
Modular Base Station:
PIU: PWR = green. If one PIU is installed, MASTER = green. If two PIU
modules are installed, the MASTER LED of one PIU should be green, and
the other one should be off.
PSU: PWR = green, ALRM = off.
AVU: PWR = green, ALRM = off.
NPU: PWR = green, ALRM = off, BST ALRM = off, Master = green
AU-IDU: PWR = green, ALARM = off. ODU1 PWR = green, ODU1 ALRM =
off.
If the AVU's LED is Red, disconnect the power immediately to avoid damage to
the Base Station.
Power Feeder (when using AU-ODU-HP)
PWR = Green
If any of the above LEDs is red, refer to the Troubleshooting section.
BreezeMAX Base Station Installation and Maintenance Manual
139
10
Chapter 10 - Commissioning Procedure
In This Chapter:
“General” on page 142
“Accessing the Monitor Program” on page 143
“Base Station Commissioning” on page 146
“Base Station Network Connection Testing” on page 153
Chapter 10 - Commissioning Procedure
10.1
General
After completing the installation process and upon successful power-up, as
described in the preceding chapters, some basic parameters must be configured
using the Monitor application via the MON port of the NPU. These parameters are
necessary to enable remote management using SNMP or Telnet.
142
BreezeMAX Base Station Installation and Maintenance Manual
Accessing the Monitor Program
10.2
Accessing the Monitor Program
10.2.1 Connecting via the MON Connector
To access the Monitor Program via the MON connector:
1
To define the system for the first time, use the Monitor cable to connect the
MON connector of the NPU to the serial COM port of your PC (see Figure 10-1).
The COM port connector of the Monitor cable is a 9-pin D-type plug [female].
Figure 10-1: Connecting to the NPU
2
Run a terminal emulation program, such as "Hyper Terminal™", as follows:
Start > Programs > Accessories > Communications > Hyper Terminal
BreezeMAX Base Station Installation and Maintenance Manual
143
Chapter 10 - Commissioning Procedure
3
4
Set the communication parameters as follows:
Baud Rate:
9600
Data Bits:
8
Stop Bits:
1
Parity:
None
Flow Control:
Xon/Xoff
Port:
Connected COM port
After the Hyper Terminal is defined, activate the connection to the BreezeMAX
platform. The BreezeMAX entry screen is displayed.
5
Enter the password. The default password is admin (case sensitive). Upon
successful connection, the following main menu is displayed:
BreezeMAX/NPU 10.0.22.251
SW Version 4.0.1.9
Main Menu
=========
1 - Base Station
2 - NPU
3 - Radio Cluster
4 - ODU
5 - AU
6 - SU
7 - Services
X - Exit
>
Figure 10-2: BreezeMAX NPU Main Menu
10.2.2 Connecting via Telnet
To access the Monitor program via Telnet:
1
The PC used for accessing the Monitor program should be configured
according to the parameters configured for the applicable port in the NPU
(MGMT or DATA port).
144
BreezeMAX Base Station Installation and Maintenance Manual
Accessing the Monitor Program
2
Connect a PC to the DATA/MGMT port of the NPU using a crossed Ethernet
cable.
3
Run the Telnet program connecting to the IP address of the connected port.
The Enter the password message is displayed.
4
Enter the password and press the Enter key to get to the BreezeMAX Main
Menu (see Figure 10-2).
NOTE
If you forgot the password, type "help" to receive a challenge string consisting of 24 characters.
Contact Alvarion's Customer Service and provide the challenge string (after user identification) to
receive a temporary password. You can use this password only once to enter the program. The
password must be changed during the session to a different "permanent" password. The
administrator should be notified of this new password. Five consecutive errors in entering the
temporary password will invalidate it. In this case, repeat this procedure to receive a new challenge
string for a new temporary password.
NOTE
Through the Debug Stream submenu, you can configure the types of messages that will be
displayed during the Telnet session upon the occurrence of various events. For further details, refer
to the Base Station System Manual.
BreezeMAX Base Station Installation and Maintenance Manual
145
Chapter 10 - Commissioning Procedure
10.3
Base Station Commissioning
This section covers the definitions required for enabling communication with and
remote management of the BreezeMAX Base Station. Prior to entering the
definitions, verify that the Data & Management networks are connected to NPU
ports (see Chapter 7 and Chapter 8).
NOTE
The Management port must be connected to a separate network from the Data Port using a
different Router.
The following diagram shows an example of such a connection.
146
BreezeMAX Base Station Installation and Maintenance Manual
Base Station Commissioning
Figure 10-3: Data and Management Connection
10.3.1 Management Port Definition
The following procedure describes the necessary steps for the basic configuration
of the BreezeMAX Base Station. The screens have been divided for convenience. In
each screen, the required action and the new information displayed as a result of
that action appear in black, whereas information already described appears in
gray. On the actual screen all of the information appears continuously.
1
In the BreezeMAX Main Menu screen (Figure 10-2), select option 2 - NPU to
enter the NPU menu.
BreezeMAX Base Station Installation and Maintenance Manual
147
Chapter 10 - Commissioning Procedure
BreezeMAX/NPU 10.0.22.251
SW Version 4.0.1.9
Main Menu
=========
1 - Base Station
2 - NPU
3 - Radio Cluster
4 - ODU
5 - AU
6 - SU
7 - Services
X - Exit
>2
BreezeMAX/NPU 10.0.22.251
SW Version 4.0.1.9
NPU
===
1 - Show
2 - Unit Control
3 - Configuration
4 - Performance Monitoring
>
Figure 10-4: NPU Menu
2
Select 3 - Configuration to enter the NPU Configuration menu.
BreezeMAX/NPU 10.0.22.251
SW Version 4.0.1.9
NPU
===
1 - Show
2 - Unit Control
3 - Configuration
4 - Performance Monitoring
>3
BreezeMAX/NPU 10.0.22.251
SW Version 4.0.1.9
NPU-Configuration
=================
1 - Management Port
2 - Data Port
3 - Authorized Managers
4 - Bridge
5 - Voice
6 - Debug Stream
>
Figure 10-5: Configuration Menu
3
Select option 1 - Management Port. A list of parameters is displayed. These
parameters define the IP parameters for the MGMT port, necessary to
communicate with the operator Management network and NOC or AlvariSTAR
platforms.
148
BreezeMAX Base Station Installation and Maintenance Manual
Base Station Commissioning
BreezeMAX/NPU 10.0.22.251
SW Version 4.0.1.9
NPU-Configuration
=================
1 - Management Port
2 - Data Port
3 - Authorized Managers
4 - Bridge
5 - Voice
6 - Debug Stream
>1
BreezeMAX/NPU 10.0.22.251
SW Version 4.0.1.9
NPU-Configuration-Management Port
=================================
1 - Management Port IP Address
2 - Management Port Subnet Mask
3 - Management Port Gateway
4 - Management Port Destination Subnet
5 - Management Port Destination Subnet Mask
4 - Management Port Management Traffic Enable/disable
>
Figure 10-6: Management Port Menu
4
Set the following parameters:
Management Port IP Address: The default is 10.0.0.1.
Management Port Subnet Mask: The default is 255.255.255.0.
Select 3 (Management Port Gateway) to configure the static route
parameters that will be displayed one after the other. These include:
¾ Management Port Gateway: The default is 0.0.0.0.
¾ Management Port Destination Subnet: The default is 0.0.0.0.
¾ Management Port Destination Subnet Mask: The default is 0.0.0.0.
Management Port Management Traffic Enable/Disable
NOTE
The Management Port Gateway, Destination Subnet and Destination Subnet Mask are grouped
together. Exiting the configuration process (e.g. by pressing the Esc button) after configuring just
the first one or two parameters in this group will cancel the changes made.
The subnet that is used as the Static Route for remote management via the Management port
(defined by the Management Port Destination Subnet and Management Port Dest Subnet Mask
parameters), must differ from the local subnet of the Management port (defined by the Management
Port IP Address and Management Port Subnet Mask parameters) and from the local subnet of the
Data port (defined by the Data Port IP Address and Data Port Subnet Mask parameters).
BreezeMAX Base Station Installation and Maintenance Manual
149
Chapter 10 - Commissioning Procedure
10.3.2 Data Port Definitions
To configure the Data Port:
1
In the BreezeMAX Main Menu screen, select option 2 - NPU to enter the NPU
menu (see Figure 10-2).
2
Select 3 - Configuration to enter the NPU Configuration menu (see
Figure 10-5).
3
In the Configuration menu, select option 2 - Data Port: A list of parameters is
displayed. These parameters define the IP parameters for the Data port
connecting the Base Station to the backbone.
BreezeMAX/NPU 10.0.22.251
SW Version 4.0.1.9
NPU-Configuration
=================
1 - Management Port
2 - Data Port
3 - Authorized Managers
4 - Bridge
5 - Voice
6 - Debug Stream
>2
BreezeMAX/NPU 10.0.22.251
SW Version 4.0.1.9
NPU-Configuration-Data Port
===========================
1 - Data Port IP Address
2 - Data Port Subnet Mask
3 - Data Port Gateway
4 - Data Port Management VLAN ID
5 - Data Port Speed
6 - Data Port Management Traffic Enable/Disable
>
Figure 10-7: Data Port Menu
4
Set the following parameters:
Data Port IP Address: The default is 1.1.1.3.
Data Port Subnet Mask: The default is 255.255.255.0.
Data Port Gateway: The default is 0.0.0.0.
Data Port Management VLAN ID: The default is null (No VLAN).
Data Port Speed: The default is 100 Mbps.
150
BreezeMAX Base Station Installation and Maintenance Manual
Base Station Commissioning
Data Port Management Traffic Enable/Disable: the default is Enable
10.3.3 Authorized Managers Definition
To define Authorized Managers:
1
In the BreezeMAX Main Menu screen, select option 2 - NPU to enter the NPU
menu (see Figure 10-2).
2
Select 3 - Configuration to enter the NPU Configuration menu (see
Figure 10-5).
3
Select 3 - Authorized Managers to enter the Authorized Managers menu. The
Authorized Managers menu enables to define the properties of management
stations that are allowed to manage the Base Station. A list of parameters is
displayed.
BreezeMAX/NPU 192.168.254.10
SW Version 2.0.1.5
NPU-Configuration
=================
1 - Management Port
2 - Data Port
3 - Authorized Managers
4 - Bridge
5 - Voice
>3
BreezeMAX/NPU 192.168.254.10
SW Version 2.0.1.5
NPU-Configuration-Authorized Managers
=====================================
1 - Show All
2 - Select
3 - Add
>
Figure 10-8: Authorized Managers Menu
BreezeMAX Base Station Installation and Maintenance Manual
151
Chapter 10 - Commissioning Procedure
BreezeMAX/NPU 10.0.22.251
SW Version 4.0.1.9
NPU-Configuration
=================
1 - Management Port
2 - Data Port
3 - Authorized Managers
4 - Bridge
5 - Voice
6 - Debug Stream
>3
BreezeMAX/NPU 10.0.22.251
SW Version 4.0.1.9
NPU-Configuration-Authorized Managers
=====================================
1 - Show All
2 - Select
3 - Add
>
Figure 10-9: Authorized Managers Menu
4
Select 3 - Add to add a new Authorized Manager. Up to 10 Authorized
Managers can be defined.
Define the following parameters for each Authorized Manager you add to
the list:
IP Address
Send Traps (whether traps should be sent to the Authorized Manager)
Read Community: The SNMP Read Community to be used by the
Authorized Manager. Up to 23 printable characters, case sensitive.
Write Community: The SNMP Write Community to be used by the
Authorized Manager. Up to 23 printable characters, case sensitive.
5
Enter the IP address of the computer serving as the SNMP communication
manager.
For example, if the SNMP communication manager computer is the
AlvariSTAR platform, enter the IP address of the AlvariSTAR server.
152
BreezeMAX Base Station Installation and Maintenance Manual
Base Station Network Connection Testing
10.4
Base Station Network Connection
Testing
This section describes the option to test that the BreezeMAX Base Station is
properly connected to the Operator backbone and also that the definitions are
correct.
Before initiating the test, verify that the BreezeMAX is connected using either to
the DATA and/or MGMT for operator management port separately (as described in
Section 10.3 above).
The test is initiated from the Operator - NOC, and can be performed from the
AlvariSTAR or any computer connected to the Operator network in the NOC.
To ensure connectivity, perform a PING test with the Base Station as follows:
1
Using the IP address defined in Section 10.3.1 or Section 10.3.2 above:
Ping < Data port IP address >
- OR Ping < MNG port IP address >
The test terminates upon successful reply from the BreezeMAX Base Station in a
reasonable time. If no reply is received, refer to Troubleshooting (or network
administrator), Chapter 12.
The following figure shows a successful PING test to an IP device.
C:\ping 10.0.6.110
Pinging 10.0.6.110 with 32 bytes of data:
Reply
Reply
Reply
Reply
from
from
from
from
10.0.6.110:
10.0.6.110:
10.0.6.110:
10.0.6.110:
bytes=32
bytes=32
bytes=32
bytes=32
time<1ms
time<1ms
time<1ms
time<1ms
TTL=63
TTL=63
TTL=63
TTL=63
Ping statistics for 10.0.6.110:
Packets: Sent = 4, Received = 4, Lost = 0 (0% loss).
Approximate round trip times in milli-seconds:
Minimum = 0ms, Maximum = 0ms, Average = 0ms
C:\
Figure 10-10: PING Test
BreezeMAX Base Station Installation and Maintenance Manual
153
Chapter 10 - Commissioning Procedure
After completing the configuration of basic parameters, it is possible to configure
other parameters and manage the Base Station and its components as well as the
SUs connected to it, using either Telnet or SNMP.
If management traffic is enabled for both the Data Port and the Management port,
then the unit can be managed by any station on any of the following subnets
(provided the station is defined as an Authorized Manager):
The local subnet of the Management port (defined by the Management Port IP
Address and Management Port Subnet Mask parameters).
The local subnet of the Data port (defined by the Data Port IP Address and
Data Port Subnet Mask parameters).
Any subnet reachable via the default Gateway of the Data port (if Data Port
Gateway is defined).
The Static Route subnet (defined by the Management Port Dest Subnet and
Management Port Destination Subnet Mask parameters) reachable via the
Gateway of the Management port.
154
BreezeMAX Base Station Installation and Maintenance Manual
11
Chapter 11 - Maintenance
In This Chapter:
“AU-ODU and Antenna Maintenance” on page 156
“BST-SH Maintenance” on page 157
The pictures are for illustrative purposes only. The actual modules may differ
depending on the type used.
Chapter 11 - Maintenance
11.1
AU-ODU and Antenna Maintenance
Once a year, before the rain season, it is strongly recommended to check that the
sealing of all outdoor connectors is intact and that the ODU and antenna are
secure and undamaged.
156
BreezeMAX Base Station Installation and Manual
BST-SH Maintenance
11.2
BST-SH Maintenance
11.2.1 Replacing the BST Modules
The Base Station modules include special handles for high-force
insertion/extraction of modules. Each of the 6U high modules (NPU, AU-IDU)
includes two such handles, whereas each of the 3U high-modules (PIU, PSU)
includes a single handle at the bottom of the front panel.
The NPU, AU-IDU and second generation PIU modules include a blue HOT SWAP
LED and a micro-switch in the injector/ejector handle to support hot-swap
control. After releasing the ejector's button, the HOT SWAP LED should turn on,
indicating that power to/from the back-panel is disconnected and the module can
be removed safely.
To replace a module with hot-swap support (NPU, AU-IDU, second generation PIU):
1
Release the screws at the top and the bottom of the front panel.
2
Press the handles' red button until the handles are unlocked.
3
Wait until the blue HOT SWAP LED turns on, indicationg that the module has
been disconnected and can be removed.
CAUTION
In a PIU with HOT SWAP LED, disconnect power from the PIU module only after it is taken out from
the chassis (or after the HOT SWAP LED is turned on).
4
Press the handles down (the upper handle)/up (the lower handle) until the
module is unlocked, firmly hold the handles and remove the faulty module
from the chassis.
5
Insert a new module (see Section 5.1.1.1).
To replace a PSU or a PIU without HOT SWAP support:
BreezeMAX Base Station Installation and Manual
157
Chapter 11 - Maintenance
CAUTION
In a PIU without HOT SWAP LED, disconnect power from the PIU module before ejecting it from the
chassis. Before disconnecting the power cable from the PIU, the power source must be
disconnected to avoid irreversible damage due to a potential excessively high transient current.
1
Release the screw at the top of the front panel.
2
Press the handle's red button until the handle is unlocked.
3
Press the handle up until the module is unlocked, firmly hold the handle and
remove the faulty module from the chassis.
4
Insert a new module (see Section 5.1.1.1).
11.2.2 Replacing an NPU
To minimize downtime and facilitate fast and easy NPU replacement, it is
recommended to maintain an updated copy of the NPU configuration. Refer to the
System Manual for details on preparing and uploading a backup file of the NPU
configuration.
1
Release the screws at the top and the bottom of the NPU's front panel.
2
Press the handles' red button until the handles are unlocked.
3
Wait until the blue HOT SWAP LED turns on, indicating that the module has
been disconnected and can be removed.
4
Press the handles down (the upper handle)/up (the lower handle) until the
module is unlocked. Firmly hold the handles and take the module out of the
chassis.
5
Disconnect all IF cables connecting the AU-IDUs to the AU-ODUs. This is
necessary as the initial configuration of the new NPU is most probably
inappropriate.
6
Firmly push the new NPU module into its intended slot (slot 5).
7
Press the handles up (the upper handle)/down (the lower handle)
simultaneously until you hear the locking click and the red buttons are
released. The blue HOT SWAP LED will briefly turn on, indicating that the
module is being powered up.
8
Secure the module in place by closing the screws at the top and bottom of the
front panel.
158
BreezeMAX Base Station Installation and Manual
BST-SH Maintenance
9
Download the backup file using a DOS based TFTP. Use the command: tftp-i
<NPU port IP address> put <file name>. The default IP address of the MGMT
port is 10.0.0.1.
10 Use the monitor program to configure the IP parameters (IP address, Subnet
Mask, Default Gateway Address) of the MGMT port. These parameters are not
affected by the loaded file.
11 Reset the system.
12 Reconnect the IF cables.
NOTE
The life span of the battery on the NPU module is approximately 8 years. The battery is not intended
for replacement by the customer. The NPU module should be sent to Alvarion for replacement
every 8 years.
11.2.3 Replacing the AVU
If the red ALRM LED is on while the PWR LED is green, it indicates a failure of at
least one fan. Although the Base Station chassis may continue operating with one
failed fan, it is recommended to replace the AVU as soon as possible.
To replace an AVU drawer:
CAUTION
The following procedure should be completed within 10 minutes.
1
Release the screws securing the AVU to the chassis.
2
Using the handle take out the faulty chassis.
3
Position the new AVU drawer on the shelf and slide it in all the way.
BreezeMAX Base Station Installation and Manual
159
Chapter 11 - Maintenance
Figure 11-1: Installing the AVU - Step 1
4
Gently push until you hear a clicking sound, indicating that the connector has
been locked.
Figure 11-2: Installing the AVU - Step 2
5
160
Tighten the screws to secure the AVU to the chassis.
BreezeMAX Base Station Installation and Manual
BST-SH Maintenance
Figure 11-3: Installing the AVU - Step 3
BreezeMAX Base Station Installation and Manual
161
12
Chapter 12 - Troubleshooting
In This Chapter:
The following table lists some of the more common problems which may occur
when using the BreezeMAX Base Station. Locate the problems according to the
module and LED indication. Follow the instructions provided in the Corrective
Action column. The more common solutions are listed first. Proceed to the next
item on the list if the proposed solution did not solve the problem.
Chapter 12 - Troubleshooting
12.1
Common Problems
Table 12-1: Common Problems
H/W
Interface
Problem and Indication
Possible Cause
Corrective Action
PIU Card
No Power to the card
1
Chassis is not
connected to the power.
1
Verify that power cable is properly
connected (refer to "Preparing a
Power Cable").
2
Power Cable is not
properly connected or
faulty.
2
Verify that external power supply
output DC power is (-48) VDC.
PWR LED is off
Master LED is off
3
Power Supply is not
properly tuned or faulty.
3
Verify proper output power on the
power cable connector.
4
PIU card is not properly
connected or is
damaged.
4
Replace the PIU card.
PWR LED is Red
1
Power is not connected.
1
Verify that external power supply
output DC power is (-48) VDC.
Master LED is off
2
Power input is out of
range.
2
PIU card is not properly
connected or is
damaged.
Verify that power cable is properly
connected (refer to "Preparing a
Power Cable").
3
Disconnect power cable, eject and
re-insert the card and reconnect
the power cable.
4
Move the PIU module to another
PIU slot.
5
Replace the PIU card.
6
Replace Chassis.
1
Disconnect the power cable, eject
and re-insert the card properly
and reconnect the power cable.
2
Replace the PIU card.
1
Disconnect the power cable, eject
and re-insert the card properly
and reconnect the power cable.
2
Replace the PIU card.
No Ventilation
3
4
Hot Swap LED is Blue
Hot Swap LED is OFF
although the handles' RED
button was pressed
164
Chassis is powered by
the redundant PIU.
PIU card is not properly
connected or is damaged.
PIU card is not properly
connected or is damaged.
BreezeMAX Base Station Installation and Maintenance Manual
Common Problems
Table 12-1: Common Problems
H/W
Interface
Problem and Indication
Possible Cause
Corrective Action
PSU Card
No Power to all cards
(PIU's LEDs are OK)
1
PSU card is not properly
connected or is
damaged.
1
Move the PSU module to another
PSU slot (preferably at the other
side of the chassis).
2
Chassis is faulty.
2
Replace PSU.
3
Replace Chassis.
1
Verify that external power supply
output DC power is (-48) VDC
(refer to PIU section).
2
Replace PSU.
1
Move the AU module to a spare
AU slot.
2
Replace the AU-IDU card.
1
Move the AU module to a spare
AU slot.
2
Replace the AU-IDU card.
1
Eject and re-insert the card.
2
Replace the AU-IDU card.
1
Eject and re-insert the card.
Secure handles until you hear the
locking click. Secure the module in
place by closing the screw at the
top of the front panel.
2
Replace the AU-IDU card.
1
Eject and re-insert the card.
Secure handles until you hear the
locking click. Secure the module in
place by closing the screw at the
top of the front panel.
2
Move the AU module to a spare
AU slot.
3
Check ODU cabling and LEDs
4
Replace the AU IDU card.
PWR LED is OFF
ALRM LED is OFF
PWR LED is OFF
1
Power input is out of
range.
2
PSU is damaged.
3
PSU is inhibited by
NPU.
ALRM LED is Red
AU - IDU
PWR LED is OFF
(PIU and PSU are OK)
PWR LED is Red
(PIU and PSU are OK)
PWR LED is Green
Power supply to unit may
be faulty.
Power supply to unit may
be faulty.
Hardware problem exists.
ALRM is Red
PWR LED is Red
Hot Swap LED is Blue
The card is not properly
locked.
WACT LED is OFF
Hardware problem exists:
PWR LED is Green
No SUs are connected
ODU is not connected
properly
ODU malfunctioning
BreezeMAX Base Station Installation and Maintenance Manual
165
Chapter 12 - Troubleshooting
Table 12-1: Common Problems
H/W
Interface
Problem and Indication
Possible Cause
Corrective Action
WLNK is OFF
1
No SUs are connected
1
Connect SUs.
2
ODU is not connected
properly
2
Check ODU cabling and LEDs.
3
ODU malfunctioning
ODU1/ODU2 IDU's LEDs
ODU IDU PWR LED is OFF
(AU PWR is Green)
ODU IDU PWR LED is Red
(AU PWR is Green)
ODU IDU PWR LED is
Green
No IDU to ODU power
output (ODU's PWR LED is
OFF)
Replace the AU-IDU card.
IDU to ODU power output
failed.
Replace the AU-IDU card.
Communication problem
with ODU.
3
Check frequency response of the
IDU-ODU cable and IF connector
or replace with a new one.
4
Check ODU LED PWR - OFF Replace ODU.
1
Eject and re-insert the card in the
same slot (No.5)
2
Move the NPU module to slot
No.6. If OK - replace chassis
3
If not, replace the NPU card.
1
Eject and re-insert the card in the
same slot (No.5).
2
Move the NPU module to slot
No.6. If OK - replace chassis
3
If not, replace the NPU card.
ALRM LED is Red
NPU Card
PWR LED is OFF
NPU is not powered.
(PIU and PSU are OK)
PWR LED is Red
NPU power failure.
(PIU & PSU are OK)
AVU
Module
BST ALRM LED is Red
Failure in one (or more)
Base Station modules.
Hot Swap
Same as the AU
PWR LED is OFF
No 5V power input to the
module.
ALRM is OFF
166
Check that the Base Station modules
installed (AU-ODU, AU-IDU) are OK
(LEDs)
1
Eject and re-insert the module.
2
Replace the AVU.
3
Replace the chassis.
BreezeMAX Base Station Installation and Maintenance Manual
Common Problems
Table 12-1: Common Problems
H/W
Interface
Problem and Indication
Possible Cause
Corrective Action
PWR LED is Red
No 12V power input to fans.
1
Eject and re-insert the module.
2
Replace the AVU.
3
Replace the chassis
ALRM is Red
PWR LED is Green
Failure of at least one fan.
Replace the AVU.
ALRM is Red
BreezeMAX Base Station Installation and Maintenance Manual
167
A
Appendix A - Installation Checklist
In This Appendix:
Use the provided checklist to ensure that you have followed all the procedures
described in this manual.
Appendix A - Installation Checklist
General Information:
Site/BST:
Site ID/Name
Pole Diameter
Address/Location
No. Of Sectors
X/Y Coordinates
Contact Person
Ground Height
Contact Details
Pole/Tower Height
Sectors:
Site & Sectors IDs
Azimuth
No. Of Radios
Radios:
Radio Type
Antenna Tilt
Frequency / Shift
Antenna Polarity
Antenna Height
IF & RF Cable (types &
lengths)
Antenna Type
(add ALV P/N)
Checklist:
No.
Action
1.
Inspecting and Unpacking:
1.1
Chassis/System (4.2)
1.2
AU-ODU (4.3)
1.3
Cards/Modules (4.4)
1.5
ODU Power Feeder (4.5)
1.6
GPS Module (4.6)
2.
Mechanical Installation:
2.1
Cable Guide assembled (5.1)
2.2
BST-SH installed in a rack (5.1)
2.3
Modules inserted (secure, closing
screws)(5.1.1.1)
170
Status
Comments
BreezeMAX Base Station Installation and Maintenance Manual
Installation Checklist
No.
Action
2.4
ODU Power Feeder installed and connected
to AU-ODU-HP (5.1.2).
2.5
GPS Module installed, including GPS Adapter
and outdoor GPS Receiver (5.1.3)
2.6
AU-ODU installed (assemble, point the
Status
Comments
antenna, elevation adjustment, fastened)
(5.2)
2.7
Antenna Cable connected (fastened, cable
fixed on pole) (6.1)
2.8
IDU-ODU cable prepared (optional) (6.2)
2.9
AU-ODU IF cable connected (6.3)
2.10
Outdoor Unit grounded (6.6.1)
2.11
Indoor Units grounded (6.6.2)
2.12
GPS cables connected (6.5)
2.13
Connectors sealed (6.7)
3.
Connecting to Power:
3.1
Cable prepared (optional) (7.1)
3.2
(-48) VDC verified (7.2)
3.3
Power connected (7.2)
3.4
Power Up Procedure
4.
Connecting to The Network and NMS:
4.1
Network connected (8.1)
4.2
NMS connected (8.2)
5.
Commissioning Procedure:
5.1
Management Port configured (10.3.1)
5.2
Data Port configured (10.3.2)
5.3
Authorized Managers configured (10.3.3)
5.4
Base Station tested (10.4)
General Comments
BreezeMAX Base Station Installation and Maintenance Manual
171
B
Appendix B - Installation Report
In This Appendix:
This appendix provides a recommended report format to be filled out by the
installer.
Appendix B - Installation Report
Site Details:
Fill in enclosed the site details:
Date:_______________
Name of location, City and state: ____________
Network / Deployment Manager: ____________ Phone No.: __________________
Installation Contractor: ____________________
Site Lead: _______________________________ Phone No.: __________________
Site Configuration:
Record/capture the NPU main configuration show and all AUs installed "Show
parameters" captures. Rename provide each capture with an appropriate name,
such as sector name, site name, etc.
Chassis Layout and Photographs:
Take high quality pictures of chassis installation (front view, rear view, layout in
radio/equipment room, etc.).
If available, provide a layout/drawing of the radio/equipment room containing the
rack layout in the radio room, other equipment installed in the rack (networking
equipment, power DC, fibers, etc.)
Roof Plan and Sector Photographs:
Roof Plan
If available, provide a roof plan showing the radio equipment (RFU, antennas,
cables, etc.), locations and cable routing.
Sector Photographs
For each sector, take high quality close-up pictures of each of the AU Antennas
installed (rear view) and a picture as a reference point showing the center of the
sector's coverage area.
174
BreezeMAX Base Station Installation and Maintenance Manual
Installation Report
Installation Check List:
Fill in the Installation Check List (refer to Appendix A) and attach it to this report.
Cable Sweeps
If you have proper equipment for measuring the IF cable (distance to fault, return
loss), it is highly recommended to measure the cable loss and provide a graph of
the cable measurements sorted by frequency rang (50 - 300 MHz).
Add a capture of each one of the cables installed per sector.
Throughput Test Results
Perform a radio link test for each of the sector installed in a reference point, as
follows:
NOTE
At least two persons are required to perform this test, one at the base station and another at the SU
location.
1
Locate an SU in the center of the sector (to find the location of each site, use a
map, binoculars and compass).
2
Locate the SU at a location with free line of sight to the base station, and in a
distance of 1Km from base station.
3
Define a service pipe for this SU with the following parameters:
4
Service Type= L2, QoS Type = BE, CT=Short, CIR=12Mbps
5
Verify that the SU is operating in the following conditions:
RSSI is above -70 dBm.
SNR higher than 25dB.
Modulation - 64QAM¾.
6
Connect a PC to the NPU’s DATA interface or to the switch, which is connected
to the NPU.
7
Connect a PC to the SU Ethernet port.
8
Run IPERF (server) on the PC at the base station.
9
In the PC that is connected to the SU, run a throughput test using the IPERF
software.
10 Repeat the previous steps (1-8) for all the AUs in the Base Station.
BreezeMAX Base Station Installation and Maintenance Manual
175
Appendix B - Installation Report
11 Verify that all results are as expected. The expected throughput results for
64QAM¾ are as follows:
Uplink: 9Mbps
Downlink: 10Mbps
Record the throughput results in the table below.
SECTOR X TEST RESULTS
Add a picture of the SU installed aligned through the BS
Sector X test location#1
Description
Comment
Location in NZMG
Location in Lat./Long.
AU Tx power
Calculated SU RSSI
Measured SU RSSI
SU Tx power
Expected Rx RSSI at BS
Measured RSSI at BS
IPERF TCP Uplink
IPERF TCP Downlink
IPERF UDP Uplink
IPERF UDP Downlink
176
BreezeMAX Base Station Installation and Maintenance Manual
C
Appendix C - Installation of "H" Mounting
Bracket for Antennas and ODUs
In This Appendix:
This appendix provides instructions for installing an “H” Mounting Bracket for
Antennas and ODUs. The information includes:
“Overview” on page 178
“Product Specifications” on page 186
“Safety Instructions” on page 188
“Site Preparation” on page 189
“Tools” on page 190
“Installing an H-Bracket” on page 191
Appendix C - Installation of "H" Mounting Bracket for Antennas and ODUs
C.1
Overview
The “H” Mounting Bracket for Antennas and ODUs (H-Bracket) is an “H” shaped
steel frame, on which up to 4 ODUs can be installed on the Base Station Tower
per sector. It is designed to be installed on different types of structures with a
diversity of 1.3m between antennas. Table C-1 describes the different types of
structures on which an H-Bracket can be installed and the maximum number of
H-Brackets that can be installed on each type of structure. A single H-Bracket
covers 1 sector.
Table C-1: Types of Structures on which an H-Bracket Can Be Installed
Stucture
Diameter
Max. No. of H-Brackets
Monopole
6” - 10”
3
10” - 14”
16” - 20”
24” - 30”
10” - 14”
4
16” - 20”
24” - 30”
Tower
2” - 4”
3
Mast
1.5” - 2”
3
NOTE
A number of H-Brackets can be mounted at different heights on tower legs and masts to cover
more sectors.
178
BreezeMAX Base Station Installation and Maintenance Manual
Installation of "H" Mounting Bracket for Antennas and ODUs
A typical H-Bracket is shown in Figure C-1.
Figure C-1: Typical H-Bracket with 4 ODUs
BreezeMAX Base Station Installation and Maintenance Manual
179
Appendix C - Installation of "H" Mounting Bracket for Antennas and ODUs
The H-Bracket is made up of the following parts:
Antenna Mounting Frame (H-Frame): The H-Frame (Figure C-2) has three
60 mm hollow pipes, placed at equal distances from each other and connected
by an L-shaped steel beam at each end. There is a hole at one end of the frame
to insert a lightning protector rod, and antenna cables can be secured in place
with wires inserted through holes in the L-shaped beams.
Figure C-2: H-Frame
180
BreezeMAX Base Station Installation and Maintenance Manual
Installation of "H" Mounting Bracket for Antennas and ODUs
Horizontal Arms: Three horizontal arms (Figure C-3) that connect the
H-Frame to clamps on the structure on which the H-Bracket is installed.
Figure C-3: Horizontal Arm
Radio Equipment Arms: The radio devices are installed on a bracket
(Figure C-4) attached between the upper and the lower horizontal arms
connecting to the H-Frame.
Figure C-4: Radio Equipment Arm
BreezeMAX Base Station Installation and Maintenance Manual
181
Appendix C - Installation of "H" Mounting Bracket for Antennas and ODUs
Clamps: The clamps (Figure C-5, Figure C-6, Figure C-8 and Figure C-9) are
used to attach the horizontal arms to the structure on which the H-Bracket is
installed. The clamps differ depending on the type of structure on which the
bracket is installed and must be ordered separately. The clamps include
grounding connection plates, designed forstandard 3/4” or 1” cable shoes
(terminal lugs). (Refer to Section 6.6 for details.)
Figure C-5: 3 Sector Monopole Clamp (for 6”-10” and 10”-14” Monopoles)
Figure C-6: 4 Sector Monopole Clamp
182
BreezeMAX Base Station Installation and Maintenance Manual
Installation of "H" Mounting Bracket for Antennas and ODUs
Figure C-7: 3 Sector Monopole Clamp (for 16”-20” and 24”-30” Monopoles)
Figure C-8: Tower Leg Clamp
BreezeMAX Base Station Installation and Maintenance Manual
183
Appendix C - Installation of "H" Mounting Bracket for Antennas and ODUs
Figure C-9: Mast Clamp
184
BreezeMAX Base Station Installation and Maintenance Manual
Installation of "H" Mounting Bracket for Antennas and ODUs
Lightning Protector Rod: A lightning conductor (Figure C-10) can be ordered
separately. Refer to Section 2.3 for lightning protection guidelines. The
lightning protector rod includes a grounding connection plate, designed
forstandard 3/4” or 1” cable shoe (terminal lug).
Figure C-10: Lightning Protector Rod
BreezeMAX Base Station Installation and Maintenance Manual
185
Appendix C - Installation of "H" Mounting Bracket for Antennas and ODUs
C.2
Product Specifications
C.2.1
Standards Compliance
Type
Standard
Wind load
ANSI/TIA/EIA-222-F
Steel Composition
AISI/SAE 1045, ST37.2 (DIN)
Welding
AWS D1.1 (American Standards)
Bolts
AISC A325 & A490
C.2.2
Mechanical
Unit
Dimensions (mm)
Quantity
Weight (kg)
Antenna Mounting Frame (H-Frame)
1300 x 1300
1
70
Horizontal Arms
1125
3
Radio Equipment Arm
800
2
Lightning Protector Rod
1608
1
4.5
Clamp for 6-10 Monopole (3 Sectors)
3
9.0
Clamp for 10-14 Monopole (3 Sectors)
3
75
Clamp for 16-20 Monopole (3 Sectors)
3
Clamp for 24-30 Monopole (3 Sectors)
3
Clamp for 10-14 Monopole (4 Sectors)
3
71
Clamp for 16-20 Monopole (4 Sectors)
3
94
Clamp for 24-30 Monopole (4 Sectors)
3
165
Clamp for 48/60 500/600Mast
3
24
Clamp for V2”-4” Tower
3
45
Clamp for V2”-4” Tower with 10° slope
3
45
186
BreezeMAX Base Station Installation and Maintenance Manual
Installation of "H" Mounting Bracket for Antennas and ODUs
C.2.3
Torques
Open Wrench - Head Cap Screw
Socket - Head Cap Screw
Bolt Diameter
lb*in
N*m
lb*in
N*m
1/2” (12 mm)
10
163
10.5
171
5/8” (16 mm)
20
325
21.25
346
BreezeMAX Base Station Installation and Maintenance Manual
187
Appendix C - Installation of "H" Mounting Bracket for Antennas and ODUs
C.3
Safety Instructions
CAUTION
ONLY experienced installation professionals who are familiar with local building and safety codes
and, wherever applicable, are licensed by the appropriate government regulatory authorities should
install outdoor units and antennas. Failure to do so may void the product warranty and may expose
the end user or Service Provider to legal and financial liabilities. Alvarion and its resellers or
distributors are not liable for injury, damage or regulation violations associated with the installation
of Outdoor Units or antennas.
When working on building roofs, poles or masts, towers, monopole or on any
other construction, strictly observe the local safety regulations.
Use personal safety equipment (life line connection, safety cage on ladder,
working shoes, helmet etc.) when climbing on any structure during
installation and maintenance procedures.
Never work on outdoor structures such as towers, masts, monopole, roofs,
telephone lines etc. in the rain or during electrical storms.
Take care while working near microwave radiation.
At least two people are needed to climb up the structure in order to install the
H-Bracket. It is recommended that a third person, equipped with a first aid kit
and climbing gear remain on the ground during installation.
The H-Bracket can support a maximum weight of 150 Kgs.
CAUTION
Only one person should stand on the H-Bracket at any time .
Make sure that no unnecessary personnel are in the vicinity of the structure
during installation and that all personnel wear safety helmets.
Abide by all safety standards and regulations applicable in the country of
installation.
188
BreezeMAX Base Station Installation and Maintenance Manual
Installation of "H" Mounting Bracket for Antennas and ODUs
C.4
Site Preparation
Ensure that the structure on which the H-Bracket is to be installed is clean
and that there are no objects in the vicinity that might obstruct the bracket.
Make sure that you have ordered the correct parts and accessories for
installation on the specific structure on which the H-Bracket is to be installed.
Make sure that you have all the necessary radio planning guidelines and that
you know where to position the antennas. Refer to Section 3.2 for details.
Clear the area and make sure that there are no unnecessary personnel in the
vicinity.
BreezeMAX Base Station Installation and Maintenance Manual
189
Appendix C - Installation of "H" Mounting Bracket for Antennas and ODUs
C.5
Tools
The following additional tools are required for installation:
2 closed wrenches for 12 mm (1/2 inch) diameter bolts (preferably ratchet
type)
2 open wrenches for 12 mm (1/2 inch) diameter bolts
2 closed wrenches for 16 mm (5/8 inch) diameter bolts (preferably ratchet
type)
190
BreezeMAX Base Station Installation and Maintenance Manual
Installation of "H" Mounting Bracket for Antennas and ODUs
C.6
Installing an H-Bracket
The H-Bracket can be installed on different types of structures. Each type of
structure requires different parts and accessories and the installation procedure
varies according to the structure:
“Installing an H-Bracket on a Monopole (3 Sectors, 6”-10” and 10”-14”)” on
page 192
“Installing an H-Bracket on a Monopole (3 Sectors, 16”-20” and 24”-30”)” on
page 198
“Installing an H-Bracket on a Monopole (4 Sector)” on page 204
“Installing an H-Bracket on a Tower Leg” on page 210
“Installing an H-Bracket on a Mast” on page 216
BreezeMAX Base Station Installation and Maintenance Manual
191
Appendix C - Installation of "H" Mounting Bracket for Antennas and ODUs
C.6.1
Installing an H-Bracket on a Monopole
(3 Sectors, 6”-10” and 10”-14”)
To install an H-Bracket on a monopole (3 sectors):
1
Check that you have all the parts and accessories necessary for installation on
the monopole (Section C.6.1.1).
2
Install the clamps on the structure (Section C.6.1.2).
3
Attach the horizontal arms to the clamps (Section C.6.1.3).
NOTE
Steps 4, 5 and 6 are common to installations on all type of structures.
4
Attach the H-Frame to the horizontal arms (Section C.6.6).
5
Install the radio equipment arms and insert the lightning protection rod
(Section C.6.7).
6
Connect grounding cables to the grounding connection plates on the clamps.
(Refer to Section 6.6. for details.)
An example of a fully installed H-Bracket on a 3 sector monopole is shown in
Figure C-11.
192
BreezeMAX Base Station Installation and Maintenance Manual
Installation of "H" Mounting Bracket for Antennas and ODUs
Figure C-11: H-Bracket Installed on a Monopole (3 Sectors)
BreezeMAX Base Station Installation and Maintenance Manual
193
Appendix C - Installation of "H" Mounting Bracket for Antennas and ODUs
C.6.1.1
Parts and Accessories for Installation on a Monopole
(3 Sectors)
Table C-2 includes the parts required for installing a single H-Bracket to cover one
sector. Using the same clamps, it is possible to install up to three H-Brackets on
the monopole and thus cover three sectors.
NOTE
An extra 5% of spare parts will be supplied separately. In case of damaged or missing parts, please
contact Alvarion.
Table C-2: List of Parts and Accessories for Installation on a Monopole (3 Sectors)
Item No.
Description
Quantity
1
Radio Equipment Arm
2
2
I 8.8 washer 5/8”
12
3
I 8.8 spring washer 5/8”
6
4
I 8.8 bolt 5/8’’ x 2’’
6
5
Clamp for monopole(3 sectors)
3x3
6
I anchor bolt 1/2" SAE1045 L=180
18
7
Horizontal Arms
3
8
I 8.8 nut 5/8”
6
9
I 8.8 bolt 1/2'' x 3''
9
10
I 8.8 nut 1/2''
57
11
I 8.8 spring washer 1/2''
55
12
I 8.8 washer 1/2''
66
13
I 4.6 U bolt 1/2’’ x 2’’
6
14
H-Frame
1
15
I 8.8 bolt 1/2’’ x 2’’
1
16
Lightning Rod
1
194
BreezeMAX Base Station Installation and Maintenance Manual
Installation of "H" Mounting Bracket for Antennas and ODUs
Figure C-12: Installing an H-Bracket on a Monopole (3 Sectors)
BreezeMAX Base Station Installation and Maintenance Manual
195
Appendix C - Installation of "H" Mounting Bracket for Antennas and ODUs
C.6.1.2
Installing Clamps on a Monopole (3 Sectors)
The clamps should be assembled at the desired height of the antennas. They can
accommodate up to 3 H-Frames, covering up to 3 sectors.
1
Mark the height of the antennas on the monopole, making sure that there are
no interferences 100 mm above or below this mark. The second, of the 3
clamps will be installed at this point.
2
Mark points 400 mm above and below this point. The other two clamps will be
installed at these points with a total distance of 800 mm between the upper
clamp and the lower clamp.
3
Assemble two sectors of each of the 3 clamps as shown in Figure C-13 using
bolts, washers, spring washers and nuts from the list in Table C-3.
Table C-3: List of Parts for Installing 3 Sector Monopole Clamps
Item No.
Description
Quantity
5
Clamp for monopole(3 sectors)
3x3
6
I anchor bolt 1/2" SAE1045 L=180
18
10
I G5 nut 1/2”
36
11
I G5 spring washer 1/2”
36
12
I G5 washer 1/2”
36
Figure C-13: Partially Assembling 3 Sector Clamp
4
Use the remaining clamp sectors, bolts, washers, spring washers and nuts to
install the clamps in the positions marked on the monopole as shown in
Figure C-14.
196
BreezeMAX Base Station Installation and Maintenance Manual
Installation of "H" Mounting Bracket for Antennas and ODUs
Figure C-14: Installing 3 Sector Clamp for Monopole
5
Install all 3 clamps and tighten the bolts and screws according to the torque as
noted in Section C.2.3.
C.6.1.3
Attaching the Horizontal Arms to 3 Sector Monopole Clamps
1
Use the bolts, washers, spring washers and nuts as listed in Table C-4 to
attach the 3 horizontal arms to the clamps as shown in Figure C-15.
Table C-4: Parts for Attaching Horizontal Arms to 3 Sector Monopole Clamp
Item No.
Description
Quantity
2
I 8.8 washer 5/8”
12
3
I 8.8 spring washer 5/8”
6
4
I 8.8 bolt 5/8’’ x 2’’
6
7
Horizontal Arms
3
8
I 8.8 nut 5/8”
6
BreezeMAX Base Station Installation and Maintenance Manual
197
Appendix C - Installation of "H" Mounting Bracket for Antennas and ODUs
Figure C-15: Attaching Horizontal Arm to 3 Sector Monopole Clamp
2
Attach all 3 horizontal arms and tighten the bolts and screws according to the
torque as noted in Section C.2.3.
C.6.2
Installing an H-Bracket on a Monopole
(3 Sectors, 16”-20” and 24”-30”)
To install an H-Bracket on a monopole (3 sectors):
1
Check that you have all the parts and accessories necessary for installation on
the monopole (Section C.6.2.1).
2
Install the clamps on the structure (Section C.6.2.2).
3
Attach the horizontal arms to the clamps (Section C.6.2.3).
NOTE
Steps 4, 5 and 6 are common to installations on all type of structures.
4
198
Attach the H-Frame to the horizontal arms (Section C.6.6).
BreezeMAX Base Station Installation and Maintenance Manual
Installation of "H" Mounting Bracket for Antennas and ODUs
5
Install the radio equipment arms and insert the lightning protection rod
(Section C.6.7).
6
Connect grounding cables to the grounding connection plates on the clamps.
(Refer to Section 6.6. for details.)
An example of a fully installed H-Bracket on a 3 sector 16”-20”/24”-30” monopole
is shown in Figure C-16.
Figure C-16: H-Bracket Installed on a 16”-20”/24”-30” Monopole (3 Sectors)
BreezeMAX Base Station Installation and Maintenance Manual
199
Appendix C - Installation of "H" Mounting Bracket for Antennas and ODUs
C.6.2.1
Parts and Accessories for Installation on a Monopole
(3 Sectors)
Table C-5 includes the parts required for installing a single H-Bracket to cover one
sector. Using the same clamps, it is possible to install up to three H-Brackets on
the monopole and thus cover three sectors.
NOTE
An extra 5% of spare parts will be supplied separately. In case of damaged or missing parts, please
contact Alvarion.
Table C-5: List of Parts and Accessories for Installation on a Monopole (3 Sectors)
Item No.
Description
Quantity
1
Radio Equipment Arm
2
2
I 8.8 washer 5/8”
12
3
I 8.8 spring washer 5/8”
6
4
I 8.8 bolt 5/8’’ x 2’’
6
5
Clamp for 16”-20”/24”-30” monopole(3 sectors)
3x3
6
I anchor bolt 1/2" SAE1045 L=240
6
7
Horizontal Arms
3
8
I 8.8 nut 5/8”
6
9
I 8.8 bolt 1/2'' x 3''
9
10
I 8.8 nut 1/2''
33
11
I 8.8 spring washer 1/2''
33
12
I 8.8 washer 1/2''
42
13
I 4.6 U bolt 1/2’’ x 2’’
6
14
H-Frame
1
15
I 8.8 bolt 1/2’’ x 2’’
1
16
Lightning Rod
1
200
BreezeMAX Base Station Installation and Maintenance Manual
Installation of "H" Mounting Bracket for Antennas and ODUs
Figure C-17: Installing an H-Bracket on a 16”-20”/24”-30” Monopole (3 Sectors)
BreezeMAX Base Station Installation and Maintenance Manual
201
Appendix C - Installation of "H" Mounting Bracket for Antennas and ODUs
C.6.2.2
Installing Clamps on a 16”-20”/24”-30” Monopole (3 Sectors)
The clamps should be assembled at the desired height of the antennas. They can
accommodate up to 3 H-Frames, covering up to 3 sectors.
1
Mark the height of the antennas on the monopole, making sure that there are
no interferences 100 mm above or below this mark. The second, of the 3
clamps will be installed at this point.
2
Mark points 400 mm above and below this point. The other two clamps will be
installed at these points with a total distance of 800 mm between the upper
clamp and the lower clamp.
3
Assemble the 3 clamps as shown in Figure C-18 using bolts, washers, spring
washers and nuts from the list in Table C-6.
Table C-6: List of Parts for Installing 3 Sector Monopole Clamps
Item No.
Description
Quantity
5
Clamp for monopole(3 sectors)
3x3
6
I anchor bolt 1/2" SAE1045 L=240
6
10
I 8.8 nut 1/2”
12
11
I 8.8 spring washer 1/2”
12
12
I 8.8 washer 1/2”
12
Figure C-18: Installing 3 Sector Clamps for 16”-20”/24”-30” Monopole
202
BreezeMAX Base Station Installation and Maintenance Manual
Installation of "H" Mounting Bracket for Antennas and ODUs
4
Install all 3 clamps and tighten the bolts and screws according to the torque as
noted in Section C.2.3.
C.6.2.3
Attaching the Horizontal Arms to 3 Sector Monopole Clamps
1
Use the bolts, washers, spring washers and nuts as listed in Table C-7 to
attach the 3 horizontal arms to the clamps as shown in Figure C-19.
Table C-7: Parts for Attaching Horizontal Arms to 3 Sector Monopole Clamp
Item No.
Description
Quantity
2
I 8.8 washer 5/8”
12
3
I 8.8 spring washer 5/8”
6
4
I 8.8 bolt 5/8’’ x 2’’
6
7
Horizontal Arms
3
8
I 8.8 nut 5/8”
6
Figure C-19: Attaching Horizontal Arm to 3 Sector Monopole Clamp (for 16”-20”/24”-30”)
2
Attach all 3 horizontal arms and tighten the bolts and screws according to the
torque as noted in Section C.2.3.
BreezeMAX Base Station Installation and Maintenance Manual
203
Appendix C - Installation of "H" Mounting Bracket for Antennas and ODUs
C.6.3
Installing an H-Bracket on a Monopole
(4 Sector)
To install an H-Bracket on a monopole (4 sectors):
1
Check that you have all the parts and accessories necessary for installation on
the monopole (Section C.6.3.2).
2
Install the clamps on the structure (Section C.6.3.2).
3
Attach the horizontal arms to the clamps (Section C.6.3.3).
NOTE
Steps 4, 5 and 6 are common to installations on all type of structures.
4
Attach the H-Frame to the horizontal arms (Section C.6.6).
5
Install the radio equipment arms and insert the lightning protection rod
(Section C.6.7).
6
Connect grounding cables to the grounding connection plates on the clamps.
(Refer to Section 6.6. for details.)
An example of a fully installed H-Bracket on a 4 sector monopole is shown in
Figure C-20.
204
BreezeMAX Base Station Installation and Maintenance Manual
Installation of "H" Mounting Bracket for Antennas and ODUs
Figure C-20: H-Bracket Installed on a Monopole (4 Sectors)
BreezeMAX Base Station Installation and Maintenance Manual
205
Appendix C - Installation of "H" Mounting Bracket for Antennas and ODUs
C.6.3.1
Parts and Accessories for Installation on a Monopole
(4 Sectors)
Table C-8 includes the parts required for installing a single Antenna Mounting Bracket to
cover one sector. Using the same clamps, it is possible to install up to four H-Brackets on
the monopole and thus cover four sectors.
NOTE
An extra 5% of spare parts will be supplied separately. In case of damaged or missing parts, please
contact Alvarion.
.
Table C-8: List of Parts and Accessories for Installation on a Monopole (4 Sectors)
Item No.
Description
Quantity
1
Radio Equipment Arm
2
2
I anchor bolt 1/2" SAE1045 L=180
24
3
Clamp for monopole(4 sectors)
3x4
4
I 8.8 bolt 5/8’’ x 2’’
6
5
I 8.8 spring washer 5/8”
6
6
I 8.8 washer 5/8” x 2”
12
7
I 8.8 nut 5/8”
6
8
Horizontal Arms
3
9
I 8.8 bolt 1/2'' x 3''
9
10
I 8.8 nut 1/2''
69
11
I 8.8 spring washer 1/2''
69
12
I 8.8 washer 1/2''
78
13
I 4.6 U bolt 1/2’’ x 2’’
6
14
H-Frame
1
15
I 8.8 bolt 1/2’’ x 2’’
1
16
Lightning Rod
1
206
BreezeMAX Base Station Installation and Maintenance Manual
Installation of "H" Mounting Bracket for Antennas and ODUs
c
Figure C-21: Installing an H-Bracket on a Monopole (4 Sectors)
BreezeMAX Base Station Installation and Maintenance Manual
207
Appendix C - Installation of "H" Mounting Bracket for Antennas and ODUs
C.6.3.2
Installing Clamps on a Monopole (4 Sectors)
The clamps should be assembled at the desired height of the antennas. They can
accommodate up to 4 H-Frames, covering up to 4 sectors.
1
Mark the height of the antennas on the monopole, making sure that there are
no interferences 100 mm above or below this mark. The second of the 3
clamps will be installed at this point.
2
Mark points 400 mm above and below this point. The other two clamps will be
installed at these points with a total distance of 800 mm between the upper
clamp and the lower clamp.
3
Assemble three sectors of each of the 3 clamps as shown in Figure C-22 using
bolts, washers, spring washers and nuts from the list in Table C-9.
Table C-9: List of Parts for Installing 4 Sector Monopole Clamps
Item No.
Description
Quantity
2
I anchor bolt 1/2" SAE1045 L=180
24
3
Clamp for monopole(4 sectors)
3x4
10
I 8.8 nut 1/2''
48
11
I 8.8 spring washer 1/2''
48
12
I 8.8 washer 1/2''
48
Figure C-22: Partially Assembling 4 Sector Clamp
4
Use the remaining clamp sectors, bolts, washers, spring washers and nuts to
install the clamps in the positions marked on the monopole as shown in
Figure C-23.
208
BreezeMAX Base Station Installation and Maintenance Manual
Installation of "H" Mounting Bracket for Antennas and ODUs
Figure C-23: Installing 4 Sector Clamp for Monopole
5
Install all 3 clamps and tighten the bolts and screws according to the torque as
noted in Section C.2.3.
C.6.3.3
Attaching the Horizontal Arms to 4 Sector Monopole Clamps
1
Use the bolts, washers, spring washers and nuts as listed in Table C-10 to
attach the 3 horizontal arms to the clamps as shown in Figure C-24.
Table C-10: Parts for Attaching Horizontal Arms to 4 Sector Monopole Clamp
Item No.
Description
Quantity
4
I 8.8 bolt 5/8’’ x 2’’
6
5
I 8.8 spring washer 5/8”
6
6
I 8.8 washer 5/8” x 2”
12
7
I 8.8 nut 5/8”
6
8
Horizontal Arms
3
BreezeMAX Base Station Installation and Maintenance Manual
209
Appendix C - Installation of "H" Mounting Bracket for Antennas and ODUs
Figure C-24: Attaching Horizontal Arm to 4 Sector Monopole Clamp
2
Attach all 3 horizontal arms and tighten the bolts and screws according to the
torque as noted in Section C.2.3.
C.6.4
Installing an H-Bracket on a Tower Leg
To install an H-Bracket on a tower leg:
1
Check that you have all the parts and accessories necessary for installation on
a tower leg (Section C.6.4.1).
2
Install the clamps on the structure (Section C.6.4.2).
3
Attach the horizontal arms to the clamps (Section C.6.4.3).
NOTE
Steps 4, 5 and 6 are common to installations on all type of structures.
4
210
Attach the H-Frame to the horizontal arms (Section C.6.6).
BreezeMAX Base Station Installation and Maintenance Manual
Installation of "H" Mounting Bracket for Antennas and ODUs
5
Install the radio equipment arms and insert the lightning protection rod
(Section C.6.7).
6
Connect grounding cables to the grounding connection plates on the clamps.
(Refer to Section 6.6. for details.)
An example of a fully installed H-Bracket on a tower leg is shown in Figure C-25.
Figure C-25: H-Bracket Installed on a Tower Leg
BreezeMAX Base Station Installation and Maintenance Manual
211
Appendix C - Installation of "H" Mounting Bracket for Antennas and ODUs
C.6.4.1
Parts and Accessories for Installation on a Tower Leg
NOTE
An extra 5% of spare parts will be supplied separately. In case of damaged or missing parts, please
contact Alvarion.
Table C-11: List of Parts and Accessories for Installation on a Tower Leg
Item No.
Description
Quantity
1
Radio Equipment Arm
2
2
Clamp for tower leg
3
3
I anchor bolt 1/2” SAE1045 L=240
6
4
I 8.8 bolt 5/8’’ x 2’’
6
5
I 8.8 spring washer 5/8”
6
6
I 8.8 washer 5/8” x 2”
12
7
I 8.8 nut 5/8”
6
8
Horizontal Arms
3
9
I 8.8 bolt 1/2'' x 3''
9
10
I 8.8 nut 1/2''
33
11
I 8.8 spring washer 1/2''
33
12
I 8.8 washer 1/2''
42
13
I 4.6 U bolt 1/2’’ x 2’’
6
14
H-Frame
1
15
I 8.8 bolt 1/2’’ x 2’’
1
16
Lightning Rod
1
212
BreezeMAX Base Station Installation and Maintenance Manual
Installation of "H" Mounting Bracket for Antennas and ODUs
Figure C-26: Installing an H-Bracket on a Tower Leg
BreezeMAX Base Station Installation and Maintenance Manual
213
Appendix C - Installation of "H" Mounting Bracket for Antennas and ODUs
C.6.4.2
Installing Clamps on a Tower Leg
The clamps should be assembled at the desired height of the antennas.
1
Mark the height of the antennas on the tower leg, making sure that there are
no interferences 100 mm above or below this mark. The second, of the 3
clamps will be installed at this point.
2
Mark points 400 mm above and below this point. The other two clamps will be
installed at these points with a total distance of 800 mm between the upper
clamp and the lower clamp.
3
Use the bolts, washers, spring washers and nuts as listed in Table C-12 to
install the clamps in the positions marked as shown in Figure C-27.
Table C-12: List of Parts for Installing Clamps on a Tower Leg
Item No.
Description
Quantity
2
Clamp for tower leg
3
3
I anchor bolt 1/2” SAE1045 L=240
6
10
I 8.8 nut 1/2''
12
11
I 8.8 spring washer 1/2''
12
12
I 8.8 washer 1/2''
12
Figure C-27: Installing Clamps on a Tower Leg
4
Install all 3 clamps and tighten the bolts and screws according to the torque as
noted in Section C.2.3.
214
BreezeMAX Base Station Installation and Maintenance Manual
Installation of "H" Mounting Bracket for Antennas and ODUs
C.6.4.3
Attaching the Horizontal Arms to Clamps on a Tower Leg
1
Adjust the angle of the arms of the clamps downwards to a maximum of 10o so
that when the horizontal arms are attached, they are horizontal and not at an
angle.
2
Use the bolts, washers, spring washers and nuts as listed in Table C-13 to
attach the 3 horizontal arms to the clamps as shown in Figure C-28.
Table C-13: Parts for Attaching Horizontal Arms to Clamp on a Tower Leg
Item No.
Description
Quantity
4
I 8.8 bolt 5/8’’ x 2’’
6
5
I 8.8 spring washer 5/8”
6
6
I 8.8 washer 5/8” x 2”
12
7
I 8.8 nut 5/8”
6
8
Horizontal Arms
3
c
Figure C-28: Attaching Horizontal Arm to Clamp on Tower Leg
3
Attach all 3 horizontal arms and tighten the bolts and screws according to the
torque as noted in Section C.2.3.
BreezeMAX Base Station Installation and Maintenance Manual
215
Appendix C - Installation of "H" Mounting Bracket for Antennas and ODUs
C.6.5
Installing an H-Bracket on a Mast
To install an H-Bracket on a mast:
1
Check that you have all the parts and accessories necessary for installation on
the specific structure (Section C.6.5.1).
2
Install the clamps on the structure (Section C.6.5.2).
3
Attach the horizontal arms to the clamps (Section C.6.5.3).
NOTE
Steps 4, 5 and 6 are common to installations on all type of structures.
4
Attach the H-Frame to the horizontal arms (Section C.6.6).
5
Install the radio equipment arms and insert the lightning protection rod
(Section C.6.7).
6
Connect grounding cables to the grounding connection plates on the clamps.
(Refer to Section 6.6. for details.)
An example of a fully installed H-Bracket on a mast is shown in Figure C-29.
216
BreezeMAX Base Station Installation and Maintenance Manual
Installation of "H" Mounting Bracket for Antennas and ODUs
Figure C-29: H-Bracket Installed on a Mast
BreezeMAX Base Station Installation and Maintenance Manual
217
Appendix C - Installation of "H" Mounting Bracket for Antennas and ODUs
C.6.5.1
Parts and Accessories for Installation on a Mast
NOTE
An extra 5% of spare parts will be supplied separately. In case of damaged or missing parts, please
contact Alvarion.
Table C-14: List of Parts and Accessories for Installation on a Mast
Item No.
Description
Quantity
1
Radio Equipment Arm
2
2
Horizontal Arms
3
3
I 8.8 nut 5/8”
6
4
Clamp for mast
3
5
I 4.6 U BOLT 1/2" x 1 1/2"
6
6
I 8.8 bolt 5/8’’ x 2’’
6
7
I 8.8 spring washer 5/8”
6
8
I 8.8 washer 5/8” x 2”
12
9
I 8.8 bolt 1/2'' x 3''
9
10
I 8.8 nut 1/2''
33
11
I 8.8 spring washer 1/2''
33
12
I 8.8 washer 1/2''
42
13
I 4.6 U bolt 1/2’’ x 2’’
6
14
H-Frame
1
15
I 8.8 bolt 1/2’’ x 2’’
1
16
Lightning Rod
1
218
BreezeMAX Base Station Installation and Maintenance Manual
Installation of "H" Mounting Bracket for Antennas and ODUs
Figure C-30: Installing an H-Bracket on a Mast
BreezeMAX Base Station Installation and Maintenance Manual
219
Appendix C - Installation of "H" Mounting Bracket for Antennas and ODUs
C.6.5.2
Installing Clamps on a Mast
The clamps should be assembled at the desired height of the antennas.
1
Mark the height of the antennas on the mast, making sure that there are no
interferences 100 mm above or below this mark. The second, of the 3 clamps
will be installed at this point.
2
Mark points 400 mm above and below this point. The other two clamps will be
installed at these points with a total distance of 800 mm between the upper
clamp and the lower clamp.
3
Use the U bolts, washers, spring washers and nuts as listed in Table C-15 to
install the clamps in the positions marked as shown in Figure C-31.
Table C-15: List of Parts for Installing Clamp on a Mast
Item No.
Description
Quantity
4
Clamp for mast
3
5
I 4.6 U bolt 1/2" x 1 1/2"
6
10
I 8.8 nut 1/2''
12
11
I 8.8 spring washer 1/2''
12
12
I 8.8 washer 1/2''
12
220
BreezeMAX Base Station Installation and Maintenance Manual
Installation of "H" Mounting Bracket for Antennas and ODUs
Figure C-31: Installing Clamps on a Mast
4
Attach all 3 clamps and tighten the bolts and screws according to the torque
as noted in Section C.2.3.
C.6.5.3
Attaching the Horizontal Arms to Clamps on Mast
1
Use the bolts, washers, spring washers and nuts as listed in Table C-16 to
attach the 3 horizontal arms to the clamps as shown in Figure C-32.
Table C-16: Parts for Attaching Horizontal Arms to Clamps on a Mast
Item No.
Description
Quantity
2
Horizontal Arms
3
3
I 8.8 nut 5/8”
6
6
I 8.8 bolt 5/8’’ x 2’’
6
7
I 8.8 spring washer 5/8”
6
8
I 8.8 washer 5/8” x 2”
12
BreezeMAX Base Station Installation and Maintenance Manual
221
Appendix C - Installation of "H" Mounting Bracket for Antennas and ODUs
Figure C-32: Attaching Horizontal Arm to Clamp on a Mast
2
Attach all 3 horizontal arms and tighten the bolts and screws according to the
torque as noted in Section C.2.3.
222
BreezeMAX Base Station Installation and Maintenance Manual
Installation of "H" Mounting Bracket for Antennas and ODUs
C.6.6
Attaching the H-Frame to the Horizontal Arms
NOTE
The procedure for attaching the H-Frame to the horizontal arms is the same for all types of
structures. Figure C-33 illustrates the procedure for installation on a 3 sector monopole.
1
Position the H-Frame so that the hole for inserting the lightning rod is at the
topand the middle pipe is adjacent to the plates on the horizontal arms.
2
Use the bolts, washers, spring washers and nuts as listed in Table C-17 to
attach the middle pipe of the H-Frame to the plates at the end of each of the 3
horizontal arms as shown in Figure C-33.
Table C-17: List of Parts for Attaching the H-Frame to the Horizontal Arms
Item No.
Description
Quantity
9
I 8.8 bolt 1/2'' x 3''
1
10
I 8.8 nut 1/2”
13
11
I 8.8 spring washer 1/2”
13
12
I 8.8 washer 1/2”
14
13
I 4.6 U bolt 1/2'' x 2”
6
14
H-Frame
1
BreezeMAX Base Station Installation and Maintenance Manual
223
Appendix C - Installation of "H" Mounting Bracket for Antennas and ODUs
Figure C-33: Attaching H-Frame to Horizontal Arms
3
Secure a bolt through the pipe in the H-Frame to act as stopper when
inserting the lightning protection rod (Section C.6.7)andtighten the bolts and
screws according to the torque as noted in Section C.2.3.
224
BreezeMAX Base Station Installation and Maintenance Manual
Installation of "H" Mounting Bracket for Antennas and ODUs
C.6.7
Installing the Radio Equipment Arms and
Lightning Protector Rod
The radio equipment arms should be attached to the upper and lower horizontal
arms. The exact position on the arms should be determined in the field and is
dependent on accessibility and the functionality of the radio equipment.
NOTE
The procedure for installing the radio equipment arms and lightning protector rod is the same for all
types of structures. Figure C-34 illustrates the procedure for installation on a 3 sector monopole.
1
Determine the best position to install the radio equipment arms.
2
Place the two arms (Item No. 1) facing each other as shown in Figure C-34 and
using the bolts, washers, spring washers and nuts as listed in
Table C-18,attach the two radio equipment arms to the upper and lower
horizontal arms.
Table C-18: List of Parts for Installing the Radio Equipment Arms and Lightning Protector Rod
Item No.
Description
Quantity
1
Radio Equipment Arm
2
9
I 8.8 bolt 1/2'' X 3”
8
10
I 8.8 nut 1/2”
8
11
I 8.8 spring washer 1/2”
8
12
I 8.8 washer 1/2”
16
15
I 8.8 bolt 1/2'' X 2”
1
16
Lightning Rod
1
BreezeMAX Base Station Installation and Maintenance Manual
225
Appendix C - Installation of "H" Mounting Bracket for Antennas and ODUs
Figure C-34: Attaching Radio Equipment Arms and Lightning Protector Rod.
3
Insert the lightning rod into the hole in the pipe at the top of the H-Frame as
far as the stopper and secure in place with the nut on the side of the pipe.
4
226
Tighten the bolts and screws according to the torque as noted in Section C.2.3.
BreezeMAX Base Station Installation and Maintenance Manual
Glossary
AAA
Authentication, Authorization, and Accounting (Pronounced "triple a."). A
system (or several systems) that controls what resources users have
access to, and keeps track of the activity of users over the network.
ANSI
American National Standards Institute. A voluntary organization
composed of corporate, government, and other members that coordinates
standards-related activities, approves U.S. national standards, and
develops positions for the United States in international standards
organizations.
ASCII
American Standard Code for Information Interchange. A code for
representing English characters as numbers, with each letter assigned a
number from 0 to 127.
ATM
Asynchronous Transfer Mode. A network technology that dynamically
allocates bandwidth. ATM uses fixed-size data packets and a fixed channel
between two points for data transfer. ATM was designed to support
multiple services such as voice, graphics, data, and full-motion video. It
allows service providers to dynamically assign bandwidth to individual
customers.
ATPC
Automatic Transmit Power Control
AU
Access Unit
AVU
Air Ventilation Unit
BPSK
Binary Phase-Shift Keying. A data transfer technique. BPSK transmits
data using two phase modulation signals, one phase representing a binary
one, and the other representing a binary zero. The signal is divided into
bits; their status is determined by the preceding wave. If the wave changes,
for example, the signal is reversed.
BST
Base Station
BWA
Broadband Wireless Access
cPCI
Compact Peripheral Component Interface. A new standard for computer
backplane architecture and peripheral integration, defined and developed
by the peripheral component interconnect (PCI) industrial computers
manufacturers group (PICMG). Designed to provide rugged, high-density
systems.
CPE
Customer Premise Equipment. Communications equipment that resides
on the customer's premises.
Glossary
CSMA/CD
Carrier Sense Multiple Access with Collision Detection. Media-access
mechanisms wherein devices ready to transmit data first check the
channel for a carrier. If no carrier is sensed for a specific period of time, a
device can transmit. If two devices transmit at once, a collision occurs and
is detected by all colliding devices. This collision subsequently delays
retransmissions from those devices for some random length of time.
Ethernet and IEEE 802.3 use CSMA/CD access.
EGB
Earth Grounding Bar
EMC
Electro-Magnetic Compatibility. The capability of equipment or systems to
be used in their intended environment within designed efficiency levels
without causing or receiving degradation due to unintentional EMI (Electro
Magnetic Interference). EMC generally encompasses all of the
electromagnetic disciplines.
ETSI
European Telecommunications Standards Institute. A non-profit
organization producing voluntary telecommunications standards used
throughout Europe, some of which have been adopted by the EC as the
technical base for Directives or Regulations.
FEC
Forward Error Correction. A method of communicating data that can
corrects errors in transmission on the receiving end. Prior to transmission,
the data is put through a predetermined algorithm that adds extra bits
specifically for error correction to any character or code block. If the
transmission is received in error, the correction bits are used to check and
repair the data.
FFT
Fast Fourier Transform. An algorithm for converting data from the time
domain to the frequency domain; often used in signal processing.
FTP
File Transfer Protocol. A protocol for exchanging files over the Internet.
FTP uses the Internet's TCP/IP protocols to enable data transfer.
GPS
Global Positioning System. A system that uses satellites, receivers and
software to allow users to determine their precise geographic position.
H-Bracket
“H” Mounting Bracket for Antennas and ODUs - an “H” shaped steel
frame, on which up to 4 ODUs can be installed on the Base Station Tower
per sector. It is designed to be installed on different types of structures
with a diversity of 1.3m between antennas.
IB
In-Band
IDU
Indoor Unit
IEEE
Institute of Electrical and Electronics Engineers. IEEE (pronounced
I-triple-E) is an organization composed of engineers, scientists, and
students. The IEEE is best known for developing standards for the
computer and electronics industry. In particular, the IEEE 802 standards
for local-area networks are widely followed.
228
BreezeMAX Base Station Installation and Maintenance Manual
Glossary
IEEE 802.16
Also known as WIMAX. A group of broadband wireless communications
standards for metropolitan area networks (MANs) developed by a working
group of the IEEE.
IEEE 802.3
A Local Area Network protocol suite commonly known as Ethernet.
Ethernet uses Carrier Sense Multiple Access bus with Collision Detection
CSMA/CD. This method allows users to share the network cable. However,
only one station can use the cable at a time. A variety of physical medium
dependent protocols are supported.
IF
Intermediate Frequency. Radio communications systems modulate a
carrier frequency with a baseband signal in order to achieve radio
transmission. In many cases, the carrier is not modulated directly.
Instead, a lower IF signal is modulated and processed. At a later circuit
stage, the IF signal is converted up to the transmission frequency band.
IP
Internet Protocol. The standard that defines how data is transmitted over
the Internet. IP bundles data, including e-mail, faxes, voice calls and
messages, and other types, into "packets", in order to transmit it over
public and private networks.
LED
Light Emitting Diode
LPS
Lightning Protection System.
MAC
Media Access Control. The lower of the two sub-layers of the data link
layer defined by the IEEE. The MAC sub-layer handles access to shared
media, such as whether token passing or contention will be used.
MAC Address
Standardized data link layer address that is required for every port or
device that connects to a LAN. Other devices in the network use these
addresses to locate specific ports in the network and to create and update
routing tables and data structures. MAC addresses are 6bytes long and
are controlled by the IEEE.
MAN
Metropolitan Area Network. A data network designed for a town or city. In
terms of geographic breadth, MANs are larger than local-area networks
(LANs), but smaller than wide-area networks (WANs).
MIB
Management Information Base. A database of objects that can be
monitored by a network management system. SNMP uses standardized
MIB formats that allow any SNMP tools to monitor any device defined by a
MIB.
MIR
Maximum Information Rate. Specifies the maximum rate of information
that can be available to a user. The MIR is used by the traffic policing
mechanism to prevent users from sending excess traffic to the network.
NIU
Network Interface Unit
BreezeMAX Base Station Installation and Maintenance Manual
229
Glossary
NMS
Network Management System. A system responsible for managing at least
part of a network. An NMS is generally a reasonably powerful and
well-equipped computer, such as an engineering workstation. NMSs
communicate with agents to help keep track of network statistics and
resources.
NOC
Network Operations Center. The physical space from which a typically
large telecommunications network is managed, monitored and supervised.
NPU
Network Processing Unit
OA&M
Operation, Administration & Maintenance. Provides the facilities and the
personnel required to manage a network.
ODU
Outdoor Unit
OFDM
Orthogonal Frequency Division Multiplexing: A method for multiplexing
signals, which divides the available bandwidth into a series of frequencies
known as tones. Orthogonal tones do not interfere with each other when
the peak of one tone corresponds with the null. The rapid switching,
frequency-hopping technique is intended to allow more robust data
service.
OOB
Out-Of-Band
PER
Packet Error Rate. In a digital transmission, PER is the percentage of
packets with errors divided by the total number of packets that have been
transmitted, received or processed over a given time period.
PIU
Power Interface Unit
PSU
Power Supply Unit
PPPoE
Point-to-Point Protocol over Ethernet. PPPoE relies on two widely accepted
standards: PPP and Ethernet. PPPoE is a specification for connecting the
users on an Ethernet to the Internet through a common broadband
medium, such as a single DSL line, wireless device or cable modem. All the
users over the Ethernet share a common connection, so the Ethernet
principles supporting multiple users in a LAN combines with the principles
of PPP, which apply to serial connections.
QAM
Quadrature Amplitude Modulation. A technique used in wireless
applications to double the available bandwidth by combining two
amplitude-modulated signals. The two combined signals differ in phase by
90 degrees; this technique doubles the bandwidth by combining the two
signals at the source before transmission, transmitting digital data at a
rate of 4 bits per signal change.
230
BreezeMAX Base Station Installation and Maintenance Manual
Glossary
QPSK
Quadrature Phase Shift Keying. A data transfer technique used in coaxial
cable networks that sends data using modulating signals. Four different
phases represent data, with each signal's information determined by the
signal before it. For example, if a phase stays the same from one signal to
the other, the information has not changed.
RF
Radio frequency. An AC signal of high enough frequency to be used for
wireless communications.
Rx
Receive
SME
Small and Medium-sized Enterprises. SMEs are small-scale
entrepreneurial private enterprises: they are usually defined as having less
than 250 employees, but most have far fewer.
SNMP
Simple Network Management Protocol. A network management protocol
that provides a means to monitor and control network devices, and to
manage configurations, statistics collection, performance, and security.
SNMP works by sending messages, called protocol data units (PDUs), to
different parts of a network. SNMP-compliant devices, called agents, store
data about themselves in Management Information Bases (MIBs) and
return this data to the SNMP requesters.
SOHO
Small Office Home Office. A term that refers to the small or home office
environment and the business culture that surrounds it. Typically it refers
to an office or business with ten or fewer computers and/or employees.
SU
Subscriber Unit
TCP
Transmission Control Protocol. Connection-oriented transport layer
protocol that provides reliable full-duplex data transmission. TCP is the
part of the TCP/IP suite of protocols that is responsible for forming data
connections between nodes that are reliable, as opposed to IP, which is
connectionless and unreliable.
TCP/IP
Transmission Control Protocol/Internet Protocol. A set of protocols
developed by the U.S. Department of Defense to allow communication
between dissimilar networks and systems over long distances. TCP/IP is
the de facto standard for data transmission over networks, including the
Internet.
TDD
Time Division Duplex - Full duplex operation by allocating different time
slots to the uplink and downlink transmissions on the same frequency
TFTP
Trivial File Transfer Protocol. Simplified version of FTP that allows files to
be transferred from one computer to another over a network, usually
without the use of client authentication.
Tx
Transmit
U
A unit for measuring the height in rack cabinets. 1U = 1.75 inches.
BreezeMAX Base Station Installation and Maintenance Manual
231
Glossary
WAN
Wide Area Network. A computer network that spans a relatively large
geographical area. Wide area networks can be made up of interconnected
smaller networks spread throughout a building, a state, or the entire
globe.
232
BreezeMAX Base Station Installation and Maintenance Manual