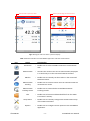
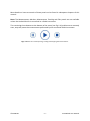
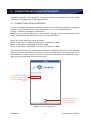
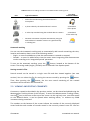
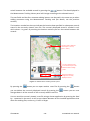
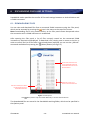
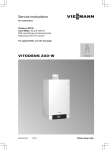
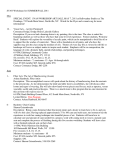
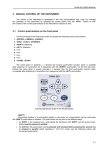
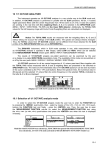
1
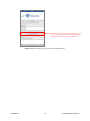
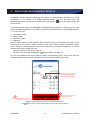
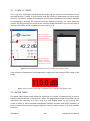
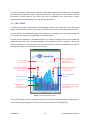
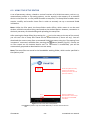
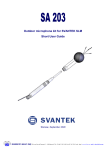
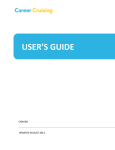
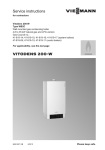
SvanMobile USER MANUAL v. 1.0 SvanMobile version: 3.1 October 2013 CONTENTS 1 2 3 GETTING STARTED .................................................................................... 2 1.1. ABOUT THIS MANUAL ............................................................................................................................ 2 1.2. INSTALLING SVANMOBILE ..................................................................................................................... 2 1.3. LICENSING .............................................................................................................................................. 3 1.4. OVERVIEW OF THE APPLICATION .......................................................................................................... 3 CONNECTING WITH SVAN INSTRUMENTS................................................. 6 2.1. CONNECTION USING BLUETOOTH ......................................................................................................... 6 2.2. CONNECTION USING INTERNET ............................................................................................................. 7 DISPLAYING MEASUREMENT RESULTS...................................................... 9 3.1. 1 PROF. & 3 PROF. ............................................................................................................................... 10 3.2. METER TABLE ....................................................................................................................................... 10 3.3. SPECTRUM ........................................................................................................................................... 11 3.4. SPECTRUM TABLE ................................................................................................................................ 13 3.5. INSTRUMENT STATUS .......................................................................................................................... 13 4 USING MARKERS .....................................................................................14 5 MEASUREMENT TRACKING .....................................................................16 6 7 5.1. CREATING COMMENTS ........................................................................................................................ 16 5.2. VIEWING AND EDITING COMMENTS ................................................................................................... 17 EXCHANGING FILES AND SETTINGS..........................................................19 6.1. DOWNLOADING FILES.......................................................................................................................... 19 6.2. USING THE SETUP EDITOR ................................................................................................................... 20 OPTIONS .................................................................................................22 APPENDIX: SVANMOBILE FILE STRUCTURES ..................................................24 A.1. REFERENCE SPECTRUM FILES .............................................................................................................. 24 A.2. SVMT FILES .......................................................................................................................................... 24 © SVANTEK -1- SvanMobile User Manual 1 GETTING STARTED SvanMobile is an application for smartphones and tablets with the Android operating system which extends the functionality of SVAN instruments. 1.1. ABOUT THIS MANUAL The figures presented in this manual have been created using one particular Android device. Taking into account the variety of Android devices available on the market, it is probable that SvanMobile will look somewhat different on your device. In particular, this concerns the (Menu) button, which in some devices is present as a hardware button, and in others—as a virtual button on the Navigation bar (at the bottom of the screen); this refers to Fig.3-1, 6-1 and 6-2. The layout of the SvanMobile application may also change significantly when the screen orientation is changed from portrait to landscape. However, since the functionality of each element of the application remains unchanged regardless of the screen orientation, it is not treated in detail in this manual, and all the figures are presented as if the screen was in portrait orientation. While using the SvanMobile application, you can always access helpful information about the currently displayed panel by pressing the Help button at the bottom-right corner of the screen (see Fig.1-1). To hide the Help window, press the Help button once again. Press this button to access helpful information about the currently displayed panel; press it again to hide the Help window. Fig. 1-1 The bottom-bar and the location of the Help button. 1.2. INSTALLING SVANMOBILE To install SvanMobile: 1. Download the .apk file from the Svantek website. 2. On your Android device, enable the “Allow installation of apps from unknown sources” option. It can be found in different places, depending on the Android version, e.g.: Settings → Personal → Security → Unknown sources (newer versions), or: Settings → Applications → Unknown sources (older versions). 3. Find and open the .apk file. Note: If you downloaded the file directly from the Internet to the Android device, it can be accessed through the notification on the navigation bar. 4. Accept the permissions required by SvanMobile and press Install. © SVANTEK -2- SvanMobile User Manual 1.3. LICENSING After downloading the SvanMobile application, you get a free 30-day license for using it. You can purchase the unlimited license from your local Svantek distributor. To activate the purchased license follow these instructions: 1. Open the SvanMobile application and go to Options. 2. Press the Licensing button. 3. Press the Send Mail button to open a template of the key-request e-mail. Complete the message by entering your name and phone number, and send it. The address of the Svantek office is already typed in the template. 4. After the key is generated, SvanMobile will automatically download it from the Internet and the license will be activated. If you cannot or do not want to use Internet connection, you can also contact the Svantek office in any other way to achieve the key corresponding to your device’s ID number, and load it from a file stored on the device by pressing the Load key from file button in the Licensing dialog box. Note: The ID number shown in the Licensing dialog box and included in the key-request e-mail is unique for each Android device. It is necessary for obtaining the license. This is the ID number unique for your particular Android device. Use this button if you want to activate the license without using the Internet. Use this button to send a key-request e-mail to the Svantek office. Fig.1-2 The Licensing dialog box. 1.4. OVERVIEW OF THE APPLICATION The SvanMobile application is composed of 8 different panels. You can select the displayed panel using the menu, located at the top of the screen (see Fig.1-3). To open the menu, press the button at the top-right corner of the screen, or drag down the bar at the top of the screen. You can also access this menu when it is hidden by pressing the Back ( ) button of your Android device. The available panels and their functionalities are described in Table 1-1. © SVANTEK -3- SvanMobile User Manual Select a panel using one of these icons. Press this bar to open the menu. Fig.1-3 Using the menu to select a panel to display. Table 1-1 Panels available in the SvanMobile application and their functionalities. Icon © SVANTEK Name Functionality Connection – Enables one to select a SVAN instrument to communicate with. Measurement – Contains the results of the current measurement, displayed in a similar way as in the connected SVAN instrument. Markers – Enables one to remotely set the markers in the connected SVAN instrument. Measurement Tracking – Enables one to enclose various forms of comments with the measurement results. Measurement Tracking Viewer – Enables one to view and edit created Measurement Tracking records. Files – Enables one to browse and download files from the SVAN instrument’s memory. Setup Editor – Enables one to remotely configure the measurement setup of the SVAN instrument. Options – Enables one to configure various options of the SvanMobile application. -4- SvanMobile User Manual More details on how to use each of these panels can be found in subsequent chapters of this manual. Note: The Measurement, Markers, Measurement Tracking and Files panels are not available unless the Android device is connected to a SVAN instrument. The remaining three buttons at the bottom of the menu (see Fig.1-4) enable one to remotely start, stop and pause the measurement performed by the connected SVAN instrument. Fig.1-4 Buttons for remote pausing, starting and stopping the measurement. © SVANTEK -5- SvanMobile User Manual 2 CONNECTING WITH SVAN INSTRUMENTS SvanMobile provides two methods for connection between an Android device and a SVAN instrument: using Bluetooth and using the Internet. 2.1. CONNECTION USING BLUETOOTH In order to establish a Bluetooth connection make sure the following settings are configured properly. In your Android device, check if Bluetooth is on. It can usually be found in: Settings → Wireless & Networks → Bluetooth. Note: If you can see the “Bluetooth is not available” message in the Connection panel, this means that Bluetooth has been turned off in your Android device. Next, set up your SVAN instrument as follows: Menu → Instrument → Communication Ports → Bluetooth → ON, Menu → Instrument → Bluetooth → Visible → ON, Menu → Instrument → Bluetooth → Transfer on stop only → OFF. If all the above settings are configured as described, SvanMobile will scan for the available SVAN instruments and display a list of them in the Connection panel. To connect with one of the instruments, press its name on the list. You can also manually force SvanMobile to scan again by pressing the Refresh button (see Fig.2-1). An instrument available by bluetooth. Press to connect, long press to display a list of options. Press this button to refresh the list of instruments available by bluetooth. Fig.2-1 Connection using Bluetooth. © SVANTEK -6- SvanMobile User Manual When connected to an instrument, you can disconnect it by long pressing its name on the list and selecting “Disconnect” from the pull-down menu. Note: In some versions of Android, it may be necessary to manually pair the Android device with the SVAN instrument before attempting to establish connection in SvanMobile. In order to pair the devices you have to do the following: In the Android device’s settings go to Wireless & Networks → Bluetooth, Press Search for devices, On the list of available devices, press the name of your SVAN instrument, Enter the authorisation code. By default, the code is 1234; it can be set in the meter: Menu → Instrument → Bluetooth → Authorisation Code. The devices will be paired and you will be able to see the SVAN instrument on the list in the Connection panel. 2.2. CONNECTION USING INTERNET A SVAN instrument can be connected to the Internet using a GSM modem or via Wi-Fi (using a MOXA modem). You can then establish an Internet connection between the SVAN instrument and an Android device with SvanMobile. To do so, you first need to manually add your device to the list by doing the following: 1. Go to Options (using the menu at the top of the screen; see Chapter 1.4: Overview of the application). 2. Press Add TCP connection by IP address or Add TCP connection by unit number (see Fig.2-2), depending on how you wish to access your SVAN instrument: • if using the IP address, you have to specify the address and port at which the instrument can be accessed, • if using the unit number, you have to specify the instrument type (e.g. SVAN 979), its serial number and the AS (Address Server) password (which has to be set up in the SVAN instrument). Once the TCP connection has been added, you can connect to the instrument by pressing its name on the list in the Connection panel, analogously to the connection using Bluetooth. Note: You can remove a TCP connection from the list by long pressing its name on the list and selecting “Remove”. When connected to an instrument, you can disconnect it by long pressing its name on the list and selecting “Disconnect” from the pull-down menu. © SVANTEK -7- SvanMobile User Manual Use these buttons to add a particular SVAN instrument to the list of instruments available by Internet using its IP address or its serial number and AS password. Fig.2-2 Buttons for adding a TCP connection in the Options panel. © SVANTEK -8- SvanMobile User Manual 3 DISPLAYING MEASUREMENT RESULTS SvanMobile makes possible displaying the results of measurement obtained by a SVAN instrument on the screen of a mobile Android device. This can be done using the Measurement panel, which can be accessed by pressing the icon in the menu at the top of the screen. The measurement results are displayed in the Measurement panel in a similar way as in the connected SVAN instrument. The panel can be used in five different so-called display modes: 1. 1 Prof. & 3 Prof., 2. Instrument status, 3. Meter Table, 4. Spectrum Table, 5. Spectrum, each of which allows to view different data acquired from the connected instrument. They correspond to the meter’s display modes of the same names, except Instrument status, which allows to display general information about the connected instrument. To switch between the display modes you can: swipe the screen to the left or right, or use the menu accessed through the (Menu) button (see Fig.3-1). You can also disable some of the display modes in the Options panel; in this case only the selected display modes will be available in the menu and by swiping the screen. Swipe the screen to the left or right to switch between subsequent display modes. 2 Use this menu to switch to a selected display mode. 1 Press the Menu button* to open the diplay modes menu. *The © SVANTEK Fig.3-1 Changing the display mode in the Measurement panel. (Menu) button may be located differently in various Android devices. -9- SvanMobile User Manual 3.1. 1 PROF. & 3 PROF. The 1 Prof. & 3 Prof display mode allows for displaying the results of measurement of one selected function / profile in large format, and the results of measurement of three other functions / profiles in smaller format below. You can switch between the functions available for displaying by pressing the name of currently displayed function; the same applies to profiles. By long pressing the name of the currently displayed function you can also open a menu to select from all the available functions (see Fig.3-2). Long press function name to select from a list of available functions. Press the name of a function or a profile number to switch to the next function or profile. Fig.3-2 Selecting the displayed functions in the 1 Prof. & 3 Prof. display mode. If the results are displayed on red background, it means that they are out of the range of the meter. Fig.3-3 The way results out of range are displayed in the 1 Prof. & 3 Prof. display mode. 3.2. METER TABLE The Meter table display mode allows for displaying the results of measurement of several functions simultaneously in the form of a table. The displayed functions and profiles can be selected in the same way as in the 1 Prof. & 3 Prof. display mode, viz. by pressing their names in order to switch between subsequent available functions and profile numbers, or (only in case of functions) by long pressing their names in order to open a list of all available functions. © SVANTEK - 10 - SvanMobile User Manual The User calculator, located at the bottom of the Meter table panel, enables one to display the differences between chosen measured functions. The functions and profiles used for calculation at both sides of the minus sign can be selected in the same way as other displayed functions and profiles, see the description above. 3.3. SPECTRUM The Spectrum display mode allows for displaying a plot of the spectrum of the measured signal, if spectrometric results (1/1 Octave, 1/3 Octave or FFT) are currently being acquired. You can change the displayed range of the spectrum by zooming in or out (by pinching the screen open or close) or by swiping the screen up or down. A cursor can be placed at a selected frequency to display numerical value of the spectrum above the plot. The cursor is represented by a thin, blue vertical line. To place it, touch the screen somewhere in the plot area. The last three points of the x-axis located to the right of the highest frequency correspond to total results. Value of the measured and reference spectrum at the frequency selected by the cursor. Current position of the cursor Pinch close in the vertical direction to zoom out the spectrum plot. Pinch open in the vertical direction to zoom in the spectrum plot. Thin, blue vertical line – the cursor Measured spectrum Reference spectrum Press somewhere in the plot area to set the position of the cursor. Swipe the screen up or down to change the displayed range of the spectrum. Fig.3-4 The Spectrum display mode. In case of FFT data, it is also possible to zoom in or out the displayed range of frequencies. It can be done by pinching open or close in the horizontal direction (see Fig.3-5). © SVANTEK - 11 - SvanMobile User Manual Pinch open in the horizontal direction to zoom in the frequency axis. Fig.3-5a An exemplary FFT spectrum. Pinch close in the horizontal direction to zoom out the frequency axis. Fig.3-5b The same FFT spectrum with a greater zoom. In case of 1/1 octave and 1/3 octave spectra, a reference spectrum may be shown together with the measured spectrum. It has to be loaded from a .csv file stored on the Android device, specified in the Options panel; for details on the format of this file, refer to the Appendix. Different files should be loaded for audio and full, 1/1 octave and 1/3 octave spectra. The reference spectrum is drawn in brighter color than the measured spectrum. Its value is also shown above the plot for the frequency selected by the cursor. In order to show or hide the reference spectrum, open the menu at the top of the screen and press the “Display reference spectrum” button (Fig.3-6). © SVANTEK - 12 - SvanMobile User Manual Go to the Options panel to specify files containing data to be used as reference spectrum. Press to show/hide the reference spectrum. Fig.3-6 Displaying the reference spectrum. 3.4. SPECTRUM TABLE The Spectrum table display mode allows for displaying the spectrum of the measured signal (if spectrometric results—1/1 Octave or 1/3 Octave—are currently being acquired) in numerical form. The displayed table consists of a column containing frequency values (on the left) and a column containing spectral data measured at the corresponding frequencies (on the right). 3.5. INSTRUMENT STATUS The Instrument Status display mode allows for displaying some general information about the connected SVAN instrument. © SVANTEK - 13 - SvanMobile User Manual 4 USING MARKERS SvanMobile makes it possible to remotely set markers in the connected SVAN instrument using the Markers panel, accessible through the icon in the menu at the top of the screen. It is only possible online, so this panel cannot be opened unless the connection with a SVAN instrument is established. Note: The marker-related features in SvanMobile depend on the SVAN instrument’s capabilities. There may be limitations compared to what is described in this chapter according to what is available in the connected SVAN instrument. At the top of the panel the measurement results are displayed. You can change the displayed function and profile in the same way as in the Measurement panel, viz. by touching the function name / profile number in order to switch to the subsequent available function or profile, or (only in case of functions) by long pressing the function name in order to select from a list of all available functions. Press to change the displayed function to the subsequent available function, or long press to open the list of available functions. Press to switch to subsequent profile. A started Block marker You can enter the marker’s name here. Press to set the end time of Marker #1. Press to set the start time of Marker #2. Press to set the position of the Point marker #3. Fig.4-1 The Markers panel. The markers are set in SvanMobile in a similar way as in the meter. You can switch the type (Event, Point, Event point or Block) of each marker by clicking the blue label next to the marker’s number. You can specify the name of each marker using the field below the marker’s number and type. In case of Point and Event point markers, the Update button below the name field serves for setting its at the current time. In case of Block and Event © SVANTEK - 14 - SvanMobile User Manual markers, the Activate / Deactivate buttons serve for setting their start / end time, respectively. A started event or block marker is shown on green background. Note: The name and type of the markers can only be changed when the measurement is stopped. The start and end time of the markers can be set only when a logger measurement is currently performed. © SVANTEK - 15 - SvanMobile User Manual 5 MEASUREMENT TRACKING The Measurement Tracking tool serves for enclosing additional comments in the form of notes, voice recordings, photos, video clips, weather information and location data with the measurement results. 5.1. CREATING COMMENTS In order to enclose a comment with the currently performed measurement, open the Measurement Tracking panel by pressing the icon in the menu at the top of the screen. The Measurement tracking tool can only be used online, so this panel cannot be accessed unless the connection with a SVAN instrument is established. Comments are grouped in so-called records. A record is described by the date and time acquired from the connected SVAN instrument’s real-time clock, and can contain all the forms of various comments such as e.g. location data or a photo. Timestamps Two timestamps are stored in each record—one representing the start time of the measurement result file (this is the time displayed on the screen, below the map), and one representing the time of saving the record. In the case when only logger results are acquired, the time of activating the Measurement Tracking tool is taken into account instead of the start time of the measurement result file. Location data The location data is acquired automatically using the Android device’s location services, if they are enabled. You can also manually point the location on the map after pressing the icon located at the top-right corner of the map. Project name and notes You can specify a name for the project and add notes using the text fields located below the map. Pressing the icon will clear the notes field. Other forms of comments You can add other forms of comments to the current record using the buttons described in Table 5-1. When a type of comment is added, the icon of the button changes, indicating that pressing this button again will enable to view the added comment and edit it. In case of audio, photo and video comments, by long pressing the corresponding button you can access a menu allowing to load the content for the comment from a file stored on the Android device, or—if a comment has already been created—to change, preview or remove it. © SVANTEK - 16 - SvanMobile User Manual Table 5-1 Buttons for adding comments in the Measurement Tracking panel. Icon Icon after comment added Type of comment – Audio file recorded using the Android device’s microphone. – A photo taken by the Android device’s camera. – A video clip recorded using the Android device’s camera. – Weather information acquired automatically using the Android device’s weather services or typed manually in a dialog box. a thumbnail of the photo a thumbnail of the video clip Automatic tracking You can use the Automatic tracking tool to automatically add records containing the time, location and weather data in one of the following modes: Single – a record is added every time the measurement is started or stopped, Periodic – a record is added every time the meter starts integrating new measurement results according to its ‘Integration period’ parameter. To turn on the automatic tracking, press the button, located at the bottom of the screen. The saving mode (single / periodic) can be selected in the Options panel. Storing records in files Several records can be stored in a single .svmt file and then viewed together (see next section). You can select the file for storing the current record by pressing the button. Then, after pressing the button, the the new record containing all the created comments will be stored in the selected file. 5.2. VIEWING AND EDITING COMMENTS Comments, created as described in the previous section, can be viewed and edited using the Measurement Tracking Viewer (or MT Viewer). To access the Measurement Tracking Viewer, use the icon in the menu at the top of the screen. As this tool only uses .svmt files stored on the Android device, it can be opened when working offline, i.e. without any SVAN instrument being connected. The numbers at the bottom of the screen indicate the number of the currently displayed record and the total number of records stored in the currently viewed .svmt file. You can © SVANTEK - 17 - SvanMobile User Manual switch between the available records by pressing the , buttons. The data displayed in the Measurement Tracking Viewer panel will change according to the selected record. The text fields and the four comment-editing buttons can be used in the same way as when adding comments using the Measurement Tracking tool (for details, see the previous section). The locations marked on the map indicate the location data specified in subsequent records stored in the currently viewed .svmt file. The currently displayed record is marked in red, while others—in green. By touching the location markers you can also switch between the records. Location data in different records (red – current, green – other). You can use these tools in the same way as in the Measurement Tracking panel. Use these buttons to change the currently displayed record. Fig.5-1 The Measurement Tracking Viewer panel. By pressing the button you can open another .svmt file. By pressing the you can delete the currently displayed record. By pressing the changes done in all the records in the currently edited .svmt file. button button you can save You can send the currently viewed .svmt file using a chosen application by pressing the Send by... command in the menu. It will let you choose between all the installed applications that allow for sending files, such as e.g. E-mail or Skype. © SVANTEK - 18 - SvanMobile User Manual 6 EXCHANGING FILES AND SETTINGS SvanMobile makes possible the transfer of files and settings between an Android device and a SVAN instrument. 6.1. DOWNLOADING FILES You can view and download files from a connected SVAN instrument using the Files panel, which can be accessed by pressing the icon in the menu at the top of the screen. Note: Downloading files is only possible online, so the Files panel cannot be opened unless the connection with a SVAN instrument is established. After opening the Files panel, a list of files currently stored on the connected SVAN instrument is acquired and displayed. To download a file, simply press its name on the list. In order to refresh the list of files after it has already been acquired, you can use the „Refresh” command available after pressing the (Menu) button (see Fig.6-1). Press a file name from this list to download a file from the SVAN instrument to the Android device. Swipe the screen up or down to see the whole list. Use this command to refresh the list of files stored on the SVAN instrument. *The 2 1* Fig.6-1 The Files panel. (Menu) button may be located differently in various Android devices. The downloaded files are stored in the SvanMobile working folder, which can be specified in the Options panel. © SVANTEK - 19 - SvanMobile User Manual 6.2. USING THE SETUP EDITOR A set of parameters values, related to various functions of a SVAN instrument, such as e.g. measurement profiles or file-saving options, can be stored in the memory of an Android device in the form of a .svt file (called hereafter a setup file). The Setup Editor enables one to acquire, modifiy and transfer these files in order to remotely set up a connected SVAN instrument. Note: Unlike the Files panel, the Setup Editor works offline, which means it can be used without a SVAN instrument being connected to the Android device. However, connection is obviously necessary for downloading and uploading the setup files. After opening the Setup Editor (by pressing the icon in the menu at the top of the screen) you can see a list of setup files stored on the Android device (if there are any). You can download the current setup from a connected SVAN instrument using the “Get setting from instrument” command, available after pressing the (Menu) button (Fig.6-2). If there are no files stored on the Android device and if a connection is established, you will be automatically proposed to download the current setup. Note: The setup files are stored in the SvanMobile working folder, which can be specified in the Options panel. List of setup files currently stored on the Android device (press a file name to open it for edition) 1* 2 *The © SVANTEK Use this command to download the current setup from the connected SVAN instrument. Fig.6-2 The main view of the Setup Editor. (Menu) button may be located differently in various Android devices. - 20 - SvanMobile User Manual Once a setup file is stored on the Android device, you can open it for editing. To do so, simply press a file name on the list. Note: By long pressing a file name you can open a pull-down menu which allows to edit, upload or delete the selected setup file. Once a setup file is opened, the Setup Editor displays a list of settings available for the connected SVAN instrument. The settings are identical to those available in the instrument’s menu; for details, please refer to the manual of the particular instrument. To access the Save, Save as, Upload and Activate and Exit commands, press the (Menu) button. Press a category name on this list to edit settings in the selected category (or to access its subcategories). Use this command to upload the currently edited setup file to the connected SVAN instrument (in order to remotely modify its settings). Use this command to navigate back to the list of stored setup files. Fig.6-3 Editing a setup file in the Setup Editor. The settings are grouped in a hierarchical structure. While browsing the settings available in a setup file, you can go one step up in the settings hierarchy by pressing the Back ( ) button. To navigate back to the list of stored setup files use the “Exit” command, as shown in Fig.6-3. The edited setup file can be saved with the same filename—using the “Save” command—or as a copy with different filename—using the “Save as” command. You can upload a setup file to the connected SVAN instrument in two ways: When editing a setup file, use the “Upload and Activate” command (see Fig.6-3). When displaying the list of setup files stored on the Android device, long press the name of a setup files and in the pull-down menu select “Upload and Activate”. The uploaded setup file is automatically activated, meaning that the SVAN instrument’s settings are modified according to the ones specified in the uploaded file. © SVANTEK - 21 - SvanMobile User Manual 7 OPTIONS This chapter contains a description of all the options that can be configured using the Options panel. These options only concern the SvanMobile application, not the connected SVAN instruments. You can access these options by pressing the icon in the menu at the top of the screen. Fig.7-1 The Options panel. Licensing – allows to activate a purchased license. For details, see Chapter 1.3: Licensing. Display Modes – allows to select which modes will be available in the Measurement panel. If you uncheck one of the modes, it will disappear from the menu available in the Measurement panel and will be omitted when swiping the screen. Start measurement / stop measurement / pause measurement – if this option is set as “on”, the Start / Stop / Pause buttons will be displayed not only in the menu at the top of the screen, but also at the bottom of the Measurement panel in the 1 Prof. & 3 Prof. display mode. © SVANTEK - 22 - SvanMobile User Manual Screen orientation – this option can be used for changing the orientation of the screen. The orientation does not automatically change while using the SvanMobile application, independent of the current Android device settings. The landscape (horizontal) orientation is particularly useful when the Android device is connected to an external projector. Path to working folder – allows to specify the location for storing on the Android device files downloaded from SVAN instruments and other files used by the SvanMobile application. Automatic Tracking: – if set to „Single”, the Automatic Tracking-related comments will be enclosed to the measurement results only once, when the Start / Stop button is pressed; if set to „Periodic”, the comments will be enclosed each time a Result file is created. Reference files for spectrum – allows to select files from the Android device’s memory that will be used for displaying reference spectra in the Measurement panel in the Spectrum display mode. Add TCP connection by IP address / by unit number – allows to add an Internet connection with a SVAN instrument to the connections list. For details, see Chapter 2.2: Connection using Internet. GPS location listener – allows to decide whether GPS will be used by SvanMobile to access your location. Note that the GPS location service also needs to be enabled in the Android device’s settings. Channel No. – allows to choose the channel of the connected multichannel SVAN instrument from which measurement results are acquired. Version number – at the bottom of the Options panel, the number of the currently installed version of SvanMobile is displayed. © SVANTEK - 23 - SvanMobile User Manual APPENDIX: SVANMOBILE FILE STRUCTURES A.1. REFERENCE SPECTRUM FILES The spectra used as reference in the Spectrum display mode in the Measurement panel are stored in the form comma-separated-values (CSV) files. These files can be generated using the SvanPC++ software in the following way: 1. In SvanPC++, open the file containing data you wish to use as reference spectrum. 2. Open the 1/1 Octave or 1/3 Octave view. 3. Use the File → Save Current View... command or the button in the Toolbar. 4. Save the file on your Android device. You can then load this file in the Options panel using the Reference files for spectrum button. Such CSV file consists of two rows, containing the following values: Channel <Ch. number> e.g. Ch1 Mode <Mode> e.g. SLM Filter <Filter type> e.g. Z Frequency [Hz] <Type of data> e.g. 1/3 Octave RMS [dB] <Frequency values> ∙ ∙ ∙ <Spectral data> ∙ ∙ ∙ A.2. SVMT FILES The .svmt files are used by the Measurement Tracking tool for storing comments (grouped in records) enclosed to measurement results. For details, see Chapter 5: Measurement Tracking. The .svmt files are text documents that use a syntax similar to the XML syntax. A .svmt file is composed of several XML-resembling elements called MeasurementTrackingRecord—one such element for each record stored in the file. Each MeasurementTrackingRecord element is described by XML-resembling attributes—in the form of name-value pairs—that specify the data contained in the record. The names of the attributes are self-explanatory; you can see all the available attributes in the example on the next page. The file-related data (concerning photo and video comments) are stored as base64 code, i.e. a single photo file is stored using three attributes: <photoFile> – the name of the file, <photoSize> – the number of bytes after base64-coding, <photoData> – the base64 code of the file’s content. Video files are stored in an analogous way. Attributes related to weather information are the ones beginning with weather. They describe various weather parameters—according to their names—which are, by default, downloaded from free.worldweatheronline.com. © SVANTEK - 24 - SvanMobile User Manual The content of an exemplary .svmt file <?xml version="1.0" encoding="utf-8"?> <MeasurementTrackingRecord unitType="979" unitSubType="0" unitNumber="21004" svanMobileTimestamp="" svanMobileTimezone="-60" unitTimestamp="2013/01/01 05:50:37" unitLatitude="" unitLongtitude="" mobileLatitude="52d 11m 40.42s N" mobileLongtitude="21d 10m 21.77s E" resultFile="@R1" loggerFile="LOG95" commentary="" photoFile="" photoSize="" photoData="" audioCommentFile="" audioSize="" audioData="" videoClipFile="" videoSize="" videoData="" weatherPressure="" weatherHumidity="" weatherTemperature="" weatherCloudcover="" weatherWindspeedKmph="" weatherWinddirDegree="" weatherCode="" project="" svanMobileTimestampOnStart="" resultFileOnStart="" loggerFileOnStart="" unitTimestampOnStart="" > </MeasurementTrackingRecord> <MeasurementTrackingRecord unitType="979" unitSubType="0" unitNumber="21004" svanMobileTimestamp="" svanMobileTimezone="-60" unitTimestamp="2013/01/01 05:54:36" unitLatitude="" unitLongtitude="" mobileLatitude="52d 10m 25.77s N" mobileLongtitude="21d 11m 20.48s E" resultFile="@R1" loggerFile="LOG95" commentary="" photoFile="" photoSize="" photoData="" audioCommentFile="" audioSize="" audioData="" videoClipFile="" videoSize="" videoData="" weatherPressure="" weatherHumidity="" weatherTemperature="" weatherCloudcover="" weatherWindspeedKmph="" weatherWinddirDegree="" weatherCode="" project="" svanMobileTimestampOnStart="2013/09/13 15:28:39" resultFileOnStart="" loggerFileOnStart="" unitTimestampOnStart="" > </MeasurementTrackingRecord> Note: It is recommended not to edit the .svmt files in other ways than using the Measurement Tracking and Measurement Tracking Viewer tools. The .svmt files differ from the .xml documents in that they do not have a root element, and therefore they cannot be viewed using typical XML viewers. The structure of the .svmt files may change in future releases of SvanMobile. © SVANTEK - 25 - SvanMobile User Manual