1
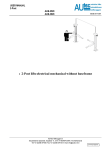
HEADLIGHT BEAMSETTER USAGE GUIDE
SLA-L80N
SLA-D200
SLA-T200wP
SLA-TPRO
Art. 80
Art. 200
Art. 200/R
-2-
Fig.1 Assembling
Art. 80
Art.200
-3-
Fig.2
WORKING SURFACE
Fig.4
OPTICAL POSITIONING
-4-
Fig. 7
ANALOG LUXMETER
Fig. 8
DIGITAL LUXMETER
-5-
GB
INDEX OF CONTENTS
GENERAL STANDARDS (SAFETY)…………………………………………………………………...…………………………………..PAGE 6
DESCRIPTION OF THE EQUIPMENT-TECHNICAL FEATURES ……………….....................….……………………………………….6
PACKING…………………………………………………………………………………………………………………………………..………..6
ASSEMBLY……………………………………………………………………………………………………………………...…………………..7
WORK SURFACE……………………………………………………………….…………………………………….…………………..……….7
PREPARATION OF THE VEHICLE………………………………………………………………………………….……….………………….7
OPTICAL POSITIONING ………………………………………………………………………………………………….……………………....7
THE INTERNAL PANEL ……………………………………………………………………..……………………………….……… …………..8
TEST ON DIPPED HEADLIGHTS………………………………………………………………………………………………………..……….8
SYMMETRICAL HEADLIGHTS…………………………………………………………...…………………………………………… ……….9
MAIN INDEPENDENT HEADLIGHTS …………………………………………………………………………………………………………..9
LUXMETER READ-OUT……………………………………………………………………………………………………………………………9
CHECKING THE LIGHT INTENSITY OF THE HEADLIGHTS…………………………………………………………………………...….10
OTHER ADJUSTMENTS AND CALIBRATIONS……………………………………………………………………………………............. .10
CLEANING………………………………………………………………………………………………....................…………………………….10
DEMOLITION AND DISPOSAL…………………………………………………………………………………………………………………..10
CHECKING MOPEDS AND MOTOCYCLES……………………………………………………………………...........……………..……….11
GENERAL STANDARDS
BEFORE USING THE HEADLIGHT BEAM SETTER, READ CAREFULLY THE INSTRUCTIONS CONTAINED IN THIS MANUAL.
DO NOT ALLOW THAT NON-SKILLED STAFF USE THE EQUIPMENT AND CAUSE DAMAGE ON IT. THE WORKING ROOM MUST
BE DRY, SUFFICIENTLY BRIGHT AND WELL-AIRED. IN ANY CASE, A SUITABLE EXHAUST GAS SUCTION SYSTEM MUST BE
AVAIILABLE BECAUSE SOME TESTS HAVE TO BE CARRIED OUT WITH RUNNIN ENGINES.
ANY ACCIDENTAL INHALATION OF CARBON MONOXYDE CAN CAUSE SERIOUS DAMAGES TO THE HUMAN BODY,
SOMETIMES WITH LETHAL EFFECTS.
INSERT THE HANDBRAKE BEFORE CARRYING OUT TESTS ON A VEHICLE.
FURTHER, TO AVOID POSSIBLE READING MISTAKES, THE HEADLIGHT BEAM SETTER SHOULD NOT BE USED IN FULL
SUNLIGHT, OR IN ANY ROOM SUBJECT TO SUDDEN TEMPERATURE CHANGES OR VIBRATION.
DESCRIPTION OF THE EQUIPMENT
HEADLIGHT
BEAM SETTER: equipment for checking headlights on automobiles, motorcycles and lorries in general;
with fixed column art. Logic 50 Logic 80 Logic 100 and Digit 100;
with tilt-back column art. Logic 200 and Digit 200
tracking with mirror viewer on all models
with analog luxmeter art. Logic 50 Logic 80 Logic 100 and Logic 200
with digital luxmeter art. Digit 100 and Digit 200
on rail art. Logic 200/R and Digit 200/R
TECHNICAL FEATURES:
HEIGHT:
cm 177 on all models
WIDTH:
cm 61 on all models
LENGTH:
cm 65 on all models
WEIGHT:
on all models: 32 Kg to 37 Kg
PACKING:
cm 174 x 64 x 33
PACKING WEIGHT:
4,5 Kg
MIN. OPERATING HEIGHT: cm 24 on all models
MAX. OPERATING HEIGHT: cm 141 on all models
POWER SUPPLY: by means of the beam of the headlight, no battery: all models with analog luxmeter.
POWER SUPPLY: with a 9V battery, all models with digital luxmeter
WEIGHT OF ELECTRICAL/ELECTRONIC COMPONENTS: <1 Kg.
The headlight beam setter is supplied packed in a recycled cardboard box.
For assembling the equipment, please refer to the “ASSEMBLY” section.
-6-
ASSEMBLY (see fig. 1)
ART. Logic 50 Logic 80 Logic 100 and Digit 100:
1 Fix the column B on the base A using
the four M8 screws.
2 Fix the side of the optical box E on
the vertical sliding system C: insert the M8
screw into the upper hole
introduce the clutch lever into
the lower slot
3 Insert the threaded pin of P viewer into
the hole on column B
A
B
C
P
E
F
G
H
L
N
Art. Logic 200 and Digit 200:
1 Fix the column Z to the base R using
the four M8 screws inserted on the rotating support of the base
2 insert the threaded pin of P viewer into the hole
on column Z
3 Fix the side of the optical box E to
the vertical sliding system C: introduce the M8 screw
in the upper hole
insert the clutch lever L in the lower slot
BASE
COLUMN
VERTICAL SLIDING SYSTEM
MIRROR VIEWER
OPTICAL BOX
R
Z
C
P
E
F
BASE
COLUMN
VERTICAL SLIDING SYSTEM
MIRROR VIEWER
OPTICAL BOX
WHEELS
CLUTCH LEVER
H WHEELS
L CLUTCH LEVER
N BRAKE
WORKING SURFACE (see fig. 2)
When testing the headlights, the floor must be as flat as possible. Should that not be possible, both the headlight beam setter and the
vehicle must be placed at least on a relatively uniform surface, but with a maximum 0,5% slope. We strongy recommend not to carry out
tests on headlights if the ground is not perfectly regular and flat because their adjustment cannot be precise.
PREPARATION OF THE VEHICLE
Make sure that the headlights are clean and dry. If the vehicle is equipped with an headlights adjusting system inside the cabin, set it
on “0”. Remove anything that could interfere with the correct attitude of the vehicle: mud, snow, ice, etc. Straighten the car’s wheels.
Put a 70 Kg load on the seats. Make sure that the vehicle chassis has no distorsions. Check that the tyre pressure is correct. Start the
engine and leave it running while carrying out the tests. In case of vehicles with pneumatic suspensions start the engine 5 minutes
before carrying out the tests, and leave it running during test procedure.
OPTICAL POSITIONING (see fig. 4)
Place the headlight beam setter in front of the car, at a distance of 20 to 50 cm.
A) Look through the viewer and search for a horizontal detail on the car or two mutually symmetrical details (for example, the upper
part of the windscreen or the bonnet). Check that the viewer line corresponds with these lines so that the whole equipment is
parallel with the car. If not, slightly turn the headlight beam setter until this result is achieved.
B) Measure the height from the ground to the center of the headlight and bring the optical box to the matching height referring to the
graduated scale on the cover. The upper part of the sliding system should be used as a reference.
E.g.: if the height from the ground to the center of the headlight is 80 cm, you must bring must the vertical sliding system onto the
80 notch. A tolerance of plus or minus 3 cm is allowed.
Art. 200 is equipped with swivel column and brake.
This allows to easily rotate the equipment and
Lock it on the desired point. The brake is locked
by pushing the pedal on the base.
The headlight beam setter on rail must be fitted with swivel column.
(art. 200/R)
-7-
INTERNAL PANEL FOR UNITED KINGDOM
NOTICE
The next paragraph refers to the internal panel and the instruction table. Both internal panel and instruction
table are suitable for most countries. In the United Kingdom it is compulsory to use the underneath fixed
internal panel.
-8-
THE INTERNAL PANEL
The internal panel moves by means of the graduated wheel placed at the back of the optical box. According to the types of vehicle that
you wish to check, set the wheel on the relevant signal as follows: (Italian law)
INTERNAL PANEL
GRADUATED WHEEL
WHEEL ON POSITION 1:
WHEEL ON POSITION 1,5:
For vehicles with a height from the ground to the center of the headlight up to 80 cm.
For vehicles with a height from the ground to the center of the headlight over 80 cm.
On some vehicles, next to the headlight, the manufacturer prints the correct inclination for the vehicle’s headlights. In this case, use the
indication given by the manufacturer.
Ex:
2%, set on position 2,0
CHECKING DIPPED HEADLIGHTS
Before carrying out tests on the headlights, CAREFULLY MAKE SURE THAT THE WATER LEVEL INSIDE THE OPTICAL BOX IS
PERFECLY LEVELLED.
If necessary, level the optical box as follows: open the clutch lever “L”, move the optical box until you reach a perfect levelling, then reclose the clutch lever.
A)
B)
C)
D)
Prepare the headlight beam setter and the vehicle as indicated above and switch on the dipped headlights: the projection of the
headlights will appear on the internal panel.
Check that this coincides with the line.
If necessary, use the headlights adjusting system to reach the desired result
In case of tests on asymmetrical headlights (which are mostly in use today) consider that their projection will also illuminate a
section on the right side of the panel with an angle of at least 15° with reference to the horizontal surface (in case of right-hand
drive vehicles, this section will be on the left side of the panel).
Just below the center, on the right, you can see a small area which is much more illuminated than the rest of the projection.
CORRECT PROJECTION ON THE PANEL–ASYMMETRICAL HEADLIGHTS
-9-
SYMMETRICAL HEADLIGHTS
In case of tests on symmetrical headlights, please consider that the projection on the panel will describe a perfectly horizontal line,
without angles.
SYMMETRICAL HEADLIGHT PROJECTION
FOG LIGHTS CAN BE ASYMMETRICAL OR SYMMETRICAL
INDEPENDENT MAIN HEADLIGHTS
In this case, a very bright area in the middle of the panel must appear.
CHECKING THE LIGHT INTENSITY OF THE HEADLIGHTS
-) Switch on the main headlight
-) Check the measured intensity on the luxmeter
READING ON A GRADUATED, DIGITAL OR WITH UNIFIED SCALE LUXMETER (see fig. 7 and 8)
According to the EEC/UN standards, the minimum lighting of dipped headlight must be 3,75 KLUX and the maximum must be 90
KLUX.
For the main headlight, the minimum lighting must be 20 KLUX and the maximum must be 150 KLUX
We recommend that you keep to the following table, which completes the EEC/UN indications.
MINIMUM ATTAINABLE VALUES:
3,75
20
30
40
KLUX
KLUX
KLUX
KLUX
Dipped headlights
For vehcles with standard main headlights
For vehicles with halogenous headlights type H4
For vehicles with halogenous headlights type H I and H3
All values are expressed in KLUX per 1 metre.
In case the above minimum values are not attained, faults on the vehicle electric installation may occur, such as a flat battery, a faulty
dynamo, a bad wire connection or wires with insufficient section, insufficient earth, faulty switch contacts, oxidized fuse contact points,
oxidized or corroded reflectors, blackened or clouded bulbs.
- 10 -
CHECKING THE LIGHT INTENSITY OF THE HEADLIGHTS
Once you have checked the inclination of the headlights, check the light intensity of both the dipped and the main headlight.
To carry out the tests, proceed as follows:
-) Switch on the main headlight
-) Press the LUX TEST button on the mark
-) Check the measured intensity on the luxmeter
Repeat the test with dipped headlight, press the LUX TEST button on
VALUES ACCORDING TO EEC/UN 20 STANDARDS
On the new generation of headlights, a manufacturer’s number is stamped on their glass.
This number shows the lightening the projectors must have according to the following table:
Ex.: (25): the headlight must have a minimum lightening of 108.17 - max. 126.2
The above values are lux at 25 mt. Use the conversion table (fig.3) if the instrument is calibrated in Klux or Kcandles at 1 mt.
OTHER CALIBRATIONS AND ADJUSTMENTS
The machine is equipped with a water level fixed on the bottom of the optical box which can be seen through the transparent panel,
when the highlight is on. To level the optical box, open the clutch lever on the side of the box and adjust the optical box until a
perfect levelling is reached, then re-close the clutch lever. This adjustment can be necessary everytime the work surface is changed.
The 3-wheel platform used with the optical pointing system is fitted with an eccentric screw adjustment mounted on the external
wheel; in case of adjustments, turn the eccentric screw to the desired direction. This operation is usually carried out by the
manufacturer and no further adjustment by the operator is required.
A correct use of the equipment allows to work for long periods without any interventions. Calibration of panel or luxmeter must be
carried out in our factory; in this case the customers has to send us the optical box only (it can be easily dismounted by removing the
screws).
CLEANING
When the instrument is not used we recommend to protect it from dust.
From time to time, pass a moistened rag on it to remove possible stains. The paint resists detergents. Do not oil the column when
using alcohol for removig stains on it. Do not leave the equipment in rooms with corrosives vapours, for example, areas for charging
batteries or varnishing areas.
DISPOSAL AND DEMOLITION
The machine includes:
-
Glass (lens)
Plastics (wheels, plexiglass cover, handle and other small parts)
Copper (wires and luxmeter bobbin).
Steel (structure and mechanisms) for a total of 85%
Paper and paperboard (operating manual, packing).
The machine is mostly made of steel; for its disposal, you should keep to yout local regulations.
- 11 -
TESTING MOPEDS AND MOTORCYCLES
1-POSITIONING THE VEHICLE
The motorvehicle must be positioned with its longitudinal axis perpendicular with the directional rails of the headlight beam setter, and
in any case parallel with the optical axis of the instrument; such a predisposition can be facilitated referring to a longitudinal strip on the
floor, which has to be perpendicular with the rails.
The motorvehicle must be empty, the ground flat and levelled, the tyres inflated at the recommended pressure; in case of air hydraulic
suspensions, they must be correctly adjusted.
2-POSITIONING THE HEADLIGHT BEAM SETTER
Once the motorvehicle has been placed in front of the beam setter, you can move the cross shifting system to take the beam setter on
the projector optical axis: on the optical control system for aligning the instrument axis with the vehicle longitudinal one, on the
horizontal aligning system to ensure the horizontality of the measuring box.
The distance between beam setter and headlight must be the same reported on the manual.
Align the optical center of the optical box lens with the headlight reference center. As far as possible measure the height from the floor
to the center of the headlight or set the optical box of the beam setter at the correspondant height referring to the graduated scale of
the unit.
For further adjustments refer to the operator’s manual supplied by the manufacturer.
3-HOW TO CARRY OUT THE TESTS
Once the alignment, horizontality, coaxiality and focusing have been achieved, you can check the following:
a) With the dipped headlight - check that
* The difference of value between the headlight center and light/shade demarcation line is at least = 10 cm at 10 meters
(downward inclination = 1%);
* The above difference of value is at least = 1/10 of the height of the headlight center from the ground (for headlights complying
with DGM standards);
* The deviation on the horizontal plane of the light beam do not represent a value higher than 1,5° on the screen outwards
(corresponding to about 1 cm on the screen);
b) With the main headlight – check that
* the center of light spot with highest light intensity is coaxial with the optical center of the instrument or displaced on the
horizontal and vertical plane for not more than 1,5° on the screen;
* The lightening of the main headlight, approved in compliance with the 97/24/CE directive and the DGM standard, is higher than
5000 lux for mopeds and between 20000 lux and 150000 lux at 1 meter for motorcycles and tricycles.
*In case of two main headlights- check that the light spots with highest light intensity are symmetrical with the instrument screen
center.
THE IDENTIFICATION PLATE IS MADE OF SELF-ADHESIVE FILM (VYNIL AND “DESTROYABLE” PAPER) POSITIONED ON THE
BACK OF THE EQUIMENT.
- 12 -
ENVIRONMENTAL INFORMATION
Following disposal procedure shall be exclusively applied to the machines having the
crossed-out bin symbol on their data plate
This product may contain substances that can be hazardous to the environment or to
human health if it is not disposed of properly.
We therefore provide you with the following information to prevent releases of these
substances and to improve the use of natural resources.
Electrical and electronic equipments should never be disposed of in
the usual municipal waste but must be separately collected for their
proper treatment.
The crossed-out bin symbol, placed on the product and in this page,
remind you of the need to dispose of properly the product at the end of
its life.
In this way it is possible to prevent that a not specific treatment of the
substances contained in these products, or their improper use, or
improper use of their parts may be hazardous to the environment or to
human health.
Furthermore this helps to recover, recycle and reuse many of the
materials used in these products.
For this purpose the electrical and electronic equipment producers and distributors set up proper
collection and treatment systems for these products.
At the end of life your product contact your distributor to have information on the collection
arrangements.
When buying this new product your distributor will also inform you of the possibility to
return free of charge another end of life equipment as long as it is of equivalent type and
has fulfilled the same functions as the supplied equipment.
- 13 -
EC statement of conformity
We Autec-VLT Automotive Equipment, Vlasakker 11 – 3417 XT Montfoort Netherlands,
do hereby declare, that the product
HEADLIGHT BEAM SETTERS
Autest SLALA-L80N – SLASLA-D200 – SLASLA-T200wP
T200wP – SLASLA-TPRO
to which statement refers, conforms to the following standards or to other regulatory
documents:
- EN ISO 12100-1; EN ISO 12100-2
- EN 60204-1
with reference to directives
- 2006/42/CE
- 2006/95/CE of 16/01/07
- 2004/108/CE
Montfoort, 25/08/2010
Th. van Leeuwen
managing director
IMPORTANT: The EEC Conformity Declaration is cancelled if the machine is not
used
exclusively
with
original
accessories
and/or
in
observance
of the instructions contained in the User's manual.
The form of this statement conforms to EN 45014 specification
NOTE
- 15 -
Engineered by GAMAR S.r.l.
for
Autec-VLT Automotive Equipment
Vlasakker 11
3417XT MONTFOORT – The Netherlands
Tel. +31 (0)348 477000
www.autec.nl
The reproduction and spreading of this publication without authorization is forbidden.
Autec-VLT Automotive Equipment defends its legal rights.