1
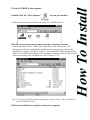
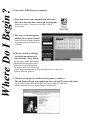
MMC 101
July 2000
Television
A HANDS-ON
USER GUIDE
FOR ELECTRONIC
SERVICE
INFORMATION
MMC 101
Internet
Explorer
July 2000
Television
SERVICE
DATA
ELECTRONIC SERVICE INFORMATION
Includes
®
Microsoft ®
Microsoft and the Microsoft Internet
Explorer logo are registered trademarks
or trademarks of Microsoft Corporation in
the United States and/or other countries.
SERVICE
DATA
P ROS CAN
Copyright 2000 Thomson Consumer Electronics
Copyright 1996-2000 Minds-Edge Computer Design, Inc.
All Rights Reserved
ELECTRONIC SERVICE INFORMATION
s
osoft ®
nternet
plorer
Microsoft and the Microsoft Internet
Explorer logo are registered trademarks
or trademarks of Microsoft Corporation in
he United States and/or other countries.
®
P R O S CAN
Copyright 2000 Thomson Consumer Electronics
Copyright 1996-2000 Minds-Edge Computer Design, Inc.
Introduction
Welcome to Thomson’s Electronic Service Information (ESI) system.
The ESI system is a group of software programs that will communicate all of
the necessary technical and administrative information that you need to
service Thomson Consumer Electronics products. ESI was designed to help
you.Yes, you.
The ESI system uses two different CD-ROM’s to pass important service
information to you. The first is ESI Monthly. This CD includes the latest
warranty, parts, and model cross-reference information. Monthly CD’s also
contain current administrative information. To keep information current, a
revised CD will be mailed monthly and the previous month’s CD should be
discarded.
The second CD is ESI Service Data. This CD is an easy-to-use portable
service manual. Yes an entire service manual is compressed onto a single
CD-ROM. With this CD, you will be able to do everything you did with a
paper manual except faster and easier. This CD will only be updated if
changes occur to the chassis or new information is needed to service the
instrument. Only discard this CD when a new CD is received.
Viewing Schematics and Circuit Boards
You can use ESI to review schematics and circuit boards. Not only can you view,
but also zoom and pan across the schematic. Schematics can also be printed.
Looking up parts on the fly
No more flipping through pages and pages of parts lists. Simply click on a
symbol number in a schematic and let ESI find the right part for you.
Doing your job easier
Tired of dragging and storing service manuals? ESI will lighten your load
and help you do your job faster.
Basic Fetures
The ESI Service Data CD-ROM offers many features that will help you do
your job easier. All the information needed to repair a Thomson product is
on this CD-ROM.This includes schematics, parts lists, alignment procedures,
technical bulletins and the user manual.
Not On My Machine
ESI Service Data uses the latest in technology.
We have chosen Microsoft Internet Explorer 5.0 to display our information
to you.
Why Internet Explorer 5.0?
We don’t want to bore you with all the techno-babble, but IE 5.0 allows us
to do more for you in the future. Eventually, we will be able to use smarter
technology that allows us to meet your needs better and faster.
I already have Netscape on my computer and I like it just fine.
Great, we use Netscape as well, just not for this program.You can run both
programs on your machine without any problem. Simply, check NO when
your computer prompts you to select IE 5.0 as your default browser.
2. Double-click the “My Computer”
icon on your desktop.
Double-click on the selection that has an image of a CD-ROM next to it.
3. On the screen you will be presented with the CD-ROM’s contents.
How To Install
1. Put the CD-ROM in the computer.
Double-click on the “IE5.01” folder. Then double-click on the “IE5setup.exe” file.
The program will walk you through the installation process step-by-step. Once the IE4
installation is complete, click on the “Setup.exe” file to install ESI. Follow the instructions
on the screen to finish the installation. Once installation is complete, click the “Back” button
to the root directory of the CD-ROM to go to the “Setup.exe” file.
Tip: To view more in-depth installation information, simply click on “ESI_Installation.txt”
in the CD-ROM’s directory.
4. When the installation is complete restart your computer..
Where Do I Begin?
1. Leave the CD-ROM in your computer.
2. When you restart your computer, you will notice
that a new icon has been created for the program.
Double click on the “Thomson Service Data” icon on
your desktop.
3. The next screen that appears
will ask you to select a model.
These selections are model numbers
of the units that are included on the
CD-ROM.
4. Choose a model by clicking
on it with your mouse and
then click the “Start” button.
By selecting a model, ESI will pull
information for that model only. If
you need to look up information
for another model, you will need to
exit the program and double click on the Thomson Service Data icon
again to restart the program.
5. The next screen you see will have three frames or windows.
The top frame tells you what model you have selected.The lower left frame
allows you to navigate through the Table of Contents, while the right frame
provides general overviews of each Table of Contents topic.
1. Easy-to-use Menu System
Simply point and click to view the information you need. ESI
Service Data uses a menu system that operates like the Internet.
From the table of contents different pieces of service information can
be found and displayed by simply pointing and clicking with the
mouse. For example, to view a schematic click on the “Schematic
Index” topic. The right-hand frame will switch to the schematic index.
Now select the schematic you would like to view from the list and the
ESI system will display that schematic on the computer monitor. The
same point and click technique can be used to view all the
information on the Service Data CD.
2. Simple Pan and Zoom
Once a schematic is displayed, use the mouse or the keyboard to zoom
in on an area or pan around the schematic. To zoom, press and hold the
left mouse button while moving the mouse. This draws a square around the area
you want to zoom in on. Release the left mouse button and the viewer
will display the area within the square. Naturally, the smaller the box the
closer the viewer zooms in. To use the zoom feature with the keyboard use
the + or - keys to zoom in or zoom out
To pan (or move) around a schematic use the right mouse button.
Position the cursor over the area you would like to move, this is the
starting point. Press and hold the right mouse button. Now move the
mouse the direction distance you want to pan. The arrow keys on the keyboard
can also be used to pan or move a schematic.
Top 5 Features
So it’s not as exciting as David Letterman’s Top Ten, but we are working on
it. Here are ESI’s coolest timesaving features.
Top 5 Features
3. Built-in Jumps to circuit board views, parts lists,
waveforms, and other schematics
The schematic viewer contains hotspots. Hotspots are areas on a drawing
(or documents) that can provide links to other information. There are
two types of hotspots (these are links and notes). As the mouse cursor
moves around the schematic, it will change to either the word “link” or
“note” as a hotspot is passed over. To activate the hotspot, click the left
mouse button as it passes over the hotspot. Links jump the viewer to the
parts list, circuit board views, and other schematics. Notes are used for
waveforms, voltage charts, and additional information.
4. Everything is Printable
Imagine being able to print full sized schematic on a normal printer,
Thomson’s ESI Service Data can do just that. By spreading a drawing
across several small pages, ESI Service Data will print a readable copy on
a normal printer (Dot Matrix, Laser, Bubble, etc). To do this, click the
printer button on the toolbar. When prompted, select one, two, or four
pages (two pages print the best for most of Thomson schematics). Not
only are schematics printable, but also alignments, disassembly procedures,
instruction books, and training information.
5. Electronic Part list
If no other feature impresses you this one will. The parts list helps you to
look up the correct part. It does this by only showing the parts used in
the instrument your working on. Part numbers are displayed by either
jumping to it from a schematic or searching for a part by the symbol
number. Display bulletins or parts notes by clicking on the bulletin or
notes button on the parts list menu. Need to locate a component on a
circuit board or schematic? The parts list can link you to both.
TIP: Learn more about the Automan Document Viewer by reading the Contents selection
under the Help menu pull-down.
With the AutoMan Document Viewer you won’t have to memorize a new set of pull-down
menus. All your tools are just a click away. AutoMan Document Viewer allows you
to view schematics and circuit boards and zoom in on problem areas.
1
2
3
4
5
6
7
8
9
10
11
12 13 14 15 16 17
1. Open an existing document – allows you to open a document on your computer
or on a disc (this function is not needed with TCE & ESI)
2. Close – lets you close out of the screen you are currently viewing.
3. Previous Open File – navigate back to the last file you viewed.
4. Print – print the screen
5. Hot Spots Off – turn off links to other pages for a better view
6. Hot Spots On – turn on links to find more information
7. Hot Spots Displayed – display all links for better navigation
8. Redraw – redraw schematics on the fly
9. Add Marker – use a marker to highlight areas on the screen
10. Edit Markers – edit highlighted areas on the screen
11. Activate Flood Fill – mark copper traces and circuit board views
12. Zoom Out – step back from the screen at the tap of a button
13. Previous View – return to the last way the document was viewed
14. Next View – navigate to the next screen
15. Go to Named View – choose your own view
16. Full View – view the entire schematic
17. Help Topics – learn the program
18. Interactive Help – click on the button and use your mouse to seek help
Keyboard Navigation
Function keys will let you perform functions at the touch of a button.
Arrow Keys - Pan or move Up, Down, Left or Right
+ Key - Zoom In
- Key - Zoom Out
F5 – return to table of contents
F6 – open parts list
F7 – make notes in a word processing document
F8 - program this button to do any function you desire
18
Navigating the CD- ROM
AutoMan Document Viewer
Navigating the CD- ROM
Adobe Acrobat
Tip: Check out the Acrobat Reader Online Guide under the Help menu.
Adobe Acrobat is used to view PDF files. PDF files are portable document
files that we use to view alignment procedures, training materials, and all
other normal size (8 1 /2 211) pages.
1
2
3 4
5
6
7
8
9 10
Tool bar
1. Visit Adobe on the World Wide web
2. Open
3. Open Web Page
4. Save
5. Print
6. Show/Hide Navigation Pane
7. First Page
8. Previous Page
9. Next Page
10. Last Page
11. Go to Previous View
12. Go to Next View
13. Actual Size
14. Fit in Window
15. Fit Width
16. Rotate View 90 CW
17. Rotate View 90 CCW
18. Find
19. Search
20. Search Results
21. Previous Highlight
22. Next Highlight
Keyboard Commands
Right Arrow + Shift Scrolls page to the right
Left Arrow + Shift Scrolls page to the left
Up Arrow + Shift Scrolls page up
Down Arrow + Shift Scrolls page down
Ctrl + 1 Go to first page
Ctrl + 2 Go to previous page
Ctrl + 3 Go to next page
Ctrl + 4 Go to last page
End key Go to last page
Ctrl + P Print
11 12
13 14 15 16 17
18 19 20 21 22
Frequently Asked Questions
Electronic Service Information (ESI) FAQ’s
Q. After installing the program and upon my first attempt to run
it, I get a message that says that I am attempting to run an
unsupported application?
A. You have overlooked or were unsuccessful in installing either the Internet
Explorer or Adobe Acrobat programs. Search your hard drive for
Iexplore.exe and Acroread.exe to determine which application is missing
and install it from the CD.
Q. The program gives me a general protection fault when I print a
schematic, why?
A. AutoMan defaults to print the schematic to one page when you use the
printer icon.To correct this, go to the toolbar and select file then print
setup and change the orientation to landscape. Then go back to file and
select print and on the CAD Document Print dialog select 2 pages then
press on OK.The Print dialog then opens, press OK to send the print
job to your printer.
Q. Do I need access to the Internet to run ESI?
A. No, ESI is reading directly from the CD. Internet connection is not
required.
Q. Is Windows 95 required to run ESI?
A. At present Windows 95 is required to run all Tech Aid software with the
exception of Chipper Check.
Q. Can I use another browser, for example Netscape to run ESI?
A. No, although Internet Explorer does not have to be your default
browser, it is required and your computer will allow the installation of
more than one Internet browser program.
Frequently Asked Questions
Q. I keep getting an error code when I try to use ESI Data.
What do I need to do to get the system running again?
A. You need to uninstall and then Reinstall the software. First
it may be necessary to delete the “ESDStart.ini” file. This
file is located in the “Windows” directory.
Q.
Do I need to keep the old versions of the solftware on
my computer?
A. No. Delete the older versions of the software from your
computer. To remove the old version of the software. go to
“Add/Remove Programs” under Control Panel.
PRINTED IN USA
T-ESI-2


![3 Janela do ESI[tronic]](http://vs1.manualzilla.com/store/data/006056768_1-d0b5f68eb94df67d86abc425e279ce6e-150x150.png)