1
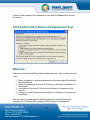
Once you enter the merge codes click Next. The wizard moves to the Export tab.
Step 5: Export to File
Choose a location and name for the file you are going to export to. The file
normally has a .jbs extension. Once you have chosen a file, click Finish, and the
data will be exported.
Once Print Audit creates the exported file you can move it and copy it like any
other file. You can e-mail it to someone, upload it to an FTP site, or copy it to
another computer on your network.
Setting up Scheduled Exports
To set up scheduled imports, the wizard guides you through the following 5
steps. Please note that there are additional requirements to set scheduled
imports and exports.
Step 1: Start
Select Setup Scheduled Exports and click Next. The wizard moves to the
Database tab.
Step 2: Export From Database
Review the currently selected database. The Wizard exports the jobs from this
database. If you want to export data from a different database, click Change
Database. Once you are satisfied with your database selection click Next. The
wizard moves to the Export Settings tab.
Step 3: Job Export Settings
Click Export Jobs Only to export only job data from the database or click
Export Jobs and Custom Fields to export job and custom field information.
Click Export New Jobs to export jobs printed since the last time you exported
jobs or click Export All Jobs in Database to export all of the jobs.
Once you have made your choices, click Next. The wizard moves to the Merge
codes tab.
94