1
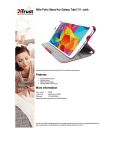
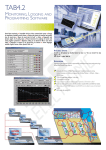
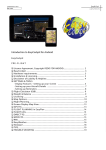
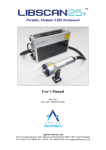
Channel Setup User Manual
Channel Setup
User Manual
INTRODUCTION .................................................................................................................................................................................................. 2
CREATING AND CONFIGURING CHANNELS .................................................................................................................................................... 3
CREATE A NEW CHANNEL ............................................................................................................................................................................................3
CONFIGURING A CHANNEL ...........................................................................................................................................................................................4
Tab1—General ........................................................................................................................................................................................... 5
TAB2—Automation and Notification ....................................................................................................................................................... 6
TAB4—Output Format................................................................................................................................................................................ 8
TAB5—Output Attributes ......................................................................................................................................................................... 10
TAB6—Filter Tab ........................................................................................................................................................................................ 11
TAB7—Delivery Protocol .......................................................................................................................................................................... 13
TAB8—Roles............................................................................................................................................................................................... 14
RETURNING TO THE CHANNEL SETUP MENU ...................................................................................................................................................................15
Testing Your Results .................................................................................................................................................................................. 15
Channel Setup User Manual
Introduction
CommerceHub’s Catalog Master solution enables suppliers to transmit product content to their retail partners through a webbased application.
This document describes how to configure Catalog Master to create the individual points of communication with your retail
partners. To begin, we introduce several important Catalog Master concepts.
Products
Individual SKU records that are stored in Catalogs.
Taxonomy
Defines the structure of the catalog in terms of Categories and Attributes. For example, Fillpoint has a catalog,
FillpointMaster, that holds all of your products. FillpointMaster has several taxonomies that offer varying views into
the products in the catalog. For each taxonomy, the products are classified differently; the distinct features of a
product are described by its attributes
Category
Classification of a product
Attribute
Description of a product
Channel
Transmits catalogs between a supplier and a single retailer. Three steps are required for proper catalog
transmission: Preparation, Approval, and Delivery.
1. Preparation
The preparation stage creates a file that contains the products of a single catalog.
2. Approval
The approval stage declares that the file is in the correct format.
3. Delivery
The delivery stage sends the file to the retailer.
Depending on how you configure the channel, the steps can occur either automatically or manually—it’s your
choice. The remainder of this document describes how to create and configure channels.
© 2003 CommerceHub®
Page 2
Channel Setup User Manual
Creating and Configuring Channels
Figure 1 shows the home page of the Channel Setup section. You navigate here by clicking on the Channel Setup link on the
navigation menu on the left side of the screen. From here you see a list of your current channels. You have the ability to create
a new channel or modify the Properties of an existing channel. (A channel’s properties determine its behavior.)
Figure 1—Channel Setup
Create A New Channel
To create a new channel, click on the New Channel button at the top of the screen.
Page 3
© 2003 CommerceHub®
Channel Setup User Manual
Configuring a Channel
To configure a channel you need to fill out eight tabs of properties.
Figure 2—General Properties
© 2003 CommerceHub®
Page 4
Channel Setup User Manual
TAB1—GENERAL
The first tab is the General tab, that is used to configure the following properties:
•
•
•
•
Channel Name
The name of the channel. Use the format: Fillpoint<Retailer Name>
Catalog
A channel exports products from a single catalog; here you must choose the catalog that the new channel will use.
Description
Enter a description of the channel so that other people will understand its purpose.
File Name
You have two choices for the name of the file that the channel will create: Default or Custom.
The Default filename is created by the system and uniquely identifies the output file.
The Custom filename depends on the requirements of your retail partner. For example, if the partner wants a file
of the form: Fillpoint<Day of the Week>. You can use the Expression Builder to create the custom name.
•
•
•
Content
You must choose whether you want to export the entire catalog as-is (Full) or just the changes from the last time
that you executed the channel (Delta).
Products Version
You must choose whether you want to export all approved products, or only the products that are contained in the
last sealed version of a catalog.
Zip File
If you choose this option, the file created by the channel will be contained in a WinZip archive – only select this
option when your retail partner asked for it.
When you’re finished with the General properties, click on the next tab: Automation and Notification.
Page 5
© 2003 CommerceHub®
Channel Setup User Manual
TAB2—AUTOMATION AND NOTIFICATION
Figure 3—Automation & Notification Properties
© 2003 CommerceHub®
Page 6
Channel Setup User Manual
Automation and notification configures parameters dealing with when and how files are prepared and delivered.
•
Prepare Delivery File
As described earlier, there are three steps in the transmission of catalog data through a channel: Prepare, Approve
and Delivery. You must first determine how you want to prepare the channel. You have three choices: Manually,
Immediately after sealing the catalog, and Scheduled.
Use manual preparation for channels that will be executed intermittently.
Use scheduled preparation for channels that will be executed on a regular basis. Click on the blue triangle next
the Scheduled label to display the properties for the scheduled preparation. You must choose either Weekly or
Monthly, and the time of the day (in 24 hour time) that you want the channel to be prepared.
•
Approve File
After preparation, the channel must be approved. If you choose manual approval, you will have an activity in the
Catalog Activities report for the approval of the channel. Most of the time you will want to configure the approval
to be Immediately after preparing.
•
Delivery File
After approval, the channel must be delivered. Choose whether you want the delivery to happen automatically
after the approval, or if you want to do it manually. If you choose manually, you will have an activity in the
Catalog Activities report to deliver the file manually.
•
Notification Profile
You may select to have emails sent to you during the steps in the channel execution process. Determine your
needs and choose the appropriate selection.
When you have finished configuring the Automation and Notification properties, click on the Output Format tab.
Note: We are skipping the External Connector tab for now.
Page 7
© 2003 CommerceHub®
Channel Setup User Manual
TAB4—OUTPUT FORMAT
The Output Format tab controls the encoding and format of the files you send.
Figure 4—Output Format Properties
© 2003 CommerceHub®
Page 8
Channel Setup User Manual
• Encoding
Select the appropriate character encoding using the select box. For most partners, the default UTF-8 encoding is
correct.
• Format
You must also select the format of the underlying file (remember, in the end the channel exists to create files to send
to partners). Excel is likely the most common format. For Excel files, you must choose whether or not you want to
include column headers, and whether to include action attributes (Add, Chance, or Delete).
When you are finished with the Output Format properties, click on the Output Attributes tab.
Page 9
© 2003 CommerceHub®
Channel Setup User Manual
TAB5—OUTPUT ATTRIBUTES
The Output Attribute tab sets the columns that you want included in the channel’s output file as shown in Figure 5. You choose
a label for the column (Output Attribute Name) and select a catalog attribute that will be the value of the column for each
product (Catalog Attribute Name). You may also use the expression builder to create a calculated field name.
Figure 5—Output Attributes Properties
When you have completed building the columns of the output file, click on the Filter tab.
© 2003 CommerceHub®
Page 10
Channel Setup User Manual
TAB6—FILTER TAB
The Filter tab allows you to create a filter that will export only a subset of the products contained in a catalog. The subset is
created by one of four ways: Item List, Search Rule, Classification, or Filtered Criteria.
Figure 6—Filter Properties
Page 11
© 2003 CommerceHub®
Channel Setup User Manual
•
Item List
Catalog Master allows you to create a list of products called an Item List. You may choose to create a filter that
only exports products contained in the Item List by select the From Item List radio button, and then choosing the
appropriate Item List.
•
Search Rule
Search Rules are defined by saving search criteria from catalog searches. If you have created such a rule, you may
create a filter based on the rule by selecting the Use Search Rule radio button, and then choosing the appropriate
search rule.
•
Classification
If you wish, you can create a filter that only exports products that are contained within a certain category. To do
so, choose the Products Classified To radio button, select the appropriate taxonomy, and then select the category
that you want to use in the filter.
•
Filtered Criteria
The Filtered Criteria option allows you to use the expression builder to create a logical expression to filter products.
For example, the expression in Figure 6 will only export products that are active and have a Last_Changed_Date
greater than August 1st, 2003.
When you have completed configuring the filter properties, click on the Delivery Protocol tab.
© 2003 CommerceHub®
Page 12
Channel Setup User Manual
TAB7—DELIVERY PROTOCOL
The Delivery Protocol specifies how you want the channel output file to get where you want it to go. You may select HTTP Post,
FTP, Email or File Drop. If you choose to email a file to a partner, you need to specify your own email address (Sender), the
recipient’s email address (Recipient), and optionally you may also select a Subject and a Message for the email.
Figure 7—Delivery Protocol Properties
When you have completed setting the delivery protocol attributes, click on the Roles tab.
Page 13
© 2003 CommerceHub®
Channel Setup User Manual
TAB8—ROLES
The Roles tab allows you to choose which sets of Catalog Master users will be able to view the channel (Channel Viewer), edit
the channel (Channel Manager), approve the channel (Channel Approver), and prepare the channel (Channel Operator). For
a more detailed explanation of each role, click on the name of the role to the left of each select box.
Figure 8—Roles Properties
In general, select the Catalog Manager group for all of the roles. Click the Save button when you are finished with the channel.
© 2003 CommerceHub®
Page 14
Channel Setup User Manual
Returning to the Channel Setup Menu
Click on the Channel Setup link shown in Figure 9 to return to the channel menu.
Figure 9—Channel Setup Link
TESTING YOUR RESULTS
After you create or edit a channel, make sure to test its results by clicking on the select box to the left of the channel’s name,
and then clicking on the Prepare button at the top of the screen as shown in Figure 10.
Figure 10—Channel Display
You can track the channel’s status through its steps by clicking on the running activities link on the left menu bar.
Page 15
© 2003 CommerceHub®