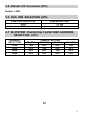
1
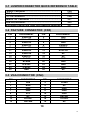
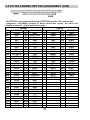
NC-830A PC/104 VGA Module
with Socket for DiskOnChip Flash Disk
USER’S MANUAL
COPYRIGHT NOTICE
This user’s manual list necessary information to assist both
Embedded Computer manufacturers and end users in installing and
setting up the system. The information contained in this user’s manual
is subject to change without any notice.
This manual is copyrighted 1999. You may not reproduce by any way.
ACKNOWLEDGEMENTS
All trademarks and registered trademarks which mentioned in this
manual are the property belongs to their respective owners.
1
1
TABLE OF CONTENTS
CHAPTER 1: INTRODUCTION
1-1
1-2
Specifications ---------------------------------------------------------Safety Precautions ---------------------------------------------------
4
4
CHAPTER 2: ALG 2032+ HIGH-PERFORMANCE VGA
2-1
2-2
2-3
Introduction-------------------------------------------------------------Technical Specifications-------------------------------------------Driver Installation------------------------------------------------------
6
7
7
CHAPTER 3: HARDWARE CONFIGURATION
3-1
3-2
3-3
3-4
3-5
3-6
3-7
3-8
Jumpers & Connectors Quick Reference Table ------Feature Connector -------------------------------------------------VGA Connector -----------------------------------------------------PC/104 Connector Pin Assignment -------------------------+5V OR +12V Select Connector ------------------------------VGA IRQ SELECTION -------------------------------------------M-System DiskOnChip Flash Disk Address Selection
Components/ Jumpers/ Connectors Locations ------
10
10
10
11
12
12
12
12
CHAPTER 4: DiskOnChip FLASH DISK SSD
4-1
4-2
4-3
Preface ----------------------------------------------------------------Quick Installation Guide ----------------------------------------Utility Reference ----------------------------------------------------
14
15
15
2
2
CHAPTER
INTRODUCTION
This chapter shows the information about NC-830 and its specifications.
Sections include:
* Specifications
* Safety precautions
3
3
1-1 SPECIFICATIONS
*VGA CHIP & FEATURES:
Realtek ALG 2032+ high-performance VGA single chip support up to
1024x768 in 16/256 Colors and 1280x1024 in 16 colors noninterlaced.
The chip build in advanced form of video acceleration consisting of
color space conversion and XY scaling. Color space conversion
convert YUV to RGB data for software MPEG and AVI playback
usage,
it also allows true color 1024x768 just using 1MB, but other brand
need
4MB. XY scaling allows images to be scaled to full screen up to 30
pfs.
This scaling technology allows images to be scaled to full screen
with
no performance degradation while being displayed in true-color.
*MEMORY:
On Board 1MB or 2MB Display Memory.
*BUS EXPANSION SUPPORT:
PC/104 Bus.
*STORAGE TEMPERATURE:
-40℃ TO 80℃.
*OPERATING TEMPERATURE:
0℃ TO 60℃.
*SYSTEM POWER REQUIREMENT:
DC Voltage: +5V, minimum +4.75V, maximum 5.25V.
*BOARD DIMENSION:
3.45”(L) X 3.78”(W) (90mm x 96mm)
* OPTIONS:
32-pin socket for M-System DiskOnChip Flash Disk
4
4
1-2 SAFETY PRECAUTIONS
Follow the messages below to avoid your system from damage:
1. Avoid your system from static electric power on all occasions.
2. Stay safe from the electronic shock. Don’t touch any components of
this card when the power is ON. Always disconnect power when the
system is not in use.
3. Remove power when you change any hardware devices. For
instance,
when you connect a jumper or install any cards, a surge of power
may damage the electronic components or the whole system.
5
5
CHAPTER
* * * ALG 2032+ VGA * * *
This chapter shows the information about ALG 2032+ VGA functions.
Sections include:
* Introduction
* Technical Specifications
* Driver Installation
6
6
2-1 INTRODUCTION
The NC-830 building the ALG2032+ VGA Chips is a highly advanced
graphics and video processor that contains a fully integrated
RAMDAC and clock.
Built- in Video acceleration
The ALG2032+ includes an advanced form of video acceleration
consisting of color space conversion and scaling. Color space
conversion converts YUV to RGB data and is required for software
MPEG and AVI playback applications. The technology used in the
ALG2032+ allows true-color video in 1024x768 resolution with only
one megabyte of DRAM compared to the up to four megabyte of DRAM
required by competing products.
To play up to 30 fps in full screen, the ALG2032+ uses an advanced XY
scaling technology. This scaling technology allows images to be
scaled to full screen with no performance degradation while being
displayed in true-color.
Window 95 Plug and Play
Using a Windows 95 system along with a DDC compatible monitor
assures complete plug and play operation. The ALG2032+
automatically detects the monitor type and sets the maximum refresh
rate allowed ensuring the user of a flicker free display and simplifies
integration of the graphics subsystem.
Hardware Features
l
l
l
l
l
l
l
l
l
Integrated RAMDAC 4, 8, 16, 24 bit-per-pixel graphics
Integrated Clock Full 256 Windows ROPS Support
Integrated 32K BIOS Rectangle BitBlt
160 Pin Package Rectangle Fill and Copy
512K to 1 MB Support Monochrome Color Expansion
Green PC Support Display List Polly Line
Plug and Play Hardware Cursor
Windows Mask Map
ISA-Bus Compatibility
7
7
2-2 TECHNICAL SPECIFICATIONS
Resolution
1280x1024
1024x768
1024x768
800x600
800x600
800x600
640x480
640x480
640x480
640x480
Colors
16
16
256
16
256
64K
16
256
64K
16.7M
Vertical Refresh (Hz)
43I
75
75
75
75
60
75
75
75
60
Mode
Non-Interlaced
Non-Interlaced
Non-Interlaced
Non-Interlaced
Non-Interlaced
Non-Interlaced
Non-Interlaced
Non-Interlaced
Non-Interlaced
Non-Interlaced
2-3 DRIVER INSTALLATION
Software support/application Drivers for:
l Windows 3.1/ 95 / NT
l ADI 4.2
Please find all information about Driver installation from
‘NCreadme.txt’ root directory from the diskette / CD-ROM included with
the board.
8
8
CHAPTER
HARDWARE CONFIGURATION
This chapter shows you the connectors & jumper settings, and
components’ locations.
Sections include:
* Jumper/Connector Quick Reference Table
* Components’ Locations
* Configuration and Jumper settings
* Connector Pin Assignments
9
9
3-1 JUMPER/CONNECTOR QUICK REFERENCE TABLE
Feature Connector...........................................……………
VGA Connector.……………………………………………..
PC/104 Connector…………………………………………..
Default +5V Connector ……….……………………………
VGA IRQ Selection………………………………….………
M-System DiskOnChip Flash Disk Address Selection
CN3
CN4
CN5
JP1
JP5
JP7
3-2 FEATURE CONNECTOR (CN3)
PIN
1
3
5
7
9
11
13
15
17
19
21
23
25
ASSIGNMENT
Video D0
Video D1
Video D2
Video D3
Video D4
Video D5
Video D6
Video D7
CLOCK
BLANK
H-SYNC
V-SYNC
GND
PIN
2
4
6
8
10
12
14
16
18
20
22
24
26
ASSIGNMENT
GND
GND
GND
EVIDEO
ESYNC
EVDCLK
NC
NC
GND
GND
GND
GND
NC
3-3 VGA CONNECTOR (CN4)
PIN
1
3
5
7
9
11
13
15
ASSIGNMENT
Red
Blue
GND
GND
VCC
NC
H-SYNC
DACWR
PIN
2
4
6
8
10
12
14
16
ASSIGNMENT
Green
NC
GND
GND
GND
DACRD
V-SYNC
NC
10
10
3-4 PC/104 CONNECTOR PIN ASSIGNMENT (CN5)
The PC/104 can support multi-pieces of PC/104 modules. This card has two
connectors: one(104AB) consists of 64-pin dual-in-line header, the other one
(104CD) consists of 40-pin dual-in-line header.
104AB
104CD
PIN ASSIGNMENT PIN ASSIGNMENT PIN ASSIGNMENT
A1
IOCHK
B1
GND
C1
GND
A2
SD7
B2
RESETDRV C2
SBHE
A3
SD6
B3
VCC
C3
LA23
A4
SD5
B4
IRQ9
C4
LA22
A5
SD4
B5
-5V
C5
LA21
A6
SD3
B6
DRQ2
C6
LA20
A7
SD2
B7
-12V
C7
LA19
A8
SD1
B8
0WS
C8
LA18
A9
SD0
B9
+12V
C9
LA17
A10
IOCHRDY
B10
GND
C10
MEMR
A11
AEN
B11
SMEMW
C11
MEMW
A12
SA19
B12
SMEMR
C12
SD8
A13
SA18
B13
IOW
C13
SD9
A14
SA17
B14
IOR
C14
SD10
A15
SA16
B15
DACK3
C15
SD11
A16
SA15
B16
DRQ3
C16
SD12
A17
SA14
B17
DACK1
C17
SD13
A18
SA13
B18
DRQ1
C18
SD14
A19
SA12
B19
REFRESH
C19
SD15
A20
SA11
B20
SYSCLK
C20
KEY PIN
A21
SA10
B21
IRQ7
A22
SA09
B22
IRQ6
A23
SA08
B23
IRQ5
A24
SA07
B24
IRQ4
A25
SA06
B25
IRQ3
A26
SA05
B26
DACK2
A27
SA04
B27
TC
A28
SA03
B28
BALE
A29
SA02
B29
VCC
A30
SA01
B30
OSC
A31
SA0
B31
GND
A32
GA0
B32
GND
PIN ASSIGNMENT
D1
GND
D2
MEMCS16
D3
IOCS16
D4
IRQ10
D5
IRQ11
D6
IRQ12
D7
IRQ15
D8
IRQ14
D9
DACK0
D10
DRQ0
D11
DACK5
D12
DRQ5
D13
DACK6
D14
DRQ6
D15
DACK7
D16
DRQ7
D17
VCC
D18
MASTER
D19
GND
D20
GND
11
11
3-5 Default +5V Connector (JP1)
Default 1-2ON.
3-6 VGA IRQ SELECTION (JP5)
FUNCTION SELECTION
IRQ9
IRQ7
JUMPER SETTING
1-2 ON
2-3 ON
3-7 M-SYSTEM DiskOnChip FLASH DISK ADDRESS
SELECTION (JP7)
ADDRESS
SELECTION
C000
C800
D000
D800
Pin 1& 2
ON
OFF
OFF
OFF
JUMPER SETTING
Pin 3& 4
Pin 5& 6
OFF
OFF
ON
OFF
OFF
ON
OFF
OFF
Pin 7& 8
OFF
OFF
OFF
ON
12
12
CHAPTER
DiskOnChip Flash Disk SSD
This chapter shows the information about M-System DiskOnChip SSD
functions.
Sections include:
* Preface
* Quick Installation Guide
* Utility Reference
13
13
4-1 Preface
The NC-830 features a 32-pin socket to support DiskOnChip Flash
Disk SSD function. The DiskOnChip can be build on board by order.
The NC-830 is designed to use the DiskOnChip single chip Flash Disk
to plug into a standard 32-pin socket which built on board. The
DiskOnChip Flash Disk should be mapped into an 8K Byte window in
the BIOS expansion address space of the NC-830 mini board which is
usually located between address 0C0-00H to 0D800H. The NC-830 can
contain the operating system in DiskOnChip to allow systems to boot
without a hard disk.
The DiskOnChip can install standard MS-DOS and the DOS can boot
from DiskOnChip, its command is fully DOS Command compatible,
such as Del, Deltree, Format, Copy, Xcopy, MD........, users can read
and write DOS Command or data to DiskOnChip same as using Hard
Disk Drive.
Users can take this DiskOnChip as physical HDD and its priority is
software selectable. For example, if system have one HDD, either HDD
& DiskOnChip could be assigned as C or D Drive. When having two
HDD (Drive C & Drive D), the DiskOnChip could be assigned as C, D, E
Drive. If the system don’t have HDD, the DiskOnChip will be taken as C
drive only. When it is taken as C drive, it can boot system just same as
using Hard Disk Drive.
The capacity of DiskOnChip have 2MB, 4MB, 8MB, 12MB, 24MB, 40MB
72MB and 144MB option.
The location for M-System DiskOnChip socket is U7.
14
14
4-2 Quick Installation Guide
1.Make sure the NC-830 mini board SBC is power OFF
2.Plug the DiskOnChip chip into socket U7. Verify the direction is
correct (pin1 of the DiskOnChip is aligned with pin1 of the U7
socket).
3.Power ON the system.
4.During Power ON, you may observe the message displayed by the
DiskOnChip SSD when its drivers will automatically loaded into the
system’s memory.
5.At this stage the DsikOnChip can be accessed as any disk in the
system.
6.If the DiskOnChip SSD is the only disk in the system, it will appear as
the first disk (drive C:).
7.If there are more disks besides DiskOnChip, the DiskOnChip will
appear by default as the last drive.
8.The DiskOnChip can be used immediately by “Format” procedure.
Warning:
Be careful when you " Format" DiskOnChip, don’t make wrong
format
to the HDD which you are using. It better to use Floppy Disk Drive to
" Format" the DiskOnChip. Make sure your DiskOnChip is C or D, E ,..
4-3 Utility Reference
If you need more information beside the diskette, please reach the MSystem web www.m-sys.com to get the detail information.
15
15