1
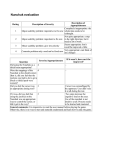
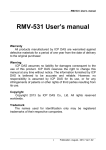
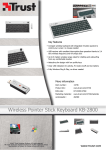
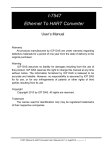
Georgia Institute of Technology
School of Electrical and
Computer Engineering
__________________________
User’s Manual
CP/IO System
__________________________
CP/IO Team Spring 09
CPIO System
______________________________________________________________________________________
Table of Contents
1. Overview………………………………………………………………......3
2. List of Components …………………………………………………….4
3. Requirements……………………………………………………………..7
4. Setting up the Hardware……………………..………………………..8
5. Setting up the Software……………………..………………………….10
6. Using the CPIO System……………………..………………………….11
7. Personalizing the System (Advanced) ……………………..……… 18
8. Troubleshooting……………………..………………………………….. 19
2
CPIO System
______________________________________________________________________________________
1. Overview
The purpose of this manual is to provide a step-by-step guide for setting up the CP/IO
system design for Cerebral Palsy patients. This system enables the patient to operate
certain features of a desktop computer, such as writing text files, sending and receiving
emails, and web browsing.
This manual uses font conventions and icons to facilitate its reading and location of
information. Words in italics represent titles or names of windows, menus, dialog boxes
and buttons seen on the screen. Words in boldface represent actions or keywords of a
step. An icon of an arrow ( ) represents a note for tips and extra information. An icon
of an exclamation mark inside a red triangle ( ) represents a warning the user should be
aware of.
3
CPIO System
______________________________________________________________________________________
2. List of Components
•
Foot Operated Device (FOD)
The user controls this device with his foot. It is operated by moving the platform
where the user’s foot rests from left to right.
The FOD is composed of a rotational foot platform and a clear-plastic enclosure, as
seen in the figure below.
Plastic
Enclosure
Foot
Platform
•
Nintendo Wii Remote
The Nintendo Wii Remote is a central piece for the system. The system uses any
commercial version of the Wii Remote, which can be found at any store with a video
games section (i.e. Walmart, BestBuy) or any electronics online store (i.e.
Amazon.com)
A picture of the Wii Remote can be seen below
4
CPIO System
______________________________________________________________________________________
•
Nintendo Wii Nunchuk
Nintendo’s Wii Nunchuk is an extension controller that connects to the Wii Remote.
It is used to perform the left-click action of a standard computer mouse. The system
uses any commercial version of the Nunchuk, which can be found at any store with a
video games section (i.e. Walmart, BestBuy) or any electronics online store (i.e.
Amazon.com). A picture of the Wii Nunchuk can be seen below.
•
Wii Remote battery adapter
In order to avoid changing batteries in the CPIO system, the Wii Remote uses a
battery adapter to get power from the user’s computer. The battery adapter is fixed to
the Wii Remote battery lid provided. Please always use this battery lid with any Wii
Remote. A picture of the battery adapter can be seen below.
•
Desk extension
The system uses a cylindrical extension that attaches to the desk where the user’s
computer is installed. This extension is used to hold the Wii Nunchuk on its free end.
The extension for this particular system is made of a 1 1/4“ PVC pipe covered with a
soft rubber material, and a 90-degree elbow at the end holding the Wii Nunchuk. The
extension is attached to the desk with four 1 1/2” plastic brackets.
5
CPIO System
______________________________________________________________________________________
Desk extension
90-deg elbow
Wii Nunchuk
•
Protection circuit
All the hardware used in this system is powered by the user’s computer via USB
ports. In order to protect the user’s computer from voltage spikes, the CPIO system
includes a protection circuit. The circuit can be seen in the figure below.
6
CPIO System
______________________________________________________________________________________
•
Software files
The CPIO system provides a number of software applications and programs that are
needed to perform functions such as writing letters, sending emails and browsing the
web. A compressed folder with the necessary files and programs may be downloaded
from the CPIO team’s website.
3. Requirements
In order to use the CPIO system, the user’s computer needs to support the following
features:
•
Microsoft Windows XP/Vista
The CPIO system has been designed to run in Microsoft Windows XP and Windows
Vista.
•
Bluetooth connectivity
The user’s computer needs to be able to connect to the Wii Remote via Bluetooth. In
this particular system, a Targus USB Bluetooth adapter has been connected to one of
the front USB ports of the user’s computer. The USB Bluetooth adapter can be seen
below.
•
Internet connectivity
Many of the software applications provided with this system make use of the Internet.
For example, the user will need to have Internet access in order to read/send emails
and surf the web. In this particular solution, a Netgear USB wireless Internet adapter
has been connected to one USB port in the back of the computer. A picture of the
wireless adapter can be seen below.
7
CPIO System
______________________________________________________________________________________
•
Windows 2003 Resource Kit
This software package is required for running the programs that initialize the CPIO
software environment. The Windows 2003 Resource Kit may be downloaded from
the following website:
http://technet.microsoft.com/en-us/windowsserver/bb405955.aspx
•
Microsoft .Net Framework 3.5
This software package is required for running the programs that allow the user to
operate the computer. Microsoft .Net Framework 3.5 may be downloaded from the
following website:
http://www.microsoft.com/downloads/details.aspx?FamilyId=333325FD-AE524E35-B531-508D977D32A6&displaylang=en
4. Setting up the hardware
The steps for connecting the hardware components of the system are shown below.
1) Gather the list of hardware components shown in Section 2 of this document.
2) If the Wii Remote has already been placed inside the plastic enclosure, skip to
Step 7. Otherwise, open the plastic enclosure by pulling on the knob located on
the top lid. The enclosure door will not open completely.
3) Place battery adapter into Wii Remote battery compartment. This can be done by
aligning the battery adapter to be parallel to the Wii Remote and then pushing the
battery lid until it snaps into place. One side of the battery lid might not snap; this
is normal and it will not interfere with the Wii Remote operation.
4) Slide the Wii Remote inside the enclosure, in between the four vertical standoffs.
Make sure that the “Wii” logo on the Wii Remote is facing up and is on the side
closer to the edge of the base of the FOD.
5) Press the Wii Remote down until it rests on the two plastic blocks attached to the
bottom of the enclosure. The top and bottom edges of the Wii Remote should be
aligned with the edges of these plastic blocks. Make sure the cable from the
battery adapter is not between the bottom plastic block and the Wii Remote.
6) Close the top lid of the plastic enclosure. Make sure that the “1” and “2” buttons
on the Wii Remote are being pushed by the rubber pieces attached to the top lid of
the plastic enclosure. If not, make the necessary adjustments so that they are being
securely pushed. A picture of the correct setting is shown next.
8
CPIO System
______________________________________________________________________________________
7) If the Wii Nunchuk has been already placed inside the desk extension, skip to
Step 10. Otherwise, slide the Nunchuk’s cable inside the cylindrical desk
extension and route it outside through the bottom hole on the desk extension.
8) Insert the Wii Nunchuk into the 90-deg elbow already attached to one end of the
desk extension. Make sure the Nunchuk’s joystick is facing towards the user. Use
the red spongy material included to secure the Wii Nunchuk inside the elbow.
9) Connect the Wii Nunchuk to the bottom connector of the Wii Remote. A picture
of the correct setting is shown below.
Desk extension
Spongy material
90-deg elbow
Wii Nunchuk
10) Gather all the cables included with the system. There should be four cables: Two
cables with a USB connector in one end, and two cables coming out of the
rotational foot platform and Wii Remote.
11) Locate the protection circuit. It might be hidden in a safe place or attached to the
desk via Velcro straps.
9
CPIO System
______________________________________________________________________________________
12) Connect the cables mentioned in Step 10 to the protection circuit. Note that the
circuit has four 2-pin connectors on each side. Also note that these pin connectors
are color coded. Identify the cable that connects to each connector on the circuit
by matching the colors of the smaller cables going into the 2-pin connector on
each of the four cables. For example, both USB cables have smaller red and black
cables on one end. Look for the connectors with red pins on the protection circuit
and connect the USB cables there. Make sure to also align the colored wire with
its corresponding colored pin on the circuit connector. A picture with the correct
setup is shown below.
USB cables
connect to red
pin connectors
Yellow and
purple cables
connect to its
corresponding
pin connector on
protection
circuit
Warning: The protection circuit contains electric-active components. To reduce the
risk of electric shock or malfunctioning of the system, please store the protection
circuit in a safe place away from the user.
13) Connect the two USB cables to the back of the computer.
14) Place the FOD in the floor, nearby the computer. Adjust its position depending on
the preferences of the user.
The hardware for the system has been completely setup. For information on how to setup the
software components, please refer to the next section.
5. Setting up the software
The steps for connecting the software components of the system are shown below.
1) Extract the contents of the compressed file (already downloaded from Section 2)
to the hard drive. Keep track of where the files are extracted.
2) A folder called CPIO Software Suite will be created at the directory. This will
contain all the necessary files.
3) Open the CPIO Software Suite folder.
10
CPIO System
______________________________________________________________________________________
4) Locate CPIO_launcher_shct file. Create a shortcut to it by right-clicking on it and
selecting create shortcut.
5) Copy the created shortcut to the startup folder of Window’s start menu.
6) Restart the computer. Every time the computer is rebooted the software suite will
open automatically.
Note: Make sure that all the hardware is properly connected and powered.
The Bluetooth and Internet connections must be enabled on the computer.
6. Using the CPIO system
The CPIO system offers the following five basic functionalities:
•
On-Screen Keyboard
•
Text Editor
•
Email Reader
•
Email Composer
•
Web Browser
Using the On-Screen Keyboard (OSK):
The on-screen keyboard is the first application the user will see on starting up the
application (Figure 1). The On-Screen Keyboard is controlled by two actions: 1) Scrolling from
left to right by using the FOD, and 2) Clicking by pulling the Nunchuk’s joystick up. Each time
the user clicks on a button in the bottom most
row, a submenu pops up on the row above it, and
the cursor automatically moves vertically to the
row above. To escape out of a menu row, the
user needs to click on the Esc button
corresponding to that row.
In order to aid the user in determining the
location of the cursor, whenever the cursor
Figure 1. The On-Screen Keyboard.
moves over a button it turns yellow. Also,
whenever the cursor reaches the extreme left or right of the screen, the cursor automatically
wraps around to the other edge of the screen.
11
CPIO System
______________________________________________________________________________________
The alphabet submenus, that contain the individual alphabet keys, have a Caps-lock key
in addition to a Space and Delete keys.
The Caps-lock key allows toggling the
case of characters. Once the Caps-lock key
is pressed it turns blue, and stays locked in
that state until it is clicked again (Fig. 2).
The Tab key is useful in text
editing as an indent key, and in the websurfing as a key to cycle through the
clickable links on a webpage.
Figure 2. Caps-Lock for changing case, and Esc
for going to previous menu.
Starting up an application:
To start an application, the
user should click on the ‘Other’
button on the far right of the OSK.
The submenu will contain the buttons
corresponding to the applications
(Figure 3).
Figure 3. List of Applications displayed on clicking ‘Othr’.
Using the Text Editor:
The Text Editor application allows the user to write text and save it to the hard drive for
reading from it at a later date. The entered text is read and saved to a file called Data.txt which is
located inside the Data Folder of the application folder. The user can either save the file
manually by clicking Save or let the application auto-save the text, which happens automatically
every five minutes. The name of the file, along with the time of last save is displayed on top, as
shown in Figure 4.
12
CPIO System
______________________________________________________________________________________
Figure 4. Text Editor Application displays time of last save along with name of saved file.
To start typing, click Esc to go down to the main alphabet menu. The arrow keys are provided in
the submenu to scroll through the text editor.
Using the Email Reader:
To use the Email Reader, the user’s computer should have installed the following:
1) MS Outlook installed and set up on the computer. For details please see the
SettingUpOutlook.doc help file.
2) ApplicationSettings.xml file located in the Data Folder of the application folder. The
program parses through this file to get the account settings (such as username, password,
SMTP server, etc.) for reading and writing emails. If this file is missing or corrupt, then
the program will show an error and exit the application.
3) Advanced Security for Outlook must be installed on the machine to bypass security
features of MS Outlook. Without this setup, the user will get security pop-ups whenever
he tries to read emails.
13
CPIO System
______________________________________________________________________________________
After starting up the Email Reader the user will get a blank form. The top sub-window is
used to display the contents of the inbox while the bottom sub-window displays the details of the
selected email. To refresh the contents of the inbox, click on Get New. At times there might be a
security warning from Advanced Security for Outlook similar to Figure 5. In such a case, choose
“Allow access” and check “Always perform this action for this file”. This is a temporary
behavior and will disappear as the system learns which files to grant access to.
Figure 5. Security pop-up on pressing Get New.
As the application connects to outlook and retrieves the emails off the internet, the user will
get an “Application Busy” message. Once this action is complete, the emails from the user’s
inbox will be displayed on the screen.
14
CPIO System
______________________________________________________________________________________
Clicking Select will display the contents of the currently highlighted email in the reading
pane (Figure 6).
Figure 6. Reading an email after clicking Select in the inbox view.
Only once an email has been selected, can the user use the Reply button to compose an email
back to the sender.
The Inbox and Reading Pane buttons are used to shift focus to inbox pane (top) and reader
pane (bottom) respectively.
Using the Email Composer:
In order to use the Email Composer, it is required to have the user account settings
mentioned in ApplicationSettings.xml.
Note: If ApplicationSettings.xml is not found in the Data folder, the
program will display an error and exit the application.
15
CPIO System
______________________________________________________________________________________
As shown in Fig. 7, the email
composer module has the following
four interactive fields:
•
To
•
From
•
Subject
•
Body
The buttons To, From, Subject and
Body are used to set the cursor
Figure 7. Click Send to send the composed email.
position to the corresponding fields.
The Clear button clears the contents of the field/box that is currently active.
The From field displays the default email address of the user (which is saved in
ApplicationSettings.xml) for the user’s ease. However, the user has the option to manual edit
this should the need arise.
Once the email is complete, click Send to submit the email. The user will get a
confirmation of whether the email is sent or not as shown in Figure 8.
Note: If sending an email fails, then most likely reasons would be malformed “From”
and “To” fields, or loss in internet connectivity.
Figure 8. EmailUsing
confirmation
clicking Send.
the Webon
Browser
16
CPIO System
______________________________________________________________________________________
The Web Browser application allows the user to surf simple web pages. On first start, a
webpage of a url that is part of the source code will open up as shown in figure 9.
Figure 9. Default Webpage on startup.
Note: Not all web pages will work with this Web Browser. Pages needing
third-party plug-ins like Flash might not show up correctly
The browser menu has the following buttons:
•
Home: This will take the user to the page that has been set up as the default
homepage in Internet Explorer on the same machine.
•
Enter URL: This changes focus to the website url field so that the user can enter
the web address of the destination address without the http://. Once the complete
URL has been entered, the user can click Go or Enter from the main menu to go
the specified website.
•
Go: Display the webpage of the entered address. This also changes the focus back
to the browser pane on top.
•
Back: Takes the user to the previous page.
•
Arror Keys: Are used for scrolling the webpage.
17
CPIO System
______________________________________________________________________________________
•
Tab Key: This key is found in the main menu on the bottom. When the web
browser is open, use the Tab key for cycling through the clickable links on the
current web page. On reaching the desired link, click Enter.
7. Personalizing the system (Advanced)
This section explains how to personalize certain features of the CPIO system, like
adjusting the scrolling speed and left and right thresholds.
Adjusting the scrolling speed
After having the computer initialized all the software, follow the steps shown below.
1)
2)
3)
4)
5)
6)
7)
8)
9)
Open the plastic enclosure where the Wii Remote is.
Press the Home button located at the middle of the Wii Remote.
Close the On-Screen Keyboard application.
Select the GlovePIE application opened in the Windows Taskbar.
Locate this line in the code:
var.sensitivity = 250 ms
Change the value of the var.sensitivity variable to an appropriate value in
milliseconds. The lower the value, the faster the cursor will move.
Save the file by selecting File>Save.
Close GlovePIE.
Restart the computer or double click the CPIO Software Suite shortcut located in
Window’s Desktop.
Adjusting left and right thresholds
Similarly to adjusting the scrolling speed, follow the steps shown below.
1)
2)
3)
4)
5)
6)
7)
8)
9)
Open the plastic enclosure where the Wii Remote is.
Press the Home button located at the middle of the Wii Remote.
Close the On-Screen Keyboard application.
Select the GlovePIE application opened in the Windows Taskbar.
Locate these two lines in the code:
var.leftThreshold = 900
var.rightThreshold = 375
Change the values of the var.leftThreshold and var.rightThreshold variables to an
appropriate value. Values closer to 500 will shorten the swing range, and values
away from 500 will increase the swing range.
Save the file by selecting File>Save.
Close GlovePIE.
Restart the computer or double click the CPIO Software Suite shortcut located in
Window’s Desktop.
18
CPIO System
______________________________________________________________________________________
8. Troubleshooting
When the computer starts, I get a message saying “No Wimotes were
found” and nothing starts up.
Check that the Bluetooth connectivity is enabled in the computer. This includes
checking that the Bluetooth adapter is connected in case the computer uses one. If this
is the case, try unplugging and plugging the Bluetooth adapter. Restart the system.
I do not see any messages in my inbox when I start the Email Reader.
Make sure that the Internet connectivity is enabled in the computer. This includes
checking that the Wireless Internet adapter is connected. Try unplugging and
plugging the Wireless Internet adapter. Restart the system.
No web pages are shown when I try to use the Web Browser.
Refer to the steps shown previously for “I do not see any messages in my inbox
when I start the Email Reader.”
Everything loads fine, but I cannot scroll on the screen, even when I
operate the FOD with my foot.
Check that the power connections are connected correctly. Please refer to Section 4
on Setting up the Hardware.
The scrolling works, but the clicking does not.
Check that all power connections are connected correctly. Also check that the
Nunchuk is connected to the Wii Remote. Please refer to Section 4 on Setting up the
Hardware.
Everything was working fine but the system hanged up.
Restart the system.
19