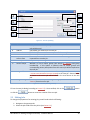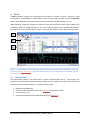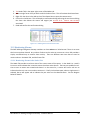
1
Building Intelligence Gateway
RS-1095 Rev 2
Software Manual
SMT Research Ltd.
1 Contents
1
Contents ................................................................................................................................................ 2
2
Introduction .......................................................................................................................................... 5
3
System Requirements ........................................................................................................................... 6
4
5
6
3.1
Internet Connectivity .................................................................................................................... 6
3.2
Power Settings .............................................................................................................................. 6
3.3
Application Event Log ................................................................................................................... 6
3.4
Background Processes and Automatic Updaters .......................................................................... 7
User Interface ....................................................................................................................................... 9
4.1
The Nodes Tab ............................................................................................................................ 11
4.2
The Events Tab ............................................................................................................................ 14
4.3
The Devices Tab .......................................................................................................................... 14
4.4
The Devices Tab .......................................................................................................................... 15
4.5
The Jobs Tab ................................................................................................................................ 16
Jobs ..................................................................................................................................................... 18
5.1
Adding Jobs ................................................................................................................................. 18
5.2
Editing Jobs ................................................................................................................................. 19
5.3
Deleting Job(s)............................................................................................................................. 20
5.4
Activating Jobs ............................................................................................................................ 21
5.5
Copying and Pasting Jobs ............................................................................................................ 21
Nodes .................................................................................................................................................. 23
6.1
Adding Nodes .............................................................................................................................. 23
6.2
Renaming Nodes ......................................................................................................................... 24
6.3
Mailbox Messages for Nodes ...................................................................................................... 24
6.4
Configuring Nodes....................................................................................................................... 25
6.4.1
WiDAQ Configuration Dialog .............................................................................................. 26
6.5
Deleting Nodes ............................................................................................................................ 28
6.6
The Default Node Schema .......................................................................................................... 28
6.7
Clearing the Default Node .......................................................................................................... 29
6.8
Copying and Pasting Nodes......................................................................................................... 29
6.9
Deleting Node Data ..................................................................................................................... 30
RS-1095 Rev 2: Building Intelligence Gateway - Software Manual
2
7
Sensors ................................................................................................................................................ 31
7.1
Browsing Sensors and Sensor Data ............................................................................................. 31
7.1.1
Using the Time Graph ......................................................................................................... 32
7.2
Adding Sensors ............................................................................................................................ 33
7.3
Configuring Sensors .................................................................................................................... 34
7.3.1
Configuring a Single Sensor................................................................................................. 34
7.3.2
Configuring Multiple Sensors .............................................................................................. 34
7.4
Deleting Sensors.......................................................................................................................... 35
7.5
Deleting Sensor Data................................................................................................................... 36
7.6
Deleting Sensor Events ............................................................................................................... 37
8
Groups ................................................................................................................................................. 38
8.1
Browsing Groups ......................................................................................................................... 38
8.2
Adding Groups ............................................................................................................................ 38
8.3
Renaming Groups........................................................................................................................ 39
8.4
Deleting Groups .......................................................................................................................... 39
8.5
Grouping Sensors ........................................................................................................................ 39
9
8.5.1
Adding and Removing Sensors Using the Sensor Context-Menu ....................................... 39
8.5.2
Grouping Sensors Using Drag-and-Drop ............................................................................. 40
Settings................................................................................................................................................ 41
9.1
General Settings .......................................................................................................................... 42
9.2
Sync Settings ............................................................................................................................... 43
9.3
Dial-up Settings ........................................................................................................................... 44
9.4
Mail Settings................................................................................................................................ 45
9.5
Relay Settings .............................................................................................................................. 47
10
Import/Export ................................................................................................................................. 48
10.1
Exporting the Schema to a File ................................................................................................... 48
10.2
Importing the Schema From a File .............................................................................................. 48
10.3
Exporting Data ............................................................................................................................ 50
10.4
Importing Data ............................................................................................................................ 52
11
SMT Analytics Connectivity ............................................................................................................. 55
11.1
Commissioning BiG to an SMT Analytics Project ........................................................................ 55
11.1.1
Logging in With SMT Analytics User Account ..................................................................... 55
RS-1095 Rev 2: Building Intelligence Gateway - Software Manual
3
11.1.2
Selecting the SMT Analytics Project .................................................................................... 56
11.1.3
Merging Jobs ....................................................................................................................... 57
11.1.4
Importing from Analytics Project ........................................................................................ 58
11.2
Synchronizing BiG with Analytics ................................................................................................ 58
11.3
Import Jobs from Analytics ......................................................................................................... 59
11.4
Decommissioning from an SMT Analytics Project ...................................................................... 61
12
Alarm Handling ............................................................................................................................... 62
12.1
Creating Alarms ........................................................................................................................... 62
12.1.1
Creating Alarms from the Alarms Window ......................................................................... 62
12.1.2
Creating and Linking Alarms from the Sensor Context Menu ............................................ 63
12.1.3
Creating and Linking Alarms from the Alarms Pane ........................................................... 64
12.2
Linking and Unlinking Existing Alarms ........................................................................................ 65
12.2.1
Linking and Unlinking Existing Alarms from the Sensor Context Menu ............................. 65
12.2.2
Linking Alarms from the Alarms Pane ................................................................................. 66
12.2.3
Unlinking Alarms from the Alarms Pane ............................................................................. 68
12.3
Monitoring Alarms ...................................................................................................................... 69
12.3.1
Monitoring Alarms in the Nodes Tab .................................................................................. 69
12.3.2
Monitoring Alarms in the Events Tab ................................................................................. 70
12.4
Targets and Actions..................................................................................................................... 71
12.4.1
Creating Targets .................................................................................................................. 72
12.4.2
Configuring Targets ............................................................................................................. 73
12.4.3
Linking Targets .................................................................................................................... 82
12.4.4
Unlinking Targets ................................................................................................................ 83
12.4.5
Renaming Targets ............................................................................................................... 84
12.4.6
Deleting Targets .................................................................................................................. 84
RS-1095 Rev 2: Building Intelligence Gateway - Software Manual
4
2 Introduction
Welcome to the software manual for the Building Intelligence Gateway (BiG). The BiG software serves
several functions. It is primarily used for:
Data collection
Data forwarding to the SMT Research Analytics Monitoring Center*
Real-time monitoring of data collected
Programmable alarms and actions
*
Requires an active account with SMT Research Analytics Monitoring Center
RS-1095 Rev 2: Building Intelligence Gateway - Software Manual
5
3 System Requirements
The SMT BiG software can be installed on a computer with the following minimum system
requirements:
Microsoft Windows XP/Vista/7
512 MB of RAM
50 MB of free disk space
3.1 Internet Connectivity
Certain features require internet connectivity to function. Specifically, synchronizing with SMT Analytics
(see 11 - SMT ANALYTICS CONNECTIVITY ), E-mail actions (see 12.4.2.3.3 - CONFIGURING AN EMAIL ACTION),
and Pager actions (see 12.4.2.3.4 - CONFIGURING A PAGER ACTION) require a working internet connection.
BiG can be configured to use Windows Dial-Up Networking (DUN) to establish an internet connection on
demand (see section 9.3 - DIAL-UP SETTINGS). For this to work, a working dial-up connection must be
configured. This manual does not cover setting up the dial-up connection. Please consult with the
Microsoft Windows help documentation for instructions.
3.2 Power Settings
By default, BiG will prevent Windows from putting the computer into sleep/stand-by/hibernate mode
when the computer is idle. This default assumes that BiG will be deployed in an always-on gateway
setting. This behavior can be disabled in the BiG settings.
BiG does not prevent Windows from sleeping or powering off the computer when BiG is installed on a
laptop and the lid is closed. The computer administrator is responsible for configuring such settings, if
available.
In addition, the host machine should be connected to a reliable for prolonged operation.
3.3 Application Event Log
BiG records important logging information into the Windows
Application Event Log. Sometimes, when there is a lot of
information, the log to become full. It is strongly recommended
that the computer administrator adjust the Application Event Log
settings for increased capacity and to overwrite old log entries. To
do this:
1. Log in as an administrator
2. Click on the Start button, and right-click on My Computer
3. Click on Manage
In Windows XP:
1. Ensure the Event Viewer node is expanded
RS-1095 Rev 2: Building Intelligence Gateway - Software Manual
Figure 3-1 – Bring up Application Event
Log properties
6
2. Right-click on the Application node and click Properties… (see FIGURE 3-1)
3. Enter 4096 KB for the Maximum log size and ensure Overwrite events as needed is selected (see
FIGURE 3-2)
Figure 3-2 - Proper Application Event Log Settings
4. Press Ok
3.4 Background Processes and Automatic Updaters
When BiG is deployed in a permanent or semi-permanent location, it is critical that the software
continue to run uninterrupted. It is strongly recommended that BiG is installed on a dedicated machine
without any additional software running in the background.
If a computer cannot be dedicated to BiG, then the number of background programs should be
minimized. Any unused programs should be exited. In addition, software which automatically updates
the computer and restarts or shuts down the computer should be uninstalled or disabled.
The following is a list of common programs known to interfere with BiG’s operation and the appropriate
action to take.
Product
Windows
Automatic Update
Google Chrome
Issue
Action
Windows might be configured to automatically Change Windows Automatic
install updates and restart the computer.
Updates to prompt before
installing updates.
The software has been known to consume Ensure Google Chrome is closed
memory over time. If left open, it will use up after using it.
all available memory causing unexpected
behavior and could potentially crash BiG.
RS-1095 Rev 2: Building Intelligence Gateway - Software Manual
7
Google Updater
This software is scheduled to run periodically
when Google software products are installed
on Windows machines. It has been known to
consume memory over time on long-running
machines.
RS-1095 Rev 2: Building Intelligence Gateway - Software Manual
At the time of writing this
manual, Google has not provided
a supported way of disabling the
updater, however many users
have posted methods of
achieving a working solution. An
internet search for “Disable
google updater” should yield
step-by-step instructions.
8
4 User Interface
Most of the functionality for BiG can be found in the main window. The main window appears when BiG
is started. At all times, three bars will be visible in the main window.
1. The menu bar
The menu bar is where many of the advanced features of BiG can be found. The menu bar
consists of four submenus including the File menu, the View menu, the Analytics menu, and the
Help menu.
2. The tab bar can be used to move between tab pages. The tab pages are described in the
subsections that follow.
3. The status bar displays status information about the gateway.
A
Label
A
Name
Sync status
B
C
D
E
Description
Shows the SMT Analytics synchronization status. When BiG has not
been commissioned to a SMT Analytics project (see 11 - SMT
ANALYTICS CONNECTIVITY ) the sync status will display
“Uncommissioned”, the color of the icon will be red and can be
disregarded.
When BiG has been commissioned to a SMT Analytics project, but has
never been synced, the status will display “Commissioned” and the
icon will be green.
When BiG has been commissioned to a SMT Analytics project, and has
been synced, but is not configured to periodically sync (see 9.2 - SYNC
SETTINGS) the status will show the date and time of the last successful
sync. The color will be green if the last sync attempt was successful, or
red if it failed.
If BiG has been commissioned to a SMT Analytics project and is
configured to periodically sync, the status will show the time remaining
RS-1095 Rev 2: Building Intelligence Gateway - Software Manual
9
until the next periodic sync. The color of the icon will reflect the
success (green) or failure (red) of the last sync attempt.
If BiG has been commissioned and is currently syncing with SMT
Analytics, the icon will be bright green, and the status of the current
sync will be displayed. The status indicate one of the following stages:
B
Project
C
Gateway
D
E
Job
Error notification
1. Dialing connection – If no internet connection is present and
BiG is configured to use dial-up (see 9.3 - DIAL-UP SETTINGS).
2. Syncing schema – The first stage of the sync is to update the
node and sensor names and configuration. This step can take
some time if there are several jobs/nodes/sensors in BiG.
3. Uploading data & throttling – The second stage is to upload
the new readings to SMT Analytics. A progress bar appears to
visualize the progress of this step. If the internet connection is
inconsistent, BiG may begin “throttling” the data into smaller
chunks to increase the chance of successful transmission. If
BiG cannot send even a small chunk, it will ultimately fail.
4. Marking exported readings – The third stage is to mark the
successfully transmitted readings as being synced. If BiG
needed to throttle, it will repeat stages 3 & 4 until all the
chunks have been transmitted and marked.
5. Delete exported data – If configured to do so, BiG will delete
data that has been successfully exported (see 9.2 - SYNC
SETTINGS).
Shows the ID and name of the SMT Analytics project that BiG is
commissioned to. If BiG is not commissioned, this field will not be
displayed.
Shows the ID and name of the gateway. When BiG is commissioned to
a SMT Analytics project for the first time, the copy of BiG must be
registered with SMT Analytics to facilitate the sync. The process is
known as serialization. During serialization, the copy of BiG is assigned
a gateway ID and name. If a copy of BiG as been serialized, the ID and
name are shown here.
The number and name of the active job are shown here (see 5 - JOBS).
If an unexpected error occurs, the error notification icon will be
displayed. Clicking on the icon will display the Debug Log, where the
error can be examined. If the errors cause BiG to not operate
correctly, please report any such errors to SMT Research support.
RS-1095 Rev 2: Building Intelligence Gateway - Software Manual
10
4.1 The Nodes Tab
The Nodes tab is used for exploring and manipulating the data and configuration of BiG nodes. Most of
the primary functionality of BiG can be found in the Nodes tab. The various components of the Nodes
tab are labeled in FIGURE 4-1 - THE NODES TAB and described in TABLE 4-1 - NODES TAB COMPONENT
DESCRIPTION .
A
C
B
D
E
G
F
H
Figure 4-1 - The Nodes tab
Label
A
Name
New
B
Viewing options
C
Graph toggle button
Description
Click to display a drop-down menu for creating new:
Nodes (see 6.1 - ADDING NODES)
Sensors (see 7.2 - ADDING SENSORS)
Groups (see 8.2 - ADDING GROUPS)
Click to display a drop-down menu for changing the viewing settings
including:
Browse by:
o Node – navigate sensors by the their corresponding
node
o Group – navigate sensors by the user-defined groups
that they belong to
Sensor view:
o List – show sensors in a sortable table
o Dashboard – show sensors with large icons and last
reading values. This helps to get a quick snapshot of
the sensors and their current measurements after the
system has been configured.
Raw data – toggles showing raw voltage/resistance/current
values and converted units
This button toggles between displaying and hiding the graph (see label
H).
RS-1095 Rev 2: Building Intelligence Gateway - Software Manual
11
D
E
Alarms pane toggle This button toggles between displaying and hiding the alarms pane (see
button
label G)
Node/group list
Shows a list of the nodes/groups on the active job.
This list can be toggled between nodes and groups using the viewing
options drop-down button (see label B).
Users can select nodes/groups by clicking on them. To select a range of
nodes/groups, click on the first node/group, then hold the SHIFT key,
and click on the last node/group.
The sensors belonging to the selected node(s)/group(s) are displayed in
the sensor list/dashboard (see label F).
Nodes can be deleted, copied, pasted, and modified by right-clicking on
a selected node.
F
Sensor
list/dashboard
See 6 - NODES for a more detailed explanation.
Shows the sensors for the selected node(s)/group(s) in the node/group
list (see label E). Information about the sensor including their
configured sensor type, name, input, and last reading are displayed.
Users can toggle between a list view and dashboard view in the viewing
options (see label B).
Users can select the desired sensors by clicking on them. A range of
sensors can be selected by clicking on the first sensor in the range,
holding the SHIFT key, then clicking on the last sensor in the range and
releasing the SHIFT key.
If a single sensor is selected, the data for that sensor is shown in the
graph (see label H). The linked alarms will also be displayed in the
alarms pane (see label G).
The selected sensor(s) can be deleted, configured, linked to alarms,
added/removed from groups, and have their data graphed by rightclicking on the selected sensors to bring up the sensor context menu.
See 7 - SENSORS for a more detailed explanation.
G
Alarms pane
Can only be used when a single sensor is selected in the sensor
list/dashboard (see label F).
Provides an interface for viewing the alarms linked to the sensor and
the corresponding events and targets of those links. Please refer to 12 ALARM HANDLING for a full description of the alarm handling in BiG.
RS-1095 Rev 2: Building Intelligence Gateway - Software Manual
12
H
Graph
When a single sensor is selected in the sensor list/dashboard (see label
F), the data for that sensor is displayed on the graph.
This graph is displays a real-time view of the data. As readings are
received, they will be instantly added to the graph.
Clicking-and-dragging left and right with the left mouse button will
zoom in and out of the time axis. Clicking-and-dragging left and right
with the right mouse button will pan back and forth on the time axis.
A double-click on the graph toggles the date range controls from being
displayed. Here a resizable scrollbar can be used to scrub and zoom on
the date axis. There is also a button to toggle between play mode and
pause mode. When in play mode, the graph translates with the current
time. In pause mode, the graph will not translate with the current time.
When the user pans the graph backwards in time, the graph is
automatically paused. If the user pans the graph forwards to the
current time, it will snap back into play mode.
Table 4-1 - Nodes tab component description
RS-1095 Rev 2: Building Intelligence Gateway - Software Manual
13
4.2 The Events Tab
The events tab shows a list of all events in the system. Active events are highlighted in red and by
default are shown at the top of the list. The list can be sorted by any of the columns by clicking on the
column header.
Additionally, the events can be double-clicked and BiG will navigate to the applicable event in the nodes
tab.
A
B
C
D
E
F
G
Figure 4-2 - Events tab. (A) Time Set – when the event was triggered. (B) Time cleared – when the event was cleared or
displays --- if the event is still active. (C) Alarm – the name of the alarm that triggered the event. (D) Sensor – the name of
4.3
The
Tab
the sensor
thatDevices
the event was
triggered on. (E) Node – the ID of the node that the triggering sensor belongs to. (F) Input –
thedevice
input ofisthe
triggering
(G)talk
Condition
– The oncan
condition
the triggering
alarm
(see 12so- Avirtual
LARM H ANDLING
). like
Not
A
a unit
whichsensor.
BiG can
to. Devices
rangefor
from
hardware
dongles,
devices
shown is another column labeled “Manually Cleared” which displays whether the alarm was manually cleared.
the Gateway itself. Each of these device types is called a IO engine plug-in. At the time of the writing of
this manual, here is a complete list of I/O engine plug-ins:
iCAN – USB dongle which can connect to a wired CAN network of SMT WiDAQs
WiKey – USB dongle which can communicate wirelessly with SMT WiDAQs
Gateway – The host computer that the BiG software is running on
Lawicel CAN-USB – A 3rd party USB dongle which can connect to a wired CAN network of SMT
WiDAQs.
Devices are automatically detected by BiG, and are displayed in the devices tab. They are grouped
together by their IO engine plug-in type. Beside the plug-in is a colored icon which indicates whether
RS-1095 Rev 2: Building Intelligence Gateway - Software Manual
14
the BiG has connected to the device. BiG automatically connects to devices on startup and when new
ones are detected (inserted/attached to the computer).
Users can manually connect/disconnect a device by clicking on it, and then pressing “Connect” or
“Disconnect” in the toolbar.
Double-clicking on a device in the devices tab will bring up the diagnostic interface for that device. This
can be used to configure the device and its associated network of nodes/sensors. Currently, device
diagnostics is unsupported, but documentation will be provided as soon as it becomes supported.
4.4 The Devices Tab
The BiG gateway software receives all data through connected devices. In most cases, devices are
connected through a USB port. BiG communicates to each device type using a plug-in. A plug-in is a
software component that can be “plugged in” to BiG to communicate with a particular device type.
The devices tab shows all devices that are found attached to the host computer. Devices are organized
by their plug-in type. BiG ships with plug-ins for the SMT iCAN, the SMT WiKey, the SMT BiN, and the
Lawicel CAN-USB devices. In addition, developers are welcome to develop additional plug-ins for
receiving data and communicating with networks. Refer to FIGURE 4-3 - THE DEVICES TAB for a diagram of
the devices tab. Each component is labeled and described in TABLE 4-2 - THE DEVICES TAB COMPONENT
BREAKDOWN .
A
B
C
D
E
F
G
Figure 4-3 - The devices tab
RS-1095 Rev 2: Building Intelligence Gateway - Software Manual
15
Label
A
B
C
D
Name
Connect/disconnect
Diagnostics
Rename
Change Timer
E
Plug-in groupings
F
Devices
G
Autonomous Timer
Description
Can be used to connect or disconnect the selected device.
Configure the device or communicate over the device’s network.
Change the display name of the device.
Some devices have an autonomous timer property. The timer is
distributed to all nodes on the device’s network. Nodes that are
configured to inherit their autonomous timer will do so from this value.
Devices are categorized by their plug-in type. These labels show the plugin type.
Each device is shown in the list under its corresponding plug-in.
Connected devices are shown with a green icon. Disconnected devices
are shown with a red icon.
The device’s autonomous timer is shown in this column. See the
description of label D above.
Table 4-2 - The devices tab component breakdown
4.5 The Jobs Tab
The jobs tab provides an interface to view and manipulate jobs (see 5 - JOBS) in BiG. In addition, the jobs
tab displays statistics and buttons to initiate a sync with SMT Analytics and optionally a button to shut
down the host computer1.
A
D
B
E
C
1
F
This shutdown button can be configured to be shown or hidden in the BiG settings.
RS-1095 Rev 2: Building Intelligence Gateway - Software Manual
16
Label
A
Name
Show archived jobs
B
Job list
C
Job toolbar
D
Active job stats
E
Sync button
F
Shutdown button
Description
Toggles whether or now archived jobs are shown. Jobs can be archived
when BiG is commissioned to an Analytics project. If the job is closed
from Analytics, then the job gets archived in BiG. The active job is always
shown, regardless if it is archived or not. Archived jobs will not sync with
Analytics.
The job list shows all jobs in BiG. The active job is shown in bold font and
has a flag beside it. The default job is one named “Default Job” and has
an ID of 0. You can select a job by clicking on it. Right-clicking on a job
reveals extra options for that job such as copy and paste.
Provides the ability to create a new job, and basic actions that can be
performed on the selected job(s).
Shows information about the active job:
Sensors: number of sensors in the job
Active alarms: number of alarms that are currently active in the
job
Last sync: The date and time BiG successfully synced last with
Analytics. This can be ignored if BiG is not commissioned to
Analytics.
Unsynced readings: The number of sensor readings that have not
been synced to Analytics.
This button is used to sync with the Analytics server. The button will be
disabled if BiG is not commissioned to an Analytics project.
Can be used to shutdown the computer. This button can be hidden
depending on your settings (see 9.1 - GENERAL SETTINGS).
RS-1095 Rev 2: Building Intelligence Gateway - Software Manual
17
5 Jobs
In BiG, a job is a collection of node and sensor definitions and their corresponding data. One job is active
in BiG at any given time. All incoming sensor data gets recorded to the active job.
Jobs can be used to partition data in BiG. For example, BiG comes pre-installed on a computer which
ships with SMT Mobile Monitoring Kits (MMKs). With a MMK, each job site is set up differently and
requires different nodes (i.e. WiDAQs) and sensors be attached. BiG treats each job as a separate
deployment and configuration can change from job to job.
The Default Job is a special job with ID 0. It is a built-in job that cannot be deleted. When BiG is
deployed in a permanent installation, users will rarely use multiple jobs. In this case, the default job
should be used. When BiG is used in mobile deployments, the default job can serve as a temporary job.
During the installation of a MMK, the user can make the default job active. Once the user has confirmed
that all WiDAQs are communicating and all sensors are measuring correctly, the user can create the
desired job and activate it.
Jobs in BiG can be found in the Gateway tab. The active job is shown in bold in the job list and has a flag
( ) indicator shown beside it. The user can also see the active job in the status bar.
Active job
Job list
Default job
Figure 5-1 - The job list
5.1 Adding Jobs
To add a job:
Click on the
dialog (see FIGURE 5-2).
button under the job list (see FIGURE 5-1). This will present the New Job
RS-1095 Rev 2: Building Intelligence Gateway - Software Manual
18
E
A
F
B
G
C
H
D
I
Figure 5-2 - The new job dialog
Label
A
B
C
D
E
F
G
H
I
Option
Name
Description
A unique name to identify the job. An internal reference number for the
job could be used
Address
[OPTIONAL] The address for the new job
Contact Person
[OPTIONAL] The name of a contact person for the new job
Phone Number
[OPTIONAL] A contact phone number for the new job
Import nodes & This controls whether or not the node and sensor configuration will be
sensors from
imported from another job
Source job
The job to import configuration from
Sensor Groups
Whether or not to import groups (see section 8 - GROUPS) and group
membership. If this option is checked, then all sensor groups and
corresponding sensor participation from the source job will be imported to
the new job.
Assigned Alarms
Whether or not to import each sensors alarm assignment (see section 12.2
- LINKING AND U NLINKING E XISTING ALARMS) to the new job. Sensors linked
to alarms in the source job will be linked to the same alarms in the new
job.
Assigned Targets Whether or not to import the target linkage (see section 12.4.3 - LINKING
TARGETS) from the source job.
Figure 5-3 – The new job dialog summary
Fill out the new job dialog (according to FIGURE 5-3). Once satisfied, click on the
or click the
button
button to cancel the creation of the new job.
5.2 Editing Jobs
To change the properties of an existing job, you will need to do the following:
1. Navigate to the gateway tab
2. Select the job to edit from the job list (see FIGURE 5-1)
RS-1095 Rev 2: Building Intelligence Gateway - Software Manual
19
3. Click on the
button below the job list
An Edit Job dialog will appear. The dialog contains the same fields as FIGURE 5-2, with the exception of
the job import fields. Refer to FIGURE 5-3 when making the desired changes.
Once the desired changes have been made, click the
Otherwise press the
button to apply the changes.
button to abort.
5.3 Deleting Job(s)
All jobs except the default and active jobs can be deleted. If you wish to delete a job that is active, but
not the default job, activate a different job first (see section 5.4 - ACTIVATING JOBS).
It is important to note that deleting a job will delete the configuration and data associated with it.
Deleting a job cannot be undone. The configuration of a job includes:
Nodes (see section 6 - NODES)
Groups (see section 8 - GROUPS)
Sensors (see section 7 - SENSORS)
Data
Linked alarms & targets (see section 12 - ALARM HANDLING )
Events
Be sure that this data loss is acceptable before continuing.
To delete job(s):
1. Navigate to the gateway tab
If the job to be deleted is active, activate another job (see section 5.4 - ACTIVATING JOBS) such as
the default job
2. Select the job to be deleted from the job list (see FIGURE 5-1)
3. Click on the
button
4. Accept or reject the delete confirmation dialog (see FIGURE 5-4)
RS-1095 Rev 2: Building Intelligence Gateway - Software Manual
20
Figure 5-4 - Delete confirmation dialog
5.4 Activating Jobs
In the Building Intelligence Gateway, only one job may be active at a time. All data that is received gets
recorded to the active job. To switch the active job:
1. Navigate to the gateway tab
2. Select the desired job in the job list (see FIGURE 5-1)
3. Click the
button
The job will appear bold in the job list and will be displayed in the status bar as labeled in FIGURE 5-1 THE JOB LIST.
5.5 Copying and Pasting Jobs
Sometimes, it is desirable to copy the configuration of one job to another. This is achieved by the
following steps:
Navigate to the gateway tab
Select the source job in the job list (see FIGURE 5-1)
Right-click the job and select Copy (see FIGURE 5-5)
Figure 5-5 - Copying a job
RS-1095 Rev 2: Building Intelligence Gateway - Software Manual
21
Select the target job from the job list
Right-click the job and select Paste… (see FIGURE 5-6)
Figure 5-6 - Pasting a job
Complete the paste job dialog (see FIGURE 5-7). When pasting a job, node and sensor
configurations are always pasted. The user can also choose to paste the sensor groups (and
sensor-group membership), assigned alarms, and assigned targets.
Figure 5-7 - The paste job dialog
RS-1095 Rev 2: Building Intelligence Gateway - Software Manual
22
6 Nodes
A node represents a physical or virtual device that features a number of sensors. Typically, a node
corresponds to a SMT WiDAQ or a SMT WiMote. There are other types of nodes such as the BiG node,
which collects diagnostic information about the host machine that the BiG software is run on.
Nodes belong to a single job. Changes to a node in one job will not affect the same node in another job.
In addition, nodes are managed by their ID. For certain types of nodes (such as WiDAQs and WiMotes),
BiG uses this ID to communicate with the node. A user can add, delete, rename, copy, and paste nodes.
A
B
C
Figure 6-1 - The nodes tab. (A) The Viewing Options drop-down allows users to switch between browsing by nodes and by
groups. This section assumes you are browsing by nodes. (B) The New drop-down button allows users to create new
nodes (see section 6.1 - ADDING NODES ). (C) The node list allows users to select, rename, delete, set the defaults, copy, and
paste nodes.
6.1 Adding Nodes
BiG automatically creates a new node when it receives communication from it. If the node is not
configured to automatically measure and send readings, you will need to create the node manually and
tell BiG to poll the node for readings. To manually create a node:
1.
2.
3.
4.
Navigate to the Nodes tab
Click on the New drop-down button (see FIGURE 6-1) in the Node toolbar
Click the Node… item
You will be presented with the New Node dialog (see FIGURE 6-2)
RS-1095 Rev 2: Building Intelligence Gateway - Software Manual
23
Figure 6-2 - New node dialog
5. Enter an ID number for the node. This is a number used to identify the unit. If you are creating
a node for a SMT WiDAQ or WiMote, use the serial number of the unit. Please refer to the
product documentation for identifying the serial number.
6. Enter a name or label
7. Press the
button
6.2 Renaming Nodes
To rename a node:
1.
2.
3.
4.
Navigate to the Nodes tab
If you are browsing by group, click on the Viewing Options → Browse by → Node
Select the node to be renamed (only one node can be renamed at a time)
Begin renaming the node using one of the following methods:
a. Press F2 on the keyboard
b. Right-click on the node and choose Rename…
5. Enter the new name for the node
6. Finish renaming the node using one of the following methods:
a. Press ENTER on the keyboard to save the new name
b. Click on another object to save the new name
c. Press ESCAPE to cancel the rename
6.3 Mailbox Messages for Nodes
Certain nodes (such as wireless WiDAQs) are optimized for conserving power. Instead of maintaining
continuous communication with BiG, wireless WiDAQs periodically establish a connection to report
readings and check their mailbox for messages.
BiG allows the user to place a message in a node’s mailbox. Types of messages include:
Enter diagnostics mode – The node should enter into diagnostics mode. In this mode, the node
refrains from taking measurements and instead listens continuously for commands from BiG.
This can be used when a wireless node needs to be configured (see 6.4 - CONFIGURING NODES).
Note that while in diagnostics mode, WiDAQs no longer check for mailbox messages. If a
WiDAQ in diagnostics mode receives no commands from BiG for 10 minutes, it will exit
diagnostics mode.
Retransmit Entire Log – Some nodes, such as wireless WiDAQs, are capable of logging readings
when BiG is out of communication range. WiDAQs will automatically transmit this log when
RS-1095 Rev 2: Building Intelligence Gateway - Software Manual
24
they re-establish communication with BiG. In some cases, the log transmission may fail and the
log may be only partially transmitted. Send this mailbox message to instruct the WiDAQ to
retransmit all logged readings that are stored in its memory. BiG will ignore duplicate readings.
Be warned that transmitting the entire log can consume a large amount of power. Use only
when necessary and check batteries afterwards.
Reset – Should the need arise for a node to be reset, this message will instruct the node to do so
upon receiving the message.
6.4 Configuring Nodes
BiG has the ability to change the configuration of certain types of nodes. For example, SMT WiDAQs can
have their measurement and communication settings configured. Depending on the type of node, the
configure option may or may not be available.
Configuring a node requires that the node is listening to communication from BiG. In the following
situations, WiDAQs do not continuously listen to BiG:
Wireless WiDAQs go into low-power mode in between measurements and transmissions
o Put the WiDAQ into diagnostics mode (see section 6.3 - MAILBOX MESSAGES FOR NODES)
Wired (CAN) WiDAQs stop listening when they are taking readings
o Put the WiDAQ into diagnostics mode
o This cannot be done with Mailbox Messages, since wired WiDAQs do not check the
mailbox
o You can physically do this by physically pressing the button on the WiDAQ 5 times in
rapid succession. The LEDS should flicker between red and green. After flickering, they
will turn to staying both on. This means that the WiDAQ is in diagnostics mode.
Once the node is listening for communication from BiG, you can configure the node by:
1. Navigate to the Nodes tab (see FIGURE 6-1)
2. If you are browsing by group, then select Viewing Options → Browse By → Node in the Node
toolbar
3. Right-click on the desired node and click Configure... (see FIGURE 6-3)
Figure 6-3 - Configure node menu
RS-1095 Rev 2: Building Intelligence Gateway - Software Manual
25
4. You will be presented with the configuration dialog for the node. Depending on the type of
node, the configuration options will vary. At the time of writing this manual, there is only a
WiDAQ configuration dialog (see section 6.4.1 - WIDAQ CONFIGURATION DIALO).
6.4.1 WiDAQ Configuration Dialog
The WiDAQ configuration dialog allows the user to change the configuration of a WiDAQ. Please refer
to FIGURE 6-4 and TABLE 6-1 - WIDAQ CONFIGURATION SETTINGS for details.
D
A
E
B
C
H
F
I
G
K
J
Figure 6-4 - WiDAQ Config Dialog
Label Option
A
PhyID
B
Autonomous
Measurement
Enabled
C
Advanced Input
Config
Description
Physical identifier (serial number) of the WiDAQ being configured
Controls whether or not the WiDAQ will periodically take measurements of
the selected inputs/sensors and report the readings to BiG. When a WiDAQ
acts as a clusterhead, this should be disabled.
When checked, the user can view and change measurement parameters
(number of samples, polarity, mode, and speed) for the WiDAQ’s inputs. To
modify the measurement parameters:
1. Ensure Advanced Input Config is checked
2. Right-click non the desired input to bring up the measurement
parameters context menu
3. Hover the mouse over the desired parameter from the context menu
to bring up the possible values
4. Click on the desired value for the chosen parameter
RS-1095 Rev 2: Building Intelligence Gateway - Software Manual
26
D
E
F
G
H
I
J
Inherit
from When checked, the WiDAQ will regularly adjust its autonomous measurement
clusterhead
timer to match BiG’s global autonomous measurement timer. When
unchecked, the WiDAQ will use its own autonomous measurement timer (see
below).
Autonomous
When autonomous measurement is enabled (see B above) and Inherit from
measurement
clusterhead (see D above) is not checked, the WiDAQ will measure the
timer
Enabled Inputs (see F below) at this interval.
Enabled Inputs When Autonomous Measurement is enabled (see B above), the inputs that
are checked will be measured.
Communication Controls how the WiDAQ will communicate back to BiG. Refer to the diagram
Configuration
below.
Wireless
It is advised not to adjust this value without first contacting SMT Research
Channel
support.
Wireless PAN
If the WiDAQ is acting as a clusterhead, this controls the wireless channel for
communication.
It is advised not to adjust this value without first contacting SMT Research
support.
A Personal Area Network (or PAN) is a numeric identifier used to allow
multiple networks to operate on the same wireless channel. WiDAQS will
ignore wireless communication with a different PAN number except when in
diagnostics mode. All WiDAQs that are deployed on the same system should
have the same PAN number. In addition, the WiKey needs to be operating on
the same PAN number as well.
Lock
to It is advised not to adjust this value without first contacting SMT Research
clusterhead
support.
When checked, a wireless WiDAQ will “bind” to the best clusterhead. If the
WiDAQ fails communication with the clusterhead it is bound to, it will not
look for a new clusterhead and will wait for communication with the
clusterhead to resume. To bind the WiDAQ to the best clusterhead at any
time, press the button once on the WiDAQ (consult the WiDAQ user manual
for more detailed information). The WiDAQ will use the selected scan
channels (see K below) when binding.
K
Scan Channels
When unchecked, the WiDAQ will search and bind to the clusterhead with the
best signal strength before each wireless communication. The WiDAQ will
use the selected scan channels (see K below).
It is advised not to adjust this value without first contacting SMT Research
support.
Wireless WiDAQs will scan the selected channels for clusterheads and send its
readings to the candidate with the strongest signal.
Table 6-1 - WiDAQ Configuration Settings
RS-1095 Rev 2: Building Intelligence Gateway - Software Manual
27
Upon opening the WiDAQ Config Dialog, BiG will populate the dialog with the WiDAQ’s current
configuration. Make the desired changes, then press the Save button to apply the changes and reset the
WiDAQ into its normal operating mode.
6.5 Deleting Nodes
Deleting a node also removes the corresponding sensor configuration, sensor data, links to alarms and
targets, and events. Before deleting, be sure that this is understood and desired. To delete node(s):
1. Navigate to the Nodes tab
2. Select the node(s) to delete
3. Delete the node(s) using one of the following methods:
a. Press SHIFT+DELETE on the keyboard
b. Right-click on one of the selected nodes and choose Delete… from the context menu
4. Accept or reject the delete confirmation dialog
6.6 The Default Node Schema
In BiG, it is possible to specify a default node schema. The default node schema gets automatically
applied to new nodes when they are detected. It includes sensor names and configuration (see 7 SENSORS), and linked alarms and targets (see 12 - ALARM HANDLING). To set the default node schema:
1. Navigate to the nodes tab, and in the toolbar, choose Viewing Options → Browse By → Node
2. Create a new node or use an existing node which will be used as a template for the default node
schema.
3. Adjust the node’s sensors to the desired default configuration (see 7.3 - CONFIGURING SENSORS)
4. Link the desired alarms and targets to the node’s sensors (see 12 - ALARM HANDLING )
5. Right-click on the node in the node list and choose Default Node Schema → Snapshot Selected
Node (see FIGURE 6-5)
Figure 6-5 - Set as default
RS-1095 Rev 2: Building Intelligence Gateway - Software Manual
28
6.7 Clearing the Default Node
If you wish to erase the default node schema, do the following:
Navigate to the nodes tab, and in the toolbar, choose Viewing Options → Browse By → Node
Right-click anywhere in the node list (see label E in FIGURE 4-1 - THE NODES TAB)
From the node context-menu, choose Default Node Schema → Clear… (see Figure 6-6 - Clear the
DEFAULT NODE )
Accept the confirmation dialog
Figure 6-6 - Clear the default node
6.8 Copying and Pasting Nodes
Often times, nodes will have similar configurations. In these cases, it is simpler to configure one node
and then copy the configuration to the other nodes. To do this:
1. Navigate to the Nodes tab
2. If not browsing by node, then click on the Viewing Options drop-down button in the toolbar and
select Browse by → Node
3. Select the node whose configuration will be copied from
4. Right-click on the node and click Copy
5. Choose one of the following:
a. To overwrite an existing node’s configuration, right-click on the destination node and
choose Paste
b. To create a new node, choose Paste as New… You will be prompted to enter the new
node’s ID and name (refer to section 6.1 - ADDING NODES).
RS-1095 Rev 2: Building Intelligence Gateway - Software Manual
29
6.9 Deleting Node Data
To delete the recorded sensor data for all sensors belonging to a node or set of nodes:
1. Navigate to the Nodes tab
2. If not browsing by node, then click on the Viewing Options drop-down button in the toolbar and
select Browse by → Node
3. Select the node(s) whose sensor data should be deleted
4. Right-click on the node and click Delete Data…
5. Select a range of data to delete or all of the data (see 7.5 - DELETING SENSOR DATA)
6. Accept or reject the delete confirmation dialog
RS-1095 Rev 2: Building Intelligence Gateway - Software Manual
30
7 Sensors
Each node connects with a number of sensors that take measurements and send them to BiG. Within a
single node, each sensor is identified by its input number. Sensors typically output a voltage, resistance,
or current measurement which is called a raw value. BiG allows users to assign the type, wood species,
a temperature compensation sensor, and an offset to each sensor which can be used to convert the raw
value to an engineering unit. These parameters make up the configuration of a sensor. A sensor can be
configured different
7.1 Browsing Sensors and Sensor Data
A
B
C
Figure 7-1 – The sensor list
A. Sensor List – This list shows all sensors for the selected nodes or groups. The list contains the
following columns:
Name: The name of the sensor and a status icon
Node: The ID number of the node to which the sensor belongs
Input: The input number of the sensor
Type: The type of the sensor (temperature, moisture, humidity, etc…)
Last Reading: The value of the last reading received from the sensor. This is displayed
either as a raw value or as an engineering unit.
Reading Date: The date and time of the last reading received from the sensor
The sensor list can be sorted on any column by clicking on the column header. The sort
direction can be toggled by additional clicks on the column header.
B. Selected Sensor(s) – The currently selected sensor(s) are highlighted.
To select a single sensor, simply click on the corresponding row.
RS-1095 Rev 2: Building Intelligence Gateway - Software Manual
31
To select a range of sensors, click on the first sensor in the range. Next, hold down the
SHIFT key on the keyboard and click on the last sensor in the range
To toggle a single sensor from your selection, hold down the CTRL key on the keyboard
and click on the corresponding row
C. Time Graph – When a single sensor is selected, this graph shows the readings for the selected
sensor. The time graph can be adjusted to show a particular period of time. It can also be put
into Live Mode, where the time graph scrolls with the current time. (See 7.1.1 - USING THE TIME
GRAPH)
7.1.1 Using the Time Graph
When a single sensor is selected in the sensor list, the measurements for the sensor are shown in the
time graph. A time graph for a particular sensor can be opened in a new window by right-clicking on a
single sensor in the sensor list and clicking on View Graph → Time Graph.
A
B
E
D
C
E
Figure 7-2 - The time graph breakdown
A. Graph Area - Readings taken by the selected sensor during the selected time range are shown in
the graph area. The user can use their mouse in this area to adjust the time range. By clicking
the left mouse button and dragging left and right, the time range will shrink and expand. By
clicking the right mouse button and dragging left and right, the time range will pan forwards and
backwards in time.
B. Play/Pause Button – This button toggles Live Mode for the time graph. In Live Mode, the time
graph continually scrolls to keep the graph current. This mode can be used to monitor readings
as they are received by BiG.
C. Time Slider – This slider can be used to adjust the time period that the graph shows. By
dragging the slider left and right, the time period is moved backwards and forwards in time. By
dragging the edges of the slider, you can adjust the size of the time period. You can also rightclick on the slider to adjust the snapping resolution and to manually enter the visible time range.
D. Selection Indicator – This field shows the exact period of time that is visible in the time graph.
This can be referenced while sliding the time slider.
E. Slider Boundary Controls – These fields control the range that the Time Slider represents. The
left field controls the earliest time that the slider can be set to. The right field controls the most
recent date that is represented by the slider. Dates are represented by the dd/mm/yyyy format.
They can be edited by clicking on one of the numbers and typing in the new value. Additionally,
RS-1095 Rev 2: Building Intelligence Gateway - Software Manual
32
a calendar can be displayed by clicking on the drop-down button. To toggle between date and
time precision, right-click on the field.
7.2 Adding Sensors
By default, BiG will create sensors automatically when it receives readings from them. This can be
controlled by the Lock Schema setting. When BiG automatically creates a sensor, it first checks the
default node (see 6.6 - THE DEFAULT NODE). If there is no default node set, or if the default node does
not contain a sensor with the same input number, then an empty sensor is created.
In addition to automatic sensor creation, users can manually create sensors before they are attached or
detected. The Lock Schema setting must be disabled to create sensors manually. To create a sensor:
1. If the node that the sensor belongs to does not exist, create it first (see 6.1 - ADDING NODES).
2. Navigate to the Nodes tab in the main window.
3. [OPTIONAL] In the toolbar, select Browse By → Node. Select the node that the sensor belongs
to. This will be used to auto-fill the sensor’s node in the New Sensor dialog.
4. In the toolbar, select New → Sensor… or from the menu select File → New → Sensor…
5. The New Sensor dialog will display. Fill in the new sensor’s information (refer to TABLE 7-1).
A
B
C
D
E
F
G
H
I
Figure 7-3 - New sensor dialog
Label
A
B
C
D
Field
Node
Input #
Sensor Name
Sensor Type
Description
The node that the sensor belongs to.
The number corresponding to the input that the sensor is on for the given
node. Only one sensor may be created for a node/input combination.
A user-friendly name to identify the sensor.
Used to convert the raw values received from the sensor into the desired
RS-1095 Rev 2: Building Intelligence Gateway - Software Manual
33
E
Wood Type
F
Offset (raw)
G
Polling
H
Temp Sensor
I
Comments
engineering units.
This field is only shown when the sensor type is moisture. Selects the wood
type being probed. This is used to calculate the moisture percentage more
accurately with SMT’s pre-calibrated wood type moisture curves.
When the wood type is set to Custom A/B, additional fields will appear
allowing the user to set the A (slope) and B (y-intercept) of a custom woodtype curve. Please consult with SMT Research if you would like more
information about how to calculate the A/B values for a custom wood type.
This value gets added to the raw values (millivolts/ohms) received from the
sensor before converting to engineering units. This field is commonly used for
zero-ing (or calibrating) a sensor.
Check the polling field when the sensor needs to be polled by BiG. The interval
between polls can be set when the checkbox is checked.
Use this field when creating a moisture or humidity sensor to pick a
temperature correction sensor. Press the “…” button to browse for the
temperature sensor. Press the X button to remove temperature correction.
This field can be used to store comments about the sensor. The field is limited
to 255 characters in length.
Table 7-1 - Sensor configuration fields
7.3 Configuring Sensors
BiG is able to configure sensors individually and collectively. Configuration of sensors functions similarly
to creating a new sensor (see 7.2 - ADDING SENSORS), except that the node and input fields cannot be
changed after the sensor is created.
7.3.1 Configuring a Single Sensor
To change a single sensor’s configuration:
1.
2.
3.
4.
Navigate to the Nodes tab
Locate the sensor using the Node List or the Group List
Double-click the sensor or right-click the sensor and select Configure from the context-menu
Modify the fields as necessary (refer to TABLE 7-1). Note, that changing the node and input is
not allowed
5. Press
to accept the changes or
to cancel
6. If the sensor being configured was previously configured as a temperature correction sensor and
you have chosen to change the sensor’s type, you will be notified that the change will remove
the temperature correction and prompted for confirmation
7.3.2 Configuring Multiple Sensors
It is also possible to configure multiple sensors at once. This process has been streamlined for efficient
and easy use. To configure multiple sensors:
1. Navigate to the Nodes tab
2. Select the desired sensors for configuration (see 7.1 - BROWSING SENSORS AND SENSOR D ATA).
RS-1095 Rev 2: Building Intelligence Gateway - Software Manual
34
3. Right-click on one of the sensors in the selection and choose Configure… from the contextmenu. The Multi-Sensor Configuration dialog will be presented (see FIGURE 7-4).
4. Using the apply checkboxes, select the fields that you wish to modify for all the selected sensors.
5. Enter the corresponding values into the controls on the right (refer to TABLE 7-1).
6. Press
to accept the changes or
to abort the operation.
7. If the sensor being configured was previously configured as a temperature correction sensor and
you have chosen to change the sensor’s type, you will be notified that the change will remove
the temperature correction and prompted for confirmation.
apply
checkboxes
Figure 7-4 - Multi-Sensor Configuration dialog
7.4 Deleting Sensors
If a sensor is no longer needed, it can be deleted from the system. Deleting a sensor is permanent and
cannot be undone. In addition, deleting a sensor also deletes any associated information including:
Readings – all data received from the sensor
Alarms – Any alarms (see section 12 - ALARM HANDLING ) that have been linked to the sensor will
be unlinked
Targets – Any targets (see section 12.4 - TARGETS AND ACTIONS) that have been linked to the
sensor will be unlinked
Events – All history of triggered events will be deleted
To delete one or more sensors:
RS-1095 Rev 2: Building Intelligence Gateway - Software Manual
35
1.
2.
3.
4.
Navigate to the Nodes tab
Select the sensors to delete
Press SHIFT+DEL on the keyboard or right-click one of the sensors and choose Delete → Sensor…
A confirmation prompt will be displayed which alerts the user of the associated data which will
be deleted. Confirm or cancel the operation as indicated.
7.5 Deleting Sensor Data
When sensor data is no longer needed, it can be selectively deleted. Users can specify the sensors and
period of time to delete the data for. To delete sensor data:
1. Navigate to the Nodes tab
2. Select the desired sensors to delete
3. Press DEL on the keyboard or right-click on one of the sensors and choose Delete → Data… This
will present the Delete Sensor Data dialog (see FIGURE 7-5)
4. Choose to delete either:
a. All data (click the All Data radio button in the delete range options in FIGURE 7-5)
b. Date range (click the Date Range radio button in the delete range options in FIGURE 7-5)
Using the calendar control
1. Navigate to the date range’s start year by clicking on one of the year
labels (see FIGURE 7-5) and selecting the date range’s start year from the
drop-down box
2. Navigate to the date range’s start month using the month arrows or by
clicking on one of the month labels (see FIGURE 7-5) and selecting the
start month from the drop-down box
3. Drag from the start date to the end date in the calendar area
Using the to/from controls
1. Enter the range’s start date/time in the From controls (see FIGURE 7-5)
using the keyboard and calendar drop-down
2. Enter the range’s end date/time in the To controls (see Figure 7-5) using
the keyboard and calendar drop-down
5. To accept the deletion, press the Delete # readings button. To cancel, click the Cancel button.
RS-1095 Rev 2: Building Intelligence Gateway - Software Manual
36
Month Arrows
Delete range options
Month label
From
controls
Year label
To
controls
Figure 7-5 - Delete Sensor Data dialog
7.6 Deleting Sensor Events
To remove all events for one or more sensors:
1. Navigate to the Nodes tab
2. Select the desired sensors
3. Press CTRL+SHIFT+DEL on the keyboard or right-click on one of the sensors and select Delete →
Events…
4. You will be prompted for confirmation. Confirm the dialog to delete all events for the sensor.
RS-1095 Rev 2: Building Intelligence Gateway - Software Manual
37
8 Groups
A group is a customized collection of sensors. Users can organize sensors into groups as they see fit. In
addition, each job can have its own set of groups which are separate from each other. Groups allow the
user to rapidly select a particular set of sensors.
Sensors can belong to multiple groups or no groups at all. BiG has several methods to efficiently
add/remove sensors to/from groups.
8.1 Browsing Groups
Groups are provided as an organizational system for sensors. To browse sensors by their group,
navigate to the Nodes tab, click on the Viewing Options drop-down, and select Browse By → Group (see
FIGURE 8-1).
Figure 8-1 - Browse by group
The list on the left will be replaced with a list of groups for the active job. The first item in the list is a
special entry called (All). This group is permanent and contains all sensors for the active job. The
remaining groups are user-created.
To view the sensors in a group, simply click on the group in the list. The sensors in the group will appear
in the sensor list (see 7.1 - BROWSING SENSORS AND SENSOR D ATA).
By selecting multiple groups, you will see the sensors which belong in one or more of the selected
groups. To select a sequential range of groups, click on the first group in the range, then hold the SHIFT
key on the keyboard and click on the last group in the range. To toggle adding/removing a single group
from your current selection, hold the CTRL key on the keyboard and click on the group.
8.2 Adding Groups
To create new groups, simply choose File → New → Group… from the main window’s menu.
Alternatively, you can also navigate to the Nodes tab and in the toolbar, click New → Group…
RS-1095 Rev 2: Building Intelligence Gateway - Software Manual
38
Enter a name for the group in the New Group dialog and press OK to create the group.
NOTE: It is also possible to add a group with an initial set of sensors (see 8.5.1 - ADDING AND REMOVING
SENSORS USING THE SENSOR CONTEXT-MENU).
8.3 Renaming Groups
To rename a group:
1. Navigate to the Nodes tab
2. Ensure you are browsing by group by selecting Viewing Options → Browse By → Group from the
toolbar
3. Select the group to be renamed by clicking on it
4. Either click a second time on the group to begin renaming or right-click on the group and select
Rename… from the context-menu
5. Type in a new name and press ENTER on the keyboard to save or ESC to cancel
8.4 Deleting Groups
Deleting groups does not also delete the sensors in the group, but the membership of sensors in the
group is deleted permanently. It is not possible to delete the special group (All). To delete a group:
1. Navigate to the Nodes tab
2. Ensure you are browsing by group by selecting Viewing Options → Browse By → Group from the
toolbar
3. Select the groups to be removed (see 8.1 - BROWSING GROUPS)
4. Press SHIFT+DEL on the keyboard or right-click on one of the groups and click on Delete… from
the context-menu
5. Confirm the prompt to delete the groups or cancel
8.5 Grouping Sensors
There are two methods for adding sensors to a group. The first method can be done using the sensor
context-menu. The second method is using drag-and-drop.
8.5.1 Adding and Removing Sensors Using the Sensor Context-Menu
The sensor context-menu allows you to add and remove sensors from groups. To add/remove sensors
to/from an existing group:
1.
2.
3.
4.
Navigate to the Nodes tab
Use the sensor list to select the sensors
Right-click on one of the sensors to bring up the sensor context-menu
Under the Groups submenu, all groups for the active job are listed. Groups with checkmarks
beside them indicate groups that all of the selected sensors are members of. Groups with a
bullet beside them indicate groups that some (but not all) of the selected sensors belong to.
Groups without any icon beside them indicate groups that none of the selected sensors are a
member of.
RS-1095 Rev 2: Building Intelligence Gateway - Software Manual
39
5. Click on one of the following:
a. An unchecked group to add all of the sensors to the group or
b. A group with a bullet to add all ungrouped sensors to the group or
c. A group with a checkmark to add all sensors to the group
d. The New… item to create a new group and add all of the selected sensors to it
Checkmark – All selected
sensors are members of the
group. Click to remove all
sensors from the group.
Bullet – One or more of the
selected sensors (but not all)
are members of the group.
Click to add remaining sensors
to the group.
Unchecked – None of the
selected sensors are members
of the group. Click to add all
sensors to the group
8.5.2 Grouping Sensors Using Drag-and-Drop
To add sensors to a group using drag-and-drop:
1. Navigate to the Nodes tab
2. Ensure you are browsing by group by selecting Viewing Options → Browse By → Group from the
toolbar
3. Select the (All) group to see all of the sensors
4. Locate and select the sensors to be added using the sensor list
5. Drag the sensors into the desired group in the group list. The drag must be initiated on one of
the selected sensor’s names and ended on the name of the destination group.
RS-1095 Rev 2: Building Intelligence Gateway - Software Manual
40
9 Settings
BiG has a number of settings which can be configured for various deployment scenarios. These settings
are controlled from the Settings dialog. To access the Settings dialog, select View → Settings… (see )
from the menu of the main window.
Figure 9-1 - Open the settings window
The Settings dialog is organized into the following tab pages:
General
Sync
Dial-up
Mail
Relay
The following sections explain the settings according to their tab page.
RS-1095 Rev 2: Building Intelligence Gateway - Software Manual
41
9.1 General Settings
A
B
C
D
E
F
Figure 9-2 - General settings tab page
Label
A
B
C
D
E
F
Setting
Check Alarms
Description
This settings enables/disables alarm handling in BiG. When
enabled, BiG checks each incoming reading to see whether or
not it triggers alarm conditions that are linked to the sensor. If
an alarm is triggered, it performs the configured actions. The
administrator may wish to disable this functionality temporarily
during maintenance or completely when not desired.
Launch on Windows login Controls whether or not BiG is launched when the user first logs
into Windows.
Check for updates on If checked, BiG will attempt to check for updates from the SMT
start-up
update server when BiG is started. If an update is found, the
user will be prompted to update BiG.
Minimize to system tray
When enabled, BiG will not minimize to the Windows taskbar.
Instead, it will show as an icon in the system tray. To restore
BiG, simply double-click on the icon.
Prevent computer from Windows can be configured to put the computer in stand-by or
going to sleep
hibernate mode when there is no user input for a specified
length of time. If this option is enabled, BiG will tell Windows to
ignore the setting. This is enabled by default so that sensor
data can be collected in real time.
Show shutdown button
When BiG is deployed in a Mobile Monitoring Kit (MMK), it is
sometimes handy to have a large button to shutdown the
computer after a job is complete. Checking this box will display
a shutdown button on the Jobs tab (see 4.5 - THE JOBS TAB).
RS-1095 Rev 2: Building Intelligence Gateway - Software Manual
42
9.2 Sync Settings
BiG can be set to periodically sync with the SMT Analytics on-line system. These settings require the
purchase of a SMT Building Analytics account. In addition, BiG must be commissioned to a SMT Building
Analytics project (see 11.1 - COMMISSIONING BIG TO AN SMT ANALYTICS PROJECT). This allows the data to
be accessed from anywhere at any time.
The settings allow you to control how often BiG syncs and how much data is preserved locally.
A
B
C
C
Figure 9-3 - Export settings tab page
Label
A
Setting
Enable periodic sync
B
Export frequency
C
Delete synced
readings
D
Data preservation
period
Description
This setting controls whether or not BiG periodically synchronizes
with SMT Analytics.
If Enable periodic sync (A) is checked, this field dictates how often BiG
will automatically synchronize with SMT Analytics.
If enabled, BiG will delete readings that have been sent to SMT
Analytics, if they are older than the value of Data preservation period
(D) and not being used for alarm handling. The deletion occurs after
successful synchronizations.
If Delete synced readings (C) is checked, this setting dictates the
period of most recent readings to be preserved locally. If you would
like to delete all exported readings, the period can be set to nothing.
RS-1095 Rev 2: Building Intelligence Gateway - Software Manual
43
9.3 Dial-up Settings
BiG can be configured to use Windows Dial-Up Networking to connect to the internet during
sync/export with SMT Analyics. BiG must first be commissioned to an SMT Analytics project (see 11.1 COMMISSIONING BIG TO AN SMT ANALYTICS PROJECT) before these settings are available. This requires
that the dial-up connections are properly configured in Windows prior to configuration in BiG.
A
B
D
C
Figure 9-4 - Dial-up settings tab page
Label
A
B
Setting
Use dial-up
required
Description
when This enables/disables using dial-up for sync with Analytics and other
on-line tasks including e-mails, pager notifications, and checking for
updates. If enabled, BiG will check for connectivity to SMT before an
on-line task. If a connection cannot be made, it will attempt each dialup entry entered in BiG in the order specified (top-to-bottom) until a
connection is made. If a dial-up connection cannot be made, then the
on-line task will fail.
Dial-up entry toolbar
This toolbar can be used to:
Click this button to add a new dial-up entry
Begins editing the selected dial-up entry
Deletes the selected dial-up entries
Moves the selected dial-up entry up in the list order
Moves the selected dial-up entry down in the list order
RS-1095 Rev 2: Building Intelligence Gateway - Software Manual
44
C
Dial-up entry list
D
Dial-up entry fields
This list contains the dial-up entries that BiG will attempt to dial in the
order listed from top-to-bottom. Select a dial-up entry by clicking on
it, or select a range of entries by clicking on the first one, holding the
SHIFT key, then clicking on the last one. You can then perform actions
on the connection using the dial-up entry toolbar (see label B above).
When adding a new dial-up entry or editing an existing one, this panel
is used to view and set the fields of the dial-up entry.
Name: This name should correspond to the name used for the
Windows Dial-Up Networking entry. Please ensure the spelling and
capitalization match exactly
Username: If the dial-up entry requires a username, it must be entered
here
Password: If the dial-up entry requires a password, it must be entered
here
Press Apply to save the entry, or Cancel to abort.
No changes (new entries, modified entries, dial order, or removed
entries) actually take full effect until the Save button is pressed in the
Settings dialog.
9.4 Mail Settings
BiG can be configured to send e-mail alerts (see 12.4.2.3.3 - CONFIGURING AN E MAIL ACTION). For these
notifications to work, the mail settings must be configured so that BiG knows how it should send e-mail.
A
B
C
H
D
E
F
G
Figure 9-5 - Mail settings tab page
RS-1095 Rev 2: Building Intelligence Gateway - Software Manual
45
Label
A
B
C
D
E
F
G
H
Setting
SMTP Server
Port
Use SSL
From Address
Login
Required
Username
Password
Send Test
Email
Description
The host name of the mail server used to send e-mail mail alerts
The SMTP port of the mail server to use when sending e-mail alerts
Whether or not to use SSL to secure e-mail alerts. Consult with IT personnel.
The e-mail address that will appear as the sender of e-mails sent by BiG
If the mail server requires authentication to send e-mails, check this box and
enter the username and password. Otherwise, leave this box empty.
The username for authenticating to the mail server
The password for authenticating to the mail server
To test the e-mail settings entered, press this button. BiG will then prompt for
a destination e-mail address, and will attempt to send a test e-mail.
RS-1095 Rev 2: Building Intelligence Gateway - Software Manual
46
9.5 Relay Settings
BiG can be configured to manage relays to drive external events. Currently, only the DLP-IOR4 relay
from DLP Design is compatible with BiG. The relay settings can be used to set the initial state of the
attached relays when BiG starts. Note that no changes will be committed until the Save button is
pressed.
A
B
C
Figure 9-6 - Relay settings tab page
Label
A
Setting
Relay Toolbar
Description
This toolbar can be used to:
Add a new relay entry. Clicking this button will prompt for the
COM port of the relay. The dialog will auto-detect the attached
DLP-IOR4 relays and auto-complete the COM port as you type
B
Relay Entry List
C
Relay Entry Settings
Remove the selected relay entries. First select the desired relay
entries from the Relay Entry List (label B in FIGURE 9-6).
Lists the relays that are configured to be initialized when BiG starts.
You can modify a relay’s entry by selecting it in the list. You can also
select multiple entries to delete them with the Relay Toolbar (label A
in FIGURE 9-6).
When a single relay entry is selected in the Relay Entry List (label B in
FIGURE 9-6), you can configure the initialization settings here.
Each output of the relay can be initialized to one of its two inputs (A &
B). Simply select the desired input for each output.
RS-1095 Rev 2: Building Intelligence Gateway - Software Manual
47
10 Import/Export
BiG provides several options for importing and exporting both the configuration and the data that are
stored in the program. This section describes the import and export options available and how to use
them.
10.1 Exporting the Schema to a File
In BiG, the schema of a job consists of its nodes, sensors, and groups and their names and
configurations. BiG can export the schema of the active job as a XML file using the following procedure:
1. In the main window’s menu, choose File → Schema Export… (see FIGURE 10-1)
Figure 10-1 - Export the schema to a file using the File menu
2. A save dialog will appear. Select a directory and filename to save the schema to.
3. Press the Save button to export the schema to the desired path
10.2 Importing the Schema From a File
CAUTION: Importing a schema file may overwrite any configuration in the active job. Please be sure
that this is desired before importing a schema file.
Using a schema export file created using the procedure in 10.1 - EXPORTING THE SCHEMA, you can import
the schema to the active job. To do this:
1. In the main window’s menu, choose File → Schema Import…
RS-1095 Rev 2: Building Intelligence Gateway - Software Manual
48
Figure 10-2 - Import the schema from a file using the File menu
2. The schema import dialog will appear. Refer to FIGURE 10-3 - IMPORT SCHEMA DIALOG and TABLE
10-1 - IMPORT SCHEMA DIALOG FIELDS for details on completing the dialog.
3. Press the Open button to import the schema.
A
B
C
D
Figure 10-3 - Import schema dialog
Label
A
B
C
D
Name
Import file location
Overwrite current schema
Description
Tells BiG which file to import the schema from.
If enabled, BiG will overwrite the names and configuration of
nodes and sensors with the same ID and inputs.
Import groups
If enabled, BiG will import sensor groups and their
memberships. Otherwise, the groups will not be imported.
Import temperature correlation If enabled, BiG will import temperature correlation sensors
sensors
for humidity and moisture sensors.
Table 10-1 - Import schema dialog fields
RS-1095 Rev 2: Building Intelligence Gateway - Software Manual
49
10.3 Exporting Data
BiG has the ability to export sensor readings (data) from the active job to a file. BiG can export to two
formats including eXtensible Markup Language (XML) and Comma-Separated Values (CSV). The export
can be restricted to a specific time range and to a subset of the sensors in the active job. The following
procedure can be used to export data to a file.
1. Select File → Data Export… from the menu of the main window to open the Data Export dialog.
Figure 10-4 - Export data to a file using the File menu
2. Fill in the parameters for the data export using the Data Export dialog (see FIGURE 10-5, FIGURE
10-6 and TABLE 10-2 for details)
A
B
C
Figure 10-5 - The Data export dialog (date range)
RS-1095 Rev 2: Building Intelligence Gateway - Software Manual
50
A
D
E
Figure 10-6 - Data export dialog (nodes filter)
Table 10-2 - Data Export dialog reference
Label
A
B
Name
File
From Date
Description
Enter the location of the file where the data should be exported to. Use the
browse button (labeled “…”) to browse and pick the file with the standard
Windows file picker.
Select the beginning of the date range you wish to include in the file export.
Selecting the Pick radio button allows users to specify the exact date and
time of the start of the date range using the adjacent date and timer picker
controls.
Selecting the First Reading radio button will export data from the date of
the first reading stored in BiG.
Selecting the Last Export radio button will export all data since the date of
the last successful export
RS-1095 Rev 2: Building Intelligence Gateway - Software Manual
51
C
To Date
Select the end of the date range to be included in the file export.
Selecting the Pick radio button allows users to specify the exact date and
time of the end of the date range using the adjacent date and timer picker
controls.
D
Export data for
specific nodes
E
Nodes treeview
Selecting the Now radio button will export data up until the time the Data
Export dialog was opened in step 1.
If checked, the user can limit which nodes and sensors to export data from.
The nodes and sensors are picked using the nodes treeview (see label E
below).
If Export data for specific nodes (see label D above) is checked, this treeview
controls which nodes and sensors BiG will export the data for. Check of the
sensors with the data you wish to export. Clicking on a checkbox beside a
node will check (or uncheck) all the sensors belonging to it.
10.4 Importing Data
Just as BiG can export data to a file, it can also import data files into BiG. There are options for filtering
the range of time to import as well as which nodes and sensors to import. It is important to note that all
imported data gets added to the active job. To import data from a file:
1. Open the Import Data dialog by clicking File → Data Import… from the menu of the main
window (see FIGURE 10-7).
Figure 10-7 - Import data from a file using the File menu
2. Fill in the parameters for the data import using the Data Import dialog (see FIGURE 10-8, FIGURE
10-9 and TABLE 10-3 for reference).
RS-1095 Rev 2: Building Intelligence Gateway - Software Manual
52
A
B
C
D
Figure 10-8 - Data import dialog (date range)
A
E
F
Figure 10-9 - Data import dialog (source filter)
RS-1095 Rev 2: Building Intelligence Gateway - Software Manual
53
Table 10-3 - Data Import dialog reference
Label
A
Name
File
B
Filter by period
C
From date
D
To date
E
Filter by source
F
Source treeview
Description
Specifies the location of the file to import the data from. Click on the browse
button, labeled “…” to open a file picker dialog.
If you wish to limit the data imported to a particular range of time, check this
checkbox. You can use the from date (see label C below) and to date (see
label D below) fields to select the date range.
If filter by period is checked, this field is used to pick the beginning date to
export data from.
If filter by period is checked, this field is used to pick the end date to export
data from.
If you wish to filter the data imported by the node ID and input numbers of
the node and sensors respectively, then check this box. You can use the
source treeview (see label F below) to choose which node IDs and input
numbers should be imported.
If filter by source is checked, this field is used to dictate which node IDs and
corresponding inputs are imported from the file. After a file is picked in the
file field (see label A above), the source treeview will become populated with
all nodes and inputs that are found in the file. Uncheck any node or inputs
you do not wish to import.
3. Press Import to import data using the selected filters. NOTE: All data will be imported to the
active job
RS-1095 Rev 2: Building Intelligence Gateway - Software Manual
54
11 SMT Analytics Connectivity
With the purchase of an SMT Analytics account, BiG can configured to synchronize its schema and data
to the SMT Analytics server.
BiG must be told which SMT Analytics project it will synchronize with. The process of binding BiG to an
Analytics project is called commissioning. The commissioning process requires a working internet
connection. During the commissioning process, the jobs created in BiG must be merged with the jobs
already contained in the Analytics project.
Once BiG has been commissioned, all of the nodes, sensors, and data can be synced manually and
optionally at a configurable interval of time.
BiG indicates which project, if any, it is commissioned to in the status bar (see FIGURE 11-1).
Figure 11-1 – The status bar shows the SMT Analytics project BiG is currently commissioned to. This will be
absent if BiG is not commissioned.
11.1 Commissioning BiG to an SMT Analytics Project
To synchronize with the SMT Analytics system, BiG must first be commissioned to an SMT Analytics
Project. Commissioning BiG is done in three steps which are described in the following subsections.
11.1.1 Logging in With SMT Analytics User Account
To initiate the commissioning process, you will first need to have a purchased SMT Analytics account.
When you purchase an account, you will be provided with a username and password. These are
required before commissioning can take place. To begin commissioning:
1. Select Analytics → Commission… from the menu of the main window. The Commission Gateway
dialog will be presented.
2. Enter your SMT Analytics username and password (see FIGURE 11-2).
RS-1095 Rev 2: Building Intelligence Gateway - Software Manual
55
Figure 11-2 - Provide your SMT Analytics username and password
3. Press the Next >> button to proceed to the next step
11.1.2 Selecting the SMT Analytics Project
In this step, you must choose the project that BiG will be commissioned to. The project list will show all
projects that your account has access to. Click on the project to select it, then press the Next >> button
to proceed to the next step.
Figure 11-3 - Select a project to commission BiG to
RS-1095 Rev 2: Building Intelligence Gateway - Software Manual
56
11.1.3 Merging Jobs
Before completing the commissioning process, BiG needs to know how the existing jobs should be
handled when syncing to the SMT Analytics project. For each local job, there are three potential actions
that can be performed:
1. Create a new job in the Analytics project
2. Merge the job to an existing job in the Analytics project
3. Delete the local job [CAUTION – ALL CORRESPONDING DATA IS PERMANENTLY LOST]
A
B
C
Figure 11-4 - The job merging screen
Each row in the job table shown in Figure 11-4 represents a local job in BiG. It is the user’s job to decide
the Merge Action (label C) for each local job.
When the job merging screen is first shown, BiG automatically selects the merge actions as best as it can
using the information it has. Sometimes, BiG may choose incorrectly and the defaults need to be
changed. At any point, a user can restore the defaults by clicking on Auto Merge All (label B).
If you wish to have all the local BiG jobs synchronized as new jobs in the Analytics project, press the Set
All to New button (label B). Similarly, if you wish to have all the local jobs’ merge action set to delete,
click the Set All to Delete button (label B). The default job (see 5 - JOBS) is a special job and cannot be
deleted. In addition, the currently active job (see SECTION 5 - JOBS) cannot be deleted.
To manually select a merge action of a local job, click on the Merge Action drop-down (label C) for the
corresponding job row and select the appropriate action. The list of potential Analytics jobs that can be
RS-1095 Rev 2: Building Intelligence Gateway - Software Manual
57
merged to is dependent on the Allow merging to setting (label A). Refer to the following table for a
description of each setting.
Allow merging to
Matching Jobs
Description
BiG will only allow merging to jobs which were created by the same BiG and that
have the same local job ID. Local job IDs are ID numbers assigned to each job by
BiG. Unfortunately, when BiG is re-installed, the local job IDs will no longer match
even if the jobs have the same name.
Jobs Created by BiG will only allow merging jobs to jobs that were created by the same BiG
This Gateway
Any Job
BiG will allow merging local jobs to any existing job in the Analytics project.
Once satisfied with all of the merge actions, press the Next >> button to proceed.
11.1.4 Importing from Analytics Project
If you wish to import all of the remaining jobs and their corresponding nodes and sensors from the
Analytics project into BiG, check off the applicable checkboxes.
11.2 Synchronizing BiG with Analytics
Typically, users will configure BiG to periodically synchronize (or export) to Analytics. See SECTION 9 SETTINGS and SECTION 9.2 - SYNC SETTINGS for details on configuring the periodic export with Analytics.
When BiG is configured to periodically export, a countdown timer is displayed on the left side of the
status bar (see FIGURE 11-5).
RS-1095 Rev 2: Building Intelligence Gateway - Software Manual
58
Figure 11-5 - Synchronization countdown timer
In addition, users can manually initiate a synchronization with Analytics using one of two methods:
1. Select Analytics → Sync from the menu of the main window
2. Navigate to the Nodes tab in the main window and press the Export/Sync button.
During a synchronization with Analytics, the status icon (green circle in FIGURE 11-5) will change to
bright green to indicate that BiG is attempting to export. If dial-up (see SECTION 9.3 - DIAL-UP SETTINGS) is
required, BiG will display the dialing status next to the indicator. Next, BiG will synchronize its schema
(job, node, and sensor configuration) with Analytics. Finally, the sensor data (readings) will be
transmitted to Analytics.
After synchronization succeeds/fails, the status icon will change colors. If the synchronization
succeeded, the icon will become dark green . If an error occurred, the status icon will become dark
red . Synchronization errors get saved to the debug log which can be accessed in the status bar.
If periodic synchronization is enabled, the label beside the status icon will resume counting down until
the next scheduled export. Otherwise, the label will say “Disabled”. Refer to 4 - USER INTERFACE for full
details.
11.3 Import Jobs from Analytics
If two BiGs are commissioned to the same project, you may wish to have both of them report to the
same job. If so, create the job on one of the BiGs and synchronize it with Analytics. Then import the job
from Analytics on the second BiG. To import one or more jobs from the commissioned Analytics project:
1. Select Analytics → Import Jobs… from the menu of the main window (see FIGURE 11-6)
RS-1095 Rev 2: Building Intelligence Gateway - Software Manual
59
Figure 11-6 - Import jobs using the Analytics menu
2. A list of jobs that don’t exist in the current BiG will be shown (see FIGURE 11-7). Check the ones
you wish to import.
Figure 11-7 - Import Jobs dialog
3. Press Import.
RS-1095 Rev 2: Building Intelligence Gateway - Software Manual
60
11.4 Decommissioning from an SMT Analytics Project
Decommissioning a BiG allows you to commission it to another project. It also prevents BiG from adding
or modifying information to an Analytics project.
If you want to decommission BiG from the analytics project, simply select Analytics → Decomission…
from the menu of the main window. You will require an internet connection to complete the procedure.
BiG will prompt for your Analytics username and password. Press the Decommission button to complete
the decommissioning process.
Figure 11-8 - Decommission BiG using the Analytics menu
RS-1095 Rev 2: Building Intelligence Gateway - Software Manual
61
12 Alarm Handling
BiG provides alarm notifications for tracking and reacting to sensor readings in real-time. An alarm is a
named pair of on and off triggers. The on trigger defines the condition upon which events should be
created. The off threshold defines the condition upon which an event should be closed. Once created,
an alarm can be linked to any number of sensors. In addition, a sensor can be linked to any number of
alarms.
When BiG receives new data from a sensor, it compares the data against all alarms linked to the sensor.
If the data crosses an alarm’s on threshold, an event is created for that sensor/alarm link. Similarly, if
the data crosses an alarm’s off threshold, the event is closed.
12.1 Creating Alarms
There are three ways to create an alarm:
12.1.1 Creating Alarms from the Alarms Window
1. Open the alarms window by selecting View → Alarms… in the main menu bar
Figure 12-1 - Opening the Alarms Window
2. Click the New… button in the toolbar. This will bring up the Alarm Configuration window
Figure 12-2 - Clicking the New Alarm button in the Alarms Window
RS-1095 Rev 2: Building Intelligence Gateway - Software Manual
62
Figure 12-3 - Alarm Configuration Dialog
3. Enter a name for the alarm in the name field
4. Choose a level for the alarm
5. Specify the condition and window of the on trigger
The condition is composed of an operator and a threshold value
The window is composed of an amount and a unit. The window dictates the portion of
recent sensor data that must meet the condition for the alarm to be triggered. The
window can be specified in units of time or in number of readings. This is chosen in the
drop-down menu on the line labeled “For:”
6. Specify the condition and window of the off trigger
7. Press Save
12.1.2 Creating and Linking Alarms from the Sensor Context Menu
This method creates an alarm and links it to the desired sensors in one simple operation. Note that
once an alarm has been created, it can be linked to new sensors at any time. See the section entitled,
Linking and Unlinking Existing Alarms.
1. On the main window, navigate to the Nodes Tab
2. Select the sensor(s) to be linked to the new alarm. You can select a range of sensors by clicking
the first sensor, then holding down SHIFT and clicking on the last sensor. To add or remove a
sensor from your current selection, you can use CTRL + click on a sensor.
3. Bring up the sensor context menu by right-clicking on one of the selected sensors. Select Alarms
→ New… to bring up the Alarm Configuration window.
RS-1095 Rev 2: Building Intelligence Gateway - Software Manual
63
Figure 12-4 - Creating and linking an alarm from the Sensor Context Menu
4. See steps 3 – 7 from the first method
12.1.3 Creating and Linking Alarms from the Alarms Pane
This method creates an alarm and links it to a single sensor in one operation. Note that this alarm can
later be linked to any number of sensors. See the following section entitled, Linking and Unlinking
Existing Alarms.
1. On the main window, navigate to
the Nodes Tab.
2. Ensure that the Alarms Pane is
turned on and displayed. This is
controlled by the alarms pane
toggle button (see label D in 4.1 -
RS-1095 Rev 2: Building Intelligence Gateway - Software Manual
64
3. THE Nodes Tab) in the upper-right corner of the Nodes tab.
4. Select a single sensor to activate the Alarms Pane.
5. Right-click in the Alarms List of the Figure 12-5 - Creating and linking an alarm from the Alarms Pane
Alarms Pane to open the context
menu.
6. Select Link → New alarm… to bring up the Alarm Configuration window.
7. See steps 3 – 7 from the first method
12.2 Linking and Unlinking Existing Alarms
Once an alarm has been created, it can be linked to any number of sensors in the system. Linking an
alarm to a sensor causes the system to monitor the sensor for the alarm’s triggers and generates/closes
events. The alarms can also be unlinked from sensors at any point in time. There are two methods for
linking/unlinking alarms to/from sensors
NOTE: Unlinking alarms from sensors will delete all associated events and targets (see Targets and
Actions for details)
12.2.1 Linking and Unlinking Existing Alarms from the Sensor Context Menu
1. On the main window, navigate to the Nodes Tab.
2. Select the sensors you wish to link/unlink. You can select a range of sensors by clicking the first
sensor, then holding down SHIFT and clicking on the last sensor. To add or remove a sensor
from your current selection, you can use CTRL + click on a sensor.
3. Bring up the sensor context menu by right-clicking on one of the selected sensors.
RS-1095 Rev 2: Building Intelligence Gateway - Software Manual
65
4. Move the mouse over the Alarms item. The Alarm Linkage submenu should appear
Alarm Linkage Legend
Icon
State
Unchecked
Checked
Partially
Checked
Single Sensor
Selected
Alarm is not
linked
Alarm is linked
Multiple Sensors
Selected
No selected sensors
linked
All selected sensors
linked
Click Effect
Links all selected
sensors
Unlinks all selected
sensors
N/A
Some but not all
selected sensors linked
Links all unlinked
selected sensors
5. The Alarm Linkage submenu contains a New… item (see Creating and Linking Alarms with Sensor
Context Menu), and an item for each alarm in the system. Beside each alarm is an icon indicator
which corresponds to the linkage of the alarm to the selected sensors. See the Alarm Linkage
Legend for the possible linkage states.
6. Depending on the linkage state, clicking on the alarm’s entry will either link or unlink the
selected sensor(s) to the alarm. Refer to the Click Effect column of the Alarm Linkage Legend for
the outcome of clicking an alarm based on its current linkage state. Unlinking alarms will warn
the user that unlinking alarms also deletes associated events and targets and prompts for
confirmation.
12.2.2 Linking Alarms from the Alarms Pane
This method will link a single alarm to a single sensor.
1. On the main window, navigate to the Nodes Tab.
RS-1095 Rev 2: Building Intelligence Gateway - Software Manual
66
2. Ensure that the Alarms Pane is displayed. This is controlled by the alarms pane toggle button
(see label D in 4.1 -
RS-1095 Rev 2: Building Intelligence Gateway - Software Manual
67
3. THE Nodes Tab) in the upper-right corner of the Nodes tab.
4. Select the sensor you wish to link the alarm to. This will activate the Alarms Pane. Currently
linked alarms will be shown in the Alarms List.
5. Right-click in the Alarms List of the Alarms Pane to open the context menu.
6. Move the mouse over the Alarms
Figure 12-6 - Linking alarms from the Alarms Pane
item. This will bring up a submenu
which contains all the alarms that have not been linked to the selected sensor.
7. Click on one of the alarms to link it to the selected sensor
12.2.3 Unlinking Alarms from the Alarms Pane
This method unlinks a single alarm from a single sensor
1. On the main window, navigate to the Nodes Tab.
2. Ensure that the Alarms Pane is displayed. This is controlled by the alarms pane toggle button
(see label D in 0 -
RS-1095 Rev 2: Building Intelligence Gateway - Software Manual
68
3.
4.
5.
6.
THE Nodes Tab) in the upper-right corner of the Nodes tab.
Select a single sensor that you wish to unlink the alarm from. This will activate the Alarms Pane.
Right-click the alarm in the Alarms List of the Alarms Pane to open the context menu.
Click on the Unlink item. This will display a confirmation dialog informing the user that unlinking
the alarm also deletes the events and targets (see SECTION 12.4 - TARGETS AND ACTIONS)
associated.
7. Read and confirm the confirmation dialog
Figure 12-7 - Unlinking alarms from the Alarms Pane
12.3 Monitoring Alarms
The SMT Building Intelligence Gateway considers an alarm active on a linked sensor if there is an event
that has not yet been cleared. Any number of alarms can be active on a sensor at a time. BiG provides a
simple, streamlined way to monitor alarm activity. There are different two views that are used to
monitor alarms: the Nodes Tab, and the Events Tab.
12.3.1 Monitoring Alarms in the Nodes Tab
The Nodes Tab provides a real-time view of the current state of the system. In the Node List, a node’s
icon turns red to indicate that it contains sensors that have active alarms. The icons are updated in realtime as soon as events are created and cleared. In the sensor list, a sensor will have a red icon to
indicate that there is one or more alarms active on it. Finally in the alarms pane, when a single sensor is
selected, alarms will appear red to indicate they are active on the selected sensor. See the diagram
below for details.
RS-1095 Rev 2: Building Intelligence Gateway - Software Manual
69
Global Alarm Icon
A red window icon
indicates that one
or more alarms is
active in the system
Sensor List
Sensors with active
alarms have a red
icon
Alarms List
Alarms that are
active on the
selected sensor are
shown in red
Node/Group List
Nodes/groups
containing sensors
with active alarms are
marked with a red
indicator
Time Graph
Events for the
selected sensor
are shown in
red
Event List
Events for selected
sensor/alarm are
listed here in order
starting with the
most recent or
active (red) events,
to the oldest closed
events.
12.3.1.1 Event List
Events for the selected sensor and alarm combination can be viewed in the Event List. The events are
shown from newest to oldest.
12.3.1.1.1 Viewing Events
You can easily jump to the selected event in the Time Graph by double clicking on an event in the list, or
by right-clicking on the event and pressing the View… item.
12.3.1.1.2 Clearing Events
If the alarm is active, the first event in the Event List will be colored red and will not have a date in the
Cleared column. This event can be manually cleared by right-clicking on it and choosing the Clear… item.
This will prompt for confirmation and give the option of running the associated targets with clearing the
event (see section 12.4 - TARGETS AND ACTIONS for a complete description of targets). Pressing yes
clears the event and runs the associated targets. Pressing no clears the event without running targets.
Pressing cancel aborts the operation. Manually cleared events show up in this list with an [M] symbol
after the date in the cleared column.
12.3.2 Monitoring Alarms in the Events Tab
The Events Tab provides a sortable list of all events in the system. Each event is represented as a row in
the list and contains the following fields:
Time Set
Time Cleared
Alarm
RS-1095 Rev 2: Building Intelligence Gateway - Software Manual
70
Sensor
Node
Input
Condition (the on trigger condition for the event’s alarm)
Manually Cleared (An asterisk is shown when the event was manually cleared)
Active events are highlighted in red. To sort by a column, click on the column’s header button.
Figure 12-8 - Events Tab
Double-clicking on an event in the list will switch focus to the Nodes Tab, select the associated sensor
and alarm and show the event in the Time Graph.
12.4 Targets and Actions
The SMT Building Intelligence Gateway (BiG) can also be configured to automatically respond to alarms
that are triggered. This can be achieved through the use of targets and actions.
Actions are the fundamental building blocks that can be used to build an automated response system.
BiG is currently shipped with the following actions:
Sending an email
Sending an alphanumeric page
Running an external software program with command-line arguments
Displaying pop-up notification
Controlling an attached DLP-IOR4 dry contact relay
A Target is a group of configured actions. In BiG, actions can only be created and configured within the
context of a target. For example, a target might be named “Respond to Flood” and might consist of an
email action configured to be sent to response personnel, and a relay action to turn on a water pump.
Targets can be linked to one or more sensor/alarm combinations. In the previous example, the
“Respond to Flood” target would be linked to all of the flood sensors for the flood alarm.
RS-1095 Rev 2: Building Intelligence Gateway - Software Manual
71
12.4.1 Creating Targets
There are two methods for creating a target. The first method is using the Edit Targets Window. The
second method creates and links an alarm for the selected sensor and alarm using the Alarms Pane.
12.4.1.1 Creating Targets in the Edit Targets Window
1. Open the Edit Targets window if it is not already open. On the main window’s menu, click View
→ Targets…
2. In the Edit Targets Window, click the
3. Enter a name for the target and press Ok.
button to bring up the New Target…window.
12.4.1.2 Creating and Linking a Target with the Alarms Pane
1. On the main window, navigate to the Nodes Tab.
1. Select a sensor you wish to link to the target
2. Ensure that the Alarms Pane is displayed. This is controlled by the toggle alarms pane button
(see 0 -
RS-1095 Rev 2: Building Intelligence Gateway - Software Manual
72
3. THE NODES Tab) in the upper-right corner of the Nodes tab.
4. In the Alarms List in the Alarms Pane, select the alarm you wish to link to the target. The Alarms
List will appear empty of no alarms have been linked to the sensor. In this case, see the
previous section entitled, “Linking and Unlinking Existing Alarms”.
5. Once the alarm is selected, click on the Targets Tab in the Alarms Pane to display it.
6. Right-click an area in the Targets List in the Targets Tab in the Alarms Pane, and click on Add →
New target… to bring up the New Target window.
7. Enter a name for the new target and press Ok.
12.4.2 Configuring Targets
Target management takes place in the Edit Targets Window. This can be opened from the main window
by clicking on View → Targets… in the menu bar. From here, it is possible to adjust the trigger and clear
settings, add actions to the target, configure actions for the target, and remove actions from the target.
12.4.2.1 Adjusting Trigger Settings and Clear Settings for Targets
By default, a target’s actions get run when any sensor-alarm that it is linked to becomes activated or is
cleared. In some cases, it is desirable to only run the actions when all of the sensor-alarms linked to the
target become active or when all of the sensor-alarms are cleared. This is a configurable setting that is
managed per-target. To configure this action, bring up the Targets Window. Select the target and
RS-1095 Rev 2: Building Intelligence Gateway - Software Manual
73
choose the applicable setting in the Trigger Settings group box and Clear Settings group box. Each of the
settings is summarized in the tables below.
Trigger Setting
Trigger on any alarm
Trigger when all alarms triggered
Clear Setting
Clear on any alarm
Trigger when all alarms clear
Description
When an alarm is activated on a sensor, the
target’s actions will always be run.
Actions will only be run when an alarm is the last
alarm to be activated for the target.
Description
When an alarm is deactivated on a sensor, the
target’s actions will always be run.
Actions will only be run when an alarm is the last
alarm to be deactivated for the target.
12.4.2.2 Adding Actions to a Target
To add an action to a target, bring up the Edit Targets Window, and select the desired target from the
list. Click the Add button in the Actions panel to bring up a list of available actions. Click on the desired
action to create and configure it.
Figure 12-9 - Adding Actions to a Target
12.4.2.3 Configuring Actions for the Target
After picking an action to add you must configure it. The settings vary based on the action. In this
section, we discuss the settings for each of the different actions. But first, the action macro system must
be discussed.
12.4.2.3.1 The Action Macro System
Certain settings for actions are macro-enabled. This feature lets users to utilize the information of the
triggering alarm/sensor into the action that is taken. A macro is a symbolic placeholder that gets
replaced at the time the action is triggered. Macros in BiG take the form $(MacroName)
RS-1095 Rev 2: Building Intelligence Gateway - Software Manual
74
Macro-enabled settings are distinguishable by their yellow background. When a macro is entered into a
macro-enabled setting, it gets highlighted in blue to indicate that it has been recognized by BiG. The
following screenshot illustrates this:
In every action that allows macros, a macro legend is displayed. Here the
macros names are listed along with their symbol. The macros in the
legend can be dragged into macro-enabled setting fields using the mouse.
In the following section, all of the currently supported macros are listed
along with their symbols and description of use.
Figure 12-10 - Macro Legend
RS-1095 Rev 2: Building Intelligence Gateway - Software Manual
75
12.4.2.3.2 Macro List
Macro
Macro Symbol
Event ID
$(EventID)
Sensor ID
$(SensorID)
Node ID
$(NodeID)
Node PhyID
$(PhyID)
Node Name
Sensor Input
Sensor Name
Date
$(NodeName)
$(SensorInput)
$(SensorName)
$(Date)
Description
A whole number which identifies the event associated with
the target being triggered. See the section Alarms and Events
for a complete description of events.
A whole number which identifies the sensor that triggered
the target.
A whole number which identifies the node the sensor belongs
to. This number does NOT correspond to an SMT WiDAQ
serial number, but refers to a single device per-job.
A whole number which identifies the physical device the
sensor belongs to. In most cases, this value corresponds to an
SMT WiDAQ serial number.
The name of the node that the sensor belongs to.
The input number of the sensor that triggered the target.
The name of the sensor that triggered the target.
The date and time that the event was triggered or cleared.
The output format is:
dd/mm/yyyy hh:mm:ss [AM|PM]
State
$(State)
Threshold
$(Threshold)
Window
$(Window)
For example, “06/07/2009 02:15:33 PM” represents July 6th,
2009
Indicates whether the event is being created by the on trigger
or cleared by the off trigger of the alarm. If it is associated
with the on trigger, the value that will be inserted is
“triggered”. If the event is being cleared, the value will be
“cleared”.
The threshold value corresponding to the on/off trigger
condition of the alarm depending on whether the event is
being triggered or cleared respectively.
For example, if the alarm is being triggered and the alarm’s on
trigger condition is “greater than 500”, then the macro will be
replaced with 500.
The window of the on or off trigger depending on if the event
is being triggered or cleared. The value output depends on
the alarm trigger’s window unit. If the unit was specified in
time units, the output will be formatted as:
d.hh:mm:ss
NOTE: d is number of days but is only shown if the window is
one day or longer
If the unit was “readings”, then the output format is:
x readings
RS-1095 Rev 2: Building Intelligence Gateway - Software Manual
76
Alarm ID
$(AlarmID)
Alarm Name
Alarm Operator
$(AlarmName)
$(alarmOperator)
Warning Level
Reading
$(WarningLevel)
$(Reading)
Manually Cleared
$(ManualClear)
A whole number uniquely identifying the alarm that triggered
the target
The name of the alarm that triggered the target
The mathematical symbol corresponding to the operator of
the condition of the trigger for the alarm that triggered the
target. Possible values include
<
Less than
>
Greater than
<=
Less than or equal to
>=
Greater than or equal to
=
Equal to
<>
Not equal to
The numerical warning level of the alarm triggering the target
The value of the reading from the sensor that triggered or
cleared the alarm. If the alarm is set to use raw values, then
the reading is expressed in raw values. Otherwise, the
reading is expressed in engineering units.
The value is “true” when the target was triggered by a user
manually clearing an alarm. Otherwise, it is “false”.
RS-1095 Rev 2: Building Intelligence Gateway - Software Manual
77
12.4.2.3.3 Configuring an Email Action
Email to:
This field is used to list the e-mail addresses that the email will be sent to. To add an email address, type it into the textbox on the left hand side and press the Add button or
press the enter key. This will transfer the address to the list on the right side and empty
the textbox activate it for for easily entering additional emails. To remove one or more
e-mail addresses from the list, select the addresses to be removed in the list on the right
and then press the Remove button.
Subject:
This is a macro-enabled setting that is used to fill in the subject of the e-mail sent.
Message:
This is a macro-enabled setting that is used to fill in the message body of the e-mail.
E-mail actions require that the mail settings are configured in the settings window. To bring up the mail
settings from the main window, click View → Settings… in the menu. In the settings window, select the
mail tab.
The e-mail action can also be configured to use dial-up when a connection to the internet is not present.
Please refer to 9.3 - DIAL-UP SETTINGS for instructions on configuring dial-up connections.
RS-1095 Rev 2: Building Intelligence Gateway - Software Manual
78
12.4.2.3.4 Configuring a Pager Action
The pager action uses Simple Network Paging Protocol (SNPP) to send alphanumeric pages. Paging
carriers will usually have either a SNPP gateway or a SMTP gateway. If a carrier has a SMTP gateway,
then the e-mail action can be used to send pages. NotePage Inc. maintains a list of SMTP paging carrier
settings at http://www.notepage.net/smtp.htm. If your carrier uses a SNPP gateway, then the pager
action is needed.
NotePage Inc. also maintains a list of SNPP paging carrier settings at
http://www.notepage.net/snpp.htm. SMT Research does not lay any claim that the NotePage settings
lists are complete or accurate, nor do we put NotePage Inc. responsible for inaccurate or outdated
information. Consulting the paging carrier should be the primary source for obtaining SNPP settings.
Pager actions will also use dial-up connections if no internet connection is detected (see 9.3 - DIAL-UP
SETTINGS).
SNPP Server Host: The host of the SNPP server to send the page to. Obtain this from the paging carrier.
SNPP Server Port: The port of the SNPP server to send the page to. Obtain this from the paging carrier.
Pager Numbers:
The list of pager numbers to send the page to. All pager numbers must belong to the
carrier that owns the specified SNPP server. To add a pager number, enter it into the
number entry field on the left side of the Pager Numbers panel and press the Add
button or enter on the keyboard. This will transfer the number to the list on the right
and clear the number entry field and activate it for rapid entry. To remove pager
number(s), select them from the list on the right of the Pager Numbers panel and
then press the Remove button. At least one pager number must be specified to save
the configuration.
Subject:
The subject line that will appear on the page. This field is macro-enabled.
Message:
The body of the page text. This field is macro-enabled.
RS-1095 Rev 2: Building Intelligence Gateway - Software Manual
79
12.4.2.3.5 Configuring a Popup Action
The popup action displays a pop-up message when triggered. The message can be customized using
macros.
Popup Message: The content of the popup message that will be displayed. This field is macroenabled.
12.4.2.3.6 Configuring a Relay Action
This action is used to toggle outputs of the DLP Design DLP-IOR4 4-Channel Latching Relay Module
(http://www.dlpdesign.com/usb/ior4.shtml). The DLP-IOR4 appears in windows as a virtual COM port.
The port number can be found by browsing the device manager.
RS-1095 Rev 2: Building Intelligence Gateway - Software Manual
80
Field
COM Port
Output
Alarm Triggered
Alarm Cleared
Description
The port of the relay to act on.
The output number to act on (1-4).
The action to take on the specified relay/output when a linked alarm is triggered.
A – Set the output’s input to A
B – Set the output’s input to B
Toggle – Toggle the output’s input
No Change – Do nothing
The action to take on the specified relay/output when a linked alarm is cleared.
Same as above.
12.4.2.3.7 Configuring a Run Program Action
The Run Program action provides a powerful construct. It allows developers and system administrators
to extend the possibilities of BiG alarm handling. Using command-line arguments, it is possible to send
event information to an external program which can act accordingly.
Program:
The program to run. Click the “…” button to browse for the program.
Arguments:
The command-line arguments to pass to the program. This field is macro-enabled.
Consult the program’s documentation for information about its command-line options.
If an argument might contain spaces or special characters, it is advised to surround it the
argument with double-quotes (e.g. “$(AlarmName)”)
RS-1095 Rev 2: Building Intelligence Gateway - Software Manual
81
12.4.2.3.8 Configuring an Existing Action for a Target
Select the desired target in the Edit Targets Window. From the list of actions, select the one to be
configured and press the Configure… button. Refer to previous sections for field details.
12.4.2.4 Deleting Actions from a Target
Select the desired target in the Edit Targets Window. From the list of actions, select the ones to be
deleted. Press the Delete… button. This will display a prompt to confirm the deletion. Press Yes to
confirm the delete or No to cancel.
12.4.3 Linking Targets
Targets can be linked to any number of sensor-alarm combinations. The alarm must already be linked to
the sensor to link the target. See Linking and Unlinking Existing Alarms for details on how to do this. To
link an alarm:
1. Navigate to the Nodes Tab, in the main window.
2. Select the sensor you wish to link the target to.
3. Ensure the Alarms Pane is shown using the toggle alarms pane button (see 0 -
RS-1095 Rev 2: Building Intelligence Gateway - Software Manual
82
4.
5.
6.
7.
8.
THE NODES Tab) in the top right of the Nodes Tab.
In the Alarms Pane, select the alarm you wish to link the target to for the selected sensor.
Click on the Targets Tab in the Alarms Pane to display it.
Right click in the Targets List in the Alarms Pane and hover the mouse over the Add submenu.
Click on the desired target to link from the submenu to link it.
Figure 12-11 - Link target to selected sensor-alarm
12.4.4 Unlinking Targets
To unlink a target from a particular sensor and alarm:
1. Navigate to the Nodes Tab, in the main window.
2. Select the sensor you wish to link the target to.
3. Ensure the Alarms Pane is shown using the toggle alarms pane button (see 0 -
RS-1095 Rev 2: Building Intelligence Gateway - Software Manual
83
4.
5.
6.
7.
8.
9.
THE NODES Tab) in the top right of the Nodes Tab.
In the Alarms Pane, select the alarm you wish to link the target to for the selected sensor.
Click on the Targets Tab in the Alarms Pane to display it.
Select the target you wish to unlink from the Targets List in the Alarms Pane.
Right-click on the target and click the Remove item.
Confirm the prompt to remove the target.
12.4.5 Renaming Targets
Select the target in the Edit Targets Window and right-click it to bring up the Target Context Menu. Click
the Rename item to bring up the rename dialog. Enter a new name and press Ok to rename or Cancel to
abort.
12.4.6 Deleting Targets
To delete a target from the system, and consequently remove it from all sensor-alarms, select the target
in the Edit Targets Window and right-click on it to bring up the Target Context Menu. Click the Delete…
item. This will prompt for confirmation of the delete. Press Yes to confirm the delete or No to cancel it.
RS-1095 Rev 2: Building Intelligence Gateway - Software Manual
84