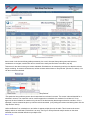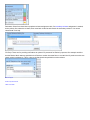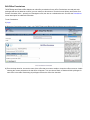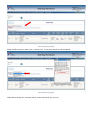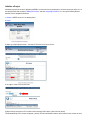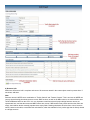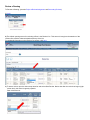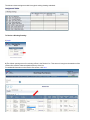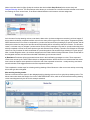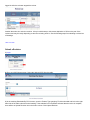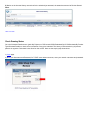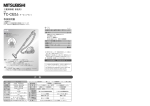
1
Web Shop Plan Review
(WSPR)
User Manual
A
R
D
T
F
February 2014
© 2014 by Texas Department of Transportation
(512) 302-2453 all rights reserved
Table of Contents
WSPR Login
Background
WSPR Description
Review Cycle Overview
Screens/Layout
Flow Charts
Roles
Video
Account Tools
(User)
Create Office/Account
Add a User
Add an Office
Approve an Office
Set Office Structure
Remove a User
Message Center
Edit Office Permissions
Help Resources
(All new users)
Video
(Office Admins)
Video
(TxDOT District or Division Admins)
Video
(TxDOT District Admin)
(TxDOT District or Division Admins)
(Office Admins)
(All account holders)
(TxDOT District or Division Admins)
Review Preparation
(All users)
A
R
Initialize a Project
Delegate Initialization
Edit a Project
Assign Reviewers
Remove an Assignment
Reject Assignment
Process Drawings
D
Find a Drawing
Submit a Drawing
Submit a Revision
Review a Drawing
Delegate a Review
Secondary Reviews
Retaining Wall Reviews
Working Drawing Review
Retract a Drawing
Check Drawing Status
Archive Drawings
Reference
Status Codes
Definitions
FAQs
Support
Updates
(TxDOT District)
(TxDOT District)
(TxDOT District)
(TxDOT District)
(TxDOT District)
(TxDOT District or Division, Consultant)
T
F
(All users)
(Contractor, Fabricator, Detailing Office)
(Contractor, Fabricator, Detailing Office)
(TxDOT District or Division, Consultant)
(TxDOT District or Division, Consultant)
(Railroad, Tollroad)
(MSE walls -TxDOT District or Division, Consult.)
(TxDOT District or Division, Consultant)
(Submitter, TxDOT District or Division, Consult.)
(All users)
(TxDOT District)
Video
Video
Video
Video
Video
Video
Video
Video
Video
Video
Video
Video
Video
Video
Video
Video
Video
Video
Video
Video
Video
Video
Video
WSPR Description
WSPR (Web Shop Plan Review) is a controlled access central repository for TxDOT shop and working drawings, and
utilizes a web based user interface. The application provides for document flow monitoring, auto-notifications, DCIS
project information retrieval and submittal association, timed task reminders, and review and submittal history
management tools for all process partners.
It is a .Net web based application using an Oracle client database. It permanently associates uploaded drawing files to
project data retrieved from DCIS, Site Manager, and PSN-Bridge Log. C# (sharp) language is used for data retrieval and
overall web page format and command structure, with associated web page display property support from XML and
JavaScript languages.
Access
• All users who retrieve and store information in WSPR must have an approved account, and login using a username and
password created for that account. TxDOT personnel (only) can view documents without an account and login using their
Novell username and password.
• All accounts are associated to an office.
• All offices have at least one Admin.
• Some TxDOT offices (AE offices for example) are associated to a managing District or Division headquarters office.
• Admins for these managing offices have additional rights and maintenance, management, and support responsibilities
than do subordinate office Admins.
Features
Document management:
Submittal flow is dated, tracked, permanently recorded and accessible statewide.
A
R
T
F
Expediency:
Far fewer steps, time, and effort are required to submit drawings, assign reviewers, distribute approved submittals,
organize records, and retrieve documents for viewing.
Transmission:
Larger files are accommodated – up to 100mb +/-, allowing files to remain in one piece.Formatting:
File name, subject line, and email body formatting issues are controlled by WSPR instead of the user.
Communication:
Automatically notifies all business partners at critical junctures, and stores the communications permanently in application
message centers. No manually created emails are necessary.
D
Review assignment:
Direct input from District Admins using reviewer drop down lists, replacing forms and pre-construction meeting
instructions.
Fewer errors:
Less manual input due to use of drop down lists, checkboxes, and data returned from existing databases, reduces
incidences of human error.
Contacts:
Account based login and recorded actions puts contact information at fingertips.
Accountability:
All critical actions are user associated, time date stamped, and permanently stored.
Security:
TxDOT approved account creation and access using Admin controlled usernames and passwords along with backed up
dedicated server storage provides for increased document and user access protection.
Table of Contents
Review Cycle Overview
The following is a brief description of a complete submittal cycle from fabricator submission to review completion to help
provide the user with a feel for the overall document flow within the system.
The Fabricator
Logs in to WSPR, types in a CCSJ, picks a product, associates a structure (where applicable), browses to a file and
submits it.
The District
Is auto-notified that a submittal needs a review assignment, logs on, types in the CCSJ, WSPR downloads info from
DCIS, the District verifies that info, and then assigns a reviewer to the submittal product type (or proactively to all
reviewers for all product types on the project if inclined to).
The Reviewer
Is auto-notified that a submittal is ready to be reviewed, logs on, sees an item in their review cue, clicks start review,
downloads the file, reviews it, clicks approve, and uploads the stamped and secured file.
The Fabricator
Is auto-notified that the submittal was approved, logs on, downloads the approved file and is cleared to start fabrication;
the contractor, District, Construction Division, and any other CC recipients added along the way are also notified.
T
F
Access, Storage and Archiving
Anyone inside TxDOT can view the file by typing in the CCSJ and picking the product, and those with an account and
directly involved with the project can pick the CCSJ from a list in the My Projects page. Outside of TxDOT, only those
directly involved with the submittal have rights to view the file and can do so by typing or selecting the CCSJ from a list
within WSPR. At the end of the project, the submittals are made available to GSD for archiving and future access through
Plans Online.
A
R
The shop plans and working drawings will continue to be available in WSPR after archiving. At the time of this writing,
there are no plans to periodically purge documents from WSPR or to keep them only for a certain amount of time after
project completion. As a safeguard against loss, our preference is to keep these duplicate (to Plans Online) sets in
WSPR indefinitely. This may change without notice as we are directed.
Pre- assigned Submittals - comment
Districts can “pre-assign” review duties for projects (before submittals come in). In this case, the reviewer has already
been assigned by the District Admin prior to submittal, so upon submittal, the submittal auto-notification goes directly to
the reviewer, eliminating one step in the process after submittal has occurred.
D
See the Process Drawings section of the Table of Contents for links to complete step by step instructions on how to carry
out all of the above tasks.
Table of Contents
Screens - Layout
User Key: All Account Holders (ACCT), TxDOT Viewer (V), TxDOT District Admin (DA), TxDOT District Initializer (DI), TxDOT Reviewer (R),
TxDOT BRG Admin (BA), Consultant Reviewer (CR), Contractor (C), Fabricator (F), Detailing Office (DO), Sub-Contractor (SC),
Railroad/Tollroad (RR/TR)
The following descriptions give the user a working knowledge of each of the WSPR screens and where they are found.
For in depth usage steps, see the Process Drawings section of this manual and choose an action category.
Contents:
1) Opening Screen
2) Toolbars
3) Layout
4) Account History
5) Review Cue
6) My Projects
7) Users/Offices
8) Permissions
9) District Defaults
10) Reference/Help
11) Message Center
12) Reminder Settings
13) Navigation
14) Submittals By CCSJ
15) Submittal Details
16) Edit Project
17) Assign Reviewers
1) Opening Screen
Users: DA-DI-R-BA-CR-RR/TR
Since the primary task of these offices is reviewing submittals or managing those reviews, these office types all open to
the Review Cue screen. All reviewer actions are performed from this screen. Managers and reviewers can see at a glance
the volume of reviews being processed (finished ones move to Account History) and the elapsed time since arrival of the
submittal. (Days Elapsed column at far right) For this reason, the default view is with the oldest reviews at the top. The
Subm. Nbr., CCSJ, Assigned Reviewer and Review Started By column items are also links to additional project or
submittal data and contact information. Additional screen details are found here.
Note - there are some toolbar differences between office role types, but otherwise the overall look of the screen is the
same for all the different users.
Users: C-F-DO-SC
As these office types are mostly concerned with the submitting drawings and monitoring of their status, all of these
account types open to the Account History screen. The table found here primarily provides information on what actions
this office has performed concerning a submittal, and provides links to other screens with more in depth info. This is also
where you would go to retract a submittal if within an acceptable time frame (before a review starts). A more detailed
description is found here.
Users: V
Viewing offices (TxDOT employees without an account) open to the CCSJ search field and Reference/Help screen. Type
in a CCSJ. If the CCSJ is found, a CCSJ Lookup table is displayed, from which the CCSJ link is clicked. The next view is
of the Submittals BY CCSJ screen, where the user can choose the submittal based on the product type.
Screen-Layout Contents
2) Toolbars
These toolbar headings provide direct or indirect access to all screens within WSPR. Versions of this parent toolbar are
present on the opening screen of all account holders (ACCT). Certain items are visible only to those users as indicated
below.
ACCT
DA,DI,BA,
R,CR,RR/TR
ACCT
ACCT
BA, DA
BA, DA
BA*
ALL
ACCT
User Key: ), All Account Holders (ACCT), TxDOT Viewer (V), TxDOT District Admin (DA), TxDOT District Initializer (DI), TxDOT Reviewer (R), TxDOT
BRG Admin (BA), Consultant Reviewer (CR), Contractor (C), Fabricator (F), Detailing Office (DO), Sub-Contractor (SC), Railroad/Tollroad
(RR/TR)
* DA and DI users have access to these settings from the Edit Project screen for each project.
Screen-Layout Contents
3) Layout
The following gives the user a view of the entire layout of WSPR. Click the individual thumbnail images to go to that
screen’s description and full size image. Click the heading area for an enlargement of the layout image. Click the subheading thumbnails to go to those content description areas.
4) Account History – All Account Holders (ACCT)
The Account History screen displays a record of all actions performed on submittals by this office. Other office’s actions
on this submittal, if any, are not shown here. Go to the Submittal Details screen for a more comprehensive listing of all
user’s actions on a given submittal. Refer to the red comments on the screen shot below for additional details.
Items remain in the Account History table permanently. As a user’s Account History table grows and becomes
cumbersome to navigate, use the Filter tool to sort and more easily and find items in the table. (top left)
This screen is also where users go to retract submittals. Submittals can be retracted up until the time that the reviewer
begins reviewing. In extreme circumstances, call the reviewer and ask them to “Stop Review” (Review Cue action). You
can then retract the submittal.
”Stop Review”
*This particular Account History screen shot is associated to a reviewer’s account. The screen is almost identical for a
submitter’s account. The retract link can be used for approvals or submittals. As mentioned in red above, if for an
approval, the time limitation for retraction is by the end of the business day that the approval action was taken. If for a
submittal, it can be retracted anytime up until the review has started. (or by calling the reviewer and having them click the
“Stop Review” action)
Unlike the Review Cue, submittals can, and often do appear multiple times in the table. This is because the screen
displays actions on submittals. Each action is an entry, and if your office performed multiple actions on the same
submittal, then the submittal will show up multiple times.
Back to Layout
5) Review Cue – DA, DI, R, BA, CR, RR/TR
The Review Cue contains submittals that are ready to be reviewed or are actively being reviewed. See the red comments
on the screen shot below for additional details. (See also Review a Drawing.)
After review approval, the entry is removed from the Review Cue and becomes a part of the Account History. One
exception: working drawings in a District Review Cue that do not receive an “official” approval – working drawings are
typically reviewed by the AE’s office and in general do not have to be approved per the TxDOT Construction Specification.
The AE or other District personnel can simply view it and leave it unapproved. If this is the case, the submittal will remain
in the Review Cue.
Also, if the review is delegated to another office, when the delegated reviewer tentatively “approves” it (only an internal
approval), the submittal will remain in the District’s review cue, unless the District decides to optionally approve it. Only the
District “official” approval can remove the item from the review cue and cause notifications to go out to the submitter.
Submittals will appear in this table only once during the review period, as opposed to the Account History table, where the
same submittal can appear several times to show the history of each action performed on the submittal.
Back to Layout
6) My Projects – All Account Holders
The My Projects screen displays all projects that your office has worked on. It serves as collection point for all CCSJs that
you have been involved with and therefore a central location from which you can gain access to all other associated
details.
Back to Layout
7) Users/Offices – All Account Admins
Use this screen to keep all offices and user info up to date, and to add or remove users or offices*.
* Only TxDOT District Admins or Bridge Division Admins can add or remove offices, and only TxDOT District Admins can
approve create office requests.
Back to Layout
8) Permissions - DA,BA
Headquarters office managers may want to be able to view subordinate office screens for management reasons, or
associated offices may want to view each other’s office screens to prevent duplication of effort, collaborate on projects, or
insure attention to work needs. District Admins and Bridge Admins (only) can use the Permissions screen to allow one
office to have access to another’s Account History and Review Cue screens. See also Edit Office Permissions for
additional information.
After the new permissions have been set, the viewing office needs to logout, log back in, and then change the “Show
Office” settings on the Account History and Review Cue screens (upper left of each screen) to show the particular
combinations of office data that is desired. (their own office, the new office, or “ALL”)
Final step in enacting revisions to permissions – choose offices to display in Review Cue and Account History screens.
Note that each permission set up is for one way viewing, ie, the granted office can see the other office screens but not
vice versa. For two-way viewing, the District Admin would need to then go back and add permissions for the second office
to see the first office’s screens.
Back to Layout
9) District Defaults – DA version.
District Admins use this screen to populate reviewer assignment lists with preferred review personnel according to their
product type specialty. The names added here will display on the Assign Reviewers screen. The Admin may also want
certain District personnel to be CC’d on actions concerning specific product types. Those names can be added from this
CC Recipient Defaults list, and then they will also appear in the available choices on the Assign Reviewers screen.
District Defaults - BA version.
The Bridge Division Admin sees only the Reviewers list on the District Defaults screen (no CC list). Bridge Admins use
this screen to set preferred in-house reviewer preferences for different products so that District Admins see at a glance
who from the Bridge Division to select as associated to a product when the review is going to be done by the Bridge
Division. Most bridge component reviews will be funneled through the BRG/FAB section. Three primary exceptions to that
rule are when MSE Retaining Wall submittals are involved – those go directly to BRG/GEOT, Working Drawings – those
go directly to BRG/CNST, and Misc Roadway (junction boxes, inlets, grates, sound barrier walls, etc.) – those go to
BRG/DSN. These exceptions are evident to the District Admin or Init when selecting reviewers on the Assign Reviewers
screen.
Back to Layout
10) Reference/Help – All Users
This is a central collection point for all shop drawing associated help links. This User Manual, as well as the Guide to Web
Shop Drawing Review, among many others, are found here.
Back to Layout
11) Message Center – All Account Holders
See the Message Center usage section in this manual for an extended description of this screen.
The Message Center contents represent a permanent record of all notifications sent and received in WSPR. An echoemail is also sent outside of WSPR to user email addresses based on account data input by Admins and users. In the
event that incorrect email address data is supplied by the account admin, or other unforeseen circumstances occur, the
message center copy serves as proof of delivery.
No user actions can be performed from within the center except to read and react to the information. (ie, you cannot
manually send messages)
Three folders are shown – Inbox, Sent, and Deleted. Messages serve as a history of WSPR actions and are therefore
permanent records. The Deleted folder is merely a receptacle for non-essential messages, if the user wishes to un-clutter
either of the other two folders. Messages are never truly deleted from WSPR.
Back to Layout
12) Reminder Settings – BA screen.
Bridge Admins use this screen to set duration timers for triggering auto-notifications. These reminders are sent to help
keep critical actions happening at reasonable intervals and thereby keep review times to a minimum. The default
minimums and maximums are based on current review times and expected reaction times on new business process
needs. The “Default Duration” is the time that the reminders will be triggered by if the District Admin/Init does not
customize (see next screen shot) the duration.
Most of the Reminder Types should be self-explanatory; one clarification note on the top one: this is for when the reviewer
as assigned by the District Admin/Init decides that they should not be the reviewer in a particular case and chooses to
reject the assignment. The timer starts when WSPR transmits this review assignment rejection notice to the District.
DA,DI view of Custom Reminders table on Edit Project screen.
Back to Layout
13) Navigation
Back and Forward buttons:
The WSPR back and forward buttons can be more useful than the browser’s buttons. WSPR will remember moves within
a screen, so that when you click one of the buttons, it will take you to a previous action within that screen, where the
Windows browser back and forward buttons will take you out of the screen to a previous screen or web address.
Filters:
When you start getting hundreds of items in the lists, you have two ways to sort the material to more easily get to what
you want: (a) click the table headings to sort the list either ascending or descending by that heading, or (b) use the filters
to sort by criteria such as CCSJ, Product, Status, or a date range, to name a few choices. These filters are available on
the Account History and Review Cue screens.
Show Office:
The Show Office field, in the upper left hand corner of the Account History and Review Cue screens, provides the user a
choice of which office’s screens to view – their own, another’s, or all of them at the same time, providing the user has
been given permissions to do so by a District Admin or a Bridge Division Admin. (a review management tool)
Sorting:
A number of tables within WSPR can be sorted according to date, contact, office, status, and other criteria. Click the table
headings to check for sorting capability, and if sortable, click a second time to sort in the reverse direction.
(descending/ascending)
Back to Layout
Back to Help Resources
14) Submittals By CCSJ - DA, DI (All other account holders – similar)
This screen displays the project information and links to all submittals for a given CCSJ. In addition, for District Admins
and Initializers, the Edit Project and Assign Reviewers buttons are provided for initializing a project, ie, preparing WSPR to
process drawings. Other users will not see these two buttons. Users looking for particular submittals will select and
expand the product type branches to find the desired submittal.
(Submittals By CCSJ path: My Projects/Click CCSJ/Submittals By CCSJ)
As seen in the above screen shot, there are numbers in parenthesis to the right of each product type indicating how many
submittals have come in for each product. Occasionally, you will see a number of product types in the list with a zero in
the parentheses. This either means that there have been no submittals yet for that submittal, or, and especially if there is
a long list of products with the zero, this means that the Initializer selected a whole category of product types to assign a
reviewer to, without regard to what products are actually in the bid tabs for a given project. Selecting categories, or large
groups, of products at once in the Assign Reviewers screen to assign one reviewer to can help speed up the Initialization
task, but the downside is that it clutters up this screen with product types that may never have submittals sent in for them.
Back to Layout
15) Submittal Details - All Account holders
As mentioned in other areas of this document, an advantage of this screen over the Account History screen is that this
screen shows actions histories for all users on a given submittal, whereas the Account History screen shows only the
actions of the account holders. More importantly, this is the location where users can go to open the actual drawings, and,
or, to check on the current status of the submittal. The Current Status field is located in the middle of the Submittal
Summary table. Also, see the red comments on the screen shot below.
(Submittal Details path: My Projects/Click CCSJ/Submittals By CCSJ/Submittals By Product Type/Submittal Details)
View/Download menu: - All Account holders (ACCT)
This opens when a drawing link is clicked on the Submittal Details screen (above). If multiple drawing sets are involved,
all will be displayed and the user can pick which one to view or download.
Back to Layout
16) Edit Project – DA,DI
See notes in red on the below screen shot for a description of screen areas. Click here for step by step usage instructions.
As mentioned in this usage link location, Edit Project is the first of the two part initialization process. At this location, the
District initializer will make sure that project structure information is correct for association to submittals, add any special
new products that the project is utilizing, set auto-notification reminder timings, and delegate initialization tasks to other
District personnel if necessary. When completed, the Initializer will go on to the Assign Reviewers screen to complete the
initialization process.
(Edit Project path: My Projects/Click CCSJ/Submittals By CCSJ/Step (1) Edit Project button)
Back to Layout
17) Assign Reviewers – DA,DI (Accessed through My Projects/Submittals By CCSJ)
District Admins or Initializers can assign the review of shop or working drawings to offices within or outside of TxDOT on a
product by product basis, on a structure basis, on a whole project basis, and on the basis of category groupings in
between. The individual tasked with assigning the review clicks to highlight a cell or multiple cells in the product tables
shown below, and then selects a reviewer from drop down lists provided in the left margin Reviewers menu. The selected
name then populates the cell(s). As soon as the changes are saved, the reviewer is notified of their assignment.
Secondary reviewers (railroad or tollroad offices), special CC recipients, and assignment explanation comments can also
be added to each cell assignment.
See the notes in red on the below screen shot for a description of screen areas. Click here for step by step procedures.
(Assign Reviewers path: My Projects/Click CCSJ/Submittals By CCSJ/Step (2) Assign Reviewers button)
Left margin fold out menus:
Legend: Colors appear in assignment cells to indicate product submittal status.
Reviewers: Select from these lists to populate reviewer assignment cells; if a secondary reviewer assignment is needed,
do the primary first, select the reviewer, then come back to this list and choose the secondary reviewer. You cannot
choose both in one trip.
CC Recip: These are for providing notifications to optional CC personnel for District’s purposes. One example would be
that the District Admin wants a specialist in the District to monitor document flow on a certain kind of product to make sure
certain criteria is adhered to. This is a way to do that when that specialist is not the reviewer.
Back to Layout
Screen-Layout Contents
Table of Contents
Flow Charts
Click individual charts for higher resolution image pdfs.
1) Working Drawings
2) Shop Drawings (all, except for MSE Retaining Walls)
3) MSE Retaining Walls (RW) – see review notes here.
RW – Developers Flow Chart (more in depth than above diagram; includes status changes, etc.)
Table of Contents
Roles
• Each user has an account with a unique username, password, and role. An office account, with it’s own distinct role, is
created first to associate user accounts to.
• The office role, or type, and user role for an account determine the extent of screens available and thereby the rights
of the user to access certain parts of WSPR. District Admins have a direct role in approving account creation requests
and therefore the extent of rights granted to new users.
• Many offices have only one user role type for the particular office role type (fabricator, contractor, detailer, consultant
reviewer), where Districts have up to three user role types.
• Each office must have at least one Admin, but may have multiple Admins.
• Account Admins, regardless of office role type, are responsible for approving user additions/deletions to their own
offices, maintaining up to date contact information, and providing office support. Correct office email addresses are
especially important in insuring email message delivery from WSPR.
Office Roles
TxDOT District
(typically the district headquarters)
TxDOT District Area
(area office or section office – such as “Construction” or “Traffic”, etc.)
TxDOT Bridge
(Bridge Division/Fabrication Branch)
TxDOT Bridge Sub
(Bridge Division – all other sections)
Consultant
(engineering office that reviews drawings for TxDOT)
Contractor
(prime or sub-contractor)
Fabricator
(hired by a contractor to furnish prefabricated components)
Detailing Office (creates and submits drawings for a fabricator or contractor)
Railroad
(railroad entity involved in a TxDOT project that sometimes provides secondary reviews)
Tollroad
(tollroad entity involved in a TxDOT project that sometimes provides secondary reviews)
User Roles
Bridge Admin
(TxDOT WSPR Administrator in the Bridge Division/Fabrication Branch)
Reviewer
(TxDOT, Railroad/Tollroad, or consultant personnel)
TxDOT Viewer
(TxDOT personnel without a WSPR account)
District Admin
(TxDOT WSPR Administrator typically in the district headquarters office)
District Init
(person in a TxDOT District that is delegated initializing duties by the District Admin –
typically in an Area Office)
Fabricator
(typically submits shop drawings to TxDOT – drawings for prefabricated items)
Contractor
(prime contractor – typically submits working drawings to TxDOT – drawings for cast in
place or jobsite work items)
Detailer
(creates and submits drawings to TxDOT for fabricators or contractors)
Office Admin
(all office role types – a general managerial role that each office must have at least one
person assuming)
Role Responsibilities
Most role responsibilities are self-evident, but four user roles have extended responsibilities that deserve further
description:
Office/Account Admin
• An Office Admin is a user that can create other users for their office, edit existing users, and edit their office
information. The Office Admin attribute is independent from the User Role, and his/her role will be determined
from the office type just like any other user.
• When an employee leaves the employment of an office, the Office Admin must remove the user from the
WSPR account for security reasons.
• Office Admins are the recipients of automatic email notifications from the WSPR system when an action
involves their office, and therefore is typically the one held responsible for acting upon those notifications.
• Every office must have at least one Office Admin, so it is required to specify the office admin at office
creation. The assigned admin can be changed later.
• Multiple admins are accommodated by WSPR, and it is preferable to have at least two to compensate for
absences.
District Admin
A District Admin has all the responsibilities of an Office Admin (listed above) plus the other duties listed in this
section:
• set District preferences (office structure, along with below items)
• setup District office accounts and add users
• set District Defaults
• approve account setup requests (non-TxDOT and District)
• initialize projects for the whole District, or delegate this task; which includes the next three tasks:
• edit project data
• set reminder timers
• assign reviewers
• set permissions
• perform and or delegate reviews
• act as level 1 District and project partner support for WSPR
District Init
A District Init, if they are also an Office Admin, has all of the responsibilities of an Office Admin (listed above)
plus the other duties listed here:
• initialize projects under their jurisdiction (Area for example), which includes the next three tasks:
• edit project data
• set reminder timers
• assign reviewers
• perform and or delegate reviews
Bridge Admin
The Bridge Admin role has all the responsibilities of an Office Admin plus the other duties listed in this
section:
• setup District Admin accounts
• solicit initial fabricator/contractor/detailing office/consultant account setup
• set statewide District Defaults for Bridge Division reviewers by product
• approve account setup requests (non-TxDOT, District, Division)
• set default statewide reminder timers
• set permissions for non-TxDOT and TxDOT offices
• perform and or delegate reviews
• assist with Level 1 WSPR support for Districts and non-TxDOT personnel
• act as liaison to Level 2 support
Table of Contents
Create a New Office Account
All non-TxDOT users must have an account to view items in WSPR or to effect any changes. (upload, review, etc.)
TxDOT personnel may view drawings without an account, but must have one to perform any actions on items. If your
office already has an account and you wish to perform actions other than viewing, contact your Office Admin to have them
add you as a new user. For those offices without an account, follow these instructions to create a new account:
To create an account:
1) Login
2) Select Create New Office
Blue field headings provide links to important help tips.
3) Fill out both sides of the form, keeping in mind the following information:
(Click the individual headings on the form for extended descriptions.)
Office Role – access rights, and available actions, are assigned based on the role chosen. Be careful to choose
the correct one.
CCSJ – insert a current CCSJ for a project that you are about to perform work on. The District Admin for that
project will verify your account application.
Office Abbreviation – choose a brief company/office abbreviation, 3 letters preferred, 8 max.
Primary Email – typically an address frequently monitored by the New Office Admin.
Second Email – optional, but preferred, to avoid communication lapses during absences.
Office Admin – by default, the person applying for the account and is responsible for maintaining its accuracy. It is
preferable to have more than one in most cases to insure availability at all times to handle process needs.
User Role – based on office role type, may be limited to one user role, or up to three different roles.
Add New Office – clicking this button submits the account application information to the associated TxDOT District
for verification. The Office Admin will receive an email upon account acceptance. Follow up with a phone call to the
District Bridge Engineer to expedite in urgent cases.
Table of Contents
Add New User
All Office Admins can add additional users to their office. Message centers, Review Cues (reviewer role offices only), and
Account History screens are shared in an office. This allows for work sharing and communication redundancy in case of
absences.
To add a new user:
1) Login.
2) Select the Users/Offices screen.
3) Under the Users table, click Add New User.
4) The below menu appears. Fill in all fields.
a) Fill in general user info as requested. Ensure the email address is accurate to insure delivery of notifications
b) Check this box if this user is an Admin also. Multiple Admins are permitted.
c) District User Role drop down list shown, some office types have only one choice.
d) Click Add User.
5) Resulting updated User table:
Remove obsolete users as employee turnover occurs for account security reasons. Use the “Make Inactive” action choice
on the right of the user table to remove users. (Since permanent action histories require associations to users, users can
never be completely removed from the system, only made inactive.)
Update addresses and phone numbers as needed using “Edit User” link.
Table of Contents
Add New Office
TxDOT District and Division Office Admins can add additional offices to their overall office structure. In this way, AE
offices, for example, can be added to District HQ Office structures and users can be associated to a particular District for
access to various user role actions such as project Initialization. See these WSPR Hierarchy Notes for additional
information.
To add a new office:
1) Login.
2) Select the Users/Offices screen.
3) Under the Offices table, click Add New Office. The below menu appears:
4) New Office Information pane (above, left):
Bridge Admins must choose an office type to create from a drop down list (above example), and if a District Office, the
District is then chosen from an additional drop down list. District Admins will not see these drop down lists, as WSPR
makes those choices for them based on their account information.
• Choose a unique office name and abbreviation. The standard format for a TxDOT District office name is
“TxDOT/ATL/Marshall AO”, for example for an Area Office, or, “TxDOT/ATL/Distr HQ” for a headquarters. The
abbreviations for these two examples are “ATL-MAR” and “ATL”, respectively.
• Keep abbreviations short – three letters preferred, eight letters max.
• Ensure email addresses are correct and are kept up to date to prevent communication failures due to misdirected
auto-notifications.
• Fill in all the rest of the fields accordingly.
Note: The primary address in both panes is typically the Office Admin’s email address, or the dedicated shop drawing
address for that office. Example: [email protected]. Provide at least two email addresses in the New
Office Information pane to insure continuous office communication during employee absences.
5) New Office Admin Information pain (above, right):
The first user assigned to a new office will by default be the Admin for that office. Offices can have multiple Admins.
The Office Admin checkbox will automatically be checked and greyed out.
Pick the appropriate User Role for this user.
• District Offices (other than HQ) have a choice of two User Roles: District Init, and Reviewer. (Note: Choose District
Init if you want to be able to delegate Initialization duties to particular users on a project-by-project basis – an AE for
example.)
• Bridge Division Admins have one choice for BRG offices: Reviewer, three choices for District offices: Admin, Init, or
Reviewer, and usually one choice for non-TxDOT offices: Admin.
7) Click Add New Office. Done.
Remove obsolete users as employee turnover occurs for account security reasons. Use the “Make Inactive” action choice
on the right of the user table to remove users. (Since action histories are permanent records and require associations to
users, users can never be completely removed from the system, only made inactive.)
The same applies to offices. Click the “Make Inactive” link on the right of the Offices table to remove offices from WSPR.
(See screenshot below.)
“Removing” offices:
Update addresses and phone numbers as needed, using “Edit User” and “Edit Office” links.
Table of Contents
Approve an Office
To ensure the integrity of the WSPR accounts, WSPR routes any new office requests for entities outside of TxDOT to the
District Admin for the District associated with the CCSJ entered in the office request form. The District Admin should verify
the credentials of the company requesting the account. Verification methods might include previous experience with the
company, a phone call to the prime contractor to see if the company is working for them, or a company name web search.
After researching the acceptability of the company in question, follow these steps to Accept or Reject the office request.
Make sure the office role choice by the person requesting the new office fits the person/company requesting it – fabricator
role for a known fabricator, contractor role for contractors, etc. A mistake here will effect notifications, access rights,
submittal rights, etc.
To approve (or reject) a new office:
1) Login.
2) Select the Users/Offices screen.
3) Under the Offices table, find the office mentioned in the message center notification. To the far right of the office, you
will see Approve and Reject action choices. Select the appropriate action. Again, verify the company’s credentials
before approving them.
4) If the decision was to approve, after selecting Approve in the above step, the action choice wording will change to
Request Make Inactive.
Done.
Note: TxDOT users can also request accounts from the logon page, and these need to be approved by the District Admin
as well.
Table of Contents
Set Office Structure (Districts) See note at the bottom of this section concerning non-TxDOT office structure options.
There could be many variations on the below examples, but here are two possible setups that would be most suited to
District usage.
The basic setup may be satisfactory for Districts with minimal shop drawing flow. The advanced one may be more suitable
to those Districts where there is a lot of flow and the management of this logically needs to be split up between multiple
offices.
Basic setup – one office
Example: one account and one Account Admin for all the District’s physical offices, and all users are added to that one
account; the review cue, account history, my projects, and message center are all shared.
District Setup 1 Diagram:
The bold framed box is an
office with a District Admin
as the office admin; the
smaller boxes are users
that are associated to the
office. Some of the users
(usually AEs) are assigned
the District Init role so that
they can help with
Initialization tasks for
projects in their area.
All the District Admin has to do to create this account structure is to add users to the already created office account,
assigning each user the appropriate role.
How do you create this office account structure?
The District Admin and their associated Office Account have already been setup by BRG, so the District Admin does the
following:
1) Add New User.
Similar to what is done using the Create New User command on the Logon screen, fill in the required fields. The correct
District Office Name will already be filled in and upon entering the Novell User Name, the name and phone number will
auto-fill. Add a password, email address, and choose a role and you are done.
Note: If you will ever want to delegate initialization duties to this person, here is where you choose the role to make this
possible – choose District Init from the drop down list.
2) Repeat step 1 as necessary for additional users.
Done
Advanced setup – multiple offices
Example: separate accounts for District headquarters, AE offices, etc.; requires multiple Office Admins; one District Admin
over all of them; though not initially shared, multiple office Review Cues/My Project pages may be viewed via permissions
setup by the District Admin.
District Setup 2 Diagram:
The largest bold framed
box is an office with a
District Admin as the office
admin. The intermediate
sized bold framed boxes
are Area Offices with the
AE acting as the Office
Admin and Init in each
case. The smaller boxes
are users that are
associated to the four
offices. The AE office
Admins are assigned the
District Init role so that they
can help with Initialization
tasks for projects in their
area.
The District Admin starts with an office assigned by BRG. The District Admin then adds new offices for the AEs, assigning
the AEs as the Office Admins, and then the AEs add users to their own offices. Finally, the District Admin adds any
necessary additional users to their office.
How do you create this office account structure?
The District Admin and their associated Office Account have already been setup by BRG, so the District Admin does the
following:
1) To add the AE offices, Add New Office.
Fill out the Office information and then the Office Admin information similar to the below example. Make sure the Office
Admin checkbox is checked. If the Office Admin is the AE, and you ever want to delegate initialization duties to this
person, select District Init from the User Role drop down list.
2) Repeat step 1 for additional AE or other types of District offices. (Construction, Traffic, etc., as District needs dictate.)
3) Add New Users to each office as needed or instruct the other Office Admins to add them.
4) Make sure that all subordinate Admins are aware of their responsibilities to keep user information up to date, and to
perform other Admin/Init tasks as assigned or as part of their overall roles.
Note: only the District Admin can approve new office requests.
Bridge Division Structure
Bridge Division Diagram:
BRG is set up with three B
Admins in the fabrication
BRG Review Management Note:
District Initializers will assign reviews to offices, not users in BRG so that managers (Admins) can monitor workload
and progress. To functionally support this need in WSPR, if a District Admin assigns a review to BRG/FAB (typical for
most bridge components) and the BRG/FAB Admin realizes that the review needs to go to an individual in BRG/DSN
GRP 1, for example, the FAB Admin will delegate it to DSN GRP 1, rather than the individual. An individual will then
start and finish the review from within the DSN GRP 1 Review Cue. Normally, the Assign Reviewers screen at the
District that the project is associated with, would update the reviewer for that product from BRG/FAB to the individual’s
name. It does not in this case, rather it updates to reflect BRG/DSN GRP 1 as the reviewer. Any future submittals for
this same product on this project will go to BRG/DSN GRP 1 and the manager/admin for DSN GRP 1 will be notified
and will be able to see when this submittal came in and monitor progress. Also, the BRG delegator (/FAB in this case)
is CC’d on all subsequent submittal actions related to this product and on this particular project for logging purposes.
The above procedure contrasts with what happens with consulting reviewers and with District reviewers. Districts need
to be able to assign reviews to individuals rather than offices, so any delegation action causes the Assign Reviewers
screen to update the reviewer named to the particular individual delegatee – not to their office name.
The Bridge Division office structure was set up using practically the same method as for the Advanced Setup above.
Non-TxDOT Office Structures
Though non-TxDOT offices may not have hierarchal office structures within WSPR as shown above for TxDOT District
and Division offices, they can achieve parallel office structures by use of permissions. Many consulting engineering
firms and contractors have multiple offices in multiple cities. Offices can share information with each other by gaining
rights to view other office’s Account History and Review Cue screens. This can be on a read only basis, or a read and
write basis. Follow the above permissions link to learn more about this. Non-TxDOT Office Admins desiring this
functionality for multiple offices within their company structure should contact the TxDOT District Admin for a project
they are working with or a TxDOT/BRG/FAB Admin for help with setting up special permissions between offices.
Table of Contents
Remove a User
All Office Admins can “remove” users from their office. However, users can never truly be removed due to permanent
records association. They can be prevented from logging on and making any changes by making them inactive. Be sure
to remove obsolete users as employee turnover occurs to help insure account security.
Steps 1-5: Remove non-Admin user
Steps 6-14: Remove/Reassign Admin user
To remove a typical (non-Admin) user:
1) Login.
2) Select the Users/Offices screen.
3) Under the Users table, to the right of the user name to be removed, click Make Inactive.
4) The confirmation menu appears. Click OK.
5) Resulting updated User table. Notice the Make Inactive link changed to Make Active.
You may want to take this opportunity to update any other office/user contact or status information as needed.
Remove/Reassign Admin
WSPR offices must always have an Admin stipulated, so removing one requires a few extra steps:
6) Login.
7) Select the Users/Offices screen.
8) All offices must have at least one Admin. Therefore, you must first make one of the other users an Admin. WSPR
accepts multiple office Admins. Make the other user in this table an Admin by clicking Edit User adjacent to the new
Admin’s name.
9) The Edit User menu appears. Check the Office Admin checkbox.
10) Choose Admin from the User Role drop down list. (Offices with only one User Role - Fabricator, Contractor, etc., can
ignore this portion of the instruction.) Click Update User.
11) Click OK on the confirmation popup.
12) Confirm the Users table has the correct updates shown.
13) Now, go back and either (a) click Edit User adjacent to the previous Admin’s name and change their role if you do not
need to remove them completely, or (b) make the original Admin inactive to remove them from WSPR altogether.
If (a), refer to Step 10 screen shot, and uncheck the Office Admin checkbox, and choose a user Role other than Admin
from the drop down list (if there is a drop down list). Click Update User in that menu.
14) Take another look at the Users table and confirm the desired results.
This example table now reflects both (a) and (b) actions having been taken for the previous Admin.
Done.
Table of Contents
Message Center
The Message Center contents represent a permanent record of all notifications sent and received in WSPR. An echoemail is also sent outside of WSPR to user email addresses based on account data input by Admins and users. In the
event that incorrect email address data is supplied by the account admin, the message center copy serves as proof of
delivery.
No user actions can be performed from within the center except to read and react to the information. You cannot manually
send messages.
The general philosophy of how, and when, and to whom, notifications are sent by WSPR: offices are notified when
actions need to be taken, or when it is critical that an office is made aware of another office’s action. If all parties were
notified at every point in the submittal review process, inbox lists would quickly become unmanageably long and users
might tend to ignore the important messages. If there is a question about why someone was not notified in a particular
situation, consider this first: users can always logon and check the status of a submittal when it is important to them to
know what is going on with a particular item.
Here is a list of typical notification junctures.
To Access the Message Center:
1) Login.
2) The Message Center link is at the far right hand side of the toolbar near the top of the screen.
There are three possible colors for the heading font:
White – all messages have been opened (read).
Yellow – there are unopened messages.
Red – there are unopened “Unassigned Submission” messages.
(These need immediate attention; District Admin or Initialzer, only.)
The subject line turns red as well:
3) Click Message Center to open it.
4) There are three folders – Inbox, Sent, and Deleted.
The first two folders are self-explanatory. The Deleted folder name is misleading, as no messages are ever truly
deleted. Messages serve as a history of WSPR actions and are therefore permanent records. The Deleted folder is
merely a receptacle for non-essential messages.
5) Most actions within WSPR generate a message to some other process partner.
You can check the sent folder after an action to verify that the correct offices were notified.
Here are some typical notifications to check:
• A drawing is submitted and the District Admin and Contractor are notified.
• If submitted after Initialization, the Reviewer is also notified.
• When reviewers are assigned by a District Admin or Initializer, the Reviewer is notified.
• If a Reviewer rejects the assignment, the District Admin or Initializer is notified.
• If a District Admin or Initializer retract a Reviewer assignment, the Reviewer is notified.
• When a Detailing Office submits a drawing on behalf of another office, that other office is notified.
• When a review is complete, the District Admin, Contractor, the Construction Div., and Submitter, if other than the
Contractor, are notified; for working drawing submittals, the AE is typically notified.
• If a review is delegated to another Reviewer, the new Reviewer is notified.
• Also, the review delegator is notified when the review is complete, as well as on any subsequent same product
submittals and review completions.
• CC recipients are notified in some of the above cases if manually input by the user performing the action.
6) Messages are sortable by column headings:
To aid in finding items in what can become very long lists of messages, the messages can be sorted by four of the
column headings: Date, Recipient, From (Sender), and Subject. Click the heading successively to sort ascending or
descending.
Table of Contents
Edit Office Permissions
TxDOT Bridge and District Office Admins can edit office permissions for any office. Permissions are read and write
privileges that can be added to an office (yours or others) to allow them to view the Account History and Review Cue
screens of another office – primarily as a management tool, but also as a collaborative tool. See also the Permissions
screen description for additional information.
To set Permissions:
1) Login.
2) Select the Permissions screen. Again, only TxDOT District and Bridge Division Admins can see this screen.
3) From the drop down list, choose the name of the office that you want to enable to view other offices screens. A table
showing the current permissions for that office will appear. You can choose Read, or Read and Write privileges for
each office in the table. Deselecting all privileges removes the office from the table.
4) Add an office to the permission table using the provided drop down list.
Select the new office,
and then set the read/write privileges for it.
5) Click the Save Changes button at the bottom of the screen.
6) To view the other office’s Review Cue, go to the Review Cue screen (similar for Account History), and change the
Show Office setting. Take note of what is in your Review Cue currently before making the change.
Select the office name you want to see, or choose “ALL” to see yours and other’s offices together.
Notice after choosing “ALL” that other offices’ review items show up in your cue.
Done.
Note that each permission set up is for one way viewing, The granted office can see the other office screens but not
vice versa. For two-way viewing, the District Admin would need to then go back and add permissions for the second
office to see the first office’s screens.
Table of Contents
Help Resources
Tooltips
Help Popups
Reference Help
Contacts
Navigation
(1) Tooltips
Hovering over many of the headings with your cursor produces a popup message with a brief description. The tooltip will
remain displayed for approximately five seconds. Note that some drop down list items also have tooltips. The review cue
Action list items have tooltips for
example.
(2) Help Popups
Longer descriptions are available for some items. If a cursor with a question mark appears as you hover over a heading,
click the heading to open up a help popup.
(3) Reference/Help
More extensive help options are available from the Reference/Help screen.
(4) Contacts
Your primary help contacts are the Office Admins for each office account. Further support is available from the District
Admin for the project, and then the Bridge Division Admins. Level 2 support is available at TSD via the Bridge Division
Admins.
District Shop Plan Admins
Bridge Division Shop Plan Admins:
Mark Bewley
512-416-2207
Patricia Coronado
512-416-2565
Jeff Cotham
512-416-2187
(5) Navigation
Back and Forward Buttons
Filters
Show Office
Sorting
Table of Contents
Initialize a Project
Initializing a project is the act of preparing WSPR to receive and convey drawings for review to the proper office. It is a
two-step process that consists of Editing the Project, and then Assigning Reviewers. It is only performed by District
Admins or their delegated Initializers.
1) Create a WSPR account if not already done.
2) Login.
3) Open your My Projects screen – find the CCSJ in the list. If found, click it.
If not, type it in the CCSJ search field.
4) When found, select the CCSJ in either of the resulting CCSJ tables. (above screen shots)
The Submittals By CCSJ screen will appear. (below) The two Initialization buttons at the bottom of the screen are only
visible to District Admins or delegated Initializers. If you do not see them, contact your District Admin to gain the rights
necessary to view them. The District Admin may be able to delegate Initialization duties to you on the Edit Project screen
if you were assigned the Initializer role at the time of your account setup. If not, your account can be adjusted accordingly
by your District Admin.
5) Continue: Edit Project
Table of Contents
Edit a Project
This is the first part of the two part initialization process. The purpose of this first portion is to insure that submitters have
the correct project information for their submittals, to allow Districts to modify controlling parameters such as autonotification timing and product list content, and to control who at the District has rights, other than the District Admin, to
assign reviewers on a project-by-project basis. Upon completion of this first part, the District Initializer finishes the project
initialization by Assigning Reviewers.
Edit a Project Contents:
1)-4) Login, go to Submittals by CCSJ screen.
5) Edit Project
6) Structure Info
7) Special Products
8) Custom Reminders
9) Assign a Project Initializer (ie, delegate this task)
10) Save
Skip to Step 5 if you came from the Initialize a Project tutorial and are already at the Submittals By CCSJ screen.
1) Create a WSPR account if you do not already have one.
2) Login.
3) Open your My Projects screen – look for the CCSJ in the list. If found, click it. If not, type it in the CCSJ search field.
Alternatively, type in a CCSJ in the search field on the home page.
4) When found, select the CCSJ in either of the resulting CCSJ tables. (above) The Submittals By CCSJ screen will
appear. Initialization starts from this screen. Click the “Step (1) Edit Project” button. (These buttons are only visible on
District Admin and District Init accounts.)
5) Edit Project Screen:
Below is a screen shot of the Edit Project screen. First check the Project Info table at the top of the screen (shown below)
for correctness. Please note that once this data is accepted and submittals start coming in and are associated with it, this
is the way the “project folder” will be represented for the project duration and beyond. Make any corrections right away -–
as early as possible in the project life.
6) Structure Info:
Make sure all Structure Info is complete and correct. All structures named in the contract plans must be present here. If
not shown, add them.
Note:
Structure names in WSPR are a combination of “Facility Carried” and “Feature Crossed”. This is as close as WSPR can
come to approximating plan sheet structure names. Data for these, as well as for NBI numbers, are retrieved from other
TxDOT databases based on the CCSJ. It is very important to make sure that all project bridge structure names are
represented here, and that the names and NBI numbers are correct. If NBI numbers are present and the other fields are
empty, the Initializer should manually populate those empty fields. Drawing submitters will select from a list of structure
names, based on this table, to associate their submittals to, when the submittal is for a product type that is directly related
to a bridge structure.
For product types not associated with bridge structures, such as some working drawings, the Initializer may enter a name
category like “Other”, as shown, in the row adjacent to “Add”, to accommodate these types of submittals. Complete the
entry by inserting an “na” in the NBI column. (MSE Retaining Walls, and Sign Bridges have another means of adding
headings in the Reviewer Assignment screen – see instructions on those tables in the Assign Reviewers section.)
Click “Add” and then “Save” (bottom of screen) to execute the changes.
Any new headings will then be apparent in the Reviewer Assignment screen tables, and in submitter upload screens.
7) Special Products:
If a new product type is missing from the product list (see Reference/Help listing), and there will be a reoccurring need for
shop drawing review of this product, then use this table to add the new product. Saving changes to the Edit Project screen
will trigger a notification to the Bridge Division for verification. Once verified, the new product will be added to all lists.
8) Custom Reminders:
This table controls the timing of auto-notification reminders. These reminders are sent out as an aid in keeping review
times to a minimum. Accept the default values, or input a custom duration.
Example: some complex structures may require an increased amount of review time. For curved tub girders, or segmental
bridge reviews, for example, you may want to set a Custom Duration for the “Requested number of calendar days to
perform the review” reminder to 21 or 30 days instead of the typical 14 days required for less complex reviews.
9) Assign a Project Initializer:
The District Admin may delegate Initialization tasks to a user in their office who is closer to the project, such as an Area
Engineer or Project Engineer. The user must be set up with a User Role of District Admin or District Init for their name to
show up in this Project Initializer drop down list on the Edit Project screen.
10) Click “Save” to have all changes go into effect. Go to Assign Reviewers to complete the second part of the
initialization task.
Edit a Project Contents
Table of Contents
Assign Reviewers
This is the second part of the two part initialization process. Edit a Project, the first of the two parts, must be completed
first. The purpose of this second portion is to provide WSPR the means of routing submittals to the correct reviewer and to
insure communication to relevant primary and secondary reviewer recipients.
District Admins or Initializers can assign the review of shop or working drawings to offices within or outside of TxDOT on a
product-by-product basis, on a structure basis, on a whole project basis, or on the basis of other sub-category groupings.
The individual tasked with assigning the review clicks to highlight a cell or multiple cells in the product tables shown below
in step 5, and then selects a reviewer from drop down lists provided in the left margin. The chosen name then populates
the cell(s). As soon as the changes are saved, the reviewer is notified of their assignment. Secondary reviewers (railroad
or tollroad offices), special CC recipients, and assignment explanation comments can also be added to each cell.
Assign Reviewers Contents:
1)-4) Login, go to Submittals by CCSJ screen.
5) Assign Reviewers Screen
6) Left Margin Tools
7) Unassigned Submissions
8) Working Drawings
9) Bridge Items
10) Roadway Items
11) MSE Retaining Walls
12) Sign Bridges
13) Removing/Retracting Assignments
14) Secondary Reviews
15) Add Comments to Assignment
16) Save
Delegated Reviews Comment
Skip to Step 5 if you came from the Edit a Project or Initialize a Project tutorials, or you are already viewing the
Submittals By CCSJ screen.
1) Create a WSPR account if you do not already have one.
2) Login.
3) Open your My Projects screen – look for the CCSJ in the list. If found, click it. If not, type it in the CCSJ search
field.
Alternatively, type in a CCSJ in the search field on the home page.
4) If you just finished Editing the Project, click Go To Assign Reviewers Page at the bottom of the Edit Project screen, or
click the “Step (2) Assign Reviewers” button from the Submittals By CCSJ screen. Note: do not assign reviewers before
editing the project. You need the structure heading columns to be accurate before assigning reviewers to them.
OR, from the Submittals By CCSJ screen:
5) Assign Reviewers Screen:
Background:
Shown below is the Assign Reviewer screen with all product categories unfolded. Until reviewer assignments are applied,
categories are normally closed and the screen much smaller as a result. If closed, click the plus signs on the desired
categories to display all products within the category. Products are separated into these categories primarily as a result of
functional review requirements, such as handling needs and therefore workflow differences, working drawing versus shop
drawing distinctions, and bridge structure versus non-structure related products.
Other than product type, another table type separation occurs to distinguish between Unassigned Submittals and
Assigned Submittals. Submitters are allowed to upload drawings to WSPR before reviewer assignments have been made.
Therefore, the Unassigned Submittals table was created to act as a buffer prior to assignment, and as an alert
mechanism, in addition to notifications, for the District Initializer. Once the item(s) in the Unassigned Submittals table is
“modified”, ie, a structure name, where applicable, is assigned to it, it will drop down into the conventional assignment
tables. (see color legend statement)
The Assignment Tables are arranged by product type rows, and structure name (or other category) columns. The more
complex review situations (interchanges, other large projects, etc.) may involve different reviewers for the same product
type, so the flexibility to provide for this is reflected in this layout. Each cell can be a different reviewer and a secondary
reviewer (for some product categories, as needed when railroads or tollroads are involved). Cells change color based on
submittal status relative to reviewer assignment.
The Assign Reviewers screen description in later sections of this manual contains some additional information.
Screen use instructions:
a) Click to highlight a cell (light grey fill color appears), or group of cells, adjacent to the product type (or types), and under
the desired heading name(s).
b) Choose a reviewer from the Reviewer fold out “working” list on the left. As soon as you select the reviewers name from
the working list (lower part of the field), that reviewer’s name will appear in the previously selected cells. See Default
Reviewer Note.
c) When you save this screen, notifications will be sent to those reviewers.
If a reviewer name or office is not found in the drop down list, such as in the case of a consultant reviewer, they probably
do not have an account. Call their office and instruct them to create an account. If a District person or office is not on the
list, the District Admin can add them.
Multiple Cell Assignment Tip:
You can select the cells for whole product categories, and all column headings with one click, or a number of other
combinations of multiple cells, and then select one reviewer for all. This saves time for making reviewer assignments;
however, there is a downside to that expediency. The Submittals By CCSJ screen, where you typically go to view
drawings (navigated to via My Projects), will be populated by all the products to whom you assigned reviewers. Typically
only a fraction of the whole product list will receive submittals. Each time you visit that screen to find and view submittals,
if you assigned reviewers to all the products instead of just the ones used on the project, you will have to review a long list
of unused product types to find the ones of interest. The alternatives are to either know the bid tab listing for the project
and select the applicable products for reviewer assignment or simply react to fabricator/contractor submittals and assign
reviewers as they come in. (This latter method may slow up the project in the long run due to increased aggregate waiting
time between individual actions.)
Screen details:
6) Left Margin Tools:
A. Save Icon – click this before exiting the screen to prevent loosing all your work.
B. Edit Project Icon – returns you to the Edit Project screen.
C. Legend – defines any color coding added to the reviewer assignment cells by WSPR. (submittal status
indicator)
D. Reviewers – contains the working list of possible reviewers, both primary and secondary.
E. CC Recip - contains the working list of possible CC recipients – optional use.
Reviewers Pane Usage Tip:
The drop down list only helps you find personnel to populate the working list in the lower field. Selecting a reviewer from
the drop down list and having it show up in the assignment cell happens only when you then select the person/office again
in the working list below.
Default Reviewer Note: Normally at least one Bridge Division choice is seen pre-populating the working list. This choice
is a result of Bridge Division staff setting the default reviewer for various products as relates to usual division practice.
See also the District Defaults (BA) screen description for additional information.
7) Unassigned Submissions:
Background:
WSPR receives drawings from submitters both before and after initialization. For a pre-initialization submittal, structure
names or other headings are not available on the upload screen for the submitter to associate their submittal to when the
submittal is of a product type that requires association to a particular structure or other type of grouping. In this case, the
submitter is required to type the associated structure name (or other grouping name) into the comments box on the
upload screen. The District Initializer then must verify the correct association when they perform the Initialization tasks.
Since the structure or grouping names will have been verified or created by the Initializer in the Edit Project stage, these
headings will carry forward to the Assign Reviewers screen and will be available to the Initializer to check off when tending
to items in the Unassigned Submissions table.
Note: The Message Center heading will glow red when there is an unopened email concerning Unassigned Submissions.
Unassigned Submissions Table Instructions:
a) When unassigned submittals are present, click “Modify” to the right of the submittal row to process the item.
b) As soon as you select the appropriate column heading for the submittal by clicking the correct checkbox, and then click
OK, that submittal will be removed from this table.
8) Assignment Tables - Working Drawings:
Working drawings are typically assigned to the AE, and less frequently to the Bridge Division, at the discretion of the AE.
Note that clicking on the 441-SEP product field caused all columns for that product row to be highlighted and ready for
accepting a reviewer assignment.
9) Bridge Items:
Note that the Bridge Items table does not have the “Other” heading that was created in the Edit Project screen. All bridge
associated products will necessarily fall under one of the structure name headings, so an “Other” heading is not needed.
Also, the greyed column of products illustrates another method of selecting multiple cells – by structure name heading.
(See Step 5 Multiple Cell Assignment Tip discussion.)
10) Roadway Items:
Roadway Items typically do not need multiple headings, therefore the one “ALL” column is used.
In the screen shot below, multiple cells were highlighted by clicking once on the sub-category “Illumin, Signal, Cameras”.
11) MSE Retaining Walls:
Instead of multiple products, retaining wall assignments consist of multiple review types – Geometric, Structural, and
Aesthetic. The first two are required for every submittal. The third, Aesthetic, is optional and generally depends on
whether an aesthetic treatment was included in the contract plans. Once reviewers are selected for all review types, and a
submittal comes in, WSPR controls the sequential review flow, providing notifications to intermediate reviewers when their
review is necessary. (However, all reviewers can view and review drawings in advance of being notified if a simultaneous
review time savings is desired.) After all reviews are done, WSPR routes the final compiling duty back to the geometric
reviewer – typically at the District, before notifying the submitter of the final review status. See Retaining Wall Reviews for
additonal information on how WSPR handles mechanically stabalized earth (MSE) retaining wall review flow.
The column headings shown below were created using the “Add or Edit Retaining Wall Review Group Heading” utility link.
MSE walls are typically numbered, and this utility provides the Initializer with the ability to create headings accordingly
when different reviewers need to be specified for different wall groups. If there is only one set of reviewers for the three
review types for all walls on a project (typical), the default heading is sufficient.
In this example, the default heading “RW ALL” was removed. See the Sign Bridge table below for an example where that
default heading was left in place (arbitrarily) and then added to.
The cell selection pattern below illustrates the ability to select multiple, but individually selected, cells.
Assign reviewers to all the necessary review types, always including at least a geometric reviewer and a structural
reviewer, before moving on to other product review assignments and then saving this screen.
12) Sign Bridges:
650 Spec Item Sign Bridge submittals are usually submitted in groups of three associated product drawings: anchor bolts,
the sign bridge supports , and the sign bridge itself. The below column headings are in line with the practice of specifying
sign bridges by stationing on most projects. The “SNB All” heading, which is normally all that is needed for most projects,
was left on the below screen shot to show the default heading before revisions. This would normally be removed if
multiple reviewers were needed and the other headings created.
Cell selection was accomplished by clicking the far left vertical border of the table. This highlights all the cells in the table
at once. In this case the reviewer was added to all the cells at once. Hover over the Reviewers utility heading in the left
margin to display that list, and select TxDOT/BRG/FAB (if the Bridge Division is your choice for reviewing) from the
“Primary Reviewers Working List”. Done.
13) Removing Reviewers/Retracting Assignments:
Right click on any cell in the Assign Reviewers screen that has a reviewer assignment and choose “Remove Assignment”
to take the reviewer out of that cell. If the Assign Reviewers page has not been saved since the original reviewer
assignment, then notifications to the reviewers were not sent. If, however, the screen data had been previously saved,
then reviewer assignment notifications already went out, and saving this screen again after removing a reviewer will
generate reviewer assignment cancellation notifications.
If a review has already begun, and it becomes apparent that it is being done by the wrong reviewer, the Initializer must
call the reviewing office and ask the reviewer to choose the action Stop Review (below screen shot) from within the
WSPR Review Cue, under the heading Action. This can only be done if this is the first review of this product on this
project*. After this action, the Initializer can “Remove Assignment” from within the Assign Reviewer screen. Note: If a
reviewer has already completed a review on the same product for the same project, the reviewer cannot be changed
except in extraorindary circumstances. (Consider: consultant contract issues, payments for work already done, submitter
must resend drawings as “revisions”, double review hours, loss of project time, confusing records, etc.)
*WSPR assumes that after the first review of a product, all subsequent submittals of that type will go to that reviewer.
After the end of the business day that the first review approval was given, the reviewer assignment cannot be retracted,
and the reviewer cannot delegate the review to another reviewer. If before the end of that business day the reviewer could
retract their review approval in the Account History screen, select the Stop Review action in the Review Cue, and then the
District could change the reviewer assignment.
14) Secondary Reviews:
“Secondary Reviews” are those reviews performed by railroad or tollroad authorities when they are associated with a
project, and when they are contractually required to perform reviews – usually, but not always, in association with critical
structural members. These secondary reviews typically only involve the “Bridge Item” category of product types. Assign
these after the primary reviewer is assigned, not in the same step. As with the primary reviewer, select the secondary
reviewer from the drop down list on the right hand side of the Reviewer menu to add it to the working list. Then select the
reviewer from the working list. Verify that the secondary reviewer’s name was added to the correct assignment cell.
Selecting the name from the working list to make it populate the assignment cell.
The secondary reviewer name is now populating the reviewer assignment cell along with the primary reviewer.
See the secondary review portion of these flow charts to see how secondary reviews fit into the overall flow.
The secondary reviewer will be notified when the structural part of the primary review is complete, so that they can view
any remarks by the primary reviewer and decide whether they agree or not. The secondary reviewer’s action is conveyed
back to the primary reviewer at the end of the secondary’s review. If in conflict with the primary reviewer, it is up to the
primary reviewer to contact the secondary reviewer outside of WSPR and resolve. The primary reviewer then chooses the
final status action from the review cue that causes distribution of the review.
15) Add Comments to Reviewer Assignments:
The Initializer can add explanatory notes to the reviewer assignment cells by right clicking the cell and choosing “Edit
Comments for Assignment”. These comments will go out in the reviewer assignment notifications.
16) Save! Save by clicking the icon in the upper left hand corner of the screen before closing.
Additional notes on Delegated Reviews – A District Admin or Initializer may go back to the Assign Reviewers screen
after assignments were made sometime earlier and some of the names may have changed in the assignment cells. This
is most probably the result of the original reviewer delegating the review to someone else in an associated office.
Whenever a reviewer delegates the review to someone else, the Assign Reviewers screen automatically updates and
shows the most current reviewer’s name. After the first review has completed for the particular submittal category, the
name cannot change again. WSPR assumes that after a review is completed by a given user, all subsequent reviews for
the same submittal type on that project will be performed by the same person or office.
It is not a generally accepted or recommended practice for a reviewer to delegate to an office not directly associated with
theirs, such as a Bridge Division employee delegating to a consulting engineer firm. The review in that case should be
sent back to the District for reassignment since the District is more familiar with the contractbetween TxDOT and the
consulting engineering firm.
Assign Reviewers Contents
Table of Contents
Find a drawing
Account and non-account (TxDOT only) holders:
1) Login page.
2) Enter your Username and Password; for TxDOT users without accounts, enter your network user name and password.
3) Search for the CCSJ: In the CCSJ field, type in the desired project’s CCSJ. Click enter or the search icon.
Note: If you do not know the whole CCSJ, you can enter part of it and end the string with an asterisk to find all CCSJs
with that beginning set of numbers. Question marks can be substituted for unknown numbers for the search also.
4) If found, a CCSJ Lookup table will appear – click the CCSJ on the left of the table.
5) Under Submittals by Product Type, click the (+) sign next to the desired product type.
6) Click the submittal number on the left of the table for the correct structure and the appropriate date.
7) In the Submittal History table that appears, under Associated Drawing, click the drawing name.
8) On the drawing popup box, click “View” adjacent to the desired drawing. You will then be asked to either Open or Save
the drawing. If you chose Save, a browsing menu will appear that will allow you to choose the save location on your PC.
Alternate method - for account holders that have worked on this CCSJ before:
1) From the My Projects screen, select the CCSJ.
2) Perform steps 5-8 above.
Table of Contents
Submit a Drawing
Ensure that the drawing set is formatted in accordance with specifications provided in the Guide to Electronic Shop
Drawing Submittal prior to submitting.
1) Create a WSPR account if not already done.
2) Login.
3) For a first time submittal to a project, find the project by searching for the CCSJ. (Use My Projects screen for
subsequent submittals.)
4) If found, select the CCSJ in the resulting CCSJ Lookup table (lower left).
5) On a first time submittal for a given project, the project may not yet be initialized (structure names added, reviewers
assigned) and a note similar to the boxed one below may appear. WSPR is set up to receive drawings before or after
initialization, but you will need to add structure information manually when you get to that point in the upload menu. (Step
11) Click the Upload drawing link at the bottom of the Submittals By CCSJ screen.
6) An upload menu screen will appear that first prompts the user to select a product type.
7) Click the down arrow to display the available product type list, and select one. If you are submitting for a new product
type that is not in this list, choose the closest product type from the list and add explanatory comments near the bottom of
this upload menu. If this is going to be a reoccurring use product, the TxDOT/District Admin may need to put in a request
to add a new product to the list based on your comments.
8) Format your submittal per the Guide to Web Shop Plan Review, and then click the Browse button on the New Submittal
menu, find it in your folder structure, select it, and click Open. Note that WSPR will format the name to fit TxDOT
guidelines, so after the upload process is complete, go to My Projects and navigate to the newly submitted file to
document the file name if different from your records.
9) If needed for this submittal, repeat the browse and open steps in the Optional Design Files fields to upload associated
OD files for approval.
10) If you are submitting on behalf of a sub-contractor and you want that office to be CC’d on this submittal, use the
Subcontractor field to find and select one from the drop down list. If not found in the list, manually add the name and
address in the field shown in Step 12.
11) As mentioned in Step 5, for pre-initialization submittals, it is essential to include the structure name (if this product is
associated with a structure) in the Comments field. Add any other comments important to the proper review of the
drawings being submitted.
12) Check for the correct inclusion of CC recipients by expanding the Automatic Notification Recipients field. If others
need to be added, fill out the name and email address fields and click Add CC Recip.
13) Read the questions shown at the bottom (in red box) and if you can answer Yes to all, click the check box
representing your signature on the agreement. Then click the Submit button. Clicking this button uploads the drawings,
and triggers the auto-notifications.
14) You can verify that the submittal was accepted in several ways – check to see that the submittal action shows in your
Account History screen or in the My Projects screen for this CCSJ. You may also want to verify notifications were sent by
going to the Sent folder of your Message Center.
Table of Contents
Review a Drawing
To Review a Drawing: (see also Reject a Review Assignment and Secondary Reviews)
1) Login.
2) The default opening screen for reviewing offices is the Review Cue. This screen is brought to the attention of the
reviewer first, with the oldest submittals at the top of the list.
For additional information on the Review Cue screen, click here.
3) To start a review, open the Action drop down list and select Start Review. Notice that after the review has begun (right
screen shot), the action list greatly expands.
Start review actions:
Intermediate review actions:
Delegate/Reassign Action: If you are not the correct reviewer for the submittal and the correct reviewer is in your
office/Division/District, click the Delegate/Reassign action in the Review Cue screen (above screen shot), choose
“Delegate to another reviewer:” in the ensuing popup menu by selecting another reviewer/office section from the drop
down list, and add justification comments in the comment field. If that reviewer shares your Review Cue, simply cease
any further WSPR actions and logout and contact them outside of WSPR and tell them that they have a review to
perform. If the correct reviewer is not in your office/Division/District, check the menu checkbox labeled “Send reviewer
assignment back to District Admin for reassignment”. Include any helpful notes in the comments box to explain the
rejection and to assist the District in reassigning it. Click Submit after either action choice. WSPR will notify the correct
person/office. (Additional Delegating notes for District Admins/Initializers.)
If you are a manager/admin of an office and the correct reviewer is a user in your office account structure, and
therefore shares your review cue, account history, and message center, do not choose the Delegate/Reassign action.
As mentioned above, simply notify them outside of WSPR that they have a submittal in for review. If you accidentally
started the review, go back to the Review Cue and choose the action Stop Review. This will reset the status of the
submittal to show that the review has not started.
Note – a reviewer cannot delegate a review to someone else if they have already performed a review for the same
product and structure on the same project. Similarly, if the review is successfully delegated to a new reviewer, the
review assignment on the District’s Assign Reviewer screen will update to the new reviewer’s name, and all
subsequent submittals of the same product type for the same structure and project will go to that new reviewer.
If you are the correct reviewer, continue to the next step.
4) Clicking “Start Review” opens the Download menu. Open or Save one or all of the drawings. Clicking Save opens a
browse menu to allow you to choose a folder location to save the file to.
(Steps 5-9 will vary for working drawing submittals. Click here to read about those differences.)
5) Perform your review, markup, stamp, flatten, password protect, and save the file per instructions in the Guide to Web
Shop Plan Review. (Note: some example screen prints show a retaining wall submittal – intermediate reviews in a
three part review are not flattened and password protected. The District compiler performs those actions at the end of
all reviews. All other single review product types need to be flattened and password protected by the individual
reviewer as mentioned above.)
6) After preparing the reviewed drawings for distribution, come back to the Review Cue, and choose the final review
status action for the submittal from the action choices available. (Approved, Approved Except as Noted, or Returned
for Correction)
7) (a) Browse and select the file you just reviewed and finalized; (b) add any additional files as appropriate; (c) and add
comments if needed. Next, (d) read; (e) electronically “sign” by checking the box; and (f) submit the reviewed
drawings.
Note: The submitted drawing name will be formatted by WSPR per TxDOT guidelines. Take note of that final name (in
Account History or Submittal Details screens) for future reference and for comparison to the file you saved in your
folders and uploaded here, or perhaps rename it to match.
8) When the review is complete, the entry automatically moves from the Review Cue screen to the Account History
screen.
Exception: Working drawings in a District Review Cue – working drawings are typically reviewed by the AE’s
office. Working drawings in general do not have to be approved per the TxDOT Construction Specification. The AE or
other District personnel can simply review it and leave it unapproved. If this is the case, the submittal will remain in the
Review Cue. Also, the AE can choose to delegate the review for complex issues to the Bridge Division, for example. After
the delegated office has completed the review and responded to the AE’s office, the review will stay in the AE’s review
cue after the review if the AE (or other designated District reviewer) does not take the second step and choose to approve
it. WSPR must accommodate this fact, and therefore leaves the option to approve open by leaving it in the District’s
review cue. A District office may, at their option, choose to clear out the review cue of these types of submittals by
approving the working drawing submittals.
Notice in the last action list that you also had available Stop Review (below screen shot) and Delegate/Reassign choices.
The Stop Review action allows you to discontinue a review so that the submitter could retract the drawings if needed, or
the District Admin/Initializer could retract a reviewer assignment.
Note that the latter action (reviewer assignment retraction) could not happen if this reviewer had already completed
another review for the same product type on the same project. Programming within WSPR assumes that if one review is
completed for a product by a specific reviewer, that all subsequent reviews for that product will be reviewed by that same
reviewer. For this same reason, a reviewer may not “delegate” (another action choice) or have reassigned a review for a
product when they have already completed a review for the same product type. Therefore, the Delegate or Reassign
choices are only functional for the first submittal on a particular product for a given project. After a review delegation
action, the reviewer assignment in the District Admin’s Assign Reviewer screen revises itself to the delegated reviewer so
that all future submittal notifications go to that new reviewer.
9) Reviewers will see requested review times in their notification messages to review. These requested review times are
set by the TxDOT District Admin or delegated Initializer. WSPR will send out reminders that the review time is about to
elapse at some preset time before the end of the requested review time – usually two days, and then a second reminder
will be triggered at the end of the requested review time.
Table of Contents
Secondary Reviews
The main differences between primary and secondary reviews are:
a) secondary reviewers are always railroad or tollroad entities,
b) secondary reviews are typically for structural bridge members, and
c) the review action choice made by the secondary reviewer at the end of a review causes WSPR notifications to go back
to the primary reviewer, not to all members of a typical review distribution list; the final status is chosen by the primary
reviewer after consultation with the secondary reviewer.
To perform a secondary review:
1) Login if you already have a WSPR account. If not, follow these instructions to Create an Account.)
2) As is the case for primary review offices, the default opening screen for secondary review offices is the Review Cue.
This screen is brought to the attention of the reviewer first, with the oldest submittals at the top of the list. (The below one
has been sorted to show the most recent one at the top.)
To start a secondary review, select Download Drawing.
View, or Save the drawing, browsing to the desired folder to save.
3) Perform your review, markup, stamp, (do not flatten or password protect) and save the file per instructions in the Guide
to Web Shop Plan Review.
4) After preparing the reviewed drawings for return to the primary reviewer, come back to the Review Cue, and choose
the final review status action for the submittal from the action choices available. (Approved, Approved Except as Noted,
or Returned for Correction)
5) Browse and select the file you just reviewed and finalized; add any additional files as appropriate (typically not needed
for secondary reviews); and add comments if needed. Next, read; electronically “sign” by checking the box; and
Submit the reviewed drawings.
Note: The submitted drawing name will be formatted by WSPR per TxDOT guidelines. Take note of that final name (in
Account History or Submittal Details screens) for future reference and for comparison to the file you saved in your
folders and uploaded here, or perhaps rename it to match.
6) When the review is complete, the entry automatically moves from the Review Cue screen to the Account History
screen, and the Retract button becomes visible on the far right. This is available only till the end of the same business
day.
7) Notification will go out to primary reviewer. If they agree with your review action, they will go into their review cue and
choose the final approval status which will trigger notifications to all required process partners. If they disagree with your
review action/remarks, they will contact you outside of WSPR to resolve.
8) Reminders: Reviewers will see requested review times in their notification messages that are sent when a review
needs to be started. These requested review times are set by the TxDOT District Admin or delegated Initializer. WSPR
will send out reminders that the review time is about to elapse at some preset time before the end of the requested review
time – usually two days, and then a second reminder will be triggered at the end of the requested review time.
Table of Contents
Retaining Wall (MSE) Review Notes
Since MSE wall submittal workflow is quite a bit different from other product type submittals, the user should be aware of
several handling details. Following is the background on these review types and how WSPR handles them: (See these
flow charts for visualizing the below described review paths.)
From purely a review step perspective, follow the instructions for reviewing typical shop drawings, keeping in mind the
following information:
• This product can require up to three (or more, if an ancillary component review is necessary) separate reviews and
typically these reviews are done by different offices.
• The first review is the geometric (GEO) review and this is almost exclusively performed by the District.
• The second review is always the structural (STR) review, and it can be reviewed by the District, a consultant, and quite
frequently is done by the geotechnical branch of the Bridge Division.
• The third review is dependent on whether there are significant aesthetic (AES) enhancements to the walls, and is usually
reviewed by the aesthetic designer.
• The District Admin or Initializer (Init) assigns all of the review types, GEO, STR, and AES (optionally), from the Assign
Reviewers screen at project outset, or as submittals begin to arrive.
• WSPR routes the review to GEO first. If approved (AP), or approved with exception (AX), WSPR routes the review to
STR. If returned for correction (RC), the subsequent reviews are bypassed and the submittal is returned to the fabricator
for revision instead. The revised submittal comes back to GEO and the cycle begins again.
• After GEO has approved it, STR next looks at the submittal. If approved (AP or AX), WSPR routes it to AES, unless
there is a secondary reviewer assigned (railroad or tollroad), in which case it is routed to the secondary reviewer before
any AES review is performed. This is because the secondary review is usually structural in nature and any structural
issues should be resolved before an AES review is performed.
• In the previous step, if the STR review instead failed (RC), WSPR routes the review back to GEO. It is not necessary to
perform an AES review or secondary review if the STR portion of the submittal was rejected, and, on all rejections, GEO
must weigh in before anything is sent back to the submitter (fabricator, ie). If GEO agrees with the rejection, then it is
routed back to the submitter.
• In the STR approval case, and there is an AES review to be done and no secondary review is assigned, WSPR routes it
to the AES reviewer. Regardless of whether AES approves or RC’s the review, it goes back to GEO for corroboration of
review findings, and if in agreement, GEO compiles all remarks that they agree with and triggers conveyance of the
marked up drawings back to the submitter. If not in agreement, then GEO resolves any discrepancies with the other
reviewers outside of WSPR, compiles all remarks, and approves (AP or AX) the overall submittal, or returns it for
correction (RC). This cycle is done.
• In addition to the final approved drawings, all the submittal and intermediate review drawings are saved by WSPR, and
are accessible for subsequent reviewers. WSPR does not determine which drawings are returned to the submitter. GEO
has full control of that.
• Intermediate reviewers do not flatten drawings or add password protection. They do add approval stamps, but they do
not do anything that prevents the final compiling from being carried out by GEO. GEO compiles remarks, if any, and
flattens and adds password protection at the end of all reviews.
• Review steps for the individual reviews are basically the same as shown in Review a Drawing, just the action choice
wording in the Review Cue will differ slightly from other products. The action choice wording will be commensurate to the
above outlined multi-reviewer handling – “Start Geometric Review” instead of “Start Review”, “Approve Geometric Except
as Noted” instead of “Approve Except as Noted”, etc.
• WSPR arranges the different reviews sequentially. To expedite reviews, offices can choose to have all reviewers
download submittal drawings simultaneously when they come in to GEO. The reviewers can then all review in parallel,
communicating pertinent information/findings outside of WSPR, and then sequentially perform all the reviewer action
choices and drawing uploads in WSPR quickly at the end of all the parallel reviews. This way the overall review is
expedited, but WSPR can still store all the actions and intermediate drawings in the submittal history for the project should
documentation ever be needed.
MSE Retaining Wall subject matter experts:
Marcus Galvan
TxDOT/BRG/GEOT
512-416-2224 [email protected]
John Delphia
TxDOT/BRG/GEOT
512-416-2359 [email protected]
Table of Contents
Working Drawing Reviews
The main differences between working drawing and typical shop drawing reviews are:
a) Working drawings are required to be submitted, but not necessarily approved**, unless for an optional design
(Construction Spec. 5.2, Table 1).
b) Working drawings may only be submitted by contractors or detailing office in WSPR, not fabricators. If a fabricator
needs to be able to submit a working drawing on behalf of a contractor, they will need to create a separate detailing office
account within WSPR.
c) Because working drawing submittals, in general, are not required to be approved, these types of submittals may remain
in the District’s Review Cue indefinitely.
d) If the review for a working drawing is delegated to another reviewer, the approval action by the delegated reviewer
causes a notification to go back to the original reviewer only (an AE, for example), and not to the other typical approved
submittal notification recipients (District Admin, Contractor, Construction Division, etc.).
e) Working drawings are typically assigned to the AE, or AE’s office, and less frequently to the Bridge Division, at the
discretion of the AE.
**Some working drawing submittals such as for segmental bridges are treated more like conventional shop drawings and
are approved. The District reviewer may optionally decide to approve and return other types of working drawing
submittals.
This diagram shows the document flow for working drawings.
The below reviewer assignment table lists typical working drawing submittals:
To Review a Working Drawing:
1) Login.
2) The default opening screen for reviewing offices is the Review Cue. This screen is brought to the attention of the
reviewer first, with the oldest submittals at the top of the list.
For additional information on the Review Cue screen, click here.
3) To start a review, open the Action drop down list and select Start Review. Notice that after the review has begun (right
screen shot), the action list greatly expands.
Start review actions:
Intermediate review actions:
Delegate/Reassign Action: The originally assigned reviewer, typically an AE in this case, may decide at this point that
they would prefer someone else perform the review. If the correct reviewer is in your office/Division/District but is
associated to a different WSPR office account, click the Delegate/Reassign action in the Review Cue screen (above
screen shot), choose “Delegate to another reviewer:” in the ensuing popup menu by selecting another reviewer/office
section from the drop down list, and add explanatory comments in the comment field. If that reviewer shares your
Review Cue, simply cease any further WSPR actions and logout and contact them outside of WSPR and tell them that
they have a review to perform. If the correct reviewer is not in your office/District or in the Bridge Division, it is at the
discretion of the AE/reviewer to check the menu checkbox labeled “Send reviewer assignment back to District Admin
for reassignment”. Click Submit after the action choice. WSPR will notify the correct person/office.
If you are a manager/admin of an office and the correct reviewer is a user in your office account structure, and
therefore shares your review cue, account history, and message center, do not choose the Delegate/Reassign action.
As mentioned above, simply notify them outside of WSPR that they have a submittal in for review. If you accidentally
started the review, go back to the Review Cue and choose the action Stop Review. This will reset the status of the
submittal to show that the review has not started.
Note – a reviewer cannot delegate a review to someone else if they have already performed a review for the same
product and structure/Group heading on the same project. Similarly, if the review is successfully delegated to a new
reviewer, the review assignment on the District’s Assign Reviewer screen will update to the new reviewer’s name, and
all subsequent submittals of the same product type for the same structure and project will go to that new reviewer’s
office.
If you are the correct reviewer, continue to the next step.
4) Clicking “Start Review” opens the Download menu. Open or Save one or all of the drawings. (Do this even if you are
not going to perform a complete review and approval. This changes the status of the submittal from Initial Submittal.)
Clicking Save opens a browse menu to allow you to choose a folder location to save the file.
5) Look at the working drawings, and if it is your choice to perform a complete review that will be returned to the
contractor, then review, markup, stamp, flatten, password protect, and save the file per instructions in the Guide to Web
Shop Plan Review. (Note: Some example screen prints show an RW submittal – intermediate reviews in a three part
review are not flattened and password protected. The District compiler performs those actions at the end of all reviews. All
other single review product types need to be flattened and password protected by the individual reviewer if that submittal
is going to be transmitted back to the contractor.) If you chose not to “Approve” the drawings, then you are done, and you
can ignore the following steps – simply leave the item in your Review Cue. If you want to clear the item out of your review
cue, or you want to return the submittal to the contractor, then go to the next step.
6) If you want to “Approve” the drawings and clear the submittal item out of your Review Cue, or the submittal needs to be
returned to the contractor, then after preparing the reviewed drawings for distribution, come back to the Review Cue,
and choose the final review status action for the submittal from the action choices available. (Approved, Approved
Except as Noted, or Returned for Correction)
7) Browse (in “Choose Working Drawing File” field) and select the file you just reviewed and finalized, or check the
checkbox adjacent to “Approve without uploading a file” (shown in illustration below), add comments if needed, read
and electronically “sign” the approval by checking the box at the bottom of the menu, and then click Submit to complete
the distribution.
The above upload screen offers an option different from what a reviewer would see when approving a shop drawing.
Since working drawings do not need to be approved, in general, replies from the delegated reviewer to the delegator
do not require accompanying drawings. Therefore this checkbox is provided on the upload screen to indicate no
drawings.
Note: The submitted drawing name will be formatted by WSPR per TxDOT guidelines. Take note of that final name (in
Account History or Submittal Details screens) for future reference and for comparison to the file you saved in your
folders and uploaded here, or perhaps rename it to match.
8) When the working drawing has been Approved or Rejected, the entry automatically moves from the Review Cue screen
to the Account History screen of the reviewing office. If a delegated review for a working drawing is approved, it
disappears from the Review Cue of the delegated reviewer, but not from the Review Cue of the District AE’s office (or
originally assigned reviewer) that delegated the review. A review approval by anyone except the original reviewer in the
AE’s office, the AE typically, or as originally assigned by the District Admin, will not cause an approval distribution back to
the contractor. A delegated review approval for these types of drawings only causes a notification to the AE, or the original
District reviewer. The AE can then choose to consider it completed and do nothing further, or they can choose to perform
another approval action from their own Review Cue, which will cause distribution notification to the contractor. In this way,
WSPR accommodates the Construction Spec wording for working drawings – approval not being required. If the AE, or
the originally assigned District reviewer, performs the second and final approval action from their Review Cue, then the
item will move from their Review Cue to their Account History.
Notice in the last action list (Step 6) that the reviewer also had available Stop Review (below screen shot) and
Delegate/Reassign choices. The Stop Review action allows you to discontinue a review so that the submitter could retract
the drawings in some unusual case, or the District Admin/Initializer could retract a reviewer assignment.
As is the same for shop drawing reviews, note that the latter action (reviewer assignment retraction) could not happen if
this reviewer had already completed another review for the same product type on the same project. Programming within
WSPR assumes that if one review is completed for a product and structure/Group heading by a specific reviewer, that all
subsequent reviews for that product and structure/Group heading will be reviewed by that same reviewer. For this same
reason, a reviewer may not “delegate” (another action choice) or have reassigned a review for a product when they have
already completed a review for the same product type and structure/Group heading. Therefore, the Delegate or Reassign
choices are only functional for the first submittal on a particular product and structure/Group heading for a given project.
After a review delegation action, the reviewer assignment in the District Admin’s Assign Reviewer screen revises itself to
the delegated reviewer so that all future submittal notifications go to that new reviewer.
9) Reminders: Reviewers will see requested review times in their notification messages to review. These requested
review times are set by the TxDOT District Admin or delegated Initializer. WSPR will send out reminders that the review
time is about to elapse at some preset time before the end of the requested review time – usually two days, and then a
second reminder will be triggered at the end of the requested review time.
This completes the review steps for reviewing working drawings. What follows are a few more notes and tips concerning
this review type when delegated.
More working drawing details:
Review cue actions look the same for the delegated working drawing reviewer as for a typical shop drawing review. The
below screen shot shows the Review Cue for the TxDOT/BRG/CNST office, which is the office that the working drawing
review was delegated to by the AE for this example submittal.
After the delegatee approves the working drawings, and you go back to the delegator’s review cue, in this case the AE’s,
you will see that the Current Status has changed to “Responded to District”, instead of Approved. This is unique to
working drawing reviews. The delegated reviewer approved it, but since this is a working drawing, and approval is not
required, the status changes to this intermediate plateau where it can remain indefinitely, or the AE can go ahead and
“Approve” it (looking over at the available actions for the AE) formally as discussed earlier. If the AE or a reviewer in their
office optionally approves it, then the item will move to the Account History screen, and notifications will go out to the
Contractor, or to the Contractor and the Detailing Office if one was involved.
AE’s Review Cue after a delegated reviewer approved the submittal.
Table of Contents
Retract a Drawing
• Submitters can retract submittals up until the time a review has started, or, alternatively, submit a revision.
• Reviewers can retract a review up until the end of the business day that the drawing was uploaded.
Retract a submittal:
1) Login.
2) Open your Account History screen, if not already open (default login screen for submitters). In the far right hand column
of the row for the submittal, under the Retract heading, if a drawing can still be retracted, you will see a blue Retract link.
Click the link.
3) Add any retraction comments in the field provided, and click the Retract button.
4) You will receive a confirmation of a successful retraction. Click OK. The submittal entry will now be removed from your
Account History screen.
5) Resubmit the drawings. The resubmittal will have the same submittal number as the retracted one.
6) Post review-start methods:
If there was not a retract link available for the submittal on the right of the Account History screen when you first went to
retract the submittal, the review had already started. If the submittal error/omission is significant enough to warrant, call
the reviewer, and have them “Stop Review” – a Review Cue screen action available after the review has begun. Once the
review is “Stopped”, the Retract link will re-appear in the Account History screen. Refresh your screen if you stayed
logged in while the reviewer stopped the review.
Another alternative is to submit a revision. Keep in mind however, this causes duplication of effort on the part of the
reviewer and may be costly depending on who the reviewing office is. See the following steps for submitting a revised set
of drawings.
Table of Contents
Submit a Revision:
1) Login.
2) Go to your My Projects screen. Select the desired CCSJ from the table.
3) In the resulting Submittals By CCSJ screen, open the Product Type grouping. Find the submittal and look at the right
hand side of the table under the Action heading. If the submittal’s Current Status indicates that the review is complete,
there will be an Upload Revision link in the Action column. Click Upload Revision.
4) Fill out the Revision Upload form including a revision synopsis in the comments field, “sign it”, and click Submit just as
for a regular submittal.
5) WSPR will rename the revised submittal keeping the original submittal number and adding a REV1, 2, or 3, etc., suffix
to it. Done.
Table of Contents
Retract a review:
1) Login.
2) The default opening screen for reviewing offices is the Review Cue. Go to the Account History
screen.
2) In the Account History screen, to the right of the reviewed item, click Retract. If the Retract link is not present, you have
exceeded the time limit for performing a retraction (end of the business day of the review approval action).
3) The retraction screen appears. Enter any comments for the record, and click the Retract
button.
4) A confirmation screen will appear. Click OK.
5) Notice on the Account History screen that for the submittal just retracted, the status has returned to Review Started.
Done.
Table of Contents
Check Drawing Status
Go to the Submittal Details screen (path: My Projects or CCSJ search/CCSJ/Submittals By CCSJ/Submittals By Product
Type/Submittal Details) to check the current status of any given submittal. The history of actions taken by all process
partners in regard to a submittal is also found on this screen. Here are the step-by-step instructions:
1) Login page.
2) Enter your Username and Password; for TxDOT users without accounts, enter your network username and password.
3) Search for the CCSJ: In the CCSJ field, type in the desired project’s CCSJ. Click enter or the search icon.
4) If found, a CCSJ Lookup table will appear. Click the CCSJ on the left of the table.
5) Under Submittals by Product Type, click the (+) sign next to the desired product type to unfold that branch list.
6) Click the submittal number on the left of the table that best fits your search criteria.
7) In the Submittal Details screen, the user can find both the current status (arrow) and the history of all actions taken (red
rectangle) on the submittal.
There is an alternate method for account holders that have worked on this CCSJ before. From the My Projects screen,
select the CCSJ and then perform steps 5-7 above.
Table of Contents
Archive Drawings
Phase II enhancements will integrate archived critical as-built drawings with WSPR upon project completion. We will
contact District Admins upon installation of any additional automated methods in this area.
For now, the Districts will continue to convey as-built drawings, identified in this table (See Comment No. 6), as items
required to be archived, to GSD as they have in the past.
The ability to upload change orders to WSPR, and link to PlansOnline for reviewer convenience, is another Phase II
objective.
Table of Contents
Status Codes
As various tasks are completed in the submittal review cycle, the user is kept informed of this progress by status label
changes in WSPR. This status is shown in tables on the Review Cue, Account History, Submittals by CCSJ, and the
Submittal Details screens. Below are listed the available status abbreviations (used in file names) and the status
labels as seen in the tables:
General Status Codes
INIT Initial Submission
SUB Submission (Revision)
RVW Review Started
DLGT Delegated
RC Returned for Correction Set
AP Approved
AX Approved Except as Noted
RC_SUB Corrected Set Submitted (Revision)
AP_P Approved by Primary Reviewer Only
AX_P Approved Except as Noted by Primary Reviewer Only
AP_S Approved by Secondary Reviewer
AX_S Approved Except as Noted by Secondary Reviewer
RC_S Returned for Correction by Secondary Reviewer
Retaining Wall Specific Status Codes
AES_AP Aesthetic Review Approved
AES_AX Aesthetic Review Approved Except as Noted
AES_DLGT Aesthetic Reviewer Delegated
AES_RC Aesthetic Reviewer Returned for Correction
AES_RVW Aesthetic Review in Progress
AGR_NO_RMK Sec. Reviewer Agrees with Primary Reviewer
AGR_RMK Sec. Reviewer Agrees (Has Remarks) with Primary Reviewer
GEO_AP Geometric Review Approved
GEO_AX Geometric Review Approved Except as Noted
GEO_CMPL Final Compile in Progress
GEO_DLGT Geometric Reviewer Delegated
GEO_RVW Geometric Review in Progress
STR_AP Structural Review Approved
STR_AX Structural Review Approved Except as Noted
STR_DLGT Structural Reviewer Delegated
STR_RC Structural Reviewer Returned for Correction
STR_RVW Structural Review in Progress
Table of Contents
Definitions
Account History
WSPR page that lists all submittals reviewed or submitted by the subject office, approved and unapproved.
Admin
Short for Administrator. Person in responsible charge of a WSPR account. See District Admin.
Assignment
As in "review assignment"; the District Admin/Initializer in charge of the project determines who the reviewer should be for
a particular product and chooses that office in WSPR.
Bridge Admin
Person(s) in responsible charge of Bridge Division settings, office structure, permissions, approving accounts, and
providing Level 1 support for WSPR users.
Browse
Navigate to the drive and folder where a file resides that needs to be uploaded or to the folder where a file needs to be
saved.
CC
Abbreviation for "Carbon Copy"; the act of providing duplicate information to additional recipients by email.
CSJ
Control-Section-Job number for a project or portion of a project.
CCSJ
Contract Control-Section-Job number for a project; the controlling CSJ on a job that may have multiple CSJ numbers
assigned to different parts of a project.
Consultant
A structural engineering company under contract to TxDOT to perform engineering services, in particular for this case –
shop plan review services.
Contractor
Company contracted to TxDOT to carry out the construction of all or part of a project, and who will typically submit
working drawings to the Engineer, or occasionally shop drawings to the Engineer of Record on behalf of a fabricator
working for them.
Default Reviewers
Reviewing office(s) that a District tends to choose to have review certain products. The Bridge Admin sets the defaults for
Bridge Division reviewers for Districts to choose from when sending reviews to BRG to review.
Defaults
Contact addresses, CC recipients, and reviewers that the Districts prefers to use on a regular basis and or as associated
to different products.
Detailing Office
An office contracted to a fabricator or contractor to provide shop or working drawings.
District
Organizational sub-division of TxDOT, responsible for projects in any of the twenty-five distinct areas of Texas.
District Admin
Short for District Administrator. A user role in WSPR. Performs duties in addition to the typical account Admin duties.
more
District Defaults
Each District can set application parameters for all projects on the "District Defaults" page. Product associated District CC
recipients and preferred reviewers may be set here. Default notification addresses are set on the User/Offices page by the
District Admin.
District Init
Short for District Initializer – the person that the District Admin has delegated the duties of initializing the project to;
typically an Area Engineer or Project Engineer; a user role within WSPR.
Division
Centralized review and inspection tasks are performed at the TxDOT organizational level of offices called Divisions.
Bridge, Traffic, and Design Divisions perform reviews for various types of submittals, and the construction Division
receives notification of submittal approval and uses the final sets to perform inspection duties on the fabricated items.
Download
Retrieve, save, or view a file from WSPR.
Duration
Time elapsed between two actions, usually referring to the timers for auto-notifications set by the District Admin/Initializer
on the Edit Project screen.
Edit Project
The Edit Project page in WSPR allows the District Admin or designated Initializer to set project specific parameters such
as structure names, Engineer association, special product additions, custom reminder timers, and delegation of the
reviewer assignment task (aka "Initializer").
Elapsed Days
The time that has passed from the point when the reviewer was notified of a submittal that is ready to review and the
uploading of the approved submittal by the reviewer to WSPR. (See Reminder Settings)
Engineer (E)
Typically the Area Engineer for the county that the construction project is in.
Engineer of Record (EOR)
Typically the Design Engineer for the particular item in the construction project.
Fabricator
Company employed by the contractor (or sub) to pre-fabricate an item that is to be erected at the project site. This is
usually the
entity that creates and submits the shop drawings to TxDOT.
Facility Carried
Refers to the highway or road that is crossing some geographical feature, and is the initial part of a concatenated bridge
structure name on a project. ("Feature Crossed" is the second part of the structure name)
Feature Crossed
Refers to the geographical obstruction (road, water body, railroad, etc.) that is being crossed by the road or highway in a
project, and is the second part of a concatenated bridge structure name on the project. ("Facility Carried", road or
highway, ie, is the first part of the structure name)
Filters
This tool is found on several pages of this program allows users to view pertinent information only and not have to view all
of a long list of items. All submittals of a certain CSJ may be "filtered", all accounts of a certain type, all submittals for a
particular project, etc.
Initialize
The act of preparing a project to receive and process review submittals. Includes assigning reviewers, verifying structure
and NBI numbers, setting reminder durations, adding any necessary default CC recipients, etc.
Initializer
The District person assigned to “Initialize” a project, ie, Edit Project info and Assign Reviewers, etc., in lieu of the District
Admin; abbreviated as “Init”.
Level 1 Support
When problems arise that the user cannot solve, the initial help resources are as follow, in order of contact sequence:
Office Account Admin, District Bridge Admin, and Bridge Admins (Bridge Division/Fabrication Branch personnel). Help
Contacts
Level 2 Support
When problems arise that the Bridge Division/Fabrication Branch personnel cannot solve (programming, etc.), the Bridge
Admins act as liaison to TSD programmers in resolving the issue.
Message Center
The Message Center is a page within WSPR that displays all notifications generated by user actions in WSPR. These
messages are duplicates of emails sent to user specified email addresses and are permanent in the system. Even when
deleted, the messages are not removed, they are just stored in the "Deleted" folder. These messages then offer proof of
WSPR notifications.
My Projects
WSPR page that lists CSJs your office has reviewed submittals for, has assigned for review, or has submitted plans on.
NBI
"National Bridge Inventory" number - a unique number for each bridge structure, consisting of a two digit district number
followed by a three digit county number, a zero, a six digit control-section number (on-system) or control number (off
system), and a three digit structure number. Where space is limited, WSPR will display only the last three structure
numbers. (See Assign Reviewers screen.) The NBI numbers for all the structures on a project are available for revision on
the Edit Project screen.
Office
A group of WSPR users that share a Review Cue, Account History, and Message Center.
Office Role
Description of what the office does in association with WSPR processes and what is chosen for the office at the time of
account creation. (limits or assigns certain action privileges within the system) Office Roles: TxDOT District, TxDOT Area,
TxDOT Bridge, TxDOT Bridge Sub, Consultant,
Railroad, Tollroad, Detailer, Contractor, Fabricator.
Permissions
The Permissions screen allows District Admins and Bridge Admins to set up permissions for one office to access another
office's Review Cue and Account History. A common example for this practice would be giving the District Office access to
one or more Area Offices within their district. Note that permission settings are "one way". This means that if office A is
given access to office B, this does not imply that office B has access to office A.
Product
A component of a structure or roadway, usually prefabricated, that by the requirements of the TxDOT Construction or
project Special Specifications must have detailed fabrication or erection drawings, and or calculations, sent to the
responsible Engineer for their review prior to fabrication or erection of that item.
Project Initializer
The person designated to perform the act of assigning reviewers to all submittals on a project. The duty may also include
the specification of additional CC recipients for certain submittal types at the time of reviewer assignment, and the setting
of custom reminder timings.
Railroad
Entity for which when involved with a TxDOT project may require the routing of submittals for secondary reviews after the
primary review has been completed.
Reminder Settings
These auto-notification settings, found near the bottom of the "Edit Project" page, are used by project initializers (District
Admin or their designee) to remind users of timings necessary to insure expedient reviews. These timers may be left at
default settings (recommended), or changed as necessary to help satisfy contract language, or to extend review times for
more complex elements.
Reminders
Auto-notification emails sent to application users to help keep various aspects of the process on time. The timing of these
notications is controlled by the District Admin or designated "Initializer" for the project on the Edit Project page accessed
via the Submittals By CSJ page.
Retract
Clickable links in various areas of the process that allow the user to correct previous actions. Users may retract new
submittals, retract reviewer assignments, or retract reviewed submittals if done in a timely manner - preferably before the
user performing the next action on a submittall has taken any action. Submittals that have moved beyond a point in the
process that retractions may reasonably occur are still retractable by verbal communication with the user performing the
next step. For example, a fabricator could call a reviewer and ask them to reject their review status even after a review
has started so that the fabricator could retract the submittal. An extreme solution since the District Admin must now reassign the submittal when the corrected version comes in. An alternative in this case is to allow the submittal to be fully
reviewed and simply submit a revision. (duplicate reviews could cause back-charge issues in certain situations however)
Review
The act of checking a shop or working drawing submittal for conformance to contract plan details, to proper standards put
forth by TBPE, or to TxDOT convention.
Reviewer, Primary
The review office or person responsible for the review of a submittal, or in the case of proprietary retaining walls - for a
portion of the submittal. The reviewer is commonly, but not always, the EOR (Engineer of Record) or person who
designed that portion of the job. If secondary reviews are necessary as in the case of tollroad or railroad associated jobs,
the primary reviewer checks the review of the secondary reviewer and determines applicability for incorporation into the
final review set. The Engineer (Area Engineer) typically reviews working drawings.
Reviewer, Secondary
The review office or person responsible for the second review of a submittal in the case of a tollroad or railroad being
associated with a job. After the primary review has been completed and the review set uploaded to the system, WSPR
notifies the secondary reviewer that a review set is ready for them to review. Upon completion, the secondary reviewer
uploads any remarks, the primary reviewer determines the content of the final review set, and the review is completed.
Review Cue
WSPR page that lists all unapproved submittals to be reviewed by the subject office; typically where the user goes to
reject, delegate, or begin a review.
Screen
A windowed view in WSPR that shows different content from a previous page or screen, and is not treated as a page by
Microsoft Windows controls.
Shop drawing
Fabrication detail sheet prepared by fabricators for their manufacturing shop to use in fabrication of bridge components in
compliance with contract plans and applicable TxDOT specifications and standards. Typically the Engineer of Record
reviews shop drawings. Shop drawings become part of the as-built drawings for the completed structure.
Sub-contractor
Contractor working for the prime contractor; treated similarly to the contractor in WSPR as far as notifications, IF the
submitter manually adds them as a CC-recipient on the upload screen. Sub-contractors can create office accounts under
the role of contractor and submit working drawings, and, or, have fabricators submit shop drawings in their behalf.
Notifications will be more automatic with an account. However, in this scenario, the sub-contractor is responsible for
relaying any notifications to the prime contractor so that the prime contractor can monitor overall document flow. (WSPR
does not associate a sub to a prime and therefore notify both if the sub has a contractor account.) Exception: if the
submitter finds the sub in the drop down list while submitting and selects them, the sub will be associated to the prime
contractor for that particular product from that point forward.
Status
Abbreviated description of progress of submittals in the process of being reviewed.
Structure
Can refer to bridge, or sign, or retaining wall structures, the names of which become headings in reviewer assignment
tables. DCIS returns a list of bridge structure names and NBI numbers for a project upon initial use of a CSJ by a District
Admin or designated Initializer. Any missing names are filled in by the District and made part of the project record in
WSPR. Reviewers are then assigned by product and structure. Structure names for proprietary retaining walls may be
simple number designations, and for sign bridges may be delineated by station numbers IF there is a need to assign
different structures to different viewers for the same product. If this need does not exist, then the project initializer may use
the default "ALL" heading.
Submit
Refers to the act of conveying the drawing set to TxDOT via WSPR, and may be conveyed by fabricators, contractors, or
detailing offices.
Timers
"Timers" control the elapsed time that must occur before an auto-notification is sent to users to help expedite reviews and
other process actions involved in the WSPR application. See Reminders and Reminder Settings for discussions on timers.
Tollroad
Entity for which when involved with a TxDOT project may require the routing of submittals for secondary reviews after the
primary review has been completed.
Upload
Transmit a file to WSPR. See Upload.
User Role
Description of what the user does in association with WSPR processes and what is chosen for the user at the time of
account creation. (limits or assigns certain action privileges within the system) See Roles section for a list of User Roles.
Users/Offices
A screen used by BRG or District Admins only to Add/delete users, revise office info, approve/view offices.
Viewer role
A TxDOT employee without a WSPR account that can access files for viewing purposes only.
Working drawing
Forming detail sheet prepared for or by the contractor for form work, false work, shoring, or erection. Work detailed does
not require review by the engineer of record. However, a Professional Engineer must sign and seal these drawings.
Submittal is required, but approval is not required.
WSPR
Web Shop Plan Review application - used for transmission, storage, and review management of shop and working
drawings statewide in Texas. More decription.
Table of Contents
FAQs
(Account Admins)How do I change the Admin on my account?
Since you can have multiple Admins on a single account, but there must be at least one, simply add the new person to the
account with an Admin role, or change the role to Admin for an existing user, and then change the role of the old Admin to
a different role, leave them the same (it is OK to have multiple admins, preferable in a lot of cases), or “Make Inactive” the
person altogether if they have left the employment of that office. (See Remove Admin instructions w/screen shots.)
(Fabricator)How do I retract a submittal after a review has begun?
Call the reviewer and have them stop the review, and tell them to click “Stop Review” in the Review Cue. The
fabricator/contractor/detailing office can then go into their Office Account History screen and “Retract” the submittal. (See
Retract Submittal instructions w/screen shots. Step 6 deals with this particular issue.)
(District)How do I change the reviewer assignment after the review has begun?
Call the reviewer and have them stop the review by selecting the Stop Review action in the Review Cue’s Action column.
The District Admin/Initializer can then go into the Assign Reviewers Page and right click on the reviewer-cell and choose
Remove Assignment. See Retract Review Assignment for additional information.
(Reviewer)How do I retract an approved submittal ?
A reviewer can retract an approval by going into the Account History screen and clicking “Retract” IF done before close of
business of the day of approval. If after the close of the business day, the reviewer must contact the submitter and ask
them to submit a revision and review the submittal again.
(District)The review assignment in the Assignment Tables changed without any action on my part. What
happened?
The originally assigned reviewer probably delegated the review to another person/office, which causes the Assignment
Table to update to showing the delegated reviewer instead of the originally assigned reviewer. See the end of the
Delegate/Reassign section for further remarks on this.
(Fabricator)How do I upload a revised set of drawings?…
Go to the Submittals By CCSJ screen, accessed by clicking the CCSJ on the MY Projects screen, and then expanding the
product listing. Then find the submittal in the list and in the Action column, click “Upload Revision”. Browse to the file on
the ensuing upload pane, repeat for additional files, add any needed comments, click the signature box, and select
“Submit”. (Step by step instructions at: Submit a Revision)
(All Account Holders) What is the difference between an Office Admin and an Account Admin?
Office Admin is the correct term for a TxDOT District or Division person(s) in responsible charge of WSPR management
and support for the whole of that District or Division. There can be multiple ones. They can create sub offices that are
under their supervision.
Account Admin is a misnomer in the strictest sense, and a vague duplication of the Office Admin term in a more general
sense. All users must have an “Account” to log onto WSPR. Those accounts are associated to an office for the purposes
of having one (or two) persons manage all contact data for those accounts (employee turnover, change of roles, etc) and
for the sharing of certain screens.
WSPR Structure Hierarchy Notes:
• All users (except TxDOT “Viewers”) have an account.
• All accounts are associated to an office.
• All offices have at least one admin.
• Some TxDOT offices (AE offices for example) are associated to a managing District or Division headquarters office.
• Admins for these managing offices have additional rights and responsibilities than do subordinate office admins.
Table of Contents
Support
Level 1 Primary: TxDOT District Admins – contact the TxDOT District WSPR Admin for the office or project for which you
are associated.
If unknown, contact the District Bridge Engineer to obtain contact info for the District WSPR Admin. Link
to District contact info:
https://www.txdot.gov/inside-txdot/district.html
800-558-9368
Level 1 Secondary: TxDOT Bridge Division/Fabrication Branch Admins:
Jeff Cotham, P.E.
[email protected]
512-416-2187
Patricia Coronado
[email protected]
512-416-2565
Mark Bewley
[email protected]
512-416-2207
Level 2: IT: Contact the above Bridge Division/Fabrication Branch personnel who will then act as liaisons to IT on
programming issues.
Table of Contents
Updates (Document Update History)
2/2.4 /2014
Table of Contents
Draft publication