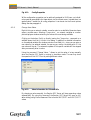
1
Manual Easylon® OPC Server for LONWORKS® networks running LNS Gesytec Gesellschaft für Systemtechnik und Datenverarbeitung mbH Pascalstr. 6 52076 Aachen, Germany Phone + (49) 24 08 / 9 44-0 Fax + (49) 24 08 / 94 4-100 email: [email protected] www.gesytec.com Doc. ID EOS/Doku/UserDoc/EOS-L_Manual-E.doc, V01.02 Date: June 2004 OPC Server L User’s Manual About this manual This manual provides information about installation, configuration and operation of the Easylon OPC Server L, focusing on the handling of the Easylon OPC Server software. For descriptions of the LNS Server, the LONWORKS technology by Echelon and the OPC interface definition please consult the respective documentation of Echelon at www.echelon.com and the OPC Foundation at www.opcfoundation.org Chapter 1 of this manual provides general product information. The installation and start-up of the Easylon OPC Server are described in chapter 2. Chapter 3 focuses on the various configuration options of OPC Server. The different diagnosis options of OPC Server L are described in chapter 4. Chapter 5 presents different client demos, which are included in the installation package, while chapter 6 gives an overview of the implemented naming items. Chapter 7 describes how to acquire a full license of the Easylon OPC Server. This manual refers to program version 1.01 and higher of the Easylon OPC Server L. For the complete specification of the OPC automation interface as well as for the OPC custom interface please refer to the OPC Foundation web site, where you can download the OPC interface definition document: The complete specification of the OPC automation interface and of the OPC custom interface are available on the OPC Foundation web site for download at http://www.opcfoundation.org This documentation is subject to modification at any time without prior notice. Gesytec does not take over any responsibility for mistakes or inaccuracies in this documentation and eventually occurring consequences. In no case Gesytec as well as its representatives and staff are liable for eventual defaults, damages caused indirectly or during use, occurring due to the use or non-usability of the software or the accompanying documentation. Microsoft®, Visual Basic® and Windows® are registered trademarks of Microsoft Corporation. Easylon® is a registered trademark of Gesytec GmbH. Echelon, LON, LONMARK, LONWORKS® and Neuron are registered trademarks of Echelon Corporation. Other names may be registered trademarks of the respective companies. ii OPC Server L User’s Manual Contents 1 Introduction ........................................................................................................................5 1.1 1.2 1.2.1 1.2.2 1.3 1.3.1 1.3.2 1.3.3 1.3.4 1.4 What is OPC? ...........................................................................................................5 Why Use the Easylon OPC Server? ............................................................................7 Use of Process Data in Business Applications .............................................................7 Why Connect LONWORKS Networks Through OPC? ................................................7 Easylon OPC Server Structure....................................................................................9 OPC Server................................................................................................................9 LNS Server ..............................................................................................................10 OPC Clients ............................................................................................................10 LonMaker for Windows ...........................................................................................10 OPC Data Model.....................................................................................................11 2 Installation and Start-up...................................................................................................13 2.1 2.1.1 2.1.2 2.1.3 2.1.4 2.1.5 2.2 2.2.1 2.2.2 2.2.3 Installation ..............................................................................................................13 Supported Hardware................................................................................................13 Installation Requirements ........................................................................................13 Installation Procedure ..............................................................................................14 OPC Server Name ...................................................................................................17 Multiple Instances ...................................................................................................17 Getting Started........................................................................................................18 Easylon OPC L Server Actions .................................................................................18 Automatic Start-up and Shutdown by OPC Clients..................................................19 Automatic Start-up by Windows .............................................................................19 3 Configuration ....................................................................................................................20 3.1 3.1.1 3.1.2 3.2 3.2.1 3.2.2 3.2.3 3.2.4 3.2.5 3.2.6 3.2.7 3.2.8 Configuration File....................................................................................................20 Opening a Different Configuration File....................................................................20 Saving the Configuration File...................................................................................20 The Options Dialog .................................................................................................21 Project Settings........................................................................................................21 Protocol Window ....................................................................................................22 OPC Events.............................................................................................................23 LNS Events..............................................................................................................24 Archive....................................................................................................................24 Show/Hide Columns ................................................................................................25 General ...................................................................................................................26 License.....................................................................................................................26 iii OPC Server L User’s Manual 4 Diagnosis ...........................................................................................................................28 4.1 Network Structure (Alt+0) .....................................................................................28 4.1.1 Browsing the Network ............................................................................................28 4.1.2 Item Types ..............................................................................................................30 4.1.3 Monitor Sets ............................................................................................................31 4.1.4 SNVT/UNVT Data Types .......................................................................................32 4.1.5 Customize View.......................................................................................................33 4.1.6 Accessing OPC Items...............................................................................................33 4.1.7 Editing Item Properties............................................................................................34 4.1.8 Change Item Value..................................................................................................37 4.2 Group/Items Diagnosis (Alt+1)...............................................................................39 4.3 Protocol View (Alt+2).............................................................................................41 5 Easylon OPC Server Demos ..............................................................................................42 5.1 Requirements ..........................................................................................................42 5.2 5.3 Visual Basic Demo...................................................................................................43 Visual Basic for Applications Demo .........................................................................44 6 Writing OPC Clients .........................................................................................................46 6.1 6.2 6.2.1 6.2.2 Identifying Items .....................................................................................................47 VBA for Excel..........................................................................................................48 Preparations ............................................................................................................48 Writing an OPC Client for Excel .............................................................................49 7 Licensing............................................................................................................................54 7.1 7.2 Trial Version............................................................................................................54 Acquiring a Valid License ........................................................................................55 8 Version History..................................................................................................................56 9 Appendix ...........................................................................................................................57 10 List of Figures....................................................................................................................58 11 List of Tables .....................................................................................................................59 12 Index..................................................................................................................................60 iv OPC Server L, User’s Manual 1 Introduction Introduction This chapter gives an introduction to basic OPC concepts and the Easylon OPC Server. The use of microprocessors has proliferated in manufacturing plants, Often though they often don’t co-operate well. Application software is not always ready to communicate with digital plant-floor devices or other applications. Making these systems work together is the most pressing need of process manufacturers. 1.1 What is OPC? Based on Microsoft’s OLE (now ActiveX), COM1 and DCOM2 technologies, OPC consists of a standard set of interfaces, properties and methods for use in processcontrol and manufacturing-automation applications. The ActiveX/COM technologies define how individual software components can interact and share data. OPC provides a common interface to communicate with diverse process-control devices, regardless of the controlling software or devices in the process. Fig. 1.1: From Proprietary Solutions to a Plug-and-Play Standard From the OLE for Process Control Standard: OLE for Process Control (OPC) is designed to be a method to allow business applications access to plant floor data in a consistent manner. 1 Component Object Model 2 Distributed Component Object Model 5 OPC Server L, User’s Manual Introduction OPC originally is the product of a taskforce that had the objective of developing a standard interface for the process control industry to enable development of servers and clients by multiple vendors that shall inter-operate seamlessly together. The first objective of OPC is not to connect (components in) process control systems to each other, but to create an interface between various existing process control systems and Windows PC’s running business management applications, accessing process data and allowing some degree of influence on the process control system. To do these things effectively, manufacturers need to access data from the plant floor and integrate it into their existing business systems. Manufacturers must be able to utilize off the shelf tools (SCADA Packages, Databases, spreadsheets, etc.) to assemble a system to meet their needs. The key is an open and effective communication enabler concentrating on data access, and not the types of data. Of course, exchanging data between business applications and process control systems is not new, but it used to be done with proprietary drivers or with DDE links. OPC is defining a standard interface, allowing a much wider range of business applications to connect to a much wider range of process control systems. Since OPC is based on the existing OLE/COM interface that is used by most Windows applications, an OPC Server provides a process control system for many business applications at the same time. 6 OPC Server L, User’s Manual 1.2 Why Use the Easylon OPC Server? 1.2.1 Use of Process Data in Business Applications Introduction Microsoft initiated OPC makes it important enough to keep track of. But there are more reasons why an Easylon OPC Server can be of advantage for you: A Standard Interface to Process Control Systems The OPC interface was designed to allow any business application with an OLE interface the access to process control systems without any interfacing operation involved. This means that the only addition needed is on the part of the process control system manufacturers: as soon as they provide an OPC Server for their process control system, virtually every business application can connect up and use the process data. Combine Data from Various Devices or Field Bus Systems Since the OPC interface builds on DCOM, the source of process data can be anywhere on the intranet. As long as your business application knows the address of an OPC Server, it can connect and use the available process data. More than one OPC Server can be combined in the same business application. Fig. 1.2: 1.2.2 Use of Process Data in Business Applications Why Connect LONWORKS Networks Through OPC? Include Data from the Control network in Standard Business Applications Business applications use the OLE interface to connect to data sources. Since the OPC interface is defined at OLE level, any business application can use LonWorks net- 7 OPC Server L, User’s Manual Introduction works data, simply by connecting to the Easylon OPC Server. For those who write their own applications in C++ the COM level OPC interface is available. If you want to include NV values in an Excel spreadsheet, visualize your control network with Intouch, or use NVs in other business applications, the Easylon OPC Server is the solution to your problem. 8 OPC Server L, User’s Manual 1.3 Introduction Easylon OPC Server Structure A typical OPC network consists of specific standard applications. 1.3.1 OPC Server The OPC Server connects to an existing LNS Server on the network which is connected itself to LonWorks using a network interface. The OPC Server wraps process data from the LNS Server into OPC objects using the OLE interface allowing to monitor and modify its values. Multiple OPC Clients can connect to the OPC Server to gain access to the monitored objects. The OPC standard is based on the OLE/COM automation interface and can be used by most Windows applications without the need for customization. Everyone who can write macros in VBA (Visual Basic for Applications) can include process data from the LON in his spreadsheets or database applications. Chapter 6 “Writing OPC Clients” describes how to develop your own client application. OPC Client SNVT / UNVT & SCPT/ UCPT formatter OPC Client OPC Client Easylon OPC Server for LNS OPC Client LonMaker for Windows LNS Server Network Interface Fig. 1.3: Easylon OPC Server Structure 9 OPC Server L, User’s Manual 1.3.2 Introduction LNS Server The LNS Server connects to a LonWorks network via a network interface. The server maintains a database of the available network objects managing the access to the data and the modification of the appropriate values. 1.3.3 OPC Clients The OPC Clients use their standard VBA (or C++) code to connect to the Easylon OPC Server and access available groups and items of LonWorks objects. A client can subscribe to specific network variables, monitor points and configuration properties on the OPC Server. When an OPC Client opens a connection to the OPC Server the desired items are subscribed. The Easylon OPC Server checks access authentication data and retrieves the current values for the desired items from the LNS Server. As soon as values change the new values are passed to the OPC Client for the subscribed objects. There are several OPC Clients available on the market. An overview of the available applications can be found on the OPC Foundation web site: http://www.opcfoundation.org/05_products/05_category.asp?cat=Client You can find some prominent clients tested for use with the Gesytec OPC Server in the appendix. 1.3.4 LonMaker for Windows Basing on the functionality of Microsoft Visio the LonMaker tool was developed by Echelon to design, install, describe and maintain LonWorks networks. A LonWorks specialist can create the structure of a network using a graphical user interface. 10 OPC Server L, User’s Manual 1.4 Introduction OPC Data Model To understand some important features of the OPC Server the OPC data model is introduced here. It is based on the OPC Data Access Automation Specification 2, which may be downloaded from the homepage of the OPC Foundation: http://www.opcfoundation.org The OPC Server offers two objects. An OPC Client is able to read information regarding all items available on the OPC Server. The server can present this information hierarchically, for instance it can sort the data points by physical devices. By using the OPC Browser the client can determine addressing information for each of the data points. Of course the client must know how to specify the data to be read. The OPC Browser provides an access path and item ID for each data point. All data has to be organized in groups. To access the data the client defines an OPC Group object. A group consists of different OPC items, which represent individual data points. OPC Server OPC Browser OPC Groups OPC Group OPC Items OPC Item Fig. 1.4: OPC Data Model The OPC item manages two values, a cached and an un-cached one. Both access methods have their own advantages and disadvantages. Managing values without caching directly addresses the LNS Server with each access resulting in most actual readouts. This can of course considerably increase network traffic. Alternatively the access to the device values on the LNS Server can be cached. Reading the data from the cache will not effect new traffic as long as the last direct device reading has been within the cache timeout. Using the caching method significantly reduces bandwidth for the communication with the devices and therefore should be 11 OPC Server L, User’s Manual Introduction favored. This can cause problems with synchronous operations, as values won’t be written to the bus because the cache timeout wasn’t reached before writing. Also note that the LNS Server may be using its own cache while accessing LonWorks devices. As the LNS Server manages all communications between the OPC Server and a LonWorks network this can result in cached values even if no caching is active at the OPC Server. There is no way to determine if a LNS Server outputs cached or un-cached data. An OPC Client offers several options to access the data on the OPC Server: 1. The first (and favored) method is to use the subscribe mechanism. A group object is defined by the client and filled with OPC items. The OPC Server sends data change events to the client, if an item has changed. Communication bandwidth between server and client is controlled by a timeout mechanism prohibiting the server from sending update information too frequently. Furthermore the client is able to define a hysteresis. Especially for analog values such as temperatures it is possible to reduce the bandwidth. Of course, by using this method the client is not able to write any values. 2. The second method uses an asynchronous mechanism. The client starts a transaction, which will be either a read or write. The OPC Server decides on its own when the transaction will be performed. After completing the transaction the OPC Server will send an appropriate event to the client. In case of a read request it contains the data. The asynchronous methods can be used either for the item cache or for direct access. Due to the undetermined execution time the user has to be careful in using the asynchronous mechanism. 3. Fast access is possible with the third method, the synchronous access for read and write. A synchronous access will be directly executed. If it has to be performed on the device value and not on the item cache it will be immediately performed. So reading or writing a value with synchronous access on the Easylon OPC Server will send direct messages on the LonWorks network. Obviously this method should be used deliberately because of bandwidth issues. 12 OPC Server L, User’s Manual 2 Installation and Start-up Installation and Start-up This chapter describes all aspects of installing and starting the Easylon OPC Server L. Subjects covered are Installation Explains how to install the Easylon OPC Server L software. Starting the Easylon OPC Server L Describes how the Easylon OPC Server is started, either manually or automatically. 2.1 Installation To install the Easylon OPC Server L on your PC follow the steps described below. Note that the Easylon OPC Server L should be installed on a PC with an interface to the LNS network. If you are already using an older version of the Easylon OPC Server L it is strongly recommended to uninstall the existing version by using the Windows uninstall-tool before installation of the new version. 2.1.1 Supported Hardware The OPC Server connects to an LNS Server on the network which itself is connected to a LonWorks network via a compatible network interface. Thus the hardware support has to be ensured by the LNS Server. 2.1.2 Installation Requirements • The Easylon OPC Server L works with Microsoft Windows 2000 or Windows XP (Professional version recommended). For test purposes Windows 98 and greater versions also can be used, • A LNS Server with LNS 3 Service pack 8 must be available on the network, • Pentium III (500 MHz or larger), • 256 MB RAM or more, • 20 Megabyte or more available hard disk space, • Ethernet interface. 13 OPC Server L, User’s Manual 2.1.3 Installation and Start-up Installation Procedure 1. Close all applications currently running on your computer 2. Start the OPC Server installer The setup program will allow you to determine a target location for the Easylon OPC Server L software. It will guide you through the necessary installation step for step. To install, run the following program: <your CD>:\Easylon OPC Server\Setup\Setup.exe 3. Accept the license agreement Accept the license agreement by clicking Yes. Fig. 2.1: License Agreement 4. Choose destination location Define a destination location by clicking Browse. Confirm your selection with a click in Next. Fig. 2.2: Choose Destination Location 14 OPC Server L, User’s Manual Installation and Start-up 5. Select setup type The installer package contains both versions OPC Server L and M. The Easylon OPC Server L operates with LNS, the Easylon OPC Server M operates as a standalone application without LNS to access the LONWORKS network. Select the Easylon OPC Server L to have the LNS version or click on Custom Configuration [T1]to install both Fig. 2.3: Server Type 6. Select program folder Set a name for the new Windows program group by accepting the default definition or by entering a new one. Confirm with the button Next. Fig. 2.4: Name of Program Group The software will now be installed. 15 OPC Server L, User’s Manual Fig. 2.5: Installation and Start-up Installation in Progress Once the installation process is completed confirm the dialog window by clicking Finish. Fig. 2.6: Installation Completed 7. Restart your computer After installing the Easylon OPC Server L and rebooting your computer you will find the following new program group, the applications “NVT Editor” and “XIFEditor” are parts of the Easylon OPC Server M: Fig. 2.7: Programm Group after Installation 8. Configure the Easylon OPC L Server for your network To access a LonWorks network the connection to a LNS Server must be configured. For detailed information about the configuration options, see chapter 3: „Configuration“ of this manual. 16 OPC Server L, User’s Manual 2.1.4 Installation and Start-up OPC Server Name An OPC client needs the name of the Easylon OPC Server L to get a connection. The name of the Easylon OPC Server L for an OPC client is Gesytec.ElonLnsOPC2. 2.1.5 Multiple Instances The Easylon OPC Server L may run in more than one instance. Each instance may connect to another LNS database by running as a remote client or several instances may connect to the same LNS database. Multiple instances can be created manually. A subfolder SVR_x needs to be created, where x is the number of the instance. So a subfolder SVR_1 will be the first additional instance. The executable file of the Easylon OPC Server L (LnsOpcServer.exe) must be copied to this folder. Afterwards this additional instance needs to registered by using this command line: LnsOpcServer /regserver. After registering this instance will be available as: Gesytec.ElonLnsOPC2_1. The number of the instance is displayed in the title bar of the user interface. 17 OPC Server L, User’s Manual 2.2 Installation and Start-up Getting Started The Easylon OPC Server L can be started either manually or automatically. Manual start is done according to usual Windows procedures by either double-clicking the program icon in its directory or by selecting one of the shortcuts that were placed in the Easylon OPC L Server program group. During start-up the server will display the following picture: Fig. 2.8: 2.2.1 OPC Server Splash Screen Easylon OPC L Server Actions Open the configuration file. The configuration file used in the last OPC Server session will automatically open on start-up time. The configuration file contains information about the network structure, LNS Servers and further options to be used. See chapter 3: ”Configuration” for details. Check the command line options. If no option is given the program starts with the regular user interface waiting for a start command before proceeding with the next steps. If the command line option "/run" is given the program doesn’t wait but immediately continues with the next step, using the recent configuration that was used in the last server session. Connect to a LNS Server In Auto mode the OPC Server L will connect to the specified LNS Server, read out its network structure via a browser-interface and make it available to all connecting OPC Clients. The Easylon OPC Server L can also run in Simulate mode (see chapter 3: “Configuration” for details). In this case a connection to the specified LNS Server will be made and the network structure will be read out but all values made available to OPC Clients will be simulated offline. For repeated accesses to a specific value random results will be generated. Wait for connections from OPC Clients At this point the Easylon OPC Server L is running and waiting for OPC Clients to contact the server, add groups and subscribe items. 18 OPC Server L, User’s Manual Installation and Start-up The Easylon OPC Server L will be found by a client as Gesytec.ElonLnsOpc2. Serve OPC requests The Easylon OPC Server L now replies to any request arriving through one of the connected OPC Clients until the program is terminated. 2.2.2 Automatic Start-up and Shutdown by OPC Clients If an OPC Client tries to open the Easylon OPC L Server it will browse the Windows registry to find the program. If the server is already running a connection will be established. If the server is not running it will be started automatically using the /run command line option. The Easylon OPC L Server will be operative until the last OPC Client has disconnected (removing the last remaining group). If an OPC Client started the server automatically it will then terminate automatically even if the last remaining OPC Client was not the one that caused the server to start. 2.2.3 Automatic Start-up by Windows You can copy the Easylon OPC Server L (run) shortcut to the Autostart directory of your Windows-PC to cause the server to start automatically when the PC is booted. The server will automatically open the recent configuration file and immediately start its OPC services. 19 OPC Server L, User’s Manual 3 Configuration Configuration This chapter explains the Easylon OPC Server L configuration options. The Easylon OPC Server L connects to a LNS Server on the network. The LNS Server provides the data of the selected LonWorks network data, which is made available to OPC Clients. The configuration settings tell the Easylon OPC where the LNS Server can be found. Further options allow configuring the logging of system events, the altering of time values and the management of the license. 3.1 Configuration File Configuration information is stored in a separate file with the extension .glo. Normally the configuration options are edited prior to the start of the Easylon OPC Server. To start the Easylon OPC Server L without a configuration file you can use the shortcut Easylon OPC Server (Config) in the Easylon\OPC Server program group. The current state (run or config) can also be read in the title of the OPC Server window title bar. If additional instances of the OPC Server are run on the same machine the title bar also contains a numerical identifier. 3.1.1 Opening a Different Configuration File If you want to open a different configuration file (or if you started the server with the Config shortcut) choose the Open command from the File-menu. If the server was already started and at least one OPC Client is connected this action is refused (a dialog box will tell you why). Otherwise, the server is stopped and the new configuration file is read in. Then the server will restart. 3.1.2 Saving the Configuration File After you have edited the options you can save the configuration information in the current configuration file or choose the name for a new one. If you save the settings to a new configuration file, this file will automatically be activated after saving and also after the next start-up of Easylon OPC Server L. 20 OPC Server L, User’s Manual 3.2 Configuration The Options Dialog To configure the OPC Server select the Options command from the Controls-menu. Basic configuration options can be specified here. 3.2.1 Project Settings The Project settings contain connection and start-up mode options of the OPC Server. The parameters in this dialog cannot be changed once the OPC Server is running. Fig. 3.1: Project Settings Network access The Network access option defines the type of connection to the LonWorks network. There are three possible options: Local: The network access is gained via the same computer as the OPC Server. Select a network name and the USB interface from the two options Network and Network Interface in the same dialog window. This configuration is most common. Remote Full Client: The OPC Server connects to a LNS Server via the network using a full remote access LonWorks connection. Select a Network interface connected to your server. The appropriate LNS Server will automatically appear in the field Network. Note: This access method is not recommended, as the access to the LNS Server will be very slow. Remote Lightweight Client: The OPC Server connects to a LNS Server via the network using the TCP/IP protocol. From the range of available LNS Servers select the desired network using the option Network in the same dialog. The Network interface will automatically be set to Internet. To create a remote LNS 21 OPC Server L, User’s Manual Configuration network you can use the Echelon LNS Remote Client Configuration Utility. Refer to the appropriate documentation for details. Network The available Network options depend on the selected Network access and the Network interface. If the Network access is set to Local the name of the only available local network will be the one provided by the connected USB interface. If Remote Full Client is selected the content of the Network field will be determined by the selected Network interface. If the connection method is Remote Lightweight Client all available LNS Servers via the TCP/IP-protocol will be available here. Network interface The option Network interface also shows values according to the selection of the Network access method. If the Network access is Local or Remote Full Client the LON USB interfaces physically connected to the OPC Server will be shown. If the network access option was set to Remote Lightweight Client the network interface will be Internet. Start-up mode This option tells the Easylon OPC Server in which mode it shall run after start-upThe available Start-up modes are described below: Auto: The OPC Server connects to the selected LNS Server and reads the structure of the associated network and all appropriate values. Simulate: The OPC Server connects to the selected LNS Server and receives the network structure using an OLE interface, but all values of the contained objects will be simulated. During a repeated access to a specific object new values will be created randomly. 3.2.2 Protocol Window All events of the OPC Server can be logged for a later analysis. The option Maximal count of lines limits the amount of log entries to the defined value. If the maximum value of lines is reached old entries will be removed to make room for new events. The Optimal count of lines defines the fallback value of log entries. If the amount of stored lines exceeds this value they will be saved until they reach the maximal amount as defined above. Then the amount of lines stored in the log file will be reduced to the optimal count of lines. Example: If you set the maximal amount of lines to 3000 and the optimal amount of lines to 2000 the 1000 oldest lines in the log file will be removed once the maximal amount of 3000 lines is reached. 22 OPC Server L, User’s Manual Fig. 3.2: Configuration Protocol Window Settings You can choose to save removed lines to a file. Activate the option Save removed lines and specify the name of the file by entering its name into the text field or selecting a file by pressing the button labeled “…”. 3.2.3 OPC Events In the OPC Events dialog you can alter the type of events being logged by the OPC Server. Fig. 3.3: Options for OPC Events With the option Management activated the events Add/remove groups or items, Change groups and items properties will be logged. If you select the option Datachange the OPC Server will also log the events Sync read/write and Async read/write/cancel. For a standard operation with an OPC Client the activation of the option Management will suffice. 23 OPC Server L, User’s Manual 3.2.4 Configuration LNS Events The options dialog LNS Events specifies which types of LNS events will be logged in the protocol. Mainly dynamical events will be covered (e.g. if the network configuration is altered with Echelon LonMaker). Fig. 3.4: Options for LNS Events You can activate logging for three different types of LNS events: Network Variable updates, NV Monitor Point updates and LNS System Events (like attachments, commissions, etc.). 3.2.5 Archive Fig. 3.5: Archive Options By using the Archive configuration panel you can define a minimal amount of hard disk space to avoid an overflow by the protocol log. Enter a value of minimal disk space to be conserved by OPC Server. The default is 50 MB. 24 OPC Server L, User’s Manual Configuration If the minimal available hard disk space is reached the logging of events will continue but the removed lines will not be saved to the disk any more until you make additional room for it. Note: There will be no alert if the minimal space limit is reached. In this case all removed lines from the log are lost! 3.2.6 Show/Hide Columns The dialog Show/Hide Columns contains options to alter the appearance of the Group/Items-Workspace (which correspond to the group information in the Kepware Quickclient). Fig. 3.6: Show or Hide Columns To avoid visual overload when browsing groups and items using the Groups/ItemsView you can deselect individual columns. Check those columns that should be displayed and uncheck those that should not. Fig. 3.7: Group/Items Diagnosis 25 OPC Server L, User’s Manual 3.2.7 Configuration General The General options allow for the altering of two time values. Fig. 3.8: General Options The drop-down menu Time format offers different appearances for time and date in the OPC Server. Note that all times in OPC Server are in UTC format. Each connected client has to calculate its own time offset for the current environment. The value Config Properties Timeoffset defines the refresh interval of the configuration properties (default: 60,000 ms). You can alter the length of the interval by editing the value in the text field. Independent from polling the properties by the OPC Server the information will also be up-dated by the LNS Server in form of a push event. The length of the push interval is defined at the LNS Server and cannot be altered by the OPC Server. 3.2.8 License The License options dialog contains two fields. The Machine ID shows a unique identification code, which is built from information on your individual computer configuration (BIOS, motherboard and hard drive). If you buy a license for the OPC Server you have to send this machine ID to Gesytec who will generate your personal Unlock key. If no unlock key is entered the software will run in trial mode. Enter the Unlock key you received from Gesytec into the appropriate field (you can also copy and paste the value) and press the button Validate license. If the key is valid the OPC Server software will be unlocked and all functions will be available. Please note that each instance of the Easylon OPC Server L needs a separate Unlock key. For information on how to acquire a valid license refer to chapter 7. 26 OPC Server L, User’s Manual Fig. 3.9: Configuration Entering License Key 27 OPC Server L, User’s Manual 4 Diagnosis Diagnosis The Easylon OPC Server offers various features for the diagnosis of problems, especially for the on-site scenario. This chapter describes the three functions, which can be accessed via the Diagnosis-menu: Network structure The Network structure displays the hierarchy and the item details of the monitored network as provided by the selected LNS Server. The different item types, in particular monitor sets, are also explained in this paragraph. Group/Item Diagnosis For troubleshooting purposes the Group/Items Diagnosis gives a configurable overview over the OPC items and groups of connected clients. Protocol OPC and LNS events can be logged for a later analysis. The automatically created protocol can be viewed and saved to disk. 4.1 Network Structure (Alt+0) 4.1.1 Browsing the Network Once the Easylon OPC Server has started and connected to the specified LNS Server the window Network structure (in the Diagnosis-menu) can be opened. It contains an object explorer, which shows a hierarchical representation of the attached LON network. It will appear under the name OPC Server Workspace in the list of open windows in the Window-menu. The Network structure window is divided into two sections. The left section shows a tree view of the network structure and the available items (for an overview of the different objects refer to the next paragraph). On the right side detailed and current information on sub-items is displayed which are contained in one of the greater objects on the left side. Opening the network or one of its items (e.g. system, subsystem, monitor set) is reicon to the alized according to Windows conventions by clicking the appropriate left of it. The object can be closed again with a left-click on the icon. Further to the actual network description there is also a folder Monitor Sets. Monitor sets are collections of monitor points (monitored network variables) that can individually be created by the user. For a detailed description of monitor sets see paragraph 4.1.3 in this chapter. 28 OPC Server L, User’s Manual Fig. 4.1: Diagnosis Network Structure Window By clicking on a node, a LonMark object or a monitor set the contained network variables, configuration properties or monitor points will be shown in the right section of the network structure window. An I identifies input NVs; an O stands for an output NV. NVs and MPs can be expanded to reveal the containing subfields. Configuration properties can only be contained in LonMark objects. Unlike to network variables that are explicitly defined, configuration properties must be assigned to existing objects. If monitoring is active (indicated by “pressed-in” button in the toolbar and entry in the status bar) the parameter columns Value and Timestamp of NV’s and MPs are displayed and constantly updated. In Simulate-mode (configurable under ControlsgOptionsgProject Settings) the displayed values are randomly created by the OPC Server. Right-clicking on a network variable, monitor point or monitor set shows a contextmenu containing instructions to alter the item’s properties or to directly change an item’s value. Refer to paragraph 4.1.7: “Editing Item Properties” and 4.1.8: “Change Item Value” (both in this chapter) for further information. 29 OPC Server L, User’s Manual Fig. 4.2: 4.1.2 Diagnosis Context-Menu of Network Variables Item Types The following table gives an overview of the items that can be found in the network structure: System, subsystem, monitor sets collection Node (commissioned/on-line) Node (not commissioned) Output network variable Input network variable LonMark object Configuration property Monitor point Monitor set Node (commissioned/not attached/failed) Subfield, according to type definition Table 4.1: Item Types in the OPC Server Network Structure Figure 4.3 shows the possible hierarchical relations between LNS items: 30 OPC Server L, User’s Manual Diagnosis Network Subsystem Subsystem Subsystem Subsystem Subsystem Subsystem Nodes Subsystem Subsystem LonMark Objects Network Subsystem Variables Subsystem Monitor Sets Subsystem Subsystem Configuration Subsystem Properties Subsystem Monitor Points Subsystem Subsystem Fig. 4.3: 4.1.3 Hierarchy of LNS Items Monitor Sets The user can create individual monitor sets for an easy management and a better overview of a range of monitored network variables. The NVs are represented in a monitor set by monitor points. Monitor sets are available for each of the three connection methods Local, Remote Full Client and Remote Lightweight Client. They can be turned on or off separately. Once created, monitor sets provide a fast and easy method to manage and monitor a specific range of network variables. Compared to the general administration of NVs via the network structure monitor sets can be started and stopped more rapidly astheir overhead is lower. Monitor sets are self-caching and offer the best data formatting support. The folder Monitor Sets can be found in the network structure view (in the Diagnosismenu) on the second level of the hierarchy below the current network representation. It always exists even if it is still empty. Tip: Duplicate your client groups of data points by creating similar monitor sets in the OPC Server. This will help you managing and monitoring existing logical sets of network variables. Adding a Monitor Set To create a new monitor set right-click on the folder Monitor Sets and select the command Add Monitor Set. Enter the name for the new set to be created. 31 OPC Server L, User’s Manual Fig. 4.4: Diagnosis Add Monitor Set Adding Monitor Points to a Monitor Set To add monitoring support to a specific network variable browse through the connected network by navigating in the explorer view above the folder Monitor Sets. There are two possible ways to add the desired network variable to the monitor set in form of a monitor point: 1. Drag-and-drop the network variable onto the tag of an existing monitor set. The OPC Server will display a status window and create a monitor point for the NV in the selected monitor set, 2. Right-click on the network variable to be added. From the context-menu select Copy. Select the target monitor set, right-click on it and choose Paste from the context-menu. A monitor point for the new network variable will be created. Fig. 4.5: Paste Network Variable Deleting Monitor Points from a Monitor Set An existing monitor point can be deleted from a monitor set by right clicking on it and executing the command Delete from the displayed context-menu. 4.1.4 SNVT/UNVT Data Types By employing device resource files the OPC Server can automatically use the predefined data types of a specific manufacturer. Standard Network Variable Types (SNVT’s) are contained in the standard.typ file covering most standard data types which are used in control networks (temperature, heat, luminosity, pressure, etc). Manufacturers may also create User Network Variable Types (UNVT’s), which define data types specific to a device or devices. All Device Ressource Files, registered to the LNS database, are used by the Easylon OPC Server L, either in “Simulation” or in “Auto” mode. 32 OPC Server L, User’s Manual 4.1.5 Diagnosis Customize View The View-menu allows for the individual configuration of the view of the network structure: The menu instruction Monitor (Shift+F9) toggles the online-monitoring of the displayed network items on or off (depending on the current state). The status of the monitoring can be learned from the appearance of the appropriate button in the toolbar under the menu. Monitoring is active if the button appears to be “pressed-in”, otherwise it is inactive. The type of items displayed in the network structure can be limited to NV’s or CPs only by selecting one of the menu items NVs only respectively CPs only. The current network structure will collapse. When you reopen the network tree by clicking the icons only the selected items will be displayed. Note that only one of the two view modes NVs only and CPs only can be active at the same time. The toolbar and the status bar of the OPC Server can be switched off, e.g. to maximize the available display space on small monitors. By selecting the appropriate command in the View-menu the particular bar will be toggled, e.g. switched on when off and vice versa. All statistics in the Diagnosis-menu can be reset using the command DiagnosisgReset Statistics. The status bar shows information on how many clients are currently connected, how many NV’s are subscribed by those clients, which network interface is used and also indicates a trial version. 4.1.6 Accessing OPC Items The OPC Client has to know each end point (network variables, monitor points and configuration properties) in a LNS hierarchy to be able to access it. Those items are clearly identified by their position within the network structure. The item ID is built from adding the path descriptions separated by dots. Examples: Test1.Subsystem 1.Subsystem564.Device 142.nvi01Value Test1.Subsystem 1.Device 12.IJK1.SCPToffsetTemp There are three possibilities to enter the item ID in the OPC Client: 1. In the client the user can enter the item ID manually in the description field ‘Access Path’, 2. The ID can also be copied to the clipboard from the item within the server network structure by right-clicking on it in the OPC Server network structure and selecting the command Copy path string. 33 OPC Server L, User’s Manual Fig. 4.6: Diagnosis Copy Path String in the OPC Server The item ID is now in the clipboard and can be pasted into the appropriate field in the client using the context menu Paste command (or the keyboard shortcut Ctrl+V). Fig. 4.7: Add Item in OPC Client 3. The Add Item dialog also offers an item browser in the lower left section of the window. You can search for the desired object by navigating through the network hierarchy as used in Windows operating systems. If you select a specific item by single clicking on it with the left mouse-key, the appropriate path information will automatically be entered in the field Access Path. 4.1.7 Editing Item Properties A context-menu can be called by right clicking on network-variables, monitor points and monitor sets. The configuration of the selected item can be changed via the menu instruction Properties. Depending on the item type a dialog window appears containing miscellaneous options. 34 OPC Server L, User’s Manual Diagnosis The item properties can only be modified in config-mode. In run-mode the current settings can be inspected but not modified. Polling vs. Binding For each item you can define if its values should be acquired via polling or binding. By polling an item’s value the OPC Server itself retrieves the values from the LNS Server in the given interval. In binding-mode the LNS Server automatically updates the values. Input network variables are always polled. Fig. 4.8: Network Variable Properties Initial Fetch This property determines whether the value of the network variable will be fetched immediately when monitoring starts. If set to “off”, the value will not be updated until an update event is received. Fig. 4.9: Monitor Point Properties 35 OPC Server L, User’s Manual Diagnosis Update by Exception If this property is active a network variable’s value will only be altered if the appropriate value has changed since the last report. Fig. 4.10: Monitor Set Properties Monitor Set State Properties The State section in the monitor set properties dialog shows the status of the object. The three values Monitor set opened, Monitor set enabled and Polling enabled represent individual status flags and cannot be altered manually. Poll Interval This property determines the time in milliseconds between polls, when using the polling method. By checking the Default-option a standard interval will be set. Entering zero for the poll interval will disable polling. Throttle Interval For binding mode the push interval for the NV value by the LNS Server can be throttled to a specified time in milliseconds. Even if the network variable provides data more frequently the LNS Server will not be able to transmit the value more often than defined here. 36 OPC Server L, User’s Manual Fig. 4.11: Diagnosis Config Properties While configuration properties can be arbitrarily assigned to LNS items, no individual properties are available for these objects via the context-menu. Instead there is a general value Timeoffset for all config properties. It can be set via the General-options dialog. See also paragraph 0. 4.1.8 Change Item Value Right-clicking on a network variable, a monitor point or a subfield of these two items opens a context-menu. Selecting Change value… on network variables or monitor points displays a window containing the values of the containing subfields. Clicking on the button Modify or directly issuing the Change value…command on a subfield shows the Modify Variable Value dialog. In addition to detailed information on the selected variable this window contains a text field Valu, where you can enter a new value for the selected variable. As soon as you confirm the dialog with OK the new value will be set. The automatic update of this specific variable will be stopped after you manually alter its value. Using the command “Change Value...” allows to set the value of a tag manually when the Easylon OPC Server is running in simulation mode. The user may check the operation of his OPC Client by setting different values. Fig. 4.12: Value information for NVs and MPs By changing a value manually, the Easylon OPC Server will stop generating values automatically. By using this command, the Easylon OPC Server will open an NV editor dialog, using Device Ressource Files to format SNVT/SCPT and UNVT/UCPT values. 37 OPC Server L, User’s Manual Fig. 4.13: Diagnosis Change Value 38 OPC Server L, User’s Manual 4.2 Diagnosis Group/Items Diagnosis (Alt+1) The Group/Item diagnosis allows for an extensive diagnosis on OPC-level displaying the qualities of the OPC items and of the OPC groups. The appropriate window shows the hierarchy of all connected clients together with the present groups on the left side. Per default general information on the local OPC Server is displayed on the right side. Fig. 4.14: Group/Item Diagnosis: General Information By selecting a client from the structure on the left side additional information for this specific client is displayed in the right part of the window. Fig. 4.15: Group/Item Diagnosis: Client Information By selecting a group specific information for this group this will be shown in the upper part of the right side of the window. The table in the lower part of the window lists specific information for the individual OPC items belonging to this group: 39 OPC Server L, User’s Manual Diagnosis Item ID, Read/Write status, Canonical data type, Requested data type, Client Handle, Value, Timestamp, Quality, Number of reads, writes and updates. The detailed information for client groups corresponds to the group information in the Kepware Quickclient. Fig. 4.16: Group/Item Diagnosis: Group Information The table can be sorted according to one of the criteria by clicking on the appropriate column head. Repeated clicking on the column head also toggles the sequence between increasing and decreasing order. Individual columns of the group items diagnosis can be switched on or off via the Show/hide columns options dialog. See paragraph 3.2.6 for details. 40 OPC Server L, User’s Manual 4.3 Diagnosis Protocol View (Alt+2) An additional diagnosis feature is given by the protocol that stores various OPC and LNS system events. The protocol can be configured the way that only events of a certain kind are gathered using the options dialog. Additional administrative parameters can be altered there as well. Refer to paragraphs 3.2.2 and following for more information. Additional commands can be accessed by opening a context-menu with a right-click on the protocol window. Besides some standard functions two commands need further explanation: The logging of system events can be paused with the Stop-command in the contextmenu. A log entry will confirm the halt. To proceed select the instruction Continue. The log text can be saved to a file using the menu item Export…. Select a target location and a valid file name to output the event information to disk. Fig. 4.17: Extract of the Protocol Window with Context Menu 41 OPC Server L, User’s Manual 5 Easylon OPC Server Demos Easylon OPC Server Demos Two demonstrations of the Easylon OPC Server have been installed together with the program: one for Visual Basic (VB-Demo) and the other one for Visual Basic for Applications (VBA Demo) 5.1 Requirements The Easylon OPC Server L always need a connection to a LNS server. Please specify a database as mentioned in the Configuration chapter. Set the startup mode to “Simulation”, so a physical connection to a network will not be necessary for test purposes. Random values will be generated by the Easylon OPC Server L now. Changing a value for an input network variable (NV) is done by clicking with the right mouse button to an OPC item in monitoring mode. A small context menu is shown, the second entry of which is Change value”. Following this entry will display a dialog box to change the value of the item: After changing the item’s value it becomes static, which means that the usual automatic updates of the simulation mode are turned off thus allowing to test a user interface. The Visual Basic demos are available in the VBdemo subdirectories that were placed in the directory where you installed the Easylon OPC Server. Examples: C:\Easylon\EOS2\VBDemo and C:\Easylon\EOS2\VBADemo To run the demos described in this chapter, the Easylon OPC Server has to be installed on your PC. 42 OPC Server L, User’s Manual 5.2 Easylon OPC Server Demos Visual Basic Demo The Visual Basic example is a simple application, which shows a couple of NV’s from the LonWorks network. The data are requested from the Easylon OPC Server, which is automatically started when you run the demo program named VBDemo.exe. How to run the Visual Basic demo 1. Make sure you have installed the Easylon OPC Server 2. Start the Visual Basic demo. You can simply double-click the VBdemo.exe program in the ..\VBDemo subdirectory. The following picture will be shown: Fig. 5.1: Start-up of VBDemo 3. Click the “Connect” button to start the Easylon OPC Server 4. Enter one or more NV names. To find NV addresses that are valid, use the NV browser of the Easylon OPC Server. Press “Start” to get the simulated NV values. 5. If you want to change NV names, press “Stop” first, change the names, and press “Start” again. The connection to the Easylon OPC Server is kept open until you quit the demo. 6. If you have a LonWorks network connected to your PC, you can use the Visual Basic demo to access NV’s from your network. Read the chapter 3 on configuration of the Easylon OPC Server to see how you can tell the program to scan your network and upload the NV information to the database. After making changes, you need to exit the Easylon OPC Server (save the changes to a new .glofile), and restart the Visual Basic demo. Take a Look at the Code If you have installed the Easylon OPC Server on your PC, the VBdemo files are also copied to the Easylon\EOS2\VBDemo directory (or wherever you have installed it to). This directory contains the source code of this Visual Basic demo, including the Visual Basic Project file for Visual Studio. 43 OPC Server L, User’s Manual 5.3 Easylon OPC Server Demos Visual Basic for Applications Demo Excel uses Visual Basic for Applications (VBA) to write macros. Since this programming system supports the OLE automation interface, which is part of OPC, it is quite easy to connect elements from your Excel spreadsheet to the Easylon OPC Server. To run the example that is discussed below, the Easylon OPC Server must be installed and, of course, you will need Microsoft Excel. For this example we use a demo database, which does not require a connection to an actual LonWorks network. Instead of polling the requested NV’s for changes in their values, these values are simulated. The difference to a real network producing the values is realized in the DLL that forms the lower level of the Easylon OPC Server software, and does not affect the behavior of the rest of the software. How to Run the Visual Basic Demo 1. Make sure you have installed the Easylon OPC Server 2. Start the VBA demo. You can simply double-click the OPCDemo.xls-sheet in the Easylon\EOS2\VBADemo directory. When starting the Excel program you have to activate the macros. The following picture will be shown: Fig. 5.2: Start-up of VBA Demo 3. Click the “Connect” button to start the Easylon OPC Server. In row 8 you can see the text: “connected to server” 4. To find NV addresses that are valid, use the NV browser in the Easylon OPC Server. The Itemnames of the Excel-Sheet have to be the same as the Description of the NV. 5. Press Start to get simulated NV values. 6. By selecting the sheet named Archive you will see a graph (with simulated changing values) as follows: 44 OPC Server L, User’s Manual Fig. 5.3: Easylon OPC Server Demos Graph of VBA Demo What the Code Looks like The VBA code is written in a single module that is associated to the Excel worksheet into which the data for the chart are written. To see the complete code, load the demo in Excel and open the VBA Macro Editor (in the Tools menu, Macro item, submenu Visual Basic Editor – or press Alt+F11). Then press F7 to see the code. To see an explanation of the source code, refer to chapter 0Fig. 6.1: NV Properties in OPC Server L VBA for Excel. 45 OPC Server L, User’s Manual 6 Writing OPC Clients Writing OPC Clients To make use of the Easylon OPC Server, you will need to write OPC Clients that request data from the OPC Server and use them in their visualizations and/or calculations. This section of the Easylon OPC Server documentation gives an introduction into writing OPC Clients by using Visual Basic and VBA for Excel. Note: This documentation is to be understood as an example, so that you can see how the interface of a client to the OPC Server works. If you want to write OPC Clients for the OPC custom interface, please check the official OPC Standard document for reference. This document can be retrieved from the OPC Foundation web site http://www.opcfoundation.org/ The current release of the Easylon OPC Server supports the OPC Standard document version 1.0a as well as version 2.02. In this section of the user documentation, the following information is available: Identifying Items The „Naming Items“ section explains which names a client can use to identify NV’s of interest to the OPC Server, and how to address subfields of structured NV’s. Fig. 6.1: NV Properties in OPC Server L VBA for Excel The „VBA for Excel“ section gives step-by-step procedures to write an OPC Client in Excel, using the DataCallBack feature of the OPC interface to automatically update the spreadsheet when OPC item values change. Although some of the code is specific for Excel, the structure of the client program is the same in other Microsoft Office applications (or any other application that supports VBA). 46 OPC Server L, User’s Manual 6.1 Writing OPC Clients Identifying Items The client specifies an item it is interested in via the access path in the network hierarchy. You can acquire the path for a desired item in the network structure of the OPC Server L or the object information dialog in a client. Refer to paragraph 4.1.6 for more information. Fig. 6.1: NV Properties in OPC Server L 47 OPC Server L, User’s Manual 6.2 VBA for Excel 6.2.1 Preparations Writing OPC Clients The support for OPC objects has to be enabled in Visual Basic and Microsoft Excel prior to create individual OPC Clients. For this purpose the library OPCDAAuto.dll has to be integrated into the references of your project in both applications. Fig. 6.2: Integrating OPC Support to Visual Basic Open the dialog ToolsgReferences in the Visual Basic Editor and activate the checkbox of the OPC Automation 2.0 library. Fig. 6.3: Starting the Visual Basic Editor Repeat the process with Visual Basic. Open your project and select ProjectgReferences. Activate the checkbox of the OPC Automation 2.0 library. 48 OPC Server L, User’s Manual Fig. 6.4: 6.2.2 Writing OPC Clients Integrating OPC Support to Excel Writing an OPC Client for Excel To write an OPC Client for Excel, you must have the Easylon OPC Server software installed on your PC before starting Excel. This is necessary to make the OPC objects available to the Visual Basic Editor. Installing the Easylon OPC Server software automatically registers the OPC libraries containing the interface definitions. The program structure of an OPC Client written in VBA is as follows: Declarations Starting the Easylon OPC Server Adding a Group Adding Items to an OPC Group Using the DataCallBack feature Stopping the DataCallBack mechanism Releasing items and/or groups Stopping the server connection The explanations below are related to VBA Demo (OPCDemo2.xls) of chapter 5.3. Declarations ‘Sample OPC Client in VBA for MS-Excel Const ITEMSMAX = 3 ‘ we need an OPCServer Private gOpcServer As OPCServer ‘ this is the groups collection Private gOPCGroups As OPCGroups ‘ we need an OPCGroup receiving events Public WithEvents gOPCGroup As OPCGroup ‘ An own index Private gIndex As Long 49 OPC Server L, User’s Manual Writing OPC Clients The objects and variables defined here are required to establish a connection to the Easylon OPC Server. The ITEMSMAX constant indicates how many NVs can be subscribed at the same time. The gIndex variable is used to identify the DataCallBack connection to the Easylon OPC Server. Starting the Easylon OPC Server ‘Connect to the OPC Server Private Sub CmdConnect_Click() On Error GoTo Err_Connect_Click ShowStatus “Connecting to Server” ‘ Create server object Set gOpcServer = New OPCServer ‘ connect to the Easylon OPC Server by using it’s name gOpcServer.Connect (“Gesytec.ElonLnsOPC2”) ‘attach to the groups collection Set gOPCGroups = gOpcServer.OPCGroups ShowStatus “connected to server” Exit Sub Err_Connect_Click: ShowStatus Err.Description MsgBox “Error connecting: “ & Err.Description End Sub If the server had not been started yet, this will be done now. If an Easylon OPC Server was already, the new gOpcServer object refers to the active server. The identifier “Gesytec.ElonOPC2” should be used as indicated. This is the name that is entered in the Windows registry. Adding a Group ‘ Add a Group Private Function AddGroup() As Boolean ‘ Add a group with name G1 Set gOPCGroup = gOPCGroups.Add(“G1”) If gOPCGroup Is Nothing Then MsgBox “Error AddGroup” AddGroup = False Exit Function End If ‘ use an update rate of 500 ms gOPCGroup.updateRate = 500 End Function 50 OPC Server L, User’s Manual Writing OPC Clients Before the OPC Client can subscribe items, a group needs to be created, using the AddGroup method. The group is used as a container object for items belonging to an OPC Client. A client can add more than one group and connect to more than one OPC Server. Adding Items to an OPC Group ‘ add the items to the Group Private Sub AddItems() ‘ Add items ‘ the ItemIDs to acces the Items Dim itemIDs(ITEMSMAX) As String ‘ our own handles Dim ClientHandles(ITEMSMAX) As Long ‘ access patch to the items (unused in this sample) Dim accessPaths(ITEMSMAX) As String ‘ the handles, assigned by the OPC Server Dim serverhandles() As Long ‘ some errors Dim errors() As Long ‘ the datatypes for our items Dim dataTypes(ITEMSMAX) As Integer Dim count As Long count = 0 Dim I As Integer For I = 0 To ITEMSMAX – 1 If Worksheets(“General”).Cells(I + 1, 1).Value <> “” Then count = count + 1 ‘ read the ItemIDs out of the worksheet itemIDs(count) = Worksheets(“General”).Cells(I + 2, 1).Value ClientHandles(count) = I ‘ no access patch accessPaths(count) = “” ‘ use string as datatype for all dataTypes(count) = 8 End If Next I ‘- - - - - - - - - - - - - - - - - - - - - - - - - - - - ‘ add the items gOPCGroup.OPCItems.AddItems count, itemIDs, ClientHandles, _ serverhandles, errors, _ dataTypes, accessPaths ‘ start the subscription gOPCGroup.IsSubscribed = True ShowStatus Format(count) & “ items defined” End Sub 51 OPC Server L, User’s Manual Writing OPC Clients Items are the OPC representation of process variables (NV’s in the case of LonWorks). To identify each item, a number of variables need to be defined for each of them: each item has a name, an access path, a data type and an active flag. The arrays are initialized (the code for one item is shown below – reading the item name from a cell in the Excel worksheet). After all parameters are set, the AddItems method is used to subscribe the items. Using the DataCallback Feature The DataCallback is used by implementing an appropriate event handler for the group object. ‘ handle the datachange event Private Sub gOPCGroup_DataChange( _ ByVal TransactionID As Long, _ ByVal NumItems As Long, _ ClientHandles() As Long, _ ItemValues() As Variant, _ Qualities() As Long, _ TimeStamps() As Date) On Error GoTo err_setValue ShowStatus “” Dim I As Long For I = 1 To NumItems ‘ put the values to the worksheet Worksheets(“General”).Cells(I + 1, 2).Value = ItemValues(i) Next ‘ handle the little archive Worksheets(“Archiv”).Cells(gIndex, 1).Value = ItemValues(1) Worksheets(“Archiv”).Cells(gIndex, 2).Value = TimeStamps(1) gIndex = gIndex + 1 If gIndex > 10 Then gIndex = 1 Exit Sub err_setValue: ShowStatus “Error during callback” End Sub The datachange event receives some collections, containing the data, the status and a timestamp for each data. Now the procedure is able to set the received values to the cells of the worksheet. 52 OPC Server L, User’s Manual Writing OPC Clients Stopping the DataCallback Mechanism Before releasing items from the group, you need to tell the Easylon OPC Server to stop using the callback mechanism. Releasing the group itself does this. Releasing Items and/or Groups Private Sub RemoveGroup() If gOpcServer Is Nothing Then Exit Sub ‘remove the group If Not gOPCGroup Is Nothing Then gOPCGroup.IsSubscribed = False Set gOPCGroup = Nothing End If ‘ Remove groups gOpcServer.OPCGroups.RemoveAll End Sub By removing a group, all the items in that group are removed as well. In this example, all added groups (the ones that were added by this OPC Client) are removed. Stopping the Server Connection Set gOpcServer = Nothing If the Easylon OPC Server was started by the OPC Client, and no other clients have connected since then, releasing the connection to the server will cause it to finish. 53 OPC Server L, User’s Manual 7 Licensing 7.1 Trial Version Licensing Without a valid license number the Easylon OPC Server L will only run in trial mode. This will be indicated by the expression Trial version in the status bar. Running in trial mode the OPC Server L will offer the same functionality as the licensed version but it will quit after a running time of 30 minutes showing the following message: Fig. 7.1: Trial Version Stopped In this state all values are marked as “bad”. The server then has to be restarted manually. 54 OPC Server L, User’s Manual 7.2 Licensing Acquiring a Valid License If you want to purchase a full-version of the Easylon OPC Server L, please follow the steps below: The License options dialog contains two fields. 1. Start the Easylon OPC Server L in Config-mode (by double-clicking the application icon Easylon OPC Server L (config) in the Easylon program group. 2. Open the Options-menu in the Controls-menu. Select the License-panel. The text field Machine ID will contain a unique identifier for your computer, which is generated on the basis of individual characteristics of your machine’s BIOS, hard drive and motherboard. Important notice: If you change one of these components your present license number will expire. You will have to request a new one on the basis of your new system configuration from Gesytec. Please note, that each instance of the Easylon OPC Server will need a separate Unlock Key. 3. Send a purchase order for the Easylon OPC Server L (by fax or email to [email protected]). Include the machine ID displayed in the options dialog in your order. For new customers Gesytec insists on payment in advance. For your and our convenience we prefer credit card payment. 4. After your payment has been made Gesytec returns a specific license key for your computer. 5. Reopen the ControlsgOptionsgLicense dialog. Enter the license key into the field Unlock key and confirm by clicking the button Validate license. The expression Trial version will disappear in the status bar and the Easylon OPC Server will change to a fully functional version. Fig. 7.2: Entering License Key 55 OPC Server L, User’s Manual 8 Version History Version History Version 1.01 (04/06/04) Initial release. 56 OPC Server L, User’s Manual 9 Appendix Manufacturer ARC Informatique Axeda Citect GE Fanuc Automation Americas ICONICS ICONICS Invensys Systems/ Wonderware KepWare Matrikon National Instruments Pvis Siemens Siemens Softing Webfaqtory Table 9.1: Appendix Client PCVUE32 OPC Inspector Citect FIX OPC Client OPC Dataspy GENESIS32 Factory Suite 2000 with OPCLink KepServerEX OPC Quick Client Matrikon OPC Client for Gensym G2 LabVIEW Pvis IndustrialDataBridge Simatic WinCC OPC Toolbox Webfaqtory Link http ://www.arcinfo.com http://www.axeda.com/ http://www.citect.com/ http://www.gefanucautomation.com/ http://www.iconics.com/ http://www.iconics.com/ http://www.wonderware.com/ http://www.kepware.com/ http://www.matrikon.com/ http://www.ni.com/ http://www.pvis.de/ http://www.siemens.com/ http://www.siemens.com/ http://www.softing.com/ http://www.webfaqtory.com/ OPC Clients 57 OPC Server L, User’s Manual 10 Fig. 1.1: Fig. 1.2: Fig. 1.3: Fig. 1.4: Fig. 2.1: Fig. 2.2: Fig. 2.3: Fig. 2.4: Fig. 2.5: Fig. 2.7: Fig. 2.8: Fig. 2.9: Fig. 3.1: Fig. 3.2: Fig. 3.3: Fig. 3.4: Fig. 3.5: Fig. 3.6: Fig. 3.7: Fig. 3.8: Fig. 3.9: Fig. 4.1: Fig. 4.2: Fig. 4.3: Fig. 4.4: Fig. 4.5: Fig. 4.6: Fig. 4.7: Fig. 4.8: Fig. 4.9: Fig. 4.10: Fig. 4.11: Fig. 4.12: Fig. 4.13: Fig. 4.14: Fig. 4.15: Fig. 4.16: Fig. 4.17: Fig. 5.1: Fig. 5.2: Fig. 5.3: Fig. 6.1: Fig. 6.2: Fig. 6.3: List of Figures List of Figures From Proprietary Solutions to a Plug-and-Play Standard..........................................5 Use of Process Data in Business Applications ...........................................................7 Easylon OPC Server Structure..................................................................................9 OPC Data Model...................................................................................................11 License Agreement.................................................................................................14 Choose Destination Location..................................................................................14 Server Type ...........................................................................................................15 Name of Program Group .......................................................................................15 Installation in Progress ..........................................................................................16 Installation Completed...........................................................................................16 Programm Group after Installation........................................................................16 OPC Server Splash Screen ......................................................................................18 Project Settings......................................................................................................21 Protocol Window Settings .....................................................................................23 Options for OPC Events ........................................................................................23 Options for LNS Events .........................................................................................24 Archive Options ....................................................................................................24 Show or Hide Columns ..........................................................................................25 Group/Items Diagnosis ..........................................................................................25 General Options ....................................................................................................26 Entering License Key .............................................................................................27 Network Structure Window ..................................................................................29 Context-Menu of Network Variables .....................................................................30 Hierarchy of LNS Items .........................................................................................31 Add Monitor Set....................................................................................................32 Paste Network Variable .........................................................................................32 Copy Path String in the OPC Server ......................................................................34 Add Item in OPC Client........................................................................................34 Network Variable Properties..................................................................................35 Monitor Point Properties .......................................................................................35 Monitor Set Properties ...........................................................................................36 Config Properties...................................................................................................37 Value information for NVs and MPs ......................................................................37 Change Value ........................................................................................................38 Group/Item Diagnosis: General Information..........................................................39 Group/Item Diagnosis: Client Information.............................................................39 Group/Item Diagnosis: Group Information ............................................................40 Extract of the Protocol Window with Context Menu..............................................41 Start-up of VBDemo..............................................................................................43 Start-up of VBA Demo..........................................................................................44 Graph of VBA Demo.............................................................................................45 NV Properties in OPC Server L..............................................................................47 Integrating OPC Support to Visual Basic ...............................................................48 Starting the Visual Basic Editor .............................................................................48 58 OPC Server L, User’s Manual Fig. 6.4: Fig. 7.1: Fig. 7.2: 11 Table 4.1: Table 9.1: List of Tables Integrating OPC Support to Excel .........................................................................49 Trial Version Stopped ............................................................................................54 Entering License Key .............................................................................................55 List of Tables Item Types in the OPC Server Network Structure..................................................30 OPC Clients ..........................................................................................................57 59 OPC Server L, User’s Manual 12 Index Index Access Path ................................................33 Archive.......................................................24 asynchronous mechanism ............................12 Auto...........................................................22 automatic startup .......................................19 Automatic start-up .....................................19 binding.......................................................35 cached value ...............................................11 change value...............................................37 Change value ..............................................37 Columns show/hide ..........................................25, 40 Command line options................................18 config .........................................................20 configuration ..............................................20 Configuration .............................................20 Configuration file........................................20 Copy path string.........................................33 DCOM .........................................................5 Device Ressource Files...........................32, 37 diagnosis.....................................................39 protocol ...................................................41 Group/Items diagnosis ................................39 Identifzing items.........................................47 Initial fetch.................................................35 installation..................................................13 Installation .................................................13 Installation requirements ............................13 introduction..................................................5 Item properties ...........................................34 Item types ..................................................30 itemname ...................................................44 License........................................................26 License key .................................................55 Licensing ....................................................54 LNS items ..................................................30 LNS Server ...........................................10, 24 Local...........................................................21 Log.............................................................41 LonMaker...................................................10 LonWorks ....................................................7 Machine ID ..........................................26, 55 Monitor......................................................33 monitor set state properties.........................36 Monitor sets ...............................................31 multiple instances.......................................17 naming items ...............................................ii Network.....................................................22 Network access...........................................21 Network interface.......................................22 Network structure ......................................28 OLE .............................................................6 OPC.............................................................5 Client ......................................................11 data model ..............................................11 events......................................................23 sClient for Excel ......................................49 Server ..................................................9, 11 Server actions ..........................................18 Server structure .........................................9 OPC Automation 2.0 .................................48 OPC Clients .........................................19, 46 OPC Foundation ..........................................ii OPC Server Name ......................................17 OPC standard...............................................ii Poll interval................................................36 polling........................................................35 Project settings ...........................................21 Protocol......................................................41 Protocol window.........................................22 Registration................................................54 Remote Full Client .....................................21 Remote Lightweight Client.........................21 run .............................................................20 setup ..........................................................14 Simulate .....................................................22 simulate mode ............................................43 SNVT ........................................................32 starting.......................................................18 Starting ......................................................18 60 OPC Server L, User’s Manual startup..................................................43, 44 startup mode ..............................................22 Status bar ...................................................33 subscribe mechanism ..................................12 supported hardware ....................................13 Supported hardware....................................13 synchronous access for read and write..........12 Throttle interval .........................................36 Time format ...............................................26 Timeoffset ..................................................26 Trial version ...............................................54 uncached value ...........................................11 uninstall .....................................................13 Index Unlock key.................................................26 Unlock kez .................................................55 UNVT .......................................................32 Update by exception...................................36 Value cached .....................................................11 uncached .................................................11 VBA...................................10, 44, 45, 48, 49 version history ............................................56 Visual Basic ................................................42 Visual Basic demos .....................................42 Visual Basic for Applications.......................44 61