1
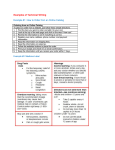
ExitCare® Word Processor Manual Version 7.9.1.7 Elsevier’s ExitCare 651-379-0483 Main 800-694-6669 Toll Free Extension 2 for Tech Support Email: [email protected] http://exitcare.com/ Copyright © 2015, Elsevier’s ExitCare ExitCare® Word Processor Manual Version 7.9.1.7 Copyright © 2015 Elsevier’s ExitCare All rights reserved. No parts of this work may be reproduced in any form or by any means - graphic, electronic, or mechanical, including photocopying, recording, taping, or information storage and retrieval systems - without the written permission of the publisher. Products other than ExitCare that may be referred to in this document may be either trademarks and/or registered trademarks of the respective owners. The publisher and the author make no claim to these trademarks. The publisher and the author assume no responsibility for errors or omissions, or for damages resulting from the use of information contained in this document or from the use of programs and source code that may accompany it. In no event shall the publisher and the author be liable for any loss of profit or any other commercial damage caused or alleged to have been caused directly or indirectly by this document. Page | 1 Table of Contents WELCOME .....................................................................................................................................................3 IF YOU NEED FURTHER ASSISTANCE ............................................................................................................................... 3 PROGRAM OVERVIEW....................................................................................................................................3 CUSTOMIZABLE FEATURES............................................................................................................................................ 3 EXITCARE TRAINING .......................................................................................................................................3 FORMATTING USED IN THIS MANUAL .............................................................................................................3 YOUR FEEDBACK ............................................................................................................................................3 CREATING CUSTOM DOCUMENTS...................................................................................................................4 COPYING AND EDITING AN EXISTING DOCUMENT ............................................................................................................. 4 CREATING A NEW DOCUMENT ...................................................................................................................................... 4 IMPORTING TEXT ........................................................................................................................................................ 4 RENAMING A DOCUMENT ............................................................................................................................................ 4 TOOL BAR FEATURES ......................................................................................................................................5 FIRST ROW ................................................................................................................................................................ 5 SECOND ROW ............................................................................................................................................................ 5 THIRD ROW ............................................................................................................................................................... 6 FOURTH ROW ............................................................................................................................................................ 7 BUILDING AND FORMATTING TABLES ............................................................................................................................. 8 A NOTE ABOUT CHANGING FONT SIZE ........................................................................................................................... 8 ADDITIONAL DOCUMENT PROCESSING FEATURES ..........................................................................................8 Page | 2 Welcome Elsevier’s ExitCare® offers Patient Education Solutions, including the ExitCare® Discharge Information System and the ExitMeds™ Prescription Writing and Drug Information Systems! If You Need Further Assistance You can access the ExitCare in-program user manual by clicking Help/Options in the sidebar and then Help; or find it online at http://exitcare.com/support/training/. Visit our Resource Center at http://elsevierresources.com/exitcare/ to view and download resources. For further help, including how to access our online in-service videos, please contact us at [email protected] or 800-694-6669, extension 2.. Program Overview The ExitCare software is quick and easy to use, yet comprehensive in what it offers clinicians. Program features include the ability to automatically import patient information; the freedom to add custom information to patient education documents; and a full electronic archive that preserves all patient information printed. We strongly recommend learning and using the program fully. This approach provides the clinical facility with the best results both for the patient and for the management of this information. Customizable Features Many features in ExitCare can be customized to save you time. Examples include macros, additional note phrases, shortcuts, drug defaults, and documents. Many features are available for every non-Administrator user who has an ID and password; others are granted by the ExitCare Administrator. If you do not have rights to work with certain features, contact your ExitCare Administrator with your request. ExitCare Training Elsevier’s ExitCare offers live, web-based training to reinforce overviews, including webinars on Basic, Super User, Administrator, and specialized topics. In-service videos can be viewed online. On-site classes are available for purchase. For more information, please contact [email protected] or 800-694-6669, extension 2. Formatting Used in this Manual Generally, the pattern used for formatting in this manual is as follows: Boldface: Click referenced item Underline: Other important items or areas on a screen Italics: Introductions and emphasis in text In addition, a wide left-hand margin is provided for those who wish to put this document in a three-ring binder. Your Feedback We value your feedback. If you have requests for additional document titles, questions, or suggestions for improvement to the program, please contact us at [email protected] or 800-694-6669, ext. 2. Page | 3 Creating Custom Documents The ExitCare program allows you to copy an ExitCare document and then edit it, or you can create a new document. In both of these cases, you have three options for adding new text. You can: import a .rtf file; copy and paste text into your document; and manually type text. The name you give to the new document will display with “%%” after the name on the Choose Titles screen. Please also see the ExitCare Super User Manual for additional information on creating custom documents. Click Help/Options | Options | Document System | Documents to go to the Documents list screen. Copying and Editing an Existing ExitCare Document New documents can be created by copying (“cloning”) and editing an existing document. Documents provided by Elsevier’s ExitCare cannot be edited directly; they must be cloned and then edited. When an ExitCare document is modified, future quarterly updates will apply only to the document provided by Elsevier’s ExitCare and not to the copied and edited version. To clone a document when on the Documents list screen, highlight a document’s name and click the Clone Highlighted button in the toolbar above. Regarding item 2 on the Clone Document dialog box, the original, retained metadata includes: CPT, ICD10, ICD9, PCS, SNOMED, and LOINC codes; and gender, age, and diagnosis data. It will also be noted on the Patient Signature Page that the document has been modified/created by the facility. Also please note that there is no maintenance by Elsevier of retained metadata to support the cloned document. Click OK. Next, enter a name for the cloned document and click OK. The document editing window will appear with the copied document ready to be customized. Creating a New Document To create a new document from scratch, click the Add button in the toolbar on the Documents list screen. In the Add Document dialog box, enter a name for the new document and click OK. On the subsequent screen, you may import text (see below); copy and paste text; or, type text into the document. For best results when copying and pasting, use text that is minimally formatted (no bolding, italicizing, etc.) Importing Text To import a text document into ExitCare, first save it as a .rtf (rich text format) file by using the “Save As” feature of your word processor. Note that importing a file eliminates any pre-existing text in the document. Also, ensure that the document to be imported is not open in another application when you are importing it. In the ExitCare program, after creating a new document or copying an existing document, click the Import button (which appears as an open folder under the English tab), browse to the file, and click on it. Click Open. Renaming a Document To rename a custom-made document: On the Documents list screen, after highlighting (clicking once on) a custom-made document title, click the Rename Highlighted button. Page | 4 Tool Bar Features First Row Imports a .rtf document from your computer Print preview Spell check Cut Copy Paste Undo the last action Redo the last action Opens the graphics library. Browse or search the entire library, or, in the lower left-hand corner, select a subcategory of the graphics. Use the Open folder button to access graphics from your computer. After inserting the image into your document, right-click on the image to see available options. The image can be resized by grabbing one of the corners and moving it. Allows the addition of fields into the document. See below for more information. Opens a window to allow insertion symbols Find Find and replace Zoom Zoom in Zoom out Adding Fields to Documents (Either Copied or New) Adding a field to a document is a two-step process: 1) adding the field for the user to use; and 2) adding relevant text for the patient to read. 1. Place your cursor in the document where you wish to insert the field. 2. Click Insert Field in the top line of the menu bar above the main text area. 3. Find and highlight your desired field in the Pick Question window. Tip: To search for a field use the % symbol as a wild card. Click Add. The inserted field will appear in this format: <<xn>>, where “x” stands for text and “n” stands for numbers; “<<time01>>” is an example. However, when it appears in the “front” end of the program, it will appear under the document’s Questions tab, which ExitCare users see, with the wording that exists in the Pick Question window, along with any associated answers. 4. As noted above, the text of the inserted field on the Pick Question window does not display in the document for the patient to see; it is for the ExitCare user to see. Therefore, you will need to manually add text, either in Page | 5 front of the field, or after the field, or both, for the patient to read. Enter text, which may be a statement, rather than a question, that will be relevant to the patient when they see the answer chosen by the ExitCare user when using this field. To see examples of how fields are used in ExitCare documents, you may wish to examine several documents with fields. One is shown below, where <<time01>> is the inserted field. The question that the user answers for the “<<time01>>” field is, “For how many hours should the patient try a clear liquid diet? Second Row Create a table Insert row Delete row Insert column Delete column Merge cells Divide cells The last eight buttons are for establishing borders around cells. Third Row Sets ExitCare styles identical to the styles buttons in the fourth row; explained below. Bold Italics Underline Superscript Subscript Left justify Center Right justify The two drop-down lists at the end of the third row determine text color and highlight color, respectively. Page | 6 Fourth Row Arrowhead bullet, left justified, red; EC Normal text Dot bullet, indented, red; EC Normal text Times New Roman, 12 point, black text Sequential numbers with periods, 12 point Times New Roman, 12 point, all caps, red Times New Roman, 12 point, all caps, red, bold Arial, 18 point, red, bold, centered Times New Roman, 11 point, black Arial, 24 point, red, bold, centered See the image on the next page for examples. Font sizes above are as displayed on the Work with Documents screen; the actual printed sizes are governed by the default print settings and the Language/Size screen settings. Text and Bullet Styles Page | 7 Building and Formatting Tables To create a table, place your cursor where the table is to go, and then click the Create Table button: shown right: . A pop up window appears as Click and drag your mouse until the required dimensions are reached, then click again. The table will be inserted at your cursor location. This button turns grid lines on and off. The default is “on;” clicking the button turns them off. When turned off, the table will appear with faint grid lines on the document editing screen, but the lines are not visible in the document. This feature allows you to arrange text, bullet points, inserted fields, and so on in a table format but not display the table grid. A Note about Changing Font Size If you change the font on the Language/Size screen, the following ExitCare styles are not resized: EC Sub Title, EC Table, and EC Title. Therefore, changing the font size, especially if your document includes graphics, may adversely affect the layout of your document. To retain specific formatting for a table or text, consider using the EC Table style. When that style is used, the general format of that part of your document should be preserved. Additional Document Processing Features This document is a form box. When checked, the document will always be printed on its own pages and is never combined with other documents. The document will also be categorized as a “Form” on the Print/Fax/Email screen. Set Document Sections button. ExitCare automatically adds to each document certain sections such as the names of the patient and physician, as well as your facility information in the header and footer. Click the Set Document Sections button to see what they are. Note that when selected on the Document Sections dialog box, they do not display on the document editing screen, but will display on your document within the main ExitCare program, as well as when the document is printed. To deselect any of these section uncheck the relevant boxes on the Document Sections dialog box. Add Translation button. Once an English document has been saved, a corresponding foreign language document can be saved. To do this, click the Add Translation button, select the language you are adding, and a new window will open so you can add the translated text to the selected language category. Once the document is complete, click the Save button, and choose the facility, group, or department level for this document. Page | 8