1
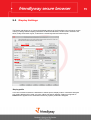
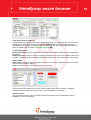
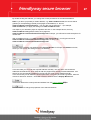
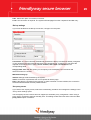
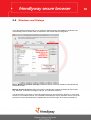
Table of contents
Part I About secure browser
Part II System Functions
Part III What is new?
Part IV Quick Start
Part V Secure Browser Configuration
2
3
5
7
8
10
1 General...................................................................................................................................
Settings
15
2 Display ...................................................................................................................................
Settings
23
3 Security...................................................................................................................................
Settings
...................................................................................................................................
28
4 Connection
Settings
...................................................................................................................................
30
5 Windows
and Dialogs
6 Mail
................................................................................................................................... 33
................................................................................................................................... 35
7 Video Mail
................................................................................................................................... 37
8 User Authorization
...................................................................................................................................
41
9 Proximity
Sensor
Part VI Customizing Layout
Part VII Running Multimedia Presentations
43
46
2
1
About secure browser
Software for secure Internet access
Exceptional software is your passion. And for us it is a constant incentive to continue our
development. Since the introduction of the friendlyway secure browser software, we have repeatedly
received enthusiastic reviews from our customers. Now we have optimized it even more,
technologically and visually. With the friendlyway secure browser software, you will once again
experience professional software of the highest standard.
Our friendlyway secure browser software is now equipped with the "active skin" technology. This
totally new technology from friendlyway's own software development makes it possible for you to
easily adapt the user elements to your corporate design. The convenient control elements, delivered
as part of the friendlyway package, comply with the newest requirements on software ergonomics.
Here, the "aqua button" technology was implemented, with which user elements on the touchsensitive monitor become a sensual experience. The seemingly transparent space in the buttons
communicates demonstratively to the user the simple operability with a fingertip.
Attach great importance to a professional appearance of your Internet system in public? Know that
an unprotected system can be dismantled in minutes by children? This can happen so quickly that
even if the system is constantly monitored, you have virtually no chance to avert these attacks. The
secure browser software from friendlyway guarantees you permanent security, an investment that
will pay for itself over and over again.
With the secure browser software, unwanted system interventions are prohibited and Internet access
is limited to the areas specified by you.
2
© 2005 friendlyway AG
3
2
System Functions
Below is a list of major functions available in the current version of the secure browser configuration:
1. Lock system keys and prevent undesirable access to windows interface
By disabling the system keys, it becomes impossible for the user to switch to other applications or
windows interface with such shortcuts as "Alt + Tab". This helps to prevent undesirable access on
the system level.
2. Reboot computer automatically at a given time
You can restart or shut down your computer at a definite time. This is done automatically without
user involved.
3. Track user activities in the log file
Want to monitor user activities? Enable this option to record all activities in a log file. It will show you
when and what exactly the user did.
4. Adjust the screen layout to certain address domains
This option enables you to change the layout of the friendlyway secure browsers depending on the
website being displayed.
5. Customizable Toolbar
Define your own buttons and configure the buttons to be displayed or hidden.
6. Security Settings
- Disable JavaScript
- Disable access to local files
- Configure ActiveX controls
- Disable download of files
7. Limit the surfing area
Don't want users to surf on chat and erotic websites? You can limit the access to certain sites easily
and reliably.
8. Block pop-up windows
Here you can disable loading of annoying pop-up windows.
9. Own data transmission manager opens connection by request only
The costs for dial-up connection can be reduced with the friendlyway secure browser, which
establishes the dial-up connection by request only and discontinues it after a preset time.
3
4
10. Monitor opened applications and windows
You can allow user to run only the applications permitted by you. Maximal number of opened
windows, as well as automatic closing of all windows when they are no more required, can be also
set in the configuration program.
11. Mail Client Configuration
In the secure browser configurator you can configure the mail server that enables the secure
browser users to send mail from various websites.
4
© 2005 friendlyway AG
5
3
What is new?
Version 6.3.0.1.
Support for the vistor card scanner
Support for the sites secured with smart-card authentication
Version 6.2.0.1.
User authorization: Now you can define the restricted area for authorized users.
Proximity sensor: Automatically change the displayed contents depending on the user
proximity.
Stability of the application was improved and several defects were fixed.
Version 6.1.0.7.
Session time: Now you can set the maximum session time and the lock time between the
sessions.
Black screen: Automatically lock the system for the preset period, e.g. at night.
Configuration packager was implemented.
Downloaded files can now be opened in associated applications.
Stability of the application was improved and several defects were fixed.
Version 6.1.0.6.
Stability of the application was improved and several defects were fixed.
The new skin: „friendlyway blue".
Version 6.1.0.4.
Own mail client: Now you can send e-mails directly from the friendlyway secure browser.
Video mail function: You can capture and send video, photo and voice messages.
Virtual keyboard: Even when using touch screen applications you may sometimes need to
type some text. It is now possible due to the virtual keyboard.
More than only ESC: Before, you could exit the secure browser with the ESC button only (or
with the „Close" button). Now you can define yourself which buttons to press for exiting.
Download Manager: Set the maximum size of the files that can be downloaded from the
Internet. Moreover, the secure browser provides a function for quick and easy saving of the
downloaded files on various media, e.g. floppy disk or USB memory stick.
New colors: Separate elements of the secure browser can be customized even more than
earlier, e.g. the color of the address bar.
Various skins: Changing the appearance of the secure browser is as easy as winking, e.g. by
using the skins.
Numerous minor improvements.
Version 6.0.2.0.
5
6
-
Toolbar in HTML format: User-specific HTML files can be used as a toolbar.
Better management for display profile: Now the display profile can be also created for pop-up
windows of a certain URL.
Color of the secure browser frames can be customized.
Pop-up windows can be resized.
Application stability was improved, known bugs were fixed.
6
© 2005 friendlyway AG
7
4
Quick Start
To quickly start using the secure browser, go through the following steps:
1.
Log in as Administrator or with Administrator rights
Since the installation procedure accesses the internal system settings, the current user must have
administrator rights. Otherwise, Windows will deny access and the installation cannot be fulfilled.
2.
Start secure browser configuration and do the following:
Tab "General 10 "
Tick the box "Load secure browser at Windows startup" and in the "Shutdown and Autostart"
pane enter the user name and password for Windows logon. It enables uncontrolled switching of the
PC. The friendlyway secure browser is automatically logged on with the specified user name.
-
Specify the start page.
This page will be automatically loaded when starting the friendlyway secure browser.
-
Enable "Lock system keys" checkbox
By disabling the system keys, it becomes impossible for the user to switch to other applications or
windows interface with such shortcuts as "Alt + Tab". This enables you to prevent undesirable access
on the system level.
-
Activate "Secure exit with password" and enter the password
This option prevents the friendlyway secure browser from being closed by an authorized user. The
password entered here is required to close the browser.
Tab "Connection
-
28
"
Select the required connection type.
Enter the user name and the password for the dial-up connection or proxy server address, if
applicable.
3.
Save the configuration and close the configuration program.
4.
When starting the computer next time, the start page will be automatically loaded in the
friendlyway secure browser.
7
8
5
Secure Browser Configuration
The friendlyway secure browser is equipped with a separate configuration program: secure browser
configuration. This is a flexible tool to tailor the settings of the friendlyway secure browser to very
specific needs. You can create several configuration files and then select the most suitable one for
every definite purpose. For your convenience, the settings are split into groups: General settings 10 ,
Display settings 15 , Security settings 23 , Connection settings 28 , Windows and dialogs 30 , Mail 33
and Video Mail 35 .
Starting secure browser configuration
The start dialog provides two options:
Open existing configuration file – select this option and click OK to find the required configuration
file (*.sbc) and open it for editing in the configuration program.
Create new configuration file – select this option and click OK to open a new configuration file
with default settings in the configuration program.
Workspace and controls
For your convenience, the settings provided by the secure browser configuration tool are split into
five groups, each represented by a dedicated navigation tab: General 10 , Display 15 , Security 23 ,
Connection 28 , Windows and dialogs 30 , Mail 33 and Video Mail 35 .
© 2005 friendlyway AG
8
9
With the buttons of the bottom bar you can:
New: create a new configuration set.
Load: open an already existing configuration file.
Save: save the modified configuration file under the default name and in the default folder.
Save as...: save the modified configuration file under a user-defined name and in the selected
folder. The file name of the configuration being currently edited is displayed in the window caption.
Close: close the secure browser configuration program. If some settings were modified, the
configuration file is updated when closing the program and confirming the changes.
Help: read the program description and help topics in case you have problems or questions.
This button bar remains unchanged when switching over the tabs.
9
10
5.1
General Settings
On the General tab you can select the language of the secure browser, set the start page address,
configure the shutdown and autostart parameters and the screen saver, lock the keyboard and hide
the mouse cursor, set the password for browser exit, temporary lock the system via a black screen
and select log files for user and system activities.
10
Language: In the drop-down list select the language for the browser and configuration program.
Currently, English and German are available.
Start page URL: The specified Start Page URL will be loaded as the first page at browser's startup.
The same page will be displayed if the user clicks Home in the secure browser toolbar 15 .
Here you can manually enter the address of the desirable start page or select one from the list of
© 2005 friendlyway AG
11
previously indicated addresses. The list of denied addresses can be edited in "Surfing area"
the "Security" 23 tab.
23
on
Click this button to load the specified page and check if it was specified correctly.
Click this button to select the start page from the web pages that are available from
your computer locally.
Configure shutdown parameters
On this pane you can specify the time to start and shut down the computer where the secure browser
is installed.
Restart at: Enable this option to automatically start your computer daily at the time specified in the
dedicated field on the left.
Shutdown at: Select this option to automatically shut down the computer daily at the time specified
in the dedicated field on the left.
Configure autostart parameters
11
Load Secure Browser at Windows startup: If this option is enabled, the friendlyway secure
browser will be started at each Windows startup. Note: The disadvantage of this option is that the
user can try to get access to the desktop with the mouse (if available) during startup. The advantage
12
is that the auto-start function remains unchanged in case the secure browser is eventually closed to
allow working with the regular operating system.
Autologin as: Usually, login information is requested when the computer is started. If this is your
case, enable this option and to automatically log in to the PC with the account data specified in this
pane (namely, user name, password and domain). Otherwise, the computer won't be started.
Perform privileged actions using: Here you can enter the administrator account, which is required
to start the secure browser and enable communication with the operating system.
Screen saver
Here you can set the parameters of the screen saver for the friendlyway secure browser. One of the
most important functions of the screen saver is to continually display a predefined HTML-page, when
the browser is not used. Additionally, all activities of the previous user (process/cache/cookies) are
automatically deleted (if the option Log user activity 10 is not enabled).
Activate screen saver in … : Enable this option to start the screen saver after the idle time
specified here, in minutes. If this checkbox is not ticked, the screen saver will be disabled. For
reasons of stability and data protection we recommend you to turn the screen saver on.
Return to start page upon user action: Tick this checkbox if the browser should return to the start
page from the screen saver after new user entry.
Lock keyboard and hide mouse cursor
Some times, you may need to lock the keyboard and the mouse to prevent undesirable access on
the system level. This can be configured here:
Lock system keys: Enable this option to lock the system keys when using the secure browser. The
© 2005 friendlyway AG
12
13
following shortcuts will be blocked: [Ctrl + Alt + Del], [Windows Logo], [Alt + Tab], [Shift + F10], [Ctrl
+ Esc], [Alt + Esc].
Hide mouse cursor: To hide the mouse cursor when using the secure browser, enable this option.
Lock right mouse button: Tick this checkbox to disable the right mouse button for users of the
secure browser.
Secure exit with password: For better security, you may prevent unauthorized closing of the
secure browser: Enable this option and enter the password, which will be requested when closing the
secure browser:
Enter the combination of keyboard buttons, which can be used to close the secure browser (for
example, ESC, Alt+F4 or Ctrl+A). You do not need to type the required shortcut letter by letter, but to
press the necessary combination of keyboard buttons, -- the field will be automatically filled in.
Temporary lock the system via a black screen
Enable the black screen to lock the system for the specified period (time fields "from" and "to"). This
function may prove useful at night, for example. The monitor becomes black, the keyboard and the
mouse cursor become disabled. Still, during this period the secure browser can be closed using the
exit shortcut key 10 and the password 10 according to your settings.
Select files to log user and system activities
13
Enable this option to automatically log user activities, e.g. process, cache, cookies. This data will be
saved into the sbuser.log file, path to this file specified in the dedicated field. You can enter the
path manually with the keyboard, or browse it with
.
14
To log system activities, enable this option. The data will be saved in the sbsystem.log file, path to
this file specified in the dedicated field. You can enter the path manually with the keyboard, or
browse it with
.
14
© 2005 friendlyway AG
15
5.2
Display Settings
The Display tab allows you to view and edit display settings of the friendlyway secure browser screen
namely, to assign different display parameters to different addresses, set the screen resolution and
skins, modify the browser layout, customize the virtual keyboard and toolbar layout.
15
Display profile
In the URL Profiles list select the addresses to define specific display modes. Parameters assigned
to a certain address will be used only when calling this specific address. Settings configured as
Default will be applied for the addresses without any specific parameters assigned.
16
Click this button to open the "Manage Profiles…" dialog window.
Here you can enter addresses that should be associated with a specific appearance of the
friendlyway secure browser.
To define a specific profile for a pop-up window of a certain URL domain only, the profile name
should start with the string "popup:". For example, from the "popup:Default" profile the default
settings for all pop-up windows are loaded. Another example is that display settings for pop-up
windows of the "microsoft.com" domain are loaded from the profile
"popup:http://www.microsoft.com". You can either type the initial string for pop-up windows
manually, or tick the checkbox "Profile for pop-up windows" to add it automatically.
Screen settings
Please configure the screen settings for the friendlyway secure browser here:
16
The upper selection list provides three options:
Area: With this option you can locate the browser on a specified part of the screen. This option can
be used for "multi screen" or "multi desktop" environments. In the field to the right specify the
position data of the target area. The upper two fields define the position of the top left corner of the
area, the lower fields –width and height.
Full screen: The friendlyway secure browser will be displayed in the full screen mode.
© 2005 friendlyway AG
17
Switch to resolution: This option enables the selection list below, where you can specify the
required screen resolution. The secure browser will start up with this resolution automatically.
Moreover, you can adjust the friendlyway secure browser to your corporate style or simply select one
of the suggested skins:
Select skin: Select any of the available skin files that will define the style of the secure browser as it
appears to users.
Frame color: Select the suitable frame color of the secure browser from those available in the list.
Press the Test button to preview the defined graphical settings.
Display appearance
Here you can select the toolbars to show or hide, and configure their position:
Address bar: In this bar user enters the address of the required page. By clicking "Go" (or pressing
Enter, if the keyboard is enabled) the page will be loaded.
Click the color box to define the background color for the address bar, if available. You can find
further information about the "Select color" dialog window below 15 .
Scrollbars: These bars enable user to move vertically and horizontally within the page.
Frame: Frames of the application main window.
Volume buttons: Buttons for volume control.
Toolbar: This bar contains buttons to navigate pages, refresh the current sites, switch to start page,
etc. The layout of this bar can be defined in the Toolbar pane.
Window bar: This bar contains buttons that bring the windows of opened applications to
background.
Switch languages: Tick this checkbox to display the language combobox next to the keyboard
button to the users of the secure browser. Users will be able to select either English or German
language for the secure browser interface and keyboard layout.
Show "URL is denied" message: The user will be informed when the called URL is denied by the
secure browser.
Show "Pop-up is blocked" message: The user will be informed when pop-ups of the called page
are blocked by the secure browser.
Customize the virtual keyboard
17
18
Show keyboard button: Tick the checkbox to show the virtual keyboard on the screen, for
example, in case the physical keyboard is not available to the users of the secure browser. If the
option is checked, users will be able to hide or show the virtual keyboard with one button:
Virtual keyboard: The virtual keyboard of the secure browser can be either Floating (user can
move it across the screen) or Docking (fastened on the bottom). Select a suitable option in the list.
Background color: Click the color box to define the background color for the virtual keyboard of the
secure browser, if available. You can find further information about the "Select color" dialog window
below 15 .
Toolbar
Here you can define the layout of the toolbar, and namely:
· Load a layout from file
· Select the background
· Customize button labels
· Select the buttons from the default list
· Define the buttons by yourself
First of all, in field Picture folder specify the folder with the images to be used for the buttons. You
can change the entry manually with the keyboard or by clicking the browse button to the right of the
field.
© 2005 friendlyway AG
18
19
Load layout from an HTML file
Toolbar layout can comply not only with a background image and various buttons, but can be also
loaded from a HTML file. Just tick the checkbox Load from file and enter the file name in the
dedicated field on the right (manually or with the Browse button next to the Toolbar file field). For
more information refer to section Customizing Layout 43 .
Toolbar Background
Background image: Enter the file name of the image that should be loaded as the background of
the toolbar.
Background color: Click the color box to define the background color for the toolbar of the secure
browser, if available. Further information about the "Select color" is provided below in this section.
Button labels
Button text: Tick this checkbox to display the labels on the buttons selected in the field under this
control element (Column "Name").
Font: Click this button to customize font, its size and color.
19
Click the color box to define the text color for the buttons of the secure browser, if available.
YFurther information about the "Select color" is provided below in this section.
Default controls
The friendlyway secure browser provides the following default buttons for standard functions:
Forward – go to the next page;
20
Back – return to the previous page;
Stop – stop the current activity;
Home – load the start page;
Refresh – reload the current page;
Exit - close the secure browser;
Print - print out the current page.
You can add, delete or change the position of the buttons to tailor the toolbar to your specific needs.
You can also change the button names or their design, but not the address (address is written with
bold).
User-defined controls
If you want to provide direct access to certain pages, regardless of those currently opened by user,
you can place a direct link on the page. You can define the buttons in the following way:
1.
Click on "User action" entry in the list of available buttons and press the button
to add a new user-defined control.
2.
Press Customize... to open the Button properties window.
3.
Enter the button name in field Name .
4.
In field URL specify the address of the page, which this button should refer to.
5.
In the Image selection list select the picture for the new button. This list contains images from
the picture folder that is defined in field Picture folder.
6.
Click OK to save properties of the button.
Make sure that you specified the Picture folder with the images to be used for your buttons.
· To add a new button, select the one in the list of Available buttons and press
.
· To delete a button, select it in the list of Shown buttons and click
.
· To change the order of the buttons, select one from the list of Shown buttons and move it by
clicking Move up and Move down .
· To insert a place holder, select Place holder entry in the list of Available buttons and click
. Now you can position the place holder as usually.
· To change properties of the button, press Customize... or double click on the names of the
buttons to be edited: dialog Button properties will open:
© 2005 friendlyway AG
20
21
With this dialog you can view and edit the name, address (for user-defined buttons only) and the
related image. The drop-down list contains all images of the selected picture folder. Use OK to
confirm and Cancel to reset changes.
Tip: You can also define different images for different states of the button, e.g. disabled, pressed
and "hot" (when mouse cursor is placed over the button). Just add the required images to the picture
folder and correctly name them. For example, if the name of the image is back.gif, the related hot
button should be named as back_p.bmp , and the disabled one– as back_d.gif.
Select the color of various control elements
The "Display" tab of the secure browser configuration program allows you to define colors of various
control elements: background color of the address bar, virtual keyboard, toolbar and the text color for
button labels. When you click on the corresponding color boxes, the "Select color" window is
displayed:
21
22
You can use a suitable color from those available on the leftmost bar or select it using the pointer on
the color palette. Adjust the intensity on the vertical panel on the right. The Target color will be
displayed in the lower left corner.
You can also specify the required color with exact values manually: enter the decimal RGB-values in
the corresponding fields. The format is RRGGBB, where RR is for Red, GG - Green and BB - Blue
color components. The intensity of the components can be defined by a value from 00 to FF (255).
Hue, Saturation and Luminosity can be specified manually as well.
22
© 2005 friendlyway AG
23
5.3
Security Settings
In the Security tab of the secure browser you can define security settings of the browser, customize
download restrictions, set the session time, specify surfing area, define access option for pop-ups.
23
Options: Here you can define the security settings for the secure browser:
Enable Java Scripts: It is recommended to enable Java scripts, since they are used in a
considerable part of Internet pages.
Enable Java Applets: Java applets are independent programs. Relatively few websites provide
JAVA games or chats and in most cases these programs are not correct enough.
Enable access to local files: With this option you can allow or deny access to local disks.
Enable download of ActiveX controls: With this option you can allow downloading and installation
24
of ActiveX control elements, in case they are required by the website but not available on your
computer. We recommend denying the installation, but allowing execution of already installed
elements.
Enable ActiveX execution: Here you can allow or deny execution of already installed ActiveX
elements.
Enable insecure ActiveX: There are ActiveX elements that allow user to access local drives or
manipulate important system files. With this option you can disable such elements.
Download
Enable file download: Tick this checkbox so that users could download files from the Internet when
using the secure browser.
Download path: Enter (or select with the Browse button next to the field) the local folder, in which
the files downloaded by users should be saved.
Download size: Specify the maximum size of downloaded files in megabytes. In case you do not
want to restrict it, enter null (0) here (default value is 10). In any case, the files can be downloaded
from the secure browser, only if disk space allows.
Open downloaded file: Select the most suitable way to treat the downloaded files, i.e. either do not
open them, ask the user or always open.
Delete files after screen saver start up: Tick this checkbox to delete the files downloaded by users
after each session of the secure browser, namely, after screen saver start up.
Session time
24
To regulate the use of the secure browser, define the time of a session. Session time reckoning
starts from the moment of the first user activity, e.g. when the user clicks a mouse button or presses
a keyboard button. As soon as the defined session time is over, the system will be locked for the
period specified in the Lock time field.
During the lock time a blue screen is displayed, the keyboard and the mouse are disabled, though
the secure browser can be closed using the exit shortcut key and the password according to your
settings. The lock screen will be not displayed if screen saver runs.
© 2005 friendlyway AG
25
Note: If one of the two values is not 0, the other cannot be set to 0 as well.
Surfing area
Here you can define the navigation area:
The green tick before the address in the Surfing area means that this address is allowed for any
user.
The red prohibitory sign stands for denied addresses that are available for authorized users only.
By double clicking the address, you change the access permission for the selected address.
Note: If you allow (or prohibit) a certain address, e.g. www.YourServer.com, the access will be
granted (or correspondingly denied) for all pages of this address, i.e. also for
www.YourServer.com/YourFolder1/ . You can also use the wildcard "* " (for example,
www.*YourServer.*) to apply the settings for www.YourServer.com.
The depth of your definition plays an important role here. In the example above, the entry
www.YourServer.com grants access to such pages as
www.YourServer.com/YourFolder1/YourPage.htm. Perhaps, you will need to make exceptions for
certain files.
With an additional entry, e.g. www.YourServer.com/YourFolder2/*, you will grant access to
www.YourServer.com/YourFolder1/YourPage.htm, but deny it for
www.YourServer.com/YourFolder2/YourPage.htm.
Click this button to add a new address in the Surfing area. It will open the Address
window, where you can specify the settings for the new address.
In the URL field you can enter the required address manually. The drop down list contains all
25
26
addresses entered before, which helps to add new pages within already provided addresses. Just
search for the corresponding address in the list and then enter precise details manually.
In the second list you can select the access permission. The green plus means "granted", while the
red minus stands for "denied". Click OK to add the address into the Surfing area list.
This button removes the currently selected address from the Surfing area.
Click this button to change the properties of the selected address.
Access to unlisted URLs is: The access to the addresses not included in the surfing area list can
be granted or denied by selecting the corresponding entry from this list.
Pop-up windows
On this pane you can define the pop-up windows to load or disable:
Custom : Select this option to separately define the behaviour for the pop-up windows dedicated to
the pages of the Surfing area 23 .
Disable All : All pop-up windows will be blocked.
Enable All : All pop-up windows for the addresses listed in the Surfing area 23 are allowed.
Close pop-up windows on changing main window URL:
If the address in the main window is changed, all pop-ups related to an old address will be
automatically closed, on condition that this option is enabled. Otherwise, the user will have to close
all windows manually.
The green tick before the address in the Pop-up windows pane means that this address is
allowed for any user.
The red prohibitory sign stands for denied addresses that are available for authorized users only.
© 2005 friendlyway AG
26
27
By double clicking the address, you change the access permission for the selected address.
Note: If you allow (or prohibit) a certain address, e.g. www.YourServer.com, the access will be
granted (or correspondingly denied) for all pages of this address, i.e. also for
www.YourServer.com/YourFolder1/ . You can also use the wildcard "* " (for example,
www.*YourServer.*) to apply the settings for www.YourServer.com.
The depth of your definition plays an important role here. In the example above, the entry
www.YourServer.com grants access to such pages as
www.YourServer.com/YourFolder1/YourPage.htm. Perhaps, you will need to make exceptions for
certain files.
With an additional entry, e.g. www.YourServer.com/YourFolder2/*, you will grant access to
www.YourServer.com/YourFolder1/YourPage.htm, but deny it for
www.YourServer.com/YourFolder2/YourPage.htm
Click this button to add a new address to the Pop-up Window. It will open the Address window,
where you can specify the settings for the new address.
In the URL field you can enter the required address manually. The drop down list contains all
addresses entered before, which helps to add new pages within already provided addresses. Just
search for the corresponding address in the list and then enter precise details manually.
In the second list you can select the access permission. The green plus means "granted", while the
red minus stands for "denied". Click OK to add the address into the Pop-up Window list.
This button deletes the currently selected address from the Pop-up window
Click this button to change the properties of the selected address.
23
list.
27
28
5.4
Connection Settings
The friendlyway secure browser undertakes comprehensive control of your Internet connection thus
preventing users from changing the settings. The Connection tab of the secure browser configuration
allows you to select a connection type and configure proxy and dial-up settings:
28
Connection type:
Dial-up : Select this option when using dial-up connection. You can adjust the connection settings in
the "Dial-up settings" 28 pane.
External : Connection is provided by the operating system or by another program. Select this
connection type also if websites should be called from the local web server only.
© 2005 friendlyway AG
29
LAN : Select this option for Intranet connection.
Local : No connection is required. The system will load pages from the computer's hard disk only.
Dial-up settings
If you have decided for the dial-up connection, configure it in this pane:
Connection: The secure browser automatically retrieves the dial-up connections already configured
in your network environment and shows them in the drop-down list. In this list you can select the
required connection and then specify Phone number, User name and Password in the
corresponding fields.
Hang-up after exit: With this option you can specify if the friendlyway secure browser will
disconnect when it is closed.
Wait before hang-up
default: Settings will be retrieved by the system.
never: Connection is preserved even if not required to call the page.
time: If the page is not located in the Internet, or there have been no user activities, the connection
will be discontinued after the time predefined here.
Use proxy server
If you want to use a proxy server, select the corresoinding checkbox and configure the settings in the
"Proxy server settings" pane.
The friendlyway secure browser does not support the automatic proxy configuration. When using a
proxy server, provide the settings manually here. This dialog window becomes active when the Use
proxy server option is enabled.
29
30
5.5
Windows and Dialogs
In the Windows and Dialogs tab you can select the window types to be disabled or windows to be
automatically closed if screen-saver is activated or the window falls to background:
30
Show „Window is blocked" message: enable this option if the user should be informed that the
window is blocked.
Manage browser windows: Select this option to manage the windows generated by the browser
(e.g. warnings, information messages, pop-ups, etc.) like other windows.
The list provided on this page contains all windows that can be monitored or blocked. In case some
window is not included in the list, it is permitted to be displayed, though automatic actions cannot be
performed. The blocked windows are marked with the red minus sign, while those permitted are
© 2005 friendlyway AG
31
marked with a green plus. To edit the list, use the buttons on the left.
Add: Clicking this button creates a new entry for the window and opens it for editing (see Window
Control dialog below).
Edit: Click this button to open the selected entry for editing.
Delete: This button deletes the entry from the monitoring list.
Default – Click this button to apply the list of default settings.
Max opened windows – Maximal number of windows that can be simultaneously opened.
Clicking the Add or Edit button opens the Window control dialog:
31
Close immediately: When user will try to open this window, it will be immediately closed without
being displayed.
Allow displaying this window: It is permitted to display this window.
Close if falls to background: The window will be closed if the secure browser falls to
background window.
Close if browser URL is changed: The window will be closed if the secure browser is
navigated to another page.
Close if screen saver id activated: The window will be closed if the screen-saver is activated.
Close if screen saver is closed: The window will be closed if, while the screen-saver is active,
a key is pressed or the mouse is moved.
32
Allow multiple instances – Allows several copies of the window.
Terminate window process: Instead of closing the window, the program bind to this window will be
closed.
Window title: If the window title complies with that one specified here, the window will be treated as
recognized.
Window class: If the window class complies with that one specified here, the window will be treated
as recognized. (For advanced users only)
32
© 2005 friendlyway AG
33
5.6
Mail
In the Mail tab of the secure browser configuration program you can configure the mail server that
enables the secure browser users to send e-mail from various websites:
33
Enable mail support: Tick this checkbox to be able to set up the the video mail. When this option is
checked, the Mail button will be added to the list of available buttons in the Display tab 15 of the
configurator. If selected there, it will be also displayed to the users of the friendlyway secure
browser.
Note: Please contact your system administrator on any questions regarding the information to be
provided on this page.
34
Main page URL: Enter the URL address of the web page that will be opened as a mail client when
users of secure browser click 'mailto' links. Click the Test button to open the specified web page in
the browser and see if it was correctly specified. Click the Browse button to select the necessary
web page from those available from your computer.
Outgoing mail (SMTP): Specify the URL of the outgoing mail server.
Port: Enter the number of the port to connect to the outgoing mail server.
Outgoing mail server requires authentication: Tick this checkbox to enable and fill in the
authentication fields: POP3 authentication and SMPT authentication.
The User Information provided here (Sender name and Sender address) will be displayed at the
bottom of each message sent via the secure browser.
Handling of 'mailto': Tick this checkbox to allow users of secure browser to send e-mail by clicking
'mailto' links.
34
© 2005 friendlyway AG
35
5.7
Video Mail
In the Video Mail tab of the secure browser configuration program you can configure the video mail
server that enables the secure browser users to capture video and audio fragments, photos, and
send them via e-mail from various websites:
35
Enable video mail support: Tick this checkbox to be able to set up the the video mail. When this
option is checked, the Video mail button will be added to the list of available buttons in the
Display tab 15 of the configurator. If selected there, it will be also displayed to the users of the
friendlyway secure browser.
Video mail page URL: Enter the URL address of the web page that will be opened as a mail client
when users of secure browser click 'mailto' links. Click the Preview button to open the specified web
36
page in the browser and see if it was correctly specified. Click the Browse button to select the
necessary web page from those available from your computer.
Video device: Select a suitable video device from the list. The list will contain video devices
installed on your computer. Click the Settings button to configure the selected device.
Format of original video: Specify the size of the picture to be captured by camera.
Audio device: Select a suitable audio device from the list. The list will contain audio devices
installed on your computer. Click the Settings button to configure the selected device.
Output video format: Specify the format of the output video (Original or Custom).
Bitrate of compressed video: The quality of the output video. The higher the bitrate is, the better is
quality of the output file and the bigger is the size of the video file.
Capturing settings: Specify maximal audio and video duration in seconds.
36
© 2005 friendlyway AG
37
5.8
User Authorization
To define the URLs that can be accessed by authorized users only (authorized by a smart card, via
regular browser login or by other authorization device available), specify the settings in the User
Authorization tab:
37
Apply user authorization: Activate this option to use your authorization device.
Authorization provider: Select one of the available provider. To configure advanced parameters,
click "Setup...". More information on each provider see below: Business cards 37 , Smart card CTAPI 37 , SafeSign card 37 , User list 37 .
Start page for restricted area: Specify the start page or select a file, which will be automatically
loaded immediately after the authorization.
38
Restricted area: Specify the allowed and denied addresses for authorized users.
The green tick before the address in the Restricted area means that this address is allowed for
any user.
The red prohibitory sign stands for denied addresses that are available for authorized users only.
By double clicking the address, you change the access permission for the selected address.
Note: If you allow (or prohibit) a certain address, e.g. www.YourServer.com, the access will be
granted (or correspondingly denied) for all pages of this address, i.e. also for
www.YourServer.com/YourFolder1/ . You can also use the wildcard "* " (for example,
www.*YourServer.*) to apply the settings for www.YourServer.com.
The depth of your definition plays an important role here. In the example above, the entry
www.YourServer.com grants access to such pages as
www.YourServer.com/YourFolder1/YourPage.htm. Perhaps, you will need to make exceptions for
certain files.
With an additional entry, e.g. www.YourServer.com/YourFolder2/*, you will grant access to
www.YourServer.com/YourFolder1/YourPage.htm, but deny it for
www.YourServer.com/YourFolder2/YourPage.htm.
Click this button to add a new address in the Restricted area. It will open the
Address window, where you can specify the settings for the new address.
In the URL field you can enter
the required address manually. The drop down list contains all addresses entered before, which
helps to add new pages within already provided addresses. Just search for the corresponding
address in the list and then enter precise details manually.
In the second list you can select the access permission. The green plus means "granted", while the
red minus stands for "denied". Click OK to add the address into the Restricted area list.
This button removes the currently selected address from the Restricted area.
Click this button to change the properties of the selected address.
Access to unlisted URLs is: The access to the addresses not included in the restricted area list can
be granted or denied by selecting the corresponding entry from this list.
© 2005 friendlyway AG
38
39
Business cards
A business cards scanner allows for collecting the information on the users, who visit the sites
specified in the Restricted area list. It grants access only in case a business card is inserted. The
personal data of the business card is recognized by the visit cards scanner and is saved into the
database.
File with contact data: Select the format of the file (Excel or Access), in which the contact data
contained in users' business cards will be saved, and specify the path and the file name.
Store business card images: Select this option to store the scanned image of users' business
cards. This might be useful in case some data is not recognized.
Smart card CT-API
A smart card reader works with smart cards of various types for user identification and granting
access.
39
Terminal number: Specify the number of the terminal (numerals 0-99).
Port: Enter the port of the specified terminal.
ATR string: Enter the hexadecimal "Answer-to-Reset" string, which is delivered with the device
driver.
SafeSign token
40
The SafeSign card can be inserted either in the chip drive or in the USB port, depending on the
devices selected in the corresponding drop down list:
In case option "All devices" is selected, the system detects which device relates to the inserted
SafeSign card. Otherwise, it is up to the user to decide, which device should be used for his/her card
to access the requested site.
User list
In case the User list is selected as the authorization provider, a standard dialog will be displayed to
the users trying to access the sites specified in the Restricted area list, suggesting the user to enter
the username and the password.
40
The users and their passwords are defined by clicking the Setup... button next to the Authorization
provider drop-down list. Note that you can select whether to Match case of username and
password or not.
© 2005 friendlyway AG
41
5.9
Proximity Sensor
If your terminal is equipped with a proximity sensor, it can be configured in the Proximity Sensor tab:
41
Use proximity sensor: Activate this option to set up the parameters of the sensor. Otherwise, the
required fields will be disabled.
Port: Specify the corresponding port. When required, you can check the correctness with the "Test"
button.
Active state: In the "Navigate to" field specify a file or a website to be displayed in presence of a
user.
End the screen saver, if the state changes to active: This field is enabled only in case there is no
42
value in the corresponding "Navigate to" field. Select this option to automatically stop playing the
screen saver specified in the General 10 tab as soon as a user steps into the sensor zone.
Passive state: In the "Navigate to" field specify a file or a website to be displayed immediately after
a user has left the sensor zone.
Start the screen saver, if the state changes to passive: This field is enabled only in case there is
no value in the corresponding "Navigate to" field. Select this option to automatically start playing the
screen saver specified in the General 10 tab as soon as a user leaves the sensor zone.
42
© 2005 friendlyway AG
43
6
Customizing Layout
The layout and color skin of the secure browser can be easily adjusted with several mouse clicks.
The friendlyway secure browser provides unlimited possibilities for layout customization in the
chargeable version. You can also try to customize the layout in a free version, though a hint
reminding you of a non-licensed version will be displayed every 3 minutes.
1. Managing display profile
To adjust the layout of the secure browser window, open the browser configuration file "*.sbc" with
the friendlyway secure browser configuration program and select the Display 15 tab. You can create
different screen layouts for different URL areas. The current URL-profile is displayed in the field URL
Profile. Click the Manage Profiles... button to create further profiles or edit URLs for the already
available profile. In one configuration file several profiles can be determined. To define the profile for
an entire domain (e.g. http://www.microsoft.com), you will need to enter the profile name
http://www.microsoft.com. If you need to adjust a certain sub-domain better, specify the path to this
sub-domain as the profile name (e.g. http://www.microsoft.com/office/officeXP). For non-defined
domains the layout settings will be loaded from the Default profile.
1.1. Assigning specific display profiles to pop-up windows
To define a specific profile for a pop-up window of a certain URL domain only, the profile name
should start with the string "popup:". For example, from the "popup:Default" profile the default
settings for all pop-up windows are loaded. Another example is that display settings for pop-up
windows of the "microsoft.com" domain are loaded from the profile
"popup:http://www.microsoft.com ".
1.2. Availability of control elements
The checkboxes of the Display
domain:
15
tab allow you to show/hide various controls for the selected URL
- Address bar
- Scrollbars
- Frame
- Toolbar (and its position)
For example, to enable presentation of a website in full screen (panorama) mode, all checkboxes
listed above should be disabled.
1.3. Customizing frame color
43
44
The color of the browser layout (except toolbar buttons) can be easily customized: just select the
desirable color from the drop-down list "Frame color". The selected color is also applied to all hint
windows and other controls. Click the "Test" button to preview the selected color in the sample
window.
1.4. Toolbar
Starting with version 6.0.2.0, the toolbar is converted in the HTML format before it is displayed. The
HTML presentation of the browser layout has particular properties:
- Buttons of different size can be used.
- Files of button images can be of JPEG, BMP, GIF or PNG extension, with or without
background.
- "Rollover" effect when moving the mouse cursor over the buttons.
Buttons for a certain display profile should be preferably saved in one folder. The rollover effect can
be achieved if the images with file names "OriginalName + _p" are provided. These images will be
used to display pressed buttons. For example, when using image "back.gif" for the "Back" button,
image "back_p.gif" should be available in the folder for the roll-over effect. For disabled buttons
ending "_d" will be used.
1.5. Button "Group"
This button helps to logically group the buttons and to organize them within the toolbar. The buttons
that follow the first button "Group" are placed in the middle of the bar (to the right or under the group
separator). The buttons after the second separator will be correspondingly placed on the right (or
under it).
1.6. Guidelines on toolbar implementation when importing as an external file
The toolbar can be also loaded from a user-specific HTML-file. To ensure correct implementation of
all functions and formatting the following instructions for HTML-code should be followed:
- The contents of the bar must be placed within one HTML-table with ID "SecureBrowser_Toolbar".
For correct formatting of a vertical bar, please define the "height" parameter of the table, and for a
horizontal bar – the "width" parameter.
- Buttons must be defined as IMG-tags.
- Default buttons should have the following HTML-IDs predefined:
© 2005 friendlyway AG
44
45
Function
Back
Forward
Start page
ID
Back
Forward
Home
Stop
Stop
Print
Print
Refresh
Close pop-up
Exit browser
Refresh
Close
Exit
- For user-defined buttons the target URL should be specified in the "alt" parameter of the IMG tag.
For disabled toolbar buttons (if available) the HTML files with the following endings should be
provided:
"_00" Functions "Back" and "Forward" are disabled.
"_01" Function "Back" is enabled, function "Forward" is disabled.
"_10" Function "Forward" is enabled, function "Back" is disabled.
Please refer to the "ToolbarSample.html" file as an example, which can be found in the
installation directory of the secure browser.
45
46
7
Running Multimedia Presentations
If the friendlyway composer suite or the friendlyway player are installed on your computer, you can
use a unique feature: running multimedia presentations from the secure browser.
Running presentations in screen saver mode:
-
Open the General tab of the secure browser configurator.
Enable the screen saver function.
In field „Screen saver URL" type the following string: play:<path to file>\<filename>.xms
Tips:
- You can also make the URL to your presentation a start page for the secure browser.
- When pressing the keyboard buttons or moving the mouse, the presentation will be closed and the
secure browser activated again.
46
© 2005 friendlyway AG