1
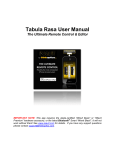
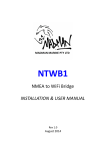
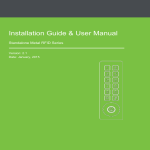
REKA Health Pte Ltd
REKA App
User Manual for
iPhone and iPad
Version: 1.0
PN:PJPUM-APPS-001
01 OCT 2013
Purpose
This document serves as a guide for E100 users to transmit and upload their ECG records or other health
data via Apple Inc’s devices such as the iPhone and iPad.
For other REKA Health-related matters, or to find out more information,
please contact [email protected].
System requirements
The REKA Health App can be installed on the following devices:
• iPhone
• iPad
All devices must be running on iOS 4.3 and above.
© 2013 REKA HEALTH PTE LTD all rights reserved.
This manual contains proprietary information of REKA Health. The information is not to be distributed, reproduced or disclosed to any
other parties for any other purpose without the expressed written permission
of REKA Health.
REKA Health reserves the right to make changes to this document without notice.
MAC OS is the trademark registered by Apple Inc.
Disclaimer:
All information contained in this document or accessed through the website (www.rekahealth.com) is provided on an “as is” and “as
available” basis. No warranty of any kind, implied, express or statutory (including but not limited to, warranties of title, merchantability,
satisfactory quality, non-infringement of third-party intellectual property rights, fitness for a particular purpose, warranties of performance
and freedom from computer virus and other malicious code), is given in conjunction with such information, the veracity, accuracy, adequacy, completeness or reasonableness thereof, or this website in general. The information and materials are subject to change at any time
without notice.
In no event shall REKA Health be liable to you or any other party for any damages, losses, expenses or costs whatsoever (including without limitation, any direct, indirect, special, incidental or consequential damages, loss of profits or loss opportunity) arising in connection
with your use of the website, or reliance on any information at this website, or any failure of performance, system, error, omission, interruption, computer virus, malicious code, corruption, breach of security, or unavailability of access, even if REKA Health has been advised as
to the possibility of such damages.
Contents Page
1.
Introduction
5.
2.
Install and Uninstall
5.3.1
Incoming phone calls
5.3.2
Short Message Service (SMS)
1.1
1.2
2.1
2.2
Overview
Getting started
Installing the REKA App
Uninstalling the REKA App
3.
Operation
4.
Features
3.1
Other Information
5.1
Disclaimer page
5.2
Firmware version number
5.3Interruption
received
Launching the app
4.1
4.2
Home page
Upload
4.2.1
Upload ECG records
4.2.2
Application log
4.2.3
Unsuccessful uploads
4.3Settings
4.3.1 Notification to physician
4.3.2
Debug log
4.4Help
4.4.1
Access user manual
4.4.2
Send email to REKA support
4.5About
4.5.1
App information
4.5.2
Uploading data
4.6
Terms and Conditions
4.6.1
Firmware version below v6.00
4.6.2
Firmware version v6.00 onwards
4.7
Invalid records
4.8
Unsuccesful uploads
4.9
Sending failed uploads via email
4.10
Error Messages
Contents
3
1. Introduction
1.1 Overview
This user manual describes the procedures
for the transmission of ECG data in your E100
device to REKA Health’s servers via a mobile
device. The figure on the right illustrates the
overall process from ECG measurement to
receiving feedback from your physician.
1.2 Getting started
1. Install the REKA App on your mobile device.
2. Install and uninstall
2.1 Installing the REKA App
STEP 1:
Go to the App Store
STEP 2:
Go to ‘Search’
and type ‘Reka’.
Introduction | Install and uninstall
4
STEP 3:
Select REKA and
click ‘Install app’.
STEP 4:
The programme will be installed
automatically and an icon will be created
on your device.
Your REKA App is now ready for use.
2.2 Uninstalling the REKA App
To delete the app, press and hold the
‘REKA’ icon until all the icons on your
screen wiggle. Click on the ‘x’ that appears
on the ‘REKA’ icon.
The REKA App will be deleted from
your device.
3. Operation
3.1 Launching the app
STEP 1:
Turn on and unlock your mobile device.
STEP 2:
Connect your mobile device to the E100
using the 30-pin cable provided in the
package as shown in the picture:
Install and uninstall | Operation
NOTE: Lightning to 30-pin
adaptors for mobile
devices are not included and must
be purchased
separately.
5
STEP 3:
Once the device is unlocked and the E100
is properly connected, the REKA App will be
launched automatically.
NOTE: The app will not launch if your
device is not connected properly.
To launch the REKA App manually,
click on the REKA App icon.
4. Features
4.1 Home page
The Home page is the default page that shows
all functions available in the REKA App.
4.2 Upload
Upload ECG records, access logs and view the
number of unsuccessful upload records stored
in the mobile device
4.2.1 Upload ECG records
Transfers and uploads your ECG
records to the REKA cloud server
Operation | Features
6
4.2.2 Application log
Keeps a history of the data transmission status and records the 50 most
recent entries.
4.2.3 Unsuccessful uploads
Tracks and displays the number of
unsuccessful uploads.
4.3 Settings
Set up and configure the device
4.3.1 Notification to physician
When set to ‘ON’, a notification
message will be sent to your physician
when data is uploaded.
Please note that your physician will
receive the notification only if he/she
has registered to the service.
4.3.2 Debug log
When set to ‘ON’, a debug log will
be generated, which can be emailed
to REKA Health’s support team for
investigation.
Features
7
4.4 Help
Access the user manual and send email to
REKA support
4.4.1 Access user manual
Provides system requirements and
information on how to use the app.
4.4.2 Send email to
REKA support
Sends the user log file (application
logs, debug logs) and other problems
to [email protected]
for troubleshooting.
4.5 About
View information about the app and “Terms and
Conditions”
4.5.1 App information
Displays the information about this app.
Features
8
4.5.2 Terms and Conditions
Click on the “Terms & Conditions”
button to view Reka Health’s terms and
conditions for using this app.
4.6 Uploading data
NOTE: When uploading data, the device must not be disconnected.
4.6.1 Firmware version below v6.00
STEP 1:
Connect your mobile device to the E100
and wait for the REKA App to launch.
NOTE: You can view
the Firmware Version
Number in the status
panel at the bottom
of the screen
First line: Total number of records to be uploaded.
Second line: Number of new records in E100.
Third line: Number of old records that have not
been uploaded previously.
If there is no record in E100, the
following image will be displayed.
STEP 2:
Data will be uploaded to the
cloud server automatically.
Features
9
STEP 3:
Once the uploading is completed, the
app will display the status of the uploads.
The first picture on the right shows a
scenario where all the records have
been successfully uploaded.
The second picture on the far right shows
a scenario where some of the records are
unsuccessfully uploaded. Please refer to
Section 4.8 Unsuccesful Uploads should
you encounter this scenario.
STEP 4:
“Uploading Completed” will be
displayed after uploading has been
successfully completed.
Disconnecting your device
Once the uploads have been completed,
you will be prompted to disconnect the
device. You will see “Please disconnect
the device” displayed on the screen.
To disconnect, press firmly on the catches
on both sides of the 30-pin connector and
pull it out from your mobile device.
4.6.2 Firmware version
v6.00 onwards
STEP 1:
Connect your mobile device to the
E100 and wait for the REKA App to
launch.
NOTE: You can view
the Firmware Version
Number in the status
panel at the bottom
of the screen
If there is no record in E100, the
following image will be displayed.
Features
10
STEP 2:
Checking for device activation status.
If the device has been successfully
activated, the images on the right
will be displayed.
If the device activation fails, please
consult your medical centre for
assistance.
STEP 3:
Once the uploading is completed,
the app will display the status of the
uploads.
The first picture on the right shows a
scenario where all the records have
been successfully uploaded.
The second picture on the far right
shows a scenario where some
of the records are unsuccessfully
uploaded. Please refer to Section 4.8
Unsuccesful Uploads should you
encounter this scenario.
Features
11
STEP 4:
If there are successful uploads,
the app will proceed to notify the
assigned physician.
STEP 5:
“Uploading Completed” will be
displayed after uploading has
been successfully completed.
Disconnecting your device
Once the uploads have been
completed, you will be prompted to
disconnect the device.
You will see “Please disconnect the
device” displayed on the screen.
To disconnect, press firmly on the
catches on both sides of the 30-pin
connector and pull it out from your
mobile device
4.7 Invalid records
When the cloud server receives invalid records,
a message will appear prompting the user
to send their user log files to REKA Health’s
support team.
NOTE: Invalid records will automatically be deleted from the device.
If ‘yes’ is selected, the user log files will be sent
via email to REKA Health’s support team.
Features
12
4.8 Unsuccesful uploads
In the event that any records have not been
successfully uploaded, a message will appear,
prompting to retry the uploading.
Select “Yes” if you would like to retry uploading the
records now.
Select “Retry Later” if you would like to retry the
uploading later.
If ‘Retry Later’ is selected, the device will store the
data in the mobile device for future uploading.
Records that were not uploaded will be stored
for two additional sessions, allowing users to
re-upload records within 3 sessions. For each
session, you may attempt to re-upload up to 5
times by tapping ‘Yes’ each time.
4.9 Sending failed uploads via email
If there are remaining records after 3 sessions,
the device will prompt to send an email to
[email protected] to notify REKA Health
about the problem. The unsuccessful records
will be attached.
Tap ‘OK’, to send a feedback note and
unsuccessful records using email.
You may add any additional comments in the
body of the email, before tapping ‘send’.
Features
13
4.10 Error messages
Should the E100 become disconnected while
uploading, the following error message will be
shown.
To remedy the error, simply disconnect and
reconnect the cable to your mobile device.
Should network service become unavailable
during upload, the following error message will
be shown. You should attempt to upload again
when network service becomes available.
Should a request timeout error be encountered
during uploading or while notifying the
physician, the following error message will be
shown. Please check your Internet connection
and try again.
Features
14
5. Other information
5.1 Disclaimer page
Upon launching the app for the first time, a
Disclaimer Page will be displayed. Please
read the terms and conditions for using the
REKA App carefully.
Tap on “I Agree” if you are agreeable to the
terms and conditions as stated to proceed in
using the app. If you disagree to the terms and
conditions for using the app, you may press
your iDevice’s “Home” button to quit the app.
5.2 Firmware version number
You can view the Firmware Version Number in
the status panel at the bottom of the screen.
5.3 Interruption
Should you receive an incoming phone call, the uploading process may restart or “Device
communication lost” message may be displayed.
5.3.1 Incoming phone calls
Should you receive an incoming phone call, the uploading process may be affected as follows:
1. The uploading may be restarted.
2. “Device communication lost” message may be displayed.
The uploading shall automatically be resumed upon hanging up the call.
5.3.2 Short Message Service (SMS) received
In the event that you receive an incoming SMS during the upload process, there should be no
interruption to the uploading process unless you click/open the SMS.
By opening the SMS, the app automatically exits, thereby stopping all uploads.
Restart the app to resume the uploading.
Other Information
15