1
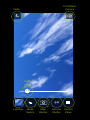
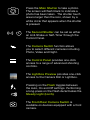
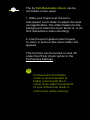
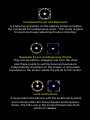
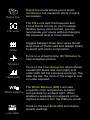
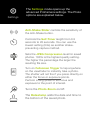
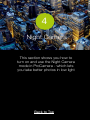
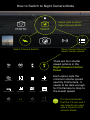
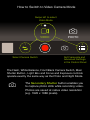
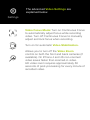
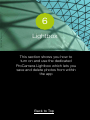
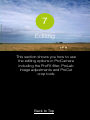
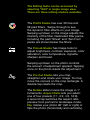
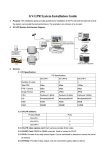
Photo: Misho Baranovic
ProCamera 7
(v5.1)
User Manual
Photo: Misho Baranovic
Table of Contents
1. Capture Screen
2. Focus and Exposure
3. Control Panel
4. Night Camera
5. Video
6. Lightbox
7. Editing
8. Share
9. General Options
10. Troubleshooting
(tap for shortcut)
1
Capture Screen
This section outlines the main
shooting functions on the
ProCamera capture screen
Back to Top
Front/Back
Camera
Flash
Digital
Zoom
1.7
Lightbox
Mode
Switch
Main
Shutter
Second
Shutter
Control
Panel
Press the Main Shutter to take a photo.
The screen will flash black to indicate a
photo has been taken. The shutter touch
area is larger than the icon, shown by a
white circle that appears when the shutter
is pressed.
The Second Shutter can be set as either
an Anti-Shake or Self-Timer through the
Control Panel.
The Camera Switch function allows
you to select different cameras including
Photo, Video and Night.
The Control Panel provides one-click
access to a range of advanced shooting
controls.
The Lightbox Preview provides one-click
access to the Camera Roll or Lightbox.
Pressing on the Flash toggles between
the Auto, On and Off settings. Performing
a long-press on the Flash de/activates the
Steady Light (torch).
The Front/Rear Camera Switch is
available on devices equipped with a front
camera.
1.7
The 6x Full-Resolution Zoom can be
controlled in two ways:
1. Slide your finger over the semitransparent zoom slider to adjust the level
of magnification. The slider fades into the
background when the zoom factor is 1x (to
limit distractions when shooting).
2. Use the pinch gesture (two fingers)
to zoom in and out (the zoom slider will
appear).
This function can be turned on and off
under the Photo Zoom option in the
ProCamera Settings.
Tip
ProCamera’s Anti-Shake
mode is recommended at
higher zoom levels (3x or
more). Even slight movements
of your iPhone can result in
motion blur while zooming.
2
Focus and Exposure
This section outlines the different
ways to control focus and
exposure in ProCamera
Back to Top
Combined Focus and Exposure
A single tap anywhere on the capture screen activates
the combined Focus/Exposure point. This mode is great
for quick and easy adjustments when shooting.
Seperate Focus and Exposure Points
They can be split by dragging one from the other.
Use these points to set the focus and exposure
independently anywhere on the screen. A long press
anywhere on the screen resets the points to the centre.
Lock and Unlock
A long press locks (shown with the small lock symbol)
and unlocks either the Focus Square and Exposure
Circle. The F/E Lock in the Control Panel locks both
points on release.
Photo: Misho Baranovic
3
Control Panel
This section explains the different
controls and functions in the
ProCamera Control Panel
Back to Top
The Control Panel is designed to provide one-click
access to a range of advanced shooting controls.
Tip
Try clicking on all the functions
and see what changes on the
capture screen (for example
the gridlines and aspect ratio)
Rapid Fire
F/E Lock
Grids
Tiltmeter
White balance
Histogram
Live data
Aspect ratio
Settings
Anti-shake
Self-timer
Fullscreen
Rapid Fire
F/E Lock
Grids
Rapid fire mode allows you to shoot
continuous, full-resolution shots in quick
succession.
The F/E Lock sets the Exposure and
Focus Points to lock on touch release
(flashes twice). Once locked, you can
recompose your scene without changing
the exposure level or focus distance.
Toggles between three Grid views (Small
Grid, Rule of Thirds Grid and Golden Ratio)
to assist with photo composition.
Turns on a virtual horizon 3D Tiltmeter to
help straighten photos.
Tiltmeter
Histogram
White balance
Live data
Turns on the Live Histogram which shows
overall light levels and over (right) and
under (left) red bar exposure warnings. The
taller the bar, the more of the image is over
or under exposed.
The White Balance (WB) Lock sets
a specific color temperature to better
compensate for ambient light. When
enabled a seperate icon appears on the
capture screen to turn the WB lock on/off.
Turns on the Live Data (ISO and shutter
speed) readings.
Aspect Ratio
Fullscreen
Anti-shake
Self-timer
Toggles between six Aspect Ratios:
Standard (4:3), 35mm film (3:2),
Widescreen (16:9), Square (1:1), Letterbox
(3:1) and Golden Mean. A long press
displays all modes.
The Fullscreen mode turns off all noncritical display elements on the Capture
Screen. Focus and Exposure points
work as standard. The mode can be
combined with different Aspect Ratios for
a customized shooting experience.
Selecting Anti-Shake assigns it to the
Second Shutter button (right of the Main
Shutter). Anti-Shake will delay the shutter
release until the iPhone is held steady,
resulting in clearer and sharper photos.
Movement detection is displayed onscreen
by the small icon above the Main Shutter
Button.
Selecting Self-Timer in the Control Panel
assigns it to the Second Shutter button
(right of the Main Shutter). Pressing the
Second Shutter activates the countdown, three beeps will signal the last
seconds before the photo is taken. The
timer duration can be adjusted within
ProCamera’s Settings.
Settings
The Settings mode opens up the
advanced ProCamera settings. The Photo
options are explained below.
Anti-Shake Slider controls the sensitivity of
the Anti-Shake button.
Controls the Self-Timer length from 0.5
seconds to 20 seconds. You can use the
lowest setting (0.5s) as another shakepreventing capture method.
Sets the JPEG Compression level for saved
photos. 100% is the highest quality setting.
The higher the percentage the larger the
resulting file size.
Turn on Fullscreen Trigger to tap anywhere
on the viewfinder to instantly take a photo.
The shutter will not fire if you press directly on
either the focus or exposure points.
Perform a long-press to set focus and
exposure to the point of interest.
Turns the Photo Zoom on/off.
The Datestamp adds the date and time to
the bottom of the saved photo.
4
Night Camera
This section shows you how to
turn on and use the Night Camera
mode in ProCamera - which lets
you take better photos in low light
Back to Top
How to Switch to Night Camera Mode
2
Swipe right to select
Night Camera Mode
Photo
Night
3
1
Open Control Panel to
select shutter speed
Select Camera Switch
1/8s
1/4s
1/2s
1s
Rapid Fire
F/E Lock
Grids
Tiltmeter
White balance
Histogram
Live data
Aspect ratio
Settings
Anti-shake
Self-timer
Fullscreen
There are four shutter
speed options in the
Night Camera Control
Panel.
Each option sets the
minimum shutter speed
used by ProCamera. It
needs to be dark enough
for ProCamera to drop to
the lowest speed.
Tip
It is recommended
that the 1/2 sec and 1
sec speeds are used
with a tripod to limit
camera shake.
Photo: Misho Baranovic
5
Video
This section shows you how to
turn on and use the Video mode in
ProCamera including the Control
Panel and advanced Video Settings
Back to Top
How to Switch to Video Camera Mode
Swipe left to select
Video Mode
2
Video
1
Select Camera Switch
Photo
3
Set Framerate and
Advanced Settings
in the Control Panel
The Flash, White Balance, Front/Back Camera Switch, Main
Shutter Button , Light Box and Focus and Exposure controls
operate exactly the same way as the Photo and Night Mode.
The Secondary Shutter button enables you
to capture photo stills while recording video.
Photos are saved at native video resolution
(e.g. 1920 x 1080 pixels).
The Video Control Panel contains
dedicated options for better recording.
They are outlined below
Resolution
Resolution sets the quality of your
recording. You can switch between different
resolutions depending on your needs. The
There are four options available:
A) HD Max (1280 x 720 + maximum
framerate available on your device)
B) HD+ 1920x1080 + selected frame rate
C) HD 1280x720
D) HQ 640x480
Framerate
Framerate sets the number of frames
captured per second when recording.
Framerate options vary across devices:
A) 24, 25 & 30 fps on 3GS/4/4S/5/5C/5S
B) 60 fps on 5/5C/5S
C) 120 fps on 5S
Note
At this stage ProCamera
cannot playback high frame
rate footage captured on the
iPhone 5 and 5C (60fps) and
iPhone 5S (120fps) in slow
motion.
The advanced Video Settings are
explained below
Settings
Video Focus Mode: Turn on Continuous Focus
to automatically adjust focus while recording
video. Turn off Continuous Focus to manually
adjust and lock focus when recording.
Turn on for automatic Video Stabilization.
Allows you to turn off the Video Zoom
control on both the front and back cameras (if
available). On iPhone 4 and 4S non-zoomed
video saves faster than zoomed-in video.
HD video zoom requires approximately 50
seconds of post-processing for every minute of
recorded video.
Photo: Misho Baranovic
6
Lightbox
This section shows you how to
turn on and use the dedicated
ProCamera Lightbox which lets you
save and delete photos from within
the app
Back to Top
Use Lightbox
The ProCamera Lightbox can be found in the Settings
under the ‘More’ Tab (Settings are accessed from the
Control Panel). When activated, ProCamera saves photos
and videos to a dedicated “Lightbox” album in the app.
This lets users delete photos in ProCamera rather than
having to go into the Photos App to delete from the
Camera Roll.
Note* the additional Delete Icon (circled) in the Lightbox
(left) compared to the Camera Roll (right).
Lightbox
Lightbox
Edit
!
Edit
CAUTION. Please ensure that you export any
Lightbox photos to the Camera Roll before you
delete ProCamera. Otherwise they will be deleted
along with the app.
Lightbox Functions are listed below
< Albums
Provides access to your Photo Library,
including Camera Roll, saved albums and
Lightbox. The Lightbox is always located
second on the Albums list.
In thumbnail view the Multi-Select tool
allows you to select multiple photos and
videos to share, export or delete (if Lightbox
is turned on)
The Select All icon appears if the MultiSelect tool is turned on. This tool selects all
photos and videos in the Lightbox. Perfect for
mass saving or deleting of photos. Select All
is only available if the Lightbox is turned on in
the Settings.
Camera returns to Photo/Video capture
mode.
The following gestures can be used to
navigate within the Lightbox:
A) Double-Tap to zoom in or out on a photo
(single image view)
B) Two-finger Pinch to zoom in or out on a
photo (single image view)
C) Rotate your iDevice to view the Lightbox
and single photo in both landscape and
portrait orientation.
Photo: Misho Baranovic
7
Editing
This section shows you how to use
the editing options in ProCamera
including the ProFX filter, ProLab
image adjustments and ProCut
crop tools
Back to Top
The Editing Suite can be accessed by
selecting “Edit” in single image view.
There are three editing studios available.
The ProFX Studio has over 50 free and
28 paid filters. Swipe through to see
the dynamic filter effects on your image.
Swiping up/down on the image adjusts the
intensity of the filter. Dedicated filter packs,
including the paid ‘Street’ and ‘San Fran’
packs are shown below the filters.
The ProLab Studio has image tools to
adjust brightness, contrast, exposure, color
saturation, color temperature, vignette,
sharpen and boost.
Swiping up/down on the photo controls
the amount of adjustment applied. Tapping
once on the photo resets the adjustment.
The Pro Cut Studio lets you crop,
straighten and rotate your image. To crop,
move the corners on the crop rectangle. A
double-tap resets the crop.
The Rotate slider moves the image in 1°
increments. Aspect Ratio lets you select
one of four presets (1:1, 3:2, 4:3, 16:9).
A second tap switches the aspect ratio
preview from portrait to landscape mode.
Flip rotates your photo 90° (left or right) or
flips the photo (horizontally and vertically).
Photo: Misho Baranovic
8
Share
This section shows you how you
can share your photos through
ProCamera
Back to Top
The Share button is located in the
bottom-left corner of the Lightbox/
Camera Roll. ProCamera can share to
the following services:
Message
Twitter
Mail
Facebook
Instagram
Dropbox
Inserts your photo directly into an
email or text. You can attach up to five
photos at one time into emails.
Share to to one or more social
networks, including Facebook, Flickr
and Twitter.
Our dedicated SquarePrepare function
lets you upload non-square photos
into Instagram. It also lets you snap
to edges and resize within the frame.
You can share individual and multiple
images to Dropbox, allowing you to
backup your photos to the cloud.
Photo: Misho Baranovic
9
General Options
This section explains the General
Options section of the Settings
Back to Top
The General Options are listed below.
Settings
Geo-tagging: Turn on/off the ability to
automatically save GPS photo data.
System Sounds: Turn on/off the ProCamera
sounds.
Copyright (EXIF): Enter text to embed
Copyright information in photo and video
metadata (EXIF).
Photo: Misho Baranovic
10
Troubleshooting
This section addresses common
user questions and issues with
ProCamera. If you have any
problems or find a bug please use
the Feedback/Support function in
the Settings.
Back to Top
1. How do I delete photos in ProCamera?
Turn on the Lightbox to save and delete photos within
ProCamera. The Lightbox is the first option that
shows up when you click ‘More’ in the Settings. You
can access the Settings from the Control Panel on the
Capture Screen.
2. Why can’t I view my slow-motion (60fps and
120fps) videos in ProCamera? Is the feature
working?
ProCamera records video at the framerate selected
in the Video Control Panel. However, at this point,
ProCamera does not provide a video player that allows
previewing the video in slow motion. You need a video
editing app for iOS or MacOS to preview or render
videos in slow motion.
3. Why are some features missing in the new
ProCamera 7 that were in ProCamera Classic
including EXIF Data and QR Code Scanner?
EXIF data, Auto Save and QR Code scanning are all
features that will return in the next few updates. We ran
out of time for the iOS7 release to properly bug fix these
features.
We apologise for any inconvenience caused, but rest
assured we are working to get them back as quickly as
possible.
4. I recorded a video but the sound is missing? What
happened?
This issue can occur when a user does not allow
ProCamera access to the Microphone when the request
pops up on screen after installation.
To give access go to:
iPhone Settings>Privacy>Microphone>ProCamera>On
If you have any other questions or would
like to provide feedback then please use
the Support & Feedback option in the
ProCamera Settings. If that’s not working
click here.