1
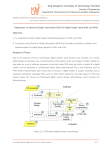
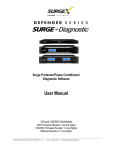
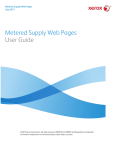
Grading System User Manual Via the INTERNET (NewACIS) Registrar’s Office King Mongkut’s University of Technology Thonburi **If you have any questions, please contact Registrar’s Office at 02-470-8149-50** Information System: Grading Service System User Manual (NewACIS) 1 Content Page KMUTT web-based grading system 2 Accessing the system 3 Creating groups of scores 4 Creating a group of scores for one section only Creating a group of scores for multiple sections 5 7 Method 1: Exporting File to Microsoft Excel How to export students’ registered detail to grade How to import the scores/grade back to the system o Importing only scores o Importing only scores and grades Method 2: Recording and Grading through the web-based grading system How to record scores through the system How to record scores for students who receive Fe, Fa, I How to grade through web-based system o Using KMUTT Standard o Calculating from groups or scores Confirming grades o First-time confirmation o Revised grading after department/faculty approval 24 27 28 30 9 9 12 14 16 19 20 20 23 Approval steps Approval by the Department Approval by the Faculty 32 37 Information System: Grading Service System User Manual (NewACIS) 2 Recording Scores and Grading The KMUTT Grading Service System is designed to record and grade students’ academic achievements. The lecturer can choose to record through the web-based system or export a file to Excel, and then import the file back to the system in order to get approval from the department and the faculty. Start Export Import . . Fe,Fa,I End Figure 1 Two methods for Recording Score and Grading are as follows: 1. Recording and Grading through the web-based system. 2. Exporting data from an online database as an Excel file. 2.1.1 Exporting a list of registered students in Excel, entering students’ scores, and then importing back to the system. 2.1.2 Exporting a list of registered students, entering scores and grades, and then importing back to the system. Information System: Grading Service System User Manual (NewACIS) 3 How to access the grading service system: 1. Direct Access: Go to URL http://studentacademic.kmutt.ac.th/NewAcis.jsf if you are accessing within the university’s IP. 2. Via the KMUTT website: Go to the KMUTT website, then click on “For Faculty and Staff”, and then click on “Student Academic Intranet” (NewACIS). You will see this page: Enter your Username and Password, then click ‘Enter’. Information System: Grading Service System User Manual (NewACIS) 4 After you enter the site, you will see your name on the top-right and several tabs based on academic categories e.g. enrollment, processing academic results, class schedule, and exams schedule. 1. Creating a group of scores for grading Creating a group of scores is to create a registered student name list in each section as one group to grade them together or separate groups to grade them separately. Menu: Recording Examination Scores and Grading If the user is the lecturer of that course, the system will display information of the lecturer namely, name, department, faculty, and the courses that the lecturer teaches, as seen in figure 2. Example of creating a single scores group only section Figure 2 Information System: Grading Service System User Manual (NewACIS) 5 From figure 2, the user can see that the lecturer is currently teaching two courses and has not yet created groups of scores for any of the sections he is teaching. To create groups of scores, click on “create new group” for the course that the user wants to create groups of scores for, as shown in figure 3. Figure 3 The system will display number of section, number of students, and lecturer name. After creating a group of scores, the user must: o Enter the Percentage of scoring criteria. o Tick the checkbox in the first column on the left of a section to select the section for which you want to create a group of scores. Click ‘Save’, and the system will display the result as in figure 4. Figure 4 To create groups of scores for the remaining sections, click “create new group”, and the system will only display sections that have not been grouped. Figure 5 Information System: Grading Service System User Manual (NewACIS) 6 o Enter the percentage of scoring criteria, and tick the checkbox to select the section for which you want to create a group of scores. o Click ‘Save’, and the system will display the result as in figure 5. Figure 6 As seen in figure 6, there are two sections of MTH303, and each section has been created in two separate groups of scores. Example of creating a single group of scores: multiple sections Figure 7 For example, for the CHM103 course, there are 8 sections. Click “create new group”, then select sections for which the user wants to create a group of scores, as shown in figure 8. Figure 8 Information System: Grading Service System User Manual (NewACIS) 7 o Enter percentage of scoring criteria. o Tick the checkbox to select the section that you want to include in this group of scores. o Click ‘Save’, and the system should display the page as seen in figure 9. Figure 9 There are three more sections of CHM103 that have not been created in a group of scores. To create another group, Click “create new group”, and the system will display sections that have not been created in a group of scores, as seen in figure 10. Figure 10 Tick in the checkbox to select the sections for which you want to create a group of scores. After the group of scores has been created, the user should see the results of grouping as in figure 11. You can see that CHM 103 has two groups of scores. Figure 11 As can be seen from figure 11, each group of scores has mutiple sections. Information System: Grading Service System User Manual (NewACIS) 8 Exporting a list of Registered Students Menu: Examination and Grading > Export List of Registered Students On this page, if there are sections that have not been grouped, the user can create groups of scores. For those sections which have been grouped, they can also be used at this stage. Figure 40 Creating groups follows the same procedure as the explanation states in the section on‘Creating Groups’ on page 4. When the user wants to export the student list of each section in order to record scores and grade outside the system, click ‘Export’ in the sections that have been grouped in a group of scores. The system will display the dialog box for selecting the Excel format that the user wants. Select the Excel format that you want, and then the ‘Do you want to open or save?” dialog box will appear. Click ‘Save’. Information System: Grading Service System User Manual (NewACIS) Figure 41 If selecting “Plain Excel”, the user will get the format as seen in figure 42. Figure 42 If selecting “Formula Excel”, the user will get the format as seen in figure 43. Figure 43 9 Information System: Grading Service System User Manual (NewACIS) 10 Importing the recorded scores and grades Importing recorded scores and grades can be done in two ways. 1. importing scores only 2. importing scores and grades When importing information, the system will display the page as shown in figure 44. Figure 44 Select ‘Transaction’, and then click “Import”. The system will display as seen in Figure 45. Figure 45 The system will verify the ‘Excel File’, which has to be the same as the one that was exported. Information System: Grading Service System User Manual (NewACIS) 11 In case of wrongly filling in percentage of score, e.g. when creating a group, the user fills in the percentage score as 30-50-20, but in the ‘Excel File’, the user fills in 40-5010. When the percentage scores do not match, the system will warn the user with the pop-up as shown in Figure 46. The user must make sure that the percentage scores in the Excel file match with the percentage score when the groups of scores is created. Figure 46 If all data in the imported file are verified, the system will display this page as shown in figure 47. Importing only scores Figure 47 Click ‘Save’, and the system will update the scores of students in that group of scores as in Excel. The user can check the process of grading from the ‘Recording Examination scores and Grading’ page. Information System: Grading Service System User Manual (NewACIS) 12 Figure 48 Importing Scores and Grades Figure 49 To import scores and grades, select ‘ import scores and grades’, and then select how to grade, specify the file’s name, and click ‘OK”. The system will verify the Excel file to make sure that grades are filled. Students who received Fe, Fa, or I will not be included as their grades must be filled in the system prior to this step. Information System: Grading Service System User Manual (NewACIS) 13 Figure 50 If all data in the Excel file are verified, the system will display the result of the data verification. Click ‘Save’, and then the system will update the scores and grades of students in the groups and display them on the first page. To check, go back to the ‘Recording Examination scores and Grading’ page, and then click on the Transaction No. of the imported file. The system should show that the user is at step 2 (orange tab) as seen in Figure 51. Figure 51 Information System: Grading Service System User Manual (NewACIS) 14 Recording Scores and Grading through the system Menu: Recording Examination Scores and Grading Figure 12 As an example, groups of scores have been created for MTH303. To record scores, click “Select” in the group for which you want to fill scores. The Filling score page will be displayed as seen in Step 11 (Orange tap). Then, click “select score type to be filled”. Figure 13 Information System: Grading Service System User Manual (NewACIS) 15 There will be a ‘dialog box’ asking the user to select the type of score, as seen in figure 14. Figure 14 Tick in the type of score you want to fill, then click ‘OK’. Figure 15 Fill in the score from left right and top bottom by pressing the Tab key on your keyboard to go to the next box. If the user fills in the “midterm-final-assignment” boxes incorrectly, the system will have a warning pop-up for you to fill in the score again e.g. “Please change the score because the assigned score is 20”. If the user fills in a score more than the assigned score, the system will warn the user to correct the score. If the user does not correct the score, the ‘Total Score’ column will in Red color. If the user fills in the scores a percentage more than 100, there will be a warning pop-up when the user tries to save the data, and the program will not save it. The user does not have to fill in all score types; she can choose to fill in only one type of score, or two, and then ‘Save’ for grading later. Information System: Grading Service System User Manual (NewACIS) 16 Recording scores for students who get Fe, Fa, or I Menu: Recording students who get Fe, Fa, or I, as seen in Figure 16. Figure 16 To record each student grade, click “Select” for the student for whom you want to record a score, and the system will display that student information, as seen in Figure 17. Figure 17 Click on the radio button to select the desired grade (Fe, Fa, I), then click “Save”. After that, the selected grade will appear in the grade column of that student, as shown in figure 18. Information System: Grading Service System User Manual (NewACIS) 17 Figure 18 Grading through web-based system Menu: Recording Examination Scores and Grading Figure 19 Click ‘Select’, the system will display ‘Step 1’ (Orange tab), and examination scores will be recorded. Figure 20 Information System: Grading Service System User Manual (NewACIS) 18 Click “Next to Grading>>”, and the system will show “Step” 2. Figure 21 At ‘Step 2’, the system will display: mean, min, max, and SD value. The system will also display ‘Default Cut Score’. Two methods of Grading: 1. Using KMUTT Standard: the system will apply the default cut score based on the KMUTT standard. The lecturer can adjust the score. 2. Calculating from groups of scores: the system will calculate the mean score and standard deviation of each group of scores, and then it will calculate the cut score. However, the lecturer can adjust the scores if they desire. If the lecturer wants to use the default cut score, click on “Use Default Cut Score”, and the system will apply the default cut score to the Current Cut Score. Using KMUTT Standard Figure 22 Information System: Grading Service System User Manual (NewACIS) 19 The user can adjust the score in “Current Cut Score’, and then click ‘Calculate Grades’. The system will apply the values in the ‘Current Cut Score’ box as the criteria for calculating grades for students in each group of scores. This is also used to calculate the GPA for this group of scores (except for those students who get Aud., Fe, Fa, I, or W) After the system has calculated the grades, it will show ‘Grading complete’. It will still be on the ‘Step 2’ page, so the user can see the ‘grading results’, as seen in figure 23. Figure 23 The user can adjust the score in ‘Adjust Score’ box, and then click ‘Calculate Grades’ to calculate the grades again. If the user wants to change from using ‘Current Cut Score’, to using ‘Default Cut Score’, simply click on ‘Use Default Cut Score’ (the system will re-calculate the score using ‘Default Cut Score’), and then click ‘Calculate grades’. If the user wants to see grading results, simply click “Display Grade Results” as shown in Figure 23. Figure 24 Users can sort the grading results by clicking on the heading of the column that you want the system to sort. Click on ‘Hide Grading Results’ if the user does not want to see the grading results. If the user wants the see the ‘score distribution’, click on ‘Score Distribution’, and the system will display the ‘Score Distribution Sheet’ in PDF format. Information System: Grading Service System User Manual (NewACIS) 20 Calculating grades from group of scores If the user want to use a group of scores to calculate cutting scores, in ‘Step 2’, select ‘Calculating from groups of scores’. The system will calculate a cut score of that group, but it will not be used as a ‘Current Cut Score’ yet. If the user wants to use the suggested cut scores, click “Use Default Cut Score”, and then click ‘Calculate Grades. The system will recalculate the grades and GPA of that group of scores again using group cut scores. However, when the calculation is completed, it will still be on the same page. Figure 25 In this step, the grades will not yet be sent to the department or the faculty, and the lecturer can adjust the score and grade again. To send the grades to the department, click “Next to Confirm Grades >>” Information System: Grading Service System User Manual (NewACIS) 21 To Confirm Grading From the ‘Recording and Grading – Step 2’ page, the system will display ‘Step 3’- Confirm Grades’. Confirming grades can be done in two methods: first-time confirmation and confirming after modifying request. Please note that when you complete each step, the tab color will change to green. Method 1: For first-time confirmation of grades, the system will display this page. Figure 26 The lecturer’s opinion is divided into two sections, namely (1) summary of teaching/ learning results and (2) suggestions of lecturers. These will be displayed on the ‘Score Distribution Sheet’. Click ‘Confirm Grades’ as shown in figure 27. Information System: Grading Service System User Manual (NewACIS) 22 Figure 27 If the user wants to send a document to the department or the faculty, the lecturer can print the “Score Distribution Sheet” which contains a confirmation reference number to show the latest version of grading. The user can print out a student’s list by ID and students list by grades, as seen in figure 28. Information System: Grading Service System User Manual (NewACIS) 23 Figure 28 If the user wants to go back to the first page, click on ‘Back to First Page’, and the system will go back to the first page and show the current status of the group as ‘waiting for department approval’, as seen in figure 29. Information System: Grading Service System User Manual (NewACIS) 24 Figure 29 Print out one copy of the ‘Score Distribution Sheet’ and Students’ list by ID, and send to the department and the faculty for approval. Method 2: In case of confirmation of grading after the department or the faculty request for modifying grades, the system will display this page. Information System: Grading Service System User Manual (NewACIS) 25 Figure 30: in case of modifying grades In case of modifying grades, the lecturer must indicate the comments why the grades have to be modified by selecting ‘ Corrected as proposed by the meeting’ or ‘Confirmed the original grading’. In case of selecting ‘ Confirmed the original grading’, please specify reasons of maintaining original grading to be shown in the approval grading page. After ‘Confirm Grades’ is clicked, the system will update the grading status of the group to ‘Confirmed’, and it will show a new confirmation reference number as the latest version of grading (same as first-time confirmation). In case of modifying grades, printing a ‘Score Distribution Sheet” will include the 2nd page, as seen in figure 31. Information System: Grading Service System User Manual (NewACIS) 26 Figure 31 Department Approval Menu: Recording and Grading>>Academic Results Approval by the Department Figure 32 Information System: Grading Service System User Manual (NewACIS) 27 Click ‘Description’, and then the system will display the page below. Figure 33 The approval results can be divided into three types: Approved, Back to Adjust Grading, and the grading in the meeting. In case of selecting ‘ Approved’ The committee in the meeting can make suggestions and submit comments in the ‘Comments in the meeting’ box. Click ‘The Score Distribution Sheet’, and the user will get the same PDF File as the lecturer. Click ‘Save’, and then the status of this group will show ‘waiting for faculty approval’. If this is a step for ‘faculty approval’, the status will show as ‘Approved’. From the ‘Approval page’, click ‘View list of registered students’. Information System: Grading Service System User Manual (NewACIS) 28 Figure 34 In case of selecting ‘ Back to adjust Grading’ The system will display the ‘comments at the meeting’ box, as shown in figure 35. Figure 35 In the “proposed new grade’ box, enter the new cut score, so that it can be applied in the new grading. The detail will be displayed in the Recording and Grading Step for the lecturer. After completely filling in all data, click ‘Save’, and the status will show as ‘waiting for adjusting”, as seen in Figure 36. Information System: Grading Service System User Manual (NewACIS) 29 Figure 36 In case of selecting ‘ The grading in the meeting’ Figure 37 Select the criteria that the user wants to use, and then adjust the ‘Current Cut Score’. Then, click ‘Grading’. The committee in the meeting can view the score distribution by clicking on ‘Scoring Distribution from the meeting’, so they can compare the grading between the original grading and the meeting grading. To confirm grading, click ‘Save’ in the ‘Do you want to use the new grading?’ dialog box. The meeting grading will receive the new confirmation reference number and the original confirmation referenced number will be cancelled. Then, click ‘Save’, and the system will display the page as seen in figure 38. Information System: Grading Service System User Manual (NewACIS) 30 Figure 38 To send the grading to a lecturer, click “Send Mail to Lecturers”, and the email address dialog box of the lecturer will appear. If the user wants to send it, click ‘Confirm’. Otherwise, click ‘Cancel’. Figure 39 Print out one copy of the ‘Score Distribution Sheet’, Students’ list by ID, and Students’ list by grades. Click “Back to First Page’, and the system will go back to the first page and show the current status of that group of scores. Information System: Grading Service System User Manual (NewACIS) 31 Faculty Approval The detailed steps of ‘Faculty Approval’ is the same as ‘Department Approval’, and after the grading is approved by the faculty, the grading will be sent to the Registration Office for confirmation, and then the Registration Office will complete the grading process for students.