1
CAYIN TECHNOLOGY
SIGNAGE MEDIA PLAYER: SMP-WEB Series
SMP-WEB
Verson .0
Verson .
User Manual
SMP-WEBPLUS
Verson .0
Verson .
SMP-WEB3/WEB3N
Verson 1.0
CAYIN TECHNOLOGY CO., LTD.
8F, NO. , Lnsen N. Rd.,
Tape Cty10, Tawan, R.O.C.
TEL: +88--9 100
FAX: +88--9 100
00 c Cayn Technology Co., Ltd.
All Rghts Reserved
Cayin Technology is established by a group of professionals specializing in development,
researches, engineering, and sales/marketing. Cayin devotes itself to providing complete
digital signage solutions in various applications, such as transportation, education, retail,
hospitality, corporation, financial and public institutions. In order to best facilitate the
deployment of Cayin products, we also provide tailored hardware and software services to
satisfy customers’ demands for almost limitless applications.
SMP-WEB SERIES USER MANUAL
About Cayin
Copyright Notice
Copyright © 2007 CAYIN TECHNOLOGY CO., LTD. All Rights Reserved.
All the contents in this manual are the intellectual property of Cayin Technology Co., Ltd.
(“Cayin”). No part of this manual, including the products and software described in it, shall
be reproduced, transferred, distributed, stored in any form,or translated into any language
without the prior written permission of Cayin. Specifications and information in this manual
are subject to change at any time without obligation to notify any person of such revision or
changes.
This product adopts Arphic's "iFont" technology and fonts.
Trademark Notice
All brand names, icons, and trademarks appeared in this manual are the sole property of their
respective holders.
Disclaimers
THE CONTENTS OF THIS MANUAL ARE PROVIDED “AS IS.” CAYIN MAKES NO
OTHER REPRESENTATION OR WARRANTIES, EITHER EXPRESSED OR IMPLIED WITH
RESPECT TO THE CONTENTS HEREOF AND SPECIFICALLY DISCLAIMS THE IMPLIED
WARRANTIES OF MERCHANTABILITY OR FITNESS FOR A PARTICUAL PURPOSE.
IN NO EVENT SHALL CAYIN, ITS DIRECTORS, OFFICERS, EMPLOYEES OR AGENTS
BE LIABLE FOR ANY INDIRECT, SPECIAL, INCIDENTAL, OR CONSEQUENTIAL
DAMAGES (INCLUDING DAMAGES FOR LOSS OF PROFITS, LOSS OF USE OR DATA,
AND THE LIKE), EVEN IF CAYIN HAS BEEN ADVISED OF THE POSSIBILITY OF SUCH
DAMAGES ARISING FROM ANY DEFECT OR ERROR IN THIS MANUAL OR PRODUCT.
About Cayin.............................................................................................................. i
Copyright Notice....................................................................................................... i
SMP-WEB SERIES USER MANUAL
Table of Contents
Trademark Notice..................................................................................................... i
Disclaimers................................................................................................................ i
1. SMP-WEB Series Overview................................................................................1
1-1 SMP-WEB Photo..........................................................................................3
1-1-1 Front View..............................................................................................................3
1-1-2 Rear View................................................................................................................3
1-2 SMP-WEBPLUS Photo................................................................................4
1-2-1 Front View..............................................................................................................4
1-2-2 Rear View................................................................................................................4
1-3 SMP-WEB3/SMP-WEB3N Photo................................................................5
1-3-1 Front View..............................................................................................................5
1-3-2 Rear View................................................................................................................5
1-4 Hardware Specifications...............................................................................6
1-4-1 SMP-WEB..............................................................................................................6
1-4-2 SMP-WEBPLUS....................................................................................................6
1-4-3 SMP-WEB3/SMP-WEB3N....................................................................................7
SMP-WEB SERIES
1-5 System Specifications ..................................................................................8
1-6 Install SMP-WEB Series............................................................................10
1-6-1 Install Hardware....................................................................................................10
1-6-2 Login on SMP-WEB Series.................................................................................10
1-6-3 Remote PC Login..................................................................................................12
2. Multimedia Contents Playback and Management........................................13
2-1 Upload Files to SMP Player........................................................................14
2-2 Edit Playlist.................................................................................................16
2-2-1 Edit New Playlist..................................................................................................16
2-2-2 Set Default Playlist...............................................................................................19
2-2-3 Select Playlist From a Keypad Device..................................................................19
2-2-4 Check File Timestamp / RUL...............................................................................20
2-3 Manage Playlist.........................................................................................21
2-3-1 Export Playlist.......................................................................................................21
2-3-2 Import Playlist.......................................................................................................22
3. Using Cayin Media Player in HTML................................................................23
3-1 Media Player Tag and Attributes................................................................24
3-2 Video Input Tag and Attributes...................................................................28
3-3 Examples.....................................................................................................29
4. Content Update and Media Folder Management...........................................35
ii
4-1 Update Media Folder..................................................................................36
4-2 Manage Media Folder.................................................................................40
5. System Status and Settings................................................................................41
5-1 System Status..............................................................................................42
5-1-1 Basic Information.................................................................................................42
5-1-2 Advanced Information.........................................................................................43
5-1-3 Firmware Information..........................................................................................44
SMP-WEB SERIES USER MANUAL
5-2 System Management and Firmware Update...............................................45
5-2-1 Set System Time...................................................................................................45
5-2-2 NTP Service..........................................................................................................46
5-2-3 Change Web Administrator’s Password................................................................46
5-2-4 Change Service Port of Web Manager..................................................................47
5-2-5 Choose Web Manager Language..........................................................................48
5-2-6 Set System Reboot................................................................................................48
5-2-7 Firmware Update..................................................................................................49
5-3 Display Settings..........................................................................................50
5-3-1 Hide Cursor..........................................................................................................50
5-3-2 Display Information.............................................................................................51
5-3-3 Screen Rotation (Only for SMP-WEBPLUS).....................................................52
5-3-4 Turn on / Turn off Display...................................................................................53
iii
SMP-WEB SERIES
5-4 Video Input Settings (SMP-WEB3 only)....................................................54
6. Network Settings.................................................................................................55
6-1 Ethernet.......................................................................................................56
6-2 Wireless Network.......................................................................................57
6-3 Off-Line Settings.......................................................................................58
7. LOG Management..............................................................................................59
7-1 Enable Syslog.............................................................................................60
7-2 View Logs..................................................................................................61
7-3 Export Log File..........................................................................................62
8. SMP Console.......................................................................................................63
9. System Recovery.................................................................................................65
Appendix..................................................................................................................67
Appendix A: Test The Resolution of Your Display..................................................68
Appendix B: Use “log_rcv” to collect syslog from clients......................................70
iv
1.
SMP-WEB Series Overview
1-1 SMP-WEB Photo...........................................................................3
1-1-1 Front View...........................................................................3
1-1-2 Rear View............................................................................3
1-2 SMP-WEBPLUS Photo.................................................................4
1-2-1 Front View...........................................................................4
1-2-2 Rear View............................................................................4
1-3 SMP-WEB3/SMP-WEB3N Photo................................................5
1-3-1 Front View...........................................................................5
1-3-2 Rear View............................................................................5
1-4 Hardware Specifications................................................................6
1-4-1 SMP-WEB...........................................................................6
1-4-2 SMP-WEBPLUS.................................................................6
1-4-3 SMP-WEB3/SMP-WEB3N.................................................7
1-5 System Specifications . .................................................................8
1-6 Install SMP-WEB Series.............................................................10
1-6-1 Install Hardware.................................................................10
1-6-2 Login on SMP-WEB Series..............................................10
1-6-3 Remote PC Login..............................................................12
SMP-WEB SERIES
SMP-WEB series is a web-based networked digital signage system. All multimedia contents
are displayed in full-screen webpage, so designers can utilize their own familiar webediting tools and unleash their creativities. SMP-WEB series supports most popular web
languages, image file formats, audio/video codec. SMP-WEBPLUS can furthermore support
HD (High Definition) videos and portrait display. In addition to Flash, HTML, video, images,
animations, and texts, SMP-WEB/WEBPLUS can easily be extended to provide interactive
services incorporating with external devices such as touch screen, keyboard, keypad, or
mouse.
SMP-WEB SERIES USER MANUAL
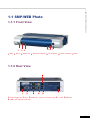
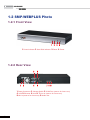
1-1 SMP-WEB Photo
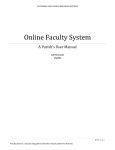
1-1-1 Front View
1
2
3
4 56 7
1. USB 2. Mic In 3. Audio Out 4. Network Indicatior 5. HD Indicator 6. Power Indicator 7. Power
1-1-2 Rear View
7
1. Power Connector 2. VGA 3. COM Port (reserve for future use) 4. TV OUT 5. Ethernet
6. USB x 2 7. Optical Audio Out
SMP-WEB SERIES
1-2 SMP-WEBPLUS Photo
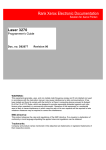
1-2-1 Front View
1. Power Indicator 2. Hard Disk Indicator 3. Reset 4. Power
1-2-2 Rear View
1. Power Connector 2. Voltage Switch 3. COM Port (reserve for future use)
4. VGA 5. Ethernet 6. 4×USB 7. Line-In (reserve for future use)
8. Mic-In (reserve for future use) 9. Audio-Out
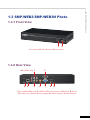
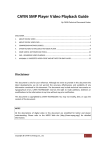
1-3-1 Front View
1
SMP-WEB SERIES USER MANUAL
1-3 SMP-WEB3/SMP-WEB3N Photo
2
1. Power & HDD LED 2. Front USB connectors
1-3-2 Rear View
(SMP-WEB3 only) 1
3
4
5
2
6
7
8
9
1. AV-in (SMP-WEB3 only) 2. COM Port 3. Power Connector 4. Ethernet 5. AV-Out
6. S-Video Out 7. VGA Connector (Output) 8. USB Connectors 9. Power Switch
SMP-WEB SERIES
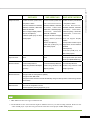
1-4 Hardware Specifications
1-4-1 SMP-WEB
Dimension
48.5 (H) x 234 (W) x 175 (D) mm
Material
Aluminum + Plastic (Out-Side Cover)
Color
Blue / Silver
Weight
1 Kg (May different between models)
Network
10/100 Mbps Ethernet
Internal Storage
40G Byte, 2.5” IDE HD
Video
VGA D-Sub, Composite/S-Video (NTSC/PAL)
Audio
Phone Jack (Stereo) / Optical
Power
100~240V AC
Others
RS-232 (COM),3 x USB
1-4-2 SMP-WEBPLUS
Dimension
44 (H) x 380 (W) x 195 (D) mm
Material
Aluminum + Steel
Color
Silver / Black
Weight
3.5 Kg (without hard drive), 4.4 Kg (with hard drive)
Network
10/100/1000 Mbps Ethernet
Internal Storage
160G Byte, 3.5” IDE HD
Video
VGA D-Sub
Audio
Phone Jack (Stereo)
Power
100~240V AC
Others
RS-232 (COM), 4 x USB
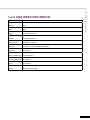
Dimension
44 (H) x 290 (W) x 150 (D) mm
Material
Steel
Color
Black
Weight
2.5 Kg (with hard drive)
Network
10/100 Mbps Ethernet
Internal Storage
40G Bytes, 2.5” IDE HD
Video Out
VGA D-Sub, Composite/S-Video (NTSC/PAL)
Audio Out
RCA Stereo
Video In (WEB3 only)
Composite (RCA)
Audio In (WEB3 only)
RCA Stereo
Power
100~240V AC
Others
RS-232 (COM), 4 x USB
SMP-WEB SERIES USER MANUAL
1-4-3 SMP-WEB3/SMP-WEB3N
SMP-WEB SERIES
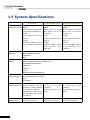
1-5 System Specifications
SMP-WEB
Playback File Format
Video Files
SMP-WEBPLUS
SMP-WEB3/WEB3N
● WEB:
● WEB:
● WEB:
Build-in Firefox 2.0; support W3C
Build-in Firefox 2.0; support
Build-in Firefox 2.0; support
HTML format and JavaScript 1.7
W3C HTML format and
W3C HTML format and
● Flash:
JavaScript 1.7
JavaScript 1.7
Support Macromedia Flash
● Flash:
● Flash:
Player V7
Support Macromedia Flash
Support Macromedia Flash
● Image:
Player V7
Player V7
JPEG/GIF(1)/BMP; support
● Image:
● Image:
image resolution up to 1280x1024
JPEG/GIF(1)/BMP; support
JPEG/GIF(1)/BMP; support
image resolution up to
image resolution up to
1600x1200
1280x1024
● MPEG/MPG/VOB/MP3/MP4
● WMV/WMA
● AVI
CODEC
● MPEG-1/MPEG-2 PS/MPEG-2 TS/MPEG-4 ISO
● MP3 (MPEG AUDIO LAYER 3)
● WMV 7/8/9
● WMA 7/8
● DivX
● RAW DV (only for SMP-WEBPLUS)
Network Streaming
● Cayin RTB (MPEG-2 TS 1~5 Mbps)
● RTP
● HTTP/MMS
Video Resolution (2)
● Support MPEG-2 video and
● Support up to 720p
● Support up to 480p
streaming up to 480p (720x480);
(1280x720)
(720x480)
other formats up to 320x240
● Support bit-rate up to 12
● Support video bit-rate up to 5
● Support MPEG-2 video with bit-
Mbps
Mbps
● internal 3.5” hard drive
● internal 2.5” hard drive
rate up to 9 Mbps; other formats
with 1.5Mbps
Storage Device
● internal 2.5” hard drive
SMP-WEBPLUS
SMP-WEB3/WEB3N
● VGA connector (VGA D-sub),
● VGA connector (VGA D-sub)
● VGA connector (VGA D-sub)
Composite, S-Video
● Screen Resolutions:
, Composite, S-Video
● Screen Resolutions: 640x480,
640x480, 800x600, 1024x768,
● Screen Resolutions:
800x600, 1024x768, 1280x1024,
1 1 52 x 8 64 , 1 2 8 0 x 1 0 24 ,
640x480, 800x600, 1024x768,
1280x768, 856x480
1600x1200, 1280x720(720p),
1 1 52 x 8 64 , 1 2 8 0 x 1 0 24 ,
● Do not support display rotation
1 2 8 0 x 76 8 , 1 6 0 0 x 9 0 0 ,
1280x720(720p), 1280x768,
● Phone Jack (Stereo)
1360x768, 1366x768
1 6 0 0 x 9 0 0 , 1 36 0 x 76 8 ,
● RS-232 (COM port), for tailor-
● Support 90 and 270 degree
1366x768
made projects
display rotation (Portrait
● Do not support display
Display)
rotation
● Phone Jack (Stereo)
● Composite & S-Video only be
● RS-232 (COM port), for
supported on screen resolution
tailor-made projects
800x600
SMP-WEB SERIES USER MANUAL
Output Connector
SMP-WEB
● RCA (Stereo)
● RS-232 (COM port), for
tailor-made projects
Input Connector
● N/A
● N/A
● Composite Video Input, RCA
Audio Input (SMP-WEB3 Only)
Network Interface
Network Protocols
● 10/100 Mbps Ethernet
● 10/100/1000 Mbps Ethernet
● 10/100 Mbps Ethernet
● 802.11b/g wireless LAN adaptor
● 802.11b/g wireless LAN
● 802.11b/g wireless LAN
(optional)
adaptor (optional)
adaptor (optional)
● Support static IP and dynamic IP (DHCP)
● Support HTTP, SMB, ICMP
● Support network detection and will automatically change to backup off-line content during network
disconnection
USB Connector
● Connect to a keyboard or mouse
● Switch playlist by entering keypad key (0~9)
1. SMP-WEB series does not support animation GIF.
2. The maximum bit-rate and resolution might be different based on your file encoding methods. Please test the
video on SMP player. Cayin does not guarantee all video files can be played on SMP-WEB properly.
SMP-WEB SERIES
1-6 Install SMP-WEB Series
1-6-1 Install Hardware
1. Open SMP package
2. Connect the power adapter to a socket. For SMP-WEBPLUS, you
need to adjust the voltage manually to fit your country’s setting.
(Default 220V)
3. Connect the Ethernet to LAN port. (By default, SMP will get an IP
address from a DHCP server.)
4. Connect the VGA cable to your screen. (The default screen resolution
is 800x600.)
5. If you need to configure system settings directly on the player, please
connect a keyboard and a mouse to any of the USB connectors.
6. Press the power button to turn on the system. Once you see the
LOGIN page on the screen, you already complete the installation.
At any time, you can
switch between playback
and Web Manager in
a local screen. Plug a
keyboard to SMP device;
press Ctrl-F10 and switch
to Web Manager Login
page; press Ctrl-F1 and
switch to playback mode.
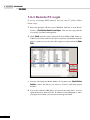
After installing a SMP player, please login and complete the initial
settings based on your network environment.
◎ DHCP (Auto IP)
If you are in the DHCP network, SMP players will get an IP address
automatically after installation. You can start to login the Web
Manager page of the player directly after you connect a keyboard
and a mouse to the SMP device.
Except for the initial
1. Click [ LOGIN ] on the Web Manager, and enter a username and
password.
installation of SMP, we
Default Username: webadmin
suggest you manage or
Default Password: admin
change settings of SMP
by remote PC, rather than
directly on the player.
10
1-6-2 Login on SMP-WEB Series
SMP-WEB SERIES USER MANUAL
◎ Static IP
If you are in the static IP network, please follow below steps to login
and complete network settings.
1. Connect a keyboard and a mouse to USB connectors on the SMP
client and press the power button to turn on the system. Click
[LOGIN] on the Web Manager, and enter a username and password.
Default Username: webadmin
Default Password: admin
2. After logging in Web Manager, click [NETWORK SETTINGS] on
the left column. Then, click “Static IP Address” in the Ethernet
Settings area and set up all related network settings for this SMP.
3. After completing, click [SAVE] at the bottom and click [APPLY] on
the left column. Then, the SMP client will reboot.
11
SMP-WEB SERIES
1-6-3 Remote PC Login
If you try to manage SMP remotely on your own PC, please follow
below steps:
1. Insert the product CD into your CD-ROM, and run “Cayin Device
Seeker” (\Tool\Device Seeker\cysrch.exe). You can also copy this file
to your PC for future management.
2. Click [Seek] and the seeker will search all available SMP clients or
CMS servers in the same LAN. Select one player and double click the
player’s name. Or, you can also click a player’s name, and click [Open
Web].
3. You can also open the Media Folder of any player by [Cayin Device
Seeker ]. Select the player you want to connect, and click [Open
Folder].
4. If your PC and the SMP player are not in the same LAN, you can
open the browser and enter the IP address of the SMP player. After
you login successfully, you can start to manage the SMP.
12
2.
Multimedia Contents Playback
and Management
2-1 Upload Files to SMP Player........................................................14
2-2 Edit Playlist.................................................................................16
2-2-1 Edit New Playlist...............................................................16
2-2-2 Set Default Playlist............................................................19
2-2-3 Select Playlist From a Keypad Device..............................19
2-2-4 Check File Timestamp / RUL............................................20
2-3 Manage Playlist..........................................................................21
2-3-1 Export Playlist...................................................................21
2-3-2 Import Playlist...................................................................22
13
SMP-WEB SERIES
Your PC and the SMP
p la y e r ha v e t o be in t he
same LAN, so that you can
use Cayin Device Seeker to
open the Media Folder of
that SMP player.
SMP-WEB series supports the playback of a variety of multimedia
files. Users can upload all contents to the SMP player, and edit the
playlist. Then, SMP-WEB series player will play files based on your
pre-scheduled playlist. Users can also choose to manage playlist the
content update from CMS server.
2-1 Upload Files to SMP Player
When you use SMP players without CMS server, you can choose one
of the following methods to upload files to SMP-WEB series players.
Method 1:
1. Insert the product CD into your CD-ROM, and run [Cayin Device
Seeker] (\Tool\Device Seeker\cysrch.exe). You can also copy this file
to your PC for future management.
2. Click [Seek] and the seeker will search all available SMP clients or
CMS servers in the same LAN. When the devices are found, select
the one you want to connect, and click [Open Folder].
3. Your PC will open File Explorer and you can see files or folders in
your selected player.
4. Copy multimedia files from your PC to the SMP player via Network
Neighborhood and then you can start to play those files in the SMP
player.
14
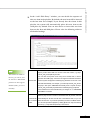
1. Open [File Explorer], and enter the \\hostname or “\\IP address”. For
example, if your hostname is SMP-WEBPLUS, please enter \\SMPWEBPLUS or \\172.16.1.2.
SMP-WEB SERIES USER MANUAL
Method 2:
2. Copy multimedia files from your PC to the SMP player via Network
Neighborhood and then you can start to play those files in the SMP
player.
15
SMP-WEB SERIES
2-2 Edit Playlist
You can edit playlists via Web Manager of SMP-WEB series player
on your own PC.
2-2-1 Edit New Playlist
You can edit at most 10
playlists of HTML/JPEG/
SWF/VIDEO and add up to
99 items in each playlist.
Please follow the following steps to edit a new playlist for a SMP
player.
1. Login SMP and enter Web Manager.
2. Click [BROWSER] and select the “BROWSER” page.
3. Locate the “Playlist index” drop-down menu, and select “0”. Then,
you can start to add an item in the “Playlist 0”.
16
Click [Add new item] and open a “Add / Edit Entry” pop-up window.
SMP-WEB SERIES USER MANUAL
5. In the “Add / Edit Entry” window, you can decide the sequence of
this new item in the playlist. By default, the new item will be inserted
as the last item. For example, if you already have five items in this
playlist, the system will automatically place this new item at the
sixth place by default. You can also choose to insert this new item
between the first and fifth place. Please refer the following table for
all detailed settings:
Specify a URL where SMP can connect to the html content, e.g. http://
This method is similar to
remote_web_server/path/to/your.html .
the way you use in your
You can also use dynamic server script, such as ASP, PHP, or CGI to
PC browser. SMP-WEB
generate the HTML page. Check the box Append Hostname Parameter
Remote URL
and the system will append hostname/group parameter to the end of the
products do not support
html URL automatically. For example, you enter http://remote_web_server/
HTTPS (SSL) protocol
test.php in this option, SMP-WEB will actually send a request as http://
currently.
remote_web_server/test.php?hostname=hostname&group=groupname
The hostname here is the hostname that you configure in “4.1 NETWORK
SETTINGS” at run-time.
Select to play an html or swf file in the Media Folder. By default, CMS will
HTML/SWF
automatically list all html and swf files in the Media Folder, so you can
file in Media
select an item here. If you haven’t uploaded your files in the Media Folder,
Folder
you can also pre-edit the playlist by clicking [Enter new one] and entering
the item (e.g. /cayin/main.html) directly in the text box.
17
SMP-WEB SERIES
You can insert an image file (JPEG) as a display item or a transition
between two HTML files by enabling this function. You can also configure
the transition effect as follows. By default, CMS will automatically list all
image files in the Media Folder, so you can select one here. If you haven’
t uploaded your files in the Media Folder, you can also pre-edit the playlist
by clicking [Enter new one] and entering the item (e.g. /cayin/cartoon.jpg)
directly in the text box.
I m a g e
transition
*
Animation: The transition effect when the image enters and leaves the
screen. We now provide four animations: “fly from top to bottom”, “fly from
bottom to top”, “fly from left to right” and “fly from right to left”.
* Speed: The speed of animation effect.
*
Pre-load next item: You must set the time when you would like the
system to start pre-loading the next item (eg. an html file) before the
image disappears. For example, the duration of this image is 20 seconds
and you want the system to start pre-loading the next item at the 15th
seconds, you need to set the number “5 (seconds)” in the field. The
number here depends on the loading time of the next item (html).
You can insert a video file as one of the items in the playlist, and display
If you play video files in
a full-screen video. By default, CMS will automatically list all video files
the Media Folder, you
Video file in
in the Media Folder, so you can select one here. If you haven’t uploaded
will not be able to set the
Media Folder
your files in the Media Folder, you can also pre-edit the playlist by clicking
[Enter new one] and entering the item (e.g. /cayin/cartoon.mpg) directly in
duration of this video. The
system will automatically
play the next item in this
playlist af ter the system
finishes playing the whole
video.
the text box.
6. Finally, set the duration of each playback item. After the time is up,
SMP-WEB will play the next item. If you configure the duration as
“Always”, the playlist will stop here, which means that SMP-WEB
will keep playing this item without moving to the next item. You can
still use ‘play-next-item’ tag to change the playlist item.
7. Click [SAVE] and [CLOSE] to complete the settings of an item.
8. Add more items to this playlist. If you want to adjust the order of the
items, please click [Up] or [Down] to move forward or backward.
9. After completing settings, click [SAVE] and [APPLY].
Please remember to enable those items which you wish to play. SMP will only play
those selected items. If you want to remove all items in this playlist, please click
[ Delete
18
all items ].
SMP-WEB player can display only one active playlist at one time,
so please click [Set as default] if you would like to play this selected
playlist index. The index number with the word ‘default’ will be the
default playlist and SMP-WEB/WEBPLUS player will automatically
display items in that default playlist on the screen after system startup.
SMP-WEB SERIES USER MANUAL
2-2-2 Set Default Playlist
2-2-3 Select Playlist From a Keypad
Device
“Enable playlist selection from a keypad device” and you can change
the playlist by clicking number keys at a keypad/keyboard device
which connects to a SMP-WEB series player. You can edit up to 10
different playlists, and user can easily change it by clicking 0~9 key
in keyboard or keypad.
19
SMP-WEB SERIES
2-2-4 Check File Timestamp / RUL
SMP-WEB uses the
following ways to
determine if the file is
updated.
* For remote URL: HTTP
Last-Modified header tag
* For HTML file in Media
Folder: File time
20
When the playlist includes HTML items either from a URL or the
Media Folder, you can choose to enable “Check file timestamp / RUL
every … seconds”. The system will check the URL or HTML file and
refresh the new web page according to your specified time. If there
is no updated file, or even the file is removed, the system will keep
playing the original one.
If you configure the
“Pop-up Blocker” in your
bro w ser or d isa b le “F i le
Download”, the “Export”
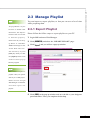
You can import or export playlists, so that you can save a lot of time
while preparing them.
2-3-1 Export Playlist
Please follow the follow steps to export playlists to your PC.
SMP-WEB SERIES USER MANUAL
2-3 Manage Playlist
function will not be able
to function properly.
1. Login SMP and enter Web Manager.
Please turn off your Pop-
2. Click [BROWSER] and select the “IMPORT/EXPORT” page.
up Block or add SMPWEB web manager in the
3. Click [Export] and you will see a pop-up window.
“Allow Web sites list”.
You can also try to press
[Ctrl] key while you click
the [Export] button. This
works for most pop-up
blocker program.
You cannot export a
playlist when you operate
directly on a SMP player.
Please use a PC to login
Web Manager via Ethernet
and then export the
playlist.
4. Click [SAVE] in the pop-up window and save the file to your designate
path and folder. Then, you complete the backup.
21
SMP-WEB SERIES
2-3-2 Import Playlist
You can import playlist to other SMP players. To import playlist,
please follow the steps:
1. Login SMP and enter Web Manager.
2. Click [BROWSER] and select the “IMPORT/EXPORT” page.
3. Click [Browse] in the “Import playlists” area and select a playlist file.
Click [Import] and then the playlist will be imported into this SMP
player.
22
3.
Using Cayin Media
Player in HTML
3-1 Media Player Tag and Attributes.................................................24
3-2 Video Input Tag and Attributes....................................................28
3-3 Examples.....................................................................................29
23
SMP-WEB SERIES
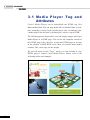
3 - 1 M e d i a P l a y e r Ta g a n d
Attributes
C a y i n ’s M e d i a P l a y e r c a n b e e m b e d d e d i n t o H T M L t a g , l i k e
Macromedia Flash. You can play media files in Media Folder or realtime streaming by using Cayin’s media player. You can embed Cayin’
s media player into browser by defining the <object> tag in HTML.
The following picture depicts how you can display images and Cayin
Media Player in a HTML page. You can see the complete content of
this HTML page with a browser. Assign this HTML page as an item
in the playlist of SMP-WEB series; then you present multi-media
contents, like a web page, on the display.
We provide many useful “Tags” which you can include in your
HTML page to control Cayin Media Player. Please refer to the
following tables and examples.
24
<object type="TYPE Attribute" height=" Object height (pixel)"
width=" Object width (pixel)">
<param name="NAME Attribute " value=" value ">
<param name="NAME Attribute " value=" value ">
<param name="NAME Attribute " value=" value ">
SMP-WEB SERIES USER MANUAL
HTML Code:
…
</object>
TYPE Attribute:
Attribute
Attribute Value
Note
Type
video/mpeg
For SMP-WEB/WEB3/WEB3N, users can play video
video/main
by using the tag “video/mpeg” or “video/main”.
video/sub
For SMP-WEBPLUS, users can play two videos in one
HTML page. “video/main” represents the main video;
“video/sub” represents the secondary video.
If you decide to play two videos in one HTML page,
we suggest that you assign the video with larger
resolutions as the main video.
We do not suggest you play two videos at the same
time when you play HD (high resolution) video.
25
SMP-WEB SERIES
NAME Attribute:
Attribute
src
Attrubute Value
Note
file://folder/video_filename
file: play files in Media Folder
mms://ip_address/mms_url
mms: Microsoft MMS streaming
http://ip_address/http_url
http: http streaming
rtb://port
rtb: Cayin RTB streaming
rtb://multi_cast_ip:port
rtp: Real-time Transport Protocol streaming
rtp://port
Note: About ‘src’ attribute usage, see examples in the following section.
rtp://multi_cast_ip:port
loop
1 (default)
Assign to play video repeatedly.
0
1
fullscreen
hidden
0 (default)
Display full-screen video.
1
By default (setting 0), the screen will not be hidden. When the player
0 (default)
is hidden, the file will still be played and the sound will not be mute, if
available.
ratio
auto (default)
Aspect ratio of media player window.
4:3 / 1:1 / 16:9 / 2.11:1
control-panel
1
Set the display mode of control-panel. If you enable this function, the panel
0 (default)
will be shown by left clicking the mouse on the region of media player.
1
play-local-all
0 (default)
Play all files in the Media Folder.
play-server-
1
Play files in Media Folder according to CMS’s Central Scheduling settings.
schedule
0 (default)
This option cannot be used with play-local-all.
play-folder-all
Play all files in selected folder.
folder_name
Example:
<param name=”play-folder-all” value=”folder_name”>
play-next-item
random-playlist
1
Play next Web Playlist item when video playlist finished in this page. This
0 (default)
option is exclusive with loop option (loop must be false).
1
Randomly play all items in a playlsit
0 (default)
audio
1 (default)
Turn on / off sounds.
0
In the case of two videos in a HTML page, the “sub-video” will automatically
be turned off, when you set “true” for the ”main video”.
26
You can play several
f i les or streaming v ideo
sequentially when you add
multiple “src” attribute to
the HTML code.
“src” attribute is used to drive media player to play playlist. You can
see some examples as follows:
a. Play videos in the Media Folder
<param name=”src” value=”file://folder/to/video.mpg”>
b. Play mms or http streaming
SMP-WEB SERIES USER MANUAL
Attribute and Usage of “src”:
<param name=”src” value=”mms://mms_server_and_url”>
<param name=”src” value=”http://http_server_and_url”>
c. Play RTB streaming
Broadcast and Uni-cast
<param name=”src” value=”rtb://port”>
Multicast
<param name=”src” value=”rtb://multicast_ip:port">
27
SMP-WEB SERIES
3 - 2 V i d e o I n p u t Ta g a n d
Attributes
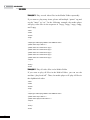
IMPORTANT: This tag is only supported by SMP-WEB3
Please do not use the
"video-in tag" and "media
player tag" at the same
time. The system might
be overloaded and play
videos with lags.
If you want to display signals of AV-IN in web pages, you can insert
the following Video Input tag. For some Video Input attributes (eg.
NTSC/PAL), please refer to section 5.4.
<o b jec t t y pe="v id eo / v id eo-i n" h eig h t ="O b jec t h eig h t ( pi x el )"
width="Object width (pixel)">
<param name="NAME Attribute " value=" value ">
…
</object>
NAME Attribute:
Attribute
Attrubute Value
Note
1 (default)
audio
0
Turn the Audio Input on/off
fullscreen
1
Display full-screen video
0 (default)
28
Example 1 : Play the file, video.mpg, in the Media Folder repeatedly
<html>
<head>
</head>
SMP-WEB SERIES USER MANUAL
3-3 Examples
<body>
………………
<object type="video/mpeg" WIDTH="320" HEIGHT="240">
<param name="src" value="file://video.mpg">
<param name="loop" value="1">
<param name="ratio" value="4:3">
</object>
………………
</body>
</html>
Example 2 : Play the file, video.mpg, in the Media Folder repeatedly
and display in full screen
<html>
<head>
</head>
<body>
……………..
<object type="video/mpeg" WIDTH="320" HEIGHT="240">
<param name="src" value="file://video.mpg”>
<param name="fullscreen" value="1">
<param name=”loop” value=”1”>
</object>
……………….
</body>
</html>
29
SMP-WEB SERIES
Example 3 : Play several video files in the Media Folder repeatedly
If you want to play many items, please add multiple “param” tag and
set the ”name” as “src”. In the following example, the media player
will play video files in the sequence of 1.mpg, 2.mpg, 3.mpg, 4.mpg,
and 5.mpg.
<html>
<head>
</head>
<body>
…….
<object type="video/mpeg" WIDTH="320" HEIGHT="240">
<param name="loop" value="1">
<param name="src" value="file://1.mpg">
<param name="src" value="file://2.mpg">
<param name="src" value="file://3.mpg">
<param name="src" value="file://4.mpg">
<param name="src" value="file://5.mpg">
</object>
……
</body>
</html>
Example 4 : Play all video files in the Media Folder
If you want to play all files in the Media Folder, you can use the
attribute “play-local-all”. Then, the media player will play all files in
the alphabetical order.
<html>
<head>
</head>
<body>
…….
<object type="video/mpeg" WIDTH="320" HEIGHT="240">
<param name="loop" value="1">
<param name="play-local-all" value="1 ">
</object>
……
</body>
</html>
30
In the following example, the player will notify the browser and
move to next web playlist item. We suggest you set the duration of
all items in a web playlist as “Always”.
<html>
<head>
SMP-WEB SERIES USER MANUAL
Example 5 : Play several video files in the Media Folder and move
automatically to the next Web playlist after playing the previous one.
</head>
<body>
…….
<object type="video/mpeg" WIDTH="320" HEIGHT="240">
<param name="src" value="file://1.mpg">
<param name="src" value="file://2.mpg">
<param name="src" value="file://3.mpg">
<param name="play-next-item" value="1 ">
</object>
……
</body>
</html>
Example 6 : Control the playlist by CMS’s central scheduling
The media player will download the playlist in CMS when you use
the tag “play-server-schedule”.
<html>
<head>
</head>
<body>
…….
<object type="video/mpeg" WIDTH="320" HEIGHT="240">
<param name="loop" value="1">
<param name="play-server-schedule" value="1 ">
</object>
……
</body>
</html>
31
SMP-WEB SERIES
Example 7 : Play all videos in a sub-folder and play files randomly
The media player will play files in a sub-folder of Media Folder
with the attribute “play-folder-all”. You can also play the video files
randomly with the attribute “random-playlist”.
<html>
<head>
</head>
<body>
…….
<object type="video/mpeg" WIDTH="320" HEIGHT="240">
<param name="loop" value="1">
<param name="play-folder-all" value="folder_name">
<param name="random-playlist" value="1">
</object>
……
</body>
</html>
Example 8 : Play two videos in one web page. (Only apply to SMPWEBPLUS). SMP-WEBPLUS can play two videos in one web page
by using attributes, “video/main” and “video/sub”.
<html>
<head>
</head>
<body>
…….
<object type="video/main" WIDTH="640" HEIGHT="480">
<param name="loop" value="1">
<param name=" src" value="file://1.mpg">
</object>
……
<object type="video/sub" WIDTH="320" HEIGHT="240">
<param name="loop" value="1">
<param name="src" value="file://2.mpg">
<param name="audio" value="0">
</object>
…….
</body>
</html>
32
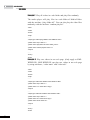
If you want to hide a media player and only play music, e.g. MP3,
you have to create a CSS rule to control the attributes of “OBJECT”
tag, and set the value of param name “hidden” as “1”.
<html>
<head>
<style type="text/css">
SMP-WEB SERIES USER MANUAL
Example 9 : Hide a media player and play sounds (music) only
<!-object {
visibility: visible;
}
object.hiddenObject {
visibility: hidden ! important;
width: 0px ! important;
height: 0px ! important;
margin: 0px ! important;
padding: 0px ! important;
border-style: none ! important;
border-width: 0px ! important;
max-width: 0px ! important;
max-height: 0px ! important;
}
-->
</style>
</head>
<body>
<object type="video/mpeg" HEIGHT="240" WIDTH="320" CLASS="hiddenObject">
<param name="src" value="file://1.mp3">
<param name="hidden" value="1">
</object>
</body>
</html>
33
SMP-WEB SERIES
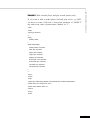
Example 10 : Play Audio Video input
<html>
<head>
</head>
<body>
………………
<object type="video/video-in" WIDTH="320" HEIGHT="240">
</object>
………………
</body>
</html>
34
4.
Content Update and Media
Folder Management
4-1 Update Media Folder...................................................................36
4-2 Manage Media Folder.................................................................40
35
SMP-WEB SERIES
If you have files copied in
the player and then enable
content update f rom the
C MS se r v e r f o l d e r , y o u r
files will be wiped out
on the player side as the
c on ten t of t he f o lder on
the server will synchronize
with the Hard drive of the
player. Therefore, if you
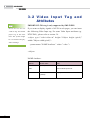
In this section, you can enable automatic content update function of
Media Folder with CMS server. You can also configure the settings
of access authorization of Media Folder.
4-1 Update Media Folder
In addition to Network Neighborhood, you can update the content of
Media Folder automatically with CMS server or a web server.
Please specify the duplicate frequency and source of media files by
completing the following settings of CMS server or entering the URL
of a web server.
want to edit SMP client’
s media folder manually,
please DO NOT enable
“Media Folder content
synchronization”.
To prevent some media
files from deleting by
CMS server while you
update content of SMP
automatically from CMS,
you can create a folder
named “protected” and
keep your files in that
folder.
36
1. Login Web Manager; then click [MEDIA FOLDER] .
3. Enable “Use hidden disk buffer”, if you would like to download files
to a hidden disk space first. After downloading process completes,
the system will copy all files to Media Folder at one time.
The maximum time
interval is 10080
SMP-WEB SERIES USER MANUAL
2. Enable the “Media Folder content synchronization” function and
SMP player will periodically download new or updated files from
CMS’s Content Update Server. It also removes those files that no
longer exist in CMS server.
The advantage of this function is to make sure that SMP will not play
incomplete contents. SMP will not play contents until all files are
completely downloaded. We suggest you enable this option.
4. If you want the SMP player can check with server for updated
contents periodically, please set the frequency here.
Check for new content every […] minutes
Set the time interval of checking with server
Check for new content at HH […] MM […]
Set the exact time when you wish to check
minutes.
with server. You can set up to 3 different time
arrangements.
For the Hostname of the
CMS server, you must
enter FQDN (full qualified
5. When you purchase a CMS server, you can create an account in the
CMS server and authorize the account to manage the group which
this SMP player belongs to. If you choose to update content by CMS,
please enter the “Group” name, “Username”, and “Password” of the
account, and the “Hostname or IP address” of the CMS server.
d oma in na me ) he r e (e g.
www.cayintech.com).
37
SMP-WEB SERIES
Central Scheduling of all
Group
Assign the group name which this SMP player belong to.
Username
The username is the account you create in CMS server, and
contents (Multimedia,
this account should be authorized to mange this group.
Image Slide Show, Ticker,
and Skin) for a SMP player
applies only one server
Password
User’s password.
Hostname or IP address
Hostname or IP address of CMS server
configuration assigned
here. Please remember
to complete the server
settings here before you
6. After completing all settings , please click [Test] to check the validity
of the account the IP address. Please note tthat the [Test] button can
olnly be usedx to test the validity of the "Username", "Password"
and "IP address". You can not check the existence of the "Group".
start to use the function
(Central Scheduling).
7. You can also synchronize contents from your own web server, if you
don't have a CMS server. Please enable "Web server" and enter the
playlist's URL here.
SMP player will send the HTTP request to the URL (e.g.
http://210.179.61.252/myvedio/playlist.txt) and get the playlist (e.g.
playlist.txt) from the server. Each line (e.g. http://210.179.61.252/
myvedio/video1.mpeg) in the playlist file will be treated as one
individual URL. SMP playter will download new or updated URL(s)
in the playlist, and remove the local files which do not exist in the
playlist.
You may type a text file like below and enter the URL of this text file
in this field:
38
SMP-WEB SERIES USER MANUAL
By changing the text file, you can update the SMP playert's playlist
in media folder.
39
SMP-WEB SERIES
4-2 Manage Media Folder
In this section, you can set share mode of Media Folder (on network
neighborhood) for users.
Do not share
The folder will not be shared.
Media folder
Share mode
Select “Share mode” if you allow open access of all users. In this
mode, users can access the folder without username and password.
In“User mode”, users need to enter username and password to access
the folder. If you only want to allow access from a particular user,
User mode
enable this function and change its username and password.
Default Username: smbuser
Default Password: smbuser
The access is
To allow access from particular IP address or subnet, enter the IP
only allowed from
address or partial IP address, e.g. type "172.16.0.1" to allow access
IP Address
only from this IP address, or type "172.16.0." to allow access from all
computers in this subnet.
40
5.
System Status and Settings
5-1 System Status...............................................................................42
5-1-1 Basic Information..............................................................42
5-1-2 Advanced Information......................................................43
5-1-3 Firmware Information.......................................................44
5-2 System Management and Firmware Update...............................45
5-2-1 Set System Time................................................................45
5-2-2 NTP Service.......................................................................46
5-2-3 Change Web Administrator’s Password.............................46
5-2-4 Change Service Port of Web Manager...............................47
5-2-5 Choose Web Manager Language.......................................48
5-2-6 Set System Reboot.............................................................48
5-2-7 Firmware Update...............................................................49
5-3 Display Settings...........................................................................50
5-3-1 Hide Cursor.......................................................................50
5-3-2 Display Information..........................................................51
5-3-3 Screen Rotation (Only for SMP-WEBPLUS)..................52
5-3-4 Turn on / Turn off Display................................................53
5-4 Video Input Settings (SMP-WEB3 only)....................................54
SMP-WEB SERIES
In this chapter you can access comprehensive system information
about a SMP-WEB series player. You can also configure system
settings.
5-1 System Status
Login Web Manager of SMP; then you will see the "SYSTEM
STATUS" page.
5-1-1 Basic Information
You can check the Hostname, Product Model, Firmware Version,
and Date/Time of a SMP-WEB series player in this section. You can
specify the hostname in “6-1 Ethernet” section, and change the date/
time/time-zone in “5-2-1 Set System Time” section.
42
In this section, you can check all detailed information about this
SMP player in the following table.
CPU Utilization
Usage of CPU
Memory Usage
Usage of system DRAM
SMP-WEB SERIES USER MANUAL
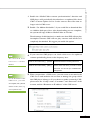
5-1-2 Advanced Information
Disk usage of system firmware disk. If the usage exceeds 90%,
System Disk Usage
we strongly suggest that you do not upload more patches for
preventing from disk overloaded.
Media Folder Usage
Disk usage of Media Folder. If you run out of disk space, you will
not be able to add more media files in Media Folder.
Resource Disk Usage
SMP-WEB3/WEB3N only. It’s the reserved space for future use.
You can check IP address and other related network information
Network information
here. For a wireless connection, you can also check the access
point (SSID) and security settings.
Display Information
You can check both the real and selected resolutions and refresh
rates of the connected display.
43
SMP-WEB SERIES
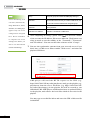
5-1-3 Firmware Information
You can check all updated patches information here.
44
In this section, you can configure basic system settings and maintain
the system with firmware update, system restart, and system
shutdown.
SMP-WEB SERIES USER MANUAL
5-2 System Management and
Firmware Update
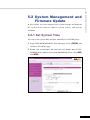
5-2-1 Set System Time
You can set the system date and time manually for the SMP player.
1. Login SMP-WEB/WEBPLUS Web Manager. Click [ SYSTEM ] and
switch to “SYSTEM” page.
2. Enable “Set system time” and enter the year, month, date (YYYY/
MM/DD), hour, minute, and second (HH/MM/SS). Then, click [SAVE]
and [APPLY].
45
SMP-WEB SERIES
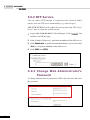
5-2-2 NTP Service
You can choose NTP function to synchronize the clocks of media
players from an NTP server automatically (e.g. time.nist.gov).
SMP-WEB/WEBPLUS will update the system time from NTP server
every 7 days or when the system restarts.
1. Login SMP-WEB/WEBPLUS Web Manager. Click [ SYSTEM] and
switch to “SYSTEM” page.
2. Click “Enable NTP service”, and enter the address of the NTP server.
3. Click [Update now] to update the time immediately. You can also click
[Test] to verify the availability of the NTP server.
4. Click [SAVE] and [APPLY].
5-2-3 Change Web Administrator’s
Password
To change administrator’s password of SMP, check the box and enter
the password.
46
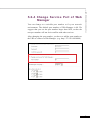
You can change to a suitable port number to f it your network
environment. The default port number of Web Manager is 80. We
suggest that you use the port number larger than 1024, so that the
new port number will not be in conflict with other services.
SMP-WEB SERIES USER MANUAL
5-2-4 Change Ser vice Por t of Web
Manager
After changing the port number, you have to add the port number to
the URL to connect to Web Manager. (e.g. http://172.16.0.100:8080)
47
SMP-WEB SERIES
5-2-5 Choose Web Manager Language
SMP-WEB series supports six build-in languages, which are English,
French, German, Spanish, Traditional Chinese, and Simplif ied
Chinese. Select here for changing the whole Web Manager’s language
setting.
5-2-6 Set System Reboot
You can assign up to three particular time sections within a day that
SMP player will restart automatically.
Enable “Set system reboot at” function, and choose a specific time.
Then, click [ SAVE ] and [ APPLY ].
48
Please only upload
firmware provided by
Cayin. Do not upload
unknown firmware and
damage the system.
You can update new firmware of SMP in the “System Maintenance”
page. We suggest you update the firmware when your PC and the
player are in the same LAN.
Yo u c a n r e s t a r t o r s h u t d o w n t h e s y s t e m b y c l i c k i n g t h e
corresponding button at the end of the page.
SMP-WEB SERIES USER MANUAL
5-2-7 Firmware Update
1. Login SMP-WEB/WEBPLUS Web Manager. Click [ SYSTEM] and
switch to “MAINTENANCE” page.
2. Click [Browse] and select a file; then click [Upload]. The extension of
a firmware file is “.psu” or “.fsu”.
3. After successfully uploading, the system will re-start. The system will
inform you the uploading status after uploading. If you fail to upload
the firmware, please make sure that the firmware is used for this
model of media player.
49
SMP-WEB SERIES
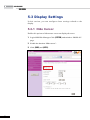
5-3 Display Settings
In this section, you can configure those settings related to the
display.
5-3-1 Hide Cursor
Enable this option to hide mouse cursor on displayed screen.
1. Login SMP Web Manager. Click [SYSTEM] and switch to “DISPLAY”
page.
2. Enable the function “Hide cursor”.
3. Click [SAVE] and [APPLY].
50
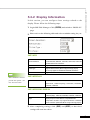
In this section, you can configure those settings related to the
display. Please follow the following steps:
1. Login SMP Web Manager. Click [SYSTEM] and switch to “DISPLAY”
page.
2. Please refer to the following table and select a suitable setting for you.
SMP-WEB SERIES USER MANUAL
5-3-2 Display Information
SMP-WEB
Screen Resolution
Include 640×480, 800×600, 1024×768, 1280×1024, 1280×768
and 856×480 screen resolutions
Refresh Rate
Support 5 modes: auto, 60, 70, 72, and 75
TV-Out Type
Support NTSC and PAL (Must configure through jumper)
TV-out only applies on 640x480 and 800x600 resolutions.
TV-Vscan
SMP-WEBPLUS doesn’t
provide the options: “TV-
Support 3 modes: Under, Over, and Fit
SMP-WEBPLUS
Screen Resolution
640x480, 800x600, 1024x768, 1152x864, 1280x1024,
1600x1200, 1280x720(720p), 1280x768, 1600x900,
Out” and “TV-Vscan”.
1360x768, 1366x768
SMP-WEB3/SMP-WEB3N
Screen Resolution
640x480, 800x600, 1024x768, 1152x864, 1280x1024,
1280x720(720p), 1280x768, 1600x900, 1360x768, 1366x768
Output
Display output to VGA D-SUB or Composite/S-Video
Composite & S-Video only support NTSC/PAL in 800x600
screen resolution. (NTSC/PAL Must configure through jumper)
3. After completing settings, click [ SAVE ] and [ APPLY ] so that those
settings will come into effect.
51
SMP-WEB SERIES
5-3-3 Screen Rotation (Only for SMPWEBPLUS)
In the “rotation” mode,
SMP-WEBPLUS does not
support to play HD video
and two videos on one web
page.
You can rotate the screen clockwise or counter-clockwise to display
portrait presentations.
1. Login SMP-WEBPLUS Web Manager. Click [SYSTEM] and switch to
“DISPLAY” page.
2. Locate the “Screen Rotation” function and select a suitable one for
you.
3. Click [SAVE] and [APPLY].
52
If you choose the display
output f rom Composite/
S- V ideo on SMP-WEB3/
You can also use “Display Command” to turn on or turn off the
screen remotely (by cutting down the VGA signal). You can also
schedule the time period during which you hope to turn off the
screen to save energy. Please follow the following steps:
WEB3N, you will not be
1. Login SMP Web Manager
able to turn on/off the
2. Click [SYSTEM] and switch to “DISPLAY” page.
display remotely.
SMP-WEB SERIES USER MANUAL
5-3-4 Turn on / Turn off Display
3. Please refer to the following table for more functions.
Display command
Press [Off] to turn off the display; press [On] to turn on the
display.
Turn off display daily from
Set a time period during which you hope to turn off the screen
everyday
Turn off display all day long
Set a specific day in weekly basis to turn off the screen. The
on the following day(s):
screen will be turned off on the day you pick here.
53
SMP-WEB SERIES
5-4 Video Input Settings (SMPWEB3 only)
1. Login SMP Web Manager
2. Click [SYSTEM] and switch to “VIDEO INPUT” page.
3. Please refer to the following table for all functions.
TV Standard
Set video input type. The input type can be NTSC, PAL and SECAM.
Brightness
To adjust the brightness from 0 to 100 by every 5 degrees.
Contrast
To adjust the contrast from 0 to 100 by every 5 degrees.
Over scan
To adjust the over scan from 0 to 100 by every 5 degrees.
This option is for you to zoom in and out of video input signals.
54
6.
Network Settings
6-1 Ethernet........................................................................................56
6-2 Wireless Network........................................................................57
6-3 Off-Line Settings.........................................................................58
55
SMP-WEB SERIES
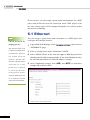
In this section, you can assign a group name and hostname for a SMP
player and define the network connection mode. SMP players with
the same Group name will be managed altogether for content update
and central scheduling.
6-1 Ethernet
Check network by
pinging gateway:
This function helps users
1. Login SMP Web Manager. Click [NETWORK SETTINGS] and switch to
“ETHERNET” page.
to adjust IP configurations
2. Enter a “Group” name and a “Hostname” of SMP.
automatically whenever
3. Select “DHCP Client” if the network supports DHCP protocol for
obtaining the IP address automatically. To use static IP address, enter
the relevant information in “Static IP Address” settings.
the DHCP network
changes. Enable this
function and SMP player
will send out a ping
packet every 3 minutes
to check the gateway.
If the gateway doesn’t
response, SMP player will
try to repair the network
connection automatically.
56
You can assign a group name and a hostname to a SMP player and
configure the Ethernet network.
4. After completing settings, click [SAVE ] and [ APPLY ] so that those
settings will come into effect.
If you connect wired and
wireless network to the
player at the same time,
the system will choose
the wired one as the
first priority, and will
switch to the wireless one
automatically when you
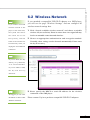
If you attached a compatible USB Wi-Fi adaptor to a SMP player,
you will see the page “Wireless Settings” and can configure all
wireless network settings here.
1. Click “Search available wireless network” and choose a suitable
wireless AP (Access Point). Please be aware that a low-signal AP may
lead to an unstable connection and data loss.
SMP-WEB SERIES USER MANUAL
6-2 Wireless Network
2. Choose an appropriate authentication and encryption method.
Normally, these settings can be detected automatically. Please enter
the key if necessary.
unplug the wired Ethernet
connection.
If you use WEP, the key
will be 5 or 13 characters,
10 or 26 hexadecimal.
If you use TK IP or AES,
the key will be 8~63
characters.
We suggest you use static
IP address for more stable
3. Please specify the DHCP or static IP address for the wireless
connection of the SMP player.
Please contact Cayin to purchase compatible USB Wi-Fi adaptors.
Wireless connection.
57
SMP-WEB SERIES
6-3 Off-Line Settings
SMP-WEB series will
play the def ault play list
specified in “Browser”
section automatically
when the connection
to the remote server
resumes.
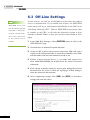
In this section, you can set an alternative action when the remote
server is disconnected. If you enable this feature, the SMP-WEB
series player will try to send requests periodically to the URL set in
“Checking following URL”. When a SMP-WEB series player fails
to connect to the URL, it will take the alternative action to play
contents in Media Folder, so that you will not suffer blank or error
pages.
1. Login SMP Web Manager. Click [EXCEPTION] and you will see the
“EXCEPTION” page.
2. Check the box of “Enable Exception function”.
3. Assign a URL to detect the network connection. SMP will send a
request to the URL periodically to check the availability of the URL
and determine if the network connection is OK or not.
4. Enable “Check Network Every […] seconds” and specify how
often SMP-WEB/WEBPLUS should check the status of network
connection.
5. Then, specify a playlist which you want to play during the network
disconnection. Or, select to show the login page of Web Manager
when the network is disconnected.
6. After completing settings, click [SAVE ] and [ APPLY ] so that those
settings will come into effect.
58
7.
LOG Management
7-1 Enable Syslog..............................................................................60
7-2 View Logs...................................................................................61
7-3 Export Log File..........................................................................62
59
SMP-WEB SERIES
In this chapter, you can make related settings of log files. Log
function helps you to create or read log records. Syslog function
allows log software in your PC to retrieve log records and further
analyze them.
7-1 Enable Syslog
You can purchase Cayin's
log management tool,
Super Reporter, to collect
and manage all log records
of players or servers.
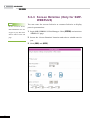
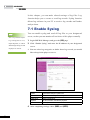
You can enable syslog and send all log files to your designated
server, so that you can monitor all activities of this player centrally.
1. Login SMP Web Manager, and go to the [LOG] page.
2. Click “Enable Syslog” and enter the IP address of your designated
server.
3. You can select log categories to define those log records you would
like to keep in the player or server.
System
system status change or system error
Network
network status or configuration change
Media Player
status of media player
Playback
file name, duration, and status of playback
Miscellaneous
other log files
4.After completing settings, chick [SAVE] and [APPLY].
60
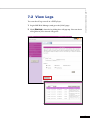
You can check log records in a SMP player.
1. Login SMP Web Manager, and go to the [LOG] page.
2. Click [View Logs]; then the log dialog-box will pop up. You can check
all log files in your selected categories.
SMP-WEB SERIES USER MANUAL
7-2 View Logs
61
SMP-WEB SERIES
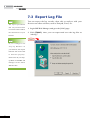
7-3 Export Log File
The export procedures
will vary from browser
to browser. Please follow
t he inst r uc t ions of y our
browser.
If you configure the
“Pop-up Blocker” in
your browser, the Export
function will not be able
to function properly.
Please turn off your Popup Block or add SMP web
manager in the “Allow
Web sites list”.
62
You can export the log records; then, edit or analyze with your
favorite text editor software, such as Notepad, Excel, etc.
1. Login SMP Web Manager, and go to the [LOG] page.
2. Click [ Export ]; then, you can export and save the log files as
“abc.log”.
8.
SMP Console
63
SMP-WEB SERIES
By pressing CTRL-ALT-Backspace, you can exit GUI mode into text
console to make some low-level management. After you configure
here, those changes take effect after the system restarts.
Viewing System Information
View firmware, CPU, memory, and disk information.
Network Management
Configure Ethernet network.
System Update
Upload system update file or patch (.fsu or .psu) file from a USB
storage device. Contact your vendor for these files, store them in a
USB flash disk (FAT32) and insert the USB device into SMP player's
USB socket. You can upload files here or from the Web Manager.
Manage Storage (Expert Only)
Manage (formatting) storage, Hard-Disk or USB storage device.
Please consult your system administrator for using these functions.
Format Internal Hard-disk
This function is especially for those system maintainers who need to format
the internal slim hard-disk. Please note that this function will format your
hard-disk and you will lose all data in the disk. Follow the questions in the
procedure.
USB storage device
Partitioning and formatting USB storage devices (e.g. flash disk). This
function is applied when the format of some USB storage devices is not
compatible with SMP.
Reset Password
Reset the Web Administration’s password to admin.
Restart
Restart the system.
Shutdown
Shutdown (turn-off) the system.
64
9.
System Recovery
65
SMP-WEB SERIES
You can try to recover
the system firmware
first, and type “N” for the
configuration recovery.
If it works for you, all
configurations will be kept
after system is restored.
If it doesn’t work, you
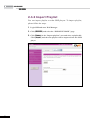
can enter system recovery
function again, and type
“Y” in the conf iguration
option.
If you encounter any unrecoverable problem (e.g. unable to boot
up) while using SMP client, you can choose this function, System
Recovery, to restore your system firmware to factory default. Follow
the steps below to recover the system:
1.Start or Restart the SMP system with keyboard connected to the box.
2.Keep press the TAB key while power on until the boot loader menu
appear (cayinos & recovery).
3.Enter “recovery”, and press “enter”. If you want to recover the system
without answering questions, you can enter “recovery automatic”.
The program will skip step 5 & 6.
4.While the recovery system boots up, follow the instructions.
5.When the instruction “The system will recover to factory default.” is
shown, please type “Y”. Then the system firmware will be restored
to the original one, i.e. you have to upload all patches again after the
system recovery.
6.When the instruction “The configuration will recover to factory
default.” is shown, you can choose to type “Y” and SMP will restore
the configuration to the original one. You will lose all configurations
which you made on this box, and you will be prompt to enter a new
key for this box when you restart the system again. The key label is
sticked behind the SMP device.
66
Appendix
Appendix A: Test The Resolution of Your Display...........................68
Appendix B: Use “log_rcv” to collect syslog from clients................70
67
SMP-WEB SERIES
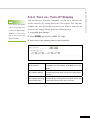
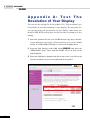
A ppendix A: Test T he
Resolution of Your Display
You can use the testing file in the product CD (\Tool\resolution_test\
restest.html) to test the resolution of your display. By using this file,
you can check the real presentation of your display, either when you
install a SMP-WEB series player for the first time or change to a new
display.
1. Insert the product CD into your CD-ROM, and copy these two files,
restest.html and restest.jpg (\Tool\resolution_test), to the Media
Folder of a SMP-WEB series player via Network Neighborhood.
2. Login the Web Manger of the SMP. Click [BROWSER] and select the
“BROWSER” page. Then, add this HTML file as an item in the
default playlist.
3. When the SMP player displays this file on the screen, you will see the
current resolution of your screen indicated on the picture.
68
SMP-WEB SERIES USER MANUAL
69
SMP-WEB SERIES
Appendix B: Use “log_rcv” to
collect syslog from clients
Don’t run the program
“log_rc v.exe” directly in
the CD.
“log_rcv.exe” is a simple tool helping you to collect syslogs from
SMP clients. You can find this program in product CD (\Tool\log
receiver).
1. Copy this file to your hard-drive, and double click it.
2. Please set the SMP client’s “syslog server IP address” as your PC’s
IP address (Chapter 2.8 LOG--> Enable Syslog).
If you install Super
Reporter, the system
will install log-rcv.exe
automatically.
3. Log_rcv.exe will start to receive the log messages from SMP clients
and display the results on your PC’s screen.
4. After log records are collected, Log_rcv.exe will generate 3 folders
automatically, which are “log”, “billing”, and “content_update”.
Each day, all collected log files from every client in that day will be
saved in a subfolder which is named for the date.
70
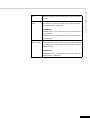
All the log records are stored in daily basis and each host has its
own files.
billing
All playback log records are stored here for billing information.
Each host has its own billing log file.
SUMMARY.TXT
[COUNT] section: Let you know for how many times those files
have are played.
SMP-WEB SERIES USER MANUAL
log
[SUMMARY] section: Let you know how long (seconds) each file
has been played.
content_update
Store all logs recording the name and the size of all files updated
from a CMS server. The unit of the file size is “bytes”. Each host
has its own log file.
SUMMARY.TXT
[SUMMARY] section indicates the size of all files which are
downloaded from a CMS server.
71