1
AlvariSTAR™ and AlvariCRAFT™
User Manual
SW Version 4.1
June 2009
P/N 215305
Document History
Document History
Topic
Description
Date Issued
Version 4.0 is regarded as the first publication.
December 2008
Single platform for NMS and Local
CRAFT Utility
The manual covers both AlvariSTAR and
AlvariCRAFT. Unless otherwise stated, The
features are applicable to both applications.
Version 4.1, March 2009
Password Policy
New feature enabling to set a policy for all
passwords.
Version 4.1, March 2009
Watchdog
External application for monitoring the NMS
server, LDAP and database servers
Version 4.1, March 2009
AlvariSTAR and AlvariCRAFT
ii
User Manual
Legal Rights
Legal Rights
© Copyright 2009 Alvarion Ltd. All rights reserved.
The material contained herein is proprietary, privileged, and confidential and
owned by Alvarion or its third party licensors. No disclosure thereof shall be made
to third parties without the express written permission of Alvarion Ltd.
Alvarion Ltd. reserves the right to alter the equipment specifications and
descriptions in this publication without prior notice. No part of this publication
shall be deemed to be part of any contract or warranty unless specifically
incorporated by reference into such contract or warranty.
Trade Names
Alvarion®, BreezeCOM®, WALKair®, WALKnet®, BreezeNET®, BreezeACCESS®,
BreezeLINK®, BreezeMAX®, BreezeLITE®, BreezePHONE®, 4Motion®,
BreezeCONFIG™, AlvariSTAR™, AlvariCRAFT™, MGW™, eMGW™ and/or other
products and/or services referenced here in are either registered trademarks,
trademarks or service marks of Alvarion Ltd.
All other names are or may be the trademarks of their respective owners.
Statement of Conditions
The information contained in this manual is subject to change without notice.
Alvarion Ltd. shall not be liable for errors contained herein or for incidental or
consequential damages in connection with the furnishing, performance, or use of
this manual or equipment supplied with it.
Warranties and Disclaimers
All Alvarion Ltd. (“Alvarion”) products purchased from Alvarion or through any of
Alvarion's authorized resellers are subject to the following warranty and product
liability terms and conditions.
Exclusive Warranty
(a) Alvarion warrants that the Product hardware it supplies and the tangible
media on which any software is installed, under normal use and conditions, will
be free from significant defects in materials and workmanship for a period of
fourteen (14) months from the date of shipment of a given Product to Purchaser
(the “Warranty Period”). Alvarion will, at its sole option and as Purchaser's sole
remedy, repair or replace any defective Product in accordance with Alvarion'
standard R&R procedure.
(b) With respect to the Firmware, Alvarion warrants the correct functionality
according to the attached documentation, for a period of fourteen (14) month from
AlvariSTAR and AlvariCRAFT
iii
User Manual
Legal Rights
invoice date (the “Warranty Period”)". During the Warranty Period, Alvarion may
release to its Customers firmware updates, which include additional performance
improvements and/or bug fixes, upon availability (the “Warranty”). Bug fixes,
temporary patches and/or workarounds may be supplied as Firmware updates.
Additional hardware, if required, to install or use Firmware updates must be
purchased by the Customer. Alvarion will beobligated to support solely the two (2)
most recent Software major releases.
ALVARION SHALL NOT BE LIABLE UNDER THIS WARRANTY IF ITS TESTING
AND EXAMINATION DISCLOSE THAT THE ALLEGED DEFECT IN THE PRODUCT
DOES NOT EXIST OR WAS CAUSED BY PURCHASER'S OR ANY THIRD
PERSON'S MISUSE, NEGLIGENCE, IMPROPER INSTALLATION OR IMPROPER
TESTING, UNAUTHORIZED ATTEMPTS TO REPAIR, OR ANY OTHER CAUSE
BEYOND THE RANGE OF THE INTENDED USE, OR BY ACCIDENT, FIRE,
LIGHTNING OR OTHER HAZARD.
Disclaimer
(a) The Software is sold on an “AS IS” basis. Alvarion, its affiliates or its licensors
MAKE NO WARRANTIES, WHATSOEVER, WHETHER EXPRESS OR IMPLIED,
WITH RESPECT TO THE SOFTWARE AND THE ACCOMPANYING
DOCUMENTATION. ALVARION SPECIFICALLY DISCLAIMS ALL IMPLIED
WARRANTIES OF MERCHANTABILITY AND FITNESS FOR A PARTICULAR
PURPOSE AND NON-INFRINGEMENT WITH RESPECT TO THE SOFTWARE.
UNITS OF PRODUCT (INCLUDING ALL THE SOFTWARE) DELIVERED TO
PURCHASER HEREUNDER ARE NOT FAULT-TOLERANT AND ARE NOT
DESIGNED, MANUFACTURED OR INTENDED FOR USE OR RESALE IN
APPLICATIONS WHERE THE FAILURE, MALFUNCTION OR INACCURACY OF
PRODUCTS CARRIES A RISK OF DEATH OR BODILY INJURY OR SEVERE
PHYSICAL OR ENVIRONMENTAL DAMAGE (“HIGH RISK ACTIVITIES”). HIGH
RISK ACTIVITIES MAY INCLUDE, BUT ARE NOT LIMITED TO, USE AS PART OF
ON-LINE CONTROL SYSTEMS IN HAZARDOUS ENVIRONMENTS REQUIRING
FAIL-SAFE PERFORMANCE, SUCH AS IN THE OPERATION OF NUCLEAR
FACILITIES, AIRCRAFT NAVIGATION OR COMMUNICATION SYSTEMS, AIR
TRAFFIC CONTROL, LIFE SUPPORT MACHINES, WEAPONS SYSTEMS OR
OTHER APPLICATIONS REPRESENTING A SIMILAR DEGREE OF POTENTIAL
HAZARD. ALVARION SPECIFICALLY DISCLAIMS ANY EXPRESS OR IMPLIED
WARRANTY OF FITNESS FOR HIGH RISK ACTIVITIES.
(b) PURCHASER'S SOLE REMEDY FOR BREACH OF THE EXPRESS
WARRANTIES ABOVE SHALL BE REPLACEMENT OR REFUND OF THE
PURCHASE PRICE AS SPECIFIED ABOVE, AT ALVARION'S OPTION. TO THE
FULLEST EXTENT ALLOWED BY LAW, THE WARRANTIES AND REMEDIES SET
FORTH IN THIS AGREEMENT ARE EXCLUSIVE AND IN LIEU OF ALL OTHER
AlvariSTAR and AlvariCRAFT
iv
User Manual
Legal Rights
WARRANTIES OR CONDITIONS, EXPRESS OR IMPLIED, EITHER IN FACT OR BY
OPERATION OF LAW, STATUTORY OR OTHERWISE, INCLUDING BUT NOT
LIMITED TO WARRANTIES, TERMS OR CONDITIONS OF MERCHANTABILITY,
FITNESS FOR A PARTICULAR PURPOSE, SATISFACTORY QUALITY,
CORRESPONDENCE WITH DESCRIPTION, NON-INFRINGEMENT, AND
ACCURACY OF INFORMATION GENERATED. ALL OF WHICH ARE EXPRESSLY
DISCLAIMED. ALVARION' WARRANTIES HEREIN RUN ONLY TO PURCHASER,
AND ARE NOT EXTENDED TO ANY THIRD PARTIES. ALVARION NEITHER
ASSUMES NOR AUTHORIZES ANY OTHER PERSON TO ASSUME FOR IT ANY
OTHER LIABILITY IN CONNECTION WITH THE SALE, INSTALLATION,
MAINTENANCE OR USE OF ITS PRODUCTS.
Limitation of Liability
(a) ALVARION SHALL NOT BE LIABLE TO THE PURCHASER OR TO ANY THIRD
PARTY, FOR ANY LOSS OF PROFITS, LOSS OF USE, INTERRUPTION OF
BUSINESS OR FOR ANY INDIRECT, SPECIAL, INCIDENTAL, PUNITIVE OR
CONSEQUENTIAL DAMAGES OF ANY KIND, WHETHER ARISING UNDER
BREACH OF CONTRACT, TORT (INCLUDING NEGLIGENCE), STRICT LIABILITY
OR OTHERWISE AND WHETHER BASED ON THIS AGREEMENT OR
OTHERWISE, EVEN IF ADVISED OF THE POSSIBILITY OF SUCH DAMAGES.
(b) TO THE EXTENT PERMITTED BY APPLICABLE LAW, IN NO EVENT SHALL
THE LIABILITY FOR DAMAGES HEREUNDER OF ALVARION OR ITS EMPLOYEES
OR AGENTS EXCEED THE PURCHASE PRICE PAID FOR THE PRODUCT BY
PURCHASER, NOR SHALL THE AGGREGATE LIABILITY FOR DAMAGES TO ALL
PARTIES REGARDING ANY PRODUCT EXCEED THE PURCHASE PRICE PAID
FOR THAT PRODUCT BY THAT PARTY (EXCEPT IN THE CASE OF A BREACH OF
A PARTY'S CONFIDENTIALITY OBLIGATIONS).
AlvariSTAR and AlvariCRAFT
v
User Manual
Important Notice
Important Notice
This user manual is delivered subject to the following conditions and restrictions:
This manual contains proprietary information belonging to Alvarion Ltd. Such
information is supplied solely for the purpose of assisting properly authorized
users of the respective Alvarion products.
No part of its contents may be used for any other purpose, disclosed to any
person or firm or reproduced by any means, electronic and mechanical,
without the express prior written permission of Alvarion Ltd.
The text and graphics are for the purpose of illustration and reference only.
The specifications on which they are based are subject to change without
notice.
The software described in this document is furnished under a license. The
software may be used or copied only in accordance with the terms of that
license.
Information in this document is subject to change without notice. Corporate
and individual names and data used in examples herein are fictitious unless
otherwise noted.
Alvarion Ltd. reserves the right to alter the equipment specifications and
descriptions in this publication without prior notice. No part of this
publication shall be deemed to be part of any contract or warranty unless
specifically incorporated by reference into such contract or warranty.
The information contained herein is merely descriptive in nature, and does not
constitute an offer for the sale of the product described herein.
Any changes or modifications of equipment, including opening of the
equipment not expressly approved by Alvarion Ltd. will void equipment
warranty and any repair thereafter shall be charged for. It could also void the
user's authority to operate the equipment.
AlvariSTAR and AlvariCRAFT
vi
User Manual
About AlvariSTAR
About AlvariSTAR
AlvariSTAR is a comprehensive, Carrier-Class Network Management System
(NMS) for Alvarion's Broadband Wireless Access products-based networks.
AlvariSTAR is designed for today's most advanced service provider Network
Operation Centers (NOCs), providing the network OA&M staff and managers with
all the network surveillance, monitoring and configuration capabilities required in
order to effectively manage the network while keeping the resources and expenses
at a minimum.
AlvariSTAR provides the following network management functionality:
Equipment Management, allowing viewing of devices according to various
search criteria, access to devices' dependent features, such as device
configuration managers and maps, access to the Configuration Backup Task
for creating backup files for a selected device, exporting general information of
selected devices to a Commas Separated Value (CSV) file, and other tasks
according to the managed device family.
Single and Multiple Device Management, allowing comprehensive
configuration and management of devices.
Location Management, allowing definition and organization of hierarchical
locations and associating them with maps and other attributes.
Discovery Settings, allowing management of device discovery for identifying
and adding existing devices to the managed devices database.
Active Events, providing alerts and real-time updates of defined alarms.
Event History Management, providing the ability to query for alarms in specific
time intervals.
Event Template Management, allowing customization and management of
event templates according to specific preferences and needs.
Event Forwarding to other Network Management Systems.
Topology, providing Geographical hierarchical topology views for selected
objects.
AlvariSTAR and AlvariCRAFT
vii
User Manual
About AlvariSTAR
Task Management, allowing definition and scheduling of system-wide
background tasks, including:
»
Network scan, allowing to scan the network for new devices
»
Database Aging, allowing automation of database management tasks.
»
Single Range Scan, allowing to scan a predefined range of IPs for new and
modified devices.
»
Additional product line dependent tasks according to the installed Device
Driver(s)
File Management, enabling to restore, import, and export configuration
backup files.
Contact Management, allowing definition of contact persons and attributes to
be associated with selected devices.
License, allowing to add and view the information about valid licenses for
managing devices.
Security Management, allowing management of users, user groups, functional
permissions and passwords.
Audit Logs, allowing viewing of logged events.
User Session Monitor, displays information on the currently logged in users
and enables sending messages to a logged in user.
Certain additional features are applicable only for certain product lines. For
information about these features refer to the applicable Device Driver Manual.
Embedded with the entire knowledge-base of WiMAX network operations, the
management system is a unique state-of-the-art power multiplier in the hands of
the service provider that enables the provisioning of satisfied customers.
AlvariSTAR dramatically extends the abilities of the service provider to provide a
rich portfolio of services and to support rapid customer base expansion.
NOTE
This manual describes the general features of the management system. To manage specific
product families, refer also to the applicable Device Driver Manual.
AlvariSTAR and AlvariCRAFT
viii
User Manual
About AlvariCRAFT
About AlvariCRAFT
AlvariCRAFT is a PC or Laptop based Graphical application based on the same
user interface available for AlvariSTAR. AlvariCRAFT is designed for field
technician use, enabling simple and intuitive Graphical Local Craft Terminal
(LCT) for managing and configuring a single device type in the field.
This utility simplifies the installation and maintenance of small size deployments
by easily enabling the change of settings or firmware upgrade for one modular
Base Station or Micro Base Station at a time, including the managed device's
components and associated SUs (if applicable).
The AlvariCRAFT utility includes all the functions of AlvariSTAR that are
applicable to the management of a single device.
AlvariSTAR and AlvariCRAFT
ix
User Manual
About This Manual
About This Manual
This manual describes the AlvariSTAR management system (referred to as
Network Management System) and the AlvariCRAFT Local CRAFT Utility. The
manual describes the full functionality of the Carrier-class management system
and presents screen captures of the AlvariSTAR application. Unless otherwise
stated, the descriptions apply to both applications.
Limitations on AlvariCRAFT due to the single device restriction are noted in a Note
specific to the application, as follows:
LOCAL CRAFT NOTE
This feature is not applicable to the Local CRAFT Utility.
This User Manual comprises the following chapters:
Chapter 1- Introduction - provides an overview of the AlvariSTAR and
AlvariCRAFT systems and their functionality.
Chapter 2 - Managed Network - describes how to access the management
functions for managing the system: Equipment Manager, Location Manager,
and Discovery Settings.
Chapter 3- Fault Management - describes the tools for managing events
generated in the system: Active Events, Event History, Event Filter Manager,
Event Template Manager, Script Command Manager and Event Forwarding
NBI Manager
Chapter 4- Administration - describes the administrative utilities: Task
Manager, File Manager, Contacts Manager and License Manager.
Chapter 5 - Security Management - describes the utilities for managing the
user permissions and access rights for AlvariSTAR and AlvariCRAFT users:
Audit Log Manager, User Manager, User Profile Manager, and User Session
Monitor.
AlvariSTAR and AlvariCRAFT
x
User Manual
Contents
Contents
Chapter 1 - Introduction .......................................................................... 1
1.1 Starting AlvariSTAR ...................................................................................................3
1.1.1 Post Installation Checklist ...................................................................................3
1.1.2 Quick Start ..........................................................................................................4
1.1.3 Starting the Client................................................................................................6
1.1.4 Logging In ...........................................................................................................6
1.1.5 Logging Out or Shutdown ...................................................................................7
1.1.6 Changing the Password ......................................................................................7
1.1.7 Suspended Accounts ..........................................................................................8
1.1.8 Application Server ...............................................................................................9
1.2 Starting AlvariCRAFT.................................................................................................9
1.3 The Main Window .....................................................................................................11
1.3.1 Main Menu ........................................................................................................11
1.3.2 Open Managers ................................................................................................12
1.3.3 Page Control Bar...............................................................................................12
1.3.4 Navigation Pane................................................................................................13
1.3.5 Management Functions.....................................................................................14
1.3.6 Hiding and Displaying the Navigation Pane ......................................................16
1.3.7 Status Bar .........................................................................................................16
1.4 The About Window...................................................................................................17
1.5 Conventions and Common Operations..................................................................18
1.5.1 Conventions ......................................................................................................18
1.5.2 Control Buttons .................................................................................................18
1.5.3 Working with Tables..........................................................................................19
1.5.4 Manipulating the Displayed Information ............................................................20
Chapter 2 - Managed Network .............................................................. 22
2.1 Equipment Manager .................................................................................................24
2.2 Location Manager.....................................................................................................25
2.2.1 Searching for a Location ...................................................................................27
AlvariSTAR and AlvariCRAFT
xi
User Manual
Contents
2.2.2 Location Editor ..................................................................................................27
2.2.3 Coordinate Types..............................................................................................29
2.2.4 Location Map.....................................................................................................30
2.3 Discovery Settings ...................................................................................................33
2.3.1 Network IP Address Ranges Tab......................................................................33
2.3.2 Network Communities Tab................................................................................36
Chapter 3 - Fault Management.............................................................. 39
3.1 Introduction ..............................................................................................................41
3.2 Active Events............................................................................................................42
3.3 Event History ............................................................................................................45
3.3.1 Managing Alarms ..............................................................................................47
3.4 Event Filter Manager ................................................................................................59
3.4.1 Creating Event Filters........................................................................................60
3.4.2 Editing Event Filters ..........................................................................................65
3.4.3 Deleting Event Filters ........................................................................................66
3.4.4 Archiving Alarms ...............................................................................................66
3.5 Event Template Manager .........................................................................................67
3.5.1 Creating or Editing Event Templates ................................................................68
3.5.2 Deleting Event Templates .................................................................................76
3.6 Script Command Manager.......................................................................................77
3.6.1 Creating or Editing Commands .........................................................................78
3.6.2 Deleting Commands..........................................................................................80
3.7 Event Forwarding NBI Manager ..............................................................................81
3.7.1 Creating or Editing Event Forwarding NBI Interfaces .......................................83
3.7.2 Deleting Event Forwarding NBI Interfaces ........................................................84
3.7.3 Creating Event Forwarding NBI Interface Policies ............................................84
Chapter 4 - Administration .................................................................... 92
4.1 Introduction ..............................................................................................................94
4.2 Task Manager ...........................................................................................................95
4.2.1 Using The Task Manager..................................................................................95
4.2.2 The Task Scheduler ..........................................................................................99
4.2.3 The Task Results Viewer ................................................................................102
AlvariSTAR and AlvariCRAFT
xii
User Manual
Contents
4.2.4 Network Scan Task .........................................................................................103
4.2.5 Database Aging Tasks ....................................................................................104
4.2.6 Single Range Scan Task.................................................................................106
4.3 Contact Manager ....................................................................................................109
4.3.1 Associating Devices with a Contact ................................................................110
4.3.2 Creating or Modifying a Contact......................................................................110
4.4 License Manager ....................................................................................................112
4.4.1 The License Manager .....................................................................................112
4.4.2 Adding Licenses..............................................................................................114
4.4.3 Activating Existing Licenses............................................................................114
4.4.4 Displaying Licensing Information ....................................................................114
Chapter 5 - Security Management ...................................................... 116
5.1 Overview .................................................................................................................118
5.2 Audit Log Manager.................................................................................................119
5.3 User Manager..........................................................................................................123
5.3.1 The User Manager Window ............................................................................123
5.3.2 Adding or Modifying a User.............................................................................124
5.4 User Profile Manager .............................................................................................129
5.5 User Session Monitor ............................................................................................136
5.6 Password Policy.....................................................................................................138
Chapter 6 - Watchdog .......................................................................... 141
6.1 The Watchdog Application ....................................................................................143
AlvariSTAR and AlvariCRAFT
xiii
User Manual
Chapter
1
Introduction
Chapter 1 - Introduction
In This Chapter:
“Starting AlvariSTAR” on page 3
“Starting AlvariCRAFT” on page 9
“The About Window” on page 17
“The Main Window” on page 11
“Conventions and Common Operations” on page 18
AlvariSTAR and AlvariCRAFT
2
User Manual
Chapter 1 - Introduction
1.1
Starting AlvariSTAR
Starting AlvariSTAR
This section describes the necessary steps to start the AlvariSTAR management
system. For a description of the AlvariCRAFT utility, go to Section 1.2.
The management system enforces security at the client level. To log in to the
application, you must have a valid user ID and password.
Before you can run this application your system must have running Application,
and Database Server. Typical installations implement the Application Server so it
runs in the background, even after you log out of the client. See the Installation
Manual for information about installing and configuring these required server
processes (called services in Windows, daemons in Solaris).
1.1.1
Post Installation Checklist
Before starting the client application, verify the following:
1.1.1.1
License
The default demo license is valid for 90 days and includes licenses for two
management system clients and a certain amount of managed devices. It does not
support licensed features.
To obtain a permanent license, contact your product reseller. To load and activate
licenses, see “License Manager” - Section 4.4.
1.1.1.2
Device Configuration
To discover and properly manage devices, certain parameters must first be
properly configured in the managed devices. For details refer to the relevant
Device Driver Manual.
1.1.1.3
SW Upgrade Files
Software Upgrade files for the managed devices need to be stored on the
Application Server in the management system firmware repository folder located
under <management system>\filesystem\firmware\<product-line>. The product
line name is device dependant (refer to the relevant Device Driver User Manual)
NOTE
The firmware repository folder is created automatically for certain device drivers. For other device
drivers it should be created manually.
Use forward slashes in UNIX systems.
AlvariSTAR and AlvariCRAFT
3
User Manual
Chapter 1 - Introduction
1.1.1.4
Starting AlvariSTAR
SNMP Ports
Verify that the SNMP ports (161, 162) are not used by any other application
running on the computer. If Windows or any other SNMP Server is installed, open
the Windows Service Manager, stop the SNMP Services and disable it to ensure
that it will not start automatically the next time you restart the computer.
1.1.1.5
Security Enforcement
The Administrator should define users, user groups, passwords and functional
permissions (refer to Chapter 5).
1.1.2
Quick Start
The following is an overview that covers the basic steps for getting started with the
management process. Refer to the respective chapter in this manual or, when
applicable, in the relevant Device Driver Manual) for an in-depth explanation of
each step.
1
Design the equipment location hierarchy. Define locations and sub-locations
and associate them with maps if applicable. (Refer to Section 2.2.)
2
Define security policy and assign permissions to users/user profiles. (Refer to
Chapter 5 )
3
Open the Discovery Settings Application. Enter the necessary IP address
ranges, locations and SNMP communities. Define all other applicable
parameters and initiate discovery. (Refer to Section 2.3 for information on
using the Discovery Settings application and Section 4.2.4 for information on
running the Network Scan task for equipment discovery.)
4
After devices are discovered and stored in the database, you can fully use the
application to manage the system:
»
Use the Equipment Manager to view devices in the database according to
various search criteria. From the Equipment Manager you can access the
devices' dependent Configuration and Multiple Configuration managers
and topology maps. (Refer to the relevant Device Driver Manual.)
»
Use additional managers that may be applicable only for certain product
lines to manage different features and parameters that are product line
dependent.
AlvariSTAR and AlvariCRAFT
4
User Manual
Chapter 1 - Introduction
Starting AlvariSTAR
»
Use the Location Manager to design and manage hierarchical locations and
associate them with maps. (Refer to Section 2.2.)
»
Use the Contact Manager to define contact persons and attributes to be
associated with selected devices. (Refer to Section 4.3.)
»
Use the Task Manager to define and schedule general system-wide tasks
and various additional tasks according to the managed product line. (Refer
to Section 4.2 and the relevant Device Driver Manual).
»
Use the Files Manager to restore, import, and export configuration backup
files generated via the Configuration Backup task (Refer to the relevant
Device Driver Manual).
»
Use the Database Aging Task to manage alarm records. (Refer to
Section 4.2.5.)
»
Use the License feature to view information on licensed vs. discovered
devices, enabling you to estimate when you need to update your license.
(Refer to Section 4.4.)
»
Use the User Session Monitor feature to identify other currently active
users and communicate with them. (Refer to Section 5.5.)
»
Use the Audit Log Manager to view logged events. (Refer to Section 5.2.)
»
Use Active Events to view alarms and other events in real time. (Refer to
Section 3.2.)
»
Use the Event History to query the database for events and alarms in
specific time intervals. (Refer to Section 3.3.)
»
Use the Event Forwarding NBI Manager to interface with other Network
Management Systems. (Refer to Section 3.7.)
»
Use the Script Command Manager to create script commands that can be
triggered by template-matched alarms.
5
Modify the threshold number of rows stored in the alarm table if necessary.
(Refer to “Database Aging Tasks” - Section 4.2.5.) By default 50000 rows are
displayed and the Database Aging task is scheduled to run every hour.
AlvariSTAR and AlvariCRAFT
5
User Manual
Chapter 1 - Introduction
1.1.3
Starting AlvariSTAR
Starting the Client
To start the application:
From the Windows Start menu, select <Management System name> “Management
System”> Start Client. After the client application is started, the Login prompt
window will be displayed.
1.1.4
Logging In
To log in, type a valid user name and password at the login prompt, as follows:
Default User Name
Default Passwords
admin
admin
manager
manager
observer
observer
By default, you have five attempts to enter the correct password before the system
aborts the login.
Figure 1-1: Login Prompt
AlvariSTAR and AlvariCRAFT
6
User Manual
Chapter 1 - Introduction
1.1.5
Starting AlvariSTAR
Logging Out or Shutdown
Logging out keeps the application running but disable access to the client,
preventing unauthorized persons from using it. You may log in again without the
need to restart the client.
The Exit feature, however, shuts down the client application, while the Application
Server continues to run.
To log out of the system
1
From the Main Menu at the top of the window select System> Logout. A
confirmation message is displayed.
2
Click OK to confirm.
3
Only the Main Menu of the client is displayed. Only the System and Help
menus are available.
To log in again after logging out
From the Main Menu at the top of the window select System > Login. The Login
prompt window will be displayed, allowing you (or another authorised user) to log
in.
To shut down the client:
1
From the main menu select System > Exit, or, use the X icon displayed on the
right upper corner of the main window, or use the Alt+F4 shortcut. A
confirmation message is displayed.
2
1.1.6
Click OK to confirm.
Changing the Password
By default, there are no password constraints. By using Change Password, the
current logged-in users can change only their own password.
To change the password:
AlvariSTAR and AlvariCRAFT
7
User Manual
Chapter 1 - Introduction
1
Starting AlvariSTAR
From the main menu, select System > Change Password. The Change
Password dialog is displayed.
2
Enter the old password.
3
Enter the new password (8-32 characters). Confirm it.
4
Click OK to save the new password.
Figure 1-2: Change Password Dialog
Passwords constraints are set from the Security Management > Password Policy
menu
The password policy also determines when the user receives a password
expiration warning.
1.1.7
Suspended Accounts
Users with a suspended account cannot access the system. An account can be
suspended by the administrator, or is blocked according to the Login Policy
settings set in the Password Policy window. The Login Attempts parameter sets
the number of unsuccessful login attempts before the user is locked out (default:
five attempts). The account can be re-activated by the system administrator.
Only the system administrator can activate suspended and blocked accounts. The
default admin user is never blocked.
To activate an account:
1
Open the User Manager window.
2
Select the suspended user and click Edit.
AlvariSTAR and AlvariCRAFT
8
User Manual
Chapter 1 - Introduction
1.1.8
Starting AlvariCRAFT
3
Select Security Info and change it to Active.
4
Click OK to apply the changes.
Application Server
The application server, which typically runs on a dedicated host, enables the
system to process incoming alarms and communicate with equipment and
network devices. If the client application cannot connect to an application server,
a warning message appears and the client is not launched.
1.2
Starting AlvariCRAFT
To log in to the application, you must have a valid user ID and password.
To open AlvariCRAFT:
1
Double-click on the AlvariCRAFT icon or open it from the windows Start menu
(Programs>AlvariCRAFT>Start Craft). The Network Interface Cooser opens.
Figure 1-3: Network Interface Chooser
The Network Interface Chooser enables to select the IP address of the
computer on which the Local CRAFT Utility is installed. The Network Interface
Chooser includes the following fields:
AlvariSTAR and AlvariCRAFT
9
User Manual
Chapter 1 - Introduction
Starting AlvariCRAFT
Field
Description
Network Interface
A list of the available network interace cards (NIC) installed.
State
The state of the selected network interface. Only network interfaces
that are UP are displayed.
MAC Address
The MAC Address of the selected NIC. For the local loopback NIC, no
MAC address is displayed.
IP Address
The IP address associated with the selected NIC.
Description
A read-only description of the selected NIC.
2
In the Network Interface Chooser, select a network interface from the list.
3
Click OK. The Main window opens.
AlvariSTAR and AlvariCRAFT
10
User Manual
Chapter 1 - Introduction
1.3
The Main Window
The Main Window
After logging on, the main window is displayed, providing access to all functions.
Figure 1-4: The Main Window
1.3.1
Main Menu
The main menu contains all menus and their options, which provide access to the
management system functions. It mirrors all the functions available in the
Navigation Pane (see Section 1.3.4).
In addition, the Main Menu includes the following menus and options:
Menu
Description
Help
Provides the following options:
About: Enables viewing details about installed system components
(see Section 1.4).
Help Contents: Opens the WebHelp contents window.
AlvariSTAR and AlvariCRAFT
11
User Manual
Chapter 1 - Introduction
The Main Window
Menu
Description
System
Provides the following options:
Login: Enables logging in to the client application. Applicable after
logging out (refer to Section 1.1.5) and in the management
system, also after time-out.
Logout: Enables logging out of the client application without
closing it. The application is still running and you may login again
(refer to Section 1.1.5).
Change Password: Opens the Change Password window
enabling to change the user’s password (refer to Section 1.1.6)
Exit: Enables shutting down the client application.
1.3.2
Open Managers
The Open Managers section displays all the currently open managers.
Click on an open manager name to switch to the window of this manager.
Click on the X sign of an open manager to close it.
1.3.3
Page Control Bar
The Page Control Bar is displayed at all times only for certain windows at the
bottom of the window. It contains quick access icons for some common
operations.
Figure 1-5: Page Control Bar
When the number of results in the manager exceeds the number defined in the
Page Size box, the results are divided into several pages. Use the following
controls to browse the various pages:
Icon
Description
Help - Opens the Online Help Navigator.
First/Previous - Cycles back to the first or previous page. .
AlvariSTAR and AlvariCRAFT
12
User Manual
Chapter 1 - Introduction
Icon
The Main Window
Description
Next/Last - Cycles forward to the next or last page .
Go to Page - Specify the page number in the box to the right
Page Size - define the number of results to display in each page
1.3.4
Navigation Pane
Figure 1-6: Navigation Pane
Click on menu headings to expand that menu node (double click on the menu
heading or single-click on the + sign to its right), then click on the appropriate
item in that node to display the associated page.
AlvariSTAR and AlvariCRAFT
13
User Manual
Chapter 1 - Introduction
1.3.5
The Main Window
Management Functions
The Navigation Pane and Main Menu provide access to all the management
functions. The Navigation Pane and Main Menu options are described below:
NOTE
Certain menus/menu options may be applicable only for certain product lines. The descriptions
below are only for menus/menu options that are common to all product lines. Refer to the relevant
Device Driver Manual for details on additional menus/menu options that are dependent on the
installed device driver(s) and the managed product line.
Node
Description
Managed Network
Provides the following options:
Equipment Manager - Opens the Equipment Manager window,
enabling to view equipment in the network and access the Equipment
Editor. Refer to Section 2.1 and the relevant Device Driver Manual.
Location Manager - Opens the Location Manager window, enabling to
define equipment locations and to associate maps and other features
with locations. Refer to Section 2.2.
Discovery Settings (not applicable to the Local CRAFT Utility)- Opens
the Discovery Settings window, enabling to manage IP address ranges
or sub-nets and global SNMP Read and Write community pairs. Refer
to Section 2.3.
AlvariSTAR and AlvariCRAFT
14
User Manual
Chapter 1 - Introduction
The Main Window
Node
Description
Fault Management
The Fault Management allows you to manage alarms that occur in the
network. It displays information about each alarm and lets you
acknowledge received alarms. It also provides tools that help you
diagnose and correct alarms. The Fault Manager is divided into the
following sub-menus:
Active Events - Displays real time updates of new events and alarms
entering the system. Refer to Section 3.2.
Event History - Queries for alarms and events in the database,
according to specified time intervals. Refer to Section 3.3.
Event Filter Manager - Allows to create, edit and delete filters to the
Active Events/Event History windows. Refer to Section 3.4.
Event Template Manager - Allows to create, modify and delete event
templates. Refer to Section 3.5.
Script Command Manager - Allows to create, edit and delete script
commands. Refer to Section 3.6.
Event Forwarding NBI Manager (not applicable to the Local CRAFT
Utility) - Allows to connect to other management systems and to
forward traps related to this system. Refer to Section 3.7.
Administration
Provides the following sub-menus:
Task Manager - Enables to define, manage, schedule, run/abort
system-wide operations, such as Network Scan (not applicable to the
Local CRAFT Utility), Database Aging, and product line dependent
tasks, etc. Refer to Section 4.2 and to the relevant Device Driver
Manual.
File Manager - Opens the File Manager window, enabling to manage
configuration backup and other types of files. Functionality depends on
the managed product line. Refer to the relevant Device Driver Manual.
Contact Manager - Opens the Contact Manager window, enabling to
organize and manage your contacts. Refer to Section 4.3
License Manager (not applicable to the Local CRAFT Utility) - Enables
viewing information about valid licenses and summary details on the
currently managed device types, included in the license. Refer to
Section 4.4.
AlvariSTAR and AlvariCRAFT
15
User Manual
Chapter 1 - Introduction
The Main Window
Node
Description
Security Management
Provides the following sub-menus:
Audit Log Manager - Enables to view recorded events and export the
logged data to an external Comma Separated Value (CSV) file. Refer
to Section 5.2.
User Manager - Enables to create and manage users, and associate
information to them such as passwords, profile membership and
contact information. Refer to Section 5.3
User Profile Manager (not applicable to the Local CRAFT Utility) Enables to create user profiles, edit them or delete profiles. Refer to
Section 5.4
User Session Monitor (not applicable to the Local CRAFT Utility) Enables to view information on the currently logged in users and to
send messages to a logged in user. Refer to Section 5.5.
Password Policy (available only from the Main Menu) - enables to set
general policies for user passwords.
1.3.6
Hiding and Displaying the Navigation Pane
By default, both the Navigation Pane and Work Area are displayed. When hovering
the mouse over the separation bar between the Navigation Pane and Work Area,
the mouse pointer becomes a double-headed arrow (). You can change the size
of the Navigation Pane by dragging this arrow left/right.
You can hide the Navigation Pane to increase the size of the Work Area or hide the
Work area to increase the size of the Navigation Pane by clicking on the
arrowheads (
) located on the separation bar until reaching the required
display.
With the Navigation Pane hidden or maximized, if clicking the arrowhead does not
restore the display of both panes, manually drag the separation bar to restore the
display.
1.3.7
Status Bar
The Status Bar is displayed at the bottom of the main window, and contains the
following information:
Current logged user.
AlvariSTAR and AlvariCRAFT
16
User Manual
Chapter 1 - Introduction
The About Window
The IP address of the application server or the selected interface of the Local
CRAFT Utility machine.
The name of the currently open manager.
A progress bar is displayed every time a window is refreshed or a new window is
selected.
Figure 1-7: Status Bar
1.4
The About Window
The About window displays a list of all products installed and their software
version.
To open the About window, select Help > About in the Main Menu.
Figure 1-8: About Window
The version numbers of the management system and the installed product line
device driver(s) are in the format a.b.c.d, where a.b increases for major releases, c
increases for minor releases and d is an internal control number.
AlvariSTAR and AlvariCRAFT
17
User Manual
Chapter 1 - Introduction
1.5
Conventions and Common Operations
Conventions and Common Operations
The following conventions and common operations appear throughout this
manual, unless otherwise specified.
1.5.1
Conventions
The phrase “Select Managed Network > Equipment Manager from the Main Menu
bar or the Navigation Pane” means you should do one of the following:
Click on the Managed Network menu in the Main Menu bar to expand it, then
click on Equipment Manager.
Click on the Managed Network node in the Navigation Pane to expand it (if it is
not already expanded), then click on Equipment Manager.
1.5.2
Control Buttons
A control button causes an immediate action. To activate a control button, click
on it. Certain control buttons only appear in selected windows. Others are
common to most windows. Equivalent functions to some control buttons are
available from the toolbar and main menu.
Button
Description
Apply
Applies changes made in the window. Clicking the Apply button
maintains the window opened for the following transaction or
response delivery.
OK
Applies changes made in the window and closes the window.
Cancel
Closes the active window without taking any further action. Any
modifications made prior to clicking Cancel are ignored.
Refresh
Refreshes the window and displays the most updated information.
Save
Saves changes made in the dialog box.
Help
Displays the online help window.
Browse
The Browse button appears whenever the command’s completion
may need additional step. Clicking this button displays another
window that lets you select an entry for an adjacent field.
AlvariSTAR and AlvariCRAFT
18
User Manual
Chapter 1 - Introduction
Conventions and Common Operations
Button
Description
Clear
Clears adjacent fields. It appears next to a field with a Browse button
at the other end.
Retrieve
Displays all appropriate matches according to the selected filter. It can
also be used to refresh the display.
Some of the control buttons, such as Edit, Open, Import and Export may appear
grayed out for users without write permission.
1.5.3
Working with Tables
All tables and lists allow resizing and rearranging the column display sequence. In
some pages, tables are used for displaying information and configuring and
managing multiple entities of the same type.
Color conventions:
»
Grayed-out cells are read-only.
»
In rows with modified parameter(s) all the details are colored blue.
»
The new lines added are green
»
The lines marked for deletion are red.
To modify the configuration of an existing entity:
1
Double-click on the applicable cell
»
In a text-cell, edit the content.
»
In some cells a drop-down menu opens, enabling selection of the required
option.
2
Click on any other cell to apply the change to the selected cell. At this stage the
change only applies to the display.
3
1.5.3.1
Click Apply to apply the change to the device.
Sorting Tables
Click on any of the column headings to sort tables. Click again on a column
heading to toggle between ascending and descending sort order.
AlvariSTAR and AlvariCRAFT
19
User Manual
Chapter 1 - Introduction
1.5.3.2
Conventions and Common Operations
Resizing and Rearranging Columns
To resize a column, position the cursor on the border line between two columns
headings. The cursor changes into a double-headed arrow. Drag the cursor to the
left or to the right to increase or decrease the size of a column. To rearrange
column sequence, click a column header and drag it to the new desired position.
1.5.4
Manipulating the Displayed Information
1.5.4.1
Using Filters
The system supports wildcard characters for specifying entity searches of the
various list fields. When applying filters to lists of objects in the application, you
can use the asterisk (*) wildcard character as part of the search criteria. The
asterisk wildcard character matches any sequence of characters in a string,
including an empty sequence.
To apply filters:
1
In the Criteria field, click on the Browse button. The filter selection window is
displayed.
Figure 1-9: Typical Filter Selection Window
AlvariSTAR and AlvariCRAFT
20
User Manual
Chapter 1 - Introduction
2
Conventions and Common Operations
Select the filter criteria by checking the boxes to the left of each item. If a box
is not checked, the associated criterion is not used by the filter. To further
narrow down the results, select additional filter criteria.
3
For every selected filter criterion, enter a value, or select a value from the
drop-down list, as required.
1.5.4.2
4
Click OK to apply the filter criteria.
5
Click Retrieve to complete the filtering and refresh the displayed list.
Limiting the Results Set
You can define the maximum number of results to be displayed in a list by
entering a number in the Page Size box or by using the up and down arrows to the
right of the number field. If the results set exceeds the defined number, it will be
divided into several pages. Click Retrieve to refresh the displayed list. Refer to
Section 1.3.3 for details on navigating among pages.
AlvariSTAR and AlvariCRAFT
21
User Manual
Chapter
2
Managed Network
Chapter 2 - Managed Network
In This Chapter:
“Equipment Manager” on page 24
“Location Manager” on page 25
“Discovery Settings” on page 33 - not applicable to the Local CRAFT Utility
NOTE
This manual does not cover some topics, which are device driver dependant. Refer to the
applicable Device Manager Manual for information about the following features (if applicable):
GPS Chain manager
Network Maintenance
Offline Configuration
AlvariSTAR and AlvariCRAFT
23
User Manual
Chapter 2 - Managed Network
2.1
Equipment Manager
Equipment Manager
The Equipment Manager provides functionality and access to windows that
enables you to manage equipment in your network. From the Equipment Manager
you can:
View devices that exist in the database according to various selection criteria.
View general information on the displayed devices
Add and Delete devices to/from the database
Edit the general properties of devices
Open the Configure window to configure a selected device
Apply licenses to selected equipment (not applicable to the Local CRAFT
Utility)
Open a Telnet session for a selected device (if supported by the specific device
type)
Open the Backup Configuration Task to backup the configuration of selected
devices (if applicable)
Export the general information of selected devices to a Commas Separated
Value (CSV) file.
Open a map display associated with a selected device, if applicable.
Perform additional operations according to the product line and type of
managed devices.
To open the Equipment Manager:
Select Managed Network > Equipment Manager from the Navigation Pane or menu
bar. The Equipment Manager window is displayed.
The structure and functionality of the Equipment Manager depend on the
installed device drivers and type of managed equipment. Refer to the relevant
Device Driver Manual for details on how to use the Equipment Manager with the
applicable devices.
AlvariSTAR and AlvariCRAFT
24
User Manual
Chapter 2 - Managed Network
2.2
Location Manager
Location Manager
The Location Manager enables to specify information regarding the physical
location of managed equipment, to facilitate quick detection of managed objects
and to help drill down quickly when using maps to view specific equipment
components.
You can specify equipment locations within the Location Manager. Note that a
location can have a “Parent” Location, meaning that it belongs to a subset of
another location. For example, if network objects are on the third floor of a facility,
you can designate both the building and the specific floor as locations; the
building would be the parent of the floor. You may define multiple levels for
locations. In the current example, the city in which the building is located can be
defined as the parent location of the building, and so on.
To associate a single device with a location or several devices with a single
location, open the Equipment Editor for the device(s), click the Browse button
next to the Location field to open the Select Location window and select a location.
For further details, refer to Section 2.2.2.
To use the Location Manager:
1
Select Managed Network > Location Manager from the main menu or the
Navigation Pane. The Location Manager window is displayed.
AlvariSTAR and AlvariCRAFT
25
User Manual
Chapter 2 - Managed Network
2
Location Manager
Select one or more locations from the list.
Figure 2-1: Location Manager
3
Use the following command buttons for various actions in the Location
Manager:
Button
Action
New
Opens the Location Editor, through which you can define a new
location. Refer to Section 2.2.2, for more information
Edit
Opens a Location Editor for a selected location, enabling you to
modify the definition of the Location. See Section 2.2.2 for more
information.
Delete
Enables to delete the selected location(s). When deleting a parent
location, the application also deletes its associated child locations. A
location associated with equipment cannot be deleted.
AlvariSTAR and AlvariCRAFT
26
User Manual
Chapter 2 - Managed Network
Location Manager
Button
Action
Add Child
Opens the Location Editor, through which you can define a new child
location that will be subordinate to the selected location. When
creating a child location, the name of the parent location field is
displayed in the Parent field.
Open Map
Opens the Location Map, displaying the selected location. See
Section 2.2.4 for more information.
2.2.1
Searching for a Location
To search for a specific location, enter the full name of the location (for example:
California) or part of the name (Ca) in the Name field. Only locations matching
that specification appear. Note that the filter is case-sensitive and the results are
displayed immediately.
2.2.2
Location Editor
The Location Editor enables to create a new location or modify details of an
existing location.
To create/modify a location:
1
In the Location Manager, click New to create a new location, or, to edit an
existing location, select a location from the list and click Edit or double-click
on the selected location. The Location Editor is displayed.
AlvariSTAR and AlvariCRAFT
27
User Manual
Chapter 2 - Managed Network
Location Manager
Figure 2-2: Location Editor
2
Type in or modify the Location Editor fields as required:
Parameter
Description
General parameters
Name
Enter a unique name for the Location, up to 32 printable characters.
This is the name that will be used for searching.
Parent
The parent of this location (the location to which this location is
subordinate). Click the Browser button to open the Select Location
window through which you can select a Parent Location. Click the
Eraser icon to clear the Parent Location field.
Coordinate Type
Specifies the way coordinates are designated; see Section 2.2.3
for more information. Valid types are: Country-City, Latitude-Logitude,
Area Code-prefix, Vertical-Horizontal.
Coordinates
The coordinates of the location, using the Coordinate Type specified
above. Up to 80 printable characters.
Note that Coordinates do not relocate icons in geographic topology
maps; dragging icons does.
AlvariSTAR and AlvariCRAFT
28
User Manual
Chapter 2 - Managed Network
Parameter
Location Manager
Description
Images
Icon
Select an icon from the drop-down list to associate it with the location.
Available icons are: Building, Location.
Topology Image
Click the Browse button to open the Select Location window through
which you can select a map and associate it with the location. Click
the Eraser icon to clear the field. Click the Preview button to view the
associated map.
Depending on whether or not an image is assigned, the label
changes from "No image assigned" to "Image assigned".
Details
Postal Address
An optional field for entering the address of the location. A string of up
to 80 characters.
Location Details
An optional field for entering a description of the location. A string of
up to 80 characters.
3
2.2.3
Click Apply.
Coordinate Types
You can define locations using a variety of coordinate types, enabling accurate
definition of locations. The following are the default coordinate types:
Parameter
Description
Country-City
Country and city access codes.
Example: 049-071
Latitude-Longitude
Latitude and longitude.
Example: 38.57N, 121.47W
Area Code-Prefix
Area code and prefix.
Example: 916-939
Vertical-Horizontal
Vertical / horizontal coordinates, developed by Bell
Systems.
NOTE
Coordinates type and coordinates values are not used for displaying the location in geographic
topology. They are available for informational purposes only.
AlvariSTAR and AlvariCRAFT
29
User Manual
Chapter 2 - Managed Network
2.2.4
Location Manager
Location Map
The Location Map viewer displays a topology view of network devices and their
relationships. Clicking on the Open Map button opens the Location Map viewer
for the selected location, displaying its sub-locations and the equipment
associated with it. Associating a map with a location is optional; if no map is
associated with the location, the Location Map viewer will be empty. Each location
can either share a map with any other location or it can be associated with its own
map.
LOCAL CRAFT NOTE
In the Local CRAFT Utility, the Map displays the only the licensed equipment and their associated
SUs (where applicable).
2.2.4.1
Defining Locations, Sub Locations and Maps
Primary (first level) locations have no parent locations. However, you can define
sub-locations (second level) whose “parents” are the primary locations. You may
continue and define third, fourth and fifth levels, where the parent location for
level N is a location in level N-1.
For each location you can also define a Geographical Map.
To define locations, sub locations, and/or maps:
1
Locations: From the Location Manager, click New to open the Location Editor.
Sub Locations: Select a location and click Add Child to open the Location
Editor with the selection location as the default parent location. Alternatively,
click New to open the Location Editor and select an existing node as the parent
in the Parent field.
2
Define the Location Name.
NOTE
For first level locations, the parent location field must be empty. For additional locations, a parent
location must be defined.
3
If you want to associate the location with a map, select the required map in the
Topology Image field.
AlvariSTAR and AlvariCRAFT
30
User Manual
Chapter 2 - Managed Network
Location Manager
NOTE
The required maps must be available (as *.jpg, *.gif, *.bmp, or *.png files) in the client station. The
file size is limited to 512 kb.
4
You can optionally define the Location Type, Icon and other details available in
the Location Editor.
5
2.2.4.2
You can associate equipment with locations. See Section 2.2.
Location Map Viewer Options
The Location Map viewer includes the following controls:
Parameter
Description
Up one level
Opens the next higher level of the topology map in the same
window. Disabled with in first level locations.
Display BreezeMAX SU
Check to display the associated SUs on the map. Only SUs
associated with the relevant location are displayed. If the serving
Base Station(s) are associated with the same location, each of
the displayed SU will be connected to the serving device.
Save
Saves the changes made to the map.
Cancel
Closes the Location Map viewer without saving.
The Location Map viewer provides a pop-up menu with the following options when
right-clicking on an equipment/location icon:
Parameter
Description
Drill down
Opens the next lower level of the topology map in the same window.
Available only when right-clicking a location in the map, provided there is
a sub-location.
Up one level
Opens the next higher level of the topology map in the same window.
Disabled for first level locations.
Configure
Available only for equipment with an Up state. Opens the Configuration
window, enabling to configure the selected device. You can also
double-click on the device icon on the map. Refer to the applicable Device
Manager Manual.
Cut Through
Available only for equipment. Opens a Telnet session to the device.
Applicable only for devices that support this feature. (SUs do not support
Telnet.)
AlvariSTAR and AlvariCRAFT
31
User Manual
Chapter 2 - Managed Network
Location Manager
Parameter
Description
Open Alarms
Available only for equipment. Opens the Active Events window, enabling
to view the alarms (if any) associated with the selected device.
The background color of the device icon on the map is in accordance with the
alarm status of the device (the highest severity open alarms). For more
information, refer to “Alarm Severities” - Section 3.3.1.2.
Place a cursor on an icon to view its general details.
AlvariSTAR and AlvariCRAFT
32
User Manual
Chapter 2 - Managed Network
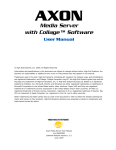
2.3
Discovery Settings
Discovery Settings
LOCAL CRAFT NOTE
Not applicable to the Local CRAFT Utility.
The Discovery Settings application enables to define the IP ranges/sub-nets in
which devices are expected to be discovered, and global SNMP Read and Write
community pairs. This defines the scope of your network and only devices within
this scope will be discovered. Up to 65535 IPs are supported.
To open the Discovery Settings Application:
Select Managed Network > Discovery Settings from the main menu or the
Navigation Pane. The Discovery Settings Application includes two tabs:
“Network IP Address Ranges Tab” - Section 2.3.1
“Network Communities Tab” - Section 2.3.2
2.3.1
Network IP Address Ranges Tab
The Network IP Address Ranges tab displays the currently defined IP address
ranges/sub-nets (up to 65535 IPs) and other applicable information and enables
to add, edit, or remove a range.
AlvariSTAR and AlvariCRAFT
33
User Manual
Chapter 2 - Managed Network
Discovery Settings
Figure 2-3: Network IP Address Ranges Tab
To edit IP address ranges:
1
Click inside the cells and enter the required information. The following
information is displayed for each range:
Parameter
Description
Type
The type of range definition: IP Range or Subnet. Select from the drop-down
menu whether to define the range using IP Range (the first and last address in
the range) or Subnet (Network and Mask).
Start/Network
The first IP address in an IP Range or the Subnet address in a Subnet range
type.
AlvariSTAR and AlvariCRAFT
34
User Manual
Chapter 2 - Managed Network
Discovery Settings
Parameter
Description
End/Mask
The last IP address in an IP Range or the Subnet Mask in a Subnet range
type.
To minimize unnecessary traffic load in the network, avoid defining IP address
ranges that include too many “gaps”, e.g., non existing addresses.
Discovery
Check to enable periodical discovery, according to parameters defined in the
Task Manager. When unchecked, discovery is disabled.
Auto Discovery
Indicates whether Auto Discovery for the range is enabled or disabled. When
enabled, Discovery will be initiated whenever a trap is received from a device
in the range.
Read Community
The unique SNMP Read community to be used by discovery when accessing
devices in the range. If unique communities are not defined, the defined global
Read communities will be used one after the other.
Write Community
The unique SNMP Write community to be used when accessing discovered
devices in the range. If unique communities are not defined, the global Write
community paired with the global Read community that was used to discover
devices in the range will be used when accessing these devices.
Location
The location defined for devices in the range. If a location is not defined, the
range will be used as the default location.
NOTE
Whenever possible, use unique SNMP community pairs for defined ranges rather than global
community pairs.The key for deciding which Write community to use is the IP range. Unique
community definitions enable to use the same Read community with several different Write
communities in different ranges, as well as to use the same Write community with several different
Read communities in different ranges. When using global community pairs, the Read community is
the key for deciding which Write community to use, meaning that the Read community should not
be used in more than one pair.
The Discovery process is based on the defined Read community. All future device management
actions will use the defined Write community. If a wrong Write community was defined, the device
will be discovered and displayed, but its status will be “Unknown” and it will not be possible to
manage it. The same is true for cases where the Write community in the device was changed (not
via the management system) after being discovered. In this case, the range must be updated with
the correct Write community, the device(s) must be deleted from the database, and the Discovery
process for the range should be re-initiated.
AlvariSTAR and AlvariCRAFT
35
User Manual
Chapter 2 - Managed Network
2
3
Discovery Settings
Use the tab buttons to perform the following available actions:
Button
Action
Add
Click to add an empty row to the Network IP Address Ranges table. Proceed
by entering the required information in each table cell. Click Apply to save
your changes. Up to 65535 IPs are supported.
Revert
Reverts the table to the last save, discarding any unsaved changes.
Delete
Click to delete the selected Network IP Address Range entry.
Import
Click to import an existing file (.nar) of IP address ranges settings. Browse
to the location of the file and click Open.
Export
Click to export the current IP Address Ranges table to an external file (.nar).
Browse to the location where the file is to be saved and click Save.
Click Apply to save your changes (or Refresh to retrieve the data from the
database).
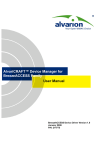
2.3.2
Network Communities Tab
The Network Communities tab displays the currently defined global SNMP Read
and Write community pairs and enables to add, edit, and delete a community
pair. Global community pairs are used when a unique pair is not defined for an IP
address range.
AlvariSTAR and AlvariCRAFT
36
User Manual
Chapter 2 - Managed Network
Discovery Settings
Figure 2-4: Network Communities Tab
To edit the Network Communities:
1
Click inside the cells and enter the required information. The following fields
are displayed for each pair:
Parameter
Description
Read Community
A global SNMP Read Community to be used by discovery when
accessing devices in a range for which no unique community pair is
defined. The global Read Communities will be used one after the
other until getting a response from the device or until all of them have
been tried.
Write Community
The SNMP Write community to be used when accessing devices that
were discovered using the paired Read Community.
2
Use the Network Communities tab buttons to perform various actions:
AlvariSTAR and AlvariCRAFT
37
User Manual
Chapter 2 - Managed Network
Discovery Settings
Button
Description
Add
Click to add an empty row to the Network Communities table.
Proceed by entering the required information in each table cell. Click
Apply to save your changes.
Revert
Reverts the table to the last save, discarding any unsaved changes.
Delete
Click to delete the selected Network Network Community pair.
NOTE
When using global community pairs, the Read community is the key for deciding which Write
community to use. Each Read community should not be used more than once.
3
Click Apply to save your changes (or Refresh to retrieve the data from the
database).
AlvariSTAR and AlvariCRAFT
38
User Manual
Chapter
3
Fault Management
Chapter 3 - Fault Management
In This Chapter:
“Introduction” on page 41
“Active Events” on page 42
“Event History” on page 45
“Event Filter Manager” on page 59
“Event Template Manager” on page 67
“Script Command Manager” on page 77
“Event Forwarding NBI Manager” on page 81 - not applicable to the Local
CRAFT Utility
AlvariSTAR and AlvariCRAFT
40
User Manual
Chapter 3 - Fault Management
3.1
Introduction
Introduction
The Fault Management module provides network operators with the full fault
management capabilities required for rapid problem solving to ensure that the
network is up and running.
The Fault Management module comprises efficient tools for managing alarms
generated in the system. Information about each alarm is readily displayed,
helping operators diagnose and correct system failures. The Fault Management
tools allow you to acknowledge received alarms, clear, or forward them. You can
apply filters to display specific alarms or to display specific information about
each alarm according to your needs.
You can connect to other management systems and forward traps, apply
templates to automate the processing of alarms, and trigger external scripts.
The following Fault Management tools are available:
Active Events - Displays real time updates of new alarms entering the system,
color coded according to severity and allows to manage each alarm.
Event History - Enables to query the database for all events and alarms that
occurred in the system in specific time intervals, color coded according to
severity.
Event Filter Manager - Allows to create, edit and delete filters which are used
to display events in Active Events and Event History windows.
Event Template Manager - Allows to create, edit and delete templates to
automate the processing of alarms.
Script Command Manager- Allows to associate template-matched alarms with
external scripts.
Event Forwarding NBI Manager - Provides an interface where you can connect
to other management systems and effectively forward traps.
AlvariSTAR and AlvariCRAFT
41
User Manual
Chapter 3 - Fault Management
3.2
Active Events
Active Events
The Active Events window displays real time updates of new alarms entering the
system, color coded according to severity. It allows you to manage and diagnose
alarms.
By default, only events that are categorized as alarms are displayed, and cleared
alarms (either manually or by automatic correlation rules) are removed from the
Active Events display and can only be viewed from the Event History window.
Alarms associated with devices that can no longer be managed by the system are
removed from the Active Events display and can only be viewed from the Event
History window. To change the default settings, see “Event Template Manager,”
Section 3.5.
To open Active Events:
Select Fault Management > Active Events from the main menu or from the
Navigation Pane. The Active Events window is displayed:
AlvariSTAR and AlvariCRAFT
42
User Manual
Chapter 3 - Fault Management
Active Events
Figure 3-1: Active Events Window
When Active Events is launched, it opens in Listening mode. The display is
updated whenever an alarm is received or cleared.
To freeze the display such that the display of incoming alarms is suppressed, click
on the Freeze button. When in Freeze mode, the button label changes to
Unfreeze, enabling to return to the default state of displaying incoming alarms on
the fly.
The Active Events window is divided into the following main areas:
Filter - allows you to filter out displayed alarms according to a custom filter or
according to severity. The displayed alarms change according to your
selection. Refer to Section 3.4 for information on the filtering options.
Alarm Table - displays general information about each alarm (see
Section 3.3.1.1). You can customize the information displayed in the table to
provide a more efficient view.
AlvariSTAR and AlvariCRAFT
43
User Manual
Chapter 3 - Fault Management
Active Events
Counters - displays the distribution of the alarms, color coded according to
their severity, and a count of the number of active alarms meeting the filter
criteria out of the total number of active alarms. The format is x/y, where x is
the number of active alarms meeting the filter criteria per severity and y is the
total number of active alarms per severity.
Section 3.3.1 provides details on managing alarms in Active Events and Event
History. The following information is available:
“Alarm Table,” Section 3.3.1.1
“Alarm Severities,” Section 3.3.1.2
“Editing Event Filters,” Section 3.4.2
“Alarm Operations,” Section 3.3.1.4
AlvariSTAR and AlvariCRAFT
44
User Manual
Chapter 3 - Fault Management
3.3
Event History
Event History
The Event History window displays a list of all events and alarms occurred in the
system, color-coded according to severity.
To open the Event History:
Select Fault Management > Event History from the main menu or from the
Navigation Pane. The Event History window is displayed:
Figure 3-2: Event History Window
To display newly received alarms or to updated the display of cleared alarms, click
on the Refresh button.
The Event History window is divided into the following main areas:
AlvariSTAR and AlvariCRAFT
45
User Manual
Chapter 3 - Fault Management
Event History
Counters - displays the list of severities, color coded according to pre-defined
settings, and a count of active alarms distributed according to severity. The
format is x/y, where x is the number of active alarms meeting the filter criteria
per severity and y is the total number of active alarms per severity.
Alarm Table - displays general information about each event or alarm (see
Section 3.3.1.1). You can customize the information displayed in the table to
provide a more efficient view. You can also define the maximum number of
alarms displayed in the table (see Section 3.3.1.1.1).
Filter - allows you to filter out displayed alarms according to a custom filter or
for a range of dates that the event occurred. By default the alarms are
displayed for 10 days, but the range can be changed. Click on the calendar
icon to change the date and use the up/down arrows to change the time from
and until when to display events. The default time displayed is the real time of
the system. If Now is checked, alarms will be displayed from the time selected
until the present time.
Page Size - allows you to limit the number of displayed alarms.
Page x of y - a read only display of the number of the page displayed. You can
browse through the multiple screen displays using the right/left arrows.
Section 3.3.1 provides details on managing alarms in Active Events and Event
History. The following information is available:
“Alarm Table,” Section 3.3.1.1
“Alarm Severities,” Section 3.3.1.2
“Event Details Window,” Section 3.3.1.3
“Alarm Operations,” Section 3.3.1.4
AlvariSTAR and AlvariCRAFT
46
User Manual
Chapter 3 - Fault Management
3.3.1
Event History
Managing Alarms
The following paragraphs describe how to manage alarms using Active Events and
Event History.
3.3.1.1
Alarm Table
The Alarms Table presents general information about each alarm occurred in the
system. You can change the order of the columns by dragging the columns title to
the desired location. The following describes the available attributes (columns) in
alphabetic order.
Parameter
Description
Acked By
The user who acknowledged the alarm.
Ack Time
The date and time the alarm was acknowledged.
Alias
A user defined name for the equipment.
Cleared By
The user who cleared the alarm.
Clear Time
The date and time that the alarm was cleared.
Location
The location of the equipment at the source of the alarm.
Equipment
The name of the equipment at the source of the alarm.
Equipment Type
The type of equipment at the source of the alarm.
Event Category
The cateogry classification of the event. The event categories are:
Alarm, State Change, System Event, Config Change
Event Name
The name of the alarm. For SNMP traps, the name is the trap OID. If
the name is blank when received by the application, the alarm takes
the name of the event template used for processing.
Event Time
The time and date the event occurred.
Event Type
The classification type of the alarm. Event types vary according to the
event category.
Last Update Time
The date and time the network element last updated the alarm.
Managed Object
The name of the equipment associated with the alarm. If the object
name is unknown, NotFound appears. An identification of a
component of the network element for which the alarm occurred. For
example a port on a router would be a managed object instance.
IP Address
The IP address of the mediation agent reporting this alarm.
Receive Time
The time the alarm was received by a mediation agent.
Severity
The severity of the alarm. Refer to Section 3.3.1.2
AlvariSTAR and AlvariCRAFT
47
User Manual
Chapter 3 - Fault Management
Event History
Event Category
Event Type
Alarm
All
Other
Communications Alarm
Quality of Service Alarm
Processing Error Alarm
Equipment Alarm
Environmental Alarm
Integrity Violation
Operational Violation
Physical Violation
Security Violation
Time Domain Violation
State Change
All
State Or Status Change
System Event
All
System Event
Software Download
Backup Configuration File
Maintenance
Telnet Session
Config Change
All
Config Change
Entity Added
Entity Changed
Entity Removed
3.3.1.1.1
Limiting the Number of Alarms Displayed
You can change the maximum number of alarms to be displayed in the table by
changing the value of the Max Row Count field in the Database Aging Task Editor
(Section 4.2.5). If the number of alarms exceeds the maximum number of alarms,
older alarms will not be displayed so as to make room for new received alarms.
The older alarms are not deleted from the database, only from the display.
AlvariSTAR and AlvariCRAFT
48
User Manual
Chapter 3 - Fault Management
3.3.1.1.2
Event History
Customizing Views in Active Events / Event History
You can make changes to a view by adjusting columns in the Alarm Table
The following are the available options for customizing the view:
Sort columns - Click on the column header of the column according to which
you want to sort the table. An icon appears on the header, indicating sorting in
ascending/descending order. Only the following columns can be sorted:
Severity, Event Name, Received Time, Equipment, IP Address, Managed
Object, Alias, and Location.
NOTE
Column sorting is not available in Active Events.
Move Columns - Click the column header of the column you want to move and
drag it to its new location.
Resize Columns - Click the right margin of the column header you want to
resize and drag to resize the column. The column margin is located between
the column headers.
You can also Configure which alarms will appear in the Alarm Table, using the
Event Filter Manager (see Section 3.4).
3.3.1.2
Alarm Severities
The management system is delivered with a set of default alarm severity
definitions, each with its own default color.
The default severity definitions are:
Parameter
Description
Critical A
service-halting condition occurs, requiring immediate corrective
action. The equipment is completely out of service and you must
restore its capability.
Major
A service-affecting condition has developed and corrective action is
required. There is severe degradation in the equipment’s capability
and you must restore its full capability.
Minor
A non-service-affecting fault condition exists and corrective action
should be taken in order to prevent a more serious fault. The detected
alarm condition is not currently degrading the capacity of the
equipment.
AlvariSTAR and AlvariCRAFT
49
User Manual
Chapter 3 - Fault Management
3.3.1.3
Event History
Parameter
Description
Warning
A potential or impending service-affecting fault could occur, and no
significant effects have yet been felt. Action should be taken to further
diagnose and correct the problem to prevent it from becoming a more
serious service-affecting fault. The detected alarm condition does not
currently pose a problem, but may degrade the capacity of the
equipment if you do not take corrective action.
Cleared
The problem is corrected, and the correlated alarm is cleared from
the Alarm Table.
Other
All other types of events/alarms.
Indeterminate
Indicates an alarm for which the perceived severity is uncertain, due
to any cause.
Event Details Window
The Event Tables in Active Events/Event History provide a simplified display,
summarizing each alarm. The Event Details window, however, presents all the
information associated with a selected alarm.
To open the Event Detail Information window:
From the Active Events/Event History window, select an alarm from the table,
right-click and select Event Details from the Alarm pop up menu, or double-click
on the alarm.
An example of the Event Details window is displayed below:
AlvariSTAR and AlvariCRAFT
50
User Manual
Chapter 3 - Fault Management
Event History
Figure 3-3: Event Details Window
The Event Details window consists of the following tabs:
“General Tab,” Section 3.3.1.3.1
“Timestamps and Status Tab,” Section 3.3.1.3.2
“Event Parameters Tab,” Section 3.3.1.3.3
“Additional Information Tab,” Section 3.3.1.3.4
“Notes Tab,” Section 3.3.1.3.5
3.3.1.3.1
General Tab
The General tab displays the following alarm attributes:
Parameter
Description
Network Element
Equipment Name
AlvariSTAR and AlvariCRAFT
The name of the equipment.
51
User Manual
Chapter 3 - Fault Management
Event History
Parameter
Description
Equipment Type
The type of equipment: Base Station, Micro Base Station, SU, NPU,
AU.
Managed Object
The name of the equipment associated with the alarm. If the object
name is unknown, NotFound appears.
Alias
A user defined name for the equipment
Location Name
The physical location of the equipment.
General Information
Event Category
The category classification of the event. The event categories are:
Alarm, State Change, System Event, Config Change
Event Type
The classification type of the alarm. Event types vary according to the
event category.
Event Name
The name of the alarm. For SNMP traps, the name is the trap OID. If
the name is blank when received by the application, the alarm takes
the name of the event template used for processing.
Event Description
An optional text description of the alarm as defined in the related
event template.
Event Severity
The severity of the alarm.
Object Severity
The alarm severity of the object associated with the alarm.
AlvariSTAR and AlvariCRAFT
52
User Manual
Chapter 3 - Fault Management
3.3.1.3.2
Event History
Timestamps and Status Tab
Figure 3-4: Event Details Window - Timestamps and Status Tab
The Timestamps and Status tab displays the following alarm attributes:
Parameter
Description
Last Update Time
The date and time the Alarm Table was last updated.
Receive Time
The time a mediation agent received the alarm.
Event Time
The time that the event actually occurred.
Ack Time
The date and time the alarm was acknowledged.
Acked By
The user who acknowledged the alarm.
Clear Time
The date and time that the alarm was cleared.
Cleared By
The user who cleared the alarm.
AlvariSTAR and AlvariCRAFT
53
User Manual
Chapter 3 - Fault Management
3.3.1.3.3
Event History
Event Parameters Tab
Figure 3-5: Event Details Window - Event Parameters Tab
The Event Parameters tab displays the following alarm attributes:
Parameter
Description
Event Severity
The severity of the alarm.
Object Severity
The alarm severity of the object associated with the alarm.
Probable Cause
The probable cause of the alarm.
Specific Problem
The specific problem that caused the alarm.
Cleared By
The user who cleared the alarm.
Clear Time
The date and time that the alarm was cleared.
Clear Cause
The reason the alarm was cleared.
AlvariSTAR and AlvariCRAFT
54
User Manual
Chapter 3 - Fault Management
3.3.1.3.4
Event History
Additional Information Tab
Figure 3-6: Event Details Window - Additional Information Tab
The Additional Information tab displays the following alarm attributes:
Parameter
Description
Protocol
Protocol
The protocol used for the alarm. The current version supports SNMP
only.
Source IP Address
The IP address of the object or device that sent the alarm. For Q3,
the source is the TNS name of the device or object.
Mediation Agent Address
The IP address of the mediation agent that received the trap.
SNMP Version
The SNMP version number
Generic Trap
The generic trap code. For Q3, it indicates an enterprise specific trap.
Possible values: 0,1,2,3,4,6
Specific Trap
The specific trap code as defined in the MIB, used only if Generic trap
is 6.
AlvariSTAR and AlvariCRAFT
55
User Manual
Chapter 3 - Fault Management
Event History
Parameter
Description
Enterprise OID
The SNMP Object Identification number. For SNMP v1, the OID is the
enterprise value from the SNMP PDU. For SNMP v2c, the OID is the
SNMP trap OID. For Q3, the OID is the Q3 Alarm Enterprise
OID — 1.3.6.1.4.1.231.7.1.3.1.1.5.204.
System Up Time
Seconds elapsed since the object or device last rebooted. For Q3, it
is seconds elapsed since the Q3 Listener/Parser last rebooted.
Variable Bindings - Displays a list of the variable bindings for the selected alarm
3.3.1.3.5
Name
The name of the variable as it appears in the MIB.
OID
The variable’s Object Identification.
Value
The value for the variable set in the MIB.
Notes Tab
fi
Figure 3-7: Event Details Window - Notes Tab
AlvariSTAR and AlvariCRAFT
56
User Manual
Chapter 3 - Fault Management
Event History
The Notes tab displays the following information about the alarm:
3.3.1.4
Parameter
Description
Event Advisor
Displays a text description of the alarm and sometimes proposes a
remedy. For example, “The device has received an improperly
authorized protocol message. The message has been discarded.”
The default message displayed in the Advisor page comes from the
trap’s MIB, but the message can be edited in the Event Template
Editor Advisor page (see Section 3.5.1.3.1). The Advisor
message is the default message for any e-mails sent about the alarm.
Proposed Repair Actions
The proposed remedy for the Alarm. The remedy comes from the
trap’s MIB.
General Notes
Enables the operator to provide additional information about the
selected alarm, such as steps already taken to correct the problem.
The note is stored with the alarm.
Alarm Operations
The system provides many alarm management features allowing you to diagnose,
troubleshoot, process, and clear alarms.
All general alarm operations are available via the context menu.
To manage alarms:
Select an alarm from the table and right-click on it to display the context
menu.The following are the displayed items:
Action
Description
Acknowledge Alarm
Acknowledges the selected open alarm(s). The current date and time
appear in the Ack Time field, and the name of the currently logged-on
user appears in the Ack By field.
Available if the Alarm and is not acknowledged automatically. By
default, alarm can be cleared without having to be acknowledged.
This status can be changed, using an event template. See
Section 3.5.1 for additional information.
Unacknowledge Alarm
Unacknowledges previously acknowledged selected alarm(s), and
clears the entries in the Ack By and Ack Time fields.
Available for the current user if the alarm was previously
acknowledged by the current user.
AlvariSTAR and AlvariCRAFT
57
User Manual
Chapter 3 - Fault Management
Event History
Action
Description
Clear Alarm
Clears only open selected alarm(s). Alarms’ status changes from
open to cleared. The status of the alarm changes from open to
cleared, but the alarm remains in the table.
Available if the Event type of a selected entity is Alarm and is not
acknowledged automatically by correlation mechanism.
Event Details
Displays detailed information about the selected alarm. See
Section 3.3.1.3 for additional information.
Event Advisor
Displays a text description of the alarm and sometimes proposes a
remedy.
Clearing Event
Opens the Event Details window of the event that cleared the alarm.
Equipment Details
Opens the Configuration Manager for the selected equipment.
Cut Through
Opens a Telnet session to the device. Applicable only for devices that
support this feature.
Topology Map
Displays the Location Map centered on the equipment associated
with the selected alarm.
Available only when the device has a location associated with it.
Export
Exports the selected alarm(s) and creates a comma delimited text file
that can be imported into other programs (for example, a
spreadsheet).
Print Preview
Displays a preview of the Event History of the selected alarm(s)
before printing.
Print
Prints the Event History of the selected alarm(s).
AlvariSTAR and AlvariCRAFT
58
User Manual
Chapter 3 - Fault Management
3.4
Event Filter Manager
Event Filter Manager
The Event Filter Manager lets you create, edit and delete filters which are used to
display events in the Active Events and Event History windows. When using
pre-defined filters, specific alarm types are displayed, allowing you to control
alarms more efficiently.
To open the Event Filter Manager:
1
Select Fault Management > Event Filter Manager from the main menu or from
the Navigation Pane. The Criteria window is displayed:
Figure 3-8: Event Filters Manager - Criteria
AlvariSTAR and AlvariCRAFT
59
User Manual
Chapter 3 - Fault Management
Event Filter Manager
NOTE
You cannot apply an event filter to the Alarm Tables in the Active Events or Event History windows
from the Event Filter Manager. To apply a filter, select a Custom Filter in the Active Events or Event
History windows.
For each filter, the following information is displayed:
2
Parameter
Description
Name
The name of the filter
Description
A description of the filter.
Owner
The user who created the filter.
Creation Date
The filter’s date of creation.
From the Event Filter Manager you can:
Create new event filters - see Section 3.4.1
Modify existing event filters - see Section 3.4.2
Delete event filters - see Section 3.4.3
3.4.1
Creating Event Filters
To create a new event filter:
1
From the Event Filter window (Figure 3-8), click New to define a new event
filter. The Event Filter Editor window is displayed.
The Event Filter Editor window comprises the following main pages:
3.4.1.1
»
“General Tab” on page 60
»
“Simple Filter Tab” on page 61
2
Enter the relevant information in each of the pages.
3
Click OK to confirm your choices and save them to the database.
General Tab
In the General Tab, you can add general information on the filter.
AlvariSTAR and AlvariCRAFT
60
User Manual
Chapter 3 - Fault Management
Event Filter Manager
Figure 3-9: Event Filter Editor - General Page
The General Tab comprises the following fields:
Parameter
Description
General Event Template Settings
3.4.1.2
Name
The name of the event filter.
Description
An optional description of the filter’s purpose.
Owner
A read only display of the user who created the template.
Creation Date
A read only display of the creation date of the template.
Simple Filter Tab
The Simple Filter tab lets you enter custom filter criteria that are used to change
the event views in Active Events and Event History windows to make the
information more manageable.
To create filter criteria:
1
From the Event Filter Editor, click Simple Filter to define filter criteria. The
Filter Page is displayed:
AlvariSTAR and AlvariCRAFT
61
User Manual
Chapter 3 - Fault Management
Event Filter Manager
Figure 3-10: Event FIlter Editor - Simple Filter Page: NE
The main Simple Filter page comprises the following pages:
2
»
“NE Tab” on page 62
»
“Topology Page” on page 63
»
“Event Tab” on page 64
Enter the relevant information in each of the pages. When there is a select
icon, click the icon to select elements from a list. Click the eraser icon to
remove selected elements.
3
3.4.1.2.1
Click the OK button to confirm your choices and save them to the database
NE Tab
The NE page (Figure 3-10) lets you enter the following filter criteria:
Parameter
Description
Network Element Type
Select the type of the network element from which the alarm
originated from.
Managed Object Type
Select the type of managed object from which the alarm originated.
AlvariSTAR and AlvariCRAFT
62
User Manual
Chapter 3 - Fault Management
3.4.1.2.2
Event Filter Manager
Parameter
Description
Managed Object
Instance
Enter a specific instance name of the object where the alarm
originated.
Alias
A user defined name for the manged object.
Trap Name / OID
Select the trap name or OID Selector of the alarm. For SNMP traps,
the name of the trap is OID.
Topology Page
The Topology Page lets you select the following filter criteria about the equipment
and at a particular location:
Figure 3-11: Event Filter Editor - Simple Filter Tab: Topology
Parameter
Description
Locations
Select the physical location of the equipment.
Network Elements
Select the network element from which the alarm originated. This
option is available only when the element has a location associated
with it.
AlvariSTAR and AlvariCRAFT
63
User Manual
Chapter 3 - Fault Management
3.4.1.2.3
Event Filter Manager
Event Tab
The Event page lets you select the following filter criteria:
Figure 3-12: Event Filter Editor - Simple Filter Tab: Event
Parameter
Description
Event Category
Select the category classification of the event. Possible values are:
All, Alarm, State Change, System Event, Config Change
Event Type
Select the classification type of the event. The possible values differ
according to the event category.
Event Severity
Check the boxes for the relevant alarm severity For more
information on alarm severity see Section 3.3.1.2.
Event Status
Check Acknowledged to display only acknowledged alarms, Cleared
to only display cleared alarms or both to display all alarms
User Classifier
Possible values are: None, Service Affecting
AlvariSTAR and AlvariCRAFT
64
User Manual
Chapter 3 - Fault Management
3.4.2
Event Filter Manager
Editing Event Filters
To edit an existing event filter:
1
From the Criteria Window (Figure 3-8), select an existing filter from the list
and click Edit. The Event Filter Editor window is displayed:
Figure 3-13: Event Filter Editor
The Editing Event Filter window comprises the following main pages:
»
“General Tab” on page 60
»
“Simple Filter Tab” on page 61
2
Edit the information in the fields on all the pages as required.
3
Click OK to confirm your choices and save them to the database.
AlvariSTAR and AlvariCRAFT
65
User Manual
Chapter 3 - Fault Management
3.4.3
Event Filter Manager
Deleting Event Filters
To delete an Event Filter:
1
In the Criteria window (Figure 3-8), select the filter to remove and click Delete.
A confirmation message is displayed.
2
3.4.4
Click Yes to confirm the deletion.
Archiving Alarms
To ensure your database does not fill up with alarms, you can archive them via
the Database Aging task. See Section 4.2.5 for further details.
AlvariSTAR and AlvariCRAFT
66
User Manual
Chapter 3 - Fault Management
3.5
Event Template Manager
Event Template Manager
Event Templates determine how the system processes different types of messages
sent by managed network objects. These templates can even trigger external
scripts (see Section 3.6). The system’s messages (alarms) typically indicate a
change in the operational status of the object, like a device failure or a system
reset. Event templates match each incoming message with specific actions. Device
drivers often install their own templates.
To open the Event Template Manager:
Select Fault Management > Event Template Manager from the main menu or from
the Navigation Pane. The Event Template Manager window is displayed:
Figure 3-14: Event Template Manager - General
For each template, the following information is displayed:
AlvariSTAR and AlvariCRAFT
67
User Manual
Chapter 3 - Fault Management
Event Template Manager
Parameter
Description
Name
The name of the template.
Description
A description of the template.
Owner
The user who created the template.
Creation Date
The template’s date of creation.
Priority
The template’s priority. The range is 1~99999.
From the Event Template Manager you can:
Create new event templates and modify existing templates - Section 3.5.1
Delete event templates - Section 3.5.2
3.5.1
Creating or Editing Event Templates
To create or edit an event template:
1
From the Event Template Manager window (Figure 3-14), click New to define a
new event template, or select an existing template from the list and click Edit.
The Event Template Editor window is displayed:
The Event Template Editor window comprises the following main pages:
»
“General Tab” on page 69
»
“Filter Tab” on page 69
»
“Behavior Tab” on page 74
2
Enter the relevant information in each of the pages.
3
Click OK to confirm your choices and save them to the database.
AlvariSTAR and AlvariCRAFT
68
User Manual
Chapter 3 - Fault Management
3.5.1.1
Event Template Manager
General Tab
In the General tab, you can add general information on the template.
Figure 3-15: Event Template Editor - General Tab
The General tab comprises the following fields:
3.5.1.2
Parameter
Description
Name
The name of the event template.
Description
An optional description of the template’s purpose.
Priority
A numerical ranking for this template. The template priority field determines
which template processes an alarm if the alarm matches more than one
template. The smaller the number defining a template’s priority, the higher the
priority the template is. The range is: 0~999999.
Owner
A read only display of the user who created the template.
Creation Date
A read only display of the creation date of the template.
Filter Tab
The Filter tab lets you edit Filter Criteria. This filter information matches, or finds,
an event template for each alarm received by Fault Management. The first
template that matches the received alarm controls the processing of that alarm.
AlvariSTAR and AlvariCRAFT
69
User Manual
Chapter 3 - Fault Management
Event Template Manager
Fault Management’s fault processing logic uses the filtering information provided
in the Event Template, along with the templates’ priority, to determine which
template to use for a given alarm.
NOTE
The smaller the number defining a template’s priority, the higher the priority.
For every alarm received, Fault Management scans each template, in order of
priority (high to low). Fault Management selects the first template that matches on
each of the filterable fields for alarm processing.
If a template does not define a field (with either a null or empty value, or set to
“All”) then Fault Management does not use the field in the comparison. Empty or
“All” in a filterable template field means that the field matches anything.
Therefore, Fault Management uses only fields that have non-empty or non-“All”
values in any comparison.
To create filter criteria:
1
From the Event Template Editor, click Filter to define filter criteria. The Filter
tab is displayed:
AlvariSTAR and AlvariCRAFT
70
User Manual
Chapter 3 - Fault Management
Event Template Manager
Figure 3-16: Event Template Editor - Filter Page: NE
The main Filter page comprises the following sub-tabs:
2
»
“NE Page” on page 71
»
“Topology Page” on page 72
»
“Event Page” on page 73
Enter or edit the relevant information in each of the pages. When there is a
select icon, click the icon to select elements from a list. Click the eraser icon to
remove selected elements.
3.5.1.2.1
3
Edit the information in the fields on all the pages as required.
4
Click OK to confirm your choices and save them to the database.
NE Page
The NE page (Figure 3-16) lets you enter the following filter criteria about the
network elements and managed objects from which the alarm originates:
Parameter
Description
Network Element Type
Select the type of the network element from which the alarm
originates.
AlvariSTAR and AlvariCRAFT
71
User Manual
Chapter 3 - Fault Management
3.5.1.2.2
Event Template Manager
Parameter
Description
Managed Object Type
Select the type of managed object from which the alarm originates.
Managed Object
Instance
Enter a specific instance name of the object where the alarm
originated.
Managed Object Alias
A user defined name for the managed object
Event Name
Select the name of the alarm.
Topology Page
The Topology Page lets you select the following filter criteria about the equipment
at a specific location:
Figure 3-17: Event Template Editor - Filter Page: Topology
Parameter
Description
Locations
Select the physical location of the equipment.
AlvariSTAR and AlvariCRAFT
72
User Manual
Chapter 3 - Fault Management
3.5.1.2.3
Event Template Manager
Parameter
Description
Network Elements
Select the network element from which the alarm originates. This
option is available only when the element has a location associated
with it.
Event Page
The Event page lets select the following filter criteria:
Figure 3-18: Event Template Editor - Filter Page: Event
Parameter
Description
Event Category
Select the category classification of the event. Possible values are:
All, Alarm, State Change, System Event, Config Change
Event Type
Select the classification type of the event. The possible values differ
according to the event category.
Event Severity
Check the boxes for the relevant alarm severity For more
information on alarm severity see Section 3.3.1.2.
AlvariSTAR and AlvariCRAFT
73
User Manual
Chapter 3 - Fault Management
3.5.1.3
Event Template Manager
Behavior Tab
The Behavior tab provides parameters that determine how Fault Management
processes matching alarms.
Figure 3-19: Event Template Editor - Behavior Tab
The main Behavior page comprises the following sub-tabs:
“Actions Page” on page 74
“Email Page” on page 75- not applicable to the Local CRAFT Utility
3.5.1.3.1
Actions Page
The Actions page contains the following parameters:
Parameter
Description
Script Command
Initiates an external script. Browse for the script command name by
clicking the command (...) button. When you click this button, the
Command Selector is displayed.
See Section 3.6 for information about how to add commands to this
selector. Click the eraser icon to remove selected scripts from this
field.
AlvariSTAR and AlvariCRAFT
74
User Manual
Chapter 3 - Fault Management
3.5.1.3.2
Event Template Manager
Parameter
Description
User Classifier
Select the User Classifier. Possible values: None, Service Affecting
Alarm Severity
Select the severity level of the alarm. Once Fault Management
selects the template, before actually processing the alarm, this field
overrides the severity of the alarm as it was received from mediation.
Possible values are: No Change, Cleared, Indeterminate, Warning,
Minor, Major, Critical
Requires Acknowledge
Check to require that the associated event is acknowledged
Advisor Message
Enter a text description of the event.
Email Page
LOCAL CRAFT NOTE
The Email page is not applicable to the Local CRAFT Utility.
Use the Email page to enter a message that appears in emails when the template
acts and define a list of recipients to be notified. This presupposes email functions
within the environment where your host is installed.
Figure 3-20: Event Template Editor - Email
AlvariSTAR and AlvariCRAFT
75
User Manual
Chapter 3 - Fault Management
Event Template Manager
The Email page contains the following parameters:
3.5.2
Parameter
Description
Auto Send Email
Check to automatically send a defined email message to the specified
recipient(s) whenever the associated event occurs.
To
Select the recipient for this email message from the list.
Subject
Enter the subject line of the email message.
Message
Enter an email message.
Deleting Event Templates
To delete an Event Template:
1
In the Event Template Manager window (Figure 3-14), select the template to
remove and click Delete. A confirmation message is displayed.
2
Click Yes to confirm the deletion.
AlvariSTAR and AlvariCRAFT
76
User Manual
Chapter 3 - Fault Management
3.6
Script Command Manager
Script Command Manager
Template-matched alarms can trigger external scripts. These script commands
can even have parameters that come from values in the EventInfo alarm’s
attributes, or other assigned constants. The Script Command Manager lists
available script commands. You can create, edit and delete script commands.
To open the Script Command Manager:
Select Fault Management > Script Command Manager from the main menu or from
the Navigation Pane. The Script Command Manager window is displayed:
Figure 3-21: Script Command Manager
AlvariSTAR and AlvariCRAFT
77
User Manual
Chapter 3 - Fault Management
Script Command Manager
From the Script Command Manager, you can:
Create new commands and modify existing commands - Section 3.6.1
Delete commands - Section 3.6.2
3.6.1
Creating or Editing Commands
To create or edit a command:
1
From the Script Command Manager, click New to define a new command. The
Command Editor window is displayed:
Figure 3-22: Command Editor
2
Configure your script with the following fields:
AlvariSTAR and AlvariCRAFT
78
User Manual
Chapter 3 - Fault Management
Parameter
Script Command Manager
Description
Command Information
Command Name
A unique text identifier.
Description
A text description
Command Details
Script Name
The name of the script to run
Script Path
The location of the script. Describe either a Windows or UNIX path.
Command Argument
Argument Option
Enter a text value
Argument Type
Possible values are: Constant, Event Property
Argument Value
If Argument Type = Constant, this is a text field
If Argument Type = Event Property then selct from a list of possible
attributes
Text Qualifier
Select whether this parameter needs double, single quotes, or no
qualifier. When you select quotes, the parameter looks like this: -a
“surrounded by quotes”.
Command Line
This section of the screen displays the script command as you
assemble it. Click the Add button on the right to assemble the
complete script command. Added parameters always appear last on
the list in this area, but you can use the arrow keys to re-arrange their
order, and the Delete button to remove parameters (but not the
script). Delete All removes everything.
3
Click Add to assemble the complete script command. Added parameters
always appear last on the list, but you can use the arrow keys to re-arrange
their order, or use the Delete button to remove parameters (not the script).
Delete All removes everything.
4
Click the Up or Down buttons to arrange the order of parameters.
5
Click OK to add your command script to the list of available scripts.
AlvariSTAR and AlvariCRAFT
79
User Manual
Chapter 3 - Fault Management
3.6.2
Script Command Manager
Deleting Commands
To delete a command:
1
In the Script Command Manager window (Figure 3-21), select the command to
remove and click Delete. A confirmation message is displayed.
2
Click Yes to confirm the deletion.
AlvariSTAR and AlvariCRAFT
80
User Manual
Chapter 3 - Fault Management
3.7
Event Forwarding NBI Manager
Event Forwarding NBI Manager
LOCAL CRAFT NOTE
The Event Forwarding NBI Manager is not applicable to the Local CRAFT Utility.
The Event Forwarding NBI Manager provides an interface where you can connect
to other management systems, and effectively forward traps. Fault Management
uses these definitions to enable it to forward notifications to those systems.
Event Forwarding NBI systems include any EMS system (a system receiving
information from Fault Management), for example: Billing Management Systems,
Support Management Systems, Network Management Systems, and Customer
Service Systems.
To open the Event Forwarding NBI Manager:
Select Fault Management > Event Forwarding NBI Manager from the main menu
or from the Navigation Pane. The Criteria window is displayed:
AlvariSTAR and AlvariCRAFT
81
User Manual
Chapter 3 - Fault Management
Event Forwarding NBI Manager
Figure 3-23: Event Forwarding NBI Manager - Criteria
For each of the criteria, the following information is displayed:
Parameter
Description
Name
The name of the filter.
Description
A description of the filter.
IP Address
The IP address of the higher manager
Protocol
The protocol governing the network management.
Event Forwarding
The event forwarding status.
From the Event Forwarding NBI Manager you can:
Create or modify Event Forwarding NBI interfaces - Section 3.7.1
Delete Event Forwarding NBI interfaces - Section 3.7.2
AlvariSTAR and AlvariCRAFT
82
User Manual
Chapter 3 - Fault Management
Event Forwarding NBI Manager
Create and modify Event Forwarding NBI interface policies - Section 3.7.3
NOTE
It is mandatory to define at least one policy for a Event Forwarding NBI interface in order to activate
trap forwarding. If no policy has been defined, or if the policy is not enabled, the Event Forwarding
NBI interface appears gray in the display, indicating that an action must be taken.
3.7.1
Creating or Editing Event Forwarding NBI
Interfaces
To create a new Event Forwarding NBI interface:
1
From the Event Forwarding NBI Manager window (Figure 3-23), click New to
define a new Event Forwarding NBI interface, or select an entry from the list
and click Edit. The NBI Editor window is displayed:
Figure 3-24: NBI Editor
2
Edit the information in the fields on all the pages as required.
AlvariSTAR and AlvariCRAFT
83
User Manual
Chapter 3 - Fault Management
Event Forwarding NBI Manager
Parameter
Description
Name
The name for the northbound interface .
Description
An optional description of the Event Forwarding NBI interface.
Enable
Check to enable trap forwarding
Note: If disabled, the
IP Address
The IP address of the remote host to which the traps will be
forwarded.
Protocol
SNMP
SNMP Parameters
Version
The SNMP version. Possible values are: v1 or v2c
Trap Port
The port number to use to communicate with the system.
NOTE
The port configured in the NBI editor must match the port your system uses to communicate.
Typically, SNMP devices use port 161 to receive set/get requests and port 162 to receive traps. So,
typically you must configure Fault Management to forward traps to a Event Forwarding NBI system
with a destination port of 162
3
3.7.2
Click OK to confirm your choices and save them to the database.
Deleting Event Forwarding NBI Interfaces
To delete an NBI:
1
In the Event Forwarding NBI Manager window (Figure 3-23), select the filter to
remove and click Delete. A confirmation message is displayed.
2
3.7.3
Click Yes to confirm the deletion.
Creating Event Forwarding NBI Interface
Policies
Once you have defined the IP address to which to forward traps, the policy
determines which traps to forward and when. At least one policy must be defined
for a specific Event Forwarding NBI interface in order to activate trap forwarding.
The policy manager displays the current policies defined for the specific interface
AlvariSTAR and AlvariCRAFT
84
User Manual
Chapter 3 - Fault Management
Event Forwarding NBI Manager
To open the NBI Policy List:
From the Event Forwarding NBI Manager window (Figure 3-23), select an existing
NBI from the list and click Policy. The NBI Policy List is displayed:
Figure 3-25: NBI Policy List
For each NBI Policy, the following information is displayed:
Parameter
Description
Name
The name of the policy.
Description
A description of the policy.
Status
The policy status
AlvariSTAR and AlvariCRAFT
85
User Manual
Chapter 3 - Fault Management
Event Forwarding NBI Manager
From the NBI Policy list you can:
Create or modifying NBI policies - Section 3.7.3.1
Delete NBI policies - Section 3.7.3.2
3.7.3.1
Creating or Modifying NBI Policies
To create or modify a NBI policy:
1
From the NBI Policy window (Figure 3-25), click New to define a new NBI
policy, or select an entry from the list and click Edit. The NBI Policy Editor
window is displayed (Figure 3-27).
The NBI Policy Editor window comprises the following main pages:
3.7.3.1.1
»
“General Page” on page 86
»
“Filter Tab” on page 87
»
“Scheduler Page” on page 91
2
Enter the relevant information in each of the pages.
3
Click OK to confirm your choices and save them to the database.
General Page
In the General page, you can add general information on the policy.
AlvariSTAR and AlvariCRAFT
86
User Manual
Chapter 3 - Fault Management
Event Forwarding NBI Manager
Figure 3-26: NBI Policy Editor - General Page
The General page comprises the following fields:
3.7.3.1.2
Parameter
Description
Name
The name of the NBI policy.
Description
An optional description of the policy.
Enabled
Check to enable the policy.
Filter Tab
The Filter tab lets you associate a filter with the NBI policy. If you do not add a
schedule (See Section 3.7.3.1.3) to a filter, the filter will be always on.
To create filter criteria:
1
From the NBI Policy Editor, click Filter to define filter criteria. The Filter Page
is displayed:
AlvariSTAR and AlvariCRAFT
87
User Manual
Chapter 3 - Fault Management
Event Forwarding NBI Manager
Figure 3-27: NBI Policy Editor - Filter Page: NE
The main Filter page comprises the following sub-tabs:
2
»
“NE Page” on page 88
»
“Topology Page” on page 89
»
“Event Page” on page 89
Enter the relevant information in each of the pages. When there is a select
icon, click the icon to select elements from a list. Click the eraser icon to
remove selected elements.
3
3.7.3.1.2.1
Click the OK button to confirm your choices and save them to the database
NE Page
The NE page (Figure 3-27) lets you enter the following filter criteria:
Parameter
Description
Network Element Type
Select the type of the network element from which the alarm
originated from.
Managed Object Type
Select the type of managed object from which the alarm originated.
AlvariSTAR and AlvariCRAFT
88
User Manual
Chapter 3 - Fault Management
3.7.3.1.2.2
Event Forwarding NBI Manager
Parameter
Description
Managed Object
Instance
Enter a specific instance name of the object where the alarm
originated.
Managed Object Alias
A user defined name for the managed object.
Event Name
Select the name of the alarm.
Topology Page
The Topology Page lets you select the following filter criteria:
Figure 3-28: NBI Policy Editor - Filter Page: Topology
3.7.3.1.2.3
Parameter
Description
Locations
Select the physical location of the equipment.
Network Elements
Select the network element from which the alarm originated. This
option is available only when the element has a location associated
with it.
Event Page
The Event page lets you select the following filter criteria:
AlvariSTAR and AlvariCRAFT
89
User Manual
Chapter 3 - Fault Management
Event Forwarding NBI Manager
Figure 3-29: NBI Policy Editor - Filter Page: Event
Parameter
Description
Event Category
Select the category classification of the event. Possible values are:
All, Alarm, State Change, System Event, Config Change
Event Type
Select the classification type of the event. The possible values differ
according to the event category.
Severity
Check the boxes for the relevant alarm severity For more
information on alarm severity see Section 3.3.1.2.
User Classifier
Select the User Classifier. Possible values: None, Service Affecting
AlvariSTAR and AlvariCRAFT
90
User Manual
Chapter 3 - Fault Management
3.7.3.1.3
Event Forwarding NBI Manager
Scheduler Page
The Scheduler page allows you to schedule the operation of a selected policy.
Figure 3-30: NBI Policy Editor - Scheduler Tab
The Scheduler page comprises the following fields:
3.7.3.2
Parameter
Description
Days of Week
Check the days of the week on which the policy should run.
Starting Time
Use the up/down arrows to select a time at which the policy will start
running.
Ending Time
Use the up/down arrows to select a time at which the policy will stop
running.
Deleting NBI Policies
To delete an NBI policy:
1
In the NBI Policy List window (Figure 3-25), select the policy to remove and
click Delete. A confirmation message is displayed.
2
Click Yes to confirm the deletion.
AlvariSTAR and AlvariCRAFT
91
User Manual
Chapter
4
Administration
Chapter 4 - Administration
In This Chapter:
“Introduction” on page 94
“Task Manager” on page 95
“Contact Manager” on page 109
“License Manager” on page 112 - not applicable to the Local CRAFT Utility
AlvariSTAR and AlvariCRAFT
93
User Manual
Chapter 4 - Administration
4.1
Introduction
Introduction
The Administration node in the Navigation Pane comprises the following
system-wide utilities:
Task Manager - enables to manage system-wide tasks, such as SW upgrade,
Network scan (not applicable to the Local CRAFT Utility), PM collection, etc.
See Section 4.2.
File Manager - enables to manage files that are stored in the database. These
files and functionality of the manager are product line dependent. For details
refer to the relevant Device Driver Manual.
Contact Manager - enables to organize and manage your contacts. Refer to
Section 4.3
License Manager (not applicable to the Local CRAFT Utility) - enables to view
information about valid licenses. See Section 4.4.
AlvariSTAR and AlvariCRAFT
94
User Manual
Chapter 4 - Administration
4.2
Task Manager
Task Manager
This section includes:
“Using The Task Manager” on page 95
“The Task Scheduler” on page 99
“The Task Results Viewer” on page 102
“Network Scan Task” on page 103 - not applicable to the Local CRAFT Utility
“Database Aging Tasks” on page 104
“Single Range Scan Task” on page 106 - not applicable to the Local CRAFT
Utility
4.2.1
Using The Task Manager
Tasks are operations that are performed on a large number of system entities
(such as equipment, services, etc.). They run in the background, allowing the
network administrators to continue managing the network while they run. After a
task has completed, or upon termination of a task, a report is issued.
The Task Manager displays information on defined tasks and enables to create
new tasks, edit, schedule, run or delete existing tasks. If there is any error in the
parameters definition such as a missing parameter, contradicting definitions or a
non-valid value, the relevant error message(s) will be displayed at the top section
of the window, and a red border around the relevant entries will indicate the
parameters that should be corrected. The Task Manager also enables to abort
running tasks and to view reports on completed and aborted tasks.
As tasks availability and functionality differ depending on the configured device
driver, refer to the relevant Device Driver Manual for a detailed description of
performing these tasks.
The following are the common available types of tasks:
“Network Scan Task” - Section 4.2.4 - not applicable to the Local CRAFT Utility
“Database Aging Tasks” - Section 4.2.5
AlvariSTAR and AlvariCRAFT
95
User Manual
Chapter 4 - Administration
Task Manager
“Single Range Scan Task” - Section 4.2.6 - not applicable to the Local CRAFT
Utility
To access the Task Manager:
1
Select Administration > Task Manager from the main menu or the Navigation
Pane. The Task Manager displays a list of defined tasks.
Figure 4-1: Task Manager
The following information is displayed for each defined task:
Parameter
Description
Name
A unique name of the task.
Created by
The user name of the task creator.
AlvariSTAR and AlvariCRAFT
96
User Manual
Chapter 4 - Administration
Task Manager
Parameter
Description
Modified by
The name of the user who last modified the task.
Volatile
Describing if the task’s behavior varies unpredictably. This type of
tasks is not saved in the database. It can be run only once.
Type
The type of task. The available task types are:
Network Scan Task (not applicable to the Local CRAFT
Utility)
Database Aging Task
Single Range Scan Task (not applicable to the Local
CRAFT Utility)
Additional tasks according to the installed device driver(s).
State
The current state of the task: Active, Inactive, Waiting, Stopping.
Last Run
The date and time the last time the task was run.
Last Run Result
The result of the task’s last run: Completed/Completed with
errors/Aborted/Never run.
Next Run
The date and time the next time the task is scheduled to run, or Not
Scheduled.
2
Use the following controls of the Task Manager:
Control
Description
New
Adds a new task to the Task list. Click to select the type of task to be
added, then click OK. The Task Editor for the selected task opens,
allowing to set the task parameters. From the Task Editor, you can
also run an inactive task by clicking Run.
Edit
For an Inactive Task: Opens the Task Editor for the selected
Inactive task, allowing to edit the task parameters. Not available if
more than one task is selected. From the Task Editor, you can
also run the task by clicking Run.
For Active Task: Opens the Runtime Results window displaying
the task’s progress.
AlvariSTAR and AlvariCRAFT
97
User Manual
Chapter 4 - Administration
Task Manager
Control
Description
Delete
Deletes the selected task from the database. Select the task to
remove and click Delete. The application prompts you for
confirmation.
Not available for active tasks and for system tasks (Network Scan
Task and Database Aging Tasks).
Scheduled tasks cannot be deleted. To delete a scheduled task, you
need to first clear the schedule (see below).
Run
Manually executes the task. While the task is running, the state
changes from Inactive to Active. The button is unavailable for
currently running tasks. The Run button is also available in each of
the task windows. If there are more than 20 active tasks, some of the
tasks may change from Inactive to Waiting.
Abort
Aborts the selected running task. Available for running tasks only.
Upon clicking on the Abort button, a confirmation message is
displayed. Click Yes to abort the task. The task’s State changes to
Inactive and the Last Run Result to Aborted.
Schedule
Opens the Schedule Editor, enabling to schedule the activation of the
task. See Section 4.2.2.
Unschedule
Clears the schedule for the selected task. Active only for scheduled
tasks.
Report
Opens the Task Report window, enabling to view a report of the last
execution of the selected task. Not available for tasks that were never
run.
The Report window can also be accessed from each task editor. The
Report button in the task editors is inactive while the task is running
and will become active only after the task has completed.
You can save the report to the file system by clicking the Save As
button in the Task Report window. The system will prompt you to save
large reports. You can print the report directly from the report window.
Not available for tasks that were never run.
History
Opens the Task Results window, displaying a list of all past
activations of the selected task and their results.
Not available for tasks that were never run.
When editing tasks, the following general controls are available:
AlvariSTAR and AlvariCRAFT
Click
To:
OK
Save the changes and close the task window
98
User Manual
Chapter 4 - Administration
Task Manager
Click
To:
Cancel
Close the window without saving
Run
Execute the task
Abort
Stop the task
View Report
Open the scan reoport (see Section 4.2.3)
Schedule
Set a time to run the task (see Section 4.2.2)
Additional task status information may appear at the bottom of the task window.
For example: Completed, Never Run, or Inactive
4.2.2
The Task Scheduler
Tasks can be scheduled to run once, or at predefined recurrence intervals.
Examples of recurring tasks include Network Scan and Database Aging.
To schedule a task:
1
In the Task Manager window, select a task from the list and click Schedule.
Alternatively, you can schedule a task during task creation, or while editing a
task, by clicking on the scheduler icon at the bottom left of the task window.
The Schedule Editor opens.
AlvariSTAR and AlvariCRAFT
99
User Manual
Chapter 4 - Administration
Task Manager
Figure 4-2: Schedule Editor
The Schedule Editor includes the following parameters:
Parameter
Description
Start
The start time for the task. Select one fo the following options:
Now
On - set a specific start date and time. You can highlight the value
to change (month, day, year) and click on the up/down arrows to
change the value, or you can pick a specific date using the
calendar icon. You can also type in the date and time as follows:
MMMM DD, YYYY HH:MM AM/PM.
AlvariSTAR and AlvariCRAFT
100
User Manual
Chapter 4 - Administration
Task Manager
Parameter
Description
Recurrence
Set the recurrence interval between each task execution. Available
intervals include:
None - no recurrence (default)
Minutely - specify the number of minutes. (the range is 1-1,440)
Hourly - specify the number of hours. (the range is 1-96).
Daily - specify the number of days. (the range is 1-60)
Weekly - select one of the following options:
»
Recur every - enter the number of weeks between task
executions (the range is 1-20)
»
Day - specify the day of the week (Sunday to Saturday) and
the number of weeks between task executions (the range is
1-20).
Monthly - select one of the following options:
End
»
Recur every - enter the number of months between task
executions (the range is 1-36)
»
Day - specify the day in the month (1-31) and the number of
months between task executions (the range is 1-36).
The end time for a recurring task (only). Select one of the following
options:
Never - enable tasks to be executed indefinitely
After N occurrences (where N is a number between 1-65,000) set the number of occurrences after which the task’s scheduling
will be cleared.
On - set an end date and time. You can highlight the value to
change (month, day, year) and click on the up/down arrows to
change the value, or you can pick a specific date using the
calendar icon. You can also type in the date and time as follows:
MMMM DD, YYYY HH:MM AM/PM.
2
Set the Start and End time and optionally select a recurrence interval.
3
Click OK to apply the schedule for the selected task.
AlvariSTAR and AlvariCRAFT
101
User Manual
Chapter 4 - Administration
4.2.3
Task Manager
The Task Results Viewer
The Task Results window displays a list of all past activations of the task selected
in the Task Manager window and their results. Not available for tasks that were
never run.
To use the Task Results window:
1
In the Task Manager window, select a task from the list and click History. The
Task Results window is displayed.
Figure 4-3: Task Results Window
The Task Results window displays the following information for each listed
activation:
2
Parameter
Description
Start
The start time of the activation.
End
The end time of the activation.
Result
The result of the activation.
Use the Task Results controls as required:
AlvariSTAR and AlvariCRAFT
102
User Manual
Chapter 4 - Administration
4.2.4
Task Manager
Action
Description
View
Displays the task results.
Save
Enables to save the task results to an external file. Click and
browse to a location in the file system, enter a name for the
file and click Save.
Delete
Deletes the selected task.
Close
Closes the Task Results window.
Network Scan Task
LOCAL CRAFT NOTE
The Network Scan Task is not applicable to the Local CRAFT Utility.
The Network Scan task is a system task that scans the entire network for new
devices. The scope of the network is defined in the Discovery Settings window (see
Section 2.3). The Network Scan task can only be modified, not deleted.
To edit the Network Scan Task
1
In the Task Manager window, select the Network Scan task from the list and
click Edit. If the task is Active, the Runtime Results window opens, displaying
the status of the running task.
Figure 4-4: Network Scan Task - Runtime Results
AlvariSTAR and AlvariCRAFT
103
User Manual
Chapter 4 - Administration
Task Manager
If the task is Inactive, the Network Scan Task is displayed.
Figure 4-5: Network Scan Task Window
2
Set the SNMP Parameters of the Network Scan Task as required:
Parameter
Description
Retries
The maximum number of retries for SNMP/TFTP communication.
The range is from 0 to 255.
Timeout
The maximum time in seconds that the requesting process waits for a
response before attempting a retransmission (or aborting if the
maximum number of retries has been reached).
The available range is 1 to 3,600 seconds.
3
4.2.5
Use the Editor controls as required.
Database Aging Tasks
The Database Aging tasks set the maximum number of alarms shown in the Event
History (Section 3.3) and Audit Log (Section 5.2) and automate database
management tasks. Database Aging tasks are system tasks and can only be
modified, not deleted.
To edit the Database Aging Task:
1
In the Task Manager window, select the Database Aging task from the list and
click Edit. If the task is Active, the Runtime Results window opens, displaying
the status of the running task.
AlvariSTAR and AlvariCRAFT
104
User Manual
Chapter 4 - Administration
Task Manager
If the task is Inactive, the Database Aging Task is displayed.
Figure 4-6: Database Aging Task Window
The Database Aging Task window includes the following information in two
tabs:
Parameter
Description
Criteria tab
Table Name
The name of the table. Possible values are Event History and Audit
Logs. This is a read only field and cannot be modified
Max Row Count
The maximum number of alarms in the database.
Note: When the number of alarms exceeds the value entered in the
Max Row Count field by 25%, an alarm is sent. When the number of
alarms exceeds the value entered in the Max Row Count field by
50%, the oldest alarms are deleted so that the total number of alarms
in the database equals the value defined in the Max Row Count field.
Actions tab
Secondary
Storage
File type of the archived records. Possible values are: None, CSV
Destination
A disk location for archiving. The default location is:
<Management_System>/filesystem/archive.
AlvariSTAR and AlvariCRAFT
105
User Manual
Chapter 4 - Administration
2
Task Manager
Change the parameters as required and click OK to save the changes and
close the task window, Cancel to close the window without saving, Run to
execute the task, or abort to stop it. The adjacent field display changes from
Inactive to Active, until the task has completed.
3
When completed, click Report to view the report.
4
You can modify the task schedule by clicking on the scheduler icon at the
bottom left corner.
4.2.6
Single Range Scan Task
LOCAL CRAFT NOTE
The Single Range Scan Task is not applicable to the Local CRAFT Utility.
The Single Range Scan Task enables to scan a predefined range of IPs for new and
modified devices.
To open the Single Range Scan Task window:
1
In the Task Manager window:
»
Click New, select Single Range Scan from the list of available task types
and click OK, the Single Range Scan Task window is displayed.
OR
»
Select an existing Single Range Scan task from the list and click Edit. If
the task is Active, the Runtime Result window is displayed, displaying the
status of the running task.
If the task is Inactive, the Single Range Scan Task window is displayed.
AlvariSTAR and AlvariCRAFT
106
User Manual
Chapter 4 - Administration
Task Manager
Figure 4-7: Single Range Scan Task Window
The Single Range Scan Task window comprises the following fields:
Parameter
Description
Task Name
The name of the task. A string of up to 128 printable characters. The
name must be unique in the system and cannot include the following
characters: /,\,?,<,>,:,*,^,|,"
Range Type
The range type: IP or Subnet.
Range Start
The first IP/Subnet in the range, depending on the selected Range
Type.
Range End
The last IP/Subnet in the range, depending on the selected Range
Type.
NMS Reference
Location
AlvariSTAR and AlvariCRAFT
An optional field for defining a location for devices in the range. Select
from the available locations. Newly discovered devices will be
automatically associated with the defined location. Devices already in
the database will not be affected.
107
User Manual
Chapter 4 - Administration
Task Manager
Parameter
Description
Contact
An optional field for defining a contact for devices in the range. Select
from the available contacts. Newly discovered devices will be
automatically associated with the defined contact. Devices already in
the database will not be affected.
SNMP Parameters
Retries
The maximum number of retries for SNMP/TFTP communication.
The range is from 0 to 255.
Timeout(s)
The maximum time in seconds that the requesting process waits for a
response before attempting a retransmission (or aborting if the
maximum number of retries has been reached).
The available range is 1 to 3,600 seconds.
SNMP Communities
Read/Write Community
2
The community strings (passwords) for SNMP operations. These
strings are used by the SNMP agent to allow/disallow SNMP access.
Edit the parameters as required and click OK to save the changes and close
the task window, Cancel to close the window without saving, Run to execute
the task, or Abort to stop it. The adjacent field display changes from Inactive
to Active, until the task has completed. When completed, you can view the
report from the Task Editor or from the Task Manager.
3
You can schedule the task by clicking on the scheduler icon at the bottom left
corner.
AlvariSTAR and AlvariCRAFT
108
User Manual
Chapter 4 - Administration
4.3
Contact Manager
Contact Manager
The Contact Manager enables to organize and manage your contacts. Each device
can be associated with a contact.
To open the Contact Manager:
1
Select Administration > Contact Manager from the main menu or the
Navigation Pane. The Contact Manager displays a list of available contacts.
Figure 4-8: Contact Manager
2
Click Retrieve when the Contact Manager window initially opens to display all
defined contacts. You can filter the display by selecting one of the predefined
filters in the Criteria browser and then clicking on Retrieve.
AlvariSTAR and AlvariCRAFT
109
User Manual
Chapter 4 - Administration
3
4.3.1
Contact Manager
Use the following controls on the Contact Manager window:
Button
Description
New
Opens the Contact Editor window, enabling to create new contacts.
Open
Opens the Contact Editor window, enabling to modify the selected
contact.
Delete
Deletes the selected contact(s) from the Contact Manager window
and from the database. Contacts that are associated with equipment
cannot be deleted.
Associating Devices with a Contact
To associate devices with a contact:
Open the Equipment Editor of the device. Click the Browse button next to the
Contact field to open the Select Contact window and select a contact.
4.3.2
Creating or Modifying a Contact
To create/modify a contact:
1
From the Contact Manager window, click New to create a new contact. To
modify an existing Contact, select a contact from the list and click Open, or
double-click on the selected contact.
AlvariSTAR and AlvariCRAFT
110
User Manual
Chapter 4 - Administration
Contact Manager
Figure 4-9: The Contact Editor
2
3
Configure the following parameters:
Parameter
Description
Contact ID
A unique identifier for this contact. Up to 80 printable characters.
First Name
Optional. The contact’s first name. Up to 80 printable characters.
Last Name
Optional. The contact’s last name. Up to 80 printable characters.
Company
Optional. The contact’s company name. Up to 80 printable
characters.
Contact Icon
Optional. Select from the drop-down list an icon to represent this
contact: Contact/Group.
Address
Optional. The contact’s address. Up to 80 printable characters.
Phone Number
Optional. The contact’s phone number. Up to 80 printable characters.
Mobile Number
Optional. The contact’s mobile number. Up to 80 printable characters.
Email
Optional. The contact’s e-mail address. Up to 80 printable characters.
Fax Number
Optional. The contact’s fax number. Up to 80 printable characters.
Click OK, to save and close the contact, or click Cancel to close the window
without saving the changes.
4
To display the new contact in the Contact Manager, click Retrieve.
AlvariSTAR and AlvariCRAFT
111
User Manual
Chapter 4 - Administration
4.4
License Manager
License Manager
LOCAL CRAFT NOTE
The License Manager is not applicable to the Local CRAFT Utility.
This section includes:
“The License Manager” on page 112
“Adding Licenses” on page 114
“Activating Existing Licenses” on page 114
“Displaying Licensing Information” on page 114
4.4.1
The License Manager
The License Manager displays information about valid licenses for managing
different device types, summary details on the currently managed device types,
and server information included in the license.
To access the License Manager window:
Select Administration > License Manager from the main menu or the Navigation
Pane.
AlvariSTAR and AlvariCRAFT
112
User Manual
Chapter 4 - Administration
License Manager
Figure 4-10: License Manager
The License Manager displays the following information for each licensed device
type: <Name> (#) used: #
Parameter
Description
Name
The device type.
(#)
The number of licensed devices of the applicable type.
used: #
The number of managed devices. The number increases whenever a
new device is discovered.
When the number of discovered devices (Managed Devices) reaches the number of
Licensed Devices, additional discovered devices will be ignored.
Unlicensed devices will be marked in Equipment Manager with an exclamation
icon.
When considering future expansion plans, the number of licensed devices
compared with the number of managed devices of each type, will indicate whether
there is a need for an updated license.
AlvariSTAR and AlvariCRAFT
113
User Manual
Chapter 4 - Administration
4.4.2
License Manager
Adding Licenses
Before adding a license, make sure that the file obtained from the supplier is
available.
To add licenses:
Click Add and browse to the location of the license file. Select the file and click
Open. The new licenses are displayed on the list. Alternatively, save the license
file in the /<Management_System>/file system/license folder. The next time the
server will be restarted, the new license will also be added.
4.4.3
Activating Existing Licenses
The new license added to the system needs to be activated in order to enable the
system to manage the required devices.
To activate a license:
Select the required license and click on Activate.
NOTE
Activating a license will deactivate all other licenses.
4.4.4
Displaying Licensing Information
To display licensing information:
Click on Licensing Information. The Server Information window is displayed
showing the Server IP and MAC Addresses.
AlvariSTAR and AlvariCRAFT
114
User Manual
Chapter 4 - Administration
License Manager
Figure 4-11: Server Information Window
AlvariSTAR and AlvariCRAFT
115
User Manual
Chapter
5
Security Management
Chapter 5 - Security Management
In This Chapter:
“Overview” on page 118
“Audit Log Manager” on page 119
“User Manager” on page 123
“User Profile Manager” on page 129
“User Session Monitor” on page 136 - not applicable to the Local CRAFT Utility
“Password Policy” on page 138
AlvariSTAR and AlvariCRAFT
117
User Manual
Chapter 5 - Security Management
5.1
Overview
Overview
In the Security Management menu you can define and manage user permissions
and access rights for users of the management system. The access level you
assign to users determines the management functions that the user can access.
The menu provides access to the following windows:
Audit Log Manager - Enables to view recorded events and export the logged
data to an external Comma Separated Value (CSV) file. Refer to Section 5.2.
User Manager - Enables to create and manage users, and associate
information with each user. Refer to Section 5.3.
User Profile Manager - Enables to create and manage user profiles, which
contain the default access right definitions for all users assigned to that user
group. Refer to Section 5.4.
User Session Monitor (not applicable to the Local CRAFT Utility) - Enables to
display information on the currently logged in users and to send messages to a
logged in user. Refer to Section 5.5.
Password Policy - Enables to set policies for user passwords. These policies
govern the security measures applied to user’s attempts to log in.
AlvariSTAR and AlvariCRAFT
118
User Manual
Chapter 5 - Security Management
5.2
Audit Log Manager
Audit Log Manager
The management system provides a logging service that records messages to the
database upon the occurrence of pre-specified events. These messages can
include event date and time, event type, error messages and other important
information according to the recorded event. The Audit Log Manager enables to
view recorded events and export the logged data to an external Comma Separated
Value (CSV) file.
To open the Audit Log Manager:
Select Security Management > Audit Logs from the main menu or the Navigation
Pane. The Audit Log Manager displays a list of all logged records.
Figure 5-1: Audit Log Manager
AlvariSTAR and AlvariCRAFT
119
User Manual
Chapter 5 - Security Management
Audit Log Manager
For each audit record, the following information is displayed:
Event Time - The date and time of the event
Category - The category of the event:
»
Equipment Manager
»
Event Filter Manager
»
Event Template Manager
»
Licence
»
NBI Manager
»
NBI Policy Manager
»
Script Command Manager
»
Security
»
System
»
Task Manager
»
User Manager
»
User Profile Manager
User ID - The user who initiated the action. System User ID indicates a system
initiated action.
AlvariSTAR and AlvariCRAFT
120
User Manual
Chapter 5 - Security Management
Audit Log Manager
The action performed:
»
Change Password
»
Entity Change
»
Entity Create
»
Entity Delete
»
Equipment Create
»
Equipment Delete
»
Licence Activated
»
License Expired
»
License Imported
»
System Shutdown
»
System Startup
»
Task Abort
»
Task Create
»
Task Delete
»
Task Finish
»
Task Start
»
Task Schedule
»
Task Unschedule
»
Task Update
»
User Login
»
User Logout
AlvariSTAR and AlvariCRAFT
121
User Manual
Chapter 5 - Security Management
Audit Log Manager
Target Entity - The element which is the target of an action, (for example: the
"entity delete" action that for which the target is a user named "aa"):
»
Event History DAP
»
User of any type
Entity Type - The entity associated with the event.
»
Database Aging Task
»
Event Filter
»
Event Template
»
License
»
NBI
»
NBI Policy
»
Network Scan Task
»
Performance Collection Task
»
Script Command
»
Security
»
Single Range Scan Task
»
System
»
User
»
User Profile
»
Additional entities according to the installed Device Driver(s)
To export the information of selected audit records:
Click Export, browse to the desired location, enter a file name, and click Save.
AlvariSTAR and AlvariCRAFT
122
User Manual
Chapter 5 - Security Management
5.3
User Manager
User Manager
The User Manager enables to create and manage users, and associate information
to them such as passwords, profile membership and contact information. You can
filter the display to show a select subset of users.
5.3.1
The User Manager Window
The User Manager displays the User Name, Display name, and status (Active or
Suspended, Password Expired and Activation Waiting) for each user.
To access the User Manager window:
Select Security Management > User Manager. The User Manager window is
displayed.
Figure 5-2: User Manager
AlvariSTAR and AlvariCRAFT
123
User Manual
Chapter 5 - Security Management
User Manager
To filter the display:
1
2
Click on the Filter button.
Select a filter parameter(User name or User State), enter a name in the text
field, or select a status from the states dropdown list. Use the asterisk (*) as a
wildcard to match any number and combination of characters. For example, to
display Last Names beginning with C, enter C* in the text field.
3
Click OK. The users list changes according to your settings.
To reset a user’s password:
1
Select a user entry from the list.
2
Click Reset Password. The Reset Password window is displayed.
Figure 5-3: Reset Password Window
3
5.3.2
Enter and confirm the new password.
Adding or Modifying a User
You can add new users or edit existing ones by modifying their properties.
You can set the User Profiles to associate with a user (see Section 5.4 for
information about how to create the profiles). As you grant permissions to defined
profiles, you can grant or deny users access to certain functions based on their
profile associations.
AlvariSTAR and AlvariCRAFT
124
User Manual
Chapter 5 - Security Management
User Manager
To create a new user:
1
Click New to display the User Editor.
2
Enter the appropriate information for the General section. Most of the
information associated with a user is optional. However, the Username entryis
required.
Figure 5-4: User Editor - General
NOTE
The Username must be unique; if it matches an existing Username, the application generates an
error. The Username you enter here is displayed in the User Manager window and in all relevant
reports.
3
Click Next and enter the required information for the Security Info section:
AlvariSTAR and AlvariCRAFT
125
User Manual
Chapter 5 - Security Management
User Manager
Figure 5-5: User - Security Info
Parameter
Description
User Name
Read-only. Taken from the previous dialog box.
Password
Password is mandatory. The password must adhere to the Password
Policy.
Confirm Password
Re-enter the password.
Password Creation Date
Date you created the password. The date is added automatically. The
countdown for the password expriation age begins from this date.
Password Expiration Date
Specify a date when the password will expire. The default is three months.
Account Activation Date
The date when this account becomes effective. This field lets you create
accounts in advance. The accounts remain with Activation Waiting status
until the first login of the user after the Effective Date.
Specify an Effective Date by entering the date directly in the text field, in the
proper format (by default: month/day/year). You can also click the
Calendar button and select a date from the calendar graphic display.
Password Never Expires
AlvariSTAR and AlvariCRAFT
When selected, the user’s password will not expire, regardless of the
password policy.
126
User Manual
Chapter 5 - Security Management
User Manager
Parameter
Description
Login Attempts
Number of attempts to login until the system is locked
Last Login Time
Time that the user last logged in
User State
Active or Activation Waiting
4
Click Next and set the user profile in the User Profile section. Use the controls
in this section to assign profiles to or remove assignments from the current
user:
Figure 5-6: User - User Profile
To
Do This:
Assign or remove one
profile to the user
1
Select a profile from the left pane (Available User Profiles)
2
Click the right-arrow (>) button to move the profile into the
right pane (Profile Membership), or left-arrow (<) to remove.
Assign or remove
multiple profiles
1
Ctrl+click to select multiple items or click on one item and
Shift-click on another to select a range of consecutive items
2
Click the right-arrow (>) or left-arrow (<).
AlvariSTAR and AlvariCRAFT
127
User Manual
Chapter 5 - Security Management
3
User Manager
To
Do This:
Assign or remove all
profiles to the user
Click the double-right-arrow (>>) or double-left-arrow (<<) button
Click Finish. The new user is added to the list.
To edit an existing user entry:
1
Select an existing user and click Edit or right-click the entry from the list and
select Edit. A three-tab User Editor appears, open to the General tab.
2
Modify the information as required in the General, Security Info and User
Profile tabs. For more information, see the steps in “To create a new user:” .
3
Click OK to apply the changes.
4
Click Delete to remove the entry.
In addition to these entries, you may want to associate the user with a Profile.
This confers a predetermined set of permissions to the user. See Section 5.4 for
more information.
AlvariSTAR and AlvariCRAFT
128
User Manual
Chapter 5 - Security Management
5.4
User Profile Manager
User Profile Manager
The User Profile Manager lets you create user profiles, edit them or delete profiles.
You can associate individual users with profiles and grant permissions to users
based on their association with a profile.
Only profiles that have no users can be deleted. Default profiles and users cannot
be deleted or modified.
By default, several user profiles with one user defined in each profile are provided
when you install your application. The following are the defaults:
»
Administrators (admin)
»
Observers
»
Managers
To access the User Profile Manager
Select Security Management > User Profile Manager from the main menu or the
Navigation Pane. The User Manager window is displayed, showing the profile
names and how many users share those profiles.
AlvariSTAR and AlvariCRAFT
129
User Manual
Chapter 5 - Security Management
User Profile Manager
Figure 5-7: User Profile Manager
To add a new profile:
1
In the Profile Manager click New. A User Profile editor window is displayed.
AlvariSTAR and AlvariCRAFT
130
User Manual
Chapter 5 - Security Management
User Profile Manager
Figure 5-8: User Profile Editor
2
Enter a unique name for the new profile and optionally add a description.
3
If you want to assign that new profile to existing user(s), click Add; The User
Selector window is displayed. Select the user(s) to which to assign the profile
and click Select.
AlvariSTAR and AlvariCRAFT
131
User Manual
Chapter 5 - Security Management
User Profile Manager
Figure 5-9: User Selector
4
Click Next; The Security Assignment window is displayed.
AlvariSTAR and AlvariCRAFT
132
User Manual
Chapter 5 - Security Management
User Profile Manager
Figure 5-10: User Profile - Security Assignment
5
Grant permissions to the profile by selecting a predefined function check-box
and then possible operations (edit, delete, configure, and so on) that each
profile or user can perform when exercising the function. To select all, check
the Functional Permissions and/or Operations check-boxes.
6
Click Finish to save your settings.
To modify an existing profile:
Select the profile in the Profile Manager, and click Edit; An editor window is
displayed, with two tabs.
AlvariSTAR and AlvariCRAFT
133
User Manual
Chapter 5 - Security Management
User Profile Manager
Figure 5-11: User Profile Editor - General Tab
7
In the General tab, enter or modify the description of the profile. The name is
read-only.
8
If you want to assign that profile to existing user(s), click Add; The User
Selector window is displayed. Select the user(s) to which to assign the profile
and click Select. To remove users from the profile click Remove or Remove
All.
9
In the Security Assignment tab, set the permissions to the profile: Grant
permissions by selecting a predefined function and then possible operations
(delete, edit, configure, and so on) that each profile or user can perform when
exercising the function. To select all, check the Functional Permissions and/or
Operations check-boxes.
AlvariSTAR and AlvariCRAFT
134
User Manual
Chapter 5 - Security Management
User Profile Manager
Figure 5-12: User Profile Editor - Security Assignment Tab
10 Click OK to save your settings.
To delete a profile:
Select the profile in the Profile Manager and click Delete. Default profiles cannot
be deleted.
AlvariSTAR and AlvariCRAFT
135
User Manual
Chapter 5 - Security Management
5.5
User Session Monitor
User Session Monitor
LOCAL CRAFT NOTE
The User Session Monitor is not applicable to the Local CRAFT Utility.
The User Session Monitor window displays information on the currently logged in
users and enables sending messages to a logged in user. Users with Administrator
rights can terminate the application of other users.
To open the User Monitor:
1
Select Security Management > User Session Monitor from main menu or the
Navigation Pane. The User Session Monitor displays a list the Current Logged
In Users with the User Name, IP addresses with correlation to server and client
IPs, and login time for each of the currently logged in users.
AlvariSTAR and AlvariCRAFT
136
User Manual
Chapter 5 - Security Management
User Session Monitor
Figure 5-13: User Session Monitor Window
2
Use the following buttons available in the User Session Monitor window:
Button
Description
Send Message
Click after selecting one of the logged in users to open the Sending
Message window, enabling you to send a text message to the
selected user.
Kill
Click to terminate the application of the selected user(s). Only an
Administrator can perform this operation to terminate applications of
users with lower permission levels.
AlvariSTAR and AlvariCRAFT
137
User Manual
Chapter 5 - Security Management
5.6
Password Policy
Password Policy
The Password Policy editor enables to set policies for user passwords, such as
required length, required characters, expiration policy.
To open the Password Policy Editor:
Select Security Management > Password Policy from the main menu. The
Password Policy Editor opens.
Figure 5-14: Password Policy Editor
The Password Policy Editor includes the following parameters:
AlvariSTAR and AlvariCRAFT
138
User Manual
Chapter 5 - Security Management
Password Policy
Parameter
Description
Minimum Password Length
Sets the minimum length of accepted passwords.
Any password with less than the set minimum will be
rejected.
Maximum Password Length
The maximum length allowed for a password. The
maximum length is pre-set to 32 characters and
cannot be changed.
Character Setting Rules
Lower Cases
When checked, a new password will be required to
include at least one lower case character.
Upper Cases
When checked, a new password will be required to
include at least one upper case character.
Numbers
When checked, a new password will be required to
include at least one digit.
Special Characters
When checked, a new password will be required to
include at least one special character, e.g. <, >, /, *,
&, ^, $, #, !.
Login and Expiration
Login Attempts
The number of allowed erroneous login attempts
before the application is closed and the user is
blocked.
This parameter can be configured for a selected user
from the User Manager. In case of contradiction, the
parameter set in the User Manager overrides the
general policy for the specific user.
Password Expiration Age
The time in months before the user is required to
change the password.
This parameter can be configured for a selected user
from the User Manager. In case of contradiction, the
parameter set in the User Manager overrides the
general policy for the specific user.
From the User Manager you can set the password
expiration policy for a selected user to never expire.
Password Expiration Warning
AlvariSTAR and AlvariCRAFT
The number of days before a user password expires
during which a message requiring to change the
password is displayed. The message is displayed at
every login until the password expiration age is
reached.
139
User Manual
Chapter 5 - Security Management
Password Policy
Parameter
Description
Password History
The number of old passwords for the system to keep
a record. The user will not be able to repeat a used
password if it was used in a cycle within the set
range.
Inactivity Session Timeout
The number of minutes with no user activity, after
which the user is logged out. The user will be
required to log in again to continue working.
Not applicable to the Local CRAFT Utility
AlvariSTAR and AlvariCRAFT
140
User Manual
Chapter
6
Watchdog
Chapter 6 - Watchdog
In this chapter:
“The Watchdog Application” on page 143
AlvariSTAR and AlvariCRAFT
142
User Manual
Chapter 6 - Watchdog
6.1
The Watchdog Application
The Watchdog Application
Watchdog is an external application for monitoring the NMS server, LDAP and
database servers (providing they reside on the same machine as AlvariSTAR). The
NMS watchdog service is started when the AlvariSTAR server is started.
In case the server or LDAP are down, Watchdog will try to restart them. The
monitoring information and the actions involved in restarting the NMS server or
LDAP are written in the watchdog.log file. The log is saved daily to
<AlvariSTAR Root>\<NMS installation folder>\watchdog\watchdog.log.YYYY-MM-DD
Watchdog can be configured from the watchdog.properties file located in
<AlvariSTAR Root>\<NMS installation folder>\watchdog.
Watchdog logs can be automatically deleted by configuring the following two
parameters (in red text) in the log4j.xml file located in
<AlvariSTAR Root>\<NMS installation folder>\watchdog.
--------------------------------------------------------------------------------------------------<?xml version=”1.0” encoding=”UTF-8” ?>
<!DOCTYPE log4j:configuration SYSTEM “log4j.dtd”>
<log4j:configuration xmlns:log4j=”http://jakarta.apache.org/log4j/”>
<appender name=”LOG_SHRINK”
class=”com.bwanms.watchdogcommon.SizeShrinkAppender”>
<param name=”File” value=”${nms.root}/watchdog/log/dummy.log”/>
<param name=”MaxFileSize” value=”10KB”/>
<param name=”MaxBackupIndex” value=”1”/>
<param name=”RetainsDays” value=”10”/>
<!-- max log files size (ex.: 10KB, 20MB, 3GB, 100) -->
<param name=”MaxFilesSize” value=”10MB”/>
<layout class=”org.apache.log4j.PatternLayout”>
<param name=”ConversionPattern” value=”%d %-5r %-5p [%c{2}] (%t:%x) %m%n”/>
</layout>
</appender>
<appender name=”FILE” class=”org.apache.log4j.DailyRollingFileAppender”>
<param name=”File” value=”${nms.root}/watchdog/log/watchdog.log” />
AlvariSTAR and AlvariCRAFT
143
User Manual
Chapter 6 - Watchdog
The Watchdog Application
<!-- Rollover at midnight each day -->
<param name=”DatePattern” value=”’.’yyyy-MM-dd”/>
<layout class=”org.apache.log4j.PatternLayout”>
<param name=”ConversionPattern” value=”%d{ABSOLUTE} %5p %c{1} - %m%n”/>
</layout>
</appender>
<appender name=”stdout” class=”org.apache.log4j.ConsoleAppender”>
<layout class=”org.apache.log4j.PatternLayout”>
<param name=”ConversionPattern” value=”%d{ABSOLUTE} %5p %c{1} %m%n”/>
</layout>
<filter class=”org.apache.log4j.varia.LevelRangeFilter”>
<param name=”LevelMin” value=”INFO” />
<param name=”LevelMax” value=”INFO” />
</filter>
</appender>
<root>
<priority value=”INFO” />
<appender-ref ref=”FILE”/>
<appender-ref ref=”LOG_SHRINK”/>
<appender-ref ref=”stdout”/>
</root>
</log4j:configuration>
AlvariSTAR and AlvariCRAFT
144
User Manual