1
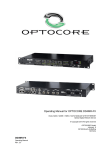
Initial Assembly
INTRODUCTION
Your Explorer is assembled and tested at the factory. Some components
are then removed to package the unit. When you receive your Explorer, the
following components will need to be put together.
GENERAL NOTES ON ASSEMBLY
1. All O-rings should be lightly lubricated.
2. Inspect all O-rings for cracks and other damage during each assembly.
3. All breathing loop parts should be sanitized before diving. If assembling
for a dive, see the following section "Complete Disassembly and Reassembly" for further instructions.
Step 1. Remove all parts from the split top box (Fig. 2.1).
Step 2. Open the Oxygen sensor and CO2 sensor (optional) boxes. Remove the sensors from their boxes, and open up the airtight bags.
! D
ANGER: Only Hollis Explorer Oxygen sensors must be used with
this unit. No other sensors are tested or approved. These are available from your Hollis Dealer.
Fig. 2.1
! D
ANGER: All oxygen sensors must be allowed to sit in an AIR atmosphere for at least 24 hours prior to use in the EXPLORER. The
Sensors can be immediately assembled into the Sensor Module but
this module should not be fully installed for at least 24 hours after
unsealing the sensors packages.
! W
ARNING: The sensors must be calibrated after the 24 hour acclimation period.
Step 3. Pull the Sensor Module straight out of the Canister.
Step 4. Push the three oxygen sensors onto their respective connection
points as shown in the picture (Fig. 2.2).
! N
OTE: Ensure the oxygen sensors are installed with the white
membrane facing up, as shown.
8
|
Fig. 2.2