1
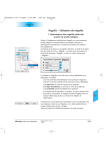
7. For the new scan frame input “30 lpcm“ under “Screen“. Then
input “30 lpcm“ for “name”.
➆
8. Now repeat steps 6 to 7 for the values “40 lpcm“ until
“80 lpcm“, with steps of 10 in between.
9. In the main dialogue change to the “General“ panel and select
“batch Mode (File)” under “Scan Mode“.
➈
10.Start processing of the seven scan frames with clicking on
“Scan Batch“. A dialogue will come up asking you for a destination for the final scans.
11.When the seven scans are done, mount them in a layout-program onto one paper, e.g. letter format. It is important that all
scans get exactly the same frame size! Mark each scan frame
with the full name of the image file respectively!
12.The test chart can now be printed and evaluated.
20 lpcm
30 lpcm
40 lpcm
50 lpcm
60 lpcm
70 lpcm
80 lpcm
paper,
printer
13.Evaluation of results:
Which image, resp. which “screen“, will get the best result with
the current paper ?
Where can you distinguish fine resolution just about?
What is the optimum screen? Notice how rapidly file size
increases with higher line screens!
In reality the limit for recognizing any enhancement in print
quality will be between 40 to 50.
It will be interesting to see the comparison print of the same
image file on different paper or other printers.
Example of positioned test
scans on a DIN A4 format
sheet.
SilverFast® Manual
7.3 • Addendum
451