1
I
LED PROJECTOR UC2O USER MANUAL
I
.tFJERoperatethisapplianceifithasadamagedcordorplug,ifitisnotworkingproperly,if
MPORTANT SAFEGUARDS:
When using electrical products, especially when children are present, basic
a
dery pe::rnions
il "as ixen dropped or damaged,
should
C:o-r
lways be followed, i ncluding the following:
-
To reduce
the
ri sk
of electric shock:
.AlwaysunplugtheappliancefromtheelectricaloutletimmediateiyafterusrEarrbefore
-drirtered.
- DOlr0Toperateunderablanketorpillow,Excessiveheatingcanoccurandcausefire,
ai*:tric shock or inj ury to persons,
- D0 h0T carry this appliance by the power cord or use cord as handle.
.ToCisconnect,turnallcontrolstothe off position,thenremoveplugfromoutlet.
.D0NOTreachforanappliancethathasfallenintowater.Unplugiti,T:edi.te)*.
'
D0 NOT use while bathing or in show€r.
.
D0 NOIplaceorstoreappliancewhereitcanfall
'
.
D0 NOT place in ordrop into waterorother Iiquid,
NEVER use pins orother mbtallicfasteners with this appliance.
'
Keepdry-D0 NOToperateinawetormoistcondition
WARNING
-
To reduce
dropped int0 water. Return it to 5l Prod ucts Service
. !(:epcordawayfromheatedsurfaces.
. IFdER d rop or insert any object into any open ing.
. )0lt0Toperatewhereaerosol(spraylproductsarebeingusedorwhereoxygenisbeing
READ ALL INSTRUCTIONS BEFORE USING
DANGER
or
folexamination and repair.
orbepulledintoaubarrirr-
- This appliance is desig ned for personal, non-professional use only.
. D0NoTuseoutdoors.
. fO ll0T look directly into the projector
the risk of burns, fire, electric shock or injury to petsoe;:
. Anapplianceshouldneverbeleftunattendedwhenpluggedin-Ud4f:c,trcuditrteo
not in u5e and before putting on or ta king off parts or attach mnte.
. Closesupervisionisnecessarywhenthisapplianceisusedby,oflcrE.r:tricr€r"ir{"lios
(iI;;r
ordisabled persons.
Fonr
lens
while projector isturned on, doing so may
revere eye damage.
Fa:*ing List:
L(2'l tED proiector 'l p(
.Usethisapplianceonlyforitsintendeduseasdescribedinthisrr.nuElD,lffitur€
adaptor
1 pc
L€rs ioYer I pc
-rree-in-one
anachments not re(ommended by supplier; specifically any attadrllerti rEt
provided with the unit,
AV
cable 1 pc
l,ser rnanual 1 pc
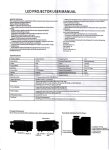
Specificatio ns
Model NO
LCD PROJECTOR
lmagre System
LCD intaqe Il
lmaoe svstem
LCD
l{ominal Briohtness
4O0lumen(max)
LED
Cobr
16770K
Aspe(t Ratio
4:3
Operation *iode
Manual
Contr.st
lfiIl
Projedion Disfdn(e
3.5+12.7 feet
Picture 5ize
I 7 C6Tinches
Power Consumotion
28W
Weight
0.83 lbs.
Supported External Storaqe
16G
Size
5
Power Adaptor
1
Lamp
x
5x2.3
lnput terminal
1 2V power input, AV lN, USB,
Output terminal
Audio play
Speaker (2.0w x I ). earphone
5upported Audio Form: MP3, WMA, AAC, FLAC, APE
Multiaudio-eff ect:7 mode of audio-eff ect plus 5R5 WOW and SR5 WOW HD
MP3 embed album art piciure display supported
Synchronic
LRC
2V-2A
SD Card
lyric display s upported
Breakinq point continuous play supported
Picture display
Supported static picture fi le: JPEG,BMP,GIF,PNG,TIF
Support multi PPT exchange effect: Chessboard, partition, effaces, etc.
Picture scaling, rotation sup ported
Video d isplay
Supported video fi le format: RMVB/RM(Realvideo 2.0/3.0/4.0),AVI(XviD/H264),WMV(WMV 7/8/9),FLV(Sorenson H.263
Breaking point continuous playsupported
AVIN audio display
PAL & NTSC
Text Read
TXT
Energy saving mode
Energy saving time setting and sleeping timing
format
text fi le supported
Automatic page turning and manual turning supported
Breakinq point continuous d isplay & Backqround music supported
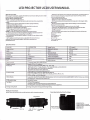
Product Structure:
Notes: Please do not block the ve ntilation holes wh ile
us
ing the projector.
SD
Function lntroduction for Keys:
interface
2. Select button
3. Left/Volume+/Forward
Power indicator
l2V
DC in
USB AV
input
lnterface
l. Power
Ventilation
hole
4. Right/Uolume C/Backwarr
5. Volume selec
6. Back/Return
Using Guide
Browser Function
The Browser function allows you to see allfiihs (videos, pictures, music, etc.) that can
Powering ON and OFF
be accessed from various sources, Ihis is helpfuluhen you have morethan one source
(onnected, To view all files, choose Browser ftom the main menu using the Left and
Right buttons (Fig.3). Using the leftand Bighthfitons,togglethrough all ofthe files from
Stand-by status: Once the projector has been pluggedinb.llWoutlet, it enters
STANDBY mode (Power indicator light willflashl.To poEo.r,pr6sand hold the power
button for
2
thelistandpressEnterselectdesiredfile.Gpose
Browser inthemainmenu,andhere
you can see all the files thatyou can plry ardyo.rcanalsochooseto playthemjust as
describedintheabove.The Browser menualsoallowsyoutoMove,Copy,andDelete
leconds.lhe indicator light wlll becomerolidandtheprolector wlll turn on.
To power off, press and hold the power button for 2 seconds-The projector will turn
and the indicator light will flash, indicating that the prciector
is(fF.
off
but still plugged i n.
files from your connected sources.
Focusing
Desired Projector Settings
ThepicturesizevariesfromlT
to67 dependingonhowfarawaytheprojectorisfrom
(ustomized viewing can be achieved underth€ s€ttirgs menu.To
the wall
or screen
it
s
surface
and turn the lens to focus the picture to desired clarity.
Playing Music From USB/
dlary.the settings,
choose Setting fromthemainmenuusirqtheLeftandRightbuttons{Fig.3}.TlreSetting
menu allows you to customize vieuring effectg rt powersaving options,select laquage,
customize installation modes, set atdio Feftremes,ad retuntltprqectortothe
being projected on. Position the projector towardthedesired projecting
default settings.
SD
PLEASE
N0TE: Settings will only be saved whentheproiettor is shndorn properly.
Fromthemainmenu,(hoose Muslc byuslngrheLeftandRightbuttons(Fig.3),Usethe
Left and Right butlons again to togg le throug h mu sic selections, then press Enter (Fig. 3)
I
to select.
L_Playing Video From
USB
and SD
Fromthemainmenu,choose Video byusingtheLeftandRightbuttons(Fig,3),Usethe
L€ft and Rig ht buttons again to togg le throug h video selections, then press Enter (Fig. 3)
to select.
Videos being played from the USB or SD ports cannot
exc*d
640 x 480 resolution.
- t/Llec-kF..Lg8nr{Eeo.bedm{ilEdrinGfffu
xlesdtrc
.l
in order to be plared.
km
From the main menu, choose Photo by using the Left and Right buttons (Fig.3).
the Photo menu, use the Left and Right button s again to select photos in the Directory List
( Dir I ist). Use the Left and Right buttons again to select viewing option s, From main Photo
He
menu, select Play Mode and, using the Left and Right buttons, toggle through th€
options. For Slide Show mode,5elect Sllde lnterval from the main Photo menu,tten sdect
the desired length of time each photo will appear on the screen. Select Slide- Effectftom
the main Photo menu to select different Slide show effects.
Using Proje(tor through AV-lnput
From the main menu,
between
PAL or NTSC
choose AV ln by using Left and Right buttons (Fig. 3). Select
format (ch$k the device being connected to the projector to
determine which format to us€). Press Enterto connect devace to proiector,
(Note: Please check which mode ofsignal format your playe, can output, and then dt@se
"AL'ort{TSC". )
Viewing eBook from
USB and SD
From themain menu, (hoose'Ebook"by using the Left and Right buttons (Flg.3). kom
the EBook menu, uE the Left and Right buttons again to sele(t content from the Directory
List (Dir listl.Viewing option can a lso be sele€ted from the main eBook menu, including
font size, (olor, and viewing options
l