1
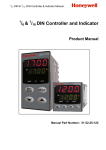
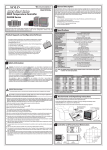
Industrial Ovens An ISO 9001:2008 Registered Company GENERAL INSTRUCTION GUIDE HONEYWELL UDC 1200 & 1700 PROCESS & 120L LIMIT CONTROLLERS This guide is provided by LEWCO, Inc. to assist its customers in becoming familiar with how LEWCO sets up and uses the Honeywell Controllers to test equipment prior to shipping. This document does not replace respective Honeywell user’s manuals and anyone using any of the Honeywell products mentioned here is responsible for obtaining and understanding the user’s manual before using any of these controllers. The user is responsible for setting up and configuring these devices to meet their own application requirements, not limited to but including adjusting set points, tuning and programming profiles. LEWCO, Inc. can offer some technical assistance with the minimum setup and configuration to enable the user to get started; however, Honeywell Tech Support (800 423-9883) provides the best possible assistance in most technical matters regarding their products. If you do not have a manual for your controller, or wish to view an online version of it, please use the following link. The “quick-start” document is very useful and well explained. https://www.honeywellprocess.com/enUS/explore/products/instrumentation/panel-mounted-controllers-and-programmers/1-8th-dincontrollers/pages/default.aspx UDC 1200 and 1700 PROCESS CONTROLLER ADJUSTING THE SETPOINT ACCESSING SETTABLE PARAMETERS ACCESSING PASS CODE PROTECTED PARAMETERS FINDING THE PASS CODE ENTERING THE SETUP MENU ENTERING THE CONFIGURE MENU SETUP PARAMETER TABLE CONFIGURATION PARAMETER TABLE TUNING THE CONTROLLER CHANGING THE DISPLAY FROM FAHRENHIET TO CELCIUS SETTING UP AN ALARM (links to Honeywell Tech Tips Site) DC120L LIMIT CONTROLLER ADJUSTING THE SETPOINT SETUP PARAMETER TABLE CHANGING THE DISPLAY FROM FAHRENHIET TO CELCIUS CLEARING THE OVERTEMP MEMORY AFTER TESTING 1 Industrial Ovens An ISO 9001:2008 Registered Company GENERAL INSTRUCTION GUIDE HONEYWELL UDC 1200 & 1700 PROCESS & 120L LIMIT CONTROLLERS “Honeywell,” “UDC1200,” “UDC1700,” “DC120L” and “DR4300,” as well as certain other terms and phrases are trademarks of Honeywell, and possibly the distinctive shape, style and overall appearance of their products as well. Honeywell terminology is used in this document for instructional use only. LEWCO, Inc. is not affiliated with Honeywell. UDC1200 & 1700 PROCESS CONTROLLERS: Adjust the Process Controller Set point (SP): From the Operator Display, indicated by the “Process Variable” (PV) or actual workspace temperature shown in the upper display and the Set point (SP) shown in the lower display, do the following: Press the “SETUP” key once. “SP” should appear in the lower display and the current Set point value should show in the upper display. Press the appropriate “ARROW” key to raise or lower the Set point to the desired value. Press the “SETUP” key to exit or leave it and it will exit automatically within a minute. Accessing the Settable Parameters in the Controller: Press the “SETUP” key and “UP ARROW” key simultaneously. TIP: Use your thumbs. It can be difficult and frustrating attempting to press both exactly simultaneously with two fingers on the same hand since they are different lengths. “OPtr” should appear in the upper display and “SLCt” should show in the lower display. Press the “UP ARROW” key to scroll through the available menu selections (upper display), which will be “SEtP,” (setup*) “ConF,” (configure*) “inFo,” (information) “Atun” (auto-tune) and back to “OPtr,” (operator) in that order as you continue to press the “UP” ARROW key. Press the “SETUP” key to access any of the above selections to enter that menu. For pass code protected, menus, follow instructions below. Press the “SETUP” key and “UP ARROW” key simultaneously to get out of that menu and back to the selection menu. To get out of the selection menu, scroll to “OPtr” and press the “SETUP” key and you should again see the “Process Variable” (PV) is shown in the upper display and the Set point (SP) is shown in the lower display. NOTE: Figures 1 and 2 list Settable Parameters, their original Honeywell factory defaults and LEWCO factory settings for SETUP (SEtP) and CONFIGURE (ConF) Menus. Not all parameters shown in the tables will be displayed on a given controller based on whether or not associated options have been installed. 2 Industrial Ovens An ISO 9001:2008 Registered Company GENERAL INSTRUCTION GUIDE HONEYWELL UDC 1200 & 1700 PROCESS & 120L LIMIT CONTROLLERS Accessing Pass Code Protected Settable Parameters: (reference “Accessing the Settable Parameters in the Controller,” above) The SETUP (SEtP) and CONFIGURE (ConF) menus require the entry of a pass code to enter. Default pass codes are listed in the tables below. Once you have pressed the “SETUP” key to access either of the above menus, “ULoc” will appear in the lower display and “0” will appear in the upper display. At this prompt, press the “UP ARROW” key until the appropriate pass code appears (i.e. “10”, “20,” etc.). Press the “SETUP” key to enter. If the entered pass code was correct, a new display will show the first parameter available under that menu. If the entered pass code was incorrect, the display will return to the menu display. TIP: If you feel that the pass code that you entered was correct, but you are returned to the menu display, try entering either “1” or the pass code you thought it should have been plus one (i.e. you thought it should have been “10” but “10” did not work, try “1” or “11.” The reason for this is that when setting the pass code and exiting the menu, it is easy to increment the pass code by “one.” Finding the Pass Codes: (If you cannot remember what they are) Power down the controller. Wait ten seconds after the display goes blank and power back up. Once the controller is powered up, and before the display lights up, press AND HOLD the “SETUP” key and “UP” ARROW keys simultaneously. While holding the “SETUP” key and “UP” ARROW keys all functional LED segments in the display will light up and display what appears to be all “eights” with decimals between all of them. Continue to HOLD the “SETUP” key and “UP” ARROW keys simultaneously. After about ten seconds, the display will change to indicate the “ConF” in the lower display and its pass code in the upper display. At this time you may release the keys and scroll through the other pass codes. 3 Industrial Ovens An ISO 9001:2008 Registered Company GENERAL INSTRUCTION GUIDE HONEYWELL UDC 1200 & 1700 PROCESS & 120L LIMIT CONTROLLERS Enter the SETUP Menu and Adjust Parameters Listed in Table 1: Press the “UP ARROW” key and the “SETUP” key simultaneously. Press the “UP ARROW” key until “SEtP” appears on the display. Press the “SETUP” key once to accept. “ULoc” should appear on the display. Press the “UP ARROW” key until “10” (default pass code) appears on the upper display. Press the “SETUP” key once to accept. “FiLt” should appear on the lower display. At this point you may scroll through the parameters using the “SETUP” key. Once you have reached the parameter you wish to change, press the “UP ARROW” or “DOWN ARROW” to change the value. Press the “SETUP” key to scroll to the next parameter or repeatedly until “SLoc” appears in the lower display, indicating that you have reached the end of the settable parameters under that menu. Press the “UP ARROW” key and the “SETUP” key simultaneously to exit the “SETUP” menu and return to the menu selection display. Enter the CONFIGURE Menu and Adjust Parameters Listed in Table 2: Press the “UP ARROW” key and the “SETUP” key simultaneously. Press the “UP ARROW” key until “ConF” appears on the display. Press the “SETUP” key once to accept. “ULoc” should appear on the display. Press the “UP ARROW” key until “20” (default pass code) appears on the upper display. Press the “SETUP” key once to accept. “InPt” should appear on the lower display. At this point you may scroll through the parameters using the “SETUP” key. Once you have reached the parameter you wish to change, press the “UP ARROW” or “DOWN ARROW” to change the value. After a parameter value has been changed, the displayed value (upper display) will BLINK. Press the “Man/Auto” key once to accept. Press the “SETUP” key to scroll to the next parameter or repeatedly until “CLoc” appears in the lower display, indicating that you have reached the end of the settable parameters under that menu. Press the “UP ARROW” key and the “SETUP” key simultaneously to exit the “CONFIGURE” menu and return to the menu selection display. 4 Industrial Ovens An ISO 9001:2008 Registered Company GENERAL INSTRUCTION GUIDE HONEYWELL UDC 1200 & 1700 PROCESS & 120L LIMIT CONTROLLERS FIGURE 1 PROCESS CONTROLLER (UDC1200) SETUP RECORD Controller Serial Number: Parameter Lower Display Factory Default LEWCO Settings Input Filter Time Constant Filt 2 2 Process Variable Offset OFFS 0 0 Primary (Heat) Power PPbJ - Secondary (Cool) Power SPbJ - Primary Proportional Band Pb P 10 10 Secondary Proportional Band Pb S 10 10 Automatic Reset (Integral Time) ArSt 5 5 Rate (Derivative Time) rAtE 1.15 1.15 Overlap/Deadband OL 0 0 Manual Reset biAS 25 25 Primary ON/OFF Differential diFP 0.5 0.5 Secondary ON/OFF Differential diFS 0.5 0.5 Prim. & Sec. ON/OFF Diff. diFF 0.5 0.5 Set point Upper Limit SPuL Range Max Max Design Temp Set point Lower Limit SPLL Range Min Range Min Primary Output Power Limit OPuL 100 100 Output 1 Cycle Time Ct1 32 16 or 32 Output 2 Cycle Time Ct2 32 diSA Output 3 Cycle Time Ct3 32 diSA High Alarm 1 Value PhA1 Range Max Range Max Low Alarm 1 Value PlA1 Range Min Range Min Deviation Alarm 1 Value dAL1 5 5 Band Alarm 1 Value bAL1 5 5 Alarm 1 Hysteresis AHY1 1 1 High Alarm 2 Value PhA2 Range Max Range Max Low Alarm 2 Value PLA2 Range Min Range Min Deviation Alarm 2 Value dAL2 5 5 Band Alarm 2 Value bAL2 5 5 Alarm 2 Hysteresis AHY2 1 1 Loop Alarm Time Lat1 99.59 99.59 Auto Pre-Tune Apt diSA diSA Auto/Manual Control Selection PoEn diSA diSA Set point Ramping SPr diSA diSA Set point Ramp Value rP - - SP Value SP Range Min Range Min SP1 Value SP1 Range Min Range Min SP2 Value SP2 Range Min Range Min Setup Lock Code Sloc 10 10 5 Industrial Ovens An ISO 9001:2008 Registered Company GENERAL INSTRUCTION GUIDE HONEYWELL UDC 1200 & 1700 PROCESS & 120L LIMIT CONTROLLERS FIGURE 2 PROCESS CONTROLLER (UDC1200) CONFIGURATION RECORD Controller Serial Number: Parameter Lower Display Factory Default LEWCO Settings Input Range/Type inPt JF JF Scale Range Upper Limit ruL 1401 1401 Scale Range Lower Limit rLL 32 32 Decimal Point Position dPos 1 1 Control Type CtYP SnGL SnGL Primary Output Control Action Alarm 1 Type High Alarm 1 Value CtrL ALA1 PhA1 rEv P_Hi Range Max rEv nonE Low Alarm 1 Value PLA1 Range Min Deviation Alarm 1 Value dAL1 5 Band Alarm 1 Value bAL1 5 Alarm 1 Hysteresis AHY1 1 Alarm 2 Type ALA2 P_Lo High Alarm 2 Value PhA2 Range Max Low Alarm 2 Value PLA2 Range Min Deviation Alarm 2 Value dAL2 5 Band Alarm 2 Value bAL2 5 Alarm 2 Hysteresis AHY2 1 Loop Alarm Loop Alarm Time Alarm Inhibit LAEn diSA diSA Inhi nonE nonE Output 1 Usage USE1 Pri Pri Linear Output 1 Range tYP1 0-10 Retransmit Output 1 Scale Max. ro1H Range Max Retransmit Output 1 Scale Min. ro1L Range Min Output 2 Usage USE2 A2_d Linear Output 2 Range tYP2 0-10 Retransmit Output 2 Scale Max. ro2H Range Max Retransmit Output 2 Scale Min. ro2L Range Min Output 3 Usage USE3 0-10 Linear Output 3 Range tYP3 Range Max Retransmit Output 3 Scale Max. ro3H Range Min Retransmit Output 3 Scale Min. ro3L 1 Display Strategy diSP - Comms Protocol Bit rate Comms Address Prot bAud Addr - Comms Write CoEn - Digital Input Usage Config Lock Code diGi Cloc 20 nonE 1 20 6 Industrial Ovens An ISO 9001:2008 Registered Company GENERAL INSTRUCTION GUIDE HONEYWELL UDC 1200 & 1700 PROCESS & 120L LIMIT CONTROLLERS Change Display from Fahrenheit to Celsius: Enter the Configuration Mode: Press the “UP ARROW” key and the “SETUP” key simultaneously. Press the “UP ARROW” key until “ConF” appears on the display. Press the “SETUP” key once to accept. “ULoc” should appear on the display. Press the “UP ARROW” key until “20” appears on the display. Press the “SETUP” key once to accept. “InPt” should appear on the display. Press either “ARROW” key until “JC” appears on the display. Press the “Man/Auto” key once to accept. Press the “SETUP” key once to move to the Range Upper Limit” parameter. “ruL” should appear on the display. Press either “ARROW” key until “761” appears on the display. Press the “Man/Auto” key once to accept. Press the “SETUP” key once to move to the Range Lower Limit” parameter. “rLL” should appear on the display. Press either “ARROW” key until “0” appears on the display. Press the “Man/Auto” key once to accept. Press the “UP ARROW” key and the “SETUP” key simultaneously. Press the “UP ARROW” key until “OPtr” appears on the display. Press the “SETUP” key once to accept. Adjust the Process Controller Set point (SP): The upper display should now indicate the Process Variable in degrees C and the lower display should indicate a Set-Point of “0” Press the “SETUP” key once to enter the Set-Point entry mode. Press the “UP ARROW” key until the desired temperature in degrees C appears on the display. Press the “SETUP” key once to accept. The upper display should now indicate the Process Variable in degrees C and the lower display should indicate the Set-Point in degrees C. 7 Industrial Ovens An ISO 9001:2008 Registered Company GENERAL INSTRUCTION GUIDE HONEYWELL UDC 1200 & 1700 PROCESS & 120L LIMIT CONTROLLERS Enter the ACCU-TUNE (Atun) Menu and Enable or Disable: ACCU-TUNE consists of two different tuning functions; “Pre-Tune,” which generates the initial optimum values in the PID and “Self-Tune,” which can be used to refine the values in the PID as the controller is operated under “normal” conditions over time. Pre-Tune can only be engaged if the temperature is significantly less than the Set point and disengages automatically when done and is indicated by a blinking “AT” light on the controller. Self-Tune must be disengaged manually, once one is comfortable that the controller is tuned for normal conditions, and is indicated by a steady “AT” light on the controller. Press the “UP ARROW” key and the “SETUP” key simultaneously. Press the “UP ARROW” key until “Atun” appears on the upper display. Press the “SETUP” key once to enter the Accutune menu. “Ptun” should appear on the lower display. o If “ULoc” appears in the lower display instead then someone has set up a pass code. o At the “ULoc” prompt, press the “UP ARROW” key until the appropriate pass code appears (i.e. “10” or “20,” etc.). If you do not know the pass code, refer to the index. o Press the “SETUP” key once to accept. o “Ptun” should now appear on the lower display. At this point you may toggle between “ON” and “OFF” using the “UP ARROW” key. o If “ON” cannot be selected, it means that the PV is too close to the SP for “Pretune” (Ptun) to engage. Once Pre-Tune is accessed and engaged or disengaged, press the “SETUP” key once to accept and advance to Self-Tune, where “Stun” appears in the lower display. You may now toggle between “ON” and “OFF” using the “UP ARROW” key. Once Self-Tune is accessed and engaged or disengaged, press the “SETUP” key once to accept. “tLoc” should appear in the lower dsiplay. You may set a pass code using the “UP ARROW” or “DOWN ARROW”. Press the “UP ARROW” key and the “SETUP” key simultaneously to exit the “Atun” menu and return to the menu selection display. 8 Industrial Ovens An ISO 9001:2008 Registered Company GENERAL INSTRUCTION GUIDE HONEYWELL UDC 1200 & 1700 PROCESS & 120L LIMIT CONTROLLERS DC120L LIMIT CONTROLLER: Adjust the Limit Controller Set point (SP): Press the “UP ARROW” key and the “SETUP” key simultaneously. “ULoc” should appear in the lower display and a zero should appear in the upper display. At this prompt, press the “UP ARROW” key until the appropriate pass code appears (i.e. “10” or “20,” etc.). Press the “SETUP” key. If the entered pass code was correct, a new display will show the first parameter available under that menu. If the entered pass code was not correct, the display will return to the menu display. TIP: If you feel that the pass code that you entered was correct but you are returned to the menu display, try entering either “1” or the pass code you thought it should have been plus one (i.e. you thought it should have been “10” but “10” did not work, try “1” or “11.” The reason for this is that when setting the pass code and exiting the menu, it is easy to increment the pass code by “one.” Once you make it past the pass code: “SP” should appear in the lower display and the current Set point value should show in the upper display. A small red “s” should appear in the right of the lower display indicating that the controller is in “set up” mode. Press the appropriate “ARROW” key to raise or lower the Set point to the desired value. Press the “SETUP” key until “Loc” appears in the lower display. Press the “UP ARROW” key and the “SETUP” key simultaneously to exit or leave it and it will exit automatically within a minute. Finding the Pass Codes if you cannot remember what they are: Power down the controller. Wait ten seconds after the display goes blank and power back up. Once the controller is powered up, and before the display lights up, press AND HOLD the “SETUP” key and “UP” ARROW keys simultaneously. While holding the “SETUP” key and “UP” ARROW keys all functional LED segments in the display will light up and display what appears to be all “eights” with decimals between all of them. Continue to HOLD the “SETUP” key and “UP” ARROW keys simultaneously. After about ten seconds, the display will change to indicate the “ConF” in the lower display and its pass code in the upper display. At this time you may release the keys and scroll through the other pass codes. NOTE: Set Limit Controller Set Point at 20 F. over maximum operating temperature. o Electric Drum Heating Cabinets: 300 F + 20 F = 320 F. o Steam Drum Heating Cabinets: 300 F + 20 F = 320 F. o High Humidity Drum Heating Cabinets: 190 F + 20 F = 210 F. 9 Industrial Ovens An ISO 9001:2008 Registered Company GENERAL INSTRUCTION GUIDE HONEYWELL UDC 1200 & 1700 PROCESS & 120L LIMIT CONTROLLERS LIMIT CONTROLLER (DC120L) SETUP RECORD Controller Serial Number: Parameter Lower Display Factory Default LEWCO Settings Limit Set point Value SP Range Max. Max Design+20F Limit Hysteresis HYSt 1 Input Filter Time Constant Filt 2 Process High Alarm 1 Value PhA1 Range Max Process Low Alarm 1 Value PLA1 Range Min Deviation Alarm 1 Value dAL1 5 5 Band Alarm 1 Value bAL1 5 5 Alarm 1 Hysteresis AHY1 1 1 High Alarm 2 Value PhA2 Range Max Range Max Low Alarm 2 Value PLA2 Range Min Range Min Deviation Alarm 2 Value dAL2 5 5 Band Alarm 2 Value bAL2 5 5 Alarm 2 Hysteresis AHY2 1 1 Setup Lock Code Sloc 10 10 2 10 Industrial Ovens An ISO 9001:2008 Registered Company GENERAL INSTRUCTION GUIDE HONEYWELL UDC 1200 & 1700 PROCESS & 120L LIMIT CONTROLLERS LIMIT CONTROLLER (DC120L) CONFIGURATION RECORD Parameter Lower Display Factory Default LEWCO Settings Input Range/Type inPt JF JF Scale Range Upper Limit ruL 1401 1401 Scale Range Lower Limit rLL 32 32 Decimal Point Position dPos 1 1 Decimal Point Position dPos 1 1 Process Variable Offset OFFS 0 0 Limit Action CtrL Hi Hi Set point Upper Limit SPuL Range Max Max Design+20F Set point Lower Limit SPLL Range Min 32 Alarm 1 Type ALA1 P_Hi nonE High Alarm 1 Value PhA1 Range Max Low Alarm 1 Value PLA1 Range Min Deviation Alarm 1 Value dAL1 5 Band Alarm 1 Value bAL1 5 Alarm 1 Hysteresis AHY1 1 Alarm 2 Type ALA2 P_Lo High Alarm 2 Value PhA2 Range Max Low Alarm 2 Value PLA2 Range Min Deviation Alarm 2 Value dAL2 5 Band Alarm 2 Value bAL2 5 Alarm 2 Hysteresis AHY2 1 Output 2 Usage USE2 A1_d Linear Output 2 Range tYP2 0-10 Retransmit Output 2 Scale Max. ro2H Range Max Retransmit Output 2 Scale Min. ro2L Range Min Output 3 Usage USE3 0-10 Linear Output 3 Range tYP3 Range Max Retransmit Output 3 Scale Max. ro3H Range Min Retransmit Output 3 Scale Min. ro3L 1 Display Strategy diSP - Comms Protocol Prot - Bit rate bAud - Comms Address Addr - Comms Write CoEn - Digital Input Usage diGi - Config Lock Code Cloc 20 nonE 1 20 11 Industrial Ovens An ISO 9001:2008 Registered Company GENERAL INSTRUCTION GUIDE HONEYWELL UDC 1200 & 1700 PROCESS & 120L LIMIT CONTROLLERS Change Display from Fahrenheit to Celsius: Cycle Power on the Controller: Pull controller from the socket far enough that the display goes off. Wait several seconds. Re-insert controller. Immediately press and hold the “UP ARROW” key and the “SETUP” key simultaneously. Continue to hold both keys until “1420” appears on the display. Press the “DOWN ARROW” key once to display “1419.” Press the “RESET” key once to accept. Press the “UP ARROW” key and the “SETUP” key simultaneously again to exit. The display will go blank momentarily then re-appear with decimals between all the characters. The decimals indicate that all parameters have been reset to factory default. Adjust the Limit Controller Set point (SP): Press the “UP ARROW” key and the “SETUP” key simultaneously. “ULoc” should appear in the lower display and a zero should appear in the upper display. Press the “UP ARROW” key until “10” appears in the upper display. Press the “SETUP” key. “SP” should appear in the lower display and the current Set point value should show in the upper display. A small red “s” should appear in the right of the lower display indicating that the controller is in “set up” mode. Press the appropriate “ARROW” key to raise or lower the Set point to the desired value. Press the “SETUP” key until “Loc” appears in the lower display. Press the “UP ARROW” key and the “SETUP” key simultaneously to exit or leave it and it will exit automatically within a minute. Clear Overtemp History After Testing/ Before Shipping: Clear History: Press the “SETUP” key once. “HiHd” should appear in the lower display and the highest attained “overtemp” temperature or “OPEN” (if the TC had ever been disconnected while under power) should appear in the upper display. Press and hold either “ARROW” key until “- - - -” appears in the upper display. The record is cleared. Press the “SETUP” key again. “ti” should appear in the lower display and the accumulated elapsed time that the controller saw overtemp and/or an open TC should show in the upper display. Press and hold either “ARROW” key until “- - - -” appears in the upper display. The record is cleared. Press the “SETUP” key again twice to return to the operator’s display. 12