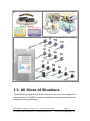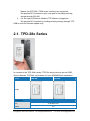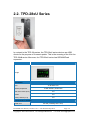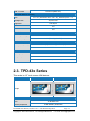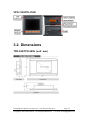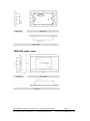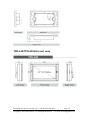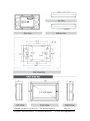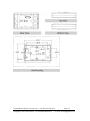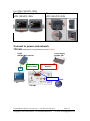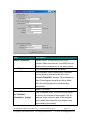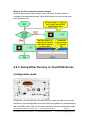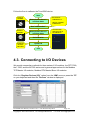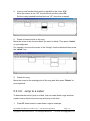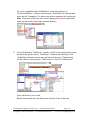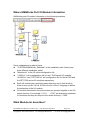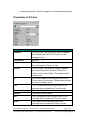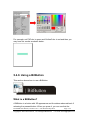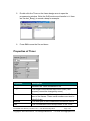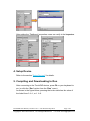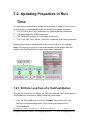
1
TouchPAD TPD/VPD Series HMI Device User Manual Version 1.0.12 ICP DAS Co., Ltd. TouchPAD User Manual, version 1.0.12. Last Revised: May 2012 Copyright © 2012 ICP DAS Co., Ltd. All Rights Reserved. Page: 1 E-mail: [email protected] Warning ICP DAS assumes no liability for any damage resulting from the use of this product. ICP DAS reserves the right to change this manual at any time without notice. The information furnished by ICP DAS is believed to be accurate and reliable. However, no responsibility is assumed by ICP DAS for its use, nor for any infringements of patents or other rights of third parties resulting from its use. Copyright Copyright @ 2012 by ICP DAS Co., Ltd. All rights are reserved. Trademark The names used for identification only may be registered trademarks of their respective companies. Support ICP DAS takes your problem as ours. If you have any problem, please feel free to contact us. You can count on us for quick response. Email: [email protected] Tel: 886-3-5973336 Also, the FTP site of ICP DAS has contents about TouchPAD which you may be interested in. We believe that those contents may be helpful to your work. FTP: ftp://ftp.icpdas.com/pub/cd/touchpad/ TouchPAD User Manual, version 1.0.12. Last Revised: May 2012 Copyright © 2012 ICP DAS Co., Ltd. All Rights Reserved. Page: 2 E-mail: [email protected] Preface Thank you for buying TPD/VPD Series HMI Devices, TouchPADs, which are made by ICP DAS Co., Ltd. We suggest you read through this user manual before you set up these devices and develop their programs. Purpose This manual shows how to use TouchPADs and develop programs. This manual mainly contains the following parts: Introduction: basic understandings of TouchPADs. Hardware: specifications, dimensions, and installations. Software: mainly how to build a project and HMIWorks introductions. Personnel This manual is fit for following personnel: End Users Engineers Technicians TouchPAD User Manual, version 1.0.12. Last Revised: May 2012 Copyright © 2012 ICP DAS Co., Ltd. All Rights Reserved. Page: 3 E-mail: [email protected] Table of Contents Preface ............................................................................................................ 3 1. Introduction ............................................................................................... 7 1.1. Advanced Features ........................................................................ 7 1.2. Applications of TouchPAD ............................................................. 8 1.3. All Kinds of Situations .................................................................. 10 2. 3. 4. 5. General Specifications ............................................................................ 13 2.1. TPD-28x Series ............................................................................ 14 2.2. TPD-28xU Series ......................................................................... 16 2.3. TPD-43x Series ............................................................................ 17 2.4. VPD-13x Series ........................................................................... 18 Hardware ................................................................................................ 21 3.1. Hardware Appearance ................................................................. 21 3.2. Dimensions .................................................................................. 23 3.3. Installation and Wiring .................................................................. 29 Set up Devices and Connect to I/O......................................................... 35 4.1. Preparation .................................................................................. 35 4.2. Setup Devices .............................................................................. 36 4.2.1. Setup the TPD-280 devices ................................................ 36 4.2.2. Setup the TPD-283 devices ................................................ 38 4.2.3. Setup Other Devices in TouchPAD Series........................... 45 4.3. Connecting to I/O Devices ........................................................... 49 Development Software, HMIWorks ......................................................... 51 5.1. The Construction of HMIWorks .................................................... 51 5.2. 5.3. The Options of TouchPAD ............................................................ 54 Ladder Designer .......................................................................... 55 5.3.1. Getting Started .................................................................... 56 5.3.2. Introduction to Ladder Designer .......................................... 57 5.3.3. Operations of Ladder Designer ........................................... 62 5.3.4. User-Defined Function Block .............................................. 76 5.3.5. Associate Tags with Tools ................................................... 79 5.3.6. User-Defined I/O Modules ................................................... 81 5.4. Frames and Tools......................................................................... 88 5.4.1. Properties of a Frame ......................................................... 89 5.4.2. Drawing a Rectangle ........................................................... 92 TouchPAD User Manual, version 1.0.12. Last Revised: May 2012 Copyright © 2012 ICP DAS Co., Ltd. All Rights Reserved. Page: 4 E-mail: [email protected] 5.4.3. 5.4.4. 5.4.5. 5.4.6. 5.4.7. 5.4.8. 5.4.9. 5.4.10. 5.4.11. Drawing an Ellipse .............................................................. 95 Drawing a Text .................................................................... 97 Loading a Picture .............................................................. 100 Drawing a Line .................................................................. 103 Using a TextPushButton .................................................... 105 Using a Slider .................................................................... 110 Using a BitButton .............................................................. 114 Using a HotSpot .............................................................. 118 Using a CheckBox ........................................................... 121 5.4.12. Using a Label .................................................................. 125 5.4.13. Using a Timer .................................................................. 130 5.4.14. Using a PaintBox............................................................. 133 5.4.15. Using an ObjectList ......................................................... 136 5.5. Menus ........................................................................................ 141 5.5.1. Cascading and Grouping, Arrange Menu .......................... 141 5.5.2. Rotating and Flipping, Edit Menu ...................................... 144 5.5.3. Frame Managing and Aligning, Layout Menu .................... 146 5.5.4. Build and Download to Run, Run Menu ............................ 149 6. 7. 5.5.5. Library Management, Popup Menu ................................... 150 Making a Simple Project ....................................................................... 155 6.1. Your First Project Using Standard C .......................................... 155 6.2. Your First Project Using Ladder ................................................. 158 6.3. Integrating TPD-280 Series with I/O modules ............................ 163 6.4. Integrating TPD-283 Series with I/O modules ............................ 166 Advanced Programming in C ................................................................ 170 7.1. Adding a New File to Project ...................................................... 170 7.2. Updating Properties in Run Time ............................................... 171 7.2.1. FillColor and Text of a TextPushButton.............................. 171 7.2.2. Percentage of a Slider....................................................... 173 7.2.3. Selected of a CheckBox .................................................... 174 7.2.4. Font, Text and TextColor of a Label ................................... 176 7.3. Accessing Tags in Ladder .......................................................... 178 Appendix ...................................................................................................... 180 A. FAQ ............................................................................................... 180 A.1. What to do if screen flashes? .............................................. 180 A.2. How to have higher-resolution Picture? .............................. 180 A.3. A.4. How does a TouchPAD control I/O? .................................... 180 How to change Font of Text? .............................................. 180 TouchPAD User Manual, version 1.0.12. Last Revised: May 2012 Copyright © 2012 ICP DAS Co., Ltd. All Rights Reserved. Page: 5 E-mail: [email protected] A.5. A.6. A.7. A.8. A.9. How to represent decimals for Ladder Designer? ............... 181 How to remove the startup beep of a TPD-283 device? ..... 181 How to customize the generated code? .............................. 181 How to store data in the flash? ........................................... 182 How to clear a PaintBox? .................................................... 182 TouchPAD User Manual, version 1.0.12. Last Revised: May 2012 Copyright © 2012 ICP DAS Co., Ltd. All Rights Reserved. Page: 6 E-mail: [email protected] 1. Introduction Our solution for HMI (Human Machine Interface) is composed of GUI (Graphical User Interface) based touch screens and an integrated software development package. ICP DAS hears the voices of our customers and is dedicated to providing a series of solutions particularly for intelligent building, equipment monitoring, factory automation and automatic controls. Its development software, HMIWorks, provides plenty of widgets and a variety of templates. Combined with the high resolution color touch screen of the TouchPAD series, a GUI can be realized with your own unique fashion and style. Development is no longer difficult and project accomplishment is within reach. ICP DAS provides two types of touch HMI devices, the TPD series and the VPD series. The TPD series is designed for home/building automation applications and the VPD series is designed for factory/machine automation applications. Both have many common features, such as a high-resolution touch screen, RTC, and a variety of communication interfaces, including RS-232/RS-485, Ethernet, USB. However, each still has its own specific features for its respective target applications. For the TPD series, you can use an external wall box to help you smoothly blend the TPD series device into your decoration. For the VPD series, the rubber keypad, IP-65 waterproof front panel and DIN-Rail/panel mounting are designed for harsh environment, and are especially suitable for factories. 1.1. Advanced Features Excellent C/P ratio (cost/performance) Workable under tough environments, operating temperature: -20℃~70℃ High Color resolution touch screen PoE, Power over Ethernet (TPD-283) RS-485 network (TPD-280/TPD-280U/TPD-430/VPD-130) TouchPAD User Manual, version 1.0.12. Last Revised: May 2012 Copyright © 2012 ICP DAS Co., Ltd. All Rights Reserved. Page: 7 E-mail: [email protected] WYSIWYG (What You See Is What You Get) GUI design Complete and powerful development tool, easy integration with touch HMI devices, quick design for a variety of applications Supports the popular C programming language Ladder logic design 1.2. Applications of TouchPAD Interactions between human and machine are getting more and more important since automation control has emerged. From systematic surveillance of equipments, status monitoring of house appliances or even measurements of temperature and humidity, HMI devices play an indispensable role in passing information. In the early time, HMI devices consist of lights, meters, 7-segment display. For now, LED and LCD are prevalently used and ICP DAS releases TouchPAD as a state-of-the-art solution. In addition to GUI and touch LCD, the solution of ICP DAS provides development software package, HMIWorks. HMIWorks satisfies most of the requirements with the WYSIWYG (What You See Is What You Get) design environment. Besides, It has plenty of widgets and varieties of templates, and so it’s easy to present customers with professional interface with modern styles. Moreover, HMIWorks supports C language. It makes easy timing control and logic design and in turns makes TouchPAD more powerful. Through standard communication protocols and SCADA (Supervisory Control and Data Acquisition) software, it is directly inoculated with background TouchPAD User Manual, version 1.0.12. Last Revised: May 2012 Copyright © 2012 ICP DAS Co., Ltd. All Rights Reserved. Page: 8 E-mail: [email protected] software and attains the best effect of completely integration. Below are figures of the application fields of TouchPAD, intelligent building and classroom automation. In these examples, TouchPADs are used to control lights, curtains, air conditioners, stereos, projectors, projector screens, and to monitor temperature, humidity, and weather conditions. Application Fields of TouchPAD Intelligent Building Example Classroom Automation Example Single-way, Two-way, Multi-way Switches Example Temperature Control Example TouchPAD User Manual, version 1.0.12. Last Revised: May 2012 Copyright © 2012 ICP DAS Co., Ltd. All Rights Reserved. Page: 9 E-mail: [email protected] Multi-Display TouchPAD Anywhere 1.3. All Kinds of Situations TouchPAD can be applied in all kinds of situations you even have imagined. In these situations, TouchPAD is used as a window for signal transmissions and arranges incoming messages. TouchPAD User Manual, version 1.0.12. Last Revised: May 2012 Copyright © 2012 ICP DAS Co., Ltd. All Rights Reserved. Page: 10 E-mail: [email protected] In the hotel, on the wall In the apartment building, beside the door In the exhibition hall, beside the exhibits In the school, in the classroom In the office, outside the meeting room In the farm, in the front door of the greenhouse TouchPAD User Manual, version 1.0.12. Last Revised: May 2012 Copyright © 2012 ICP DAS Co., Ltd. All Rights Reserved. Page: 11 E-mail: [email protected] In the hypermarket, on the shelves In the factory, on the steam chambers In the toilet And more… TouchPAD User Manual, version 1.0.12. Last Revised: May 2012 Copyright © 2012 ICP DAS Co., Ltd. All Rights Reserved. Page: 12 E-mail: [email protected] 2. General Specifications Note: Communication interface that is only for run time supports the following protocols: I. For the case of RS-485, Modbus RTU Master and DCON Protocol TouchPAD User Manual, version 1.0.12. Last Revised: May 2012 Copyright © 2012 ICP DAS Co., Ltd. All Rights Reserved. Page: 13 E-mail: [email protected] Master (for ICP DAS I-7000 series modules) are supported. We provide API functions to open com port for sending/receiving strings through RS-485. II. For the case of Ethernet, Modbus TCP Master is supported. We provide API functions to sending/receiving strings through TCP. USB is used for firmware update only. 2.1. TPD-28x Series In contrast to the TPD-28xU series, TPD-28x series devices are not USB clients. Besides, TPD-28x series does not have SDRAM/Flash expansion. Models TPD-280 TPD-283 Image CPU Module CPU Buzzer 32-bit RISC CPU Yes TouchPAD User Manual, version 1.0.12. Last Revised: May 2012 Copyright © 2012 ICP DAS Co., Ltd. All Rights Reserved. Page: 14 E-mail: [email protected] Rotary Switch (0~9) Yes Communication Interface Ethernet Serial Port - RJ-45 x 1, 10/100 Base-TX RS-485 (including Self-Tuner) - MMI (Main Machine Interface) LCD 2.8” TFT (Resolution 240 x 320 x 16), defective pixels <= 3 Backlight Life 20,000 hours Brightness 160 cd/m2 Touch Panel Yes Reset Button Yes Electrical Power Input Range +10 ~ 30 VDC PoE (Power over Ethernet) Power Consumption 1.2 W (50 mA @ 24 VDC) IEEE 802.3af, Class 1 Mechanical Dimensions (WxLxH) Installation 76mm (W) x 119mm (L) x 31mm (H) Wall Mount Environmental Operating Temperature -20 ~ +70 °C Storage Temperature -30 ~ +80 °C Ambient Relative Humidity 10 ~ 90% RH, non-condensing TouchPAD User Manual, version 1.0.12. Last Revised: May 2012 Copyright © 2012 ICP DAS Co., Ltd. All Rights Reserved. Page: 15 E-mail: [email protected] 2.2. TPD-28xU Series In contrast to the TPD-28x series, the TPD-28xU series devices are USB clients for the purpose of firmware update. This is the meaning of the U in the TPD-28xU series. Moreover, the TPD-28xU series has SDRAM/Flash expansion. Models TPD-280U Image CPU Module CPU Memory Expansion 32-bit RISC CPU 16 MB SDRAM / 8 MB Flash Real Time Clock (RTC) Yes Buzzer Yes Rotary Switch (0~9) Yes Communication Interface Serial Port RS-485 (including Self-Tuner) TouchPAD User Manual, version 1.0.12. Last Revised: May 2012 Copyright © 2012 ICP DAS Co., Ltd. All Rights Reserved. Page: 16 E-mail: [email protected] USB 1.1 Client Firmware updates only MMI (Main Machine Interface) LCD 2.8” TFT (Resolution 240 x 320 x 16), defective pixels <= 3 Backlight Life 20,000 hours Brightness 160 cd/m2 Touch Panel Yes Reset Button Yes Electrical Power Input Range +10 ~ 30 VDC Power Consumption 1.2 W (50 mA @ 24 VDC) Mechanical Dimensions (WxLxH) 76mm (W) x 119mm (L) x 31mm (H) Installation Wall Mount Environmental Operating Temperature -20 ~ +70 °C Storage Temperature -30 ~ +80 °C Ambient Relative Humidity 10 ~ 90% RH, non-condensing 2.3. TPD-43x Series This series is 4.3” touch screen HMI devices. Models TPD-430 TPD-430-EU Image CPU Module CPU Memory Expansion 32-bit RISC CPU 16 MB SDRAM / 8 MB Flash TouchPAD User Manual, version 1.0.12. Last Revised: May 2012 Copyright © 2012 ICP DAS Co., Ltd. All Rights Reserved. Page: 17 E-mail: [email protected] Real Time Clock (RTC) Yes Speaker Yes Rotary Switch (0~9) Yes Communication Interface Serial Port RS-485 (including Self-Tuner) USB 1.1 Client Firmware updates only MMI (Main Machine Interface) LCD 4.3” TFT(Resolution 480 X 272 X 16), defective pixels <= 3 Backlight Life 20,000 hours Brightness 400 cd/m2 Touch Panel Yes LED Indicator Yes Reset Button Yes Electrical Power Input Range +10 ~ 30 VDC Power Consumption 2.5 W (104 mA @ 24 VDC) Mechanical Dimensions (WxLxH) Installation 126mm(W) x 82mm(L) x 24mm(H) 126mm(W) x 92mm(L) x 29mm(H) Wall Mount Wall Mount (Suitable for the outlet box in (Suitable for the European 86mm United States ) x 86mm outlet box) Environmental Operating Temperature -20 ~ +70 °C Storage Temperature -30 ~ +80 °C Ambient Relative Humidity 10 ~ 90% RH, non-condensing 2.4. VPD-13x Series VPD series devices are designed for industrial applications. Models VPD-130 VPD-130N TouchPAD User Manual, version 1.0.12. Last Revised: May 2012 Copyright © 2012 ICP DAS Co., Ltd. All Rights Reserved. Page: 18 E-mail: [email protected] Image CPU Module CPU 32-bit RISC CPU Memory Expansion 16 MB SDRAM / 8 MB Flash Real Time Clock (RTC) Yes Buzzer Yes Rotary Switch (0~9) Yes Communication Interface Serial Port One set of RS-232/ RS-485, including Self-Tuner USB 1.1 Client Firmware updates only MMI (Main Machine Interface) LCD 3.5” TFT (Resolution 240 x 320 x 16), defective pixels <= 3 Backlight Life 20,000 hours Brightness 270 cd/m2 Touch Panel LED Indicator Yes Yes - Reset Button Rubber Keypad Yes 5 keys (Programmable) - Electrical Power Input Range +12 ~ 48 VDC Power Consumption 2 W (83 mA @ 24 VDC) Mechanical Dimension Ingress Protection Installation 103 mm (W) x103 mm (L) x 53mm (H) Front Panel: IP65 DIN-Rail Mount and Panel Mount Environmental Operating Temperature -20 ~ +70 °C Storage Temperature -30 ~ +80 °C TouchPAD User Manual, version 1.0.12. Last Revised: May 2012 Copyright © 2012 ICP DAS Co., Ltd. All Rights Reserved. Page: 19 E-mail: [email protected] Ambient Relative Humidity 10 ~ 90% RH, non-condensing TouchPAD User Manual, version 1.0.12. Last Revised: May 2012 Copyright © 2012 ICP DAS Co., Ltd. All Rights Reserved. Page: 20 E-mail: [email protected] 3. Hardware This chapter shows the overviews, dimensions, etc. of the TouchPAD devices. 3.1. Hardware Appearance TPD-280/TPD-280U TPD-283 TouchPAD User Manual, version 1.0.12. Last Revised: May 2012 Copyright © 2012 ICP DAS Co., Ltd. All Rights Reserved. Page: 21 E-mail: [email protected] Where is the reset button? TPD-430/TPD-430-EU TouchPAD User Manual, version 1.0.12. Last Revised: May 2012 Copyright © 2012 ICP DAS Co., Ltd. All Rights Reserved. Page: 22 E-mail: [email protected] VPD-130/VPD-130N 3.2. Dimensions TPD-280/TPD-280U (unit: mm) TouchPAD User Manual, version 1.0.12. Last Revised: May 2012 Copyright © 2012 ICP DAS Co., Ltd. All Rights Reserved. Page: 23 E-mail: [email protected] TPD-283 (unit: mm) TouchPAD User Manual, version 1.0.12. Last Revised: May 2012 Copyright © 2012 ICP DAS Co., Ltd. All Rights Reserved. Page: 24 E-mail: [email protected] TPD-430/TPD-430-EU (unit: mm) TouchPAD User Manual, version 1.0.12. Last Revised: May 2012 Copyright © 2012 ICP DAS Co., Ltd. All Rights Reserved. Page: 25 E-mail: [email protected] TouchPAD User Manual, version 1.0.12. Last Revised: May 2012 Copyright © 2012 ICP DAS Co., Ltd. All Rights Reserved. Page: 26 E-mail: [email protected] TouchPAD User Manual, version 1.0.12. Last Revised: May 2012 Copyright © 2012 ICP DAS Co., Ltd. All Rights Reserved. Page: 27 E-mail: [email protected] VPD-130/VPD-130N (unit: mm) TouchPAD User Manual, version 1.0.12. Last Revised: May 2012 Copyright © 2012 ICP DAS Co., Ltd. All Rights Reserved. Page: 28 E-mail: [email protected] 3.3. Installation and Wiring Mount the hardware TouchPAD User Manual, version 1.0.12. Last Revised: May 2012 Copyright © 2012 ICP DAS Co., Ltd. All Rights Reserved. Page: 29 E-mail: [email protected] For TPD-280/TPD-280U/TPD-283: TPD-280/TPD-280U with External Wall Box, EWB-T28 (optional) TPD-280/TPD-280U with Outlet Box, OB120 (optional) For TPD-430/TPD-430-EU: TPD-430 with External Wall Box, EWB-T43 (optional) TPD-430 with Outlet Box, OB120 (optional) TPD-430-EU for European 86 x 86 mm outlet box TouchPAD User Manual, version 1.0.12. Last Revised: May 2012 Copyright © 2012 ICP DAS Co., Ltd. All Rights Reserved. Page: 30 E-mail: [email protected] For VPD-130/VPD-130N: The DIN-rail mounting of VPD-130/VPD-130N The panel mounting of VPD-130/VPD-130N Connect to power and network TPD-280 (Applications are downloaded through RS-485.) I-7561, USB/RS-485 Converter USB RS-485 (Data+, Data-) Power supply, DP-665, 24V VDC (+10 ~+30 VDC) Ground Frame Ground Earth PC TPD-280 TouchPAD User Manual, version 1.0.12. Last Revised: May 2012 Copyright © 2012 ICP DAS Co., Ltd. All Rights Reserved. Page: 31 E-mail: [email protected] TPD-283 (Applications are downloaded through Ethernet.) PoE Switch NS-205PSE Power supply KA-52F-48 Power PC Ethernet Internet ET-7000/PET-7000 TPD-283 ** Note: either “Ethernet” or “PoE” uses the same general Ethernet cable. ** PoE, power over Ethernet, means that the Ethernet cable conveys not only data but also power. TPD-280U (Applications are downloaded through USB only.) I-7561, USB/RS-485 Converter USB RS-485 (Data+, Data-) USB Power supply, DP-665, 24V VDC (+10 ~+30 VDC) and Ground Frame Ground Earth PC TPD-280U TouchPAD User Manual, version 1.0.12. Last Revised: May 2012 Copyright © 2012 ICP DAS Co., Ltd. All Rights Reserved. Page: 32 E-mail: [email protected] TPD-430/TPD-430-EU (Applications are downloaded through USB only.) Power supply, DP-665, 24V I-7561, USB/RS-485 Converter VDC (+10 ~+30 VDC) and Ground RS-485 (Data+, Data-) USB Earth Frame Ground USB TPD-430/TPD-430-EU PC VPD-130/VPD-130N (Applications are downloaded through USB only.) I-7561, USB/RS-485 Converter RS-485 (Data+, Data-) Power supply, DP-665, 24V VDC (+10 ~+30 VDC) and Ground USB Frame Ground USB Earth PC VPD-130/VPD-130N TouchPAD User Manual, version 1.0.12. Last Revised: May 2012 Copyright © 2012 ICP DAS Co., Ltd. All Rights Reserved. Page: 33 E-mail: [email protected] The pin assignments The pin assignments of the TPD-280/ TPD-280U/ TPD-283/ TPD-430/ TPD-430-EU devices: No Mode Description 0 F.G. Frame Ground. F.G. is connected to the inside EMI or ESD suppression circuits. Make sure that F.G. is connected to the Earth 1 VDC DC input Voltage (range: +10V ~ +30V) 2 GND Connected to the power supply’s ground pin 3 Data+ The positive data line of the RS-485 network 4 Data- The negative data line of the RS-485 network The pin assignments of the VPD-130/ VPD-130N devices: No Mode Description 0 F.G. Frame Ground. F.G. is connected to the inside EMI or ESD suppression circuits. Make sure that F.G. is connected to the Earth 1 VDC DC input Voltage (range: +12V ~ +48V) 2 GND Connected to the power supply’s ground pin 3 Data+ The positive data line of the RS-485 network 4 Data- The negative data line of the RS-485 network 5 TxD The pin of transmitted data of the RS-232 6 RxD The pin of received data of the RS-232 The common ground of the RS-232 GND Note: the RS-485 and the RS-232 use the same serial port on the VPD-130/ VPD-130N devices. 7 TouchPAD User Manual, version 1.0.12. Last Revised: May 2012 Copyright © 2012 ICP DAS Co., Ltd. All Rights Reserved. Page: 34 E-mail: [email protected] 4. Set up Devices and Connect to I/O This chapter is divided into two parts. One is setup TouchPAD and the other is connecting TouchPAD to I/O modules. 4.1. Preparation First of all, you should install the HMIWorks development software on your PC. HMIWorks is the development tools for the TouchPAD devices. Follow the steps below to install the HMIWorks: 1. Double click the icon to install. 2. Simply follow the instructions to finish the installation. TouchPAD User Manual, version 1.0.12. Last Revised: May 2012 Copyright © 2012 ICP DAS Co., Ltd. All Rights Reserved. Page: 35 E-mail: [email protected] 3. The snapshot of Finish. 4.2. Setup Devices The TouchPAD devices are divided into several groups. Before downloading programs to the TouchPAD device, the TouchPAD device must be set up. We describe how to set up each kind of the TouchPAD devices in the following sections. 4.2.1. Setup the TPD-280 devices Configuration mode: TouchPAD User Manual, version 1.0.12. Last Revised: May 2012 Copyright © 2012 ICP DAS Co., Ltd. All Rights Reserved. Page: 36 E-mail: [email protected] On the back panel of the TPD-280 device, configuration modes can be found. Use the rotary switch to set the configuration mode. No Mode Description 0 Run Only This mode is used for running programs. 1 Update Only This mode is used for updating programs. Click the “Setup Device” option from the “Run” menu of the HMIWorks software. The TPD-280 device uses the RS-485 network as its communication method. It is not able to connect through the Ethernet network. Select the com port that connects to the TPD-280 device. Before downloading programs to the TouchPAD device, be sure to set up the TouchPAD device (TPD-280) to connect to it first. TouchPAD User Manual, version 1.0.12. Last Revised: May 2012 Copyright © 2012 ICP DAS Co., Ltd. All Rights Reserved. Page: 37 E-mail: [email protected] Downloading programs to the TPD-280 device Downloading programs to a TPD-283 device is easy. Just click on the “Run” option or the “Download Only” option from the “Run” menu. However, downloading programs to a TPD-280 device is a little complicated. As shown in the figure below, set the rotary switch to “1” when downloading the program and set the rotary switch back to “0” when finishing downloading and let the program run. 4.2.2. Setup the TPD-283 devices Configuration mode: TouchPAD User Manual, version 1.0.12. Last Revised: May 2012 Copyright © 2012 ICP DAS Co., Ltd. All Rights Reserved. Page: 38 E-mail: [email protected] On the back panel of a TPD-283 device, configuration modes can be found. Use the rotary switch to set the configuration mode. No Mode Description 0 Run & This is a special run mode which is used in the development stage. The TouchPAD (TPD-283) devices can be updated by a PC from the remote side through Ethernet. Update 1 Force Update While the application run on the TouchPAD device seriously crashes, use this mode to update an new application to the TouchPAD device. 2 Run Only Simply run, a TouchPAD device cannot be updated in this mode. Click the “Setup Device” option from the “Run” menu. TPD-283 uses Ethernet as its communication method. It is not able to connect through RS-485 network (since it doesn’t have). Before downloading programs to the TouchPAD (TPD-283) devices, be sure to set up the TouchPAD device to connect to it. The IP configuration of the TouchPAD User Manual, version 1.0.12. Last Revised: May 2012 Copyright © 2012 ICP DAS Co., Ltd. All Rights Reserved. Page: 39 E-mail: [email protected] TPD-283 device is not stored directly in the flash memory. It is a part of the program image which is built by the HMIWorks software. Every time a program is downloaded into the TPD-283 device, it also updates the IP settings of the TPD-283 device. Default IP settings of the TPD-283 device Item Value IP 192.168.255.1 Type Static IP The IP settings of a TPD-283 device can be classified in one of two types: “DHCP” or “Static IP”. Type Description DHCP The TPD-283 device is assigned an IP address from the DHCP server every time it is turned on (reset). Static The TPD-283 device has a static, unchanged IP address. Users can change the type of IP settings by downloading a new program into the TPD-283 device. 1. 2. Click the “Setup Device” option from the “Run” menu, then click the “Search TouchPad …” button in the displayed “Setup Ethernet Device” window to find the TouchPAD (TPD-283) device on the network. If the TouchPAD (TPD-283) device is found and displayed in the list on the “Search TouchPAD” dialog box, double click on the TouchPAD (TPD-283) item in the list to bring the information back to the “Setup 3. 4. Ethernet Device” window. Select the IP Address type, “DHCP” or “Static IP”, for the new program and then press “OK”. Click the “Run” option from the “Run” menu to download the new program to the TouchPAD (TPD-283) device. (We will introduce the details below.) Note: The new IP settings take effect only when the downloading is successful because the IP settings are stored in a part of the program image. TouchPAD User Manual, version 1.0.12. Last Revised: May 2012 Copyright © 2012 ICP DAS Co., Ltd. All Rights Reserved. Page: 40 E-mail: [email protected] item description Search TouchPAD Search for the TouchPAD devices on the network. Make sure that the TouchPAD devices and the local computer are in the same subnet. Host IP Address The IP address of the local computer Device Nickname The nickname used to identify the TouchPAD device which is selected in the list on the “Search TouchPAD” window. This nickname is part of the program image and it takes effect after the new program runs (downloading successful). Type of IP Static IP or DHCP Device IP Address (in the “Runtime Information” group) The IP address of the TouchPAD device which is used in the runtime of the program. The IP address in the runtime is part of the program and it takes effect after the new program runs (downloading successful). TouchPAD User Manual, version 1.0.12. Last Revised: May 2012 Copyright © 2012 ICP DAS Co., Ltd. All Rights Reserved. Page: 41 E-mail: [email protected] Mask The subnet mask for the TouchPAD Gateway The gateway address for the TouchPAD. The gateway address is the IP address for a network interface on a router that leads to a larger network. Device IP Address (in the “Download Information” group) The IP address of the TouchPAD which is used only when downloading programs. This IP address information is NOT part of the program image, every time the downloading process starts, HMIWorks assigns this IP address just for downloading only. MAC address The MAC address of the TouchPAD device which is selected in the “Search TouchPAD” window. Every TouchPAD device is shipped with its MAC information pasted on its back panel. item description Refresh Re-search again to re-make the list. Disable UDP filter We have UDP filter enabled by default to search for the TouchPAD devices only. Devices which are not TouchPAD are filtered out if this option is not checked. TouchPAD User Manual, version 1.0.12. Last Revised: May 2012 Copyright © 2012 ICP DAS Co., Ltd. All Rights Reserved. Page: 42 E-mail: [email protected] Press the “Search TouchPAD” button to search the TPD-283 device. Note1: The MAC address can be found on the back panel of the TPD-283 device. HMIWorks uses this MAC address to search for the TouchPAD device. To see if the TouchPAD device is on the network, check that if there is a device with the MAC address in the list after searching. Note2: Be sure to put the TPD-283 device and your PC in the same subnet. In short, we draw the flow chart of setup the TPD-283 devices: TouchPAD User Manual, version 1.0.12. Last Revised: May 2012 Copyright © 2012 ICP DAS Co., Ltd. All Rights Reserved. Page: 43 E-mail: [email protected] TouchPAD User Manual, version 1.0.12. Last Revised: May 2012 Copyright © 2012 ICP DAS Co., Ltd. All Rights Reserved. Page: 44 E-mail: [email protected] What to do if the download process hangs? Anytime download process hangs, users can follow the flow below to complete the download process. (Note that below is not just for the case after setup device.) 4.2.3. Setup Other Devices in TouchPAD Series Configuration mode: Except the TPD-280 and the TPD-283 devices, users can find out the same definitions of the configuration modes on their back panels for other devices in the TouchPAD series. We use the rotary switch to set the configuration mode. TouchPAD User Manual, version 1.0.12. Last Revised: May 2012 Copyright © 2012 ICP DAS Co., Ltd. All Rights Reserved. Page: 45 E-mail: [email protected] Take the TPD-280U device for example as below. No Mode Description 0 Run This mode is used to run the application. (There is only one application on a TouchPAD device.) 1 Update OS This mode is used to update operating system of the TouchPAD device. 9 Update AP This mode is used to download an application to the TouchPAD device. (There is only one application on a TouchPAD device.) All devices in the TouchPAD series have USB ports, except the TPD-280 and the TPD-283 devices. HMIWorks can download a program through that USB port. Unlike TPD-280 and TPD-283, Users need not “Setup Device” from the “Run” menu but users must install the USB driver for TouchPAD on their PC first. Note: Other means of downloading (such as through the RS-485 network) are not provided for the TouchPAD devices which have a USB port on themselves. Installing the TouchPAD USB Driver on your PC 1. 2. 3. If HMIWorks version 2.03 or above has been already installed on your PC, the TouchPAD USB driver has also been automatically installed, too. However, users may need to update the TouchPAD USB driver manually if some previous version of HMIWorks was installed. HMIWorks setup file: ftp://ftp.icpdas.com/pub/cd/touchpad/setup/ To update the TouchPAD USB driver, use the USB driver located in the below directory to update the driver in the device manager from the control panel. C:\ICPDAS\HMIWorks_Standard\Tools\USB_Drivers (“C:\ICPDAS\HMIWorks_Standard\” is the installation path of the HMIWorks software.) In order to update a USB driver for the TouchPAD devices, set the rotary switch on the TouchPAD device to the “9” position, then plug the USB cable into the TouchPAD Device and then turn on the supply power to the TouchPAD device (reset). Finally, you can see that the TouchPAD USB driver is in the list of the device manager. (something like “Stellaris Device Firmware Upgrade”) TouchPAD User Manual, version 1.0.12. Last Revised: May 2012 Copyright © 2012 ICP DAS Co., Ltd. All Rights Reserved. Page: 46 E-mail: [email protected] Downloading programs through USB Follow the flow to download a program to the TouchPAD device. Start Rotary switch is on the back of TouchPAD. Plug in the USB cable XXX-XXX MiniOS8 is running. Waiting for connection… Version 1.01 (May 11 2011) Rotary Switch set to 9 After resetting, the above screen can be seen. Reset Run Run (F9) Download the program Rotary Switch set to 0 Reset End Updating OS through USB Except the TPD-280 and the TPD-283 devices, all other devices in the TouchPAD series have an OS (Operating System) on them. In cases that users may need to update OS, we introduce the flow to do that. You can find that an OS image file is in the following directory: [HMIWorks_Install_Path]\bin\boot\[Device_Name]\MiniOS8.bin. For example, an OS image file, MiniOS8.bin can be found at “C:\ICPDAS\HMIWorks_Standard\bin\boot\TPD-280U\” if trying to find out TPD-280U’s OS image file. And in the same directory, there’s a batch file TouchPAD User Manual, version 1.0.12. Last Revised: May 2012 Copyright © 2012 ICP DAS Co., Ltd. All Rights Reserved. Page: 47 E-mail: [email protected] named “osupdate.bat” and it is used to update OS. Follow the flow to update OS to the TouchPAD devices. Start In back of TouchPAD Rotary Switch set to 1 After resetting , usually you can see a blank screen. In back of TouchPAD Reset The content of “osupdate.bat” is: Run “osupdate.bat” “dfuprog -a 0x1800 -r -f MiniOS8.bin” Rotary Switch set to 0 Reset Set rotary switch to 9 and then reset to check the result. End Calibrations Usually users need not to calibrate the touch screen because we calibrate the TouchPAD devices before shipping. However, in cases users may need to calibrate the touch screens, we introduce the flow below. You can find that the calibration programs are in the following directory: “[HMIWorks_Install_Path]\bin\boot\[Device_Name]\calibrate”. For example, there are two calibration programs can be found at “C:\ICPDAS\HMIWorks_Standard\bin\boot\TPD-280U\calibrate” if trying to calibrate TPD-280U. One is for landscape (when the screen is horizontal) and the other is for portrait (when the screen is upright). And in the same directory of the file, calibrate.bin, there’s a batch file which is used to download the calibrate.bin to the TPD-280U device and it is called “calibrate.bat”. TouchPAD User Manual, version 1.0.12. Last Revised: May 2012 Copyright © 2012 ICP DAS Co., Ltd. All Rights Reserved. Page: 48 E-mail: [email protected] Follow the flow to calibrate the TouchPAD device. Start In back of TouchPAD Rotary Switch Set to 1 and then Reset The content of “calibrate.bat” is: “dfuprog -a 0x1800 -r -f calibrate.bin” Run “calibrate.bat” In back of TouchPAD Rotary Switch Set to 0 and then Reset Touch the white small square to do the calibrations. Do Calibration Update the OS as the above flow. Update OS End 4.3. Connecting to I/O Devices We provide connection methods for three series of I/O modules, the PET-7000, the I-7000, and the M-7000 series and a general approaches for the Modbus TCP Master I/O modules, Modbus RTU Master/Slave I/O modules. Click the “Register Devices (I/O)” option from the “HMI” menu or press the “F3” on your keyboard and then the “Devices” window is displayed. TouchPAD User Manual, version 1.0.12. Last Revised: May 2012 Copyright © 2012 ICP DAS Co., Ltd. All Rights Reserved. Page: 49 E-mail: [email protected] Step by step specify or fill each field and click the OK button to import tags. Finally, check these imported tags in the Workspace. The possible device series are as below: TouchPAD is Device Series Device Series Description M-7000 Remote I/O modules over Modbus RTU protocol User_Define (MRTUM) Remote Modbus RTU I/O modules of third parties Modbus RTU Slave Profiles (MRTUS) TouchPAD is treated as a slave device and wait for some master devices to control DCON Master I-7000 Remote I/O modules over DCON protocol PET-7000 Remote I/O modules over Modbus TCP protocol WISE-7000 WISE (Web Inside, Smart Engine) devices User_Define (MTCPM) Remote Modbus TCP I/O modules of third parties Modbus RTU Master Modbus TCP Master The explanations of items in the Devices window (Register Device): Item Description Connection Specify an existing connection approach (TCPIP or UART) or create a new one to connect to the I/O module. Device Name Specify the name of the I/O module. Users can assign a name they want. Model Name Specify the model name of the I/O module to connect. Net ID The specified ID of the I/O module in the network. Possible range: For Modbus RTU: 1 ~ 247 For DCON: 0 ~ 255 For PET-7000: 1 ~ 255 Timeout The timeout value for the communications, both RS-485 and TCP TouchPAD User Manual, version 1.0.12. Last Revised: May 2012 Copyright © 2012 ICP DAS Co., Ltd. All Rights Reserved. Page: 50 E-mail: [email protected] 5. Development Software, HMIWorks HMIWorks is the development tool for, both TPD and VPD series. It supports two programming types, Standard C and Ladder. Compared with traditional GUI development tools, HMIWorks is easy to learn, flexible to design GUIs, and takes less time to raise productivity. Features of HMIWorks include: FREE of charge (for ICP DAS TouchPAD devices) Two programming types, ladder diagram and Standard C Plenty of widgets Plenty of demos shorten development time Advanced search for I/O modules Detail error messages Easy downloading after building Automatic generated codes for user-designed frames Multi-frame design WYGIWYS (What You Get Is What You See) Abstract graphics as simple APIs Easy learning IDE to raise productivity in short time 5.1. The Construction of HMIWorks Before showing the construction of HMIWorks, create a new project first. Click File menu, then click on New…. TouchPAD User Manual, version 1.0.12. Last Revised: May 2012 Copyright © 2012 ICP DAS Co., Ltd. All Rights Reserved. Page: 51 E-mail: [email protected] A valid project name is a sequence of one or more letters, digits or underscore characters (_). It must not begin with a digit. Besides, it is of suggested length 100 characters (including its path). Choose the target module, Orientation, and the Default Programming Type. Press OK and HMIWorks integrated design environment shows as below. There are several parts of HMIWorks. 1. 2. 3. 4. 5. 6. Menu bar Workspace and Toolbox Frame Design area Inspector and Libraries Results window (Output and Errors) Status bar TouchPAD User Manual, version 1.0.12. Last Revised: May 2012 Copyright © 2012 ICP DAS Co., Ltd. All Rights Reserved. Page: 52 E-mail: [email protected] Menu bar Workspace and Toolbox Frame Design Area Inspector and Libraries Results window (Output and Errors) Status bar Below are the operations (pop-up menus) that users have in Workspace. Next sections show the functions of these parts. TouchPAD User Manual, version 1.0.12. Last Revised: May 2012 Copyright © 2012 ICP DAS Co., Ltd. All Rights Reserved. Page: 53 E-mail: [email protected] 5.2. The Options of TouchPAD Users can set the options of the TouchPAD in the file, hmi_options.h. The file is located in “C:\ICPDAS\HMIWorks_Standard\include” directory, where “C:\ICPDAS\HMIWorks_Standard\” is the installation directory. The defines in the hmi_options.h are the options for TouchPAD. They are listed below: Define HMI_STARTUP_DELAY Default Descriptions 0 This is used to delay the system for a while before enabling the LCD backlight. (unit=ms) Normally, the system will HMI_WDT_ENABLE 0 automatically refresh the watchdog timer. And the system should be rebooted only when a procedure is blocking the system for a period larger than the HMI_WDT_TIMEOUT value. 2000 The timeout value to reboot (Valid range: 1,000 ~ 50,000 ms) HMI_WDT_CLEAR 500 The refreshing period to prevent reboot. The system refreshes (clears) the watchdog timer to prevent rebooting. HMI_STARTUP_BEEP 1 When startup, 1 = Beep, 0 = disable HMI_TOUCH_BEEP 1 When touched, 1 = Beep, 0 = disable HMI_BEEP_FREQ 800 For TPD-430/ TPD-430-EU only. This is the pitch value of the beep. The valid range is 30 ~ 4,000 Hz. HMI_BEEP_MS 25 For TPD-430/ TPD-430-EU only. The time length for each beep HMI_LCD_BRIGHTNESS 255 For TPD-430/ TPD-430-EU only. 0=the darkest, ..., 255=the brightest. HMI_STARTUP_LED 0 1=Enable red LED indicator, 0 = Disable red LED indicator. This HMI_WDT_TIMEOUT TouchPAD User Manual, version 1.0.12. Last Revised: May 2012 Copyright © 2012 ICP DAS Co., Ltd. All Rights Reserved. Page: 54 E-mail: [email protected] option is used for TPD-430 and VPD-130 only. HMI_LCD_AUTO_OFF 30 How long does it take to turn the LCD off automatically when the touch is idle. The LCD will back again when touched is pressed and released. 0 = disable, 5 ~ 300 seconds HMI_LCD_ON_BEEP 1 0 = disable, 1 = Beep when LCD backlight is turned on HMI_LCD_OFF_BEEP 1 0 = disable, 1 = Beep when LCD backlight is turned off HMI_TCP_TIMEOUT_BEEP 0 0 = Disable, 1 = Beep when TCP timeout/error Note: The options in the hmi_options.h are treated as global settings that affect all projects. To affect only one project, copy this hmi_options.h file into the project directory and then modify it. 5.3. Ladder Designer One of the most important features of HMIWorks is Ladder Designer. The ladder logic is defined by the followings: 1. A Ladder Diagram consists of many rungs. 2. 3. Each rung resembles a circuit which is formed by relays. All of the rungs are executed serially in a loop. Click HMI menu to use this feature. TouchPAD User Manual, version 1.0.12. Last Revised: May 2012 Copyright © 2012 ICP DAS Co., Ltd. All Rights Reserved. Page: 55 E-mail: [email protected] New Virtual Tag: defines your own variables Register Devices (I/O): uses I/O devices of ICP DAS on the networks Ladder Designer: designs your ladder logics Refresh Time (I/O Scan): set the refresh time of each scan of a Ladder (the minimum value is 100 ms) depreciated, this item is moved to the “Project Configuration”. Project Configuration: the configuration of the project Users can manage their ladder design in the Workspace. 5.3.1. Getting Started To use the Ladder Designer, run HMIWorks_Standard.exe first. Then create a new project. New Virtual Tag and open Ladder Designer from the HMI menu New Virtual Tag adds variables used in the Ladder Designer. There are three ways to open the “Edit variable” window, pressing F2 key on your keyboard, select the New Virtual Tag option in the HMI menu, right-click on the Virtual item and click the “New Virtual Tag” option. TouchPAD User Manual, version 1.0.12. Last Revised: May 2012 Copyright © 2012 ICP DAS Co., Ltd. All Rights Reserved. Page: 56 E-mail: [email protected] 5.3.2. Introduction to Ladder Designer A Ladder Designer is a tool to implement the ladder logic according to users’ design. Press F4 on your keyboard to open the Ladder Designer. The Menu Bar The Function Bar The first rung The second rung The cursor The Edit Space Mainly, a Ladder Designer consists of three parts, the menu bar, the function bar, and the edit space. The highlighted rectangle area is the cursor. The briefings of the function bar: Item Description TouchPAD User Manual, version 1.0.12. Last Revised: May 2012 Copyright © 2012 ICP DAS Co., Ltd. All Rights Reserved. Page: 57 E-mail: [email protected] Insert a contact input in the left of the cursor Insert a contact input in the right of the cursor Insert a contact input which is parallel to the cursor Insert a coil output Insert a function block in the left of the cursor Insert a function block in the right of the cursor Insert a function block which is parallel to the cursor Insert a Jump which is parallel to the cursor Change the type of the contact input/ coil output Add comments The briefings of the contact input type: Item Description A normally-open contact input A normally-closed contact input A positive transition contact input when the state from OFF to ON, trigger one shot A negative transition contact input when the state from ON to OFF, trigger one shot The briefings of the coil output type: Item Description A normally-open coil output TouchPAD User Manual, version 1.0.12. Last Revised: May 2012 Copyright © 2012 ICP DAS Co., Ltd. All Rights Reserved. Page: 58 E-mail: [email protected] A normally-closed coil output A “Set” coil output once triggered, the coil remains ON until a reset A “Reset” coil output once triggered, the coil remains OFF until a set A positive transition coil output when the state from OFF to ON, trigger one shot A negative transition coil output when the state from ON to OFF, trigger one shot The briefings of function blocks Refer to “C:\ICPDAS\HMIWorks_Standard\bin\FunctionBlock” for more details. Item Description (parts of C code) Group AND (And) If en == 1, eno = in1 & in2; Else eno = 0. default OR (Or) If en == 1, eno = in1 | in2; Else eno = 0. default XOR (Exclusive Or) If en == 1, eno = in1 ^ in2; Else eno = 0. default Equal If (en == 1 and in1 is equal to in2), eno = 1; Else eno = 0; default NE (Not Equal) If (en == 1 and in1 is not equal to in2), eno = 1; Else eno = 0; default TouchPAD User Manual, version 1.0.12. Last Revised: May 2012 Copyright © 2012 ICP DAS Co., Ltd. All Rights Reserved. Page: 59 E-mail: [email protected] GE (Greater or Equal) If (en == 1 and in1 >= in2), eno = 1; Else eno = 0; default LE (Less or Equal) If (en == 1 and in1 <= in2), eno = 1; Else eno = 0; default Assign If en == 1, “out” is assigned with “in” and eno = 1; Else eno = 0; default OnChange If en == 1 and “in” is changed, eno = in; Else eno = 0; default Add (Addition) If en == 1, q = in1 + in2 and eno = 1; Else eno = 0; math Sub (Subtraction) If en == 1, q = in1 - in2 and eno = 1; Else eno = 0; math Mul (Multiplication) If en == 1, q = in1 * in2 and eno = 1; Else eno = 0; math Div (Division) If en == 1, q = in1 / in2 and eno = 1; Else eno = 0; math TouchPAD User Manual, version 1.0.12. Last Revised: May 2012 Copyright © 2012 ICP DAS Co., Ltd. All Rights Reserved. Page: 60 E-mail: [email protected] Inc (Increment) If en == 1, increment “in” by 1; Else eno = 0; math Dec (decrement) If en == 1, decrement “in” by 1; Else eno = 0; math Mod (Modulo) If en == 1, q = in1 % in2 and eno = 1; Else eno = 0; math CTU (Count Up) End: count >= value. If en == 1, Count up until End, During counting, eno = 0, When End, eno = 1; Else Reset count to 0, eno = 0; counter Note: the counting period depends on the number of rungs CTD (Count Down) End: Count <= 0. If en == 1, Count down until End, During counting, eno = 0, When End, eno = 1; Else Reset count to value, eno = 0; counter Note: the counting period depends on the number of rungs TouchPAD User Manual, version 1.0.12. Last Revised: May 2012 Copyright © 2012 ICP DAS Co., Ltd. All Rights Reserved. Page: 61 E-mail: [email protected] TON (Timer On, unit=ms) End: elapsed >= DelayMS. If en == 1, Start the timer if not, Stop the timer when End, When timer runs, eno = 0, When End, eno = 1; Else Reset the timer, timer eno = 0; TOF (Timer Off, unit=ms) End: elapsed >= DelayMS. If en == 1, Start the timer if not, Stop the timer when End, When timer runs, eno = 1, When End, eno = 0; Else timer Reset the timer, eno = 0; Beep If en == 1, beep and eno = 1; Else eno = 0; system 5.3.3. Operations of Ladder Designer 5.3.3.1. New Virtual Tags (F2) To use the Ladder Designer, add variables for the Ladder Designer first. 1. Press F2 on your keyboard or click the “New Virtual Tag” option from the “HMI” menu to add virtual tags, then an “Edit variable” window displayed. 2. Define a new variable in the “Name” field and optionally fill the other fields. 3. Finally, press the OK button to take effect. TouchPAD User Manual, version 1.0.12. Last Revised: May 2012 Copyright © 2012 ICP DAS Co., Ltd. All Rights Reserved. Page: 62 E-mail: [email protected] Here, we add three variable v1, v2 and v3 for example in the next sections. 5.3.3.2. Assigning Variables and Constants Double click on the symbol of contact inputs, coil outputs, etc. to open the “Select variable” window to select variables or enter constants as below. Browse variables (tags) to select. Select a group of variables (tags). Clear the association with the symbol, such as a contact, a coil, etc. Enter a constant. 5.3.3.3. Inserting and Deleting a Rung To insert a rung, move the cursor (the highlighted area) to the empty place and then press F2 (or F3/F4) on your keyboard. TouchPAD User Manual, version 1.0.12. Last Revised: May 2012 Copyright © 2012 ICP DAS Co., Ltd. All Rights Reserved. Page: 63 E-mail: [email protected] (Or press F6, F7, F8 to insert a rung with a function block.) To delete a rung, move the cursor to the starting point of the rung and then press “Delete” key. 5.3.3.4. Copying and Pasting a Rung Supposed that we have three rungs and we want to copy the third rung and insert it between the first and the second rungs. TouchPAD User Manual, version 1.0.12. Last Revised: May 2012 Copyright © 2012 ICP DAS Co., Ltd. All Rights Reserved. Page: 64 E-mail: [email protected] PS. Or use Copy & Paste in the Edit menu. 1. Control+c to copy 2. Move the cursor to the second rung. 3. Control+v to paste 5.3.3.5. Inserting and Deleting a Contact Input To demonstrate how to insert or delete a contact input and other related issues, go through the steps below. 1. Associate a variable to a contact input Press F2 on your keyboard to insert a new rung with a contact input and a coil output. In the new rung, double-click on the contact input to open the “Select variable” TouchPAD User Manual, version 1.0.12. Last Revised: May 2012 Copyright © 2012 ICP DAS Co., Ltd. All Rights Reserved. Page: 65 E-mail: [email protected] window to select a variable (tag) and assign it to the contact input. For example, we double-click on the variable “v1” and set to the contact input. v1, v2 and v3 are the variables set by “New Virtual Tags”. Refer to the “New Virtual Tags” section. 2. Insert a new contact input in the left of the cursor (F2) Move the cursor to the “v1” contact input and then press F2. And to make things clear, associate variable “v2” to the newly-inserted contact input. TouchPAD User Manual, version 1.0.12. Last Revised: May 2012 Copyright © 2012 ICP DAS Co., Ltd. All Rights Reserved. Page: 66 E-mail: [email protected] 3. Insert a new contact input in the right of the cursor (F3) Move the cursor to the “v2” contact input and then press F3. Associate variable “v3” to the newly-inserted contact input. 4. Insert a new contact input which is parallel to the cursor (F4) Move the cursor to the “v3” contact input and then press F4. 5. Set the type of a contact input Move the cursor to a contact input and then press the space bar to change the type of the contact input. For example, we move the cursor to the “v3” contact input. Press the spacebar twice to set the type of the contact input to pulse contact input. TouchPAD User Manual, version 1.0.12. Last Revised: May 2012 Copyright © 2012 ICP DAS Co., Ltd. All Rights Reserved. Page: 67 E-mail: [email protected] 6. Delete a contact input in the rung Move the cursor to the contact input you want to delete. Then press “delete” on your keyboard. For example, we move the cursor to the “v3” contact input and then press the “delete” key. 7. Delete the rung. Move the cursor to the starting point of the rung and then press “Delete” on your keyboard. 5.3.3.6. Inserting and Deleting a Coil Output To demonstrate how to insert or delete a coil output and other related issues, see the figure below. TouchPAD User Manual, version 1.0.12. Last Revised: May 2012 Copyright © 2012 ICP DAS Co., Ltd. All Rights Reserved. Page: 68 E-mail: [email protected] Press F2 to insert a new rung and double-click on the coil to open the “Select variable” window to associate the variable (tag) “v1” to the coil. 1 Move the cursor to the coil “v1” and press F5 to insert a new parallel coil which is associated with variable (tag) “v2”. 2 Move the cursor to a coil “v2” and press the space bar twice to change the coil type to “set” coil. 3 Move the cursor to the coil “v1” and press the “delete” key to delete coil “v1”. 4 5.3.3.7. Inserting and Deleting a Function Block To demonstrate how to insert or delete a function block and other related issues, go through the following steps. 1. Set the function type to a function block i. Insert a new rung Press F6 to insert a new rung with a function block and a coil output. ii. Choose function type In the new rung, double-click on the function block to open the TouchPAD User Manual, version 1.0.12. Last Revised: May 2012 Copyright © 2012 ICP DAS Co., Ltd. All Rights Reserved. Page: 69 E-mail: [email protected] “Function Block” window. Double-click on the “Function Name” field in the list to set the type of the function. For example, we double-click on the Function “Assign” in the default group and set to the function block. iii. Assign the variables to the function Now, we should assign the variable to the function “Assign”. As you can see, there are four variables, en, eno, out, in. Both “en” and “eno” cannot associate variables by users. We can associate “out” and “in” with the variables we define by “New Virtual Tags”. For example, we associate “v1” to “out” and “v2” to “in”. v1, v2 and v3 are the variables defined in from the “Edit Variable” dialog box. Refer to the “New Virtual Tags” section. To associate “v1” to “out”, move the cursor just beside “out” but not in the function block. TouchPAD User Manual, version 1.0.12. Last Revised: May 2012 Copyright © 2012 ICP DAS Co., Ltd. All Rights Reserved. Page: 70 E-mail: [email protected] Double-click on just beside “out” to open “Select variable” window. Double-click on the variable in the list to assign the variable to “out”. For example, we double-click on the variable “v1” and set to “out” of “Assign” function. Set “v2” to “in” of “Assign” function in the same way. Finally, set “v3” to the coil output. TouchPAD User Manual, version 1.0.12. Last Revised: May 2012 Copyright © 2012 ICP DAS Co., Ltd. All Rights Reserved. Page: 71 E-mail: [email protected] This function assigns “v2” to “v1” if en is set to high. The coil output “v3” is purely defined by eno, where eno = en. 2. Insert a new function block in the left of the cursor (F6) Move the cursor to the “Assign” function block and then press F6. And to make things clear, set the newly-inserted function block as “NE” (not equal). 3. Insert a new function block in the right of the cursor (F7) Move the cursor to the “NE” function block and then press F7. Set the newly-inserted function block as “GE” (greater than or equal). TouchPAD User Manual, version 1.0.12. Last Revised: May 2012 Copyright © 2012 ICP DAS Co., Ltd. All Rights Reserved. Page: 72 E-mail: [email protected] 4. Insert a new function block which is parallel to the cursor (F8) Move the cursor to the “GE” function block and then press F8. Set the newly-inserted function block as “LE” (less than or equal). 5. Delete a function block in the rung Move the cursor to the function block you want to delete. Then press “delete” on your keyboard. For example, we move the cursor to the “Assign” function block and then press the “delete” key. 6. Delete the rung. Move the cursor to the starting point of the rung and then press “Delete” on your keyboard. 5.3.3.8. Jump to a Label To demonstrate how to jump to a label, first we create three rungs and then explain how to skip the second rung and jump to the third. 1. Press F2 three times to create three rungs for example. TouchPAD User Manual, version 1.0.12. Last Revised: May 2012 Copyright © 2012 ICP DAS Co., Ltd. All Rights Reserved. Page: 73 E-mail: [email protected] 2. Move the cursor to the coil output of the first rung and then press F9 to add a Jump. 3. Double click on the starting point of the third rung to add a label “Test_Label” to it. TouchPAD User Manual, version 1.0.12. Last Revised: May 2012 Copyright © 2012 ICP DAS Co., Ltd. All Rights Reserved. Page: 74 E-mail: [email protected] 4. Double click on the Jump of the first rung to associate with the label of the third rung. 5. When running the ladder logic, set the coil output of the first rung to high, skip the second rung and jump to the third rung if the contact input of the first rung is closed. TouchPAD User Manual, version 1.0.12. Last Revised: May 2012 Copyright © 2012 ICP DAS Co., Ltd. All Rights Reserved. Page: 75 E-mail: [email protected] 5.3.4. User-Defined Function Block Why should we use function block? There may be cases that using only ladders is too complex. At that time, using a function block may be a good choice. To know how to add a user-defined function block, we first explain how HMIWorks uses these function blocks. Take “Assign” function block in the “default” group for example. How HMIWorks Uses Function Blocks 1. Go to the installation path of the HMIWorks software. In the sub-directory, “bin\FunctionBlock”, of that installation path, open the file “Category.ini” to load the groups. 2. If we choose the “default” group, then HMIWorks opens the matching-name sub-directory and then loads from the matching-name “.ini” file in that sub-directory. That is, the “default.ini” in the sub-directory “default”. TouchPAD User Manual, version 1.0.12. Last Revised: May 2012 Copyright © 2012 ICP DAS Co., Ltd. All Rights Reserved. Page: 76 E-mail: [email protected] 3. Double click on the “Assign” to use it in the Ladder Designer. The Ladder Designer uses the logics defined in the file “FB.hsf” in the sub-directory “Assign”. FB.hsf is based on the C language. The following figure explains what FB.hsf of the “Assign” function does. Adding a User-Defined Function Block Now, we introduce how to add a user-defined function block. 1. Create a new group if necessary. TouchPAD User Manual, version 1.0.12. Last Revised: May 2012 Copyright © 2012 ICP DAS Co., Ltd. All Rights Reserved. Page: 77 E-mail: [email protected] Go to the installation path of HMIWorks. In the sub-directory of “bin\FunctionBlock”, create a new directory “TestGroup” for example and open the file “Category.ini” to add a new item to represent the new group. Note: The name of the new item in the Category.ini must be exactly the same as the name of the newly-created directory. 2. Go to the directory “TestGroup”, create a .ini file of the exactly same name as that of the group, that is, “TestGroup”. Create a sub-directory of the “TestGroup” directory and we may call the sub-directory “TestFunction”. Finally, define a new function, “TestFunction” in the file “TestGroup.ini”. Note: VarCount = pin counts. Below shows what does the Row mean and the order of the pins. TouchPAD User Manual, version 1.0.12. Last Revised: May 2012 Copyright © 2012 ICP DAS Co., Ltd. All Rights Reserved. Page: 78 E-mail: [email protected] 3. In the directory “TestFunction”, create a new file FB.hsf to implement the user-defined function. 5.3.5. Associate Tags with Tools In order to use Ladder Designer to build HMI of TouchPAD, we should associate tags with tools. There are three methods to associate tools with tags. Every change of the tag in the Ladder Designer is updated to the tool in the run time after association. 1. The first method: simply drag and drop the tags in the Workspace to the frame design area. A CheckBox component is created with the tag associated. Note: this feature is only supported for the CheckBox components. TouchPAD User Manual, version 1.0.12. Last Revised: May 2012 Copyright © 2012 ICP DAS Co., Ltd. All Rights Reserved. Page: 79 E-mail: [email protected] 2. Click a tag. 1 3. Drag and drop the tag on the frame design space. 2. 1. Pick a icon to represent the tag. The second method: double click the widget on the frame design area to open the “Select variable” window. Take a Slider for example. Double click on the tag Name you want to associate with the widget. Then you can see the tag is associated with the widget (that is, the Slider for example) by setting the property TagName to the name of the tag. TouchPAD User Manual, version 1.0.12. Last Revised: May 2012 Copyright © 2012 ICP DAS Co., Ltd. All Rights Reserved. Page: 80 E-mail: [email protected] 3. The third method is click the “…” button from the TagName field in the Inspector to open the “Select variable” window. Similar steps as above. Special Note: Refer to section “Using an ObjectList”. Set the RefObject property of a CheckBox component to an ObjectList component which contains images and then associate a tag to the CheckBox component. Then every time the tag changes its value, the CheckBox component toggles the images. This feature is especially useful when building switches. 5.3.6. User-Defined I/O Modules To know how to add a user-defined I/O module, we first explain how HMIWorks uses these I/O modules. There are several kinds of I/O modules. DCON I/O modules: I-7000 series I/O modules by ICP DAS. http://www.icpdas.com/products/Remote_IO/i-7000/i-7000_introduction.htm Modbus TCP I/O modules: ICP DAS provides ET/PET-7000 series. http://www.icpdas.com/products/Remote_IO/et-7000/et-7000_introduction.htm Modbus RTU I/O modules: M-7000 series I/O modules by ICP DAS http://www.icpdas.com/products/Remote_IO/m-7000/m-7000_introduction.htm TouchPAD User Manual, version 1.0.12. Last Revised: May 2012 Copyright © 2012 ICP DAS Co., Ltd. All Rights Reserved. Page: 81 E-mail: [email protected] Where HMIWorks Put I/O Module Information HMIWorks puts I/O module information in the following locations. Some explanations for above figure: “C:\ICPDAS\HMIWorks_Standard\” is the installation path. (Users may have different installation paths.) “Modules.ini” is the I/O series configuration file. “I-7000.ini” is the configuration file for the I-7000 series I/O modules. “M-7000.ini” and “PET-7000.ini” are configuration file for the M-7000 and the PET-7000 series I/O modules respectively. Each I/O module has a matching name directory and in that directory there is only one file, IO.hsf. IO.hsf is the file of the C language to define the behaviors of the I/O module. I/O module directories in the same series are grouped together in the I/O series directory. For example, I-7011, …, I-7067 are directories represent I/O modules and they are all put to the series directory “I-7000”. What Module.ini describes? TouchPAD User Manual, version 1.0.12. Last Revised: May 2012 Copyright © 2012 ICP DAS Co., Ltd. All Rights Reserved. Page: 82 E-mail: [email protected] Modules.ini In details, we have the following table: Item Description This section keeps the list of the device series which HMIWorks supports. When registering device Category (F3), the “Devices” window gets the information of device series from this “Category” section. MTCP Protocol UART Verb Search “Protocol=MTCP” in the Module.ini is corresponding to “Protocol=TCPIP” in the “New/Edit Connection” window in the Workspace. “Protocol=UART” in the Module.ini is corresponding to “Protocol=UART” in the “New/Edit Connection” window in the Workspace. HMIWorks scans through the network to find out I/O modules. Until now, PET-7000 is the only series which support this “Search” function. TouchPAD User Manual, version 1.0.12. Last Revised: May 2012 Copyright © 2012 ICP DAS Co., Ltd. All Rights Reserved. Page: 83 E-mail: [email protected] Select HMIWorks pops up a list of I/O modules to let users select one. The list of I/O modules is loaded from the file whose name is [Device_Series_Name].ini Edit HMIWorks opens the “Import” window to let users decide the I/O points for the I/O module. HMIWorks imports the tags of the I/O Template Import Manual module from the I/O module configuration file. For example, HMIWorks imports tags of I-7011 from the template in the file of I-7000.ini. HMIWorks imports the tags of the I/O module by the manually-decided I/O points. Generating Tags by “Register Devices (F3)” Press F3 on your keyboard to open the “Devices” window to register I/O devices. The I/O modules configuration file has templates for all the I/O modules in the I/O series. For example, I-7000.ini is the configuration file for the I-7000 series I/O modules. Take I-7065 in the I-7000 series for example as shown in the following figure. TouchPAD User Manual, version 1.0.12. Last Revised: May 2012 Copyright © 2012 ICP DAS Co., Ltd. All Rights Reserved. Page: 84 E-mail: [email protected] I7000.ini As above, ERROR is the tag for the communication status. Defining I/O Behaviors in IO.hsf Take I-7065 for example (I-7000 series I/O module) Open the IO.hsf in the directory “[HMIWorks install path]\bin\Modules\I-7000\I-7065\”. The codes in IO.hsf are of C language as below: BEGIN_FUNCTION_BLOCK(); //this line is necessary DWORD v_do = 0; DWORD v_di = 0; int gWriteCount = 0; uart_SetTimeout($DEVICE, $TIMEOUT); //$W_ACTION: a tag used in Ladder to enable/disable writing actions //$ENABLE_DO: a tag used in Ladder to enable/disable the part of DOs if ( VAR_VALUE($ENABLE_DO) && VAR_VALUE($W_ACTION)) { int iWrite = 0; //To decide if there’s a need to write any DO channel TouchPAD User Manual, version 1.0.12. Last Revised: May 2012 Copyright © 2012 ICP DAS Co., Ltd. All Rights Reserved. Page: 85 E-mail: [email protected] v_do = 0; // Update the status for each channel if it has been changed. iWrite += VAR_GET_WRITE_U32(&v_do, $DO0, 0); iWrite += VAR_GET_WRITE_U32(&v_do, $DO1, 1); iWrite += VAR_GET_WRITE_U32(&v_do, $DO2, 2); iWrite += VAR_GET_WRITE_U32(&v_do, $DO3, 3); iWrite += VAR_GET_WRITE_U32(&v_do, $DO4, 4); if ( iWrite ) // Write only when need { gWriteCount++; if ( ! dcon_WriteDO($DEVICE, $NETID, 5, v_do & 0xFF) ) // dcon_WriteDO: the DO writing API function of I-7000 I/O series. // I-7000 I/O series uses the DCON protocol. return HMI_ERROR; } } if ( gWriteCount ) return HMI_OK; // Skip reading to reduce the device loading if ( (VAR_VALUE($ENABLE_DO) || VAR_VALUE($ENABLE_DI)) && VAR_VALUE($R_ACTION)) { //$R_ACTION: a tag used in Ladder to enable/disable reading actions //$ENABLE_DO: a tag used in Ladder to enable/disable the part of DOs //$ENABLE_DI: a tag used in Ladder to enable/disable the part of DIs if (dcon_ReadDIO($DEVICE, $NETID, 4, 5, &v_di, &v_do)) // dcon_ReadDIO: the DI/DO reading API function of I-7000 I/O series. // I-7000 I/O series uses the DCON protocol. { VAR_SET($DI0, v_di & (1<<0)); // VAR_SET: used to set the value of this channel to its tag VAR_SET($DI1, v_di & (1<<1)); VAR_SET($DI2, v_di & (1<<2)); VAR_SET($DI3, v_di & (1<<3)); VAR_SET($DO0, v_do & (1<<0)); TouchPAD User Manual, version 1.0.12. Last Revised: May 2012 Copyright © 2012 ICP DAS Co., Ltd. All Rights Reserved. Page: 86 E-mail: [email protected] VAR_SET($DO1, v_do & (1<<1)); VAR_SET($DO2, v_do & (1<<2)); VAR_SET($DO3, v_do & (1<<3)); VAR_SET($DO4, v_do & (1<<4)); } else return HMI_ERROR; } END_FUNCTION_BLOCK(); //this line is necessary Creating a User-Defined I/O Module … Test_Module1 Test_Series IO.hsf They must be the SAME name. They must be the SAME name. Test_Series.ini Modules.ini 1. 2. In the directory, “[HMIWorks install path]\bin\Modules\”, create a new I/O series directory whose name is “Test_Series” and be sure to update Modules.ini to notify HMIWorks that there is a new I/O series called “Test_Series”. As the figure shows, the series directory name and the name in the Modules.ini must be the same. In the I/O series directory, “Test_Series”, we create a new I/O module directory whose name is “Test_Module1” and be sure to create a I/O modules configuration file, Test_Series.ini, to depict the template of the newly-created I/O module, Test_Module1. As the figure shows, the TouchPAD User Manual, version 1.0.12. Last Revised: May 2012 Copyright © 2012 ICP DAS Co., Ltd. All Rights Reserved. Page: 87 E-mail: [email protected] 3. module directory name and the name in the Test_Series.ini must be the same. Implement the IO.hsf which is created in I/O module directory, Test_Module1, to describe the behaviors of the I/O module, Test_Module1. Refer to the IO.hsf I. of PET-7000 series if using the Modbus TCP protocol. II. of M-7000 series if using the Modbus RTU protocol. III. of I-7000 series if using the DCON protocol. All are similar to the example of the I-7065 above. 5.4. Frames and Tools This section introduces properties and usages of frames and tools. In the Toolbox, there are three kinds of tools, the Drawing, the Widget and the System components. Drawing: 1. Rectangle: draw a rectangle. 2. Ellipse: draw ellipse. 3. Text: put string (text) on screen. 4. Picture: load an image file on a frame. 5. Line: draw a line. Widget: 1. 2. 5. TextPushButton: create a button. Slider: show or decide the percentage. BitButton: create an image button. HotSpot: create a hot spot that can issue an OnClick event. CheckBox: provide an 6. alternative. Label: provide a string that can be 3. 4. TouchPAD User Manual, version 1.0.12. Last Revised: May 2012 Copyright © 2012 ICP DAS Co., Ltd. All Rights Reserved. Page: 88 E-mail: [email protected] modified during the run-time. System: 1. Timer: periodically execute codes. 2. PaintBox: draw shapes in the run time. 3. ObjectList: maintain a list of library objects which can be used through property “RefObject” of TextPushButton and CheckBox. Important Notice: 1. Make sure that widget component should not overlap or unexpected behavior may happen when clicking. 2. The touch area of a widget component is the rectangle enclosed by the widget’s outline. 5.4.1. Properties of a Frame This section introduces the properties of a frame. Properties of a Frame Click on the frame, and the properties of the frame are shown in the Inspector. TouchPAD User Manual, version 1.0.12. Last Revised: May 2012 Copyright © 2012 ICP DAS Co., Ltd. All Rights Reserved. Page: 89 E-mail: [email protected] properties description BackgroundColor The background color of the frame. The color is represented by a three-byte value in the hexadecimal form. From the highest byte to the lowest, it is the blue byte, the green byte, the red byte in sequence. Solid or Clear. If BrushStyle is set to “Solid”, then the setting of the “BackgroundColor” property does take effect. However this may make the screen flash if background color is quite different from the loaded picture. Setting BrushStyle Clear disables the “BackgroundColor” property and prevents the screen from flashing. Whether this frame is default frame or not. The default frame is displayed first after the TouchPAD device turns on. The serial numbers of the components in the Toolbox and of the frames. These serial numbers are used to identify them. The name of the frame BrushStyle Default ID Name OnCreate OnDestroy OnHide OnPaint OnShow ProgramStyle The function name of the OnCreate event handler of the frame. Use OnCreate to perform some operations when the frame is created. The function name of the OnDestroy event handler of the frame. Use OnDestroy to perform some operations when the frame is destroyed. The function name of the OnHide event handler of the frame. Use OnHide to perform some operations when the frame is hidden. The function name of the OnPaint event handler of the frame. Use OnPaint to perform some operations when the frame is redrawn. The function name of the OnShow event handler of the frame. Use OnShow to perform some operations when the frame is shown. Standard C or Ladder Changing the BackgroundColor of a frame TouchPAD User Manual, version 1.0.12. Last Revised: May 2012 Copyright © 2012 ICP DAS Co., Ltd. All Rights Reserved. Page: 90 E-mail: [email protected] Click on the “BackgroundColor” field in the Inspector. Then click on the “…” button to open the color window to select a color. Implementing event handlers of a frame There are five event handlers of a frame, OnCreate, OnDestroy, OnHide, OnPaint, and OnShow. Take OnCreate event handler for example. 1. Click on the “OnCreate” field in the Inspector. Then click on the “…” button to open the programming window. 2. Here we use hmi_Beep() to sound a beep for example. TouchPAD User Manual, version 1.0.12. Last Revised: May 2012 Copyright © 2012 ICP DAS Co., Ltd. All Rights Reserved. Page: 91 E-mail: [email protected] 3. Press OK to save the file and leave. 5.4.2. Drawing a Rectangle This section shows how to draw a rectangle. Drawing a rectangle 1. 2. Click the Rectangle icon from the Drawing panel of the Toolbox tab. Move your mouse to the frame design area and click and drag a suitable sized rectangle. TouchPAD User Manual, version 1.0.12. Last Revised: May 2012 Copyright © 2012 ICP DAS Co., Ltd. All Rights Reserved. Page: 92 E-mail: [email protected] PS. What to do if I want to draw a square? Step 2 with the “Ctrl” key pressed at the same time. Properties of Rectangle properties description BrushStyle The style used to fill to a rectangle FillColor The color used to fill the rectangle. The color is represented by a three byte value in the hexadecimal form. From the highest byte to the lowest, it is the blue byte, the green byte, the red byte in sequence. Height The length of the vertical side of the rectangle ID The serial numbers of the components in the Toolbox and of the frames. These serial numbers TouchPAD User Manual, version 1.0.12. Last Revised: May 2012 Copyright © 2012 ICP DAS Co., Ltd. All Rights Reserved. Page: 93 E-mail: [email protected] Left are used to identify them. The x-coordinate of the left-top vertex of the rectangle Name The name of the rectangle OutlineColor The outline color of the rectangle Top The y-coordinate of the left-top vertex of the rectangle Width The length of the horizontal side of the rectangle Changing the FillColor and OutlineColor Click on the “FillColor” field in the Inspector. Then click on the “…” button to open the color window to select a color. Repeat the same procedure for the “OutlineColor” field. For example, set “FillColor” to green and “OutlineColor” to red and then you may have the results as shown below. TouchPAD User Manual, version 1.0.12. Last Revised: May 2012 Copyright © 2012 ICP DAS Co., Ltd. All Rights Reserved. Page: 94 E-mail: [email protected] 5.4.3. Drawing an Ellipse This section shows how to draw an ellipse. Drawing an ellipse 1. 2. Click the Ellipse icon from the Drawing panel of the Toolbox tab. Move your mouse to the frame design area and click and drag a suitable sized ellipse. PS. What to do if I want to draw a circle? Step 2 with the “Ctrl” key pressed at the same time. Properties of Ellipse TouchPAD User Manual, version 1.0.12. Last Revised: May 2012 Copyright © 2012 ICP DAS Co., Ltd. All Rights Reserved. Page: 95 E-mail: [email protected] properties description BrushStyle The style used to fill to an ellipse FillColor The color used to fill the ellipse. The color is represented by a three byte value in the hexadecimal form. From the highest byte to the lowest, it is the blue byte, the green byte, the red byte in sequence. Height The length of the vertical side of the rectangle that inscribes the ellipse to draw ID Left The serial numbers of the components in the Toolbox and of the frames. These serial numbers are used to identify them. The x-coordinate of the left-top vertex of the rectangle that inscribes the ellipse to draw Name The name of the ellipse OutlineColor The outline color of the rectangle that inscribes the ellipse to draw Top The y-coordinate of the left-top vertex of the rectangle that inscribes the ellipse to draw Width The length of the horizontal side of the rectangle that inscribes the ellipse to draw Changing the FillColor and OutlineColor Click on the “FillColor” field in the Inspector. Then click on the “…” button to open the color window to select a color. Repeat the same procedure for the “OutlineColor” field. TouchPAD User Manual, version 1.0.12. Last Revised: May 2012 Copyright © 2012 ICP DAS Co., Ltd. All Rights Reserved. Page: 96 E-mail: [email protected] For example, set “FillColor” to green and “OutlineColor” to red and then you may have the results as shown below. 5.4.4. Drawing a Text This section shows how to draw a Text. Drawing a Text 1. 2. Click the Text icon from the Drawing panel of the Toolbox tab. Move your mouse to the frame design area and click to put a Text on it. 3. Specify the Text field in the Inspector with “Hello”, for example. TouchPAD User Manual, version 1.0.12. Last Revised: May 2012 Copyright © 2012 ICP DAS Co., Ltd. All Rights Reserved. Page: 97 E-mail: [email protected] 4. Or you can simply copy an text from the clipboard and paste it on the frame design area of HMIWorks. HMIWorks then create a Text component and then load the string from clipboard automatically. Properties of Text properties description Alignment This property determines where to locate the string, Left, right, or center. (LeftJustify, RightJustify, or Center) Note: This property is enabled only when AutoSize=True AutoScaleFontSize Automatically scale the font size to fit the rectangle which encloses the Text. TouchPAD User Manual, version 1.0.12. Last Revised: May 2012 Copyright © 2012 ICP DAS Co., Ltd. All Rights Reserved. Page: 98 E-mail: [email protected] Note: This property is enabled only when AutoSize=True. AutoSize True or False. This property is used to indicate that whether the size of the rectangle which encloses Text can be automatically changed to cover the whole string. BrushStyle The style used to fill the rectangle that encloses the Text Font The font of the Text. Note: This property is enabled only when TextAsImage=True. Height The length of the vertical side of the rectangle that encloses the Text to draw ID The serial numbers of the components in the Toolbox and of the frames. These serial numbers are used to identify them. The x-coordinate of the left-top vertex of the Left rectangle that encloses the Text to draw Name The name of the Text Text The string of the Text component to be displayed TextAsImage True or False. Whether the text is stored as an image or not. If the text is treated as an image, it will take more space to store and more time to download. Top The y-coordinate of the left-top vertex of the rectangle that encloses the Text to draw Width The length of the horizontal side of the rectangle that encloses the Text to draw Changing the font of Text Click the “Font” field in the Inspector. Then click on the “…” button to open the font window to change the font. TouchPAD User Manual, version 1.0.12. Last Revised: May 2012 Copyright © 2012 ICP DAS Co., Ltd. All Rights Reserved. Page: 99 E-mail: [email protected] Be sure to set TextAsImage to True. Otherwise the changed font settings do not take effect. 5.4.5. Loading a Picture This section shows how to load a Picture. Loading a Picture 1. 2. Click the Picture icon from the Drawing panel of the Toolbox tab. Move your mouse to the frame design area and click and drag a suitable sized picture box. TouchPAD User Manual, version 1.0.12. Last Revised: May 2012 Copyright © 2012 ICP DAS Co., Ltd. All Rights Reserved. Page: 100 E-mail: [email protected] 3. Click the “Picture” field in the Inspector. Then click on the “…” button to open the “Select Picture” window to load a picture. 4. The frame with the loaded picture as shown below. 5. Or you can just copy an image from the clipboard and paste it on the frame design area of HMIWorks. HMIWorks create a Picture TouchPAD User Manual, version 1.0.12. Last Revised: May 2012 Copyright © 2012 ICP DAS Co., Ltd. All Rights Reserved. Page: 101 E-mail: [email protected] component and then load the image from clipboard automatically. Properties of Picture properties description AutoSize True or False. This property is used to indicate that whether the size of the Picture can be changed or not. FrameIndex Ignored Height The length of the vertical side of the rectangle that encloses the Picture to load HiColor True or False. This property decides whether the loaded picture is stored as 16-bit color (True) or 8-bit color (False). The default option is 8-bit color. ID The serial numbers of the components in the Toolbox and of the frames. These serial numbers are used to identify them. The x-coordinate of the left-top vertex of the rectangle that encloses the Picture to load Left Name The name of the Picture Picture The picture to be loaded Top The y-coordinate of the left-top vertex of the rectangle that encloses the Picture to load Width The length of the horizontal side of the rectangle that encloses the Picture to load TouchPAD User Manual, version 1.0.12. Last Revised: May 2012 Copyright © 2012 ICP DAS Co., Ltd. All Rights Reserved. Page: 102 E-mail: [email protected] Trade-off between firmware size and resolution Above is the comparison between “HiColor = True” and “HiColor = False”. The left picture is original one in HMIWorks. The two right-side pictures are real photos. One is “HiColor = True” and the other is “HiColor = False”. As you can see, setting HiColor to False makes the photo have a not-smooth gradient part while setting HiColor to True does not. Because 8-bit color does not have enough color (256 only) to represent the picture, similar colors are represented by the same color and this results in not-smooth gradient. However, preventing pictures from not-smooth gradient costs TouchPAD bigger size of memory. Take above picture for example, setting HiColor to True uses memory of 189KB but setting HiColor to False costs only 69KB. 5.4.6. Drawing a Line This section shows how to draw a line segment. Drawing a line segment: TouchPAD User Manual, version 1.0.12. Last Revised: May 2012 Copyright © 2012 ICP DAS Co., Ltd. All Rights Reserved. Page: 103 E-mail: [email protected] 1. 2. Click the Line icon from the Drawing panel of the Toolbox tab. Move your mouse to the frame design area and click and drag a suitable sized line. Properties of Line properties description Height The length of the vertical side of the rectangle whose diagonal line is the line segment to draw ID IsSolid The serial numbers of the components in the Toolbox and of the frames. These serial numbers are used to identify them. Ignored Left The x-coordinate of the left-top vertex of the rectangle whose diagonal line is the line segment to draw Name The name of the line segment Top The y-coordinate of the left-top vertex of the TouchPAD User Manual, version 1.0.12. Last Revised: May 2012 Copyright © 2012 ICP DAS Co., Ltd. All Rights Reserved. Page: 104 E-mail: [email protected] rectangle whose diagonal line is the line segment to draw Width The length of the horizontal side of the rectangle whose diagonal line is the line segment to draw 5.4.7. Using a TextPushButton This section shows how to use a TextPushButton. What is a TextPushButton? A TextPushButton is a button with a Text on it. When a TextPushButton is pressed and not released, the status is changed. But the status is restored back to the original state after you release it. Using a TextPushButton: 1. Click the TextPushButton icon from the Widget panel of the Toolbox tab. 2. Move your mouse to the frame design area and click and drag a suitable sized TextPushButton. TouchPAD User Manual, version 1.0.12. Last Revised: May 2012 Copyright © 2012 ICP DAS Co., Ltd. All Rights Reserved. Page: 105 E-mail: [email protected] 3. Click the Text field in the Inspector to change the string on the TextPushButton. Here we change the Text to “Hello”. 4. Double click the TextPushButton on the frame design area to open the programming window. Write the On-Click event handler in it. Here we use hmi_Beep() to sound a beep for example. Note: The property “OnClick” is supported only in the programming type “Standard C”. TouchPAD User Manual, version 1.0.12. Last Revised: May 2012 Copyright © 2012 ICP DAS Co., Ltd. All Rights Reserved. Page: 106 E-mail: [email protected] 5. Press OK to save the file and leave. Properties of TextPushButton properties description FillColor The color used to fill the TextPushButton. The color is represented by a three byte value in the hexadecimal form. From the highest byte to the lowest, it is the blue byte, the green byte, the red byte in sequence. TouchPAD User Manual, version 1.0.12. Last Revised: May 2012 Copyright © 2012 ICP DAS Co., Ltd. All Rights Reserved. Page: 107 E-mail: [email protected] Font The font of the text. Note that the only the font style and the font size are effective. Height ID Left The length of the vertical side of the TextPushButton The serial numbers of the components in the Toolbox and of the frames. These serial numbers are used to identify them. The x-coordinate of the left-top vertex of the TextPushButton Name The name of the TextPushButton OnClick The function name of the on-click event handler of the TextPushButton. Note: Supported only in the programming type “Standard C”. OnRelease The function name of the on-release event handler of the TextPushButton. Note: Supported only in the programming type “Standard C”. OutlineColor The outline color of the TextPushButton PressFillColor The color used to fill the TextPushButton when the TextPushButton is touched (but not yet released) Reference The reference to a frame. That is, when pressing on the TextPushButton, TouchPAD goes to the frame you specified in this property. Note: the priority of the property “Reference” is higher than that of “OnClick”. RefObject The reference to the object list. An object list is a component that can be selected in the Toolbox to maintain a list of the elements of the library. Refer to “Using an ObjectList” section for details. Tag The variable used for programming purpose. For example, it can be assigned a unique number for each TextPushButton component in order to identify them. Refer to the <<API Reference>> for functions to get/set the Tag property. TouchPAD User Manual, version 1.0.12. Last Revised: May 2012 Copyright © 2012 ICP DAS Co., Ltd. All Rights Reserved. Page: 108 E-mail: [email protected] Note: This Tag has nothing to do with the “Tag” which the TagName property refers to. TagName Associate a variable (tag) in Ladder Designer. Note: The property is supported only in programming type “Ladder”. Text The string of the TextPushButton Top The y-coordinate of the left-top vertex of the TextPushButton Width The length of the horizontal side of the TextPushButton Changing FillColor, OutlineColor, and PressFillColor Click the “FillColor” field in the Inspector. Then click the “…” button to open the color window to select a color. Repeat the same procedure for “OutlineColor” and “PressFillColor”. For example, set FillColor to green and OutlineColor to red and then you may have the results as shown below. TouchPAD User Manual, version 1.0.12. Last Revised: May 2012 Copyright © 2012 ICP DAS Co., Ltd. All Rights Reserved. Page: 109 E-mail: [email protected] Using Reference to another frame The Reference property is used as an event of go-to-specified-frame. It has higher priority than other events, such as OnClick event. Thus specifying an option of the Reference property disables the OnClick event. It’s easy to specify a value to the Reference property. Simply click the “Reference” field in the Inspector and then choose the frame for reference. 5.4.8. Using a Slider This section shows how to use a Slider. What is a Slider? A Slider is a control element used to set levels. Usually, a Slider is used in volume control. Using a Slider: TouchPAD User Manual, version 1.0.12. Last Revised: May 2012 Copyright © 2012 ICP DAS Co., Ltd. All Rights Reserved. Page: 110 E-mail: [email protected] 1. 2. Click the Slider icon from the Widget panel of the Toolbox tab. Move your mouse to the frame design area and click and drag a suitable sized Slider. 3. Double click the Slider component on the frame design area to open the programming window. Write the OnSliderChange event handler in it. Here we use hmi_Beep() to sound a beep for example. Note: The property “OnSliderChange” is supported only in programming type “Standard C”. 4. Press OK to save the file and leave. Properties of Slider TouchPAD User Manual, version 1.0.12. Last Revised: May 2012 Copyright © 2012 ICP DAS Co., Ltd. All Rights Reserved. Page: 111 E-mail: [email protected] properties description BackgroundFillColor The color used to fill the background of the Slider. The color is represented by a three byte value in the hexadecimal form. From the highest byte to the lowest, it is the blue byte, the green byte, the red byte in sequence. BackgroundTextColor The color of the text in the background of the Slider. The color is represented by a three byte value in the hexadecimal form. From the highest byte to the lowest, it is the blue byte, the green byte, the red byte in sequence. FillColor The color used to fill the Slider. The color is represented by a three byte value in the hexadecimal form. From the highest byte to the lowest, it is the blue byte, the green byte, the red byte in sequence. Font The font of the text on the Slider Height The length of the vertical side of the Slider The serial numbers of the components in the Toolbox and of the frames. These serial numbers ID TouchPAD User Manual, version 1.0.12. Last Revised: May 2012 Copyright © 2012 ICP DAS Co., Ltd. All Rights Reserved. Page: 112 E-mail: [email protected] are used to identify them. Left The x-coordinate of the left-top vertex of the Slider Max The maximum value of the Position Min The minimum value of the Position Name The name of the Slider OnSliderChange The function name of the on-slider-change event handler of the Slider. Note: The property is supported only in programming type “Standard C”. OutlineColor The outline color of the Slider Position The value where the slider locate (between Max and Min) Tag The variable used for programming purpose. For example, it can be assigned a unique number for each Slider component in order to identify them. Refer to the <<API Reference>> for functions to get/set the Tag property. Note: This Tag has nothing to do with the “Tag” which the TagName property refers to. TagName Associate a variable (tag) in Ladder Designer. Note: The property is supported only in programming type “Ladder”. Top The y-coordinate of the left-top vertex of the Slider Vertical The direction of the Slider Width The length of the horizontal side of the Slider Changing FillColor and OutlineColor Click the “FillColor” field in the Inspector. Then click the “…” button to open the color window to select a color. Repeat the same procedure for “OutlineColor”, “BackgroundFillColor” and “BackgroundTextColor”. TouchPAD User Manual, version 1.0.12. Last Revised: May 2012 Copyright © 2012 ICP DAS Co., Ltd. All Rights Reserved. Page: 113 E-mail: [email protected] For example, set FillColor to green and OutlineColor to red and then you may have the results as shown below. 5.4.9. Using a BitButton This section shows how to use a BitButton. What is a BitButton? A BitButton is a button with 3D appearance and the status rebounds back if releasing the pressed button. When you press it, you can see that the TouchPAD User Manual, version 1.0.12. Last Revised: May 2012 Copyright © 2012 ICP DAS Co., Ltd. All Rights Reserved. Page: 114 E-mail: [email protected] BitButton is pressed “down”. This 3D-like appearance is achieved by two images so that it takes more spaces to store and more time to download than a Text PushButton. Using a BitButton: 1. 2. Click the BitButton icon from the Widget panel of the Toolbox tab. Move your mouse to the frame design area and click and drag a suitable sized BitButton. 3. Click the “Text” field in the Inspector to change the string on the BitButton. Here we change the Text to “Hello”. 4. Double click the BitButton on the frame design area to open the programming window. Write the On-Click event handler in it. Here we use hmi_Beep() to sound a beep for example. Note: The property “OnClick” is supported only in programming type “Standard C”. TouchPAD User Manual, version 1.0.12. Last Revised: May 2012 Copyright © 2012 ICP DAS Co., Ltd. All Rights Reserved. Page: 115 E-mail: [email protected] 5. Press OK to save the file and leave. Properties of BitButton properties description Font The font of the text of the BitButton Height The length of the vertical side of the BitButton ID Left The serial numbers of the components in the Toolbox and of the frames. These serial numbers are used to identify them. The x-coordinate of the left-top vertex of the BitButton Name The name of the BitButton OnClick The function name of the on-click event handler of the BitButton. Note: Supported only in programming type “Standard C”. OnRelease The function name of the on-release event handler of the BitButton. Note: Supported only in programming type “Standard C”. TouchPAD User Manual, version 1.0.12. Last Revised: May 2012 Copyright © 2012 ICP DAS Co., Ltd. All Rights Reserved. Page: 116 E-mail: [email protected] Reference The reference to a frame. That is, when pressing on the BitButton, TouchPAD goes to the frame you specified in this property. Note: The priority of the property “Reference” is higher than that of “OnClick”. Tag The variable used for programming purpose. For example, it can be assigned a unique number for each BitButton component in order to identify them. Refer to the <<API Reference>> for functions to get/set the Tag property. Note: This Tag has nothing to do with the “Tag” which the TagName property refers to. TagName Associate a variable (tag) in Ladder Designer. Note: The property is supported only in programming type “Ladder”. Text The string on the BitButton Top The y-coordinate of the left-top vertex of the BitButton Width The length of the horizontal side of the BitButton Using Reference to another frame The Reference property is used as an event of go-to-specified-frame. It has higher priority than other events, such as OnClick event. Thus specifying a value to the Reference property disables the OnClick event handler. It’s easy to specify an option to the Reference property. Simply click the “Reference” field in the Inspector and then choose the frame for reference. TouchPAD User Manual, version 1.0.12. Last Revised: May 2012 Copyright © 2012 ICP DAS Co., Ltd. All Rights Reserved. Page: 117 E-mail: [email protected] 5.4.10. Using a HotSpot This section shows how to use a HotSpot. What is a HotSpot? HotSpot decides an area which is capable of responding to on-click events. Usually, putting a HotSpot on the Drawing components (that is, Rectangles, Ellipses, Texts, Pictures, and Lines) makes them to respond to on-click events. After downloading to TouchPAD, a HotSpot is invisible. Using a HotSpot: 1. Click the HotSpot icon from the Widget panel of the Toolbox tab. 2. Move your mouse to the frame design area and click and drag a suitable sized HotSpot. 3. Double click the HotSpot on the frame design area to open the programming window. Write the On-Click event handler in it. Here we use hmi_Beep() to sound a beep for example. TouchPAD User Manual, version 1.0.12. Last Revised: May 2012 Copyright © 2012 ICP DAS Co., Ltd. All Rights Reserved. Page: 118 E-mail: [email protected] Note: The property “OnClick” is supported only in programming type “Standard C”. 4. Press OK to save the file and leave. Properties of HotSpot properties description Height The length of the vertical side of the HotSpot ID Left The serial numbers of the components in the Toolbox and of the frames. These serial numbers are used to identify them. The x-coordinate of the left-top vertex of the HotSpot Name The name of the HotSpot OnClick The function name of the on-click event handler of the HotSpot. Note: Supported only in programming type “Standard C”. The function name of the on-release event handler of the HotSpot. OnRelease TouchPAD User Manual, version 1.0.12. Last Revised: May 2012 Copyright © 2012 ICP DAS Co., Ltd. All Rights Reserved. Page: 119 E-mail: [email protected] Reference Tag Note: Supported only in programming type “Standard C”. The reference to a frame. That is, when pressing on the HotSpot, TouchPAD goes to the frame you specified in this property. Note: The priority of the property “Reference” is higher than that of “OnClick”. The variable used for programming purpose. For example, it can be assigned a unique number for each HotSpot component in order to identify them. Refer to the <<API Reference>> for functions to get/set the Tag property. Note: This Tag has nothing to do with the “Tag” which the TagName property refers to. TagName Associate a variable (tag) in Ladder Designer. Note: The property is supported only in programming type Top “Ladder”. The y-coordinate of the left-top vertex of the HotSpot Width The length of the horizontal side of the HotSpot Using Reference to another frame The Reference property is used as an event of go-to-specified-frame. It has higher priority than other events, such as OnClick event. Thus specifying a value to the Reference property disables the OnClick event. It’s easy to specify an option to the Reference property. Simply click the “Reference” field in the Inspector and then choose the frame for reference. TouchPAD User Manual, version 1.0.12. Last Revised: May 2012 Copyright © 2012 ICP DAS Co., Ltd. All Rights Reserved. Page: 120 E-mail: [email protected] 5.4.11. Using a CheckBox This section shows how to use a CheckBox. What is a CheckBox? A CheckBox is a control element that provides a yes-no choice. Using a CheckBox: 1. Click the CheckBox icon from the Widget panel of the Toolbox tab. 2. Move your mouse to the frame design area and click and drag a suitable sized CheckBox. 3. Click on the “Text” field in the Inspector to change the string on the CheckBox. Here we change the Text to “Hello”. TouchPAD User Manual, version 1.0.12. Last Revised: May 2012 Copyright © 2012 ICP DAS Co., Ltd. All Rights Reserved. Page: 121 E-mail: [email protected] 4. Double click the CheckBox on the frame design area to open the programming window. Write the OnChange event handler in it. Here we use hmi_Beep() to sound a beep for example. Note: The property “OnChange” is supported only in programming type “Standard C”. 5. Press OK to save the file and leave. Properties of CheckBox TouchPAD User Manual, version 1.0.12. Last Revised: May 2012 Copyright © 2012 ICP DAS Co., Ltd. All Rights Reserved. Page: 122 E-mail: [email protected] properties BoxSize description The size of the checking box Font How to display the pictures which are loaded from RefObject property. The color used to fill the CheckBox. The color is represented by a three byte value in the hexadecimal form. From the highest byte to the lowest, it is the blue byte, the green byte, the red byte in sequence. The font of the text of the CheckBox Height The length of the vertical side of the CheckBox ID Left The serial numbers of the components in the Toolbox and of the frames. These serial numbers are used to identify them. The x-coordinate of the left-top vertex of the CheckBox Name The name of the CheckBox OnChange OutlineColor The function name of the OnChange event handler of the CheckBox. The outline color of the CheckBox RefObject The reference to the object list. An object list is a DisplayType FillColor component that can be selected in the Toolbox to maintain a list of the elements of the library. Refer to Selected section “Using an ObjectList” for details. True or false. Whether the CheckBox is checked or not Tag The variable used for programming purpose. For TouchPAD User Manual, version 1.0.12. Last Revised: May 2012 Copyright © 2012 ICP DAS Co., Ltd. All Rights Reserved. Page: 123 E-mail: [email protected] example, it can be assigned a unique number for each CheckBox component in order to identify them. Refer to the <<API Reference>> for functions to get/set the Tag property. Note: This Tag has nothing to do with the “Tag” which the Text TagName property refers to. Associate a variable (tag) in Ladder Designer. Note: the property is supported only in programming type “Ladder”. The string of the CheckBox Top The y-coordinate of the left-top vertex of the CheckBox Width The length of the horizontal side of the CheckBox TagName Changing FillColor and OutlineColor Click the “FillColor” field in the Inspector. Then click the “…” button to open the color window to select a color. Repeat the same procedure for “OutlineColor”. For example, set FillColor to green and OutlineColor to red and then you may have the results as shown below. TouchPAD User Manual, version 1.0.12. Last Revised: May 2012 Copyright © 2012 ICP DAS Co., Ltd. All Rights Reserved. Page: 124 E-mail: [email protected] 5.4.12. Using a Label This section shows how to use a Label. What is a Label? A Label is a Text put on TouchPAD to give information that may change at the run time. Using a Label: 1. 2. Click the Label icon from the Widget panel of the Toolbox tab. Move your mouse to the frame design area and click and drag a suitable sized Label. TouchPAD User Manual, version 1.0.12. Last Revised: May 2012 Copyright © 2012 ICP DAS Co., Ltd. All Rights Reserved. Page: 125 E-mail: [email protected] 3. Click the “Text” field in the Inspector to change the string on the Label. Here we change the Text to “Hello”. Properties of Label TouchPAD User Manual, version 1.0.12. Last Revised: May 2012 Copyright © 2012 ICP DAS Co., Ltd. All Rights Reserved. Page: 126 E-mail: [email protected] properties description Alignment Font This property determines where to locate the string, left, right, or center. (LeftJustify, RightJustify, or Center) The power to which ten must be raised to produce the value, say divisor, which is used to divide the value of the associated tag of this Label. The value of the tag must be divided by the divisor to show on the screen to represent decimal digits. Note: The property is supported only in programming type “Ladder”. The color used to fill the Label. The color is represented by a three byte value in the hexadecimal form. From the highest byte to the lowest, it is the blue byte, the green byte, the red byte in sequence. The font of the text Height The length of the vertical side of the Label ID Left The serial numbers of the components in the Toolbox and of the frames. These serial numbers are used to identify them. The x-coordinate of the left-top vertex of the Label Name The name of the Label OutlineColor The outline color of the Label TagName Associate a variable (tag) in Ladder Designer. Note: The property is supported only in programming type “Ladder”. DecimalDigits FillColor TouchPAD User Manual, version 1.0.12. Last Revised: May 2012 Copyright © 2012 ICP DAS Co., Ltd. All Rights Reserved. Page: 127 E-mail: [email protected] Text The string of the Label Top The y-coordinate of the left-top vertex of the Label Width The length of the horizontal side of the Label Changing FillColor and OutlineColor Click the “FillColor” field in the Inspector. Then click the “…” button to open the color window to select a color. Repeat the same procedure for “OutlineColor”. For example, set FillColor to green and OutlineColor to red and then you may have the results as shown below. Representing decimals for Ladder Designer The numbers used in the Ladder Desinger are all integers. The decimals are not accepted in the Ladder Designer. However, in some cases, users may need to calculate or display decimals. So we provide a work-around method to handle these cases. TouchPAD User Manual, version 1.0.12. Last Revised: May 2012 Copyright © 2012 ICP DAS Co., Ltd. All Rights Reserved. Page: 128 E-mail: [email protected] Take the I-7017Z module for example. Supposed that we use the I-7017Z module to read an analog value 3.265V back from the remote side and we want to display decimals on the TouchPAD devices. But the Ladder Designer supports only integers. So we must handle this drawback to directly read back the AI value from the I-7017Z module in the Ladder Designer. 1. Set the property “DecimalDigits” to the number of digits in the right of the decimal point. For example, we set DecimalDigits to 3. 2. Modify the I/O module’s IO.hsf. Let the read back AI value multiplied by ten of the n-th power where n is the value of “DecimalDigits”. You can find out I/O module’s IO.hsf file in the following locations: “[HMIWorks_install_path]\ bin\Modules\”. For example, IO.hsf of I-7017Z is located in “C:\ICPDAS\HMIWorks_Standard\bin\Modules\I-7000\I-7017Z”, where “C:\ICPDAS\HMIWorks_Standard\” is the installation path of HMIWorks. And we modify the IO.hsf to make v_ai[6] = v_ai[6] * 1000; Supposed we use channel 6 to read back AI value. As shown in the figure below, you can see that the tag “$AI6” in the Ladder Designer is 1000 times of the real value. With DecimalDigits set to 3, the correct value 3.265 is displayed on TouchPAD. 3.265V IO.hsf 3.265 TouchPAD User Manual, version 1.0.12. Last Revised: May 2012 Copyright © 2012 ICP DAS Co., Ltd. All Rights Reserved. Page: 129 E-mail: [email protected] Representing decimals in the C language In the frame of “Standard C”, representing decimals may be difficult since “sprintf” function is not supported in HMIWorks. We use “usprintf” (or “usnprintf”) to replace “sprintf”, but “usprintf” does not support the argument “%f”. In order to display a floating-point value, we provide a new API function for this purpose, the “FloatToStr” function as shown in the example below. void TextPushButton4OnClick(tWidget *pWidget) { float ret_sin; float angle = 1.57; static char str_sin[16]; // sin ret_sin = sin(angle); // int FloatToStr(char *buf, float fVal, int precision); // the precision determine the number of the digits after the decimal point FloatToStr(str_sin, ret_sin, 3); LabelTextSet(&Label5, str_sin); // The result is 1.000 } 5.4.13. Using a Timer This section shows how to use a Timer. Note: this component is supported only in programming type “Standard C”. TouchPAD User Manual, version 1.0.12. Last Revised: May 2012 Copyright © 2012 ICP DAS Co., Ltd. All Rights Reserved. Page: 130 E-mail: [email protected] What is a Timer? A Timer is a component that executes the OnExecute event handler every specified interval. Using a Timer: 1. 2. 3. 4. Click the Timer icon from the System panel of the Toolbox tab. Move your mouse to the frame design area and click to put the Timer on it. Note that you should not worry about the size or the location of the Timer because the Timer is invisible when downloaded to the TouchPAD. Also it’s not necessary to put the Timer on the frame panel. Click the “Interval” field in the Inspector to change the repeating period of the Timer. Here we set the Interval to 1000 (ms). And then change the property “Enabled” to True. TouchPAD User Manual, version 1.0.12. Last Revised: May 2012 Copyright © 2012 ICP DAS Co., Ltd. All Rights Reserved. Page: 131 E-mail: [email protected] 5. Double click the Timer on the frame design area to open the programming window. Write the OnExecute event handler in it. Here we use hmi_Beep() to sound a beep for example. 6. Press OK to save the file and leave. Properties of Timer properties description Enabled Whether the Timer is enabled or not Height The length of the vertical side of the Timer (This ID property cannot be changed by users.) The serial numbers of the components in the Toolbox and of the frames. These serial numbers are used to identify them. Interval The time span of two consecutive OnExecute events Left The x-coordinate of the left-top vertex of the Timer TouchPAD User Manual, version 1.0.12. Last Revised: May 2012 Copyright © 2012 ICP DAS Co., Ltd. All Rights Reserved. Page: 132 E-mail: [email protected] Name The name of the Timer OnExecute The function name of the OnExecute event handler of the Timer. Top The y-coordinate of the left-top vertex of the Timer Width The length of the horizontal side of the Timer (cannot be changed by users.) 5.4.14. Using a PaintBox This section shows how to use a PaintBox. Note: this tool is supported only in programming type “Standard C”. What is a PaintBox? A PaintBox is a component which is used to paint shapes, such as rectangles, ellipses, etc., in the runtime. Using a PaintBox 1. 2. Click the PaintBox icon from the System panel of the Toolbox tab. Move your mouse to the frame design area and click and drag a suitable sized PaintBox. TouchPAD User Manual, version 1.0.12. Last Revised: May 2012 Copyright © 2012 ICP DAS Co., Ltd. All Rights Reserved. Page: 133 E-mail: [email protected] 3. Double click the PaintBox on the frame design area to open the programming window. Write the OnPaint event handler in it. Here we draw a rectangle for example. Note 1: the diagonal points used in the function of hmi_FillRect are in the same coordinate as the frame. Note 2: the part of the rectangle which is outside the perimeter of the PaintBox is cut off. Note 3: WidgetLeft(pWidget) and WidgetTop(pWidget) are the x, y coordinates of the left-top vertex of the PaintBox. While WidgetRight(pWidget) and WidgetBottom(pWidget) are those of the right-bottom. 4. Press OK to save the file and leave. Properties of PaintBox TouchPAD User Manual, version 1.0.12. Last Revised: May 2012 Copyright © 2012 ICP DAS Co., Ltd. All Rights Reserved. Page: 134 E-mail: [email protected] properties description Height The length of the vertical side of the PaintBox ID Left The serial numbers of the components in the Toolbox and of the frames. These serial numbers are used to identify them. The x-coordinate of the left-top vertex of the PaintBox Name The name of the PaintBox OnPaint The function name of the OnPaint event of the PaintBox. Top The y-coordinate of the left-top vertex of the PaintBox Width The length of the horizontal side of the PaintBox Clearing a PaintBox Use the “hmi_SetForeground” function to paint a white rectangle to clear the PaintBox as shown in the red box in the example below. Refer to the API reference for more details. ftp://ftp.icpdas.com/pub/cd/touchpad/document/english/api_reference/ TouchPAD User Manual, version 1.0.12. Last Revised: May 2012 Copyright © 2012 ICP DAS Co., Ltd. All Rights Reserved. Page: 135 E-mail: [email protected] 5.4.15. Using an ObjectList This section shows how to use an ObjectList component. What is an ObjectList? TouchPAD User Manual, version 1.0.12. Last Revised: May 2012 Copyright © 2012 ICP DAS Co., Ltd. All Rights Reserved. Page: 136 E-mail: [email protected] An ObjectList is a component which is used to maintain a list of library objects. An ObjectList can be used in both programming types. Combined with “RefObject” properties of the TextPushButton and the CheckBox components, users can easily toggle two images. Using an ObjectList: 1. 2. 3. 4. Click the ObjectList icon from the System panel of the Toolbox tab. Move your mouse to the frame design area and click to put an ObjectList component on it. Note that you should not worry about the size or the location of the ObjectList component because the ObjectList component is invisible when downloaded to the TouchPAD device. Also it’s not necessary to put the ObjectList component on the frame panel. The ObjectList component maintains a list of a library objects and is used in a TextPushButton component or a CheckBox component. After downloading to the TouchPAD device, the images of the library objects replace the TextPushButton component or the CheckBox component. When the state of the TextPushButton component or the CheckBox component changed, users see only the images of the library objects toggles but do not see the original appearances of the TextPushButton component or the CheckBox component. 5. Add two library objects in the ObjectList by double clicking the ObjectList icon. Then the “ObjectList” window is displayed. Double click on the list of the library objects to adds them to the right side region. Note 1: To delete the library objects in the “ObjectList” window, TouchPAD User Manual, version 1.0.12. Last Revised: May 2012 Copyright © 2012 ICP DAS Co., Ltd. All Rights Reserved. Page: 137 E-mail: [email protected] double click on the objects in the right-side block. 6. Click and drag a CheckBox component on the frame panel for example. Be sure to make the size of the CheckBox component large enough to cover the whole image of the library object. 7. Go to the Inspector to select an option from the “RefObject” field for the CheckBox component. The selected ObjectList component is connected to the CheckBox component. TouchPAD User Manual, version 1.0.12. Last Revised: May 2012 Copyright © 2012 ICP DAS Co., Ltd. All Rights Reserved. Page: 138 E-mail: [email protected] 8. Build and download the project. You can see two images of the library objects toggle when the state of the TextPushButton component or the CheckBox component changes. Properties of ObjectList properties description Height The length of the vertical side of the ObjectList ID Left The serial numbers of the components in the Toolbox and of the frames. These serial numbers are used to identify them. The x-coordinate of the left-top vertex of the ObjectList Name The name of the ObjectList Objects The maintained library objects Top The y-coordinate of the left-top vertex of the ObjectList Width The length of the horizontal side of the ObjectList TouchPAD User Manual, version 1.0.12. Last Revised: May 2012 Copyright © 2012 ICP DAS Co., Ltd. All Rights Reserved. Page: 139 E-mail: [email protected] Relationships between TouchPAD and I/O module Take the I-7066 module for example, click on the “Register Devices” option from the “HMI” menu or press F3 on your keyboard to automatically generate tags and then drag and drop the tag on the frame. HMIWorks does the followings to build the relationships between the TouchPAD device and I/O modules. TouchPAD User Manual, version 1.0.12. Last Revised: May 2012 Copyright © 2012 ICP DAS Co., Ltd. All Rights Reserved. Page: 140 E-mail: [email protected] Note: The TagName property takes effect only in the programming type Ladder. (It’s easier in programming type “Standard C”. Control the I/O by using API function, dcon_WriteDO, in the event handler of the CheckBox.) 5.5. Menus All the menus can be accessed from menu bar or the popup menu. The menu bar: Right click on the frame design area, a popup menu is displayed. The frame design area: 5.5.1. Cascading and Grouping, Arrange Menu TouchPAD User Manual, version 1.0.12. Last Revised: May 2012 Copyright © 2012 ICP DAS Co., Ltd. All Rights Reserved. Page: 141 E-mail: [email protected] To demonstrate functions of cascading and grouping, first draw three shapes as followings: Back One Make the selected object go down a level of the stacks. For example, select the blue ellipse and click the “Back One” option in the “Arrange” menu. You can see that the blue ellipse goes down one level in the stack. Forward One Repeat the similar procedure for the “Forward One” option from the “Arrange” menu to go up a level in the stack. To back Repeat the similar procedure for the “To back” option from the “Arrange” menu to make the selected object go down to the lowest level of the stack. TouchPAD User Manual, version 1.0.12. Last Revised: May 2012 Copyright © 2012 ICP DAS Co., Ltd. All Rights Reserved. Page: 142 E-mail: [email protected] To front Repeat the similar procedure for the “To front” option from the “Arrange” menu to make the selected object go up to the highest level of the stack. For example, select the red square and click “To front” in the menu. You can see that the red square goes up to the highest level in the stack. Group Put components (the Drawing, the Widget and the System components) together as a set, that is, a group. For example, first circle the items together by a mouse, and then click “Group” in the menu. You can see that they are grouped together. Ungroup Break a group back into its original separate state. For example, select the group and then click the “Ungroup” option from the “Arrange” menu. TouchPAD User Manual, version 1.0.12. Last Revised: May 2012 Copyright © 2012 ICP DAS Co., Ltd. All Rights Reserved. Page: 143 E-mail: [email protected] 5.5.2. Rotating and Flipping, Edit Menu To demonstrate functions of rotating and flipping, first draw three shapes as followings: Rotate CCW Rotate the selected item in the counter-clockwise direction. For example, first put three items into one group, select the group and then click the “Rotate CCW” option from the “Edit” menu. You can see that this group of shapes is rotated counter-clockwise. TouchPAD User Manual, version 1.0.12. Last Revised: May 2012 Copyright © 2012 ICP DAS Co., Ltd. All Rights Reserved. Page: 144 E-mail: [email protected] Rotate CW Similar to the above step, click the “Rotate CW” option from the “Edit” menu to rotate the selected item in the clockwise direction For example, first put three items into one group, select the group and then. You can see that this group of shapes is rotated clockwise. Flip horizontal Flip the selected item in the horizontal direction. For example, first put three items into one group, select the group and then click the “Flip horizontal” option from the “Edit” menu. You can see that this group of shapes is flipped horizontally. Flip vertical Similar to the above step, click the “Flip vertical” option from the “Edit” menu to flip the selected item in the vertical direction. TouchPAD User Manual, version 1.0.12. Last Revised: May 2012 Copyright © 2012 ICP DAS Co., Ltd. All Rights Reserved. Page: 145 E-mail: [email protected] 5.5.3. Frame Managing and Aligning, Layout Menu Frame Management: New Frame Create a new frame (select the programming type) Delete Frame Delete the current frame Rename Frame Rename a frame Alignment: To demonstrate the functions of alignment, draw three shapes as followings TouchPAD User Manual, version 1.0.12. Last Revised: May 2012 Copyright © 2012 ICP DAS Co., Ltd. All Rights Reserved. Page: 146 E-mail: [email protected] Note: all alignment functions refer to the last shape you draw. In above example, all alignment functions refer to the square. Align left Align the leftmost edge of all the selected items to that of last-drawn item. For example, select all the items and then click “Align left” in the menu. Align horizontal center Align the horizontal center of all the selected items to that of last-drawn item. For example, select all the items and then click “Align horizontal center” in the menu. TouchPAD User Manual, version 1.0.12. Last Revised: May 2012 Copyright © 2012 ICP DAS Co., Ltd. All Rights Reserved. Page: 147 E-mail: [email protected] Align right Align the rightmost edge of all the selected items to that of last-drawn item. Align top Align the topmost edge of all the selected items to that of last-drawn item. Align vertical center Align the vertical center of all the selected items to that of last-drawn item. Align bottom Align the bottommost edge of all the selected items to that of last-drawn item. Align center Align the center point of all the selected items to that of last-drawn item. For example, select all the items and then click “Align center” in the menu. TouchPAD User Manual, version 1.0.12. Last Revised: May 2012 Copyright © 2012 ICP DAS Co., Ltd. All Rights Reserved. Page: 148 E-mail: [email protected] 5.5.4. Build and Download to Run, Run Menu Refer to the chapter, “Setup Devices and Connect to I/O”, for “Setup Device”. Other Items in the Run Menu Run (F9) Rendering + Build + Download Rendering and build (F5) Rendering + Build (Compile and Link) Rendering Only (Ctrl + F5) Generate source codes for frames, tools, ladders, etc. Download Only (Ctrl + F9) Download the project’s bin file to the TouchPAD devices Download File (User bin) Download a bin file to the TouchPAD devices Console (F10) Open a console window (cmd.exe) with environment variables for HMIWorks. Users can modify the generated codes and then re-make the codes. (Use make.exe.) TouchPAD User Manual, version 1.0.12. Last Revised: May 2012 Copyright © 2012 ICP DAS Co., Ltd. All Rights Reserved. Page: 149 E-mail: [email protected] 5.5.5. Library Management, Popup Menu Adding items to library All the items added have the file extension “hwd”. For example as below: 1. Click the “libraries” tab, select a folder (where the library object is to be added to) from the dropdown menu as shown in the picture below. 2. Group the selected items. 3. Right click on the frame design area to open the popup menu. 4. Click on “Add to library …” TouchPAD User Manual, version 1.0.12. Last Revised: May 2012 Copyright © 2012 ICP DAS Co., Ltd. All Rights Reserved. Page: 150 E-mail: [email protected] 5. Specify the library name and save it to the library. Note: you can preview the library object in the library window and the “size” information of that library object is shown below. Using items from library For example as below: 1. 2. 3. Click on the tab of “Libraries” to show the library panel. Pick the object you want. You can preview the object in the preview box below. Click (and not released) on the item in the preview box (or in the list) and then drag the item and drop it on the frame design area. TouchPAD User Manual, version 1.0.12. Last Revised: May 2012 Copyright © 2012 ICP DAS Co., Ltd. All Rights Reserved. Page: 151 E-mail: [email protected] Adding a new folder into library window Select the folder of the libraries as shown in the picture below. To add a new folder into the library window, create a new folder in the following path: “HMIWorks_install_path\bin\Lib\” where the HMIWorks_install_path is the installation path of HMIWorks. TouchPAD User Manual, version 1.0.12. Last Revised: May 2012 Copyright © 2012 ICP DAS Co., Ltd. All Rights Reserved. Page: 152 E-mail: [email protected] Supposed the installation path of HMIWorks is “C:\ICPDAS\HMIWorks_Standard”. And we want to add a new folder named “Test” into the library window. Then all we have the do is creating a new folder named Test in the directory of “C:\ICPDAS\HMIWorks_Standard\bin\Lib”. And then re-open the library window, you can see that the new folder “Test” as shown below. Of course, there’s no library item in it. You should add items yourself. The special [Picture] directory in the project directory 1. 2. Click the “libraries” tab, select the “[Picture]” directory from the dropdown menu as shown in the picture above. Unlike others options in that dropdown menu, “[Picture]” directory is at the location of the project directory. Any library that is added to the “[Picture]” directory is always together with the project and makes the project portable among different computers. TouchPAD User Manual, version 1.0.12. Last Revised: May 2012 Copyright © 2012 ICP DAS Co., Ltd. All Rights Reserved. Page: 153 E-mail: [email protected] 3. When opening a project, a red cross will be shown on the frame panel if HMIWorks fails to load the image as shown in the below picture. Import Images to Library This option can also be accessed from the File menu. Click this option to select more than one image files, transform them into the .hwd file format which HMIWorks can recognize and finally put these files in the [Pictures] folder in the current project directory. Since the transformed .hwd files are put in the [Pictures] folder of a project, users should create or open a project to execute this option. As shown below, click the “Select files” button to execute. Note: Now, we support GIF/JPG/BMP/ICO/WMF/EMF image formats. TouchPAD User Manual, version 1.0.12. Last Revised: May 2012 Copyright © 2012 ICP DAS Co., Ltd. All Rights Reserved. Page: 154 E-mail: [email protected] 6. Making a Simple Project There are two programming types in HMIWorks. In this chapter, we introduce how to build your first project for each programming type. 6.1. Your First Project Using Standard C 1. Creating a new project Click the “New…” option from the “File” menu and then select the Model, specify the Project name, the Location, the Orientation, and the Programming Type. Here we choose programming type as [1] Standard C. 2. Designing the Graphic User Interface For example, draw a rectangular and fill the color. Of course, you can draw more complex and beautiful figures. Here, we simply demonstrate how to TouchPAD User Manual, version 1.0.12. Last Revised: May 2012 Copyright © 2012 ICP DAS Co., Ltd. All Rights Reserved. Page: 155 E-mail: [email protected] make a simple project. And then select a Widget. For example, pick a BitButton. 3. Modifying Source Codes Double click the BitButton in the frame design area to open the programming window. Use “hmi_Beep();” to sound a beep for example, then press OK. TouchPAD User Manual, version 1.0.12. Last Revised: May 2012 Copyright © 2012 ICP DAS Co., Ltd. All Rights Reserved. Page: 156 E-mail: [email protected] 4. Setup Device Refer to the “Setup Devices” section for details. 5. Compiling and Downloading to Run After connecting to the TouchPAD device, press F9 to run (or click the “Run” option from the “Run” menu. As the shown in the figure below, pressing the button makes TouchPAD sound a beep. TouchPAD User Manual, version 1.0.12. Last Revised: May 2012 Copyright © 2012 ICP DAS Co., Ltd. All Rights Reserved. Page: 157 E-mail: [email protected] 6.2. Your First Project Using Ladder 1. Creating a new project Click the “New…” option from the “File” menu, and then select the Model, specify the Project name, the Location, the Orientation, and the Programming Type. Here we choose programming type as [2] Ladder. 2. Designing the Graphic User Interface For example, place a CheckBox component and a Label component on the frame panel. Here, we plan to take the CheckBox component as an input and the Label component as an output. TouchPAD User Manual, version 1.0.12. Last Revised: May 2012 Copyright © 2012 ICP DAS Co., Ltd. All Rights Reserved. Page: 158 E-mail: [email protected] Select an ObjectList component and click on the frame design area. Double click the ObjectList icon to open the “ObjectList” window. In the “ObjectList” window, double click to select the pictures you want. Users need to double click on two pictures, one is for the checked state of the CheckBox component and the other is for the unchecked state. Press OK to finish this step. Make the CheckBox component refer to the ObjectList component by setting the property “RefObject” to the ObjectList component. Now toggling the states of the CheckBox component becomes the switching of the pictures in the ObjectList component. TouchPAD User Manual, version 1.0.12. Last Revised: May 2012 Copyright © 2012 ICP DAS Co., Ltd. All Rights Reserved. Page: 159 E-mail: [email protected] 3. Designing the Ladder Diagram First, add virtual tags (variables) for the ladder diagram. Press F2 on your keyboard or click the “New Virtual Tag” option from the “HMI” menu. Here, we add two tags, v1 and v2, for example. After adding the tags, users can verify in the Workspace. Press F4 on your keyboard or click the “Ladder Designer” option from the “HMI” menu to open the Ladder Designer window. In the Ladder Designer window, press F2 to create a new rung. TouchPAD User Manual, version 1.0.12. Last Revised: May 2012 Copyright © 2012 ICP DAS Co., Ltd. All Rights Reserved. Page: 160 E-mail: [email protected] Double click the contact input of the first rung in the Ladder Designer window. Then the “Select variable” dialog box is displayed. Choose the variable to associate with the contact input. Here, we select variable v1 to associate the contact input. Repeat the same procedure to associate v2 with the coil output. Then we associate the CheckBox component with the v1 tag and the Label component with the v2 tag by the “TagName” properties of themselves. TouchPAD User Manual, version 1.0.12. Last Revised: May 2012 Copyright © 2012 ICP DAS Co., Ltd. All Rights Reserved. Page: 161 E-mail: [email protected] After setting the “TagName” properties, users can verify in the Inspector. 4. Setup Device Refer to the section “Setup Devices” for details. 5. Compiling and Downloading to Run After connecting to the TouchPAD device, press F9 on your keyboard to run (or click the “Run” option from the “Run” menu). As shown in the figure below, pressing the button switches the value of the Label from 0 1, or 1 0. TouchPAD User Manual, version 1.0.12. Last Revised: May 2012 Copyright © 2012 ICP DAS Co., Ltd. All Rights Reserved. Page: 162 E-mail: [email protected] 6.3. Integrating TPD-280 Series with I/O modules In this example, we use the TPD-280 device to control an I-7066 module, the 7-channel photo-MOS relay output module of ICP DAS. First, put the I-7066 module in the same RS-485 network of the TPD-280 device and configure the settings of the I-7066 module with the DCON Utility (baudrate, data bit, parity, stop bit, Net ID, etc.). 1. Using DCON Utility to Set Up I-7066 Download the DCON Utility to install and refer to its user manual. ftp://ftp.icpdas.com/pub/cd/8000cd/napdos/driver/dcon_utility/ Then use the DCON Utility to set up the I-7066 module. At least set the followings: Address(Net ID), Baudrate, Databit, Parity, and Stopbit. TouchPAD User Manual, version 1.0.12. Last Revised: May 2012 Copyright © 2012 ICP DAS Co., Ltd. All Rights Reserved. Page: 163 E-mail: [email protected] 2. Creating a new project Click the “New…” option from the “File” menu and then select the Model, specify the Project name, the Location, the Orientation, and the Programming Type. Here we choose programming type as [2] Ladder. 3. Designing the Graphic User Interface We can skip this step. Here we just demonstrate how to quickly complete a whole new project with I/O modules of ICP DAS. TouchPAD User Manual, version 1.0.12. Last Revised: May 2012 Copyright © 2012 ICP DAS Co., Ltd. All Rights Reserved. Page: 164 E-mail: [email protected] 4. Designing the Ladder Diagram Press F3 on your keyboard or click the “Register Devices” option from the “HMI” menu to open the “Devices” window to register the I-7066 module. Refer to the section “Connect to I/O Modules” for details. Click the “Libraries” tab to select a picture to represent the tag in the “Libraries” panel. Drag and drop the tag that is corresponding to the DO0 of I-7066. On the frame design area, the picture you just select is now on the frame. 5. Setup Device Refer to the section “Setup Devices” for details. 6. Compiling and Downloading to Run After connecting to the TouchPAD device, press F9 on your keyboard to run (or click the “Run” option from the “Run” menu). As shown in the figure below, pressing the button switches the output of channel 0 of the I-7066 module. TouchPAD User Manual, version 1.0.12. Last Revised: May 2012 Copyright © 2012 ICP DAS Co., Ltd. All Rights Reserved. Page: 165 E-mail: [email protected] 6.4. Integrating TPD-283 Series with I/O modules In this example, we use the TPD-283 device to control a PET-7060 module, the 6-channel Power Relay Output, 6-channel Isolation Digital Input and PoE module of ICP DAS. First, put the PET-7060 module in the Ethernet network of the TPD-283 device and use a browser to configure the PET-7060 module. 1. Configuring PET-7066 by a Browser Download the MiniOS7 Utility and its user manual from ftp://ftp.icpdas.com/pub/cd/8000cd/napdos/minios7/utility/minios7_utility/ Then use the MiniOS7 Utility to configure the IP settings of the PET-7060 module. (Be sure to make the PET-7060 module and your PC in the same subnet.) Press F12 on your keyboard to scan through the network. Then click the PET-7060 module that is found and then click the “IP setting” button to configure the IP settings. TouchPAD User Manual, version 1.0.12. Last Revised: May 2012 Copyright © 2012 ICP DAS Co., Ltd. All Rights Reserved. Page: 166 E-mail: [email protected] Finally, connect to the PET-7060 module and configure it by a browser. 2. Creating a New Project Click the “New…” option from the “File” menu, and then select the Model, specify the Project name, the Location, the Orientation, and the Programming Type. Here we choose programming type as [2] Ladder. TouchPAD User Manual, version 1.0.12. Last Revised: May 2012 Copyright © 2012 ICP DAS Co., Ltd. All Rights Reserved. Page: 167 E-mail: [email protected] 3. Designing the Graphic User Interface We can skip this step. Here we just demonstrate how to quickly complete a whole new project with I/O modules of ICP DAS. 4. Designing the Ladder Diagram Press F3 in your keyboard or click the “Register Devices” option from the “HMI” menu to open the “Devices” window to register the PET-7060 module. Refer to section “Connect to I/O Modules” for details. Click the “Libraries” tab to select a picture to represent the tag in the “Libraries” panel. Drag and drop the tag that is corresponding to the DO0 of the PET-7060 module to the frame design area. On the frame design area, the picture you just select is now on the frame. TouchPAD User Manual, version 1.0.12. Last Revised: May 2012 Copyright © 2012 ICP DAS Co., Ltd. All Rights Reserved. Page: 168 E-mail: [email protected] 5. Setup Device Refer to “Setup Devices” for details. 6. Compiling and Downloading to Run After connecting to the TPD-283 device, press F9 on your keyboard to run (or click the “Run” option from the “Run” menu). As shown in the figure below, pressing the button switches the output of channel 0 of the PET-7060 module. TouchPAD User Manual, version 1.0.12. Last Revised: May 2012 Copyright © 2012 ICP DAS Co., Ltd. All Rights Reserved. Page: 169 E-mail: [email protected] 7. Advanced Programming in C We have an API reference for TouchPAD. ftp://ftp.icpdas.com/pub/cd/touchpad/document/english/api_reference/ Though you can refer to the generated codes to learn how to use these API functions, all the API functions are defined in header files in the following path: “C:\ICPDAS\HMIWorks_Standard\include\grlib” and “C:\ICPDAS\HMIWorks_Standard\include”, where “C:\ICPDAS\HMIWorks_Standard” is the installation path. We give some examples in this chapter. 7.1. Adding a New File to Project Before introducing the details, first we show how to add a new file (.c or .h) to the project. 1. 2. 3. Go to Workspace. Right click on the “File” item and a pop-up menu is displayed. On that pop-up menu, choose the type of the file you want to add. As the following figure shows: TouchPAD User Manual, version 1.0.12. Last Revised: May 2012 Copyright © 2012 ICP DAS Co., Ltd. All Rights Reserved. Page: 170 E-mail: [email protected] 7.2. Updating Properties in Run Time It is a bit more complicated to change the properties of widgets in the run time. In this section, we demonstrate some commonly-used cases, including: 1. The “FillColor” and “Text” properties of a TextPushButton component 2. 3. 4. The percentage of a Slider component The “Selected” property of a CheckBox component The “Font”, the “Text” and the “TextColor” properties of a Label component Updating properties is implemented in the event handlers of the widgets. Note: The naming convention of the event handler of the widget (here the widget is the TextPushButton component) is shown as below: 7.2.1. FillColor and Text of a TextPushButton This section shows how to change the “FillColor” and the “Text” properties of a TextPushButton component. Simply follow the steps below. 1. Click the TextPushButton icon in the “Toolbox” panel and move your mouse to the frame design area. Click and drag a suitable sized TextPushButton. TouchPAD User Manual, version 1.0.12. Last Revised: May 2012 Copyright © 2012 ICP DAS Co., Ltd. All Rights Reserved. Page: 171 E-mail: [email protected] 2. Double click the TextPushButton component to implement its OnClick event handler in the displayed programming window. Then press OK to save the file and leave. 3. In order to make it clearer, we copy the above codes below. void TextPushButton13OnClick(tWidget *pWidget) { static char * str = "Hello World!"; PushButtonTextSet(&TextPushButton13, str); PushButtonFillColorSet(&TextPushButton13, 0x00FF00); WidgetPaint((tWidget*)&TextPushButton13); // green } The effect of the OnClick event handler: To set the “Text” property of a TextPushButton, we provide another function “TextButtonTextSet” for your convenience. Refer to the API reference for more details. The API reference can be downloaded from: TouchPAD User Manual, version 1.0.12. Last Revised: May 2012 Copyright © 2012 ICP DAS Co., Ltd. All Rights Reserved. Page: 172 E-mail: [email protected] ftp://ftp.icpdas.com/pub/cd/touchpad/document/english/api_reference/ For more API functions of the TextPushButton component, refer to pushbutton.h in the following path: “C:\ICPDAS\HMIWorks_Standard\include\grlib”, where “C:\ICPDAS\HMIWorks_Standard” is the installation path. 7.2.2. Percentage of a Slider Simply follow the steps below to display the percentage of a Slider when it changes its position. 1. Click the Slider icon in the “Toolbox” panel and move your mouse to the frame design area. Click and drag a suitable sized Slider. 2. Double click the Slider component to implement its OnSliderChange event handler in the displayed programming window. Then press OK to save the file and leave. 3. In order to make it clearer, we copy the above codes below. void SliderWidget6OnSliderChange(tWidget *pWidget, long lValue) { static char strValue[10]; TouchPAD User Manual, version 1.0.12. Last Revised: May 2012 Copyright © 2012 ICP DAS Co., Ltd. All Rights Reserved. Page: 173 E-mail: [email protected] usnprintf(strValue, sizeof(strValue), "%d%%", lValue); SliderTextSet((tSliderWidget*) pWidget, strValue); } The effect of the OnSliderChange function (after selecting colors): For more API functions of Slider, refer to slider.h in the following path: “C:\ICPDAS\HMIWorks_Standard\include\grlib”, where “C:\ICPDAS\HMIWorks_Standard” is the installation path. 7.2.3. Selected of a CheckBox Take the steps below for example to change the “Selected” property of a CheckBox component in the run time. 1. 2. 3. Click the CheckBox icon in the “Toolbox” panel and move your mouse to the frame design area. Click and drag a suitable sized CheckBox. Repeat the same procedure as that of the CheckBox component for a BitButton component. Double click the BitButton component to implement its OnClick event handler in the displayed programming window. Then press OK to save the file and leave. TouchPAD User Manual, version 1.0.12. Last Revised: May 2012 Copyright © 2012 ICP DAS Co., Ltd. All Rights Reserved. Page: 174 E-mail: [email protected] 4. In order to make it clearer, we copy the above codes below. void BitButton23OnClick(tWidget *pWidget) { //make CheckBox status = selected (checked) CheckBoxSelectedSet(&CheckBoxWidget22, 1); WidgetPaint((tWidget*) &CheckBoxWidget22); } The effect of the OnClick function: For more API functions of CheckBox, refer to checkbox.h in the following path: “C:\ICPDAS\HMIWorks_Standard\include\grlib”, where “C:\ICPDAS\HMIWorks_Standard” is the installation path. TouchPAD User Manual, version 1.0.12. Last Revised: May 2012 Copyright © 2012 ICP DAS Co., Ltd. All Rights Reserved. Page: 175 E-mail: [email protected] 7.2.4. Font, Text and TextColor of a Label Take the steps below for example to update properties of a Label component in the run time. 1. 2. Click the Label icon in the “Toolbox” panel and move your mouse to the frame design area. Click and drag a suitable sized Label. Repeat the same procedure as that of the Label component above for three BitButton components. 3. Double click the BitButton component to implement its OnClick event handler in the displayed programming window. Then press OK to save the file and leave. TouchPAD User Manual, version 1.0.12. Last Revised: May 2012 Copyright © 2012 ICP DAS Co., Ltd. All Rights Reserved. Page: 176 E-mail: [email protected] 4. In order to make it clearer, we copy the codes below with their corresponding results. Results Codes of the event handler //step 0 //the beginning snapshot N/A //step 1 //Click on BitButton “change Text” void BitButton17OnClick(tWidget *pWidget) { static char *str = "Hello! TouchPAD"; CanvasTextSet(&LabelWidget18, str); WidgetPaint((tWidget*) &LabelWidget18); // or use LabelTextSet to replace // CanvasTextSet and WidgetPaint, that is: // LabelTextSet(&LabelWidget18, str); } //step 2 //Click on BitButton “change Font” void BitButton19OnClick(tWidget *pWidget) { //change Font to size 20 CanvasFontSet(&LabelWidget18, &g_sFontCm20); WidgetPaint((tWidget*) &LabelWidget18); } TouchPAD User Manual, version 1.0.12. Last Revised: May 2012 Copyright © 2012 ICP DAS Co., Ltd. All Rights Reserved. Page: 177 E-mail: [email protected] //step 3 //Click on BitButton “change Color” void BitButton20OnClick(tWidget *pWidget) { //change Text color to Red CanvasTextColorSet(&LabelWidget18, 0xFF0000); WidgetPaint((tWidget*) &LabelWidget18); } To set the “Text” property of a Label component, we provide another function “LabelTextSet” for your convenience. Refer to the API reference for more details. The API reference can be downloaded from: ftp://ftp.icpdas.com/pub/cd/touchpad/document/english/api_reference/ For more API functions of Label, refer to canvas.h in the following path: “C:\ICPDAS\HMIWorks_Standard\include\grlib”, where “C:\ICPDAS\HMIWorks_Standard” is the installation path. In the same path, there is a header file, grlib.h. grlib.h contains prototypes for the pre-defined fonts, such as g_sFontCm20. 7.3. Accessing Tags in Ladder In HMIWorks, users can design a project with many frames of two different types, “Standard C” and “Ladder”. The variables (tags) used in the Ladder is transformed into a structure of the C language after building the project and thus the tags can be accessed in the frame of programming type “Standard C”. Two macros are provided for this purpose: 1. 2. VAR_GET: get the value from the tag in the Ladder VAR_SET: set a value to the tag in the Ladder Supposed that we have a tag named “count” incremented in the Ladder, then TouchPAD User Manual, version 1.0.12. Last Revised: May 2012 Copyright © 2012 ICP DAS Co., Ltd. All Rights Reserved. Page: 178 E-mail: [email protected] we can get the value of the “count” tag and set the “count” tag to zero as shown in the example below. static char str[32]; //get count (virtual tag) from Ladder void TextPushButton8OnClick(tWidget *pWidget) { VAR_GET(count); usprintf(str, "%d", count); LabelTextSet(&LabelWidget9, str); } //Set count to zero void TextPushButton11OnClick(tWidget *pWidget) { VAR_SET(count, 0); usprintf(str, "%d", count); LabelTextSet(&LabelWidget9, str); } TouchPAD User Manual, version 1.0.12. Last Revised: May 2012 Copyright © 2012 ICP DAS Co., Ltd. All Rights Reserved. Page: 179 E-mail: [email protected] Appendix Appendix is listed below: 1. FAQ, Frequently Asked Questions A.FAQ A.1. What to do if screen flashes? Go to the section “Properties of a Frame” for details. A.2. How to have higher-resolution Picture? Go to the section “Loading a Picture” for details. A.3. How does a TouchPAD control I/O? Go to the section “Using an ObjectList” for details. A.4. How to change Font of Text? Go to the section “Drawing a Text” for details. TouchPAD User Manual, version 1.0.12. Last Revised: May 2012 Copyright © 2012 ICP DAS Co., Ltd. All Rights Reserved. Page: 180 E-mail: [email protected] A.5. How to represent decimals for Ladder Designer? Go to the section “Using a Label” for details. A.6. How to remove the startup beep of a TPD-283 device? The TPD-283 devices sound a beep when startup. Refer to the section “The Options of TouchPAD” for more details. A.7. How to customize the generated code? Every time when building a project, HMIWorks generates source codes to build. Below is the procedure to customize the generated source codes. 1. After finishing designing the project, press F5 (build) on your keyboard instead of F9 (run) to generate codes. 2. In the directory of the project, open the source file (.c files). 3. Edit the source files (.c files). 4. Press F10 on your keyboard, and a “cmd.exe” window is displayed. Enter “make” in the “cmd.exe” window to re-make the project. 5. Click the “Download Only (Ctrl + F9)” option from the “Run” menu to download the .bin (or .bix) file. TouchPAD User Manual, version 1.0.12. Last Revised: May 2012 Copyright © 2012 ICP DAS Co., Ltd. All Rights Reserved. Page: 181 E-mail: [email protected] A.8. How to store data in the flash? For users’ convenience, there are two sets of API functions for data storage in the flash on the TouchPAD devices. One is for the MCU (micro-controller unit) internal flash and the other is the external serial flash. To user these features, install the HMIWorks software with version 2.03 or above. ftp://ftp.icpdas.com/pub/cd/touchpad/setup/ No. 1 2 Target Flash MCU internal flash External serial flash Possible Target Device All devices in the TouchPAD series All devices in the TouchPAD series, except TPD-280 and TPD-283 (for those having external flash) API Functions Provided* hmi_UserParamsGet, hmi_UserParamsSet hmi_UserFlashReadEx, hmi_UserFlashWriteEx, hmi_UserFlashConfig, hmi_UserFlashErase Size of Storage 256 byte 4 KB ~ 7 MB Suggested Users Any TouchPAD users For advanced users only. Any undetermined use will damage the application image. * Refer to the API reference for more details. ftp://ftp.icpdas.com/pub/cd/touchpad/document/english/api_reference/ A.9. How to clear a PaintBox? Go to the section “Using a PaintBox” for details. TouchPAD User Manual, version 1.0.12. Last Revised: May 2012 Copyright © 2012 ICP DAS Co., Ltd. All Rights Reserved. Page: 182 E-mail: [email protected]