1
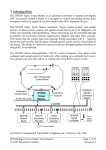
17.1 DT100IR Route Editing
Diagram 5 shows the DT100IR key strokes to allow you to create & edit
routes. The matrix shows an array of 32 routes each with an initial TOP
switch entry, and up to 7 more switches in that route. Note that the diagram
shows a dashed box display that is flashed up to indicate which entry you are
working on. After this flashed display, the DT100IR will display the actual
switch information that is "behind" or stored in this entry. This is depicted
as the solid display box behind, and related to, the dashed display.
Entering Switch Editor & Selecting A Route To Review or Edit:
, press the
key to change to
1. If you are currently in LOCO mode
SWITCH mode
. Note that you have a 6 second inactivity time-out,
and if you do not make an entry within 6 seconds, the DT100IR will
return to LOCO mode
.
2. Press the
key to change from SWITCH mode and enter
Route/Signal/Clock Editor mode.
3a. If routes are enabled in the DCS100, by OPSW# 26 being made "c" or
closed, then the display will flash "rt:01" (Route:01) to indicate you have
entered the Route Editor.
3b. If routes are not enabled then this editor mode will be skipped and the
DT100IR will attempt to edit Signal module information. Since the
Signal modules are not yet installed, the unit will then skip to the Clock
editor. Section 22.0 describes the steps for changing the Fast Clock, Rate
and Alarm setting using these editors.
4. Select the route number you wish to edit by browsing through the 32
available routes. This route number, "nn" is simply a reference for
editing and transcribing route information in the Route memory array.
You will not trigger routes with the Route number but will do so by
selecting the TOP switch in the route and changing its position to match
the position set up at the Top of a particular route.
As you assemble your routes, we recommend that you keep a list of switches
in each route (this will make it much easier to find problems with
nesting). The following page is a blank route list table to help you keep
up with the switches you set up in each route.
4a. The DT100IR will display "rt:nn" (route:route number) to indicate that
you are at the TOP switch of route number "nn". After this ID has
flashed up, the display will change to the 3 digit switch number of the
TOP switch and the last digit will show either "t" or "c" to indicate the
position of the TOP switch that will trigger the route.
5. After the "rt:nn" display has flashed up the switch number of this Top
switch can be reviewed and changed if necessary. Use the following keys
to make changes as needed:
64