1
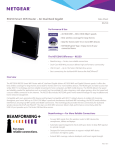
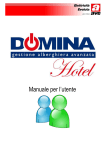
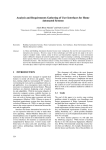
Works with:
MI CASA VERDE VERA
NEVO
Schlage LiNK
LAGOTEK
HOME SEER
AEON LABS
mControl
ADT Pulse
Z-Wave InWall Single Switch
DHS-ZW-SWIW-03
User Guide
Z-Wave Technology for Automated Homes
Wiring diagram
Z-Wave is a state of-the-art wireless technology used as a standard for wireless home control.
It is a next-generation wireless ecosystem that lets all your home lighting systems and electronics talk to each other, and to you, via a controller or a gateway. It uses simple, reliable,
low-power radio waves that easily travel through walls, floors and cabinets. All products in
Australian / New Zealand version (921.4h MHz) featuring the Z-Wave logo are certified to
work smoothly with each other.
Product Overview
The DHS In-Wall Single Switch DHS-ZW-SWIW-01 is effective Z-Wave switch device specifically designed for use in smart homes and offices.
The product allows to switch on/off attached lighting (single circuit) wirelessly using a Zwave enabled (AUS/NZ version 921.42 MHz) controllers (compatible universal remote controllers, control panels, gateways, PC with Z-Wave USB dongle) or manually via connected
manual switch.
The switch can act as a wireless repeater to ensure that commands intended for another
device in the network are received. This is useful to eliminate “RF deadspots” when the radio
range of the Z-Wave network is influenced. This function is part of the Z-Wave network functionality and is set up via Z-Wave controller.
Installation
Please check the maximum load before installing or operating.
Please note:
in Australia and New Zealand the installation must be done by certified electrician.
Please note:
Two state switch will not work properly. Button on the wall plate have to be Bell Press type
(e.g. push-button Saturn Series 60PBBP or similar).
It is recommended that you wire your Switch Controller and include it into Z-Wave network
before mounting it in a wall cavity. Leigh of wires between manual button and device must
be less than 0.5m.
You may setup your Switch and include into Z-Wave grid before mounting in wall cavity.
Manual Operations
Press and release the button on the connected Bell Switch to switch on / turn off the connected light. Once the light is on you can switch ON/OFF the light by pressing and releasing
the manual switch button connected to the device.
Example of wiring with Clipsal Saturn range 1 gang wall
plate and one 30/60PBBPL Bell Press Mechanism.
Z-Wave Operations
SAFETY INSTRUCTIONS
NOTE:
Before including the product to your Z-wave network it is advised to perform removal
procedure to reset network settings.
The Z-Wave In-Wall Switch must be included into your Z-Wave home network before it can
send and receive Z-Wave commands. The Z-Wave In-Wall Switch can only communicate to
devices within the same Z-wave home network.
Always follow your controller’s specific instructions for Z-Wave inclusion, exclusion, association and control operations.
Always read the safety instructions carefully:
- Keep this User’s Manual for future reference
- Keep this equipment away from high humidity and any liquid.
- This product is for indoor use only inside dry wall cavity or similar environment. Keep e
nough space around for ventilation.
- Do not connect to the load bigger then maximum approved for this product
- Do not connect to the non-compatible load
- If the product’s enclosure, is damaged, it shall be replaced by the manufacturer or its ser
vice agent or similarly qualified person in order to avoid a hazard
Inclusion to Z-wave home network – general instructions
The Z-Wave In-Wall Single Switch must be included into your Z-Wave home network before
it can send and receive Z-Wave commands. The Z-Wave In-Wall Switch can only communicateto devices within the same Z-wave home network. Always follow your controller’s
specific instructions for Z-Wave inclusion, exclusion, associationand control operations.
1. Connect the Z-Wave In-Wall Single Switch to the load, power circuits and to the manual
switch as per instructions in the section INSTALLATION above.
2. Start inclusion procedure on your controller and when requested press and release the
button on the connected Bell switch. During the whole procedure controller (Gateway)
and Z-Wave In-Wall Single Switch must be in close proximity of 15cm.
Successful inclusion will be indicated by your Z-Wave remote controller (Gateway). In
case inclusion was not successful, try the procedure again or reset network settings by
running exclusion procedure (see below).
3. Once the Z-Wave In-Wall Switch has been added into your Z-Wave home network
successfully, you may need to assign it to a specific button on your controller (Gateway).
Refer to your Z-Wave controller (Gateway) / panel for instructions on how to do this.
4. Now, you can control your light via your Z-Wave Gateway or other controller.
Exclusion from Z-wave home network – general instructions
1. Install Connect the Z-Wave In-Wall Switch to the load, power circuits and to the manual
switch as per instructions in the section INSTALLATION above.
2. Start exclusion procedure on your controller and when requested press and release the
round button on the product’s enclosure. During the whole procedure the controller and
Z-Wave In-Wall Switch must be close proximity of not more then 15cm.
3. Successful exclusion will be indicated by your Z-Wave remote controller. LED on the ZWave In-Wall Switch will start slow blinking. In case exclusion was not successful, try the
procedure again.
Association with other Z-wave devices (e.g. motion sensor) – general instructions
1. Include the Z-Wave In-Wall Switch into your Z-Wave home network.
2. Start association procedure on your controller and when requested press and release the
round button on the device.
- DO NOT INSTALL THIS DEVICE INSIDE SEALED INCLOSURES AND METAL BOXES. ALWAYS
LEAVE ROOM FOR VENTILATION.
- INSTALLATION MUST BE DONE BY CERTIFIED ELECTRICIAN.
Technical Specifications
RF Protocol:
Z-Wave device type:
Connections type:
Operating Voltage:
MaxLoading:
Switch type:
RF Frequency:
Operation Range:
Application:
Operation temperature:
Storage temperature:
Weight:
Housing:
Dimensions LxWxH:
Compliance:
RCM:
Z-Wave
Z-Wave Binary Switch, routing slave
See wiring above
AC 240V / 50Hz
6A
Universal (relay)
921.42Mhz - AU/NZ approved RF for Z-Wave
Up to 30m when no obstacles
Indoor use only
0 ~ 55 °C
10 ~ 80 °C
70g
ABS
48mm x 45mm x 18 mm
AS/NZS 4268:2008, AS/NZS CISPR 14.1, IEC60669-2-1
N5496
Specifications are subject to change without further notice
The information in this document is subject to change without notice. Digital Home Systems Pty Ltd (DHS) does not make any representations or warranties (implied or otherwise) regarding the accuracy and
completeness
of this document and shall in no event be liable for any loss of profit or any commercial damage, including but not limited to special, incidental, consequential, or other damage.
TRADEMARKS
All trademarks and registered trademarks are the property of their respective owners or companies.
DHS One (1) Year Limited Warranty
Digital Home Systems Pty Ltd warrants this DHS branded hardware product against defects in materials and workmanship under normal use for period of one (1) year from the date of retails purchase by the
original enduser
purchaser (‘Warranty Period’). PLEASE NOTE: breaking security label will void the warranty.
Terms and conditions
To see complete terms and conditions browse to http://www.digitalhomesystems.com.au/images/stories/DHS_Terms_and_conditions.pdf
Product of Digital Home Systems Pty Ltd
See all range of compatible devices at www.digitalhomesystems.com.au
Enquiries Sales and Marketing Email: [email protected]
© 2012 Digital Home Systems Pty Ltd. All rights reserved.