1
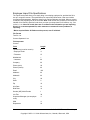
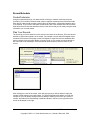
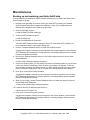
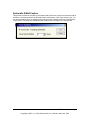
Keller-Soft® E-Z Access Recordkeeper
User Manual
Copyright © 2003 J. J. Keller & Associates, Inc., Neenah, Wisconsin, USA
Table of Contents
Introduction
2
What is the Keller-Soft® E-Z Access Recordkeeper and what will it do?. 2
Administrative Features
3
Company and Location.................................................................................... 3
Entering Company Information ................................................................. 3
Entering Location Information ................................................................... 3
Employee List .................................................................................................. 4
Adding an employee ................................................................................. 4
Deleting an employee ............................................................................... 4
Importing employees................................................................................. 5
Employee Import File Specifications......................................................... 6
Calendar .......................................................................................................... 7
Adding a personal item ............................................................................. 7
Viewing calendar items ............................................................................. 7
Changing a personal item ......................................................................... 8
Removing a personal item ........................................................................ 8
Refreshing the calendar............................................................................ 8
Recordkeeping
9
By Employee.................................................................................................... 9
By Training Topic............................................................................................. 9
By Non-Training Topic..................................................................................... 9
Record/Schedule ........................................................................................... 10
Create/Customize ................................................................................... 10
Plan Your Records .................................................................................. 10
Label and Define the Contents of the Fields........................................... 11
Modifying Records Contained in the Program ........................................ 12
Search..................................................................................................... 12
Miscellaneous
13
Backing up and restoring your Keller-Soft® data .......................................... 13
Automatic E-Mail Feature .............................................................................. 14
Keller-Soft® E-Z Access Recordkeeper
Copyright © 2003 J. J. Keller & Associates, Inc., Neenah, Wisconsin, USA
1
Introduction
The Keller-Soft® E-Z Access Recordkeeper has been designed to provide workplace safety,
transportation safety, and hazmat professionals with an efficient and reliable way to keep track of
all training aspects and more. To maintain compliance with mounds of regulations, employers are
required to not only train and retain employees regularly, but must also keep accurate records
regarding training. Now, recording, tracking, and reporting employee training will be easier than
ever before.
This program’s sharp recordkeeping focus and flexibility make it relevant to all industries and
gives us access to a large market.
What is the Keller-Soft® E-Z Access Recordkeeper and what will it
do?
The E-Z Access Recordkeeper is a straightforward database program with the ability to track
anything users want to record and track. It provides trainers with an efficient and reliable way to
track all aspects of training, including personnel trained, dates, training topics, and instructors.
The software provides instant, on-screen visibility of training information, sorted according to the
your needs without requiring you to click through multiple screens. Pre-assigned fields and userdefined fields offer the kind of flexibility training professionals have been asking for in a training
recordkeeper.
•
Pre-assigned fields will cover standard training recordkeeping data such as:
•
Personnel trained
•
Instructors
•
Dates of training
•
Training topics
•
Location of training
Safety professionals have many different responsibilities in addition to training employees. For
this reason additional fields are provided that allow you to customize the program for your
operation. Examples of additional fields you may want to include are:
•
Service anniversaries
•
Birthdays
•
Employee evaluations
•
Vehicle maintenance
•
Driver qualification requirements
Traditional database programs would require you to enter data by going to each employee's file.
With more than a few employees, this method can be very cumbersome. The E-Z Access
Recordkeeper allows you to enter data from any point in the program.
The software's reporting capabilities provide the same flexibility as data entry. If you want to see
who has been trained in a particular topic, select that topic from the training topics list and view
the report. No need to sort out the entire employee list by having to click through multiple
screens.
2
Keller-Soft® E-Z Access Recordkeeper
Copyright © 2003 J. J. Keller & Associates, Inc., Neenah, Wisconsin, USA
Administrative Features
Company and Location
Entering Company Information
The Keller-Soft® E-Z Access Recordkeeper uses your company information in various ways. This
information includes your company’s name, address, and phone/fax numbers. You will be asked
for location information as part of this process, where you can enter specific information for each
location. See Entering location information for complete details.
1. Click the ‘Company and Location’ hyperlink in the ‘Home’ window.
The ‘Step 1: Enter Your Company Information’ window appears.
2. Complete all the fields in the window.
3. Do either of the following:
•
Click ‘Finish’ to save company information
- or -
•
Click ‘Location Information’ to add the appropriate location information for your company.
Note: Location information is entirely optional, but can be a good organizer if you have a
larger operation.
Click ‘Finish’ when you have completed your information entry.
Entering Location Information
Location information consists of the name, address, phone/fax numbers, and main contact person
for each of your company’s locations. Location information is an entirely optional feature of the
Keller-Soft® E-Z Access Recordkeeper. You are not required to enter any locations, but if you
have multiple facilities with varying requirements, location information can be a helpful way of
differentiating recordkeeping requirements from facility to facility.
Note: When first installed, the E-Z Access Recordkeeper creates a default location for you, called
Location #1. You may change this location before adding any other locations. See Changing
location information for complete instructions.
1. If you want to enter location information, click the ‘Location Information’ button at the bottom
of the ‘Step 1: Enter Your Company Information’ dialog box.
Location information is entered as part of the company information process.
2. Enter the appropriate information into the ‘Step 2: Enter Your Location Information’ dialog
box.
3. You may also continue to:
•
Add another location.
•
Change a location.
• Delete a location.
4. Use the same steps to add or change information on existing locations. When you are
finished, do one of the following:
•
Click ‘Finish’ to save the new location information.
•
Click ‘Back’ to close the window without saving any information.
Keller-Soft® E-Z Access Recordkeeper
Copyright © 2003 J. J. Keller & Associates, Inc., Neenah, Wisconsin, USA
3
Employee List
When you click the ‘Employee List’ hyperlink in the Home window, you will see this Employees
window. All existing employees in your program display, or you can apply various filters to refine
the employees that display at any given time. Available filters are:
•
Location
•
Department
•
Job Title
•
Status (Active or Inactive).
You can add, edit, or delete employee records from this window. You can also import an existing
employee list. See the Importing employees topic for complete details on that operation.
You can also add, rename, or delete job titles or locations from this window. And you can print an
Employee List, or Training by Job Title or Department by clicking the ‘Employee Reports’ button.
Adding an employee
You can add employees as you need to in Keller-Soft® E-Z Access Recordkeeper. To do so, use
this procedure:
1. Click the ‘Add’ button in the ‘Employees’ window which opens when you click the
Employee List hyperlink in the Home window.
2. The E-Z Access Recordkeeper opens the ‘Add Employee’ dialog box.
3. Work through the fields in the dialog box, adding as much information as you wish on the
employee you are adding.
Note: Be certain to complete any "required" fields – they are marked with an *.
4. When you have entered all the appropriate information, click ‘Next’ and enter any
additional information you want on the new employee you are adding to the list.
5. When you have completed all the information you wish to add, click ‘Finish" to add the
employee to the list.
6. The ‘Information about’ dialog box closes and you return to the Employees window. You
can continue to add more employees if you wish.
Deleting an employee
You can delete an employee, providing they do not have training sessions attached to them in the
Keller-Soft® E-Z Access Recordkeeper. To do so, use this procedure:
1. Navigate to the Employees window.
2. Click the ‘Delete’ button with the employee you want to delete selected.
E-Z Access Recordkeeper asks you to confirm your selection.
3. Click ‘Yes’ to confirm deletion
Click ‘No’ to cancel and return to the Employees window.
4. If there are no training classes attached to the employee, the name is immediately removed
from the employee list.
If classes are found attached to the person, E-Z Access Recordkeeper opens an advisory
dialog telling you that the employee cannot be deleted until the existing course data has been
deleted.
4
Keller-Soft® E-Z Access Recordkeeper
Copyright © 2003 J. J. Keller & Associates, Inc., Neenah, Wisconsin, USA
5. Click ‘OK’ and remove the person from any training courses, etc. before deleting them.
Importing employees
Follow this procedure to import an employee file.
1. Click the ‘Import’ button in the Employees window.
2. Click ‘OK’ in the Import Employee window.
The Keller-Soft® E-Z Access Recordkeeper will open the ‘Select file to import’ dialog box.
3. Click the Look in field and select the appropriate drive where the employee list to be imported
is located.
4. Navigate to the appropriate program folder where the employee list file resides.
5. When a list of files appears in the file name area at the left of the dialog box, click on the
appropriate one to select it. The file name now appears in the ‘File Name’ field.
Note: Be certain that you have selected the correct variety of file from the ‘List files of type’
box.
6. When all specifications are correct, click ‘OK’ and the file’s contents are automatically
imported and placed in your employee list.
Click ‘Cancel’ and you will be returned to the Employees window.
Keller-Soft® E-Z Access Recordkeeper
Copyright © 2003 J. J. Keller & Associates, Inc., Neenah, Wisconsin, USA
5
Employee Import File Specifications
The import function will allow you to easily bring in an existing employee list, provided the file is
set up in a specific manner. The specifications for import files follow below. Lists must include
commas as field separators. Maximum sizes for the various fields are also listed. When a comma
is detected, the program goes to the next field. Note: Field number one (location) is the numerical
identifier for a location’s position found when you open your drop-down list of locations, e.g., first
on list is 1, etc. Note: Be certain there are no commas in the information you are importing.
Since it is a comma-separated file, other extraneous commas will cause problems in
importing.
* Marks required fields. All fields must be present, even if left blank.
File Format
Text file *.txt
Comma Separated *.csv
Field separator
Comma
Field
Length
Locationkey (must be numeric)
4
* Employee Code
11
* Firstname
15
MiddleInitial
1
* Lastname
20
Company
30
Phone (work)
20
Phone2 (home)
20
Email
100
Address1
30
Address2
30
City
20
State
2
Zip
10
Hire Date
14
Birth Date
14
Gender (M/F) Male/Female
1
Job Title
30
Supervisor/Manager (use employee
code)
11
SSN
11
Department
22
6
Keller-Soft® E-Z Access Recordkeeper
Copyright © 2003 J. J. Keller & Associates, Inc., Neenah, Wisconsin, USA
Calendar
Adding a personal item
You can add personal items at any time and include them on the Calendar Report for any date
range you wish. For any personal item you can enter a date, time, subject, and reminder notes.
1. Click on the date on which you want to add the item.
The Calendar highlights that date.
2. Click the ‘Add an item’ icon on the toolbar.
The Calendar Item dialog box appears. The Date field defaults to the highlighted date while
the Time field defaults to either the current time (if the selected date is today) or to 8:00:00
AM.
3. Complete the fields in the dialog box and click the ‘OK’ button.
The Calendar adds the new item, displaying it in the Summary area for the date.
Viewing calendar items
You can view the Keller-Soft® and personal items for any day at any time. Dates with items
contain the appropriate icon. Dates without icons do not contain any items.
1. Click the ‘Refresh’ icon on the toolbar to ensure that all recently added Keller-Soft® items
appear on the Calendar.
2. If necessary, change the month or year.
3. Click on the date that you wish to view.
The Calendar highlights that date and displays all the items for that date in the Summary area
of the Calendar window.
4. For more information about an item, double-click on the item in the Summary area:
•
If it is a Keller-Soft® item, the Keller-Soft® Calendar starts or activates the appropriate
application and takes you to information about the item.
•
If it is a personal item, the Calendar Item dialog box appears.
Keller-Soft® E-Z Access Recordkeeper
Copyright © 2003 J. J. Keller & Associates, Inc., Neenah, Wisconsin, USA
7
Changing a personal item
Although you can change a Keller-Soft® item only from within the application where the item was
set, you can change any of the following information for a personal item:
•
Date
•
Time
•
Subject
•
Notes
The Calendar applies the changes as soon as you save them.
1. From the Calendar window, click on the date that contains the item that you want to change.
The Safety Plan Customizer highlights that date.
2. In the Summary area of the window, double-click on the appropriate item.
The Calendar Item dialog box appears.
3. Click in the field that you want to change and type the new information over the old.
4. Click ‘OK’ to save your change.
The Calendar immediately saves your change. If you changed the date, the Calendar moves
the item to that date.
Removing a personal item
You can remove a personal item at any time; the item is immediately deleted from the Calendar.
However, you cannot remove a Keller-Soft® item.
1. From the Calendar window, click on the date that contains the item that you want to remove.
The Safety Plan Customizer highlights that date.
2. In the Summary area of the window, click on the appropriate item to highlight it.
3. Click the ‘Remove an item’ icon on the toolbar.
The Calendar asks if you are sure that you want to remove the item.
4. Click ‘Yes’ to remove the item from the calendar.
Refreshing the calendar
When you use an application with the calendar open, the Calendar cannot recognize any review
date changes. So, when you switch back to the calendar, it won’t be accurate until you refresh it.
1. From the Calendar window, click the ‘Refresh’ icon on the toolbar.
The Calendar makes any pending application changes and updates the Keller-Soft® items.
8
Keller-Soft® E-Z Access Recordkeeper
Copyright © 2003 J. J. Keller & Associates, Inc., Neenah, Wisconsin, USA
Recordkeeping
By Employee
Click the ‘By Employee’ hyperlink at the left of the Home window and you will see this window
labeled ‘View Employee Records.’
If you have a large number of employees, you will want to use the location and department filters
to select smaller groups of employees. Furthermore, the little buttons will show you which
employees have Topic and Training information linked to them, and which ones don’t. You will be
able to see who has had training on what, at a glance.
When you first get the program, your employee list box is probably empty. There are two ways to
fill it. You can add your employees one at a time by clicking the Add button, or you can import
your employee list from another source using the Import button. If you are going to import an
employee list, check the Help information topic on importing employees.
By Training Topic
This list contains all of the Training Topics in the program. You can use the little boxes on the left
to select the topics that are of interest to you and then click the radio button on the right to show
only those topics you have selected. If you double click on a Topic, e.g. Acrylonitrile, you can look
at it. These features are described in the Topic Detail window writeup.
By Non-Training Topic
Some recordkeeping topics are not usually associated with training. Unlike the Training Topics,
these records are all different. You can use the links at the right to add your own topics or you
can customize the topics that are here. You can delete them, but if you do they are gone.
Keller-Soft® E-Z Access Recordkeeper
Copyright © 2003 J. J. Keller & Associates, Inc., Neenah, Wisconsin, USA
9
Record/Schedule
Create/Customize
Using an organized layout for your data records will help you maintain useful and accurate
records for your business. Electronic data is kept in separate records that are divided into fields.
Each field in a data record contains a specific piece of information. A field might contain a name
or an address. They would be referred to as the Name Field or the Address Field. Each of these
fields should have a label that describes what is in the field so that you can easily recognize what
information your records contain.
Plan Your Records
The first thing you will be asked for on this screen is the Name of the Record. This name should
describe in general terms what is in the record. For example a record called Fire Brigade might
contain a list of names of the people on the Fire Brigade. It might also have the addresses and
phone numbers for those people. Before you begin to set up your record you should decide on
the name that will be meaningful. Click Add New as shown below to enter the name of your
record.
After entering the name of the record, a box will pop up and you will be asked to supply the
number of fields that the record will contain. You should think about this before you enter the
number but your can always change it later by adding or deleting a field. After you enter the
number, the fields will be automatically created and shown in the box on the right side of the
screen as illustrated on the right.
10
Keller-Soft® E-Z Access Recordkeeper
Copyright © 2003 J. J. Keller & Associates, Inc., Neenah, Wisconsin, USA
Label and Define the Contents of the Fields
After the fields have been created you will need to give each field a meaningful label so that you
will know what data is in each field. After you have labeled the field you will need to define the
type of data that will be contained in the field. This is important because the computer may not
search your data properly if it does not understand the type of data that is in the field. In order to
store the data efficiently you also need to tell the computer about how big the field will be. This
does not need to be exact. These steps are illustrated below. When you have completed these
steps, click on Apply the Field as shown. This will cause your layout to be applied to the field.
Select the next field in the box on the right by clicking on it and repeat the process for the next
field. When you have labeled and defined each field, click Return at the bottom of the screen. You
should go to the appropriate recordkeeping area and look at your Record to see if it will contain
the data that you planned for it. If you want to change the record, the data type, the label, or the
order of appearance of the fields, return to this screen and make any necessary modifications.
Don’t worry about making a mistake. You can always delete your records or fields and start
again. Remember however, that if you delete a record or field that has data in it, that data will be
lost.
Enter a label for your field.
Choose the type of data the field will contain. If the field will contain lists such as the employee
list, you should check the multiple selection box if you want to select more than one item at a
time. For example you may want to choose all of the employees that are on the Fire Brigade. The
default selection is text, but you will want to choose the "Employee" selection in the dropdown list
which is accessed by clicking the arrow on the right side of the box.
You may also use the "Add New" to create your own permanent selection list of items that pertain
to your business. An example might be tools or equipment. If you use this option, the initial list will
be empty. To maintain the list go to the main menu and click Edit and Manage Lists. You will
need to return to the Home Screen to do this, as Manage Lists is not available from this screen.
When you enter the record you have created, your list of items will be available to you.
Choose the size of the field. Size is important for text fields. You need to make sure your field is
large enough for your data, but not so large as to use unneeded space on the screen.
Keller-Soft® E-Z Access Recordkeeper
Copyright © 2003 J. J. Keller & Associates, Inc., Neenah, Wisconsin, USA
11
The display order can be changed at any time. Looking at your record after you are finished will
help you to know whether the order is correct.
Making the data required for certain fields such as a name field may be a good idea. It will help
you make your data consistent and avoid the creation of empty records. It is not a good idea to
make all the fields required, as you may not have all the data you need when create a new record
and the program will not allow you to continue without the required data.
When you have set up your field, click on "Apply the field". Your label will now appear in the list of
fields in the box. You should then click on the next field in the box and repeat the label and
definition process.
If you are modifying an existing record and want to add another field to the record, click on "Add
Another Field" and then repeat the steps. The new field will appear at the bottom of the list after
you click "Apply the field".
Modifying Records Contained in the Program
You may wish to add fields to the records already contained in the program. To do this select the
record from the list in the dropdown box as shown on the right. You may add a field by clicking on
"Add another field" at the bottom of the screen as shown above.
Search
12
Keller-Soft® E-Z Access Recordkeeper
Copyright © 2003 J. J. Keller & Associates, Inc., Neenah, Wisconsin, USA
Miscellaneous
Backing up and restoring your Keller-Soft® data
It is important that you establish a regular schedule of backing up your Keller-Soft® data. Follow
this procedure to do that.
1. Navigate to the jjka folder on the drive where your Keller-Soft® program(s) are installed.
Note: By default Keller-Soft® programs are installed to C:\jjka. If you installed them to a
different drive, navigate to the location of the jjka folder.
2. Click the jjka folder to open it.
Locate the KSOFT32 folder inside jjka.
3. Click the KSOFT32 folder to open it.
Locate KSUtilities.exe.
4. Double-click KSUtilities.exe to launch it.
The Keller-Soft® Database Utilities dialog box opens. All of the Keller-Soft® programs you
have installed are listed in the program display area.
5. Click the ‘Compact Databases’ button to launch the compact process.
A progress box appears, showing you the progress of the compact operation. Note: All KellerSoft® databases are compacted in a single operation. A message displays when the compact
has been completed successfully.
6. Now click the ‘Backup Databases’ button to launch the backup process for all your KellerSoft® databases.
A ‘Select a file to backup to’ dialog box appears.
7. Give the file a name (Note: you may want to use some kind of dating system so you can keep
track of the versions of backup you have stored on your system. For example, 111001.zip
would indicate the backup you did on October 10, 2002. Another good idea is to move these
files to a removable floppy disk or CD on a regular basis, with appropriate date labeling.)
8. Click ‘Open’ to launch the backup operation.
A progress box appears, showing you the progress of the backup operation. Note: All KellerSoft® databases are backed up in a single operation. A message displays when the backup
has been completed successfully.
9. When you are ready, click the ‘Restore Databases’ button to launch the restore process for
all your Keller-Soft® databases.
A ‘Select a file to restore from’ dialog box appears.
10. Locate the file that you backed up and click on it.
It drops into the ‘File Name:’ box.
11. Click ‘Open’ to launch the restore operation.
A progress box appears, showing you the progress of the restore operation. Note: All KellerSoft® databases are backed up in a single operation. A message displays when the restore
has been completed successfully.
Keller-Soft® E-Z Access Recordkeeper
Copyright © 2003 J. J. Keller & Associates, Inc., Neenah, Wisconsin, USA
13
Automatic E-Mail Feature
This product contains an automatic e-mail feature that will send an e-mail to the instructor and all
students in a training session if the Reminder Date at the bottom of the Topic Screen is set. You
can shut this feature off or set a delay for the date by clicking Features and then E-mail Options
on that menu. The dialog box illustrated below will allow you to change your e-mail options.
14
Keller-Soft® E-Z Access Recordkeeper
Copyright © 2003 J. J. Keller & Associates, Inc., Neenah, Wisconsin, USA