1
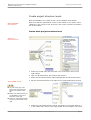
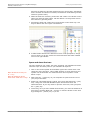
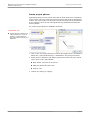
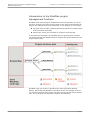
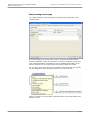
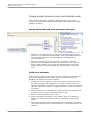
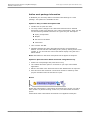
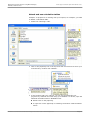
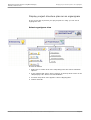
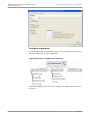
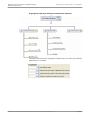
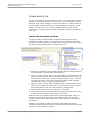
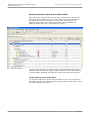
MindPlan Developing a Project Structure using Work Packages, Activities, and Resources User Manual Part II ▪ Status as of December 2008 Contact: [email protected] ▪ www.weilgut.com ▪ www.mindplan.com Developing a Project Structure using Work Packages, Activities, and Resources A multitude of tasks arise in a project, which is why the project deliverables, work packages and individual tasks of each project must have a clear structure. In this part of the User Manual, you will learn step-by-step how to develop a project structure plan, create activities, allocate resources, and estimate effort and costs for your project. As you work through the manual you will become familiar with the basic and easy-to-use MindPlan project management functions. This chapter describes the basic principles of project planning in the map editor, based on the principles developed in "Brainstorming with MindMaps" in Part I. IN THIS PART: Create project structure levels............................................................3 Create basic project structure level....................................................3 Open and close the tree...................................................................4 Create project phases......................................................................5 Structure contents and assign phases................................................6 Basic structure for project management.............................................6 Introduction to the MindPlan project management functions..............7 Work package node type..................................................................8 Activity node type ...........................................................................9 Deliverable node type......................................................................9 Milestone node type ......................................................................10 Create project structure plan and estimate costs..............................11 Assign deliverable and work package node types...............................11 Initial cost estimates......................................................................11 Show/hide information fields in the map...........................................13 Define work package information.....................................................15 Attach and use calculation tables.....................................................16 Display project structure plan as an organigram...............................18 Select organigram view..................................................................18 Configure organigram.....................................................................19 Create activity list.............................................................................21 Create and formulate activities........................................................21 Convert existing branches to activities..............................................22 Assign milestones..........................................................................23 Allocate resources, duration, and costs for activities........................24 Task managers and duration...........................................................24 Target costs, actual costs, and actual duration...................................25 Display costs and duration in the map..............................................27 Save, copy, and delete project plan...................................................28 Copy project plan..........................................................................28 Save and use project plan as a template...........................................29 Delete project plan........................................................................30 Project structure view in the map and Gantt editor...........................31 Project structure view in the map editor...........................................31 Project structure view in the Gantt editor..........................................32 MindPlan User Manual Part II © Haus Weilgut ▪ December 2008 ▪ www.mindplan.com Page 2 Developing a Project Structure using Work Packages, Activities, and Resources Create project structure levels Create project structure levels Open the MindPlan you created in Part I of the MindPlan User Manual. OPEN SIDEBAR: Ctrl+Shift+S Make sure that the right sidebar is open. If the sidebar is not visible, select »Sidebar« in the »View« menu at the top. Click on the »Create new branch« link in the sidebar. Create basic project structure level Insert key: Branches below 1 Select the central node and select the »Your next steps« menu in the right sidebar. 2 Type »00 Brainstorming« and confirm with »Enter«. 3 Select all the branches above while holding down the left mouse button. 4 Pull the selected branches to the right to the »00 Brainstorming« branch. APPLY NODE STYLE: You can easily copy node styles using the brush functions in the toolbar at the top. Select a formatted branch (of any MindPlan) and click on the brush on the left. Select an unformatted branch and click on the brush on the right. 5 Select the »00 Brainstorming« branch and assign a new visual effect to it in the »Node style« menu in the right sidebar. In this example, the border MindPlan User Manual Part II © Haus Weilgut ▪ December 2008 ▪ www.mindplan.com Page 3 Developing a Project Structure using Work Packages, Activities, and Resources Create project structure levels and font are dark blue and the background color is light gray. Advantage: As the number of branches increases, the different visual effect gives the structure greater clarity. 6 While the branch is selected, press Enter and create a new branch on the same level with the same effect. Call this branch »01 Project Structure« and confirm by pressing Enter. 7 Press Enter again and create two more branches in the same way: »02 Project dates« and »03 Project coordination«. 8 To differentiate between the branches from a visual perspective, assign icons to them. To do this, select the relevant branch and select suitable icons in the right sidebar. Open and close the tree The more branches you create, the more confusing your MindPlan becomes. Therefore open and close parts of your MindPlan as required: Open branches level by level: + key Open all branches at the same time: Shift and + keys 1 Click on the minus symbol at the bottom right of the central node. This closes the entire structure. This symbol appears on each node as a plus symbol if all levels below are closed and as a minus symbol if a level below is open. 2 Now press the + (plus) key on your keyboard to open the first level of your project structure. 3 Select the »00 Brainstorming« branch, then press the Shift and + (plus) keys. Using this command MindPlan opens all branches below the selected branch. If you only want to open the next level, then just press the + (plus) key. 4 Conversely, once you have edited the branches, you close the branches of all levels by pressing Shift and - (minus) or close the branch of one level by pressing the - (minus) key. Try it out. MindPlan User Manual Part II © Haus Weilgut ▪ December 2008 ▪ www.mindplan.com Page 4 Developing a Project Structure using Work Packages, Activities, and Resources Create project structure levels Create project phases By Brainstorming you now have a basic idea of what needs to be considered in the project. You now create the project structure plan step-by-step based on this. You need to take into account now that a project has several phases. In our example, these are the Concept & Planning, Realization and Project closure phases. You create project phases in MindPlan as follows: TEAMWORK TIP: Several project members can collect activities in a map in parallel, as each activity in the map is stored directly in a database. 1 Click on the »01 Project Structure« branch and create three new branches below this: »Concept & Planning«, »Realization« and »Project closure«. 2 Select all three branches and assign properties to these using the »Node style« menu in the right sidebar: Node border »Process arrow east 2« Dark blue border and font color Gray fill color 3 Confirm by clicking on »Apply«. MindPlan User Manual Part II © Haus Weilgut ▪ December 2008 ▪ www.mindplan.com Page 5 Developing a Project Structure using Work Packages, Activities, and Resources Create project structure levels Structure contents and assign phases You have now created all the project phases and assigned the topics collected in Brainstorming to the respective phases. Using this as a basis, you can now easily and flexibly develop the first basic structure plan: 1 Open the »00 Brainstorming« branch by clicking on the small plus symbol to the right. 2 Copy the individual topics to the planned project phases one by one. To do this, hold down the mouse button and pull the »Program« branch to the right corner while also holding down the Ctrl key. You can see from the plus symbol on the cursor that the branch is being copied. 3 In MindPlan, it is easy to arrange branches in a logical order simply by moving them around while holding down the mouse button. Example: The Program must be defined before the agenda can be incorporated in the invitation text. Basic structure for project management You now have a basic structure from which to develop a project plan using the convenient project management functions of MindPlan. Read how to do this on the next page. MindPlan User Manual Part II © Haus Weilgut ▪ December 2008 ▪ www.mindplan.com Page 6 Developing a Project Structure using Work Packages, Activities, and Resources Introduction to the MindPlan project management functions Introduction to the MindPlan project management functions MindPlan offers special project management functions that allow you to list activities, structure the entire scope of work for the project and benefit from easy-to-use analyses for project monitoring. In this chapter, you will create a project structure plan containing statements about the required order of the individual work steps, activity lists, which you can assign to a specific work package. In a project structure plan it is important that you group project elements into clearly-defined deliverables and thus organize the total workload for the project step-by-step. MindPlan helps you do this by providing the node types Work package, Activity, Deliverable and Milestone. The figure shows, for example, how you can use the individual node types in the project structure plan and in activity lists. The node types are described in detail in the following: MindPlan User Manual Part II © Haus Weilgut ▪ December 2008 ▪ www.mindplan.com Page 7 Developing a Project Structure using Work Packages, Activities, and Resources Introduction to the MindPlan project management functions Work package node type The »Work package« node type denotes a branch that represents a selfcontained task. In work packages you specify work content, objectives and deliverables, persons responsible, dates and durations, resources, preparatory work and costs. Standard fields are available for this in MindPlan that enable you to perform analyses on the project status according to different criteria. You no longer enter requirements in a separate text document, but instead use the designated short description field on the »General« tab. These are visible to you and other map participants in the information field below the node. MindPlan User Manual Part II © Haus Weilgut ▪ December 2008 ▪ www.mindplan.com Page 8 Developing a Project Structure using Work Packages, Activities, and Resources Introduction to the MindPlan project management functions Activity node type Below the work package, you create branches of the »Activity« node type , which you use to specify who carries out a particular part of a work package, in what time frame, and at what cost. You should always describe activities using a verb. Example: »Visit event location« or »Draw invitation«. In the Activities properties window, you specify the start date and due date, a resource, the target duration and target costs, a priority, and the target result. During the further course of the project, you maintain the actual duration and actual costs, percentage completed and status in order to track the progress of the project in detail. Deliverable node type You use the MindPlan-specific node type »Deliverable« to group project elements into project deliverables or project products of different levels of detail (work products, deliverables) project phases, business processes (major deliverables, project lifecycle phases, project objectives, business processes) A project deliverable is a self-contained result that results from one or several work packages. Deliverables are divided into several work packages, each assigned to a person responsible. Work packages should be grouped according to the criterion of belonging to a deliverable. The central node of MindPlan describes not just the project, but also represents the primary project deliverable or product (primary deliverable, project product) MindPlan User Manual Part II © Haus Weilgut ▪ December 2008 ▪ www.mindplan.com Page 9 Developing a Project Structure using Work Packages, Activities, and Resources Introduction to the MindPlan project management functions Milestone node type Milestones are key events in the project and are important for the ongoing project planning and monitoring. A milestone is a predefined result that provides important information for decisions regarding the further course of the project. Using the »Milestone« node type, you define these types of events as a date in the project, and thus show that a work package is complete, important review and approvals are pending, important decisions in the project are pending, a transfer of responsibility for a deliverable is taking place, external key events affect the project plan, or that key decision-makers must be included at a certain point in time. MindPlan User Manual Part II © Haus Weilgut ▪ December 2008 ▪ www.mindplan.com Page 10 Developing a Project Structure using Work Packages, Activities, and Resources Create project structure plan and estimate costs Create project structure plan and estimate costs This is where things really get started. Step-by-step you are going to develop a project structure plan by assigning the »Deliverable« and »Work package« functions. Assign deliverable and work package node types 1 Select the »01 Project Structure« and »Concept & Planning« branches and click on »Convert node to deliverable« in the right sidebar. Note how the node display changes: The deliverables are now assigned the corresponding icon. 2 Drag your mouse to select the »Catering«, »Location«, »Develop Program« and »Invitations« branches, and then click on the »Convert node to work package« menu in the right sidebar. Note how the node display changes: The work packages are now identified by a package icon. Initial cost estimates Even in the early stages of the project you can estimate costs and effort for your project and discuss these directly with your superiors using your MindPlan. You prepare your map as follows: 1 Double-click on the »Catering« node. The properties window opens and the »Work package« tab is displayed. The »Type« indicates that it is a regular work package. For certain types of projects, special work package types are offered, for example, »Change Request« or »Free correction« in IT projects. 2 Let us assume that you estimate the duration of this work package to be five days. Enter a 5 in the »Estimated duration« field. 3 Enter a person responsible (Harry Mayer). 4 Select »Conception (Planning)« in the »Phase« field. In an advanced project, the person responsible can set the »Release« or »Approved« status. 5 List all the members of this work package in the »Members« field. These can include task managers of related activities or key decision makers, for example. MindPlan User Manual Part II © Haus Weilgut ▪ December 2008 ▪ www.mindplan.com Page 11 Developing a Project Structure using Work Packages, Activities, and Resources Create project structure plan and estimate costs 6 Confirm with OK. MindPlan User Manual Part II © Haus Weilgut ▪ December 2008 ▪ www.mindplan.com Page 12 Developing a Project Structure using Work Packages, Activities, and Resources Create project structure plan and estimate costs Show/hide information fields in the map The information fields below the individual work packages and deliverables now display the entries you made in the properties windows. Enable or disable the display using the blue i field or make the following default settings: Show/hide additional information of the open map To ensure that the information fields are displayed in the open MindPlan, proceed as follows: 1 Right-click on the background of the open map and select »MindPlan options«. 2 Select »Details« in the drop-down menu on the »Map display« tab. 3 Enable »for this MindPlan« and click on »Display additional infos«. 4 By clicking on the »Standard« button at the bottom right, you can restore the default settings. 5 Confirm with OK. MindPlan User Manual Part II © Haus Weilgut ▪ December 2008 ▪ www.mindplan.com Page 13 Developing a Project Structure using Work Packages, Activities, and Resources Create project structure plan and estimate costs Default settings for displaying additional information You make your personal default settings by choosing File – Settings – Node settings in the menu. These affect every MindPlan you open afterwards. Click on the node type that you wish to configure and enable/disable each information field as required. Note: Changes to these settings affect all MindPlans that you open in the future. MindPlan User Manual Part II © Haus Weilgut ▪ December 2008 ▪ www.mindplan.com Page 14 Developing a Project Structure using Work Packages, Activities, and Resources Create project structure plan and estimate costs Define work package information In MindPlan you can easily define information that belongs to a work package. Two options are available for this: Option A: Entry in short description field 1 Double-click to open the node. 2 You may need to change to the »General« tab and enter a detailed description of the work package in the »Short description« field. You can use the following standard structure as a guide for your description: Input, prerequisites Output Services not included Comments 3 Then confirm with OK. 4 MindPlan displays the short description below the work package by default. You can hide this individually at any time by clicking on the cross symbol, or you can hide the entire information display using the blue i button below. Note: Information in the short description field is applied to analyses. Option B: Open the Lotus Notes document using the F11 key 1 Select the work package and press the F11 key. 2 The related document opens in a window of your open Lotus Notes application. 3 Edit the text field in the document and create attachments as required. 4 Save and close the document. The branch cannot be edited by other project members while the document is open. Notes: Nodes with information in Lotus Notes documents have an RTF icon with a blue i button. By double-clicking on this icon, the Lotus Notes document opens. Information within Lotus Notes documents is not applied to analyses. MindPlan User Manual Part II © Haus Weilgut ▪ December 2008 ▪ www.mindplan.com Page 15 Developing a Project Structure using Work Packages, Activities, and Resources Create project structure plan and estimate costs Attach and use calculation tables Example: To prepare for a meeting with your superior, for example, you want to attach a calculation table. 1 Select the »Catering« node. 2 Click on the paperclip icon in the top menu bar and select a file from your local directory. Confirm with »Attach«. 3 In the meeting with your superior, you can now demonstrate your project's key contents and costs using your MindPlan. To do this, open the attached calculation table in MindPlan itself: Double-click on the paperclip, or right-click on the paperclip in »Catering« and select »Edit file attachment«. MindPlan User Manual Part II © Haus Weilgut ▪ December 2008 ▪ www.mindplan.com Page 16 Developing a Project Structure using Work Packages, Activities, and Resources Create project structure plan and estimate costs 4 The program in which you created the calculation opens immediately. You can make and save changes, if required. 5 Close the file and confirm with Yes in the »Update attachment« window. The changed file is now available in MindPlan. Note: You can use this function for all software programs installed on your computer. You can use it to open, edit and save file attachments of all types in the respective format. MindPlan User Manual Part II © Haus Weilgut ▪ December 2008 ▪ www.mindplan.com Page 17 Developing a Project Structure using Work Packages, Activities, and Resources Display project structure plan as an organigram Display project structure plan as an organigram If you do not wish to present your project plan as a map, you can use an organigram view: Select organigram view Proceed as follows: 1 Right-click in a blank area of the map background and select »MindPlan options«. 2 In the window that opens, select »Layout« in the drop-down menu on the »Map display« tab. Select »for this MindPlan«. 3 A further drop-down menu appears. Select »Organigram«. 4 Confirm with OK. MindPlan User Manual Part II © Haus Weilgut ▪ December 2008 ▪ www.mindplan.com Page 18 Developing a Project Structure using Work Packages, Activities, and Resources Display project structure plan as an organigram Configure organigram In the MindPlan options mentioned earlier you can change the line style and individual parameters of your organigram: Organigram using »Straight lines« line style Select the »Straight lines« line style to display your organigram as shown in the figure. MindPlan User Manual Part II © Haus Weilgut ▪ December 2008 ▪ www.mindplan.com Page 19 Developing a Project Structure using Work Packages, Activities, and Resources Display project structure plan as an organigram Organigram with large distances between the elements This figure shows how the organigram changes when you enter the following parameters, for example: MindPlan User Manual Part II © Haus Weilgut ▪ December 2008 ▪ www.mindplan.com Page 20 Developing a Project Structure using Work Packages, Activities, and Resources Create activity list Create activity list You use an activity list to specify who is to carry out a certain part of a work package, in what time frame, and at what cost. You should always describe activities using a verb. Example: »Visit event location« or »Draw invitation«. You can assign activities directly to the work packages in MindPlan. In this chapter, you will learn how to create a detailed activity list and allocate resources. You will also specify the final results/dates using the »Milestone« node type. Create and formulate activities The work package example below is related to designing and printing invitations. The work package is complete when the invitations have been delivered as a paper print-out. Until this point, a number of activities need to be carried out by different people, which you now list: 1 Select the »Invitations« work package defined earlier and now describe it more specifically: »Design and print invitations«. 2 Click on »Create new activity« in the right sidebar. In order to do this, the branch must be selected. Enter a clearly formulated task. Make sure you use an action verb for this – such as develop, prepare, install – and that you name an object to be used to describe the target result. Example: »Draft invitation text«. Confirm by pressing Enter. 3 When you press on Enter again, MindPlan opens a further activity on the same level and applies the structure of the previous one. Enter a clearly formulated task here too and confirm again by pressing Enter. 4 Continue this process until your activity list is complete. 5 You change the order of the activities by selecting an activity and moving it above or below another activity using your mouse. Make sure that you arrange the activities in a meaningful order when you formulate and sort them and that a work package is the sum of several activities. They must be self-contained in order to achieve a result that can be checked. Example: An invitation is drafted and then printed. When the printed invitations are delivered, the result to be checked has been achieved and the process (= work package) is closed. MindPlan User Manual Part II © Haus Weilgut ▪ December 2008 ▪ www.mindplan.com Page 21 Developing a Project Structure using Work Packages, Activities, and Resources Create activity list Convert existing branches to activities You can easily convert existing branches in a MindMap to activities using the sidebar: 1 Drag your mouse over the branches you want to select from top to bottom or select the relevant branches while holding down the Ctrl key. 2 Click the »Convert node to activity« link in the »Your next steps « menu in the right sidebar. If the sidebar is not visible, you can display it by clicking on the small middle triangle in the right margin or by choosing View – Sidebar from the top menu. 3 The branches now have activity characteristics. You can see this from the small yellow cog wheel and the progress indicator, the empty circle. MindPlan User Manual Part II © Haus Weilgut ▪ December 2008 ▪ www.mindplan.com Page 22 Developing a Project Structure using Work Packages, Activities, and Resources Create activity list Assign milestones You use the »Milestone« node type to set deadlines such as the end point of a series of activities. In our example, the milestone is the invitation, which is available as a print-out. You change a branch into a milestone as follows: 1 Select the activity »Document responses in participants list«. 2 Click on the »More types to change to« menu in the sidebar and select »Milestone«. 3 Then double-click on this milestone and assign a resource to it in the properties window. 4 Indicate this milestone as a Fixed appointment if this date must not be delayed in any way. MindPlan prevents this milestone from being pushed back due to other project delays. You receive a warning message in any case. MindPlan User Manual Part II © Haus Weilgut ▪ December 2008 ▪ www.mindplan.com Page 23 Developing a Project Structure using Work Packages, Activities, and Resources Allocate resources, duration, and costs for activities Allocate resources, duration, and costs for activities Task managers and duration Now assign task managers to the individual Activities and estimate the amount of work involved. Proceed as follows: Allocate resources to multiple activities: Select several activities while holding down the Ctrl key. Right-click on a selected activity and select »Properties«. 1 Double-click on an individual activity. The properties window opens and the »Activity« tab is displayed. Enter the name of the task manager in the »Resource« field. 2 Define the estimated amount of work in the »Target duration« field. In MindPlan, this can either be a from/to period (calculated from the difference between the start date and the due date) or the actual amount of work involved. Example: The activity can be completed in a time frame between December 7 and 20. However, the effort only involves one to two work days. In this case, you would avoid using the calculation (calculator icon) or you would overwrite the value calculated with the required value. 3 If the activity has already started, select »In implementation« in the Status field. 4 You can already assign the priority for this activity within the work package here. 5 It is not always possible to name task managers in the planning phase. Example: The host for this event still has to be found. In such a case, assign a »Type« to the activity in the properties window, for example, »For review«. Confirm with OK. MindPlan User Manual Part II © Haus Weilgut ▪ December 2008 ▪ www.mindplan.com Page 24 Developing a Project Structure using Work Packages, Activities, and Resources Allocate resources, duration, and costs for activities Target costs, actual costs, and actual duration You can now enter an initial estimate for additional costs, for example, for commissioning external service providers, catering, hiring the hall, registrations, etc. Proceed as follows: Create activity with target costs 1 Double-click on an activity. 2 Enter the planned amount in the »Target costs« field. MindPlan User Manual Part II © Haus Weilgut ▪ December 2008 ▪ www.mindplan.com Page 25 Developing a Project Structure using Work Packages, Activities, and Resources Allocate resources, duration, and costs for activities Maintain actual costs and actual duration for an activity 1 Double-click on an activity. 2 Maintain the actual costs/effort involved in the project in progress in the »Actual costs« and »Actual duration« fields. Example: Costs of EUR 1,500 are planned in the Target costs field. However, the actual invoice amount is only EUR 1,295. 3 Confirm with OK. 4 MindPlan now displays all the information entered in the information field below the »Print invitation« activity, provided you have not disabled the display. MindPlan User Manual Part II © Haus Weilgut ▪ December 2008 ▪ www.mindplan.com Page 26 Developing a Project Structure using Work Packages, Activities, and Resources Allocate resources, duration, and costs for activities Display costs and duration in the map Once you have assigned all target costs and target durations to activities, you have an initial overview of the anticipated costs and effort involved, which you can track in stages in the information fields of activity tasks, work package tasks and deliverables. For you as a project manager, you have an overview of the costs and effort in a matter of seconds. We will demonstrate this using a map from our sample project: 1 Using the map in the planning phase, you can quickly see where the greatest portion of estimated costs lie on every single level. Let us assume that the budget allowance for your project is EUR 50,700. You can then see that this has already been exceeded by EUR 227 in the planning phase. 2 Analyze further: EUR 50,700 from below the »01 Project Structure« deliverable has been allotted to the »Concept & Planning« project phase. 3 Now check to see which costs are incurred for which work packages. The »Invitations« work package makes a difference of EUR 173 to the target costs. When you enter the actual costs later on in the project, you immediately have a comparison of target costs and actual costs using this display. This also applies to the target and actual duration. This function is very useful in the planning phase of projects for providing initial estimates of cost and effort. Depending on the MindPlan version you use, you can also use analyses to obtain more detailed cost overviews. MindPlan User Manual Part II © Haus Weilgut ▪ December 2008 ▪ www.mindplan.com Page 27 Developing a Project Structure using Work Packages, Activities, and Resources Save, copy, and delete project plan Save, copy, and delete project plan You never need to save your project plan to cache as MindPlan writes all information to a database. You can, however, make a copy of each MindPlan or store certain variants in other databases. Make sure that all the MindPlan attachments are also copied. Copy project plan To create a copy of your project plan, choose File – Save MindPlan as from the top menu. Select a database and enter a name or an addition to the name in the »New label« field. Confirm with »Copy«. The copied MindPlan opens straightaway. MindPlan User Manual Part II © Haus Weilgut ▪ December 2008 ▪ www.mindplan.com Page 28 Developing a Project Structure using Work Packages, Activities, and Resources Save, copy, and delete project plan Save and use project plan as a template You can save each MindPlan as a template for other projects and make them available to your colleagues too. Proceed as follows: Save template 1 Click on File in the top menu and select »Save MindPlan as template«. Enter a label for the template in the window that opens. 2 Confirm with »Copy«. Use template 1 Select File – New MindPlan and then click on the »Start with template« tab. Access the template that you wish to use for a new project plan MindPlan User Manual Part II © Haus Weilgut ▪ December 2008 ▪ www.mindplan.com Page 29 Developing a Project Structure using Work Packages, Activities, and Resources Save, copy, and delete project plan there. 2 MindPlan copies the template title to the »Label of new MindPlan« field. You can overwrite this with a new project title. 3 Enter a category and confirm with »Create«. Delete project plan You delete a project plan from the database by selecting the central node and pressing the Delete key on your keyboard. Make sure that all attachments and Lotus Notes documents are also deleted from the database. MindPlan User Manual Part II © Haus Weilgut ▪ December 2008 ▪ www.mindplan.com Page 30 Developing a Project Structure using Work Packages, Activities, and Resources Project structure view in the map and Gantt editor Project structure view in the map and Gantt editor Before you begin with scheduling, let us take a brief look at what your project plan could look like now. Project structure view in the map editor The scope of tasks in the project are clearly structured, according to deliverables, work packages and activities. Despite the increasing complexity of the plan, you still maintain an overview of your project structure. MindPlan User Manual Part II © Haus Weilgut ▪ December 2008 ▪ www.mindplan.com Page 31 Developing a Project Structure using Work Packages, Activities, and Resources Project structure view in the map and Gantt editor Project structure view in the Gantt editor Now click on the »Gantt« tab at the top right. A table view of your project plan opens with a Gantt chart on the right. Open your project structure in the window on the left by clicking on the plus and minus symbols. All branches, deliverables, work packages, activities and milestones are displayed below each other in the »Subject« column: This table view provides you with the same information as the map editor: Priorities, start and capacity, target duration, resource, status and progress as a percentage. MindPlan cumulates the values across all levels upwards. Project planning in the Gantt editor. You use the Gantt editor just like the map editor to plan your project tasks and dates. You can find out more about working with the Gantt editor in Part III of the MindPlan User Manual. MindPlan User Manual Part II © Haus Weilgut ▪ December 2008 ▪ www.mindplan.com Page 32 © 2008 Haus Weilgut GmbH Computer Conception, 76275 Ettlingen, Germany Printed in Germany All rights reserved Contact: [email protected] ▪ www.weilgut.com ▪ www.mindplan.com