1
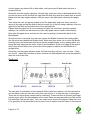
The next set of ports is at the back of the Mountbatten. Begin at the right-hand end. If your
user isn't able to reach around the Mountbatten, turn it around so that the back is facing
the user, but begin at the same end – with the keyboard port.
The keyboard port is a small PS/2 port, and can be hard to find because it is set flush with
the case.
The middle port is a parallel port, for connecting a printer to the Mountbatten; then there's
a second serial port, which can be used for connecting to a computer instead of USB,
depending on what ports are available on the computer.
The last part of orientation is the right-hand side of the Mountbatten, which has the
earphone socket to the rear, and two power sockets toward the front.
The earphone socket takes a standard 3.5 mm headphone jack, so any headphones the
user already has with this sized jack should fit.
The two power sockets are of different sizes. The large socket is used for the power pack
supplied with the Mountbatten; the small one can be used for charging the Mountbatten
from a DC source like the one in a car.
Battery care
It's very important to stress the need for battery care. Take some time to do it here; have
the user plug the power pack into the Mountbatten socket, and plug the charger into the
mains power.
Discuss with the user or their parents or teacher where the Mountbatten is going to be
charged; it's important that they find a permanent, safe place near a power outlet to charge
the Mountbatten every night. Let them know that the Mountbatten will work all day long on
battery, but that they must charge it overnight every single night without fail. You cannot
state this too strongly!
Once you have covered this, if you're sure that the Mountbatten has enough charge for the
full training session, you can unplug the power and use battery for the training.
Loading paper
There are two ways to load paper; from the top and from the rear. Show the user both
ways. Most young users prefer the second method, loading from the rear; let your user try
both ways a few times until they find the way they prefer. The methods are explained in the
User Manual, with pictures; make sure you are able to use them both yourself, without
looking, before you try to teach a user.
Step 1 in loading paper: raise the paper lever! Make sure it stays up until paper loading is
complete.
Once the paper is more or less in place, by whichever method, show the user how to do
the following things, and let them practice:
1. slip the left-hand edge of the paper under the paper grip wheel at the far left;
2. bring the right margin adjuster in towards the paper, and make sure the paper is
under the wheel but over the base of the margin adjuster. You can show the user
how to hold the paper against the roller
Page 6 of 12