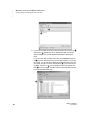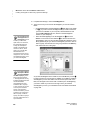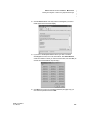
1
User Manual Learn how to: • Send files from the NEO to your computer or another NEO • Set up Infrared beaming and install AlphaBeam • Write, edit, and manage files in AlphaWord Plus • Manage SmartApplets, including the Responder SmartApplet on NEO 2 and User Manual Contact Information Our Web site is a good source of information about products, sales, support, and the latest news. Visit the Web site at: www.renlearn.com (United States) www.alphasmart.co.uk (United Kingdom) www.alphasmart.com/international (all other countries) If you can’t find the information you’re looking for on the Web site, use this contact information: United States Renaissance Learning PO Box 8036 Wisconsin Rapids, WI 54495-8036 Technical questions or problems: Phone: (800) 338-4204 Email: [email protected] Web: www.renlearn.com/support Purchase NEOs, general information, or sales questions: Web: www.renlearn.com Phone: (800) 338-4204 Email: [email protected] United Ki ngdom Technical questions or problems: Phone: 0870 120 0718 Email: [email protected] Latest support information: Web: www.alphasmart.co.uk/support Purchase NEO products: Web: www.alphasmart.co.uk/ordering (This URL also provides a list of resellers and contacts for NEO products.) Europe, Middle East, and Afri ca Technical questions or problems: Phone: +44 870 120 0718 Email: [email protected] Latest support information: Web: www.alphasmart.eu/support Purchase NEO products: Web: www.alphasmart.com/international (This URL also provides a list of resellers and contacts for NEO products.) ii NEO 1 and NEO 2 User Manual Asia/Pacific, Canada, and Latin America Technical questions or problems: Contact your local reseller. If you do not have a local reseller, email Technical Support at [email protected]. Latest support information: Web: www.alphasmart.com/international Select your country or region. Purchase NEO products: Web: www.alphasmart.com/international (This URL also provides a list of resellers and contacts for NEO products.) Copyright Notice Copyright © 2009 by Renaissance Learning, Inc. All Rights Reserved. This publication is protected by US and international copyright laws. It is unlawful to duplicate or reproduce any copyrighted material without authorization from the copyright holder. This document may be reproduced only by staff members in schools that own NEO devices. For more information, contact Renaissance Learning, Inc., at the address above. 2Know!, Accelerated Math, Accelerated Reader, AccelTest, AlphaQuiz, AlphaSmart Manager, AlphaWord, Beamer, KeyWords, MathFacts in a Flash, NEO, NEO 1, NEO 2, Renaissance, Renaissance Learning, the Renaissance Learning logo, Renaissance Place, Renaissance Receiver, Renaissance Responder, SmartApplet, and Text2Speech are trademarks of Renaissance Learning, Inc., and its subsidiaries, registered, common law, or pending registration in the United States and other countries. Macintosh is a registered trademark of Apple Inc., registered in the US and other countries. Windows and Windows Vista are registered trademarks of Microsoft Corporation in the United States and other countries. IrDA is a registered trademark of the Infrared Data Association. Google Docs is a trademark of Google Inc. As technology advances, it becomes necessary for software companies to drop support for older operating systems and third-party software. It is the responsibility of customers to keep their computers, networks, operating systems, and third-party software up-to-date and functional. Although Renaissance Learning will not discontinue support for older products immediately, we will continue to evaluate system requirements and do our best to provide advance notice when it becomes necessary to raise our requirements. 510014D-0309 3/2009 NEO 1/NEO 2 NEO 1 and NEO 2 User Manual iii C ONTENTS Introduction . . . . . . . . . . . . . . . . . . . . . . . . . . . . . . . 1 Why Use NEO? . . . . . . . . . . . . . . . . . . . . . . . . . . . . . . . . . . . . . . . . . . . . . . . . . . . . . . . 1 NEO 1 and NEO 2 in This Manual . . . . . . . . . . . . . . . . . . . . . . . . . . . . . . . . . . . . . . . . 2 Types of Tips in This Manual . . . . . . . . . . . . . . . . . . . . . . . . . . . . . . . . . . . . . . . . . . . . 2 Getting Started . . . . . . . . . . . . . . . . . . . . . . . . . . . . . 3 System Requirements . . . . . . . . . . . . . . . . . . . . . . . . . . . . . . . . . . . . . . . . . . . . . . . . . . 3 Installing the Batteries . . . . . . . . . . . . . . . . . . . . . . . . . . . . . . . . . . . . . . . . . . . . . . . . . 3 How to Install AA Batteries. . . . . . . . . . . . . . . . . . . . . . . . . . . . . . . . . . . . . . . . . . . . . . . . . .4 How to Install and Charge a Rechargeable Battery Pack. . . . . . . . . . . . . . . . . . . . . . . . . . 5 Starting the NEO . . . . . . . . . . . . . . . . . . . . . . . . . . . . . . . . . . . . . . . . . . . . . . . . . . . . . . 6 Writing on Your NEO . . . . . . . . . . . . . . . . . . . . . . . . . . . . . . . . . . . . . . . . . . . . . . . . . . 7 How to Start Writing on a NEO . . . . . . . . . . . . . . . . . . . . . . . . . . . . . . . . . . . . . . . . . . . . . . 7 What to Do If the File That Opens Isn’t Blank . . . . . . . . . . . . . . . . . . . . . . . . . . . . . . . . . . 7 Checking the List of SmartApplets Installed on the NEO. . . . . . . . . . . . . . . . . . . . . 8 Sending Files to Your Computer . . . . . . . . . . . . . . . . . . . . . . . . . . . . . . . . . . . . . . . . . 9 Sending Files Using a Direct Cable Connection . . . . . . . . . . . . . . . . . . . . . . . . . . . . . . . . .9 Connecting Your NEO to a Computer Using a USB Cable. . . . . . . . . . . . . . . . . . . . .9 Sending Text When Connected by a USB Cable . . . . . . . . . . . . . . . . . . . . . . . . . . . . 10 Sending Files Using Infrared (IR) Beaming . . . . . . . . . . . . . . . . . . . . . . . . . . . . . . . . . . . 11 Sending Files to Programs Other Than Word Processing Programs . . . . . . . . . . . . . . . 13 Tips for Sending Text to a Spreadsheet . . . . . . . . . . . . . . . . . . . . . . . . . . . . . . . . . . . 13 Sending Files from One NEO to Another . . . . . . . . . . . . . . . . . . . . . . . . . . . . . . . . . 13 Transferring Files between NEO 2 and Supported Programs . . . . . . . . . . . . . . . . 14 Sending Files from NEO 2 to Supported Programs . . . . . . . . . . . . . . . . . . . . . . . . . . . . . 14 Retrieving Files from Supported Programs and Copying Them to NEO 2 . . . . . . . . . . 15 Printing from NEO . . . . . . . . . . . . . . . . . . . . . . . . . . . . . . . . . . . . . . . . . . . . . . . . . . . 17 How to Print by Connecting your NEO to a USB Printer . . . . . . . . . . . . . . . . . . . . . . . . 17 How to Send Text to a Printer Using IR Beaming . . . . . . . . . . . . . . . . . . . . . . . . . . . . . . 18 How to Print Wirelessly Using NEO 2’s RF Capability . . . . . . . . . . . . . . . . . . . . . . . . . . 18 Installing AlphaSmart Manager. . . . . . . . . . . . . . . . . . . . . . . . . . . . . . . . . . . . . . . . . 19 Installing AlphaSmart Manager on Windows Computers. . . . . . . . . . . . . . . . . . . . . . . . 19 iv NEO 1 and NEO 2 User Manual ..... CONTENTS Installing AlphaSmart Manager on Macintosh Computers. . . . . . . . . . . . . . . . . . . . . . 20 Setting Up Infrared Beaming and Installing AlphaBeam . . . . . . . . . . . . . . . . . . . . 21 Requirements for Using IR Beaming with NEO . . . . . . . . . . . . . . . . . . . . . . . . . . . . . . . . 21 NEO . . . . . . . . . . . . . . . . . . . . . . . . . . . . . . . . . . . . . . . . . . . . . . . . . . . . . . . . . . . . . . . . 21 IR Capability on Your Computer . . . . . . . . . . . . . . . . . . . . . . . . . . . . . . . . . . . . . . . . 21 Computer Requirements . . . . . . . . . . . . . . . . . . . . . . . . . . . . . . . . . . . . . . . . . . . . . . . 21 Programs Required . . . . . . . . . . . . . . . . . . . . . . . . . . . . . . . . . . . . . . . . . . . . . . . . . . . 21 Installing AlphaBeam . . . . . . . . . . . . . . . . . . . . . . . . . . . . . . . . . . . . . . . . . . . . . . . . . . . . .22 Installing AlphaBeam on Windows Computers . . . . . . . . . . . . . . . . . . . . . . . . . . . .22 Installing AlphaBeam on Macintosh OS 10 Computers. . . . . . . . . . . . . . . . . . . . . .24 Setting Up a Renaissance Receiver for NEO 2 . . . . . . . . . . . . . . . . . . . . . . . . . . . . . 24 How to Connect a Renaissance Receiver to Your Computer. . . . . . . . . . . . . . . . . . . . . .25 How to Name the Receiver . . . . . . . . . . . . . . . . . . . . . . . . . . . . . . . . . . . . . . . . . . . . . . . . .25 W r i t i n g o n N E O U s i n g A l p h a W o r d P l u s . . . . . . . . . . . 27 Starting AlphaWord Plus . . . . . . . . . . . . . . . . . . . . . . . . . . . . . . . . . . . . . . . . . . . . . . 27 Entering and Editing Text . . . . . . . . . . . . . . . . . . . . . . . . . . . . . . . . . . . . . . . . . . . . . 28 Moving the Cursor . . . . . . . . . . . . . . . . . . . . . . . . . . . . . . . . . . . . . . . . . . . . . . . . . . . . . . . .28 Selecting Text . . . . . . . . . . . . . . . . . . . . . . . . . . . . . . . . . . . . . . . . . . . . . . . . . . . . . . . . . . . .29 Cutting/Copying/Pasting/Deleting Text . . . . . . . . . . . . . . . . . . . . . . . . . . . . . . . . . . . . . .29 About the NEO Clipboard . . . . . . . . . . . . . . . . . . . . . . . . . . . . . . . . . . . . . . . . . . . . . . . . . .30 To view the clipboard contents . . . . . . . . . . . . . . . . . . . . . . . . . . . . . . . . . . . . . . . . . .30 To view the clipboard status . . . . . . . . . . . . . . . . . . . . . . . . . . . . . . . . . . . . . . . . . . . .30 Using Text2Speech to Read AlphaWord Files Aloud . . . . . . . . . . . . . . . . . . . . . . . 30 Managing Files in AlphaWord Plus . . . . . . . . . . . . . . . . . . . . . . . . . . . . . . . . . . . . . . 30 Creating New Files . . . . . . . . . . . . . . . . . . . . . . . . . . . . . . . . . . . . . . . . . . . . . . . . . . . . . . . . 31 Naming and Saving Files. . . . . . . . . . . . . . . . . . . . . . . . . . . . . . . . . . . . . . . . . . . . . . . . . . . 31 Finding and Opening Files . . . . . . . . . . . . . . . . . . . . . . . . . . . . . . . . . . . . . . . . . . . . . . . . .32 Formatting Text . . . . . . . . . . . . . . . . . . . . . . . . . . . . . . . . . . . . . . . . . . . . . . . . . . . . . . 33 Using Tabs . . . . . . . . . . . . . . . . . . . . . . . . . . . . . . . . . . . . . . . . . . . . . . . . . . . . . . . . . . . . . .33 Changing Font Size . . . . . . . . . . . . . . . . . . . . . . . . . . . . . . . . . . . . . . . . . . . . . . . . . . . 33 Available Font Sizes . . . . . . . . . . . . . . . . . . . . . . . . . . . . . . . . . . . . . . . . . . . . . . . . . . . . . . .33 How to Change the Font Size . . . . . . . . . . . . . . . . . . . . . . . . . . . . . . . . . . . . . . . . . . . . . . .34 How the System Font Differs from the Large Font . . . . . . . . . . . . . . . . . . . . . . . . . . . . .35 Finding Text in AlphaWord Plus Files . . . . . . . . . . . . . . . . . . . . . . . . . . . . . . . . . . . 36 Searching for Text . . . . . . . . . . . . . . . . . . . . . . . . . . . . . . . . . . . . . . . . . . . . . . . . . . . . . . . .36 Finding and Replacing Text . . . . . . . . . . . . . . . . . . . . . . . . . . . . . . . . . . . . . . . . . . . . . . . . 37 NEO 1 and NEO 2 User Manual v ..... CONTENTS Finding Sections of a File . . . . . . . . . . . . . . . . . . . . . . . . . . . . . . . . . . . . . . . . . . . . . . . . . .38 An Example of How Sections Work in AlphaWord Plus . . . . . . . . . . . . . . . . . . . . .38 Checking Spelling . . . . . . . . . . . . . . . . . . . . . . . . . . . . . . . . . . . . . . . . . . . . . . . . . . . . 39 Spell Check Tips . . . . . . . . . . . . . . . . . . . . . . . . . . . . . . . . . . . . . . . . . . . . . . . . . . . . . . . . . 40 Turning Off Spell Check . . . . . . . . . . . . . . . . . . . . . . . . . . . . . . . . . . . . . . . . . . . . . . . . . . . 41 User Dictionary . . . . . . . . . . . . . . . . . . . . . . . . . . . . . . . . . . . . . . . . . . . . . . . . . . . . . . . . . . 41 Using the Thesaurus . . . . . . . . . . . . . . . . . . . . . . . . . . . . . . . . . . . . . . . . . . . . . . . . . . 42 Spanish-English Word Lookup. . . . . . . . . . . . . . . . . . . . . . . . . . . . . . . . . . . . . . . . . . . . . .43 Using Linked Files . . . . . . . . . . . . . . . . . . . . . . . . . . . . . . . . . . . . . . . . . . . . . . . . . . . . 45 How to Send a Linked File to Your NEO(s) . . . . . . . . . . . . . . . . . . . . . . . . . . . . . . . . . . .46 How to View a Linked File on Your NEO . . . . . . . . . . . . . . . . . . . . . . . . . . . . . . . . . . . . . 47 Tips for Using Linked Files . . . . . . . . . . . . . . . . . . . . . . . . . . . . . . . . . . . . . . . . . . . . . . . . . 47 A Sample Linked File . . . . . . . . . . . . . . . . . . . . . . . . . . . . . . . . . . . . . . . . . . . . . . . . . . . . . .48 Character, Word, Paragraph, and Page Counts . . . . . . . . . . . . . . . . . . . . . . . . . . . . 49 File Size Limits. . . . . . . . . . . . . . . . . . . . . . . . . . . . . . . . . . . . . . . . . . . . . . . . . . . . . . . 50 Reaching the Size Limit for a File. . . . . . . . . . . . . . . . . . . . . . . . . . . . . . . . . . . . . . . . . . . . 51 Checking the File Size and the Number of Pages Available. . . . . . . . . . . . . . . . . . . . . . . 51 Clearing and Deleting Files . . . . . . . . . . . . . . . . . . . . . . . . . . . . . . . . . . . . . . . . . . . . 52 How to Clear a File (Remove Its Contents) . . . . . . . . . . . . . . . . . . . . . . . . . . . . . . . . . . . .53 How to Clear All Numbered Files (File 1–File 8) . . . . . . . . . . . . . . . . . . . . . . . . . . . . . . .53 Deleting Files . . . . . . . . . . . . . . . . . . . . . . . . . . . . . . . . . . . . . . . . . . . . . . . . . . . . . . . . . . . .54 How to Delete the Open File . . . . . . . . . . . . . . . . . . . . . . . . . . . . . . . . . . . . . . . . . . . .54 How to Delete a File from a List of Files . . . . . . . . . . . . . . . . . . . . . . . . . . . . . . . . . .54 How to Delete All Files . . . . . . . . . . . . . . . . . . . . . . . . . . . . . . . . . . . . . . . . . . . . . . . .54 Recovering Data. . . . . . . . . . . . . . . . . . . . . . . . . . . . . . . . . . . . . . . . . . . . . . . . . . . . . . 55 Using the Typing Timer . . . . . . . . . . . . . . . . . . . . . . . . . . . . . . . . . . . . . . . . . . . . . . . 55 S m a r t A p p l e t s . . . . . . . . . . . . . . . . . . . . . . . . . . . . . 57 Managing SmartApplets . . . . . . . . . . . . . . . . . . . . . . . . . . . . . . . . . . . . . . . . . . . . . . . 57 What Are SmartApplets?. . . . . . . . . . . . . . . . . . . . . . . . . . . . . . . . . . . . . . . . . . . . . . . . . . . 57 Installed SmartApplets . . . . . . . . . . . . . . . . . . . . . . . . . . . . . . . . . . . . . . . . . . . . . . . . . . . . 57 How to Use Your SmartApplets . . . . . . . . . . . . . . . . . . . . . . . . . . . . . . . . . . . . . . . . . . . . .58 Managing the SmartApplets on Your NEO . . . . . . . . . . . . . . . . . . . . . . . . . . . . . . . . . . . .59 How to Change the Startup SmartApplet from the SmartApplets Menu . . . . . . . . . . .59 How to Disable a SmartApplet from the SmartApplets Menu . . . . . . . . . . . . . . . . . . . 60 vi NEO 1 and NEO 2 User Manual ..... CONTENTS U s i n g t h e R e s p o n d e r S m a r t A p p l e t o n N E O 2 . . . . . . . 61 Preparing to Use NEO 2 with AccelTest, Accelerated Math RP, or the 2Know! Toolbar . . . . . . . . . . . . . . . . . . . . . . . . . . . . . . . . . . . . . . . . . . . . . . . . . . . . . . . . . . . . . 61 Using NEO 2 to Complete AccelTest Assignments . . . . . . . . . . . . . . . . . . . . . . . . . 61 Using NEO 2 in a Student-Paced Session in AccelTest . . . . . . . . . . . . . . . . . . . . . . . . . .62 Teacher Preparation Steps . . . . . . . . . . . . . . . . . . . . . . . . . . . . . . . . . . . . . . . . . . . . .62 Steps Students Follow during a Student-Paced Session . . . . . . . . . . . . . . . . . . . . .62 Using NEO 2 in a Teacher-Paced Session in AccelTest . . . . . . . . . . . . . . . . . . . . . . . . . .64 Teacher Preparation Steps . . . . . . . . . . . . . . . . . . . . . . . . . . . . . . . . . . . . . . . . . . . . .64 Steps Students Follow during a Teacher-Paced Session . . . . . . . . . . . . . . . . . . . . .64 Using NEO 2 to Complete Accelerated Math Assignments . . . . . . . . . . . . . . . . . . 65 Teacher Preparation Steps . . . . . . . . . . . . . . . . . . . . . . . . . . . . . . . . . . . . . . . . . . . . .65 Steps Students Follow to Complete Accelerated Math Assignments . . . . . . . . . . .65 Using NEO 2 with the 2Know! Toolbar. . . . . . . . . . . . . . . . . . . . . . . . . . . . . . . . . . . 67 How Participants Respond to 2Know! Toolbar Questions Using NEO 2 . . . . . . . . . . . 67 How Teachers Can Use NEO 2 to Control the 2Know! Toolbar Program . . . . . . . . . . .68 N E O S e t t i n g s . . . . . . . . . . . . . . . . . . . . . . . . . . . . . . 69 Changing Settings in the Control Panel . . . . . . . . . . . . . . . . . . . . . . . . . . . . . . . . . . 69 How to Change the Settings in the Control Panel . . . . . . . . . . . . . . . . . . . . . . . . . . . . . .69 About the Settings in the Control Panel . . . . . . . . . . . . . . . . . . . . . . . . . . . . . . . . . . . . . .70 Spell Check Settings . . . . . . . . . . . . . . . . . . . . . . . . . . . . . . . . . . . . . . . . . . . . . . . . . . .70 AlphaWord Plus Settings. . . . . . . . . . . . . . . . . . . . . . . . . . . . . . . . . . . . . . . . . . . . . . . 71 Change Default AlphaWord Font . . . . . . . . . . . . . . . . . . . . . . . . . . . . . . . . . . . . . . . . 72 Turn Calculator Off . . . . . . . . . . . . . . . . . . . . . . . . . . . . . . . . . . . . . . . . . . . . . . . . . . . 72 Two-Button On Option . . . . . . . . . . . . . . . . . . . . . . . . . . . . . . . . . . . . . . . . . . . . . . . . 72 Set Screen Contrast . . . . . . . . . . . . . . . . . . . . . . . . . . . . . . . . . . . . . . . . . . . . . . . . . . . 73 Keyboard Command Reference List. . . . . . . . . . . . . . . . . . . . . . . . . . . . . . . . . . . . . . 73 View Keyboard Layout . . . . . . . . . . . . . . . . . . . . . . . . . . . . . . . . . . . . . . . . . . . . . . . . . 73 Display Battery Status . . . . . . . . . . . . . . . . . . . . . . . . . . . . . . . . . . . . . . . . . . . . . . . . . 73 Change Keyboard Settings. . . . . . . . . . . . . . . . . . . . . . . . . . . . . . . . . . . . . . . . . . . . . . 74 Search for Networks (NEO 2 Only) . . . . . . . . . . . . . . . . . . . . . . . . . . . . . . . . . . . . . . 76 About NEO 2 (NEO 2 Only) . . . . . . . . . . . . . . . . . . . . . . . . . . . . . . . . . . . . . . . . . . . . 76 Wireless Security (NEO 2 Only) . . . . . . . . . . . . . . . . . . . . . . . . . . . . . . . . . . . . . . . . . 77 Update Text2Speech Device . . . . . . . . . . . . . . . . . . . . . . . . . . . . . . . . . . . . . . . . . . . . 77 About the Auto Repeat Setting . . . . . . . . . . . . . . . . . . . . . . . . . . . . . . . . . . . . . . . . . . . . . . 77 NEO 1 and NEO 2 User Manual vii ..... CONTENTS Changing the Transfer Speed for Sending or Beaming Files . . . . . . . . . . . . . . . . . 77 How to Change the Transfer Speed for a USB Cable Connection. . . . . . . . . . . . . . . . . .78 How to Change the Transfer Speed for Beaming (IrDA Transfer Speed) . . . . . . . . . . .78 P a s s w o r d s o n N E O . . . . . . . . . . . . . . . . . . . . . . . . . 79 The Three Passwords Used with NEOs. . . . . . . . . . . . . . . . . . . . . . . . . . . . . . . . . . . 79 Enabling Password Protection for AlphaWord Plus Files. . . . . . . . . . . . . . . . . . . . 80 Enabling or Disabling File Passwords While Working in AlphaWord Plus . . . . . . . . . . . . . . . . . . . . . . . . . . . . . . . . . . . . . . . . . . . . . . . . . . . . . 80 Enabling or Disabling File Passwords in the Control Panel . . . . . . . . . . . . . . . . . 80 Setting Individual Passwords for AlphaWord Plus Files . . . . . . . . . . . . . . . . . . . . 81 How to Change a File Password from within the Control Panel . . . . . . . . . . . . . . . 81 How to Change a File Password from within AlphaWord Plus. . . . . . . . . . . . . . . .82 Resetting File Passwords . . . . . . . . . . . . . . . . . . . . . . . . . . . . . . . . . . . . . . . . . . . . . . 82 How to Reset All File Passwords from within the Control Panel . . . . . . . . . . . . . .82 How to Reset All File Passwords from within AlphaWord Plus . . . . . . . . . . . . . . .83 S y s t e m S t a t u s . . . . . . . . . . . . . . . . . . . . . . . . . . . . . 84 W o r k i n g w i t h A l p h a S m a r t M a n a g e r . . . . . . . . . . . . . . 85 About AlphaSmart Manager. . . . . . . . . . . . . . . . . . . . . . . . . . . . . . . . . . . . . . . . . . . . 85 Starting AlphaSmart Manager and Connecting Your NEO . . . . . . . . . . . . . . . . . . 86 Viewing, Printing, and Saving Files from Your NEO. . . . . . . . . . . . . . . . . . . . . . . . 87 How to View One of the Files . . . . . . . . . . . . . . . . . . . . . . . . . . . . . . . . . . . . . . . . . . .89 How to Print One or More Files . . . . . . . . . . . . . . . . . . . . . . . . . . . . . . . . . . . . . . . . 90 How to Save Files . . . . . . . . . . . . . . . . . . . . . . . . . . . . . . . . . . . . . . . . . . . . . . . . . . . . .92 Sending Files, Rubrics, or Write On! Lessons to NEOs . . . . . . . . . . . . . . . . . . . . . 95 Creating and Sending Text Files. . . . . . . . . . . . . . . . . . . . . . . . . . . . . . . . . . . . . . . . . . . . .95 Sending Rubrics or Other Linked Files to NEOs . . . . . . . . . . . . . . . . . . . . . . . . . . . . . . . 97 Sending Write On! Lessons to NEOs . . . . . . . . . . . . . . . . . . . . . . . . . . . . . . . . . . . . . . . .102 Sending Empty Files to NEOs. . . . . . . . . . . . . . . . . . . . . . . . . . . . . . . . . . . . . . . . . . . . . . 105 Retrieving KeyWords Data Using AlphaSmart Manager . . . . . . . . . . . . . . . . . . . 105 Installing SmartApplets on NEOs Using AlphaSmart Manager . . . . . . . . . . . . . 105 Deleting SmartApplets from NEOs . . . . . . . . . . . . . . . . . . . . . . . . . . . . . . . . . . . . . 108 viii NEO 1 and NEO 2 User Manual ..... CONTENTS Defining System Settings for the NEO . . . . . . . . . . . . . . . . . . . . . . . . . . . . . . . . . . 110 System Settings You Can Change in AlphaSmart Manager. . . . . . . . . . . . . . . . . . . . . . 110 How to Change System Settings Using AlphaSmart Manager . . . . . . . . . . . . . . . . . . . 112 About the Startup SmartApplet . . . . . . . . . . . . . . . . . . . . . . . . . . . . . . . . . . . . . . . . . . . . 113 Defining Settings for SmartApplets. . . . . . . . . . . . . . . . . . . . . . . . . . . . . . . . . . . . . 113 About the Disable This SmartApplet Setting . . . . . . . . . . . . . . . . . . . . . . . . . . . . . . . . . 114 AlphaWord Plus Settings. . . . . . . . . . . . . . . . . . . . . . . . . . . . . . . . . . . . . . . . . . . . . . . . . . 115 File Sizes . . . . . . . . . . . . . . . . . . . . . . . . . . . . . . . . . . . . . . . . . . . . . . . . . . . . . . . . . . . 115 Spell Check Settings. . . . . . . . . . . . . . . . . . . . . . . . . . . . . . . . . . . . . . . . . . . . . . . . . . . . . . 116 Other SmartApplets Settings . . . . . . . . . . . . . . . . . . . . . . . . . . . . . . . . . . . . . . . . . . . . . . 116 Using Send Lists . . . . . . . . . . . . . . . . . . . . . . . . . . . . . . . . . . . . . . . . . . . . . . . . . . . . 116 How to Send Changes Without Saving the Send List. . . . . . . . . . . . . . . . . . . . . . . . . . . 116 How to Save Changes in a Send List . . . . . . . . . . . . . . . . . . . . . . . . . . . . . . . . . . . . . . . . 117 How to Open a Saved Send List . . . . . . . . . . . . . . . . . . . . . . . . . . . . . . . . . . . . . . . . . . . . 118 How to Close a Saved Send List That Is Open . . . . . . . . . . . . . . . . . . . . . . . . . . . . . . . . 118 Passwords in AlphaSmart Manager . . . . . . . . . . . . . . . . . . . . . . . . . . . . . . . . . . . . 118 Setting or Changing the Master Password . . . . . . . . . . . . . . . . . . . . . . . . . . . . . . . . . . . 119 Setting or Changing the Send List Password . . . . . . . . . . . . . . . . . . . . . . . . . . . . . . . . .120 Clearing (Removing) a Send List Password . . . . . . . . . . . . . . . . . . . . . . . . . . . . . . . . . .120 Enabling File Passwords for AlphaWord Plus Files and Changing the Default File Password . . . . . . . . . . . . . . . . . . . . . . . . . . . . . . . . . . . . . . . . . . . . . . . . 121 Sending a User Dictionary to NEO . . . . . . . . . . . . . . . . . . . . . . . . . . . . . . . . . . . . . 122 Replacing the Thesaurus with the Spanish-English Word Lookup . . . . . . . . . . . 123 Updating Your NEO Operating System or SmartApplets Using AlphaSmart Manager . . . . . . . . . . . . . . . . . . . . . . . . . . . . . . . . . . . . . . . . . . . . . . . . 124 How to Update NEOs Without Preserving Work . . . . . . . . . . . . . . . . . . . . . . . . . . . . . . 124 How to Update NEOs While Preserving AlphaWord Plus Files and KeyWords Data. . . . . . . . . . . . . . . . . . . . . . . . . . . . . . . . . . . . . . . . . . . . . . . . . . . . . . 125 Other AlphaSmart Manager Tasks . . . . . . . . . . . . . . . . . . . . . . . . . . . . . . . . . . . . . 126 T r o u b l e s h o o t i n g . . . . . . . . . . . . . . . . . . . . . . . . . . . 127 NEO Difficulties and Solutions . . . . . . . . . . . . . . . . . . . . . . . . . . . . . . . . . . . . . . . . 127 Nothing appears on the NEO screen when I turn it on.. . . . . . . . . . . . . . . . . . . . . . . . . 127 When I attach my NEO to my computer, I can’t send any data, and my NEO screen shows a file instead of the “Attached to…” message. . . . . . . . . . . . . . . . . . 127 When I turn on my NEO, I see something other than the file that I expected.. . . . . . 127 When I send a file to my computer, some of the characters don’t show up. . . . . . . . . 128 I try to type in a file, but no characters appear. . . . . . . . . . . . . . . . . . . . . . . . . . . . . . . . 128 NEO 1 and NEO 2 User Manual ix ..... CONTENTS My file (or the end of my file) is filled with garbage characters.. . . . . . . . . . . . . . . . . . 129 When I transfer text to my Windows computer, the case of the characters is reversed; all the lowercase characters show up as uppercase, and the uppercase characters show up as lowercase.. . . . . . . . . . . . . . . . . . . . . . . . . . . . . . 129 When I press a key, the wrong letter appears on the screen. . . . . . . . . . . . . . . . . . . . . 129 My LCD screen broke. Is it covered under warranty? What should I do? . . . . . . . . . . 129 Do I need antivirus software for my NEO? . . . . . . . . . . . . . . . . . . . . . . . . . . . . . . . . . . . 129 What should I do if I spill something on my NEO? . . . . . . . . . . . . . . . . . . . . . . . . . . . .130 When I use Kid Works and Student Writing Center on my computer, I can’t send text from my NEO. . . . . . . . . . . . . . . . . . . . . . . . . . . . . . . . . . . . . . . . . . . . . . .130 When I try to send NEO 2 files to supported programs such as Google Docs, I see a message that says Wireless File Transfer is not installed or disabled. . . . . . . .130 Reinstalling or Repairing Keys on the NEO Keyboard . . . . . . . . . . . . . . . . . . . . . 131 Reinstalling the Key Cap Only . . . . . . . . . . . . . . . . . . . . . . . . . . . . . . . . . . . . . . . . . . . . . 131 Reinstalling the Scissors Assembly . . . . . . . . . . . . . . . . . . . . . . . . . . . . . . . . . . . . . . . . . 132 Reinstalling the Spacebar . . . . . . . . . . . . . . . . . . . . . . . . . . . . . . . . . . . . . . . . . . . . . . . . . 134 M o r e A b o u t N E O B a t t e r i e s a n d P o w e r S o u r c e s . . . . . 136 How Your NEO Receives Power. . . . . . . . . . . . . . . . . . . . . . . . . . . . . . . . . . . . . . . . 136 NEO Turns on Automatically When Connected . . . . . . . . . . . . . . . . . . . . . . . . . . 136 Replacing AA Batteries . . . . . . . . . . . . . . . . . . . . . . . . . . . . . . . . . . . . . . . . . . . . . . . 137 Using the Optional Rechargeable Battery Pack . . . . . . . . . . . . . . . . . . . . . . . . . . . 138 Specifications for the AC Adapter . . . . . . . . . . . . . . . . . . . . . . . . . . . . . . . . . . . . . . . . . . 138 About the Optional Rechargeable Batteries . . . . . . . . . . . . . . . . . . . . . . . . . . . . . . . . . . 139 Conditioning the Batteries . . . . . . . . . . . . . . . . . . . . . . . . . . . . . . . . . . . . . . . . . . . . 139 Storing and Recharging NEOs . . . . . . . . . . . . . . . . . . . . . . . . . . . . . . . . . . . . . . . . .140 Lifetime of the Rechargeable Batteries . . . . . . . . . . . . . . . . . . . . . . . . . . . . . . . . . .140 Toxic Elements Statement. . . . . . . . . . . . . . . . . . . . . . . . . . . . . . . . . . . . . . . . . . . . . 141 Low Battery Message. . . . . . . . . . . . . . . . . . . . . . . . . . . . . . . . . . . . . . . . . . . . . . . . . 141 Checking Battery Status (Charge) . . . . . . . . . . . . . . . . . . . . . . . . . . . . . . . . . . . . . . 141 Tips on Caring for Batteries . . . . . . . . . . . . . . . . . . . . . . . . . . . . . . . . . . . . . . . . . . . 142 NEO’s Backup Lithium Battery . . . . . . . . . . . . . . . . . . . . . . . . . . . . . . . . . . . . . . . . 142 x NEO 1 and NEO 2 User Manual ..... CONTENTS K e y b o a r d C o m m a n d s a n d S p e c i a l C h a r a c t e rs . . . . . . 143 Keyboard Commands . . . . . . . . . . . . . . . . . . . . . . . . . . . . . . . . . . . . . . . . . . . . . . . . 143 International and Special Characters . . . . . . . . . . . . . . . . . . . . . . . . . . . . . . . . . . . 147 Troubleshooting Special Characters . . . . . . . . . . . . . . . . . . . . . . . . . . . . . . . . . . . . . . . . 150 W a r r a n t y a n d M a i n t e n a n c e . . . . . . . . . . . . . . . . . . . . 151 Warranty. . . . . . . . . . . . . . . . . . . . . . . . . . . . . . . . . . . . . . . . . . . . . . . . . . . . . . . . . . . 151 Guarantee . . . . . . . . . . . . . . . . . . . . . . . . . . . . . . . . . . . . . . . . . . . . . . . . . . . . . . . . . . 151 Maintenance Tips . . . . . . . . . . . . . . . . . . . . . . . . . . . . . . . . . . . . . . . . . . . . . . . . . . . 152 Storing Your NEO . . . . . . . . . . . . . . . . . . . . . . . . . . . . . . . . . . . . . . . . . . . . . . . . . . . . . . . 152 Return Procedures. . . . . . . . . . . . . . . . . . . . . . . . . . . . . . . . . . . . . . . . . . . . . . . . . . . 153 FCC Statement . . . . . . . . . . . . . . . . . . . . . . . . . . . . . . . . . . . . . . . . . . . . . . . . . . . . . . 154 FCC Caution . . . . . . . . . . . . . . . . . . . . . . . . . . . . . . . . . . . . . . . . . . . . . . . . . . . . . . . . . . . . 154 I n d e x . . . . . . . . . . . . . . . . . . . . . . . . . . . . . . . . . . . 155 NEO 1 and NEO 2 User Manual xi xii NEO 1 and NEO 2 User Manual I NTRODUCTION Welcome to NEO, the better laptop for school and the perfect writing tool. With NEO, you can comfortably write, edit, and store text quickly and conveniently, no matter what your location. NEO’s light weight and long battery life make it an easy choice to use at school, the library, in meetings, or out in the field. NEO integrates with your computer and prints directly to your printer, either wirelessly or with a cable connection. If you’re using a group of NEOs with an AlphaHub (the SmartOption Mobile Lab), consult the AlphaSmart Manager 2 User Manual for more detailed information about using AlphaSmart Manager in group settings. If you have a NEO 2 model, you can also use it as you would use Responders with a Renaissance Receiver, allowing you to get real-time input from students in your class, and you can use its radio frequency capability to print wirelessly. NEO 1 and NEO 2 both come with AlphaSmart Manager software, the companion program that runs on your computer (Windows or Macintosh) and lets you manage and configure your NEOs. Why Use NEO? With NEO you’ve got a solution that is • Simple. Just turn it on and start typing; turn it off when you’re done. Everything is saved as you type. With its built-in AlphaWord Plus word processor, you can write stories, capture brainstorming ideas, take notes or minutes, and more. Then you can easily transfer the information to any computer or printer. • Flexible. You can customize NEO to suit your varying needs. You can control the screen contrast level on NEO’s large, easy-to-read display. And you can choose a font size in AlphaWord Plus that lets you work comfortably no matter where you are or what you’re working on. You can also set file sizes so that your NEO works the way you do. • Infrared-compatible. NEO comes with a built-in IrDA port for sending text or printing to infrared-enabled devices. (NEO 2 also has radio frequency capability for use with a Renaissance Receiver or for wireless printing.) • Rugged and portable. NEO is built to endure. Its design ensures it can be toted to classrooms, board rooms, seminars, on vacation, or virtually anywhere without damage. Its light weight and extra long battery life make it an invaluable tool. NEO 1 and NEO 2 User Manual 1 ..... INTRODUCTION NEO 1 and NEO 2 in This Manual • Expandable. NEO comes with a variety of SmartApplets: AlphaWord Plus, Responder (for NEO 2 only), Accelerated Reader (NEO 2 only), MathFacts in a Flash (NEO 2 only), Calculator, Control Panel, Beamer, KeyWords, and AlphaQuiz. (AlphaQuiz is installed on NEO 1 laptops and can be installed on NEO 2 laptops.) You can purchase and install other optional SmartApplets, such as Co:Writer® by Don Johnston Inc., to support your needs. • Windows and Macintosh compatible. NEO works with both Windows and Macintosh computers. NEO 1 and NEO 2 in This Manual This manual describes both NEO 1 and NEO 2 models. When the manual refers to NEO, the manual is referring to both models. When it refers to NEO 1 or NEO 2, the manual is describing features that are only available on that model. Types of Tips in This Manual In this manual, you’ll see two types of tips in the left margin. The icon in the tip shows you which type it is: Tips with a light bulb are software tips. They provide helpful information such as reminders or alternate ways to do a task. Tips with an apple are teacher tips. They provide ideas for using your NEOs in the classroom. 2 NEO 1 and NEO 2 User Manual G ETTING S TARTED This section explains how to start using your NEO. It includes this information: • System requirements for computers used with NEO • Installing or recharging the batteries • Starting the NEO • Starting to write on NEO • Checking the SmartApplet list • Sending files to your computer • Beaming files between NEOs • Printing from NEO • Installing AlphaSmart Manager • Set up infrared capabilities (optional) • Setting up a Renaissance Receiver System Requirements For the latest NEO system requirements, go to www.renlearn.com\requirements. Installing the Batteries You can order the rechargeable battery pack after receiving the NEO if you’d prefer it to standard batteries. Your NEO came with either three AA batteries or a rechargeable battery pack. You need to install the batteries or battery pack before you can use the NEO. Important: For complete information about batteries (including the rechargeable battery pack), see “More About NEO Batteries and Power Sources” on page 136. This section will help you ensure maximum battery life for your NEO. Follow the steps for the type of battery power you have. NEO 1 and NEO 2 User Manual 3 ..... GETTING STARTED Installing the Batteries How t o Instal l AA Batteries 1. Turn the NEO over. On the back of the NEO, put your thumbs in the circles on the battery compartment cover A and slide the compartment cover toward the left to remove it from the NEO. After you install the batteries the first time, you may use the small screw that came with the NEO to secure the cover. If you do this, you’ll need to remove the screw the next time you install batteries. A A 2. The first time you open the compartment, you’ll find a small plastic bag with a Phillips screw for holding the battery compartment cover shut. Remove the bag. 3. Insert three AA batteries into the compartment. Make sure the + end of each battery points toward the black and red cables. 4. Put the battery compartment cover back on and slide it back in place. You can insert the small Phillips screw in the hole provided to make sure the cover stays shut. 4 NEO 1 and NEO 2 User Manual Installing the Batteries ..... GETTING STARTED How t o Install and Charge a Rechargeable Battery Pack Charge the batteries as soon as possible after you receive it. Do not store the NEO without first charging the batteries. 1. Turn the NEO over. On the back of the NEO, put your thumbs in the circles on the battery compartment cover A and slide the cover toward the left to remove it from the NEO. After you install the rechargeable battery pack the first time, you may use the small screw that came with the NEO to secure the cover. If you do this, you’ll need to remove the screw the next time you install rechargeable batteries. A A 2. The first time you open the compartment, you’ll find a small plastic bag with a Phillips screw for holding the battery compartment shut. Remove the bag. 3. Insert the rechargeable battery pack in the NEO with the cable end toward the matching cable in the NEO. Then, gently pull that cable out and connect it to the rechargeable battery pack. 4. Put the battery compartment cover back on and slide it back in place. You can insert the small Phillips screw in the hole provided to make sure the cover stays shut. You can use your NEO while it’s charging, but don’t disconnect it until it is fully charged. 5. Connect the AC adapter cord to your NEO at the connector shown B, and plug the cord into a working electrical outlet. The batteries will automatically start charging. B NEO 1 and NEO 2 User Manual 5 ..... GETTING STARTED Starting the NEO 6. The first time you charge the battery pack, let it charge for 16 hours. After that, whenever you recharge, let the unit charge for 4–8 hours. The light on the front of the NEO C is green when the NEO is fully charged. C Rechargeable batteries should be conditioned so they hold a full charge. For more information, see page 139. 7. Disconnect the AC adapter cord when you’ve finished charging the battery pack. S t a r t i ng t h e N E O To start your NEO after you install the batteries, simply press the on/off key in the upper-left corner of the keyboard. You can use the Two-Button On setting in the Control Panel to require the on and enter keys to be pressed together in order to turn the NEO on. This helps prevent NEO from being turned on accidentally. For more information, see page 72. 6 NEO 1 and NEO 2 User Manual Writing on Your NEO ..... GETTING STARTED Writing on Your NEO How to Start Writing on a NEO It’s easy to start writing on your NEO. Once you turn NEO on, it will automatically start AlphaWord Plus, which is the SmartApplet (program) that you write in. A message will appear briefly to show you which of the eight files you are in. (These files correspond to the “file 1” through “file 8” keys on the NEO.) Since this is the first time you’ve written on the NEO, it should open in file 1, which is blank. Begin typing. Your text appears on the screen. You can use the arrow keys () to move your cursor in the text. Press backspace to erase the character to the left of the cursor; press delete to erase the character to the right of the cursor. All text is automatically saved in the current file number while you type. To begin another document, press one of the other file keys (2 through 8) in the top row of the keyboard. For more detailed information about writing using AlphaWord Plus, see page 27. What to Do If the File That Opens Isn’t Blank If you turn on your NEO and the screen isn’t blank, it usually means that someone else has used the NEO before you, perhaps because you’re sharing NEOs in a group or classroom. One of these three things may have happened: • The NEO could be in AlphaWord Plus, but it could already have text in one or more of the files. You can press a different file key to find an empty file that you can write in. This example shows a typical NEO 2 SmartApplet menu. The order of SmartApplets on your NEO and the SmartApplets included may vary. NEO 1 and NEO 2 User Manual • Your NEO may be in the SmartApplets menu, which shows the programs available on the NEO. Use the arrow keys to move the cursor next to AlphaWord Plus; then, press enter to start it. AlphaWord Plus will open one of the files that you can write in. 7 ..... GETTING STARTED Checking the List of SmartApplets Installed on the NEO • The NEO may be in another SmartApplet, such as Calculator (shown below). Press the applets key to go to the SmartApplets menu. Then, use the arrow keys to move the cursor next to AlphaWord Plus and press enter. You might need to press one of the file keys along the top of the keyboard to find an empty file. Checking the List of SmartApplets Installed on the NEO AlphaWord Plus may not be the program that opens when you start the NEO because you can change the startup SmartApplet. To change it on the NEO itself, see page 59. To change it using AlphaSmart Manager, see page 113. SmartApplets are programs installed on your NEO. When you start the NEO, AlphaWord Plus opens automatically so that you can start writing, but you can press applets to see a list of the other SmartApplets on your NEO. To open one of these SmartApplets, use the arrow keys to move the cursor next to it; then, press enter. Most NEOs come with these SmartApplets installed: • AlphaWord Plus (for writing) • Responder (for NEO 2 only; enables NEO 2 to be used like a Renaissance Responder) • Accelerated Reader (for NEO 2 only; enables students to take Accelerated Reader RP quizzes on NEO 2 instead of at a computer) • MathFacts in a Flash (for NEO 2 only starting in spring 2009; enables students to do MathFacts in a Flash RP work on NEO 2 instead of a computer) • KeyWords in the US or KAZ in the UK (for learning or teaching keyboarding) • Beamer (for sending files between NEOs) • Control Panel (for changing settings for NEO or its SmartApplets) 8 NEO 1 and NEO 2 User Manual ..... GETTING STARTED Sending Files to Your Computer • AlphaQuiz (for administering quizzes to students on the NEO) AlphaQuiz is installed on NEO 1 laptops by default. NEO 2 laptops don’t have this SmartApplet preinstalled, but you can install it using AlphaSmart Manager. • Calculator The Quick Guide that you received with your NEO provides basic instructions for using most of these SmartApplets. For detailed instructions, see the NEO 1 and NEO 2 SmartApplet User Manual on our Web site or the Documentation CD for NEO 1 and NEO 2. For more general information about SmartApplets, see page 57. Sending Files to Your Computer There are two ways to send files from the NEO to your computer: • You can use a USB cable to connect the NEO to your computer. Then, you can send the files via the cable connection. See the instructions below. • You can send the files using infrared beaming. See page 11. Sending Files Using a Di rect Cable Connection Connecting Your NEO to a Computer Using a USB Cable 1. If this is the first time you have connected the NEO to your computer, make sure you are logged in to your computer as an administrator or that you have permissions that allow the device drivers to load properly. Also, make sure AlphaSmart Manager is not running. 2. Using the cable that came with the NEO, connect the thin, rectangular end of the cable into a USB port on your computer. Connect the smaller, square end of the cable into the computer port along NEO’s top edge A. To the computer USB port To the Neo computer port The USB cable for connecting to USB computers A NEO 1 and NEO 2 User Manual 9 ..... GETTING STARTED Sending Files to Your Computer On Windows XP computers, you may be notified that the driver is not certified for Windows XP. The driver will work for your system; to go on, click Continue Anyway. 3. On Windows computers, you may be prompted to install a driver the first time you connect your NEO to the computer with a USB cable. If so, accept the default values in the Wizard and click Next > in each panel. When you’ve finished, restart the computer. On Macintosh OS 10 computers, the first time you connect your NEO, a keyboard setup assistant will open. Follow the instructions in the assistant. 4. NEO will automatically change modes to prepare to transfer files, and the screen will display one of the following messages. If you don’t see the appropriate message, check your cable to make sure it’s properly attached to the computer and the NEO. Macintosh: Windows: As soon as you’ve successfully connected your computer to NEO, you can send text to your computer. Sending Text When Connected by a USB Cable 1. If you have AlphaSmart Manager installed on your computer, make sure it is closed. If AlphaSmart Manager is running, you can’t send text to a computer file. 2. On your computer, open the file that you want to receive the NEO text into. (It can be a new file or a file that already has text.) Place your cursor where you want the text to begin. If your text isn’t correct in your computer file, the problem may be that your computer program needs a slower transfer speed. See page 78 to change the transfer speed for USB cable connection transfers. 10 3. Turn on your NEO and open the file you want to send. 4. Connect your NEO to your computer using the USB cable as described on page 9. 5. Press send. NEO displays a progress bar and a percentage of how much text has transferred. 6. On your computer, save the file. 7. Disconnect the cable from your computer and the NEO. NEO 1 and NEO 2 User Manual ..... GETTING STARTED Sending Files to Your Computer 8. If you don’t want to keep the file on your NEO, press clear file, then press Y for yes. (You don’t have to clear the file if you want to keep it.) 9. If you want to send another file to the computer, you can switch files on the NEO. Press and the file # key for that file at the same time. When the file is open, press send to send it. 10. When you’ve finished sending files, disconnect the NEO from your computer. You can also use AlphaSmart Manager to send text to your computer when connected by USB cable. See “Working with AlphaSmart Manager” on page 85 for more information. Sending Files Using Infrared (IR) Beaming If your computer has a built-in IR transceiver, of if it has an IR pod attached, you can send files from your NEO to the computer without using cables. NEO can be up to three feet (one meter) away while transferring text to and from a computer or printer. To beam files from your NEO to the computer, you must have either the AlphaBeam program or the Get Utility installed. For more information, see page 21. To beam text to a computer using AlphaBeam, follow these steps: 1. Turn on your NEO and open the file you want to send. 2. Start the AlphaBeam program on your computer: • Windows: Click Start Programs AlphaSmart AlphaBeam. • Macintosh: Open the AlphaBeam program folder and double-click AlphaBeam 3.x. 3. Point the infrared lens of the NEO toward the IR transceiver as shown above. Your computer’s transceiver may be elsewhere on the computer, or it may be a separate IR pod. NEO 1 and NEO 2 User Manual 11 ..... GETTING STARTED Sending Files to Your Computer 4. On your computer, open the file to which you want to send the text. (It can be a new file or a file that already has content.) Place your cursor where you want the text to begin to ensure your program is the active window and ready to receive text. If your text isn’t correct in your computer file, the problem may be that your computer program needs a slower transfer speed. See page 78 to change the transfer speed for beamed file transfers. 5. Press send on NEO. AlphaBeam shows that it’s retrieving text, and when it’s ready, all text from the file appears in your open file. (When you beam text instead of sending it over a USB cable, NEO collects the whole file and sends it all at once instead of sending text one character at a time. This process may take a few seconds.) AlphaBeam Text transferred by AlphaBeam into a program If it looks like nothing happened, it might be that AlphaBeam was the active window instead of the program you want to receive the text into. Try one of these two solutions: • The text you sent should be on your computer’s clipboard, so you can paste it into your file. Click in the file that you want the text to appear in, click the Edit menu, and choose Paste. • If this does not work, click in the file on your computer that should receive the text. Make sure that window is active and the cursor is where you want the text to start. Then, try sending the text again. 12 NEO 1 and NEO 2 User Manual ..... GETTING STARTED Sending Files from One NEO to Another Sending Files to Programs Other Than Word Processing Pr ograms The previous procedures assume you are sending text to a word processing program on your computer. However, you can also send text to: • Multimedia text fields • Text tools in a page layout or graphics program • Email programs • Spreadsheets Just place your cursor wherever you would normally type text in your program; then, press send on the NEO. Tips for Sending Text to a Spreadsheet Spreadsheets keep track of information in columns and rows. On NEO, you can set up some of your data in AlphaWord Plus using tabs and returns for eventual transfer into a spreadsheet program on your computer. Sending Files from One NEO to Another When you have the Beamer SmartApplet on your NEO, you can beam files from one NEO to another right within AlphaWord Plus. You can also use the Send and Receive options in the Beamer SmartApplet itself, but it is faster to send files from within AlphaWord Plus. If you want to start the Beamer SmartApplet, press applets, move the cursor next to Beamer, and press enter. In the Beamer SmartApplet, you can also change Beamer settings. NEO 1 and NEO 2 User Manual You don’t need to open the Beamer SmartApplet to send and receive files. If you want to send and receive files while working in the AlphaWord Plus file spaces, follow these steps: 1. Move your NEOs to within three feet of each other and aim their infrared ports A at each other as shown. A 13 ..... GETTING STARTED Transferring Files between NEO 2 and Supported Programs A If there is text in the clipboard of the NEO that’s receiving a file, NEO will ask if you want to overwrite the clipboard with the file you’re receiving. To continue and allow the clipboard to be overwritten, press enter. 2. The sender should open the file he or she wants to send and press ctrlsend. 3. The receiver should open the file space that he or she wants to receive the text into and press ctrl-B. 4. If the file that the receiver chose was not empty, a message will ask if you want to overwrite it or append to it (that is, add the beamed text to the end of the file). Move your cursor next to an option and press enter. Transferring Files between NEO 2 and Supported Programs If you have a NEO 2 laptop and a Renaissance Receiver, you can also send your AlphaWord Plus files to supported programs such as Google Docs for NEO 2, and you can retrieve documents from those programs into one of your NEO 2 files. Note: Wireless File Transfer must be installed on your NEO 2. If you receive a message that it is not installed or has been disabled, see page 130. Sending Files from NEO 2 to Supported Programs If the file that you send has a linked file, in the program you are sending to, the linked file will be added to the end of the main document. <FORM> tags will appear around the linked file text. 14 1. First, check the following: • Make sure your Renaissance Receiver is connected to a computer that is currently connected to the Internet. (To connect the Receiver, see page 25.) • Make sure you know the Receiver/Network name. (To set the name for the Renaissance Receiver/computer combination, see page 25.) 2. On your NEO 2, open the file that you want to send. NEO 1 and NEO 2 User Manual ..... GETTING STARTED Transferring Files between NEO 2 and Supported Programs 3. Press cmd-send. 4. NEO 2 will search for your network (Receiver) and do one of two things: If you have already sent a file to the supported program since you last turned NEO 2 on, it will skip steps 4–6. • If the NEO 2 finds that you have connected to a Receiver before, it will ask if you want to stay connected to that network. Press Y for yes and then enter. • If NEO 2 does not find a previous connection, the screen will list the available Receivers. Press until you have highlighted your Receiver name; then, press enter. 5. If more than one supported program is available, you will see a list. Use the arrow keys to highlight the program you want to use; then, press enter. 6. NEO 2 will connect to the supported program through your computer. If the program requires you to log in, you will be asked to enter the email address and password. Enter the email address and press enter, then enter your password and press enter again. By saving files as a new document, students can keep multiple drafts of their work in the supported program. This can be helpful if you require your students to show multiple revisions of their writing. 7. If you already have files in the supported program, you will see two options. Use the arrow keys to highlight the option you prefer and press enter. Then, follow the instructions for the options you chose: • If you chose to save the file as a new document in the program, enter a name for the new file and press enter. • If you chose to replace a file that you already have in the program, use the arrow keys to highlight the name of the file you want to replace and press enter. 8. The file will be copied to the program. When NEO 2 has finished sending (copying) the file, it will notify you. Press enter. You will go back to the file you have sent. Retrieving Files from Supported Programs and Copying Them to NEO 2 1. First, check the following: NEO 1 and NEO 2 User Manual • Make sure your Renaissance Receiver is connected to a computer that is currently connected to the Internet. (To connect the Receiver, see page 25.) • Make sure you know the Receiver/Network name. (To set the name for the Renaissance Receiver/computer combination, see page 25.) 15 ..... GETTING STARTED Transferring Files between NEO 2 and Supported Programs 2. On NEO 2, press one of the file keys to open the file space that you want to retrieve the file into. 3. Press cmd-O. 4. If the file that you opened on NEO 2 is not empty, NEO 2 will ask if you want to keep the current file. • If you want to keep the NEO 2 file you had open, press Y. Then, enter a name for the file and press enter. • If you do not want to keep the NEO 2 file that is open, press N. 5. NEO 2 will search for your network (Receiver) and do one of two things: If you have already sent a file to a supported program since you last turned NEO 2 on, it will skip steps 5–7. • If the NEO 2 finds that you have connected to a Receiver before, it will ask if you want to stay connected to that network. Press Y for yes and then enter. • If NEO 2 does not find a previous connection, the screen will list the available Receivers. Press until you have highlighted your Receiver name; then, press enter. 6. If more than one supported program is available, you will see a list. Use the arrow keys to highlight the program you want to use; then, press enter. 7. NEO 2 will connect to the program through your computer. If the program requires you to log in, you will be asked to enter the email address and password. Enter the email address and press enter, then enter your password and press enter again. 8. The next screen will list the files found in the supported program. Use the arrow keys to highlight the file that you want to copy to your NEO 2. Then, press enter. Comments that were inserted in the document within Google Docs will appear in square brackets [ ] in the document on NEO 2. 16 9. The file will be copied from the program to the file space you opened on NEO 2. When NEO 2 has finished copying the file, it will open it. NEO 1 and NEO 2 User Manual Printing from NEO ..... GETTING STARTED P r i n t i ng f r o m N E O There are several ways to print your AlphaWord files through your computer. If you prefer to print from your computer, you can do one of the following: For more about printers that are compatible with NEO, go to http://support.renlearn.com/ techkb/techkb/6833262e.asp. • Send the file to your computer as described on the previous pages and then print from your word processing program. • Retrieve files using AlphaSmart Manager and then print them. (See page 87.) If you prefer to print directly from the NEO, there are three ways to do this: • You can connect NEO to your printer with a USB cable and then press print on the NEO. See the instructions on page 17. • You can use IR beaming to send the file from NEO to your printer. (For more about IR setup, see page 21.) To print this way, see page 18. • For NEO 2 only, you can use radio frequency technology to send the file to your printer for wireless printing. To print using this method, see page 18. How t o Pri nt by Connecti ng your NEO t o a USB Printer 1. Plug one end of the printer’s USB cable into NEO’s USB printer port A. A 2. Make sure the other end of the USB cable is plugged into the printer, and make sure the printer is on. 3. Make sure NEO is turned on, and open the file you want to print. 4. Press print on NEO to print the current file. Note: NEO doesn’t control print settings such as font, print quality, margins, and so on. These settings are determined by the printer’s default settings. NEO 1 and NEO 2 User Manual 17 ..... GETTING STARTED Printing from NEO How t o Send Text to a Pri nter Using IR Beaming 1. Make sure your NEO is turned on, and open the file you want to print. 2. Point your NEO’s IR port A at the printer’s IR transceiver. A 3. Press print on the NEO. How t o Print Wirelessly Using NEO 2’s RF Capability To print wirelessly with NEO 2, you must have a Renaissance Receiver connected to your computer. (See page 24 to set up the Receiver.) The NEO 2 file will print to your computer’s default printer. Important notes for printing wirelessly: • The Renaissance Wireless Receiver Utility must be running before you can print wirelessly. • It’s important to use the Server Settings to give your network a unique name so you can find it easily. See page 24 for instructions. 18 1. Make sure your NEO 2 is turned on, and open the file you want to print. 2. Press print on the NEO 2. 3. NEO 2 will look for a cable connection first, then for an IR connection. If neither is found, NEO 2 will search for networks (that is, computers connected to Renaissance Receivers). When it lists those networks, use the arrow keys to highlight the Receiver name you want; then, press enter. NEO 2 will connect to the computer that has that Receiver, and it will print to the computer’s default printer. NEO 1 and NEO 2 User Manual ..... GETTING STARTED Installing AlphaSmart Manager Installing AlphaSmart Manager AlphaSmart Manager helps your computer work with NEO. It lets you do the following: The Renaissance Wireless Server Utility program is installed with AlphaSmart Manager. This program enables you to use NEO 2 as a Responder when you have a Renaissance Receiver. The utility starts when you start your computer. • Get files from your NEO so you can view them, save them, and/or print them. • Send text files from your computer to your NEO. You can use this feature to send text for lessons or instructions or just text files that you want to work on further on the NEO. • View reports about student work in KeyWords on the NEO and synchronize the data with Renaissance Place. (For more about using AlphaSmart Manager to view KeyWords data, see page 105.) • Install or remove SmartApplet programs from your NEO. • Change settings on your NEO or in one of the SmartApplet programs that are on the NEO. • View the items you’re about to send to the NEO(s) and select the NEOs to send them to. To install AlphaSmart Manager, follow the steps for your type of computer. Make sure your computer is running Windows versions 2000, XP, or Vista or Macintosh OS 10.3.9 to 10.5.x. Note: Macintosh OS 10 and Windows 2000, XP, and Vista make distinctions between administrators and other users. You need to have administrator privileges or be logged in as an administrator to install and access AlphaSmart Manager. If you don’t have administrator privileges, see your system administrator for help installing and running AlphaSmart Manager. Installing AlphaSmart Manager on Windows Computers 1. If you have an AlphaSmart Manager CD, insert it into your computer. If a window doesn’t open to show you the contents of the CD, view the contents using My Computer or Windows Explorer. If you do not have an AlphaSmart Manager CD, extract the files from the .zip file you downloaded. View the files. 2. Double-click the setup.exe file. 3. Click Next > in the first panel of the installation wizard. 4. Read the license agreement. Then, click the first option to accept the terms and click Next >. The installation will start. NEO 1 and NEO 2 User Manual 19 ..... GETTING STARTED Installing AlphaSmart Manager 5. The program will ask if you want to search for configuration files from previous versions of AlphaSmart Manager. If this is the first time you’ve installed the program, click No. If you have a previous version and you want to save your configuration, click Yes. If the program can’t find the files, you may need to browse for them yourself. 6. On the final panel of the wizard, check the box if you want to view the Read Me file as soon as the installer closes. Then, click Finish. Installing AlphaSmart Manager on Maci nt osh Computers 1. If you have an AlphaSmart Manager CD, insert it into your computer and view the contents. If you do not have an AlphaSmart Manager CD, open the .dmg file you downloaded. 2. Double-click AlphaSmart Manager Installer. 3. Enter your user name and password for this computer when the installer asks you to do so. Then, click OK. 4. Click Continue. 5. Read the license agreement; then, click Continue. When the program asks if you want to agree to the license agreement, click Agree. 6. Click Install. Installation will start. 7. The installer will notify you that it may automatically restart your computer after installation. Click OK. 8. The program will ask if you want to search for configuration files from previous versions of AlphaSmart Manager. If this is the first time you’ve installed the program, click No. If you have a previous version and you want to save your configuration, click Yes. If the program can’t find the files, you may need to browse for them yourself. 9. The installer will also ask if you want to add the program to the dock. Click Yes or No. The installation will be completed. Your computer may be restarted. To learn about using AlphaSmart Manager, see “Working with AlphaSmart Manager” on page 85. 20 NEO 1 and NEO 2 User Manual ..... GETTING STARTED Setting Up Infrared Beaming and Installing AlphaBeam Setting Up Infrared Beaming and Installing AlphaBeam Requir ements for Using IR Beaming with NEO NEO NEO has a built-in infrared module that conforms to IrDA industry standards. IR Capability on Your Computer Your computer must have one of the following: • A built-in IrDA transceiver • An IR Pod (serial or USB) purchased from Renaissance Learning for computers that don’t have a built-in IrDA transceiver. Computer Requirements IR Pods are not compatible with some older Windows operating systems. The serial IR pod is not compatible with Windows ME. The USB IR pod is not compatible with Windows 95 or Windows NT. For computer requirements for NEO, go to www.renlearn.com/requirements. Programs Required You must have one of the following programs: • AlphaBeam, which allows you to send files from NEO to a computer. You can install AlphaBeam from the AlphaSmart Manager CD or download it from www.renlearn.com/neo/downloads/. • Get Utility, which allows you to send files from NEO to a computer and from a computer to NEO. Using Get Utility is the only method that lets you transfer data from your computer using IR beaming. For complete information about Get Utility, refer to the Read Me file for the utility or visit our Web site. NEO 1 and NEO 2 User Manual 21 ..... GETTING STARTED Setting Up Infrared Beaming and Installing AlphaBeam Installing AlphaBeam Follow the instructions for your operating system to install AlphaBeam. Warning! If you’re going to use a USB wireless pod as the transceiver, don’t connect it to your computer until after you’ve completed installing AlphaBeam. Installing AlphaBeam on Windows Computers 1. Do one of the following: • Insert the AlphaBeam CD that came with your USB IR-pod into the CD drive on your computer. If the installer does not start automatically, open the AlphaBeam folder and double-click Setup.exe. • Go to www.renlearn.com/neo/downloads/ in your Web browser, find the AlphaBeam download links, and click the PC link. Then, doubleclick the AlphaBeam.zip file that you downloaded and extract the .exe file. Double-click alphabeam_324.exe. (Numbers in the file name may vary.) The installation Wizard will start. 2. In the Welcome panel of the Wizard, click Next >. Files will be extracted, and a new installation Wizard will start. 3. Click Next > in the Welcome panel of the new Wizard. 4. Read the license agreement. Then, click Yes to accept it and continue. 5. Check the location where AlphaBeam will be installed. If it is acceptable, click Next > to continue. If you want to change the location, click Browse first, open the folder where you want to install the program, and click OK; then, click Next >. 6. Check the Program Folder where icons will be installed for the Start menu. If necessary, change the folder. Click Next > when you’re ready to continue. 7. If the infrared port isn’t built in, click the type of infrared pod that will be used with the computer: Serial Infrared Pod or USB Infrared Pod. Then, click Next >. 8. If NEO is the only infrared device that you will use with your computer, leave Typical selected and click Next >. If you are using other infrared devices with your computer, click Custom and click Next >. Then, click Next > again. 9. The final panel will ask if you want to restart. Click Yes or No. You must restart the computer before you can use AlphaBeam. After clicking one of the options, click Finish. 10. If you are using an IR Pod, connect it to your computer if you haven’t already done so. 22 NEO 1 and NEO 2 User Manual ..... GETTING STARTED Setting Up Infrared Beaming and Installing AlphaBeam 11. If you are using Windows 2000, Windows XP, or Windows Vista and you have other IR-capable devices that you want to use with your computer, follow these steps: a. Windows 2000: Click Start Settings Control Panel. Windows XP and Vista: Click Start Control Panel. b. Double-click Add/Remove Hardware (Windows 2000) or Add Hardware (Windows XP and Vista). (If you don’t see the Add Hardware option in Windows XP, double-click Printers and Other Hardware first to see it.) c. Follow the instructions in the Wizard that appears until you see a list of devices in the Choose a Hardware Device window (Windows 2000) or the Add Hardware Wizard window (Windows XP and Vista). d. Windows 2000: Double-click Add a new device; then, click Select hardware from a list and click Next >. Windows XP and Vista: Double-click Add a new hardware device; then, click Install the hardware that I manually select from a list and click Next >. e. Select Infrared Devices from the list of hardware types. f. Select ACTiSYS from the list of manufacturers; then, select the ACTiSYS IR-220L Serial Infrared Device. g. Click Next > to accept the default settings and install the software. h. Select the serial (COM) port that your IR pod is connected to; then, click Finish. i. Windows 2000 and XP: Go back to the Control Panel and double-click Wireless Link. (In Windows XP, you may need to double-click Printers and Other Hardware before you can double-click Wireless Link.) Windows Vista: Go back to the Control Panel and double-click Infrared. j. Click the Image Transfer tab and remove the check mark next to Use Wireless Link to transfer images from a digital camera to your computer. You’re now ready to start using AlphaBeam to receive files from your NEO. NEO 1 and NEO 2 User Manual 23 ..... GETTING STARTED Setting Up a Renaissance Receiver for NEO 2 Installing AlphaBeam on Macintosh OS 10 Computers 1. Do one of the following: • Insert the AlphaBeam CD that came with your USB-IR-pod into the CD drive on your computer. • Go to www.renlearn.com/neo/downloads/ in your Web browser, find the AlphaBeam download links, and click the link for OS 10. 2. If you are using the CD, copy the AlphaBeam for OS X folder onto your computer. The AlphaBeam program is in this folder. If you are downloading the program, an alphabeam_osxb3 folder will be extracted onto your computer. This folder contains the AlphaBeam program. 3. If you are using an IR Pod, connect it to your computer if you haven’t already done so. 4. Double-click AlphaBeam in the folder that you copied or extracted to start the program. 5. Click the Edit menu and choose Preferences. Make sure Receive text using infrared (wireless) is checked. In the Infrared connection via drop-down list, choose the type of infrared connection—Built-in IrDA Transceiver, Modem or Printer (for a Mac IR pod), or USB IR Wireless pod. You’re now ready to start using AlphaBeam to receive files from your NEO. Setting Up a Renaissance Receiver for NEO 2 If you have a NEO 2, you can use it as you would use a Renaissance Responder if you have a Renaissance Receiver connected to your computer. This means students can use NEO 2 to send responses to assignments in AccelTest software or Accelerated Math RP software, and you can use it with the 2Know! Toolbar. Students can also take Accelerated Reader RP quizzes on NEO 2 laptops. A Renaissance Receiver comes with your kit if you have ordered a SmartOption Mobile Lab. You can also use Receivers that you purchased separately with a 2Know! kit. The following procedures describe how to connect the Receiver and how to assign a unique name to your Receiver so that NEO 2 users can find it and connect to it. 24 NEO 1 and NEO 2 User Manual ..... GETTING STARTED Setting Up a Renaissance Receiver for NEO 2 How t o Connect a Renaissance Receiver to Your Computer Follow these steps to connect a Renaissance Receiver to your computer: 1. Find the Renaissance Receiver and the USB data cable. 2. Plug the end of the data cable that is nearly square into the connector on the back of the Receiver A. A 3. Connect the USB connector on the data cable B to the matching USB port on your computer. B A How t o Name the Receiver It’s important to set a name for the computer/Receiver combination so that students know they’re connecting to the right Receiver when they use NEO 2 for assignments. This is especially important if your school has more than one Renaissance Receiver. Follow these steps: 1. Start the Renaissance Wireless Server Utility: NEO 1 and NEO 2 User Manual • Windows computers: Right-click in the lower-right corner of your computer screen (the system tray) and choose Manage from the menu that appears. If you don’t see this icon in your system tray, click Start Programs Renaissance Wireless Server Renaissance Wireless Server Utility. • Macintosh computers: In your computer’s Applications folder, open the Renaissance Wireless Server folder. Then, double-click Renaissance Wireless Server Utility. 25 ..... GETTING STARTED Setting Up a Renaissance Receiver for NEO 2 2. Type 1234 and click OK to log in. (This is the default Administrator PIN. If you have changed the PIN, enter your new PIN.) If necessary, click Start. 3. Click the Server Settings tab. You can also change the Administrator PIN on this tab by clicking Set Administrator PIN, entering a new PIN, and clicking OK. Be sure to update the network settings if you do this. 4. Enter a new name in the Network Name field A. Make sure the name is different from the name of your school’s other Receivers. A B 5. Click Update Network Settings B. 6. Click OK when the program finishes updating the network settings. Make sure your students know the Receiver name. 26 NEO 1 and NEO 2 User Manual W RITING ON NEO U SING A LPHA W ORD P LUS Since AlphaWord Plus is the SmartApplet that you use to write on the NEO, it is the one that you will probably use the most. This chapter explains how to use AlphaWord Plus, including the following: • Starting AlphaWord Plus • Typing text and editing it • Managing files in AlphaWord Plus • Formatting text • Changing the onscreen font size (for AlphaWord Plus only) • Finding text • Checking spelling • Using the thesaurus • Using linked files • Counting characters, words, and more • File size limits • Clearing and deleting files • Recovering files • Using the typing timer Starting AlphaWord Plus When you first receive your NEO, it starts AlphaWord Plus automatically whenever you turn it on. If you have changed the program that starts when you start the NEO, you can still open AlphaWord Plus by following these steps: 1. Press applets. 2. Use the arrow keys to move the cursor next to AlphaWord Plus. 3. Press enter. NEO 1 and NEO 2 User Manual 27 ..... WRITING ON NEO USING ALPHAWORD PLUS Entering and Editing Text Entering and Editing Text When you first start NEO and it starts AlphaWord Plus, NEO opens file 1, which is empty. The next time you start the NEO, it places you in the file you last worked on. The cursor is where you left it in that file. If you want to work in a different file, select it by pressing one of the file keys (file 1–file 8) at the top of the keyboard. file 1 file 2 file 3 file 4 file 6 file 5 file 7 file 8 To enter text in a file, simply begin typing. Use backspace or delete to erase text you’ve typed. As with most word processors, text automatically wraps at the end of each line. Press enter only when you want to separate paragraphs. NEO saves each character as you type it. The following tables show you how to move through your file, select text, and cut, copy, paste, or delete text. Moving the Cursor Press these keys... One character to the left or right One line up or down - Up one screen (scrolling) - Down one screen (scrolling) - Beginning of line - End of line option- or option- Previous word or next word ctrl- or ctrl- Previous sentence or next sentence ctrl- or ctrl- Previous paragraph or next paragraph home end 28 ...to move to this point: Beginning of file End of file NEO 1 and NEO 2 User Manual Entering and Editing Text ..... WRITING ON NEO USING ALPHAWORD PLUS Selecting Text When you select text on your NEO, the selection appears highlighted in reverse; that is, text within a selection is light and the background is dark. To deselect text that you’ve selected, press esc or an arrow key. (Cutting, copying, and pasting also deselects the text.) Press these keys... ...to select the following: shift- One character to the left at a time shift- One character to the right at a time shift- One line up shift- One line down shift-option- From cursor to beginning of word shift-option- From cursor to end of word shift-- From cursor to beginning of line shift-- From cursor to end of line shift-home shift-end ctrl-A or -A From cursor to beginning of file From cursor to end of file Entire file Cutting/Copying/Past ing/ Deleting Text To cut, copy, or paste text, you must first select it (see the previous table). Then, do one of the actions below. To do this: Cut selected text and copy it to the clipboard ctrl-X or -X Copy selected text to the clipboard ctrl-C or -C Paste text from the clipboard into your file ctrl-V or -V Delete a character to the left of the cursor or delete selected text backspace Delete a character to the right of the cursor or delete selected text delete Remove the entire contents of the file NEO 1 and NEO 2 User Manual Press this: clear file 29 ..... WRITING ON NEO USING ALPHAWORD PLUS Using Text2Speech to Read AlphaWord Files Aloud About t he NEO Cl ipboard NEO has a built-in clipboard, like most computers. Whenever you cut or copy text, it is placed in the clipboard. When you use the paste command, you paste the text from the clipboard into a file (either the same file or a new file). The clipboard can store one block of text at a time. By following the steps below, you can view the text in the clipboard or the status of the clipboard at any time. To view the clipboard contents 1. Press ctrl-option--C. If the text in the clipboard is too long to be shown in one screen, you can use the arrow keys to scroll through the text. 2. Press esc to return to your file. To view the clipboard status 1. Press option--C. The screen shows you the number of text pages in the clipboard and how much empty space (in pages) is still available. 2. Press any key to exit the status screen and return to your file. Using Text2Speech to Read AlphaWord Files Aloud If you have an optional Text2Speech device from Renaissance Learning, the device can read aloud the text you write in AlphaWord Plus. To turn Text2Speech on or off or to change options such as the voice type, speed, or volume, press ctrl-J. For more information, refer to the Text2Speech User Manual, which you received with the device. Managing Files in AlphaWord Plus On the top of the NEO keyboard, you’ll see keys for files 1–8. Press these keys to go to any of the eight files that are open in AlphaWord Plus. By pressing one of the file keys, you can switch between your active files quickly without losing any text in the other files. If the file you choose is empty, you simply add the new text you want to store in that file. (Remember that NEO saves your text as you type it.) 30 NEO 1 and NEO 2 User Manual Managing Files in AlphaWord Plus ..... WRITING ON NEO USING ALPHAWORD PLUS If you want to start a new file, but you want to keep the text that was in that space (file 3, for example), you can name the file and close it. You can open named files later when you’re ready to work on them again. Creating New Fi les To start a new file in AlphaWord Plus, press the file keys until you find an empty file and begin typing. NEO saves each character as you type it, so if you press that file key again later, the text will still be there (unless you’ve removed it). You can, however, name your file so that it is saved even if you start a new file in that space. You can then open the file again later. See “Naming and Saving Files” below for more information. If you want to create a new file in a file number that already has text, follow these steps: 1. Press the file key for the file number you want to work in. 2. Press ctrl-N. 3. AlphaWord Plus will ask whether you want to keep the existing text in the workspace: • Press Y if you want to save text, then type a name for the text. AlphaWord Plus saves the text as a file with the name you specified, then clears the numbered file so you can begin your new file. • Press N if you don’t want to save the existing text. AlphaWord Plus removes the text so you can begin your new file. Naming and Savi ng Files At any point when you’re working on a file, you can stop and name it. This will make the file available to open even if you no longer have it in one of the eight active files associated with the file keys. Teach students to save their files when they begin an assignment to ensure that they can retrieve the files even if they clear a file space. It’s also helpful to teach students to put an automatic heading on every document they create. NEO 1 and NEO 2 User Manual The file will still be in the location where you’re working, but it will also be available to open again later if you don’t have it in one of the eight active files. (See the next section.) Follow these steps to name a file and save it outside the eight active files: 1. From within the file you want to name, press ctrl-S. 2. Type a name for the file and press enter. You don’t need to worry about saving the file again—it will save any additional changes to your text until you close the file by clearing it or creating a new one. 31 ..... WRITING ON NEO USING ALPHAWORD PLUS Managing Files in AlphaWord Plus Fi nding and Opening Files To open a file that you know is in one of the eight active files, press the appropriate file key. If you don’t know where the file is, you can find the file by its first line or name. Follow these steps: It’s a good idea to choose an empty file space or one that contains a named file. If you have text in the file and you haven’t named it, you will be given the chance to name it. 1. Press one of the eight file keys to choose which file space you want to use. 2. Press ctrl-F to see a list that includes the first line of each file on the NEO as shown below—both the numbered files and named files that aren’t open in files 1–8. If you prefer to see files by name, press ctrl-O to see a list of file names. 3. Use the arrow keys to move the cursor next to the file you want to open; then, press enter. 4. Most of the time, the file you chose will open immediately. If the NEO asks you to press enter to open the file in another file number, it’s because the file you chose is already open in that file number. This prevents you from working on the same file in more than one location. By naming the file, you’re making sure you can open it again later. Named files that aren’t open are listed when you press ctrl-F or ctrl-O. 32 If the NEO asks if you want to keep the current file, it’s because the file you chose in step 1 already has text in it, and that file hasn’t been named. If you want to use that file again, press Y and enter a name so you’ll be able to select it later; after you do that, the new file you chose will open. If you don’t want to name the current file, press N to discard it and open the new one you’ve chosen. NEO 1 and NEO 2 User Manual Formatting Text ..... WRITING ON NEO USING ALPHAWORD PLUS Formatting Text NEO lets you concentrate on the content of your text rather than its layout. Formatting—such as margins, fonts, and style attributes—are more conveniently performed on your computer (with its larger screen and mouse) after you transfer text from your NEO. Only the characters themselves (ASCII key codes) are transferred from NEO to the computer. You can, however, change the size of the screen font on your NEO. See “Changing Font Size” below for details. Using Tabs You can use press the tab key to create columns or paragraph indents in your file. If you have Show Marks on, tabs look like this: tabs look like spaces between characters. . If Show Marks is not on, Changing Font Size Available Font Si zes You can change the font size that is used on your screen when you work in AlphaWord Plus or AlphaQuiz 3.1. The font change does not affect other SmartApplets. AlphaQuiz 3.1 does not support the Very Large or Extra Large fonts. Changing the font doesn’t add any attributes to the text, so when you send text to your computer or printer, the text itself is plain text and uses your default font or the font you’ve chosen in your computer program. Six font sizes are available: • System (four lines per screen using a fixed-width font) • Small (six lines per screen) • Medium (five lines per screen) • Large (four lines per screen with a proportional font) • Very large (three lines per screen) • Extra large (two lines per screen) When you change the font size, that change applies to all files in AlphaWord Plus. You can’t set different font sizes for different files. If, for some reason, NEO 1 and NEO 2 User Manual 33 ..... WRITING ON NEO USING ALPHAWORD PLUS Changing Font Size some of the font sizes are removed from your NEO (using AlphaSmart Manager), AlphaWord Plus goes back to the four-line system font. The illustrations below show examples of the font sizes. Extra large (two lines) Very large (three lines) Large (four lines) Medium (five lines) Small (six lines) You can set the font size in one of three ways: • By using a keyboard command as described below. • Through the Control Panel SmartApplet (see the instructions below and “Changing Settings in the Control Panel” on page 69). • Through AlphaSmart Manager. Note, however, that AlphaSmart Manager can only reset the font size to the system font (four lines onscreen). See page 110. How t o Change the Font Si ze 1. Do one of the following: 34 • Press ctrl-option--F. • Press applets, move the cursor next to Control Panel, and press enter. Then, scroll down to Change default SmartApplet font and press enter. NEO 1 and NEO 2 User Manual Changing Font Size ..... WRITING ON NEO USING ALPHAWORD PLUS 2. Scroll to select the font size you want to use, then press enter. (The current size has “+” next to it.) If you changed the font size with the keyboard command, you go back to the file where you were working. If you used Control Panel, you’re returned to the list of settings; to see the new font size, press applets, then select AlphaWord Plus. How the Syst em Font Di ffers from the Large Font Although both are four-line fonts, the four-line system font is a fixed-width or monospace font, and the four-line large font is a proportional font. In fixed-width fonts like the system font, every character and space occupies the exact same width. In proportionally spaced fonts like the large font, each character occupies only the space it needs to display that particular character. So, for example, an m character takes up more space than an i character. This example shows the difference between the two fonts. Note the different widths of the words “William,” “ill,” and “lollipop” in each illustration. Large four-line font (proportional) System four-line font (fixed width) NEO 1 and NEO 2 User Manual 35 ..... WRITING ON NEO USING ALPHAWORD PLUS Finding Text in AlphaWord Plus Files Finding Text in AlphaWord Plus Files There are a few ways to find text within AlphaWord Plus: • You can search for a text string within a file or across all files. See the instructions below. • You can search and replace text within a file (see page 37). • You can view a list of sections in a particular file. Sections are separated by paragraph returns, and the section selector displays the first line of each paragraph. See page 38. Searching f or Text In AlphaWord Plus, you can search for text within the current file or within all files. To search for text, follow these steps: 1. Press find or -F. 2. Type the text you want to find. (If you’ve searched for text before, press clear file to remove that text before typing the new text you want to find.) You can enter up to 100 characters, including spaces. Note that this type of search is not case-sensitive, but if you choose to find and replace (see page 37), you can make that search case-sensitive. 3. Do one of the following: • Press enter to search within the current file. • Press option-enter to search within all files. (You can’t search all files if password protection is enabled on your NEO; see page 80.) • To exit the Find screen without searching, press esc. If the text string is found, the cursor appears at the beginning of the string. If NEO can’t find the text you entered, you will see a brief message to tell you that the text is not found. If the text is found in another file, you’ll be asked enter to open the file. 4. To find the same text again, press -G. 36 NEO 1 and NEO 2 User Manual Finding Text in AlphaWord Plus Files ..... WRITING ON NEO USING ALPHAWORD PLUS Fi nding and Replacing Text Follow these steps to search and replace in the file you have open. (You can’t search and replace in all files at the same time.) 1. Press ctrl-find. The Find/Replace screen appears. You can use the clipboard to paste text into both the Find and Replace With fields. 2. Type the text you want to find in the Find field, then press tab or to move to the Replace field. (If you searched for and replaced text before, press clear file in each field to remove your earlier text entries.) You can search for up to 100 characters, including spaces. 3. Type the replacement text. 4. Press tab or , then or to move between options for the search (whole word, match case, and replace all). Press the spacebar to enable or disable each option. When the option is selected, you’ll see * between the parentheses next to that option. • Whole word searches for complete words only. If you don’t select this option, NEO searches for characters that may be part of a longer word or part of more than one word (for example, searching for hat would find that, chat, and hatchet). • Match case finds text that exactly matches the capitalization of the text you typed in the Find field. • Replace all specifies that you want to replace all occurrences within the file. 5. Press enter to begin the search. When AlphaWord Plus finds the text, it will show you the first occurrence with options listed to the right as in the example below. NEO 1 and NEO 2 User Manual 37 ..... WRITING ON NEO USING ALPHAWORD PLUS Finding Text in AlphaWord Plus Files 6. Do one of the following: • Type R to replace the found text with the replacement text. • Type S to skip that occurrence of the found text and leave it as is. • Press the arrow keys to scroll through the surrounding text so you can see the found text in the context of nearby text. • Press esc to exit without finding or replacing this or any other text. Fi nding Sections of a File In AlphaWord Plus, a “section” is a block of text separated by as few as one or as many as nine blank lines. In longer files, it is helpful to go straight to one of these sections instead of scrolling through the files. To do this, follow these steps: 1. Press -S. A list of sections in your file appears. 2. The number in the top right corner of the screen shows how many blank lines AlphaWord Plus expects to see between sections A. If you have more or fewer blank lines between sections in this document, type the number you have used (any number from 1 to 9). When AlphaWord Plus asks if you want to change the section separator, press Y for yes. A 3. Use the arrow keys to move the cursor next to the section you want; then, press enter to move to the beginning of the section you chose. An Example of How Sections Work in AlphaWord Plus In the example on the next page, the user typed two blank lines between sections of the document about bears. For this document, when you are looking for a section, you would press -S to see a list of sections and press 2 to change the number of blank lines between sections to two. You would then see a list like the one shown. 38 NEO 1 and NEO 2 User Manual Checking Spelling ..... WRITING ON NEO USING ALPHAWORD PLUS An example of how you might format your file in AlphaWord Plus How sections might appear when blank lines are set to two Checking Spelling Follow these steps to check spelling in an AlphaWord Plus file. You can disable spell check. See page 41. NEO 1 and NEO 2 User Manual 1. Open the file that you want to check. 2. Press spell check. Spell check begins checking each word in your file. If it finds a word that doesn’t exist in its dictionary, a suggestion screen appears, as in the example shown here (which found the word “runn” in the file). 39 ..... WRITING ON NEO USING ALPHAWORD PLUS Checking Spelling 3. Do one of the following: The ability to add words to the user dictionary can be disabled by changing the spell check settings in the NEO Control Panel (see page 70) or in AlphaSmart Manager (see page 116). • Use the arrow keys to select the correct word from the list of suggested spellings and press enter. • Press i to ignore the word and go on to check the next word, or press ctrl-i to ignore all occurrences of this word. • Press E to edit the word. Then, after “New,” type the new word you want and press enter to make the change. • Press C to see the word in context. You can’t make changes to the misspelled word while viewing it in context. To go back, press any key. • Press A to add the word to the user dictionary so that AlphaWord Plus does not question the spelling of the word in the future. When the program tells you the word has been added, press any key. • Press esc to exit spell check. If you haven’t exited spell check by pressing esc, when it finishes checking your file, it notifies you that the spell check is complete and returns you to your file. Spell Check Tips Use these tips to streamline your spell checks: You can create your own custom user dictionary for AlphaWord Plus so that the spell check does not question unusual words that you use often. See “User Dictionary” on page 41 for details. 40 • You can spell check part of a file by selecting the text and pressing ctrl-spell check. • You can have spell check replace all occurrences of a word you frequently misspell with the correct spelling. For example, if you routinely type teh for the, when spell check catches this mistake in one place, press ctrl-enter to replace all instances of teh with the in your file. NEO 1 and NEO 2 User Manual Checking Spelling ..... WRITING ON NEO USING ALPHAWORD PLUS Turning Off Spell Check There may be times when you want to turn off the spell check feature. For example, if students use NEO for spelling assignments, you may not want them to be able to spell check their work. There are three ways to turn off spell check or turn it back on: You can set the master password using AlphaSmart Manager. For more information, see page 119. • You can press option--spell check on a NEO and enter the master password. • You can use the Control Panel SmartApplet on the NEO (page 69). • From AlphaSmart Manager, you can disable spell check for all connected NEOs (page 114). For the first two methods, you’ll need to enter a master password. For information on master passwords, see “The Three Passwords Used with NEOs” on page 79. User Dictionary If you have a list of custom words that regularly trip up your spell checks— such as scientific terms, proper names, or acronyms—you can add them to the AlphaWord Plus dictionary so that spell check doesn’t question them in the future. There are three ways to add words to the user dictionary: • During the spell check, you can press A for “add” when spell check questions the word. • You can change the Spell Check Settings in the Control Panel (see page 69). Using this method, you can add words to the user dictionary or delete the user dictionary. (You can also turn off the ability to add words to the dictionary.) • You can create a text file on your computer that contains the words to be added, and then you can send it to your NEO(s) using AlphaSmart Manager. See page 122. The AlphaSmart Manager method is the most efficient because it allows you to update more than one NEO at the same time. If you use this method, you can also add several words to the NEO’s user dictionary at once, and you can delete individual words from the user dictionary. (You can’t delete words using the other methods.) Whenever you make updates to your text file, simply use AlphaSmart Manager to send the file again, and the existing user dictionary on the NEO(s) will be overwritten. To find out how to use AlphaSmart Manager to send a user dictionary to NEO(s), see page 122. NEO 1 and NEO 2 User Manual 41 ..... WRITING ON NEO USING ALPHAWORD PLUS Using the Thesaurus Using the Thesaurus Keeping writing lively and interesting can be a challenge, but a thesaurus can help. AlphaWord Plus on NEO comes with a thesaurus that you can use to look up a word and select a synonym or antonym to replace it. To use the thesaurus, follow these steps: 1. In your file, move your cursor so it is either just before the word you want to look up or inside the word. (You can skip this step if you want to look up a word that isn’t in your text.) 2. Press ctrl-T to open the thesaurus. If you moved the cursor next to a word, it will be shown between the brackets A 3. If there is no word in the brackets, or if you want to look up a different word, type the word you want to look up A. (If you need to delete text that is already between the brackets, press clear file.) 4. Press enter. 5. If the word was found, you will be asked to pick a category (or part of speech) as shown below. Use the arrow keys to move the cursor next to a category and press enter. (If the word could not be found in the thesaurus, you can press enter to look up a different word or esc to exit.) 42 NEO 1 and NEO 2 User Manual Using the Thesaurus ..... WRITING ON NEO USING ALPHAWORD PLUS 6. Next, some synonyms for the word will be listed. You can do any of the following: • If you see a word that you want to use, move the cursor next to it and press enter. • If you want to look up additional words, press L. • If you want to see antonyms (words with the opposite meaning), press A. • If you want to go back and choose a different category, press C. • If you want to leave the thesaurus without doing anything, press esc. 7. If you chose to replace the word, move the cursor to choose one of these options and press enter: • Replace the original word in your file. • Copy the word you chose to the clipboard so you can paste it elsewhere. • Do a new search in the thesaurus for the word you selected. Depending on what you choose, you’re either returned to your file or to the thesaurus. Spanish-English Word Lookup You can replace NEO’s thesaurus with a Spanish-English word lookup utility. The word lookup operates the same as the thesaurus, but you type in Spanish words to find their English equivalents. Note: You can’t have both the English thesaurus and the Spanish-English word lookup installed on a NEO. You must choose one. If you decide to replace the thesaurus on your NEO with the Spanish-English word lookup, you can use AlphaSmart Manager to do this. See page 123 for details. Once you’ve installed the word lookup, follow the steps on the next page to type a Spanish word and find its English equivalent. NEO 1 and NEO 2 User Manual 43 ..... WRITING ON NEO USING ALPHAWORD PLUS Using the Thesaurus 1. In AlphaWord Plus, press ctrl-T. The word lookup (labeled Thesaurus) appears. 2. Type the Spanish word you want to look up and press enter. 3. Use the arrow keys to select the category of words you want to look up and press enter. 4. Use the arrow keys to select the English word you want to use and press enter. (If you don’t see the word you want, you can press L to look up additional words or C to return to the category list.) 5. Use the arrow keys to select whether to place the word in the file, copy it to the clipboard, or begin a new lookup search; then, press enter. 44 NEO 1 and NEO 2 User Manual Using Linked Files ..... WRITING ON NEO USING ALPHAWORD PLUS Using Linked Files AlphaWord Plus supports linked files, that is, files that you connect to AlphaWord Plus files. A linked file is a place to store additional information related to a file. For example, you could create a linked file that outlines the writing you plan to do, displays a checklist of tasks to accomplish, stores vocabulary words, or contains rubric information. Teachers can use them to include guidelines for writing assignments. A linked file is read-only. You can’t create or edit linked files in AlphaWord Plus. You create them on your computer, enclosing the text within special tags, and send them to AlphaWord Plus using AlphaSmart Manager (see page 46) or Get Utility. On your NEO, you can press ctrl-L to go back and forth between the file you can write in and the linked file. Here’s an example of a simple linked file that lists vocabulary words: Linked file source in AlphaSmart Manager Linked file on NEO AlphaWord Plus file on NEO NEO 1 and NEO 2 User Manual 45 ..... WRITING ON NEO USING ALPHAWORD PLUS Using Linked Files How t o Send a Li nked Fi le t o Your NEO(s) 1. Start AlphaSmart Manager on your computer and connect your NEO. 2. Click the AlphaWord Files to Send tab. 3. In the file list on the left, click the file number that you want to send to on the NEO(s) A. You can also click the Linked Files button, type the text for the linked file in the <form> tags that have been entered for you in the new window, and then click OK to come back to the main window. See page 97. A B 4. In the File # window B, type the text for the linked file. All text that should be in the linked file should be inside <FORM> and </FORM> tags as shown above. If you want to send any text for the main AlphaWord Plus file (not the linked file), insert it before or after the <FORM> tags. In your linked file, you can use the tags below to insert check boxes, specify a preformatted section, and control line breaks. The tags in the table are similar to HTML tags. Most have a beginning tag enclosed in angle brackets (<tag>) and an end tag enclosed in angle brackets with a forward slash (</tag>). Tag 46 Description <FORM> Begin a linked file. </FORM> End a linked file. [] or [ ] Insert a check box. <PRE> Begin a preformatted section (use this when you want to precisely control line breaks). </PRE> End a preformatted section. <NOBR> Begin no break text (use this to keep the text that follows on a single line, if possible). NEO 1 and NEO 2 User Manual Using Linked Files Tag If you want to send the file to some NEOs, but not others, click Select Devices and check the NEOs that should get the file before you send it. ..... WRITING ON NEO USING ALPHAWORD PLUS Description </NOBR> End of no break text. <BR> Insert a hard return. 5. Click the Send List tab to verify that the linked file and any other text appears as you want it C, then click Send to send the linked file and any other associated text to your NEO(s). C How t o View a Linked File on Your NEO 1. On your NEO, press the file number key for the file that has a linked file. 2. Press ctrl-L. The linked file appears. When viewing a linked file, you can check boxes by pressing the spacebar or X, and you can clear them by pressing the spacebar or backspace. Move forward through check boxes by pressing tab; move backward by pressing shift-tab. If a linked file is long, you can use the arrow keys to scroll through it. 3. To return to the main file, press ctrl-L again or press the file key. Ti ps for Using Linked Files • If you send a file from NEO to your computer using send, and that file has a linked file associated with it, the text of the linked file is also sent. The main file is sent first; then, the linked file is sent with the form tags. • You can print just linked file text. Simply press ctrl-L to view your linked file, then press print on your NEO. Whatever is onscreen when you press NEO 1 and NEO 2 User Manual 47 ..... WRITING ON NEO USING ALPHAWORD PLUS Using Linked Files print—the text of a main file or the linked file text—is what is sent to your printer. • You can copy the text of a linked file and paste it into the main file or into another file. To do so, view the linked file by pressing ctrl-L, then press shift-ctrl--C. The linked file is copied to the clipboard. Next, press ctrl-L to return to the main file, or press one of the file keys for a different file. Then, press ctrl-V to paste the text. • You can type the linked file tags and text you want to use for a linked file in AlphaWord Plus, then beam it over to another NEO using the Beamer SmartApplet. The receiving NEO accepts it as a linked file. (To beam files, see page 13.) A Sample Linked File Below is a sample of a complex linked file, shown as you’d create it on your computer and how it appears on a NEO. An example of a linked file you might create on your computer Editable text that appears in the main file Text and check boxes that appear in the linked file 48 Story Starter The assignment is to write a story. Every story has four parts: a setting, characters, a plot, and a solution. Press ctrl-L to view the steps to complete. Write your story in the first person and begin with one of the phrases below. I never noticed... I remember... I felt... I saw... <FORM> Complete each step: <br> [ ] Choose a setting [ ] Choose characters [ ] Choose a plot [ ] Choose a solution </FORM> Line break NEO 1 and NEO 2 User Manual Character, Word, Paragraph, and Page Counts Complete each step: [ [ [ [ ] ] ] ] Choose Choose Choose Choose a setting characters a plot a solution Viewing the linked file on a NEO... ..... WRITING ON NEO USING ALPHAWORD PLUS Story Starter The assignment is to write a story. Every story has four parts: a setting, characters, a plot, and a solution. Press ctrl-L to view the steps to complete. Write your story in the first person and begin with one of the phrases below. I I I I never noticed... remember... felt... saw... ... and the connected AlphaWord Plus file Character, Word, Paragraph, and Page Counts In AlphaWord Plus, you can follow these steps to find out how many characters, words, paragraphs, and pages are in your current file. 1. Make sure you’re working in the file for which you need the information. The percentage and the black bar at the bottom show how much more you can enter before reaching the limit for the file. For another way to see the space remaining, see page 50. NEO 1 and NEO 2 User Manual 2. Press ctrl-W. The following screen appears, displaying statistics for your particular file. 49 ..... WRITING ON NEO USING ALPHAWORD PLUS File Size Limits 3. Press M to view additional statistics. You’ll need to scroll to view all the information. 4. Press esc to exit the screen and return to your file. File Size Limits AlphaWord Plus has minimum and maximum file size limits. The default maximum file size limit is 51,200 characters (about 25 pages). The default minimum file size is 512 characters (about a quarter of a page.) You can change these limits using AlphaSmart Manager; see page 115 for more information. Important: The amount of space available for AlphaWord Plus files is affected by the size of data files for other SmartApplets you might be using. For example, if you have the AlphaQuiz SmartApplet, which needs to reserve space for quizzes, less space will be available for AlphaWord Plus files. 50 NEO 1 and NEO 2 User Manual File Size Limits ..... WRITING ON NEO USING ALPHAWORD PLUS Reaching the Size Limit for a File When an AlphaWord Plus file reaches the limit, the message shown below appears. To continue working, you should continue in another file or send this one to your computer as recommended. Checking the File Si ze and the Number of Pages Available You can see the file size as a percentage of the limit when you view the character, word, paragraph, and page counts. See page 49. You can check how many pages you’ve written in the file you’re working on and how much space you have left in that particular file. Follow these steps to see the information: 1. Press -i. The File Status screen appears. This screen shows the pages used and available for this file and for all files (System). 2. When you’ve finished, press any key to exit the screen. If you want to see the number of pages you’ve written for all files on your NEO, follow these steps: 1. Press shift--i. The screen that opens shows you the number of pages you’ve written in each file. The current file is marked with *. 2. Press any key to exit the screen. NEO 1 and NEO 2 User Manual 51 ..... WRITING ON NEO USING ALPHAWORD PLUS Clearing and Deleting Files Clearing and Deleting Files Clear all files off NEOs on a regular basis (perhaps once a quarter) to prevent too many files from being stored on the school NEOs. The text that you type in each file remains there until you clear or delete the files. There is a difference between what happens when you clear a file and what happens when you delete it: • Clearing a file removes the contents of an unnamed numbered file (1–8). If the file is named (see page 31), clearing the file closes it. If you clear an unnamed file, you can recover the text if you haven’t entered new text yet; see “Recovering Data” on page 55. • Deleting a file completely removes both the contents of the numbered file and the named file (if the file is named), and you can’t recover any of the data. If the file has a linked file, the linked file is deleted as well. The table below summarizes what happens when you clear or delete each type of file: File Type Clear File Unnamed text in a numbered file (1–8) • Clears text (which you can still recover) • Leaves you in the empty, active file • Deletes text (no recovery) • Leaves you in the empty, active file Named text in a numbered file (1–8) • Closes the file so it is no longer open in the numbered file space (however, you can still open the named file in any of the eight active files) • Leaves you in the empty, active file • Deletes the file and its name • Leaves you in the empty, active file Named file that isn’t in one of the eight numbered files • Clears text (which you can still recover) • Keeps file name, resulting in an empty named file • Deletes the file and its name • Returns you to the numbered file you were using before (which might or might not contain text) • Clears the unnamed text (which you can still recover) • Keeps linked file text intact and clears check boxes • Leaves you in the empty, active file (with linked file available) • Deletes the unnamed text (no recovery) and the linked file • Leaves you in the empty, active file (use ctrl-F to view) Unnamed file with a linked file in a one of the numbered files (1–8) 52 Delete File NEO 1 and NEO 2 User Manual Clearing and Deleting Files File Type (Continued) Clear File Named text and linked file in a one of the numbered files (1–8) • Closes file and lets you choose whether to: – Create new text in the file space without a linked file – Create new text, keep linked file text intact, and clear check boxes • Leaves you in the active file space • Deletes the file, its name, and its linked file • Leaves you in the empty, active file Named text and linked file not in one of the numbered files (1–8) • Clears text in the main file (which you can still recover) • Keeps file name • Keeps linked file text intact and clears check boxes • Deletes the file, its name, and its linked file • Returns you to the File Selector Clear All Numbered Files: • See other cells in this table for descriptions of how the command deals with each file type • Leaves you in the empty, active numbered file space Delete All Files: • Deletes all text, named files, and linked files from the device • All numbered files (1–8) are empty • Leaves you in the empty, active file (use ctrl-F to view) Mixed group of files ..... WRITING ON NEO USING ALPHAWORD PLUS Delete File How t o Clear a File (Remove It s Contents) 1. Press the file key for the file you want to clear to open that file. You can also clear a file from the File Selector by pressing ctrl-F, scrolling to the file you want to clear, and pressing clear file. 2. Press clear file. A prompt appears. 3. Press Y to clear the file if you want to continue. (Otherwise, press N to return to the file.) Note: You can clear files only when your NEO is not connected to your computer. If your NEO is connected to your computer, pressing clear file has no effect. How t o Clear All Numbered Files ( File 1–File 8) You can clear files 1–8 simultaneously, which can be useful if multiple users have entered information on NEO. You can clear files only from the numbered files (either named or unnamed files). Named files that aren’t open in files 1–8 are not affected. Follow these steps to clear files 1–8 at the same time: 1. Press shift-ctrl-option--clear file. NEO 1 and NEO 2 User Manual 53 ..... WRITING ON NEO USING ALPHAWORD PLUS Clearing and Deleting Files 2. Press Y to clear all the files if you want to continue. (If not, press N to return to the last active file.) 3. If you have named files with linked files in files 1–8, for each file, AlphaWord Plus asks whether you want to keep the linked file. Note: If necessary, you can restore these files one at a time using the data recovery feature as long as you haven’t typed new text into the files. To recover files, see page 55. Deleti ng Fil es Deleting a file removes everything: its contents, its name (if it is a named file), and its linked file (if it has one). You can delete a single file, or you can delete all files on the NEO, including named files. You can’t recover data from a file that’s been deleted. How to Delete the Open File You can also delete a file from the File Selector by pressing ctrl-F, scrolling to the file you want to clear, and pressing clear file. 1. Open the file you want to delete. 2. Press option--clear file. 3. Press Y to delete the file permanently if you want to continue. (If not, press N to return to the file.) How to Delete a File from a List of Files 1. From within any file, press ctrl-O. A list of files appears. 2. Move the cursor next to the file you want to delete. 3. Press enter. 4. Press Y to delete the file permanently if you want to continue. (If not, press N to cancel.) NEO returns you to the active file space. How to Delete All Files 1. From within any file, press ctrl-option--clear file. 2. Press Y to permanently delete all the files (including named files not in files 1–8). (If you don’t want to do this, press N to return to the file without deleting files.) 54 NEO 1 and NEO 2 User Manual Recovering Data ..... WRITING ON NEO USING ALPHAWORD PLUS Recovering Data If you clear a file, and you haven’t deleted a file or entered new text in a file, you may be able to recover text you’ve cleared by following these steps: 1. Make sure you’re in the file number that the file you want to recover was open in. The screen appears blank. 2. Press option--R. The file should reappear onscreen. If it doesn’t, you can try an emergency recovery, which may place “garbage” characters in your file that you need to remove. Follow these steps to perform an emergency recovery of the entire file: 1. Make sure you’re in the file number that the file you want to recover was open in. The screen appears blank. 2. Press shift-ctrl-option--R. Your file should reappear, possibly along with a quantity of garbage characters. 3. Scroll to the location where the garbage characters begin and press shiftend to select from the cursor to the end of the file; then, press delete. Using the Typing Timer The Typing Timer is a tool you can use to evaluate typing proficiency. It lets you perform any keyboarding exercise in an AlphaWord Plus file, and when it is stopped, it displays the elapsed time and words per minute (WPM) typed. NEOs also include the KeyWords SmartApplet, which you can use to learn typing skills or to teach your students. For more about this SmartApplet, see the NEO1 and NEO 2 SmartApplet User Manual on our Web site or the Documentation CD for NEO 1 and NEO 2. (UK NEOs include the KAZ SmartApplet instead.) NEO 1 and NEO 2 User Manual You can’t delete characters while using the Typing Timer so you can see any mistakes you made in the text when you finish. Pressing backspace while using the Typing Timer has no effect. (Note that the final WPM result doesn’t subtract for errors made while typing.) You can edit the text you type after turning off the Typing Timer. Follow these steps to use the Typing Timer: 1. Choose where you want to start the typing timer. You can start in an empty file or clear the current file so it is empty. If you want to use a file that already has text in it, place the cursor where you want to start the Typing Timer. 55 ..... WRITING ON NEO USING ALPHAWORD PLUS Using the Typing Timer 2. Press -find. The following message appears. 3. Start typing. The elapsed time appears as you type. 4. Press caps lock to stop. The elapsed time and words per minute appear. 5. If you want to start the timer again, press enter. If you want to exit the timer, press esc. 56 NEO 1 and NEO 2 User Manual S MART A PPLETS Managing SmartApplets What Are Smar tApplet s? SmartApplets are the programs installed on your NEO. AlphaWord Plus—the program you use to write on the NEO—is just one of the available SmartApplets. Installed Smar tAppl et s NEO comes with these SmartApplets installed: SmartApplet NEO 1 and NEO 2 User Manual What to Use It For Responder (NEO 2 only) Use this SmartApplet to use your NEO 2 as you would use a Renaissance Responder. You can use it with the 2Know! Toolbar, AccelTest software, and Accelerated Math RP. You must have a Renaissance Receiver to use NEO 2 as you would use a Responder. AlphaWord Plus Use this SmartApplet to write on your NEO. This SmartApplet opens automatically when you start the NEO unless you have used AlphaSmart Manager to change the startup SmartApplet. Accelerated Reader (NEO 2 only) If you 1) have an active subscription to Accelerated Reader RP 7.5 or higher, 2) have installed AlphaSmart Manager on teacher computers, and 3) have connected Renaissance Receivers to teacher computers, then students can use this SmartApplet on NEO 2 laptops to complete Reading Practice Quizzes, Vocabulary Practice Quizzes, and Other Reading Quizzes. MathFacts in a Flash (NEO 2 only; available spring 2009) If you 1) have an active subscription to MathFacts in a Flash RP 3.1 or higher, 2) have installed AlphaSmart Manager on teacher computers, and 3) have connected Renaissance Receivers to teacher computers, then students can use this SmartApplet on NEO 2 laptops to complete MathFacts in a Flash work. 57 ..... SMARTAPPLETS Managing SmartApplets SmartApplet What to Use It For KeyWords (US) or KAZ (UK) Use this to learn keyboarding or to teach it to your students. Beamer Use this to use the infrared (IR) port to send (or beam) files to another NEO or to receive files from another NEO. Control Panel Use this to change settings for the NEO itself or for individual SmartApplets. AlphaQuiz Use this SmartApplet to administer quizzes to students on the NEO. On your computer, you’ll need to install QuizDesigner and QuizManager. QuizDesigner allows you to create the quizzes, and QuizManager allows you to send the quizzes to NEOs and retrieve student responses. You can download the programs from our Web site or install them from the AlphaSmart Manager CD’s AlphaQuiz folder if you received a CD. Calculator Use this to perform mathematical calculations. AlphaQuiz is installed on new NEO 1 laptops, but not new NEO 2 laptops. However, you can install it on NEO 2 laptops using AlphaSmart Manager. To see a list of the installed SmartApplets, press applets. To choose the one you want to use, press the arrow keys to move the cursor next to that SmartApplet; then, press enter. An additional SmartApplet, Co:Writer, is available from Don Johnston, Inc. If you purchase this SmartApplet and it was not already installed when you received your NEOs, be sure to follow the installation instructions provided by Don Johnston, Inc. How to Use Your Smar tApplets The previous chapter explains how to use AlphaWord Plus. You’ll find basic instructions for using the other standard SmartApplets in the Quick Guide for your NEO 1 or NEO 2. For more detailed information, refer to the NEO 1 and NEO 2 SmartApplet User Manual that is on our Web site or the Documentation CD for NEO 1 and NEO 2. 58 NEO 1 and NEO 2 User Manual ..... S MARTAPPLETS Managing SmartApplets Managing the SmartApplets on Your NEO The easiest way to manage SmartApplets is to use AlphaSmart Manager. In AlphaSmart Manager, you can do the following: • Install new or updated SmartApplets on the connected NEOs (see page 105). • Remove SmartApplets from the connected NEOs (see page 108). • Change the startup SmartApplet (the one that starts automatically when you start a NEO). See page 113. • Disable SmartApplets on your NEOs (see page 114). • Change SmartApplet settings on NEOs (see page 113). You can also perform some of these tasks on the NEO itself. For example, from the SmartApplets menu, you can quickly change the SmartApplet that starts when you start the NEO as described below, and you can disable SmartApplets (see page 60). How t o Change the Startup Smart Applet from the Smar tAppl et s Menu 1. Press applets. If you don’t set a startup SmartApplet, when you turn on your NEO, it goes to the SmartApplets list, with the cursor next to the SmartApplet you were working in when you turned the NEO off. 2. Use the arrow keys to move the cursor next to the SmartApplet that you want to start when you turn on your NEO. 3. Press ctrl-applets. An asterisk designating the startup SmartApplet appears in the menu. Repeat the steps to turn the setting off. NEO 1 and NEO 2 User Manual 59 ..... SMARTAPPLETS Managing SmartApplets How t o Disable a SmartApplet from t he SmartAppl ets Menu Follow the steps below to disable a SmartApplet on the NEO. You can also disable SmartApplets using AlphaSmart Manager; see page 114. 1. Press applets. 2. Move the cursor next to the SmartApplet you want to disable. You need the master password to disable SmartApplets. You can use AlphaSmart Manager to set this password (see page 119) or contact Technical Support to get the default master password. 60 3. Press ctrl--L. 4. Enter the master password (see page 119) and press enter. The symbol appears next to the SmartApplet to show it has been disabled. Repeats these steps to enable the SmartApplet. If you want to disable the Calculator SmartApplet, from within AlphaWord Plus, you can press ctrl--C and then enter the master password. NEO 1 and NEO 2 User Manual U SING THE R ESPONDER S MART A PPLET ON NEO 2 NEO 2 includes a Responder SmartApplet that lets you use your NEO 2 laptop as you would use a Renaissance Responder. Students can use NEO 2 to complete assignments for Accelerated Math RP and AccelTest software. You can also use NEO 2 with the 2Know! Toolbar. Important: You can’t use NEO 2 with more than one program at a time. If you have both AccelTest and Accelerated Math RP, or if you have the 2Know! Toolbar and one of these programs, you should only have one of the three programs open at a time. Preparing to Use NEO 2 with AccelTest, Accelerat ed Math RP, or t he 2Know! Toolbar Make sure you have done the following before you use NEO 2 with any of these programs: • Connect the Renaissance Receiver to your computer and assign a unique name to the Receiver (see page 24). • Install AlphaSmart Manager on your computer using the CD that came with your NEO 2 or the files you downloaded (see page 19). This is necessary because AlphaSmart Manager updates the Renaissance Wireless Server Utility, which helps NEO 2 communicate with the software. U s in g N EO 2 t o C o m p l e t e A c c e l T e s t A s s i g n m e n t s NEO 2 does not support the homework and notes features in AccelTest, though you can use those features with Renaissance Responders. Also, NEO 2 laptops do not support assigned owners. NEO 1 and NEO 2 User Manual If you ordered a SmartOption Mobile Lab, you received AccelTest software with your NEO 2 laptops. In AccelTest, when you choose “Responder” as the scoring method for assignments, students can use their NEO 2 laptops to complete assignments instead of using Responders. When you choose “NEO 2 Only” as the scoring method, only NEO 2 laptops can be used. Students can use NEO 2 to complete in-class assignments, but not homework. 61 ..... USING THE RESPONDER SMARTAPPLET ON NEO 2 Using NEO 2 to Complete AccelTest Assignments Using NEO 2 in a Student -Paced Session in AccelTest Student-paced sessions allow students to work on anything that has been assigned to them in the AccelTest class Gradebook except for Homework. Students can complete these assignments without needing the teacher to lead the session or send the questions one by one. The instructions below explain what teachers and students need to do in order to use NEO 2 during a student-paced session. Teacher Preparation Steps 1. Make sure your Renaissance Receiver is connected to your computer and that the computer is on. 2. Click the AccelTest Responder menu and choose Start Student-Paced Session. 3. Make sure students have their student IDs from the AccelTest Gradebook. (IDs are also available in the AccelTest Student ID Report.) Since NEO 2 laptops don’t have assigned owners, the student ID is always used to identify the student for assignments. Steps Students Follow during a Student-Paced Session 1. Press on/off to turn NEO 2 on. 2. Press applets. 3. Make sure the cursor is next to Responder; then, press enter. 4. NEO 2 will attempt to join the session. If you have connected to a Renaissance Receiver before, it will ask if you want to stay connected to it; press Y for yes or N for no. Then, press enter. If there are several Receivers available, but not all of them are listed, select More. If you haven’t connected to a Renaissance Receiver before, NEO 2 will show you a list of networks (Renaissance Receivers). Use the arrow keys to highlight the one you want to connect to; then, press enter. 5. Type your AccelTest student ID and press enter. 6. If you have only one assignment available, the program will ask if you are ready to work on the assignment. Press Y for yes to continue; then, press enter. If you have more than one assignment, the program will ask which one you want to work on. It will list the assignments you have with a letter before each assignment name. Press the letter for the assignment you want; then, press enter. 62 NEO 1 and NEO 2 User Manual Using NEO 2 to Complete AccelTest Assignments You may see “Sending” when you enter the answer to each question. ..... USING THE RESPONDER SMARTAPPLET ON NEO 2 7. NEO 2 will show you the first question in the assignment. Choose an answer for each question; then, press enter: • For multiple-choice questions, press the letter next to the answer you want to choose. • For true-false questions, press T for true or F for false. • For yes/no questions, press Y for yes or N for no. • For questions that ask you to enter a number, type the number and press enter. • For short-answer questions, type the answer and press enter. Note: If the assignment is printed, it may include some questions that you can’t answer on NEO 2, such as essay questions; answer these questions on paper. You can answer the questions in order or use these commands to go back or to go to a specific question: To do this... Scroll through a question. ...press these keys: Press and . Go forward or back one question. Press -?. Arrows ( ) will appear to the right of the question number. As long as you see those arrows, you can press to go back one question or to go forward one question. Press -? again when you want the arrow keys to scroll through the question instead. Go to a specific question number. Press find, type the question number, and press enter. Go to the end of the question. Go to the beginning of the question. Press -. Press -. 8. When you’ve answered all the questions, the program will ask if you are ready to submit your work. If you are, press Y for yes and press enter. When the assignment is complete, your score may be shown; if so, press any key when you are ready to leave that screen. The NEO 2 will go back to the SmartApplets list. If you want to work on another assignment, press enter to choose the Responder SmartApplet again and repeat these steps. If you are not ready, press N for no and press enter. You will go back to question one, and you can go through each question again to check your answers. NEO 1 and NEO 2 User Manual 63 ..... USING THE RESPONDER SMARTAPPLET ON NEO 2 Using NEO 2 to Complete AccelTest Assignments Using NEO 2 in a Teacher-Paced Session in AccelTest In AccelTest, teachers use teacher-paced sessions when they want to ask questions of the entire class and have the class answer the questions at the same time. The instructions below explain how to use NEO 2 during a teacher-paced session. Teacher Preparation Steps 1. Make sure your Renaissance Receiver is connected to your computer and that the computer is on. 2. Click the AccelTest Responder menu and choose Start Teacher-Paced Session. The steps that you follow next depend on the options you choose in the Responder Session Wizard. For detailed instructions for setting up the session and asking the questions during the session, refer to the user manual that was installed with your AccelTest software. Steps Students Follow during a Teacher-Paced Session 1. Press on/off to turn NEO 2 on. 2. Press applets. 3. Once the teacher has started the session, make sure the cursor is next to Responder; then, press enter. 4. NEO 2 will attempt to join the session. If you have connected to a Renaissance Receiver before, it will ask if you want to stay connected to it; press Y for yes or N for no. Then, press enter. If you haven’t connected to a Renaissance Receiver before, NEO 2 will show you a list of networks (Renaissance Receivers). Use the arrow keys to highlight the one you want to connect to; then, press enter. (If there are several Receivers and not all are listed, select More.) 5. Type your AccelTest student ID and press enter. For some types of teacher-paced sessions, you’ll see the question on the NEO 2 screen. For others, you will only see your answer choices (not the possible answers). 64 6. When the teacher tells you to do so, press enter. Then, choose an answer for the first question: • For multiple-choice questions, press the letter next to the answer you want to choose and press enter. • For true-false questions, press T for true or F for false and press enter. • For yes/no questions, press Y for yes or N for no and press enter. • For questions that ask you to enter a number, type the number and press enter. • For short-answer questions, type the answer and press enter. NEO 1 and NEO 2 User Manual Using NEO 2 to Complete Accelerated Math Assignments ..... USING THE RESPONDER SMARTAPPLET ON NEO 2 After you press enter, a message will tell you that your answer has been recorded. Repeat this step for each question in the session. 7. When the teacher ends the session, the teacher will ask you to press enter again. The NEO 2 will tell you that there is no session. Leave N selected and press enter. U s i n g N E O 2 t o C o m p l e t e Ac c e l e r a t e d M a t h A s s i g n m e n t s If you are using Accelerated Math RP, your students can use NEO 2 to complete assisted-response (multiple-choice) assignments, but not for freeresponse assignments or extended-response assignments. For each class, the teacher uses the Accelerated Math RP Scoring preference to determine whether students can use Responders (and therefore NEO 2) with exercises or tests. Before you can use NEO 2 with Accelerated Math RP, you must have a Renaissance Receiver connected to your computer (see page 24) and you must have the Renaissance Responder client program installed (see the Accelerated Math RP Software Manual). Teacher Preparation Steps 1. Make sure your students have printed copies of their assignments. 2. Start the Renaissance Responder program and log in with your Accelerated Math RP user name and password. (To install the program and connect it to your Renaissance Place server, see the Accelerated Math RP Software Manual.) Steps Students Follow to Complete Accelerated Math Assignments 1. Press on/off to turn NEO 2 on. 2. Press applets. 3. Make sure the cursor is next to Responder; then, press enter. 4. NEO 2 will attempt to join the session. If you have connected to a Renaissance Receiver before, it will ask if you want to stay connected to it; press Y for yes or N for no. Then, press enter. If there are several Receivers and not all are listed, select More. NEO 1 and NEO 2 User Manual If you haven’t connected to a Renaissance Receiver before, NEO 2 will show you a list of networks (Renaissance Receivers). Use the arrow keys to highlight the one you want to connect to; then, press enter. 65 ..... USING THE RESPONDER SMARTAPPLET ON NEO 2 Using NEO 2 to Complete Accelerated Math Assignments 5. Enter the form number printed at the top of the assignment. Then, press enter. 6. If the NEO 2 tells you to wait until your assignment is retrieved, press enter again. 7. When the NEO 2 shows your name and form number, press Y for yes if this information is correct; then, press enter. (If not, press N for no and enter the form number again.) 8. Press the letter keys (A, B, C, or D) to enter your answer to each question. Then, press enter. You can answer the questions in order or use these commands to go back or to go to a specific question: To do this... Scroll through a question. ...press these keys: Press and . Go forward or back one question. Press -?. Arrows ( ) will appear to the right of the question number. As long as you see those arrows, you can press to go back one question or to go forward one question. Press -? again when you want the arrow keys to scroll through the question instead. Go to a specific question number. Press find, type the question number, and press enter. Go to the end of the question. Go to the beginning of the question. Press -. Press -. 9. When you’ve answered the last problem, NEO 2 asks if you’re ready to submit your work. If you are, press Y for yes and press enter. (If you’re not ready, press N for no and press enter to go back and go through the problems again.) If some students haven’t submitted their work before you end the session, you’ll be asked whether these scores should be recorded as is or saved for a later date. For details, see the Accelerated Math RP Software Manual. 66 10. If NEO 2 asks you to wait while your assignment is saved, press enter again. When the assignment is done, you’ll be asked to get your TOPS report at the printer. The NEO 2 will go back to the SmartApplets list. 11. When all students have finished their assignments, the teacher can click End Session in the Renaissance Responder program and close the program. NEO 1 and NEO 2 User Manual Using NEO 2 with the 2Know! Toolbar ..... USING THE RESPONDER SMARTAPPLET ON NEO 2 Using NEO 2 with the 2Know! Toolbar If you have your Renaissance Receiver connected and you’ve installed AlphaSmart Manager, you can also use NEO 2 with the 2Know! Toolbar. Participants can use NEO 2 to respond to questions. Teachers can use it to control the toolbar program as they would use a teacher Responder. How Participants Respond to 2Know! Toolbar Questions Using NEO 2 Participants follow these steps to respond to questions from the 2Know! Toolbar: 1. Press on/off to turn NEO 2 on. 2. Press applets. 3. Make sure the cursor is next to Responder; then, press enter. 4. NEO 2 will attempt to join the session. If you have connected to a Renaissance Receiver before, it will ask if you want to stay connected to it; press Y for yes or N for no. Then, press enter. If you haven’t connected to a Renaissance Receiver before, NEO 2 will show you a list of networks (Renaissance Receivers). Use the arrow keys to highlight the one you want to connect to; then, press enter. (If there are several Receivers and not all are listed, select More.) To help students answer multiplechoice, true/false, or pulse questions, you can press ctrl-caps lock or cmdcaps lock on NEO 2 to put the Responder SmartApplet in “bubble mode.” In this mode, when students type A–E, T, F, Y, N, R, or G, answer bubbles appear (similar to the ones on Responders) to help students see the available choices. The SmartApplet goes back to the standard text mode when you press ctrl-caps lock or cmdcaps lock again, exit the SmartApplet, or shut off the NEO 2. NEO 1 and NEO 2 User Manual 5. Enter your response to each question: • For multiple-choice questions, type the letter for the answer you want to choose and press enter. • For true/false questions, type T for true or F for false and press enter. • For questions that require a number for an answer, type the number and press enter. • For “pulse” questions, you can enter either T, Y, or G for true/yes/green, and you can enter F, N, or R for false/no/red; then, press enter. • For short-answer questions, type your answer and press enter. The teacher will let you know when you can send your answer to each question. 6. When you’ve finished answering questions, the teacher can shut down the 2Know! Toolbar program. The next time you press enter, NEO 2 will tell you there is no session and ask if you want to search for networks. Press N for no and press enter to go back to the SmartApplets menu. 67 ..... USING THE RESPONDER SMARTAPPLET ON NEO 2 Using NEO 2 with the 2Know! Toolbar How Teachers Can Use NEO 2 to Control the 2Know! Tool bar Program Teachers can use NEO 2 to control the 2Know! Toolbar program. The steps are similar to those you would use on a Responder: 1. In the 2Know! Toolbar program, click the Options button and choose Teacher Responder from the menu. 2. Click Assign in the Teacher Responder dialog box. The program will show you a PIN. Leave this dialog box open. 3. Press on/off on the NEO 2 to turn it on. 4. Press applets. 5. Make sure the cursor is next to Responder; then, press enter. 6. NEO 2 will attempt to join the session. If you have connected to a Renaissance Receiver before, it will ask if you want to stay connected to it; press Y for yes or N for no. Then, press enter. If there are several Receivers and not all are listed, select More. If you haven’t connected to a Renaissance Receiver before, NEO 2 will show you a list of networks (Renaissance Receivers). Use the arrow keys to highlight the one you want to connect to; then, press enter. 7. When NEO 2 asks you to enter the Teacher Responder PIN, enter the one that is shown in your 2Know! Toolbar program. Then, press enter. 8. In the 2Know! Toolbar program, click Close to go back to the toolbar. 9. NEO 2 will list your options. Press A to ask a question, B to show a graph, or C to minimize the toolbar on your computer or maximize it again; then, press enter. After you choose to view a graph, press A to stop receiving responses, B to close the graph, or C to reset so participants can respond again; then, press enter. To choose or enter the correct answer while viewing the graph, press D, then enter; then, type or select the answer. 10. When you’ve finished, you can unassign the NEO 2 so it is no longer meant for use by the teacher. Follow these steps: a. In the 2Know! Toolbar program, click Options and choose Teacher Responder. b. Click Unassign in the Teacher Responder dialog box. c. Click Close. 68 NEO 1 and NEO 2 User Manual NEO S ETTINGS Changing Settings in the Control Panel How t o Change the Settings in t he Control Panel You can change settings for the NEO and its SmartApplets within the Control Panel. These settings include screen contrast and the keyboard layout you’d like to use. You can also view the battery charge status. The steps below explain how to change these settings. For more information, see “About the Settings in the Control Panel” on page 70. 1. Press applets, scroll the list to select Control Panel, then press enter. 2. Scroll to select the option you want to set and press enter. 3. Some settings, such as turning Calculator or Spell Check on and off, require that you enter the master password to authorize the change. You can set the master password in AlphaSmart Manager (see page 119) or contact Technical Support to get the default master password. If you’re asked to enter the master password, type it and press enter. 4. Follow the instructions on the screen until you’re satisfied with the setting. 5. Press esc to return to the previous screen. You might need to press esc several times to return to Control Panel or the SmartApplets menu. NEO 1 and NEO 2 User Manual 69 ..... NEO SETTINGS Changing Settings in the Control Panel About t he Setti ngs in the Control Panel The following settings are available in the NEO Control Panel. You need the master password to change the spell check settings. Use AlphaSmart Manager to set this password; see page 119. Spell Check Settings Spell check has its own settings in the NEO Control Panel. When you select the spell check settings, you will be asked to enter the master password. Setting Name What It Does Turn spell check OFF/ON This setting acts like a switch or toggle. When you choose this setting and press enter, if spell check was on, it will be off; if it was off, it will be on. Turn add words to user dictionary ON/OFF By changing this setting, you are choosing whether users can add words to the user dictionary while doing a spell check in AlphaWord Plus. If spell check finds a word that isn’t in its dictionary, but the user knows that word is spelled correctly, the user can usually press A to add that word to the user dictionary so it isn’t marked as misspelled again in the future. If you have turned off this ability, the user cannot add the word to the user dictionary. To change the setting, simply move the cursor next to it and press enter to change it from “on” to “off” or from “off” to “on.” Delete user dictionary When you choose this setting and press enter, you can delete the user dictionary. When you do this, all words that you added to the spell check dictionary will be deleted, and spell check will question those words once again. Add new word to user dictionary When you choose this setting and press enter, you can add words to the user dictionary one at a time. Use this feature to add words that you use often but that spell check marks as misspelled. Another way to update the user dictionary on NEOs is to create a text file on your computer and use AlphaSmart Manager to replace the user dictionary on your NEOs with the words in the text file. To do this, see page 122. If you save the text file on your computer, you can easily add or delete words at any time and re-send the user dictionary to as many NEOs as necessary. 70 NEO 1 and NEO 2 User Manual ..... NEO SETTINGS Changing Settings in the Control Panel AlphaWord Plus Settings AlphaWord Plus also has its own settings in the NEO Control Panel: Setting Name What It Does Turn show marks in files ON/OFF When you turn show marks on, in AlphaWord Plus you will see for each carriage return (enter), and you’ll see for each tab that you type in your file. If show marks is off, carriage returns are not shown (except as line breaks), and tabs are shown as spaces. To change the setting, move the cursor next to it and press enter to change it from on to off or from off to on. • Press option--K in AlphaWord Plus. In the screen that appears, press 3 to change the show marks setting. Then, press esc. This setting is normally off, so passwords aren’t required to open AlphaWord Plus files. If you turn this setting on, you must enter the file’s password or the master password when you open a file by pressing the file key or selecting a named file. When you first turn this setting on, the password for all files is write. Use the next setting to set individual file passwords. • Press ctrl-option--P in AlphaWord Plus; then, enter the master password to change the setting. Press esc to go back to AlphaWord Plus. When file passwords are on or enabled as described above, you can use this setting to change the password for each file. When you select this setting and press enter, you’ll see a list of files 1–8 plus any named files you have on the NEO. Move the cursor next to a file, press enter, and enter the current password once and the new password twice; then, press enter. • Press option--P in the file that needs its password changed. Enter the current password, and then enter the new password twice. Turn file passwords ON/OFF Change a specific file password NEO 1 and NEO 2 User Manual Other Ways to Change This • In AlphaSmart Manager, click the Settings tab, select AlphaWord Plus on the left, check the Show Marks box, and click On or Off. Then, send the changes to NEOs from the Send List tab. • In AlphaSmart Manager, click the Settings tab, select AlphaWord Plus on the left, check the Passwords Enabled box, and click On or Off. Then, send the changes to NEOs from the Send List tab. 71 ..... NEO SETTINGS Changing Settings in the Control Panel Setting Name Reset all file passwords What It Does Other Ways to Change This When file passwords are ON or enabled, this setting changes all file passwords back to the default password (write). Simply highlight the setting and press enter. You’ll be asked to enter the master password (see page 119). • In AlphaSmart Manager, click the Settings tab, select AlphaWord Plus on the left, check the File Passwords box, and enter the password that you want to use for all files. Then, send the changes to NEOs from the Send List tab. Change Default AlphaWord Font This setting allows you to choose the font size you want to use for AlphaWord Plus files. For more information, see page 34. Turn Calculator Off To turn NEO’s Calculator SmartApplet off, move the cursor next to this setting and press enter. Then, enter the master password (see page 119) and press enter. There are other ways to turn the Calculator off on NEOs or to turn it back on: • In AlphaWord Plus, press ctrl--C. Enter the master password (see page 119). • Press applets to see the SmartApplet menu. Move the cursor next to Calculator and press ctrl--L. Enter the master password (see page 119). The symbol appears next to Calculator in the list to show it has been disabled. • In AlphaSmart Manager, click the Settings tab, click Calculator on the left, check the Disable this SmartApplet box on the right, and click Yes or No. Then, send the changes to your NEOs from the Send List tab. Two-Button On Option Normally, NEO turns on when you press the on/off button. If your NEO often gets turned on accidentally, perhaps because the button is pressed when you carry the NEO in a bag or backpack, you can enable the two-button on option to require you to press on/off and enter together to turn NEO on. After you select this Control Panel setting, press enter to enable it (if it was disabled) or disable it (if it was enabled). 72 NEO 1 and NEO 2 User Manual ..... NEO SETTINGS Changing Settings in the Control Panel Set Screen Contrast Use this setting to set the screen contrast. After you select this setting, you can press to darken the screen or to lighten it. When you’ve finished, press esc. Keyboard Command Reference List Use this setting to see a list of keyboard commands you can use on the NEO. For a list of keyboard commands, see page 143. You can view a list of international characters and find out how to type them by pressing ctrl-H in AlphaWord Plus and selecting International from the help topic list. View Keyboard Layout Use this setting to see where keys are on the keyboard with the current selected keyboard layout. This is helpful if you’ve chosen a layout other than the standard layout (QWERTY). To set keyboard layout, use the Change KeyBoard Layout setting under “Change KeyBoard Settings.” (For details, see the next page.) You can press shift to see what characters are available when you hold down the shift key and type, and you can press option to see what special characters you can type while holding down that key. (For more about international and special characters, see page 147.) Display Battery Status Use this setting to see the state of the battery charge, both as a graphic and a percentage. Then, press any key to leave the battery status. Another way to check the battery charge is to press ctrl--B while working on the NEO. NEO 1 and NEO 2 User Manual 73 ..... NEO SETTINGS Changing Settings in the Control Panel Change Keyboard Settings There are several keyboard settings in NEO: Setting Name Change keyboard layout What It Does Other Ways to Change This This sets the keyboard layout you are using. Press the number key that represents the layout you want to use. Then, press esc. • QWERTY: the standard layout used on computer keyboards. • DVORAK: a scientifically designed keyboard layout that requires much less finger reaching and stretching for the most commonly used keys, and results in faster and easier typing. • RIGHT (one hand): a layout that allows people who type only with the right hand to type faster. • LEFT (one hand): a layout that allows people who type only with the left hand to type faster. • Press option--L. Then, press the number that represents the keyboard layout you want and press esc. • In AlphaSmart Manager, click the Settings tab and click System on the left. Then, check the Keyboard Layout box on the left and choose a layout from the dropdown list. Send your changes to NEOs on the Send List tab. For pictures of the layouts, see the keyboard examples after this table. Note: If you change the keyboard layout, when you use keyboard commands, note that although the ctrl, option, , and shift keys stay where they are, the letter keys used in commands may have moved. Change slow keys setting 74 Use this setting to increase or decrease the time you must hold down a key before the character appears onscreen (0.0 means the delay is off). Press the up and down arrow keys to increase or decrease the time in tenths of a second. When you’ve finished, press esc. This setting is useful for someone who has unsteady hands or difficulty targeting specific keys. • Press ctrl-option--K while working on the NEO. Then, use the up and down arrow keys to increase or decrease the delay. Press esc when you’ve finished. • In AlphaSmart Manager, click the Settings tab and click System on the left. Then, check the Slow Keys box, click On, and enter the delay in the Slow Key Delay field. Send your changes to NEOs on the Send List tab. NEO 1 and NEO 2 User Manual ..... NEO SETTINGS Changing Settings in the Control Panel Setting Name Turn sticky keys ON/OFF What It Does Other Ways to Change This Use this setting if it is difficult for you to perform keyboard commands because you cannot hold multiple keys down at the same time. When sticky keys is on, users can press one key at a time to type keyboard commands that use the shift, ctrl, option, or keys. For example, to open a file in AlphaWord Plus, you could press , let it go, and then press O if sticky keys is on. To change the setting from on to off or off to on, simply move the cursor next to it and press enter. • Press option--K while working on the NEO. Then, press 2 to change the sticky keys setting from on to off or off to on. Then, press esc. on/off file 1 ~ ` file 2 @ 2 ! 1 alt option control { [ : ; < , > . esc delete applets send back space + = P L M end _ - O K N home ) 0 I J B clear file find ( 9 U H V spell check * 8 Y G C print & 7 T F X file 8 ^ 6 R D Z file 7 % 5 E S shift file 6 file 5 $ 4 W A caps lock file 4 # 3 Q tab Some language versions of NEO do not support alternate keyboard layouts. file 3 • In AlphaSmart Manager, click the Settings tab and click System on the left. Then, check the Sticky Keys box and click On or Off. Send your changes to NEOs on the Send List tab. } ] | \ enter " ' shift ? / cmd The standard QWERTY keyboard layout on/off file 1 ~ ` tab caps lock file 2 @ 2 ! 1 file 4 $ 4 < , A alt option G D X spell check * 8 F I K print & 7 Y U J file 8 ^ 6 P E Q : ; file 7 % 5 > . O file 6 file 5 # 3 " ' shift control file 3 ( 9 B end { [ R T M home ) 0 C H clear file find ? / S W V esc delete + = | \ enter _ - Z send back space } ] L N applets shift cmd The Dvorak keyboard layout NEO 1 and NEO 2 User Manual 75 ..... NEO SETTINGS Changing Settings in the Control Panel on/off file 1 ~ ` tab caps lock file 2 } ] { [ file 4 Q alt option U D G file 8 M Y C X " ' file 7 F B K _ - file 6 file 5 P ? / : ; shift control file 3 L V J R T end @ 2 > . A I home # 3 O E N clear file find $ 4 S H W spell check print % 5 < , ) 0 esc delete + = ( 9 | \ enter & 7 * 8 send back space ! 1 ^ 6 Z applets shift cmd The left one-handed keyboard layout Search for Networks (NEO 2 Only) On NEO 2 models, when you use NEO 2 with a Renaissance Receiver, the first network that you choose with NEO 2 is the one that is used by default the next time you use the Responder SmartApplet. If you want to search for a different computer/Receiver combination (network), move the cursor next to this setting in the Control Panel and press enter. NEO 2 will find the Renaissance Receivers that are within range and show you their names. Use the up and down arrow keys to highlight the new Receiver you want to use. Then, press enter to connect to it. About NEO 2 (NEO 2 Only) On NEO 2 models, you can select this Control Panel setting to view information about your laptop, including the system version and the version of other items that are unique to NEO 2. 76 NEO 1 and NEO 2 User Manual ..... NEO SETTINGS Changing the Transfer Speed for Sending or Beaming Files Wireless Security (NEO 2 Only) Use this setting to enter the encryption key if it is required for NEO 2 to communicate with Renaissance Receivers. For more information, contact Renaissance Learning. Update Text2Speech Device Use this setting to send updates to an optional Text2Speech device. For more information, see the Text2Speech User Manual. About t he Aut o Repeat Setting The Auto Repeat setting is not in the Control Panel, but it is related to the keyboard settings in the Control Panel. Normally, when you are typing in AlphaWord Plus, any key that you hold down will be repeated. If you want to turn this off, follow these steps: 1. Press option--K while working on the NEO. 2. Press 1 to turn auto repeat on or off. 3. Press esc to exit the screen and return to your work. You can also change this setting in AlphaSmart Manager. Simply click the Settings tab, click System on the left, check the Auto Repeat box, and click On or Off. Send your settings to NEOs from the Send List tab. Changing the Transfer Speed for Sending or Beaming Files NEO can send text faster than some older computers can accept it. If you notice missing characters or jumbled text, you may need to slow down the transfer speed. Even on newer, faster computers, some programs are slow to accept text, and you must slow down your NEO transfer speed to transfer text into these programs. You can change the transfer speed for both USB cable and IR transfers. You cannot change the transfer speed in the Control Panel, but you can change it by following the instructions on the next page. Note that the steps for changing the transfer speed for a USB cable connection are different from the steps for changing the beaming transfer speed. NEO 1 and NEO 2 User Manual 77 ..... NEO SETTINGS Changing the Transfer Speed for Sending or Beaming Files How t o Change the Transf er Speed for a USB Cable Connection 1. Make sure your NEO is not attached to your computer. (You can change the transfer speed only when the NEO is not attached.) 2. Press option--s and type the number for one of these speeds: • 1: Very Slow. This is the slowest speed setting. It is compatible with all machines and programs. It is especially recommended when you use graphic-intensive programs. • 2: Slow. This setting is compatible with all machines and most programs. • 3: Fast. This the default speed, which usually works well with most computers. • 4: Fastest. This setting provides the quickest transfers. However, some word processing programs may lose data when files are transferred using this speed, so you might want to experiment to see which speed works best for you. How t o Change the Transf er Speed for Beaming (Ir DA Transf er Speed) 1. Make sure your NEO is not attached to your computer. (You can change the transfer speed only when the NEO is not attached.) 2. Press ctrl-option--S and type the number for one of these options: 78 • 1: Fastest speed. This setting provides the quickest IR transfers. However, some programs may lose data when files are transferred using this speed, so you might want to experiment to see which speed works best for you. • 2: Compatibility speed. This setting is compatible with all computers and most programs. NEO 1 and NEO 2 User Manual P ASSWORDS ON NEO The Three Passwords Used with NEOs There are three types of passwords you can set for NEO. • Master password: This password is required when you change certain settings (for example, when you turn Calculator or Spell Check on or off). The master password also allows you to create individual file passwords. You can obtain a master password from Technical Support, but it’s easier— and more secure—to specify your own using AlphaSmart Manager (see page 119). • File passwords for AlphaWord Plus files: If you enable password protection as described in the next section, you need a password to open each file. The default password is write or the new default password you chose in AlphaSmart Manager (see page 121). You can set unique passwords for each AlphaWord Plus file on the NEO (see page 81). File passwords are useful when more than one person is using the same NEO or when the contents of your files are confidential. • Send list password: This password is used in AlphaSmart Manager. It lets you set a password so that no one can send anything—files, SmartApplets, or settings—from AlphaSmart Manager to any connected NEO(s) without first typing the send list password. See “Setting or Changing the Send List Password” on page 120. Note: NEO’s password system is meant to protect against accidental or mischievous data loss and to provide a minimum level of data privacy. It cannot prevent concerted, malicious efforts at data destruction. NEO 1 and NEO 2 User Manual 79 ..... PASSWORDS ON NEO Enabling Password Protection for AlphaWord Plus Files Enabling Password Protection for AlphaWord Plus Files When you first receive your NEO, you cannot set individual file passwords until you enable password protection. When password protection is enabled, any time you press a file key or open a named file, you must enter the file’s password. When you enable password protection, you must enter the master password. You can set that password in AlphaSmart Manager (see page 119) or contact Technical Support to get the default master password. (You can also use AlphaSmart Manager to enable password protection; see page 121.) There are two ways to enable password protection on your NEO: you can enable it while in AlphaWord Plus or the Control Panel. Enabling or Disabling File Passwords While Working in AlphaWord Plus 1. Be sure you know your master password (see page 119 to set the master password using AlphaSmart Manager). 2. Press ctrl-option--P. A message will tell you whether password protection is on or off. 3. To change the setting, type the master password and press enter. A message will tell you what the setting has been changed to. You can enter the master password instead of the file’s password to open that file when password protection is enabled. 4. Press any key to exit the screen. All AlphaWord Plus files will have the password write until you change the password for each file (see page 81). Enabling or Disabling File Passwords in the Control Panel 1. Be sure you know your master password (see page 119 to set the master password using AlphaSmart Manager). 2. Press applets. 3. Move the cursor next to Control Panel and press enter. 4. Move the cursor next to AlphaWord settings and press enter. 80 NEO 1 and NEO 2 User Manual ..... PASSWORDS ON NEO Setting Individual Passwords for AlphaWord Plus Files 5. Move the cursor next to Turn file passwords ON/OFF and press enter to change the setting from on to off or from off to on. A message will tell you whether password protection is on or off. 6. To change the setting, type the master password and press enter. A message will tell you what the setting has been changed to. 7. Press any key to exit the screen. All AlphaWord Plus files will have the password write until you change the password for each file (see the next section). Setting Individual Passwords for AlphaWord Plus Files When you first enable password protection for AlphaWord Plus files, all files have the same default password: write (unless you’ve changed the default in AlphaSmart Manager—see page 121). If you want to give each file a unique password instead, follow the steps below. Passwords can be up to six characters long. They aren’t case-sensitive. They can contain letters, numbers, and symbols, but not spaces. If you don’t know an individual file’s password, you can enter the NEO’s master password instead. (To set the master password, see page 119.) You can change a file’s password from Control Panel or from within AlphaWord Plus. How to Change a File Password from within the Control Panel 1. Press applets. 2. Move the cursor next to Control Panel and press enter. 3. Move the cursor next to AlphaWord settings and press enter. 4. Move the cursor next to Change a specific file password and press enter. 5. Move the cursor next to the file whose password you want to change and press enter. NEO 1 and NEO 2 User Manual 81 ..... PASSWORDS ON NEO Resetting File Passwords 6. Type the current password. (If you’ve never changed it, the password is probably write.) Then, type the new password, press tab, and type the new password again to confirm it. Press enter when you’ve finished. A message appears telling you the password was changed. 7. Press any key to return to the AlphaWord settings. If you don’t know a file’s password, you can enter the master password instead. The master password automatically overrides file passwords. How to Change a File Password from within AlphaWord Plus 1. Open the file for which you want to change the password. You need to enter the current password to open it. If you’ve never changed the password, you can use the default password, which is write, or you can enter the master password. 2. Press option--P. You will see a screen like the one below. 3. Type the current file password. Press tab and type your new password; then, press tab and type it again to confirm it. 4. Press enter. You’ll see a message that the password has been changed; then, you’ll return to your file. Resetting File Passwords If you forget file passwords, you can reset the passwords for all AlphaWord Plus files on this NEO back to the default password, which is write (or the password you chose in AlphaSmart Manager—see page 121). You can reset passwords from Control Panel or from within AlphaWord Plus as described below. You can also reset all file passwords using AlphaSmart Manager (see page 121). You need the master password to reset file passwords. Use AlphaSmart Manager to set this password; see page 119. How to Reset All File Passwords from within the Control Panel 1. Press applets. 2. Move the cursor next to Control Panel and press enter. 3. Move the cursor next to AlphaWord settings and press enter. 82 NEO 1 and NEO 2 User Manual Resetting File Passwords ..... PASSWORDS ON NEO 4. Move the cursor next to Reset all file passwords and press enter. 5. Type the master password and press enter. A message will notify you that the passwords have been reset to the factory default (write). 6. Press any key to exit the screen. How to Reset All File Passwords from within AlphaWord Plus 1. With an AlphaWord Plus file open, press shift-ctrl-option--P. 2. Type the master password and press enter. A message will notify you that the passwords have been reset to the factory default (write). 3. Press any key to exit the screen. NEO 1 and NEO 2 User Manual 83 S YSTEM S TATUS For a quick view of the current settings on your NEO, you can check system status. The settings that appear are • System version • Language • Current file you’re in • Cable speed (for text transfers to your computer) • Keyboard layout • Auto Repeat setting • Sticky Keys setting • Passwords setting The system status for a NEO with an ISO (European) keyboard differs slightly from the one shown here. Follow these steps to check system status: 1. Press option--V. 2. Press any key to exit the screen and return to your file. 84 NEO 1 and NEO 2 User Manual W ORKING WITH A LPHA S MART M ANAGER This chapter explains how to perform some common tasks in the AlphaSmart Manager software that came with your NEO. For complete information about AlphaSmart Manager, refer to the AlphaSmart Manager User Manual. (If you do not have a printed copy, you’ll find this manual on our Web site or the Documentation CD for NEO 1 and NEO 2.) Some AlphaSmart Manager capabilities are meant to help you manage and maintain a group of NEOs connected to an AlphaHub in a SmartOption Mobile Lab. However, some features are also useful for those who have just one NEO. This chapter focuses on AlphaSmart Manager procedures that you may use often. About AlphaSmart Manager AlphaSmart Manager is a program that you install and use on the computer that you plan to use with your NEO(s). It helps you manage files, change NEO settings, and control which SmartApplets are installed and enabled on your NEO(s). Although you can perform some of the same tasks on the NEO itself, AlphaSmart Manager can make some tasks easier. AlphaSmart Manager provides these advantages: • You can make the same setting, password, or SmartApplet changes for more than one NEO. (You can even choose to make them for some NEOs and not others.) • You can transfer files from your computer to the NEO. In AlphaSmart Manager, you can only retrieve files 1–8. You can’t retrieve named files that aren’t open in files 1–8. Also, you can only send files from the computer into files 1–8 on the NEO(s). NEO 1 and NEO 2 User Manual • You can transfer up to eight files from NEO to your computer at the same time (as opposed to sending the files one at a time by pressing send on the NEO). • You can save send lists so that you can easily make the same changes to NEOs again later. 85 ..... WORKING WITH ALPHASMART MANAGER Starting AlphaSmart Manager and Connecting Your NEO S t a r t i n g A l p h a S m a r t M a n a g er a n d C o n n e c t i n g Y o u r N E O To start AlphaSmart Manager, follow the steps below. (If you have not installed the program yet, install it now by following the instructions in “Installing AlphaSmart Manager” on page 19.) 1. Windows: Click Start Programs AlphaSmart Manager 2 Start AlphaSmart Manager 2. AlphaSmart Manager opens. Macintosh: Open the Applications folder on your computer. Then, open the AlphaSmart folder and open the AlphaSmart Manager 2 folder. Double-click AlphaSmart Manager. AlphaSmart Manager opens. 2. Connect your NEO to your computer as described on page 9, or connect your cart. The example shows what the screen looks like when you connect one NEO 2 with a cable. For more about connecting multiple NEOs, refer to the AlphaSmart Manager 2 User Manual. 3. In AlphaSmart Manager, click the plus sign (Windows) or triangle (Macintosh) at the bottom of the screen to view connection status.You might need to wait a few moments before the connection status light appears. Click to expand or hide the Connection Status area. Color indicates the connection status, and the “2” indicates a NEO 2. 86 NEO 1 and NEO 2 User Manual Viewing, Printing, and Saving Files from Your NEO ..... WORKING WITH ALPHASMART MANAGER • Green circle: Your NEO is properly connected. An empty green circle indicates a NEO 1, and a green circle with a “2” indicates a NEO 2. • Yellow circle: The connected NEO needs updating. • Red circle: An AS3000 is connected. This version of AlphaSmart Manager is not compatible with AS3000 laptops, and you cannot have both NEOs and AS3000s connected to the SmartOption Mobile Lab. • Black circle: Your NEO is not connected or is improperly connected (refer to “Troubleshooting” on page 127). When you’re properly connected, you can transfer information between your NEO and your computer. Viewing, Printing, and Saving Files from Your NEO An earlier procedure in this manual describes how to send files from your NEO to an open program on your computer (“Sending Files to Your Computer” on page 9). You can also use AlphaSmart Manager to retrieve the numbered files (1–8) on your NEO. In AlphaSmart Manager, you can view files 1–8 from the connected NEO(s), print the files, or save them as separate text files. If you retrieve a file that has a linked file associated with it, you retrieve the linked file text as well. When you view, print, or save the file, the linked file text is appended to the end of the main file. For more about linked files, see “Using Linked Files” on page 45. AlphaSmart Manager retrieves files 1–8 from NEOs. It doesn’t retrieve named files that aren’t open in one of the eight numbered files. If you want to retrieve one of the named files, make sure you open it. By following the steps below, you can view the contents of files 1–8 on the connected NEO(s). You can only view one file at a time. 1. In AlphaSmart Manager, click the Get/Print AlphaWord Files tab. If you have just one NEO connected, you’ll see a device called “AlphaSmart USB” in the File Contents list as shown. If you connect an entire SmartOption Mobile Lab, the connected NEOs will be listed by number. NEO 1 and NEO 2 User Manual 87 ..... WORKING WITH ALPHASMART MANAGER Viewing, Printing, and Saving Files from Your NEO B A 2. If you have one NEO connected, in the File Contents area, click the + A (Windows) or (Macintosh) next to “AlphaSmart USB.” A message appears briefly to tell you that AlphaSmart Manager is retrieving the file(s). If you have more than one NEO connected, use the Sort by drop-down list B to choose whether to sort by File # or Device (NEO). If you sort by file number, you can click the + (Windows) or (Macintosh) next to the file number you want to print for multiple NEOs C. If you sort by Device (by NEO), click the + or next to the NEO for which you want to view files (D on the next page). The NEO numbers match the cable numbers in your SmartOption Mobile Lab. C 88 NEO 1 and NEO 2 User Manual Viewing, Printing, and Saving Files from Your NEO ..... WORKING WITH ALPHASMART MANAGER D How to View One of the Files The example shows how to select a file with one NEO connected. For more about selecting files when you have multiple NEOs, refer to the AlphaSmart Manager 2 User Manual. 1. Click the displayed file text to select the file contents you want to view A. A B NEO 1 and NEO 2 User Manual 89 ..... WORKING WITH ALPHASMART MANAGER Viewing, Printing, and Saving Files from Your NEO 2. Click View File B to see the selected file. The file appears in its own window. You can save the file from here (see page 92) or click Close to close the window and return to AlphaSmart Manager. How to Print One or More Files If you print a file that has a linked file attached, the linked file prints on a separate page. 1. If you know exactly which files you want to print, check the boxes next to those files in the File Contents list A. A B 2. Click Print Files B. A print dialog box appears. 90 NEO 1 and NEO 2 User Manual Viewing, Printing, and Saving Files from Your NEO ..... WORKING WITH ALPHASMART MANAGER 3. For Macintosh computers only, click the Copies & Pages list and select AlphaSmart Manager C. When you do this, the dialog box will display print options specifically for AlphaSmart Manager as shown below. Select AlphaSmart Manager from the list to display appropriate print options C 4. Choose a printer to send the files to D. Windows E F Macintosh G D H D E F G H NEO 1 and NEO 2 User Manual 91 ..... WORKING WITH ALPHASMART MANAGER Viewing, Printing, and Saving Files from Your NEO 5. Use the Print drop-down list to choose the files you want to print E: • All Files. Prints all eight files from your NEO. • Checked Items. Prints only the files you checked. • File #. Prints only that numbered file. 6. If you have more than one NEO connected, use the From drop-down list to choose which NEOs to print from F: • All AlphaSmarts. Prints the file(s) you chose from all connected NEOs. • AlphaSmart #. Prints the files from the NEO connected at this numbered cable in the SmartOption Mobile Lab. • AlphaSmart USB. Prints from the NEO connected via a USB cable. (This is the only option available if only one NEO is connected.) 7. Click one of the header options G: • Print header information on first page. Prints the NEO number (or “AlphaSmart USB”) and the file number on the first page only. • Print header information on all pages. Prints the NEO number (or “AlphaSmart USB”), the file number, and the page number on all pages. • Do not print header information. Omits header information from all pages. 8. Check the box if you want empty files to print as a blank page H. This provides a useful visual cue if you’re printing many files from many NEOs. 9. Click Print. How to Save Files You can use AlphaSmart Manager to save any of the numbered files (1–8) that are on your NEO(s). Files are saved in their own folders as text files. If you have connected just one NEO using the USB cable, all files will be saved in a folder named AlphaSmart USB as shown in the examples on the next page. 92 NEO 1 and NEO 2 User Manual Viewing, Printing, and Saving Files from Your NEO ..... WORKING WITH ALPHASMART MANAGER If you have connected a SmartOption Mobile Lab, you will see a folder for each file number. Within that folder, you will see that file number for each connected NEO. NEO 1 and NEO 2 User Manual 93 ..... WORKING WITH ALPHASMART MANAGER Viewing, Printing, and Saving Files from Your NEO Follow these steps to save the files from your NEO(s): 1. If you know exactly which files you want to save, check those files in the File Contents list A. A B 2. Click Save Files B. A Save File dialog box appears. C D D 3. On Windows computers, click Browse C and go to the location where you want to save the file. On Macintosh computers, navigate to the location where you want to save the file. 94 NEO 1 and NEO 2 User Manual Sending Files, Rubrics, or Write On! Lessons to NEOs ..... WORKING WITH ALPHASMART MANAGER 4. Click the Save drop-down list D and choose one of these options: • All Files. Saves all eight files from your NEO(s). • Checked Items. Saves only the files you checked. • File #. Saves only that numbered file. 5. If you have more than one NEO connected, click the From drop-down list and choose the NEO(s) to save files from. 6. Click Save (Windows) or Choose (Macintosh). The file(s) are saved as text files in the location you specified, either in the AlphaSmart USB folder or in separate folders for each file number. If that location already has files that were previously saved, you may be asked if you want to replace the files. Sending Files, Rubrics, or Write On! Lessons to NEOs In AlphaSmart Manager, you can send text files to NEOs. You can also create or select assignment rubrics or select Write On! lessons to send to your NEOs. Warning! Before you send anything to your NEO, it’s important to know that once you begin sending files (or SmartApplets or settings) to your NEO, you need to let AlphaSmart Manager complete the send before disconnecting your NEO from your computer. If you don’t, you run the risk of corrupting system files on your NEO. Creating and Sending Text Files AlphaSmart Manager can send files you’ve created on your computer to NEOs. You can compose text in another program and paste or drag it into AlphaSmart Manager, or you can type text directly into AlphaSmart Manager. If your computer is connected to a group of NEOs through an AlphaHub on a SmartOption cart, you can send the files to all connected NEOs or just specific NEOs you select. Follow these steps to send a file to NEOs: 1. In AlphaSmart Manager, click the AlphaWord Files to Send tab. 2. Check the box next to the number of the file to which you want to send text (A on the next page). Note that any existing text in the file on the NEO will be overwritten. NEO 1 and NEO 2 User Manual 95 ..... WORKING WITH ALPHASMART MANAGER Sending Files, Rubrics, or Write On! Lessons to NEOs 3. In the File # area B, type the text you want to transfer, or paste or drag the text from another program. A B 4. Click the Send List tab C and verify that the text you want to send appears in the Send List Display. C 96 NEO 1 and NEO 2 User Manual Sending Files, Rubrics, or Write On! Lessons to NEOs ..... WORKING WITH ALPHASMART MANAGER 5. If you are using a SmartOption Mobile Lab and you want to send the text to some, but not all, of the NEOs, click Select Devices, check the devices to which you want to send the text, then click OK. (To send to all connected NEOs, skip this step.) 6. Click Send. If you have set a send list password (see page 120), you must enter the password and click OK. You can transfer multiple files simultaneously. To do so, repeat steps 2 and 3 until you’re ready to send, then review the Send List Display to make sure all the files appear before clicking Send. Sending Rubrics or Other Linked Files to NEOs Encourage students to use their prewriting to type a rough draft, then present them with a rubric, either as a linked file or on paper. This encourages students to use keyboarding skills to actually revise instead of just looking for typos. Rubrics can incorporate requirements commensurate with current grammar lessons. NEO 1 and NEO 2 User Manual AlphaSmart Manager can also send assignment rubrics or other linked files to NEOs. You can create your own rubric or linked file to send, open a text file that you want to link to the main file, or select one of the sample rubrics. The file that you create or choose will be linked to the main file that you send it to on the NEO; the text won’t be in the main file. For more about linked files, see page 45. Follow these steps to send a rubric or another linked file to NEOs: 1. In AlphaSmart Manager, click the AlphaWord Files to Send tab. 97 ..... WORKING WITH ALPHASMART MANAGER Sending Files, Rubrics, or Write On! Lessons to NEOs 2. Check the box next to the number of the file to which you want to send the rubric or other linked file A. (Note that if there is existing text in the file number on the NEO, that text will be removed.) A B 3. Click Linked Files B at the bottom of the window. 4. Now, you can create a linked file, select a sample one, or open a file that contains the text you want to link: Any text that is outside the <form> </form> tags will be in the file workspace itself, not in the linked file. 98 • To create your own rubric or other linked file, type the text between the <form> and </form> tags in the window (C on the next page). If you want to insert a check box, click Insert a check box D and change the text that is inserted behind the box. If you want to save the linked file to use again, click Save As E and save the linked file as a text file in the location you select. When the linked file is done, click OK. The text will be shown in the File # area of the AlphaWord Files to Send tab. NEO 1 and NEO 2 User Manual Sending Files, Rubrics, or Write On! Lessons to NEOs ..... WORKING WITH ALPHASMART MANAGER C D E • To select a sample linked file, use the drop-down list F. When you select a sample linked file, the text will appear in the window G, and you can change it as needed. Then, click OK. The text will be shown in the File # area of the AlphaWord Files to Send tab. G F NEO 1 and NEO 2 User Manual 99 ..... WORKING WITH ALPHASMART MANAGER Sending Files, Rubrics, or Write On! Lessons to NEOs • To open a text file that contains the text you want to link, click Open H and find and select the text file. Then, click OK (Windows) or Choose (Macintosh). Click OK in the Linked Files window to select the file you’ve opened. The text will be shown in the File # area of the AlphaWord Files to Send tab. H 5. Click the Send List tab and verify that the text you want to send appears in the Send List Display. 100 NEO 1 and NEO 2 User Manual Sending Files, Rubrics, or Write On! Lessons to NEOs ..... WORKING WITH ALPHASMART MANAGER 6. If you are using a SmartOption Mobile Lab and you want to send the linked file to some, but not all, of the NEOs, click Select Devices, check the numbers to which you want to send the text, then click OK. (To send to all connected NEOs, skip this step.) 7. Click Send. If you have set a send list password (see page 120), you must enter the password and click OK. You can transfer multiple linked files simultaneously. To do so, repeat steps 2–4 until you’re ready to send, then review the Send List Display to make sure all the files appear before clicking Send. NEO 1 and NEO 2 User Manual 101 ..... WORKING WITH ALPHASMART MANAGER Sending Files, Rubrics, or Write On! Lessons to NEOs Sending Write On! Lessons to NEOs AlphaSmart Manager can also send Write On! lessons to NEOs. Follow these steps: For more about Write On! lessons, see the AlphaSmart Manager User Manual. 1. In AlphaSmart Manager, click the AlphaWord Files to Send tab. 2. Check the file number to which you want to send the lesson A. (Note that any existing text in the file on the NEO will be overwritten.) A B 3. Click WriteOn Lessons B at the bottom of the window. If the file you have chosen already has text, an alert will appear to remind you that the text will be replaced; click Yes to continue. You can make your own Write On! lessons. To do this, create a new folder for the lessons. Then, create text files that contain each of your writing prompts or writing lessons. Save each file with a .txt extension. When you’ve finished, move the folder into your AlphaSmart Manager program folder on your computer. 102 4. Double-click one of the categories on the left C to find the available lessons, or click the category and click Next. You may need to open a few different subcategories before you see a list of lessons. You can use the Back button to back up one category level. NEO 1 and NEO 2 User Manual Sending Files, Rubrics, or Write On! Lessons to NEOs ..... WORKING WITH ALPHASMART MANAGER C 5. Click the lesson you want to select D and view the text in the Preview window E. You can continue to click the lesson files until you find the one you want to use; then, click Insert F. The lesson text will be shown in the File # area of the AlphaWord Files to Send tab. E D F 6. Read through the lesson. You can make changes if you’d like. Since the lesson includes instruction, examples, and many writing prompts, teachers generally divide the lesson among several files. (The lines made up of = signs are natural places to break the file.) To break up the files, you can cut some of the text from this file, click another file number, and paste the text into that file. When you do this, students will see different parts of the lesson in the different files you send to NEOs. NEO 1 and NEO 2 User Manual 103 ..... WORKING WITH ALPHASMART MANAGER Sending Files, Rubrics, or Write On! Lessons to NEOs 7. Click the Send List tab and verify that the lesson you want to send appears in the Send List Display. 8. If you are using a SmartOption Mobile Lab and you want to send the lesson to some, but not all, of the NEOs, click Select Devices, check the numbers to which you want to send the text, then click OK. (To send to all connected NEOs, skip this step.) 9. Click Send. If you have set a send list password (see page 120), you must enter the password and click OK. You can transfer multiple lessons simultaneously. To do so, repeat steps 2–6 until you’re ready to send, then review the Send List Display to make sure all the files appear before clicking Send. 104 NEO 1 and NEO 2 User Manual Retrieving KeyWords Data Using AlphaSmart Manager ..... WORKING WITH ALPHASMART MANAGER Sending Empt y Fi les to NEOs In the AlphaWord Files to Send tab, you can check the box next to the number of an empty file and send it to your NEO to overwrite any existing text in that file on the NEO. This is a handy trick to use if you’ve retrieved text from your NEO and no longer need the text on the NEO. If you want to delete all the AlphaWord Plus files from your NEO, including named files that aren’t in workspaces, it’s better to use the Delete All Files setting described in “AlphaWord Plus Settings” on page 115. Retrieving KeyWords Data Using AlphaSmart Manager UK NEOs use KAZ instead of KeyWords. KeyWords is a SmartApplet that helps students learn to type. Using AlphaSmart Manager, you can retrieve information about students’ progress through KeyWords lessons on NEOs. If your students are using KeyWords, when you connect the NEOs and click the KeyWords tab, AlphaSmart Manager displays the students’ names and gives you options for creating and saving reports and for synchronizing the information with Renaissance Place (for Renaissance Place subscribers). The KeyWords tab, its features, and tasks are described more fully in the AlphaSmart Manager User Manual. If you do not have a printed copy of this manual, you can find it on our Web site or the NEO Documentation CD. For more information about KeyWords, refer to the NEO 1 and NEO 2 SmartApplet User Manual on our Web site or the Documentation CD. I n s t a l l i n g S m a r t A p p l e t s o n N EO s U s i ng A l p ha Sm a r t Manager SmartApplets are programs on your NEO. For a list of the SmartApplets that come installed on NEOs, see page 8. By following the steps below, you can install other SmartApplets or updates or reinstall SmartApplets that you’ve removed. To do this, you install a SmartApplet on your computer (if necessary), then select it and send it to your NEO with AlphaSmart Manager. For more information about available SmartApplets, visit our Web site. 1. If you have a new SmartApplet that isn’t already available to install in AlphaSmart Manager, install the SmartApplet on your computer, following the instructions in the SmartApplet package. NEO 1 and NEO 2 User Manual 105 ..... WORKING WITH ALPHASMART MANAGER Installing SmartApplets on NEOs Using AlphaSmart Manager 2. In AlphaSmart Manager, click the SmartApplets tab. 3. There are two ways to choose the SmartApplets you want to install on NEOs: Not everything in the SmartApplet list is a SmartApplet. The list includes your NEO fonts, Spell Check, the Thesaurus, the Spanish-English word lookup, the Text2Speech Updater, and Wireless File Transfer on NEO 2, which allows you to transfer files between NEO 2 and supported programs such as Google Docs. You can install and delete these items just as you would SmartApplets. • Click a SmartApplet in the SmartApplet List A and drag it to the Install List B. (If you don’t see the SmartApplet that you want to install and you know it is installed on your computer, click the File menu and choose Add to Applet List; then, browse to the SmartApplet’s location on your computer.) • Select the SmartApplet(s) in the SmartApplet List A; then click Add => to move them to the Install List B. To select more than one SmartApplet to add, you can hold down the Ctrl key (Windows) or the key (Macintosh) as you click the SmartApplets you want to add. To select a group, click the first one in the group, hold down the Shift key, and click the last one in the group. A If you have a mixed SmartOption Mobile Lab with both NEO 1 and NEO 2 laptops, please keep in mind the following: 1. SmartApplets that are only for NEO 2 (the Responder and Accelerated Reader SmartApplets) will not be installed on NEO 1 laptops. 2. NEO 1 laptops do not have as much space as NEO 2 laptops. The information shown in the Memory column is based on the space left on NEO 1 laptops, not NEO 2 laptops, since NEO 1 laptops have the smallest amount of space available. 106 B C As you add SmartApplets to the Install List, check the Memory column C to make sure there is enough memory available on the NEO to install the SmartApplets you want. The darker color shows the space used on the NEO, and the lighter color shows what is needed by the SmartApplet(s) you want to install. If you don’t have enough memory to install the SmartApplets you want, you could delete some from NEOs as described on page 108. NEO 1 and NEO 2 User Manual ..... WORKING WITH ALPHASMART MANAGER Installing SmartApplets on NEOs Using AlphaSmart Manager 4. Click the Send List tab and verify that the SmartApplets you want to install appear in the Send List Display. 5. If you have a SmartOption Mobile Lab and you want to send the SmartApplets to some, but not all, of the NEOs, click Select Devices, check the numbers to which you want to send the text, then click OK. (To send to all connected NEOs, skip this step.) 6. Click Send. If you have set a send list password (see page 120), you must enter the password and click OK. NEO 1 and NEO 2 User Manual 107 ..... WORKING WITH ALPHASMART MANAGER Deleting SmartApplets from NEOs Deleting SmartApplets from NEOs To remove SmartApplets from your NEOs, use the SmartApplets tab in AlphaSmart Manager. On this tab, you select the SmartApplets you want to keep and choose to delete all other SmartApplets as described in the steps below. If you want to deny users access to a SmartApplet installed on your NEO, consider disabling it rather than removing it. Disabling turns off the SmartApplet until you enable it again. Some SmartApplets take some time to install, so disabling can save you time if you plan to use the SmartApplet again in the future but want to prevent access for specific activities. See page 114 to find out how to disable SmartApplets in AlphaSmart Manager. Normally, you would not need to delete SmartApplets from your NEOs, even if you are not using them. However, you might want to remove SmartApplets to free up memory or because you’re beginning a new session or activity in a classroom. Important: If you remove some SmartApplets, such as AlphaQuiz or KeyWords, you also remove any files associated with them. For example, if you remove KeyWords, you also remove any KeyWords work your students have done and progress reports. If there is information on the NEOs that you want to save, be sure to retrieve the data first. Follow these steps to delete SmartApplets from NEOs: 1. In AlphaSmart Manager, click the SmartApplets tab. 2. Click each SmartApplet you want to install or keep in the SmartApplets List A, then click Add => to move it to the Install List B. You should add all SmartApplets that you want on your NEOs, including those that are already installed on the NEOs. 3. Check the box above the SmartApplet list C to specify that all SmartApplets that aren’t in the Install List should be deleted from NEOs. 108 NEO 1 and NEO 2 User Manual Deleting SmartApplets from NEOs Be careful not to delete nonSmartApplet items that you want to keep. The SmartApplet list includes the fonts included on your NEO, spell check, the Thesaurus, the Text2Speech Updater, and Wireless File Transfer on NEO 2. ..... WORKING WITH ALPHASMART MANAGER In the example below, the Calculator would be deleted since it isn’t included in the Install List. C A B 4. Click the Send List tab and verify that only the SmartApplets you want to keep on your NEOs are in the Send List. 5. If you have a SmartOption Mobile Lab and you want to send the changes to some, but not all, of the NEOs, click Select Devices, check the numbers to which you want to send the text, then click OK. (To send to all connected NEOs, skip this step.) 6. Click Send. If you have set a send list password (see page 120), you must enter the password and click OK. NEO 1 and NEO 2 User Manual 109 ..... WORKING WITH ALPHASMART MANAGER Defining System Settings for the NEO Defining System Settings for the NEO NEO and its SmartApplets have settings that let you customize how it works. There are two ways to change these settings: • You can change the settings on the NEO itself using the Control Panel. See page 69. • You can use AlphaSmart Manager to change the settings. In some cases, the same settings are available in both places; in other cases, slightly different settings are available. You can change settings for specific SmartApplets, or you can change System settings. System settings apply to all functions and SmartApplets on your NEO. SmartApplet settings, on the other hand, apply only to the selected SmartApplet. System Settings You Can Change in AlphaSmart Manager The table below lists the System settings you can change in AlphaSmart Manager. (It does not include the settings for specific SmartApplets.) You can change many of these same settings in the Control Panel on each NEO. See page 69 to change the settings and page 70 to find out more about the settings. 110 Setting What It Does: Startup SmartApplet Lets you designate which SmartApplet starts automatically when you turn on your NEO. See page 113. Auto Repeat Sets whether keys repeat when held down. The delay before keys repeat is affected by the Slow Keys setting. If the Slow Keys setting is greater than one second, then that delay also determines how long NEO waits before repeating a key that is held down. Sticky Keys Sets whether you must hold keys down for keyboard commands or whether you can press them sequentially. For example, to copy text, you would normally select it and then press ctrl and C at the same time. However, if the sticky keys setting is on, you could select the text, press ctrl and let go, and then press C. This is useful for those who have difficulty pressing more than one key at the same time. The Sticky Keys setting affects key combinations that include the shift, option, cmd, or ctrl keys. Keyboard Layout Lets you select alternate keyboard layouts (such as Dvorak). For pictures of the keyboard layouts, see page 73. NEO 1 and NEO 2 User Manual ..... WORKING WITH ALPHASMART MANAGER Defining System Settings for the NEO Setting NEO 1 and NEO 2 User Manual What It Does: Idle Time Sets the time that a NEO can be idle before turning off automatically (4–59 minutes). Note that this idle time does not apply when the Responder or Accelerated Reader SmartApplets are running on NEO 2. If the Responder SmartApplet is running, the idle time is always 30 minutes. If the Accelerated Reader SmartApplet is running, the idle time is always 10 minutes. Slow Keys and Slow Key Delay Sets a time delay for holding down a key before the character appears onscreen. This is useful for those who have difficulty typing to ensure that brief accidental key presses aren’t recorded. Reset System Font to Default Sets your NEO to the four-line fixed-width system font instead of another font size you’ve chosen. See page 35. Transfer Speed Sets the rate at which text is transferred to your computer when NEO is connected to the computer by cable. See page 77. IR Transfer Speed Sets the rate at which text is transferred to your computer when NEO is beaming to the computer. See page 78. Master Password Lets you set your own personal master password for your NEO. This password is required for many tasks on the NEO. See page 119. Printer Selection Doesn’t apply to NEO but is provided for compatibility with other devices. Two-Button On mode Lets you specify that two keys must be pressed at the same time—enter and on/off—to turn your NEO on. When this mode is on, pressing on/off alone does not turn the NEO on. This helps prevent NEO from being turned on accidentally if the on/off key is bumped. 111 ..... WORKING WITH ALPHASMART MANAGER Defining System Settings for the NEO How t o Change System Set tings Using AlphaSmart Manager 1. In AlphaSmart Manager, click the Settings tab. 2. Click System in the Settings List A. A B 3. Check the settings you want to change B. (You might need to scroll down to view all the settings.) Then, make changes to the settings as needed. Note: When you change settings, notice that AlphaSmart Manager automatically checks the System box on the left A. If you remove the check mark from this box, changes you make to settings won’t be sent to your NEO. 4. Click the Send List tab and verify that the settings you want to send appear in the Send List Display. 5. If you have a SmartOption Mobile Lab and you want to send the changes to some, but not all, of the NEOs, click Select Devices, check the numbers to which you want to send the text, then click OK. (To send to all connected NEOs, skip this step.) 6. Click Send. If you have set a send list password (see page 120), you must enter the password and click OK. 112 NEO 1 and NEO 2 User Manual ..... WORKING WITH ALPHASMART MANAGER Defining Settings for SmartApplets About t he Startup SmartApplet To find out how to set the startup SmartApplet right on the NEO, see page 59. The Startup SmartApplet that you choose in the System settings is the SmartApplet that starts automatically when you turn on your NEO. To use another SmartApplet, you must press the applets key and select a SmartApplet from the list. AlphaWord Plus is the startup SmartApplet when you first receive the NEO so you can begin writing right away. You can choose only one SmartApplet as the startup program. If you don’t select a startup SmartApplet, when you turn on a NEO, it goes to the SmartApplets list, with the cursor next to the SmartApplet you were working in when you turned the NEO off. Defining Settings for SmartApplets Like the System settings, the settings for each SmartApplet can be changed either in the NEO Control Panel or in AlphaSmart Manager. Some settings are different in the two locations. The number of settings for each SmartApplet varies. AlphaWord Plus, for example, has several settings; other SmartApplets have only one. If you have a SmartOption Mobile Lab, you can only change settings for SmartApplets that are installed on all connected NEOs or for SmartApplets that you have just chosen to install. Only these SmartApplets are listed in the Settings list. This can be especially important if you are using a mixed SmartOption Mobile Lab because SmartApplets that are only for NEO 2 (such as the Accelerated Reader and Responder SmartApplets) are not listed if NEO 1 laptops are connected as well as NEO 2 laptops. Disconnect the NEO 1 laptops if you want to change settings for NEO 2 SmartApplets. Follow these steps to change SmartApplet settings using AlphaSmart Manager: 1. In AlphaSmart Manager, click the Settings tab. 2. Click the SmartApplet in the Settings List on the left A. NEO 1 and NEO 2 User Manual 113 ..... WORKING WITH ALPHASMART MANAGER Defining Settings for SmartApplets 3. Check the settings you want to change B; then, make your changes to the settings. A B Note: When you change settings, notice that AlphaSmart Manager automatically checks the corresponding SmartApplet check box on the left A. If you remove the check mark from this box, changes you make to those settings won’t be sent to your NEO. 4. Click the Send List tab and verify that the settings you want to transfer appear in the Send List Display. 5. If you have a SmartOption Mobile Lab and you want to send the changes to some, but not all, of the NEOs, click Select Devices, check the NEOs to which you want to send the text, then click OK. (To send to all connected NEOs, skip this step.) 6. Click Send. If you have set a send list password (see page 120), you must enter the password and click OK. About t he Disabl e This SmartApplet Setti ng Every SmartApplet includes the “Disable This SmartApplet” setting. You can check this box to disable the SmartApplet for connected NEOs so it cannot be used. (To find out how to disable SmartApplets right on the NEO, see page 60.) For example, you might disable Calculator if you want to prevent access to electronic calculations during a quiz or math assignment. 114 NEO 1 and NEO 2 User Manual ..... WORKING WITH ALPHASMART MANAGER Defining Settings for SmartApplets Al phaWord Pl us Settings Some of these settings can also be changed in the NEO Control Panel. You can’t set file size limits in the Control Panel, but you can set passwords for individual files instead of setting the same password for all files. For more information, see page 71. You can estimate page lengths using a character count of 2,048. A page is approximately 2,048 characters, though page length can be affected by printer and program settings on your computer. AlphaWord Plus has its own settings that you can control through AlphaSmart Manager: Setting: What It Does: Disable This SmartApplet If checked, this setting prevents the user from using AlphaWord Plus. See page 114. Passwords Enabled Enables the use of individual file passwords in AlphaWord Plus. See page 80. When teachers share a SmartOption Mobile Lab, it is helpful to enable file passwords and teach students to password-protect their files. To set unique file passwords, see page 81. File Passwords Specifies a common password for all AlphaWord Plus files. See page 121. Maximum File Size (in characters) Set by default to 51,200 characters (approximately 25 pages). See “File Sizes” below. Minimum File Size (in characters) Set by default to 512 characters (approximately a quarter of a page). See “File Sizes” below. Show Marks Sets whether to display arrows where there are tabs and carriage returns. Delete All AlphaWord Plus Files Deletes all AlphaWord Plus files on connected NEOs, including files 1–8 and named files that aren’t in files 1–8. File Sizes In the AlphaWord Plus settings in AlphaSmart Manager, you can set minimum and maximum file size limits. (The minimum size limit ensures that a certain amount of space is reserved on the NEO for each file.) The highest maximum file size allowed is 102,400 characters (about 50 pages); the minimum is 512 characters (about one quarter of a page). To keep track of how many characters and pages are in a file and how much space is left, press ctrl-W while working in the file on the NEO (see page 49). If you increase the maximum file size, keep in mind that the total amount of space available on a NEO remains the same, and SmartApplets such as AlphaQuiz and their data files also take up space on the NEO. The space required for SmartApplets affects the amount of space left for AlphaWord Plus files. When working with large files, you might notice some performance issues, depending on the number of SmartApplets on each NEO, the number of files, and the size of files and data on the NEO. NEO 1 and NEO 2 User Manual 115 ..... WORKING WITH ALPHASMART MANAGER Using Send Lists Spell Check Settings Spell Check also has its own settings that you can control through AlphaSmart Manager: Setting: What It Does: Disable this SmartApplet Prevents users from performing spell checks. Allow adding words to dictionary Allows users to add words to the custom user dictionary so they are not flagged by a spell check again in the future. Delete user dictionary Deletes the custom user dictionary on all connected devices. Other Smar tApplets Settings Other SmartApplets, such as Beamer or KeyWords, have settings specific to them. To check or change the settings, simply click the Settings tab in AlphaSmart Manager, click the SmartApplet name on the left, and then review the settings listed on the right. Using Send Lists Send lists are not used when you’re retrieving files or data on the Get/Print AlphaWord Files tab or the KeyWords tab. Whenever you choose to send AlphaWord files, install or remove SmartApplets, or change settings, your changes are added to a Send List. To send the changes to your NEO(s), you must click the Send List tab, choose the NEOs to receive the changes (if necessary), and click Send. This allows you to review all changes before you send them to NEOs. If you have several NEOs connected using a SmartOption Mobile Lab, you can make sure that the right NEOs are getting the changes. For more tips on using send lists, refer to the AlphaSmart Manager User Manual. You can save send lists that include changes you make regularly. This can save you time and ensure consistency. How t o Send Changes Wit hout Saving the Send List 1. In AlphaSmart Manager, make the changes that you want to send to your NEO on the AlphaWord Files to Send tab, the SmartApplets tab, and/or the Settings tab. 116 NEO 1 and NEO 2 User Manual ..... WORKING WITH ALPHASMART MANAGER Using Send Lists 2. Click the Send List tab and verify that the changes you want to make appear in the Send List display. 3. If you have a SmartOption Mobile Lab and you want to send the changes to some, but not all, of the NEOs, click Select Devices, check the numbers to which you want to send the text, then click OK. (To send to all connected NEOs, skip this step.) 4. Click Send. If you have set a send list password (see page 120), you must enter the password and click OK. How t o Save Changes in a Send List 1. In AlphaSmart Manager, make the changes that you want to send to your NEO on the AlphaWord Files to Send tab, the SmartApplets tab, and/or the Settings tab. A “startup” send list can make it easy to set up all NEOs in a SmartOption Mobile Lab at the beginning of a school year. The list could include the master password and SmartApplets you want to use and set file passwords to “on.” 2. Click the Send List tab and verify that the changes you want to make appear in the Send List display. 3. Click the File menu and choose Save Send List (or Save Send List As if you’re basing a new send list on an old one). 4. Browse to specify the folder where you want to save the send list, type a name in the field provided, and click Save. (On Macintosh computers, you may need to click the arrow next to the Save As field to see the full dialog box that lets you choose the location.) Notice that your saved send list name appears in the title bar for the window. 5. If you have a SmartOption Mobile Lab and you want to send the changes to some, but not all, of the NEOs, click Select Devices, check the NEO 1 and NEO 2 User Manual 117 ..... WORKING WITH ALPHASMART MANAGER Passwords in AlphaSmart Manager numbers to which you want to send the text, then click OK. (To send to all connected NEOs, skip this step.) 6. Click Send to send the information to your NEO(s). If you have set a send list password (see page 120), you must enter the password and click OK. How t o Open a Saved Send List 1. In AlphaSmart Manager, click the File menu and choose Open Send List. 2. Browse to the folder where the saved send list is located. 3. Click the send list you want to open. (Send lists have an .acf file extension.) 4. Click Open. The name of the send list will be shown in the title of the window. 5. Click the Send List tab in AlphaSmart Manager to see the changes in the opened send list. Important: If the saved send list includes setting changes for a SmartApplet, and you are using or installing a newer version of the SmartApplet when you open the send list, the setting changes won’t be used. Setting changes only apply to the version of the SmartApplet that you were using when you selected the settings. How t o Close a Saved Send List That Is Open In AlphaSmart Manager, click the File menu and choose Close Send List. Passwords in AlphaSmart Manager As explained in “The Three Passwords Used with NEOs” on page 79, there are three types of password protection for the NEO: the master password, file passwords for AlphaWord files, and send list passwords. AlphaSmart Manager lets you control all three types of passwords. For more information, see the procedures on the next few pages. Passwords can be one to six characters long and can contain letters, numbers, and symbols, but not spaces. They are not case-sensitive. 118 NEO 1 and NEO 2 User Manual Passwords in AlphaSmart Manager ..... WORKING WITH ALPHASMART MANAGER Setting or Changing t he Master Password The master password is required when you enable or disable SmartApplets on the NEO itself, when you change spell check settings, when you enable file passwords for AlphaWord Plus, when you change or reset file passwords, or when you change teacher options in KeyWords. You can also use the master password as a substitute for any AlphaWord Plus file password. You can set or change the master password in AlphaSmart Manager and then send the changed password to NEOs. We recommend that you set a unique master password for your NEO(s) for greater security. Follow these steps to change the master password: If you forget your master password, you can set a new one by following these steps. You don’t need to know the old password to set a new one. 1. In AlphaSmart Manager, click the Settings tab. 2. Select System A in the Settings List. 3. Scroll down until you see the Master Password setting B. A B C 4. Delete the text in the field and type the new password you want to use C. (Master passwords can be 1-6 characters long.) 5. Click the Send List tab and verify that the change appears in the send list. 6. If you have a SmartOption Mobile Lab and you want to send the changes to some, but not all, of the NEOs, click Select Devices, check the numbers to which you want to send the text, then click OK. (To send to all connected NEOs, skip this step.) 7. Click Send. If you have set a send list password (see page 120), you must enter the password and click OK. NEO 1 and NEO 2 User Manual 119 ..... WORKING WITH ALPHASMART MANAGER Passwords in AlphaSmart Manager Setting or Changing t he Send List Passwor d Normally, you do not need to enter a password to send changes to NEO(s). However, you can set a password so that no one can send information from AlphaSmart Manager to your NEOs without first typing this password. Follow these steps to set a send list password: If you forget your send list password, contact Technical Support for assistance. Send list passwords can only be set in AlphaSmart Manager, and you must know your old password to set a new one or to clear the password. 1. Windows computers: Click the Edit menu and choose Preferences. Macintosh computers: Click the AlphaSmart Manager menu and choose Preferences. 2. Click Set Send Password (Windows) or Set Password (Macintosh). 3. If you have set a send list password before and you need to change it, enter the old password first in the field provided. 4. Enter the same new send list password in the two fields provided. Make a note of this password. 5. Click OK. 6. Windows computers: Click OK again. Macintosh computers: Close the Preferences dialog box. Clearing (Removing) a Send List Password If you no longer want to use a send list password, you can clear it if you know the current send list password. When you clear the send list password, anyone using AlphaSmart Manager can send changes to your NEO(s) without entering a password. Follow these steps to clear send list passwords. 1. Windows computers: Click the Edit menu and choose Preferences. Macintosh computers: Click the AlphaSmart Manager menu and choose Preferences. 2. Click Set Send Password (Windows) or Set Password (Macintosh). 3. Type the current password in the Old password field. 4. Leave the New password and Retype new password fields blank and click OK. 5. Windows computers: Click OK again. Macintosh computers: Close the Preferences dialog box. 120 NEO 1 and NEO 2 User Manual Passwords in AlphaSmart Manager ..... WORKING WITH ALPHASMART MANAGER Enabling File Passwords for AlphaWord Plus Files and Changing the Default Fi le Password To enable file passwords on a single NEO without using AlphaSmart Manager, see page 80. You can also change individual file passwords by following the steps on page 81, and you can reset file passwords on the NEO by following the steps on page 82. In AlphaSmart Manager, you can set the default file password for all files, but you can’t set passwords for individual files. File passwords are useful for protecting the contents of your AlphaWord files. When you first enable passwords for AlphaWord Plus files, all files use the default password (write) or the password you set in step 4 below. If you decide to set a unique password for each file later, you can do so on the NEO itself; see page 81. You can’t set file passwords without first enabling password protection. To enable passwords and set a new default password for all files: 1. In AlphaSmart Manager, click the Settings tab. 2. Click AlphaWord Plus in the Settings List on the left A. 3. Click the On option for Passwords Enabled B; note that AlphaSmart Manager checks the Passwords Enabled check box. 4. The default password for all AlphaWord Plus files is write. If you want to change it, type a new default file password in the File Passwords field C. (Passwords can be between one and six characters long.) A B C 5. Click the Send List tab and verify that the setting appears in the send list. 6. If you have a SmartOption Mobile Lab and you want to send the changes to some, but not all, of the NEOs, click Select Devices, check the numbers to which you want to send the text, then click OK. (To send to all connected NEOs, skip this step.) 7. Click Send. If you have set a send list password (see page 120), you must enter the password and click OK. NEO 1 and NEO 2 User Manual 121 ..... WORKING WITH ALPHASMART MANAGER Sending a User Dictionary to NEO Sending a User Dictionary to NEO If your writing often contains words that aren’t in NEO’s spell check dictionary, you might want to create your own list of words (a custom user dictionary) and send it to your NEO instead of adding words one by one during a spell check. You can create a word list as a text file on your computer and send it to your NEO using AlphaSmart Manager. This is the most efficient way to update the user dictionary if you want to add words to the dictionary or delete words from it. You should save the text file on your computer so you can update it as needed. A sample user dictionary is shown below. You can separate words in the text file with spaces, commas, tabs, or carriage returns as shown. SpiffyPro Oban Turlock Cumbria Bena Caden Cupertino Islay MegaSync Aptos Surrey You can also delete a user dictionary from the Spell Check settings, either in AlphaSmart Manager (see “Spell Check Settings” on page 116) or in Control Panel on your NEO (see page 70). Each NEO can only have one user dictionary. When you send a new user dictionary to your NEO, it overwrites the existing user dictionary on the NEO. Follow these steps to send a user dictionary to your NEO: 1. Using a word processing program on your computer, create a list of words and save the file as a text file (end the file with .txt, as in mywords.txt). 2. In AlphaSmart Manager, click the File menu and choose Send User Dictionary. 3. Browse to select the text file you created, then click Open (Windows) or Choose (Macintosh). 4. Click the Send List tab and verify that your list of words appears in the SpellCheck Files area of the send list. 122 NEO 1 and NEO 2 User Manual ..... WORKING WITH ALPHASMART MANAGER Replacing the Thesaurus with the Spanish-English Word Lookup 5. If you have a SmartOption Mobile Lab and you want to send the changes to some, but not all, of the NEOs, click Select Devices, check the numbers to which you want to send the text, then click OK. (To send to all connected NEOs, skip this step.) 6. Click Send. If you have set a send list password (see page 120), you must enter the password and click OK. Replacing the Thesaurus with the Spanish-English Word Lookup If you’re not using the thesaurus that comes preinstalled on NEO, you can remove it and replace it with a Spanish-English word lookup utility, which lets you look up Spanish words to find their English equivalents. You can have either the thesaurus or the Spanish-English word lookup on the NEO, but you can’t have both, so you need to remove one as you’re installing the other. To find out how to use the SpanishEnglish word lookup, see page 43. Follow these steps to install the Spanish-English word lookup: 1. In AlphaSmart Manager, click the File menu and choose New Send List. 2. Click the SmartApplets tab. 3. Click Thesaurus-Spanish in the Install List A, then click Add =>. A NEO 1 and NEO 2 User Manual 123 ..... WORKING WITH ALPHASMART MANAGER Updating Your NEO Operating System or SmartApplets Using AlphaSmart Manager 4. Click the Send List and verify “Thesaurus Spanish to English” appears in the SmartApplets section of the list. 5. If you have a SmartOption Mobile Lab and you want to send the changes to some, but not all, of the NEOs, click Select Devices, check the numbers to which you want to send the text, then click OK. (To send to all connected NEOs, skip this step.) 6. Click Send. If you have set a send list password (see page 120), you must enter the password and click OK. AlphaSmart Manager will remove the thesaurus and install the word lookup. Updating Your NEO Operating System or SmartApplets Using AlphaSmart Manager When you install a new version of AlphaSmart Manager, and a new update is available to the NEO operating system or to one or more SmartApplets, there are two ways to update your NEOs. These methods are described below. How t o Update NEOs Without Preserving Wor k If you do not need to save AlphaWord Plus files or student work in the KeyWords SmartApplet, you can follow the steps on the next page to update your NEO laptops. 124 NEO 1 and NEO 2 User Manual ..... WORKING WITH ALPHASMART MANAGER Updating Your NEO Operating System or SmartApplets Using AlphaSmart Manager For a SmartOption Mobile Lab, this procedure will take about 45–60 minutes for NEO 2 laptops. Important: This procedure removes all AlphaWord Plus files and student work in KeyWords and AlphaQuiz, and it restores all default settings. The procedure also removes any SmartApplets that aren’t in the standard set. (See page 57.) The NEO operating system and SmartApplets will be updated to the versions you have available in AlphaSmart Manager. If you want to follow these steps, make sure you retrieve any files you need and complete all KeyWords instruction before updating the NEOs. 1. Start AlphaSmart Manager and connect your NEOs. (See page 86.) 2. In AlphaSmart Manager, click the Setup menu and choose Reset All AlphaSmart Devices. 3. A warning message about loss of data appears. Click Yes (Windows) or OK (Macintosh). AlphaSmart Manager will send a new list that contains the factory default settings and updates to the connected NEOs. How to Update NEOs While Pr eserving Al phaWord Plus Files and KeyWords Data These steps allow you to update your NEOs and still keep all AlphaWord Plus files and your students’ KeyWords work. While this procedure will make the updates you need, the standard procedure on the previous page is the best practice. If you use a SmartOption Mobile Lab, this procedure takes about 2–4 hours for NEO 2 laptops. 1. Start AlphaSmart Manager and connect your NEOs. (See page 86.) 2. In AlphaSmart Manager, click the SmartApplets tab. 3. For each SmartApplet that you want to update, click the SmartApplet name and click Add. The NEO operating system will also be updated. 4. Click Send List. 5. Click Send. NEO 1 and NEO 2 User Manual 125 ..... WORKING WITH ALPHASMART MANAGER Other AlphaSmart Manager Tasks Other AlphaSmart Manager Tasks For more about the other tasks you can do in AlphaSmart Manager, such as setting preferences, restoring settings to factory defaults, or viewing SmartApplet information, refer to the AlphaSmart Manager User Manual. If you do not have a printed copy of the manual, you can find an electronic copy on our Web site or the Documentation CD for NEO 1 and NEO 2. 126 NEO 1 and NEO 2 User Manual T ROUBLESHOOTING This chapter describes some common NEO difficulties and their solutions. If you’re having a problem that you don’t see described here, visit our Web site or contact Technical Support. NEO Difficulties and Solutions Nothing appears on the NEO screen when I turn it on. If the screen is blank except for a flashing cursor in the upper-left corner, then you’re simply in an empty file. Start typing and characters should appear on your screen. If your screen is completely blank without a flashing cursor, check your batteries by connecting your NEO to your computer with a USB cable. If the NEO turns on when you connect it to a computer, you probably have one of these problems: • Your alkaline batteries need to be replaced (see page 137). • Your alkaline batteries were not installed correctly. Reinsert the batteries, making sure to have the + and – ends as shown on the diagram inside the battery door. • Your rechargeable battery pack was fully discharged and needs charging. When I attach my NEO to my computer, I can’t send any data, and my NEO scr een shows a file instead of the “Attached to…” message. Check these three things: • Examine the cable connections—one may be loose. • Plug your USB cable into a different USB port on your computer. • Close AlphaSmart Manager if it’s running. You can’t send text to a program on your computer when AlphaSmart Manager is running. When I turn on my NEO, I see something ot her t han the file that I expected. The startup SmartApplet determines which program starts when you turn the NEO on. NEO 1 and NEO 2 User Manual 127 ..... TR O U B L E S H O O T I N G NEO Difficulties and Solutions If the startup SmartApplet is AlphaWord Plus, your NEO places you in the file you were last working in when you turned the NEO off. To change files, press one of the numbered file keys. If you’ve set a different startup SmartApplet, that SmartApplet will open when you turn on the NEO. (See page 59 to change the startup SmartApplet right on the NEO; see page 113 to change it in AlphaSmart Manager.) If you do not have a startup SmartApplet specified, the SmartApplets list will appear, with the cursor next to the last SmartApplet you worked in. When I send a file to my computer, some of the characters don’t show up. This is probably a problem with the speed with which the NEO is sending the data. Try these measures to solve the problem: • Disconnect NEO from the computer and check the file transfer speed by pressing option--S. Reset NEO to a slower setting (speed 1 is the slowest). • Try using a different word processing program on your computer. Some programs allow faster data transfer than others. If this solves the problem, you can copy and paste the text back into your original program. • Adjust keyboard settings on your computer, experimenting with the key repeat rate and the repeat delay rate. (On a Macintosh, adjust hardware settings in System Preferences; on a Windows computer, adjust keyboard settings in Control Panel.) I try to type in a file, but no charact er s appear. You might have the Slow Keys setting turned on. You can change the setting in one of three ways: • Press ctrl-option--K and adjust the time delay. • On your NEO, press applets and choose the Control Panel SmartApplet. Then step through the settings to change to the keyboard settings you want. • In AlphaSmart Manager, select a Slow Keys setting from the Settings tab. See page 113 for more information. 128 NEO 1 and NEO 2 User Manual ..... TR O U B L E S H O O T I N G NEO Difficulties and Solutions My fi le (or the end of my fi le) is filled with garbage characters. There are three ways you can deal with this situation: • If you have no useful text in the file, just press clear file to remove the entire file. • If you have some data you would like to save, place the cursor where the garbage characters start, press shift-end to select the garbage characters, then press delete. • Send the file to your computer and cancel the transfer when garbage characters appear. When I tr ansfer text to my Windows computer, the case of the characters is reversed; all the lowercase characters show up as uppercase, and t he uppercase characters show up as lowercase. The Caps Lock key on your computer was probably on when you sent the text from NEO. Press Caps Lock on your computer keyboard to turn it off, and then resend the file. When I press a key, the wrong let ter appears on the screen. Your NEO is probably using a different keyboard layout. You can change the keyboard layout in one of three ways: • Press option--L and select a layout. • On your NEO, press applets and choose the Control Panel SmartApplet. Then step through the settings to change to the keyboard layout you want. • In AlphaSmart Manager, select a layout from the Settings tab. See page 113 for more information. My LCD screen broke. Is it covered under warranty? What should I do? If the NEO malfunctions during the warranty period, repairs are covered. However, a broken LCD screen is not considered a malfunction and is therefore not covered under warranty. The LCD screen can be replaced; contact Technical Support for pricing information and a Return Material Authorization number. Do I need ant ivirus software for my NEO? Antivirus software isn’t needed for your NEO. NEO 1 and NEO 2 User Manual 129 ..... TR O U B L E S H O O T I N G NEO Difficulties and Solutions What should I do if I spil l something on my NEO? If you’ve spilled water, follow these steps: 1. Remove all power sources (batteries, USB cable, AC adapter, and the rechargeable battery pack). 2. Dry the NEO using a canned air dusting product or hair dryer (on air only or low heat setting). 3. When the NEO is dry, reconnect the power sources and try turning the NEO on. 4. If the NEO doesn’t turn on or malfunctions, contact Technical Support. If you spilled something other than water, contact Technical Support immediately for assistance. Don’t let the NEO sit for an extended period before consulting Technical Support. The cleanup measures that Technical Support will suggest aren’t likely to work if you don’t deal with the spill soon after it occurs. When I use Kid Wor ks and St udent Wr iting Center on my computer, I can’t send text f rom my NEO. With graphic-intensive programs such as these, you need to use the slowest transfer speed. Change the transfer speed by following the instructions on page 77 and choosing Very Slow (1). If you still lose data sending to Kid Works 2, turn Sound Effects off by deselecting it under the Kid Works 2 Options menu. When I try to send NEO 2 files to supported pr ograms such as Google Docs, I see a message that says Wir eless File Transfer is not installed or disabled. You cannot transfer files between NEO 2 and these supported programs if you have removed Wireless File Transfer using AlphaSmart Manager or if you have disabled Wireless File Transfer. If you have deleted Wireless File Transfer and you want to use this feature, you must use AlphaSmart Manager to reinstall Wireless File Transfer. See page 105. If you have disabled Wireless File Transfer, change the settings in AlphaSmart Manager to enable it again. See page 114. 130 NEO 1 and NEO 2 User Manual ..... TR O U B L E S H O O T I N G Reinstalling or Repairing Keys on the NEO Keyboard R e i n s t a l l i n g o r R e p a i r in g K e y s o n t h e N E O K e y b o a r d In the unlikely event that one of the NEO keys comes off the keyboard, you can probably reinstall it yourself by following the instructions on the next few pages. Read through all the instructions before reinstalling the keys. If the spacebar has come off, see “Reinstalling the Spacebar” on page 134. If only the cap has come off the key (not the white plastic scissors assembly), follow the steps in “Reinstalling the Key Cap Only” on page 131. If the white plastic scissors assembly has come off in addition to the key cap, follow the steps in “Reinstalling the Scissors Assembly” on page 132. Reinstalli ng t he Key Cap Only 1. Start by looking at the underside of the key cap to make sure there are no broken prongs, which are the protruding U-shaped clasps and hooked pegs that help keep the key in place. Also, note the location of the plus sign in the middle of the key cap’s underside. The photos below show the two main styles of keys; though the shapes are different, the keys have the same basic structure. 2. If you see at least one broken prong, stop here and contact Technical Support for your location. (See the beginning of this manual for contact information.) NEO 1 and NEO 2 User Manual 131 ..... TR O U B L E S H O O T I N G Reinstalling or Repairing Keys on the NEO Keyboard If the prongs don’t appear to be damaged, and the key’s underlying scissors assembly is still flatly in place on your keyboard as shown to the right, start the repair by gently placing the key back on top of its original location, centering the plus sign over the circular dome that the scissors assembly surrounds. Do not press the key down yet. 3. Before you press the key down, please note that if you press too hard, you may break the underlying scissors pieces, in which case you will need to contact Technical Support and arrange for repair. Now, press down gently until you hear the key click into place on the left and right sides. If it clicks into place on one side, carefully push on the opposite side until it clicks. If you don’t have the key perfectly aligned, wiggling the key slightly as you press down may help. Reinstalling t he Scissors Assembly 1. If one or both of the white scissors assembly pieces are still attached to the key cap, separate them from the key cap. 2. Now, place the two scissors pieces in front of you, so that the square piece is on your left and the round piece is on your right as shown. Make sure the pieces have the correct sides facing up; the square piece should be tilted slightly towards the right, and the round piece should tilt slightly towards the left. 132 NEO 1 and NEO 2 User Manual ..... TR O U B L E S H O O T I N G Reinstalling or Repairing Keys on the NEO Keyboard 3. Now, slide the round piece underneath the square piece, and bring it up through the center of the square piece. Halfway up, maneuver the small knobs on each side of the round piece into the holes on each side of the square piece, one at a time, to create the scissoring action. When you’ve finished, the assembly should look like the picture to the right. 4. Take the two joined pieces and place the assembly into the keypad. Look at the space where the scissors piece fits. For most keys, the left side has two little “slider” bars. The right side has a narrow vertical channel. For arrow keys, the top side has the two little “slider” bars, and the bottom has a narrow vertical channel. 5. For all keys except the arrow keys, put the square part of the scissors piece to the far left of the keypad area where it is to sit; then, slide it underneath the two slider pieces. Slide it all the way to the right. For arrow keys, put the square part of the scissors at the top of the keypad area where it is to sit; then, slide it underneath the two slider pieces. Slide it all the way to the bottom of the area. 6. Now you should be able to click the right side (or the bottom side of arrow keys) into the narrow channel just by pressing down on that side. You should hear it click soundly into place. It should look like the image to the right. 7. Now, go to page 131 and follow the steps for reinstalling the key cap. NEO 1 and NEO 2 User Manual 133 ..... TR O U B L E S H O O T I N G Reinstalling or Repairing Keys on the NEO Keyboard Reinstalling t he Spacebar 1. Make sure the wire bar is snapped into the underside of the spacebar correctly. The long part of the wire needs to be snapped into the little holders on each end of the bottom of the spacebar key cap. When the wire is correctly positioned, two wire “ears” will stick up as shown below. 2. Hold the spacebar with the thumb and index finger of each hand as shown below. Make sure the wire “ears” are extended toward the bottom of the spacebar. 134 NEO 1 and NEO 2 User Manual ..... TR O U B L E S H O O T I N G Reinstalling or Repairing Keys on the NEO Keyboard 3. Holding the spacebar above and slightly in front of its intended location, insert the wire “ears” into the square tabs on the keyboard as shown below. Hook each wire “ear” into the square tabs on the keypad, one at each end. Slide the wire ears from the front of the tabs to the back. Hold the wire there with your thumbs as you fold the spacebar forward and snap it into place. NEO 1 and NEO 2 User Manual 135 M ORE A BOUT NEO B ATTERIES AND P OWER S OURCES This appendix contains technical information about batteries for your NEO. It explains • Power sources for the NEO • When the NEO turns on automatically • Alkaline batteries • Rechargeable batteries • The low battery indicator • Tips on caring for batteries and storing your NEO How Your NEO Receives Power Your NEO receives power in one of two ways: • Through three AA batteries (alkaline provide the longest battery life—up to 700 hours or more) • Through an optional internal rechargeable battery pack you have purchased (see our Web site for details) If you use AA batteries, all three must be the same type. When the battery power is low, you can replace the batteries as described on the next page. If you have a rechargeable battery pack, you recharge it with the AC adapter that came with the battery pack. Refer to “Using the Optional Rechargeable Battery Pack” on page 138 for additional information. When your NEO is connected to your computer with a USB cable, it also receives power from the computer. However, NEO functions are limited when it is connected to a computer. NEO Turns on Automatically When Connected NEO turns on automatically when you use a USB cable to connect it to • A SmartOption Mobile Lab or an AlphaHub that is on (usually in a classroom situation) • A running computer 136 NEO 1 and NEO 2 User Manual ..... MORE ABOUT NEO BATTERIES AND POWER SOURCES Replacing AA Batteries NEO remains on until the cable is disconnected or the AlphaHub or computer is turned off. When the cable is disconnected or power is removed from the cable, NEO returns to the state it was in before connecting. For example, if it was off before connecting, it will turn off again when disconnected. When connected to a computer or AlphaHub, NEO uses the power available from the computer even if no batteries are installed. Don’t connect the AC adapter when NEO is connected to a computer; it’s not necessary. Replacing AA Batteries When you replace NEO’s AA batteries, you must change all three batteries. If one discharged AA battery is used with two new batteries, the battery life is significantly reduced, even though two out of the three are new. Follow these steps to replace AA batteries: 1. Turn the NEO over. If a small screw is holding the cover in place A, remove the screw using a Phillips screwdriver. 2. On the back of a NEO, put your thumbs in the circles on the battery compartment cover B and slide the cover toward the left to remove it from the NEO. B NEO 1 and NEO 2 User Manual B A 137 ..... MORE ABOUT NEO BATTERIES AND POWER SOURCES Using the Optional Rechargeable Battery Pack 3. Remove the three old batteries from the battery compartment. 4. Insert three AA batteries into the compartment. Make sure the + end of each battery points toward the black and red cables. 5. Put the battery compartment cover back on and slide it back in place. You can reattach the small Phillips screw to make sure the cover stays shut. U s i n g t h e O p t i o n a l R e c ha r g e a b l e B a t t e r y P a c k If you purchased a rechargeable battery pack, your batteries are automatically recharged whenever you connect the NEO to a computer or AlphaHub using a USB cable. You can also recharge the batteries by plugging the NEO in using the AC adapter. Page 5 describes how to charge or recharge the battery pack using the AC adapter. Important: If you’re going to store your NEO for a month or longer, charge it before you store it, and then again after you take it out of storage to compensate for the batteries’ self-discharge. Specifications for t he AC Adapter These are the specifications for the AC adapter that is included with the rechargeable battery pack: • Class 2 transformer • Input: AC 120V 60Hz 9W (US) or 230V 50Hz 11.5W (UK and Europe) 138 NEO 1 and NEO 2 User Manual Using the Optional Rechargeable Battery Pack ..... MORE ABOUT NEO BATTERIES AND POWER SOURCES • Output: DC 7.5V 500 MA – (Negative) + (Positive) You should always use the AC adapter supplied with the battery pack; don’t use other types. About t he Optional Rechargeable Batteries NEO’s rechargeable batteries use Nickel Metal Hydride (NiMH) cells. NiMH cells can be charged about 500 times. Fully charged batteries can power the NEO for 60–150 hours (or even much longer), depending on use. (Note, however, that fully charged batteries that are never used lose their charge in about a month due to the self-discharge effect.) New NiMH batteries need to be “cycled”—also known as “conditioned”—three to five times before they hold a full charge. This means that, during the first three to five charge cycles, the batteries hold a successively better charge each time until they reach full capacity. To charge the batteries, plug the AC adapter into a working electrical outlet and connect it to the power port on the left side of your NEO as described on page 5. Conditioning the Batteries To condition the batteries, follow these steps: 1. Fully charge your NEO with the AC adapter. 2. Use your NEO without the AC adapter until the low battery message appears. (This may take 60–150 hours of use.) 3. Repeat steps 1 and 2 three to five times. You’ll get the longest life from your batteries if you wait for the low battery warning to appear before recharging so the batteries aren’t needlessly recharged. Charging with the AC adapter for about 8–16 hours fully charges the batteries; if you use an AlphaHub or USB cable to recharge the batteries, it may take as long as 24 hours. Don’t charge the batteries for more than a week; doing so may damage the batteries. NEO 1 and NEO 2 User Manual 139 ..... MORE ABOUT NEO BATTERIES AND POWER SOURCES Using the Optional Rechargeable Battery Pack NEO’s indicator light A turns green when the device is fully charged. A Storing and Recharging NEOs Rechargeable batteries that aren’t used over time lose their charge and need to be fully charged again before being used. If the batteries lose too much charge while in storage (which can happen if you store your NEO for longer than you intended), the batteries themselves may become damaged, which in turn can damage the NEO. Important: If you’re going to store your NEO for a month or longer, charge the batteries before you store it, and then charge them again after you take the NEO out of storage to compensate for the batteries’ self-discharge. Lifetime of the Rechargeable Batteries Well-maintained rechargeable batteries last about 500 charges, or about three years. If your battery charge lasted forty hours in the past, but now it lasts only one hour, you need a new battery pack, which you can purchase from our Web site. If your batteries have run down, and you don’t have an AC adapter, you can still connect your NEO to your computer and transfer the data in your files while the computer provides power to your NEO. You can also temporarily switch to AA alkaline batteries until you can obtain a new rechargeable battery pack. 140 NEO 1 and NEO 2 User Manual Low Battery Message ..... MORE ABOUT NEO BATTERIES AND POWER SOURCES Toxic Elements Statement Each rechargeable battery cell is a sealed container enclosing a nickel electrode and a potassium hydroxide electrolyte. The electrolyte is caustic. Avoid contact with skin or eyes. If exposed accidentally, flush eyes with water immediately. Warning! Do not incinerate or mutilate the battery, as this may cause it to burst or release toxic materials. Do not short circuit, as this may cause burns. Please dispose of in accordance with local, state, and federal regulations. Low Battery Message When your AA batteries or rechargeable batteries are getting low, a warning message appears on the NEO screen. The message appears about eight hours before your AA batteries are dead and about twenty minutes before your rechargeable batteries are dead. Be sure to replace your AA batteries or recharge your optional battery pack before the batteries are completely discharged. Checking Battery Status (Charge) To find out how much battery charge is remaining, follow these steps to check the battery status on your NEO: 1. Press ctrl--B. The display shows a picture representing the amount of battery power left and a message showing the percentage. 2. Press any key to return to your file. You can also check battery status in the Control Panel by following these steps: 1. Press applets. 2. Move the cursor down next to Control Panel and press enter. 3. Move the cursor down next to Display battery status and press enter. The display shows a picture representing the amount of battery power left and a message showing the percentage. 4. Press any key to leave this screen. NEO 1 and NEO 2 User Manual 141 ..... MORE ABOUT NEO BATTERIES AND POWER SOURCES Tips on Caring for Batteries Tips on Caring for Batteries • To avoid battery leakage in AA batteries, change the batteries as soon as they become weak. • Do not drop, puncture, disassemble, mutilate, or incinerate the batteries. • Do not leave batteries in hot locations. N E O ’ s B a c k u p L i t h i um B a t t e r y NEO contains a secondary backup battery that isn’t intended to be accessed by users. The lithium battery provides power to the memory and helps prevent data loss when the unit is turned off or when the batteries are dead or removed. The lithium battery will last approximately five to seven years. If you suspect a problem with the lithium battery, visit our Web site for more information or contact Technical Support for assistance. California USE Only: This Perchlorate warning applies only to primary CR (Manganese Dioxide) Lithium coin cells sold or distributed ONLY in California, USA: “Perchlorate Material-special handling may apply. See www.dtsc.ca.gov/hazardouswaste/perchlorate.” 142 NEO 1 and NEO 2 User Manual K EYBOARD C OMMANDS AND S PECIAL C HARACTERS This appendix provides lists of keyboard commands and information and tables that show you how to enter international and special characters using your NEO. Ke yboa rd Com mands Action Move one character left or right Move up or down one line Move up one screen (scrolling) - Move down one screen (scrolling) - Move to beginning of line - Move to end of line - Move to beginning of file Move to end of file NEO 1 and NEO 2 User Manual Keyboard Command home end Move to previous word option- Move to next word option- Move to previous sentence ctrl- Move to next sentence ctrl- Move to previous paragraph ctrl- Move to next paragraph ctrl- Select/deselect one character to the left shift- Select/deselect one character to the right shift- Select/deselect one line up shift- Select/deselect one line down shift- Select from cursor to beginning of word shift-option- Select from cursor to end of word shift-option- 143 ..... KEYBOARD COMMANDS AND SPECIAL CHARACTERS Keyboard Commands Action Select from cursor to beginning of line shift-- Select from cursor to end of line shift-- Select all (select entire file) ctrl-A or -A Cut selected text to clipboard ctrl-X or -X Copy selected text to clipboard ctrl-C or -C Paste text from clipboard ctrl-V or -V Have the selected text read by an optional Text2Speech device ctrl-M Change settings for the Text2Speech device ctrl-J Delete a character or selection to the left of the cursor backspace Delete a character or selection to the right of the cursor delete or ctrl-backspace Clear the entire contents of the file Clear the contents from all eight workspace files Permanently delete an entire file Permanently delete all files Recover 40 characters Recover file from last deletion Recover entire file Find text Find again Find and replace Check spelling Spell check word containing cursor Spell check on/off Spell check a selected section Ignore all occurrences in spell check Replace all in spell check Open thesaurus 144 Keyboard Command clear file shift-ctrl-option--clear file option--clear file ctrl-option--clear file ctrl-option--R option--R ctrl-shift-option--R find or -F -G ctrl-find spell check -spell check option--spell check ctrl-spell check ctrl-I ctrl-enter ctrl-T NEO 1 and NEO 2 User Manual Keyboard Commands Action File status (characters) File status (pages) File statistics (number of words, characters, paragraphs, and spaces in a file) Number of characters in all files Number of pages in all files Word count (characters, words, paragraphs, pages) System details Clipboard contents Clipboard status (characters) ctrl--I -I ctrl-option--I shift-ctrl--I shift--I ctrl-W option--V ctrl-option--C ctrl-shift-option--C option--C Print files print or -P Typing Timer -find Create new file ctrl-N Open file ctrl-O -O Save and name a file ctrl-S Select file ctrl-F Delete file ctrl-D Send current AlphaWord Plus file to another NEO with Beamer ctrl-send Send current AlphaWord Plus file to supported programs like Google Docs (NEO 2 only) -send Receive an AlphaWord Plus file from another NEO with Beamer ctrl-B Go to SmartApplets menu Set a startup SmartApplet from the SmartApplets menu Disable a SmartApplet from the SmartApplets menu NEO 1 and NEO 2 User Manual Keyboard Command Clipboard status (pages) Open or retrieve file from supported programs (NEO 2 only) ..... KEYBOARD COMMANDS AND SPECIAL CHARACTERS applets ctrl-applets ctrl--L 145 ..... KEYBOARD COMMANDS AND SPECIAL CHARACTERS Keyboard Commands Action Display information about selected SmartApplet option-applets Select font size ctrl-option--F Copy linked file to clipboard Copy current screen of a linked file Select section View linked file/main file Password enable/disable (master password required) Change file password Enable/disable Calculator (master password required) Sticky Keys, Auto Repeat, Show Marks status Slow Keys status shift-ctrl--C shift-ctrl-C -S ctrl-L ctrl-option--P option--P ctrl--C option--K ctrl-option--K Change keyboard layout (QWERTY, Dvorak, Right, Left) option--L Change send speed (cable) option--S Change send speed (IR) Switch to another file (when connected by USB) Check battery status 146 Keyboard Command ctrl-option--S -File 1 (File 2, File 3, and so on) ctrl--B Set idle time option--T View help contents ctrl-h or -H Copy help contents ctrl-C View system hardware details ctrl-shift-option--I View system software details ctrl-shift-option--B NEO 1 and NEO 2 User Manual International and Special Characters ..... KEYBOARD COMMANDS AND SPECIAL CHARACTERS International and Special Characters The following tables show the international and special characters that NEO supports and the keys to press to generate each character. Keyboard combinations separated by hyphens (ctrl-option-2, for example) should be pressed in the order given and held down until the last key is pressed. Keyboard combinations separated by a comma (for example, option-E, A) should be pressed sequentially; in this example, press and hold the option key while pressing E, then release them both before pressing A. You will not see a character displayed after pressing the E, but the character that appears after pressing the A will be an accented lowercase a. NEO 1 and NEO 2 User Manual Character Keystroke(s) Notes Á option-e, shift-a acute accent À option-`, shift-a grave accent Ä option-u, shift-a umlaut accent à option-n, shift-a tilde accent Å option-shift-a dot accent á option-e, a acute accent à option-`, a grave accent â option-i, a circumflex accent ä option-u, a umlaut accent ã option-n, a tilde accent å option-a dot accent æ option-' digraph (ligature) Æ option-shift-' digraph (ligature) ç option-c cedilla accent Ç option-shift-c cedilla accent É option-e, shift-e acute accent È option-`, shift-e grave accent Ê option-i, shift-e circumflex accent Ë option-u, shift-e umlaut accent é option-e, e acute accent 147 ..... 148 KEYBOARD COMMANDS AND SPECIAL CHARACTERS International and Special Characters Character Keystroke(s) Notes è option-`, e grave accent ê option-i, e circumflex accent ë option-u, e umlaut accent í option-e, i acute accent ì option-`, i grave accent î option-i, i circumflex accent ï option-u, i umlaut accent Ñ option-n, shift-n tilde accent ñ option-n, n tilde accent Ó option-e, shift-o acute accent Ò option-`, shift-o grave accent Ô option-i, shift-o circumflex accent Ö option-u, shift-o umlaut accent Õ option-n, shift-o tilde accent ó option-e, o acute accent ò option-`, o grave accent ô option-i, o circumflex accent ö option-u, o umlaut accent õ option-n, o tilde accent Ú option-e, shift-u acute accent Ù option-`, shift-u grave accent Û option-i, shift-u circumflex accent Ü option-u, shift-u umlaut accent ú option-e, u acute accent ù option-`, u grave accent û option-i, u circumflex accent ü option-u, u umlaut accent ÿ option-u, y umlaut accent NEO 1 and NEO 2 User Manual International and Special Characters . Character Keystroke(s) ™ option-2 ® option-r © option-g ø option-o Ø option-shift-o ° option-shift-8 ∞ (infinity) option-5 § option-6 ¶ option-7 ¿ option-shift-/ ¡ option-1 » option-shift-\ « option-\ ´ (acute accent) option-e, space ` (grave accent) option-`, space ^ (circumflex) option-i, space ¨ (umlaut) option-u, space ~ (tilde) option-n, space (superscript dot) option-h ½ ctrl-option-2 ..... KEYBOARD COMMANDS AND SPECIAL CHARACTERS ctrl-option-3 NEO 1 and NEO 2 User Manual ¼ ctrl-option-4 ÷ option-/ ± option-shift-= ƒ option-f $ shift-4 ¢ option-4 £ option-3 ¤ option-shift-5 149 ..... KEYBOARD COMMANDS AND SPECIAL CHARACTERS International and Special Characters Character Keystroke(s) ¥ option-y € option-shift-2 ß (beta or German Sharp S) option-s Σ (sigma) option-w π (pi) option-p µ (mu) option-m Ω (omega) option-z Tr oubleshooting Special Charact ers International characters are supported by both Macintosh and Windows computers. However, some Windows programs don’t support the Microsoft international character set, so they may have problems displaying international characters correctly. If your characters haven’t transferred correctly to a specific Windows program, follow these steps to try to transfer international characters to any problematic Windows program: 1. On your computer, open the Notepad program. 2. On your NEO, send your text to Notepad. 3. In Notepad, select all the text, then press Ctrl-C to copy it to the Windows clipboard. 4. Open a new file in the program that didn’t accept the special characters earlier. 5. Paste the text into a document in that program. Copying and pasting through the clipboard usually solves the problem because the clipboard interprets the characters correctly and transfers them into the program. 150 NEO 1 and NEO 2 User Manual W ARRANTY AND M AINTENANCE Warranty Renaissance Learning, Inc., warrants the NEO keyboard and display to be free from defects in materials and workmanship for a period of three years from the date of original purchase. For rechargeable devices, Renaissance Learning, Inc., warrants the rechargeable battery to be free from defects for 90 days from the date of original purchase. During this period, if a defect occurs, Renaissance Learning, Inc., will, at its option, repair or replace your NEO at no charge to you, provided that it is returned during the warranty period to Renaissance Learning, Inc., or one of its authorized resellers. This warranty does not apply if your NEO has been damaged by accident or abuse, modified without the written permission of Renaissance Learning, Inc., or if identifying marks (including serial numbers) or seals have been removed or defaced. There are no other warranties, expressed or implied. Renaissance Learning, Inc., accepts no responsibility for consequential damages, including, but not limited to, loss of profit or benefits. Guarantee Renaissance Learning, Inc., will refund your money in full (less original shipping charges) if the items are returned in original condition within thirty days of customer receipt of items. NEO 1 and NEO 2 User Manual 151 ..... WA R R A N T Y A N D M A I N T E N A N C E Maintenance Tips Maintenance Tips With proper care and maintenance, your NEO will last a long time. These practices help keep your NEO in top condition: • Always turn off your NEO before changing the batteries. • Take care not to break the LCD screen. Don’t drop NEO or subject it to strong impact. Don’t place an AC adapter or other heavy object over the LCD screen. • Clean the screen only with a soft, dry cloth. Don’t use solvents. • Keep your NEO away from extreme heat. Don’t leave it on the dashboard of a car, in the trunk of a car, or near a heater. • Don’t leave your NEO in a place that is extremely dusty or damp. • Don’t use frayed or damaged cables. • Never force a connector into a port if the connector and port do not join easily. St oring Your NEO If you know you’re not going to be using your NEO for a while, follow these guidelines: • If you are storing a NEO that uses alkaline batteries, and you’re going to be storing it for longer than six months, or the battery capacity is less than 20%, remove the batteries from the NEO. • If you’re storing a rechargeable NEO for between one and six months, charge the NEO before you store it, and again after you take it out of storage (to compensate for the battery pack’s self-discharge). If you’re storing a group of rechargeable NEOs, be sure to charge all of them before and after storage. • Use care when storing or stacking a group of NEOs. You may inadvertently cause a power drain from some units if they are stored incorrectly. If several NEOs are stacked on top of each other and offset somewhat, be careful that the rubber foot on the bottom of one NEO does not touch the on/off key on the top of another NEO. If any NEO is accidentally turned on and the on/off key remains pressed, this causes a small but constant battery power drain even though nothing may appear on the screen. To avoid this potential problem, stack your NEOs on edge or carefully make sure they are stacked vertically with no offset. You might want to enable the Two-Button On option in the NEO Control Panel so you can’t turn the NEO on by pressing just one key. 152 NEO 1 and NEO 2 User Manual ..... WA R R A N T Y A N D M A I N T E N A N C E Return Procedures Return Procedures Important: If you’re a customer outside the United States or United Kingdom, and you purchased your NEO from a reseller, then you should contact that reseller for assistance with your NEO. Do not return the device to Renaissance Learning. If you bought your NEO direct from Renaissance Learning outside the United States or United Kingdom, contact the technical support resource listed for your region in the front of this manual. If you have a problem with your NEO, first read the section “Troubleshooting” on page 127. If this section doesn’t help you solve your problems, follow these steps for help. 1. Contact Technical Support using the contact information for your country listed on page ii. Eighty percent of all problems can be solved by email or over the phone. 2. If the device does need to be returned to the factory for repair, it must be assigned an RMA (Return Material Authorization) number in order to track the unit before it is returned. To receive an RMA number, contact Technical Support using the contact information for your country listed on page ii. You’ll need to provide the following information: a. A detailed description of the problem b. The serial number of the device c. Your name and the address where the device should be returned Note: Only Renaissance Learning, Inc. can assign RMA numbers. If a NEO is returned without an RMA number, it will delay the repair and increase the chance that it could become lost. 3. Write the RMA number on the outside and inside of the box. Also on the inside, tape a short, detailed note to the NEO explaining the problem (include the RMA number). 4. Ship the damaged NEO to the address given when you receive your RMA number. You will be sending your NEO to a repair center, not to the Renaissance Learning, Inc., office. Important: Please ship NEO with a reliable shipper. Renaissance Learning, Inc., will not be held responsible for devices that are lost in shipment from a customer, or that are returned without an RMA number. Your repaired NEO will be returned to you within two weeks of receipt. If damages are due to accident or abuse, you’ll be charged a fee for the parts replaced, as well as a repair handling fee. NEO 1 and NEO 2 User Manual 153 ..... WA R R A N T Y A N D M A I N T E N A N C E FCC Statement FCC Statement Note: This equipment has been tested and found to comply with the limits for a Class B digital device, pursuant to part 15 of the FCC Rules. These limits are designed to provide reasonable protection against harmful interference in a residential installation. This equipment generates, uses and can radiate radio frequency energy and, if not installed and used in accordance with the instructions, may cause harmful interference to radio communications. However, there is no guarantee that interference will not occur in a particular installation. If this equipment does cause harmful interference to radio or television reception, which can be determined by turning the equipment off and on, the user is encouraged to try to correct the interference by one or more of the following measures: • Reorient or relocate the receiving antenna. • Increase the separation between the equipment and receiver. • Connect the equipment into an outlet on a circuit different from that to which the receiver is connected. • Consult the dealer or an experienced radio/TV technician for help. FCC Cauti on Any changes or modifications not expressly approved by Renaissance Learning could void the user’s authority to operate the equipment. This device complies with part 15 of the FCC Rules. Operation is subject to the following two conditions: (1) This device may not cause harmful interference, and (2) this device must accept any interference received, including interference that may cause undesired operation. 154 NEO 1 and NEO 2 User Manual I NDEX Numerics 2Know! Toolbar and NEO 2 67 A AA batteries 136 installing 4 replacing 137 About NEO 2 setting 76 AC adapter specifications 138 Accelerated Math RP and NEO 2 65 Accelerated Reader SmartApplet 8, 57 AccelTest software and NEO 2 61 Adding words to user dictionary 70, 116 Africa contact information ii Alkaline batteries 136 AlphaBeam 21 installing 21, 22, 24 AlphaQuiz SmartApplet 9, 58 AlphaSmart Manager 85 deleting SmartApplets 108 described 85 disabling SmartApplets 114 installing 19 installing SmartApplets 105 manual 126 more information 126 passwords in 118 printing files 87, 90 retrieving KeyWords data 105 saving files 87, 92 sending a user dictionary to NEOs 122 setting the master password 119 starting 86 system settings 110, 112 viewing files 87, 89 AlphaWord Plus SmartApplet 8, 27, 57 changing passwords for specific files 71 NEO 1 and NEO 2 User Manual enabling file passwords 71 printing files 17 resetting passwords for files 72 retrieving files from supported programs (NEO 2 only) 15 sending files to supported programs (NEO 2 only) 14 settings 71, 115 show marks setting 71 starting 27 using 27 using Text2Speech with 30 Antivirus software 129 Antonyms 43 Asia/Pacific contact information iii Auto Repeat setting 77, 110 Automatic startup 136 B Batteries 136, 141 caring for 142 charging rechargeable 5 checking charge (status) 73, 141 installing 3 installing AA batteries 4 installing rechargeable 5 lithium 142 rechargeable 139 rechargeable upgrade kit 136 replacing 137 status indicator 141 Beamer SmartApplet 8, 58 Beaming AlphaWord Plus files to a printer 18 text from one NEO to another 13 text to a computer 11 Black circle in AlphaSmart connection status 87 155 ..... INDEX Blank files 7 Blank screens 127 Broken LCD screen 129 C Calculator SmartApplet 9, 58 turning off 60, 72 Can’t send data to computer 127 Canada contact information iii Case reversed on sent characters 129 Changing file passwords 71, 82 Changing font size 33 Changing NEO settings 110, 112 Changing settings in the Control Panel 69 Changing the font size 34 Changing transfer speed 77, 78 Character counts 49 Characters international or special 143, 147 missing 128 Charging rechargeable batteries 5 Checking battery charge (status) 73, 141 Checking file size 51 Checking spelling 39 disabling feature 41 tips 40 user dictionary 41 Clearing a send list password 120 Clearing all files 53 Clearing files 52, 53 Clipboard 30 contents 30 status 30 Closing send lists 118 Commands, keyboard 73, 143 Conditioning rechargeable batteries 139 Connecting NEO to a computer using a USB cable 9 Connection status 86 Contact information ii Africa ii Asia/Pacific iii Canada iii 156 Europe ii Latin America iii Middle East ii United Kingdom ii United States ii Contrast, screen 73 Control Panel SmartApplet 8, 58, 69 changing settings 69 Copying files to NEO 2 15 Copying NEO 2 files to supported programs 14 Copying text 29 Copyright notice iii Counting characters, words, paragraphs, pages 49 Creating files 31 Cursor missing 127 moving 28 Custom dictionary 41 sending to NEO 122 Cutting text 29 D Data, recovering 55 Delete user dictionary setting 70 Deleting all AlphaWord Plus files 115 Deleting files 52, 54 Deleting SmartApplets 108 Deleting text 29 Deleting user dictionary 70, 116 Dictionary, user 41, 122 Disable This SmartApplet setting 114 Disabling SmartApplets 60, 114 Disabling spell check 41 Displaying battery status 73 DVORAK keyboard layout 74 E Editing files 32 Email, sending text to 13 Empty files, sending to NEOs 105 NEO 1 and NEO 2 User Manual ..... INDEX Enabling password protection for AlphaWord Plus files 71, 80 Encryption key for NEO 2 77 English-Spanish word lookup 43 Entering text 28 Europe contact information ii Extra large font 33 F FCC statement 154 File is full message 50 File passwords 79 setting for AlphaWord Plus 115 Files 30 capacity 50 changing passwords 71, 72 checking file size 51 clearing all 53 clearing one 52, 53 creating 31 deleting 52, 54 deleting all using AlphaSmart Manager 115 editing 32 enabling password protection 71, 80 full 50 getting from supported programs 15 length 49 linked 45 maximum/minimum sizes 115 naming and saving 31 passwords 79, 81, 121 printing in AlphaSmart Manager 87, 90 reaching capacity in 51 recovering 55 resetting passwords 72, 82 retrieving from supported programs 15 saving in AlphaSmart Manager 87, 92 sections 38 sending empty files to NEOs 105 sending to NEOs 95 sending to supported programs 14 size 50, 115 NEO 1 and NEO 2 User Manual switching 11 viewing in AlphaSmart Manager 87, 89 Files that aren’t blank 7 Finding and replacing text 37 Finding sections 38 Finding text 36 Finding text again 36 Finding text by section 38 Fixed-width font 35 Font sizes on NEO 33 Fonts Extra Large 33 Large 33, 35 Medium 33 resetting to System 111 setting the size 34 Small 33 System 33, 35 Very Large 33 Formatting text 33 Full file 51 G Garbage characters 129 Get Utility 21 Getting started 3 Google Docs 14 retrieving files from (NEO 2 only) 15 sending files to (NEO 2 only) 14 troubleshooting 130 Wireless File Transfer 130 Green circle in AlphaSmart Manager connection status 87 Guarantee 151 I Idle time setting 111 Individual file passwords 81 Installed SmartApplets 8, 57 Installing AA batteries in NEO 4 157 ..... INDEX Installing AlphaBeam 21, 22, 24 Installing AlphaSmart Manager 19 Installing batteries in NEO 3 Installing SmartApplets 105 Installing Spanish-English word lookup 123 International characters 147 Introduction to the NEO 1 IR beaming from NEO to a computer 11 requirements 21 setting up 21 IR pod 21 IR transfer speed setting 111 IrDA transceiver 21 K Keyboard alternate layouts 74, 75, 76, 79 auto repeat 77 commands 73, 143 settings 74 slow keys setting 74 sticky keys setting 75 Keyboard commands on NEO 73, 143 Keyboard layout setting 74, 75, 76, 110 Keyboarding timer 55 KeyWords SmartApplet 8, 58 retrieving data from 105 L Large font 33 Latin America contact information iii Launching AlphaSmart Manager 86 LCD screen 129 Left (one hand) keyboard layout 74 Length of a file 49 Linked files 45 printing 47 sample 48 sending to NEOs 46, 97 158 tips for using 47 viewing 47 Lithium battery 142 Looking up Spanish words 43 Low battery message 141 M Maintenance tips for NEO 152 Master password 79, 111, 119 Match case replace option 37 MathFacts in a Flash SmartApplet 57 Maximum file size 115 Medium font 33 Memory column 106 Middle East contact information ii Missing characters 128 Monospaced font 35 Moving the cursor 28 Multimedia text fields, sending text to 13 N Naming files 31 NEO 2 transferring files to and from supported programs 14 using the Responder SmartApplet 61 using with Accelerated Math RP 65 using with AccelTest 61 using with the 2Know! Toolbar 67 NEO 2 settings about NEO 2 76 Search for Networks 76 wireless security 77 NEO files, viewing in AlphaSmart Manager 87 NEO power sources 136 NEO status (settings) 84 NEO 1 and NEO 2 User Manual ..... INDEX O R Opening send lists 118 Overwriting NEO files with empty files 105 Rechargeable batteries 138 conditioning 139 lifetime 140 specifications 139 Rechargeable battery upgrade kit 136 Recharging NEOs 140 Recovering files 55 Red circle in AlphaSmart Manager connection status 87 Removing the send list password 120 Renaissance Receiver connecting to 76 Replace All option 37 Replacing AA batteries 137 Replacing text 37 Requirements for IR beaming 21 Requirements for NEO 3 Reset system font setting 111 Resetting all file passwords 72 Resetting file passwords 82 Resetting the system font 111 Responder SmartApplet 8, 57 using 61 Retrieving files from supported programs (NEO 2 only) 15 Retrieving KeyWords data using AlphaSmart Manager 105 Return procedures 153 Right (one hand) keyboard layout 74 RMA number 153 Rubrics 45 sending to NEOs 97 P Page counts 49 Paragraph counts 49 Password protection for AlphaWord Plus files 80 Passwords 79 changing for specific files 71 default file 82 enabling password protection for files 71, 80 file 121 for AlphaWord Plus files 79 in AlphaSmart Manager 118 master password 79, 119 resetting for all files 72, 82 resetting for files 82 send list 79, 120 setting for files 81 Passwords enabled setting for AlphaWord Plus 115 Pasting text 29 Power sources for NEO 136 Printer selection setting 111 Printing AlphaWord Plus files from NEO 17 Printing files in AlphaSmart Manager 87, 90 Printing using a USB cable connection 17 Printing using infrared (IR) beaming 18 Procedures for return 153 Proportional font 35 Q QuizDesigner 58 QuizManager 58 QWERTY keyboard layout 74 NEO 1 and NEO 2 User Manual S Safety 151 Saving files 31 Saving files in AlphaSmart Manager 87, 92 Saving send lists 117 Screen contrast 73 Screen, blank 127 159 ..... INDEX Screen, broken LCD 129 Search for Networks setting (NEO 2) 76 Searching for text 36 Sections of AlphaWord Plus files 38 Selecting a font size 34 Selecting text 29 Self discharge effect 140 Send list password 79 Send lists 116 closing 118 opening 118 password 120 password, removing 120 saving 117 Sending a user dictionary to NEOs 122 Sending empty files to NEOs 105 Sending files from NEO 2 to supported programs 14 Sending files to a computer 9 programs that can receive files 13 using a USB cable connection 9, 10 using infrared (IR) beaming 11 Sending files to NEOs 95 Sending linked files to NEOs 46, 97 Sending rubrics to NEOs 97 Sending text to a computer 9, 10, 11 Sending Write On! lessons to NEOs 102 Setting font size 34 Setting up infrared (IR) beaming 21 Settings about NEO 2 76 add new word to user dictionary 70 auto repeat 77 change a specific file password 71 change default AlphaWord font 72 delete user dictionary 70 display battery status 73 for AlphaWord Plus 71, 115 for NEO 69 for NEO, changing in AlphaSmart Manager 110, 112 for SmartApplets 113 for spell check 70, 116 keyboard 74 160 keyboard command reference list 73 keyboard layout 74, 75, 76 reset all file passwords 72 search for Networks (NEO 2) 76 set screen contrast 73 slow keys 74 sticky keys 75 system 110 turn add words to user dictionary ON/OFF 70 turn Calculator off 72 turn file passwords ON/OFF 71 turn show marks in files ON/OFF 71 two-button on option 72 view keyboard layout 73 wireless security (NEO 2) 77 Show marks setting for AlphaWord Plus 71, 115 Size limit for files 50 Size of files 50, 115 checking 51 Slow Keys setting 74, 111, 128 Small font 33 SmartApplets 8, 57 Accelerated Reader 57 AlphaQuiz 58 AlphaWord Plus 57 Beamer 58 Calculator 58 Control Panel 58 defined 57 deleting from NEOs 108 disabling in AlphaSmart Manager 114 disabling on a NEO 60 installed on NEO 8, 57 installing 105 instructions for using 9, 58 KeyWords 58 MathFacts in a Flash 57 Responder 57 settings 113 startup 59, 113 Space for files 50 Spanish-English word lookup 43 installing 123 NEO 1 and NEO 2 User Manual ..... INDEX Special characters 143, 147 Speed of text transfer 77, 78 Spell checking 39 settings 70, 116 tips 40 turning off or disabling 41 user dictionary 41 user dictionary, sending 122 Spills 130 Spreadsheets, sending text to 13 Standard keyboard layout 74 Starting AlphaSmart Manager 86 Starting AlphaWord Plus 27 Starting the NEO 6 Startup SmartApplet 59, 110, 113 Status of battery charge 141 Status of NEO connection in AlphaSmart Manager 86 Status of NEO settings 84 Status of the clipboard 30 Sticky Keys setting 75, 110 Storing NEOs 140, 152 Switching files 11 System font 33, 35 System requirements 3 System settings 110 System status 84 T Tabs in text 33 Text cutting, copying, pasting, or deleting 29 finding 36 formatting 33 replacing 37 searching for 36 selecting 29 sending to a computer 9, 10, 11 size on NEO 33 Text2Speech 30 updating device 77 Thesaurus 42 NEO 1 and NEO 2 User Manual antonyms 43 replacing with Spanish-English lookup 43 Timing your typing 55 Tips for NEO maintenance 152 Tips for spell checks 40 Tips for using linked files 47 Toxic elements statement 141 Transfer speed 77 for IrDA beaming 78 for USB cable connections 78 Transfer speed setting 111 Transferring files between NEO 2 and supported programs 14 Troubleshooting 127 Turn add words to user dictionary ON/OFF 70 Turn files passwords ON/OFF 71 Turn show marks in files ON/OFF 71 Turning off spell check 41 Turning off the Calculator 60 Turning the NEO on 6 Two-button On setting 72, 111 Typing on NEO 28 Typing special or international characters 147 Typing timer 55 U United Kingdom contact information ii United States contact information ii Upgrade kit, rechargeable battery 5, 136 URL for Web site ii USB connection to computers 9 USB printer 17 User dictionary 41, 122 adding words to 70, 116 deleting 70, 116 sending to NEO 122 V Very large font 33, 35 Viewing file length 49 161 ..... INDEX Viewing files in AlphaSmart Manager 87, 89 Viewing linked files 47 Viewing the contents of the clipboard 30 Viewing the keyboard layout 73 W Warranty 151 Web site ii Whole Word Replace option 37 Why use NEO 1 Wireless File Transfer 130 Wireless security setting (NEO 2) 77 Word counts 49 Word lookup (Spanish-English) 43 installing 123 Working with files 33 Workspaces 30 Write On! lessons, sending to NEOs 102 Writing on NEO 7, 28 Y Yellow circle in AlphaSmart Manager connection status 87 162 NEO 1 and NEO 2 User Manual 2911 Peach Street, Wisconsin Rapids, WI 54494 (800) 338-4204 Email: [email protected] Web: www.renlearn.com 510014D.0309 MAN0114