1
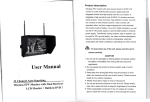
Disclaimer
The information contained in this Adobe PDF file is for general information
purposes only. Due to the age of the information and the difficulty in
converting it to computer formats it may not be up to date or correct, we
make no representations or warranties of any kind, express or implied, about
the completeness, accuracy, reliability, suitability or availability with respect
to the Adobe PDF or the information, products, services, or related graphics
contained in the Adobe PDF document for any purpose. Any reliance you
place on such information is therefore strictly at your own risk.
In no event will we be liable for any loss or damage including without
limitation, indirect or consequential loss or damage, or any loss or damage
whatsoever arising from loss of data or profits arising out of, or in connection
with, the use of this Adobe PDF.
This document is available free from cineinformation.org.
r
.
j'
)
I
ZOOM 518 ZOOM 318
Follow these simple steps
w
........
...
_ 0 __"
Ii
Film Type
Window
Shutter Lock
Dial,
Side Cover
Latch ",
Shutter Release
Button
l
4
1
Insert Super 8 film cartridge.
;2
I
Remove lens d/8 P.
3
Look through the viewfinder.
II
I
I
I
,
J
I
, I
5
•
4
Focus, and check whether the
exposure meter needle is within
the proper range.
5
Rotate zoom"lng lever and
adjust size of subject.
8
Press the sh utter release
button.
F'EA"rURES OF SUPER 8 SYSTEM
Film loading
',Canon
518 and 318 incorporate the new
Super 8 system. Just slip in the entire Super 8
which holds a continuous 50-foot length of
film.
, ,Film Speed is Automatically Set
ThJ Super 8 cartridges have differently positioned
;
j ,';,
slot:s according to the type of film. Therefore, when
'\film cartridge is slipped into the camera the film
l$pe'ed is automatically set and properly exposed
can always be shot.
Color Temperature ConverskHl Filter
A Color Conversion A type filter for conversion of
color temperature has been built into the optical
system. This enables the use of tungsten type film
in daylight. When shooting under artificial light,
the conversion can be easily made by simply setting
upright the filter conversion pin on the trigger grip.
When using daylight film from the beginning, the
filter is automatically removed with the insertion of
the film cartridge and shooting can be performed
in that condition.
7·
SPECIFICATIONS
Canon Zoom 518
Type: 8mm cine camera, employing Super 8 film
cartridge. Cartridge includes both film-load and
take-up
with automatic setting of film sensitivity. Not necessary to turn cartridge over.
Frame Size: 4 x 5.4mm Super 8 size film.
Lens: F 1.8 with zooming range of. 9.5-47.5mm.
II-component, 14-element construction. Zoom
ratio, 1: 5. Zooming is manual by rotation of lens
barrel. Zoom range can be extended to super-telephoto (I5.6-78mm) with optional tele-converter.
single lens reflex type,
including 4 prisms and II-element lens construction. Built-in prism screen focusing system and
exposure meter indicat-o-r-.---E:yepiece can be adjust.. ed to the eyesight of photographer.
Exposure Meter: Through the lens system, with
highly sensitive CdS meter. Batteries for EE systems are two 1.3 V # 625.
EE System: Film sensitivity, filming speed and
aperture setting are coupled. Aperture warning
marks for under- or over-exposure are shown in
viewfinder. Automatic adjustment for filters.
Film Sensitivity: ASA 25-160 (with Color Conversion A type filter: ASA 16-100).
ASA Setting: Exposure meter is set between ASA
25 and 160 with in ran ge of F 1.8 and F 16 at 18
fps when new cartridge is inserted.
eCA Filter: Built into Cc:lmera, automatically corrects for exposure of tungsten film for daylight
use. Determined by cartridge Used, or manually
from outside.
Filming speed: 18 fps.
Film Advancing: Electrically powered micromotor
provides continuous automatic filming of the full
15m (50 ft.) length of the film.
Power for Drive: Three 1.5 V penlight batteries.
Shutter Release: Mercury battery switch with continuous running and safety lock.
Footage Counter: Countable up to 50ft. Automatically resets when new cartridge is inserted.
Film Transport Indicator: For checking film advancement.
Battery Tester:
Push-button actuated indicator
shows power I·evel of micromotor batteri'es.
Size: 206xl0lx44mm
Weight: 1,020 grams (2 lb. 1 oz.)
Accessories: Trigger grip 4, tele-converter 1.6x,'etc.
Canon Zoom 318
Similar to model 518, with the following exceptions:
Lens: F 1.8 with zooming range of 10-30·mm.
Zoom ratio, 1: 3.
10-component, 'I2-elemt:nt
construction.
Focusing: Zone focus system, set by rotation of
front lens.
.
Viewfinder: Contains 4 prisms and 12-element lens
construction.
Body Color: Brown
Size: 204 x 101 x 44mm (8" x 4" x
Weight: 1,015 grams (2 lb.)
Note: No tele-converter is available for this model.
8
MERCURY BATTERIES
7
Before using Canon Zoom 518 or 318, load it with
the two mercury batteries packed in a separate
envelope.
If the batteries are not inserted, the
electric eye (EE) mechanism will not function.
Do not leave fingerprints or stains on the mercury
batteries. Before inserting the mercury batteries
into the camera, wipe all poles clean of all
fingerprints or stains with a dry cloth. If this is
not done, they may cause corrosion and damage
the contact points. When the camera is not to be
used for a prolonged period of time, remove the
mercury batteries and keep them in a dry place.
9
LOADING OF MERCURY BATTERY
1
2
Remove the outer cover of the mercury battery
com partment by turning the outer cover knob
to the left.
4
Screw in the inner cover of the mercury battery
compartment by turning it to the right.
.
Remove the inner cover of the mercury battery
compartnlent by turning it to the left.
5
Attach the outer cover of the mercury battery
compartment.
3
Face the central contact side of the two mercury batteries inwards and insert.
.. Be sure the mercury batteries are inserted in the
correct direction. Otherwise the EE mechanism
will not function properly.
10
. REPLACING OF MERCURY BATTERIES
When the sh utter lock dial is set at L the EE circuit
is cut off. When set at R or • the electric circuit
is switched on and the exposure meter functions.
If the exposure meter needle inside the viewfinder
does not move after setting the shutter lock dial at
R or • and aiming the camera at,the sky or other
bright places, the mercury batteries must be reo
placed. Use two 1.3V 625 batteries of the same
make - equivalent to Mallory RM 625, Eveready
E 625, GE
National M-ID, Toshiba TH-MC. A
mercury battery can ordinarily be used for one
and a half years.
Be sure to replace the two
mercury batteries sim ultaneously.
11
POWER FOR FI,LM DRIVE AND
EYEPIECE ADJUSTMENT
LOADING OF DRY BATTERIES
1
Loosen the battery compartment opening-closing knob by turning it to the left.
2Remove the top cover by sliding it backwards.
3
•
,nsert three 1.5V penlight (size AA) batteries,
with the (+) poles facing towards the front
according to the instructions inside the battery
compartment.
"When the camera is not to be used for a prolonged
period of time, remove the dry batteries.
12
EYEPIECE ADJUSTMENT
Adjust the eyepiece before putting on the top cover.
Aim the camera
light or subject.
while turning the
make adjustments so
can be clearly seen.
1
in the direction of a bright
Then look into the viewfinder
eyepiece adjustment ring and
that the aperture stop figures
After the eyepiece adjustment has been
pleted, slide the top cover back on and then
tighten the battery compartment openingclosing knob by turning it to the right.
2
13
BATTERY CHECK
After the dry batteries have been loaded, check to
see whether the capacity of the batteries is sufficient.
Press the red button,a,t the bottom of the camera
and check the position of the needle seen in
the battery test window.
1
2
If the needle is in the blue zone, it means the
batteries have sufficient capacity. If the needle
is not in the blue zone, it means the batteries
must be' replaced.
.. Always check the battery tester before shooting.
14
LOADING AND UNLOADING OF
FILM CARTRIDGE
Open the side cover by sliding the side cover
latch in the direction of the arrow.
1
CANON ZOOM 518
CANON ZOOM 318
Slide the Super 8 film cartridge in, right-sideup, towards the front of the camera, and then
set the film cartridge into position by pressing
down on it.
2
3
Close the side cover by pressing it.
L
15
4
Set the shutter lock dial at R and press the
shutter button. If a film winding sound can be
heard and the white dot in the film transport
indicator revolves, it means preparations for shooting have been completed.
.•
5
The super 8 cartridge contains a continuous
50-foot length of film. Stop shooting when the
footage counter indicates 50, advance the film
further until F appears, and then take out the
cartridge.
No flip over or rehandling at the end
is necessary.
.. The footage counter automatically resets to 0
when the cartridge is taken out.
16
SHOOTING
FOCUSING-CANON ZOOM 518
CANON ZOOM 518
CANON ZOOM 318
Turn the focusing ring and get the subject into focus.
Canon Zoom 518 has a prism screen rangefinder
built into the center of the viewfinder. Adjust the
focus so that the subject can be seen most clearly
through this prism screen rangefinder.
The aligned image can be seen more accurately and
easily the longer the focal length of the lens. The
Out of focus
In focus
17
focal point does not chan'ge during zooming. There
fore, even when you wish to shoot at I,ow magnifica
tion (wide-angle), first focus at maxim um magnification (telephoto) and then return to low magnification
and shoot.
o
o
number on the focusing ring to the indicator line
on the lens barrel. Focusing can also be easily
performed by using the zone focus marks.
FOCUSING-CANON ZOOM 318
Estimate the distance from your camera to the subject, and then set the distance by matching the
Close distance
Medium distance
Under-exposure
warning mark
Aperture scale
Long distance
Over-exposure
warning ,mark
Exposure
meter needle
2.8
11 16.
CANON ZOOM 518
1.8
2.8
CANON ZOOM 318
18
It The zone focus marks are for determining approximate distances. Thus, even when photographing
one person, if the distance from the camera to the
person is distant, set the needle to the group or
scenery marks.
Use the distance scale for accurate focusing.
ZOOMING
The image seen through the viewfinder will change
in magnification and the field-af-view will also
change by turning the zooming ring. The field-of·
view seen through the viewfinder will be exposed
on the film in its entirety. When zooming is performed during shooting, any desired zooming effect
can be reproduced on the film.
f
19
SHUTTER RELEASE BUTTON
When the sh utter release button is pressed, shooting
starts and the footage counter advances sim ultaneously. The shutter lock dial must be set at R.
The shutter lock dial performs the following two
functions:
Safety Lock
When the sh utter lock dial is set at L, the mercury battery circuit is disconnected. The sh utter release button is also locked and prevents inadvertent film advance.
1
20
2
Running Lock
Set the shutter lock dial at R and then press the
shutter release button. 1'\ ext, if the shutter lock
dial is set at., while still pressing the shutter
release button, the shutter release button will remain in a pressed down condition even after the
finger is taken off the shutter release button.
CABLE RELEASE SOCKET
When shooting movies using a tripod, use the cable
release by screwing it into the cable release socket.
--------------------------
---------
Turn while pressing the shutter release button.
21
ACTUAL SHOOTING AND
WARNING MARK
Canon Zoom 518 and 318 are completely automatic cameras. Exposure adjustments or film speed
settings are absolutely unnecessary.
Before pressing the shutter release button, aim the
camera at the subject and check the position of the
exposure meter needle inside the viewfinder. If the
needle is pointing somewhere within the range of the
aperture scale, you can press the shutter release
button. It means the exposure meter needle is
CANON ZOOM 518
CANON ZOOM 318
1.3
2.8
4
5.6
8
2.8
I
----
Use N D filter
Proper exposu re
Insufficient exposure
j
l
tl!l.t!Jl.!J
4 • 5.6
8
.1.8
2.8
4
56
8
11
16
__'
I
I
22
C
pointing to the proper aperture stop.
Warning Mark
If the exposure meter needle is pointing to either of
the red warning marks on both sides of the aperture
scale, shooting under proper exposure conditions is
impossible.
However, if the needle is pointing to
the over-exposure warning mark on the left side,
shooting will become possible if an ND filter is
attached in front of the lens to restrict the light
intensity.
.. When checking the exposure meter needle, remember that the needle will not move unless the
shutter lock dial is set at R.
23
FOLDING TYPE TRIGGER GRIP
USE OF ACCESSORIES
The shutter can be released while firmly holding the
camera by the trigger grip. Use of the trigger grip is
recommended for easier handling.
1
Unfold the grip, align the connecting parts of the
grip and camera, and attach the grip onto the
camera by screwing the attachment screw into
the tripod socket.
24
2
3
4
Hold the grip with the right hand and pull the
. trigger. The shU'tter will function and the film
will advance.
When folding the grip, pull the lever down-.
wards.
TRIGGER GRIP AND COLOR TEMPERATURE
CONVERSION
When tungsten type film is used for daylight
shooting, a Color Conversion A type filter for con-
verting the color temperature becomes necessary.
To eliminate the trouble of attaching a filter every
time you want to shoot in daylight, a Color Conversion A type filter has been built into the optical
system of the camera. Thus, for daylight shooting
with tungsten type film you use the camera as it
is.
In case you want to shoot under artificial lighting,
stand up the color conversion filter cancellation
I
L
25
pin of the grip before attaching it onto the camera.
This pin will eliminate the built-in Color Conversion
from the optical system and shooting
under artificial lighting becomes possible. Use of
blue lamp is not necessary. You may use ordinary
flood lamps or spotlights.
.. When the grip "is not attached to the camera, or
when the grip is attached to the camera with the
color conversion filter cancellation pin folded, the
camera is set for daylight shooting.
Please bear in mind that proper color photography cannot be performed if the above-mentioned
manipulations are not followed correctly.
When using black and white or daylight type
color films, the Color Conversion A type filter is
automatically eliminated with the insertion of the
film cartridge. When shooting under artificial lighting with daylight type color film, use blue lamp or
Color Conversion B type filter.
•
26
REMOTE CONTROL SWITCH
With the use of the remote control switch you can
operate the camera from a distance.
1
Insert the plug of the remote control switch
cord into the remote control switch socket of
the camera.
2
Set the shutter lock dial at • t while pressing
the shutter release button, to set the camera
in running lock condition.
3
When the release button of the remote control
switch is pressed down and slid in the direction of the arrow, the film advances and is set
into running lock condition.
.. When disconnecting the cord of the remote con·
trol switch from the camera, be sure to return the
shutter lock dial of the camera to R first.
If the cord of the remote control switch is discon·
nected from the camera before the shutter lock
l
27
FILTERS
dial is set at-R, the shutter will actuate and the
film will start advanci·ng.
It The length of the cord for the remote control
switch is 8 meters.
.. When shooting pictures with the remote control
switch, it' is better to check the general conditions
of the subject or its immediate surroundings before
pressing the shutter release button. Also, cover the
eyepiece with a handkerchief or some other conve·
nient material to shut out bright light.
48mm screw-in type filters for Canon Zoom 518
and 318, and 72mm screw-in type filters for the
converters are availab'le.
In the Canon Zoom 518 and 318, the right passing through the optical system of the lens is measur,ed by the TTL system exposure meter. Therefore,
any type of filter most suited for a certain purpose
can be freely chosen without regard to the exposure
factor.
28
TELE"CONVERTER
The Canon C-8 Converter is an attachment for the
taking lens of Canon Zoom 518 to convert it into
a telephoto zoom lens. In this case, the converted
magnification range or focal length becomes 15.678 mm, making possible shooting in a wide range,
from standard to telephoto.
Infinity setting window
Lens Speed:
Zooming Ratio:
Zooming Range:
Lens Structure:
system.
Distance Scale:
F 1.8
5
15.6-78 mm
3 components, 5 elements, afocal
ft
50
30
20
15
12
10
m
20
10
7
5
4
3
29
'Coating:
Filter Size:
Cap Size:
Hood:
Size:
Weight:
Purple spectra coating
72mm
80mm
Built-in type
Overall length-75mm. (3")
Maximum diameter-80mm (3 1h")
450 grams (16 oz.)
Method of Attaching
Remove the back cover of the converter and
attach the converter over the taking lens of
the camera.
Turn the lens barrel of the converter and screw
the converter into the front panel of the shooting lens.
Loosen the tightening screw of the
distance ring.
1
2
3
Cap
Distance ring tightening screw
Back cover
Lens barre
30
4
5
8
Turn the distance ring of the converter so that
the infinity mark appears in the distance
ring window. Fix the distance ring securely
with the tightening scr.ew.
Pull out the built-in hood.
Zooming and· focusing are carried out in the
ordinary manner.
Without converter
31
48mm CLOSE-UP LENS 450
STORING THE CAMERA
The close-up lens is designed for titling, reproduction of documents, photographing of plants and insects, etc. Attach the close-up lens, and when the
distance scale is adjusted to 00, the distance from
the tip of the lens to the subject is 450m m.
Keep the camera avvay from dampness. heat, and
dust when storing. Do not place the camera near
naphthalene or camphor. While it is not necessary
to oil any part of the camera, a periodic overhaul
and cleaning will prolong its lifes
"When storing the camera in the case, turn the
safety lock of the sh utter to L.
FIELD-Of-VIEW OF 48mm CLOSE-UP LENS 450
32
PANNING
Panning is employed when shooting a picture from
one position to another by moving the camera
around horizontally to make a continuous shot over
a wide area in one sequence.
.. Do not move the camera too rapidly in
direction, particularly vertically.
Use of a tripod is therefore recommended.
any
"It is important, when shooting panoramic
tures, to move the camera at a constant speed.
PIC-
.When following a fast-moving subject with pan·
ning, try to keep the subject in the same position
in the viewfinder .
33
CANON P..S CINESTAR S
Here is a compact 8mm projector that can show
either regular 8mm film or the new Super 8 size.
Operation is fully automatic. Insert the film end
into the projector, turn the switch, and the film will
run completely through and rewind ... with no need
for resetting or touching any other switches. It has
a fast 15-30mlll F 1.5 zoom lens, 8V 50W mirror
lamp, adjustable filming speeds from 10 to 20 fps,
a builtin power cord, a plug for a room light and
a projection screen built into its side cover. It
accepts six different line voltages-IOO, 115, 125,
220 or 240 volts.
Focusing Ring
Zooming Lever
Indicator
Line
Release Socket
Coupled with
Trigger Grip
Socket for
Changing Color
Conversion Filter
Knob for
Outer Cover
of Mercury
Battery
Compartment
Tripod Socket.
Battery Test
Button
Film Position
Mark
Remote Control
Switch Socket
Film Transport
Indicator
Footage
Counter
Battery Tester
Battery Compartment
Opening-Closing Knob
Eyepiece