1
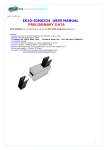
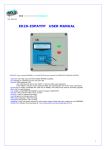
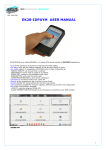
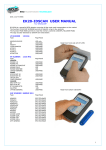
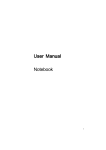
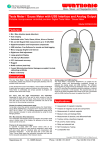
RFID TRANSPONDER TECHNOLOGY
DOC 435-R04
EK20-IDJ3
USER MANUAL
IDJ3 (here named READER) is an UHF RFID reader oriented to applications of TRACEABILITY.
Features:
-Operates with the most popular TAGs:
UHF: EPC-Gen2, 18000-6B, 18000-6C
-Long range reading tip 80cm.
-Operates with only one key.
-Three LED Yellow:scanner running Green: RADIO connection Red: Battery Low.
-Records 2500 LOGs in CODE+TEXT mode.
-Connectable wireless by RADIO UHF (Standard) or BLUETOOTH.
-Can create an User Database using IDONE_R sofware.
-Rechargeable LIPO battery.
- IP65 box, shock resistant.
-Complete of the IDONE-R software freely downloadable from:
www.zetanetweb.com/download/zetanet.htm
- Compatible with our mobile readers IDTRCM, IDGIANO, and fixed IDTRCF.
IDONE-R
1
INDEX
1.0
2.0
3.0
4.0
5.0
6.0
7.0
8.0
9.0
10.0
11.0
12.0
13.0
HOW TO READ A TAG
HOW TO OPERATE WITH IDTRCM READER
IDONE-R FIRST INSTALL
HOW TO CREATE A NEW PROJECT
LOG MANAGEMENT
HOW TO CREATE AN USER DATABASE
SET CURRENT DATE ON A READER
SET A DEVICE NUMBER ON A READER
HOW TO REDUCE IDONE-R
BATTERY
AVAILABLE MODELS
TECHNICAL SPEC
HOW TO UPGRADE THE FIRMWARE AND THE LANGUAGE ON IDTRCM
1.0 HOW TO READ A TAG
The tipical reading distance depends from the TAG type and size.
UHF
EPC GEN2
Card
Tip. 800 mm
2
2.0
HOW TO OPERATE WITH IDJ3 READER
The READER operates in 3 different states:
STANDBY STATE – SCANNER STATE- RADIO STATE
STANDBY STATE
The LED YELLOW and GREEN are turned off.
The current absorption is reduced at a minimun value.
SCANNER STATE
From the STAND BY STATE pressing the key the READER enters the SCANNER STATE.
The YELLOW LED turn on.
The READER exec the UHF scan for the set TIME SCAN (from 1 sec to 3600sec).
When a TAG is detected the LED YELLOW flash.
At any TAG detected the READER verify if was just read in this session.
If it was never read so will be saved in the LOG memory.
The buzzer emit a sound and the TIME SCAN is retriggered.
If the TIME SCAN is expired the READER enters the RADIO STATE.
The pass in RADIO STATE can be made also pressing the key.
The LED YELLOW turn off.
RADIO STATE
Entering the RADIO STATE the LED GREEN turn on.
The RADIO became active for the period set in RADIO TIME. ( 1 sec to 200 sec)
They are four possible situations:
1)No LOG has to be transmitted and the READER is out the RF field.
After the RADIO TIME the READER enters the STANDBY MODE.
2)No LOG has to be transmitted and the READER is in the RF field.
After the RADIO TIME the READER enters the STANDBY MODE.
3)Some LOGs has to be transmitted and the READER is out the RF field.
The LED GREEN flashes. The buzzer emits a sound.
After the RADIO TIME the READER enters the STANDBY MODE.
4) Some LOGs has to be transmitted and the READER is in the RF field.
The LED GREEN flashes and the LOGs are transferred to the HOST.
At any transferred LOG the RADIO TIME is retriggered. The LED GREEN become fixed.
At the end of LOG transfer, after the RADIO TIME the READER enters the STANDBY MODE.
The passage in STANDBY STATE can be made also pressing the key.
DEFAULT VALUES obtained by pressing the key for 12 seconds.
DEVICE NUMBER:
00
BAUD RATE:
19200 N-8-1
TIME SCAN:
60 sec
TEMPO RADIO ON :
60 sec
TIME CANCEL FILTERS: 1min
RADIO SID:
1
RADIO CHANNEL :
7
3
3.0
IDONE-R FIRST INSTALL
The first install is very important because creates the correct environment need by the system.
So we have made a simplified procedure to start the first install.
INSTALL IDONE-R ON PC
-Connect to the web site: www.zetanetweb.com/download/zetanet.htm
-Download the file “IDONE-R_5xx_Setup.exe”.
-Exec the file and follow the instructions to the end of install.
-An icon will appear on your PC.
RADIO COM PORT INSTALL
-Insert the RADIO PEN UHF into an USB connector on your PC.
-The PC begin to install the new device. Wait for the completion of the install of the assigned COM PORT.
Click on the icon
to launch IDONE-R.
Will appear a request. Press OK.
Compile the fields as in this example and choose the Tag UHF to be read. Press OK.
Open the window “COMMUNICATION PARAMETERS”.
-Set “SETTINGS MODE”.
-Set the “CONFIGURATION READER”.
-Select the RADIO COM PORT.
-Press “CONNECTION”.
Open the “CONFIGURATIONS” window.
-Press “SEND TO READER”
-In the window “CONFIGURATION SEND” mark the Configuration to send (TEST).
-Activate on the READER the RADIO STATE
-Press “SEND” and wait for the end transfer (BLUE BAR).
4
-Activate on the READER the SCAN STATE.
-Read one or more TAG.
-Activate on the READER the RADIO STATE
-Press “LOG DOWNLOAD”. A window show the transfer advance (LOG TRANSFERRED).
Now the first install is complete.
You can create new projects following the procedure in #4.0.
4.0
HOW TO CREATE A NEW PROJECT
Open the window “COMMUNICATION PARAMETERS”.
-Select the “SETTINGS MODE”.
-Mark “ENABLE COMMUNICATION AT START UP”.
ARCHIVE OF CONFIGURATIONS
Open the window “PROGRAM”.
-Choose the CURRENT LANGUAGE.
IDONE-R permits to create an ARCHIVE of your PROJECTS.
5
CREATE YOUR PROJECT
-Press “CREATE NEW DATABASE”
-Insert the “DATABASE NAME”.
We do suggest to detail this name so that during a next search will be easily reknown as the CLIENT as th PROJECT.
-Insert the CLIENT NAME and the PROJECT NAME.
LOG FOLDER SETTINGS
Appear the DEFAULT of the LOG FILE folder. (Users\MYNAME\Documents\IDONE-R\Log Files).
-If you want to assign a new root press “CHOOSE FOLDER” and insert the new root.
-Select in “LOG FILE SETTINGS” the log saving mode, any MONTH or any YEAR.
The logs will be automatically saved in a folder so defined:
DATABASE NAME_YEAR_MONTH
Es. AMRA_CASSONETTI_2015_3
Any LOG will be inserted in the folder in function of the recorded date, also for month deferred transfer.
ATTENTION In case of “CREATE NEW DATABASE”, as here descripted, the correct LOG FILE will be created after the
first received log.
CUSTOMER SETTINGS
Select “CUSTOMER” in the “CUSTOMERS & PROJECT S” windows.
-Insert the Customer data and press “SAVE”.
6
PROJECT SETTINGS
Select “PROJECT” in the “CUSTOMERS & PROJECTS” windows.
LOG FORMAT
CODE +TEXT
Into the LOG string will be recorded in “TAG DATA” the full EPC (12 or 16 byte).
The PROJECT CODE is sent to all the READERS configured with this Project.
Grants that only the log comprise into this project will be recorded.
We suggest don’t modify this CODE.
CREATE YOUR CONFIGURATION
For any PROJECT on IDJ3 you can create one CONFIGURATION.
Select “CONFIGURATIONS”.
-Press “NEW”.
-Insert a name in the “NAME:” window and press “SAVE”.
-The name appears in the list.
To delete, modify or move a name in the list, select the name and exec the appropriate commands.
-Press “SAVE”.
CONFIGURATION SETTINGS
Here are descipted the admitted parameters by the READER.
In the window “CONFIGURATION MANAGEMENT” press “CONFIGURATIONS”.
7
TAG CHOICE
-Select the TAG type “UHF EPC GEN2”.
READ MODE
-Select “TEXT”
-Press “SAVE”
SEND CONFIGURATIONS TO THE READER
-Press "SEND TO READER”. Appears the window “CONFIGURATION SEND”.
-Mark the CONFIGURATION you want send to the READER.
-Activate on the READER the RADIO STATE.
-Press “SEND” and wait for the end transfer (BLUE BAR).
Now the READER is ready to operate.
5.0
LOG MANAGEMENT
The Log transfer can be set in two mode:
1) SETTINGS MODE
2) LOG MODE
1)SETTINGS MODE
This mode is normally used for the CONFIGURATION activities and for the LOG TRANSFER on a single READER at time.
-Select the READER device number to connect.
-Press “LOG DOWNLOAD” and wait for the end of log tranfer.
8
To visualize the received LOGs select “LOG MANAGEMENT”.
The current LOG FILE is displayed in red.
CONFIGURATION
DATE-TIME
COMPANY
READER
TAG TYPE
TAG DATA
CONFIGURATION associated to the received LOG.
DAY-MONTH-YEAR- HOUR-MINUTES-SECONDS of the READ TAG operation
CUSTOMER associated
DEVICE NUMBER
The read TAG type.
A 16 characters field for EPC(UHF).
FILTERS
Filters the Logs in function of:
-Configuration
-Date from / to
-Reader number
SAVE LOG IN CSV OR XLS FORMAT
-Press “SAVE LOG CSV FORMAT” to archive the Logs for use with EXCEL.
OPEN LOG FILE
-Press “OPEN LOG FILE” to visualize previous recorded Logs.
FIELDS SELECTION
-Press “FIELDS SELECTION” to choose the items to be viewn in the Log area.
CHAR SEPARATOR serve to export the logs in .csv format.
9
2)LOG MODE
IDONE-R via the RADIO PEN UHF start a continuous scanning of the READERS.
Don’t serve any command by the operator, the LOGs will be transferred from the READERS present in the RF field.
-Mark “LOG MODE”
-Set the N’ of readers to be interrogated (from 1 to 99).
-Start the connection.
A mimic panel show the current state of any READER:
GREY
DISCONNECTED OR NOT IN RF FIELD.
GREEN
CONNECTED.
YELLOW
LOG transfer running.
The N’ of received LOGs is also shown.
6.0
HOW TO CREATE AN USER DATABASE
In the window “LIST” press “USERS” to open the window “USERS MANAGEMENT”.
-Choose the CONFIGURATION on which to be create the USER DATABASE.
-Press DB FIELDS NAME” to open he window “USER FIELDS TEXT”
-Insert a name in the fields will be used by the DATABASE. Ex: “COMPANY”,”NAME”,”CELL”.
-Press before “SAVE” and next “EXIT”.
10
-Press “NEW”
-Insert the data into the fields.
-Connect the READER to read the “UID CODE” to be associated.
-Press “READ UID”, the read EPC CODE appear in the window.
-Press “SAVE”.
The User Data are viewn in the riepilogative window.
Repeat the operation for all the USER to be inserted into the DATABASE.
Open the window “LOG MANAGEMENT”.
-Press “FIELD SELECTION”.
-Mark the new fields generated by the “CUSTOMER DATABASE” you want to visualize in the LOG area.
-Press “SAVE”.
11
7.0
SET CURRENT DATE ON A READER
Set the READER number and press “SEND”.
8.0
SET DEVICE NUMBER INTO A READER
Insert the “ACTUAL ADDRESS” and the “NEW ADDRESS” to be set in the READER. Press “SEND”.
9.0
HOW TO REDUCE IDONE-R.
Normally the end user application don’t use all the functions available on IDONE-R.
The user can reduce them activating only those really needed.
Digit the Reserved Code.
Will appear a window “CLIENT SETTINGS” where you can select the functions to be active.
Any reduction is associated to one PROJECT.
Close the program IDONE-R and restart it to visualize the new one.
12
10.0
BATTERY
The READER operates from a rechargeable LIPO battery (1000mah).
The recharge is made through the connector positioned in the bottom side.
The 12VDC power supply to charge the battery is comprised in the furniture.
When the battery is charging a RED LED is lighted.
When is charged the RED LED is off.
In case of LOW BATTERY the RED LED flash.
The READER turn-off.
11.0
AVAILABLE MODELS
EK20-IDJ3-R
Suffix B
Model with antenna UHF and RADIO UHF.
BLUETOOTH interface. (Optional)
RADIO UHF PEN
The RADIO PEN UHF is quoted a part.
13
12.0 TECHNICAL SPEC
RFID FREQUENCY
UHF 868 Mhz
POWER
Max 24 dbm
LOG MEMORY (circular buffer)
2500 records in LOG FORMAT: CODE+TEXT (32 chars)
LOG MEMORY (circular buffer)
YELLOW:SCAN STATE GREEN:RADIO STATE RED: CHARGE STATE
ACOUSTIC WARNING
Buzzer
LED
YELLOW:SCANNER GREEN:RADIO RED:BATTERY CHARGE
BATTERY
LIPO 7.4V 1000mah rechargeable
CHARGER
Main Adapter 12VDC 1A
DATA TRANSMISSION 19200-8-N-1
RADIO UHF(max 200mt in free air)
OPERATING TEMPERATURE
-20’C to +60’C
DIMENSIONS
125mm x 70mm x 23mm
WEIGHT
170 g
13.0
EPC-GEN2
time to full charge max 5 hours
BLUETOOTH
(OPTIONAL)
HOW TO UPGRADE THE FIRMWARE ON IDJ3
To upgrade the FIRMWARE:
-
Launch the program EK20-UPLOADER
that you find in the IDJ3-CD folder.
Set the RADIO COM PORT and the bit rate(19200).
Press UPLOAD PROGRAM. Will appear the window RISORSE DEL PC.
Select the file IDJ3xxxx.BIN
Set the address of the connected READER.
- Activate on the READER the RADIO STATE.
- Press START and wait the end of programming.
- On the READER will appear
14
IDONE_CLOUD
Another solution is to collect the LOG by RADIO in real time and transmit them by INTERNET CLOUD.
- LOG transmitted to the SERVICE CENTER in your Personal Area.
- Offer a full protected access by a personal Password.
This operation need an Internet Access Point in your location and a Microserver to collect the Logs from the READERS
INOUT RFID s.r.l
Phone:+39 02.95138.139
Email: [email protected]
Via Milano,14/H 20064-Gorgonzola (ITALY)
Fax:+39 02.95.158.694
Web: www.inoutsrl.it
15