1
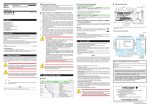
Electron Microscopy Centre
Title:
RUNNING LEO 1450VP SEM
Equipment: LEO 1450VP SEM
Revision:
1.0
Effective Date: 20/11/2005
Author:
X. Yang
Warning!
Before you attempt to operate this equipment for the first time,
please make sure you are aware of the precautions that you must
take to ensure your own safety.
Warning!
IN AN EMERGENCY, PRESS THE RED
ILLMUNATED STOP BUTTON
Warning!
The EHT voltages present in this instrument
can be lethal.
Working Environment
Do not use electrical equipment in:
• Rain or excessive moisture environment
• The presence of flammable or explosive gases
The equipment is not designed to be water or splash proof, or to be used in
area where there are flammable or explosive gases or fumes.
1
Running LEO 1450VP SEM: Basic Instructions
1. Logon LEO 1450VP user interface.
2. Load your specimen and standards (please wear provided powder free gloves only).
3. Turn on the filament and set accelerating voltage to desired operating conditions (if
not sure, set 20kV).
4. The default detector has been set to collect secondary electrons. You can now work
on obtaining a sharp image using stage position (focus), stigmators, image brightness
and contrast.
5. Set the working distance to desired value and adjust the spot size.
6. Adjust the brightness and contrast if necessary.
7. Save the desired image after scanning.
8. When done with collecting data, turn off the beam and wait for 30 min so the filament
is cooling down to room temp.
9. Remove specimen from chamber, close the door before pumping.
10. Log off the LEO user interface.
11. Remember to fill the log book.
2
Running LEO 1450VP SEM: Detailed Instructions
1. Logon LEO 1450VP user interface.
There are two computers on the SEM, but only one keyboard and mouse. The
monitor for the SEM computer is on the left - this is computer #1. The monitor for
the EDS system is on the right - this is computer #2. The red number on the gray box
in between the two monitors indicates which computer the monitor and keyboard are
working with. If the red number is 2, please switch the keyboard and mouse to
computer #1 by simply hitting Ctrl-Alt-1.
Click on the LEO icon on the SEM computer desktop and logon the software
interface using the username and password assigned to you.
2. Load your specimen (please wear provided powder free gloves only).
The first thing you will want to do is to load your sample. Please make sure the
filament has been turned off at least 30 minutes so to increase the lifetime the
filament. Do this by right clicking on the Vac button in the bottom-right corner and
select Vent button at the popup widow. This will vent the sample chamber, and
allow you to open the sample chamber door. It will take approximately 5 minutes to
balance the pressure within the sample chamber with atmosphere. Never pull the
door during the 5 minutes venting period – another detector (EDS) has a fragile
and expensive window, a sudden pressure increase in the specimen chamber
would likely damage the EDS window.
Never reach into the sample chamber without gloves on! Always use the sample
exchange tool (tweezers and special designed screw-driver) to switch your sample
with the one that is already in the chamber. Put the sample you just removed into
covered box to prevent the dust. If you are not familiar with the sample exchange
procedure or how the sample stubs fit onto the stage, please ask for help.
WARNING: Any bare hand operation during the sample loading/unloading may
result in loss of privilege of using the system.
Once your sample is secure on the stage and positioned approximately where you
want it, close the door, latch it, and right click the Vac button on the computer then
select Pump to begin the pumping process. After about 5 minutes the Vac indicator
will shows a ready sign. At that point, the sample chamber is under vacuum,
and you are ready to begin viewing your sample. It is always a good idea to wait a
litter longer until the vacuum reading is approaching 10-6 torr.
3
While waiting for the vacuum to be ready, adjust the sample stage and locate your
first sample under the center of the column. In order not to hit on any detectors
within the chamber, it is always a good practice to move the sample at front end of
the stage under the column and rotate the stage to locate your interested one. It is
important to remember that the specimen must be flat or not tilted for BSD
detection.
3. Turn on the filament and set accelerating voltage to desired operating conditions
(if not sure, set 20kV).
Right-click on to Fil button (
) and select beam on to turn on the beam.
At this time, you should enter your information and the time-on into the SEM
logbook.
Beam damage can be the result of using high voltage or a high probe current, thus the
accelerating voltage and probe current should both be adjusted together to determine
the optimum settings. Coating the specimen with conducting film such as gold often
helps to dissipate the heat generated by the beam. However, better results are
usually obtained by operating at lower voltages.
4. Work on obtaining a sharp image using stage position (focus), stigmators, image
brightness and contrast.
The default detector (SE1) has been set to collect secondary electrons. You can now
work on obtaining a sharp image using stage position (focus), stigmators, image
brightness and contrast.
4
In order to get an image, you will have to
adjust the focus, contrast, and brightness. It is
always a good practice to start from a low
magnification such 30x, 50x and switch to
higher magnification.
You could focus the image by selecting
focus/mg mode and turning the ‘FOCUS’
knob. In this case, the working distance (WD)
physically remains but the electron beam
focus on different level to match the WD. The
WD value becomes REAL only when the
beam is well focused on specimen.
You could also focus by changing the Zposition of your sample (this is the physical
distance between the sample holder and the
pole piece – the tapered column that hangs
above your sample). BE CAREFUL! You
might inadvertently ram your sample into the final lens. Therefore, you may want to
switch on the infrared camera (TV mode) so that you can pay attention to how close
your sample is from the pole piece.
Stigmation: While you are still at high magnification with small, circular or
rectangular features in the image (generally 10 KX, which is high enough to clearly
display astigmatism), through focusing will lead from one privileged focus direction
(Figure 1a) to another (Figure 1b) if astigmatism exists. Once you have made your
final focus adjustments with FOCUS FINE to obtain an image quality which lies
between the two images, you should adjust the 'Stigma-X' and 'Stigma-Y' to try to
improve the focus slightly --- one direction at a time. Repeat the procedure if
necessary. You could also use Autostig if noise in the image is low and features are
well defined.
Moving between fine focus and Stigma adjustments at high magnification may
provide small, but sometimes significant improvements to the quality of your image.
(a)
(b)
(c)
Figure 1 Comparison of images under different focusing conditions (From: LEO32 Help)
5
5. Set the working distance to desired height and spot size.
The choice of working distance is strongly
depended on user’s specimen and most time
user might have to make a compromise.
Here are some the factors suggested to be
considered:
1. As the working distance is decreased the
available resolution increases.
2. If the sample is large, it is wise to use a
longer working distance in order to
avoid being hit on the lens or BSD.
3. The retractable BSD occupies a finite
space beneath the final lens. A safe
working distance is 10mm to 12mm or
higher.
4. The geometry used for X-ray analysis
(EDS) dictates that the surface to be
analyzed should be at a working distance
of 19mm to 25mm.
The Spot Size value can be adjusted from the user interface in the range 1 to 1000. In
most cases, a value of 333 gives a good video signal without over exposing the
sample to electron bombardment. Other settings would be as follows:
Purpose of Viewing
High Resolution
Backscattered electron imaging
X-Ray analysis
Charge or beam sensitive samples
Spot Size Value
120 to 230
380 to 450
460 to 500
160 to 220
The improved resolution performance at low values is achieved because the diameter
of the beam on the specimen is reduced. A larger beam diameter is acceptable for Xray analysis because of the larger volume of interaction
6. Adjust the brightness and contrast if necessary.
Set Brightness to 95% and adjust Contrast until the imaging can be viewed.
Readjust Brightness and Contrast if the image is too bright or dark.
7. Save the desired image after scanning.
Before you start saving an image, you have to freeze the image first. This could be
done by left click the “Pause” button if you want to freeze right away or middle click
6
the button if you wish the image to be frozen at the end of the frame. You could save
a desired SE image under Menu Bar, click on “File” and “Save Image” then choose
the folder you would like to file to be saved.
8. When done with collecting image, turn off the beam and wait for 30 min so the
filament is cooling down to room temp.
9. Remove specimen from chamber, close the door before pumping.
10. Log off the LEO user interface.
In the Menu Bar, click on “File” and “Log Off”, then “OK” to log off the LEO
operation system.
You can also log off the system by closing the window.
Reminder: you have to log off the LEO system after finishing your research,
otherwise the computer log system would “mistakenly” consider you are still using
the machine and therefore extra charge may occur due to extended logon time to the
system
11. Remember to fill the log book.
Reference:
1. LEO 1400 Series Scanning Electron Microscopes Operator User Manual, LEO
Electron Microscopy Ltd, Cambridge, England, 1998
2. LEO 32 Help Manual, LEO Electron Microscopy Ltd, Cambridge, England, 1998
7