1
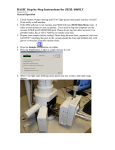
USING THE JEOL JSM6490LV SCANNING ELECTRON MICROSCOPE
1. Switch on the left monitor. Open the Evacuation Monitor program (EvacMon) and the JEOL Scanning
Electron Microscope software (6490 SEM) from the desktop.
2. Open the Stage window in the SEM software. Confirm that X, Y, R and T are set to 0. Confirm that Z
is set to 40mm. If they are not, click in one of the windows corresponding to the settings and change
them to 0,0,0,0, and 40, then press Go and wait for the stage to stop moving.
3. Push and hold the Vent button on the SEM cabinet until the button lights up, bringing the specimen
chamber to atmospheric pressure. While the chamber is venting, put on gloves and load your samples in
the proper sample holder insert. Tighten the samples in place with set screws, then load the sample
holder insert into the proper sample holder. Measure the height of your samples above the top of the
sample holder and record this height. Make note of your sample order in the sample holder.
4. Pick up the sample holder with the sample holder insertion tool. Unlatch the door to the specimen
chamber and swing the door open. CAREFULLY guide the sample holder onto the microscope stage.
Make sure you are inserting the sample holder level, and keep everything away from the detectors above
and behind the microscope stage. It takes a little bit of force to move the sample holder all of the way
back on the microscope stage. Once the sample holder is in place, squeeze the black tabs on both sides
of the insertion tool and hold them in while removing the insertion tool from the chamber.
5. Close and latch the chamber door. Press and hold the Evac button on the microscope cabinet until the
button lights up. This will start pumping the air out of the chamber.
6. While the microscope is coming to high vacuum, monitor the valves on the microscope using the
Evacuation Monitor. The microscope is ready to use when the Pi1 H and L lights are green and the
HT button on the SEM software page turns from being grayed out to being blue. When the HT button
turns blue, sufficient vacuum has been reached in the chamber to use the microscope.
7. Close the Evacuation Monitor window. In the SEM software window, push the SNS button, which
will move the stage to a place where a color camera will take a low magnification photo of the stage and
samples. This photo will be loaded in the small viewing window to the right, top of the large image
window on the SEM software.
8. Push the Windows button at the bottom left side of the keyboard, which will allow you to open the
Infrared camera on the microscope. Double-click on the camera icon to switch on the camera. This
camera gives a live view of the inside of the specimen chamber. Stage motion can be monitored with
this camera to insure that the specimens do not come too close to the Backscattered Electron detector.
9. Set up initial operating parameters for using the microscope before moving your sample or switching on
the High Tension (HT). For biological samples, set the voltage (kV) to 15kV, set the spot size to 30, and
select SEI for viewing the sample from the drop-down windows below the image window. Referring
to the distance you measured from the top of the sample holder to the top of your tallest sample, enter
this number in the Height box. This gives a safety zone above the stage that will keep your samples from
striking the Backscattered Detector. All of these changes are accomplished by single mouse clicking in
each box, then either typing in a response or selecting a parameter from a list of parameters.
10. Return to the Stage window, and enter 0,0,0,0, and 10mm plus the height in millimeters from the top of
the sample holder to top of tallest sample. This will move the stage to its center position and move the
samples 10mm below the Backscattered Detector. Click on the Go button to start stage movement. If
it appears that a sample will hit the detector, using the knob set (behind the keyboard), quickly push the
X/Y button (above and to the left of the joystick), then push the joystick to either side. This is the
emergency stop mechanism for the stage.
11. Select Scan 2 on the knobset or from the software. The microscope should already be at the lowest
magnification if the last person using the microscope followed shut-down procedures. If the microscope
is not, you can go instantly to the lowest magnification by either pushing the INST Mag button on the
knob set (above the magnification knob) or by pushing the View button on the software. Adjust the
Contrast and Brightness of the image by either using the corresponding knobs on the knobset or by right
or left mouse clicking on the words Contrast or Brightness above the Image window. Holding a mouse
button down, you can change the contrast and brightness settings by moving the mouse up or down. The
Left button controls fine changes, while the Right mouse button controls coarse changes.
12. To move your sample in the microscope, you can double-click on an area of the color photo in the
snapshot window to move to that area of the sample. By clicking on an area of the stage image in the
stage window and hitting the Go button, that area will move to the center of the field of view in the
Image window. You can also use the joystick to move your sample if the X/Y button has been pushed,
or you can go to the stage image in the Stage window. Another way to make large movements with the
stage is to move the mouse to an edge of the stage image window. A double headed arrow will appear.
Holding the left mouse button down will move the stage in the direction indicated by the arrow. When
you are getting closer to an object of interest, smaller stage motions can be made by switching the
joystick to Fine Shift, by double-clicking on an object in the field of view in the Image window, (which
will center that object), or by pointing the mouse to an edge of the Image window, where the pointer will
switch to an arrow. By holding the Left mouse button down at an edge of the Image window, the stage
will move in the direction of that edge of the Image window as long as the mouse button is held down.
13. Focus the microscope on the sample by either hitting the AFD button on the software or using the
Focus knob on the knobset. Readjust the contrast and brightness if necessary. Select an area of your
sample with extremely small details in it. Center this area, then increase the microscope magnification to
at least 5000x. Use the focus controls to get the best possible focus. You can work in Scan 1 or Scan 2 at
this point. Adjust the astigmatism of the microscope by either using Stigma X and Stigma Y from above
the Image window, or by using the Stigmator controls on the knobset. The stigmators should be used to
get the best focus of the sample. Work with one stigmator at a time until the best focus is obtained. Use
the focus controls to refocus the microscope, then check the stigmator settings a second time. Correction
for astigmatism should be done once per session if photographing below 5000x, but with each new area
of a sample if taking high magnification photos of the sample.
14. Examine your samples, and photograph them. It may be necessary to change the accelerating voltage to
reduce charging of a sample (lower kV) or to increase resolution (usually, higher kV). It may also be
necessary to change spot size to increase resolution (smaller spot size-more resolution, but also more
noise in the image due to fewer electrons hitting the sample). These settings are determined after initial
examination of your samples. In the SEM, it is preferred to focus the microscope at a magnification
higher than the photo magnification. Focusing is done in Scan 1, 2 or 3. After focusing, reduce the
magnification and take the photo. The electron beam can actually burn a depressed area into a sample, or
leave carbon deposits on a sample. For this reason, it will be necessary to focus at the magnification that
the photo will be taken for beam sensitive samples, and to work quickly.
15. Photography is done with either the Scan 4 button, which will take an 80 second scan of the sample and
then freeze the frame, or with the Photo button, which will take a 160 second scan of the sample and
then freeze the frame. The longer the microscope takes to scan an area, the more electrons that are
collected from the sample. With more electrons per spot on the sample, signal increases and random
noise decreases, giving a higher resolution photo. With beam sensitive samples, it may be necessary to
photograph with Scan 4 to minimize beam damage, specimen shrinkage and specimen drift. Each photo
must be saved by going to File, then Save Image File. Make a folder on the Desktop for your photos.
Name each photo with an identifier for the sample. It is helpful to number your photos, either by
entering a number in the Number box on the software page or by typing the number into your photo
legend. It is also helpful to enter the magnification of the microscope when you took the photo. The
image magnification is different than the microscope magnification. The image is magnified higher than
the microscope magnification. The 6490 is designed so that a 4x5 inch image will correspond to the
magnification indicated. The micron bar in the image is accurate, but the magnification of the
microscope is not the image magnification. Since the micron bar is accurate, the image can be displayed
at any magnification, and then the magnification of the displayed image can be calculated from the
micron bar. Switch back to Scan 2 to close the frozen image and resume examining your sample.
16. If you need to change samples to another sample already in the microscope, hit the INST Mag button or
the View button to go to bottom magnification, move the stage by one of the methods above, then find a
region on the new sample to examine and photograph. If you need to change samples to a sample not in
the microscope, switch off the HT, then move the microscope stage to 0,0,0,0, and Z of 40mm. Push and
hold the Vent button on the microscope console, and unlatch the chamber door. CAREFULLY remove
the sample holder from the microscope with the sample holder retrieval tool and set the sample holder
aside. Latch the chamber door, then switch samples (WEAR GLOVES!) and re-insert the sample holder
into the microscope stage. Press the Windows key, then switch on the Evacuation Monitor software.
Repeat the pump down and start-up procedure for the new samples (Steps 5-10). Clear the color
Snapshot photo of the last sample by right mouse clicking in the snapshot window and selecting All
Clear.
17. If you are finished using the microscope for the day, after repumping the chamber (NEVER leave the
chamber at atmospheric pressure when you are finished!), remove your samples from the sample holder
insert and place the sample holder and insert in the dust-free box that holds them. Select Scan 2 from
the SEM software or knobset. Leave the microscope at its lowest magnification. Shut off the JEOL
SEM software and retrieve your images. Photos on the SEM will be removed periodically so they do
not take up computer memory space. It is planned to remove photos every Monday. Make sure you
have good copies of your photos safely loaded on a computer and burned to a CD or DVD before the
images are purged. THE LAB WILL NOT MAKE BACK-UP COPIES OF PHOTOS BEFORE THEY
ARE PURGED! Log your filament time in the SEM logbook.
18. The filament on the microscope will last for only about 30 hours, so if you need to leave the room for
more than a few minutes, please shut the filament off. If the filament burns out during your session, it
may take an hour to get the microscope ready for use again.
Once a user has become comfortable with the basic functions of the microscope, they may refer to the User’s
Manual and check with the Lab Manager for more advanced applications such as using the Backscattered
Electron detector and using the Low Vacuum mode. In order to use the Backscattered detector, the Infrared
camera window must be minimized, which turns the infrared light for the camera off. Otherwise, the infrared
light will overwhelm the Backscattered detector, and the detector cannot be used.