1
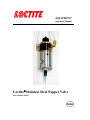
EQUIPMENT
Operation Manual
Loctite® Stainless Steel Poppet Valve
Part Number 982621
1 Please Observe The Following
1.1
Emphasized Sections
Warning!
Refers to safety regulations and requires safety measures that protect the operator or
other persons from injury or danger to life.
Caution!
Emphasizes what must be done or avoided so that the unit or other property is not
damaged.
Notice:
Gives recommendations for better handling of the unit during operation or
adjustment as well as for service activities.
1.2
For Your Safety
For safe and successful operation of the unit, read these instructions
completely. If the instructions are not observed, the manufacturer can assume no
responsibility.
Use only original equipment replacement parts.
Always disconnect the air supply before servicing the unit.
Observe general safety regulations for the handling of chemicals such as
Loctite® adhesives and sealants. Observe the manufacturer’s instructions as stated
in the Material Safety Data Sheet (MSDS).
While under warranty, the unit may be repaired only by an authorized Loctite service
representative.
1.3
Unpacking and Inspection
Carefully unpack the Loctite® Stainless Steel Poppet Valve and examine the items contained in the
carton. Inspect the unit for any damage that might have occurred in transit. If such damage has
occurred, notify the carrier immediately. Claims for damage must be made by the consignee to the
carrier and should be reported to the manufacturer.
2
2 Introduction
This Dispense Valve is designed to dispense Loctite® high viscosity silicones, modified silanes, and
abrasive gasketing products. The valve is typically used in conjunction with a positive displacement
pump or pressure-time system.
The valve is a poppet type valve with a single lip type seal on the poppet stem. The poppet design
gives the valve a “suck-back” feature to reduce product stringing. This valve can operate at fluid
pressures up to 625 psi and is equipped with a 1/8” NPT outlet for Luer Lock and standard needle
dispensing.
A double acting air cylinder operates the poppet. This valve has stroke adjustment capability and is
treated with a proprietary Loctite® coating to prevent premature adhesive curing.
3
3 Theory of Operation
Product is supplied at pressure to valve fluid inlet port.
Compressed air is supplied to air cylinder while “Product Shut Off” port holds poppet on its seat
preventing product flow.
Compressed air is exhausted from “Product Shut Off” port and switched to “Product Flow” port.
Poppet moves off its seat and product flows through valve and out of nozzle.
At the end of the desired dispense cycle; the compressed air is exhausted from “Product
Flow” port and is switched to “Product Shut Off” port. This moves the poppet back onto its seat.
As the poppet moves back onto its seat, a straight section of the poppet enters a close fitting
bore in the valve body. This action creates a seal.
As the poppet travels back further it increases the volume in the valve chamber above the
nozzle. This increase in volume produces a slight negative pressure in the chamber above the
nozzle. This negative pressure lets atmospheric air pressure push the product column back
up the nozzle. This is the “Suck - Back” effect.
The final seal is made when the 120 deg. poppet taper contacts the seat in the valve body.
Relationship of Product Pressure to Control Air pressure:
• There is a pressure balance between the Product Pressure and the Control Air Pressure.
• This balance is determined by the ratio of the projected poppet area to the air cylinder area.
• The ratio is 1 psig of control air pressure to balance 13 psig of product pressure.
• For the valve to operate reliably the force available from the air cylinder must be greater
than the force available from the product pressure.
• Loctite recommends that the product pressure be less than 10 times the control air
pressure.
4 Instructions
4.1 Safety Precautions: Read and observe before working on valve!
Wear protective gear (safety glasses, gloves, aprons, etc.) as required.
Make sure that the control air pressure is zero and that air is “off” and no compressed air is
trapped in the air lines.
Make sure that the product pressure is zero and that product is “off” and that no product
under pressure is trapped in the product supply lines.
Product under high pressure can penetrate skin and other organs. Always position the
dispense nozzle so that it will not discharge in a dangerous manner. Likewise, position any
disconnected hoses so that they will not discharge in a dangerous manner.
4
4.2 Installation:
This valve requires a source of pressurized product and a 4-way pneumatic valve to operate.
1. Turn all utilities “OFF” and set the product pressure to zero psig.
2. Connect the normally passing port of the 4-way pneumatic valve to the Dispense Valve
“Product Shutoff” port.
3. Connect the normally not passing port of the 4-way pneumatic valve to the Dispense Valve
“Product Flow” port.
4. “Connect” the pressurized product source to the Dispense Valve product inlet port (unmarked).
4.3 Operation:
1. Turn on utilities. Compressed air to “Product Shutoff” moves poppet onto seat, closing valve.
2. Pressurize product.
3. On initial startup or after replacing empty product container with a full one, remove air from
product supply tube and valve as follows:
4. Place container under dispense nozzle.
5. Open dispense valve under manual control to remove air from product supply tube and valve.
When air is purged from system, close dispense valve.
6. Resume normal operation.
4.4 Shutdown Procedure:
This is the specific procedure to follow if the Dispense Valve is to be shut down overnight or
longer when dispensing products. This procedure leaves the valve in the open position so that the
minimum number of wetted parts are in close contact.
1. Remove all product pressure to the Dispense Valve. It is also advisable to relieve the pressure
on the product by setting it to zero.
2. Place a container under the dispense nozzle.
3. Cycle the Dispense Valve to the “Open” or “Product Flow” position. This moves the cylindrical
“Suck-Back” section of the poppet out of the valve body. This leaves the minimum number of
wetted parts in close contact.
4. When restarting the system, cycle the Dispense valve to the “Closed” or “Product Shut Off”
position.
5
5 Troubleshooting and Phone Numbers for Help
Because of the complex steps in, the chemicals required for, and the safe handling and disposal of
these chemicals, Loctite does not recommend rebuilding of this Dispense Valve.
Henkel Corporation has a Valve Rebuild Program and can ship a rebuilt and tested Dispense Valve
to the customer generally within (1) day of receipt of a failed Dispense Valve.
If you have a critical application we recommend that you keep a new or rebuilt valve in stock so that
your down time will be limited to the time that it takes to change out a Dispense Valve.
5.1 Troubleshooting:
Problem
No Product Dispensed.
Product Flow does not shut off.
Product appears at observation
port in valve body.
Cause
Check that pressurized product is
available at valve inlet port.
Proposed Solution
Supply Pressurized Product.
Check that control air is
operating and available.
Supply Control Air.
Nozzle plugged.
Replace Nozzle.
None of the above.
Replace Dispense Valve.
Check that control air is operating
and available.
Supply Control Air at correct
pressure.
Product pressure too great.
Reduce product pressure.
None of the above.
Replace Dispense Valve.
Seal is leaking.
Replace Dispense Valve.
Questions regarding installation, operation, or safety should be addressed to:
Henkel Corporation
Technical Information Department
1001 Trout Brook Crossing
Rocky Hill, Connecticut 06067
U.S.A.
Telephone: 1-800-LOCTITE (1-800-562-8483) or 860-571-5100.
6
6 WARRANTY
Henkel expressly warrants that all products referred to in this Instruction Manual for 982621 Loctite® Valve
(hereafter called “Products”) shall be free from defects in materials and workmanship. Liability for Henkel
shall be limited, as its option, to replacing those Products which are shown to be defective in either materials
or workmanship or to credit the purchaser the amount of the purchase price thereof (plus freight and
insurance charges paid therefor by the user). The purchaser’s sole and exclusive remedy for breach of
warranty shall be such replacement or credit.
A claim of defect in materials or workmanship in any Products shall be allowed only when it is submitted in
writing within one month after discovery of the defect or after the time the defect should reasonably have
been discovered and in any event, within (12) months after the delivery of the Products to the purchaser. This
warranty does not apply to perishable items, such as (indicate items: fuses, filters, lights, ect.) No such claim
shall be allowed in respect of products which have been neglected or improperly stored, transported, handled,
installed, connected, operated, used or maintained. In the event of unauthorized modification of the Products
including, where products, parts or attachments for use in connection with the Products are available from
Henkel, the use of products, parts or attachments which are not manufactured by Henkel, no claim shall be
allowed.
No Products shall be returned to Henkel for any reason without prior written approval from Henkel.
Products shall be returned freight prepaid, in accordance with instructions from Henkel.
NO WARRANTY IS EXTENDED TO ANY EQUIPMENT WHICH HAS BEEN ALTERED, MISUSED,
NEGLECTED, OR DAMAGED BY ACCIDENT.
EXCEPT FOR THE EXPRESS WARRANTY CONTAINED IN THIS SECTION, HENKEL MAKES NO
WARRANTY OF ANY KIND WHATSOEVER, EXPRESS OR IMPLIED, WITH RESPECT TO THE
PRODUCTS.
ALL WARRANTIES OF MERCHANTABILITY, FITNESS FOR A PARTICULAR PURPOSE, AND
OTHER WARRANTIES OF WHATEVER KIND (INCLUDING AGAINST PATENT OR TRADEMARK
INFRINGEMENT) ARE HEREBY DISCLAIMED BY HENKEL AND WAIVED BY THE PURCHASER.
THIS SECTION SETS FORTH EXCLUSIVELY ALL OF LIABILITY FOR HENKEL TO THE
PURCHASER IN CONTRACT, IN TORT OR OTHERWISE IN THE EVENT OF DEFECTIVE
PRODUCTS.
WITHOUT LIMITATION OF THE FOREGOING, TO THE FULLEST EXTENT POSSIBLE UNDER
APPLICABLE LAWS, HENKEL EXPRESSLY DISCLAIMS ANY LIABILITY WHATSOEVER FOR
ANY DAMAGES INCURRED DIRECTLY OR INDIRECTLY IN CONNECTION WITH THE SALE OR
USE OF, OR OTHERWISE IN CONNECTION WITH, THE PRODUCTS, INCLUDING, WITHOUT
LIMITATION, LOSS OF PROFITS AND SPECIAL, INDIRECT OR CONSEQUENTIAL DAMAGES,
WHETHER CAUSED BY NEGLIGENCE FROM HENKEL OR OTHERWISE.
7
Loctite Industrial
Henkel Corporation
1001 Trout Brook Crossing
Rocky Hill, CT 06067-3910
Henkel Corporation
2225 Meadowpine Boulevard
Mississauga, Ontrario L5N 7P2
Henkel Automotive Technology
Center
2455 Featherstone Road
Auburn Hills, Michigan 48326
Henkel Ltda. Brazil
Av. Prof. Vernon Krieble, 91
06690-11-Itapevi
Sao Paulo, Brazil
Henkel Capital, S.A. de C.V.
Calzada de la Viga, s/n, Fracc. Los Laureles
Loc. Tulpetlac, C.P. 55090
Ecatepac de Morelos, Edo de Mexico,
Mexico
www.loctite.com
Loctite is a registered trademark of Henkel Loctite Corporation, U.S.A
© Copyright 2007. Henkel Corporation. All rights reserved. Data in this operation manual is subject to change without notice.
Manual P/N: 8901592, 11/2007
8