1
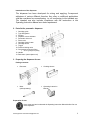
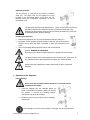
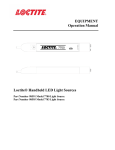
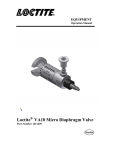
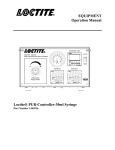
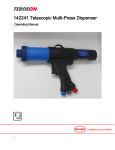
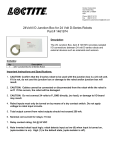
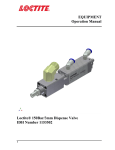
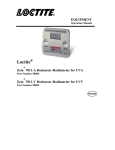
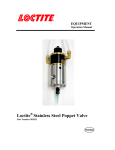
EQUIPMENT Operating Instruction Manual Loctite® High Force Pneumatic Dispenser 1500890 for 2-Component Adhesives [email protected] 1 Contents: 1. Safety instructions 2-4 Symbols used in the Operating Instruction Manual Explanation of the safety concept Intended use 2. Parts list for pneumatic dispenser 3. Preparing the dispenser for use 4 4-5 Package contents Preparation for use Operating principle Preparing the dispenser 4. Operation of the dispenser 5-6 Insert cartridge Connect the dispenser to the compressed air supply Dispensing the adhesive Removing the cartridge 5. Troubleshooting 6 6. Maintenance and Repair 7 Ordering Spare Parts 7. Technical data 7 8. Standards applied 7 9. Warranty 8 Always keep this instruction manual easily accessible to users of the dispenser. 1. Safety instructions Read through this dispenser Operating Instruction Manual carefully. For safe and reliable operation, it is essential for users to understand and follow all the safety instructions provided in the Manual. Symbols used in the Manual and on the dispenser INFORMATION Important information on installation, operation or maintenance. DANGER / CAUTION Risks or hazardous applications that can result in severe / fatal injuries or considerable material damage. WEAR GLOVES Failure to do so can result in serious personal injury [email protected] 2 WEAR SAFETY GOGGLES Failure to do so can result in serious personal injury CE The pneumatic dispenser is marked with the CE symbol in compliance with the applicable European directives. Do not use the dispenser until you have read and understood the operating procedure and the instructions contained in this Operating Instruction Manual. The dispenser operates under high pressure. Failure to follow these instructions can lead to inadvertent discharge of pressure or breakage of the dispenser at high pressure and may result in serious personal injury to the user or bystanders and/or property damage. The following instructions must be read and strictly observed: The user of the dispenser and any persons standing in the vicinity must wear safety goggles and gloves at all times during operation of the dispenser. The user should never point the barrel end of the dispenser at himself or in the direction of bystanders [animals] or objects during operation. Never open the pneumatic drive or attempt to remove. Handle the dispenser properly. Store in a cool dry place. Transport it carefully, with minimal vibration. Do not drop it to the ground or slam it on a bench or other workspace. Safety devices must not be removed, worked around, bypassed or deactivated during operation. Always comply with the warnings and notices on the device. Never, under any circumstances, remove these warnings and notices. Replace them immediately if they become detached or illegible. Do not remove, tamper or manipulate pressure limiting valve and strictly respect pressure limits. Check the dispenser for visible damage and defects before each use. The dispenser must only be used if it is in good working order. If you have any doubt about the condition of the dispenser, or if there are any signs of breakage or other damage, immediately stop using the device and send it for inspection and repair by a site authorized by the manufacturer. Keep the dispenser clean at all times. Failure to do so may result in malfunction of dispenser or bodily injury. Do not attempt to modify or repair the dispenser. Maintenance and repairs must be carried out exclusively by qualified specialists. No such work may be carried out while the dispenser is connected to the compressed air supply. Always follow safe workplace practices, such as making sure the air hoses are carefully routed so that neither you nor any other person can become entangled in the hoses or trip over them. Be cautious connecting and disconnecting air pressure hose. Always keep this instruction manual easily accessible to users of the dispenser. Use only authentic Loctite® spare parts. Malfunctions or accidents may result if spare parts of other manufacturers are used, and any warranty claims against the manufacturer will be considered void. Replace missing or damaged hazard warning labels / stickers. Modifications or changes to the dispenser by persons not authorized by the manufacturer and any failure to comply with the safety instructions given in the Operating Instruction Manual are dangerous and can lead to accidents with severe injuries and / or property damage. [email protected] 3 Intended use of the dispenser The dispenser has been developed for mixing and applying 2-component adhesives of various different formulas. Any other or additional applications shall be considered as nonconforming, i.e. not conforming to the intended use. The intended use also includes compliance with the instructions in this Operating Instruction Manual as a basic requirement. 2. Parts list for pneumatic dispenser: 1. 2. 3. 4. 5. 6. 7. 8. 9. 10. 11. Cartridge guide Type designation Plunger Dispense volume indicator Pneumatic drive unit Piston rods Cartridge ejector button Cartridge sleeve Trigger Pressure limiting valve Compressed air supply fitting 983723 (packaged separately) 12. Handle 13. Red button (retract piston rod) 3. Preparing the dispenser for use: Package contents Dispenser Cartridge sleeve Mixer (sold separately) Operating Instruction Manual Preparation for use Users must read and understand the Operating Instruction Manual before first use of the dispenser. [email protected] 4 Operating principle The air pressure is reduced by the pressure reduction valve (10). The piston rods (6) are pushed out of the housing by the pneumatic piston of the drive unit (5), thereby forcing the component compounds A and B through the mixer. The dispenser operates under high pressure. Failure to follow the instructions in this Manual can lead to inadvertent release of pressure or breakage of the dispenser at high pressure and may result in serious personal injury to the user or bystanders and/or property damage. Preparing the dispenser Remove the protective cap (11) from the pressure reduction valve (10). Install the ¼" BSP adapter (external thread) on the inlet side of the pressure reduction valve, which will allow a standard ¼”male npt connection to be made. The use of properly rated pneumatic hose is also recommended. Caution: DANGER OF CRUSHING. Never place your hands or fingers between the plunger and the cartridge. The input pressure of the compressed air must not exceed max. 6 bar (max. 87 psi). Requirements for the compressed air supply (see Technical Data). Strictly follow the manufacturer’ s safety instructions for the 2-component adhesive. 4. Operation of the dispenser Insert cartridge Never insert the cartridge while the dispenser is connected to the compressed air supply. Push the cartridge into the cartridge sleeve as shown in the drawing and press it down until it clicks into position. To remove the cartridge stopper, unscrew the cap nut of the cartridge. Fasten the mixer using the cap nut on the cartridge outlet thread. If the cartridge is not in the correct position, the trigger (9) cannot be pressed. [email protected] 5 Connect the dispenser to the compressed air supply Dispensing the adhesive Press the trigger (9). Dispensing is started, and the red dispense volume indicator (4) moves forward. When the trigger (9) is released, dispensing stops. The dispense volume can be controlled by means of the pressure reducing valve (10). a) Pull the pressure reduction valve. b) Adjust the dispense volume by turning the adjuster in the + or – direction. c) Press the pressure reduction valve to confirm the set value. Do not remove, tamper or manipulate pressure limiting valve and strictly respect pressure limits. Removing the cartridge Release the trigger (9) and press the red button (13) until the feed plungers have retracted to the back end-stop. Using the release button (7), push the cartridge out of the cartridge retainer and pull it upwards out of the unit. Dispose of the cartridge and mixer in conformity with the manufacturer’ s specifications. 5. Troubleshooting: Problem Plunger discs cannot enter the cartridge Potential Cause Cartridge not fully inserted in cartridge bed Remedy Check that there is no foreign matter in the cartridge bed. Push the cartridge fully down into the cartridge bed. Mind your fingers. The cartridge cannot be removed from the dispenser. The plunger discs are still in position inside the cartridge. Press the red button to fully retract the plunger discs to the back end-stop. [email protected] 6 6 . Maintenance and repair: Notices All maintenance and repairs must only be carried out by sites authorized by the manufacturer and exclusively by qualified and suitably trained personnel. Always disconnect the compressed air supply from the dispenser during maintenance and repairs. Never open the pneumatic drive unit. If the pneumatic drive unit is or appears to be in need of maintenance or repair, contact a Henkel authorized Service Center Keep the dispenser clean at all times. Failure to do so may result in malfunction of dispenser or bodily injury. Do not use aggressive cleaning products to clean the surface of the device. Information for ordering spare parts: When ordering spare parts, please contact equipment-customerservice @loctite.com information: 7. Technical data: Operating pressure: Compressed air supply: Air requirements: Pressure adjustment: Sound level: Weight: max. 6 bar (max. 87 psi) max. 8 bar (max. 120 psi) ISO 8573-1.2.4.2 Variable 0- 6 bar (87 psi) 83 dBA 1500890 2.4 kg 8. Standards applied: 2006/42/EG: 97/23/EC: ISO 8573-1: Machinery Directive Pressure Equipment Directive Compressed air quality classes [email protected] 7 9 WARRANTY Henkel expressly warrants that all products referred to in this Instruction Manual for Loctite® Pneumatic Dual Cartridge Dispenser 1500890 (hereafter called “Products”) shall be free from defects in materials and workmanship. Liability for Henkel shall be limited, as its option, to replacing those Products which are shown to be defective in either materials or workmanship or to credit the purchaser the amount of the purchase price thereof (plus freight and insurance charges paid therefore by the user). The purchaser’s sole and exclusive remedy for breach of warranty shall be such replacement or credit. A claim of defect in materials or workmanship in any Products shall be allowed only when it is submitted in writing within one month after discovery of the defect or after the time the defect should reasonably have been discovered and in any event, within (12) months after the delivery of the Products to the purchaser. No such claim shall be allowed in respect of products which have been neglected or improperly stored, transported, handled, installed, connected, operated, used or maintained. In the event of unauthorized modification of the Products including, where products, parts or attachments for use in connection with the Products are available from Henkel, the use of products, parts or attachments which are not manufactured by Henkel, no claim shall be allowed. No Products shall be returned to Henkel for any reason without prior written approval from Henkel. Products shall be returned freight prepaid, in accordance with instructions from Henkel. NO WARRANTY IS EXTENDED TO ANY EQUIPM ENT WHICH HAS BEEN ALTERED, MISUSED, NEGLECTED, OR DAMAGED BY ACCIDENT. EXCEPT FOR THE EXPRESS WARRANTY CONTAINED IN THIS SECTION, HENKEL MAKES NO WARRANTY OF ANY KIND WHATSOEVER, EXPRESS OR IMPLIED, WITH RESPECT TO THE PRODUCTS. ALL WARRANTIES OF MERCHANTABILITY, FITN ESS FOR A PARTICULAR PURPOSE, AND OTHER WARRANTIES OF WHATEVER KIND (INCLUDING AGAINST PATENT OR TRADEMARK INFRINGEMENT) ARE HEREBY DISCLAIMED BY HENKEL AND WAIVED BY THE PURCHASER. THIS SECTION SETS FORTH EXCLUSIVELY ALL OF LIABILITY FOR HENKEL TO THE PURCHASER IN CONTRACT, IN TORT OR OTHERWISE IN THE EVENT OF DEFECTIVE PRODUCTS. WITHOUT LIMITATION OF THE FOREGOING, TO THE FULLEST EXTENT POSSIBLE UNDER APPLICABLE LAWS, HENKEL EXPRESSLY DISCLAIMS ANY LIABILITY WHATSOEVER FOR ANY DAMAGES INCURRED DIRECTLY OR INDIRECTLY IN CONNECTION WITH THE SALE OR USE OF, OR OTHERWISE IN CONNECTION WITH, THE PRODUCTS, INCLUDING, WITHOUT LIMITATION, LOSS OF PROFITS AND SPECIAL, INDIRECT OR CONSEQUENTIAL DAMAGES, WHETHER CAUSED BY NEGLIGENCE FROM HENKEL OR OTHERWISE. Henkel Corporation One Henkel Way Rocky Hill, CT 06067-3910 Henkel Canada Corporation 2515 Meadowpine Boulevard Mississauga, Ontario L5N 6C3 Canada Henkel Capital, S.A. de C.V. Calzada de la Viga s/n Fracc. Los Laureles Loc. Tulpetlac, C.P. 55090 Ecatepac de Morelos, Edo. de México Henkel Corporation Henkel Ltda. Rua Karl Huller, 136 –Jd. Automotive / Metals HQ 32100 Stephenson Hwy. Canhema 09941-410 Madison Heights, MI 48071 Diadema/SP, Brazil www.loctite.com ® and ™ designate trademarks of Henkel Corporation or its affiliates. ® = registered in the U.S. and elsewhere. © Henkel Corporation, 2009. All rights reserved. Manual # 8902871, Rev A, Date: 04/29/2013 [email protected] 8