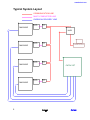
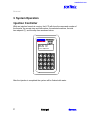
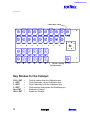
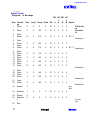
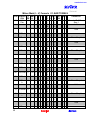
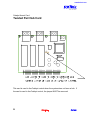
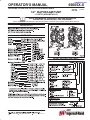
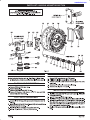
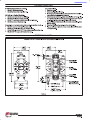
1
www.Softrol.com
CATALYSTInstallation and
Operation Manual
Softrol Systems Inc.
1100 North Point Parkway
Acworth, GA 30102
(770) 974-2700
www.Softrol.com
2
www.Softrol.com
Table of contents
Chapter
1
2
Description
Page
Introduction
Installation
Catalyst Alarms
Interface Alarms
Arcnet Troubleshooting
Catalyst Electronics
Catalyst Pneumatics
5
15
16
21
24
28
31
34
35
37
39
40
41
42
45
47
49
55
67
68
73
80
86
92
Pump Manual
Catalyst Schematic
Catapulse Schematic
A1
A2
A3
System Utilities
System Configuration
Interface Installation
Network Installation
3
System Operation
Passwords
Priming the system
Interface Operation
4
Calibration
Flow meter Based Calibration
H-Factor Calibrations
Time Based Calibration
Conversion Table
5
6
7
8
PulseNet Configuration
PulseNet Programming
Washer Programming
Maintenance and Troubleshooting
Appendix
1
2
3
3
www.Softrol.com
4
www.Softrol.com
1. Introduction: The Catalyst System
The Catalyst System is a chemical metering and injection system that delivers
liquid chemicals to multiple washers. The system is flexible and can be
customized to serve up to twenty machines with a possible sixteen chemicals.
The Catalyst System offers precise chemical deliveries with consistent results.
The system has the ability to interface with various types of controllers, and
production data may be gathered for a variety of washers. Formula entry is
simplified with a with the PulseNet PC software and all formulas are stored in the
Interface Box or on the microPulse washer controller.
5
www.Softrol.com
Typical System Layout
COMMUNICATION LINE
MULTI-CONDUCTOR LINE
CHEMICAL DELIVERY LINE
MACHINE
CONTROL
INTERFACE
MACHINE
HUB
MACHINE
CONTROL
INTERFACE
MACHINE
CONTROL
INTERFACE
MACHINE
MACHINE
CATALYST
MACHINE
CONTROL
MACHINE
6
COMPUTER
INTERFACE
www.Softrol.com
The Softrol Catalyst Family
Softrol Systems, Inc. offers six types of Catalyst Chemical Dosing Systems to
automatically deliver chemicals to wet processing equipment. All of the Catalyst
Systems utilize specialized Windows® based software to allow user defined
programming and process reporting. Softrol Catalyst Systems are built in noncorrosive enclosures with easy access to valves, pumps, and electronic parts.
The Catalyst System uses flow meter based injection technology, providing
volumetric injection and water flush verification. In combination with Softrol
engineered electronics, flow meter, and alarms (watchdogs) the system
measures and verifies each injection. With this combined technology, chemicals
are injected quickly and accurately: no excess chemicals enter the machine(s).
Features of Softrol Catalyst Systems include:
o Connection with any type washer control
o Properly maintained chemical injections
o 128 programmable injection formulas
Catalyst System
o User-friendly operation
Machine Interface
o 16 user defined chemical names
o Corrosion resistant materials
o Control of flow rates from 0.2gpm to 10.0gpm
o Data recording and reports
o Programmable alarms
o 32 preventative maintenance prompts
o Accurate chemical injections over a wide range of viscosities
o Simple calibration procedures
o Modular design for simplified troubleshooting, repair and expansion
7
www.Softrol.com
Types of Systems
Catalyst Lite
The Catalyst Lite System is a low cost flow metered chemical injection system
capable of delivering up to eight (8) chemicals to a maximum of eight (8) washers
in a compact all-inclusive chemical resistant enclosure. The Softrol designed and
manufactured manifold systems, with built-in flow meter, assures that precise
delivery of chemicals is maintained during formula execution. By using the
standard Softrol Catalyst software package, this unit delivers many of the
features of the Catalyst Classic. In order to provide a low cost solution for the
automatic injection of chemicals, Softrol has been able to engineer a system with
slightly less automation, primarily in the calibration of chemicals, which is more
automated on the upper line systems. Additionally, the Catalyst Lite incorporates
an integrated 6-gallon flush tank providing immediate water for flushing the
manifold. This model is available as a redundant system.
8
www.Softrol.com
Catalyst Classic
The Catalyst Classic System is the industry standard for effectively automating
the delivery of up to sixteen (16) chemicals to a maximum of sixteen (20)
washers. The freestanding, non-corrosive enclosure can be placed either in the
chemical storage area, or on the washroom floor for easy access. By using
multiple Softrol designed manifolds with built-in flow meters; this system is
custom designed to deliver high flow, precisely calibrated chemical injections
throughout the process formulation. This highly automated system incorporates a
full featured, yet simple to operate, Softrol Catalyst Plus software to provide user
defined programming and process reporting. All functions of this unit are
automated including automated operation of calibration valves and a back flush
valve for easy maintenance of the system. Additionally, the Cataly st Classic
incorporates a larger integrated 7.5-gallon flush tank providing isolated and
tempered water for flushing the injectors. This system has Redundancy
capabilities. Please see below for additional descriptive information.
9
www.Softrol.com
Catalyst Dual Inject
The Catalyst Dual Inject System has similar features of the Catalyst Classic, but
offers dual injection capability during the delivery of chemicals to washers. For
high production facilities this unit can deliver chemicals to two (2) machines
simultaneously while ensuring minimum formula hold times, thus increasing
productivity. The Catalyst Dual Inject System does not require any additional
chemical pumps to provide multiple machine injections. In addition, the system
incorporates a large integrated 15-gallon flush tank with an additional flush pump
(2) to ensure proper flushing during simultaneous chemical injections. This Dual
Inject System also has redundancy capabilities. Please see below for additional
descriptive information.
10
www.Softrol.com
Catalyst Tunnel
The Catalyst Tunnel System operates in the same method as other Catalyst
Systems, including features to ensure superior precision and accuracy for
delivering chemicals to a continuous batch washer. The Catalyst Tunnel System
has the capability to simultaneously deliver up to sixteen (16) chemicals to eight
(8) individual modules of a continuous batch washer. The unique Softrol Catalyst
Tunnel System design allows each continuous batch washer module receiving
chemicals to be matched with its own chemical manifold with built-in flow meter
and flush pump. This ensures quick chemical injections with precise volumetric
accuracy. This design allows simultaneous injection of chemicals to separate
continuous batch washer modules without initiating production delays. Softrol
designed Tunnel Interface Hardware and Catalyst Software is provided with each
system which offers user defined programming, data collection, and report
generation.
11
www.Softrol.com
Many installations may require the additional performance of fully redundant
chemical injection systems. Softrol also offers their Catalyst Classic and Catalyst
Dual Inject systems in fully redundant configurations that provide the unique
capabilities of delivering chemicals to 2, 3 or 4 machines simultaneously. They
also can provide the unique capability of delivering chemicals to machines while
one of the systems is shut down for preventative maintenance
For Washrooms Requiring Redundant Chemical
Injections
Catalyst Classic Redundant
The Catalyst Classic Redundant System can utilize two or more Catalyst Classic
Systems to achieve complete redundancy for chemical injection. The system
utilizes all of the features of the standard Catalyst Classic for effectively
automating the delivery of up to sixteen (16) chemicals to a maximum of sixteen
(16) washers. The Catalyst Classic Redundant System consists of two complete
Catalyst Classic Systems which includes complete replication of valves, pumps,
flow meters, calibration components, and software capable of delivering
chemicals to two or more machines simultaneously (one machine injection from
each system) or have the capability to deliver chemicals to machines while one
of the units is shut down for preventative maintenance.
12
www.Softrol.com
Catalyst Dual Inject Redundant
The Catalyst Dual Inject Redundant System utilizes two Catalyst Dual Inject
Systems to achieve complete redundancy for chemical injection. Utilizing all of
the features of the Catalyst Dual Redundant for effectively automating the
delivery of up to sixteen (16) chemicals to a maximum of sixteen (16) washers.
The Catalyst Dual Inject Redundant System consists of two complete Catalyst
Dual Inject Systems which includes complete replication of valves, pumps, flow
meters, calibration components, and software capable of delivering chemicals to
four (4) machines simultaneously (two (2) machines simultaneously injections
from each system) or have the capability to deliver chemicals to machines while
one of the units is shut down for preventative maintenance.
For Washrooms Requiring Single Machine Chemical Injections
ChemPulse Express
The ChemPulse Express flow metered system is an automated chemical
injection system for individual machines. This system does not employ a
Queued, First In - First Out (FIFO operation) as in the ChemPulse Catalyst small
systems, but instead the ChemPulse Express system supplies chemicals
immediately upon demand from the control. The ChemPulse Express interfaces
to a MicroPulse Machine Control or MicroPulse Machine Interface, and allows
the control of up to 32 chemicals per machine.
The system is completely modular, so that maintenance or repairs may be
completed for specific parts of the system without having to shut down an entire
operation. Chemicals are delivered to the ChemPulse Express system by either
pressurized chemical headers or a Softrol engineered pump system. After every
injection, the system is flushed with water to ensure the system’s longevity and to
guarantee complete injection of required volumes.
The unique feature of the ChemPulse Express is the feedback which it supplies
to the MicroPulse controller. In addition to monitoring volumes, the controller
uses the feedback received from the ChemPulse Express to obtain proof of
injection and proof of flush. The MicroPulse will alert operators if there are any
problems with any part of the injection process. These safeguards prevent
chemical waste and costly errors due to improper processing of valuable goods.
13
www.Softrol.com
14
www.Softrol.com
2. Catalyst Installation & Configuration
Several weeks prior to the installation, an on site survey should be conducted to
determine the best location in the plant for the Catalyst system. Consideration
should be given to the location of the chemicals in relation to the washroom and
the length of the run from the chemical storage area to the washers. The shorter
the length of the Catalyst to the machines, the faster the injection times will be.
This is very important with the Catalyst Tunnel system. A plant layout with the
proposed location for the Catalyst along with the list of chemical and typical
injection amounts should be sent to Softrol when the system is ordered. Also
include a list of machines and their controller types with the chemical output
voltage. This will help ensure that the configuration and layout of the system is
optimal.
Before beginning the installation, Softrol Systems recommends that plant
personnel be familiar with the types of chemicals they will be working with and
the potential hazards that are associated with the chemicals (this information
must be supplied in the form of a Material Safety Data Sheet, or MSDS.)
Softrol Systems also recommends that, at the very minimum, plant personnel be
required to wear all protective equipment suggested in the MSDS. Extreme care
should be taken when working with a pressurized chemical system. Ensure that
all pressure has been removed from the system and that all power to the
machine is turned off before undergoing maintenance.
Injection Unit
Remove the equipment from the shipping packages. Check the system carefully
to assure that no damage occurred in shipment. If any damage from shipment is
apparent call Softrol Systems immediately at (770) 974-2700.
Clear the area in which it is to be placed. This should have already been
determined in the Site Survey. Uncrate and stand the Catalyst Injection System
in the position where it is to be located. Be careful in transporting the Catalyst - it
is heavy.
Utility Connections
15
www.Softrol.com
Make all the electrical, air and water connections as explained below.
Water Connections:
The Catalyst requires water > 3 GPM at a temperature no greater then
110oF or less than 80oF. (This can be either tempered water, or hot and
cold with a mixing valve- valve is not supplied) The supply line should
have shut-off valves and stubbed to a 1/2” barb. Flexible tubing should be
used to connect the water supply line to the fill valve for the flush tank on
the Catalyst System. The unit has a 1/2” barb connection. (Tubing not
supplied) Water pressure should be no more than 45 psi.
Air Connections:
A ½” line of clean, dry air at 90 PSI minimum is required for the system.
The system uses about 8 SCFM maximum (12 SCFM for the Catalyst DI)
at 90 PSI. For multiple or redundant systems, the supply line should be
upsized accordingly. The unit has a 3/8” OD flexible tubing connection.
(Tubing not supplied)
Electrical
Connections:
The Catalyst requires
120 VAC at 5 Amps.
The unit is supplied
with a 15’ US power
cord. The Active Hub
(not used on the
Catalyst Lite) also
requires 120 VAC at 5
Amps. These circuits
should be dedicated for
the chemical system
use only.
Chemical
Connections
The
16
chemical feed lines
should be run from the
www.Softrol.com
source (Tank, Drum, Tote, etc…) and connected to the appropriate pump. The
pump’s inlet is at the bottom and the outlet (to the chemical valves) is at the top.
On the inlet of the pump, use ½” tubing for the small pump and ¾” tubing for the
large pump. It might be necessary to use reinforced tubing on some of the inlets
if chemical is being drawn a long distance and/or uphill.
The maximum distance for the pumps to draw depends on the chemical viscosity
and the elevation that it must overcome. Viscous chemicals should be kept as
close to the unit as possible. Also, avoid running the suction tubes over an
elevation of 6 ft.
The inlet lines to the pumps must have
adequate strainers (#12 Mesh minimum).
These may be incorporated with drum
wands (available from Softrol) or can be
piped inline. It is recommended that if the
strainers are piped inline, a shutoff valve
be located on either side as to allow for
easier cleaning.
3/4" Y-Strainer
#12 Mesh
3/4" Drum Wand
17
www.Softrol.com
CATALYST
Chemical Pumps
The chemical pumps should be tightened to the proper torque range before use.
The proper torque is 70 in.-lbs.
Use a ½” wrench.
Torque both sides
Tighten ALL bolts
and nuts.
18
Use 7/16” nut driver. Torque from
bolt head. This is on the side of
the air inlet. Tighten all 6 bolts.
www.Softrol.com
CATALYST
Machine Connections
The Catalyst has 3/4” hose barb (1/2” for the Catalyst Tunnel) connections for the
machine delivery lines. A minimum of 5’ of tubing should be used even if the
machine lines are hard piped. For a redundant Catalyst setup or a Catalyst DI,
there should be multiple lines to each washer or the lines should be connected
together with check valves to form a single line to the washer. These connectors
are not included but can be ordered from Softrol. See drawing below.
Catalyst DI Systems and
Redundant Systems
Check Valve Assembly for multiple DI systems or more than 2 redundant
Catalyst systems.
19
www.Softrol.com
CATALYST
Drain Connection
There are 2 drain connections for the Catalyst with 1/2 “ NPT connections. The
back-flush outlet MUST be plumbed to an applicable drain. Since this outlet can
be pressurized, the drain line does not have to be a gravity drain. The overflow
is for the flush tank and cannot be run any higher than the top of the tank. It is
not necessary to hook up the overflow line, however, if the level switch fails in the
tank, water will be forced out this outlet.
Machine Connections
System 1
Machine Connections
System 2
Back Flush Port
Overflow Port
20
www.Softrol.com
CATALYST
Configuration: Injection Controller
The Catalyst machine setups tailor the operation to suit individual preferences
and applications. These parameters are global meaning they effect all formulas.
Some of these parameters (AutoChem Flush, for example) can also be set on
the machine and override the global parameters and only effect the current
injection. Use the following sequence to set up the user programmable features.
From the “Waiting for Chemical Injection Request!” display, enter a valid
level 7 password (please refer to Passwords).
1=Setup
3=Maint.
5=Totals
Selection?
2=Program
4=Calib.
6=Clock
0=exit
Select 1=Setups
1=Watchdogs/Setups
2=Chemical Setups
Select 1=Watchdogs/Setups
1=Machine Setup
2=Maintenance Setup
3=Clear Ram Vocabs
4=Passwords
0=exit
Select 1=Machine Setup
The current setting is shown on the display. The Programmable Functions
section describes all of the questions in detail.
Note: Use the [YES] or [NO] keys and the numbers on the keypad to change the
answer to the setup questions. Some questions require the operator to enter a
value.
Press the [ENT] key to accept the answer.
Press only the [ENT] key to accept the default or keep the previously
programmed value.
You cannot go backwards through the questions. If you need to change the
answer to a previous question, press the [ENT] key to accept the current
values to the remaining questions then restart the procedure.
21
www.Softrol.com
CATALYST
Press the [CLR] key to clear the numeric value of the current question.
After all setups are complete pressing the [CLR] key will accept the changes.
The Catalyst does not store any of the changes in memory until the last setup
question is answered and the [CLR] key is pressed. If the power is lost during
the setup procedure, the changes will not take effect.
AutoChem Flush
This setup answered in seconds is the amount of time the Catalyst will flush the
system with water after each chemical injection. The Catalyst will read the time
on the machine and use the time that is the greatest.
Chems 9-12 Auto
If answered YES, the Catalyst will turn on the chemical outputs for chemicals 9
through 12.
Chems 13-16 Auto
If answered YES, the Catalyst will turn on the chemical outputs for chemicals 13 through
16.
Flow Sensors
This setup tells the Catalyst to use the flow sensor input. This should be set to
YES.
Chemical Watchdog
This is the time in mm:ss the user defines is the maximum Catalyst inject time.
Prompt Weight
This indicates whether the operator wishes to prompt the weight of the load
before the start of each manual formula. This will most likely be set to NO.
Signal Mute Time
This is the time in mm:ss the user defines how long a signal will be ignored when
pressing the CLR key.
First Washer ID
This setup informs the Catalyst the ArcNet networking ID of the first washer to be
serviced.
Last Washer ID
This setup informs the Catalyst the ArcNet networking ID of the last washer to be
serviced.
Preferred ID Lo
Used for a redundant system. This setup is used to assign the highest ArcNet
networking ID that determines the preferable range for the Catalyst to inject
chemicals. Decisions by the Catalyst will be given preference according to the
programmed range.
Preferred ID Hi
This setup is used to assign the highest ArcNet networking ID that determines
the preferable range for the Catalyst to inject chemicals. Decisions by the
Catalyst will be given preference according to the programmed range.
22
www.Softrol.com
CATALYST
Installation: Machine Interface
Mount the Machine Interface Boxes on or near each washer. Use nuts and
bolts for a machine mount, and screws for a wall mount. The interface should
be connected to the washer controller with 15-conductor wire. 24 VDC will be
supplied from the Catalyst for the power. Refer to the interface schematic for
specific wiring instructions.
Once the interface is powered, the setups may be entered. The setups in the
interface are accessed in the same manner as the setups in the podium.
WiringThe interface comes pre-wired with a 20’ length of 15 conductor 18 gauge wire.
This wire should be cut to length and wired to the input converter.
The illustration above shows three “Daisy Chains” from the Catalyst. The first
one is machines 1-4 the second daisy chain covers machines 5-9. The third
daisy chain is from the communication card of the Catalyst to the computer.
Machines 4 and 9 and the computer should have terminators. If there are
multiple Catalysts, then the network will be wired in a similar fashion, but a Hub
will be used for communications. Refer to the Catalyst manual for this layout.
CATAPULSE INTERFACE
23
INPUT CONVERTER
www.Softrol.com
CATALYST
The input converter should be wired on the interface side. The wires should be
as follows:
Fig.2
Terminal
1
2
5
6
10
11
12
13
14
15
16
17
18
Wire Color
Orange
White
Blue/Black
Jump to #2
Black
Blue
Blue/White
Green
Green/White
Red
Red/White
Black/White
White/Black
Once the connections are made, the power and the Arcnet communications must
be connected to the interface. The Arcnet runs on stranded Cat 5 twisted pair
wire. The power line is a two conductor 18 ga. Wire. To access these
connections, remove the small box at the base of the interface.
The power is 24 VDC. The black wire is the 0V and connects to the terminal that
is connected to the black wire that enters the CataPulse. The white wire is
+24VDC and should be connected to the terminal that connects to the red wire.
INTO
CATAPULSE
RED
BLACK
INTO
CATAPULSE
RED
BLACK
+V 0V
+V 0V
2 Conductor
Power Line
BLACK
WHITE
END OF "Daisy
Chain"
24
2 Conductor
Power Line
FROM
PREVIOUS
MACHINE
BLACK
WHITE
BLACK
WHITE
TO
NEXT
MACHINE
MIDDLE OF "Daisy
Chain"
FROM
PREVIOUS
MACHINE
www.Softrol.com
CATALYST
Arcnet
Connections
Remove Terminator from
Arcnet Card
Arcnet Card must
have Terminator!!
INTO
CATAPULSE
INTO
CATAPULSE
SOLID
WHITE
SOLID
WHITE
+V 0V
+V 0V
Cat 5
Communication Line
FROM
PREVIOUS
MACHINE
TO
NEXT
MACHINE
BLUE
WHITE/BLUE
WHITE/BLUE
BLUE
END OF "Daisy
Chain" or STAR
NETWORK
Cat 5
Communication Line
FROM
PREVIOUS
MACHINE
BLUE
WHITE/BLUE
MIDDLE OF "Daisy
Chain"
The communication cable uses the Blue pair. The Blue wire should connect to
the terminal on the right side and the Blue/White wire should connect to the left
side of the terminal. If there is another machine on the daisy chain, then the 2
conductor power wire should be connected parallel to the +V and 0V and run to
the next machine. Also, a Cat 5 cable should run in parallel to incoming
communications cable to the next interface. If this is the last machine in the
daisy chain, then only two lines will enter the interface, one for power and one for
communications. The arcnet card in the Catapulse should have the terminating
jumper.
Configuration: Machine Interface
From the “Waiting for Chemical Injection Request!” display,
enter a valid level 7 password (please refer to Passwords).
1=Setups
2=Program
3=Maint.
4=Calibrate
5=Totals
6=Clock
Selection?
0=exit
Select 1=Setups
1=Watchdogs/Setups
2=Chemical Setups
Select 1=Watchdogs/Setups
1=Machine Setup
2=Maintenance Setup
3=Clear Ram Vocabs
25
CataPulse
-----------* The Catalyst *
by
Softrol Systems, Inc
c. 1998-2004
www.Softrol.com
CATALYST
4=Passwords 0=exit
Select 1=Machine Setup
The setups are:
AutoChem Flush- (5-99 sec) This setup tells the Catalyst how long to
flush the chemical to the machine. The further away from the Catalyst the
machine is, the longer the flush time.
Chemical Watchdog- (0:00- 99:00) This a timer that will alarm if the
Catalyst does not answer the chemical request in the specified time.
Prompt Weight- (YES or NO) This will allow an operator to enter the
weight at the beginning of the formula for reporting or ratiometric chemical
addition purposes.
Signal Mute Time- (0:00- 5:00) This is the amount of time that the alarm
will be silenced by pressing the CLR button.
Latch Delay
The latch time for the interface will also need to be set. To set this time, first exit
to the waiting for formula screen. Then enter 273685. This will take you to the
main menu. Then enter 1 for the setup mode. Then enter 935483. This will take
you to the EEPROM setups. Enter through the setups until you reach Latch
Delay. This time is noted on the schematic notes for the specific machines. This
time should never be less than 1 second. For machines that can turn on all of
their chemical signals at once, this time should be 1 second. If the machine
cannot give multiple signals at once, (for example a Braun or Milnor EP+) the
latch time will be longer. (About 30 seconds for a Braun and 20 seconds for a
Milnor EP+) Refer to the Catalyst manual for more programming information as
well as the interface schematic.
Node IDThe LAN ID on the CataPulse is set via a set of dip switches. This located in the
bottom of the interface and is accessed via the small box on the bottom interface.
The dip switches give the interface a binary code for the LAN ID. This LAN ID
should be set the same as the machine number. This is very important since the
interface communicates this ID and the Catalyst will dispense chemical out the
valve associated with this machine ID. The ID goes from right to left. When the
switch is in the up position, it is on. See figure on the next page for the proper
configuration.
26
www.Softrol.com
CATALYST
Bottom of CataPulse
with connection box
removed.
Dipswitch settings for Ids 1-20
1
2
3
4
5
6
7
8
9
10
27
11
12
13
14
15
16
17
18
19
20
www.Softrol.com
CATALYST
Installation: ArcNet Network
Catalyst
Interface
Catalyst
Interface
Catalyst
Interface
Catalyst
Interface
Catalyst
Interface
Catalyst
Interface
Catalyst
Interface
Catalyst
Interface
2
1
3
4
5
6
7
8
To
Computer
Active
Hub
Catalyst DI
chemical injection system
15 Conductor
wire
RG-62 Coax
Cable
Catalyst chemical
system
network layout
If it is a single system, the hub card will be in the Catalyst control. If there are
multiple systems, then there will be a separately powered hub.
The ArcNet cable is run as a bus system with the lines from an active hub run
in a daisy chain fashion.
The maximum number of nodes (machines, interface, computer, or Catalyst)
on one line from the hub is 8.
The last node on a line should have a 93-ohm terminator.
The cable should be installed to avoid coming in close contact with high
voltage lines (do not attach cable to incoming power to a machine) and
variable speed drives for motors. If you must cross a high voltage line, run
the communication cable perpendicular to it.
The arcnet layout varies with each plant, but a typical layout is as shown above:
Note: The Catalyst Lite system has a maximum of 8 machines and does not use
an active hub. All the nodes on the network are in one daisy chain.
Once the network is functional, communications can be tested from the PC.
Formulas should be downloaded to the Catalyst and the machines/interfaces.
This will load the proper chemical names into the Catalyst for priming and
calibration.
28
Catalyst
Interface
9
www.Softrol.com
CATALYST
ARCNET
TWISTED PAIR
POLARITY GUIDE
FOR THE CATALYST
ARCFIBER
(CATALYST)
PCI20
(COMPUTER)
29
HYHUB
(HUB)
OPTARC
(INTERFACE)
RJ45
(COMPUTER)
www.Softrol.com
CATALYST
30
www.Softrol.com
CATALYST
3. System Operation
Injection Controller
While an injection formula is running, the LCD will show the name and number of
the formula, the current step and line number, the selected machine, the total
time elapsed (T), and the step time as shown below:
128: Chemical Injection
Alkali 064
018
Machine B 002
T= 0:12 Step= 0:00
After the injection is completed the system will be flushed with water.
31
www.Softrol.com
CATALYST
The LCD will display:
128: Catalyst Inject
Waiting for Chemical
System to Flush!
Machine B
003
While the controller is idle, and waits for an injection request the LCD alternates
between the two displays below:
* The Catalyst *
Injection System
Softrol Systems Inc.
c. 1988 - 2001
32
Waiting for Chemical
Injection Request
Depress [YES] key to
Select Formula
www.Softrol.com
CATALYST
The Main Menu
1=Setup
3=Maint.
5=Totals
Selection?
2=Program
4=Calib.
6=Clock
0=Exit
To access the Main Menu you must enter a password. The Injection Controller is
shipped from the manufacturing facility with 8 pre-programmed passwords. Each
password consists of 6 digits that correspond to each password level. For
example:
Level 1 = 111111
Level 2 = 222222
Level 3 = 333333
Level 4 = 444444
only)
33
Level 5 = 555555
Level 6 = 666666
Level 7 = 777777
Level 8 = 888888 (freezes the timer
www.Softrol.com
CATALYST
These passwords should be changed (see below) and customized for each level.
There can only be one password assigned to each level for a total of eight
passwords. To determine which password level is needed for access to each
function see the following table:
Action
Manual Chemical Injection
Cancel Signal
Cancel Steps
Access Totals
Calibrate
Set Clock
Cancel Maintenance Watchdogs
Setups
Password Level
No Password
Levels 4-7
Levels 1-7
Levels 2-7
Levels 3-7
Levels 3-7
Levels 4-7
Levels 6-7
Program Formulas
Freeze Timers
Levels 6-7
Level 8
To Edit/Change Passwords at the Controller
Input the Level 6 or 7 password to access the Main Menu
Press the [1] key 1=Setup
Press the [1] key 1=Watch Dogs/Setup
The LCD screen displays:
1=Machine Setup
2=Maintenance Setup
3=Clear Ram Vocabs
4=Passwords 0=Exit
Press the [4] key 4=Passwords
The LCD screen displays:
Level # 1
Password =111111
Use arrows to scroll
ENTER=Accept NO=Exit
Use the arrows to scroll to the password level desired. Enter the six-digit
password for this level.
Press the [ENT] key to accept.
Use the arrow keys to scroll to another password level if desired
34
www.Softrol.com
CATALYST
Press the [NO] key to exit
Disabling the System
The system can be placed in the disabled mode. This will allow for maintenance
and calibration without the machines calling for chemical. From the main screen:
Press the [NO] & [ENT] keys at the simultaneously to DISABLE the system.
Hold down the [ENT] key and then press the [YES] key to ENABLE the
system.
Downloading Chemical Names
Once the system has been installed and the network connections have been
established, the chemical names and check formulas can be downloaded from
the PulseNet computer. See section 5 for more details on configuring PulseNet.
The names and formulas will be downloaded when a Group Formula Update for
the Catalyst Group is preformed. Once this is accomplished, it will be easier to
calibrate and prime the system.
Priming the System
To check the Chemical Output Valves (Priming the System)
At the Injection Controller screen:
Waiting for Chemical
Injection Request!
Enter the Level 7 password (factory default: 777777).
Press the [3] key for Maintenance at the Main Menu.
Press the [1] key for Manual Outputs.
Press the [3] key for Machine selects.
Press the [Down arrow] key to get to calibration port.
Press [Yes] to turn the output on.
Press [0] to exit
Press the [1] key for Chemicals.
Use the arrows to scroll to the chemical to be checked.
Press and hold the [YES] key to turn on the chemical’s delivery valve and
pump. Releasing the [YES] key turns off the valve and pump.
Use the Stroke Limiting adjustment nut to adjust the flow through the valve.
Low flow = .5 to 1 gpm, High flow = 1—3 gpm.
Press the [CLR] + [ENT] keys to flush the system between each chemical
injection.
Repeat this procedure for each chemical. Press the [0] key to exit.
35
www.Softrol.com
CATALYST
Calibration valve
Stroke Limiting
Adjustment
Key Strokes for the Catalyst
CLR + ENT
1 + ENT
3 + ENT
5 + ENT
No + ENT
YES + ENT
36
=
=
=
=
=
=
Flush all valves down the Calibration port
Flush Chemicals 1-8 thru Calibration port
Flush Chemicals 9-16 thru Calibration port
Flush machine flush valves thru Backflush port
Disable the Catalyst
Enable the Catalyst
www.Softrol.com
CATALYST
Interface Operation
Typically the interface is set-up to automatically read the
formula from the machine when it starts and end the
formula when the machine ends its cycle. When this is the
case, no operator intervention is required.
Operator intervention is required when the formula on the
interface is started manually. This can be useful when the
machine lacks multiple chemical outputs or the machine
has a chart controller and a normal interface is used. To
start a formula manually, press YES and the enter in the
appropriate formula number.
CataPulse
-----------* The Catalyst *
by
Softrol Systems, Inc
c. 1998-2004
Additionally, it may be useful to have the operator enter in
the weight of the load at the start of each cycle. This can
be used for weight tracking as well as ratiometric chemical
additions.
To use this option, turn the setup for Prompt Weight=
YES. It is useful to have the formula started manually if
the weight is being tracked. This will help speed up the
process since the formula identification step will be
eliminated.
ANY FORMULA THAT IS STARTED MANUALLY
SHOULD NOT HAVE THE FORMULA IDENTIFICATION STEP.
Press and hold the [1] button to view the chemicals 1-8 that are in the step. The
1st column is the desired amount, the 2nd column is the received amount. Button
[2] shows chemicals 9-16.
Advancing a Formula:
If a formula on the machine needs to be advanced, the best option is to advance
the machine to the chemical identification step. This will tell the interface to go to
the appropriate step in its formula.
Ending a Formula:
To end a formula, the machine can be advanced to the end formula signal (Latch
by itself) or it can be ended manually. To end the formula manually do the
following:
Press NO- This will pause the formula
Press CLR- This will silence the alarm
Enter in a Password- This can be level 1 thru 7. (111111 or 777777)
37
www.Softrol.com
CATALYST
Press NO + ENT at the same time to take the formula to the end. This will cancel
the formula and it will not accrue weight or runs in the totals report. It will show
up as a canceled load. If the formula is advanced to the end (use UP arrow), the
load will be considered complete.
38
www.Softrol.com
CATALYST
4. Calibration
Calibration of chemicals with the Injection Controller is done on a per chemical
basis. This allows you to have extremely accurate injections of chemicals with a
wide range of varying specific gravity and viscosity. The flow properties of a
heavy, viscous surfactant will be quite different from those of a low viscosity acid.
Softrol Systems recommends that plant personnel become very familiar
with the types of chemicals they will be handling and the potential hazards
that are associated with each chemical. This information is contained in the
MSDS (Material Safety Data Sheet) supplied by the chemical vendors.
Softrol Systems also recommends that, at the very minimum, plant
personnel be required to wear all protective equipment recommended in
the MSDS.
Calibration
Ball Valve
Graduated Cylinder
39
Chem 1
Chem 2
Chem 3
Chem 4
Chem 5
Chem 6
Chem 7
Chem 8
Chem 9
Chem 10 Chem 11 Chem 12
Flush
www.Softrol.com
CATALYST
Flow Meter Based Calibration
To calibrate chemicals using the flow meter, please do the following:
1. At the Waiting for Chemical Injection screen on the Injection Controller –
disable the system by pressing [No] & [ENT]. This will prevent the system
from receiving chemical requests from machines.
2. Open the valve at the end of the calibration line and place the graduated
cylinder underneath it.
3. Press [CLR] + [ENT] to flush the system. Make sure the system is thoroughly
flushed. Empty and dry the cylinder.
4. Enter the Level 7 password to access the Main Menu.
5. Press [4] 4=Calib.
6. Press [1] 1=Calibrate Chems.
7. Use the [ ] and [ ] arrows to scroll through the available chemical numbers
until the chemical to be calibrated is displayed on line 1 of the LCD display.
8. Press the [ENT] key to select that chemical.
9. Select [1] for flow sensor calibrations.
10. Press and hold the [YES] key to dispense chemical. This will stop when the
[YES] key is released.
For chemicals with large injections (Alkali, Detergent, Bleach…etc), fill
the cylinder to 1800 ml. For chemicals with small injections (<6oz ex.
Sour, A/C, …etc) fill the cylinder to about 800 ml.
11. The Catalyst screen will display the counts from the flowmeter. These should
be about 18-30 counts per oz.
12. Close the valve at the end of the calibration line. Place the graduated
cylinder on a level surface and accurately read the amount of chemical in the
graduated cylinder.
The cylinder has graduations in 20 ml increments. To
convert ml to Oz., divide by 29.57. Be sure to measure
the chemical only and not foam. This will result in more
accurate injections.
Example 1760 ml / 29.57= 59.5 Oz.
40
www.Softrol.com
CATALYST
13. Press [ENT] to accept the counts. The controller will display a suggested
amount based on the previous calibration. Press [CLR] and enter in the new
amount. Enter the amount to the tenths place. Example- 58 Oz. = 58.0
14. Press [ENT]. The Catalyst will display:
Save Calibration As
1= Initial 2= H-Factor
3= Update
4= V-Factor
0= Discard and Exit
15. Select [1] to store the calibration as the initial calibration. This is very
important, if it is not done, the calibration will be lost.
16. The controller will then return to the calibration menu.
17. Press and hold [1] & [ENT] to flush chemicals 1-8 for 5 seconds. Then press
and hold [3] & ENT to flush chemicals 9-16 for 5 seconds. Finally, press and
hold [CLR] & [ENT] to flush the system for about 15 seconds.
H-Factor Calibrations- This is used for greater accuracy for small dispense
amounts (<6 Oz.). If you do wish to do a H-Factor calibration, skip to step 26.
18. Select [1] for calibrate chemicals.
19. Select the same chemical as previously calibrated.
20. Select #1 for Flow sensor calibration.
21. Place the 250 ml graduated cylinder under the calibration port.
22. Press and hold [YES] to dispense 200-220 ml. (it will contain mostly water)
The small graduated cylinder is marked in 2 ml
graduations. Accurately read the amount and divide by
29.57 to convert to Oz.
Example 226 ml / 29.57 = 7.6 Oz.
23. Press [ENT] to accept the counts.
24. Enter in the amount dispensed. It should be slightly more than the suggested amount.
If the amounts differ by more than 1 oz. then it might be necessary to recalibrate.
41
www.Softrol.com
CATALYST
25. Select #2 H-Factor.
26. Flush the system by the same procedure in step 17
27. Press 0 to exit to the main menu.
28. Enable the system by holding down the [ENT] key and pressing [YES]
Time Based Calibration
Due to certain circumstances, it may be beneficial to calibrate the chemicals
based on time rather than flow meter input.
To calibrate the chemicals without the flow meter, do the following:
Follow the normal calibration procedure. At step 9 select #2 for Time
Based Calibration.
Press YES to dispense the chemical as described in step 11. The
controller will display the time on the screen in tenths of a second.
Once the product has been dispensed, press enter to accept the counts
and then enter in the received amount. The controller will automatically
save the calibration as the Initial calibration.
The Catalyst will now dispense that particular chemical without reference
from the flow meter.
There is no need to change the programming on the machines or
interfaces, the Catalyst will still dispense the chemical in the desired units.
On time based delivery, the controller will open the chemical valve and
turn on the pump for a specified time. If there is no flow or lack of product,
the Catalyst will not alarm.
Calibration Errors0 cannot be entered in for a Calibration.
If No counts or low counts (<1 per second) are detected, the Catalyst will
alarm with a Minimum Frequency Error. If this occurs, press No to exit
and check the flow rate as well as the response from the meter.
Checking the Calibration
WARNING: DO NOT USE THE CALIBRATION ROUTINE TO
CHECK CALIBRATION ACCURACY OR THE CALIBRATION WILL
BE ALTERED. INSTEAD, PROGRAM A CALIBRATION TEST
FORMULA.
42
www.Softrol.com
CATALYST
After the chemical is calibrated, it is preferable to run a calibration check formula.
These are the formulas that are stored on the Catalyst itself. These formulas
should correspond to the chemical number. For example, formula #1 checks
chemical #1. If chemical #1 is Alkali, formula #1 should be called Check Alkali
and when run, it will dispense the requested amount of Alkali.
Check Formula example:
:001 Check Alkali
:002
Set Chemical Flush = 0
:003
Add 0 oz of Alkali
:004
Run Time 0:00
:005
END FORMULA
To run the check formula, do the following:
1. At the Waiting for Chemical Injection screen on the Injection Controller –
disable the system by pressing [No] & [ENT]. This will prevent the system
from receiving chemical requests from machines.
2. Open the calibration port and place the graduated cylinder underneath it.
3. Press [YES] and then enter in the formula number. Press [ENT] to begin.
4. The controller will ask you to select the destination. Press [ENT] to select the
Calibration port. (This is very important so the unit will not flush after
dispensing the chemical.
5. The controller will then ask you to key in
the desired amount.
6. Then press [YES] to begin the dispensing Desired Amount
of the chemical.
128: Chemical Injection
Alkali 005
000
7. The controller will display the desired
Machine B 002
T= 0:12 Step= 0:00
amount as well as the received amount.
The received amount should be counting
up to the desired amount.
8. Once the injection is complete, measure
the amount of chemical that has been
dispensed.
9. To determine the amount of error,
subtract the measured amount received
from the amount desired. Divide this
number by the amount desired and then
multiply by 100. This will give you the percentage error
Example-
43
Desired 64 Oz
64-62=2
.03125 X 100 =
Received 62 Oz
2/64=.03125
3.125 % error
Delivered Amount
www.Softrol.com
CATALYST
If any calibrations are outside the desired tolerance (normally 1%-5%), see the
section, Trouble With Calibrations. Taking a painstaking approach to the
calibration procedure will pay off later with extremely accurate chemical
injections. By contrast, a poorly executed calibration routine will result in
inaccurate and possibly costly chemical injections.
Flush the system when finished by the procedure in step 17 and press [ENT] &
[YES] to enable the Catalyst to resume pumping.
44
www.Softrol.com
CATALYST
ML to Oz. Conversion Table
ML
50
52
54
56
58
60
62
64
66
68
70
72
74
76
78
80
82
84
86
88
90
92
94
96
98
100
102
104
106
108
110
112
114
116
118
120
122
124
126
128
130
132
134
136
138
45
OZ
1.7
1.8
1.8
1.9
2.0
2.0
2.1
2.2
2.2
2.3
2.4
2.4
2.5
2.6
2.6
2.7
2.8
2.8
2.9
3.0
3.0
3.1
3.2
3.2
3.3
3.4
3.4
3.5
3.6
3.7
3.7
3.8
3.9
3.9
4.0
4.1
4.1
4.2
4.3
4.3
4.4
4.5
4.5
4.6
4.7
ML
140
142
144
146
148
150
152
154
156
158
160
162
164
166
168
170
172
174
176
178
180
182
184
186
188
190
192
194
196
198
200
202
204
206
208
210
212
214
216
218
220
222
224
226
228
Oz
4.7
4.8
4.9
4.9
5.0
5.1
5.1
5.2
5.3
5.3
5.4
5.5
5.5
5.6
5.7
5.7
5.8
5.9
6.0
6.0
6.1
6.2
6.2
6.3
6.4
6.4
6.5
6.6
6.6
6.7
6.8
6.8
6.9
7.0
7.0
7.1
7.2
7.2
7.3
7.4
7.4
7.5
7.6
7.6
7.7
ML OZ
230
240
250
260
270
280
290
300
310
320
330
340
350
360
370
380
390
400
410
420
430
440
450
460
470
480
490
500
510
520
530
540
550
560
570
580
590
600
610
620
630
640
650
7.8
8.1
8.5
8.8
9.1
9.5
9.8
10.1
10.5
10.8
11.2
11.5
11.8
12.2
12.5
12.9
13.2
13.5
13.9
14.2
14.5
14.9
15.2
15.6
15.9
16.2
16.6
16.9
17.2
17.6
17.9
18.3
18.6
18.9
19.3
19.6
20.0
20.3
20.6
21.0
21.3
21.6
22.0
ML
660
670
680
690
700
710
720
730
740
750
760
770
780
790
800
810
820
830
840
850
860
870
880
890
900
910
920
930
940
950
960
970
980
990
1000
1010
1020
1030
1040
1050
1060
1070
1080
1090
1100
OZ
22.3
22.7
23.0
23.3
23.7
24.0
24.3
24.7
25.0
25.4
25.7
26.0
26.4
26.7
27.1
27.4
27.7
28.1
28.4
28.7
29.1
29.4
29.8
30.1
30.4
30.8
31.1
31.5
31.8
32.1
32.5
32.8
33.1
33.5
33.8
34.2
34.5
34.8
35.2
35.5
35.8
36.2
36.5
36.9
37.2
ML
1110
1120
1130
1140
1150
1160
1170
1180
1190
1200
1210
1220
1230
1240
1250
1260
1270
1280
1290
1300
1310
1320
1330
1340
1350
1360
1370
1380
1390
1400
1410
1420
1430
1440
1450
1460
1470
1480
1490
1500
1510
1520
1530
1540
1550
OZ
37.5
37.9
38.2
38.6
38.9
39.2
39.6
39.9
40.2
40.6
40.9
41.3
41.6
41.9
42.3
42.6
42.9
43.3
43.6
44.0
44.3
44.6
45.0
45.3
45.7
46.0
46.3
46.7
47.0
47.3
47.7
48.0
48.4
48.7
49.0
49.4
49.7
50.1
50.4
50.7
51.1
51.4
51.7
52.1
52.4
ML
1560
1570
1580
1590
1600
1610
1620
1630
1640
1650
1660
1670
1680
1690
1700
1710
1720
1730
1740
1750
1760
1770
1780
1790
1800
1810
1820
1830
1840
1850
1860
1870
1880
1890
1900
1910
1920
1930
1940
1950
1960
1970
1980
1990
2000
OZ
52.8
53.1
53.4
53.8
54.1
54.4
54.8
55.1
55.5
55.8
56.1
56.5
56.8
57.2
57.5
57.8
58.2
58.5
58.8
59.2
59.5
59.9
60.2
60.5
60.9
61.2
61.5
61.9
62.2
62.6
62.9
63.2
63.6
63.9
64.3
64.6
64.9
65.3
65.6
65.9
66.3
66.6
67.0
67.3
67.6
www.Softrol.com
CATALYST
46
www.Softrol.com
CATALYST
5. Configuring PulseNet
The Catalyst Chemical System comes standard with the PulseNet Catalyst Plus
Module. This software can be used to easily program formulas, monitor the
system, and generate production and consumption reports. Before the software
can be used properly, it must be configured to meet the plant specifications. The
manual for the PulseNet software has specific details on how to set-up the
software for your plant. The key items for setup can be found in the PulseNet
manual and start on page 15. They are as follows:
Configure Plant Location- This needs to be completed for the reports.
Configure Ports- This should already be done if the computer was received
from Softrol. If not, this will need to be completed per the manual.
Configure Groups- This will need to be completed. There should be a group
for each different size / type of machine.
Note: All machines in the same group will have the exact same formulas.
There should also be a group created for the Catalyst. The controller type for
this group will be the Catalyst Plus Podium.
Configure Supply Inventory Data- This will need to be entered to have
chemical totals reports. The units are the units that the bulk chemical is
delivered in. This will most likely be in Gal. Then the cost would be entered in
cost per gallon. This will give the Plant Chemical totals report in Gallons, not
ounces. (If the units of measurement on the Catalyst are Oz.)
Configure Plant Utility Data- This is generally not used in a Catalyst only
plant. Please refer to the PulseNet Manual if this option is desired.
Configure Classification- This can be done for the plant production report.
Each formula can be assigned to a classification for convenience in reporting.
Now we get into the group setups. These should be done for the first group and
then can be copied into each of the other groups.
Edit Vocab Files- The only Vocab that needs to be created is under
chemical units and is unit 001. This will be set to whatever units that you will
be calibrating in- most likely Oz.
Edit Chemical Assignments- This setup is very important for proper
operation of the system. In this screen, the name of the chemical is created
as well as the units it is measured in, if it can be used with steam, and the
units per pound if it is to be used with ratiometric processing. Also, the
chemical supply is identified and corresponding amount is entered.
Note: Most likely, the bulk units are in gallons while the calibrated units are in ounces. Then the amount of gallons per ounce
would be entered as .007812. See page 22 of the PulseNet manual for examples.
47
www.Softrol.com
CATALYST
Once this page is completed, save it and then change the Group ID to another
group. Now import the data from the first group into the new group and save.
Repeat this until all of the groups have been completed.
Finally, enter the system defaults Menu and set the RSR to have an automatic
time. You will need to enter in the time the RSR will occur. This should be at
the end of a shift or the end of the day.
Note: The machines/interfaces and the computer need to be powered on to
communicate to the totals to the computer.
Also, check the box to also upload history. This will allow the plant history
reports to be viewed for specified time periods.
PulseNet is a very powerful software tool and has many features. The above
information is just the basic amount that needs to be entered to have the system
function properly.
48
www.Softrol.com
CATALYST
6. Programming from PulseNet
The Catalyst Chemical System comes standard with the Pulsenet Catalyst Plus
Module. This software can be used to easily program formulas, monitor the
system, and generate production and consumption reports.
One of the best features of PulseNet is the ease with which formulas can be
programmed. We will show you how to program a few simple formulas in order to
get you started quickly and painlessly. There are many details involved in
programming a formula. These are covered fully in the PulseNet User’s Manual
included with this installation. We will only use the basic programming tools on
this tutorial.
49
www.Softrol.com
CATALYST
Programming a Wash Formula
At the main screen of PCPM, click on Group. Select Edit Formulas to bring up
the editing screen.
Click on File on the menu then select Open Formula.
A list of Formulas will be displayed. For this example, please click on 001
Unassigned to select formula 1.
The editing window will display two lines. One line will be the unedited formula
name and the other with END FORMULA instruction.
Click on the first line and press <Enter>.
Input the name of the formula. In this case input Hot Wash.
The display will show the edited name.
Move the cursor to the END FORMULA line and press the <Insert> key.
A window with icons for all the available instructions will be displayed. The set of
instructions displayed will vary according to the type of controller used. For this
example we will be using a washer controller.
The display shows 10 icons, one icon for each set of instructions.
Click on the rightmost icon on the top, which depicts a water faucet.
A list of all the selections will be displayed. Click on the first selection.
Input the inches of water of hot fill. In this case input 10.0
Press <Enter>
The main editing display will show the newly inserted instruction.
50
www.Softrol.com
CATALYST
The next instruction to be inserted is a Run instruction. Move the cursor to the
END FORMULA line and press the <Insert> key. The window with the instruction
icons will be displayed.
Click on the Clock Icon, the first icon on the top left.
Input the Run Time. For this example input 5:00
The newly inserted instruction will be displayed on the editing screen.
The formula has been programmed. The display should look like below:
0001: Hot Wash
0002: Fill Hot When Level < 10.0” Until Next Step
0003: Run Time 5:00
0004: END FORMULA
The formula must be saved or it will be lost when the computer is turned off. To
save the formula, click on File and then click on Save. To exit the editor, click on
the Door Icon on the top of the window. For additional information refer to the
PulseNet User’s Manual.
Programming Operations using PulseNet
Operations are small but complete sections of instructions that perform a specific
task. They are reusable and are used to construct the more complex formulas.
Operations are programmed in the same manner as formulas. From the main
screen in the formula editor, click on the File and select Open Operation. Refer
to the PulseNet User’s Manual for more information on Programming Formulas
and Operations.
The washer formulas can be very complex and are beyond the scope of this. For
more information on developing these formulas, consult the washer manual as
well as the PulseNet manual.
51
www.Softrol.com
CATALYST
Programming the Interface
Using the PulseNet software in the same way as the washer formulas can
program the interface. However, since the interface does not have all of the
capabilities of the washer controller, it has a limited instruction set. These are
the instructions that may be used:
Add Chemical by Percent
Add Chemical by Unit
Chemical Step
Run Time
Signal
Wait to Satisfy
The formula on an interface consists of chemical steps and chemical amounts.
Each step must end with a Run Time 0:00. This tells the interface to wait there
until the washer calls for the next step.
The formula always begins with the Formula Name and ends with the End of
Formula. When the washer identifies the formula to the interface, the interface
starts the formula. The interface will execute all the instructions in the first step.
This can include chemical injections. If no injection is desired at the identification
of the formula, the formula name should be immediately followed by a run time of
0:00. For example a flush at the beginning of a formula:
Formula #18, Bar Mops
0001:
0002:
0003:
0004:
0005:
0006:
Bar Mops
Run Time 0:00
*******Chemical Step 1*******
Add 30 Oz. of Alkali
Add 15 Oz. of Detergent
Run Time 0:00
If there is chemical desired upon identifying the formula, then the first step should
include these amounts. For example a break at the beginning of a formula:
Formula #8, Color Pants
0001:
0002:
0003:
0004:
0005:
52
Color Pants
*******Chemical Step 1*******
Add 30 Oz. of Alkali
Add 15 Oz. of Detergent
Run Time 0:00
www.Softrol.com
CATALYST
All of the Chemical steps should end with a Run Time 0:00. This includes the
last step before the end of formula. For example:
0012:
0013:
0014:
0015:
0016:
*******Chemical Step 4*******
Add 12 Oz. of Softener
Add 10 Oz. of Sour
Run Time 0:00
END OF FORMULA
The chemicals in a step are injected in order of their chemical number. For
instance, if Detergent is set-up as chemical #1 and Alkali as Chemical #2, The
Detergent will always be injected before the Alkali when they are in the same
step. Example0001:
0002:
0003:
0004:
0005:
Color Pants
*******Chemical Step 1*******
Add 30 Oz. of Alkali
Add 15 Oz. of Detergent
Run Time 0:00
Some examples of formulas and their functional descriptions are on the following
page.
Programming the Injection Controller
Only calibration test formulas should be programmed for the injection controller.
These formulas will be used to test the accuracy of chemical calibrations.
Chemical units should be set to 0. When the formula is ran the controller will
prompt for a unit input.
A typical test formula is shown below.
:0001
:0002
:0003
:0004
:0005
:0006
Check Alkali
Set Chemical Flush = 0
Add 0 Oz of Alkali
Wait to Satisfy
Run Time 0:00
END FORMULA
Go ahead and program the formula by yourself. If you run into problems take
another look at the other formula examples. Refer to the PulseNet User’s Manual
for additional information.
53
www.Softrol.com
CATALYST
54
www.Softrol.com
CATALYST
7. Programming the Washers
Washers with Softrol controllers can be programmed by PulseNet and can
interface directly with the Catalyst unit. The section on Programming from
PulseNet describes how to create washer formulas. The chemical additions are
simply programmed with the chemical name and the desired amount.
Note: The injection must be followed by a Wait to Satisfy in order for the
machine to hold while chemical is being injection. (Softrol controllers only)
Non-Softrol controlled washers will require an interface to work with the Catalyst
chemical system. The interface reads signals from the washer’s chemical
outputs and determines the formula that is being run and the step that it is at.
See the section on Programming from PulseNet for information on how to
program washers with Softrol controls.
The interface has 8 inputs that correspond to the binary formula identifier:
Input
1
2
3
4
5
6
7
8
Binary
1
2
4
8
16
32
64
Latch
The inputs to the interface are wired to the chemical outputs of the washer. If
there are not 8 outputs, the last output should be wired to the input #8 of the
Interface.
To identify the formula, the washer needs to be programmed to give the
corresponding binary number followed by a latch. Example:
Formula
1
2
3
7
63
Outputs
1,8
2,8
1,2,8
1,2,3,8
1,2,3,4,5,6,8
The outputs should be programmed to turn on for 5 seconds. The Latch output
should be programmed to turn on last. This will cause the interface to read all
inputs that are on or that were on during a specified time period.
55
www.Softrol.com
CATALYST
Once the formula is identified to the interface, the washer should be programmed
to identify the chemical step that is desired. The chemical step is identified in the
same binary manner; however, the latch is not called for. The maximum number
of chemical steps is 16. Example:
Chemical Step
1
2
3
4
5
Outputs
1
2
1,2
3
1,3
To signal the end of the formula, the washer should be
programmed to turn on the Latch input for 5 seconds. There
should not be any other binary inputs to the interface on at this
time. Some washers require a water level to turn on any
chemical outputs; in this case, the end of the formula signal
should be programmed before the extract step.
The number of formulas depends on the number of outputs
available from the washer. Additionally, some machines require
that chemical be used for the hold. This will reduce the number
of outputs available for the interface. Ideally, all 8 outputs from
the washer can be turned on at the same time. If the washer
cannot do this, then the maximum time between output signals
should be no more than 20 seconds.
The following pages show examples of formulas for different
machines. These are general guidelines for programming and
should be used only as such.
56
www.Softrol.com
CATALYST
B
muullaa
Brraauunn FFoorrm
Program 14 Bar Mops
Step Operati
on
1
Rinse
Time
SPL VO SPL VO
L
L
Level Temp Flush SS A A B B Option
0
0
0
0
B
2
5
3
5
2+4+8+Lat
ch
=Formula
14
2
Rinse
2
17
140
0
B
4
5
11
5
3
4
Drain
Break
12
9
170
0
B
1
5
0
0 ST + T
Chem Step 1
5
6
7
8
Drain
Rinse
Drain
Wash
2
17
160
0
B
0
0
0
0
2
9
170
0
B
2
5
0
0 ST + T
Chem Step 2
9
10
11
12
13
14
15
16
Drain
Rinse
Drain
Rinse
Drain
Rinse
Drain
Wash
2
17
170
0
B
0
0
0
0
2
17
160
0
B
0
0
0
0
2
17
160
0
B
0
0
0
0
10
9
145
0
B
1
5
2
5
Chem Step 3
17
18
19
20
Drain
Rinse
Drain
Rinse
2
17
145
0
B
0
0
0
0
2
17
130
0
B
3
5
0
0
Chem Step 4
21
22
Drain
Wash
5
9
100
0
B
1
5
3
5
Chem Step 5
23
Extract
2
24
Shakeou
t
Extract
Shakeou
t
1
0
0
0
B
0
0
0
0
6
0
0
0
0
B
11
5
0
0
25
26
27
57
End
Low
Spd
Formula
End
www.Softrol.com
CATALYST
Catalyst Formula
Formula #14, Bar Mops
0001: Bar Mops
0002:
Run Time 0:00
0003:
*******Chemical Step 1*******
0004:
Add 280 Oz. of Alkali
0005:
Add 60 Oz. of Detergent
0006:
Run Time 0:00
0007:
*******Chemical Step 2*******
0008:
Add 48 Oz. of Detergent
0009:
Run Time 0:00
0010:
*******Chemical Step 3*******
0011:
Add 256 Oz. of Bleach
0012:
Run Time 0:00
0013:
*******Chemical Step 4*******
0014:
Add 10 Oz. of Antichlor
0015:
Run Time 0:00
0016:
*******Chemical Step 5*******
0017:
Add 12 Oz. of Mildewcide
0018:
Add 9 Oz. of Sour
0019:
Run Time 0:00
0020: END OF FORMULA
Braun Formula
Braun outputs 1 2 3 4 5 6 7 11
Interface inputs
1 2 4 8 16 32 64 Latch
Steps 1 & 2 Identify the formula as formula 14. The Catalyst interface will
recognize the formula and start formula 14. The formula will proceed to the first
step ender (line 2). No chemicals are called for and thus will not be injected.
Step 4 signals the interface to go to chemical step #1. The interface will then
place the Braun on hold and request the Alkali and Detergent. Once the
chemical is delivered, the interface will proceed to the next step ender (line 6)
and release the washer.
Steps 5- 25 will continue to call for the appropriate chemical steps and deliver
the chemicals.
Step 26 signals the interface to end the formula. This will start the Load/Unload
timer until the next formula is run.
58
www.Softrol.com
CATALYST
Program 31
Step
Operation Time
1
2
3
Break
Break
Break
4
5
6
7
8
Drain
Rinse
Drain
Wash
Wash
9
10
11
12
Drain
Rinse
Drain
Rinse
13
14
15
16
Drain
Rinse
Drain
Wash
17
18
Extract
Shakeout
19
End
59
White Bath
Towel
Level Temp Flush
SS
SPL VOL SPL VOL
A
A
B
B Optio
n
1
5
2
5
1+2+4+8
3
5
4
5
+16+Latch
5
5
11
5 ST + T =Formula
31
0
0
10
0
0
9
0
0
160
0
0
0
B
B
B
2
17
160
0
B
0
0
0
0
1
2
9
9
155
155
0
0
B
B
0
2
0
5
0
0
0
0
2
17
145
0
B
0
0
0
0
2
17
130
0
B
1
5
2
5
2
17
115
0
B
0
0
0
0
5
9
100
0
B
3
5
0
0
7
0
0
0
0
B
11
5
ST + T
Chem Step
2
Chem Step
3
Chem Step
4
Formula
End
www.Softrol.com
CATALYST
Catalyst Formula
Formula #31, White Bath Towel
0001: White Bath Towel
0002:
*******Chemical Step 1*******
0003:
Add 30 Oz. of Alkali
0004:
Add 15 Oz. of Detergent
0005:
Run Time 0:00
0006:
*******Chemical Step 2*******
0007:
Add 48 Oz. of Bleach
0008:
Run Time 0:00
0009:
*******Chemical Step 3*******
0010:
Add 6 Oz. of Antichlor
0011:
Run Time 0:00
0012:
*******Chemical Step 4*******
0013:
Add 12 Oz. of Softener
0014:
Add 10 Oz. of Sour
0015:
Run Time 0:00
0016: END OF FORMULA
Braun Formula
Braun outputs 1 2 3 4 5 6 7 11
Interface inputs
1 2 4 8 16 32 64 Latch
The Braun formula above is programmed to identify formula 31 and call for the
appropriate chemical injections.
Steps 1-3 Identify the formula to the interface as formula 31. The interface will
start the formula and proceed to the step ender (line 5) This includes chemical
step 1 so the Alkali and Detergent will be injected as the washer fills.
Step 8 tells the interface to go to chemical step 2. The interface will add the
bleach and stop at line 8.
Step 18 signals the interface to end the formula. The Load/Unload timer will start
and run until the next formula is run.
60
www.Softrol.com
Ellis / AWC 1000 Formula 1> BAR TOWELS
#
1
2
3
4
5
6
7
8
9
10
11
12
13
14
15
16
17
18
19
20
21
22
23
24
25
26
27
28
29
30
31
32
33
34
35
36
37
38
39
40
41
42
43
44
OPERATION MIN SEC
Formula Select
05
Fill
01
3
ALKALI FLUSH
Drain
1
1 30
FLUSH
Drain
1
Fill
01
Inject
05
10
BREAK
Drain
1
1 30
FLUSH
Drain
1
Fill
01
Inject
05
6
SUDS
Drain
1
1 30
FLUSH
Drain
1
1 30
FLUSH
Drain
1
1 30
FLUSH
Drain
1
1 30
FLUSH
Drain
1
Fill
01
Inject
05
10
BLEACH
Drain
45
2
RINSE
Drain
45
Fill
01
Inject
05
2
ANTICHLOR
Drain
45
1
RINSE
Drain
45
Fill
01
Inject
05
5
SOUR
Drain
1
High Extract
6
Shakeout
1 30
Stop
30
End
61
TEMP LEV
180
180
12
12
180
12
180
6
180
6
175
12
175
6
175
6
170
12
165
12
160
12
155
12
150
6
150
6
135
12
120
12
120
12
105
12
90
6
90
6
CHEMICAL
Formula ID & Chem Step 1
Chem Step 2
Chem Step 3
Chem Step 4
Chem Step 5
Chem Step 6
Formula End
CATALYST
KEY #'S
ACS Chem
17 - 23
Output
# Binary
2
17
1
1
2-3
18
2
2
5
19
3
4
2
20
4
8
5
21
5
16
2
22
6
32
18
23
7
Latch
2-3
5
2
5
2
17 - 18
2-3
5
2
5
2
5
2
5
2
5
2-3
19
2
5
2
5
2
17 - 19
2
5
1
5
1
18 - 19
1
5 - 10
5 - 14
5 - 11
5 - 23
4 - 5 - 8 - 16
www.Softrol.com
CATALYST
Catalyst Formula
Formula #1, White Bar Towels
0001: Bar Towels
0002:
*******Chemical Step 1*******
0003:
Add 30 Oz. of Alkali
0004:
Run Time 0:00
0005:
*******Chemical Step 2*******
0006:
Add 72 Oz. of Alkali
0007:
Add 48 Oz. of Detergent
0008:
Run Time 0:00
0009:
*******Chemical Step 3*******
0010:
Add 24 Oz. Alkali
0011:
Add 24 Oz. Detergent
0012:
Run Time 0:00
0013:
*******Chemical Step 4*******
0014:
Add 64 Oz Bleach
0015:
Run Time 0:00
0016:
*******Chemical Step 5*******
0017:
Add 4 Oz Antichlor
0018:
Run Time 0:00
0019:
*******Chemical Step 6*******
0020:
Add 8 Oz Sour
0021:
Run Time 0:00
0017: END OF FORMULA
Ellis Formula
AWC outputs
Interface inputs
17 18 19 20 21 22 23
1 2 4 8 16 32 Latch
The Ellis formula above is programmed to identify formula 1 and call for the
appropriate chemical injections.
Step 1 Identifies the formula to the interface as formula 1. The interface will start
the formula and proceed to the step ender (line 4). This includes chemical step 1
so the Alkali will be injected as the washer fills.
Step 8 tells the interface to go to chemical step 2. The interface will add the
break chemicals and stop at line 8.
Step 43 signals the interface to end the formula. The Load/Unload timer will start
and run until the next formula is run.
62
www.Softrol.com
CATALYST
Milnor Mark Formula 01> BAR TOWELS
T = Type of Step (0 = End Formula 1 = 1-Way Wash 2 = 2-Way Wash 3 = Soak Wash
4 = Pre + Final Extract 5 = Intermediate Extract 6 = Final Extract 7 = Double Ext)
MMQ = Time (Minutes [10's], Minutes [1's], Quarter Minutes)
FFF = Bath Temperature
H = Hot Water (0 = Off 1 = On 2 = Raises Temp)
C = Cold Water (0 = Off 1 = On 3 = Lowers Temp)
3 = 3rd Water (0 = Off 1 = On)
B = Bottom Fill (0 = No 1 = Yes)
L = Liquor Level (0 = No Water 1 = Level 1 2 = Level 2 3 = Level 3)
S = Steam (0 = None 1 = After + Timer Run 2 = Timer Stop Only 3 = After + Timer Stop
4 = Early
4 = Early
& After
& After
+ Timer
+ Timer
Run Run
5 = Early
5 = Early
+ Timer
+ Timer
Stop Stop
6 = E &6A= +Early
Timer
& After
Stop + Timer Stop)
CC = Chemical Number (00, 01, 02, 03, 04, 05 16 = Signal Only)
NN = Chemical Name (00 = Same as Chemical Number)
W = When to Inject (0 = With Fill 1 = Level OK 2 = Level + Temp OK)
SSS = Seconds of Chemical Injection
* = Signal with Chemical? (0 = No 1 = Yes)
RPM = Basket Speed in % of Normal
D = Drain (0 = Standard 1 = 2-Way Wash Speed 2 = Do Not Drain 3 = Stop w/ Drain
4=Stop w/ Fill 5=Stop w/ F & D 6=Stop w/ F & no D 7=D w/ 25 sec Spray Rinse)
R = Drain Destination (0 = Drain to Sewer 1 = Drain to Reuse)
S = Spray Rinse at End of Intermediate Extract (0 = No 1 = Yes)
E = How to End (0 = Stopped 1 = Reversing 2 = Drain Speed 3 = Break Cake 4=Tumbling)
@ = Option
@
@@ @
@
@@
STEP OPERATIONTYPE MMQ FFF H C 3 B L S CC NN W SSS * RPM D R S E
CHEMICAL
01
15/Alk Flsh 2 030 180 1 0 0 0 3 3 01 01 0 005 0
0
- Formula ID & Chem Step 1
05 01 0 005 0
0
Latch
02
02/Flush
2 012 000 1 0 0 0 3 - 00 00 0 000 0
0
03
03/Break
2 100 180 1 0 0 0 2 3 02 02 0 005 0
0
Chem Step 2
04
02/Flush
2 012 000 1 0 0 0 3 - 00 00 0 000 0
0
05
04/Suds
2 060 175 1 0 0 0 2 3 01 01 0 005 0
Chem Step 3
02 02 0 005 0
0
06
02/Flush
2 012 170 2 3 0 0 3 0 00 00 0 000 0
0
07
02/Flush
2 012 165 2 3 0 0 3 0 00 00 0 000 0
0
08
02/Flush
2 012 160 2 3 0 0 3 0 00 00 0 000 0
0
09
02/Flush
2 012 155 2 3 0 0 3 0 00 00 0 000 0
0
10
06/Bleach
2 100 150 1 0 0 0 2 5 03 03 2 005 0
0
Chem Step 4
11
07/Rinse
2 020 135 2 3 0 0 3 0 00 00 0 000 0
0
12
08/Anticlor 2 020 120 2 3 0 0 3 0 01 01 0 005 0
Chem Step 5
03 03 0 005 0
0
13
07/Rinse
2 010 105 2 3 0 0 3 0 00 00 0 000 0
0
14
10/Sour
2 042 090 2 3 0 0 2 0 02 02 0 005 0
Chem Step 6
03 03 0 005 0
2
15
11/Stop
2 002 090 2 3 0 0 2 0 05 05 0 005 0
0
Formula END
16
14/Extract
6 070
4
63
www.Softrol.com
CATALYST
Milnor Mark (I – V) Formula 01- BAR TOWELS
STEP OPERAT TY MM FF H C 3 B L S
ION
PE Q F
01
15/Alk
2 030 18 1 0 0 0 3 3
Flsh
0
02
02/Flush
2
03
03/Break
2
04
02/Flush
2
05
04/Suds
2
06
02/Flush
2
07
02/Flush
2
08
02/Flush
2
09
02/Flush
2
10
06/Bleac
h
2
11
07/Rinse
2
12
08/Anticlo 2
r
020 13 2 3 0 0 3 0
5
020 12 2 3 0 0 3 0
0
13
07/Rinse
010 10 2 3 0 0 3 0
64
2
012 00 1 0 0 0 3 0
100 18 1 0 0 0 2 3
0
012 00 1 0 0 0 3 0
060 17 1 0 0 0 2 3
5
012 17
0
012 16
5
012 16
0
012 15
5
100 15
0
230030
230030
230030
230030
100025
C
C
0
1
0
8
0
9
0
0
0
2
0
9
0
0
0
1
0
2
0
9
0
0
0
0
0
0
0
0
0
3
0
9
0
0
0
1
0
3
0
9
0
N W SS * RP D R S E
CHEMICAL
N
S
M
0 0 00 0
0
- Formula ID & Chem
1
5
Step 1
0 0 00 0
0
Latch
5
0 1 03 0
0
Hold
0
0 0 00 0
0
0
0
0 0 00 0
0
Chem Step 2
2
5
0 1 03 0
0
Hold
0
0 0 00 0
0
0
0
0 0 00 0
Chem Step 3
1
5
0 0 00 0
0
2
5
0 1 03 0
0
Hold
0
0 0 00 0
0
0
0
0 0 00 0
0
0
0
0 0 00 0
0
0
0
0 0 00 0
0
0
0
0 2 00 0
0
Chem Step 4
3
5
0 2 03 0
0
Hold
0
0 0 00 0
0
0
0
0 0 00 0
Chem Step 5
1
5
0 0 00 0
0
3
5
0 1 03 0
0
Hold
0
0 0 00 0
0
-
www.Softrol.com
CATALYST
14
15
16
10/Sour
11/Stop
5
0
042 09 2 3 0 0 2 0 0
0
2
0
3
0
9
002 09 2 3 0 0 2 0 0
0
8
070
2
2
14/Extrac 6
t
0
0
0 0 00 0
2
5
0 0 00 0
3
5
0 0 03 0
0
0 0 00 0
5
5
2
Chem Step 6
0
-
0
-
Hold
0
-
Formula END
-
4
Note: The washer must have the option for Chemsave and be enabled for more
than 8 chemicals. If not, the washer should be programmed as shown in the
previous Milnor example and held by the water levels.
Milnor Formula
Milnor outputs
Interface inputs
1
1
2
2
3
4
4
8
5 6 7 8
16 32 64 Latch
The Milnor formula above is programmed to identify formula 1 and call for the
appropriate chemical injections.
Step 1 Identifies the formula to the interface as formula 1. The interface will start
the formula and proceed to the step ender (line 4). This includes chemical step 1
so the Alkali will be injected as the washer fills.
Step 3 tells the interface to go to chemical step 2. The interface will add the
break chemicals and stop at line 8.
Step 10 tells the interface to go to chemical step 4. The interface will add the
Bleach and stop at line #15.
Note: The W for when to add chemicals is a 2, which will wait until the washer has
filled and reached temp before the bleach is added.
Step 16 signals the interface to end the formula. The Load/Unload timer will start
and run until the next formula is run.
65
www.Softrol.com
CATALYST
Catalyst Formula
Formula #1, White Bar Towels
0001: Bar Towels
0002:
*******Chemical Step 1*******
0003:
Add 30 Oz. of Alkali
0004:
Run Time 0:00
0005:
*******Chemical Step 2*******
0006:
Add 72 Oz. of Alkali
0007:
Add 48 Oz. of Detergent
0008:
Run Time 0:00
0009:
*******Chemical Step 3*******
0010:
Add 24 Oz. Alkali
0011:
Add 24 Oz. Detergent
0012:
Run Time 0:00
0013:
*******Chemical Step 4*******
0014:
Add 64 Oz Bleach
0015:
Run Time 0:00
0016:
*******Chemical Step 5*******
0017:
Add 4 Oz Antichlor
0018:
Run Time 0:00
0019:
*******Chemical Step 6*******
0020:
Add 8 Oz Sour
0021:
Run Time 0:00
0017: END OF FORMULA
66
www.Softrol.com
CATALYST
8- System Maintenance and Troubleshooting
Maintenance
The Catalyst Chemical system will require periodic maintenance. Doing a few
simple procedures can dramatically increase the life of the chemical system. The
following is a suggested maintenance plan. Due to site-specific conditions, the
intervals may need to be changed.
1st Week
Re-torque all chemical pumps.
Carefully inspect all connections for signs of chemical or water leaks. If any
leaks are found, fix them immediately.
Check calibration of the chemicals.
Tighten all hose clamps.
Check the water temperature- it should be 80-110 degrees F.
WeeklyCheck the strainers on the chemical lines for blockage.
Check air filters; drain if necessary.
Clean system by wiping down with a damp cloth. Use air to blow off the
pump section.
MonthlyCheck the torque on the pumps.
Inspect the system for leaks.
Check Calibrations.
Tighten hose clamps
Torque on pumps: 70 in-lbs
Use 7/16” nut driver. Torque
Use a ½”
from bolt head. This is on
wrench. Torque
the side of the air inlet.
both sides
Tighten all 6 bolts.
Tighten ALL
bolts and nuts.
67
www.Softrol.com
CATALYST
Catalyst Alarms
Call Maintenance
Chemical Watchdog
Chemical #12
The Catalyst can have 7 different alarms while
running. They are:
Power Interrupted During Formula. This happens when
the power is lost to the processor while running a formula.
Press the YES button to resume the formula.
Low Air Pressure. This happens when the air pressure
drops below 65 psi during a chemical injection. Once the
air pressure is above 65 psi, pressing the YES button will
resume the formula. The Catalyst will display low air
pressure, but will not alarm if it is not running a formula.
Power Interruption
During Formula
Execution! Press
[YES] to Continue
128: Chemical Injection
Alkali 005
000
Low Air Pressure !!
Chemical Watchdog. This alarm occurs when the flow
Call Maintenance !!!
meter senses that it is out of chemical, sensor is jammed,
Chem watchdog
Chemical #1
or the injection took too long. Use the password to reset
Chemical #2
this error. If the system is out of chemical and needs to be
primed, holding the YES button will allow pump to turn on and ignore the
watchdog. Release the YES button when the pump is primed. See the next
section for more details.
Sensor Flush. This is similar to the Chemical watchdog,
however, it occurs during the metered flush after the
injection. This should be corrected the same as a
chemical watchdog.
68
Call Maintenance
Sensor Flush Watchdog
Sensor #1
www.Softrol.com
CATALYST
Flush Water Tank Not at Minimum Level. This message will be displayed
when the water level in the flush tank is not at the minimum level needed to
start an injection. This message will only display and not alarm when the
system is enabled. If the system is enabled and this condition exists, the
system will display the message and continue to fill the tank for 1 minute
before sounding the alarm. The injection cannot start until this has been
corrected. To silence the alarm, disable the Catalyst by pressing No & Ent
and correct the problem. The input for flush tank low is S7-04 and turns on
when the tank level is low.
Current Calibrations Do not Match Slot 5. The Catalyst will check the
calibration value in the REM K-4 and compare it to the value held in the
memory card in slot 5; if they do not match, an alarm will occur and the
system will display this message. This problem will occur when either the
memory card (Flowmem- Slot 5) or processor memory card (REM K4- Proc
Slot) is replaced. If the Flowmem is replaced, the calibrations will need to be
copied to Slot 5. If the REM K4 is replaced, the calibrations will need to be
copied from Slot 5. To copy the calibrations, do the following:
Enter in the level 7 password.
Select 2 for Program.
Select 5 for Copy.
Select 3 for Copy Calibrations.
Select 1 to copy the Calibrations to Slot 5.
Or
Select 2 to copy the Calibrations from Slot 5.
The controller will prompt you to enter in a password. Enter the
level 7 password. The controller will return to the main menu.
Exit the menu and the controller should return to the waiting for
formula state.
The chemicals can also be re-calibrated to eliminate this error.
If the memory card has been replaced, you will also need to send a Group
Formula Update from PulseNet. This should be done for the Catalyst group.
If this error occurs and no cards have been replaced in the controller, then it is
likely that the calibrations on the processor RAM have been corrupted. Follow
the same procedure and copy the calibrations from Slot 5.
69
www.Softrol.com
CATALYST
Check Chemical Tanks. This error occurs when the input S7-07 turns on.
This can be used for low level in day tanks. Once this input is on, the system
will not dispense until it is corrected. To clear this error, disable the system
by pressing No & Ent and fill the tank.
70
www.Softrol.com
CATALYST
How to clear a chemical watchdog on the Catalyst
The Catalyst will alarm with a chemical watchdog when the injection takes too
long or when the controller does not register any pulses from the flow meter. If
the controller encounters these faults, it will alarm and display the watchdog with
the chemical number. Do the following:
1. Press [CLR] to silence the alarm.
2. Check the supply tank or drum to make sure there is sufficient chemical supply.
3. If there is chemical, enter the level 7 password. The default is 777777. If the unit is
out of chemical, replace the drum or fill the tank. To prime the system, enter in the
level 7 password and then press and hold YES. Once the pump has been primed,
release the YES key.
4. The formula will reset; press [YES] to restart the injection.
5. Watch the display. It will show the desired amount and the delivered amount. The
delivered amount should be counting up. If not, the unit will alarm again.
6. If the system alarms and chemical is pumping, the flowmeter is likely obstructed and
will need to be cleared. If chemical did not pump, go to step 12.
7. Press & hold [CLR] & [ENT] for approximately 15 seconds to flush the system.
8. Press & hold [The Manifold #] & [CLR] for approximately 15 seconds to flush the
individual manifold. Observe the flowmeter, if gears rotate, then the are not jammed
and the formula should be rstarted. If the gears are jammed, Then the flowmeter will
need to be disassembled. See the net section.
9. Enter in the level 7 password and press [YES] to restart the injection.
10. If the system is still not metering the chemical, flush the system and disassemble the
flowmeter. Make sure there are no obstructions and the gears turn freely. (Make
sure when replacing the gears, the numbers face the back of the meter)
11. Enter in the level 7 password and restart the injection by pressing [YES]. Make sure
the system is pumping chemical.
12. Check the air pilot valve for the chemical valve and pump. They should both turn on
(LED on air valve should come on).
13. The chemical valve has a stroke limiting adjustment; make sure the valve is opening
enough to let chemical flow. Turn the adjustment counter-clockwise to increase flow.
14. If the valves are not turning on, troubleshoot the output cards in the controller.
71
www.Softrol.com
CATALYST
Flowmeter Disassembly
Cover w/
embedded sensor
5
7
1
3
4
2
8
6
O-Ring
Flowmeter Gears
If the flowmeter becomes clogged with debris and cannot be cleared by back
flushing, it will be necessary to disassemble and clean the flowmeter. To
disassemble the meter, do the following:
Press and hold [5] & [ENT] for 20 seconds to flush the system with water.
Place several rags or towels under the meter. (The manifold will be full of
water)
Press the Emergency Stop Button
Remove the cable that attaches to the cover of the flowmeter.
Remove the 8 bolts that hold the cover in place.
Carefully remove the cover from the manifold. Use a screwdriver to pry it
loose if necessary.
Remove the gears from the meter. Remove any debris that may be blocking
them.
Replace the gears. Make sure the magnets on the gears face the cover of
the flowmeter. The gears should turn freely when in place.
Replace the O-ring with a new one. Replace the cover. Tighten the bolts in a
staggered manner. The bolts should only be finger tight (10-12 in.-lbs.)
Attach the cable. Release the Emergency Stop Button.
Restart the system and check flowmeter to make sure it is functioning
properly.
72
www.Softrol.com
CATALYST
Interface Troubleshooting
Catalyst
Call Maintenance !!!
Chem watchdog
Chemical #1
Chemical #2
The Catalyst interface can have 4
different alarms while running.
They are:
1 2
3
POWER
4
5
6
ENABLE
7
8
9
HOLD
YES
0
CLR
NO /
CHEM
INJECT
Power Interrupted During Formula. This happens when
the power is lost to the processor while running a formula.
Press the YES button to resume the formula.
Power Interruption
During Formula
Execution! Press
[YES] to Continue
Machine Disabled. This happens when the machine on input is lost during
the formula. The machine on light (ENTER key) at the top
right of the keypad must be on to run the formula. This is
Machine Disabled !
input D1.
Press [YES] to Continue
73
Chemical Watchdog. This alarm occurs when the
interface has requested chemical and the Catalyst has not
responded. Enter in a level 4 password or higher and then
press YES to resume. If the Catalyst does not answer the
chemical request, then there might be a problem with the
Catalyst or the network. If this happens often, check the
chemical watchdog setup in the interface.
Call Maintenance !!!
Chem watchdog
Chemical #1
Chemical #2
Invalid Formula. This will be displayed when the interface
receives an input that indicates a formula that is not
currently programmed.
To clear the formula, press [CLR] + [NO]+[ENT].
To select the correct formula, use the arrow keys.
Check the machine programming and chemical
outputs to verify proper operation.
Invalid Formula
Selection!
NO= Exit
www.Softrol.com
CATALYST
Manual Formula Advancement/Cancel
Advancing a Formula:
If a formula on the machine needs to be advanced, the best option is to advance
the machine to the chemical identification step. This will tell the interface to go to
the appropriate step in its formula.
Canceling a Formula:
When a formula on the interface is canceled, no credit will be received for the run
or poundage. This may be required when the wrong formula is started. To
cancel the formula manually do the following:
Press NO- This will pause the formula
Press CLR- This will silence the alarm
Enter in a Password- This can be level 1 thru 7. (111111 or 777777)
Press NO + ENT at the same time to take the formula to the end.
Ending a Formula:
When the formula is ended, credit will be received for poundage and the run
time. This may be required when a formula has been run and there is a problem
with extract and the load is manually removed before the shakeout. To end the
formula manually do the following:
Press NO- This will pause the formula
Press CLR- This will silence the alarm
Enter in a Password- This can be level 1 thru 7. (111111 or 777777)
Press [UP Arrow] to take the formula to the end.
Changing a Formula:
If the incorrect formula has been started on the machine and the operator desires
a new formula, the best option is to Cancel the formula on the interface. This will
not give the credit for the incorrect formula in PulseNet and will show up as a
canceled load.
Note- If this is not done and the machine is restarted on the new formula, the
interface will switch to the new formula and the old formula will be credited with a
run. The machine must be restarted from the very beginning of the formula to
identify the new formula to the interface.
74
www.Softrol.com
CATALYST
Interface Board Problems
Memory Card May Be Corrupt. This may be displayed when the memory
chip in the interface has been reinitialized. To correct this do the
following:
o Press [CLR] then 777777 [ENT] 0624577
o Press 777777
o Select 1 for machine setups
o Enter valid setups (From interface configuration)
If this does not correct the problem, replace the memory chip or the entire
OPT-PRO board.
Replacing the OPT-PRO
Disconnect the power to the interface.
Remove the FPD, Power, IIC and I/O cables.
Remove the EEPROM chip and insert into new board.
Remove the OPT-ARC card.
Remove the EPROM chip and insert into new board.
Install the OPT-ARC card on the new board.
Reconnect all the cables to the new card.
Power up the interface. Enter in valid setups- Including the LAN ID.Send
a group formula update for the interface.
75
www.Softrol.com
CATALYST
CataPulse Interface
TroubleshootingThe CataPulse interface can have 6 different alarms while running. They are:
1. Power Interrupted During Formula. This happens when
the power is lost to the processor while running a formula.
Press the YES button to resume the formula.
2. Machine Disabled. This happens when the machine on
input is lost during the formula. The machine on light
(ENTER key) at the top right of the keypad must be on to
run the formula. This is input D1.
Power Interruption
During Formula
Execution! Press
[YES] to Continue
Machine Disabled !
Press [YES] to Continue
3. Chemical Watchdog. This alarm occurs when the interface has requested
chemical and the Catalyst has not responded. Enter in a
Call Maintenance!!!
level 4 password or higher and then press YES to resume.
Chem watchdog
Chemical #1
If the Catalyst does not answer the chemical request, then
there might be a problem with the Catalyst or the network.
Also, check the chemical watchdog time in the setups. This time should be 4
to 10 min.
4. Invalid Formula. This will be displayed when the interface receives an input
that indicates a formula that is not currently programmed.
Formula Number = 63
To clear the formula, press [CLR] + [NO]+[ENT].
Not Assigned
To select the correct formula, use the arrow keys.
Use arrows to scroll
Check the machine programming and chemical
ENT=Accept NO=Exit
outputs to verify proper operation.
5. Invalid Formula Request. This will be displayed when the interface, in the
waiting for formula state, receives the latch input without a
Formula Number = 131
valid formula number.
INVALID FORMULA RQX!
To clear the formula, press [CLR] + [NO]+[ENT].
Use arrows to scroll
To select the correct formula, use the arrow keys.
ENT=Accept NO=Exit
Check the machine programming and chemical outputs
to verify proper operation.
6. Invalid Injection Request. This will be displayed when the
interface, in the waiting for formula state, receives binary
inputs without the latch.
To clear the formula, press [CLR] + [NO]+[ENT].
To select the correct formula, use the arrow keys.
Check the machine programming and chemical outputs
to verify proper operation.
76
Formula Number = 130
INVALID INJECT RQX!
Use arrows to scroll
ENT=Accept NO=Exit
www.Softrol.com
CATALYST
Advancing a Formula:
If a formula on the machine needs to be advanced, the best option is
to advance the machine to the chemical identification step. This will
tell the interface to go to the appropriate step in its formula.
Canceling a Formula:
When a formula on the interface is canceled, no credit will be
received for the run or poundage. This may be required when the
wrong formula is started. To cancel the formula manually do the
following:
Press NOThis will pause the formula
Press CLRThis will silence the alarm
Enter in a Password- This can be level 1 thru 7. (111111 or 777777)
Press NO + ENT at the same time to take the formula to the end.
Ending a Formula:
When the formula is ended, credit will be received for poundage and
the run time. This may be required when a formula has been run and
there is a problem with extract and the load is manually removed
before the shakeout. To end the formula manually do the following:
Press NOThis will pause the formula
Press CLRThis will silence the alarm
Enter in a Password- This can be level 1 thru 7. (111111 or 777777)
Press [UP Arrow] to take the formula to the end.
Changing a Formula:
If the incorrect formula has been started on the machine and the operator desires
a new formula, the best option is to Cancel the formula on the interface. This will
not give the credit for the incorrect formula in PulseNet and will show up as a
canceled load.
Note- If this is not done and the machine is restarted on the new formula, the
interface will switch to the new formula and the old formula will be credited with a
run. The machine must be restarted from the very beginning of the formula to
identify the new formula to the interface.
77
www.Softrol.com
CATALYST
Hardware replacementThe CataPulse is designed for limited in field service. The two main
components of the interface are the mother board and the arcnet card. The
following directions should be used for replacement of the mother board.
4
6
8
2
7
3
5
1
Replacement Procedure
1. Remove the small junction box at the bottom of the interface. Unplug the
power connection and the communications connection. Be careful, the
power will have 24 VDC.
2. Remove the 6 screws that hold the cover in place. Remove the cover and
disconnect the 4 wires that connect it to the mother board.
3. Rotate the horn 180 deg. The wire connectors should be at the top.
4. Remove the plug that connects to the inputs.
5. Remove the connector from the outputs.
6. Remove the plug for the mother board power.
7. Remove the screw that holds the arcnet card in place. Remove the arcnet
card.
8. Remove the EEPROM chip. Note the orientation of the chip in the socket.
The notch on the chip should line up with the notch on the socket. If you
do not change this chip, the latch time will need to be set. This is found in
the installation and configuration section.
9. Remove the mother board from the plastic holder. You may need to pry
back the sides to release the board.
78
www.Softrol.com
CATALYST
10. Replace the mother board with a new one. Be sure to set the LAN ID to
the correct number by using the dip switches in the lower right hand coner
of the card. You can use the old mother board as a reference or refer to
the installation and configuration section. Replace the new EEPROM
with the old one. If you do not change this chip, the latch time will need to
be set. This is found in the installation and configuration section.
11. Put the arcnet card back in the holder and insert the screw that holds it in
place.
12. Reconnect all the plugs for the wires that connect to the mother board in
the reverse order in which they were removed.
13. Reconnect the cover and the power. Once the unit is powered up, you will
need to do the machine setups and passwords. These can be found in
the installation and configuration section. Download the formulas to the
interface. You may wish to run a test formula at this time.
To replace the Arcnet card:
1. Turn power off the interface. Open the interface.
2. Remove the wires that go to the arcnet card.
3. Remove the retaining screw that holds the arcnet card in place.
4. Remove the card and replace with a new one.
5. Check the terminating jumper. If the interface has only one
communication line going to it (it is at the end of the “daisy chain”) then the
jumper should be in place. If not, remove the jumper and discard.
6. Replace the retaining screw and reconnect the wires to the card. The
white wires go to terminal A and the colored wires go to terminal B.
7. Check the communications. The red LED on the card should be on
steady.
Terminating Jumper
79
www.Softrol.com
CATALYST
ArcNet Communications
BNC Hub
RECON
Softrol TP Hub
Catalyst Hub
MOD
HUB
+PWR
-PWR
TIMING
Card
All of the communications involved with the Catalyst are run on an ArcNet
network. ArcNet is an industrial, high-speed network designed to be rugged
and trouble free. The network can be run on RG-62 Coaxial cable, Cat 5
twisted pair, or fiber optic cables. Most all of the Catalyst installations now
use Cat 5 Twisted pair cable and is attached to the controller with Phoenix
connectors.
All the chemical requests from the machines and interfaces to the Catalyst are
transmitted over this network. If the network is not functioning properly, the
delivery of chemicals can be impeded.
The network is typically laid out in a bus fashion with an active hub.
Note: If it is a single Catalyst using twisted pair, the hub card may be located in
the controller in slot 8. If there are multiple Catalysts, or the system is older, an
active hub will be used.
The illustration above depicts a Mod Hub on the left (for older, coax networks)
and an Arc hub on the right. (Usually twisted pair) For more information on the
layout of the network, please see section 2:10 of Installation and Configuration.
Troubleshooting the network:
The active hub (Pictured above) is the central piece of equipment that brings the
all of the branches of the network together. In normal operation, the yellow
RECON light should be off. If this light is on steady or blinking, then there may
be a problem with the network. If this light blinks occasionally (once every 100
80
www.Softrol.com
CATALYST
seconds), then the network should be OK as this is the normal reconfiguration of
ArcNet. The ArcHub does not have this light- All the red LEDs should be on
steady. If you suspect a problem with the Network try the following:
Communications can be verified from the Pulsenet computer by bringing up the
multiple display feature. If the front panel displays of all the machines that are
turned on are shown, then it is likely that communications are OK.
If there is a problem with communications, remove one of the lines from the
hub. If the hub continues to reconfigure, plug that line back in an unplug
another. Repeat this process until the network is stable. You can then
recheck communications at the computer to see which machines are causing
the trouble.
Once the line that is causing the problems is identified, the machine can usually
be identified by the process of elimination. To do this, plug the line back into the
hub and remove the tee from the first machine (or node) on that line. Check to
see if communications are restored. Repeat this process until offending machine
or the end of the line is reached.
Items that can cause network trouble:
Duplicate IDs.- Each node must have a unique ID from 1 to 255. The ID is
usually set in the machine setup menu. The exception is the ArcFiber card
and the CataPulse interface which is used with the K4 Processor. This card
has a set of 8 dip switches that determine the ID.
Terminating Jumper- Only the last machine on the line should be terminated.
This terminator can be either a jumper on the card, or a BNC terminator
connected to the other side of a tee. It should not have both. The computer
must have a tee and terminator if it is at the end of the line. (it does not have
terminating capability) If twisted pair is used, then the terminating jumpers
must be used at the end of the line.
Un-terminated Line- This will cause the network to reset. This can be a card
at the end of the line that does not have a terminator, or when the cable is
damaged or cut.
CX / TP Jumper- The ArcNet cards can be configured for either Coax or
twisted pair communications. For the Coax networks, the jumpers should be
on the CX side. For Refer to the parts manual for exact jumper positions.
Faulty ArcNet Card- Due to excessive noise on the line, ArcNet cards can be
damaged and cause the network to fail. If this is the case, try to locate the
source of electrical noise and correct it. Some sources of electronic noise
are:
Cables run too close to power wires. If you must cross a power line,
the cable should be run perpendicular to the line.
81
www.Softrol.com
CATALYST
Poorly grounded controllers and machines.
Cables run too close to Variable Speed Drives.
Coax Network
Interface Arcnet Card
Catalyst Arcnet Card
82
www.Softrol.com
CATALYST
Twisted Pair Network
CataPulse Arcnet Card
83
www.Softrol.com
CATALYST
Catalyst Arcnet Card
Twisted Pair Hub Card
This card is used in the Catalyst control when the system does not have a hub. If
the card is used in the Catalyst control, the jumper MUST be removed.
84
www.Softrol.com
CATALYST
Twisted Pair Network
ARCNET
TWISTED PAIR
POLARITY GUIDE
FOR THE CATALYST
ARCFIBER
(CATALYST)
PCI20
(COMPUTER)
85
HYHUB
(HUB)
OPTARC
(INTERFACE)
RJ45
(COMPUTER)
www.Softrol.com
CATALYST
Catalyst Electronics
HY-HUB Hub card
for single Catalyst
I/O 8X8- Inputs
Standard Outputs
ARCFIBERCommunications
Flow-Mem
Memory Card
MicroPulse Power Supply
5 VDC for Control
15 VDC for Alarm
OUT 16- Air Push
Machines 17-20
OUT 16- Chemicals 9-16
Machines 9-16
OUT 16- Chemicals 1-8
Machines 1-8
Processor
REM K4
ON/OFF Switch
24 VAC Transformer
All Outputs and Inputs
Relay for Alarm
DPDT
Main Fuse
1A Fuse for
15 VDC
Typical Catalyst Electronics Layout.
86
5A Fuse for
4A Fuse for 24 VAC
5 VDC
24 VDC 5 A Power Supply
for CataPulse Interface
www.Softrol.com
CATALYST
PROC Slot- PRO-K4A, REM-K4A
REM-K4A- This card contains the software that controls the Catalyst. It also
contains the Catalyst setups and the current calibrations of the chemicals.
PRO-K4A- This card is the main processor for the system.
87
www.Softrol.com
CATALYST
Slot 1- OUT-16
This card has the outputs for chemicals 1-8 and machines 1-8
The outputs go from right to left and are S1-01 to S1-16. This stands for slot 1,
outputs 1-16.
Slot 2- OUT-16- Optional
This card has the outputs for chemicals 9-16 and machines 9-16
Slot 3- OUT-16- Optional
This card is used in a dual inject system and has outputs for pumps 1-16
Slot 4- OUT-16 – Optional
This card is used for the Air Push feature.
88
www.Softrol.com
CATALYST
Slot 5- FLOW-MEM
This card contains the memory for the system (for formulas and totals) and has 4
flow-meter inputs. The Catalyst uses channel one for its meter. The card should
be jumped for DC on channel 1for the Catalyst meter.
Slot 6- ARCFIBER-B
This card is used for the communications to the PC and the machines. The card
can be used either for BNC (coax cable) or for twisted pair (CAT 5)
89
www.Softrol.com
CATALYST
Slot-7- IO 8X8
This card has 8 inputs and 8 outputs. The inputs are on the left side and are
from left to right:
S7-03 Flush tank full- Tank will try to fill when off.
S7-04 Flush tank empty- Turns on when tank is low.
S7-06 Air Pressure is OK- Turns on when > 65 PSI
S7-08 Emergency stop is OK- Turns off when E-stop is pressed.
The outputs are:
S7-09 Calibration Valve
S7-10 Fill Flush Tank
S7-11 Flush Chems 1-8
S7-12 Flush Chems 9-16
S7-13 Flush Machine valves
S7-14 Back Flush
S7-15 Flush Pump
S7-16 Signal
90
www.Softrol.com
CATALYST
Slot 8- HYHUB-TP-CAT
This card is sometimes used in place of a hub. It will have three branches from
it:
1- Catalyst – Computer
2- Machine branch 1
3- Machine Branch 2
91
www.Softrol.com
CATALYST
Catalyst Pneumatics
Air Push Solenoid
Machine Valve
Manifold (90 PSI)
Air Push Regulator
(25 PSI)
Chemical Valve
Manifold (90 PSI)
Low Pressure
Pump Manifold (50 PSI)
Low Air Pressure Sensor
Open at below 65 PSI
High Pressure
Pump Manifold (70 PSI)
The pneumatic layout will vary with the system configuration. A layout is
mounted inside the pneumatic box. Air push is a option and may not be included
or available.
92
www.Softrol.com
66605X-X
OPERATOR’S MANUAL
INCLUDING: OPERATION, INSTALLATION & MAINTENANCE
1/2” DIAPHRAGM PUMP
RELEASED: 4-15-87
REVISED:
11-22-04
(REV. AM)
1:1 RATIO (NON-METALLIC)
READ THIS MANUAL CAREFULLY BEFORE INSTALLING,
OPERATING OR SERVICING THIS EQUIPMENT.
It is the responsibility of the employer to place this information in the hands of the operator. Keep for future reference.
SERVICE KITS
PUMP DATA
MODEL DESCRIPTION CHART
INGERSOLL-RAND COMPANY
(800) 276-4658
FAX (800) 266-7016
2004
CCN 99449712
www.Softrol.com
OPERATING AND SAFETY PRECAUTIONS
WARNING
WARNING
CAUTION
WARNING
CAUTION
CAUTION
CAUTION
CAUTION
CAUTION
NOTICE
NOTICE
WARNING
NOTICE
WARNING
WARNING
CAUTION
NOTICE
www.Softrol.com
GENERAL DESCRIPTION
MAINTENANCE
DUCKBILL CHECK VALVES (OPTIONAL)
AIR AND LUBE REQUIREMENTS
OPERATING INSTRUCTIONS
www.Softrol.com
PARTS LIST / 66605X-X FLUID SECTION
MATERIAL CODE
www.Softrol.com
PARTS LIST / 66605X-X FLUID SECTION
DIAPHRAGM
LUBRICATION / SEALANTS
TORQUE REQUIREMENTS
BALL
www.Softrol.com
PARTS LIST / 66605X-X AIR MOTOR SECTION
DIAPHRAGM PUMP SERVICE
FLUID SECTION DISASSEMBLY
FLUID SECTION REASSEMBLY
www.Softrol.com
PARTS LIST / 66605X-X AIR MOTOR SECTION
TORQUE REQUIREMENTS
AIR MOTOR SECTION SERVICE
MAJOR VALVE DISASSEMBLY
PILOT VALVE DISASSEMBLY
MAJOR VALVE REASSEMBLY
PILOT VALVE REASSEMBLY
www.Softrol.com
TROUBLE SHOOTING
DIMENSIONAL DATA
www.Softrol.com
www.Softrol.com
www.Softrol.com
www.Softrol.com
www.Softrol.com
www.Softrol.com
www.Softrol.com
www.Softrol.com
www.Softrol.com
www.Softrol.com
www.Softrol.com
www.Softrol.com
www.Softrol.com
www.Softrol.com
www.Softrol.com
Please visit us on the World Wide Web at www.Softrol.com.
Softrol Catalyst Manual
Entire contents© 1995-2005 Softrol Systems Inc
1st Edition 10/31/96
Revised 07/10/01- Updated for new K4 processor.
Revised 11/16/01- New layout
Revised 05/06/02- Updating Introduction
Revised 11/22/04- Updating Calibration
Revised 06/29/05- Updating Introduction and Maintenance
Revised 07/19/05- Updating Calibration and Maintenance
Revised 01/26/06- Updating Maintenance
Revised 10/16/07- New layout and added pump information
No portion of this manual may be duplicated in any manner without
expressed written consent of Softrol Systems, Inc.
4867 North Main Street
Acworth, GA 30101
770.974.2700
www.softrol.com