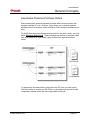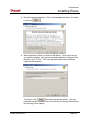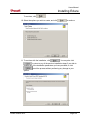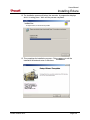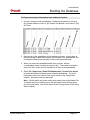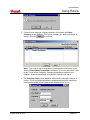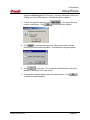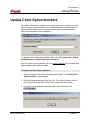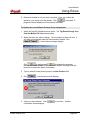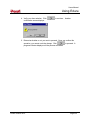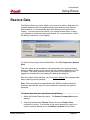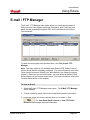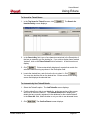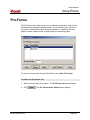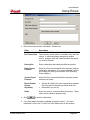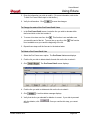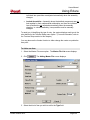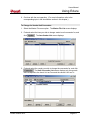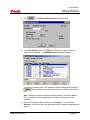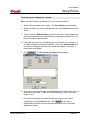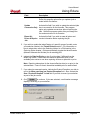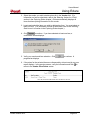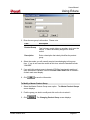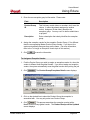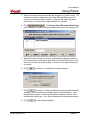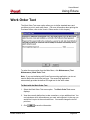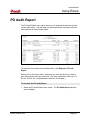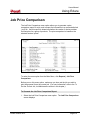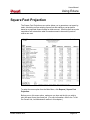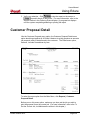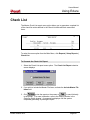
1
ECLARE Estimating Software Version 2016 Users Manual Prosoft, Inc. 6018 E. Columbus Drive, Tampa FL 33619 Phone (813) 626-8778 Fax (813) 964-7810 Customer Support (813) 626-8778 WWW.PROSOFTINC.COM This document contains exclusive and confidential information property of Prosoft, Inc. It cannot be passed on to third parties, reproduced or transmitted, altered or translated to any other language without Prosoft, Inc. prior written authorization. Trademarks Windows is a registered trademark of Microsoft Corporation in the United States and other countries. ReportWriter is a registered trademark of Clarion Inc. Google and Gmail are registered trademarks of Google, Inc. Users Manual Table of Contents Table of Contents Introduction ......................................................................................................... 8 Welcome ......................................................................................................... 8 Overview ......................................................................................................... 9 Eclare Estimating ...........................................................................................10 About this Manual ..........................................................................................11 General Concepts ..............................................................................................14 Estimating Concepts ......................................................................................15 Eclare Provides You Setup Flexibility .........................................................16 What is a Job Takeoff.................................................................................17 What is a Template ....................................................................................18 Eclare Summarizes Estimating Costs for Accounting .................................19 Eclare Automatically Updates Standard Costs for Production Builders .......20 Eclare Summarizes Estimating Details in Reports ......................................21 Eclare Handles Sub-contracted Activities ...................................................22 How Eclare handles Vendors and Prices....................................................23 How Eclare Updates the Takeoff Quantities ...............................................24 How Eclare Produces Purchase Orders .....................................................25 What are Conversions Used For ................................................................26 Eclare Concepts.............................................................................................27 How Prosoft’s Suite / Family of Products Interface .....................................27 How Eclare Interfaces with other Applications ............................................29 Eclare Provides You Customization Capabilities ........................................30 How Eclare Handles Documents ................................................................32 Other Special Features to Simplify your Work ............................................34 Security ..........................................................................................................36 How security works ....................................................................................36 Exploring Eclare .................................................................................................42 Activating Eclare ............................................................................................43 Selecting a Menu Option ............................................................................45 Closing a Menu Option ...............................................................................46 Exiting Eclare .............................................................................................47 Interface .........................................................................................................48 Eclare Screens ...........................................................................................48 Elements ....................................................................................................49 Data Display ...............................................................................................51 Functions and Modes .................................................................................57 Dialog Boxes ..............................................................................................58 Messages...................................................................................................60 Progress Bar ..............................................................................................62 Selecting data from a list ............................................................................63 Selecting values for a field..........................................................................64 Finding and Saving Files ............................................................................65 Screen Management ..................................................................................69 Reports ..........................................................................................................72 Before you Start .........................................................................................72 Running a Report .......................................................................................72 Eclare Version 2016 Page 3 Users Manual Table of Contents Selecting a Report ......................................................................................73 Selection Criteria ........................................................................................74 Selecting a Print Function ..........................................................................76 Extracting Report Data ...............................................................................77 Entering further Information ........................................................................78 Generating a Report ...................................................................................79 Previewing a Report ...................................................................................80 Printing a Report ........................................................................................82 Creating a PDF Report ...............................................................................83 E-mailing a PDF Report .............................................................................83 Sending a PDF Report via FTP ..................................................................85 Using a Third Party’s Report Generator......................................................86 Using Prosoft’s Report Writer .....................................................................86 Utilities ...........................................................................................................87 Calendar ....................................................................................................87 Calculator ...................................................................................................88 Digiwin .......................................................................................................89 Roof Calculator ..........................................................................................89 Other Tools ....................................................................................................90 Text Editor ..................................................................................................90 Online Help ....................................................................................................93 About .............................................................................................................98 Check for Updates .........................................................................................99 Prosoft File Exchange ..................................................................................100 Installing Eclare ...............................................................................................101 Installing the Application ..............................................................................101 Configuring the System ................................................................................108 Building the Database ......................................................................................110 Steps for Building the Database ...............................................................111 Creating the Data Structure ......................................................................112 Building the Data Structure from Spreadsheets ........................................116 Estimating Procedures .....................................................................................126 Procedures Timetable ..................................................................................127 Initial Evaluation and Setup Procedures .......................................................128 Standard Operating Procedures ...................................................................129 Data Maintenance Procedures .....................................................................132 Data Management Procedures.....................................................................134 Using Eclare ....................................................................................................136 Eclare Menu Maps .......................................................................................137 File Menu .................................................................................................137 Jobs Menu ...............................................................................................140 Maintenance Menu ...................................................................................141 Reports Menu...........................................................................................143 Window Menu ..........................................................................................144 Help Menu ................................................................................................145 Company Login ............................................................................................146 Print Setup ...................................................................................................151 Terminal Setup.............................................................................................153 Define Toolbar .............................................................................................165 Eclare Version 2016 Page 4 Users Manual Table of Contents Export Job Budgets ......................................................................................168 Export Job PO’s ...........................................................................................170 Export Cost Codes .......................................................................................172 Export T/O Detail .........................................................................................174 Export Cost Code Compare .........................................................................177 Export Takeoff Compare ..............................................................................180 Export Takeoff Detail Compare ....................................................................182 Export Option Pricing ...................................................................................184 Export Gemini Price Book ............................................................................188 Import Vendor Pricing ..................................................................................190 Import Vendors ............................................................................................198 Import Cost Codes .......................................................................................201 Import PO Reason Codes ............................................................................203 Retrieve Jobs ...............................................................................................205 Update Common Information .......................................................................211 Update Model Option Reference ..................................................................213 Send Option Pricing .....................................................................................215 Send Product Groups...................................................................................218 Program Setup .............................................................................................219 Company Maintenance ................................................................................225 Master File Import ........................................................................................230 Master File Export ........................................................................................234 Vendor Price Export .....................................................................................235 Vendor Price Import .....................................................................................237 Renumber Master Items ...............................................................................239 Rename Product Group ...............................................................................246 Update Client Option Numbers ....................................................................247 Tag M/F Operations .....................................................................................248 Restore Data ................................................................................................253 Reset In-Use Flags ......................................................................................257 Download All CD Files .................................................................................259 Install Release .............................................................................................261 Technical Menu ............................................................................................262 User Maintenance ........................................................................................264 TxText Maintenance.....................................................................................275 Print Vendor Letters .....................................................................................283 Launch Spreadsheet ....................................................................................289 Custom Reports ...........................................................................................290 Report Writer Manager .................................................................................296 Calculator .....................................................................................................297 Digiwin .........................................................................................................298 Roof Calculator ............................................................................................298 Show Users..................................................................................................304 Registration Code ........................................................................................306 Customer Suggestions .................................................................................307 Backup Data ................................................................................................312 Fax Manager ................................................................................................317 E-mail / FTP Manager ..................................................................................325 Multi-File FTP Send .....................................................................................331 Eclare Version 2016 Page 5 Users Manual Table of Contents Exit ...............................................................................................................332 Job Maintenance ..........................................................................................334 Clear Job Selection ......................................................................................350 Duplicate Job ...............................................................................................351 Checklist Qty ................................................................................................353 Takeoffs .......................................................................................................356 Pricing ..........................................................................................................376 Clear Pricing ................................................................................................381 CAD Import ..................................................................................................382 Pro-Forma ....................................................................................................385 Master File ...................................................................................................394 Price Update ................................................................................................421 Vendors .......................................................................................................426 Quick Index ..................................................................................................439 Job Pricing ...................................................................................................442 Global Takeoff Maintenance ........................................................................445 Vendor Price Delete .....................................................................................451 Tag Delete Jobs ...........................................................................................453 Master Product Groups ................................................................................456 Product Group Exceptions ...........................................................................459 Cost Codes ..................................................................................................466 Divisions ......................................................................................................468 Category ......................................................................................................471 Unit Conversion ...........................................................................................473 PO Pack.......................................................................................................477 View PO Reason Codes ..............................................................................480 Check List ....................................................................................................481 Job Criteria ..................................................................................................485 Takeoff Type Codes .....................................................................................488 Show Item / Option References....................................................................490 PO Text........................................................................................................493 Work Order Text ..........................................................................................494 Vendor Order Quote Text .............................................................................495 Specification Text .........................................................................................496 Takeoff Report .............................................................................................499 Material Summary ........................................................................................502 PO Audit Report ...........................................................................................504 Vendor Orders .............................................................................................507 Job Price Comparison ..................................................................................510 Product Group Report ..................................................................................512 Square Foot Projection ................................................................................514 Check List ....................................................................................................517 Customer Proposal ......................................................................................518 Customer Proposal Detail ............................................................................520 Job Category Report ....................................................................................522 Takeoff Type Usage .....................................................................................524 Job List ........................................................................................................525 Master File Report........................................................................................526 Master File by Cost Code .............................................................................529 Eclare Version 2016 Page 6 Users Manual Table of Contents Item Part Number Ref ..................................................................................530 Vendor Listing ..............................................................................................532 Vendor Part # Reference..............................................................................534 Vendor Price Book .......................................................................................535 Vendor by Product Group.............................................................................537 Product Group..............................................................................................539 Cost Code ....................................................................................................541 Divisions ......................................................................................................542 Category ......................................................................................................544 Conversions .................................................................................................545 PO Sequence...............................................................................................546 Check List ....................................................................................................547 Model Option Reference ..............................................................................548 Takeoff Type Codes .....................................................................................549 Appendixes ......................................................................................................550 Appendix A - File Layouts ............................................................................551 Export Layouts .........................................................................................551 Import Layouts .........................................................................................560 Global Maintenance Layouts ....................................................................564 Appendix B – Special Tokens ......................................................................567 Appendix C – Registry Values and TPS Files...............................................568 Appendix D – Sample Structures .................................................................570 Glossary ..........................................................................................................571 Index ................................................................................................................574 Eclare Version 2016 Page 7 Users Manual Introduction INTRODUCTION Welcome Welcome to Eclare! Eclare is an estimating software designed especially for building contractors. Whether you are a small builder or a production builder, Eclare’s features will prove invaluable in assisting you to estimate and price your construction jobs. Before you get started, take a few minutes to familiarize yourself with Eclare’s features. Learn how you can: Benefit from keeping an online database of items, vendors, products and jobs. Automate your current estimating procedures to deliver prompt and accurate customer proposals. Simplify tracking and management of your operations through over twenty different reports and through integrated fax processing and report generating capabilities. Integrate your estimating software with client and accounting systems for a completely automated solution. Then you will be able to put Eclare’s power and flexibility to work for you! REMEMBER TO REGISTER. In order to use Eclare, you must register your copy with Prosoft. Registered users will receive notification of product updates and information about related Prosoft products. Eclare Version 2016 Page 8 Users Manual Introduction Overview Eclare Estimating is part of Prosoft’s Suite, an integrated system that delivers a completely automated solution to your business needs. This family of products includes three basic structures: PSClient, the retail vehicle and “front-end” application, is designed to collect prospective clients’ information and to track all activity prior to sale. Once the prospect decides to purchase, it records the selected model, standard and custom options, along with lot details, to be sent to Eclare for processing. PSClient also automates order and contract management, and greatly improves the interface between scheduling and all departments in the company. Eclare, the cost vehicle and estimating application, is designed to automate and simplify job pricing. Once the client finalizes his selections, it uses the base house and “extras” (options) information to update the client’s estimating records. With just a click of the mouse, Eclare prices the job, produces estimating reports, client proposals and purchase orders, among others. Once the estimating process is complete, the finished estimate is ready for Gemini in the form of detailed purchase orders, contracts and budgets. Eclare Version 2016 Page 9 Users Manual Introduction Gemini, the accounting application, is designed to provide all necessary job management and financial control tools. Once the estimating process is complete, it uses the purchase orders and budget information to update the job’s accounting records. Gemini automates the printing and tracking of contracts, purchase orders, and financial reports. The interaction of PSClient, Eclare and Gemini simplifies the flow of information from one application to the other, whether through user-activated import and export menu options, or through a direct “Exchange Module”, an optional module that automatically connects all three. Thus, the Prosoft Suite provides a full management control cycle for your building contracting needs, resulting in a system that works, flows and thinks like a contractor. Eclare Estimating Whether you choose to benefit from Prosoft’s Suite or to interface Eclare with third parties’ applications, Eclare allows you to easily maintain a database of elements needed to define, estimate and manage your construction jobs. Eclare Version 2016 Page 10 Users Manual Introduction Whether handling custom jobs or models, Eclare simplifies your estimating process, allowing you to easily make changes at any stage of the project. It handles vendors and sub-contractors, automates processing of cost and price increases, and summarizes your information for accounting and reporting purposes, among others. As a multi-company system, Eclare allows you to define separate databases for remote locations within your company. It is available as a single or multi-user version, with a full security scheme to guarantee the integrity of your estimating data. About this Manual The purpose of this Users Manual is to present Eclare’s concepts and basic features in a concise and clear manner, and to provide you detailed instructions on how to use Eclare’s menu options to automate your estimating procedures. This Manual is based on the assumption that you are familiar with the Windows environment, terms, mouse and keyboard usage. If you are not, please refer to the documentation provided with your operating system before using Eclare. Additionally, in order to fully benefit from the Import and Export features, you must have a thorough understanding of spreadsheet concepts and usage. Organization The information is organized in a logical and progressive order, beginning with an overview of concepts: Chapter Description Introduction Explains the purpose of Eclare Estimating and its relationship with Prosoft’s PSClient and Accounting applications. General Concepts Explains how Eclare implements general construction concepts and system security. Exploring Eclare Explain general software and interface concepts, common features and utilities, printing of reports, and usage of online help. Installing Eclare Explains installation and initial configuration concepts and procedures. Eclare Version 2016 Page 11 Users Manual Introduction Chapter Description Building the Database Explains concepts and general procedures. Estimating Procedures Contains detailed instructions on how to perform day-to-day estimating procedures using Eclare’s menu options. Using Eclare Contains detailed steps on how to use each and every one of Eclare’s menu options and features. Appendixes Contains sample file layouts and field descriptions for spreadsheet related functions. Glossary Contains a list and definition of Eclare’s main terms. Conventions used: The information in this Manual is presented according to the following standards: Convention Description Bold The words that appear boldface are screen titles or field labels. Boldface is also used to highlight important terms. [brackets] Brackets are used to represent the different keys on the keyboard. The text between the brackets indicates the key name. Italics The words that appear in italics refer you to a section or topic within the Users Manual where you can find additional information on a related topic. click The word “click” refers to pressing the left mouse button in order to select or activate a menu option, screen or field, or to perform a function. Option The word “option” is used in several contents Eclare Version 2016 “Menu option” - refers to a program that can be activated through a menu selection. “System option” - refers to a standard Windows function available for user selection. Page 12 Users Manual Introduction Convention Description “Program option” - refers to a specific feature or function available within a program for user selection. “Option” – refers to construction options, that is, standard or custom options a client may choose. Menu option | Menu option Words separated by the piping symbol “|” indicate a sequence of navigational steps necessary to select and activate a menu option. For example: Maintenance | Setup Maintenance | Cost Codes To select and activate the Cost Codes menu option: Eclare Version 2016 Click on the Maintenance menu option on Eclare’s Menu bar. Click on the Setup Maintenance sub-menu that displays under Maintenance. Click on the Cost Codes selection that displays under Setup Maintenance. Page 13 Users Manual General Concepts GENERAL CONCEPTS Eclare is a very powerful tool that allows you to automate your estimating procedures in a simple and straightforward manner. Designed to suit both production and turnkey builders, it simplifies cost management and reporting, easily integrates with sales and accounting applications in Prosoft’s suite or family of products, and puts its database at your disposal for further management using spreadsheet applications. Learning the general concepts behind its implementation will enable you to understand Eclare’s power and flexibility. What You Will Learn Please take a few minutes to read this chapter and familiarize yourself with Eclare’s general and security concepts. You will find answers to your questions about what Eclare can do for you. In this chapter, you will learn how Eclare: Eclare Version 2016 Implements basic estimating concepts Summarizes information for accounting and reporting purposes Automates and simplifies handling of costs and price increases Handles sub-contracted activities, vendors and pricing Updates takeoff quantities Produces Purchase Orders Interfaces with other applications Ensures data integrity through its Security scheme Page 14 Users Manual General Concepts Estimating Concepts Eclare Version 2016 Page 15 Users Manual General Concepts Eclare Provides You Setup Flexibility Whether you are a production or turnkey builder, whether you handle models, custom or semi-custom jobs, Eclare’s data structure can be set to suit your individual needs. You may view Eclare’s structure as an empty numbering scheme that will contain the details of how you conduct business. It is a pre-formatted shell that allows you to group and organize all information used for estimating your construction jobs. * Job Takeoff Job Takeoff Job Takeoff Job Takeoff 1 2 3 1 2 3 1 2 3 1 2 3 Base House 16 Options Base House 16 Base House 16 Elevations Subdivision Dependent Options Elevations Custom Builder 25 Options Even though your selected structure and data will differ greatly from another builder’s, Eclare’s features translate it into accurate estimates, reports, and accounting information. Note: Contact Prosoft, Inc. for assistance in determining the database setup that best suits your company’s needs * The numbers used in this chapter are for illustration purposes only. They do not reflect actual takeoff, cost codes, vendor or item number assignments. Eclare Version 2016 Page 16 Users Manual General Concepts What is a Job Takeoff Eclare uses a structure called Job to store all details necessary for identifying and estimating a construction project, whether a model or a client specific project. A job’s detailed material list is organized in structures called Takeoff that normally contain individual items and assemblies of items. However, takeoffs may also contain labor and materials, labor only, etc. Estimating Job 1 2 3 Base House 16 Options Eclare allows you to create new jobs from scratch and also to use any existing job or model as a template, or starting point. Eclare Version 2016 Page 17 Users Manual General Concepts What is a Template A Template is a “boiler plate”, or an “original”, that is used as a base for generating new jobs or models. They contain standard takeoffs and other estimating information that is common to all or most of your jobs. Using a template provides you a starting point. Instead of manually creating the job and all its takeoffs, Eclare automatically duplicates the template and prepares a real estimating job you can use for your new construction project. You only need to review the new job’s details and provide or adjust the takeoff quantities before you are ready to work! Estimating Template 1 2 3 Estimating Real Job Base House 1 2 3 Accounting Real Job 16 Base House 16 010 020 030 Cost Codes 710 Options Options From template to real job to accounting, Eclare seamlessly automates your estimating work. Eclare Version 2016 Page 18 Users Manual General Concepts Eclare Summarizes Estimating Costs for Accounting The Cost Code structure is the basic link or interface between accounting and estimating. It determines the level of detail for which Eclare tracks job costs, and how these are summarized for accounting, customer proposals and reporting purposes. Eclare Cost Codes Accounting Since each item in the database is associated with a cost code, Eclare can easily determine and categorize all costs in a job’s material list. The job’s total costs by cost code then update the corresponding account in your accounting system. Eclare Version 2016 Page 19 Users Manual General Concepts Eclare Automatically Updates Standard Costs for Production Builders Just as easily as Eclare tracks and summarizes costs, it allows you to automatically update your standard costs on a periodic basis based on your vendors’ price increases and to document the reasons for the changes. If you are a production builder with multiple model-specific takeoff templates, you can globally update the costs across your models in one easy step. With just one click of the mouse, Eclare reads your vendor’s price update spreadsheet, finds the matching vendor/item and updates the cost. Once you have updated prices for all vendors, all or selected models automatically reflect the price increase. Eclare Version 2016 Page 20 Users Manual General Concepts Eclare Summarizes Estimating Details in Reports With over 20 pre-defined reports and its ability to interface with report generators, Eclare provides you great flexibility in accessing your estimating information. You can easily produce detailed reports and different levels of summary reports. Most importantly, Eclare maintains detail at the same time that supports summary reporting and export features. Job Takeoffs 1 ---------------------------------------------------------------------------- 2 ---------------------------------------------------------------------------- 3 ---------------------------------------------------------------------------- Material List and Purchase Orders 98 -------------------------------------------------------------------- 800 lines ---------------------------------------------------------------------------------------------------------------------------------------------------------------------------------------------------------------------------------------------------------------------------------------------------------------------------------------------------------------------------------------------------------------------------------------------------------------------------------------------------------------------------------------------- Cost Codes 400 lines ---------------------------------------------------------------------------------------------------------------------------------------------------------------------------------------------------------------------------------------------------------------------------------------------------------------------------------------------------------------------------------------- Categories 300 lines ------------------------------------------------------------------------------------------------------------------------------ 125 lines Eclare also supports user selection criteria to allow you to narrow down the data you wish to include in the reports. Eclare Version 2016 Page 21 Users Manual General Concepts Eclare Handles Sub-contracted Activities Eclare’s data structure can handle sub-contracted activities as well as detail material items. It allows you to define vendors that supply materials, vendors that provide services of labor and material (turnkey), and vendors that provide labor only. Simply define as vendors your suppliers or sub-contractors, and as items your materials, labor, or labor and materials; then assign them to the corresponding job takeoff. Regardless of your setup, Eclare features understand and properly process the information, whether generating vendor orders, bid requests, purchase orders, etc. Eclare Version 2016 Page 22 Users Manual General Concepts How Eclare handles Vendors and Prices Eclare allows you to simultaneously track the price of an item from multiple vendors, although only one is used when pricing the job. It allows you to define a Vendor of Choice, or usual supplier, for a Product Group, or kind of item. You may also choose a supplier other than the vendor of choice by defining an Exception for a job based on subdivisions or areas. To determine the price to use when estimating a job, Eclare examines each takeoff item, determines its product group and associated vendor of choice, and finds the corresponding vendor item price. If you have defined an exception vendor for the job, Eclare uses the exception vendor item price instead. Vendor of Choice (e.g. Vendor 1 - Usual provider of Lumber) Product Group (e.g. Lumber) Job Exception (e.g. Vendor 2 Provider of Lumber for Subdivision X) Vendor 1 (Possible provider of Lumber) Vendor 2 (Possible provider of Lumber) Item (e.g. Lumber - 2"x4") Vendor 3 (Possible provider of Lumber) The Product Group and Exceptions structure can also be used to quickly change the job’s prices by simply changing the vendor of choice. Eclare Version 2016 Page 23 Users Manual General Concepts How Eclare Updates the Takeoff Quantities Takeoff Quantities are the number of individual items required to complete a specific job takeoff (e.g. number of 2x4’s, number of windows, number of Sq. Ft. of slabs, number of electrical outlets, etc.) Eclare provides four ways to register or change a job’s quantity information. If you are interfacing with Prosoft’s suite or family of products, the most common way is through Exchange. You can also enter or adjust the quantities directly in the job takeoff detail, import the quantities from CAD, or automatically read them using a digitizer. 1 Eclare Quantity Sales Office (PS Client) CAD Quantity 3 Digitizer 4 Job Exchange Job Takeoff Detail Manual 2 Quantity Entry Items Eclare Version 2016 Assemblies Page 24 Users Manual General Concepts How Eclare Produces Purchase Orders Eclare automatically produces separate purchase orders for each vendor that supplies materials for a job. However, it also allows you to produce separate purchase orders for the same vendor at different times during the development of a job. To have Eclare generate multiple purchase orders for the same vendor, you must define Purchase Order Packs. These packages are families of purchase orders that, when assigned to a job takeoff, group its items into separate purchase orders. To generate the purchase orders, simply select the PO Pack you wish to print. The total number of vendors and PO Packs in a job determines the total number of separate purchase orders that will be generated for that job. Eclare Version 2016 Page 25 Users Manual General Concepts What are Conversions Used For Eclare has system-wide built-in functionality to assist you in keeping consistent units of measure within the database. This method is called Conversions. You can set up conversions for purchased items (Items to Vendors) and for items that make up an assembly (Assembly to Items). If you purchase an item in units different than the takeoff’s measurement unit, Eclare automatically uses the formula or conversion factor you define to determine the correct quantity to order from your vendor. If your assembly contains items that have a takeoff measurement unit different than the assembly’s, Eclare automatically uses the formula or conversion factor you define to calculate the individual item quantities needed for the assembly. 12' 4' x 8' Drywall Item (e.g. 4x8 Drywall - EA) Conversion (e.g. 1) Eclare Version 2016 4' x 8' Drywall Conversion (e.g. ¼ or .25) 1 Ft 4' x 8' Drywall Assembly (e.g. 8x12 Wall - LF) 4' x 8' Drywall 8' Vendor (e.g. 4x8 Drywall - EA) Page 26 Users Manual General Concepts Eclare Concepts How Prosoft’s Suite / Family of Products Interface Eclare allows you to securely share data with other Prosoft’s applications through a common data directory called Exchange Directory. This approach maintains complete data integrity in each application, and works on multiple environments, whether local area networks, WAN, remote mobile access, or internet. Exchange Directory Jobs PsClient Model Option Reference Estimating Vendor / Cost Code Accounting PO's Budgets The information you can exchange falls in two categories: 1. Maintenance oriented, where common information that is primarily maintained in one application is used to periodically update the other applications. 2. Job specific, where information generated in one application is automatically uploaded into another application to reduce typing. Eclare Version 2016 Page 27 Users Manual General Concepts 1 From Exchange Directory Accounting Vendor Information To Estimating PS Client 1 Accounting 1 PS Client 1 Estimating 2 PS Client 2 Estimating Eclare Version 2016 Cost Code Information Option Information (option #, descr) Option Information (retail price of base house and its options) Job and selected Customer Options Information Jobs Purchase Orders Budgets Estimating Estimating PS Client Estimating Accounting Page 28 Users Manual General Concepts How Eclare Interfaces with other Applications Eclare allows you to easily import and export database information to spreadsheet applications. If you are an experienced spreadsheet user, the export features allow you to further manage your information. You can perform “what-if” analysis, prepare electronic lists for vendors to supply their periodic price increases, among others. The import features can greatly reduce your need to manually type into the system information you have readily available in electronic form, as in the case of vendor price increases. get Bud Files Ve ndo r Ite m Ma s Jobs s eoff Tak tities n Qua ste r Spreadsheets O Co s Co t Co mp de are s on pti ors nd Ve Pricing Co s tC od es Costs In summary, you can use the Import / Export features to: Build the master files Vendors Cost Codes Pricing Master File Database Maintain the database information Vendor Price Update Add Vendors Change the Master File structure Export database information Vendor Master File Cost Comparison Item Master File Base House and Options Cost Eclare Version 2016 Page 29 Users Manual General Concepts Eclare Provides You Customization Capabilities In addition to setup flexibility, Eclare also provides you great customization capabilities. You may define your own job criteria, job access control, and envelopes, among others, tailoring these values to your organizations’ specific needs: Eclare Version 2016 Page 30 Users Manual General Concepts Eclare Version 2016 Page 31 Users Manual General Concepts How Eclare Handles Documents In addition to standard, system-defined reports, Eclare allows you to define, customize and print letters and labels. These user-defined layouts work through Prosoft’s Text Document Editor, and provide you ample printing flexibility. Custom-defined documents allow you to select and include specific data fields from your estimating database, to control the field arrangement and to tailor the document’s text and font characteristics in order to produce letters that suit your organizational needs. Prosoft’s Text Editor provides you these features without having to purchase a word processor, and is automatically installed upon first use. Prosoft’s Text Editor contains standard document management features that are very similar to MSWord. If you are not familiar with word processing, explore the Text Editor’s menu and experiment with its options, or contact Prosoft, Inc. for assistance. (For more information, refer to Other Tools, Text Editor section in the Exploring Eclare chapter and To Work with Eclare Text Editor, Tx Document Maintenance section in the Using Eclare chapter.) Eclare Version 2016 Page 32 Users Manual General Concepts Eclare stores the master text documents you create in the TxDOCS directory, which is automatically created under the Eclare directory upon installation. Your company defines its own naming conventions to suit your specific needs, and organizes the master documents according to your own custom-defined directory structure. For organization purposes, store documents in a sub-category that corresponds to the document purpose (e.g. Project-related Letters, etc.) This will allow you to quickly locate the files you need. You may also configure Eclare to automatically store a copy of the resulting output documents. Eclare Version 2016 Page 33 Users Manual General Concepts Other Special Features to Simplify your Work In addition to Eclare’s extensive reporting capabilities, you may also automatically fax any report to one or multiple recipients through its Fax Manager utility: Simply generate and send the fax from any report preview screen. Eclare also stores them in the fax server, from where you may directly manage their status, edit recipient and scheduling information, delete or send faxes. (For more information, refer to the Fax Manager section in the Using Eclare chapter.) Eclare Version 2016 Page 34 Users Manual General Concepts Eclare also supports an optional feature that allows you to generate and e-mail reports in PDF format (Adobe’s Portable Document Format): Simply generate the PDF file from any report preview screen. Eclare also allows you to e-mail the file, storing the e-mail in the e-mail server, from where you may directly manage their status, edit, delete or send e-mails. (For more information, refer to the E-mail / FTP Manager section in the Using Eclare chapter.) The PDF module is an optional feature that must be purchased separately. For sales and pricing information, contact Prosoft, Inc. Eclare Version 2016 Page 35 Users Manual General Concepts Security Whether you are working with Eclare’s single-user or multi-user version, Eclare provides security controls to ensure the safety and integrity of your estimating data. In addition to verifying your company’s licensing and registration, its security scheme is two-fold: Only authorized users can gain access to the system Authorized users can only gain access to menu options and features for which they have been granted access privileges in their user account Proper use of these security features allows you to effectively control access to the system and protect your data. In the multi-user version, there is no limit to the number of users you can define. How security works Eclare’s security scheme is composed of the following interrelating elements: Eclare Version 2016 User Accounts (Supervisor, other Users) Login (User ID, Password, Company Database selection) Access Control (Functions, Reports, Maintenance, etc.) Page 36 Users Manual General Concepts Only persons that have a valid user account defined in the User Maintenance table are able to log in to the system. Eclare requires that the user provides a valid ID and password, which in turn determines which menu options and features the user can work with. The user can only select functions and features defined in his user account. Only the Supervisor has access to all menu options and features. When the supervisor is logged in, no other user can log in to the system. He has complete control of the system to enable him to execute functions that globally affect the database. In addition to menu option and function access control, data access rights may be defined by establishing user and job restrictions by customizable limits. (For more information, refer to the Data Access Rights topic in this section.) User Accounts There are two types of accounts: User Type Description Supervisor There is only one supervisor account in the system. It has full access to all menu options and features, and defines the default security access levels granted upon creation of new user accounts. Due to the nature of the supervisor related functions, all other users must exit the system before the supervisor logs in. User In Eclare’s multi-user version, there is no limit to the number of user accounts you may create. User accounts may have access to all functions, or access may be limited based on the access levels defined for the individual account. User accounts may also be individually restricted from all access to the system. All user accounts are created and managed by the Supervisor. If you need access to the system or to additional menu options and features, contact the Supervisor. (For more information, refer to the User Maintenance section in the Using Eclare chapter.) User accounts are identified by: Eclare Version 2016 Page 37 Users Manual General Concepts Identifier Description User Name This is the primary means of user identification. It can be made of up to eleven (11) characters and numbers, and must be different for each user account. Password Although you are not required to use passwords, passwords ensure that only authorized users gain access to the system. They should be kept confidential to ensure system security. They can be made of up to eight (8) characters and numbers, and can be changed as needed. Login The first step of the login process is to verify the status of your company’s licensing and registration. (For more information, refer to the Licensing and Registration Verification topic in this section). Once verified, the login routine is activated in the following instances: Upon entering Eclare (for more information, refer to the Activating Eclare section in the Exploring Eclare chapter.) Upon logging in to a different Company Database (for more information, refer to the Company Login section in the Using Eclare chapter.) Although the login process involves several steps, the main purpose is to identify the person requesting access to the system and to determine the menu options and features that will be available: For the person to gain access to the system: Eclare Version 2016 The User Name must correspond to a user account in the User Maintenance table. Page 38 Users Manual General Concepts The Password provided must correspond to the password defined for the user account. The user account’s access must not be restricted. The user account must have access privileges assigned in the Security section. If any of these conditions is not met, a security message displays. If you receive this message upon login, yet feel you should have access to the system, contact the Supervisor. Access Control Access privileges are defined in the Security section of the User Maintenance table. Most of the access levels include a group of related menu options. (For more information, refer to the User Maintenance section in the Using Eclare chapter.) Once a user gains access to the system, only menu options for which access privileges have been granted will be available. All other menu options and features will be inactive. If you make a selection for which you have no access privilege, a message displays: Eclare Version 2016 Page 39 Users Manual General Concepts If you do not have access to the Maintenance menu options, you can still access the programs for view only and selection purposes. Since your access privileges are limited, the functions appear inactive: Data Access Rights Eclare allows you to control which jobs are available to the user based on twentyeight possible limits: Eclare Version 2016 Page 40 Users Manual General Concepts Although the user may have access to the jobs’ maintenance menu option, access to each job is controlled by assigning pre-defined limits to each user and job. Users may only work with jobs that match their assigned limits, whether “Default” or one of the customizable twenty-six. Regardless of the user’s Limit access rights, all users have access to jobs defined as “unlimited”. Licensing and Registration Verification All of Prosoft’s applications automatically verify your company’s licensing and registration upon sign in. This takes place by comparing Eclare’s Registration Codes against Prosoft’s servers. When your company’s licensing and registration is up to date, login proceeds as usual. However, when your company’s registration has expired, you will receive a message, and further action on your part is needed: If you have your new registration codes, select Enter Registration and click to continue. (For more information, refer to the Registration Code section in the Using Eclare chapter.) If you want Prosoft’s server to verify your licensing status and automatically update your registration codes for you, select Prosoft Server and click to continue. If your licensing is up to date, a message displays: For further assistance, please contact Prosoft Inc. Eclare Version 2016 Page 41 Users Manual Exploring Eclare EXPLORING ECLARE Eclare is an easy to use, Windows based application with a standard graphical user interface. Learning to use its general features will enable you to confidently work with all its menu options. What You Will Learn Please take a few minutes to read this chapter and familiarize yourself with Eclare’s user interface and general features. In this chapter, you will learn to: Eclare Version 2016 Enter and exit Eclare Select and close menu options Work with screens, dialog boxes and windows Identify elements, functions, modes and messages Sort, browse and locate data Select data and values from lists Select, open and save files Generate and print reports Use Eclare’s utilities and On-line help Page 42 Users Manual Exploring Eclare Activating Eclare There are several ways to activate Eclare Estimating. The most common are: Click on Start | Programs | Prosoft | Estimating Double-click on Eclare’s icon computer’s desktop. , if you have it defined on your Upon activation, the Eclare Estimating registration information screen displays, followed automatically by the login procedure. To log in, you must: Select the company you wish to work with, if the system contains data for more than one company. Provide a valid User ID and Password for an active user account. (For more information, refer to the Company Login section in the Using Eclare chapter, and the Security section in the General Concepts chapter.) Eclare Version 2016 Page 43 Users Manual Exploring Eclare Once you have gained access to the system, Eclare’s main menu screen displays: Eclare Version 2016 Page 44 Users Manual Exploring Eclare Selecting a Menu Option All of Eclare’s menu options are available in the Menu Bar. You may also define and activate the most frequently used menu options in Eclare’s Toolbar. From the Menu bar To activate the menu, click on any of the Menu Bar’s options. A cascading menu displays: Once you have activated the menu, move the mouse over the menu options until you find the one you wish to select. If you point to a menu option that is followed by , another cascading menu displays. If you prefer, you may also use the arrow keys (↑, ↓, →, ←) to move among the menu options. Once you find the desired menu option, click on it to activate it. The screen you see next varies according to the menu option selected. Eclare’s screens are windows that display a group of related fields and functions. Eclare Version 2016 Page 45 Users Manual Exploring Eclare From the Toolbar Although not all menu options may be available through the toolbar, you may customize it to include the menu options you use more frequently. To activate a menu option from the toolbar, simply click on the button that corresponds to the desired menu option. You do not need to navigate through the menu bar to find the option. Closing a Menu Option There are several ways to close and exit a menu option. Some of these are: Click the button Click the button Click the button Click the Close button on the option’s title bar Press the keyboard’s [Esc] key Upon exiting the menu option, Eclare may ask whether or not you wish to save the changes: Eclare Version 2016 If you have made changes that you would like to save, click . Eclare automatically saves the changes and returns to the main menu screen. Page 46 Users Manual Exploring Eclare If you have not made changes or do not wish to keep the changes you have made, click . Eclare returns to the main menu screen without saving the changes. If you wish to cancel your request to exit the menu option, click . Eclare returns to the same screen you were working in, where you may resume your work. Exiting Eclare There are several ways to exit Eclare Estimating. Some of these are: Click File | Exit in the Menu Bar Click the button on the Toolbar Click the Close button on the window’s title bar Upon exiting the system, Eclare will ask whether or not you wish to back up the company data. (For more information, refer to the Exit section in the Using Eclare chapter.) Note: If do not exit Eclare properly, a message will display the next time you activate the system. To avoid possible data corruption, always follow the exiting procedure described above and make frequent backups. Eclare Version 2016 Page 47 Users Manual Exploring Eclare Interface Eclare Screens Eclare screens follow Windows standard graphical user interface: Note: Before you start working with Eclare, familiarize yourself with Windows basic features. Among other functions, you must know how to use the keyboard and mouse, how to open, close, move and resize windows. (For more information, refer to your Windows system documentation.) Eclare Version 2016 Page 48 Users Manual Exploring Eclare Elements Eclare consistently uses the following Windows standard elements to display information and provide you a way to input data. These elements vary within each menu option according to the option’s purpose. Sample Function Tabs. Identify the order of the information presented in a section of the screen. To use, click on the tab that displays the information in the order you wish to see. The system automatically activates the selected section. Although the order varies, the data is the same. Columns. Display database information for view only purposes. Each row corresponds to a complete record, each column to a specific data field within that record. The column label identifies its content. You can increase or decrease the column width so you can see more or less information, as needed. To use, move the mouse until the pointer is on the gray row that contains the column labels. Place it over the line on the right-hand side of the column you wish to adjust. The pointer now display as . To increase the size of the column, drag the mouse to the right. To decrease the size of the column, drag the mouse to the left. Column Area Menu. Display function menu for corresponding table. To activate, right-click on any column on a table display. The menu provides another way to perform the table’s main functions, and access to the table’s column customization screen. (For more information, refer to the To Customize a Table’s Columns topic in this section.) Data fields. Accept data entry, whether to be stored in the database or used during processing. Eclare Version 2016 Page 49 Users Manual Exploring Eclare Sample Function Data fields may also display information stored in the database. The field label identifies its content. Data fields usually correspond to a column. To use, click on the desired data field. Type or correct the information. If the data field is part of a record, you must save the record in order to register the changes in the database. Drop-down menu. Contains a list of pre-defined values and displays as default the value that is most commonly assigned. To use, click on the arrow to activate the dropdown menu, find the desired value and click on it to select it. To close the drop-down menu without changing the original value, press the [Esc] key. Check box. Allows you to select or deselect a specific program option. To use, click on the check box. If a check mark displays, the program option is selected or active. If no check mark displays, the program option is deselected or inactive. Radio buttons. Allows you to select only one of the program options in the group. To use, click on the desired radio button. If a dot mark displays, the program option is selected or active. If no dot mark displays, the program option is deselected or inactive. When you select or activate one option in the group, all other options deactivate automatically. Push buttons. Activate a specific function within a menu option. Push buttons allow you to control the next operation the system will perform from within the available program options. The button label identifies its function. To use, click on the push button for the function you wish to perform. The system proceeds accordingly. Smart Lookup button. Activates a lookup Eclare Version 2016 Page 50 Users Manual Exploring Eclare Sample Function window for the associated data field, and automatically displays the existing lookup values. To use, type a few characters of the desired value in the associated data field and press the [Tab] key or click on the smart lookup button. The system activates the corresponding lookup window, and displays the existing values in the order that corresponds to the data entered in the field, based on the number of characters entered. Utility buttons. Activate a selection dialog box or utility feature. The graphical representation on the button identifies its function. To use, click on the desired button. The system activates the corresponding window. Data Display Eclare consistently uses a table approach to display database information: Eclare Version 2016 Page 51 Users Manual Exploring Eclare Eclare’s database is composed of many interrelated tables that store estimating information. Each table or file groups information of a specific kind (e.g. cost codes, items, vendors, jobs.) When you select a menu option, Eclare opens a window and automatically displays all the information stored in the database for the corresponding table. You can customize each table’s looks and content. Each row or record groups specific data related to one case (e.g. one cost code, one item, one vendor, one job). Each column or field displays the specific data available for the record (e.g. ID number, description, telephone number, price, etc.) You can select which columns to show or hide per table, and adjust individual column’s width. (For more information, refer to the To Customize a Table’s Columns topic in this section.) The records display in the order indicated by the active tab’s label (e.g. Cost Code). The tabs correspond to specific data fields available within the record. The selected record or active record is highlighted. You can use the scroll bar to browse the records. When the window displays a large number of records, you can use the search field to easily locate the record you wish to see. The push buttons allow you to perform different functions on the selected record. Only functions that apply to the specific record are available. To sort the display The order in which you can sort the records is predefined for each table based on the available fields. To select the order, click on the tab that corresponds to the order you wish to see. For example, if the Cost Code tab is active, the records appear in ascending order by Cost Code, from the lowest to the highest number: Eclare Version 2016 Page 52 Users Manual Exploring Eclare If the Description tab is active, the same records appear in ascending order by Description, from a to z: To browse through a table There are several ways to browse through the records: Press the up and down arrow keys to move one record at a time. Press the [Page Down] and [Page Up] keys to move one screen at a time. Click on the scroll bar’s and buttons to move one record at a time. Drag the box inside the scroll bar to the desire location, or click inside the scroll bar. The length of the bar represents the total number of records in the table. For example, to go to the middle of the file, drag the in the middle of the scroll bar. To go to the end of the file, drag the to the end of the bottom of the scroll bar. Note: Before you use the keyboard to browse through a table, you must click on one of the rows to activate the table. To quickly locate a record Use the search field at the bottom of the screen to quickly locate a record when the window displays a large number of records. The search field changes according to the selected tab. To search for a record: 1. Click on the search field. 2. Type the first few characters of the record you wish to locate. 3. Press the [Tab] key. Eclare Version 2016 Page 53 Users Manual Exploring Eclare Eclare will locate the first record that contains the characters you specify. The result depends on the characters you type and the content of the records stored in the table. If a match is found, the first matching record is highlighted. For example, if you are searching by Description and you type “elec”, the result may be: If no match is found, the record that would follow the match is highlighted. For example, if you are searching by Description and you type “dw”, the result may be: To Customize a Table’s Columns You can customize each table’s grid and determine which columns to show or hide. These settings persist across sessions on the workstation and for the Company made. To customize the list display, right-click on any of the column’s headings. The Column Area menu displays: Eclare Version 2016 Page 54 Users Manual Exploring Eclare Select the Select Columns to Show option. The Select List Columns screen displays data specific to the table in use: To customize the table’s grid looks, indicate whether or not you wish to Show Vertical Lines and/or Show Horizontal Lines: Eclare Version 2016 Page 55 Users Manual Exploring Eclare To customize the table’s column display, use the button to specifically mark which columns not to show. Use the button as a show/hide toggle, or double-click on the line that contains the column you wish to show or hide: Some columns may be FIXED and cannot be hidden. At least one column must be shown. When hiding columns on lists that have multiple search tabs (e.g. ), hiding columns may result in one or more of the tabs not showing any columns at all. (For information on setting column width, refer to the Elements topic, Columns element, in this chapter.) Use the button to reset all of a Company’s browse lists’ tables back to original defaults: all columns show, both vertical and horizontal lines show, and all columns return to their default size. Note: Once you confirm, all previous customizations for the currently active Company will be lost. This operation cannot be undone. Eclare Version 2016 Page 56 Users Manual Exploring Eclare Functions and Modes Eclare allows you to perform different functions, according to the purpose of the menu option. The following functions are the basic operating modes common to all database maintenance menu options: Mode Purpose Insert. Add a new record to the database. This mode activates an entry screen, normally labeled “will be added”. To insert, click the button, press the [Insert] key, or use the column area’s menu. Change. Change information currently stored in the database. This mode activates an entry screen, normally labeled “will be changed”. Delete. Remove a record from the database or mark it for deletion. This mode activates a confirmation screen. This function may not be undone. To delete, click the button or press the [Delete] key. Eclare uses the Delete Authority as a safety feature. Note: If a record is not physically removed from the database due to existing relations, it is marked “deleted” and displays in red. Eclare displays a warning message if you assign these values to other records. You may undo this operation simply deactivating the Deleted field through the change feature. If the option supports the Show Deleted checkbox, you must activate it in order to view marked records: Eclare Version 2016 Page 57 Users Manual Exploring Eclare Functions that are menu option specific are described within the corresponding option. The following are standard functions common to most menu options: Function Purpose Close. Close a screen or menu option. This function returns control to Eclare’s main menu. Cancel. Cancel a function or process. This function stops the current process. Done. Close a screen or menu option. This function tells the system you have concluded your activities and are ready to exit the menu option. Yes. Responds affirmatively to a system’s inquiry. This function tells the system that you wish to proceed. No. Responds negatively to a system’s inquiry. This function tells the system that you do not wish to proceed. OK. Responds affirmatively to a system’s message. This function tells the system that you have read, understood and agreed to the action taken. Dialog Boxes A dialog box allows you to respond to Eclare, providing information the system needs to perform an operation. You may select program options and functions, provide information the system needs to perform a calculation, or simply enter information to store in the database. Eclare Version 2016 Page 58 Users Manual Exploring Eclare Standard Windows Dialog Box Eclare Dialog Box The elements and features available in a dialog box vary according to the purpose of the menu option. To indicate you have finished working in the dialog box, click on the push button for the function you wish to perform. Note: The and functions close the dialog box without completing the operation. Any information you have selected or typed will be lost. Eclare Version 2016 Page 59 Users Manual Exploring Eclare Messages Eclare automatically verifies that the data you enter or the function you try to perform is valid. It uses warnings and messages to inform you of errors and potential problems. Although the text of the message varies according to the menu option or data field, you will encounter the following basic categories: Sample Function Warning. Informs you of a situation or potential problem that does not hold back processing. No Selection. Indicates that the selected function cannot be performed because no job has been designated as the current job. Required Field. Indicates that the record cannot be stored in the database because no information has been provided for a required field. Invalid. Indicates that the information provided does not conform to the field’s criteria or expected characteristics. Eclare Version 2016 Page 60 Users Manual Exploring Eclare Sample Function Duplicate. Indicates that the record cannot be stored in the database because another record already exists for the specified key. Save Record. Indicates that an unsaved change has been detected upon exiting the menu option. Gives you the opportunity to save or discard the change before proceeding, or to cancel the exit request. Confirm Delete. Gives you the opportunity to reconsider your request to delete a record. Once you confirm, you cannot undo the deletion. Confirmation. Gives you the opportunity to reconsider your request to perform a specific function. Once you confirm, you cannot undo the operation. Nothing to Do. Indicates that the selected operation cannot be performed because there is no data to process. Eclare Version 2016 Page 61 Users Manual Exploring Eclare Sample Function Operation Complete. Indicates that the requested operation was successfully completed. Progress Bar Eclare uses different kinds of progress indicators to keep you posted on the progress of an automatic activity: The length of the progress bar represents the activity’s expected completion time. The example above shows that almost a third of the activity has been completed. Eclare Version 2016 Page 62 Users Manual Exploring Eclare Selecting data from a list Eclare allows you to select data from a pre-defined list of values. The selection list feature is available throughout the system, and varies according to menu option. Selected items display an X in the left-most column. There are several ways to work with the items. To work with one item: Find the desired item, click on the line to select it and click or . Find the desired item, click on the line to select it and press the space bar key. Find the desired item and double-click on the line. To work with all items: Click or . To quickly find an item from within a long list of items: 1. Click on the tab that corresponds to the order in which you wish to see the items. 2. Click on the search data field. 3. Type some characters that uniquely identify the item you are looking for. The system automatically moves to the next-like or matching item. Eclare Version 2016 Page 63 Users Manual Exploring Eclare Selecting values for a field Eclare allows you to select values directly from the field’s table, which contains all valid entries for the field. When this feature is available, a next to the field label. button displays The format of the selection table varies depending on the field. The maintenance functions are active while the table displays. For example: If you click for the Job Number field, the Jobs Maintenance table displays a list of all the jobs currently defined in the system. There are two ways to select the job: Find the desired job, click on it to select it, and click Find the desired job and double-click on it. . The selected value displays in the field. Eclare Version 2016 Page 64 Users Manual Exploring Eclare Finding and Saving Files Eclare uses Windows standard dialog boxes to simplify location, selection and saving of files. When this feature is available, a button displays. The format of the dialog box varies depending on the menu option. To SELECT a file or location using the Windows 95 format: 1. Click . The selection dialog box displays. The window’s title varies, and identifies the menu option you are working with. 2. If the file or location is in a drive other than your computer, click . 3. Select the desired drive in the Drives field. 4. Select the desired directory location in the Folders section. Click on a folder to select it. Double-click on a folder to open it, and to see or select its subdirectories. The selected folder displays under the Folders label. 5. To select a file, locate the file in the File Name list. Click on the file to select it or type the name in the File Name field. 6. Click Eclare Version 2016 to accept the selection or to exit. Page 65 Users Manual Exploring Eclare To OPEN a file using the Windows 98 format: 1. Click . The selection dialog box displays. The window’s title varies, and identifies the menu option you are working with. 2. Select the desired location. Click on a folder to select it. Double-click on a folder to open it and see or select its subdirectories. You can also use the button or the Save in drop-down menu. The selected folder displays in the File name text box. 3. To select a file, locate the file within the selected directory. Click on the file to select it. The file name displays in the File name text box. 4. Click Eclare Version 2016 to continue or to exit. Page 66 Users Manual Exploring Eclare To SAVE a file using the Windows 98 format: 1. Click . The selection dialog box displays. 2. Select the desired location. Click on a folder to select it. Double-click on a folder to open it and see or select its subdirectories. You can also use the button or the Save in drop-down menu. The selected folder displays in the File name text box. 3. To save a new file, type the filename on the File name box. To replace an existing file, locate the file within the selected directory and click on it to select it. The file name displays in the File name text box. 4. Click Eclare Version 2016 to save the file or to exit. Page 67 Users Manual Exploring Eclare To BROWSE for a folder using Prosoft’s Alternate File dialog format: 1. Click . The Browse for Folder dialog box displays: 2. Select the desired location. Click on its subfolders, or click on the Folder text box. to expand a folder and see or select to collapse it. The selected folder displays in 3. To make a new folder, first locate the folder you wish to contain it. Click . The New Name dialog displays: Type the name of the new folder in the New Folder Name field. It must be unique within the containing folder. Click to continue or to exit. 4. Once you have located or created the folder you need, click continue. Eclare Version 2016 to Page 68 Users Manual Exploring Eclare To SELECT a file using Prosoft’s Alternate File dialog format: 1. Click . The Choose Filename dialog box displays. The window’s title varies depending on the option you are working with: 2. Select the desired drive in the Drive field. 3. Select the desired folder location in the folder list section. Click on a folder to select it. Double-click on a folder to open it, and to see or select its subdirectories or files. To move up the folder structure, click on the top most row <Dir>… 4. To sort the list in ascending or descending order, click on the Name column label: or . 5. To view all files or a specific file type, select the desired type in the corresponding drop-down. 6. To select a file, locate the file in the File Name list. Click on the file to select it. You can also locate a file or create a new file by typing the name in the File name field. 7. Click to accept the selection or to exit. Screen Management Eclare supports Windows standard system options for managing windows, screens and icons. These system options appear under the Window menu option in the Menu bar and are available only when more than one window or screen is opened at one time. Eclare Version 2016 Page 69 Users Manual Exploring Eclare The active window is identified by a highlighted window title. Only one window can be active at one time. You must activate a window before working with its fields or functions. To change the active window There are several ways to change the active window: Click on any part of the window you wish to activate. Select Windows on the Menu bar, and click on the desired window on the bottom part of the menu. The active window displays a check mark. To change the size of the active window You may change the size of the active window to increase or reduce its size and the amount of information you can see. This feature is helpful when the active window contains a list. To change the size of a window: Position the pointer on the window’s border or any of its side corners, and drag the border or corner to the desired size. To organize the opened windows There are several ways to organize the opened windows: Click on a window title and drag the window to the desired location on the screen. Repeat this process for each window you wish to organize. Select Windows on the Menu bar, and click on the desired menu option on the top part of the menu: Eclare Version 2016 Page 70 Users Manual Exploring Eclare Eclare Version 2016 Menu Option Sample Tile Fills the screen with all the opened windows. The resulting layout depends on the number and size of the opened windows. Cascade Layers all the opened windows one on top of another. The active window remains on top. Arrange Icons Lines up and organizes the icons of the minimized windows on the bottom of the screen: Page 71 Users Manual Exploring Eclare Reports Eclare’s reports put the power of its estimating database at your disposal. With just a click, you can easily track your items, jobs, vendors and prices, make summaries, comparisons and projections, prepare purchase orders and customer proposals, among others. Although Eclare is equipped with its own set of predefined reports, you may also define custom reports using Prosoft’s report writer and also a third party’s report generator, such as Clarion ReportWriter, available from any Clarion authorized dealer. You can also integrate the custom reports into Eclare’s menu structure for ease of use. (For more information, refer to the Custom Reports and Report Writer Manager sections in the Using Eclare chapter.) Before you Start Before you start working with Eclare’s reports you must: Already have a printer connected to your terminal or network. Properly configure the printer according to your hardware and operating system’s requirements. Select the printer in the Print Setup menu option. Turn the printer on. If you will use a third party’s report generator, you must have purchased, properly installed and registered your copy. If you will use Prosoft’s report writer, you must contact Prosoft, Inc. to activate your license. Running a Report The reporting process normally involves several steps: 1. 2. 3. 4. 5. 6. 7. Selecting a report menu option Entering the report selection criteria Selecting a print function Extracting the selected data from the database Entering further information necessary for processing the data Generating the report based on the selected data Displaying the report on the screen and/or sending it to the printer, fax, PDF, FTP or e-mail Eclare Version 2016 Page 72 Users Manual Exploring Eclare Although the overall reporting process is the same for all reports, the purpose and features of each report differs. Thus, some of these steps may not apply to the selected report. (For more information, refer to the specific report section in the Using Eclare chapter.) Selecting a Report All of Eclare’s predefined reports are available in the Reports menu. To activate the report menu, click on the Report menu option on the Main Menu: To generate a report, find the desired report and click on it to start. Note: Some reports require that you have already selected the current job and will not allow you to proceed otherwise. (For more information, refer to the To Set the Current Job, Job Maintenance section in the Using Eclare chapter.) Eclare Version 2016 Page 73 Users Manual Exploring Eclare Selection Criteria Some of Eclare’s reports automatically include all data available for the selected menu option. When no user selection is available, a print functions screen displays: Other reports allow you to specify which information you wish to include or process in the report. When such flexibility is available, a selection criteria screen displays. The selection options available depend on the purpose and features of the specific report. For example, you may indicate: Eclare Version 2016 Page 74 Users Manual Exploring Eclare Only the information that matches the criteria you specify will be included in the report. However, if you do not enter criteria for a field, the field is not used in determining matching records. For example: If you select Vendor ACME, only records defined for that vendor are processed and printed. If you do not enter vendor criteria, all vendor records are included. If, in addition to vendor, you select a range of Purchase Orders from 100 to 120, only purchase orders for vendor ACME that fall within the 100-200 range are processed and printed. If you enter vendor criteria but no purchase order criteria, all purchase orders are included for the selected vendors. If you activate the Add Tax to Vendor Total, the report automatically calculates sales tax and includes it in the purchase order. If you activate Include PO Notes the report automatically prints the purchase order text that has been predefined in the system. If you select Models Only, all jobs that are not marked models are excluded. If you select by Job Number, the detail lines are organized in number order, from the lowest job number to the highest (ascending order.) If you select by Job Name, the very same lines result, but are organized in alphabetical order by job name. You may specify as much selection criteria as necessary to further narrow down the information that prints in the report. It is possible that the criteria you select result in no matching record being found. If you wish to include all records, do not enter selection criteria in the selection data fields (e.g. From, To, Vendor Number, etc.) Eclare Version 2016 Page 75 Users Manual Exploring Eclare Selecting a Print Function The print functions allow you to control what the report menu option does next. These functions are normally available in the initial selection criteria screen. Once you have specified your criteria or entered additional information necessary to process the data, select one of the print functions: Button Function Generates the report and displays the results on the screen. Use this feature when you wish to review the information before printing it to paper. (For information on how to set preview as your preferred print function, refer to the Terminal Setup section in the Using Eclare chapter.) Generates the report and sends it directly to the printer. Use this feature when you wish to skip the preview step. (For information on how to set print as your preferred print function, refer to the Terminal Setup section in the Using Eclare chapter.) Cancels the report request. Use this feature if you decide not to run the report. The system ignores the selection criteria and automatically closes the report menu option. Proceeds to extract report data based on selection criteria but does not generate the report. This feature is available only in reports that require entry of additional information necessary for processing the selected data. It allows the menu option to continue until such data is provided and the final print function selected. Eclare Version 2016 Page 76 Users Manual Exploring Eclare Extracting Report Data When you specify selection criteria, Eclare must find the data that matches your requirements and prepare it for the report generation step. When this happens, the Extracting Job Data screen displays: This process may take a few seconds or minutes, depending on the amount of data. To continue, wait until the extracting process concludes. If you wish to cancel your report request, click . The system stops the extraction process, ignores the selection criteria and automatically closes the report menu option. If the extraction process does not find any matching information, a message displays. To continue, click necessary changes and try again. Eclare Version 2016 . Check your selection criteria, make any Page 77 Users Manual Exploring Eclare Entering further Information Some of Eclare’s report menu options require that you enter further information necessary for processing after the selected data has been extracted from the database. The program must stop and request the information because, due to its variable nature, it is not stored in the database. For example, in order to perform a square foot projection, you must: 1. Select the information you wish to include 2. Proceed to extract the selected data 3. Provide the job’s projection information before generating the report Once you have entered this information, Eclare has all the data it needs to complete the projection calculations. It takes the selected data, applies the projection values provided, and proceeds to generate the report. Eclare Version 2016 Page 78 Users Manual Exploring Eclare Generating a Report Eclare displays a progress bar to let you know how far away from completion your report request is. This process may take a few seconds or minutes, depending on the amount of data. To continue, wait until the generation process concludes. If you wish to cancel your report request, click . The system stops the generation process, ignores any entered information or criteria, and automatically closes the report menu option. If the generation process results in no data being reported, a message displays. To continue, click changes and try again. Eclare Version 2016 . Check your selection criteria, make any necessary Page 79 Users Manual Exploring Eclare Previewing a Report If you have selected the print option, Eclare displays the generated report on the screen. This feature allows you to review the information before printing it on paper, or to use the information directly from the screen. Preview Screen You may scroll through the information using the mouse scroll button, the up and down arrow keys, or the vertical slide bar. Preview Screen Buttons Button Purpose Zoom In. Increases the size of the display in 25% increments for easier reading. Zoom Out. Decreases the size of the display in 25% increments for a better view of the page. Select Zoom Size. Allows you to directly select the desired magnification percentage. Eclare Version 2016 Page 80 Users Manual Exploring Eclare Button Purpose First Page. Displays the first page of the report. This button is not available when the report has only one page. Previous Page. Displays the page before the current page. This button is not available when displaying the first page. Next Page. Displays the page after the current page. This button is not available when displaying the last page. Last Page. Displays the last page of the report. This button is not available when the report has only one page. Go to Page. Activates a dialog box where you can type the number of the page you wish to display: Type or select the desired page number and click display it. to Current Page. Displays the number of the page that is currently displayed. Print Current Page. Sends the current page directly to the printer. Reverse Print. Results in printing the report in reverse page order (e.g. pages 10-1). Activates the standard Windows print dialog box to allow you to change the printer or its pre-defined configuration. (For more information, refer to the Print Setup section in the Using Eclare chapter.) Print. Results in printing the report in normal page order (e.g. pages 1-10). Activates the standard Windows print dialog box to allow you to change the printer or its pre-defined configuration. (For more information, refer to the Print Setup section in the Using Eclare chapter.) Fax. Sends the report to the Fax Manager. Mail. Activates the E-mail functionality, generates the report and sends it to the E-mail Manager as a PDF attachment. Eclare Version 2016 Page 81 Users Manual Exploring Eclare Button Purpose FTP. Sends the PDF report using FTP (File Transfer Protocol). PDF. Activates the PDF functionality, generates and saves the report as a PDF file. Send. Sends the report for batch processing through several methods at one time (Fax, E-mail, FTP, Print), as defined for the vendor. This feature is available for specific items only. Exit (Cancel Print). Closes the preview window and exits the report menu option without printing the report. Printing a Report If you have selected the print option, Eclare sends the complete report directly to the printer. If you have selected the or print option, just click to send either the current page or the complete report to the printer. If the printer is off-line, a message displays. Check the printer, turn it on or set it on-line if necessary, and click Eclare Version 2016 to continue. Page 82 Users Manual Exploring Eclare Creating a PDF Report If you have selected the option, enter the file’s path and name, and a password if you need additional data protection. Click to proceed. Eclare automatically generates an Adobe PDF file and stores it in the specified location. Note: Upon installation, Eclare sets the PDF path to C:\PROGRAM FILES\ECLARE\PDF (if you installed the application in the default directory). To change it, simply enter a different path along with the PDF file name. Eclare remembers it and uses it as a default until you change it again. We recommend that you save all resulting PDF files to a single, predefined location. Password Protection is supported by the Adobe application and it is stored in the file itself. Thus, you may not be able to open password protected files when using Reader’s versions prior to 6.x. E-mailing a PDF Report If you have selected the option, enter the recipient’s complete e-mail address and other necessary e-mail information, any message to send along with the PDF file, and a password if you need additional data protection. Click to proceed. Eclare automatically generates an Adobe PDF file, an email message with the attached file, and sends the e-mail to the E-mail server. Password protection is supported for the PDF by the Adobe application itself. Eclare Version 2016 Page 83 Users Manual Exploring Eclare Note: You must use complete, valid e-mail addresses, or select it from your address book: Eclare Version 2016 Page 84 Users Manual Exploring Eclare Sending a PDF Report via FTP If you have selected the option, enter the FTP (File Transfer Protocol) and e-mail information, and a password if you need additional data protection. Click to proceed. Eclare automatically generates an Adobe PDF file and sends it through the Internet via FTP. Note: You must enter the FTP Address in its numeric form (e.g. “192.168.1.1”) instead of its symbolic name (e.g. “ftp:www.prosoftinc.com”). You must also enter the FTP Port, which defaults to 21 and in most cases should not be changed. If you do not specify an FTP User Name and FTP Password, Eclare attempts to log into the FTP anonymously. You may also use the PDF Password as additional access protection for your PDF file. Eclare Version 2016 Page 85 Users Manual Exploring Eclare Using a Third Party’s Report Generator In order to create and produce custom reports, you must acquire a Report Generator software from a third party vendor, such as Clarion ReportWriter, available from any Clarion authorized dealer. Contact Prosoft for specific software and compatibility requirements. Please refer to the software’s documentation for installation and usage instructions. To use a custom report: 1. Define the report using your Report Generator software. 2. Test the report to ensure it works properly. 3. If you wish to run the custom report from within Eclare’s menu, define it in the Custom Reports menu option. (For more information, refer to the Custom Reports section in the Using Eclare chapter.) You may pre-define necessary execution parameters and data extraction criteria. 4. Run the report. Provide any necessary parameters and data criteria. 5. Follow your Report Generator’s instructions to view or print the report’s output. Using Prosoft’s Report Writer Prosoft’s report writer is included as part of Eclare. Future releases will include report samples to activate the feature and to assist advanced users get a head start in customizing their own reports. For more information regarding Prosoft’s report generator, contact Prosoft, Inc. Support for the report generator is available on a bill basis. Eclare Version 2016 Page 86 Users Manual Exploring Eclare Utilities Calendar The Calendar is a general utility available throughout the system in screens where entry of date information is required. It allows you to easily select a date from a calendar format instead of typing it. The calendar utility is available for fields that display the calendar icon the date field. next to To Use the Calendar 1. Click for the field you wish to select a date for. The Calendar dialog displays. 2. If you wish to change the day, click on the desired day number on the calendar section to select it. You may also click on Day, use or your mouse’s scroll wheel, or press the keyboard’s [left/right arrow] until the correct day displays. The system automatically adjusts the calendar when you select a day in another month. 3. If you wish to change the month, click on Month, use or your mouse’s scroll wheel, or press the keyboard’s [Shift+left/righ arrow] until the correct month displays. The system automatically adjusts the calendar section to correspond to the selected month. Eclare Version 2016 Page 87 Users Manual Exploring Eclare 4. If you wish to change the year, click on Year, use or your mouse’s scroll wheel, or press the keyboard’s [Control+left/right arrow] until the correct year displays. The system automatically adjusts the calendar section to correspond to the selected year. 5. If you wish to quickly reset the calendar to your computer’s current date, click . 6. Double-click on the calendar’s desired date or click to accept the new date, or click to exit the calendar without changing the original date. Calculator Eclare integrates access to Window’s standard desktop Calculator to assist you when performing mathematical calculations. Although you can access the Calculator through the Programs system option in the Start Windows menu, it is also available from within Eclare’s menu structure. To select this menu option, click File | Utilities | Calculator. (For more information, refer to the Calculator section in the Using Eclare chapter.) Eclare Version 2016 Page 88 Users Manual Exploring Eclare Digiwin Eclare integrates access to Prosoft’s Measurement or Construction Takeoff System to simplify your data entry load by enabling you to read takeoff information from a digitizer. Digiwin is a menu optional software program not included with Eclare. For more information, please contact a Prosoft representative. Roof Calculator Eclare provides you with a simple to use tool to assist you in performing roof calculations for development of non-manufactured roofs. (For more information, refer to the Roof Calculator section in the Using Eclare chapter.) Eclare Version 2016 Page 89 Users Manual Exploring Eclare Other Tools Text Editor Prosoft’s Text Editor is a generic word processing utility that allows you to create and maintain text (.tx) documents within the application, without having to own a license of Microsoft Word. If you are already familiar with other word processing applications, you will find its features simple and easy to use. The Text Editor utility works exclusively with .tx text files. It is available through the TxText Maintenance and also through the Print Vendor Letters menu options. Eclare Version 2016 Page 90 Users Manual Exploring Eclare Editor Screen and Functions The Text Editor work window allows you to enter and format text, and to access all available functionality through its main menu bar and toolbars: Eclare Version 2016 Page 91 Users Manual Exploring Eclare It supports all standard word processing functions and features for file handling, printing and editing, including images and objects, tables and spell checking: Among other features, the Text Editor also allows you to generate PDF documents, include user-entry fields, and also client information from your PSClient database through the use of tokens in a manner similar to MSWord’s mail merge. Note: Text Editor’s features that are directly relevant to Eclare are explained in the corresponding Text Document related options in the Using Eclare chapter. However, it is outside the scope of this manual to instruct you on how to use standard word processing features. For information on how to contact a dealer for custom setup support, contact Prosoft Inc. Eclare Version 2016 Page 92 Users Manual Exploring Eclare Online Help Eclare’s online help information displays in a Windows standard tri-pane screen. It allows you to easily find and access the information you need through a Table of Contents, Index, or content text search. The tri-pane arrangement simultaneously displays the topics and the selected help page, making it easier for you to browse through the online information. To activate Eclare’s Online Help You can activate the Online Help in several ways: Select Help | Contents or Help | Search for Help On to activate Eclare’s Online Help system and display the Welcome help page. Select Help | How to Use Help to activate Windows’ standard “How to Use Help” online assistance. (For more information, refer to your Windows system documentation.) Press the [F1] key to display the help page for the active screen. Eclare Version 2016 Page 93 Users Manual Exploring Eclare Online Help’s Toolbar The Online Help’s toolbar is located in the Navigational Pane and contains the following buttons: Menu Option Hide Options Available Purpose Back Forward Print Options Displays the previous help topic by navigating backwards through the sequence of topics you have already seen. Displays the next help topic by navigating forward through the sequence of topics you have already seen. Allows you to print help topics. You may select to print either the current help page or all pages under a heading. Hides/Shows the Tabs pane. Moves backward/forward through the sequence of topics you have already seen. Goes to the Home page, if one is defined. Stops a topic or web page from loading. Refreshes the information displayed in the help window. Eclare Version 2016 Hides the Tabs pane so that only the help topic displays. Redisplays the Tabs pane so that the Content, Index and Search tabs display. Page 94 Users Manual Exploring Eclare Menu Option Options Available Purpose Access Windows’ Internet Options dialog. Allows you to print help pages. Highlights, or not, all occurrences of the search words (entered in the Search tab) that are found in the help page. Navigation Bar The Online Help’s navigational buttons are located in the Navigational Pane and contain the following buttons: Button Purpose Displays the previous help topic by navigating sequentially through all the topics in a book, whether you have already seen them or not. Displays the next help topic by navigating sequentially through all the topics in a book, whether you have already seen them or not. Allows you to select a book within the help system’s browse topics. The book you select automatically activates its predefined browse sequence for the help topics it contains. You can also activate a book from the Table of Content. Allows you to move backward or forward sequentially through all the topics in the selected book. Displays the topics in the selected book in their predefined browse sequence. It automatically highlights the help topic you are currently seeing in the topics pane. You may change the topic you see by clicking on another icon in the bar. Eclare Version 2016 Page 95 Users Manual Exploring Eclare Tabs Pane The Online Help’s tabs pane displays the Table of Contents, Index and Search information, activated by the following tabs: Tab Purpose Display the table of content, a list of topics organized in logical groups called “books”. To select a subject and display its information in the Topic Pane: 1. Find the book. 2. Double-click to open the book. 3. Repeat the process until you find the topic you wish to read. 4. Click on the topic to display it. Display the topics that begin with the characters you type on the top field. To select a subject and display its information in the Topic Pane: 1. Type some characters of the topic’s title in the top field. 2. When the topic you wish to read displays, double-click on it to display it. Eclare Version 2016 Page 96 Users Manual Exploring Eclare Tab Purpose Display the dialog box for the Find feature to help you locate a specific text within the content of a help screen. Since this feature searches the content of the topic and not only its title, it is more encompassing than the Index. To select a subject and display its information in the Topic Pane: 1. Type some characters of the content word you wish to locate. 2. When the topics that contain the keyword display on the bottom section, find the one you wish to see and doubleclick on it to display it. Note: This process takes a few minutes for setting up the first time you use it. Eclare Version 2016 Page 97 Users Manual Exploring Eclare About The About help menu option displays Eclare’s version information and your registration information. Use this option to obtain system information before contacting Prosoft, Inc. for support. To select the menu option from the Main Menu, click Help | About. To exit the information screen, click . If you wish to see Eclare’s data path along with other licensing and additional application information, click Eclare Version 2016 : Page 98 Users Manual Exploring Eclare Check for Updates The Check for Updates menu option allows you to automatically check and download Eclare’s updates. Use this option to connect and perform a “live update” directly from Prosoft. Eclare Version 2016 Page 99 Users Manual Exploring Eclare Prosoft File Exchange The Prosoft File Exchange menu option is an expanded version of the Check for Updates automatic procedure. This option allows you to access Prosoft’s server to send data for troubleshooting purposes or to automatically retrieve documentation updates or any other available files. Note: You must have a valid registration number in order to use this menu option. To download files from Prosoft’s server, simply locate in the list of available files the ones you wish to download and mark them as selected. To upload files, click , locate the desired file in your computer’s file structure to add them to the list, and mark them as selected. Click to perform the operation, and once the operation concludes. Eclare Version 2016 Page 100 Users Manual Installing Eclare INSTALLING ECLARE Eclare’s installation is an automated process using the Windows standard installation Wizard. However, you must acquire a licensed copy of Eclare Estimating before you install it in your computer system. What You Will Learn Before you install the application, take a few minutes to look at the subjects in this chapter and read over the installation sections that apply to you. In this chapter, you will learn: Points to consider and initial decisions to make before you get started Eclare’s hardware and software requirements How to install the application in a standalone or network environment How to properly perform the initial system configuration Installing the Application Before you begin using Eclare Estimating, you must acquire a licensed copy of the software and install the application in your computer system. Eclare may be installed in your hard disk as a single-user standalone system, or in your server as a multi-user system in a network environment. You may also reinstall Eclare’s demo data at any time. Making Decisions Before you begin installation of your system, you must have made the following decisions. Does my computer system meet Eclare’s hardware requirements? Will I be using Eclare as a standalone single-user software, or in a network environment? Do I desire to have Eclare’s Play/Base Company’s data structure available to assist me in understanding the system and possibly in setting up my own data structure? For assistance, please contact Prosoft, Inc. Eclare Version 2016 Page 101 Users Manual Installing Eclare Hardware and Software Requirements Your computer system must meet the following hardware and software requirements: Pentium processor 200 MHz 128 K RAM minimum (suggested 256 K) 1 Gig available on hard disk drive Windows 98, 2000 or NT Operating System To install Eclare as a standalone application Note: Prosoft’s applications will update your computer’s Windows Registry. If you decide to uninstall the program, Registry changes will be restored to their original status. (For information regarding these changes, refer to Appendix C – Registry Values and TPS Files.) 1. Insert Eclare’s CD in your CD-Rom Drive. Note: You may also obtain Eclare’s installation CD files directly from Prosoft’s server (for more information, refer to Download All CD Files section in Using Eclare chapter). 2. If the installation does not begin automatically, use Windows Explorer or any other applicable Window’s function to display the contents of your CD-Rom Drive. The listed files vary according to the version you are installing. 3. To manually begin the installation, double-click on the general loader program PSInstall.EXE: You must click before proceeding. This function gives you important information you will need before installing the program. Eclare Version 2016 Page 102 Users Manual Installing Eclare 4. Read the Important Decisions information and make any necessary preparations. 5. Click : Note: If Windows Registry needs to be updated, or if Microsoft Security Essentials is detected in your computer (and it is not set to exclude TPS files), a corresponding message displays before the Welcome screen displays. (For more information, refer to Appendix C – Registry Values and TPS Files.) 6. Click . 7. Read the Readme information and click Eclare Version 2016 : Page 103 Users Manual Installing Eclare 8. Read the licensing agreement. Click on the I accept radio button to activate it, and click : 9. Select the directory where you wish to install Eclare. If this is the first time you install the program, the system automatically displays the Program Files directory in your C: Drive. This is the standard location where Windows installs all new programs. To change it, click and select the desired location. (For more information on how to browse, refer to the Finding and Saving Files section in the Exploring Eclare chapter.) Eclare Version 2016 Page 104 Users Manual Installing Eclare To continue, click . 10. Select the options you wish to create, and click 11. To continue with the installation, click to continue. . You may also click to return to any of the previous installation steps if you wish to change any of the installation parameters you have provided, or click to exit the process without performing any change to your system. Eclare Version 2016 Page 105 Users Manual Installing Eclare 12. The installation process will take a few seconds. A progress bar displays while it is taking place. Wait until the process completes. 13. This completes the installation process. Click Installation Wizard and return to Windows. Eclare Version 2016 to exit the Page 106 Users Manual Installing Eclare To install Eclare in a network environment 1. Do not install the application on each workstation. 2. Install the application only once on the network server. For a detailed list of steps, refer to the To Install Eclare as a standalone application section in this chapter. 3. Create shortcuts to the server on each workstation. To reinstall data from your installation CD If for any reason you need to reinstall the application or the demo data, you may do so at any time. To reinstall the data, simply select Demonstration Data in the Custom Setup installation screen. This process will not overwrite any company databases you have created. Eclare Version 2016 Page 107 Users Manual Installing Eclare Configuring the System Once you have successfully installed the application, you must activate and configure the system before you begin setting up the data files. If you were using a previous version of PSClient, you must process all pending exchange information before converting the data files to avoid losing jobs and payment information that had been exchanged but not yet retrieved. To properly configure the system, you must perform the following steps: 1. Enter your Registration Information 2. Configure Eclare for your Company Making Initial Decisions Before you begin configuring your system, you must have made the following decisions. Which users will have access to the system, and what will their access privileges be? Which printer will Eclare use, if more than one is available? Which menu options will be used most frequently? How will I handle data backups? Will reports normally preview on the screen or go directly to the printer? For assistance, please contact Prosoft, Inc. Entering your Registration Information The first step in configuring the system is entering your Registration Information from the sheet provided to you when you purchased your copy of Eclare Estimating. This information defines you as an authorized user with the legal right to use the software, grants you access to the system and activates the menu options so that you can work. If you don’t have a licensed copy of the software, contact Prosoft, Inc. If you install Eclare in more than one location, you must acquire a separate license for each and register each license accordingly. To proceed: 1. Click on Start | Programs | Prosoft | Estimating to activate the application. (For more information, refer to the Activating Eclare section Eclare Version 2016 Page 108 Users Manual Installing Eclare in the Exploring Eclare chapter.) You must log in as Supervisor through the configuration and setting up process. 2. Select File | Registration Code and enter your registration information. (For more information, refer to the Registration Code section in the Using Eclare chapter.) Configuring Eclare for Company The second step in configuring the system is defining your company and authorized users, and configuring the system for your company. To proceed: 1. Select File | Supervisor | Program Setup and enter the information that applies to the legal entity to which the software is licensed. (For more information, refer to the Program Setup section in the Using Eclare chapter.) 2. Select File | User Maintenance and define the authorized users as of this moment. You may add, modify or delete users at any time. (For more information, refer to the User Maintenance section in the Using Eclare chapter.) 3. Select File | Print Setup and select the printer you will be using to print Eclare’s reports. (For more information, refer to the Print Setup section in the Using Eclare chapter.) 4. Select File | Define Toolbar and define the most frequently used menu options. Although you may define or modify the toolbar at any time, we suggest you define it at this time to help new users get up and going. If you are using Eclare in a network environment, you must activate the system and perform the next step on each terminal: 5. Select File | Terminal Setup and define the characteristics you wish the terminal to display as of this moment. Each terminal’s user may change these characteristics at any time. (For more information, refer to the Terminal Setup section in the Using Eclare chapter.) Once you have determined how you plan to use Eclare and start setting up your data file, you will return to some of these menu options to conclude your company’s configuration. (For more information, refer to the Building the Database chapter.) Eclare Version 2016 Page 109 Users Manual Building the Database BUILDING THE DATABASE Building your database is the most important aspect of using Eclare. The structure you select determines how the elements in the application interrelate in order to produce the estimating output you desire. Once you have properly built the database according to your requirements, you can put Eclare’s power and flexibility to work for you! Although it is not within the scope of this manual to instruct you on how to select, organize and integrate the data structure to suit your individual business approach, we suggest you thoroughly go through Eclare’s Tutorial at this time. Eclare’s tutorial will guide you through the basic building block components in a hands-on series of lessons. It will help you understand the building blocks’ relationship and how to properly set them up to meet your estimating requirements. For a complete evaluation and needs analysis, contact Prosoft Inc. What You Will Learn This chapter summarizes the steps needed to set up your data files once you have successfully configured Eclare for your company and decided on the data structure that best suits your company’s needs. In this chapter, you will learn: Eclare Version 2016 Where you may get assistance for determining the data structure that suits your business approach Points to consider and decisions to make when determining how to structure your database Different ways in which you may build up your data structure How to manually build your database How to build your database using spreadsheets Page 110 Users Manual Building the Database Steps for Building the Database To properly set up the database, you must perform the following steps: 1. 2. 3. 4. 5. Decide on the data structure that best suits your company’s needs Gather item and pricing information from your vendors Determine your purchase orders’ output expectations Determine the structure of your model’s templates Create the data structure, whether manually or through spreadsheets Making Decisions The most important decision you must make is the selection and organization of your data structure. You must carefully consider all possibilities and their impact on your work before you begin setting up your database. The approach you select must: Minimize changes to the Cost Codes structure Minimize the number of job templates used in Estimating Suit your individual business approach To assist you in familiarizing yourself with the data structure, Eclare includes a: Tutorial to help you understand the Eclare’s relationships and how to properly set them up to meet your estimating requirements. (For information, refer to the Eclare Tutorial document.) Fully functional estimating database called Play/Base Company that you can install along with the application. (For information, refer to the Installing Eclare chapter.) This database already contains a cost code structure that follows the CSI numbering scheme, a master file of all items and assemblies normally required in a building project, and a sample estimating job and takeoffs. Familiarize yourself with its general layout and print several of the job reports, like the Takeoff Report and Materials List, etc. Before you begin setting up your database, you must have made the following decisions. Eclare Version 2016 Will you create a completely new data structure? Will you use all or part of Eclare’s pre-defined structure or ideas? Will you use spreadsheets along with the Import/Export features to expedite the database setup process? If you do, will you define and import assemblies at this time? Page 111 Users Manual Building the Database Will you import job quantities from CAD or a Digitizer? Will you use the Exchange interface? How will you structure alternate items? How will you organize your job templates? Will you follow the “base house with options” approach? Will you produce purchase orders? For assistance, please contact Prosoft, Inc. Creating the Data Structure If you have decided to create a completely new data structure, you must first carefully determine its layout and ensure that it meets your business requirements from the estimating and accounting point of view. If you have decided to use Eclare’s Play/Base Company as a base, you must review it in detail and refine it to ensure that it covers every aspect of your business needs. Either way, we recommend you lay your structure out on paper before you perform the following steps. Such planning will reduce the need for renumbering the Master file and help you avoid mistakes. To set up the Maintenance Tables 1. Select File | Supervisor | Company Maintenance and create a new company database. (For more information, refer to the Company Maintenance section in the Using Eclare chapter.) If creating a completely new database, use the Do Not Copy Anything option. This program option prepares empty database files into which you will enter the data required to set up your selected data structure. If using Eclare’s pre-defined data structure, use the Copy Structure Only option. This program option automatically prepares a duplicate copy of the cost code and master file structures, without duplicating the jobs and vendor related cost information. 2. Select Maintenance | Setup Maintenance | Cost Codes and create or modify your cost code structure. This structure determines how your costs are grouped and summarized for proposals and job cost accounting purposes. (For more information, refer to the Cost Codes section in the Using Eclare chapter.) Eclare Version 2016 Page 112 Users Manual Building the Database 3. Select Maintenance | Setup Maintenance | Divisions and create or modify your Divisions. This structure determines the numbering system you wish to use within your Item Master file, whether CSI, AIA or local. (For more information, refer to the Divisions section in the Using Eclare chapter.) 4. Select Maintenance | Setup Maintenance | Category and create or modify your main categories of items (e.g. labor, subcontract, etc.). This structure identifies and groups the items in the Master File. (For more information, refer to the Category section in the Using Eclare chapter.) 5. Select Maintenance | Setup Maintenance | PO Pack and create or modify your groups or families of purchase orders (e.g. site preparation, foundation, etc.). This structure results in takeoff items being included in the correct purchase order according to when the item is used. (For more information, refer to the PO Pack section in the Using Eclare chapter.) 6. If you wish to create or modify your categories or groups of items that have similar quantity characteristics (e.g. Sq. Ft. Living Area, Sq. Ft. under Roof, etc.) at this time, select Maintenance | Setup Maintenance | Check List. This structure allows you to automatically update the takeoff quantity of all items assigned to the group. (For more information, refer to the Check List section in the Using Eclare chapter.) Note: We recommend that you build and test your takeoff templates before you create or modify the checklist categories. 7. If you wish to define your company’s takeoff criteria structure (e.g. area, elevation, series) at this time, select File | Supervisor | Program Setup to create your lists. Also select Maintenance | Setup Maintenance | Job Criteria and create or modify each list’s criteria. This structure results in grouping takeoffs for selection and reporting purposes. (For more information, refer to the Program Setup and to the Job Criteria section in the Using Eclare chapter.) 8. If you wish to further refine your takeoff classification structure at this time (e.g. deluxe kitchen, mini kitchen, etc.), select Maintenance | Setup Maintenance | Takeoff Type Codes and create or modify your Takeoff Types. This structure results in identifying takeoff variations for sales analysis purposes. (For more information, refer to the Takeoff Type Codes and to the Job Criteria section in the Using Eclare chapter.) To set up the Vendors and Price related Files 9. Select Maintenance | Vendors and create every supplier and subcontractor that provides either items or services to your business. This structure allows you define your sources of labor and materials and to set the basis for the pricing structure. (For more information, refer to the Vendors section in the Using Eclare chapter.) Eclare Version 2016 Page 113 Users Manual Building the Database You may type all information directly into the Vendors file, or use the Import functions to automatically upload data from pre-defined spreadsheets. (For more information, refer to the Building the Data Structure from Spreadsheets section in this chapter.) 10. Select Maintenance | Setup Maintenance | Master Product Groups and create or modify your major item groupings, or trades, and assign each group a vendor of choice. This structure determines the item’s default vendor and thus the item’s price. (For more information, refer to the Master Product Groups section in the Using Eclare chapter.) 11. If you currently use vendors other than the vendor or choice for certain developments or neighborhoods, select Maintenance | Setup Maintenance | Product Group Exceptions. Create the cases (whether developments, neighborhoods, subdivisions, projects, etc.) that require vendor exceptions. This structure can be used to quickly change the vendor and thus the prices of all items in a job by simply assigning a job to the neighborhood. (For more information, refer to the How Eclare handles Vendors and Prices section in the General Concepts chapter, and to the Product Group Exceptions section in the Using Eclare chapter.) To set up the Item Master File You may type all information directly into the Master File, or use the Import functions to automatically upload data from pre-defined spreadsheets. (For more information, refer to the Building the Data Structure from Spreadsheets section in this chapter.) 12. To type information directly into the Master file, select Maintenance | Master File and define your items or materials. This structure allows you create your items and assemblies, and is the basis for takeoffs, reports, and estimating in general. (For more information, refer to the Master File section in the Using Eclare chapter.) If creating a completely new database: Create every item you will be using in a job, categorizing them as defined in the Maintenance tables. If you have already determined the assemblies, proceed to enter them at this time. (For more information, refer to the To Add a new Assembly, Master File section in the Using Eclare chapter.) Resolve any invalid unit conversions due to assembly creation or vendor assignment at this time. (For more information, refer to the To Fix an Incorrect Unit Conversion section in the Using Eclare chapter.) If using Eclare’s pre-defined data structure: Eclare Version 2016 Page 114 Users Manual Building the Database Make changes to the Master File, reflecting any changes you have made to the Maintenance tables. You may expedite global changes to the Cost Code and Product Group assignments using the TagDelete options, and to the Item Numbers using the Renumber Master Item option. (For more information, refer to the Tag M/F Operations and Renumber Master Items sections in the Using Eclare chapter.) Review the Item Master file in detail and refine it to ensure that every item you will be using in a job is included in the file, assemblies are properly set according to your requirements, and correct unit conversions are assigned. (For more information, refer to the To Add a new Assembly, Master File section and the Unit Conversion section in the Using Eclare chapter.) 13. Select File | Supervisor | Global File Maintenance | Renumber Master Items to automatically renumber the items you have just created in the Master File. This menu option allows you to evenly space your numbering sequence in predefined increments, leaving room for increase. (For more information, refer to the Renumber Master Items section in the Using Eclare chapter.) 14. Select Maintenance | Quick Index and define the locations in your Item Master file you will regularly refer to (e.g. Lumber). This menu option allows easily access records in the Master File. (For more information, refer to the Quick Index section in the Using Eclare chapter.) 15. Select Maintenance | Setup Maintenance | Unit Conversions and define any other necessary formulas, or conversion factors, used in calculations that involve more than one unit of measure (e.g. Each, Linear Foot, etc.) that have not been defined while setting up the Item Master File. (For more information, refer to the Unit Conversions section in the Using Eclare chapter.) To set up Text related files 16. Select Maintenance | Text Maintenance | PO Text and define standard terms and conditions to print in purchase order forms. (For more information, refer to the PO Text section in the Using Eclare chapter.) 17. Select Maintenance | Text Maintenance | Work Order Text and define standard terms and conditions to print in work order forms. (For more information, refer to the Work Order Text section in the Using Eclare chapter.) 18. Select Maintenance | Text Maintenance | Vendor Order Quote Text and define standard quote text to print in vendor order forms. (For more information, refer to the Vendor Order Quote Text section in the Using Eclare chapter.) Eclare Version 2016 Page 115 Users Manual Building the Database 19. Select Maintenance | Text Maintenance | Specification Text and define common terms and conditions that are regularly assigned during takeoff as job specifications for printing in the job’s vendor orders. (For more information, refer to the Specification Text section in the Using Eclare chapter.) Building the Data Structure from Spreadsheets If you are an experienced spreadsheet user and have decided to benefit from the import/export features, you may significantly reduce the amount of time and effort required to set up your vendor, pricing and item information in the database. This process requires that you prepare a spreadsheet layout to give your main vendors, requesting that they register the part number, description, price and unit of measure of the items they supply to you. Once you receive their data, you complete the information with additional data that Eclare Estimating requires for each item, and automatically upload it into the Vendor and Item Master files. Once you have built your files using the data from your main vendors as a base, you can provide your other vendors a partially completed list. This process keeps you from reassigning Eclare’s item numbers for items that are already registered in your Master File, while allowing your vendors to modify their part numbers and descriptions according to their requirements, and to add additional items that are not yet registered in your Master File. Note: To properly build your data structure from spreadsheets, you must first set up the following tables, or import the information using the corresponding import options: 1. Cost Codes 2. Vendors (minimum information: Vendor Name, Vendor Number) 3. Conversion Defaults (minimum information: default record for EA, LN, SF, SY) To Work with the Vendors Spreadsheets 1. Contact your primary vendors for each major category of work / material (e.g. lumber, windows, etc.) Request that they supply you their pricing list in spreadsheet format or comma separated value (CSV) format. It must contain the following information: Eclare Version 2016 Page 116 Users Manual Building the Database You should have one spreadsheet per primary vendor. If it contains more than the required information, you may have to delete some of the information before you use it to create your Master File. 2. Add the following fields to each primary vendors’ spreadsheet and fill in the missing data: Field Description Vendor # Enter the number you wish to assign to this vendor for identification purposes. This field can contain letters or numbers, and it must be unique. It cannot be already assigned to another record. If you are interfacing with accounting, you must use the same vendor number in both systems. You can also generate the vendor number through the Exchange Import Vendors option. (For more information, refer to the Import Vendors section in the Using Eclare chapter. Eclare Item # Enter the number you wish to assign to this item for identification purposes. This field can only contain numbers, and it must be unique. It cannot be already assigned to another record. It must follow the format: nn.nnnnn, where the first two digits correspond to the division. (For more information, refer to the Divisions section in this chapter.) Note: You may use the auto number feature in your spreadsheet software to automatically generate a numeric value in a column. This feature may assist you in quickly generating your part numbers. Eclare Version 2016 Page 117 Users Manual Building the Database Field Description Min Purchase Order Type the vendor’s required minimum order quantity. This information allows you to automatically determine the correct order amount from the takeoff quantities. Incremental Purchase Order Type the vendor’s required increment order quantity. This information allows you to automatically determine the correct order amount from the takeoff quantities. For example, if your takeoff requires 77 of a certain item but the vendor’s increment order is 10, the system automatically rounds the order up to the next 10, in this case to 80. 3. Merge all vendors’ spreadsheets into one to form a combined spreadsheet of all vendors, items and prices. We suggest you name the new file “Vendors” and also keep the individual vendor’s spreadsheets. To Work with the Items Spreadsheet 1. Use your “Vendors” spreadsheet as a base. Add the following fields to each and fill in the missing data for each line: Field Description Type Identify the kind of item contained in the line. If it is a standard item, leave the field empty or type an “I”. Otherwise, you may use this field to build the assemblies in the next step. Assembly # Leave this field blank. If you have decided to define and import assemblies along with items, you will use this field to build the assemblies in the next step. Item # Duplicate the Eclare Part # from column B. Category Classification Enter a Category to place the item in its corresponding group. You must already have defined the category grouping scheme (e.g. Labor, Materials, Subcontractor, Eclare Version 2016 Page 118 Users Manual Building the Database Field Description etc.). (For more information, refer to the Category section in the Using Eclare chapter.) Cost Code Enter a Cost Code to place the item in its corresponding cost group for accounting purposes. You must already have defined the cost code scheme. (For more information, refer to the Cost Code section in the Using Eclare chapter.) Item Description Duplicate the vendor’s Description of Part from column D. You may make any necessary changes so that the text corresponds to the description you wish to set for the item in the Item Master File. Min T/O Req Minimum Takeoff Requirements. Enter the minimum amount that can be assigned for the item in a takeoff. Normally, set this value to 1. Product Grouping Enter a Product Group to place the item in its price group for pricing purposes. You must already have defined the grouping scheme. (For more information, refer to the Master Product Groups section in the Using Eclare chapter.) T/O Units Takeoff Units. Duplicate the vendor’s Purchase Units from column F. Taxable If you wish to calculate the item’s tax for reporting purposes, type Y. Waste % If you wish to include waste for this item in your estimates, type the corresponding percentage. If your waste is 10%, type 10. Warning! Although it is possible to create assemblies now, we recommend you create them after you have successfully completed the initial import of (1) items and (2) vendors, in that order. If you then wish to build the assemblies using a spreadsheet, you may proceed to create and import it, as described below. 2. If you have decided to build your assemblies directly through Eclare at a later time, you do not need to perform this step. However, if you wish to define your assemblies at this time and import them into Eclare along with the items, create them at the end of the items spreadsheet, in the following manner: Eclare Version 2016 Page 119 Users Manual Building the Database Locate the first item of the assembly and use the copy/paste features of the spreadsheet software to place it in the first empty row, where the assembly will be created. (See row 6 below.) Use that line to create the initial assembly identification line. Add the following information (see columns O and P of row 6 below), but do not change any other fields: Field Description Type Identify the kind of assembly contained in the line. Type “A” if you wish to define a standard or “calculation type” assembly, where the takeoff quantity of each detailed component changes automatically when the assembly quantity changes. Type “L” if you wish to define a locked assembly, where its detailed components have fixed takeoff quantities that are not affected by changes to the assembly quantity. Assembly # Enter the Item Number you wish to assign to this assembly for identification purposes. This field can only contain numbers, and it must be unique. It cannot be already assigned to another record. It must follow the format: nn.nnnnn, where the first two digits correspond to the division. (For more information, refer to the Divisions section in this chapter.) Eclare Version 2016 On the row below the assembly identification line, paste again the first item of the assembly. To clearly identify that the item belongs to the assembly, copy the assembly number into the Assembly # field. Do not copy the Type information. (See row 7 below.) Locate all other items that make up the assembly and use the copy/paste features of the spreadsheet software to copy them as part of the assembly. To clearly identify each item as belonging to the Page 120 Users Manual Building the Database assembly, copy the Assembly # into the Assembly # field. Do not copy the Type information. (See row 8 to 10 below.) 3. If you did not define any assemblies in your spreadsheet, you must add an additional line at the end of the spreadsheet before you save the spreadsheet. This line works as a “place holder”, to ensure that your spreadsheet program retains the empty Type and Assembly # columns when you save the spreadsheet. These columns are required for the import process to function properly Create the place holder line in the following manner: Locate the last item in the spreadsheet and use the copy/paste features of the spreadsheet software to place it in the next empty row where the place holder will be created. (See row 6 below.) Add the following information (see columns O and P of row 6 below): Field Description Type Enter “A”. Assembly # Enter 99.99999. Note: Although the “place holder” line results in one error during import, this is expected. It also results in the creation of an additional assembly line in your Item Master File. You must delete this line once the import process concludes. (For more information, refer to the To Delete an Item or Assembly, Master File section in the Using Eclare chapter.) Eclare Version 2016 Page 121 Users Manual Building the Database To Prepare the Spreadsheets for Import Note: The finished spreadsheet should not have any duplicate Item Numbers or Assembly Numbers, except for Item Numbers used again in defining an Assembly. Once the spreadsheet is complete and you have verified that the Item and Assembly Numbers are unique, you must split it into two separate spreadsheets: The Vendor Price spreadsheet will be used to import vendor information. The Master File spreadsheet will be used to create the Item Master File. To prepare the spreadsheets: 1. Create the Vendor Price spreadsheet using columns A (#1) through H (#8) from the existing spreadsheet. If you have created assemblies, delete all assembly identification lines and their associated items. If you have not created assemblies, delete also the place holder line. The resulting spreadsheet should look like this: 2. Create the Master File spreadsheet using columns I (#9) through S (#19) from the existing spreadsheet. If you have created assemblies, column I (#9) should contain an “A” for normal assemblies or an “L” for locked assemblies Eclare Version 2016 Page 122 Users Manual Building the Database in the assembly identification line. If you have not created assemblies, you must retain the placeholder line. The resulting spreadsheet should look like one of these: With Assemblies Without Assemblies 3. Delete the headers (column labels) from the spreadsheets. 4. Save each spreadsheet with a different name using the “Save as” command. Select File Type CSV. 5. Close the spreadsheet program. Eclare Version 2016 Page 123 Users Manual Building the Database To Import the Spreadsheet information Note: Before performing the following steps, make sure that all takeoff units used in the spreadsheet (e.g. LF, EA, etc.) already exist as a default record in the Unit Conversion table. (For more information, refer to the Unit Conversion section in the Using Eclare chapter.) Also, you must import the Master File before the Vendors file. 1. Click on Start | Programs | Prosoft | Estimating to activate the application. (For more information, refer to the Activating Eclare section in the Exploring Eclare chapter.) You must log in as Supervisor through the import process. 2. Select File | Supervisor | Global File Maintenance | Master File Import to create the Master File based on the Items spreadsheet. (For more information, refer to the Master File Import section in the Using Eclare chapter.) If you created a placeholder line and are not importing assemblies at this time, you should expect to get one import error message due to the placeholder line. 3. Select File | Supervisor | Global File Maintenance | Vendor Price Import to create the Vendors file based on the Vendors spreadsheet. (For more information, refer to the Vendor Price Import section in the Using Eclare chapter.) No import errors are expected. 4. Select File | Supervisor | Global File Maintenance | Tag M/F Operations to verify and correct the Cost Codes and Product Group assignments in the Master File. (For more information, refer to the Tag M/F Operations section in the Using Eclare chapter.) 5. Select Maintenance | Master File to verify and complete the conversion assignments. Conversions are normally set to a one-to-one relationship (e.g. EA -> Ea, SF -> SF, etc.). (For more information, refer to the Master File and Unit Conversions sections in the Using Eclare chapter.) Also, if you created a placeholder line instead of importing the assemblies, delete the item Master File record created by the placeholder line. (For more information, refer to the To Delete an Item or Assembly, Master File section in the Using Eclare chapter.) Eclare Version 2016 Page 124 Users Manual Building the Database To Request and Import information from additional Vendors 1. Use your existing Vendor spreadsheet. Delete the information in column A (#1) Vendor Number, column C (#3) Vendor Part Number, and column E (#5) Unit Price. 2. Send a copy of the spreadsheet to the remaining vendors. Instruct them to include their part number and unit price for the items in the spreadsheet, and to change the Description according to their ordering requirements. 3. When you receive the spreadsheet back from a vendor, add the corresponding vendor’s number in column A (#1). The number must be the same in all lines, and it must be included for all items in the spreadsheet. 4. Select File | Supervisor | Global File Maintenance | Vendor Price Import to create the Vendors file based on the Vendors spreadsheet. (For more information, refer to the Vendor Price Import section in the Using Eclare chapter.) No import errors are expected. Note: Use this option only when adding new vendor items to the Master File. To update the price of existing items, use the Import Vendor Pricing option. (For more information, refer to the Import Vendor Pricing section in the Using Eclare chapter.) Eclare Version 2016 Page 125 Users Manual Using Eclare ESTIMATING PROCEDURES Eclare’s database, menu structure and features allow you manage your company’s estimating information and produce the output you desire. However, some of the tasks you must perform are procedures comprised of several steps that must be performed at specific times. For Eclare to properly accomplish such tasks, you must follow the steps, activating the corresponding menu options and features, in the correct order and at the appropriate time. What You Will Learn This chapter outlines Eclare’s basic procedures to guide you in correctly performing your day-to-day work. It organizes the procedures based on frequency, and provides references to other sections of the manual where you may find detailed information on a procedure or its individual steps. In this chapter, you will learn: Eclare’s Procedures Timetable Initial Evaluation and Setup Procedures Standard Operating Procedures Data Maintenance Procedures Data Management Procedures (For detailed installation and initial database building procedures, refer to the Installing Eclare and Building the Database chapters.) Eclare Version 2016 Page 126 Users Manual Using Eclare Procedures Timetable The Timetable is intended as a guide to help you understand how to use the system. It lists standard procedures you must perform to properly operate Eclare, and provides references to detailed procedural instructions or related information contained in this manual. Frequency Initial Stage Daily Step Procedure Section Reference 1 System Evaluation and Training Initial Evaluation and Setup 2 Development Planning Initial Evaluation and Setup 3 Database Building Cycle Initial Evaluation and Setup Create New Jobs Standard Operating Procedures Estimate Single Job Standard Operating Procedures Transfer Finished Estimates to Accounting Standard Operating Procedures Reporting Takeoff Detail Report Job Vendor Orders Takeoff Report, Using Eclare chapter Vendor Orders, Using Eclare chapter Data Backup Data Management Weekly None --- Monthly Update Vendor and Subcontractor Pricing Data Maintenance Create New Budgets for Sales Department Job Pricing, Using Eclare chapter Yearly None --- As Needed Maintenance of Master files and Setup Tables Data Maintenance Estimate New Projects Standard Operating Procedures Estimate Buildings with Multiple Units Standard Operating Procedures Data Restore Data Management Note: Other business-oriented procedures performed by your company are not within the scope of this manual, and thus are not included in the Timetable. Eclare Version 2016 Page 127 Users Manual Using Eclare Initial Evaluation and Setup Procedures The following procedures must be followed only once, upon initial evaluation and setup. System Evaluation and Training 1. Perform and document a core evaluation of needs. 2. Thoroughly examine Eclare’s Tutorial to understand the estimating structure’s basics. 3. Make decisions on how to set up your estimating structure. 4. Confirm whether the selected estimating structure will properly integrate with other systems Development Planning 1. Delegate and timeline the database building activities. 2. Collect electronic files with subcontractor and vendor prices. Database Building Cycle For detailed installation and initial database building procedures, refer to the Installing Eclare and Building the Database chapters. Step 1. Build product groups and exceptions 2. Build the accounting cost codes (budget updates) 3. Build divisions 4. Build categories 5. Build PO packages (sequences) 6. Build the conversions 7. Build the Vendor files 8. Build the Master file Eclare Version 2016 Section Reference Master Product Groups and Product Group Exceptions, Using Eclare chapter Cost Codes and Import Cost Codes, Using Eclare chapter Divisions, Using Eclare chapter Categories, Using Eclare chapter PO Pack, Using Eclare chapter Unit Conversion, Using Eclare chapter Vendors and Import Vendors, Using Eclare chapter Master File, Import Vendor Pricing, Master File Import, Vendor Price Import, and Renumber Master Items, Using Eclare chapter Page 128 Users Manual Using Eclare 9. Build the Quick Index 10. Build the Text files 11. Build Takeoff structures 12. Build Model Templates Quick Index, Using Eclare chapter PO Text, Work Order Text, Vendor Order Quote Text, Specification Text, Using Eclare chapter Job Criteria and Takeoff Type Codes, Using Eclare chapter Takeoffs, Using Eclare chapter Standard Operating Procedures Create New Jobs To create a new job from a Model template: Step 1. Duplicate the model template to use as a base for the new job. 2. Update the copied template to suit the new job’s specifications. 3. Enter the takeoff quantities for each item and assembly in the job, and any relevant notes for purchase order information. 4. Check for price exceptions. Section Reference Duplicate Job, Using Eclare chapter Job Maintenance, Using Eclare chapter Takeoffs, Using Eclare chapter Pricing, Using Eclare chapter To create a new job from PSClient through Exchange: Step 1. Bring PSClient’s information into Eclare. 2. Enter the takeoff quantities for each item and assembly in the job, and any relevant notes for purchase order information. 3. Check for price exceptions. Section Reference Retrieve Jobs, Using Eclare chapter Takeoffs, Using Eclare chapter Pricing, Using Eclare chapter Note: PSClient and Eclare must be properly configured for direct interface to allow Eclare’s Exchange option to retrieve the client’s model and “options” selections from PSClient. This procedure can also be used to update an existing estimating job with client changes registered in PSClient. Eclare Version 2016 Page 129 Users Manual Using Eclare Estimate Single Job To estimate a new job: Step 1. If new job, create the job. 2. Find the job to estimate and select it as the current job. 3. Validate and update the job’s information. 4. Validate and update the job takeoff details. 5. Price the job. 6. Print the Take-off report. 7. Print and verify the Material Summary report. 8. Print and verify the Vendor Orders report. 9. Print the Customer Proposal. 10. Transfer finished estimates to Accounting. Section Reference Create New Jobs Job Maintenance, Using Eclare chapter Job Maintenance, Using Eclare chapter Takeoffs, Using Eclare chapter Pricing, Using Eclare chapter Takeoff Report section, Using Eclare chapter Material Summary, Using Eclare chapter Vendor Orders, Using Eclare chapter Customer Proposal and Customer Proposal Details, Using Eclare chapter Transfer Finished Estimates to Accounting Transfer Finished Estimates to Accounting To transfer data from finished estimate to Gemini through Exchange: Step 1. Send job to Gemini. 2. Select PO packages to send to Gemini. Section Reference Job Maintenance, Using Eclare chapter (Change function / Exchange function) Job Maintenance, Using Eclare chapter (Change function / Exchange screen) 3. Repeat these steps to transfer additional jobs. Note: Gemini and Eclare must be properly configured for direct interface to allow Eclare’s Exchange option to send the completed estimate’s information to Gemini for accounting processing. Eclare Version 2016 Page 130 Users Manual Using Eclare To export data from finished estimate to other applications using spreadsheets: Step 1. Export the job’s budgets. 2. Export the job’s PO’s. Section Reference Export Job Budgets, Using Eclare chapter Export Job PO’s, Using Eclare chapter 3. Repeat these steps to export additional jobs. Note: For more information on how to upload the spreadsheet into third party’s accounting applications, refer to the corresponding application’s documentation. Estimate New Pro-Forma Projects To estimate the costs of a new project or subdivision based on pro-forma Model templates: Step 1. Ensure templates exist for all models/jobs to be priced as part of the estimate. 2. Define the new project. 3. Define the project’s detail and quantities. 4. Run the report. Section Reference Job Maintenance, Using Eclare chapter Pro-Forma, Using Eclare chapter. Pro-Forma, Using Eclare chapter. Pro-Forma, Using Eclare chapter. Estimate Buildings with Multiple Units To estimate the costs of multiple units within buildings: Step Section Reference 1. Determine the takeoff structure for your project. Note: All buildings must follow the same takeoff structure. For example, if a project consists of: Building #1, Unit A, B, C, Building #2, two Units A, one Unit B, Building #3, one Unit B, two Units C, the takeoff structure would be: Building Unit A Unit B Unit C #1 1 1 1 #2 2 1 0 #3 0 1 2 Eclare Version 2016 Page 131 Users Manual Using Eclare 2. Create a job for your project. 3. Define the takeoffs for one building, and assign quantities, Building and Unit numbers. 4. Copy the takeoffs for all other buildings. 5. Update the Building and Unit assignments on the copied takeoffs. 6. Assign the quantities to the copied takeoffs. Job Maintenance, Using Eclare chapter. Takeoffs, Using Eclare chapter. Takeoffs, Using Eclare chapter. Takeoffs, Using Eclare chapter. Takeoffs, Using Eclare chapter. Data Maintenance Procedures In addition to the standard operating procedures, you must also perform maintenance procedures in order to update the information contained in Eclare’s database as the need arises. Direct Maintenance Eclare provides options to allow you to create new records or directly update specific values stored in either setup tables or in master files. Such additions and modifications are needed from time to time for various reasons (e.g. incorporating new products, using new vendors, creating new assemblies to improve the estimating process, etc.) Data Setup (or reference) tables Item Master file You may add new items and assemblies manually or through the spreadsheet import process. If adding less than 10 records, the manual process is typically faster. You may also create new assemblies by copying existing assemblies. Use this method only when both assemblies follow the same basic estimating logic. You must manually adjust the new assembly’s items (add, delete, select conversation factors). Caution: A single conversion factor may be assigned to multiple assemblies or items. Thus, conversion factor adjustments made Eclare Version 2016 Section Reference Eclare Menu Maps, Maintenance, Using Eclare chapter Master File, Using Eclare chapter To Add a New Item topic To Add a New Assembly topic Unit Conversion, Using Eclare chapter To Assign Vendors to an Item Page 132 Users Manual Using Eclare upon receiving feedback on the accuracy of the estimates, or when assigning factors to new items and assemblies may impact item-vendor and assembly-item relationships not intended to change. If none of the existing conversion factors can be used for a new item or assembly, create a new one instead. Vendors File Jobs Takeoffs topic To Assign one Item to an Assembly topic Vendors, Using Eclare chapter Job Maintenance, Using Eclare chapter Takeoffs, Using Eclare chapter Global Changes Eclare provides options that simplify repetitive tasks by automatically performing global changes to several files or records at one time. Function Build the Item Master file from electronic spreadsheets provided by vendors. Remove referenced items no longer in use. You must first determine the jobs and assemblies that reference the item you wish to delete. Remove jobs or models no longer needed. Section Reference Master File Import, Using Eclare chapter Show Item / Option Reference and Global Takeoff Maintenance, Using Eclare chapter Tag Delete Jobs, Using Eclare chapter Price Maintenance Eclare provides options that simplify job price maintenance and price updates for vendors and subcontractors. Function Determine items with pricing exceptions (no vendor assigned, no price found for vendor, invalid conversion factor) Update Vendor and Subcontractor Pricing. You may update these prices manually or through the spreadsheet import process if the vendor or subcontractor provides you an electronic copy of the price increase. Eclare Version 2016 Section Reference Pricing, Using Eclare chapter Price Update, Import Vendor Pricing, Vendor Price Import, Vendor Price Export, Using Eclare chapter Page 133 Users Manual Using Eclare Data Management Procedures The following procedures protect your data, along with the time and energy you have invested in building and maintaining the database. Data Backup The backup procedure only takes a few seconds and must be done on a regular basis. Upon login, Eclare will remind you when backup is due according to your company’s configuration. (For more information on offsite storage procedures, refer to the Offsite Backup Storage topic in this section, or to the To Configure Eclare’s Interface with Other Applications topic in the Using Eclare chapter for backup reminder warning.) Step 1. 2. 3. Logoff all users except the supervisor. Make the backup to the location where you wish to store the compressed data. The data storage location can be an external zip disk, a CD, tape or any hard drive on the network. If storing the backup files on a network hard drive, use a separate hard drive than the SERVER drive where the program files are loaded. In the event that the SERVER drive fails, you will be able to retrieve the data from another location. Inform users when the backup is complete. Section Reference Backup Data section, Using Eclare chapter Data Restore The restore procedure is the opposite process of backing up the data. In the event of a hardware failure, data corruption, or if need to utilize a previous data structure, this process will replace the current data structure with the compressed back up data. Step 1. Make sure you really wish to perform this operation before you begin. This process erases the current data set. To temporarily restore an old data set, make a Eclare Version 2016 Section Reference Backup Data section, Using Eclare chapter Page 134 Users Manual Using Eclare 2. 3. 4. 5. temporary backup of the current data set to a location other than where you store your normal backups. Logoff all users except the supervisor. Restore from the location where the old data set is stored. Upon completion, verify the newly restored data structure before proceeding with any additional work. Inform users when the backup is complete. If you made a temporary restore, repeat these steps to reinstall your current data set. Eclare Version 2016 Restore Data section, Using Eclare chapter Page 135 Users Manual Using Eclare USING ECLARE Eclare’s menu structure and menu options contain unique tools that allow you to automate your estimating procedures. Learning to properly use each one of its features will enable you to fully benefit from Eclare’s power and flexibility. What You Will Learn Refer to this chapter when you need detailed information about Eclare’s menu structure, or about specific menu options and their related functionality. It is arranged in menu option order to help you easily locate the information you need. In this chapter, you will learn: Eclare Version 2016 Eclare’s Menu organization and purpose The purpose of each menu option How to select and activate the menu option What you can do with each feature How to use the menu option to add, modify, delete records, etc. Fields definition and special requirements How your actions affect the database Page 136 Users Manual Using Eclare Eclare Menu Maps File Menu The File menu contains system and supervisor menu options that allow you to set up and configure your system, share data with other applications, and perform data management functions. Export Menu Since Eclare is a full-fletched estimating system, it allows you to share its data with other applications. Eclare Version 2016 Page 137 Users Manual Using Eclare The Export menu allows you to extract bits of information out of the system in a fixed, comma-delimited file format (or CSV file type). This standard file type is generally recognized by other systems and spreadsheet programs. Thus, you are able to send the data from your finished estimates into Prosoft’s accounting system without having to retype the information. However, you must perform two steps: export the information out of Eclare and import it into the other application. Although Eclare Export generates a fixed, standard export format, it is the third parties’ responsibility to modify their program to meet export requirements. Import Menu Eclare’s standard Import functions provide a quick way to bring day-to-day information into the system from other applications. The Import menu allows you to integrate bits of information into the system from a fixed, comma-delimited file format (or CSV file type). This standard file type is generally supported by other systems and spreadsheet programs. Thus, you are able to quickly bring information in without having to retype it. However, you must perform two steps: export the information out of other applications and import it into Eclare. If, for example, you keep your vendor master file in your accounting system, use the Import menu to periodically upload any new vendors and changes into Eclare’s Vendor file. The import menu options will only update the database with new information, and will not overwrite the existing data unless a modification is required. Exchange Menu Eclare has been designed to easily interface with other Prosoft’s applications, like PSClient and Accounting. It provides a cohesive tie to allow data sharing between the applications. You may automatically synchronize your database with regards to construction options, product groups, vendors and costs, and jobs. Unlike the Import and Export menus, which are based on a standard commadelimited file format (or CSV file type), the Exchange menu uses a common directory where Client, Estimating and Accounting share information. You only need to perform one step: select the corresponding menu option in the Exchange menu. The interface between the applications is automatic. When, for example, a prospective client stored in PSClient finalizes his home selection and upgrade options, his information is ready for estimating and preparation of client proposal. Upon confirmation from the salesperson, use the Eclare Version 2016 Page 138 Users Manual Using Eclare Retrieve Jobs menu option to share the information with Eclare, automatically creating a job and takeoffs within the Estimating system. Supervisor Menu The Supervisor menu contains menu options that allow you to perform setup and maintenance functions that have a global effect on the database. These menu options have a major impact on Eclare operations, and are by nature more complex than the import / export operations. In order to gain access to these features, you must log in as a Supervisor. The system will be unavailable to other users while the supervisor is logged in. Global File Maintenance Menu The Global File Maintenance menu allows the supervisor to make changes that affect the entire item and vendor database, including a renumbering of the item part number structure. Due to the broad effect global functions have on the database, exercise care when performing these operations. You can use these menu options as a quick an efficient way to build a company database from item and vendor information in spreadsheet files provided by the vendors themselves. You may also export the information out of the system, modify the data using a spreadsheet program, and bring the global changes back into the system. The spreadsheets must conform to a pre-defined format (for more information, refer to Appendix A – File Layouts.) The import operation will only update the database with new information, and will not overwrite the existing data unless a modification is required. Program Release Files Menu This menu contains tools to assist you to download and install the latest release. Utilities Menu This menu contains tools to assist you with simple mathematical calculations, roof related calculations, and measurement data entry. Digiwin, Prosoft’s Measurement or Construction Takeoff System, is a menu optional software not included with Eclare. Eclare Version 2016 Page 139 Users Manual Using Eclare Jobs Menu The Jobs Menu contains menu options to allow you to define and maintain your jobs and models, perform estimating takeoffs, and automatically update prices and quantities. You may also select the job to work with. Pricing Menu The Pricing Menu allows you to automatically reprice or clear the prices for the current job. You may reprice based on the latest Master File prices or change the assigned prices or vendor for specific items or groups of items. Eclare Version 2016 Page 140 Users Manual Using Eclare Maintenance Menu The Maintenance Menu contains menu options that allow you to set up and configure your master files and maintenance tables. You can define your items, assemblies, vendors and prices, and also define index entries for easy access to specific locations in your Master file. Eclare Version 2016 Page 141 Users Manual Using Eclare Global Job Maintenance Menu The Global Job Maintenance menu allows you to make changes that affect selected jobs or assemblies in the database. Due to the broad effect global functions have on the database, exercise care when performing these operations. You can use these menu options to adjust the price of models after a price increase or due to a formula correction. You may also tag the Item Master file operations, insert or delete takeoffs, and replace or delete assemblies. Setup Maintenance Menu The Setup Maintenance menu allows you to define standard values upon which master item definitions are based. Although you must set these values before creating your item master file, you can modify these tables at any time. Text Maintenance Menu The Text Maintenance menu allows you to define standard text used regularly within Eclare. You may define terms and conditions to print in purchase order forms, work order forms and vendor order forms, or standard specifications to include as part of a job’s takeoff detail. Eclare Version 2016 Page 142 Users Manual Using Eclare Reports Menu The Reports Menu allows you to generate job and takeoff reports, purchase orders, check lists, projections and customer proposals, in addition to item, vendor or setup related reports. Master File Menu The Master File Menu allows you to print lists of selected items from your Item Master file. Use these menu options to obtain a hardcopy of you Item Master file data. Eclare Version 2016 Page 143 Users Manual Using Eclare Vendor Related Menu The Vendor Related Menu allows you to print lists of selected vendor information. Use these menu options to obtain a hardcopy of your Vendor Master File data, or to print vendor’s reference numbers and price books. Setup Reports Menu The Setup Reports Menu allows you to print lists of selected setup and reference information. Use these menu options to obtain a hardcopy of your Setup Master Files data. Window Menu The Windows Menu allows you to manage Eclare’s windows or screens. If there are multiple open windows, you may view a list of the opened windows and select the one you wish to activate, or you can organize the windows automatically in the standard Windows tile or cascade format. (For more information, refer to the Managing Windows and Screens section in the Exploring Eclare chapter.) Eclare Version 2016 Page 144 Users Manual Using Eclare Help Menu The Help Menu allows you to access Eclare’s online help system, automatically send data or download program updates, and to view the Registration Information screen displayed upon system activation. You can also access the online help system by pressing [F1] in the active window. (For more information, refer to the Help section in the Exploring Eclare chapter.) Eclare Version 2016 Page 145 Users Manual Using Eclare Company Login The Company Login menu option allows you to login to Eclare and select the company data you wish to work with. Use this option to log in as a different user or to work with a different company database once you are already in the application. To select the menu option from the Main Menu, click File | Company Login. To enter the system, you must have an active user account defined in the Users Maintenance menu option, and correctly provide its User ID and Password. To Login to a Company Note: If you are activating Eclare and performing the initial log in, steps 1 and 2 do not apply. 1. Select the Company Login menu option. 2. If your terminal has been configured to prompt for backup on exit, a backup message displays. Click if you wish to back up the company data now or to continue without making the backup. (For more information, refer to the Backup Data section in this chapter.) Eclare Version 2016 Page 146 Users Manual Using Eclare 3. If there is more than one company defined in the system, the Select Company screen displays. Click on the company you wish to work with to select it and click to continue. Note: If you wish to see all companies, including ones not currently in use, click on Show Hidden Companies to activate it. (For more information, refer to the To Add a New Company, Company Maintenance section in this chapter.) Eclare will remember your selection next time you log in. 4. The Company Login screen displays. Verify that the selected company is correct. If you are switching between companies that have the same user name and password, Eclare automatically displays them for you. Eclare Version 2016 Page 147 Users Manual Using Eclare 5. If it is not already displayed, enter your User Name. Verify that you have typed it correctly. The system checks that the User Name is defined for an active user account. Note: Only one person can log in as supervisor at any one time. Since the supervisor has access to global and setup menu options, the system will not be available to other users while the supervisor is logged in. If you attempt to log in as supervisor while another supervisor is logged in, a message displays. DO NOT proceed unless you are certain. 6. If it is not already displayed, enter your Password. This field is not case sensitive. The Password displays asterisks instead of the characters you typed to protect it from unauthorized use. The system checks that the password corresponds to the one defined for the user account. 7. Verify the Date. Eclare only uses this date for reporting purposes, printing on all report headers. If you need to change it, click to activate the Calendar and select the correct date. (For more information, refer to the Calendar section in the Exploring Eclare chapter.) 8. Click Eclare Version 2016 to enter the system. Page 148 Users Manual Using Eclare In order to gain access, the User ID and Password must be correct. Otherwise, an error message displays. Correct the information and try again or click to exit the system. 9. If this company’s data has not been backed up through Eclare’s Backup Data menu option within your specified number of days, Eclare will automatically show you a backup reminder message: Click to continue. (For more information on how to configure the backup reminder warning, refer to the To Configure Eclare’s Interface with other Applications section in this chapter.) 10. If you log in as the Supervisor and there are other users currently working on the selected Company, a list of active users displays. Eclare will automatically log you in as supervisor once all users log out. To Indicate the Location of Eclare’s Data Note: This menu option displays under the File menu only after cancellation of the Company Login process. Use this feature to direct Eclare to the folder containing the estimating database when running the program from a location other than the server where the data files are stored. 1. After in the Company Login screen, click on the Select Data Location menu option under the File menu. The Select Program Data Location screen displays: Eclare Version 2016 Page 149 Users Manual Using Eclare 2. Type or locate the path to the estimating data files in the Data Location. Note: When navigating, locate the corresponding folder that contains Eclare’s COMPANY.TPS file. 3. If both program and data files are stored in the Eclare’s Program folder, click on the Always use Program Folder field to activate it. A check box must display. 4. Click Eclare Version 2016 to save the information. Page 150 Users Manual Using Eclare Print Setup The Print Setup menu option activates the standard Windows print dialog box. It allows you to select the printer you will use with the system. To select the menu option from the Main Menu, click File | Print Setup. Once the printer is set, you do not need to set it again. However, you may change the selected printer at any time. Note: The printer must be defined for the print and preview functions to operate properly. To Select a Printer 1. Select the Print Setup menu option. The Print Setup dialog displays. 2. Select the printer from the Name drop-down menu. Only printers defined and configured in your Windows® operating system display. (For more information on how to define and configure printers, refer to your Windows system documentation.) Eclare Version 2016 Page 151 Users Manual Using Eclare 3. Click to save the selected printer, or click saving the changes. to exit without The selected settings will be in effect until the next time you use the Print Setup menu option to change the printer. Note: Although the following characteristics display on the screen, selections made in this section with not affect Eclare’s printing. Fonts, orientation, and other properties are set within the program in order to best utilize the report formats: Option Description Activates the standard Windows properties dialog box. These properties vary according to the printer. (For more information on the properties available to your printer and how to change them, refer to your Windows system documentation.) Paper Allows you to change the paper size and tray source. Leave the Auto Select option active if you want Windows to automatically get the selected paper size from the correct tray, as defined in the Windows printer configuration. Orientation Allows you to change the page orientation (Portrait or vertical, Landscape or horizontal.) Eclare Version 2016 Page 152 Users Manual Using Eclare Terminal Setup In a network environment, you can run Eclare from multiple computers or terminals. The Terminal Setup menu option allows you to define characteristics that apply exclusively to the specific computer where the setup is defined. To select the menu option from the Main Menu, click File | Terminal Setup. Once the terminal is set, you do not need to set it again. However, you may change the selected characteristics at any time. To Change the Terminal Configuration 1. Select the Terminal Setup menu option. The Terminal Configurations dialog displays. Eclare Version 2016 Page 153 Users Manual Using Eclare 2. Select the desired configuration options. These program options apply exclusively to the computer or terminal where the setup is defined, regardless of the company data you work with. Field Description Default Reports to Preview Indicate your preferred selection for the report menu options’ buttons: Numeric keypad “+”Key Acts like Tab Key Indicate your preferred [+] key operation: Disable Browse Format Save Activate this field to automatically have the Preview button selected if you normally choose to see reports on screen before printing them. This program option assumes that your answer will be preview, although you will still be able to select print. Deactivate this field to automatically have the Print button selected if you normally send reports directly to the printer. This program option assumes that your answer will be print, although you will still be able to select preview. Activate this field if you wish the [+] key in the numeric keypad to serve the same function as the [Tab] key. This feature will be active next time you log in to Eclare, and will apply throughout the system. Deactivate this field if you do not wish the [+] key in the numeric keypad to serve the same function as the [Tab] key. The [+] key assumes its normal character operation. Indicate your preferred selection for Browse Format Save: Backup On Exit Eclare Version 2016 Activate this field if you wish to disable the browse windows’ format save feature to ensure that no changes are made to the company’s current browse column settings on this terminal. A check mark must display. Deactivate this field if you do not wish to disable it. Indicate your preferred backup handling upon exiting the system. Page 154 Users Manual Using Eclare Field Description Select Prompt for Backup – Default Yes if you wish to see the backup reminder and to automatically have the Yes button selected. This program option assumes that your answer will be yes, although you will still be able to answer no. Select Prompt for Backup – Default No if you wish to see the backup reminder but to automatically have the No button selected. This program option assumes that your answer will be no, although you will still be able to answer yes. Select Do not show Backup Prompt if you do not wish to see the backup reminder. Select this program option if your backup procedures are handled by a System Administrator or through a server Tape Backup system. You will still be able to backup Eclare’s data as needed using the File • Backup Data menu option. Spreadsheet EXE If you are working in a network environment, you may speed up loading and activation of your preferred spreadsheet program by installing it on each terminal. For a local configuration, type or select this terminal’s program filename and path in this field (i.e. c:\program files\Microsoft Office\Excel.exe). Fax Server Path If you are using Eclare’s fax server, you may send faxes automatically. (For more information, refer to the Other Special Features to Simplify your Work section in the General Concepts chapter, and the Fax Manager section in this chapter.) To configure this feature, type or select the fax controller’s directory path in this field. Note: The selected directory must be a common directory available to all users of the fax server. E-mail Server Path Eclare Version 2016 If you are using Eclare’s e-mail server, you may send emails automatically. (For more information, refer to the Other Special Features to Simplify your Work section in Page 155 Users Manual Using Eclare Field Description the General Concepts chapter, and the E-mail / FTP Manager section in this chapter.) To configure this feature, type or select the e-mail controller’s directory path in this field. Note: The selected directory must be a common directory available to all users of the e-mail server. If you are using Gemini or/and PSClient you will use the same directory location for all the programs. Indicate up to three preferred color selections for easy identification of item records in the Item Master screen. Although all standard items display in black, you may activate these custom colors on an item basis to visually segregate portions of the Master File. (For more information, refer to the Master File section in this chapter.) Click on any of these buttons to activate the Windows standard color selection dialog box. Select the desired color and click . Item records assigned to this custom color group will now display in this color in the Item Master screen. Eclare Version 2016 Page 156 Users Manual Using Eclare Field Description Indicate your preferred color selection for easy identification of assembly records in the Item Master screen. (For more information, refer to the Master File section in this chapter.) Click on this button to activate the Windows standard color selection dialog box. Select the desired color and click . All assembly records in the Item Master screen will now display in this color. Indicate your preferred color selection for easy identification of locked assembly records in the Item Master screen. (For more information, refer to the Master File section in this chapter.) Click on this button to activate the Windows standard color selection dialog box. Eclare Version 2016 Page 157 Users Manual Using Eclare Field Description Select the desired color and click . All locked assembly records in the Item Master screen will now display in this color. Indicate your preferred color selection for easy identification of alternate takeoff items (Status) in the Takeoffs screen. (For more information, refer to the Takeoffs section in this chapter.) Click on this button to activate the Windows standard color selection dialog box. Eclare Version 2016 Page 158 Users Manual Using Eclare Field Description Select the desired color and click . All alternate takeoff item records in the Takeoffs screen will now display in this color. Indicate your preferred color selection for easy identification of fixed items in the Takeoffs screen. (For more information, refer to the Takeoffs section in this chapter.) Click on this button to activate the Windows standard color selection dialog box. Eclare Version 2016 Page 159 Users Manual Using Eclare Field Description Select the desired color and click . All fixed item records in the Takeoffs screen will now display in this color. Indicate your preferred color selection for easy identification of deleted master item records in the Item Master screen. (For more information, refer to the Master File section in this chapter.) Click on this button to activate the Windows standard color selection dialog box. Eclare Version 2016 Page 160 Users Manual Using Eclare Field Description Select the desired color and click . All deleted item records in the Item Master screen will now display in this color. Click on this button to define images to display as wallpaper for the current company or when not logged in. (For more information, refer to the To Manage Wallpapers topic in this section.) Eclare Version 2016 Page 161 Users Manual Using Eclare Field Description Click on this button to reset all of a Company’s browse lists’ tables back to original display defaults: Click to confirm the operation. Once you confirm, all previous customizations for the currently active Company will be lost. All columns will show, both vertical and horizontal lines will show, and all columns will return to their default size. Note: This operation cannot be undone. 3. Click to save the selected terminal configuration, or click to exit without saving the changes. The selected settings will be in effect until the next time you use the Terminal Setup menu option to change the terminal. To Manage Wallpapers Use this feature to define wallpaper images to personalize the workstation or for easier company-identification. 1. Select the Terminal Setup menu option. The Terminal Configurations dialog displays. 2. Click . The Manage Wallpapers screen displays. 3. If you wish to define an image to identify the current Company on this workstation, activate the Terminal Company tab: Eclare Version 2016 Page 162 Users Manual Using Eclare Click to locate and select the image. 4. If you wish to define an image to personalize this workstation when not currently logged in to any particular Company, activate the Terminal Global tab: Click to locate and select the image. 5. If you have administrator’s access privileges and wish to define the current Company’s background for all workstations, activate the Program Company tab: Eclare Version 2016 Page 163 Users Manual Using Eclare Click and click to locate and select the image. Eclare will use this image in any workstation that does not have a Terminal Company wallpaper defined. 6. If you have administrator’s access privileges and wish to define an image to use as background on all workstations when not currently logged in to any particular Company, activate the Program Global tab: Click and click to locate and select the image. Eclare will use this image in any workstation that does not have a Terminal Global wallpaper defined. 7. To remove a workstation-based image from Terminal Company or Terminal Global, remove the content of the Image field. To remove a program-based image from Program Company or Program Global, click and 8. Click Eclare Version 2016 . to conclude the operation. Page 164 Users Manual Using Eclare Define Toolbar The Define Toolbar menu option allows you to customize the buttons available in Eclare’s toolbar. Use it to create a quick way to select and activate functions you use often. To select the menu option from the Main Menu, click File | Define Toolbar. Assignment section – Displays a sample toolbar of the assigned icons, and a legend of the icon position and its corresponding menu option. Available Icons section – Displays all icons defined in the system that are available to the Define Toolbar menu option. Select Menu Option section – Displays all Eclare menu options, whether or not they are currently assigned to an icon in the toolbar. You can add buttons for frequently used menu options, select a different button for a menu option, or change the order in which the buttons display. Once the toolbar is set, you do not need to set it again. However, you may change the assignments at any time. Eclare Version 2016 Page 165 Users Manual Using Eclare To Add a New Menu Option to the Toolbar 1. Select the Define Toolbar menu option. The Define User Toolbar screen displays. 2. In the Assignment section, determine the position where you want the new menu option to display. Click on the position to select it. An asterisk displays after the position number. 3. In the Select Menu Option section, find the menu option you wish to add to the toolbar. Double-click on the line. The menu option name displays on the legend section for the corresponding position. 4. In the Available Icons section, determine the icon you wish to associate to the selected menu option. Double-click on the icon. The icon displays on the corresponding position of the sample toolbar. 5. Click to save the new assignment. The system exits the menu option and displays the new button on the toolbar. To Remove a menu option from the Toolbar 1. Select the Define Toolbar menu option. The Define User Toolbar screen displays. 2. In the Assignment section, find the position of the menu option you wish to delete. Click on the position to select it. An asterisk displays after the position number. 3. In the Select Menu Option section, double-click on the Blank menu option, the first one in this section. The label “Blank” displays on the legend section for the corresponding position, instead of the menu option you wish to delete. 4. In the Available Icons section, double-click on the empty icon, one of the last two icons in this section. The assigned icon no longer displays on that position. 5. Click to save the deletion. The system exits the menu option and no longer displays the deleted button on the toolbar. Eclare Version 2016 Page 166 Users Manual Using Eclare To Change the Icon for an Assigned Menu Option 1. Select the Define Toolbar menu option. The Define User Toolbar screen displays. 2. In the Select Menu Option section, find the menu option you wish to change the icon for. Click on the position to select it. An asterisk displays after the position number. 3. In the Available Icons section, determine the new icon you wish to associate to the menu option. Double-click on the icon. The new icon displays on the corresponding position of the sample toolbar. 4. Click to save the change. The system exits the menu option and displays the new button on the toolbar. To Clear all Menu Options from the Toolbar 1. Select the Define Toolbar menu option. The Define User Toolbar screen displays. 2. Click . A confirmation message displays. Make sure whether you want to proceed with the operation. This process cannot be undone. To recover the definitions once the toolbar is cleared, you must redefine each menu option again. 3. Click to continue or to cancel the operation. The system automatically removes all current assignments from the toolbar. (For information on how to reassign a menu option, refer to the To Add a New Menu Option to the Toolbar topic in this section.) Eclare Version 2016 Page 167 Users Manual Using Eclare Export Job Budgets The Export Job Budgets menu option allows you to extract budgeting information for a selected job, including cost code adjustments. It generates a general comma-delimited file (.CSV) as output that can be imported into your accounting system. To select the menu option from the Main Menu, click File | Export | Export Job Budgets. To Export Job Budget information 1. Select the Export Job Budgets menu option. The Export Budgets screen displays. 2. Select the job you wish to export budget information for. (For more information on how to set the current job, refer to the To Set the Current Job, Job Maintenance section in this chapter.) 3. Select the Export Job Budgets menu option. If a job is selected, the Export Budgets screen displays. 4. Type or select the filename and path of the output file. The system remembers the last location and file used. If you use the selection dialog box, do not change the Save as type CSV Files type. (For more information, refer to the Finding and Saving Files section in the Exploring Eclare chapter.) 5. Indicate the desired export options: Eclare Version 2016 Page 168 Users Manual Using Eclare Field Description Include Tax Activate this field if you wish to export tax information to the output file. Deactivate if you do not. Include Waste Activate this field if you wish to include the waste. Deactivate if you do not. Enforce Vendor Order Requirements Activate this field if you wish to enforce the vendor’s ordering requirements when exporting information to the output file. This program option checks that the item’s ordered quantities conform to the minimum and increments defined for the item’s vendor. Deactivate if you do not. 6. Click to start the export process. The extracting progress screen displays. Eclare automatically adds the job’s cost code adjustments to the exported cost. 7. If the process encounters items that are not assigned to a vendor or for which no vendor price is defined, a warning message displays. Click to continue. The items will be exported, and you may verify the price at a later time. 8. A confirmation message displays when Eclare finishes extracting the job data: 9. Verify that the new output file will not override any other document you wish to keep. Click to continue. 10. Click to conclude the export operation. (For a sample of the data included in the output file, see Appendix A – File Layouts.) Eclare Version 2016 Page 169 Users Manual Using Eclare Export Job PO’s The Export Job PO’s menu option allows you to extract purchase order information for a selected PO package. It generates a comma-delimited file (.CSV) as output that can be imported to your accounting system, or can be used in a spreadsheet program if you need to manipulate the data. To select the menu option from the Main Menu, click File | Export | Export Job PO’s. To Export Purchase Order information 1. Select the Export Job PO’s menu option. The Export Job Purchase Orders screen displays 2. Select the job you wish to export purchase order information for. (For more information on how to set the current job, refer to the To Set the Current Job, Job Maintenance section in this chapter.) 3. Select the Export Job PO’s menu option. If a job has been selected, the Export Job Purchase Orders screen displays. 4. Type or select the filename and path of the output file. The system remembers the last location and file used. If you use the selection dialog box, do not change the Save as type CSV Files type. (For more information, refer to the Finding and Saving Files section in the Exploring Eclare chapter.) 5. Select the PO package to export. To export all purchase orders, leave the Lower and Higher PO Limits blank. To export a range of purchase orders, Eclare Version 2016 Page 170 Users Manual Using Eclare click on Lower PO Limit and type the first PO to include. Click on Higher PO Limit and type the last PO to include. Only purchase orders that fall within the selected range will be included in the output file. 6. Indicate the desired export options: Field Description Include Waste Activate this field if you wish to include the waste. Deactivate if you do not. Enforce Vendor Order Requirements Activate this field if you wish to enforce the vendor’s ordering requirements when exporting information to the output file. This program option checks that the item’s ordered quantities conform to the minimum and increments defined for the item’s vendor. Deactivate if you do not. 7. Click displays. to start the export process. The extracting progress screen 8. If the process encounters items that are not assigned to a vendor or for which no vendor price is defined, a warning message displays. Click to continue. The items are then exported, and you may verify the price at a later time. 9. A confirmation message displays when Eclare finishes extracting the purchase order data: 10. Verify that the new output file will not override any other document you wish to keep. Click not exported. to continue. Items that have no order quantity are 11. A completion message displays when Eclare finishes extracting the job data. It also displays a message when items without order quantity are found: Eclare Version 2016 Page 171 Users Manual Using Eclare 12. Click to conclude the export operation. (For a sample of the data included in the output file, see Appendix A – File Layouts.) Export Cost Codes The Export Cost Codes menu option allows you to extract your cost code information from the master file. It generates a comma-delimited file (.CSV) as output that can be imported to your accounting system. To select the menu option from the Main Menu, click File | Export | Export Cost Codes. To Export Cost Code information 1. Select the Export Cost Codes menu option. The Export Cost Codes screen displays Eclare Version 2016 Page 172 Users Manual Using Eclare 2. Type or select the filename and path of the output file. The system remembers the last location and file used. If you use the selection dialog box, do not change the Save as type CSV Files type. (For more information, refer to the Finding and Saving Files section in the Exploring Eclare chapter.) 3. Indicate the desired export options: Field Description Export Order Select the order in which you wish to sort the output file. Write Gemini Header Activate this field you wish to include the column headers in the output file (Cost Code, Description, Category, Category Closeout, Type, Phase, Closeout Account, AIA Line Number.) This program option allows the import process into your accounting system to run smoothly. Deactivate if you do not. 4. Click to start the export process. A completion message displays when Eclare finishes generating the output file. 5. Click to conclude the export operation. (For a sample of the data included in the output file, see Appendix A – File Layouts.) Eclare Version 2016 Page 173 Users Manual Using Eclare Export T/O Detail The Export T/O Detail menu option allows you to extract detailed job takeoff information (quantities, pricing, etc.) for selected jobs. It generates a commadelimited file (.CSV) as output that can be used in a spreadsheet program to compare different models for pricing purposes. To select the menu option from the Main Menu, click File | Export | Export T/O Detail. To Export Takeoff information 1. Select the Export T/O Detail menu option. The Export to CSV screen displays. 2. Select the jobs to export. To export all jobs, leave the Start and End Job Numbers blank. To export a range of jobs, select the desired range. Only jobs that fall within the range will be included in the output file. 3. In the Include section, select the type of export you wish to perform, whether for jobs, models or both. Eclare Version 2016 Page 174 Users Manual Using Eclare 4. Indicate the desired export options: Field Description Include Tax Activate this field if you wish to export tax information to the output file. Deactivate if you do not. Include Category Markup Activate this field it if you wish to mark up items upon export to the output file. Deactivate if you do not. Include Waste Activate this field if you wish to include the waste. Deactivate if you do not. Enforce Vendor Order Requirements Activate this field if you wish to enforce the vendor’s ordering requirements when exporting information to the output file. This program option checks that the item’s ordered quantities conform to the minimum and increments defined for the item’s vendor. Deactivate if you do not. Exclude Alternate Items Activate this field if you wish to exclude alternate items from the output file. (For more information, refer to the Takeoffs section in this chapter.) Deactivate if you do not. 5. Type or select the filename and path of the output file. The system remembers the last location and file used. If you use the selection dialog box, do not change the Save as type CSV Files type. (For more information, refer to the Finding and Saving Files section in the Exploring Eclare chapter.) 6. Select the items to include in the Export List. These are the fields you wish to export to the output file. To choose an item, click on the Choices drop-down arrow. Find the item you wish to include, and click the Export List button. The letter corresponding to the selected item displays in the Export List. 7. Select the item’s Sort Order. For maximum flexibility, you may sort by fields not included in the output file. To choose a sort order, click on the Choices drop-down arrow. Find the item you wish to include, and click the Sort Order button. The letter corresponding to the selected item displays in the Sort Order list. Eclare Version 2016 Page 175 Users Manual Using Eclare 8. Click on the desired function to start the print / export process. The extracting progress screen displays. If a Revised Takeoff Quantity exists for the job, Eclare exports it instead of the standard quantity. 9. If the process encounters items that are not assigned to a vendor or for which no vendor price is defined, a warning message displays. Click to continue. The items will be exported, and you may verify the price at a later time. 10. A confirmation message displays when Eclare finishes extracting the purchase order data: 11. Verify that the new output file will not override any other document you wish to keep. Click to continue. A progress bar displays, followed by a completion message indicating the total number of exported records. 12. Click to conclude the export operation. (For a sample of the data included in the output file, see Appendix A – File Layouts.) Eclare Version 2016 Page 176 Users Manual Using Eclare Export Cost Code Compare The Export Cost Code Compare menu option allows you to extract summary cost code information for selected jobs. It generates a comma-delimited file (.CSV) as output that can be used in a spreadsheet program to see how models stack up against other models (e.g. cost of framing in all different models). To select the menu option from the Main Menu, click File | Export | Export Cost Code Compare. To Export Cost Code information 1. Select the Export Cost Code Compare menu option. The Export Cost Code Comparison screen displays. 2. Select the jobs to export. To export all jobs, leave the Start and End Job Numbers blank. To export a range of jobs, select the desired range. Only jobs that fall within the range will be included in the output file. 3. In the Include section, select the type of export you wish to perform, whether for jobs, models or both. 4. Indicate the desired export options: Field Description Include Tax Eclare Version 2016 Activate this field if you wish to export tax information to the output file. Page 177 Users Manual Using Eclare Field Description Deactivate if you do not. Include Category Markup Include Zero Cost Codes Activate this field it if you wish to mark up items upon export to the output file. Deactivate if you do not. Activate this field it if you wish to include in the output file cost codes that have a value of zero. This program option allows you produce a consistent list of cost codes for comparing two jobs. For example, if there are 100 items defined in your master file, one job may use 10 of these items and another job 25. If you include costs with a value of zero, the lines in both lists will include 100 items in the exact same order. Deactivate if you do not. This program option allows you to save space and paper In the same example, if you do not include costs with a value of zero, the lists for one job will include only 10 items and the other job 25 items. The lines in the lists will not correspond. Include Waste Activate this field if you wish to include the waste. Deactivate if you do not. Enforce Vendor Order Requirements Activate this field if you wish to enforce the vendor’s ordering requirements when exporting information to the output file. This program option checks that the item’s ordered quantities conform to the minimum and increments defined for the item’s vendor. Deactivate if you do not. Include “Direct Budget Adjustments” Activate this field if you wish to add the budget adjustments to the cost before export. Deactivate if you do not. 5. Type or select the filename and path of the output file. The system remembers the last location and file used. If you use the selection dialog box, do not change the Save as type CSV Files type. (For more information, refer to the Finding and Saving Files section in the Exploring Eclare chapter.) 6. Click displays. Eclare Version 2016 to start the export process. The extracting progress screen Page 178 Users Manual Using Eclare 7. If the process encounters items that are not assigned to a vendor or for which no vendor price is defined, a warning message displays. Click to continue. The items will be exported, and you may verify the price at a later time. 8. A confirmation message displays when Eclare finishes extracting the purchase order data: 9. Verify that the new output file will not override any other document you wish to keep. Click to continue. A progress bar displays, followed by a completion message indicating the total number of exported records. 10. Click to conclude the export operation. (For a sample of the data included in the output file, see Appendix A – File Layouts.) Eclare Version 2016 Page 179 Users Manual Using Eclare Export Takeoff Compare The Export Takeoff Compare menu option allows you to extract takeoff information for selected jobs. It generates a comma-delimited file (.CSV) as output that can be used in a spreadsheet program to see new jobs’ takeoff information. To select the menu option from the Main Menu, click File | Export | Export Takeoff Compare. To Export Takeoff information 1. Select the Export Takeoff Compare menu option. The Export Takeoff Compare screen displays. 2. Indicate which jobs you wish to list for export selection: Eclare Version 2016 Page 180 Users Manual Using Eclare Field Description Show Hidden Jobs Display Activate this field if you wish to list jobs marked ‘hidden’. Deactivate if you do not. Indicate whether you wish to export takeoffs from jobs, models, or both. 3. Locate and select the jobs to export takeoff information for. (For information on how to select data, refer to the Selecting Data from a List section in the Exploring Eclare chapter.) 4. Indicate the desired export options: Field Description Include Tax Include Category Markup Include All Takeoffs Activate this field if you wish to export tax information to the output file. Deactivate if you do not. Activate this field it if you wish to mark up items upon export to the output file. Deactivate if you do not. Activate this field if you wish to compare the selected job’s takeoffs and also include in the output file those that exist in only one job. Deactivate if you do not. Include Waste Activate this field if you wish to include the waste. Deactivate if you do not. Enforce Vendor Order Requirements Activate this field if you wish to enforce the vendor’s ordering requirements when exporting takeoffs to the output file. This program option checks that the item’s ordered quantities conform to the minimum and increments defined for the item’s vendor. Deactivate if you do not. 5. Select the specific takeoff information you wish to export in the Items to Export field. 6. Type or select the filename and path of the output file. The system remembers the last location and file used. If you use the selection dialog box, do not change the Save as type CSV Files type. (For more information, refer to the Finding and Saving Files section in the Exploring Eclare chapter.) Eclare Version 2016 Page 181 Users Manual Using Eclare 7. Click displays. to start the export process. The extracting progress screen 8. If the process encounters a job with no takeoffs or containing items with no price, a message displays. Click to continue. The items will be exported, and you may verify the price at a later time. 9. Click to conclude the export operation. (For a sample of the data included in the output file, see Appendix A – File Layouts.) Export Takeoff Detail Compare The Export Takeoff Detail Compare menu option allows you to extract takeoff detail information for multiple jobs. It generates a comma-delimited file (.CSV) as output that can be used in a spreadsheet program for side-by-side job comparison to ensure takeoff and figures are correct. To select the menu option from the Main Menu, click File | Export | Export Takeoff Detail Compare. Eclare Version 2016 Page 182 Users Manual Using Eclare To Export Takeoff Detail information 1. Select the Export Takeoff Detail Compare menu option. The Export Takeoff Detail Compare screen displays. 2. Indicate which jobs you wish to list for export selection: Field Description Show Hidden Jobs Display Activate this field if you wish to list jobs marked ‘hidden’. Deactivate if you do not. Indicate whether you wish to export takeoffs from jobs, models, or both. 3. Locate and select the jobs to export takeoff detail information for. (For information on how to select data, refer to the Selecting Data from a List section in the Exploring Eclare chapter.) 4. Indicate the desired export options: Field Description Takeoff # Low Takeoff # High Select the takeoff numbers to export. To export all, leave Takeoff # Low and the Takeoff # High blank. To export a range, select the desired range. Only takeoffs that fall within the range will be exported. Product Group Select the Product Group you wish to export takeoffs for. To include all groups, leave the field empty. Export Select the specific takeoff information you wish to export. Only items with a check mark will be exported. You must select at least one. Job Options Select the specific job information you wish to include. 5. Type or select the filename and path of the output file. The system remembers the last location and file used. If you use the selection dialog box, do not change the Save as type CSV Files type. (For more information, refer to the Finding and Saving Files section in the Exploring Eclare chapter.) 6. Click displays. Eclare Version 2016 to start the export process. The extracting progress screen Page 183 Users Manual Using Eclare 7. If the process encounters a job with no takeoffs or containing items with no price, a message displays. Click to continue. The items will be exported, and you may verify the price at a later time. 8. Click to conclude the export operation. (For a sample of the data included in the output file, see Appendix A – File Layouts.) Export Option Pricing The Export Option Pricing menu option allows you to extract estimate information for selected models or options. It generates a comma-delimited file (.CSV) as output that can be used in a spreadsheet program to create a price book for retail in the PSClient application. It also generates the Export Option Pricing Exception report. To select the menu option from the Main Menu, click File | Export | Export Option Pricing. This menu option allows you to extract selected wholesale prices, whether for modules or options, mark them up by a percentage, and to upload the information into the Client application. Instead of updating all option pricing in the system, your selection indicates which values you are ready to update. Eclare Eclare Version 2016 Page 184 Users Manual Using Eclare supports up to four prices, along with effective dates, and exports according to the job export definition. Note: This function includes jobs marked ‘hidden’. To Export Option Pricing information 1. Select the Export Option Pricing menu option. The Export Option Pricing screen displays. 2. If you wish to update pricing by models, select the models to export from the selection list. Only the pricing (cost) information for the selected models will be included in the output file. (For information on how to define models, refer to the Job Maintenance section in this chapter.) 3. If you wish to update pricing by options, activate the Options Selection (All) section: Select the options to export from the selection list. Only the pricing (cost) information for the selected options will be included in the output file. Use this feature to further narrow the amount of information, indicating exactly which options you are ready to update (e.g. price update applies to cabinets option only, not to entire model.) Note: Your selection does not affect base price calculation. 4. If you wish to generate an output file for options and their price, type or select the filename and path of the Option Pricing output file. The system remembers the last location and file used. If you use the selection dialog box, do not change the Save as type CSV Files type. (For more information, refer to the Finding and Saving Files section in the Exploring Eclare chapter.) 5. If you wish to generate an output file for base cost only, type or select the filename and path of the Base Pricing output file. The system remembers Eclare Version 2016 Page 185 Users Manual Using Eclare the last location and file used. If you use the selection dialog box, do not change the Save as type CSV Files type. (For more information, refer to the Finding and Saving Files section in the Exploring Eclare chapter.) 6. Indicate the desired pricing options: Field Description Include Tax Activate this field if you wish to export tax information to the output file. Deactivate if you do not. Include Category Markup Activate this field it if you wish to mark up items upon export to the output file. Deactivate if you do not. Include Waste Activate this field if you wish to order the waste. Deactivate if you do not. Enforce Vendor Order Requirements Activate this field if you wish to enforce the vendor’s ordering requirements when exporting information to the output file. This program option checks that the item’s ordered quantities conform to the minimum and increments defined for the item’s vendor. Deactivate if you do not. Include “Header Adj” in Base Include Alternate Takeoffs in Pricing Activate this field if you wish to include in the base price any budget adjustments specified for the job. (For more information, refer to the To Add a Direct Budget Adjustment to a Job, Job Maintenance section in this chapter.) Deactivate if you do not. Activate this field if you wish Job Pricing to produce price sheets that include both takeoffs and alternate takeoffs. Use this feature to allow you to obtain pricing on all takeoff possibilities. Deactivate if you wish the price sheet to only include takeoffs. 7. Indicate the desired printing options: Field Description Print Base Price Only Eclare Version 2016 Activate this field if you wish to export only base pricing information to the output file. Deactivate if you wish to export option pricing in Page 186 Users Manual Using Eclare Field Description addition to base pricing information. Print/Export Zero Options Activate this field if you wish to include in the output file or report options that have a price of zero. Deactivate if you do not. 8. Click or to start the export process. If exporting to a file that already exists, a confirmation message displays. Click to continue. The extracting progress screen displays. 9. If the process encounters items that are not assigned to a vendor or for which no vendor price is defined, a warning message displays. Click to continue. The items will be exported, and you may verify the price at a later time. 10. A progress bar for the report generation displays. Depending on your selection, the report displays in the preview window or goes directly to the printer when finished. 11. From the preview screen, click screen. Eclare Version 2016 to return to the Export Option Pricing Page 187 Users Manual Using Eclare Export Gemini Price Book The Export Gemini Price Book menu option allows you to export selected pricing information for Gemini Accounting. It generates a comma-delimited file (.CSV) as output to be imported directly into Gemini. To select the menu option from the Main Menu, click File | Export | Export Gemini Price Book. To Export Gemini Price Book information 1. Select the Export Gemini Price Book menu option. The Export Gemini Price Book screen displays. 2. Type or select the filename and path of the output file. The system remembers the last location and file used. If you use the selection dialog box, do not change the Save as type CSV Files type. (For more information, refer to the Finding and Saving Files section in the Exploring Eclare chapter.) 3. Indicate the desired export options: Field Description Vendor Name Select the vendor to export pricing information for. To export all vendors, leave the field blank. (For information on how to select data, refer to the Selecting Eclare Version 2016 Page 188 Users Manual Using Eclare Field Description Values for a Field section in the Exploring Eclare chapter.) Lower Item # Upper Item # Select the items to export. To export all, leave Lower Item # and the Upper Item # blank. To export a range, select the desired range. Only items that fall within the range will be exported. Product Group Select the Product Group you wish to export takeoffs for. To include all groups, leave the field empty. 4. Click to start the export process. Eclare exports pricing information that matches all selected options. A progress bar displays, followed by a completion message. 5. Click to conclude the export operation. (For a sample of the data included in the output file, see Appendix A – File Layouts.) Eclare Version 2016 Page 189 Users Manual Using Eclare Import Vendor Pricing The Import Vendor Pricing menu option allows you to upload into Eclare pricing information received from vendors and suppliers. It reads a comma-delimited file (.CSV) as input and automatically updates the vendors file with new or updated pricing information. Use this menu option on a regular basis once the initial building of the database is completed. To select the menu option from the Main Menu, click File | Import | Import Vendor Pricing. This menu option performs two functions: (1) set up the structure furnished by the vendor, and (2) import the vendor’s data into the structure. If a vendor agrees to provide you a file with updated prices on a regular basis, you only need to define the vendor’s structure format once. To Import Vendor Pricing information 1. Select the Import Vendor Pricing menu option. The Import Vendor Pricing screen displays. Eclare Version 2016 Page 190 Users Manual Using Eclare 2. Select the vendor you will import pricing information for. If it is a new vendor, define the vendor. (For more information, refer to the To define a new vendor topic in this section.) If the vendor has already been defined, the vendor’s default values display. You may make any necessary changes that apply to this import session following the steps below. 3. Type or select the filename and path of the input file. The system remembers the last location and file used. If you use the selection dialog box, do not change the Files of type CSV Files type. (For more information, refer to the Finding and Saving Files section in the Exploring Eclare chapter.) 4. If you need to change the Price % Adjust, click on the field and enter the new percentage. For example, if you get a 3% discount over base price from the vendor, type –3. 5. Indicate the Price Effective Date you wish to assign to the imported prices, if different than the default log in date. Note: Upon import, Eclare compares this date against the existing vendor price entries, creating a new entry only if no other exists for the date and price combination. If four entries already exist, Eclare automatically replaces the oldest one. 6. If necessary, you may change the import actions: Field Description Action if not in master file Activate Prompt for Action if you wish the import process to stop and prompt you for action when an item to be imported is not found in the master file: This program option allows you to figure out where the item fits in the master scheme and to associate the vendor’s item with the correct item number within Eclare. Eclare Version 2016 Page 191 Users Manual Using Eclare Field Update with newer descriptions Description Activate Skip without asking to activate it if you wish the import process to skip items that are not found in the master file. Activate this field if you wish the import process to update the vendor description in the item master file when the vendor description in the input file is new or has changed. Deactivate if you are not setting up your system or you do not wish to update the vendor description. Test Only 7. Click Activate this field if you wish to perform a test run of the import data without updating the item master file. This program option checks that the input file is intact without changing anything in the system. Use it when initially testing the vendors’ levels, or anytime you wish to make sure the import will work before actually performing the import function. Deactivate this field if you wish to automatically load into Eclare the information in the input file. to start the import process. 8. If Prompt for Action is active, the Item not found dialog displays when an import item is not found in the master file. Select the appropriate action to continue. 9. If you click displays. Eclare Version 2016 , the Master File List (without assemblies) Page 192 Users Manual Using Eclare 10. Locate the item number you wish to associate with the new vendor price structure. Select the item and click automatically processes the next item. to continue. The system 11. If any of the vendors’ pricing information cannot be imported, an Exception Report displays. The report includes an entry for each line on which there is an error. 12. From the preview screen, click to exit the menu option. You must verify the information for the listed vendors and cost codes to ensure the data in both applications is correct. 13. A completion message displays when the import finishes. Click conclude the import operation. Eclare Version 2016 to Page 193 Users Manual Using Eclare To Define a New Vendor Note: The information you define will display automatically every time you import data for the selected vendor. You may still change the vendor’s default values prior to import. 1. After selecting the vendor, click screen displays. . The Changing Import Definitions 2. Type or select the filename and path of the input file. The system remembers the last location and file used. If you use the selection dialog box, do not change the Files of type CSV Files type. (For more information, refer to the Finding and Saving Files section in the Exploring Eclare chapter.) 3. Select the delimiter used to signal the end of the line or record in the input file. Click on the Terminator drop-down arrow and select the corresponding program option: Field Description Cr/Lf Carriage return and line feed. This is the most commonly used terminator. Lf/Cr Line feed and carriage return. Cr Only Carriage return only. Lf Only Line feed only. Eclare Version 2016 Page 194 Users Manual Using Eclare 4. Enter the Price % Adjust if you wish to globally adjust all the vendor’s prices by this fixed percentage amount at a later time. For example, if you get a 3% discount over base price from the vendor, type –3. 5. Indicate the desired import actions to use as default: Options Action if not in master file Description Activate Prompt for Action if you wish the import process to stop and prompt you for action when an item to be imported is not found in the master file: This program option allows you to figure out where the item fits in the master scheme and to assign Eclare’s correct item numbering. Update with newer descriptions Activate Skip without asking to activate it if you wish the import process to skip items that are not found in the master file. Activate this field if you wish the import process to update the vendor description in the item master file when the vendor description in the input file is new or has changed. Deactivate if you are not setting up your system or you do not wish to update the vendor description. 6. Define the import file structure. Since the vendor’s file may contain more information than Eclare needs, you must tell the system where to find the four fields to import: Part Number, Description, Unit and Price. This definition depends on the kind of file the vendor provides: Eclare Version 2016 Page 195 Users Manual Using Eclare Comma Separated File (CSV) – This is the format of spreadsheet files, where fields are separated from each other by commas. This is the most common file structure, and it must not include a header line. Fixed Length Fields – This is the format produced by mini-computer systems and mainframe systems, where each field is always a fixed number of ASCII characters. This file format is not separated by commas. Field Description Segment In CSV files, this field indicates the location within the file (the position in the list of fields) where the field is located. The first position in the list is represented by the value “1”. The Segment number must be different for each of the four fields to import, and it does not necessarily correspond to the order listed in the Record Definition section. This field is not used when importing Fixed Length files. Offset In Fixed Length files, this field indicates the character position within the file where the field value begins. This field is not used when importing CSV files. Length In Fixed Length files, this field indicates how many characters long the field is, and thus where it ends. This field is not used when importing CSV files. For example, one vendor may provide you a Comma Separated Values (CSV) file with six (6) data fields, in this order: Abbreviation, Description, Part Number, Price, Unit, Comments. The Record Definition would be: Field Part Number Description Unit Price Eclare Version 2016 Segment Offset Length 3 2 5 4 0 0 0 0 0 0 0 0 Page 196 Users Manual Using Eclare Another vendor may provide you a Fixed Length Fields file with five (5) data fields, containing a record like this: The Record Definition would be: Field Part Number Description Unit Price Segment Offset Length 1 1 1 1 52 5 1 26 7 21 4 6 7. Click to save the definitions. The values display in the Import Vendor Pricing screen. Eclare Version 2016 Page 197 Users Manual Using Eclare Import Vendors The Import Vendors menu option allows you to upload into Eclare basic vendor information from another source. It reads a comma-delimited file (.CSV) as input and updates the vendors file with new or updated vendors. To select the menu option from the Main Menu, click File | Import | Import Vendors. This menu option allows you to update your vendors file with information from other systems. If you build your vendor files in your accounting system, you may export the vendors out of accounting and import them into Eclare. Note: You may use this feature in conjunction with the Export Vendor information sent from Gemini’s Export to Eclare menu option if you wish to import vendor information after working with the data in spreadsheet format. If you are not familiar with the format of the import file or if you wish to customize the fields to import and their order, create an empty header file and use it to collect and organize your client information. (For more information regarding the import file, refer to Appendix A – File Layouts.) Eclare Version 2016 Page 198 Users Manual Using Eclare To Import Vendor information Note: If you do not know the format of the import file or wish to customize it, use the Create Header feature first. (For more information, refer to the To Create a Vendor Information File Header topic in this section.) 1. Select the Import Vendor menu option. The Import Vendor Information screen displays. 2. Type or select the filename and path of the input file. The system remembers the last location and file used. If you use the selection dialog box, do not change the Files of type CSV Files type. (For more information, refer to the Finding and Saving Files section in the Exploring Eclare chapter.) 3. If you wish to standardize the size of the Vendor ID field, enter the desired size in the Vendor ID Length field. This program option automatically adds leading zeros to the imported vendor number so that all numbers have the same number of digits in size (e.g. if the imported data contains an ID of 3 and you select a length of 5, the resulting ID will be 00003.) 4. Click to start the import process. This process does not erase previous vendor information. A confirmation message displays: 5. Click to continue. The number of records added or with errors displays in the Import Vendor Information screen. The menu option automatically closes when the import operation concludes. To Create a Vendor Information File Header 1. Select the Import Vendor menu option. The Import Vendor Information screen displays. 2. Click . 3. If the file already exists, a warning displays: Eclare Version 2016 Page 199 Users Manual Using Eclare Verify whether you wish to proceed. If you do not wish to override the existing file, click continue. 4. Click . If you wish to proceed, click to . 5. Work with the file using your spreadsheet application. You may customize the data you wish to work with by deleting the columns you do not need or rearranging the order of the columns. Eclare Version 2016 Page 200 Users Manual Using Eclare Import Cost Codes The Import Cost Codes menu option allows you to upload into Eclare cost code information from another source. It reads a comma-delimited file (.CSV) as input and updates the cost code file with new or updated information. To select the menu option from the Main Menu, click File | Import | Import Cost Codes. This menu option allows you to update your cost code file with information from other systems. If you build your cost files in your accounting system, you may export the cost codes out of accounting and import them into Eclare. This menu option does not overwrite existing data, so you can import multiple times. Note: You may use this feature in conjunction with the Export Cost Code information sent from Gemini’s Export to Eclare menu option if you wish to import cost code information after working with the data in spreadsheet format. To Import Cost Codes Information 1. Select the Import Cost Codes menu option. The Import Cost Code screen displays. 2. Type or select the filename and path of the input file. The system remembers the last location and file used. If you use the selection dialog box, do not Eclare Version 2016 Page 201 Users Manual Using Eclare change the Files of type CSV Files type. (For more information, refer to the Finding and Saving Files section in the Exploring Eclare chapter.) 3. To view the import file definition, click conform to this layout. Click . Your import file must to exit the definition window. 4. If you wish to standardize the size of the Cost Code field, enter the desired size in the Cost Code Length field. This program option automatically adds leading zeros to the imported cost code so that all numbers have the same number of digits in size (e.g. if the imported data contains an ID of 3 and you select a length of 5, the resulting ID will be 00003.) 5. Click to start the import process. This process does not erase previous cost code information. A confirmation message displays: 6. Click to continue. The number of records added or with errors displays in the Import Cost Code screen. 7. A completion message displays when the import finishes. Click conclude the import operation. Eclare Version 2016 to Page 202 Users Manual Using Eclare Import PO Reason Codes The Import PO Reason Codes menu option allows you to upload into Eclare PO reason codes from other sources. It reads a comma-delimited file (.CSV) as input and uploads only new codes into the file. To select the menu option from the Main Menu, click File | Import | Import PO Reason Codes. This menu option allows you to update your PO Reason Codes file with information from other systems. If you build your PO files in your accounting system, you may export the reason codes out of accounting and import them into Eclare. This menu option does not overwrite existing data, so you can import multiple times. Note: You may use this feature in conjunction with the Export PO Reason Codes information sent from Gemini’s Export to Eclare menu option if you wish to import reason code information after working with the data in spreadsheet format. To Import PO Reason Codes Information 1. Select the Import PO Reason Codes menu option. The Import PO Reason Information screen displays. 2. Type or select the filename and path of the input file. The system remembers the last location and file used. If you use the selection dialog box, do not Eclare Version 2016 Page 203 Users Manual Using Eclare change the Files of type CSV Files type. (For more information, refer to the Finding and Saving Files section in the Exploring Eclare chapter.) 3. To view the import file definition, click conform to this layout. Click . Your import file must to exit the definition window. 4. Click to start the import process. This process does not erase previous PO reason code information. A confirmation message displays: 5. Click to continue. The number of records added or with errors displays in the Import Cost Code screen. 6. A completion message displays when the import finishes. Click conclude the import operation. Eclare Version 2016 to Page 204 Users Manual Using Eclare Retrieve Jobs The Retrieve Jobs menu option allows you to automatically upload into Eclare groups of clients who have finalized their options selection in PSClient. It automatically creates a new job for the client based on the selected model, without having to retype the information. The information will be ready for estimating once the retrieve process completes. To select the menu option from the Main Menu, click File | Exchange | Retrieve Jobs. This function retrieves client and job information, including model option numbers, descriptions and quantities, sent from the Exchange button in PSClient’s Client Edit option for different option deadline groups. Pending option changes may also be exchanged. The system verifies the client information to determine whether or not it has already been uploaded and allows you to determine how to proceed in such case. Note: Before you run this menu option, you must define the default Exchange directory in the Program Setup menu option. (For more information, refer to the Program Setup section in this chapter.) Upon completion, you must reselect the current job. (For more information, refer to the To Set the Current Job, Job Maintenance section in the Using Eclare chapter.) Eclare Version 2016 Page 205 Users Manual Using Eclare To Retrieve Job information into Eclare 1. Select the Retrieve Jobs menu option. The Retrieve Jobs screen displays the information for the first client to process if it has not been previously uploaded. (For more information, refer to the To Process a client that has already been uploaded topic in this section.) 2. Verify the information. The system automatically displays the client personal information, the selected options in the Source section, and automatically assigns a Job # and Name. 3. If you wish to change the job number or name, click on the Job Number or Job Name and type the corresponding information. 4. Select the model you wish to use as a base to generate the job in the Estimating system. The takeoff for the client’s job will contain all of the selected model’s characteristics plus the options defined in the Source section. If you do not select a model, Eclare creates the job header with only the client characteristics; no takeoff is created. You must manually create a takeoff and add its quantities and options at a later point. Although this is not an operation you will perform often, it may be necessary when the model does not exist in Eclare. Click to continue. 5. If you wish to clear the new job’s revised quantities, activate the Reset Revised Quantity in New Job field. If you do not, Eclare displays a warning message if the job contains revised quantities. 6. For jobs that do not exist, click new job, or click the next client. if you wish to proceed to add the to skip uploading this job and continue retrieving For jobs that already exist, click information that has changed, or click complete job. if you wish to update only if you wish to replace the 7. Process the addition, rejection, update or replace of the customer information. (For more information, refer to the To Add a Job for the Customer information, To Reject a Job for the Customer information, or To Replace a Job for the Customer information topics in this section.) If you select to update, Eclare automatically updates the job. When adding jobs, it shows the option number exceptions on a preview window: Eclare Version 2016 Page 206 Users Manual Using Eclare Note: You may print this report and keep it for future reference. 8. If there are more customers to retrieve that have not been previously uploaded, the system automatically displays the next customer. Repeat the above steps for all clients. (For more information, refer to the To Process a client that has already been uploaded topic in this section.) 9. A message displays when all jobs have been retrieved. Click to conclude the operation. The current job is automatically cleared to prevent accidental changes to the original job. You must set a job as current to continue. (For more information, refer to the To Set the Current Job, Job Maintenance section in this chapter.) To Process a client that has already been uploaded 1. If Eclare detects that the client has already been uploaded, a message displays. Eclare Version 2016 Page 207 Users Manual Using Eclare 2. Determine the action you wish to take. Click the client or previously uploaded. if you wish to reload if you wish to keep the information that was 3. If you choose to reload, a deletion message displays. Click and proceed retrieving the information. (For more information, refer to the To Retrieve Job information into Eclare topic in this section.) 4. If you choose to keep the already uploaded information and there are more customers to retrieve, the system automatically displays the next customer. (For more information, refer to the To Retrieve Job information into Eclare topic in this section.) 5. A message displays when all jobs have been retrieved. Click to conclude the operation. The current job is automatically cleared to prevent accidental changes to the original job. You must set a job as current to continue. (For more information, refer to the To Set the Current Job, Job Maintenance section in this chapter.) To Add a Job for the Customer information 1. Once you click job: , a progress screen displays while processing the 2. If there are any options specified in the client information that are not defined for the model, the Missing Options screen displays. These options are not included in the takeoff. Click Eclare Version 2016 to continue. Page 208 Users Manual Using Eclare Note: You may now see the new client in the Job Maintenance and Takeoffs menu options. However, if there were missing options, you must make the necessary changes in Eclare and PSClient so that the options exist in, and can interface between, both applications. Once you have standardized the options, you may exchange the job again or manually add the missing options in Eclare. If your company supports a complex takeoff structure, you may set up option equivalents in the Extended Option field. (For more information, refer to the Takeoffs, To Edit Takeoff Details section in this chapter.) 3. If there are more customers to retrieve that have not been previously uploaded, the system automatically displays the next customer. (For more information, refer to the To Retrieve Job information into Eclare topic in this section.) To Reject a Job for the Customer information 1. Once you click displays: to skip uploading this client, a confirmation screen 2. Verify the client information and determine the action you wish to take. Eclare Version 2016 Page 209 Users Manual Using Eclare 3. Click if you wish to proceed. This operation cannot be undone, unless the client information is resent from PSClient. Click return to the Retrieve jobs screen. to 4. If there are more customers to retrieve that have not been previously uploaded, the system automatically displays the next customer. (For more information, refer to the To Retrieve Job information into Eclare topic in this section.) To Replace a Job for the Customer information 1. Once you click , a confirmation message displays: 2. Verify your selection and click 3. Click Eclare Version 2016 to continue. to conclude the operation. Page 210 Users Manual Using Eclare Update Common Information The Update Common Information menu option allows you to automatically upload into Eclare vendor, reason codes and cost code information that is maintained in other Prosoft’s applications. The information is exchanged automatically and will be ready for estimating once the retrieve process completes. To select the menu option from the Main Menu, click File | Exchange | Update Common Information. This function detects and attempts to import different vendors, reason codes and cost codes with the same number from Gemini’s AP Vendor List Maintenance, PO Reason Code file defined as part of the Purchase Order entry, and Cost Code file under JC Cost Item List Maintenance. To Update Common Information 1. Select the Update Common Information menu option. The Update Vendor / Cost Codes screen displays. 2. Indicate the desired update options: Field Vendor Eclare Version 2016 Description Activate this field if you wish to update Eclare’s vendor information with accounting’s new and updated vendors. Only vendors marked for transfer Page 211 Users Manual Using Eclare Field Description in Gemini are exchanged. Deactivate if you do not. Include Deleted Vendors Indicate whether you wish to synchronize Eclare’s vendors status based on your Gemini’s master vendor definition to protect Eclare from using a deleted vendor while still have that vendor in place. Activate this field if you wish to allow Gemini’s exported deleted vendors to be imported into Eclare, which will result in automatically updating their status to deleted. Deactivate if you do not. PO Reason Codes Cost Code Activate this field if you wish to update Eclare’s PO Reason Codes with accounting’s new and updated vendors. Deactivate if you do not. Activate this field if you wish to update Eclare’s Cost Code information with accounting’s new and updated cost codes. Deactivate if you do not. 3. Verify your selection. Click to start the import process and display the Update Exception report to the screen. Click to start the process but send the exceptions report directly to the printer. (For more information, refer to the Reports section in the Exploring Eclare chapter.) A progress bar displays for each part of the process, until the system completes the import and generates or prints the report. 4. If at least one of the vendors or cost codes cannot be imported, an Update Exception Report displays. The report includes: Eclare Version 2016 Vendors registered in accounting that are not found in Eclare Vendor numbers registered in both applications, but with a different name Cost Codes registered in Eclare that are not found in accounting Page 212 Users Manual Using Eclare 5. From the preview screen, click to exit the menu option. You must verify the information for the listed vendors and cost codes to ensure the data in both applications is correct. 6. You may rerun the import or click to conclude the operation. Update Model Option Reference The Update Model Option Reference menu option allows you to automatically upload into Eclare takeoff information that is maintained in the PSClient application. The information is exchanged automatically and will be ready for estimating once the retrieve process completes. Eclare Version 2016 Page 213 Users Manual Using Eclare To select the menu option from the Main Menu, click File | Exchange | Update Model Option Reference. Note: This menu option provides the only way to update Eclare’s model options descriptions with master model options sent from PSClient’s Master Option List. If you do not use PSClient, you can use Eclare’s option numbers but will not have an option description available. To Update Model Option Reference information 1. Select the Update Model Option Reference menu option. The Update Model Option Reference screen displays. 2. Click to continue. If there is Model Option Reference information from PSClient available, a confirmation message displays: 3. Verify that you indeed want to update the model option references. Click to continue. A progress bar displays, followed by a completion message. 4. Click Eclare Version 2016 to conclude the operation. Page 214 Users Manual Using Eclare Send Option Pricing The Send Option Pricing menu option allows you to send selected models or options’ item cost information to PSClient, where it is used to automatically update retail price for options within a module. It is only available for items with an assigned Option Number. To select the menu option from the Main Menu, click File | Supervisors | Send Option Pricing. Note: For the Exchange process to work correctly, Eclare’s Job Number must match the value defined in PSClient’s Eclare Link field. To Send Option Pricing Information 1. Select the Send Option Pricing menu option. The Exchange Option Pricing screen displays. 2. If you wish to send pricing by models, select the models to exchange from the selection list. (For information on how to select data, refer to the Selecting Data from a List section in the Exploring Eclare chapter.) Eclare Version 2016 Page 215 Users Manual Using Eclare 3. If you wish to send pricing by options, activate the Options Selection (All) section: Select the options to send from the selection list. Only the pricing (item cost) information for the selected options will be sent to PSClient. Use this feature to further narrow the amount of information, indicating exactly which options you are ready to update (e.g. price update applies to cabinets option only, not to entire model.) Note: Your selection does not affect base price calculation. 4. Select the desired Model Pricing Options: Field Description Include Tax Activate this field if you wish to export tax information to the output file. Deactivate if you do not. Include Category Markup Activate this field it if you wish to mark up items upon export to the output file. Deactivate if you do not. Include Waste Activate this field if you wish to include the waste. Deactivate if you do not. Enforce Vendor Order Requirements Activate this field if you wish to enforce the vendor’s ordering requirements when exporting information to the output file. This program option checks that the item’s ordered quantities conform to the minimum and increments defined for the item’s vendor. Deactivate if you do not. Include “Header Adj” in Base Eclare Version 2016 Activate this field if you wish to include in the base price any budget adjustments specified for the job. Page 216 Users Manual Using Eclare Field Description (For more information, refer to the To Add a Direct Budget Adjustment to a Job, Job Maintenance section in this chapter.) Deactivate if you do not. Include Alternate Takeoffs in Pricing Activate this field if you wish Job Pricing to produce price sheets that include both takeoffs and alternate takeoffs. Use this feature to allow you to obtain pricing on all takeoff possibilities. Deactivate if you wish the price sheet to only include takeoffs. 5. If you wish to generate an output file for base cost only, type or select the filename and path of the Base Pricing output file. The system remembers the last location and file used. If you use the selection dialog box, do not change the Save as type CSV Files type. (For more information, refer to the Finding and Saving Files section in the Exploring Eclare chapter.) 6. Indicate the desired printing options: Field Description Print Base Price Only Print/Export Zero Options Activate this field it if you wish to export only base pricing information to the output file. Deactivate if you wish to export option pricing in addition to base pricing information. Activate this field if you wish to include in the output file or report options that have a price of zero. Deactivate if you do not. 7. Click or to start the export process. If exporting to a file that already exists, a confirmation message displays. Click to continue. The extracting progress screen displays. 8. A progress bar for the report generation displays. Depending on your selection, the report displays in the preview window or goes directly to the printer when finished. Eclare Version 2016 Page 217 Users Manual Using Eclare Send Product Groups The Send Product Groups menu option allows you to send product group vendor information for all jobs from Eclare to PSClient. It is only available for items with an assigned Option Number. To select the menu option from the Main Menu, click File | Exchange | Send Product Groups. Note: To send a specific job’s product group and vendor information, use the Exchange feature in the Job Maintenance menu option. (For more information, refer to the Job Maintenance, To Exchange Job Information to PSClient section in this chapter.) To Send Product Groups 1. Select the Send Product Groups menu option. The Send Product Group to PSClient screen displays. 2. Click to continue. A confirmation message displays: 3. If you wish to proceed, click exchange file for PSClient. Eclare Version 2016 . Eclare automatically generates the Page 218 Users Manual Using Eclare Program Setup The Program Setup menu option allows you to define your registration information and to configure Eclare’s interface with other applications, such as CAD and Exchange. It is only available to users with supervisor’s access privileges. To select the menu option from the Main Menu, click File | Supervisors | Program Setup. To Define your Registration Information 1. Select the Program Setup menu option. The General Information screen displays. 2. Enter your company’s name, address, phone and e-mail information. “Company” here refers to the legal entity that purchased the software, to which the software is licensed. Eclare Version 2016 Page 219 Users Manual Using Eclare 3. Click to save the information. To Configure Eclare’s Interface with other Applications 1. Select the Program Setup menu option. The General Information screen displays. 2. Click on the Configuration tab to activate it. 3. Indicate the order in which your CAD system provides the takeoff information. The CAD input file is a comma-delimited file (CSV) containing these three fields: Take Off Number, Item Number and Quantity. During import, Eclare uses the sequence you define here to identify and map the CAD data and assign it to the corresponding database fields. Field Description Take Off Number Enter the number that identifies which field in the CAD file corresponds to the Take Off Number. For example, if it is the eighth field in the CAD file, enter 8 to match your CAD data sequence. Item Number Enter the number that identifies which field in the CAD Eclare Version 2016 Page 220 Users Manual Using Eclare Field Description file corresponds to the Item Number. For example, if it is the second field in the CAD file, enter 2 to match your CAD data sequence. Quantity Enter the number that identifies which field in the CAD file corresponds to the Quantity. For example, if it is the fifth field in the CAD file, enter 5 to match your CAD data sequence. 4. Enter the maximum number of backup files your company wishes to keep in any given backup directory. If no value is specified, Eclare allows only one backup file per directory. This value manages the total number of backup files that follow the standard backup file naming convention. (For more information, refer to the Backup Data section in this chapter.) 5. Indicate your preferred price handling for alternate items: Field Description Price Alternate Items Use Prosoft alternate File Dialog control Disable Report “Page Of Page” Activate this field if you wish to show the price of alternate items in the takeoff reports. (For more information, refer to the Takeoff Report section in this chapter.) Deactivate if you do not. Activate this field if you wish to use a tree control based dialog for folder and file location and selection. (For more information, refer to the To BROWSE for a folder using Prosoft’s Alternate File dialog format or to the To SELECT a file using Prosoft’s Alternate File dialog format sections in the Exploring Eclare chapter.) Deactivate if you do not. Activate this field if you wish to print just the page number (e.g. “Page 2”). This option allows you to reduce the amount of time it takes to generate reports. Deactivate if you want to print the specific page number within the total number of pages (e.g. “Page 2 of 10”). 6. Type or select the standard interface or Exchange directory. The system remembers the last location used. (For more information, refer to the Finding and Saving Files section in the Exploring Eclare chapter.) Eclare Version 2016 Page 221 Users Manual Using Eclare 7. Indicate your company’s desire to receive a backup reminder by entering a non-zero number in the Backup Warning Days field. If you do not want to receive a reminder, or if you perform backups through some method other than Eclare’s Backup Data option, enter a zero in this field. Upon login, Eclare will automatically compare today’s date against Eclare’s Backup Data option’s last backup file. If longer than the specified number of days has elapsed, a backup reminder warning message displays. (For more information, refer to the To Login to a Company section in this chapter.) Note: Even if you use an external backup system, we strongly urge you to make backups through Prosoft’s program on a frequent basis prior to critical operations (e.g. renumbering master file, performing global operations, etc.) instead of just once a day. This will allow your data to match critical recovery points and allow Prosoft to work with you without your network personnel having to send the backup to Prosoft. 8. Verify that the configuration is correct. Click information. to save the To Define your Job Takeoff Criteria Note: Use this feature to customize your company’s takeoff criteria structure. (For more information, refer to the Job Criteria section in this chapter.) 1. Select the Program Setup menu option. The General Information screen displays. 2. Click on the Job T/O Criteria tab to activate it. Eclare Version 2016 Page 222 Users Manual Using Eclare 3. Type the label you wish to use to identify your company’s takeoff criteria list. You may define up to four lists. (For more information on how to define the items for each list, refer to the Job Criteria section in this chapter.) 4. Click to save the information. To Define your Job Data Access Limits Note: Use this feature to define the categories your company will use to control users’ data access to jobs. 1. Select the Program Setup menu option. The General Information screen displays. 2. Click on the Limits tab to activate it. Eclare Version 2016 Page 223 Users Manual Using Eclare 3. Type the labels you wish to use to identify jobs’ data access limits. You may define up to twenty-six customizable limits. (For more information, refer to the Data Access Rights, Security section in the General Concepts chapter.) 4. Click Eclare Version 2016 to save the information. Page 224 Users Manual Using Eclare Company Maintenance The Company Maintenance menu option allows you to define and manage the company databases. To select the menu option from the Main Menu, click File | Supervisors | Company Maintenance. You may view the company database information, create new company databases, modify existing databases, hide unused databases or delete databases you no longer need. Note: Multiple company databases are required only if you have different operations with different price structures, or if you have companies in different locations that remotely operate separate databases within one licensed location of Eclare. If Eclare is installed separately at each company location, you must purchase a license for each. To Add a New Company 1. Select the Company Maintenance menu option. The Company Maintenance screen displays. 2. If you wish to base the new company on the structure or data of an existing company, find the company to use as a base and click on it to select it. 3. Click Eclare Version 2016 . The Company will be Added dialog box displays. Page 225 Users Manual Using Eclare 4. Enter the new company’s information. Please note: Field Description Number The Company Number must be unique. It cannot be already assigned to a company. Company You must enter a Company name. This field is required. Hide Company Indicates whether or not the company displays for selection during Company Login on the Select Company screen. (For more information, refer to the To Login to a Company, Company Login section in this chapter.) 5. Select one program option from the Copy Options from Current Company section: Field Description Copy Structure Only Activate this field if the new company’s structure will be similar to the selected company’s. This program option automatically duplicates the cost code and master file structures, but will not duplicate the jobs or vendor related cost information. Select this program option when setting up another company, in a different market, that purchases the items from different vendors. Duplicate all Information Eclare Version 2016 Activate this field if the new company’s structure and data will be similar to the selected company’s. This Page 226 Users Manual Using Eclare Field Description program option automatically duplicates the structures and the data contained therein, including jobs and vendor related cost information. Select this program option when performing “whatifs” scenarios to explore ideas for existing companies. Do Not Copy Anything Activate this field if you do not want to base the new company on any existing company. If you select this program option, the new company will be empty. You must create the structure and enter all data using the system’s menu options and/or uploading information from spreadsheets through the import / export options. Use this program option if you want to manually build the new company’s entire structure. 6. Verify that the information is correct. Click company. to create the new The new company displays in the Company Maintenance screen. The system automatically assigns a Data Number to identify the company’s associated data files. The new company is now ready for use. (For more information, refer to the Company Login section in this chapter.) To Modify a Company 1. Select the Company Maintenance menu option. The Company Maintenance screen displays. 2. Find the company you wish to modify and click on the line to select it. 3. Click Eclare Version 2016 . The Company will be Changed dialog box displays. Page 227 Users Manual Using Eclare 4. You can only hide or unhide the company, or change the company name. Enter a new name that is not currently assigned to any other company. (For more information, refer to the To Add a New Company topic in this section.) 5. Click to save the change. To Delete a Company 1. Select the Company Maintenance menu option. The Company Maintenance screen displays. 2. Find the company you wish to delete and click on it to select it. 3. Click . A warning message displays: 4. Verify that the company you selected for deletion is correct. If you wish to proceed with the deletion, click displays: Eclare Version 2016 . Another confirmation message Page 228 Users Manual Using Eclare 5. Verify once again that the company is correct and whether you wish to delete the company’s information. Once you confirm this step, you cannot undo it. 6. Click Eclare Version 2016 to continue. Page 229 Users Manual Using Eclare Master File Import The Master File Import menu option allows you to upload into Eclare item information from another source. It reads a comma-delimited file (.CSV) as input and updates the item master file. You can import item information to create the item master file or to register global changes made to the data through a spreadsheet program. To select the menu option from the Main Menu, click File | Supervisor | Global File Maintenance | Master File Import. This menu option allows you to delete the company database information and create a new item master file, or to add additional items and assemblies. It does not modify existing items. In order to use this option to change existing items, you must first delete the items from the database (master file, jobs and assemblies) before re-importing them. If you are not familiar with the format of the import file or if you wish to customize the fields to import and their order, create an empty header file and use it to collect and organize your client information. (For more information regarding the import file, refer to Appendix A – File Layouts.) Due to the nature of the operation, you must make a backup of the company data before importing the Master File To Import Master File information Note: If you do not know the format of the import file or wish to customize it, use the Create Header feature first. (For more information, refer to the To Create a Master File Header topic in this section.) Eclare Version 2016 Page 230 Users Manual Using Eclare 1. Select the Master File Import menu option. A confirmation screen displays. 2. If you wish to delete the company database information and create a new item master file, click Click . A confirmation screen displays: to continue. Click . 3. If you wish to update the item information with new items, click the program will not import items that already exist in the master file. ; 4. The Master File Import screen displays. 5. Type or select the filename and path of the input file. The system remembers the last location and file used. If you use the selection dialog box, do not change the Files of type CSV Files type. (For more information, refer to the Finding and Saving Files section in the Exploring Eclare chapter.) 6. If you wish to standardize the size of the Cost Code field, enter the desired size in the Cost Code Length field. This program option automatically adds leading zeros to the imported Cost Code so that all codes have the same number of digits in size (e.g. if the imported data contains a code of 3 and you select a length of 5, the resulting codes will be 00003.) 7. If you do not wish to import records for which the associated Category, Product Group or Cost Code is missing in Eclare, click the Do NOT Auto Insert Related Records field to activate it. Eclare will skip the record and list Eclare Version 2016 Page 231 Users Manual Using Eclare it the Exceptions report. If you wish to insert them anyway, deactivate this field and Eclare will create the corresponding reference record with an “**Auto” description. For example: 8. Click to start the export process. A progress bar displays. 9. A completion message displays when Eclare finishes the import process. 10. Click to conclude the import operation. (For a sample of the data included in the input file, see Appendix A – File Layouts) 11. If at least one of the items cannot be imported, an Import Exception Report displays. It shows lines that cannot be automatically uploaded because their layout does not conform with the expected format. 12. From the preview screen, click to exit the menu option. You must verify the information in the import file for the listed items, fix the information to match the required import format and run this menu option again. (For more information, refer to the Appendix A – File Layouts.) To Create a Master File Header 1. Select the Master File Import menu option. A confirmation screen displays. Eclare Version 2016 Page 232 Users Manual Using Eclare 2. Click to continue. The Master File Import screen displays. 3. Type or select the filename and path of the output file. If you use the selection dialog box, do not change the List Files of type CSV Files type. (For more information, refer to the Finding and Saving Files section in the Exploring Eclare chapter.) 4. Click . 5. If the file already exists, a warning displays: Verify whether you wish to proceed. If you do not wish to override the existing file, click . If you wish to proceed, click continue. A reconfirmation screen displays: Click 6. Click to to continue the operation. . 7. Work with the file using your spreadsheet application. You may customize the data you wish to work with by deleting the columns you do not need or rearranging the order of the columns. Eclare Version 2016 Page 233 Users Manual Using Eclare Master File Export The Master File Export menu option allows you to extract information from the item master file. It generates a comma-delimited file (.CSV) as output that can be used in a spreadsheet program to make global changes to the data, and then import it back into the system. To select the menu option from the Main Menu, click File | Supervisor | Global File Maintenance | Master File Export. To Export Master File information 1. Select the Master File Export menu option. The Master File Export screen displays. 2. Type or select the filename and path of the output file. The system remembers the last location and file used. If you use the selection dialog box, do not change the Save as type CSV Files type. (For more information, refer to the Finding and Saving Files section in the Exploring Eclare chapter.) 3. If you do not wish to export assembly items in addition to regular items, deactivate the Include Assemblies field. 4. Click displays: Eclare Version 2016 to start the export process. A confirmation message Page 234 Users Manual Using Eclare 5. Verify that the new output file will not override any other document you wish to keep. Click to continue. A progress bar displays. 6. A completion message displays when Eclare finishes generating the output file. 6. Click to conclude the export operation. (For a sample of the data included in the output file, see Appendix A – File Layouts.) Vendor Price Export The Vendor Price Export menu option allows you to extract selected price information from the vendor master file. It generates a comma-delimited file (.CSV) as output that can be used in a spreadsheet program to make global changes to the data, and then import it back into the system. To select the menu option from the Main Menu, click File | Supervisor | Global File Maintenance | Vendor Price Export. Eclare Version 2016 Page 235 Users Manual Using Eclare To Export Vendor Price information 1. Select the Vendor Price Export menu option. The Vendor Price Export screen displays. 2. Type or select the filename and path of the output file. The system remembers the last location and file used. If you use the selection dialog box, do not change the Save as type CSV Files type. (For more information, refer to the Finding and Saving Files section in the Exploring Eclare chapter.) 3. Indicate the desired export options: Field Description Vendor Name Select the vendor to export pricing information for. To export all vendors, leave the field blank. (For information on how to select data, refer to the Selecting Values for a Field section in the Exploring Eclare chapter.) Lower Item # Upper Item # Select the items to export. To export all, leave Lower Item # and the Upper Item # blank. To export a range, select the desired range. Only items that fall within the range will be exported. Product Group Select the Product Group you wish to export takeoffs for. To include all groups, leave the field empty. 4. Click to start the export process. Eclare exports pricing information that matches all selected options. A confirmation message displays: 5. Verify that the new output file will not override any other document you wish to keep. Click to continue. A progress bar displays. 7. A completion message displays when Eclare finishes generating the output file. Click to conclude the export operation. (For a sample of the data included in the output file, see Appendix A – File Layouts.) Eclare Version 2016 Page 236 Users Manual Using Eclare Vendor Price Import The Vendor Price Import menu option allows you to upload into Eclare vendor pricing and to replace vendor’s part numbers information from another source. It reads a comma-delimited file (.CSV) as input and updates the vendor file. You can import pricing information to register global changes made to the data through a spreadsheet program. To select the menu option from the Main Menu, click File | Supervisor | Global File Maintenance | Vendor Price Import. To Import Vendor Price information 1. Select the Vendor Price Import menu option. The Vendor Pricing Import screen displays. 2. Type or select the filename and path of the input file. The system remembers the last location and file used. If you use the selection dialog box, do not change the Files of type CSV Files type. (For more information, refer to the Finding and Saving Files section in the Exploring Eclare chapter.) Note: Eclare allows a maximum filename’s length of 255 characters. 3. If you wish to document the date and reason for the price change, type it as an explanatory note in the Update Reason field. If entered, Eclare automatically registers it in the Reason field for each item updated. Use this feature to assist you in managing future price changes. Eclare Version 2016 Page 237 Users Manual Using Eclare Note: Eclare stores a maximum length of 500 characters. When there are less than 80 characters available, Eclare automatically deletes the first portion of the text, starting with the first character until the first carriage return, and saves the newly typed information at the end. 4. If you wish to exclusively register changes to the vendor’s part numbers without updating pricing information, activate the Replace Vendor Part Number Only field. Eclare will simply update the corresponding item’s Vendor Part Number with new part number in the input file. 5. To view the import file definition, click conform to this layout. Click 6. Click displays: 7. Click Eclare Version 2016 . Your import file must to exit the definition window. to start the import process. A confirmation message to continue. A progress bar displays. Page 238 Users Manual Using Eclare 8. A completion message displays when Eclare finishes the import process. Click to conclude the import operation. (For a sample of the data included in the input file, see Appendix A – File Layouts.) Renumber Master Items The Renumber Master Items menu option allows you to import/export your item master numbering scheme to a comma-delimited (.csv) file, and to change the part numbers assigned to the items in the Item Master file. You may perform this operation for restructuring purposes or to add space in your numbering sequence for additional products. The system adjusts the numbering scheme throughout the entire database, including master files and jobs. To select the menu option from the Main Menu, click File | Supervisor | Global File Maintenance | Renumber Master Items. Due to the nature of the operation, you must make a backup of the company data before renumbering the item master file. Then you may either perform an automatic or individual item renumber. There is no limit to the number of times you may renumber the Item Master file. Note: If the original Item Number and Vendor Part Number are the same, Eclare automatically updates the Vendor Part Number with the new Item Number. To Automatically renumber the Items in the Item Master File Eclare Version 2016 Page 239 Users Manual Using Eclare 1. Select the Renumber Master Items menu option. A warning message displays. Read the message carefully before proceeding. 2. Click to continue. A backup warning message displays. Make sure you have made a backup copy of the company data before proceeding. 3. If you have already made the backup, click to continue. A warning message explaining how the operation will affect Gemini displays: Note: Proceed only if you are certain that there will be no discrepancies, or if you are willing to manually verify each price book item in Gemini and correct as necessary. Eclare Version 2016 Page 240 Users Manual Using Eclare 4. If you wish to continue, type the word “CONTINUE” in the text field. Click . The New Renumber Approval screen displays. 5. Click . The Global Renumbering Range screen displays: 6. Select the item numbers you wish to change in the Original Item Numbers to Adjust section. To renumber all items, leave the Beginning and Ending Item Number fields blank. To renumber a range of items, select the desired range. Only items that fall within the range will be changed. Eclare Version 2016 Page 241 Users Manual Using Eclare 7. Indicate the renumbering criteria in the New Item Number section. The new numbers are assigned based on the starting number and increment size you specify: Field Description New Beginning Item Number Enter the first part number you wish to use. This number will be assigned to the first item. If you wish to assign the items to a new division, include the new division number as the first two digits (e.g. from 00.10100 to 99.10100.) Increment Size (Right of Decimal) Enter the increment you wish to use. This number determines the space Eclare will leave between part numbers, and is not applied to the first two digits or Division number. For example, if the starting number is 00.10100 and the increment is 10, the items will be numbered: 00.10110, 00.10120, 00.10130, and so on. 8. Verify all requested number changes and click to continue. 9. If a duplicate number is found, an error message displays. Click find the duplicate number and assign a new number that is not in use. , 10. If no duplicate number is found, a confirmation message displays. Click to continue. 11. A completion message displays when the process finishes. Click conclude the renumber operation. Eclare Version 2016 Page 242 to Users Manual Using Eclare To Individually renumber the Items in the Item Master File 1. Select the Renumber Master Items menu option. A warning message displays. Read the message carefully before proceeding. 2. Click to continue. A backup warning message displays. Make sure you have made a backup copy of the company data before proceeding. 3. If you have already made the backup, click to continue. A warning message explaining how the operation will affect Gemini displays: Eclare Version 2016 Page 243 Users Manual Using Eclare Note: Proceed only if you are certain that there will be no discrepancies, or if you are willing to manually verify each price book item in Gemini and correct as necessary. 4. If you wish to continue, type the word “CONTINUE” in the text field. Click . The New Renumber Approval screen displays. 5. Locate the item you wish to renumber and click on the line to select it. Type the number you wish to assign in the Enter New Number field and click or press the [Tab] key. The entered value displays in the New Number column. 6. Once you enter the new number for all desired items, verify the changes and click to continue. 7. If a duplicate number is found, an error message displays. Click find the duplicate number and assign a new number that is not in use. , To Export the Item Master File Descriptions Note: Use this feature to export your current item master file numbering scheme to a comma-delimited (.csv) file. You may then review, reorganize and change your item number assignments using a spreadsheet, and import the changes automatically in just one step. (For more information, refer to Appendix A – File Layouts, Item Master Descriptions Import/Export.) 1. In the New Renumber Approval screen, click Filename screen displays: Eclare Version 2016 . The Please Enter Page 244 Users Manual Using Eclare 2. Type or select the filename and path of the output file. The system remembers the last location and file used. If you use the selection dialog box, do not change the Save as type CSV Files type. (For more information, refer to the Finding and Saving Files section in the Exploring Eclare chapter.) 3. Click to continue. 4. A completion message displays when the process finishes. Click conclude the export operation. to To Import a new Item Master File Mapping Note: Use this feature to upload your revised item master file numbering scheme into Eclare’s database. (For more information, refer to Appendix A – File Layouts, Item Master Descriptions Import/Export.) 1. In the New Renumber Approval screen, click Filename screen displays: . The Please Enter 2. Type or select the filename and path of the input file. The system remembers the last location and file used. If you use the selection dialog box, do not change the Save as type CSV Files type. (For more information, refer to the Finding and Saving Files section in the Exploring Eclare chapter.) 3. Click to continue. 4. A completion message displays when the process finishes. Click conclude the export operation. Eclare Version 2016 Page 245 to Users Manual Using Eclare Rename Product Group The Rename Product Group menu option allows you to change a product group code that is already assigned and referenced in the database. You may perform this operation if you need to modify your product group structure or change a specific code. To select the menu option from the Main Menu, click File | Supervisor | Global File Maintenance | Rename Product Group. To Automatically Rename a Product Group 1. Select the Rename Product Group menu option. The Change Product Group Code screen displays. 2. Select the Product Group you wish to rename in the Existing Product Group field. (For information on how to select data, refer to the Selecting values for a field section in the Exploring Eclare chapter.) 3. Type the new code you wish to assign to the selected Product Group in the New Product Group field. It can contain letters or numbers, and it must be unique. It cannot be already assigned to another record. 4. Click to begin the operation. If the new code is valid, a confirmation message displays. 5. Click 6. Click Eclare Version 2016 to proceed. to conclude the operation. Page 246 Users Manual Using Eclare Update Client Option Numbers The Update Client Option Numbers menu option allows you to update your client option numbering scheme and the associated descriptions. Use this feature to upload changes made to your current list of client options and automatically apply them throughout Eclare’s database. To select the menu option from the Main Menu, click File | Supervisor | Global File Maintenance | Update Client Option Numbers. Due to the nature of the operation, you must make a backup of the company data before updating client option numbers. To Update the Client Option Numbers 1. Select the Update Client Option Numbers menu option. The Update Client Option Numbers screen displays. 2. Enter the filename and path of the input file. (For more information, refer to the Finding and Saving Files section in the Exploring Eclare chapter.) 3. If you wish to see additional information about the file’s format, click : Eclare Version 2016 Page 247 Users Manual Using Eclare 4. Click to begin the process. PSClient automatically change all references to the original option number and replaces them with the new one. A completion message displays when the process finishes. 5. Click to conclude the operation. Tag M/F Operations The Tag M/F Operations menu option allows you to automatically update the Cost Code or Master Product Group for selected items. You may perform this operation after you add new product groups or cost codes and wish to reassign a group of items in the Master File. To select the menu option from the Main Menu, click File | Supervisor | Global File Maintenance | Tag M/F Operations. You may only perform one kind of tag operation at a time. Once the update concludes, the tagged items no longer display in the Tag Delete/Change screen. To process the same items again, you must exit and reenter the Tab M/F Operations menu option. Eclare Version 2016 Page 248 Users Manual Using Eclare To Update the current Cost Code assignments 1. Select the Tag M/F Operations menu option. The Tag Delete/Change Cost Code for Master File List screen displays. 2. Select the items you wish to change. You must select at least one Item. If you wish to automatically select all items marked “deleted”, click . A confirmation message displays: Click to continue and to complete the operation. Activate the Show Deleted field to see these records, and page down the items list to refresh the display if necessary. 3. Type or select the new cost code in the New CCode field. 4. Click . A confirmation screen displays: 5. Verify your item selection. Click confirmation screen displays: Eclare Version 2016 to continue. Another Page 249 Users Manual Using Eclare 6. Determine whether or not you want to proceed. Once you confirm this operation, you cannot undo the change. Click progress indicator displays until the process concludes. to proceed. A To Update the current Master Product Group assignments 1. Select the Tag M/F Operations menu option. The Tag Delete/Change Cost Code for Master File List screen displays. 2. Select the items you wish to change. You must select at least one Item. If you wish to automatically select all items marked “deleted”, click . A confirmation message displays: Click to continue and to complete the operation. Activate the Show Deleted field to see these records, and page down the items list to refresh the display if necessary. 3. Type or select the new product group in the New Product field. 4. Click . A confirmation screen displays: 5. Verify your item selection. Click confirmation screen displays: Eclare Version 2016 to continue. Another Page 250 Users Manual Using Eclare 6. Determine whether or not you want to proceed. Once you confirm this operation, you cannot undo the change. Click progress indicator displays until the process concludes. to proceed. A To Delete Items or Assemblies 1. Select the Tag M/F Operations menu option. The Tag Delete/Change Cost Code for Master File List screen displays. 2. Select the items you wish to delete from the master file. You must select at least one Item. If you wish to automatically select all items marked “deleted”, click . A confirmation message displays: Click to continue and to complete the operation. Activate the Show Deleted field to see these records, and page down the items list to refresh the display if necessary. 3. Click Eclare Version 2016 . A confirmation message displays: Page 251 Users Manual Using Eclare 4. Verify your item selection. Click confirmation screen displays: to continue. Another 5. Determine whether or not you want to proceed. Once you confirm this operation, you cannot undo the change. Click progress indicator displays until the process concludes. Eclare Version 2016 to proceed. A Page 252 Users Manual Using Eclare Restore Data The Restore Data menu option allows you to revert to an earlier, dated copy of a company database when you regularly make system backups using Eclare’s Backup feature, or to automatically retrieve the backup from Prosoft via the Internet. You can use this menu option if you experience data failure, to bring your database up to the last known good backup. (For more information, refer to the Backup Data section in this chapter.) To select the menu option from the Main Menu, click File | Supervisor | Restore Data. This menu option is only available to users with supervisor’s access privileges. Before you begin, make sure you log into the same company database you wish to restore. The restore operation will only take place if the company you are logged into corresponds to the company the backup was made for. Due to the nature of the operation, you must make a backup of the company data before restoring previous backups. Note: When restoring an encrypted backup file, PSClient handles password protection automatically, thus you are not required to remember nor type the password. To Restore Data from the Latest Known Good Backup 1. Select the Restore Data menu option. The Restore Company Data screen displays. 2. Verify that the destination Restore To and the source Restore From information is correct. If the location of the source backup files (.zip) is not correct, select the desired one in the Defined Locations field (for more Eclare Version 2016 Page 253 Users Manual Using Eclare information, refer to the To Define Backup Locations, Backup Data section in the Exploring Eclare chapter.) If you wish to restore the backup from a one-time custom location, select Pick Custom Location option. Eclare automatically opens a Browse for Folder dialog defaulted to the nearest valid backup folder. 3. Verify that the file to be restored is correct. If you wish to restore a different one, click to select it. Note: The backup files are named “ECL###-YYYY-MM-DD-HHmmS”, where the number corresponds to the Company Number, and the remaining information corresponds to the date (year, month, day) and time (hour, minute) when the backup was made. A last character of “S” indicates a secure backup. Eclare automatically defaults to the latest backup, that is, the file with the most recent date. 4. Click to continue. If the company you are logged into corresponds to the company the backup was made for, a confirmation message displays: 5. Make sure that you have selected to restore the correct company, and have located the last good known backup for the database. Click start. A progress bar displays until the restore process concludes. to 6. A completion message displays when the process finishes. Click 7. Once the restore process concludes, you must perform a company login. (For more information, refer to the Company Login section in this chapter.) Eclare Version 2016 Page 254 . Users Manual Using Eclare To Restore a Backup from Prosoft Note: Do not use this feature unless specifically instructed by Prosoft. If Prosoft has requested that you download a backup file, you must have a permanent Internet connection active before you perform the steps below. 1. Select the Restore Data menu option. The Restore Company Data screen displays. 2. Verify the restore information. (For more information, refer to the To Restore Data from the Latest Known Good Backup topic in this section.) 3. Click . A confirmation message displays: 4. Click to continue. A progress bar displays until the retrieve process concludes. The Download Files screen displays while the file downloads. When the download finishes, a completion message displays: Eclare Version 2016 Page 255 Users Manual Using Eclare 5. Click 6. Click Eclare Version 2016 . The Restore Confirmation message displays. to restore the downloaded backup. Page 256 Users Manual Using Eclare Reset In-Use Flags The Reset In-Use Flags menu option automatically resets internal database flags that indicate records are still in use. Such flags might have been incorrectly set due to power failures or any other abnormal program termination. Use this option as part of your recovery efforts when you need to unlock the database. To select the menu option from the Main Menu, click File | Supervisor | Reset In-Use Flags. This menu option is only available to users with supervisor’s access privileges. Due to the magnitude of the operation, we strongly recommend that you make a backup of the company data before running the procedure. To Reset In-Use Flags 1. Select the Reset In-Use Flags menu option. The Reset In-Use Flags screen displays. 2. Verify that you indeed wish to reset the flags. 3. Click completes: Eclare Version 2016 to continue. A progress bar displays until the operation Page 257 Users Manual Using Eclare Note: This process results in clearing up your current job selection along with any files that have been marked In-Use. (For more information, refer to the To Set the Current Job, Job Maintenance section in this chapter.) 4. Click Eclare Version 2016 to conclude the operation. Page 258 Users Manual Using Eclare Download All CD Files The Download All CD Files menu option allows you to download all files normally found in our Eclare Installation CD. Use this option to obtain a copy of the latest release, including installation files, What’s New, User Manual PDF and Online Help. To select the menu option from the Main Menu, click File | Supervisor | Program Release Files | Download All CD Files. This menu option is only available to users with supervisor’s access privileges. Note: You must have Internet connection and a valid registration number in order to use this menu option. To Download CD Files 1. Select the Program Release Files menu option. The Download All CD Files screen displays: Eclare Version 2016 Page 259 Users Manual Using Eclare 2. Click on the version you wish to download CD files for. Eclare automatically connects to Prosoft server and displays the requested files, if available: 3. Select the files you wish to download, if different than the ones already selected. (For information on how to select data, refer to the Selecting Data from a List section in the Exploring Eclare chapter.) 4. Click on cancel the operation. to download, or to 5. Once the download process concludes successfully, a completion message displays: 6. Click to conclude the operation, and then navigate to the specified folder in your computer to obtain the downloaded files. Eclare Version 2016 Page 260 Users Manual Using Eclare Install Release The Install Release menu option allows you to automatically install a downloaded version of Eclare. Use this option after downloading the newest release to automatically update your installation. To select the menu option from the Main Menu, click File | Supervisor | Program Release Files | Install Release. This menu option is only available to users with supervisor’s access privileges. Note: You must have already downloaded installation files using the Download All CD Files menu option. To Install Release 1. Select the Install Release menu option. The Choose Version to Install screen displays. 2. Click on the desired version and follow steps to complete installation. (For more information, refer to the To install Eclare as a standalone application section in Installing Eclare chapter.) Eclare Version 2016 Page 261 Users Manual Using Eclare Technical Menu The Technical Menu option allows you to run special maintenance utilities provided to assist you when you need support. Use this option only when instructed by, and during phone assistance from, Prosoft’s Support Department. To select the menu option from the Main Menu, click File | Supervisor | Technical Support Menu. This menu option is only available to users with supervisor’s access privileges. Note: When calling for support, please have your Eclare serial number available. (For more information, refer to the Registration Code section in this chapter, and the About section in the Exploring Eclare chapter.) To Run a Support Utility Note: Before you run this function, you must close all Eclare menu options currently active in your terminal. You must already be in phone communication with Prosoft’s Support Representative. 1. Select the Technical Support Menu menu option. The Support Utilities screen displays. 2. As requested by Prosoft’s Support Representative, provide the Request Code displayed in the screen. This code is unique to each terminal. Eclare Version 2016 Page 262 Users Manual Using Eclare 3. Enter the Access Code provided by Prosoft’s Support. This code will grant you access to the Utility section of the screen. 4. Click on the Utility drop-down and select the utility indicated by Prosoft’s Support. 5. Make sure you have selected the correct utility. Follow Prosoft’s instructions to complete the technical maintenance process. 6. Once the support process concludes successfully, click logout message displays. 7. Click . A to conclude the operation. 8. Once the operation concludes, you must log in again. (For more information, refer to the Company Login section in this chapter.) Eclare Version 2016 Page 263 Users Manual Using Eclare User Maintenance The User Maintenance menu option allows you to define and manage Eclare’s user accounts. To select the menu option from the Main Menu, click File | User Maintenance. You may view the defined users, create new users, change a user’s access privileges, activate or inactivate users, or delete users. There are two types of accounts: Supervisor – There is only one supervisor account in the system. It has full access to all menu options, and defines the default security access levels granted upon creation of new user accounts. The Supervisor account cannot be deleted. User – There is no limit to the number of user accounts you may create. User accounts may have access to all menu options, or access may be limited based on the access levels defined for the individual account. User accounts may automatically receive the same access privileges already assigned to another user, or be individually restricted from all access to the system. User accounts may also contain data limits to determine which jobs the user will have access to. Only authorized active users will be granted access to the system and its data. (For more information, refer to the Security section in the General Concepts chapter.) Users with no Maintenance options’ access privileges can still access the menu option for view only and selection purposes. Eclare Version 2016 Page 264 Users Manual Using Eclare To View Users 1. Select the User Maintenance menu option. The Browse Records screen displays all users defined in the system. The following information displays: Field Description Active Indicates whether or not the user is currently logged in to the system. Restricted Indicates whether or not the user’s access privileges are currently restricted. Password Indicates whether or not there is a password defined for the user. 2. To view additional account information, double-click on the desired user. The User Will be Changed screen displays, where you can see the user’s Password and security access levels defined for the account. (For more information, refer to the To Modify a User topic in this section.) 3. Click to exit. If you have changed the information displayed in the Users Will be Changed screen, a message displays. Click changes. to exit without saving the To Add a New User 1. Select the User Maintenance menu option. The Browse Records screen displays. 2. Click Eclare Version 2016 . The User will be Added dialog box displays. Page 265 Users Manual Using Eclare 3. In the General tab, enter the new user’s information. Please note: Field Description User Name The User Name must be unique. It cannot be already assigned to another user. Password The password is not required. However, it will better help control access to the system. To assign one, type up to eight (8) characters. The password is not case sensitive. Inform the password to the user. Fax Name Type the name you wish to appear on faxes generated by this user. This field may contain letters and numbers. E-mail Address Type the user’s e-mail address. Eclare automatically assigns this information as the From address when using its E-mailing features. (For more information, refer to the Other Special Features to Simplify your Work section in the General Concepts chapter.) 4. Click on the Security tab to activate it. Determine the new user’s access privileges. Eclare Version 2016 Page 266 Users Manual Using Eclare The levels control the following menu options and functions: Field Description Export Authority Allows user to generate standard comma-delimited (CSV) files. Includes - All File | Export menu options Import Authority Allows user to import standard comma-delimited (CSV) files from third parties’ applications. Includes - All File | Import menu options Exchange Option Allows user to exchange data between Prosoft’s applications. Includes – All File | Exchange menu options Job/Model Reports Allows user to produce job and model related reports. You can only inactivate this access privilege for users that have the Job Maintenance privilege active. Includes – Reports | Takeoff Report Reports | Material Summary Reports | Vendor Orders Reports | Job Price Comparison Reports | Product Group Report Reports | Square Foot Projection Reports | Check List Reports | Job Category Report Reports | Job List Customer Allows user to produce customer proposals. Eclare Version 2016 Page 267 Users Manual Using Eclare Field Proposals Description Includes – Reports | Customer Proposal Reports | Customer Proposal Detail Run Report Writer If your company has activated Eclare’s report writer’s licensing, allows user to: Run Report Writer – All custom reports defined using Prosoft’s report generator Allow Edit Report Writer – Ability to create and edit custom reports using Prosoft’s report generator Note: The report writer will only print fields the user has security access privileges to. Master File Reports Allows user to produce item related reports. Includes – All Reports | Master File menu options Master File Maintenance Allows user access to the information in master and reference files. If not selected, the user still has view only access in order to allow data selection in other menu options. Includes – Maintenance | Master File (view only) Maintenance | Price Update Maintenance | Vendors (view only) Maintenance | Quick Index All Maintenance | Setup Maintenance menu options (view only) except Show Item / Option References All Maintenance | Text Maintenance menu options (PO Text is view only) Job Maintenance Allows user to work with jobs and models. Includes – Maintenance | Job Maintenance Maintenance | Clear Job Maintenance | Duplicate Job Maintenance | Check List Maintenance | Takeoffs Maintenance | Pricing Maintenance | Clear pricing Model Maintenance Allows user to work with models only. Includes – Maintenance | Job Maintenance Maintenance | Clear Job Maintenance | Duplicate Job Maintenance | Check List Maintenance | Takeoffs Maintenance | Pricing Eclare Version 2016 Page 268 Users Manual Using Eclare Field Description Maintenance | Clear pricing Administrator Allows user to work with the Global Job Maintenance options. Includes – All Maintenance | Global Job Maintenance menu options User Maintenance Allows user to work with the User Maintenance option. Includes – File | User Maintenance 5. Activate each level you wish the user to have access to. To automatically select all levels, click . . To automatically deselect all levels, click 6. If you wish the new user to inherit the security privileges of another user, enter the other user’s information. Use this feature if you have set up master user records that contain pre-established security privileges and now wish to easily assign the same privileges to the new user. Note: You may assign privileges from up to two different users. Eclare will only assign direct security privileges, not privileges that had been inherited. Before assigning the users below, verify their access privileges to make sure you are not inadvertently assigning unwanted privileges. Field Description Inherit User 1 Enter or click to select the User ID of the user you wish to assign security privileges from. Inherit User 2 If you wish to assign security privileges from yet another user, enter or click to select the second User ID. 7. If you wish to define specific data access limits for this user, click on the Limits tab to activate it. PSClient uses this information to determine which Eclare Version 2016 Page 269 Users Manual Using Eclare jobs the user will have access to. (For more information, refer to the Data Access Rights, Security section in the General Concepts chapter.) You may assign up to three limits. Select “Unlimited” to grant access to all jobs. Select either “Default” or a specific custom-limit to control user access only to jobs that match the selected limit. 8. If the new user will not have immediate access to the system, click on the General tab to activate it. Activate the Restrict User Access check box. This allows you to create the user account and to define its access privileges in advance. 9. Verify that the information is correct. Click to create the new user. The new user displays in the Browse Records screen. The access privileges assigned in the Security tab will not take effect if user access is restricted. (For more information, please refer to the Security section in the General Concepts chapter.) To Modify a User 1. Select the User Maintenance menu option. The Browse Records screen displays. 2. Find the user you wish to modify and click on the line to select it. (For information on how to modify the supervisor, refer to the To Modify the Supervisor topic in this section.) Eclare Version 2016 Page 270 Users Manual Using Eclare 3. Click . The User will be Changed dialog box displays. 4. Enter the user information you wish to modify. You may change the user name, password, security access levels or restriction status. (For more information, refer to the To Add a New User topic in this section.) 5. Click to save the changes. To Modify the Supervisor 1. Select the User Maintenance menu option. The Browse Records screen displays. 2. Find the supervisor record and click on the line to select it. 3. Click Eclare Version 2016 . The User will be Changed dialog box displays. Page 271 Users Manual Using Eclare 4. Enter the information you wish to modify. In the General tab, you may change the supervisor’s general information, or click on Restrict All User Log-in’s Except Supervisor to prevent other users’ access while performing maintenance work. (For more information, refer to the To Add a New User topic in this section.) 5. To change the security access levels to assign as defaults to new users, click on the New User Default tab to activate it. Eclare Version 2016 Page 272 Users Manual Using Eclare Determine and register the values you wish to assign as default for the new user’s access privileges. (For more information, refer to the To Add a New User topic in this section.) 6. To change the Limits to assign as defaults to new users, click on the Limits tab to activate it: Determine and register the limits you wish to assign as default access privileges to new users. (For more information, refer to the To Add a New User topic in this section). 7. Click to save the changes. To Delete a User Note: Only delete users that will no longer use the system. Otherwise, restrict user access instead. (For more information, refer to the To Modify a User topic in this section.) 1. Select the User Maintenance menu option. The Browse Records screen displays. 2. Find the user you wish to delete and click on it to select it. 3. Click Eclare Version 2016 . A confirm delete message displays. Page 273 Users Manual Using Eclare 4. Verify that the user you selected for deletion is correct. If you wish to proceed with the deletion, click cannot undo it. . Once you confirm this step, you To Generate the User Report 1. Select the User Maintenance menu option. The Browse Records screen displays. 2. Click . The User Report preview screen displays. (For more information, refer to the Reports section in the Exploring PSClient chapter.) Eclare Version 2016 Page 274 Users Manual Using Eclare TxText Maintenance The TxText Maintenance menu option allows you to manage bulk vendor letters using Eclare’s predefined text document structure and Editor. Use these features to organize, create, edit and maintain document templates used when generating specific vendor letters. (For more information, refer to the How Eclare Handles Documents section in the General Concepts chapter.) To select the menu option from the Main Menu, click File | TxText Maintenance. This menu option is only available to users with administrator’s access privileges. To Work with the Tx Documents 1. Select the TxText Maintenance menu option. The Tx Document Maintenance screen displays. 2. To work with a specific document or kind of document, locate the folder for the desired document type or the document within the folder. To move down on the directory structure, click on the desired folder line to select it and click . To move up on the directory structure, click You may not go past the root directory or the last directory level. . 3. To create a custom folder, click . Use this feature to organize your text documents (e.g. a new directory for a different type of document, or Eclare Version 2016 Page 275 Users Manual Using Eclare subcategories to further organize documents, etc.) (For more information, refer to the To Create a New Text Document Folder topic in this section.) 4. If you wish to create a new text document, click to activate the Text Editor’s word processing features. (For more information, refer to the To Add a New Text Document topic in this section.) Note: If this is the first time you use the Text Editor, Eclare automatically initiates its installation. Click to proceed. 5. If you wish to open an existing text document, click to activate the Text Editor’s word processing features. (For more information, refer to the To View or Modify a Text Document topic in this section.) 6. If you wish to create a copy of an existing text document, click to activate the Get Document features. You may only access text files (.txt). (For more information, refer to the To Copy a Text Document topic in this section.) 7. If you wish to rename a text document or folder, click . (For more information, refer to the To Rename a Text Document or Folder topic in this section.) 8. If you wish to delete a text document, click . You may only delete text files or folders created under Eclare’s base directory structure. (For more information, refer to the To Delete a Text Document or Folder topic in this section.) To Create a New Text Document Folder 1. Select the TxText Maintenance menu option. The Tx Document Maintenance screen displays. Eclare Version 2016 Page 276 Users Manual Using Eclare 2. Locate the level into which you wish to create the new folder. To move down on the directory structure, click on the desired folder line to select it and click . To move up on the directory structure, click 3. Once you have located the desired level, click Prompt screen displays: . . The User 4. Type the name of the new folder. Assign a name that clearly identifies its purpose to help you differentiate it from the others. 5. Click level. . Eclare now displays the new folder in the selected directory To Add a New Text Document 1. Select the TxText Maintenance menu option. The Tx Document Maintenance screen displays. 2. Locate the directory where you wish to store the new document. To move down on the directory structure, click on the desired folder line to select it and click . To move up on the directory structure, click . Note: Although you may store the document in the main folder, saving it in the pre-defined sub-directory that best describe the purpose of the document will keep your documents organized and make it easier for you to find it. 3. Once you have located the desired folder, click Prompt screen displays: Eclare Version 2016 . The User Page 277 Users Manual Using Eclare 4. Type the desired file name. Eclare automatically assigns its internal text document extension (.tx). You may only create .tx files. 5. Click to enter the information. Eclare automatically activates the Text Editor’s word processing features. (For more information, refer to the To Work with Eclare Text Editor topic in this section.) 6. Complete the entry process and save the document. Eclare displays the new document in the selected folder. To View or Modify a Text Document 1. Select the TxText Maintenance menu option. The Tx Document Maintenance screen displays. 2. Locate the text document you wish to open and click on the line to select it. To move down on the directory structure, click on the desired folder line to select it and click . To move up on the directory structure, click . 3. Click . You may only work with text (.tx) files. Eclare automatically activates the Text Editor’s word processing features and opens the selected document. (For more information, refer to the To Work with Eclare Text Editor topic in this section .) 4. View the document or enter and save the changes. Eclare displays the updated document in the selected folder. To Copy a Text Document Note: For more information regarding Eclare’s directory structure, refer to the How Eclare Handles Documents section in the General Concepts chapter. 1. Select the TxText Maintenance menu option. The Tx Document Maintenance screen displays. Eclare Version 2016 Page 278 Users Manual Using Eclare 2. Locate the directory or folder where you wish to store the copy of the text document. To move down on the directory structure, click on the desired folder line to select it and click structure, click . To move up on the directory . 3. Click . The Get Document screen displays. It follows Window’s standard displays. (For more information on how to browse, refer to the Finding and Saving Files section in the Exploring Eclare chapter.) 4. Locate the folder that contains the text document you wish to copy. Locate the desired text document and click on the line to select it. Note: You may only use this feature for text documents (.tx). 5. If you wish to store the file with a new name, type the new name in the File Name text box. 6. Click . Eclare automatically stores a copy of the document in the folder where the operation began. If the folder already contains a file by the same name, a warning message displays. Note: The original document in the source folder remains unchanged. However, if you choose to continue when a file by the same name exists in the receiving folder, the copy will overwrite the one stored in the receiving folder. To Rename a Text Document or Folder 1. Select the TxText Maintenance menu option. The Tx Document Maintenance screen displays. 2. Locate the document or folder you wish to rename and click on the line to select it. To move down on the directory structure, click on the desired folder line to select it and click . To move up on the directory structure, click . You may only rename text files or folders created under Eclare’s base directory structure. 3. Click Eclare Version 2016 . The corresponding User Prompt screen displays: Page 279 Users Manual Using Eclare 4. Type the new document or folder name and click . Eclare automatically assigns its internal text document extension (.tx). You may only create .tx files. To Delete a Text Document or Folder 1. Select the TxText Maintenance menu option. The Tx Document Maintenance screen displays 2. Locate the document or folder you wish to delete and click on the line to select it. To move down on the directory structure, click on the desired folder line to select it and click . To move up on the directory structure, click . You may only delete text files or folders created under Eclare’s base directory structure. 3. Click . A corresponding confirmation message displays. 4. Verify that the document or folder you selected for deletion is correct and that you no longer need it. If you wish to proceed with the deletion, click . Once you confirm this step, you may not be able to undo it. (For more information, refer to the Functions and Modes section in the Exploring Eclare chapter.) Eclare Version 2016 Page 280 Users Manual Using Eclare To Work with Eclare Text Editor Note: Eclare Text Editor contains standard document management features that are very similar to MSWord. If you are not familiar with word processing, please refer to a Windows text editor’s documentation, or contact Prosoft, Inc. for assistance. (For more information, refer to the Other Tools, Text Editor section in the Exploring Eclare chapter.) 1. In the Text Editor screen, type, edit or insert the text content of your document. 2. To insert a pre-existing document, whether generated from MSWord (.doc) or the Text Editor (.tx), click where you want the document’s text to appear. Select Insert, Document from the menu bar. The Insert Document screen displays. Locate the desired file and click on the line to select it. Click to complete the operation. If the inserted document already contains tokens that do not match Eclare’s token definitions, a warning message displays: Note: You must fix any token errors before proceeding. 3. To delete an incorrect token, double-click on the token to select the field, and press [Delete]. 4. To add a token, click where you want the field to appear. Click Please select token to use screen displays: Eclare Version 2016 . The Page 281 Users Manual Using Eclare Locate the desired token from a list of ALL tokens, or click on the other tabs to narrow down the display by type of token (for more information, refer to the To quickly locate a record section in the Exploring Eclare chapter.) Click on the desired line to select it, and click . Note: Upon print, Eclare will replace the token with the information from the database, as done in MSWord’s mail merge. 5. To add user-entry fields, click where you want the user-entered information to appear. Select the Insert, User Entry function and define the information to be entered. Note: The value you assign in the Entry Group field determines how the Text Editor prompts you for user-entry when processing multiple documents in a single print operation. If you wish to be prompted only once and have the value entered automatically assigned to all documents, you must assign a number in this field. Otherwise, leave this field blank and you will be prompted for entry of a different value as each document is printed. Thus, define a User Prompt that makes sense across all documents. 6. Format the document as you wish the final client document to look. 7. Click Eclare Version 2016 to save the changes. Page 282 Users Manual Using Eclare Print Vendor Letters The Print Vendor Letters menu option allows you to automatically generate letters or e-mails for selected vendors, whether a specific vendor or all vendors associated with a job. Use this function to generate pre-defined, custom documents (.tx) to inform vendors of things that affect them. To select the menu option from the Main Menu, click File | Print Vendor Letters. Note: You must first select or tag the vendors you will generate letters for. You may process only one document at a time for your vendor selection. E-mail generation is only available when Eclare’s E-mail feature is properly configured. (For more information, refer to the Other Special Features to Simplify your Work section in the General Concepts chapter.) Before you run this menu option, you must define the default E-mail Server directory in the Terminal menu option. (For more information, refer to the Terminal Setup section in this chapter.) To Print Vendor Letters 1. Select the Print Vendor Letters menu option. The Print Vendor Letters screen displays. 2. If you wish to print letters for specific vendors, locate and select the vendors. You must select at least one vendor. (For information on how to select data, refer to the Selecting Data from a List section in the Exploring Eclare chapter.) Eclare Version 2016 Page 283 Users Manual Using Eclare 3. If you wish to print letters for vendors associated with a specific job, click . (For information, refer to the To Select Vendors by Job topic in this section.) 4. Click to print vendor letters. The Print Vendor Letters selection screen displays: 5. If you wish to print letters, verify that the Letters section is available for entry. Click on the Do Not Print Letters field to activate it or deactivate it. Enter the following information: Field Description Document Name Select the document (.tx) to print. (For more information, refer to the Finding and Saving Files section in the Exploring Eclare chapter.) 6. If you wish to generate labels, verify that the Labels section is available for entry. Click on the Do Not Generate Labels field to activate it or deactivate it. Enter the following information: Eclare Version 2016 Page 284 Users Manual Using Eclare Field Description First Usable Label Type or select the row and column position of the first usable label in the sheet. For example, if you are using sheets with ten rows and three columns and want to begin printing on the very first label, select Row 1, Column 1. However, if you are printing on a partially used sheet and the first available label is on the third row, second column, select Row 3, Column 2. Export Filename If you wish to send the labels to an export file for printing by an outside company, type or select the filename and path of the output file in the field. (For more information, refer to the Finding and Saving Files section in the Exploring PSClient chapter.) 7. If you wish to export print letters, verify that the Letters section is available for entry. Click on the Do Not Print Letters field to activate it or deactivate it. Enter the following information: 8. If you wish to select a different printer for either letters or bulk labels, click and select the desired printer from Windows selection dialog. (For more information, refer to the Print Setup section in the Using Eclare chapter.) 9. If you wish to generate e-mails, verify that the Email section is available for entry. Click on the Do Not Use Email field to activate it or deactivate it. PSClient automatically activates or deactivates the Email Detail tab. Enter the following information: Field Description Email Address Select the vendor’s e-mail address you wish to use, whether the primary address defined in the vendor record or the address of one of the vendor’s fixed contacts. To change the From, Subject and Body information, click on the Email Detail tab to activate it, and enter the corresponding information: Eclare Version 2016 Page 285 Users Manual Using Eclare Note: To include in the email the primary contact’s name, defined in the General tab of the Vendors screen, type the desired text in the Email Body field, locate the cursor where you wish the name to appear, and click . (For more information on how tokens work, refer to the Other Tools, Text Editor section in the Exploring Eclare chapter.) 10. Click . If you are printing letters or labels, the corresponding confirmation message displays: Eclare Version 2016 Page 286 Users Manual Using Eclare 11. Click to continue. PSClient automatically generates the selected output, whether printed letters, printed labels, export labels file, or e-mails. Note: If there are user-entry fields defined for the document, the Text Editor prompts you for user-entry based on the field’s Entry Group definition. Thus, some fields may prompt you only once and assign your entry value to all letters in the print run, while others prompt you for a different value as each letter is processed. (For more information, refer to the To Work with Eclare Text Editor, TxText Maintenance section in this chapter.) To Select Vendors by Job 1. In the Print Vendor Letters screen, click Letters Bulk Tag screen displays: . The Print Vendor 2. Select the Job you wish to print vendor letters for. (For information on how to select data, refer to the Selecting Values for a Field section in the Exploring Eclare chapter.) 3. Click . A confirmation screen displays: 4. Click to continue. Eclare automatically determines and tags the vendors that are associated with the selected job. If the job has vendors assigned, a message displays: Eclare Version 2016 Page 287 Users Manual Using Eclare 5. Click to continue. All tagged vendors are marked “X” in the Print Vendor Letters screen: 6. Verify the marked vendors and adjust your vendor selection as necessary. (For information on how to select data, refer to the Selecting Data from a List section in the Exploring Eclare chapter.) 7. Click to print vendor letters. (For more information, refer to the To Print Vendor Letters topic in this section.) Eclare Version 2016 Page 288 Users Manual Using Eclare Launch Spreadsheet The Launch Spreadsheet menu option provides you a convenient shortcut to simplify activation of your preferred spreadsheet program (e.g. MS Excel). You may use this spreadsheet application to work with data extracted from Eclare’s database through the export options or to prepare new data to import into Eclare. If you have just used one of the export profile functions, Eclare automatically activates the corresponding file. To select the menu option from the Main Menu, click File | Launch Spreadsheet. A spreadsheet’s features allow you to further work with and manage your information. You can perform “what-if” analysis and greatly reduce your need to manually type into the system information you have readily available in electronic form. To fully benefit from Eclare’s ability to interact with spreadsheets, you must have a thorough understanding of spreadsheet concepts and be an experienced spreadsheet user. (For more information, refer to your spreadsheet’s documentation, or contact Prosoft, Inc. for assistance.) Eclare Version 2016 Page 289 Users Manual Using Eclare Custom Reports The Custom Reports menu option allows you to set up a menu structure within Eclare to facilitate the execution of reports created through a Report Generator. You must define the report and ensure it works properly before assigning and running it in this menu option. To select the menu option from the Main Menu, click File | Custom Reports. Although the system does not come with a report generator, you may acquire one from a third party. Use the report generator to define your custom reports utilizing Eclare’s database information, connect the custom report to Eclare’s menu structure, and easily execute it during your Eclare’s work session. If you do not include your custom reports in this menu option, you must run the reports externally from your report generator. When running a custom report, this menu option activates the report generator, transfers control to the report generator in order to execute the selected report according to the defined parameters, and returns control to Eclare after the report finishes. Eclare Version 2016 Page 290 Users Manual Using Eclare To Add a Custom Report to Eclare’s Menu Structure 1. Select the Custom Report menu option. The Custom Reports screen displays. 2. Click . The Custom Report will be Added screen displays: 3. Click . The Custom Report will be Added screen displays: 4. Enter the new report’s information: Field Description Description Assign a description that easily identifies the purpose of the custom report. It displays in the Custom Reports menu screen. The Description must be unique. It cannot be already assigned to another report. Preview Report Activate this field if you wish to preview the custom report on the screen upon running it. Deactivate this field if you wish to send the custom report directly to the printer upon running it. Report TXR Type or select the filename and path of the report file created by the report generator. If you use the selection dialog box, do not change the List files of type Report TXR’s type. (For more information, refer to the Finding and Saving Files section in the Exploring Eclare chapter.) Report Name Type the main filename or directory for the report. Eclare Version 2016 Page 291 Users Manual Using Eclare Field Description Opt. Parameters Type any values the report generator needs in order to run the report. For example, if the custom report filters the information by job, type the Job Name. Auto create Database Activate this field if you wish to automatically consolidate information from more than one database table into a single file. The report generator will use the generated file to expedite processing. Deactivate it if you do not. 5. Verify that the information for the new report is correct. Click to save the information. The new report displays in the Custom Report screen. To Modify a Custom Report 1. Select the Custom Report menu option. The Custom Reports screen displays. 2. Find the custom report you wish to modify and click on the line to select it. 3. Click . The Custom Report will be Changed screen displays: 4. You can change any of the fields. (For more information, refer to the To add a custom report topic in this section.) 5. Click Eclare Version 2016 to save the change. Page 292 Users Manual Using Eclare To Delete a Custom Report 1. Select the Custom Reports menu option. The Custom Reports screen displays. 2. Find the report you wish to delete from the menu and click on it to select it. 3. Click . A confirm delete message displays. 4. Verify that the report you selected for deletion is correct. If you wish to proceed with the deletion, click . Note: The delete process only deletes the entry in the custom report menu. It does not delete the report file produced by the report generator. To Create a Database for a Custom Report Note: This menu option consolidates information from more than one database table into a single file. The report generator will use the generated file to expedite processing. 1. Select the Custom Report menu option. The Custom Reports screen displays. 2. Find the custom report you wish to create a database for and click on the line to select it. 3. Click Eclare Version 2016 . The Job Takeoff Detail screen displays: Page 293 Users Manual Using Eclare 4. Select the jobs to include in the custom report database. To include all jobs, leave the Start and End Job Numbers blank. To include a range of jobs, select the desired range. Only jobs that fall within the range will be included in the custom report database. 5. Indicate the information you wish to include in the custom report’s database: Field Description Include Tax Include Category Markup Include Waste Enforce Vendor Order Requirements Activate this field if you wish to include tax information in the custom report database. Deactivate if you do not. Activate this field it if you wish to mark up items included in the custom report database. Deactivate if you do not. Activate this field if you wish to order the waste for items included in the custom report database. Deactivate if you do not. Activate this field if you wish to enforce the vendor’s ordering requirements when exporting information to the output file. This program option checks that the item’s ordered quantities conform to the minimum and increments defined for the item’s vendor. Deactivate if you do not. 6. Type or select the filename and path of the custom report database file. The system remembers the last location and file used. If you use the selection dialog box, do not change the Save as type TPS Files type. (For more information, refer to the Finding and Saving Files section in the Exploring Eclare chapter.) 7. Click to extract the selected data and generate the custom report database. The extracting progress screen displays. 8. If the process encounters items that are not assigned to a vendor or for which no vendor price is defined, a warning message displays. Click to continue. The items will be included, and you may verify the price at a later time. 9. Upon completion, the system returns to the Custom Report screen. Eclare Version 2016 Page 294 Users Manual Using Eclare To Run a Custom Report 1. Select the Custom Report menu option. The Custom Reports screen displays. 2. Find the custom report you wish to run. 3. To run the report, click on the line to select it and click double-click on the line. A confirmation screen displays: 4. Click , or to continue. If the report is found, Eclare transfers control to the report generator. The report generator executes the report according to the defined parameters and returns control to Eclare after the report finishes. Eclare Version 2016 Page 295 Users Manual Using Eclare Report Writer Manager The Report Writer Manager menu option will allow you to create and print your own custom reports. Unlike a third party’s report generator, Prosoft’s report writer will not require that you rebuild your reports upon updates to Eclare’s data dictionary. To select the menu option from the Main Menu, click File | Report Writer Manager. This menu option is only available to users with Report Writer access privileges. (For more information, refer to the To Add a New User, User Maintenance section in this chapter.) Note: For more information regarding Prosoft’s report generator, contact Prosoft, Inc. Support for the report generator is available on a bill basis. Eclare Version 2016 Page 296 Users Manual Using Eclare Calculator The Calculator menu option gives you access to Window’s standard desktop Calculator. Use the calculator to simplify mathematical calculations and directly move the result into a data field. (For detailed instructions on how to use the calculator, refer to your Windows system documentation.) To select the menu option from the Main Menu, click File | Utilities | Calculator. This menu option is also available under the Start button, Start | Programs | Accessories | Calculator. To Perform a Mathematical calculation and move the result into a data field 1. Select the Calculator menu option. The Calculator displays. 2. Click on the digits that make up the first number, or activate the [Num Lock] key and type in the digits using the numeric keypad. 3. Click on the desired mathematical operation, or press the corresponding numeric keypad operation key. 4. Repeat steps 2 and 3 for all numbers involved in the calculation. 5. Click the equal sign, or press Enter in the numeric keypad. Eclare Version 2016 Page 297 Users Manual Using Eclare 6. Select Edit | Copy on the Calculator’s menu bar, or press the [Ctrl] + [C] keys. 7. Activate the window where you wish to copy the result to. Click on the desired field and press the [Ctrl] + [V] keys. Digiwin The Digiwin menu option provides a direct interface between Eclare Estimating and Digiwin, Prosoft’s Measurement or Construction Takeoff System. Digiwin enables you to read takeoff information from a digitizer instead of using the keyboard to enter the quantities. It is a menu optional software not included with Eclare. Roof Calculator The Roof Calculator menu option allows you automate calculations when developing non-manufactured roofs. Eclare Version 2016 Page 298 Users Manual Using Eclare To select the menu option from the Main Menu, click File | Utilities | Roof Calculator. To Calculate the Roof’s Hip Takeoff 1. Select the Roof Calculator menu option. The Roof Calculator displays. 2. If necessary, click to adjust the standard roof calculation values. (For more information, refer to the To Define the Standard Roof Calculation Values topic in this section.) 3. Select the Hip calculation type. Enter the hip information in the Hip screen. 4. Verify the entered information. Click to continue. The results of the calculation display in the Calculation Results section: 5. If you wish to store the calculation results in the clipboard for further use, click . If you wish to send the takeoff worksheet directly to the printer, click Eclare Version 2016 . If you wish to exit the menu option, click . Page 299 Users Manual Using Eclare If you wish to perform a different calculation, select the desired Calculation Type. (For more information, refer to the corresponding section in this chapter.) To Calculate the Roof’s Valleys Takeoff 1. Select the Roof Calculator menu option. The Roof Calculator displays. 2. If necessary, click to adjust the standard roof calculation values. (For more information, refer to the To Define the Standard Roof Calculation Values topic in this section.) 3. Select the Valleys calculation type. Enter the valley information in the Valleys screen. 4. Verify the entered information. Click to continue. The results of the calculation display in the Calculation Results section: Eclare Version 2016 Page 300 Users Manual Using Eclare 5. If you wish to store the calculation results in the clipboard for further use, click . If you wish to send the takeoff worksheet directly to the printer, click . If you wish to exit the menu option, click . If you wish to perform a different calculation, select the desired Calculation Type. (For more information, refer to the corresponding section in this chapter.) To Calculate the Common Rafter’s Takeoff 1. Select the Roof Calculator menu option. The Roof Calculator displays. 2. If necessary, click to adjust the standard roof calculation values. (For more information, refer to the To Define the Standard Roof Calculation Values topic in this section.) 3. Select the Common Rafters calculation type. Enter the common rafters’ information in the Common Rafters screen. 4. Verify the entered information. Click to continue. The results of the calculation display in the Calculation Results section: Eclare Version 2016 Page 301 Users Manual Using Eclare 5. If you wish to store the calculation results in the clipboard for further use, click . If you wish to send the takeoff worksheet directly to the printer, click . If you wish to exit the menu option, click . If you wish to perform a different calculation, select the desired Calculation Type. (For more information, refer to the corresponding menu option in this chapter.) To Calculate the Dormer’s Takeoff 1. Select the Roof Calculator menu option. The Roof Calculator displays. 2. If necessary, click to adjust the standard roof calculation values. (For more information, refer to the To Define the Standard Roof Calculation Values topic in this section.) 3. Select the Dormers calculation type. Enter the dormers information in the Dormers screen. Eclare Version 2016 Page 302 Users Manual Using Eclare 4. Verify the entered information. Click to continue. The results of the calculation display in the Calculation Results section: 5. If you wish to store the calculation results in the clipboard for further use, click . If you wish to send the takeoff worksheet directly to the printer, click . If you wish to exit the menu option, click . If you wish to perform a different calculation, select the desired Calculation Type. (For more information, refer to the corresponding section in this chapter.) To Define the Standard Roof Calculation Values 1. In the Roof Calculator menu option, click Values screen displays. . The Roof Calculator 2. Type the standard cut waste and minimum board values. 3. Click to accept the values and continue with the desired roof calculation. (For more information, refer to the corresponding roof calculation section in this chapter.) Eclare Version 2016 Page 303 Users Manual Using Eclare Show Users The Show Users menu option allows you to manage the users’ activities in a multi-user, multi-company environment. To select the menu option from the Main Menu, click File | Show Users. You may view the users that are logged in and using the system at any particular time, identify the company they are working with, and view indicators of the specific activities the user is performing. To View the Current Active Users 1. Select the Show Users menu option. The Active Users screen displays. The following information allows you to manage the users’ activities: Field Description ID Displays a Control ID reference number for internal purposes. Co # Displays the company number the user is currently working with. L Displays an “L” meaning “Locked” when the user is exclusively locking a company database. Usually occurs during backup and restore operations. S Displays an “S” meaning “Secondary” when the user is logged into another company database. Usually occurs during multi-company processes (e.g. someone signed into another company within the same program, etc.) Flags This field displays internal indicators of the specific Eclare Version 2016 Page 304 Users Manual Using Eclare Field Description activities the user is performing. Date / Time Displays the date and time when the user logged in for the current session. User Name Displays the name of the user that is currently logged in. Computer Name Displays the name of the computer the user is currently logged in. Use this information to determine which computers may have been left running. 2. Click Eclare Version 2016 to exit the menu option. Page 305 Users Manual Using Eclare Registration Code The Registration Code menu option allows you define the information of the legal entity that purchased the Eclare Estimating software. You must provide this information before you start using Eclare in order to gain access to the software. To select the menu option from the Main Menu, click File | Registration Code. This menu option validates the serial number and code. Obtain these values from the Registration, License and Activation form. If you install Eclare in more than one location, you must acquire a separate license for each and register each license accordingly. To Enter the Program Registration information 1. Select the Registration Code menu option. The Program Registration screen displays. 2. Enter the name of the legal entity Eclare is Licensed to. Verify that you have typed it correctly. 3. Enter the nine-digit (9) Serial Number from the Registration form. Verify that you have typed it correctly. 4. Enter the Validation Code from the Registration form. Verify that you have typed it correctly. 5. Click Eclare Version 2016 to save the registration information. Page 306 Users Manual Using Eclare 6. If the information you provided is not valid, an error message displays. Click to return to the Program Registration screen, and correct the information. 7. When all information is correct, the system saves the registration information and automatically exits the menu option. You are now ready to use Eclare Estimating. Customer Suggestions The Customer Suggestions menu option allows you to register and track suggestions for improvements to Eclare. Use these entries to submit your suggestions to Prosoft. To select the menu option from the Main Menu, click File | Customer Suggestions. To Add a new Suggestion 1. Select the Customer Suggestion menu option. The Eclare Customer Suggestions screen displays. 2. Click Eclare Version 2016 . The Suggestion will be Added screen displays. Page 307 Users Manual Using Eclare 3. Enter the new suggestion information. Please note: Field Description Contact Info You must enter the name of the contact person, and any other additional information that may help locate or identify the person (e.g. Department, phone, email). Menu Item Enter the menu option’s name, including the complete path you followed to activate it. Use the piping symbol “|” to separate the sequence of steps (e.g. File | Supervisor | Program Setup). Pages Attached If you are attaching any samples or any other document related to the suggestion, type or select the number of pages. This feature will assist you in submitting all relevant information available. Suggestion Enter a detailed description of the suggestion to assist Prosoft in fully understanding your idea. You may type the suggestion directly in the text field or click to activate a memo window. Reason Enter a detailed description of the reason for your suggestion to assist Prosoft in fully understanding your idea. You may type the reason directly in the text field or click Eclare Version 2016 to activate a memo window. Page 308 Users Manual Using Eclare 4. If you wish to register any additional comments or notes for internal reference, click to activate a memo window. Enter your notes; they will not be submitted to Prosoft. 5. Click to save the information. To Modify a Suggestion 1. Select the Customer Suggestion menu option. The Eclare Customer Suggestions screen displays. 2. Find the suggestion you wish to modify and click on the line to select it. 3. Click . The Suggestion will be Changed screen displays. 4. Enter the information you wish to modify. You cannot leave the record without a Contact, suggestion or reason. (For more information, refer to the To Add a New Suggestion topic in this section.) 5. Click Eclare Version 2016 to save the change. Page 309 Users Manual Using Eclare To Delete a Suggestion 1. Select the Customer Suggestion menu option. The Eclare Customer Suggestions screen displays. 2. Find the suggestion you wish to delete and click on it to select it. 3. Verify that the suggestion you selected for deletion is correct. Click . A completion message displays: The system marks the suggestion’s record “deleted”. The “deleted” record remains in the file and displays in red when the Show Deleted feature is active. To undo, deactivate the record’s Deleted check box. (For more information, refer to the To Modify a Suggestion topic in this section and to the Functions and Modes section in the Exploring Eclare chapter.) To Submit a Suggestion 1. Select the Customer Suggestion menu option. The Eclare Customer Suggestions screen displays. 2. Find the suggestion you wish to submit and click on it to select it. 3. Click . The Suggestion will be Changed screen displays. 4. If you wish to print the suggestion, click generates the suggestion form: Eclare Version 2016 . Eclare automatically Page 310 Users Manual Using Eclare Note: You may print, fax or e-mail the printed suggestion to Prosoft’s Development Department. If you do not receive acknowledgement, call Prosoft to inquire. 5. If you wish to automatically submit an electronic copy of the suggestion to Prosoft via Internet, click . A confirmation message displays: Make sure the suggestion includes all information you wish to report. Once you submit it, you will not be able to make any changes. Click to continue. Make sure to write Prosoft’s reference number for future reference. Eclare Version 2016 Page 311 Users Manual Using Eclare Backup Data The Backup Data menu option allows you to use Eclare to make a dated safety copy of the database structure for the company you are currently working with. It stores the backup copy in a different location than where the original company files are. You can use the backup to bring the system up to the last known good data in case of a data failure. To select the menu option from the Main Menu, click File | Backup Data. You must use this menu option if your backup procedures are not handled by a System Administrator or through a server Tape Backup system. We recommend you backup your system on a regular, daily basis. The backup filename will be “ECL###-YYYY-MM-DD-HHmmS”, where the number corresponds to the Company Number, and the remaining information corresponds to the date (year, month, day) and time (hour, minute) when the backup was made. A last character of “S” indicates a secure backup. Note: If your company will use offline company backup (i.e. Google Drive), contact your network administrator or other computer professional for assistance. It is possible to automatically upload to Google Drive by downloading the Google Drive application onto a synchronized folder and setting Eclare’s Backup functionality to that folder. Your company is directly responsible for establishing accounts and other service arrangements with Google. To Back up your Estimating Data 1. Select the Backup Data menu option. The Backup Company Data screen displays. Note: If it is the first time you use this option after install, Eclare automatically opens up a File Open dialog for you to select a default backup location. Eclare Version 2016 Page 312 Users Manual Using Eclare 2. Verify that the destination Backup To and the source From Directory information are correct. If the location of the destination is not correct, select the desired one in the Predefined Locations field. If you wish to make the backup to a one-time custom location, select Pick Custom Location option. Eclare automatically opens a Browse for Folder dialog defaulted to the nearest valid backup folder. The location you choose is not saved as a predefined backup location. Note: If you wish to define more than one backup location (i.e. a normal daily backup and synchronized Google Drive backup folder, etc.), click on . (For more information, refer to the To Define Backup Locations topic in this section.) 3. If you wish to create an encrypted backup copy, click Encrypt Backup File to activate it. A check mark must display. Use this feature if you wish to generate a password protected backup file. Note: Eclare handles password protection automatically during backup and restore, thus you do not need to type or remember the password. Encrypted files are thus accessible at any computer where Eclare is installed, but cannot be opened otherwise. 4. Click backup process concludes. to continue. A progress bar displays until the 5. A completion message displays when the process finishes. Click conclude the backup operation. The backup information displays in the Company Login screen. to To Send the Backup to Prosoft Note: This feature allows you to send a copy of your data to be checked or repaired. Do not use this feature unless specifically instructed by Prosoft. If Prosoft has requested that you send a backup file, you must have a permanent Internet connection active before you perform the steps below. 1. Select the Backup Data menu option. The Backup Company Data screen displays. 2. Verify the backup information. (For more information, refer to the To Back up your Estimating Data topic in this section.) 3. Click Eclare Version 2016 . A confirmation message displays: Page 313 Users Manual Using Eclare 4. Click to continue. A progress bar displays until the backup to your Program folder concludes. The Send Me screen displays: 5. Enter all required information and click . Eclare automatically transfers the files via the Internet. A completion message displays when the process finishes. Eclare Version 2016 Page 314 Users Manual Using Eclare 6. Click to conclude the send operation. To Define Backup Locations Use this feature to define up to five locations where you wish Eclare to store backup files in. Although a single location is enough for normal daily backups, you may use additional locations for Google Drive synchronization purposes or as needed. 1. In the Backup Company Data screen, click Data Setup screen displays: 2. If you wish to add a location, click Edit screen displays: Eclare Version 2016 . The Backup . The Backup Locations Page 315 Users Manual Using Eclare Enter the following information: Field Description Location Enter a descriptive name (up to a maximum of 40 characters) that clearly identifies the purpose of this backup location (e.g. Weekly Backup). Folder Select the desired location. You can type or paste the folder address or click to select it. (For more information, refer to the Finding and Saving Files section in the Exploring Eclare chapter.) 3. If you wish to modify an already defined location, click adjust the Location description or folder as needed. and 4. If you wish to define a different location as your default backup location, click or until the desired one is first on the list. 5. If you wish to remove a location, click on the line to select it and click . Note: Eclare automatically creates the Default Location line upon first use, when no backup location definitions exist yet, and sets it to your company’s preference as set in the Backup Company Data screen’s Backup To field. You may delete or adjust it if needed. 6. Click process. Eclare Version 2016 to save any changes and continue with the backup Page 316 Users Manual Using Eclare Fax Manager The Fax Manager menu option allows you to manage the status of Eclare’s faxes, edit recipient and schedule information, and delete faxes generated through the Fax feature on the Print Preview screen. To select the menu option from the Main Menu, click File | Fax Manager. Note: This menu option is only available when Eclare’s fax server feature is active and properly configured. Before you run this menu option, you must define the default Fax Server directory in the Terminal menu option. (For more information, refer to the Terminal section in this chapter.) To View the Status of a Fax 1. Select the Fax Manager menu option. The Fax Utility screen displays. Eclare Version 2016 Page 317 Users Manual Using Eclare 2. Locate the fax you wish to view status information for and click on it to select it. Eclare automatically displays the corresponding fax information in the right-hand section of the window. 3. If you wish to browse through the pages to view the fax content, click . 4. Click to exit the option, or continue with the next operation. To Edit the Status of a Fax 1. Select the Fax Manager menu option. The Fax Utility screen displays. Eclare Version 2016 Page 318 Users Manual Using Eclare 2. Locate the fax you wish to edit and click on it to select it. Eclare automatically displays the corresponding information. 3. Click . The Change Fax screen displays: 4. Modify the information as necessary. 5. Click 6. Click to save the changes. to exit the option, or continue with the next operation. To Schedule Sending of a Fax 1. Select the Fax Manager menu option. The Fax Utility screen displays. Eclare Version 2016 Page 319 Users Manual Using Eclare 2. Locate the fax you wish to schedule and click on it to select it. Eclare automatically displays the corresponding information. 3. Click . The Schedule Fax screen displays: 4. Select the scheduling action you wish to apply to the fax and click on it to activate it. You may choose to Reschedule, Complete or Postpone the fax. 5. Enter the following information in the Send Options section: Field Description Next send event Activate this option if you wish the fax to be sent along with the next regular fax session. Specific Date & Time Activate this option if you wish the fax to be sent at a specified date and time. You must enter the Date and Time when you wish Eclare to perform the send operation. Urgent, send now! Activate this option if you wish Eclare to send the fax immediately. 6. Click 7. Click Eclare Version 2016 to save the changes. to exit the option, or continue with the next operation. Page 320 Users Manual Using Eclare To Delete a Specific Fax 1. Select the Fax Manager menu option. The Fax Utility screen displays. 2. Locate the fax you wish to delete and click on it to select it. Eclare automatically displays the corresponding information. Verify that it is the correct fax. 3. Click . The Delete Fax screen displays: 4. Click on the Current Document field to activate it. 5. If you wish to proceed with the deletion, click this step, you cannot undo it. 6. Click Eclare Version 2016 . Once you confirm to exit the option, or continue with the next operation. Page 321 Users Manual Using Eclare To Delete all Older Completed Faxes Note: This process does not delete faxes generated by other users. It deletes only the faxes you have created that have a date older than the selected number of days, from the current date. 1. Select the Fax Manager menu option. The Fax Utility screen displays. 2. Click . The Delete Fax screen displays: 3. Click on the Older Completed field to activate it. Also click on the Verify deleting of YOUR’s older completed faxes field to activate it. 4. In the Removed completed older than __ days field, enter the number of days you wish to use as a criteria when determining which faxes to delete. Eclare will only delete faxes with date older than the selected number of days, from the current date. For example, if you wish to delete faxes older than three days, enter a 3. 5. If you wish to proceed with the deletion, click this step, you cannot undo it. Eclare Version 2016 . Once you confirm Page 322 Users Manual Using Eclare 6. Click to exit the option, or continue with the next operation. To Print a Log of Faxes 1. Select the Fax Manager menu option. The Fax Utility screen displays. 2. Click . The Print Fax Log screen displays: 3. Select the type of log you wish to print: Eclare Version 2016 Page 323 Users Manual Using Eclare Field Print Detailed Log Include Recipient Only Description Activate this field if you wish to print a detailed log: Deactivate this field if you wish to print a summary log: Activate this field if you wish to include only the specified recipient. Deactivate this field if you do not. 4. Type or select your selection criteria. Eclare will only include in the log the faxes that match the criteria you specify 5. Verify your selection. Click to view the report on the screen or to send it directly to the printer. (For more information, refer to the Reports section in the Exploring Eclare chapter.) A progress bar displays until the system completes generating or printing the report. Eclare Version 2016 Page 324 Users Manual Using Eclare E-mail / FTP Manager The E-mail / FTP Manager menu option allows you to manage the status of Eclare’s e-mails, edit recipient and e-mail information, print e-mail logs, and delete e-mails generated through the PDF and E-mail features on the Print Preview screen. To select the menu option from the Main Menu, click File | E-mail / FTP Manager. Note: This menu option is only available when Eclare’s PDF feature is active and the E-mail feature is properly configured. (For more information, refer to the Other Special Features to Simplify your Work section in the General Concepts chapter.) Before you run this menu option, you must define the default E-mail Server directory in the Terminal menu option. (For more information, refer to the Terminal Setup section in this chapter.) To View an E-mail 1. Select the E-mail / FTP Manager menu option. The E-Mail / FTP Manager screen displays. 2. To view e-mails by status, click on the corresponding section to activate it. 3. Locate the e-mail you wish to view and click on it to select it. Click . The View Email Detail / Resend or View FTP Detail / Resend screen displays the e-mail information. Eclare Version 2016 Page 325 Users Manual Using Eclare 4. If you wish to view the attached PDF report, click or . Eclare automatically opens the attachment and displays it on your computer’s defined viewer. Note: You must already have a viewer installed (e.g. Adobe Acrobat) and properly associated with the .PDF file extension. If the attached file is password protected, you must enter the correct password in order to display the content of the file. Eclare Version 2016 Page 326 Users Manual Using Eclare 5. Click to exit the option, or continue with the next operation. To Edit an Active E-mail 1. Select the E-mail / FTP Manager menu option. The E-Mail / FTP Manager screen displays. 2. Locate the e-mail you wish to view and click on it to select it. You may not change e-mails that have already been submitted. Click . The View Email Detail / Resend or View FTP Detail / Resend screen displays the e-mail information. Eclare Version 2016 Page 327 Users Manual Using Eclare 3. Modify the information as necessary. 4. Click e-mail. or to save the changes and re-send the To Delete a Specific E-mail 1. Select the E-mail / FTP Manager menu option. The E-Mail / FTP Manager screen displays. 2. Locate the e-mail you wish to delete and click on it to select it. Verify that it is the correct e-mail. 3. Click . A confirm delete message displays. 4. If you wish to proceed with the deletion, click this step, you cannot undo it. . Once you confirm To Delete a Group of E-mails Note: This process deletes only sent e-mails that have a date older than the selected date. 1. Select the E-mail / FTP Manager menu option. The E-Mail / FTP Manager screen displays. Eclare Version 2016 Page 328 Users Manual Using Eclare 2. Click displays: . The Delete “Sent” E-mail through a date screen 3. Type or select the date you wish to use as a criteria when determining which e-mails to delete. Eclare will only delete sent e-mails with dates older than the selected date. 4. Click . A confirm delete message displays. 5. If you wish to proceed with the deletion, click this step, you cannot undo it. . Once you confirm To Print an E-mail Log 1. Select the E-mail / FTP Manager menu option. The E-Mail / FTP Manager screen displays. 2. Click displays: Eclare Version 2016 . The E-mail / FTP Manager Log Report screen Page 329 Users Manual Using Eclare 3. Type or select your selection criteria. Eclare will only print e-mails that match the criteria you specify. 4. Verify your selection. Click to view the log on the screen or to send it directly to the printer. (For more information, refer to the Reports section in the Exploring Eclare chapter.) Eclare Version 2016 Page 330 Users Manual Using Eclare Multi-File FTP Send The Multi-File FTP Send menu option allows you send multiple selected files through FTP (File Transfer Protocol). To select the menu option from the Main Menu, click File | Multi-File FTP Send. To Send Multiple Files to the FTP 1. Select the Multi-File FTP Send menu option. The FTP Multi-File Send screen displays. 2. Enter the following information: Field Description FTP Address FTP Port You must enter the FTP Address in its numeric form (e.g. “192.168.1.1”) instead of its symbolic name (e.g. “ftp:www.prosoftinc.com”). You must also enter the FTP Port, which defaults to 21 and in most cases should not be changed. Eclare Version 2016 Page 331 Users Manual Using Eclare Field FTP Name Password Description If you do not specify an FTP User Name and FTP Password, Eclare attempts to log into the FTP anonymously. You may also use the PDF Password as additional access protection for your PDF file. Notify Email Type the e-mail addresses you wish to send the files to. Subject Email Type the e-mail’s subject line. 3. Click to select the files to send. (For more information, refer to the Finding and Saving Files section in the Exploring Eclare chapter.) 4. If you wish to delete a file, click on the line to select it and click . 5. Verify the information and selected files, and make any necessary corrections. 6. Click to continue. A progress bar displays. Exit The Exit menu option allows you close Eclare and exit the system. Before exiting, you must properly conclude the current operation or process. To select the menu option from the Main Menu, click File | Exit. To Exit Eclare 1. Select the Exit menu option. If you have selected not to receive the backup prompt upon exit, the system closes and exits automatically. 2. If you have selected to receive the backup prompt upon exit, the Backup Reminder displays: Eclare Version 2016 Page 332 Users Manual Using Eclare 3. Click if you wish to back up the company data now or to continue without making the backup. 4. If you select to back up the data now, the Backup Company Data screen displays: 5. Verify that the destination Backup To and the source From Directory information are correct. If the location of the destination is not correct, select the desired one in the Predefined Locations field. (For more information, refer to the Backup Data section in this chapter.) 6. Click backup process concludes. to continue. A progress bar displays until the 7. A completion message displays when the process finishes. Click to conclude the backup operation. The system closes and exits automatically. Eclare Version 2016 Page 333 Users Manual Using Eclare Job Maintenance The Job Maintenance menu option allows you to define the jobs’ general information, or “header”, including the client’s name and address, markup, tax and cost information, and access limit, among others. (For information on how to automatically upload job information, refer to the Retrieve Jobs section in this chapter.) To select the menu option from the Main Menu, click Jobs | Job Maintenance. This menu option allows you to work with two types of jobs. Although the data structure for both is the same, they are used for different purposes: Models – Contains source information to be used as a template, or base house. Allows you to duplicate the standard model features as a base for creating and customizing specific jobs. Eclare’s security access features prevent unauthorized users from changing models. Jobs – Contains information pertaining to a client’s specific structure. Allows you to customize the structure’s features in order to meet the client’s requests. You may view your company’s jobs listed by number, name, category or last pricing date. The Price Date list allows you to see jobs in the order they were released, most current jobs first, simplifying your data maintenance functions. You may also automatically exchange job, budgets and purchase order information between Eclare and Gemini. (For more information, refer to the To Exchange Job Information topic in this section.) Eclare Version 2016 Page 334 Users Manual Using Eclare To Add a new Job or Model 1. Select the Job Maintenance menu option. The Jobs Maintenance screen displays. 2. Click . The Adding Job screen displays. 3. Define the job in the top section of the screen. Please note: Field Description Job Name Enter the client’s name or a name that clearly identifies the job. It cannot be already assigned to another record. Job # You must enter a Job Number. This number is exclusive to Eclare. It can contain up to ten characters, letters or numbers, and it must be unique. It cannot be already assigned to another record. Model Activate this field if this is a model. Deactivate if it is a standard job. Hide Job Activate this field if you wish to exclude the job from appearing in browse lists, printed lists and reports. Deactivate if you want the job to display and print. Eclare Version 2016 Page 335 Users Manual Using Eclare Field Description Note: This feature does not apply to Global Maintenance options which process all jobs, whether or not marked ‘hidden’. 4. Enter the job’s general, or header, information in the General section. Please note: Field Description Description Enter the description you wish to use to relate to this job. It should be different than the job name (e.g. Lot Number, Block Number, etc.) Owner If the job is not a model, enter the client or owner’s name. Phone Address City State Zip Code Enter the client’s address and phone, or the model’s location. Plan ID If you wish to categorize this job, enter the corresponding ID in this field. Eclare uses this value as a job lookup field and to group jobs in the Job List report Note: Upon creating new jobs during Exchange, Eclare automatically sets this field to PSClient’s Model Name. You may change this default value at any time as needed. Upon Exchange to Gemini, the current value of this field becomes Gemini’s default for the job. Further changes in Eclare are not automatically registered in Gemini. Gemini Co. # Enter the number of the Company in Gemini that will receive Eclare’s exchanged information for this job. Limit If you wish all users to have access to this job, select “Unlimited”. If you wish to control access to this job, select the desired limit. Only users that have matching data access rights will have access to the job information. (For more information, refer to the Data Access Rights, Security section in the General Concepts chapter.) Estimator Type the initials of the user that will be estimating the Eclare Version 2016 Page 336 Users Manual Using Eclare Field Description job. This field may contain up to three (3) letters or numbers. Due Date Select the date when the Customer Proposal must be delivered. (For information on how to use the Calendar, refer to the Calendar section in the Exploring Eclare chapter.) Total Square Foot Enter the total size of the building in square feet. Square Foot Living Enter the total size of the living area in square feet. Markup Overhead Enter the markup to use when calculating overhead. If the markup is 10%, type 10. You may also enter decimal values (e.g. 10.5). The system calculates markup upon request when running customer proposals and reports. Markup Profit Enter the markup to use when calculating profit. If the markup is 10%, type 10. You may also enter decimal values (e.g. 10.5). The system calculates markup upon request when running customer proposals and reports. Sales Tax % If you wish to calculate the item’s tax for reporting purposes, enter the percentage of sales tax that applies to the job. Product Exception Leave this field empty if the items for this job are supplied by, and thus the pricing of the job is determined by, the vendor of choice defined in the Master Product Group list. (For more information, refer to the Master Product Group section in this chapter.) Select the corresponding Product Exception if the vendor for this job is not the vendor of choice. The job’s pricing will be based on the Product Group Exceptions list for the selected exception vendor. (For more information, refer to the Product Group Exceptions sections in this chapter.) Lender Number Eclare Version 2016 Select the corresponding Lender for this job. (For more information, refer to the Vendors section in this chapter.) Page 337 Users Manual Using Eclare 5. To define purchase order notes for this job, activate the PO Notes section and type the notes. You may choose to print these notes in Vendor Orders. These notes are exchanged with Prosoft’s accounting application, and will print accounting’s purchase orders and work orders. 6. To define other notes related to the job, activate the Other Notes section and type the notes. These notes are only used as reference information within Eclare. 7. To define cost code budget adjustments for this job, activate the Adjustments section and perform the necessary operations. This feature allows you to adjust the cost codes by the specified amounts during job export. (For more information, refer to the corresponding Direct Budget Adjustment topic in this section. Eclare Version 2016 Page 338 Users Manual Using Eclare 8. To define revisions for this job, activate the Revisions section and perform the necessary operations. This feature allows you to document and manage plan revisions, that is, changes made to the standard plan. To assist you in tracking revisions, Eclare displays the date of the job’s most recent revision in the Jobs Maintenance list. 9. Verify that the information is correct. Click to save the information. To Change a Job 1. Select the Job Maintenance menu option. The Jobs Maintenance screen displays. Eclare Version 2016 Page 339 Users Manual Using Eclare 2. Select the kind of job you wish to see in the Show field. 3. Click . The Changing Job screen displays. 4. Enter the information you wish to modify. You cannot leave a record without a Job Number assignment. When changing the number, name or description, make sure it is not assigned to another record. (For more information, refer to the To Add a New Job or Model topic in this section.) 5. Click to save the change. To Set the Current Job Note: Most of Eclare’s menu options require that you select a job and set it as current before you can work with them. The current job’s Name displays in Eclare’s window title bar, and applies only to your terminal. It remains current until you select another job as current or clear it. (For more information, refer to the Clear Job Selection section in this chapter.) 1. Select the Job Maintenance menu option. The Jobs Maintenance screen displays. 2. Select the kind of job you wish to see in the Show field. Eclare Version 2016 Page 340 Users Manual Using Eclare 3. Locate the job you wish to set as current and click on it to select it. 4. Click . The selected job displays in Eclare’s window title bar. To Exchange Job Information to Gemini Note: Use this menu option to send job, budgets and purchase order information to the Exchange directory until picked up by Prosoft’s Gemini Accounting application. 1. Select the Job Maintenance menu option. The Jobs Maintenance screen displays. 2. Select the kind of job you wish to see in the Show field. 3. Locate the job you wish to exchange and click on it to select it. 4. Click . The Changing Job screen displays. 5. Click . If the job is missing any data relevant to Gemini, a warning message displays. Otherwise, the Exchange: Send Job to Accounting screen displays: Eclare Version 2016 Page 341 Users Manual Using Eclare 6. Select the Send to Gemini field and enter your specific export selection. 7. Indicate the job information you wish to exchange: Field Description Include Waste Enforce Vendor Order Requirements Include Budget Include POs Include C/Os Activate this field if you wish to exchange waste information. Deactivate if you do not. Activate this field if you wish to exchange vendor’s ordering requirements. Deactivate if you do not. Activate this field if you wish to exchange budget information. Eclare will automatically apply any direct budget adjustments defined for the job. Deactivate if you do not. Activate this field if you wish to exchange purchase order information. Deactivate if you do not. Activate this field if you wish to exchange change order information. This function becomes available after you exchange the job for the first time. Deactivate if you do not. 8. If you select to Include POs, the system activates the PO’s to Send section. Select the job’s PO Packs you wish to exchange from the selection list. (For information on how to select data, refer to the Selecting Data from a List section in the Exploring Eclare chapter.) PO Packs that have already been exchanged display an “S” in the Sent column. Resending the same PO packs creates duplicates in the accounting system. Note: Eclare automatically assigns the PO Package Number Description as Gemini’s PO description. 9. If you select to Include C/Os, the system activates the C/O selection section. To send all change orders, leave the Lower and Upper C/O Limits blank. To export a range of change orders, click on Lower C/O # and type the first one to include. Click on Upper C/O # and type the last one to include. Only change orders that fall within the selected range will be sent. 10. Click . If the Gemini Co # has been properly defined, a confirmation message displays: Eclare Version 2016 Page 342 Users Manual Using Eclare 11. Verify that the job and information you selected for exchange are correct. Once you confirm this operation, you cannot undo the exchange. Click to proceed. 12. If you are resending PO Packs, a message displays. If you do not want to create duplicates, click to stop the exchange process, verify your selection in the Exchange: Send Job screen, and try again. 13. A progress indicator displays until the process concludes. Click conclude the operation. to To Exchange Job Information to PSClient Note: Use this menu option to send a specific job’s Product Group and Vendor information to the Exchange directory until picked up by Prosoft’s PSClient application. Upon receipt of the exchange, PSClient calculates retail markups. 1. Select the Job Maintenance menu option. The Jobs Maintenance screen displays. 2. Select the kind of job you wish to see in the Show field. 3. Locate the job you wish to exchange and click on it to select it. Eclare Version 2016 Page 343 Users Manual Using Eclare 4. Click . The Changing Job screen displays. 5. Click displays: . The Exchange: Send Job to Accounting screen 6. Select the Send to PSClient field and enter your specific export selection. 7. If you wish to exclude export of a specific product group, select the desired group on the list and click . To undo all excluded groups, click . 8. Click . If the Gemini Co # has been properly defined, a confirmation message displays: Eclare Version 2016 Page 344 Users Manual Using Eclare 9. Verify that the job and information you selected for exchange are correct. Once you confirm this operation, you cannot undo the exchange. Click to proceed. 10. A progress indicator displays until the process concludes. Click conclude the operation. to To Delete a Job 1. Select the Job Maintenance menu option. The Jobs Maintenance screen displays. 2. Find the job you wish to delete and click on it to select it. 3. Click . A confirm delete message displays. 4. Verify that the job you selected for deletion is correct and that it is not currently in use or assigned to any takeoffs you wish to keep. When deleting jobs, the system automatically deletes its takeoffs and direct budget adjustments. If you wish to proceed with the deletion, click Once you confirm this step, you cannot undo it. . To Add a Direct Budget Adjustment to a Job 1. In the Adjustment section for the corresponding job, click Adjustment will be added screen displays. Eclare Version 2016 . The Page 345 Users Manual Using Eclare 2. Enter the adjustment information. Please note: Field Description Cost Code Type or select the cost code the adjustment applies to. (For more information, refer to the Cost Code section in this chapter.) Amount Type the budget adjustment amount. It may be a revenue or an expense. Eclare will automatically apply this amount to the cost code during job export, whether to Gemini or other applications. 3. Verify that the information is correct. Click to save the information. To Modify a Direct Budget Adjustment 1. In the Adjustment section for the corresponding job, click Adjustment will be changed screen displays. . The 2. Enter the information you wish to modify. You cannot leave a record without a Cost Code assignment. (For more information, refer to the To Add a Direct Budget Adjustment to a Job topic in this section.) 3. Click Eclare Version 2016 to save the change. Page 346 Users Manual Using Eclare To Delete a Direct Budget Adjustment 1. In the Adjustment section for the corresponding job, find the adjustment you wish to delete and click on it to select it. 2. Click . A confirm delete message displays. 3. Verify that the adjustment you selected for deletion is correct. If you wish to proceed with the deletion, click cannot undo it. . Once you confirm this step, you To Load Direct Budget Adjustments from another Job This feature allows you to load adjustments from a different job instead of manually typing them in, simplifying model maintenance across multiple subdivisions. The receiving job’s adjustments will be exactly the same as the source job. Note: Since this operation replaces any existing adjustments with the uploaded ones, load adjustments first before registering additional adjustments for the job. 1. In the Adjustment section for the corresponding job, click . 2. If there already are adjustments for the current job, a confirmation message displays: Click to continue or Adjustments screen. to stop the load and return to the 3. The Load Job Adjustments from Another Job screen displays. Eclare Version 2016 Page 347 Users Manual Using Eclare 4. Select the job that contains the adjustments you wish to load in the Load from Job field. (For information on how to select data, refer to the Selecting values for a field section in the Exploring Eclare chapter.) 5. Click to continue. Eclare automatically loads the adjustments. 6. A completion message displays when the process finishes. Click conclude the operation. to To Add a Job Revision 1. In the Revisions section for the corresponding job, click Revision will be added screen displays. . The 2. Enter the revision information. Please note: Field Description Revision Date Select the date when the changes took place. (For information on how to use the Calendar, refer to the Calendar section in the Exploring Eclare chapter.) Eclare Version 2016 Page 348 Users Manual Using Eclare Field Description Note: The date of the most recent revision displays in the Jobs Maintenance list. Description 3. Click Enter a description that clearly identifies the changes. You may enter a maximum of 250 characters. to save the change. To Modify a Job Revision 1. In the Revisions section for the corresponding job, click Revision will be changed screen displays. . The 2. Enter the information you wish to modify. You cannot leave a record without a Date assignment. (For more information, refer to the To Add a Job Revision topic in this section.) 3. Click to save the change. To Delete a Job Revision 1. In the Revisions section for the corresponding job, find the revision you wish to delete and click on it to select it. 2. Click Eclare Version 2016 . A confirm delete message displays. Page 349 Users Manual Using Eclare 3. Verify that the revision you selected for deletion is correct. If you wish to proceed with the deletion, click cannot undo it. . Once you confirm this step, you Clear Job Selection The Clear Job Selection menu option allows you to deselect the current job. This menu option executes automatically once selected. To select the menu option from the Main Menu, click Jobs | Clear Job Selection. When there is no current job selected, you will not be able to execute most of Eclare’s menu options. (For more information on setting the current job, refer to the To set the Current Job, Job Maintenance section in this chapter.) To Clear the Current Job 1. Select the Clear Job Selection menu option. The selected job no longer displays in Eclare’s window title bar. Eclare Version 2016 Page 350 Users Manual Using Eclare Duplicate Job The Duplicate Job menu option allows you to create a new job based on an existing one. (For information on how to automatically upload job information, refer to the Retrieve Jobs section in this chapter.) To select the menu option from the Main Menu, click Jobs | Duplicate Job. To Duplicate a Job 1. Select the Duplicate Job menu option. The Duplicate Existing Job screen displays. 2. Select the job you wish to duplicate in the Old Job Number field. (For information on how to select data, refer to the Selecting Data from a List section in the Exploring Eclare chapter.) 3. Enter the new job’s information: Field Description New Job You must enter a Job Number. This field can contain Eclare Version 2016 Page 351 Users Manual Using Eclare Field Number Description letters or numbers, and it must be unique. It cannot be already assigned to another record. New Job Name Enter the client’s name or a name that clearly identifies the job. It cannot be already assigned to another record. Model Activate this field if the new job is a model. Deactivate if it is a standard job. 4. Indicate the information you wish to duplicate in the Duplication Mode section. You can only select one mode: Field Description Duplicate Header Only Activate this field if you wish to duplicate the job’s general information, or header, only. (For more information, refer to the Job Maintenance section in this chapter.) Duplicate Structure Activate this field if you wish to duplicate the job’s header and detail information, without takeoff quantities. (For more information, refer to the Takeoffs section in this chapter.) Duplicate Exactly Activate this field if you wish to duplicate the job’s header, detail information and takeoff quantities. Use this program option when you wish to examine “what-if” scenarios. (For more information, refer to the Takeoffs section in this chapter.) Duplicate Exactly / Reset Options Activate this field if you wish to duplicate the job’s header, detail information and takeoff quantities, but reset all option quantities to zero. Use this program option when you wish to generate a base house out of an existing job. (For more information, refer to the Takeoffs section in this chapter.) Duplicate Exactly / Reset Options; Set Alt. Only Activate this field if you wish to duplicate the job’s header, detail information and takeoff quantities, yet only reset the "Alternate" status flag for items or assemblies that have options. Use this feature if you wish to keep preset quantities but exclude them from base price calculations. 5. Click . A confirmation message displays. It varies depending on your selection: Eclare Version 2016 Page 352 Users Manual Using Eclare 6. Verify the information and click to continue. A progress indicator displays on the bottom of the screen until the process completes. 7. Click to conclude the operation. The current job is automatically cleared to prevent accidental changes to the original job. You must set a job as current to continue. (For more information, refer to the To Set the Current Job, Job Maintenance section in this chapter.) Checklist Qty The Checklist Qty menu option allows you to quickly update the current job’s takeoff quantities for all items assigned to an estimating category, or checklist line. (For information on how to define the checklist and assign it to the items, refer to the Check List and the Master File sections in this chapter.) To select the menu option from the Main Menu, click Jobs | Checklist Qty. This menu option requires that a job be set as current. It allows you to change the quantity of multiple checklist lines, and to apply the change of only the Eclare Version 2016 Page 353 Users Manual Using Eclare selected line or of all changed lines. Within your job selection, it finds all items that belong to the estimating category for which a new quantity is specified and automatically updates their takeoff quantity with the new quantity. To Change Checklist Quantities for the Current Job 1. Select the Checklist Qty menu option. If a job is selected, the Check List Quantity screen displays. Eclare remembers and displays the last checklist quantities that were processed. 2. Locate the checklist line you wish to update quantities for and click on it to select it. Eclare automatically displays the takeoff notes registered in the database for the selected line, if any. 3. Click . The Check List Item will be Changed screen displays: 4. Enter the new Quantity. 5. If you wish to explain the purpose of the change or the quantity’s reason of being, type the information in the Notes field. These notes are used for reference only and print in the Checklist report. For example, if the Checklist line is “Sq. Ft. under roof”, you may type a note to indicate that the current quantity is temporary because the “customer has not decided on a patio roof”. 6. Click to register the information. It displays in the Checklist Quantity screen. The Notes column indicates whether or not you typed notes for this checklist line. 7. Repeat these steps for all check list lines you wish to update quantities for. Eclare Version 2016 Page 354 Users Manual Using Eclare 8. If you wish to update the current job for only one checklist line, click on the desired line to select it and click . If you made quantity changes to more than one line and wish to update the current job for all checklist lines, click . Based on your function selection, the system automatically finds the items that match the selected line or all lines, and displays a confirmation message: 9. Verify your checklist selection and quantities. Click to continue. The system automatically updates the takeoff quantities for the matching items in the current job. The Applied column in the Check List Quantity screen indicates whether or not the quantity was applied to at least one takeoff. Eclare Version 2016 Page 355 Users Manual Using Eclare Takeoffs The Takeoffs menu option allows you to structure a job into a logical sequence of steps, and to enter the corresponding quantity measurements for each item used in each step. A job is composed of several takeoffs (header) that define the estimating of the job from beginning to end, and each takeoff is composed of one or several items and assemblies (details) required to complete the takeoff. To select the menu option from the Main Menu, click Jobs | Takeoffs. You may also specify takeoff identification criteria, define multi-unit handling, and automatically duplicate takeoffs or load them from other jobs. All buttons at top of the Job Takeoffs screen apply to the Takeoffs section shown at left-hand side. All buttons at the bottom apply to the Takeoff Details section show at the right-hand side. To display additional columns, customize this table’s column display. (For more information, refer to the To Customize a Table’s Columns topic, Exploring Eclare chapter.) Note: To simplify takeoff organization, use the first forty (40) to sixty (60) takeoffs to define the base house. Define all other available options on takeoffs higher than sixty (60). Eclare Version 2016 Page 356 Users Manual Using Eclare To Add a new Takeoff 1. Select the Takeoffs menu option. The Job Takeoffs screen displays. 2. Click . The Adding Takeoff screen displays. 3. Enter the new takeoff information. Please note: Field Description Takeoff # Enter the new number, if different than the one provided by the system. This field can contain numbers only, and it must be greater than zero. It cannot be already assigned to another record. If you need to add a takeoff between two existing numbers (e.g. 1 and 2), type a decimal number (e.g. 1.5). Eclare automatically renumbers the takeoffs for you. Change Order # If the takeoff is associated with a change order, enter the corresponding number. Use this feature to control Eclare Version 2016 Page 357 Users Manual Using Eclare Field Description exchange of job information to Gemini, when you wish to exchange the change order and base takeoffs as separate issues. Description Enter a description that clearly identifies the purpose of the takeoff. PO Pack # Select the purchase order pack you wish to assign the takeoff to. (For more information, refer to the PO Pack section in this chapter.) Reason Code Type or select the code that identifies the reason for this takeoff. Takeoff Type Type or select the category that identifies this takeoff and groups it with related ones. Use this feature to limit the takeoffs that display in the Jump screen. (For more information, refer to the To Quickly Find a Takeoff based on Type topic in this section.) Job Takeoff Criteria If a Job Takeoff Criteria structure exists for your company, Eclare activates a field for each defined list. Select the corresponding takeoff value for each available field. (For more information, refer to the Program Setup section and the Job Criteria sections in this chapter.) Notes Enter any notes or comments to remind the estimator about things that need to be done for this takeoff (e.g. “Negotiate better rate with Broker”.) These notes print on the Takeoff Report, not on the purchase orders. 4. Select the Takeoff Status. Please note: Field Description Include Activate this field if you wish to activate the takeoff. Only takeoffs marked include are processed in estimates, pricing, purchase orders, customer proposals and reports. Alternate Activate this field if you wish to inactivate the takeoff. Although takeoffs marked Alternate are stored as part of the job, they are not processed in estimates, pricing, purchase orders or reports. All items, assemblies and locked assemblies of an alternate takeoff are also marked inactive. Eclare Version 2016 Page 358 Users Manual Using Eclare 5. Verify that the information is correct. Click to save the information. 6. If you have detail information available, proceed to enter it. (For more information, refer to the To Add Takeoff Details topic in this section.) To Change a Takeoff 1. Select the Takeoffs menu option. The Job Takeoffs screen displays. 2. Find the takeoff you wish to modify, on the top section of the screen, and click on the line to select it. 3. Click . The Changing Takeoff screen displays. 4. Enter the information you wish to modify. You cannot leave a record without a Takeoff # assignment. When changing the number or description, make Eclare Version 2016 Page 359 Users Manual Using Eclare sure it is not assigned to another record. (For more information, refer to the To Add a New Takeoff topic in this section.) 5. Click to save the change. 6. If you need to modify the takeoff’s detail information, proceed to work with it. (For more information, refer to the corresponding takeoff detail topic in this section.) To Delete a Takeoff 1. Select the Takeoffs menu option. The Job Takeoffs screen displays. 2. Find the takeoff you wish to modify, on the top section of the screen, and click on the line to select it. 3. Click . A confirm delete message displays: 4. Verify that the takeoff you selected for deletion is correct and click to confirm you wish to delete the takeoff and all its detail items. Another deletion confirmation message displays. 5. If you wish to proceed, click . The system automatically deletes the detail information for the selected takeoff. Once you confirm this step, you cannot undo it. To Quickly Find a Takeoff based on Type 1. Select the Takeoffs menu option. The Job Takeoffs screen displays. 2. Click Eclare Version 2016 . The Select Takeoff to Jump to screen displays: Page 360 Users Manual Using Eclare 3. Select the type you wish to view takeoffs for in the T/O Type Code field. Eclare automatically displays all takeoffs assigned to that group. 4. Find the takeoff you wish to work with. Click on the line to select it and click , or simply double-click on the desired one. Eclare automatically returns to the selected takeoff on the Job Takeoffs screen. To Duplicate a Takeoff 1. Select the Takeoffs menu option. The Job Takeoffs screen displays. 2. Find the takeoff you wish to duplicate, on the top section of the screen, and click on the line to select it. 3. Click . A message displays: 4. Verify that the takeoff you selected is correct. If you wish to proceed with the operation and also copy the detail quantities, click . If you wish to proceed with the operation without copying the detail quantities, click . 5. A message displays indicating the number of the new takeoff. Click to conclude the operation. Eclare Version 2016 Page 361 Users Manual Using Eclare To Load a Takeoff from another Job 1. Select the Takeoffs menu option. The Job Takeoffs screen displays. 2. Click . The Load Takeoffs from Another Job screen displays: 3. Select the job you wish to load takeoffs from in the Source Job field. You may load from the current job or a different job that is not currently in use. Eclare automatically displays all takeoffs assigned to that job. 4. Locate and select the takeoffs you wish to load. (For information on how to select data, refer to the Selecting Data from a List section in the Exploring Eclare chapter.) 5. Click 6. Click Eclare Version 2016 . A confirmation message displays: to continue. Page 362 Users Manual Using Eclare 7. Click to conclude the operation. To Set Takeoff Status based on Job Criteria Note: Use this feature to change the status of a group of takeoffs in just one step. You may also change the status of individual items in the Takeoff Detail section. (For more information, refer to the To Change the Status of a Detail Line topic in this section.) Only details marked include are processed in estimates, pricing, purchase orders, customer proposals and reports. 1. Select the Takeoffs menu option. The Job Takeoffs screen displays. 2. Click . The Set Job Criteria screen displays: 3. If a Job Takeoff Criteria structure exists for your company, Eclare activates a field for each defined list. Select the corresponding takeoff value for each available field. (For more information, refer to the Program Setup section and the Job Criteria sections in this chapter.) 4. Verify your selection and click message displays: Eclare Version 2016 to continue. A confirmation Page 363 Users Manual Using Eclare Note: Eclare compares the values you select with the values stored in the corresponding takeoff’s field. The takeoff status is set to include only when all criteria matches. Blanks in the selection criteria or in the takeoff fields result in a match. If the specified and stored values do not match, Eclare sets the status to Alternate. 5. Click 6. Click to continue. A progress bar displays. to conclude the operation. To Change the Building Number for Multi-Unit Handling Note: This feature automatically changes the takeoff’s building assignment. Use it after copying multi-unit project takeoffs to assign the new takeoffs to the corresponding building. (For more information, refer to the To Edit Takeoff Details topic in this section.) 1. Select the Takeoffs menu option. The Job Takeoffs screen displays. 2. Click Eclare Version 2016 . The Set Job Criteria screen displays: Page 364 Users Manual Using Eclare 3. Locate and select the takeoffs you wish to change the building assignment for. (For information on how to select data, refer to the Selecting Data from a List section in the Exploring Eclare chapter.) 4. Type the building number you wish to assign in the Building # field. 5. Click 6. Click 7. Click 8. Click to proceed. A confirmation message displays: to continue. to conclude the operation. to return to the Job Takeoffs screen. To Add Takeoff Details 1. Select the Takeoffs menu option. The Job Takeoffs screen displays. 2. Find the takeoff you wish to add details for, on the top section of the screen, and click on the line to select it. The Takeoff Detail section displays the details that are currently registered in the database for the selected takeoff. In the Show Alt. field, select whether or not you wish to see alternate items. 3. Click Eclare Version 2016 . The Tag Items for Takeoff screen displays. Page 365 Users Manual Using Eclare 4. Locate and select the items, assemblies or locked assemblies you wish to add as detail for the selected takeoff. (For information on how to search for or select data, refer to the To Search for Takeoff Items topic in this section, or to the Selecting Data from a List section in the Exploring Eclare chapter.) 5. If you wish to add an item more than once but up to a maximum of 99 times, click on the line to select it and click to increase the count in the X column. To decrease the number of times, click instead. You may also double-click on the line or press the [space bar] key to toggle the count to 1 or none. 6. Click to continue. If you selected assemblies or locked assemblies, the system automatically adds a line for each item defined in the Master File for the selected assemblies. The new details are automatically registered in the database and display in the Takeoff Detail section of the Job Takeoff screen. 7. Continue with the next operation. Eclare Version 2016 Page 366 Users Manual Using Eclare To Search for Takeoff Items 1. In the Tag Items for Takeoff screen, click Item/Assembly screen displays: . The Search for 2. In the Search Key field, type a few characters contained in the Description of the item or assembly you are looking for. If you wish to display items marked “deleted”, click on the Show Deleted field to activate it. A check mark must display. 3. Click . Eclare automatically displays all records that contain the selected character string anywhere in the Description field. 4. Locate the desired item, and click on the line to select it. Click . You may also double-click on the desired line. Eclare returns to the calling screen and displays the selected item. To Automatically Sort Takeoff Details 1. Select the Takeoffs option. The Job Takeoffs screen displays. 2. Find the takeoff you wish to sort details for, on the top section of the screen, and click on the line to select it. The Takeoff Detail section displays the details that are currently registered in the database for the selected takeoff. In the Show Alt. field, select whether or not you wish to see alternate items. 3. Click Eclare Version 2016 . The Confirm Resort screen displays: Page 367 Users Manual Using Eclare 4. Click to continue. Eclare automatically sort the takeoff detail and displays standard non-Assembly items followed by assemblies. The detail lines’ order within an Assembly does not change. To Edit Takeoff Details 1. Select the Takeoffs option. The Job Takeoffs screen displays. 2. Find the takeoff you wish to edit details for, on the top section of the screen, and click on the line to select it. The Takeoff Detail section displays the details that are currently registered in the database for the selected takeoff. In the Show Alt. field, select whether or not you wish to see alternate items. 3. Click . The Update Detail screen displays. The available fields vary according to whether you select an item or an assembly: 4. Enter the updated information. Please note: Eclare Version 2016 Page 368 Users Manual Using Eclare Field Description Item # If you need to change the detail line’s item number while keeping all prior information, type or select the item number to use instead. Use this feature for quick option duplication between models, allowing you to adjust the item without having to reenter all of its associated details. Quantity Enter the takeoff quantity. If the selected detail line is a standard assembly, Eclare automatically assigns this quantity to each of the assembly’s items. If the selected detail line is a locked assembly, the quantity is not assigned to the items. Revised Qty Enter the takeoff revised quantity. If this quantity is different than zero, Eclare automatically uses it instead of the value in the Quantity field during export and reporting calculations. Reference Enter a brief description or encoded reference to help identify the item or assembly. You may use a maximum of seven characters. PO Pack Select the purchase order pack to assign to the item. This feature is not available for assemblies and locked assemblies. Reason Code Type or select the code that identifies the reason for this takeoff item. Cost Code Type or select the cost code for this takeoff item if different than the cost code assigned in the Item Master file. Eclare Version 2016 Page 369 Users Manual Using Eclare Field Notes Description Enter any notes or comments to further define the client or job’s requirements for the detail takeoff. For example, if the takeoff detail is for a Jacuzzi, you may further identify the color, make or model (e.g. “blue, special features”.) These notes print on the purchase orders. Multi-Unit Bldg Unit If the takeoff detail belongs to a multi-unit project, enter the building and unit numbers. Takeoff Status Activate Include if you wish to activate the takeoff detail. Only details marked include are processed in estimates, pricing, purchase orders, customer proposals and reports. Activate Alternate if you wish to inactivate the takeoff detail. Alternate takeoffs are not processed in estimates, pricing, purchase orders or reports. The Takeoff Report does not print these items and their quantities. PSClient displays these items in the custom color defined by your company. (For more information regarding color, refer to the Terminal Setup section in this chapter.) 5. If you wish to identify this takeoff detail as an option, and thus print separate base house and options totals in the Takeoff Report for the job, assign an Option #. A number may already display if this takeoff detail is an option brought over from PSClient through Exchange. In this case, the number serves as a link to update the quantity within the takeoff. To assign an option, click . The Model Option Reference screen displays. Locate the option you wish to assign by scrolling through the list or by typing the exact option number in the Option Number locator field. Click on it to select it. Click per takeoff detail. Eclare Version 2016 to assign it. You can only assign one option Page 370 Users Manual Using Eclare 6. If you wish to specify additional option requirements for the main option number above, enter them in the Ext. Option field or click to select them. Eclare considers these numbers as pre-requisites when determining a takeoff option match upon exchange. Use the ‘+’ sign to indicate ‘and’ conditions, and the ‘-‘ sign to indicate ‘or’ conditions. For example, if the Option Number is 450 and the Ext. Option includes 400+500+600, all the extended options must exist before the main option is assigned. If the Ext. Option includes 400-500-600, any one of the extended options must exist before the main option is assigned. Note: The feature adds the selected option number to the end of the Ext. Option list only if it does not already exist. It does not create duplicates. 7. If you wish to assign specifications, click . The PO Specifications Text screen displays. Locate and select the specification you wish to include for the item or assembly, and click to assign it. (For more information, refer to the Specifications Text section in this chapter.) You may assign multiple specifications, which combine and display in the Notes field. Eclare Version 2016 Page 371 Users Manual Using Eclare 8. Verify the information. Click to save the changes. 9. Continue with the next operation. To Change the Order of the Detail Lines 1. In the Takeoff Details section of the Job Takeoffs screen, select in the Show Alt. field whether or not you wish to see alternate items. Locate the item or assembly you wish to relocate within the takeoff detail and click on the line to select it. Note: Assemblies move as a unit. You cannot reorganize the items within the assembly. (For more information on how to reorganize assembly items, refer to the To Change the order of the Items in the Assembly, Item Master section in this chapter.) 2. To move an item or whole assembly down one line, click . This function is not available once you reach the end of the list. To move an item or whole assembly up one line, click the beginning of the list. . This function is not available once you reach 3. Repeat these steps until the items and assemblies are in the desired order. 4. Continue with the next operation. To Change the Status of a Detail Line Note: You may also automatically change the status of a group of takeoffs in just one step. (For more information, refer to the To Set Takeoff Status based on Job Criteria topic in this section.) Eclare Version 2016 Page 372 Users Manual Using Eclare 1. In the Takeoff Details section of the Job Takeoffs screen, select in the Show Alt. field whether or not you wish to see alternate items. Locate the item or assembly you wish to change the status for and click on the line to select it. 2. Verify you have selected the correct line. 3. Click . The system automatically updates the status of the line in the last column S. If the line corresponds to an assembly or locked assembly, the system also updates the status of all its items. Status Description I Include. Activates the takeoff detail. Only details marked include are processed in estimates, pricing, purchase orders, customer proposals and reports. A Alternate. Inactivates the takeoff detail. Alternate takeoffs are not processed in estimates, pricing, purchase orders or reports. The Takeoff Report does not print these items and their quantities. PSClient displays these items in the custom color defined by your company. (For more information regarding color, refer to the Terminal Setup section in this chapter.) For example, in the Kitchen Floor takeoff, you may have two options: Linoleum and Wood. If linoleum is your common item, set Linoleum to Include, and set Wood to Alternate. To Copy the Takeoff Quantities for Multi-Unit Handling Note: Use this feature to assign quantities to the multi-unit takeoffs in just one step. 1. In the Job Takeoffs screen, click displays: Eclare Version 2016 . The Multi-Unit Copy screen Page 373 Users Manual Using Eclare 2. Locate the building you wish to specify quantities for and click on the line to select it. 3. Click . The Unit Entry screen displays: 4. Enter the quantities for each unit. 5. Verify the values and click display in the screen. to continue. The entered quantities 6. Click . Eclare automatically finds the items assigned to the Building / Unit Number (e.g. 3-A) and multiplies the takeoff’s base quantity in the Takeoff Detail record by the entered quantity (e.g. 12). (For more information, refer to the To Edit Takeoff Details topic in this section.) Eclare Version 2016 Page 374 Users Manual Using Eclare To Delete a Takeoff Detail Line 1. Select the Takeoffs menu option. The Job Takeoffs screen displays. 2. Find the takeoff you wish to delete details for, on the top section of the screen, and click on the line to select it. 3. In the Takeoff Details section of the Job Takeoffs screen, select in the Show Alt. field whether or not you wish to see alternate items. Find the item, assembly or locked assembly you wish to delete and click on the line to select it. You may delete specific items, complete assemblies, or specific items within an assembly. 4. Click . A confirm delete message displays. 5. Verify that the item, assembly or locked assembly you selected for deletion is correct. If you select an assembly or locked assembly, all its items are automatically deleted. If you wish to proceed with the deletion, click . Once you confirm this step, you cannot undo it. Eclare Version 2016 Page 375 Users Manual Using Eclare Pricing The Pricing menu option allows you to automatically update the current job’s prices based on your selected pricing method. You may reprice the entire materials list based on the latest prices in the Item Master File or only those for which pricing is missing, directly make price changes for specific items, or change the prices by changing the item’s or Master Product Group’s assigned vendor. To select the menu option from the Main Menu, click Jobs | Pricing | Pricing. This menu option builds and updates the job’s materials list. It displays all items for the job, their latest price, and the assigned vendor and group. It supports: Eclare Version 2016 Display of all items in the job, whether in Group or Item order. Display of item exceptions, whether by Group or by Item, for items that have no vendor assignment, that have unit price zero in the Master File, or that have an incorrect conversion factor. Display of Minimum Qty Exceptions, for items that fall below the minimum units’ safety net. (For more information, refer to the Master File section in this chapter.) Page 376 Users Manual Using Eclare To reprice the Material List 1. Select the Pricing menu option. If a current job has been selected, the Job Pricing mode selection screen displays: 2. Select the desired pricing method in the Pricing Mode section: Field Description Update all pricing from master file Activate this field if you wish to update all items in the selected job based on the corresponding price in the Item Master file. Since Eclare supports four different item prices based on effective date, you must select or enter the Pricing Date when using this option. Note: Repricing takes place for the closest effective date (on or prior) to the selected date. If none is found, the earliest available price is used instead. Update only items missing prices Activate this field if you only wish to update items in the selected job for which no price exists. Eclare uses the job’s current price date as the Effective Date. Erase ALL Prices & Reprice Job Activate this field if you wish to erase all item prices before repricing the job. 3. Click Eclare Version 2016 to continue. A progress indicator displays: Page 377 Users Manual Using Eclare 4. The Job Pricing screen displays: 5. Verify the material list and the prices. You may change the price, group or vendor of individual items. (For more information, refer to the corresponding topic in this section.) The prices, vendors and groups displayed on this screen are the values currently registered in the database for the items. 6. Click to exit the menu option. To Update the Price of an Item 1. In the Job Pricing screen, locate the item you wish to change and click on it to select it. 2. Click . The system activates the Price field for the selected item. 3. Enter the new price in dollars and cents and press the [Enter] key. The new price is the value currently registered in the database for the item. 4. Continue with the next operation. Eclare Version 2016 Page 378 Users Manual Using Eclare To Update the Vendor of an item 1. In the Job Pricing screen, locate the item you wish to change and click on it to select it. 2. Click . The Item Vendor List screen displays: 3. Locate the new vendor you wish to assign and click on it to select it. Click . (For more information, refer to the To Assign Vendors to an Item, Master File section in this chapter.) The system finds new vendor’s price for the selected item and assign it instead of the current price. 4. Continue with the next operation. To Update the Vendor for a Master Product Group 1. In the Job Pricing screen, locate one item that is assigned to the Product Group you wish to change vendors for and click on it to select it. 2. Click Eclare Version 2016 . The Select Vendor by Group screen displays: Page 379 Users Manual Using Eclare 3. Select the New Vendor you wish to assign. 4. Verify the information and click to continue. The system finds all items in the Materials List that are assigned to the Product Group and overwrites the current price with the prices registered for the new vendor. A progress indicator displays on the bottom section on the screen until the process concludes. 5. Click to exit the Select Vendor by Group screen and continue with the next operation. To View Exception Items 1. In the Job Pricing screen, locate the item you wish to view exceptions for and click on it to select it. 2. To view the exceptions in Group order, activate the Exception by Group section. To view the exceptions in item order, activate the Exception by Item section. To view items that fall below the minimum units, activate the Minimum Qty Exception section. Note: A properly configured job will not show any items in the Exceptions by Group and Exception by Items sections. Eclare Version 2016 Page 380 Users Manual Using Eclare Clear Pricing The Clear Pricing menu option allows you to automatically clear all prices for the current job, including price and vendor changes made directly to the job items. Use this menu option to prepare the job when you wish to reprice it based on the original Product Group vendor of choice or exception vendors’ prices. To select the menu option from the Main Menu, click Jobs | Pricing | Clear Pricing. Note: If you wish to price a job without clearing price and vendor changes made directly to the job items, use the Pricing menu option. (For more information, refer to the Pricing section in this chapter.) To reprice the Material List based on the Item Master File Prices 1. Select the Clear Pricing menu option. The Clear Pricing confirmation message displays. 2. Verify whether or not you wish to perform this operation. Click to continue. Once you perform this function, you cannot undo it. The system automatically proceeds to erase all pricing information for the current job. 3. A message displays when the operation concludes. Click the menu option. Eclare Version 2016 to exit Page 381 Users Manual Using Eclare CAD Import The CAD Import menu option allows you to automatically update Eclare’s database with job takeoff quantity information from your CAD application. To select the menu option from the Main Menu, click Jobs | CAD Import. Note: Before you run this menu option, you must: Configure the CAD Import Sequence. (For more information, refer to the Program Setup section in this chapter.) Have a comma-delimited input file (CSV) containing three predefined fields: Part Number, Quantity, and Takeoff Number, conforming to the CAD predefined layout. (For more information, refer to Appendix A – File Layouts.) Prepare a job takeoff template for the CAD project and set it as the current job. To avoid import errors, it must contain all part numbers referenced in the CAD import file. To Import CAD Information 1. Select the CAD Import menu option. A warning message displays: Eclare Version 2016 Page 382 Users Manual Using Eclare 2. Verify whether or not you wish to perform this operation. Click to continue. The system automatically erases the job’s takeoff quantities for standalone items and for assembly headers, but it does not update locked assemblies. Assembly items are updated based on the quantity assigned to the assembly header. Once you perform this function, you cannot undo it. 3. A message displays when all quantities are cleared. Click continue. The CAD Import screen displays. to 4. Select the file to import in the CAD Import File field. (For more information, refer to the Finding and Saving Files section in the Exploring Eclare chapter.) 5. Indicate the import options: Field Description Preview Exception Report if any Debug Import 6. Click Eclare Version 2016 Activate this field if you wish to see the Import CAD exception Report on the screen. This report shows lines that cannot be automatically uploaded because their layout does not conform with the expected format. Deactivate if you do not. Activate this field if you wish to perform a trial import run before updating the job quantity. This program option produces a printed report showing the information extracted from the file instead of updating the job quantity. Deactivate if you wish to directly perform the job quantity update. to perform the import operation. A progress bar displays. Page 383 Users Manual Using Eclare 7. If at least one of the lines cannot be imported, a warning message displays. Click to continue. 8. If you selected to preview the exceptions report, the report displays: 9. From the preview screen, click to return to the Job Takeoffs screen. Note: You must correct all exceptions for the import operation to complete properly. If errors occur, verify the errors based on your exception report, correct the data in your CSV file, and import the CAD information again. Eclare Version 2016 Page 384 Users Manual Using Eclare Pro-Forma The Pro-Forma menu option allows you to estimate construction costs for new subdivisions by pricing pre-defined models. You must define your pro-forma structure by creating the project, assigning models to it, specifying the total quantity of each model to build, and generating the estimating report. To select the menu option from the Main Menu, click Jobs | Pro-Forma. To Add a new Pro-Forma List 1. Select the Pro-Forma menu option. The Pro-Forma List screen displays. 2. Click Eclare Version 2016 . The Pro-Forma will be Added screen displays. Page 385 Users Manual Using Eclare 3. Enter the new pro-forma’s information. Please note: Field Description Pro-Forma Code This field may contain letters or numbers, but it must be unique. It cannot be already assigned to another record. Assign a code that clearly identifies the project you wish to estimate. Description Enter a description that clearly identifies the project. Dollar Export Filename Select the file to use as default when exporting total per model price information. (For more information, refer to the Finding and Saving Files section in the Exploring Eclare chapter.) Vendor Export Filename Select the file to use as default when exporting vendor amounts per model. Export Vendor Groups Separately Notes Enter any notes or comments about the project. These notes are for reference purposes only. 4. Click Activate this field if you want to generate a separate file of vendors for the each pro-forma detail line. Deactivate if you do not. to save the information. 5. If you have detail information available, proceed to enter it. (For more information, refer to the To Add Pro-Forma Details topic in this section.) Eclare Version 2016 Page 386 Users Manual Using Eclare To Modify a Pro-Forma List 1. Select the Pro-Forma menu option. The Pro-Forma List screen displays. 2. Find the pro-forma list you wish to modify and click on the line to select it. 3. Click . The Pro-Forma will be Changed screen displays. 4. Enter the information you wish to modify. You may change any of the fields. However, you cannot leave the group without a code or description assignment. (For more information, refer to the To Add a New Pro-Forma List topic in this section.) 5. Click to save the change. To Delete a Pro-Forma List 1. Select the Pro-Forma menu option. The Pro-Forma List screen displays. 2. Find the pro-forma list you wish to delete and click on it to select it. 3. Click . A confirm delete message displays. 4. Verify that the list you selected for deletion is correct. If you wish to proceed with the deletion, click undo it. . Once you confirm this step, you cannot To Add Pro-Forma Details Eclare Version 2016 Page 387 Users Manual Using Eclare 1. Select the Pro-Forma menu option. The Pro-Forma List screen displays. 2. Find the list you wish to add details for and click on the line to select it. 3. Click . The Pro-Forma Detail screen displays. 4. Click . The Pro-Forma Job will be Added screen displays. 5. Enter the pro-forma’s information. Please note: Field Description Job/Model Number Select the job or model you wish to include in your project’s estimate. (For information on how to select data, refer to the Selecting Values for a Field section in the Exploring Eclare chapter.) Job Takeoff Criteria If a Job Takeoff Criteria structure exists for your company, Eclare activates a field for each defined list. Select the corresponding value for each available field. Eclare Version 2016 Page 388 Users Manual Using Eclare Field Description (For more information, refer to the Program Setup section and the Job Criteria sections in this chapter.) Quantity Enter the total number of units you wish to estimate for this job or model. 6. Click to save the information. To Edit Pro-Forma Details 1. Select the Pro-Forma menu option. The Pro-Forma List screen displays. 2. Find the list you wish to modify details for and click on the line to select it. 3. Click . The Pro-Forma Detail screen displays. 4. Find the line you wish to edit details for and click on the line to select it. The Pro-Forma Job will be Changed section displays. Eclare Version 2016 Page 389 Users Manual Using Eclare 5. Enter the information you wish to modify. (For more information, refer to the To Add Pro-Forma Details topic in this section.) 6. Verify the information. Click to save the changes. To Change the order of the Pro-Forma Detail Lines 1. In the Pro-Forma Detail screen, locate the line you wish to relocate within the list and click on the line to select it. 2. To move a line down one line, click . This function is not available once you reach the end of the list. To move line up one line, click is not available once you reach the beginning of the list. . This function 3. Repeat these steps until the lines are in the desired order. To Delete a Pro-Forma Detail Line 1. Select the Pro-Forma menu option. The Pro-Forma List screen displays. 2. Find the list you wish to delete details for and click on the line to select it. 3. Click . The Pro-Forma Detail screen displays. 4. Find the line you wish to delete and click on the line to select it. 5. Click . A confirm delete message displays. 6. Verify that the line you selected for deletion is correct. If you wish to proceed with the deletion, click undo it. Eclare Version 2016 . Once you confirm this step, you cannot Page 390 Users Manual Using Eclare To Print the Pro-Forma Report 1. Select the Pro-Forma menu option. The Pro-Forma List screen displays. 2. Find the list you wish to print the report for and click on the line to select it. 3. Click 4. Click . The Pro-Forma Detail screen displays. . The Pro-Forma Report screen displays. 5. If you are printing more than one project and wish to print each in a separate page, click on the Start Job on New Page to activate it. A check mark must display. 6. Select the report type you wish to print in the Report Mode field: Mode Description Print Structure Only Select this mode to print the Pro-forma structure without dollar or vendor information: Eclare Version 2016 Page 391 Users Manual Using Eclare Mode Description Dollar Amount Only (no Vendors) Select this mode to include dollar amounts without vendor information. Eclare automatically exports job data to the specified export file: Dollar and Vendor Amounts Select this mode to include both dollar amounts and vendor information. Eclare automatically exports job data to the specified export file: 7. Indicate the options you wish to include in the report: Field Description Include Tax Include Category Markup Include Waste Enforce Vendor Eclare Version 2016 Activate this field if you wish to calculate sales tax in the report. Deactivate if you do not. Activate this field it if you wish to mark up items in the report. Deactivate if you do not. Activate this field if you wish to include the waste in the report. Deactivate if you do not. Activate this field if you wish to enforce the vendor’s Page 392 Users Manual Using Eclare Field Order Requirements Description ordering requirements in the report. Deactivate if you do not. Include “Header Adj” in Base Activate this field if you wish to include in the base price any budget adjustments specified for the job. (For more information, refer to the To Add a Direct Budget Adjustment to a Job, Job Maintenance section in this chapter.) Deactivate if you do not. 8. Click to view the report on the screen or to send it directly to the printer. (For more information, refer to the Reports section in the Exploring Eclare chapter.) A progress bar displays until the system completes generating or printing the report. Eclare Version 2016 Page 393 Users Manual Using Eclare Master File The Master File menu option allows you to define items and assemblies of items used for estimating jobs through the takeoff process. You can define any element needed to estimate a job, like building materials, costs, commissions, etc., or to acquire bids from subcontractors. (For information on how to set your Item Master file, refer to the To Set Up the Item Master File section in the Building the Database chapter.) To select the menu option from the Main Menu, click Maintenance | Master File. This menu option works with three types of entries: Items – Individual estimating element (see screen above for examples) Fixed Items –Items, whether individual or part of an assembly, that retain their assigned quantity regardless of changes that would normally result in automatic recalculation, as in the case of PSClient exchange or regular assembly header changes. Although quantity changes must be made manually, PSClient does change the fixed item’s status (e.g. when the assembly quantity becomes zero, its fixed items become “Alternate”). Assemblies – Group of items that make up a building system (e.g. items required to build a wall). The detailed components of a standard assembly are tied together by a mathematical relationship, and thus the Eclare Version 2016 Page 394 Users Manual Using Eclare individual item quantities are adjusted automatically when the assembly changes. Locked Assemblies – Assembly where the detailed components are not tied together by their mathematical relationship, and thus the individual item quantities are not adjusted automatically when the assembly changes. In a locked assembly, item quantities must be manually changed. To assist you in identifying the type of entry, the system displays each type in the color defined in the Terminal Setup menu option. (For more information, refer to the Terminal Setup section in this chapter.) You may also use the Vendor function to either change the vendor or update the item price. To Add a new Item 1. Select the Master File menu option. The Master File List screen displays. 2. Click . The Adding Master File screen displays: 3. Select the kind of item you wish to add in the Type field: Eclare Version 2016 Page 395 Users Manual Using Eclare Field Description Item Select standard Item if you wish PSClient to automatically recalculate the quantity upon exchange and assembly changes. Fixed Item Select Fixed Item if you do not wish to automatically recalculate the quantity regardless of exchange or assembly changes. 4. Enter the new item information. Please note: Field Description Number This field can only contain numbers, and it must be unique. It cannot be already assigned to another record. It must follow the format: nn.nnnnn, where the first two digits correspond to the division. (For more information, refer to the Divisions section in this chapter.) Description You must enter a description that clearly identifies the item. It cannot be already assigned to another record. Category You must type or select a Category to place the item in its corresponding classification (e.g. labor, material, etc.) The category defines the item’s markup percentage. (For more information, refer to the Category section in this chapter.) Cost Code You must type or select a Cost Code to place the item in its corresponding cost group for accounting purposes. Although item details are used for estimating (e.g. 2”x4”), cost groupings are used for accounting purposes (e.g. rough lumber.) The cost code also defines where the item appears in the Customer Proposal. (For more information, refer to the Cost Code section in this chapter.) Takeoff Unit Eclare Version 2016 You must type the item’s unit, as it applies for takeoff purposes. Make sure you assign the correct unit since it cannot be changed after the record is saved. (For more information on unit conversions, refer to the Unit Conversions section in this chapter.) Page 396 Users Manual Using Eclare Field Waste % Description If you wish to include waste for this item in your estimates, type the corresponding percentage. If your waste is 10%, type 10. The system will calculate waste upon request for takeoff and reporting purposes. Taxable If you wish to calculate the item’s tax for reporting purposes, type Y. The system will calculate based on the sales tax rate defined in the Job Maintenance menu option. (For more information, refer to the Job Maintenance section in this chapter.) Check List Line If you wish to assign the item to a check list, type or select a Line number. The item’s takeoff unit and the Check List unit must be the same. The check list groups related items for estimating purposes, and allows automatic update of quantities within a job. For example, you could assign the Sq. Ft. Total checklist category to items you estimate based on the total square footage of the house, like paint, frame, concrete, etc. (For more information, refer to the Check List and Checklist Qty sections in this chapter.) Product Group You must type or select a Product Group for pricing purposes. The product group defines the item’s vendor and price. (For more information, refer to the Master Product Group section in this chapter.) The system automatically displays the default vendor for that group, although you can change it at the job level. (For more information, refer to the Product Group Exceptions section in this chapter.) MinUnits If you wish to automatically verify the item’s takeoff quantity, type the minimum number of units you normally require of this item. Use this check as a safety net to identify takeoffs where the item falls below the expected quantity. For example, if you normally use 50 yards of carpet on your jobs, set 50 as MinUnits. If a job takeoff has a carpet quantity of less than 50, the system identifies it as an exception in the Pricing screen. (For more information, refer to the Pricing section in this chapter.) Custom Color If you want this item to display in a color other than black, select the desired color. Use this feature to Eclare Version 2016 Page 397 Users Manual Using Eclare Field Description easily identify items, to mark them as headers (the beginning of a section of the master file), etc. The color difference allows you to easily locate a group of items. (For more information, refer to the Terminal Setup section in this chapter.) Note: Use the Deleted feature to indicate items that are no longer current and should not be used. Other Eclare options allow you to filter records based on the content of this field. 5. Verify that the information is correct. You will not be able to change the Takeoff Unit once the item is saved. 6. Click to save the information. The Copy Vendor Information dialog displays. 7. If you wish to easily duplicate the item’s vendor and pricing information, click to copy the vendors but not their pricing information, or click . Otherwise, click . Note: Quick vendor pricing copy is a one-time option. If you choose not to perform it at this time, you must manually add vendors and pricing information to the new item. 8. If you have vendor information available, proceed to enter it. (For more information, refer to the To Assign Vendors to an item topic in this section.) To Add a new Assembly 1. Select the Master File menu option. The Master File List screen displays. 2. Click . The Adding Master File screen displays for the Item Type. 3. Select the kind of assembly you wish to add in the Type field: Field Description Assemblies Select standard Assemblies if you wish to use it as a “calculation type” assembly. During the takeoff process, a quantity entered for the assembly automatically changes the takeoff quantity of each detailed component. Locked Assemblies Select Locked Assemblies if its detailed items have fixed quantities, and are not affected by changes to the assembly quantity. Eclare Version 2016 Page 398 Users Manual Using Eclare Once you make your selection, the assembly’s entry fields display. These fields are the same for both types of assemblies: 4. Enter the new assembly information. Please note: Field Description Number This field can only contain numbers, and it must be unique. It cannot be already assigned to another record. It must follow the format: nn.nnnnn, where the first two digits correspond to the division. (For more information, refer to the Divisions section in this chapter.) Description You must enter a description that clearly identifies the assembly (e.g. 8” CMU Wall – Course). It cannot be already assigned to another record. Cost Code If you wish to place the assembly in its corresponding cost group for accounting and customer proposal purposes, type or select a Cost Code. (For more information, refer to the Cost Code section in this chapter.) Eclare Version 2016 Page 399 Users Manual Using Eclare Field Description If you assign a Cost Code to the assembly, the total cost of all assembly items will be assigned to the assembly cost code, regardless of the individual items’ cost codes. If no cost code is assigned to the assembly, the costs are assigned to the corresponding item’s cost code. Takeoff Unit You must type the item’s unit, as it applies for takeoff purposes. Make sure you assign the correct unit since it cannot be changed after the record is saved. (For more information on unit conversions, refer to the Unit Conversions section in this chapter.) Check List Line If you wish to assign the assembly to a check list, type or select a Line number. The assembly’s takeoff unit and the Check List unit must be the same. The check list groups related items and assemblies for estimating purposes, and allows automatic update of quantities within a job. For example, you could assign the Sq. Ft. Total checklist category to assemblies you estimate based on the total square footage of the house, like slabs, roof area (rough), etc. (For more information, refer to the Check List and Checklist Qty sections in this chapter.) Custom Color If you want this assembly or locked assembly to display in a color other than black, select the desired color. To mark an assembly as a header, that is, the beginning of a section of the master file. The color difference allows you to easily locate a group of items. (For more information, refer to the Terminal Setup section in this chapter.) Copy Assembly If you wish to create a new assembly based on a similar, existing one (e.g. use a 10 ft. wall assembly as a base for a new 12 ft. wall assembly.), click on select the assembly to use as a base. The Pick Assembly to Copy screen displays: Eclare Version 2016 to Page 400 Users Manual Using Eclare Field Description This option generates a copy of all items defined for the selected assembly under the new assembly. Note: Once the new assembly is created, you must verify its items and all other information, and adjust it as necessary. Note: Use the Deleted feature to indicate assemblies that are no longer current and should not be used. Other Eclare options allow you to filter records based on the content of this field. 5. Verify that the information is correct. You will not be able to change the Takeoff Unit once the item is saved. 6. Click to save the information. The Copy Vendor Information dialog displays. 7. If you wish to easily duplicate the assembly’s vendor and pricing information, click to copy the vendors but not their pricing information, or click . Otherwise, click . Note: Quick vendor pricing copy is a one-time option. If you choose not to perform it at this time, you must manually add vendors and pricing information to the new assembly. 8. If you have item information available, proceed to enter it. If you based the new assembly on an existing one, you must verify the automatically generated items and add, modify, or delete items until the new assembly is properly configured. (For more information, refer to the To Assign Items to an Assembly topic in this section.) Eclare Version 2016 Page 401 Users Manual Using Eclare To Quickly look up an item in the Item Master File Note: Index entries must be defined prior to using this feature. (For more information, refer to the Quick Index section in this chapter.) 1. In the Master File List screen, select the desired pre-defined location in the Quick Index field. The system automatically displays the first item for the index entry. (For more information on how to define index entries, refer to the Quick Index section in this chapter.) 2. Locate the item you wish to work with, if it is different than the selected line. 3. Once you find the item, perform the desired operation. (For more information, refer to the corresponding topic in the Item Master section in this chapter.) To Search for Master File Items 1. In the Master File List screen, click Item/Assembly screen displays: . The Search for 2. In the Search Key field, type a few characters contained in the Description of the item or assembly you are looking for. If you wish to display items marked “deleted”, click on the Show Deleted field to activate it. A check mark must display. 3. Click . Eclare automatically displays all records that contain the selected character string anywhere in the Description field. 4. Locate the desired item, and click on the line to select it. Click . You may also double-click on the desired line. Eclare returns to the calling screen and displays the selected item. Eclare Version 2016 Page 402 Users Manual Using Eclare To Modify an Item or Assembly 1. Select the Master File menu option. The Master File List screen displays. 2. Find the item or assembly you wish to modify and click on the line to select it. 3. Click . The Changing Master File screen displays. The available fields vary for items and assemblies, depending on your selection. 4. Enter the information you wish to modify. You cannot leave a record without a Number and Description assignment. Further, you cannot leave an item record without a Category, Cost Code or Product Group assignment. When changing the number or description, make sure it is not assigned to another record. (For more information, refer to the To Add a New Item and the To Add a New Assembly topics in this section.) 5. If you wish to define the item as fixed, click on the Type field and select the Fixed Item type. PSClient will adjust the item status instead of automatically recalculating the quantity upon exchange or assembly changes. 6. If you need to modify the item’s vendor information or the assembly’s item assignment, proceed to work with it. (For more information, refer to the corresponding Item Vendor or Assembly Item topic in this section.) Eclare Version 2016 Page 403 Users Manual Using Eclare 7. Click to save the change. To Copy an Item or Assembly Note: Use this feature if you wish to create a new item or assembly from a similar record in the Master File. PSClient displays the selected item’s information as a base in order to reduce typing. 1. Select the Master File menu option. The Master File List screen displays. 2. Find the item or assembly you wish to copy and click on the line to select it. 3. Click . The Adding COPIED Master File screen displays. The available fields vary for items and assemblies, depending on your selection. Eclare Version 2016 Page 404 Users Manual Using Eclare 4. Make any necessary adjustments to the base information. You must change the item Number. You cannot leave a record without a Number and Description assignment. Further, you cannot leave an item record without a Category, Cost Code or Product Group assignment. When changing the number or description, make sure it is not assigned to another record. (For more information, refer to the To Add a New Item and the To Add a New Assembly topics in this section.) 5. If you need to modify the item’s vendor information or the assembly’s item assignment, proceed to work with it. (For more information, refer to the corresponding Item Vendor or Assembly Item topic in this section.) 6. Click to save the change. To Delete an Item or Assembly Note: Use this feature to actually remove unreferenced master items from the database. If you wish to indicate that the item is no longer current and should not be used, use the Deleted feature instead. (For more information, refer to the To Add a New Item and the To Add a New Assembly topics in this section.) 1. Select the Master File menu option. The Master File List screen displays. 2. Find the item or assembly you wish to delete and click on it to select it. Eclare Version 2016 Page 405 Users Manual Using Eclare 3. Click . If the item or assembly is not in use by any job, a confirm delete message displays. Note: To delete an item or assembly that is currently in use, you must first determine which jobs use it, and delete it from each and every job to which it is assigned. (For more information, refer to the Show Item / Option References section in this chapter.) 4. Verify that the item or assembly you selected for deletion is correct. When deleting assemblies, the system automatically deletes its relationship to the assigned items and unit conversions. If you wish to proceed with the deletion, click . Once you confirm this step, you cannot undo it. To Assign Vendors to an Item Note: This menu option allows you to define one or more vendors that can supply you the item. However, the item’s primary or default vendor is the vendor assigned to the item’s Product Group. (For more information, refer to the Master Product Group and Product Group Exception sections in this chapter.) 1. Select the Master File menu option. The Master File List screen displays. 2. Find and select the item you wish to assign vendors to, and click The Item Vendor List screen displays: 3. Click Eclare Version 2016 . . The Adding Item Vendor screen displays: Page 406 Users Manual Using Eclare 4. Select the vendor in the Vendor Name field. It must be unique. It cannot be assigned to the item already. 5. Enter the new item vendor information. Please note: Field Description Description Enter the vendor’s item description to clearly identify the item in the vendor’s purchase orders. It cannot be already assigned to another record. This description may or may not be the same as the item description you assign in the Master File (e.g. the item’s description in the Master file is “2x4x8 Pine PT”, but the vendor calls it “RLUM 2x4x8 PT Pine”). Vendor Part Number Type the SKU# or part number assigned by the vendor. This information prints in the purchase orders and allows the vendor to accurately process your order. (For more information on how to automatically upload this information, refer to the Import Vendor Pricing section in this chapter.) Min Order Type the vendor’s required minimum order quantity. This information allows you to automatically determine the correct order amount from the takeoff quantities. Increment Order Type the vendor’s required increment order quantity. Eclare Version 2016 Page 407 Users Manual Using Eclare Field Description This information allows you to automatically determine the correct order amount from the takeoff quantities. For example, if your takeoff requires 77 of a certain item but the vendor’s increment order is 10, the system automatically rounds the order up to the next 10, in this case to 80. Purchase Unit You must type the vendor’s unit for the item, as it applies for ordering purposes. If it does not need to correspond to the item’s Takeoff Unit. Rebate Available Activate this field if the vendor offers rebates for the item. This feature results in Gemini identifying item rebates on the Purchase Orders. Deactivate it if rebates are not available. Unit Cost Effective Type up to four costs for the item, along with the corresponding Effective Date. Eclare requires this date to determine which cost to use for pricing purposes. A cost of zero may result in a warning message when executing procedures and reports. (For more information on how to automatically upload this information, refer to the Import Vendor Pricing section in this chapter.) Reason If you wish to document the reason for the price change, type it as an explanatory note in the Reason field. Click if you wish to automatically include the current login date at the end of the information displayed in the box. Note: Eclare stores a maximum length of 500 characters. When there is less than 80 characters available for entry, Eclare automatically deletes the first portion of the text that appears at the beginning of the box, starting with the first character until the first carriage return, and saves the newly typed information at the end. 6. Determine the unit conversion: Eclare Version 2016 If the vendor and item’s units are the same, and if there is a default unit conversion record for the units’ combination, the default conversion record is automatically assigned. If the vendor and item’s units are different, you must click to select a Unit Conversion factor or formula. The Unit Conversion List Page 408 Users Manual Using Eclare screen displays only the records that correspond to the item’s Unit as From and the vendor’s Unit as To. Note: Whenever possible, the item’s takeoff unit and vendor’s purchase unit should be the same. To determine the conversion from measured takeoff to actual purchased units, Eclare uses the Assembly-to-Item unit conversion. (For more information, refer to the What are Conversions Used For section in the General Concepts chapter.) Locate and select the conversion for the item vendor, and click to assign it. If there are no conversion records, you must add one at this point. (For more information, refer to the Unit Conversion section in this chapter.) 7. Verify the item/vendor information. Click to save it. 8. Continue with the next operation. (For more information, refer to the corresponding topic in the Item Master section in this chapter.) To Change the Item / Vendor information 1. Select the Master File menu option. The Master File List screen displays. 2. Find and select the item you wish to change vendor information for, and click . The Item Vendor List screen displays: Eclare Version 2016 Page 409 Users Manual Using Eclare 3. Find and select the vendor you wish to change information for, and click . The Changing Item Vendor screen displays: 4. Enter the information you wish to modify. You cannot leave a record without a Vendor Name, Purchase Unit or Unit Conversion assignment. When adding a new unit cost, you must specify the Effective Date along with the cost. To delete a cost, erase both the Unit Cost and its corresponding Effective Date. (For more information, refer to the To Add a New Item and the To Assign Vendors to an Item topics in this section.) 5. Click to save the change. Eclare automatically resequences the unit costs in date order. Eclare Version 2016 Page 410 Users Manual Using Eclare 6. Continue with the next operation. (For more information, refer to the corresponding topic in the Item Master section in this chapter.) To Change the Vendor Unit Conversion 1. Select the Master File menu option. The Master File List screen displays. 2. Find and select the item you wish to change vendor’s unit conversion for, and click . The Item Vendor List screen displays: 3. Find and select the vendor you wish to change the conversion for, and click . The Unit Conversion List screen displays only the records that correspond to the item’s Unit as From and the vendor’s Unit as To: Eclare Version 2016 Page 411 Users Manual Using Eclare 4. Locate and select the conversion for the item vendor, and click to assign it. If there are no conversion records, you must add one at this point. (For more information, refer to the Unit Conversion section in this chapter.) 5. Continue with the next operation. (For more information, refer to the corresponding topic in the Item Master section in this chapter.) To Delete the Item / Vendor information 1. Select the Master File menu option. The Master File List screen displays. 2. Find and select the item you wish to delete vendor information for, and click . The Item Vendor List screen displays. 3. Find the vendor you wish to delete and click on it to select it. 4. Click . A confirm delete message displays. 5. Verify that the vendor you selected for deletion is correct and that it is no longer used in the database. If you wish to proceed with the deletion, click . Once you confirm this step, you cannot undo it. To Assign one Item to an Assembly 1. Select the Master File menu option. The Master File List screen displays. 2. Find and select the assembly you wish to assign items to, and click on it to select it. The screen displays buttons for assembly related functions. 3. Click Eclare Version 2016 . The Assembly Items List screen displays: Page 412 Users Manual Using Eclare 4. Click . The Adding Assembly Line screen displays: 5. In the Item Number field, click to select the item or items you wish to assign to the assembly. The Assembly Item List screen displays: To include an existing item in the assembly, locate the desired item and click . The assembly may contain more than one instance of the same item. Note: Adding a new item at this point simply includes it in the Item Master file. You must still use the select feature in order to make it part of the assembly. 6. If the item is active for this assembly, select Include. If it is not, select Alternate. Only active items are estimated, priced, included in proposals and reports. Eclare Version 2016 Page 413 Users Manual Using Eclare 7. Determine the unit conversion: If the assembly and item’s units are the same, and if there is a default unit conversion record for the units’ combination, the default conversion record is automatically assigned. If the assembly and item’s units are different, you must click to select a Unit Conversion factor or formula. The Unit Conversion List screen displays only the records that correspond to the assembly’s Unit as From and the item’s Unit as To. Locate and select the conversion for the assembly item, and click to assign it. If there are no conversion records, you must add one at this point. (For more information, refer to the Unit Conversion section in this chapter.) 8. Verify the assembly/item information in the Assembly Item List screen. Correct any invalid unit conversions before proceeding. These are identified by an asterisk (“*”) on the column left of the conversion. (For more information, refer to the To Fix an Incorrect Unit Conversion topic in this section.) 9. Click to save the information. Note: Adding an item to a Master File assembly does not automatically add the item to the corresponding assembly in a job takeoff. To update the jobs that use the changed assembly, use the Global Job Maintenance options. (For more information, refer to the Global Takeoff Maintenance section in this chapter.) Eclare Version 2016 Page 414 Users Manual Using Eclare To Assign multiple Items to an Assembly 1. Select the Master File menu option. The Master File List screen displays. 2. Find and select the assembly you wish to assign items to, and click on it to select it. The screen displays buttons for assembly related functions. 3. Click . The Assembly Item List screen displays: 4. Click . The Tag Items for Assembly screen displays: Eclare Version 2016 Page 415 Users Manual Using Eclare 5. Locate and select the items to assign from the selection list. (For information on how to search for or select data, refer to the To Search for Master File Items topic in this section, or to the Selecting Data from a List section in the Exploring Eclare chapter.) 6. If you wish to add an item more than once but up to a maximum of 99 times, click on the line to select it and click to increase the count in the X column. To decrease the number of times, click instead. You may also double-click on the line or press the [space bar] key to toggle the count to 1 or none. 7. Click screen . The selected items display in the Assembly Item List 8. Verify the assembly/item information. Correct any invalid unit conversions before proceeding. These are identified by an asterisk (“*”) on the column left of the conversion. (For more information, refer to the To Fix an Incorrect Unit Conversion topic in this section.) 9. Click to save the information. Note: Adding an item to a Master File assembly does not automatically add the item to the corresponding assembly in a job takeoff. To update the jobs that use the changed assembly, use the Global Job Maintenance options. (For more information, refer to the Global Takeoff Maintenance section in this chapter.) To Change the Assembly Item information 1. Select the Master File menu option. The Master File List screen displays. 2. Find and select the assembly you wish to change item information for, and click Eclare Version 2016 . The Assembly Item List screen displays: Page 416 Users Manual Using Eclare 3. Find and select the item you wish to change information for, and click . The Changing Assembly Line screen displays: 4. Enter the information you wish to modify. You cannot leave a record without an Item Number Description assignment. (For more information, refer to the To Assign one Item to an Assembly topic in this section.) 5. Click to save the change. To Fix an incorrect Unit Conversion 1. In the Assembly Item List screen, locate the item with the invalid unit conversion. These are identified by an asterisk (“*”) on the column left of the conversion: Eclare Version 2016 Page 417 Users Manual Using Eclare 2. Click on the line to select it, and click screen displays: . The Unit Conversion List 3. Determine the correct unit conversion: Eclare Version 2016 If the assembly and item’s units are the same, and if there is a default unit conversion record for the units’ combination, the default conversion record is automatically assigned. If the assembly and item’s units are different, you must click to select a Unit Conversion factor or formula. The Unit Conversion List screen displays only the records that correspond to the assembly’s Unit as From and the item’s Unit as To. Page 418 Users Manual Using Eclare Locate and select the conversion for the assembly item, and click to assign it. If there are no conversion records or none of the existing ones correctly applies to this Assembly–Item relationship, you must add a new one at this point. (For more information, refer to the Unit Conversion section in this chapter.) 4. Verify the assembly/item information in the Assembly Item List screen. Click to continue. To Change the Order of the Items in the Assembly 1. In the Assembly Item List screen, locate the item you wish to relocate within the assembly and click on the line to select it. Eclare Version 2016 Page 419 Users Manual Using Eclare 2. To move the item down one line, click . This function is not available once you reach the end of the list. To move the item up one line, click function is not available once you reach the beginning of the list. . This 3. Repeat these steps until the items are in the desired order. 4. Continue with the next operation. (For more information, refer to the corresponding topic in the Item Master section in this chapter.) To Delete the Assembly Item information 1. Select the Master File menu option. The Master File List screen displays. 2. Find and select the assembly you wish to delete item information for, and click . The Assembly Item List screen displays. 3. Find the item you wish to delete and click on it to select it. 4. Click . A confirm delete message displays. 5. Verify that the item you selected for deletion is correct and that it is no longer used in the database. If you wish to proceed with the deletion, click . Once you confirm this step, you cannot undo it. Note: Deleting an item from a Master File assembly does not automatically delete the item from the corresponding assembly in a job takeoff. To update the jobs that use the changed assembly, use the Global Job Maintenance options. (For more information, refer to the Global Takeoff Maintenance section in this chapter.) Eclare Version 2016 Page 420 Users Manual Using Eclare Price Update The Price Update menu option allows you to manually update item prices for specific vendors. Use this menu option to register price increases when the vendor supplies you a printed price increase list instead of a CSV file to import. (For more information on importing price changes, refer to the Import Vendor Pricing in this chapter.) To select the menu option from the Main Menu, click Maintenance | Price Update. Eclare displays the items in vendor part number order, to make it easy for you to find the items and enter the new prices. You may update the unit cost for a specific item or automatically adjust a group of items based on a mark up percentage or fixed dollar amount. Eclare supports up to four prices, along with effective dates. The prices you change on this screen automatically update the corresponding Master File’s item/vendor prices, not the job takeoff. (For information on how to change a takeoff’s prices, refer to the Pricing or Job Pricing sections in this chapter.) Eclare Version 2016 Page 421 Users Manual Using Eclare To Perform a Price Update for a Vendor Note: Use this feature to update the unit cost of an individual item. 1. Select the Price Update menu option. The Price Update screen displays. 2. Select the vendor you wish to update prices for on the Vendor section of the screen. 3. Type or select the Effective Date you wish to work with. Eclare displays the price that corresponds to the selected date, and assigns this date to all new prices entered through this option. 4. Locate the item you wish to update the price for and click on it to select it. If you wish to display items marked “deleted”, click on the Show Deleted field to activate it, and page down the list to refresh the display if necessary. A check mark must display. 5. Click . The Price will be Changed screen displays: 6. Enter the new price for the item in the Unit Cost field, in dollars and cents, as specified by the vendor. Eclare will not create the price entry if the cost is empty or zero. 7. If you wish to document the reason for the price change, type it as an explanatory note in the Reason field. Click if you wish to automatically include the current login date at the end of the information displayed in the box. Eclare Version 2016 Page 422 Users Manual Using Eclare Note: Eclare stores a maximum length of 500 characters. When there are less than 80 characters available for entry, Eclare automatically deletes the first portion of the text that appears at the beginning of the box, starting with the first character until the first carriage return, and saves the newly typed information at the end. 8. Verify the Effective date. If it is not correct, return to the Price Update screen to select it and reenter the price information. 9. If correct, click to save the new price. After creating the new price entry, Eclare automatically sorts them in Effective date order. Note: Eclare compares this date against the existing vendor price entries. It will not create an entry if the Effective date is older than the oldest price entry or if another entry exists for the date and price combination. If four entries already exist, Eclare automatically replaces the oldest one. 10. Repeat these steps for all of the vendor’s items you wish to update prices for. To Perform a Bulk Price Update for a Vendor Note: Use this feature to automatically adjust a group of items based on either a mark up percentage or a fixed dollar amount. 1. Select the Price Update menu option. The Price Update screen displays. 2. Select the vendor you wish to update bulk prices for on the Vendor section of the screen. 3. Type or select the Effective Date you wish to work with. Eclare displays the price that corresponds to the selected date, and assigns this date to all new prices entered through this option. 4. Click Eclare Version 2016 . The Vendor Bulk Update screen displays: Page 423 Users Manual Using Eclare 5. If you wish to update the cost based on a percentage, enter the following information: Field Description Mark Up Cost Percent Percent of increase for the group of items, as specified by the vendor. For example, if the price increase is 2%, type 2. Eclare will not create the price entry if the cost is empty or zero. Round Cost to nearest Indicate the desired rounding in the field. 6. If you wish to update the cost based on a fixed dollar amount, enter the Markup Amount $ for the group of items. Eclare will not create the price entry if the cost is empty or zero. Note: You may perform the bulk price update by either Percent or fixed Amount. Once you enter a value in either field, Eclare automatically deactivates the other field. To reactivate it, zero out the entered value. 7. If you wish to document the date and reason for the price change, type it as an explanatory note in the Reason field. If entered, Eclare automatically registers it in the Reason field for each item updated. Use this feature to assist you in managing future price changes Note: Eclare stores a maximum length of 500 characters. When there are less than 80 characters available, Eclare automatically deletes the first portion of the text, starting with the first character until the first carriage return, and saves the newly typed information at the end. 8. Locate and select the items you wish to update the price for. (For information on how to select data, refer to the Selecting Data from a List section in the Exploring Eclare chapter.) If you wish to display items marked “deleted”, click Eclare Version 2016 Page 424 Users Manual Using Eclare on the Show Deleted field to activate it, and page down the list to refresh the display if necessary. A check mark must display. 9. Click 10. If correct, click . The corresponding confirmation message displays: to continue. A progress bar displays. 11. Click to conclude the operation, and click to exit the Vendor Bulk Update screen. After creating the new price entry, Eclare automatically sorts them in Effective date order. Note: Eclare compares this date against the existing vendor price entries. It will not create an entry if the Effective date is older than the oldest price entry or if another entry exists for the date and price combination. If four entries already exist, Eclare automatically replaces the oldest one. Eclare Version 2016 Page 425 Users Manual Using Eclare Vendors The Vendors menu option allows you to define vendors, or suppliers, and subcontractors that provide either items or services to your business, along with their contact information. To select the menu option from the Main Menu, click Maintenance | Vendors. Note: The vendor’s contact information and status may be overwritten when uploading vendor information through the Import Vendors or Exchange Common Information options. If you wish to display vendors marked “deleted”, click on the Show Deleted field to activate it. To Add a new Vendor 1. Select the Vendors menu option. The Vendors List screen displays. 2. Click Eclare Version 2016 . The Adding Vendor screen displays. Page 426 Users Manual Using Eclare 3. Enter the new vendor information. Please note: Field Description Vendor # This field can contain letters or numbers, and it must be unique. It cannot be already assigned to another record. If interfacing with accounting, the vendor number must be the same in both applications. Name You must enter the vendor’s name. It cannot be already assigned to another record. Contact Enter the name of the contact person. Leave the field blank if there is none. Address Address 2 City State ZipCode Phone Number Fax Add’l Ph# Enter the vendor’s mailing address and related phone numbers. Eclare Version 2016 Page 427 Users Manual Using Eclare Field Type Text Description If you are not interfacing with Prosoft’s accounting application, select the type of text to print on the Vendor Order. If the vendor is a material supplier, select P/O Text. If the vendor is a subcontractor, select W/O Text. (For more information, refer to the PO Text, Work Order Text and Vendor Orders sections in this chapter. Note: Prosoft’s accounting application automatically provides the defined PO legal text for the vendor and work orders. E-mail Address Type the vendor’s e-mail address. Eclare automatically assigns this information as the From address when using its E-mailing features. (For more information, refer to the Other Special Features to Simplify your Work section in the General Concepts chapter.) Note: The Takeoff Report prints this Contact name and Phone Number unless a GEM:P.Orders Contact is defined. 4. If you have any contact information available at this time, click on the Contacts section to activate it and proceed to enter it. (For more information, refer to the To add a Vendor Contact topic in this section.) 5. Click to save the information. To Modify a Vendor 1. Select the Vendors menu option. The Vendors List screen displays. 2. Find the vendor you wish to modify and click on the line to select it. 3. Click Eclare Version 2016 . The Changing Vendor screen displays. Page 428 Users Manual Using Eclare 4. Enter the information you wish to modify. You cannot leave the record without a Name assignment. When changing the name or number, make sure it is not assigned to another record. To change the contact information, click on the Contacts section to activate it. (For more information, refer to the To Add a New Vendor topic or the To Add a Vendor Contact topic in this section.) Note: Use the Deleted feature to indicate vendors that are no longer current and should not be used. Other Eclare options allow you to filter records based on the content of this field. 5. Click to save the change. To Delete a Vendor 1. Select the Vendors menu option. The Vendors List screen displays. 2. Find the vendor you wish to delete and click on it to select it. 3. Click . A confirm delete message displays. If you choose to delete a vendor that is associated with other records, the system marks the vendor “deleted”. The “deleted” record remains in the file Eclare Version 2016 Page 429 Users Manual Using Eclare and displays in red when the Show Deleted feature is active. To undo, deactivate the record’s Deleted check box. (For more information, refer to the To Modify a Vendor topic in this section and to the Functions and Modes section in the Exploring Exclare chapter.) 4. Verify that the vendor you selected for deletion is correct and that it is not assigned to any item in the Master File. If you wish to proceed with the deletion, click . Once you confirm this step, you cannot undo it. To Add a Vendor Contact Note: You may access this feature as a button in the Vendors List screen and under the Contacts tab in the vendor’s screen. Eclare supports six fixed contact records per vendor for automatic faxing and e-mailing. Use them to define the vendor’s purchase order contact, construction project contact, warranty contact, warranty-related orientation and punch-out contacts, and payables open item verification contact. These records can only be changed or a contact replicated through the Contacts tab in the Vendors header screen. You may also print envelopes for your vendors. (For more information, refer to the To Print an Envelope topic in this section.) 1. Select the Vendors menu option. The Vendors List screen displays. 2. Find and select the vendor you wish to add contact information for, and click . The Contacts for screen displays: Note: Eclare automatically displays the contacts, or the 3. Click Eclare Version 2016 button for non-fixed button for fixed contact records. . The Contact will be Added screen displays. Page 430 Users Manual Using Eclare 4. Enter the new contact information. Please note: Field Description Title Enter the title of the contact person. Contact Enter the contact’s name. Phone Fax Cell Enter the contact’s related phone numbers. Export PDA Super Export PDA Tech FTP Address FTP Port FTP User Name FTP Password Eclare Version 2016 Activate this field if you wish to export this contact information during superintendent’s synchronization if the vendor is included in the sync. Deactivate if not. Activate this field if you wish to export this contact information during warranty technician’s synchronization if the vendor is included in the sync. Deactivate if not. Activate this field if you wish to export this contact information during warranty technician’s synchronization if the vendor is included in the sync. Deactivate if not. Page 431 Users Manual Using Eclare Field Description Email Address Enter the contact’s e-mail address. If you need to enter more than one address, you may use the following abbreviated format: [email protected],[email protected] Use the plus sign (+) to separate each person in the same domain, followed by a single instance of the standard domain name. Use a comma to separate additional addresses in other domain names, as the field’s capacity allows. PSMail server automatically translates this information, resulting in separate, individual emails sent to: [email protected], [email protected], [email protected], and [email protected] Send Email when FTP is Updated Send Mode Indicate the vendor’s active send modes. When printing a vendor-related document that has a send mode, PSClient automatically delivers it through all methods selected here. 5. Click Activate this field if you wish to automatically send an e-mail message to inform user of FTP updates. Deactivate if not. to save the information. To Modify a Vendor Contact Note: You may access this feature as a button in the Vendors List screen and under the Contacts tab in the vendor’s screen. Auto Contact records can only be changed or replicated through the Contacts tab in the Vendors header screen. You may also print envelopes for your vendors. (For more information, refer to the To Print an Envelope topic in this section.) 1. Select the Vendors menu option. The Vendors List screen displays. 2. Find and select the vendor you wish to change contact information for, and click Eclare Version 2016 . The Contacts for screen displays: Page 432 Users Manual Using Eclare Note: Eclare automatically displays the contacts, or the button for non-fixed button for fixed contact records. 3. Find and select the contact you wish to modify, and click Contact will be Changed screen displays: . The 4. Enter the information you wish to modify. (For more information, refer to the To Add a New Vendor topic in this section.) Define the vendor’s purchase order contact in the GEM-P:Orders record, the construction project contact in the PSC:Project record, the warranty contact in the PSC:Warranty record, the warranty-related orientation contact in the PSC:Orientation record, the Eclare Version 2016 Page 433 Users Manual Using Eclare warranty-related punch-out contact in the PSC:Punch-out record, and the payables open item verification contact in the GEM:AP Open record. Note: You may also replicate a contact so that its information is automatically assigned to all fixed contacts. (For more information, refer to the To Copy one Contact information into all Fixed Contacts topic in this section.) 5. Click to save the change. To Delete a Vendor Contact Note: You may access this feature as a button in the Vendors List screen and under the Contacts tab in the vendor’s screen. 1. Select the Vendors menu option. The Vendors List screen displays. 2. Find and select the vendor you wish to delete contact information for, and click . The Contacts for screen displays: 3. Find the contact you wish to delete and click on it to select it. You may not delete any of the four fixed contact records. 4. Click . A confirm delete message displays. 5. Verify that the vendor you selected for deletion is correct and that it is not assigned to any item in the Master File. If you wish to proceed with the deletion, click Eclare Version 2016 . Once you confirm this step, you cannot undo it. Page 434 Users Manual Using Eclare To Copy one Contact information into all Fixed Contacts Note: Use this feature to replicate a contact so that its information is automatically assigned to all fixed contacts. 1. Select the Vendors menu option. The Vendors List screen displays. 2. Find the vendor you wish to replicate contact information for and click . The Changing Vendor screen displays. 3. Click on the Contacts tab to activate it: 4. Click on the contact that you wish to copy to select it. Note: Make sure the selected contact is the one you wish to replicate it into all other fixed contacts. It will overwrite the existing fix contacts, but will not affect any of the other ones. 5. Click Eclare Version 2016 . A confirmation message displays: Page 435 Users Manual Using Eclare 6. Click to continue. 7. Click to conclude the operation. Eclare automatically displays the updated contact information: To Print an Envelope Note: This feature allows you to define and print an envelope, including the sender and receiver’s addresses. 1. Select the Vendors menu option. The Vendors List screen displays. 2. Find and select the vendor you wish to print an envelope for, and click . The Contacts for screen displays: 3. Click Eclare Version 2016 . The Print Envelope screen displays: Page 436 Users Manual Using Eclare Note: Eclare automatically displays the last address entered into the Return Address field, and also the vendor’s address from the General section in the To Address field. (For more information, refer to the corresponding add topic in this chapter.) 4. If you wish to print the sender’s address, click on the Do not print return address field to deactivate it. No check mark must display. Type or adjust the Return Address as needed. 5. If you wish to enter or change the receiver’s address, type it or make any necessary changes in the To Address field. Although you may change or adjust it as needed, these changes apply to this envelope only. 6. If you wish to see or modify the envelope’s characteristics, click on the Show Detail field. A check mark must display: Enter the envelope information. Please note: Eclare Version 2016 Page 437 Users Manual Using Eclare Field Description Form Select the desired envelope format from the pre-defined list. Return Address Position Left Down Indicate the exact position (in inches) where you wish the return address to appear on the envelope. Use this feature to properly adjust printing according to the selected format and hardware available. If you wish to change the return address’ font, click , select the desired one, and click . Paper Width Paper Height If you selected the User Defined form to print a customsized envelope, enter the dimensions (in inches) of the envelope format. Use this feature to define the custom envelope. To Address Position Left Down Indicate the exact position (in inches) where you wish the receiver’s address to appear on the envelope. Use this feature to properly adjust printing according to the selected format and hardware available. If you wish to change the return address’ font, click , select the desired one, and click . 7. If you wish to select a different printer or adjust the printer’s settings, click and complete your selection. (For more information, refer to your Windows system documentation.) Note: If this is the first time you use this feature, change Eclare’s default page orientation to landscape. 8. Verify the address and envelope information. Click Eclare Version 2016 to continue. Page 438 Users Manual Using Eclare Quick Index The Quick Index menu option allows you to define references to specific locations in your Item Master file. Use this menu option to point to items or sections you regularly refer to, for easy access to records in the Master File menu option. To select the menu option from the Main Menu, click Maintenance | Quick Index. Although the index references are defined in this menu option, they are functional in the Master File menu option. (For more information, refer to the To quickly access an item in the Master File, Master File section in this chapter.) To Add a new Quick Index Entry 1. Select the Quick Index menu option. The Items Quick Index screen displays. 2. Click Eclare Version 2016 . The Index will be Added screen displays. Page 439 Users Manual Using Eclare 3. Type or select the Search Key. This key corresponds to the first five (5) characters of the item number, as defined in the Item Master file. It determines the location where the quick index entry will place you when you use it in the Master File menu option. For example, if your Item Master file has thousands of items, and you wish to define a quick index entry for Assemblies, click locate the first assembly: Click on the assembly to select it, and click automatically assigns the Search Key 60.003. . In the Master File List, . The system 4. Enter an Index Description to identify the location you have just referenced or the purpose of the reference. This field can contain letters or numbers, and it must be unique. It cannot be already assigned to another record. 5. Click Eclare Version 2016 to save the information. Page 440 Users Manual Using Eclare To Modify a Quick Index Entry 1. Select the Quick Index menu option. The Items Quick Index screen displays. 2. Find the entry you wish to modify and click on the line to select it. 3. Click . The Index will be Changed screen displays. 4. Enter the information you wish to modify. You cannot leave the record without a Search Key or Description assignment. When changing the description, make sure it is not assigned to another record. (For more information, refer to the To Add a New Quick Index Entry topic in this section.) 5. Click to save the change. To Delete a Quick Index Entry 1. Select the Quick Index menu option. The Items Quick Index screen displays. 2. Find the entry you wish to delete and click on it to select it. 3. Click . A confirm delete message displays. 4. Verify that the entry you selected for deletion is correct. If you wish to proceed with the deletion, click cannot undo it. Eclare Version 2016 . Once you confirm this step, you Page 441 Users Manual Using Eclare Job Pricing The Job Pricing menu option allows you to reprice a job or model based on a master database of items. You may perform this operation after importing the latest price information or after correcting job formulas. To select the menu option from the Main Menu, click Maintenance | Global Job Maintenance | Job Pricing. Although the menu option allows you to reprice jobs, it is commonly used to reprice Models, not jobs in process. Note: Even though you may run this option while other users are logged in, we recommend that all users exit the system before you perform this operation. To Update the Pricing of a Job or Model Eclare Version 2016 Page 442 Users Manual Using Eclare 1. Select the Job Pricing menu option. The Update Jobs Pricing screen displays. 2. Select the jobs to Show. You may work with jobs, models or both. Eclare finds and displays the jobs corresponding to your selection. 3. Select the jobs to update from the selection list. (For information on how to select data, refer to the Selecting Data from a List section in the Exploring Eclare chapter.) 4. Indicate the desired update option: Field Description Reprice Jobs – Reprice All Items Activate this field if you wish to update conversions and update all items in the selected jobs based on the latest master file prices. Although you can reprice jobs, you would normally select this program option to perform your monthly vendor price update on your models. Reprice Jobs – Keep Existing Prices Activate this field if you wish to update conversions but only update newly added items in the selected jobs based on the latest master file prices. This program option will not reprice other items in the job, and will use Eclare Version 2016 Page 443 Users Manual Using Eclare Field Description the job’s current price date as the Effective Date. Select this program option after you update a job or model with a new feature. Update Activate this field if you wish to update the selected jobs Conversion Only due to a correction on the formulas. This program option only updates conversions without repricing the jobs. Select this program option after you change the conversion structure or its formulas. Erase ALL Prices & Reprice Job Activate this field if you wish to erase all prices and vendor information before repricing the job. 5. If you wish to update the takeoff status of a specific group of models, enter your selection criteria in the Takeoff Criteria section. (For information on how to select data, refer to the Selecting Values for a Field section in the Exploring Eclare chapter.) Eclare automatically toggles the takeoff header (between Alternate and Include) for all matching jobs. 6. Indicate the Date for Pricing or ‘as of’ pricing date, if different than the default log in date. Eclare uses this feature to determine which of the available price entries to use when repricing all items or jobs with no price. Note: Repricing takes place for the closest effective date (on or prior) to the selected date. If none is found, the earliest available price is used instead. 7. If you select to erase and reprice, indicate the Product Exception you wish to use in the When repricing use Product Exception field. Also, activate the Save “Product Exception” in Job field if you wish to record your selection as part of the job record. 8. Click to continue. If jobs are selected, a confirmation message displays, according to your selection: Eclare Version 2016 Page 444 Users Manual Using Eclare 9. Verify that you have selected the correct jobs. Click to continue. A progress report displays on the bottom of the Update Jobs Pricing screen until the update process concludes. 10. Click to exit the menu option. Global Takeoff Maintenance The Global Takeoff Maintenance menu option allows you to automate job takeoff maintenance functions in just one step. Use this feature to perform databasewide changes to items, assemblies and takeoffs, or to update specific fields in existing records. To select the menu option from the Main Menu, click Maintenance | Global Job Maintenance | Global Takeoff Maintenance. Eclare Version 2016 Page 445 Users Manual Using Eclare Due to the nature of the operation, you must make a backup of the company data before performing the changes. Note: We recommend that you familiarize yourself with the workings of this option before you make changes to your live data. You may perform practice runs in a test environment before using this feature for production. Also, even though you may run this option while other users are logged in, we recommend that all users exit the system before you perform this operation. To Perform a Global Takeoff Change 1. Select the Global Takeoff Maintenance menu option. A warning message displays: 2. Once you have successfully completed the backup, click continue. to 3. In the source screen, select the type of global change you wish to perform: Mode Description Item/Assm: Copy Only Select this mode if you wish to add a new item or assembly to a job. This function will not update existing items or assemblies, nor add assembly detail lines. Item/Assm: Copy/Update Select this mode if you wish to add a new item or assembly to a job, or update the item or assembly information if it already exists. This function will not add or update assembly detail lines. Item/Assm: Update Only Select this mode if you wish to update a selected item or assembly that already exists for a job. This function will not add new items. Item/Assm: Delete Select this mode if you wish to delete a selected item or assembly from selected jobs. This function will not add or update items. Eclare Version 2016 Page 446 Users Manual Using Eclare Mode Description Takeoff: Copy/Replace Select this mode if you wish to add or update takeoff information for the job specified in the Reference Job field. If the Reference Number already exists, the new takeoff information replaces the existing one. If the Reference Number does not exist, a new takeoff is added. Note: To insert a takeoff, use a number between two existing numbers (e.g. 2.5 results in an insert between 2 and 3). Takeoff: Delete Select this mode if you wish to delete the takeoff specified in the Reference Job field from the selected jobs. Warning: This option does not compare the contents of the selected takeoff against the content of the takeoff to be deleted. 4. Type or select the job you wish to use as the Reference Job. Eclare uses this job as a base to update other jobs, but does not make any changes to it. 5. In the Takeoff section, locate and select the takeoff you wish to update. You may double-click on the line or click You may select only one. to select or deselect it. 6. If you are in Item/Assembly mode, locate and select the item or assembly you wish to update. You may double-click on the line or click to select or deselect it. You may select only one. 7. Verify your selections and click displays: Eclare Version 2016 to continue. The target screen Page 447 Users Manual Using Eclare 8. Enter the takeoff information, depending on the mode you selected: Field Description Takeoff Number Enter the takeoff number you wish to add, update or delete. Eclare automatically displays a description of the purpose of the Takeoff Number to remind you of the operation you selected to perform. To process all takeoffs, leave the field blank. Update/Delete Mode If you selected an item/assembly update or delete mode, select the manner in which you wish to perform the operation: Update/Delete all matches in each takeoff – Select this option if you wish to perform the operation for all takeoff details that match the selected number. Update/Delete only one per takeoff based on sequence – Select this option if you wish to perform the operation for only one of the takeoff details that match the selected number. If more than one exist (e.g. 1, 2, 3), the sequential order of the one you select for the source (e.g. 2nd) determines which one will be processed in the target (e.g. 2nd also). 9. Select the type of jobs you wish to perform this operation for in the Job Types to Show field. Eclare Version 2016 Page 448 Users Manual Using Eclare 10. In the Jobs section, locate and select the jobs you wish to change. (For information on how to select data, refer to the Selecting Data from a List section in the Exploring Eclare chapter.) 11. Verify your selections and click to continue. 12. If you selected the item/assembly Copy/Update or Update Only modes, the following Fields to Update screen displays: Select the fields you wish to update, if different than the values provided. You must select at least one field. Click to continue. 13. If you selected the takeoff Copy/Replace mode for a target Takeoff Number that already exist, the following Fields to Update screen displays: Eclare Version 2016 Page 449 Users Manual Using Eclare Select the fields you wish to update, if different than the values provided. You must select at least one field. Click to continue. 14. The Ready to Execute screen displays. Eclare’s display depends on the mode and operation you selected: 15. Verify the information and click message displays. 16. Click 17. Click Eclare Version 2016 to continue. A confirmation to proceed. A progress bar displays. to conclude the operation. Page 450 Users Manual Using Eclare Vendor Price Delete The Vendor Price Delete menu option allows you to remove pricing information for a specific vendors’ items in just one step. Use this option when a vendor no longer exists or no longer supplies your company. To select the menu option from the Main Menu, click Maintenance | Global Job Maintenance | Vendor Price Delete. This operation does not work with the Current Job. It removes the selected item price from all jobs and models. Once you delete the price, you cannot undo the operation. Note: Even though you may run this option while other users are logged in, we recommend that all users exit the system before you perform this operation. To Delete a Vendor Price 1. Select the Vendor Price Delete menu option. The Vendor Price Delete screen displays. Eclare Version 2016 Page 451 Users Manual Using Eclare 2. Select the vendor you wish to delete prices for in the Vendor field. (For information on how to select data, refer to the Selecting Values for a Field section in the Exploring Eclare chapter.) Eclare automatically displays all items that have pricing information for the vendor. 3. Locate and select the items you wish to delete price from. You must select at least one item. (For information on how to select data, refer to the Selecting Data from a List section in the Exploring Eclare chapter.) 4. Click to continue. If you have selected at least one item, a confirmation screen displays: 5. Verify your vendor and item selection. Click progress bar displays. to continue. A 6. If the prices for the selected items are referenced by at least one job, an error report displays. In the preview screen, verify the information and click to return to the Vendor Price Delete screen. Eclare Version 2016 Page 452 Users Manual Using Eclare Tag Delete Jobs The Tag Delete Jobs menu option allows you to automatically delete selected jobs or models from the database in one easy step. You may perform this operation at the time your organization specifies certain estimates are no longer needed (e.g. completion of a phase, sale of the last unit in a multi-unit project, end of the last warranty period, etc.) To select the menu option from the Main Menu, click Maintenance | Global Job Maintenance | Tag Delete Jobs. Due to the nature of the operation, you must make a backup of the company data before deleting tagged jobs. To Delete Tagged Jobs 1. Select the Tag Delete Jobs menu option. The Tag Delete Jobs screen displays. 2. Select the jobs to Show. You may work with jobs, models or both. Eclare finds and displays records corresponding to your selection. 3. Select the jobs or models you wish to delete. You must select at least one job. (For information on how to select data, refer to the Selecting Data from a Eclare Version 2016 Page 453 Users Manual Using Eclare List section in the Exploring Eclare chapter.) You may also automatically add to your current selections a group of jobs that match a specific criteria. (For more information, refer to the To Quickly Tag Jobs for Deletion topic in this section.) 4. Click . 5. If the selected records include the current active job, a message displays: If you wish to return to the previous screen to adjust your record selection, click . If you wish to proceed with the deletion of all selected records except the current active job, click the current active job, click proceed with the deletion. . If you wish to delete to deselect it as active job and 6. If the selected records do not include the current active job, a confirmation screen displays: Determine whether or not you want to proceed. Once you confirm this operation, you cannot undo it. Click indicator displays. 7. Click to proceed. A progress to conclude the operation. To Quickly Tag Jobs for Deletion Eclare Version 2016 Page 454 Users Manual Using Eclare Note: This option allows you to add a group of jobs that match your specified criteria to the jobs you have already manually selected for deletion. 1. In the Tag Delete Jobs screen, click Delete screen displays: . The Mark Jobs for 2. Enter the job selection criteria you wish to use: Field Description Before Price Date Enter the last retail Price Date you wish to use as a cutoff point. Eclare automatically selects all jobs with a Price Date prior to the date you entered. To include all dates, leave the field blank. Jobs to Include Select the type, whether jobs, models or both. Exclude Job Numbers with Prefix If your company’s numbering scheme uses prefixes to identify jobs and you wish to automatically exclude a predefined group, type the characters of the group you wish to select (e.g. 'ATL’ for jobs in Atlanta). To include all job numbers, leave the field blank. 3. Click 4. Click Eclare Version 2016 . A confirmation message displays: to continue. Page 455 Users Manual Using Eclare 5. Upon completion, click . Eclare returns to the Tag Delete Jobs screen, where all jobs that matched your criteria are now marked selected. 6. Continue with the job delete operation. (For more information, refer to To Delete Tagged Jobs topic in this section.) Master Product Groups The Master Product Groups menu option allows you to define mayor item groupings, or trades, and to assign each group a vendor of choice. Use these trades to identify and group the items in the Master File. To select the menu option from the Main Menu, click Maintenance | Setup Maintenance | Master Product Groups. To Add a new Master Product Group 1. Select the Master Product Group menu option. The Master Product Groups screen displays. 2. Click Eclare Version 2016 . The Adding Product Group screen displays. Page 456 Users Manual Using Eclare 3. Enter the new group’s information. Please note: Field Description Product Group This field may contain letters or numbers, but it must be unique. It cannot be already assigned to another record. Description Enter a description that clearly identifies the product group. 4. Select the vendor you will normally acquire items belonging to this group from. If you do not know the vendor at this time, select the standard vendor “UNASSN”. 5. If you wish this product group to be part of PSClient’s automatic sending of color selections to vendors, click on the Send Color Sheet field to activate it. A check mark must display. 6. Click to save the information. To Modify a Master Product Group 1. Select the Master Product Group menu option. The Master Product Groups screen displays. 2. Find the group you wish to modify and click on the line to select it. 3. Click Eclare Version 2016 . The Changing Product Group screen displays. Page 457 Users Manual Using Eclare 4. Enter the information you wish to modify. You may change any of the fields. However, you cannot leave the group without a Vendor assignment. (For more information, refer to the To Add a New Product Group Exception topic in this section.) 5. Click to save the change. To Delete a Master Product Group 1. Select the Master Product Group menu option. The Master Product Groups screen displays. 2. Find the group you wish to delete and click on it to select it. 3. Click . A confirm delete message displays. 4. Verify that the group you selected for deletion is correct and that it is not assigned to any item in the Master File. If you wish to proceed with the deletion, click Eclare Version 2016 . Once you confirm this step, you cannot undo it. Page 458 Users Manual Using Eclare Product Group Exceptions The Product Group Exceptions menu option allows you to define exceptions to the vendor of choice assigned to the Master Product groups. You may define subdivisions or projects for which you will acquire the items from vendors other than the one you normally get the product from. Use these exceptions to change the vendor for a job. You may also automatically copy exceptions from one subdivision or project to others in one easy step. To select the menu option from the Main Menu, click Maintenance | Setup Maintenance | Product Group Exceptions. To Add a new Product Group Exception 1. Select the Product Group Exceptions menu option. The Product Group Exceptions screen displays. 2. Click Eclare Version 2016 . The Product Group List will be Added screen displays. Page 459 Users Manual Using Eclare 3. Enter the new exception group’s information. Please note: Field Description Product Group ID This field may contain letters or numbers, but it must be unique. It cannot be already assigned to another record. Assign an ID that clearly identifies the exception group. You may use it to define subdivisions or projects. Description Enter a description that clearly identifies the exception group. 4. Assign the exception vendor for the exception Product Group, if it is different than the corresponding Master Product Group Vendor. If you do not, the system automatically assumes they are the same. (For more information, refer to the To Assign an Exception Vendor topic in this section.) 5. Click to save the information. To Assign an Exception Vendor 1. Find the Product Group you wish to assign an exception vendor for, when the vendor is different than the global Vendor. If you do not assign an exception vendor, the system automatically uses the global vendor when pricing the job. 2. Click . The Product Group Exceptions Detail screen displays. 3. Click on the desired line to select the Product Group the exception is associated with. You may only select one Product Group. 4. Click . This process associates the exception product with a Master Product Group global vendor. The Product Groups will be Updated screen displays. Eclare Version 2016 Page 460 Users Manual Using Eclare 5. Select the vendor you will normally acquire items from when purchasing for this exception group. If you do not know the vendor at this time, select the standard vendor “UNASSN”. (For information on how to select data, refer to the Selecting values for a field section in the Exploring Eclare chapter.) 6. Click to save the information. The selected exception vendor displays in the List Vendor column. 7. Click to return to the Product Exception Group screen. To Copy Marked Exceptions to other Product Groups Note: This option allows you to identify the source subdivision or project that contains the exceptions, along with the specific exceptions, you wish to automatically assign to other target subdivisions or projects of your choice. 1. Find the Product Group Exception you wish to copy vendor exceptions from. This is your source subdivision or project. 2. Click Eclare Version 2016 . The Product Group Exceptions Detail screen displays. Page 461 Users Manual Using Eclare 3. Select the Product Groups that contain the exceptions you wish to copy. (For information on how to select data, refer to the Selecting Data from a List section in the Exploring Eclare chapter.) These are the values that will be copied from your source to the target subdivisions or projects. 4. Click . The Product Group Exceptions Detail Copy screen displays all Product Groups, excluding the one you are copying from: 5. Select the Product Groups you wish to update with the selected exceptions. (For information on how to select data, refer to the Selecting Data from a List section in the Exploring Eclare chapter.) These are your target subdivisions or projects. 6. Click to continue. A confirmation message displays: 7. Click to continue. Eclare automatically copies the selected vendor exceptions from the source to the target Product Group Exceptions. If the target already contains a vendor for the selected exception, the new value overrides the existing one. If not, Eclare automatically creates the exception. 8. Click Eclare Version 2016 to conclude the operation. Page 462 Users Manual Using Eclare To Modify a Product Group Exception 1. Select the Product Group Exceptions menu option. The Product Group Exceptions screen displays. 2. Find the Product Exception you wish to modify and click on the line to select it. 3. Click displays. . The Product Group List will be Changed screen 4. Enter the information you wish to modify. You may change any of the fields. However, you cannot leave the group without a Product Group ID. (For more information, refer to the To Add a New Master Product Group topic in this section.) 6. To change the exception vendor, click . If you do not know the vendor at this time, select the standard vendor “UNASSN”. (For more information, refer to the To Assign an Exception Vendor topic in this section.) 5. Click to save the change. To Copy a Product Group Exception List Note: The Product Group Exception List allows you to define exceptions to the standard vendors defined in the Product Group List for certain geographic areas (e.g. subdivision). 1. Select the Product Group Exceptions menu option. The Product Group Exceptions screen displays. 2. Find the Product Exception you wish to modify and click on the line to select it. 3. Click Eclare Version 2016 . The Product Exception Copy screen displays. Page 463 Users Manual Using Eclare 4. Enter the Product Group you wish to create based on the existing list: Field Description Product Group ID This field may contain letters or numbers. To create a new Product Group, it must be unique and cannot be already assigned to another record. Assign an ID that clearly identifies the exception group. You may use it to define subdivisions or projects. To overwrite the list of an existing Product Group, enter the ID of the group you wish to update. Eclare automatically displays the corresponding Product Group Description. Description 5. Click Enter a description that clearly identifies the exception group. . A confirmation message displays: 6. Verify that the selected operation is correct. Click to continue. Eclare automatically generates an exact copy of the selected Product Exception list under the new Product Group ID. Eclare Version 2016 Page 464 Users Manual Using Eclare 7. Click to conclude the operation. To Delete a Product Group Exception 1. Select the Product Group Exceptions menu option. The Product Group Exceptions screen displays. 2. Find the Product Exception you wish to delete and click on it to select it. 3. Click . A confirm delete message displays. 4. Verify that the group you selected for deletion is correct and that it is not assigned as the Product Exception to any jobs. If you wish to proceed with the deletion, click it. Eclare Version 2016 . Once you confirm this step, you cannot undo Page 465 Users Manual Using Eclare Cost Codes The Cost Codes menu option allows you to define cost groupings for budgeting and reporting purposes. Use these codes to identify and group the items in the Master File. The Cost Code structure is the basic interface link between Eclare Estimating and Prosoft’s Accounting application. To select the menu option from the Main Menu, click Maintenance | Setup Maintenance | Cost Codes. The cost code structure allows you to share budgeting information with accounting systems, and to prepare general and detailed customer proposals. To Add a new Cost Code 1. Select the Cost Code menu option. The Cost Code List screen displays. 2. Click Eclare Version 2016 . The Adding Cost Code screen displays. Page 466 Users Manual Using Eclare 3. Enter the new cost code information. Please note: Field Description Cost Code This field may contain letters or numbers, but it must be unique. It cannot be already assigned to another record. Description Enter a description that clearly identifies the type of cost. 4. Click to save the information. To Modify a Cost Code 1. Select the Cost Code menu option. The Cost Code List screen displays. 2. Find the cost code you wish to modify and click on the line to select it. 3. Click . The Changing Cost Code screen displays. 4. Enter the information you wish to modify. You cannot leave the record without a Cost Code assignment. When changing the description, make sure it is not assigned to another record. (For more information, refer to the To Add a New Cost Code topic in this section.) Eclare Version 2016 Page 467 Users Manual Using Eclare 5. Click to save the change. To Delete a Cost Code 1. Select the Cost Code menu option. The Cost Code List screen displays. 2. Find the cost code you wish to delete and click on it to select it. 3. Click . A confirm delete message displays. 4. Verify that the cost code you selected for deletion is correct and that it is not assigned to any item in the Master File. If you wish to proceed with the deletion, click . Once you confirm this step, you cannot undo it. Divisions The Divisions menu option allows you to define a numbering system within your Item Master file. Although you may define the sixteen standard divisions used by the CSI (Construction Standards Institute) or AIA (American Institute of Architects), Eclare allows you to define up to 99 different divisions. To select the menu option from the Main Menu, click Maintenance | Setup Maintenance | Divisions. Eclare Version 2016 Page 468 Users Manual Using Eclare To Add a new Division 1. Select the Division menu option. The Division List screen displays. 2. Click . The Adding Division screen displays. 3. Enter the new division information. Please note: Field Description Division This field must contain numbers, and it must be unique. It cannot be already assigned to another record. The Division is the first two digits of the part number in the Item Master file. Description Enter a description that clearly identifies the Division. 4. Click to save the information. To Modify a Division 1. Select the Divisions menu option. The Division List screen displays. 2. Find the division you wish to modify and click on the line to select it. 3. Click Eclare Version 2016 . The Changing Division screen displays. Page 469 Users Manual Using Eclare 4. Enter the information you wish to modify. You cannot leave the record without a Division assignment. When changing the description, make sure it is not assigned to another record. (For more information, refer to the To Add a New Division topic in this section.) 5. Click to save the change. To Delete a Division 1. Select the Division menu option. The Division List screen displays. 2. Find the division you wish to delete and click on it to select it. 3. Click . A confirm delete message displays. 4. Verify that the division you selected for deletion is correct and that it is not assigned to any item in the Master File. If you wish to proceed with the deletion, click Eclare Version 2016 . Once you confirm this step, you cannot undo it. Page 470 Users Manual Using Eclare Category The Category menu option allows you to define the main categories of items (e.g. labor, subcontract, etc.), and to assign a markup percentage to each. Use these categories to identify and group the items in the Master File. To select the menu option from the Main Menu, click Maintenance | Setup Maintenance | Category. To Add a new Category 1. Select the Category menu option. The Category List screen displays. 2. Click . The Adding Category screen displays. 3. Enter the new category information. Please note: Eclare Version 2016 Page 471 Users Manual Using Eclare Field Description Category This field may contain letters only, and it must be unique. It cannot be already assigned to another record. Description Enter a description that clearly identifies the category. % MarkUp Enter the markup percentage for the category. For example, if the markup for materials is 20%, type 20. You may also enter decimal values (e.g. 20.5). Leave the field empty if there is no markup. When you select to include markup in reports, this percentage is calculated based on, and added to, the price. 4. Click to save the information. To Modify a Category 1. Select the Category menu option. The Category List screen displays. 2. Find the category you wish to modify and click on the line to select it. 3. Click . The Changing Category screen displays. 4. Enter the information you wish to modify. You cannot leave the record without a Category assignment. When changing the description, make sure it is not assigned to another record. (For more information, refer to the To Add a New Category topic in this section.) 5. Click Eclare Version 2016 to save the change. Page 472 Users Manual Using Eclare To Delete a Category 1. Select the Category menu option. The Category List screen displays. 2. Find the category you wish to delete and click on it to select it. 3. Click . A confirm delete message displays. 4. Verify that the category you selected for deletion is correct and that it is not assigned to any item in the Master File. If you wish to proceed with the deletion, click . Once you confirm this step, you cannot undo it. Unit Conversion The Unit Conversion menu option allows you to define the different formulas, or conversion factors, used in calculations that involve more than one unit of measure (e.g. Each, Linear Foot, etc.). Use these unit conversions to identify items and define assemblies in the Master File’s Item to Vendor list. To select the menu option from the Main Menu, click Maintenance | Setup Maintenance | Unit Conversion. You must define unit conversions for all different possibilities that arise from the units of measure assigned in your Item Master file. For example, the length of a Eclare Version 2016 Page 473 Users Manual Using Eclare wall is measured in linear feet, but drywall is sold by the each. To build an 8’ wall, you may use 4’x8’ sheets or 4’x12’ sheets of drywall. Thus, you need to convert from LF to EA, and the calculation varies according to the size of the sheet. 4' x 8' Drywall 1 Ft 4' x 8' Drywall 4' x 8' Drywall 8' 4' x 12' Drywall 1 Ft 4' 4' 4' x 12' Drywall 12' To Add a new Unit Conversion 1. Select the Unit Conversion menu option. The Unit Conversion List screen displays. 2. Click . The Adding Use Conversion screen displays. 3. Enter the new conversion information. Please note: Field Description From Unit This field identifies the unit of measure that requires conversion. It may contain letters or numbers, and it may be assigned to more than one record. Eclare Version 2016 Page 474 Users Manual Using Eclare Field Description For example, the From Unit for a 4’x8’ Drywall (8ft wall) and a 4’x12’ Drywall (8ft wall on side) would both be LF. To Unit This field identifies the unit of measure to which the From unit must be converted to. It may contain letters or numbers, and it may be assigned to more than one record. For example, the To Unit for a 4’x8’ Drywall (8ft wall) and a 4’x12’ Drywall (8ft wall on side) would both be EA. Description Enter a description that clearly identifies the purpose of the unit conversion. Conversion Enter the formula or conversion factor needed to convert from the From Unit to the To Unit. You must enter a value. Enter a conversion of 1 if both units of measure correspond. For example, in the case of a 4’x8’ EA Drywall, a LF would be ¼ of a sheet, hence the conversion factor would be ¼ or .25. In the case of two 4’x12’ sheets on their side, a LF would be 1/12 of each sheet, hence the conversion factor would be 1/12 + 1/12 = 2/12 or 1/6. Note: This field supports all four basic math functions. To facilitate future verification, use the “long hand” conversion formula (e.g. 1/4) instead of the resulting decimal equivalent (e.g. .25). Default 4. Click Eclare Version 2016 Activate this field if you wish to define the conversion record as a default. Even though you may have more than one conversions for the same From/To Unit combination, only one record can be marked as default. If a default is defined, the system automatically uses it when adding a Vendor to Item or Item to Assembly. Deactivate if you do not want to define the record as the default for the From/To Unit combination. to save the information. Page 475 Users Manual Using Eclare To Modify a Unit Conversion Warning! Unit conversion formulas are global. Since a single unit conversion may be shared by many Assembly–Item and Item–Vendor relationships, a change to an existing formula or conversion factor may have a global impact on the system, affecting more than just the current record. 1. Select the Unit Conversion menu option. The Category List screen displays. 2. Find the unit conversion you wish to modify and click on the line to select it. 3. Click . The Changing Use Conversion screen displays. 4. Enter the information you wish to modify. You can only change the Description, conversion factor and default fields. You cannot leave the record without a Conversion assignment. When changing the description, make sure it is not assigned to another record. (For more information, refer to the To Add a New Unit Conversion topic in this section.) Note: When the conversion factor or formula is not exactly correct for a specific Assembly–Item or Item–Vendor relationship, do not change the conversion factor or formula. Instead, select the correct unit conversion for the relationship or add a new unit conversion record to avoid adversely impacting other relationships. 5. Click Eclare Version 2016 to save the change. Page 476 Users Manual Using Eclare To Delete a Unit Conversion 1. Select the Unit Conversion menu option. The Unit Conversion List screen displays. 2. Find the unit conversion you wish to delete and click on it to select it. 3. Click . A confirm delete message displays. 4. Verify that the unit conversion you selected for deletion is correct and that it is not assigned to any item in the Master File. If you wish to proceed with the deletion, click . Once you confirm this step, you cannot undo it. PO Pack The PO Pack menu option allows you to define groups or families of purchase orders. Use these numbers in the job takeoffs to determine the items that will be included in a particular purchase order pack. If materials ordered from the same vendor are assigned to different packages, they will print on separate purchase orders. To select the menu option from the Main Menu, click Maintenance | Setup Maintenance | PO Pack Number. Eclare Version 2016 Page 477 Users Manual Using Eclare To Add a new PO Pack Number 1. Select the PO Pack menu option. The PO Pack Number screen displays. 2. Click . The Adding PO Pack Desc. screen displays. 3. Enter the new PO Pack information. Please note: Field Description PO Pack # This field may only contain numbers, and it must be unique. It cannot be already assigned to another record. Note: PO Pack # 0 is a special record in Eclare, reserved for items that will not be exported to Gemini. Thus, it does not result in the generation of a purchase order. Description 4. Click Enter a description that clearly identifies the group or family of purchase orders. to save the information. To Modify a PO Pack Number 1. Select the PO Pack Menu option. The PO Pack Number screen displays. 2. Find the PO Pack Number you wish to modify and click on the line to select it. 3. Click Eclare Version 2016 . The Changing PO Pack Desc. screen displays. Page 478 Users Manual Using Eclare 4. Enter the information you wish to modify. You can only change the Description. Make sure it is not assigned to another record. (For more information, refer to the To Add a New PO Pack Number topic in this section.) 5. Click to save the change. To Delete a PO Pack Number 1. Select the PO Pack menu option. The PO Pack Number screen displays. 2. Find the PO Pack Number you wish to delete and click on it to select it. 3. Click . If the PO Pack is currently assigned to at least one job takeoff, a message displays and no deletion takes place. Otherwise, a confirm delete message displays. 4. If the PO Pack is not referenced, verify that the PO Pack Number you selected for deletion. If you wish to proceed with the deletion, click . Once you confirm this step, you cannot undo it. Eclare Version 2016 Page 479 Users Manual Using Eclare View PO Reason Codes The View PO Codes menu option allows you to view the PO Reasons codes defined in Gemini Accounting. To select the menu option from the Main Menu, click Maintenance | View PO Reason Codes. To View the Product Codes 1. Select the View PO Reason Codes menu option. The PO Reason Codes screen displays. 2. Click Eclare Version 2016 to exit. Page 480 Users Manual Using Eclare Check List The Check List menu option allows you to define estimating categories (e.g. Sq. Ft. Total, Sq. Ft. Living Area, etc.). Use these categories to group the items in the Master File so that you can automatically update the job takeoff quantity for all items assigned to a specific group. To select the menu option from the Main Menu, click Maintenance | Setup Maintenance | Check List. (For more information on how to update the checklist quantities, refer to the Checklist Qty section in this chapter.) To Add a new Check List line 1. Select the Check List menu option. The Master Check List screen displays. 2. Click Eclare Version 2016 . The Check Item will be Added screen displays. Page 481 Users Manual Using Eclare 3. Enter the new line information. Please note: Field Description Line Number This field may only contain numbers, and it must be unique. It cannot be already assigned to another record. Description Enter a description that clearly identifies the purpose of the check list line. Unit Enter the unit of measure for the check list line. You must enter the unit. Only items with the same unit of measure can be assigned to this line. (For more information, refer to the To Assign Items to the Check List topic in this section.) 4. Click to save the information. To Assign Items to the Check List 1. Select the Check List Menu option. The Master Check List screen displays. 2. Find the Line Number you wish to assign items to and click on the line to select it. 3. Click Eclare Version 2016 . The Tag Items to Set Check List screen displays. Page 482 Users Manual Using Eclare 4. Locate and select the items to assign to the selected check list line. (For information on how to search for or select data, refer to the Searching for Takeoff Items topic in the Takeoffs section, or to the Selecting Data from a List section in the Exploring Eclare chapter.) Note: The Line’s unit of measure must be the same as the selected item’s. Otherwise, an error message displays. 5. Click to conclude the assignment and tag the items. A message displays indicating the result of the operation. To Modify a Check List line 1. Select the Check List Menu option. The Master Check List screen displays. 2. Find the Line Number you wish to modify and click on the line to select it. 3. Click Eclare Version 2016 . The Check Item will be Changed screen displays. Page 483 Users Manual Using Eclare 6. Enter the information you wish to modify. When changing the description, make sure it is not assigned to another record. (For more information, refer to the To Add a New Check List Line topic in this section.) 4. Click to save the change. To Delete a Check List line 1. Select the Check List menu option. The Master Check List screen displays. 2. Find the Line Number you wish to delete and click on it to select it. 3. Click . A confirm delete message displays. 4. Verify that the Line Number you selected for deletion is correct and that it is not assigned to any item in the Master File. If you wish to proceed with the deletion, click Eclare Version 2016 . Once you confirm this step, you cannot undo it. Page 484 Users Manual Using Eclare Job Criteria The Job Criteria menu option allows you to further customize your company’s takeoff criteria lists (e.g. area, elevation, series). Use these categories to identify the groups that contribute to the building costs, and for selection purposes. To select the menu option from the Main Menu, click Maintenance | Setup Maintenance | Job Criteria. Note: Before using this option, you must define your company’s job takeoff criteria. (For more information, refer to the Program Setup section in this chapter.) To Add a new Job Takeoff Criteria 1. Select the Job Criteria menu option. The Job Takeoff Criteria List screen displays. 2. Select the type of criteria you wish to create categories for in the Criteria List field. Eclare supports up to four types. (For more information, refer to the Program Setup section in this chapter.) Eclare Version 2016 Page 485 Users Manual Using Eclare 3. Click . The Update Records screen displays. 4. Enter the new category information. Please note: Field Description Code This field may contain letter and numbers, and it must be unique. It cannot be already assigned to another record. Description Enter a description that clearly identifies the purpose of the category. 5. Click to save the information. To Modify a Job Takeoff Criteria 1. Select the Job Criteria menu option. The Job Takeoff Criteria List screen displays. 2. Select the type of criteria you wish to modify categories for in the Criteria List field. Eclare supports up to four types. (For more information, refer to the Program Setup section in this chapter.) 3. Find the category you wish to modify and click on the line to select it. 4. Click Eclare Version 2016 . The Update Records screen displays. Page 486 Users Manual Using Eclare 5. Enter the information you wish to modify. When changing the description, make sure it is not assigned to another record. (For more information, refer to the To Add a New Job Takeoff Criteria topic in this section.) 6. Click to save the change. To Delete a Job Takeoff Criteria 1. Select the Job Criteria menu option. The Job Takeoff Criteria List screen displays. 2. Select the type of criteria you wish to delete categories for in the Criteria List field. Eclare supports up to four types. (For more information, refer to the Program Setup section in this chapter.) 3. Find the category you wish to delete and click on the line to select it. 4. Click . A confirm delete message displays. 5. Verify that the category you selected for deletion is correct and that it is not assigned to any takeoff. If you wish to proceed with the deletion, click . Once you confirm this step, you cannot undo it. Eclare Version 2016 Page 487 Users Manual Using Eclare Takeoff Type Codes The Takeoff Type menu option allows you to define takeoff variations. Use these categories to identify and group your takeoffs for sales analysis purposes. To select the menu option from the Main Menu, click Maintenance | Setup Maintenance | Takeoff Type Codes. To Add a new Takeoff Type Code 1. Select the Takeoff Type Codes menu option. The Takeoff Type Codes screen displays. 2. Click Eclare Version 2016 . The TO Type will be Added screen displays. Page 488 Users Manual Using Eclare 3. Enter the new takeoff type information. Please note: Field Description T/O Type Code This field may contain letter and numbers, and it must be unique. It cannot be already assigned to another record. T/O Type Description Enter a description that clearly identifies the purpose of the type. 4. Click to save the information. To Modify a Takeoff Type Code 1. Select the Takeoff Type Codes menu option. The Takeoff Type Codes screen displays. 2. Find the type you wish to modify and click on the line to select it. 3. Click . The TO Type will be Changed screen displays. 4. Enter the information you wish to modify. When changing the description, make sure it is not assigned to another record. (For more information, refer to the To Add a New Takeoff Type Code topic in this section.) 5. Click to save the change. To Delete a Takeoff Type Code 1. Select the Takeoff Type Codes menu option. The Takeoff Type Codes screen displays. 2. Find the type you wish to delete and click on the line to select it. Eclare Version 2016 Page 489 Users Manual Using Eclare 3. Click . A confirm delete message displays. 4. Verify that the type you selected for deletion is correct and that it is not assigned to any takeoff. If you wish to proceed with the deletion, click . Once you confirm this step, you cannot undo it. Show Item / Option References The Show Item / Option References menu option allows you to search for a specific item or option within your database and to determine which jobs it is assigned to. Use this menu option when you need to remove a referenced item or option that you no longer use. To select the menu option from the Main Menu, click Maintenance | Setup Maintenance | Show Item / Option References. This feature only applies to jobs that are not marked ‘hidden’ and displays items’ count by status Included and Alternate. To remove a referenced item or option that you no longer use, you must first determine the takeoffs where the item is used and remove all references before you can delete it. Eclare Version 2016 Page 490 Users Manual Using Eclare To Search for an Item in the Jobs database 1. Select the Show Item / Option References menu option. The Show Item / Option References screen displays. 2. Select the item you wish to search for in the Item to Reference field. (For more information, refer to the Selecting Values for a Field section in this chapter.) 3. If you wish to limit the jobs you wish to search within, select the desired Job Numbers and the Job Type. 4. Click . If the selected item is found for the specified jobs, a line displays in the List for section for each job that contains the item. If you wish to print the Reference list, click preview the list, click 5. Click . If you wish to . to conclude the search and exit the menu option. To Search for an Option in the Jobs database 1. Select the Show Item / Option References menu option. The Show Item / Option References screen displays. 2. Select the option you wish to search for in the Option Number field. (For more information, refer to the Selecting Values for a Field section in this chapter.) 3. If you wish to limit the jobs you wish to search within, select the desired Job Numbers and the Job Type. 4. If you wish to perform a full search, click on the Also Search Extended Options field to activate it. Eclare will also check the options specified in the Ext. Option field of the takeoff detail. (For more information, refer to the To Edit Takeoff Details, Takeoffs section in this chapter.) 5. Click . If the selected item is found for the specified jobs, a line displays in the List for section for each job that contains the item. If you Eclare Version 2016 Page 491 Users Manual Using Eclare wish to print the Reference list, click preview the list, click 6. Click Eclare Version 2016 . If you wish to . to conclude the search and exit the menu option. Page 492 Users Manual Using Eclare PO Text The PO Text menu option allows you to define standard terms and conditions to print in purchase order forms. (For more information about printing the Purchase Orders, refer to the Vendor Orders section in this chapter) To select the menu option from the Main Menu, click Maintenance | Text Maintenance | PO Text. Note: If you are interfacing with Prosoft’s accounting application, you do not need to define the work order text here. The accounting application automatically provides the defined PO legal text for the vendor orders. To Work with the Purchase Order Text 1. Select the PO Text menu option. The Purchase Order Text screen displays. 2. View the currently defined text, make corrections, or type additional text. You can include as much information as you need, and organize it in the way you would like it to print in the purchase order form. You cannot change the text at print time. 3. Click Eclare Version 2016 to save the information. Page 493 Users Manual Using Eclare Work Order Text The Work Order Text menu option allows you to define standard terms and conditions to print in work order forms. (For more information about printing the Purchase Orders, refer to the Vendor Orders section in this chapter) To select the menu option from the Main Menu, click Maintenance | Text Maintenance | Work Order Text. Note: If you are interfacing with Prosoft’s accounting application, you do not need to define the work order text here. The accounting application automatically provides the defined PO legal text for the work orders. To Work with the Work Order Text 1. Select the Work Order Text menu option. The Work Order Text screen displays. 2. View the currently defined text, make corrections, or type additional text. You can include as much information as you need, and organize it in the way you would like it to print in the work order form. You cannot change the text at print time. 3. Click Eclare Version 2016 to save the information. Page 494 Users Manual Using Eclare Vendor Order Quote Text The Vendor Order Quote Text menu option allows you to define standard quote text to print in vendor order forms. This text is printed in vendor orders when the order is prepared as a bid, or to get prices from a supplier to update the Item Master file or a specific job. (For more information about printing the Vendor Orders, refer to the Vendor Orders section in this chapter.) To select the menu option from the Main Menu, click Maintenance | Text Maintenance | Vendor Order Quote Text. To Work with the Vendor Order Quote Text 1. Select the Vendor Order Quote Text menu option. The Vendor Order “Quote” Text screen displays. 2. View the currently defined text, make corrections, or type additional text. You can include as much information as you need, and organize it in the way you would like it to print in the vendor order form. You cannot change the text at print time. 3. Click Eclare Version 2016 to save the information. Page 495 Users Manual Using Eclare Specification Text The Specification Text menu option allows you to define common terms and conditions that are regularly assigned during takeoff as job specifications. This text is printed in the job’s vendor orders. (For more information about printing the Vendor Orders, refer to the Vendor Orders section in this chapter.) To select the menu option from the Main Menu, click Maintenance | Text Maintenance | Specification Text. To Add a new Specification 1. Select the Specification Text menu option. The PO Specification Text screen displays. 2. Click Eclare Version 2016 . The Update Records screen displays. Page 496 Users Manual Using Eclare 3. Enter the new specification’s information. Please note: Field Description Specification ID The Specification ID may contain letters or number, but it must be unique. It cannot be already assigned to another record. Actual Text Enter the specification details. You can include as much information as you need, and organize it in the way you would like it to appear as default when you assign the Specification ID to a Job Takeoff. (For more information, refer to the Job Maintenance section in this chapter.) 4. Click to save the information. To Modify a Specification 1. Select the Specification Text menu option. The PO Specification Text screen displays. 2. Find the specification you wish to modify and click on the line to select it. 3. Click Eclare Version 2016 . The Update Records screen displays. Page 497 Users Manual Using Eclare 4. Enter the specification information you wish to modify. You may change the ID or text. (For more information, refer to the To Add a New Specification topic in this section.) 5. Click to save the change. To Delete a Specification 1. Select the Specification Text menu option. The PO Specification Text screen displays. 2. Find the specification you wish to delete and click on it to select it. 3. Click . A confirm delete message displays. 4. Verify that the specification you selected for deletion is correct. If you wish to proceed with the deletion, click cannot undo it. Eclare Version 2016 . Once you confirm this step, you Page 498 Users Manual Using Eclare Takeoff Report The Takeoff Report menu option allows you to print a detail of all takeoffs for a job. Use this report to see how quantity measurements are applied in the job, and as a source document from which purchase orders, customer proposals, and material lists are created. To select the menu option from the Main Menu, click Reports | Takeoff Report. Before you run this menu option, make sure you have set the job you wish to print the report for as the current job. (For more information, refer to the To Set the Current Job, Job Maintenance section in this chapter.) Note: Calculations are based on the takeoff’s Revised Quantity when the value of that field is different than zero. Eclare Version 2016 Page 499 Users Manual Using Eclare To Generate the Takeoff Report 1. Select the Takeoff Report menu option. The Job Takeoff Detail selection screen displays. 2. Select the takeoff numbers to print. To print all, leave Lowest Takeoff # and the Highest Takeoff # blank. To print a range, select the desired range. Only takeoffs that fall within the range will be printed. 3. To include change orders, click on the Exclude ALL Change Orders field to deactivate it. No check mark should display. Select the change orders to print. To print all, leave Lower C/O Limit and the Upper C/O Limit blank. To print a range, select the desired range. Only change orders that fall within the range will be printed. 4. Indicate the information and adjustments you wish to include in the report: Field Description Include Tax Include Eclare Version 2016 Activate this field if you wish to calculate sales tax for this takeoff. Deactivate if you do not. Activate this field it if you wish to mark up items for Page 500 Users Manual Using Eclare Field Category Markup Description this takeoff. Deactivate if you do not. Include Waste Enforce Vendor Order Requirements Include Pricing Include Zero Quantities Include Takeoff Detail Notes Include Extended Options Include Vendor Summary Include Direct Budget Adjustments Exclude Alternate Items Eclare Version 2016 Activate this field if you wish to include the waste for this takeoff. Deactivate if you do not. Activate this field if you wish to enforce the vendor’s ordering requirements for this takeoff. This program option checks that the item’s quantities conform to the minimum order and order increments defined for the item’s vendor. Deactivate if you do not. Activate this field if you wish to print the item’s price and cost extension. Deactivate if you plan to use the report in the field, where no cost information is needed. Activate this field if you wish to print items that have a takeoff quantity of zero. Deactivate if you do not. A menu option Summary section prints at the end of the report. Activate this field if you wish to print the job takeoffs’ detail notes. Deactivate if you do not. Activate this field if you wish to include extended options in the report. This feature is only available when showing Option # in the report. Deactivate if you do not. Activate this field if you wish to include a summary list of the takeoffs’ vendor information. Deactivate if you do not. Activate this field if you wish to include a list of the takeoffs’ budget adjustments. Deactivate if you do not. Activate this field if you do not wish to print alternate items in the report. (For more information, refer to the Takeoffs section in this chapter.) Deactivate if you do. Page 501 Users Manual Using Eclare 5. In the Show on Report section, select the field you wish to print in the report. 6. Click to view the report on the screen or to send it directly to the printer. (For more information, refer to the Reports section in the Exploring Eclare chapter.) A progress bar displays until the system completes generating or printing the report. Material Summary The Material Summary menu option allows you to generate a list of materials for a job. Use this report to summarize all the job’s requirements. To select the menu option from the Main Menu, click Reports | Material Summary. Eclare Version 2016 Page 502 Users Manual Using Eclare Before you run this menu option, make sure you have set the job you wish to print the proposal for as the current job. (For more information, refer to the To Set the Current Job, Job Maintenance section in this chapter.) To Generate the Material Summary 1. Select the Material Summary menu option. The Job Material Summary Report selection screen displays. 2. Indicate the information and adjustments you wish to include in the purchase order: Field Description Include Waste Enforce Vendor Order Requirements Include Zero Items Include Direct Budget Adjustments Activate this field if you wish to include waste in the report. Deactivate if you do not. Activate this field if you wish enforce the vendor’s ordering requirements in the report. Deactivate if you do not. Activate this field if you wish to print items that have a takeoff quantity of zero. Deactivate if you do not. Activate this field if you wish to include a list of the takeoffs’ budget adjustments. Deactivate if you do not. 3. Click to view the report on the screen or to send it directly to the printer. (For more information, refer to the Reports section in the Exploring Eclare chapter.) A progress bar displays until the system completes generating or printing the report. Eclare Version 2016 Page 503 Users Manual Using Eclare PO Audit Report The PO Audit Report menu option allows you to generate concise format of the vendor order report. Use this report for internal purposes to quickly audit what will be printed on the purchase orders. To select the menu option from the Main Menu, click Reports | PO Audit Report. Before you run this menu option, make sure you have set the job you wish to print the proposal for as the current job. (For more information, refer to the To Set the Current Job, Job Maintenance section in this chapter.) To Generate the PO Audit Report 1. Select the PO Audit Report menu option. The PO Audit Report selection screen displays. Eclare Version 2016 Page 504 Users Manual Using Eclare 2. Indicate the information and adjustments you wish to include in the purchase order: Field Description Include Waste Enforce Vendor Order Requirements Include Price Add Tax to Vendor Total Eclare Version 2016 Activate this field if you wish to include waste in the report. Deactivate if you do not. Activate this field if you wish to enforce the vendor’s ordering requirements in the report. Deactivate if you do not. Activate this field if you wish to print the vendor’s unit price and extension in the report. Deactivate if you do not. Activate this field if you wish to calculate and include tax in the calculation of to the purchase order total. Deactivate if you do not. Page 505 Users Manual Using Eclare Field Description Include Takeoff Detail Notes Include PO Notes Activate this field if you wish to print the notes assigned to the job takeoff detail lines to further describe the item. This information will help the vendor in properly filling the order. Deactivate if you do not. Activate this field if you wish to print in the purchase order the text defined in the PO Text menu option. Deactivate if you do not. 3. Select the purchase orders to print. To print all, leave Lower PO Limit and the Upper PO Limit blank. To print a range, select the desired range. Only purchase orders that fall within the range will be printed. 4. Select the vendor you wish to print purchase orders for. To print all, leave the Vendor to Print field blank. 5. Click to view the report on the screen or to send it directly to the printer. (For more information, refer to the Reports section in the Exploring Eclare chapter.) A progress bar displays until the system completes generating or printing the report. Eclare Version 2016 Page 506 Users Manual Using Eclare Vendor Orders The Vendor Orders menu option allows you to generate job purchase orders by vendor. To select the menu option from the Main Menu, click Reports | Vendor Orders. Before you run this menu option, make sure you have set the job you wish to print the proposal for as the current job. (For more information, refer to the To Set the Current Job, Job Maintenance section in this chapter.) To Generate the Purchase Orders for a Vendor 1. Select the Vendor Orders menu option. The Job Vendor Orders selection screen displays. Eclare Version 2016 Page 507 Users Manual Using Eclare 2. Indicate the information and adjustments you wish to include in the purchase order: Field Description Quote Only Include Tax Enforce Vendor Order Requirements Include Price Add Tax to Eclare Version 2016 Activate this field if you wish to print in the purchase order the quote text defined in Vendor Order Quote Text menu option. To send a document to a vendor for a quote request, activate this field. It will not include vendor information. Deactivate if you do not. Activate this field if you wish to include tax in the report. Deactivate if you do not. Activate this field if you wish to enforce the vendor’s ordering requirements in the report. Deactivate if you do not. Activate this field if you wish to print the vendor’s unit price and extension in the report. Deactivate if you do not. Activate this field if you wish to calculate and include Page 508 Users Manual Using Eclare Field Vendor Total Description tax in the calculation of to the purchase order total. Deactivate if you do not. Include Takeoff Detail Notes Include PO Notes Include Contact Detail Print PO Pack Description Activate this field if you wish to print the notes assigned to the job takeoff detail lines to further describe the item. This information will help the vendor in properly filling the order. Deactivate if you do not. Activate this field if you wish to print in the purchase order the text defined in the PO Text menu option. Deactivate if you do not. Activate this field if you wish to print the contact information defined in the job header. Deactivate if you do not. Activate this field if you wish to print the PO Pack description. Deactivate if you do not. 3. Select the purchase orders to print. To print all, leave Lower PO Limit and the Upper PO Limit blank. To print a range, select the desired range. Only purchase orders that fall within the range will be printed. 4. To include change orders, click on the Exclude ALL Change Orders field to deactivate it. No check mark should display. Select the change orders to print. To print all, leave Lower C/O Limit and the Upper C/O Limit blank. To print a range, select the desired range. Only change orders that fall within the range will be printed. 5. Select the vendor you wish to print purchase orders for. To print all, leave the Vendor to Print field blank. 6. Click to view the report on the screen or to send it directly to the printer. (For more information, refer to the Reports section in the Exploring Eclare chapter.) A progress bar displays until the system completes generating or printing the report. Eclare Version 2016 Page 509 Users Manual Using Eclare Job Price Comparison The Job Price Comparison menu option allows you to generate a price comparison report for a job, and to export the information to a comma-delimited (.csv) file. Use this report to determine whether the vendor of choice provides the best price for a group of products. The price comparison is based on the selected vendors’ prices. To select the menu option from the Main Menu, click Reports | Job Price Comparison. Before you run this menu option, make sure you have set the job you wish to print the proposal for as the current job. (For more information, refer to the To Set the Current Job, Job Maintenance section in this chapter.) To Generate the Job Price Comparison Report 1. Select the Job Price Comparison menu option. The Job Price Comparison screen displays. Eclare Version 2016 Page 510 Users Manual Using Eclare 2. Indicate the Price Date you wish to compare prices for, if different than the default log in date. Eclare uses the vendor’s price entry whose effective date is equal or prior to the selected date. 3. If you wish to include the waste adjustment in the report, click on the Include Waste field to activate it. A check mark must display. 4. Select the products you wish to compare prices for in the Product Groups to Include section. You must select at least one Product Group. (For information on how to select data, refer to the Selecting Data from a List section in the Exploring Eclare chapter.) 5. Select the vendors you wish to compare prices for in the Vendors to Compare section. You must select at least one vendor, but the system allows you to compare prices for a maximum of nine. Note: Although you may select up to nine vendors, only the first three print on the report. Data from all nine vendors may be exported to the output file. 6. Type or select the filename and path of the output file. The system remembers the last location and file used. If you use the selection dialog box, do not change the Save as type CSV Files type. (For more information, refer to the Finding and Saving Files section in the Exploring Eclare chapter.) 7. Verify your selection. Click to view the report on the screen or to send it directly to the printer. (For more information, refer to the Reports section in the Exploring Eclare chapter.) A progress bar displays until the system completes generating or printing the report. Eclare Version 2016 Page 511 Users Manual Using Eclare Note: The quantity shown in the report is the Takeoff quantity, not the order quantity. If there is no price for a vendor, the corresponding column displays the dollar sign (“$”). Totals at the bottom of the report are for selected items only and may not correspond with the total job price. Product Group Report The Product Group Report menu option allows you to generate a summary cost report by trade for a job. Use this report as a tool for negotiating prices. To select the menu option from the Main Menu, click Reports | Product Group Report. Before you run this menu option, make sure you have set the job you wish to print the report for as the current job. (For more information, refer to the To Set the Current Job, Job Maintenance section in this chapter.) Eclare Version 2016 Page 512 Users Manual Using Eclare To Generate the Product Group Report 1. Select the Product Group Report menu option. The Product Group Report selection screen displays. 2. Indicate the adjustments you wish to include in the report: Field Description Include Tax Include Category Markup Include Waste Enforce Vendor Order Requirements Activate this field if you wish to calculate sales tax in the report. Deactivate if you do not. Activate this field it if you wish to mark up items in the report. Deactivate if you do not. Activate this field if you wish to include the waste in the report. Deactivate if you do not. Activate this field if you wish to enforce the vendor’s ordering requirements in the report. Deactivate if you do not. 3. Click to view the report on the screen or to send it directly to the printer. (For more information, refer to the Reports section in the Exploring Eclare chapter.) A progress bar displays until the system completes generating or printing the report. Eclare Version 2016 Page 513 Users Manual Using Eclare Square Foot Projection The Square Foot Projection menu option allows you to generate a cost report by trade, calculating cost per existing square foot and making a cost projection based on a proposed square footage or dollar amount. Use this report as a price negotiation tool to determine what concessions need to be made by trade to meet a new cost. To select the menu option from the Main Menu, click Reports | Square Foot Projection. Before you run this menu option, make sure you have set the job you wish to print the report for as the current job. (For more information, refer to the To Set the Current Job, Job Maintenance section in this chapter.) Eclare Version 2016 Page 514 Users Manual Using Eclare To Generate the Square Foot Projection Report 1. Select the Square Foot Projection report menu option. The Square Foot Projection Report selection screen displays. 2. Indicate the adjustments you wish to include in the projection: Field Description Include Tax Include Category Markup Include Waste Enforce Vendor Order Requirements Activate this field if you wish to include tax in the report. Deactivate if you do not. Activate this field it if you wish to include mark up in the report, in order to give the report to the client. Deactivate if you do not. Activate this field if you wish to include waste in the report. Deactivate if you do not. Activate this field if you wish to enforce the vendor’s ordering requirements in the report. Deactivate if you do not. 3. Verify your selection. Click . A progress bar displays while the system compiles the job information. The SF Projection Report screen displays. Eclare Version 2016 Page 515 Users Manual Using Eclare 4. Enter the desired projection information; the system automatically calculates the remaining fields: Field Description Job Squarefoot Enter the new job measurements if you wish to project cost for a different square footage. Total Job Cost Enter the total cost you would like to meet if you wish to project cost based on the total job cost. The system automatically displays the difference between the actual and proposed costs. Cost per S.F. Enter the cost per square feet you would like to meet if you wish to project cost based on the cost by square feet. The system automatically displays the difference between the actual and proposed costs. 5. Verify your selection. Click to view the report on the screen or to send it directly to the printer. (For more information, refer to the Reports section in the Exploring Eclare chapter.) A progress bar displays until the system completes generating or printing the report. Eclare Version 2016 Page 516 Users Manual Using Eclare Check List The Job Check List menu option allows you to generate a complete list of the current job’s check list lines, or estimating categories, and their associated comments. To select the menu option from the Main Menu, click Reports | Check List. To Generate the Job Check List Report 1. Select the Job Check List Report menu option. The Job Check List Report selection screen displays. 2. Click to view the report on the screen or to send it directly to the printer. (For more information, refer to the Reports section in the Exploring Eclare chapter.) A progress bar displays until the system completes generating or printing the report. Eclare Version 2016 Page 517 Users Manual Using Eclare Customer Proposal The Customer Proposal menu option brings together all of Eclare’s features to quickly produce an accurate job proposal, ready to be delivered to the customer. To select the menu option from the Main Menu, click Reports | Customer Proposal. Before you run this menu option, make sure you have set the job you wish to print the proposal for as the current job. (For more information, refer to the To Set the Current Job, Job Maintenance section in this chapter.) To Generate the Customer Proposal 1. Select the Customer Proposal report menu option. The Job Customer Proposal Report selection screen displays. Eclare Version 2016 Page 518 Users Manual Using Eclare 2. Indicate the adjustments you wish to include in the proposal: Field Description Include Tax Include Category Markup Include Waste Enforce Vendor Order Requirements Include Cost/Sq Ft. Information Include Direct Budget Adjustments Eclare Version 2016 Activate this field if you wish to calculate sales tax for this proposal. Deactivate if you do not. Activate this field it if you wish to mark up items for this proposal. Deactivate if you do not. Activate this field if you wish to include the waste for this proposal. Deactivate if you do not. Activate this field if you wish to enforce the vendor’s ordering requirements for this proposal. This program option checks that the item’s quantities conform to the minimum order and order increments defined for the item’s vendor. Deactivate if you do not. Activate this field if you wish to include cost information by total square foot and square foot living space. Deactivate if you do not. Activate this field if you wish to include a list of the takeoffs’ budget adjustments. Deactivate if you do not. Page 519 Users Manual Using Eclare 3. Verify your selection. Click to view the report on the screen or to send it directly to the printer. (For more information, refer to the Reports section in the Exploring Eclare chapter.) A progress bar displays until the system completes generating or printing the report. Customer Proposal Detail Like the Customer Proposal menu option, the Customer Proposal Detail menu option also brings together all of Eclare’s features to quickly produce an accurate job proposal, ready to be delivered to the customer. The Detail menu option, however, includes a breakdown by item. To select the menu option from the Main Menu, click Reports | Customer Proposal Detail. Before you run this menu option, make sure you have set the job you wish to print the proposal for as the current job. (For more information, refer to the To Set the Current Job, Job Maintenance section in this chapter.) Eclare Version 2016 Page 520 Users Manual Using Eclare To Generate the Customer Proposal Detail Report 1. Select the Customer Proposal Detail menu option. The Job Customer Proposal Detail Report selection screen displays. 2. Indicate the adjustments you wish to include in the proposal: Field Description Include Tax Include Category Markup Include Waste Enforce Vendor Order Requirements Exclude Zero Items Eclare Version 2016 Activate this field if you wish to calculate sales tax for this proposal. Deactivate if you do not. Activate this field it if you wish to mark up items for this proposal. Deactivate if you do not. Activate this field if you wish to include the waste for this proposal. Deactivate if you do not. Activate this field if you wish to enforce the vendor’s ordering requirements for this proposal. This program option checks that the item’s quantities conform to the minimum order and order increments defined for the item’s vendor. Deactivate if you do not. Activate this field if you do not wish to print in the proposal items that have a takeoff quantity of zero . Deactivate this field if you wish to include all items. Page 521 Users Manual Using Eclare Field Description Include Job Takeoff Notes on Report Include Direct Budget Adjustments Activate this field if you wish to print takeoff notes in the proposal. Deactivate if you do not. Activate this field if you wish to include a list of the takeoffs’ budget adjustments. Deactivate if you do not. 3. Verify your selection. Click to view the report on the screen or to send it directly to the printer. (For more information, refer to the Reports section in the Exploring Eclare chapter.) A progress bar displays until the system completes generating or printing the report. Job Category Report The Job Category Report menu option allows you to generate a cost summary report by Category for a job. Use this report to summarize the job’s costs into the least possible number of categories. To select the menu option from the Main Menu, click Reports | Job Category Report. Before you run this menu option, make sure you have set the job you wish to print the report for as the current job. (For more information, refer to the To Set the Current Job, Job Maintenance section in this chapter.) Eclare Version 2016 Page 522 Users Manual Using Eclare To Generate the Job Category Report 1. Select the Job Category Report menu option. The Job Category Report selection screen displays. 2. Indicate the adjustments you wish to include in the report: Field Description Include Tax Include Waste Enforce Vendor Order Requirements Activate this field if you wish to include tax in the report. Deactivate if you do not. Activate this field if you wish include waste in the report. Deactivate if you do not. Activate this field if you wish enforce the vendor’s ordering requirements in the report. Deactivate if you do not. 3. Verify your selection. Click to view the report on the screen or to send it directly to the printer. (For more information, refer to the Reports section in the Exploring Eclare chapter.) A progress bar displays until the system completes generating or printing the report. Eclare Version 2016 Page 523 Users Manual Using Eclare Takeoff Type Usage The Takeoff Type Usage report menu option allows you to generate a summary list of jobs by Takeoff Type. Use this report as an analysis tool to determine the number of sales per type or option variation. To select the menu option from the Main Menu, click Reports | Takeoff Type Usage. To Generate the Takeoff Type Usage Report 1. Select the Takeoff Type Usage menu option. The Print Takeoff Type Usage Report screen displays. Eclare Version 2016 Page 524 Users Manual Using Eclare 2. Select the Earliest Job Date and Latest Job Date you wish to include in the report. To include all dates, leave these fields blank. 3. Select the type of jobs you wish to print takeoff usage for in the Include Job Type field. 4. Select Takeoff Types from the selection list. (For information on how to select data, refer to the Selecting Data from a List section in the Exploring Eclare chapter.) 5. Verify your selection. Click to view the report on the screen or to send it directly to the printer. (For more information, refer to the Reports section in the Exploring Eclare chapter.) A progress bar displays until the system completes generating or printing the report. Job List The Job List report menu option allows you to generate a list of all jobs and/or models defined in the Job Maintenance menu option. To select the menu option from the Main Menu, click Reports | Job List. To Generate the Job List 1. Select the Job List menu option. The Job List Report selection screen displays. Eclare Version 2016 Page 525 Users Manual Using Eclare 2. Select the types of jobs to include in the report in the Jobs/Models to Include section. 3. Select the order in which you want the information to appear. 4. If you wish to print job related notes defined in the job header, click on the Include Job Notes field to activate it. 5. If you wish to include jobs marked ‘hidden’, click on the Include Hidden Jobs field to activate it. 6. Verify your selection. Click to view the report on the screen or to send it directly to the printer. (For more information, refer to the Reports section in the Exploring Eclare chapter.) A progress bar displays until the system completes generating or printing the report. Master File Report The Master File report menu option allows you to generate a list of items defined in the Item Master File. You can select to print a complete list, a list by Product, or a list of items with pricing exceptions. Use this report to validate the Master File information. To select the menu option from the Main Menu, click Reports | Master File | Master File Report. Eclare Version 2016 Page 526 Users Manual Using Eclare To Generate the Master File Report 1. Select the Master File Report menu option. The Master File Report selection screen displays. 2. Select the items and assemblies to include in the report. To include all, leave Lower Number Limit and the Higher Number Limit blank. To include a range, select the desired range. Only items and assemblies that fall within the numeric range will be included in the report. 3. If you wish to print an item list for a specific product, select the product in the Product List field. You may combine the Product selection with the item selection to further narrow down the items to include. 4. Indicate the Price Date you wish to print prices for, if different than the default log in date. Eclare prints the vendor’s price entry whose effective date is equal or prior to the selected date. 5. Indicate the information you wish to include in the report: Field Description Print Auto Pricing Exceptions Only Print Items with Rebates Only Include Items Eclare Version 2016 Activate this field if you wish to print only items with pricing exceptions. Deactivate if you do not. Activate this field if you wish to print only items with rebates. Deactivate if you do not. Activate this field if you wish to print items marked Page 527 Users Manual Using Eclare Field Marked Deleted Description “deleted”. Deactivate if you do not. Include Vendor Pricing Reason Activate this field if you wish to print the specified price change Reason set in the Price Update option. Deactivate if you do not. 6. Verify your selection. Click to view the report on the screen or to send it directly to the printer. (For more information, refer to the Reports section in the Exploring Eclare chapter.) A progress bar displays until the system completes generating or printing the report. Note: Due to the large number of items in the Master File of a typical production builder’s database, this report may be hundreds of pages long. We recommend that you preview the report, and only print to paper when a hardcopy is required. Eclare Version 2016 Page 528 Users Manual Using Eclare Master File by Cost Code The Master File by Cost Code report menu option allows you to generate a summary list of items by Cost Code. Use this report to see how the Master File information will be transferred to the customer proposal and accounting. To select the menu option from the Main Menu, click Reports | Master File | Master File by Cost Code. To Generate the Master File by Cost Code Report 1. Select the Master File by Cost Code Report menu option. The Master File by Cost Code Report selection screen displays. Eclare Version 2016 Page 529 Users Manual Using Eclare 2. Select the cost codes to include in the report. To include all cost codes, leave Lower Cost Code Limit and the Upper Cost Code Limit blank. To include a range of items, select the desired range. Only items that fall within the range will be included in the report. 3. Indicate the information you wish to include in the report:: Field Description Include Items Marked Deleted Activate this field if you wish to print items marked “deleted”. Deactivate if you do not. 4. Select the order in which you want the information to appear. Your selection prints in the report’s heading. 5. Verify your selection. Click to view the report on the screen or to send it directly to the printer. (For more information, refer to the Reports section in the Exploring Eclare chapter.) A progress bar displays until the system completes generating or printing the report. Item Part Number Ref The Item Part Number Reference report menu option allows you to generate an item list containing both Eclare’s part number and the vendors’ part number for the selected items. Use this report to view the item numbering relationships. To select the menu option from the Main Menu, click Reports | Master File | Item Part Number Ref. Eclare Version 2016 Page 530 Users Manual Using Eclare To Generate the Item Part Number Reference Report 1. Select the Item Part Number Ref Report menu option. The Item Number Cross Reference by selection screen displays. 2. Select the item you wish to print cross references for. To include all items, leave Item Number field blank. 3. Indicate the Price Date you wish to print prices for, if different than the default log in date. Eclare prints the vendor’s price entry whose effective date is equal or prior to the selected date. 4. Indicate the information you wish to include in the report:: Field Description Include Items Marked Deleted Activate this field if you wish to print items marked “deleted”. Deactivate if you do not. 5. Verify your selection. Click to view the report on the screen or to send it directly to the printer. (For more information, refer to the Reports section in the Exploring Eclare chapter.) A progress bar displays until the system completes generating or printing the report. Eclare Version 2016 Page 531 Users Manual Using Eclare Vendor Listing The Vendor Listing report menu option allows you to generate a list of all vendors and contact information defined in the Vendors tables and to sort it by Name or Number. Keep this report as a hard copy of the latest data. Complete Report Vendor List To select the menu option from the Main Menu, click Reports | Vendor Related | Vendor Listing. To Generate the Vendor Listing 1. Select the Vendor Listing report menu option. The Vendor Listing selection screen displays. Eclare Version 2016 Page 532 Users Manual Using Eclare 2. Select the order in which you want the vendors to appear. You selection prints in the report’s heading. 3. Indicate the information you wish to include in the report:: Field Description Show Vendor Full Address Show Linked Contacts Show nonLinked Contacts Activate this field if you wish to print the vendor’s address. Deactivate if you do not. Activate this field if you wish to print the vendor’s fixed contact information (purchase order contact, construction project contact, warranty contact, and payables open item). Deactivate if you do not. Activate this field if you wish to print the vendor’s additional contact information. Deactivate if you do not. 4. Verify your selection. Click to view the report on the screen or to send it directly to the printer. (For more information, refer to the Reports section in the Exploring Eclare chapter.) A progress bar displays until the system completes generating or printing the report. Eclare Version 2016 Page 533 Users Manual Using Eclare Vendor Part # Reference The Vendor Part # Reference report menu option allows you to generate a list of all items assigned to a specific vendor. Use this report to see how Eclare’s part numbers and descriptions relate to the ones used by a specific vendor, since they may differ. To select the menu option from the Main Menu, click Reports | Vendor Related | Vendor Part # Reference. To Generate the Vendor Part Number Reference Report 1. Select the Vendor Part # Reference report menu option. The Item Number Cross Reference selection screen displays. 2. You must select a Vendor ID. 3. Select the order you wish to sort the vendors by in the Sort By field. 4. Verify your selection. Click to view the report on the screen or to send it directly to the printer. (For more information, refer to the Reports section in the Exploring Eclare chapter.) A progress bar displays until the system completes generating or printing the report. Eclare Version 2016 Page 534 Users Manual Using Eclare Vendor Price Book The Vendor Price Book report menu option allows you to generate a list of all items supplied by a specific vendor, along with their unit of measure and price. Send this report to vendors as a basis for price changes or for confirmation of quoted prices. To select the menu option from the Main Menu, click Reports | Vendor Related | Vendor Price Book. To Generate the Vendor Price Book 1. Select the Vendor Price Book report menu option. The Vendor Price book Report selection screen displays. Eclare Version 2016 Page 535 Users Manual Using Eclare 2. You must select a Vendor ID. 3. Select the order in which you want the vendors to appear. You selection prints in the report’s heading. 4. Indicate the information you wish to include in the report: Field Description Show Only Price Date Include Pricing Reason If you wish to print only the price entry for a specific date, select or enter the desired date. To print all price entries, leave this field blank. Activate this field if you wish to print the specified price change Reason set in the Price Update option. Deactivate if you do not. 5. Select the master items to print. To print all, leave the Lower Item # and the Upper Item # blank. To print a range, select the desired range. Only purchase orders that fall within the range will be printed. 6. Select the part numbers you wish to print. To print all, leave the Lower Part # and the Upper part # blank. To print a range, select the desired range. Only purchase orders that fall within the range will be printed. 7. Verify your selection. Click to view the report on the screen or to send it directly to the printer. (For more information, refer to the Reports section in the Exploring Eclare chapter.) A progress bar displays until the system completes generating or printing the report. Eclare Version 2016 Page 536 Users Manual Using Eclare Vendor by Product Group The Vendor by Product Group report menu option allows you to generate a list of vendors assigned to a Product Group or Product Group Exception. To select the menu option from the Main Menu, click Reports | Vendor Product Group. To Generate the Vendor by Product Group Report 1. Select the Vendor by Product Group report menu option. The Vendor by Product Group selection screen displays. 2. Select the way you wish to group the data by in the Print List by field. 3. If you wish to include vendors for jobs assigned to a specific Product Group Exception, select the desired exception in the Product Exception List field. Otherwise, leave the field empty. Eclare will then determine which vendors to include based on the Master Product Group list. Eclare Version 2016 Page 537 Users Manual Using Eclare 4. Indicate the processing you wish to perform: Field Description Also check jobs for vendors Exclude duplicate vendors Activate this field if you wish to Eclare to check the vendor assigned to each individual job. Deactivate if you do not. Activate this field if you wish to print only one line per vendor. Deactivate if you do not. 5. Verify your selection. Click to view the report on the screen or to send it directly to the printer. (For more information, refer to the Reports section in the Exploring Eclare chapter.) A progress bar displays until the system completes generating or printing the report. Eclare Version 2016 Page 538 Users Manual Using Eclare Product Group The Product Group Listing report menu option allows you to generate a product list based on the groups and exceptions defined in the Master Product Groups and Product Group Exceptions tables. Product Group List Master List To select the menu option from the Main Menu, click Reports | Setup Reports | Product Group. To Generate the Product Group Report 1. Select the Product Group report menu option. The Product Group Listing selection screen displays. 2. Select the Product Group Exception you wish to print the report for in the Product List field. To include all exceptions, leave the field empty. Eclare Version 2016 Page 539 Users Manual Using Eclare 3. If you wish to include the Master Product Groups, activate the Also Print Master List field. 4. Verify your selection. Click to view the report on the screen or to send it directly to the printer. (For more information, refer to the Reports section in the Exploring Eclare chapter.) A progress bar displays until the system completes generating or printing the report. Eclare Version 2016 Page 540 Users Manual Using Eclare Cost Code The Cost Code report menu option allows you to generate a complete list of the cost codes defined in the Cost Codes table. To select the menu option from the Main Menu, click Reports | Setup Reports | Cost Code. To Generate the Cost Code Report 1. Select the Cost Code report menu option. The CostCode Report selection screen displays. 2. Click to view the report on the screen or to send it directly to the printer. (For more information, refer to the Reports section in the Exploring Eclare chapter.) A progress bar displays until the system completes generating or printing the report. Eclare Version 2016 Page 541 Users Manual Using Eclare Divisions The Divisions report menu option allows you to generate a complete list of the divisions defined in the Divisions table. To select the menu option from the Main Menu, click Reports | Setup Reports | Divisions. To Generate the Divisions Report 1. Select the Divisions report menu option. The Division Report selection screen displays. 2. Click to view the report on the screen or to send it directly to the printer. (For more information, refer to the Reports section in the Exploring Eclare chapter.) A progress bar displays until the system Eclare Version 2016 Page 542 Users Manual Using Eclare completes generating or printing the report. Eclare Version 2016 Page 543 Users Manual Using Eclare Category The Category report menu option allows you to generate a complete list of the categories defined in the Category table. To select the menu option from the Main Menu, click Reports | Setup Reports | Category. To Generate the Category Report 1. Select the Category report menu option. The Category Report selection screen displays. 2. Click to view the report on the screen or to send it directly to the printer. (For more information, refer to the Reports section in the Exploring Eclare chapter.) A progress bar displays until the system completes generating or printing the report. Eclare Version 2016 Page 544 Users Manual Using Eclare Conversions The Conversions report menu option allows you to generate a complete list of the conversion factors and formulas defined in the Unit Conversion table. To select the menu option from the Main Menu, click Reports | Setup Reports | Conversions. To Generate the Conversions Report 1. Select the Conversions report menu option. The Conversion Formulas Report selection screen displays. 2. Click to view the report on the screen or to send it directly to the printer. (For more information, refer to the Reports section in the Exploring Eclare chapter.) A progress bar displays until the system completes generating or printing the report. Eclare Version 2016 Page 545 Users Manual Using Eclare PO Sequence The PO Sequence report menu option allows you to generate a complete list of the purchase order sequences defined in the PO Pack table. To select the menu option from the Main Menu, click Reports | Setup Reports | PO Pack. To Generate the PO Sequence Report 1. Select the PO Pack report menu option. The PO Sequence Report selection screen displays. 2. Click to view the report on the screen or to send it directly to the printer. (For more information, refer to the Reports section in the Exploring Eclare chapter.) A progress bar displays until the system completes generating or printing the report. Eclare Version 2016 Page 546 Users Manual Using Eclare Check List The Master Check List report menu option allows you to generate a complete list of the check list entries defined in the Check List table and their associated items. To select the menu option from the Main Menu, click Reports | Setup Reports | Check List. To Generate the Check List Report 1. Select the Check List report menu option. The Check List Report selection screen displays. 2. If you wish to include the Master File Items, activate the Include Master File Items field. 3. Click to view the report on the screen or to send it directly to the printer. (For more information, refer to the Reports section in the Exploring Eclare chapter.) A progress bar displays until the system completes generating or printing the report. Eclare Version 2016 Page 547 Users Manual Using Eclare Model Option Reference The Model Option Reference report menu option allows you to generate and print a list of options as defined in PSClient. To select the menu option from the Main Menu, click Reports | Setup Reports | Model Option Reference. To Generate the Model Option Reference Report 1. Select the Module Option Reference report menu option. The Print Model Option Reference selection screen displays. 2. Click to view the report on the screen or to send it directly to the printer. (For more information, refer to the Reports section in the Exploring Eclare chapter.) A progress bar displays until the system completes generating or printing the report. Eclare Version 2016 Page 548 Users Manual Using Eclare Takeoff Type Codes The Takeoff Type Codes report menu option allows you to generate and print a list of Takeoff Types defined in Eclare. To select the menu option from the Main Menu, click Reports | Setup Reports | Takeoff Type Codes. To Generate the Takeoff Type Codes Report 1. Select the Takeoff Type Codes report menu option. The Print Model T/O Type Master List selection screen displays. 2. Select the order in which you wish to print the list. 3. Click to view the report on the screen or to send it directly to the printer. (For more information, refer to the Reports section in the Exploring Eclare chapter.) A progress bar displays until the system completes generating or printing the report. Eclare Version 2016 Page 549 Users Manual Appendixes APPENDIXES Eclare Version 2016 Page 550 Users Manual Appendixes Appendix A - File Layouts Export Layouts Note: The last character of every line is a carriage return line feed (cr/lf). Job Budgets This layout is for direct import to Prosoft’s Gemini Accounting. With Gemini Headers Legend: Row Description 1 Header Row Gemini Headers (optional, depending on options selected) Program [Eclare] - Job # [A25] - Job Name [Dolphin] – Date Column Description A Cost Code B Budget ($) Eclare Version 2016 Page 551 Users Manual Appendixes Job PO’s This layout is only used in direct import/export within the Prosoft Suite. It is presented for illustration purposes only. Eclare Version 2016 Page 552 Users Manual Appendixes Cost Codes With Gemini Headers Legend: Row Description 1 Header Row Gemini Headers (optional) Column Description A Cost Code (Alphanumeric, 6 characters) B Cost Code Description (Alphanumeric) C Category (Alphanumeric, A-Z) D Category Closeout E Type (1-9) Used for Quick Estimating. F Phase (Alphanumeric, 8 characters) G Close Out Account (GL account, must correspond to Gemini assignment) H AIA Line (1-999) Used to summarize draws. Eclare Version 2016 Page 553 Users Manual Appendixes T/O Detail Selection: Legend: Column Description A Item Number B Item Type (I/A/L) C Takeoff Number D Vendor Assignment E Takeoff Quantity Eclare Version 2016 Page 554 Users Manual Appendixes Cost Code Compare Legend: Row Description 1 Header Row Cost Code - Cost Code Description – Job Number (499) – Job Number (500) – Job Number (…) Column Description A Cost Code B Cost Code Description C Job Budget ($) – for first Job Number D Job Budget ($) – for second Job Number E… Job Budget ($) – for next Job Number (…) Eclare Version 2016 Page 555 Users Manual Appendixes Option Pricing Base House Pricing Legend: Row Description 1 Header Row Job Number – Base Price Column Description A Job Number B Base House Price ($) Options Pricing Legend: Row Description 1 Header Row Job Number – Option Number – Option Description – Calculated Price – Retail Price Eclare Version 2016 Page 556 Users Manual Appendixes Column Description A Job Number B Option Number C Option Description D Calculated Price E Retail Price Takeoff Compare Legend: Row Description 1 Header Row – Possible fields based on selection: Takeoff # - Description – Quantity - T/O Type Column Description A Takeoff Number B Takeoff Description C Takeoff Quantity D Takeoff Type Eclare Version 2016 Page 557 Users Manual Appendixes Takeoff Detail Compare Legend: Row Description 1 Job Numbers Row 2 Column Header Row Column Description A Takeoff Number B Assembly Number C Assembly Description D Item Number E Item Description Note: Column E and subsequent columns depend on the Export field choices made by the user when the export takes place. Eclare Version 2016 Page 558 Users Manual Appendixes Gemini Price Book Legend: Column Description A Vendor Number B Dummy field (Required) C Part Number D Taxable E Rebate F Description G Unit H Unit Price 1 I Unit Date 1 J Unit Price 2 K Unit Date 2 L Unit Price 3 M Unit Date 3 N Unit Price 4 O Unit Date 4 P Minimum Order Q Increment Order Eclare Version 2016 Page 559 Users Manual Appendixes Import Layouts Vendor Pricing Note: Eclare allows a maximum filename’s length of 255 characters. Legend: Column Description A Vendor Number B Master File Item Number C Vendor Part Number D Taxable (Y/N) E Rebate (Y/N) F Description G Purchase Unit H Cost1 Amount I Cost1 Date J Cost2 Amount K Cost2 Date L Cost3 Amount M Cost3 Date N Cost4 Amount Eclare Version 2016 Page 560 Users Manual Appendixes Column Description O Cost4 Date P Min. Order Q Increment Order Vendors (Create Headers – Exhaustive Fields List) VenNumber,"Name","Address","Address2","City","State","ZipCode","Phone1","F AX","EMail","Beeper","Contact","ConPOName","ConPOPhone","ConPOFax","Co nPOCell","ConPOEMail","ConPOSendMode","ConPOFTPAddr","ConPOFTPPort ","ConPOFTPUserName","ConPOFTPPassword","ConPOFTPNotifyFlag","ConPr ojName","ConProjPhone","ConProjFax","ConProjCell","ConProjEMail","ConProjS endMode","ConProjFTPAddr","ConProjFTPPort","ConProjFTPUserName","ConP rojFTPPassword","ConProjFTPNotifyFlag","ConWarName","ConWarPhone","Co nWarFax","ConWarCell","ConWarEMail","ConWarSendMode","ConWarFTPAddr ","ConWarFTPPort","ConWarFTPUserName","ConWarFTPPassword","ConWarF TPNotifyFlag","APOpenName","APOpenPhone","APOpenFax","APOpenCell","A POpenEMail","APOpenSendMode","APOpenFTPAddr","APOpenFTPPort","APO penFTPUserName","APOpenFTPPassword","APOpenFTPNotifyFlag" Note: The field list is generated by the Create Header feature of the Import Vendors option. You may customize your import file so as to contain only the columns or data fields you wish to import. Each column must be identified by the corresponding column label, otherwise all fields are required. (Import Data) Legend: Column Description A Vendor Number (Alphanumeric, 6 characters) B Vendor Name (Alphanumeric) Eclare Version 2016 Page 561 Users Manual Appendixes Column Description C Address Line 1 (Alphanumeric) D Address Line 2 (Alphanumeric) E City (Alphanumeric) F State (Alphanumeric) G Zip Code (Alphanumeric) H Phone (Numeric) I Fax Number (Numeric) J E-mail K Beeper L Contact M-W Fields related to Gemini’s Contact PO Information X-AH Fields related to PSClient’s Contact Project Information AI-AS Fields related to PSClient’s Contact Warranty Information AT-BD Fields related to Gemini’s Contact AP Open Information AT-BE Fields related to Gemini’s Contact AP Open Information Eclare Version 2016 Page 562 Users Manual Appendixes Cost Codes Legend: Column Description A Cost Code (Alphanumeric, although numbers generally used) B Cost Code Description (Alphanumeric) PO Reason Codes Legend: Column Description A PO Reason Code (Alphanumeric) B PO Reason Description (Alphanumeric) Eclare Version 2016 Page 563 Users Manual Appendixes Global Maintenance Layouts Master File Import/Export Legend: Column Description A Item Type (I/A/L) B Assembly Number C Item Number D Category E Cost Code F Item Description G Minimum Units H Product Group I Takeoff Units J Taxable (Y/N) K Waste Eclare Version 2016 Page 564 Users Manual Appendixes Vendor Price Import/Export Legend: Column Description A Vendor Number B Master File Item Number C Vendor Part Number D Taxable (Y/N) E Rebate (Y/N) F Vendor Part Description G Vendor Purchase Units H Cost 1 I Cost 1 Date J Cost 2 K Cost 2 Date L Cost 3 M Cost 3 Date N Cost 4 O Cost 4 Date P Minimum Order Units Q Incremental Order Units Eclare Version 2016 Page 565 Users Manual Appendixes Item Master Descriptions Import/Export Legend: Column Description A Old Number B New Number C Description Eclare Version 2016 Page 566 Users Manual Appendixes Appendix B – Special Tokens Eclare allows you to use the following fields as Tokens when extracting database information for special printed forms like vendor letters. Tokens are preceded by a double dollar sign (e.g. $$FirstLastName). Token DatePrinted TimePrinted CoName CoAddr CoCity CoState CoZip CoCSZ CoPhone CoFAX CoEMail VenAN VenName VenContact VenStreet VenStreet2 VenCity VenState VenZipCode VenCSZ VenEMail VenPhone VenFAX VendorContacts Eclare Version 2016 Dept FLAG FLAG OTHR OTHR OTHR OTHR OTHR OTHR OTHR OTHR OTHR Ven Ven Ven Ven Ven Ven Ven Ven Ven Ven Ven Ven Ven Description Current Date when printed Current Time when printed Company Name Company Address Company City Company State Company Zip Company City, State Zip Company Phone Company Fax Company EMail Vendor Number Vendor Name Vendor Contact Vendor Street Vendor Street 2 Vendor City Vendor State Vendor Zip Code Vendor City,State Zip Vendor EMail Vendor Phone Vendor FAX Vendor Contacts List (pre-defined contacts) Page 567 Users Manual Appendixes Appendix C – Registry Values and TPS Files Windows Registry Prosoft’s applications expect to find the values listed under the Recommended column in your computer’s Registry: If you uninstall the applications, your Registry’s values will be returned to your original values, which would be listed under the Current column. Microsoft Essentials (and other AntiVirus Programs) Although installation can proceed regardless of your computer’s settings, setting Microsoft Essentials to ignore TPS files will improve performance. This should also be done with other virus-checking programs. Eclare Version 2016 Page 568 Users Manual Appendixes Eclare Version 2016 Page 569 Users Manual Appendixes Appendix D – Sample Structures Eclare Version 2016 Page 570 Users Manual Glossary GLOSSARY Eclare Version 2016 Page 571 Users Manual Glossary Terms Term Description Alternate The letter A within a takeoff denotes that the item will not be included in the job. Assemblies Groups of items that logically belong together. Base House A term used to refer to a house that is the standard model. The cost of a base house is the standard model with no upgraded options. Checklist A high level method used to update multiple items and assemblies within a job template. Conversions A method of equating one unit of measure to another, for example drywall (4 x 8 sheet) is purchased by the sheet (ea) but is typically calculated based on a length (LF) measurement. Conversions from a relationship between vendors’ items and items’ assemblies. Cost The price that is charged by a vendor for an item. Cost Codes Summary of material items within a job to a level that is manageable within the (Gemini Accounting System). This is used to update budgets and application of PO detail. Summation rules – if a cost code is defined at the assembly level it over-rides the cost code at the item level. Database List of all items required to construct a house. An item could be a 2x4 or sq. ft. cost for concrete. Estimating The process of calculating production costs for a product. Gemini Accounting The best accounting software choice for interfacing with Eclare. Include Opposite of alternate. Items Detail lines within the database. Referred to many as material / subcontractor item. Eclare Version 2016 Page 572 Users Manual Glossary Term Description Job(s) The name associated to a list of material items that have specific items with pricing. Options Description given to items, or upgrades, that are not part of the standard house. PO Package A way to separate material based on a schedule of usage. For example concrete is in the drive way and slab; to create two purchase orders the concrete would need to be assigned to different PO packages. Pricing An automated method of selecting which vendors are to be used on a job, along with the related price that is to be used on a job. Product Groups A way to associate multiple items in the database for the sole purpose of easily selecting or changing vendors on a somewhat global basis PSClient Client Management software which updates Eclare with user selections, related to models, options, and custom change orders. Status Denotes whether the item is to be “included” within the job or have any “alternate” status. Subcontractor A vendor that provides services on a job. Takeoff # A specific line within a job template. Takeoff(s) A way to organize the many items that are used in a job. Template Job template; used to relate to all the takeoffs within a job. Turn Key Vendor A vendor that supplies labor and material on a job. Vendors A supplier of material, labor, or services. Eclare Version 2016 Page 573 Users Manual Index INDEX About, 11, 98 Access Code, 265 Access Control, 36, 39 accounting costs, 19 export to, 169, 171, 173 Gemini, 10, 343, 469 import from, 199, 202, 204 PO Notes, 340 transfer finished estimates, 130 ackup, 231 address book, 84 AIA line number, 174, 471, 555 alternate definition, 574 exclude during export, 176, 504 item status, 375 show price, 222 takeoff status, 360 assembly add, 400 assign items, 415, 418 change, 419, 422 color, 157 copy, 406 Copy Assembly, 402 create, 119 definition, 396, 574 delete, 253, 407, 423 deleted feature, 403 kinds of, 400 modify, 405 number, 120 procedures, 132 unit conversion, 26, 479 audit Eclare Version 2016 PO report, 507 backup, 259, 314 define location, 317 encrypted, 315 location, 315 on exit, 154 procedures, 134 to Google Drive, 314 to Prosoft, 315 warning days, 223 when to, 240, 249, 255, 449, 456 base house definition, 574 duplicate, 354 file layout, 558 model, 336 takeoff organization, 358, 372 base pricing, 186, 187, 218 budget adjustments add, 347 modify, 348, 349, 351 bulk vendor price update, 424 CAD, 24, 384 data, 221 Calculator, 88, 299 Roof, 89, 300 Calendar, 87 category add, 474 assignment, 398 delete, 476 modify, 475 reports, 525, 546 category classification, 118 category list, 546 check list add, 484 assign items, 485 assignment of, 399, 402 delete, 487 modify, 486 options, 355, 484 reports, 520, 549 clear pricing, 383 closeout account, 174 color activation, 399, 402 identification, 156, 157, 158, 159, 160 columns customize, 52, 54 menu, 49 reset, 162 comparison cost code, 178 job price, 513 takeoff, 181 takeoff detail, 183 concepts customization, 30 documents, 32 general, 14 PDF and E-mail, 35 security, 36 configuring system, 108 wallpaper, 162 conversion factor assignment, 410, 417, 421 concept, 26 incorrect, 378 option, 476 reports, 547 value, 478 warning, 132, 479 conversions. See Unit Conversion concepts, 26 Page 574 Users Manual Index definition, 574 reports, 547 copy assembly, 402 backup, 314 company, 227 cost code accounting, 19 add, 469 assignment, 398, 401 delete, 471 export, 173, 178 import, 202 modify, 470 reports, 532, 544 update, 250 CSI numbering, 111, 113, 471 CSV access control, 269 CAD, 221, 384 definition, 197 export, 138, 169, 171, 174, 176, 179, 182, 184, 186, 189, 218, 235, 237, 246, 247, 514 import, 138, 192, 195, 200, 203, 205, 232, 238 price update, 424 custom reports add, 293 database for, 295 report generator, 86 customer suggestions, 309 customization capabilities, 30 documents, 32 envelopes, 31 limits, 37 text editor, 32 daily backup, 314 procedures, 127 damaged data repair, 259 data access Eclare Version 2016 job limits, 338 job limits definition, 224 user limits, 266, 271, 275 database access control, 37 building, 110, 128 custom reports, 295 definition, 52 flexibility, 16 import export, 29 selecting company, 146 show/hide company, 147, 227 Deleted records show deleted, 57 digitizer, 24, 89, 300 Digiwin, 89, 139, 300 division add, 472 assignment, 117, 120 delete, 473 modify, 472 reports, 545 documents concepts, 32 text maintenance, 277 vendor letters, 285 download files, 261 duplicate company structure, 227 job, 353 takeoff, 363 template for new job, 129 Eclare application, 9, 10 exploring, 42 general concepts, 14 Prosoft Suite, 9 What you can do, 8 E-mail concept, 35 From, 268, 431 generating, 83 multiple addresses, 435 using Manager, 327 envelopes concept, 31 print, 439 exceptions CAD, 385 concepts, 23 procedures, 133 reports, 185, 233, 529 view, 382 Exchange access control, 269 concepts, 10, 24, 27 configuration, 221 directory, 27, 222 Gemini Company Number, 338 jobs from PSClient, 206 menu, 138 procedures, 129, 130 to Gemini, 343 to PSClient, 345 export access control, 269 concepts, 29 file layouts, 553 menu, 137 options, 169, 171, 173, 175, 178, 181, 183, 185, 235, 236 procedures, 131 extract data for reports, 77 export menu, 138 Fax Manager name on Fax, 268 overview, 34 using, 319 fixed items definition, 396 Fonts, 152 FTP multiple files, 333 sending, 85 Gemini application, 10 Page 575 Users Manual Index definition, 574 exchange, 343 file layout, 553 procedures, 130 global file layouts, 566 menu, 139, 142 procedures, 133 supervisor access, 139 tag delete jobs, 456 updates, 20 Google Documents, 221 help, 93, 145 icon, 43, 71, 166 import access control, 269 CAD, 221, 384 concepts, 29 create header, 200 file layout, 562 menu, 138 options, 191, 199, 202, 231, 238 PO Reason Codes, 204 spreadsheets, 122, 124, 133 Import create header, 233 increment size, 243 initial stage procedures, 127 install application, 101 multiple companies, 226 Play/Base Company, 111 procedures, 128 release, 263 interface applications, 27, 29, 221 concepts, 10 cost code, 19, 469 Digiwin, 300 Exchange, 221 procedures, 129, 130 Eclare Version 2016 report generator, 21 user interface, 48 item master file layout, 568 item number assignment, 398, 401 import, 192, 196 renumber, 240 reports, 533, 537 search key, 443 item references procedures, 133 show, 493 items deleted feature, 400, 432 kinds of, 398 job access control, 269, 270 add, 337 budget adjustments, 347 budget adjustments load, 349 change, 341 concepts, 17 delete, 347 delete tagged, 458 duplicate, 353 exchange, 343, 345 menu, 140 pricing, 378, 383, 445, 513 procedures, 127 proposal, 521, 523 reports, 502, 505, 510, 513, 515, 520, 525, 528 retrieve, 206 revisions, 341 tag delete, 456 template, 18 job notes, 529 job selection, 342, 352 job takeoff add, 359 building assignment, 366 concepts, 17 details, 367, 370, 377 duplicate, 363 export, 175 find by Type, 362 global maintenance, 448 load from job, 364 multi-unit quantities, 375 procedures, 130 reports, 502 set status by criteria, 365 sort details, 369 update quantities, 484 job template decisions, 112 definition, 575 minimizing, 111 lender assigment, 339 length Cost Code, 203, 232 fixed length fields, 197 Vendor ID, 200 licensing and registration check, 41 limits concepts, 37, 40 locked assembly. See Assembly color, 157 definition, 397 kinds of, 400 login, 43 Company, 146 concepts, 36 ways to, 38 maintenance access control, 270 functions, 57 global changes, 133 menu, 139, 141, 142 options, 226, 266, 336, 429 price, 133 procedures, 132 Page 576 Users Manual Index markup overhead, 339 markup profit, 339 master file access control, 270 export, 235 from spreadsheets, 116 import, 231 item search, 404 menu, 143 option, 396 procedures, 132 quick index, 442 renumber, 240 reports, 529, 532 setting up, 114 tag operations, 250 Master Product Group add, 459 assignment, 399 delete, 461 exceptions, 462 modify, 460 reports, 542 update, 250, 378 material category, 398 concepts, 17, 22, 25 definition, 574 markup, 475 master file, 396 pricing, 378 purchase orders, 480 reports, 502, 505 messages, 60 missing options, 209 model. See job access control, 269, 270 assignment, 337, 354 compare, 175, 178 concepts, 18 definition, 336, 574 extract prices, 185 PSClient, 206, 215 reprice, 445 monthly procedures, 127 multi-units Eclare Version 2016 change building, 366 change quantities, 375 estimating procedure, 131 network backup, 134 installation, 107 platforms, 27 terminal setup, 153 offset, 197 online help, 93 activate, 93 help menu, 145 navigation bar, 95 panes, 96 toolbar, 94 options access control, 39 exiting, 46 selecting, 45 selection PSClient, 9 Update Numbers, 249, 384 word usage, 12 password, 38, 39 assignment, 268 log in, 148 Path for E-mail Server, 155 for Fax Server, 155 for Spreadsheet, 155 PDF concept, 35 FTP, 85 generating, 83 phase, 174, 555 PO Pack add, 481 assignment, 360, 371 concepts, 25 definition, 575 delete, 482 modify, 481 procedures, 130 PO Reason Codes import, 204 view, 483 PO Text assignment, 430 definition, 496 price assignment, 399 clear, 383 concepts, 23 definition, 574 effective date, 192 export, 185, 236 file layout, 567 import, 191, 238 job, 378, 445 menu, 140 procedures, 133 reports, 513, 515, 517, 538 update, 424 vendor bulk update, 424 Price % Adjust, 192, 196 price update, 424 procedures, 133 pricing concepts, 23 definition, 575 file layout, 558, 562 menu, 140 options, 185, 191, 238, 378, 383, 445 procedures, 133 print setup, 151 Procedures backup, 134 create new job, 129 data maintenance, 132 estimating multiunits, 131 estimating new job, 130 estimating new projects, 131 exchange, 130 global changes, 133 price maintenance, 133 restore, 134 Page 577 Users Manual Index product group. See Master Product Group concepts, 23 vendor reports, 540 product group exception assigment, 339 concepts, 23 copy list, 466 option, 462 product group exceptions reports, 542 product grouping, 119 production builder, 20, 531 Pro-forma, 387 add, 389 delete detail, 392 edit, 391 estimating procedure, 131 order of detail, 392 print report, 393 proposal access control, 269 reports, 521, 523 PSClient application, 9 definition, 575 exchange, 345 Exchange, 138 import, 214 options report, 550 procedures, 129 retrieve jobs from, 206 purchase order packs. See PO Pack quick index add entry, 442 delete entry, 444 modify entry, 444 using, 404 registration code, 308 relationship exchange, 206, 212, 215, 216 Eclare Version 2016 import/export, 199, 202, 204 renumber master items, 240 Reports report writer, 298 Request Code, 264 reset in-use flags, 259 restore data, 255 from Prosoft, 257 location, 255 procedures, 134 restrict user, 272, 275 retrieve job, 206 Roof Calculator, 89, 300 security access levels, 39, 268 concepts, 36 data access rights, 40 inherit privileges, 271 segment, 197 setup concepts, 16 maintenance menu, 142 options, 151, 153, 220 procedures, 128 reports menu, 144 specification text, 499 spreadsheet automatic launch, 291 building from, 116 concepts, 29 export, 138 file layouts, 553 import, 122, 124, 138 items, 118 procedures, 132 vendors, 116 suggestions customers, 309 supervisor concepts, 37 definition, 37, 266 menu, 139 modify, 273 T/O Units. See Takeoff Units tag, 250 delete jobs procedures, 133 Tag M/F, 250 takeoff. See Job Takeoff change, 361 takeoff compare detail export, 183 export, 181 takeoff criteria, 488 add to list, 488 delete from list, 490 list definition, 223 modify list, 489 takeoff detail add, 367 concepts, 24 delete, 377 edit, 370 order of, 374 search, 369 sort, 369 status, 375, 377 takeoff quantities CAD, 385 checklist, 355 concepts, 24 procedures, 129 takeoff type add, 491 delete, 492 modify, 492 option, 491 reports, 527, 551 takeoff unit and vendor unit, 411 assignment, 398, 402 tax assignment, 339, 399 calculate, 394, 503, 508, 511, 516, 522, 524 taxable, 399 Technical Support, 264 template Page 578 Users Manual Index CAD, 384 concepts, 18 definition, 336, 575 terminal current job, 342 setup, 153 terminator, 195 text access control, 270 maintenance menu, 142 PO, 496 searching help content, 97 specification, 499 type, 430 vendor order quote, 498 work order, 497 text documents maintenance, 277 text editor concept, 32 functions, 91 usage, 90 user entry fields, 284 working with, 283 toolbar, 46, 166 add option, 167 clear options, 168 remove option, 167 TPS file type, 296 type of assemblies, 401 of item entries, 396 of jobs, 336 of text, 430 of user accounts, 37, 266 to quickly locate record, 53 unit conversion add, 477 change vendor’s, 413 concepts, 26 delete, 480 Eclare Version 2016 fix incorrect, 420 how to determine, 410, 416, 421 modify, 479 reports, 547 takeoff unit, 402 warning, 479 updates from Prosoft, 99, 100 user access control, 39 accounts, 36, 37 add, 267 concepts, 36 delete, 275 estimator, 338 identification, 37 inherit security, 271 interface, 48 log in, 146 modify, 272 registered, 8 show, 306 spreadsheets, 29 supervisor, 273 user report, 276 view, 267 user name, 38, 268 log in, 148 utilities, 87 Calculator, 88, 299 Calendar, 87 Digiwin, 89, 300 menu, 139 Roof Calculator, 89, 300 vendor add, 429 assignment, 408, 459, 463 bulk price update, 426 change, 411 concepts, 22, 23 copy, 400, 403 define new, 195 definition, 575 delete, 415, 432, 437 export, 236 file layout, 562, 563, 567 for item, 381 for Product Group, 381 import, 138, 191, 199, 238 menu, 144 modify, 431, 435 orders, 510 price update, 425 procedures, 133 replicate contact, 438 reports, 513, 535, 537, 538 spreadsheets, 29, 116, 125, 139 turnkey, 575 vendor order quote, 498, 511 vendors letters, 285 send color sheet, 460 version information, 98 kinds of, 36 warning message, 60 unit conversion, 479 zero cost, 410 waste assignment, 398 roof, 305 waste %, 398 weekly procedures, 127 Windows Registry, 102, 103, 570 work order text, 497 yearly procedures, 127 Page 579