1
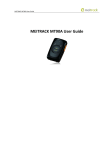
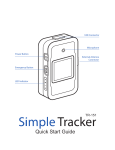
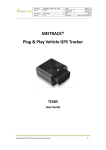
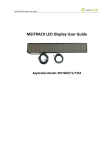
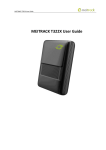
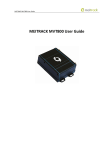
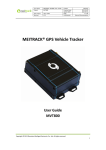
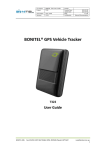
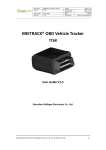
MEITRACK TC68S User Guide Meitrack TC68S User Guide MEITRACK TC68S User Guide Change History File Name MEITRACK TC68S User Guide Created By Renny Lee Project TC68S Creation Date 2013-03-15 Update Date 2015-01-19 Subproject User Guide Total Pages 14 Version V1.3 Confidential External Documentation Copyright © 2015 Meitrack Group All rights reserved. -2- MEITRACK TC68S User Guide Contents 1 Copyright and Disclaimer...............................................................................................................................................................- 4 2 Warm Reminder ............................................................................................................................................................................- 4 2.1 Using Instruction.................................................................................................................................................................- 4 2.2 Product and Accessories .....................................................................................................................................................- 4 3 About the Product .........................................................................................................................................................................- 5 3.1 Product Overview ...............................................................................................................................................................- 5 3.2 Specifications ......................................................................................................................................................................- 5 3.3 Product Function ................................................................................................................................................................- 5 3.3.1 Location Tracking .....................................................................................................................................................- 5 3.3.2 Alarms ......................................................................................................................................................................- 6 3.3.3 Other Functions .......................................................................................................................................................- 6 4 Appearance....................................................................................................................................................................................- 7 5 How to Use ....................................................................................................................................................................................- 8 5.1 Installing the SIM Card ........................................................................................................................................................- 8 5.2 Charging ..............................................................................................................................................................................- 8 5.3 Indicator..............................................................................................................................................................................- 8 5.4 Location Tracking ................................................................................................................................................................- 9 5.4.1 Setting a Combined Function Phone Number – A71 .............................................................................................- 10 5.4.2 Setting a Listen-in Phone Number – A72 ...............................................................................................................- 10 5.4.3 Setting the Smart Sleep Mode – A73 .....................................................................................................................- 11 5.4.4 Setting the SMS Time Zone – B35 ..........................................................................................................................- 11 5.5 Configured on a Computer ...............................................................................................................................................- 12 5.6 Tracking System ................................................................................................................................................................- 12 6 Installing the Device ....................................................................................................................................................................- 13 6.1 Plugging the Device Into the Vehicle Connector ...............................................................................................................- 13 6.2 (Optional) Installed by Extension Cord .............................................................................................................................- 13 - Copyright © 2015 Meitrack Group All rights reserved. -3- MEITRACK TC68S User Guide 1 Copyright and Disclaimer Copyright © 2015 MEITRACK. All rights reserved. and are trademarks that belong to Meitrack Group. The user manual may be changed without notice. Without prior written consent of Meitrack Group, this user manual, or any part thereof, may not be reproduced for any purpose whatsoever, or transmitted in any form, either electronically or mechanically, including photocopying and recording. Meitrack Group shall not be liable for direct, indirect, special, incidental, or consequential damages (including but not limited to economic losses, personal injuries, and loss of assets and property) caused by the use, inability, or illegality to use the product or documentation. 2 Warm Reminder 2.1 Using Instruction Power off the device before you go to a gas station, hazard zone, or a place where wireless products are prohibited. Do not expose the device to rain or extremely hot temperatures. The device's tracking function may be unavailable due to force majeure (like bad weather and GPS blind spots). To strength the device signal, keep away from a place with metals when you use an extension cord. The device voltage is DC 12 V, so you cannot install it on a 24 V/36 V vehicle. Otherwise, the device will be damaged, which is not covered in the warranty policy. Ensure that the vehicle engine is cut off before installation. The device extension cord purchased additionally can be used to strength the GPS signal. To prevent the device from removing deliberately, use the extension cord and place it on a hidden cool place with a valid GPS signal. 2.2 Product and Accessories Check whether the product and standard accessories are included according to the following list. You can additionally purchase optional accessories as required. Standard Packing NO. Item Optional Accessories Quantity NO. Item Quantity 1 TC68S device 1 1 OBD extension cord 1 2 USB cable 1 2 Velcro 1 3 Quick start 1 4 Warranty card 1 5 Certificate of quality 1 6 7 CD (including user manuals and configuration software) Packing box 1 1 Copyright © 2015 Meitrack Group All rights reserved. -4- MEITRACK TC68S User Guide 3 About the Product 3.1 Product Overview The TC68S is a user-friendly vehicle GPS tracker plugged into a vehicle with an OBD II connector. It supports vehicle positioning, tracking, and anti-theft. With a standard OBD II plug, it can be easily installed. When the device is removed, an alert message will be sent. It is a perfect choice for all private cars and other vehicles with an OBD II connector. 3.2 Specifications Item Specifications Dimension 69.8 mm x 51.8 mm x 31.8 mm Weight 60g Input voltage DC 12 V/1 A Standby battery 150 mAh/3.7 V Power consumption 65 mA standby current Operating temperature -20°C to 55°C Humidity 5% to 95% Working hour 7 hours in power-saving mode and 1.5 hours in normal mode Indicator 2 indicators showing GSM and GPS status Button/Switch 1 SOS button 1 power button Microphone Internal microphone Memory 8 MB byte Sensor Vibration sensor GSM frequency band GSM 850/900/1800/1900 MHz GPS sensitivity -163 dB Positioning accuracy 10m I/O port 1 USB port 3.3 Product Function 3.3.1 Location Tracking Function Description Real-time tracking Send a command to obtain the current device location. Track by time interval After you set the time interval, the device will report location information at the preset time interval to the platform or mobile phone. Track by distance After you set the distance, the device will report location information by preset distance to the platform. Direction change report Set the direction change angle. When the vehicle direction change angle is greater than the preset value, the device will report location information. Copyright © 2015 Meitrack Group All rights reserved. -5- MEITRACK TC68S User Guide 3.3.2 Alarms Function Description Disassemble alarm An alarm will be generated and sent to the platform or user when the device is removed from the OBD connector. Speeding Set the upper limit by platform. When the vehicle speed exceeds the preset value, an alarm will be generated. Geo-fence With the coordinate and radius, you can set a circle geo-fence. In/Out Geo-fence alarms can be reported to the platform or notified to the user by SMS. At most 8 circle geo-fences are allowed. SOS An alarm will be generated when the SOS button is pressed. Low power alarm An alarm will be generated when the voltage of the external power supply is lower than 11.6 V. Device status alarm An alarm will be generated when the device is powered on or restarted. 3.3.3 Other Functions Function Description Listen-in Know vehicle situations after the vehicle is stolen. Over-the-Air (OTA) Upgrade device firmware. GPS log When the GPS is valid, the device will record the driving traces at the preset time interval. You can use Meitrack Manager software to read these records (at most 130,000). GPS + GSM dual-module tracking When the GPS is invalid, the GSM base station will use the signal tower to provide an approximate coordinate, ensuring that the vehicle can be located anytime. GPS blind spot report When you enter or exit an area without GPS signal, the device will send a report to the platform. GSM blind spot storage/resend When data cannot be sent to the platform in the GPS blind spot, the data will be automatically stored. When the GSM becomes valid, the data will be automatically sent. Built-in 8 MB flash memory can store 8,000 GPRS records and 256 SMS records. Mileage report Each GPRS record includes the vehicle mileage. For the first use, you can change the default mileage. ACC ON report Select the ACC ON report function. The device will send the ACC ON report to the platform or mobile phone while ACC ON. ACC OFF report Select the ACC OFF report function. The device will send the ACC OFF report to the platform or mobile phone while ACC OFF. An SMS report includes the mileage, average driving speed, driving duration, and maximum driving speed of this trip. Maintenance report Set the maintenance mileage and duration on the platform. When the vehicle maintenance mileage or duration reaches the preset value, the device will send a maintenance alert. Copyright © 2015 Meitrack Group All rights reserved. -6- MEITRACK TC68S User Guide 4 Appearance 1. TF card slot 2. SIM card slot 3. USB port 4. Power on/off button 8. Microphone 5. GSM indicator 6. GPS indicator 7. SOS button 9. OBD II Plug NO. Item Description 1 TF card slot TF map card slot (only available for markets in China) 2 SIM card slot SIM card slot 3 USB port Used for charging, connecting a computer for parameter settings, and upgrading software. 4 Power on/off button Press and hold down the button for 2s to turn on the device. Press and hold down the button for 2s to turn off the device. Press the button to wake the device up from sleep mode. The power indicator will blink for 10s. 5 GSM indicator (green) Indicates GSM status. For details, see section 5.3 "Indicator." 6 GPS indicator (blue) Indicates the GPS status. For details, see section 5.3 "Indicator." 7 SOS button Press and hold down the button for 2s in the case of emergency. The device will sound "BI" once. The device will also dial three authorized phone numbers in turn. It will stop Copyright © 2015 Meitrack Group All rights reserved. -7- MEITRACK TC68S User Guide dialing when one phone number answers. Meanwhile, the device will send an SMS with positioning information to the authorized phone number. If the GPRS function is enabled, the device will send a GPRS message to the server. Shortly press the button to wake the device up if the device is in sleep mode. 8 Microphone It will run automatically when the listen-in function is used. 10 OBD II Plug Connect to the vehicle OBD II connector. The device is powered by vehicle's battery. 5 How to Use 5.1 Installing the SIM Card To install the SIM card, perform the following operations: Open the SIM card cover, insert the card (card chip facing down), and close the card cover. Note: Ensure that the SIM card has sufficient balance. Ensure that the phone card PIN lock has been closed. Ensure that the SIM card in the device has subscribed the caller ID service if you want to send an SMS. Power off the device before installing the SIM card. 5.2 Charging When you use the device for the first time, connect the USB cable to the computer for charging. Ensure that the device is charged at least three hours. To shorten charging time, power off the device and then charge it. 5.3 Indicator To start the device, press and hold down the power button for 3s to 5s. Once the device is plugged into the vehicle OBD II connector, a sound will be made. GPS Indicator (Blue) Steady on One button is pressed or one input is activated. Blink (every 0.1s) The device is being initialized or the battery power is low. Blink (0.1s on and 2.9s off) A GPS signal is received. Blink (1s on and 2s off) No GPS signal is received. GSM Indicator (Green) Steady on A call is coming in or a call is being made. Blink (every 0.1s) The device is being initialized. Blink (0.1s on and 2.9s off) A GSM signal is received. Blink (1s on and 2s off) No GSM signal is received. Copyright © 2015 Meitrack Group All rights reserved. -8- MEITRACK TC68S User Guide Note: The GSM and GPS indicators will be off when the device is in sleep mode. 5.4 Location Tracking Call the SIM card phone number that is used in the TC68S, and hang up after the dial tone rings 2-3 times. An SMS with a map link is received. Click the link to query the location. SMS example: Now,110727 02:48,V,16,23Km/h,61%,http://maps.google.com/maps?f=q&hl=en&q=22.540103,114.082329 The following table describes the SMS format: Parameter Description Remarks Now Indicates the current location. SMS header: indicates the alarm type. For details about the SMS header, see the MEITRACK SMS Protocol and MEITRACK GPRS Protocol. 110727 02:48 Indicates the date and time in YYMMDD None hh:mm format. V The GPS is invalid. A = Valid V = Invalid 16 Indicates the GSM signal strength. Value: 1–32 The larger the value is, the stronger the signal is. If the value is greater than 12, GPRS reaches the normal level. 23Km/h Indicates the speed. Unit: km/h 61% Indicates the remaining battery power. None http://maps.google.com/ This is a map link. None maps?f=q&hl=en&q=22.5 Latitude: 22.540103 40103,114.082329 Longitude: 114.082329 If your mobile phone does not support HTTP, enter the latitude and longitude on Google Maps to query a location. Copyright © 2015 Meitrack Group All rights reserved. -9- MEITRACK TC68S User Guide More SMS commands You can configure the device on a mobile phone or on a computer by using Meitrack Manager. For details, see section 5.5 "Configured on a Computer." Note: 1. The default password is 0000. You can change the password by using Meitrack Manager and SMS commands. For details, see section 5.5 "Configured on a Computer." 2. The device can be configured by SMS commands with a correct password. After an authorized phone number is set, only the authorized phone number can receive the preset SMS report. 5.4.1 Setting a Combined Function Phone Number – A71 SMS sending: 0000,A71,Phone number 1,Phone number 2,Phone number 3 SMS Responding: IMEI,A71,OK Description: A phone number has a maximum of 16 bytes. If no phone numbers are set, leave them blank. Phone numbers are empty by default. Phone number 1: Set phone number 1 to an SOS phone number. When you call the tracker by using the phone number, the tracker will reply an SMS with the location and send geo-fence alarms and low power alarms. Phone number 2/3: When you call the tracker, it will reply an SMS with the location. If all combined function phone numbers need to be deleted, send 0000,A71. When the SOS button is pressed, the tracker dials phone numbers 1, 2, and 3 in sequence. The tracker stops dialing when a phone number responds, and will send alarm information to phone number 1. Example: 0000,A71,13811111111,13822222222,13833333333 Responding: 353358017784062,A71,OK 5.4.2 Setting a Listen-in Phone Number – A72 SMS sending: 0000,A72,Listen-in phone number 1,Listen-in phone number 2 SMS Responding: IMEI,A72,OK Description: When you call the tracker by using the authorized listen-in phone number, the tracker will answer the call automatically and enter the listen-in state. In this way, the tracker will not make any sound. Copyright © 2015 Meitrack Group All rights reserved. - 10 - MEITRACK TC68S User Guide A maximum of two phone numbers can be set. Each phone number has a maximum of 16 digits. If no phone numbers are set, leave them blank. Phone numbers are empty by default. If no phone numbers are set and commas are remained, phone numbers set before will be deleted. If all phone numbers need to be deleted, send 0000,A72. Example: 0000,A72,13844444444,13855555555 Responding: 353358017784062,A72,OK 5.4.3 Setting the Smart Sleep Mode – A73 SMS sending: 0000,A73,Sleep level SMS Responding: IMEI,A73,OK Description: You are not advised to use the sleep function of the device because it is always powered on by OBD II plug. When the sleep level is 0 (default value), disable the sleep mode. You can use the device for 1.5 hours when it is not in sleep mode. When the sleep level is 1, the tracker enters the normal sleep mode. You can use the device for 4 hours when the device battery is full. The device will be in sleep/standby state for 5 minutes when the GPS module works for 5 minutes. The GSM module always works. GPRS scheduling and SMS scheduling are not affected. When the sleep level is 2, the tracker enters the deep sleep mode. You can use the device for 8 hours when the device battery is full. If the tracker is inactive (no SOS/any triggering by a button/incoming call/vibration/message) for 5 minutes, the GPS module stops working and the GSM module enters the sleep mode. The GPS and GSM modules will be woken up if the tracker is activated (by SOS/any triggering by a button/incoming call/message). After that, it will repeat above processes. In any condition, you can disable the sleep mode. Then the tracker exits the sleep mode and switches back to the normal working mode. In deep sleep mode, if you want to obtain the location by SMS/call, the device will reply a link with the GPS map. When the GPS is invalid, it will reply the latest GPS map link. After the device enters the deep sleep mode, functions of Track By Time Interval, Track By Distance, and GPSLog are not available until you manually disable the sleep mode. The device can be woken up from the sleep mode by pressing a key, call, or SMS. After an event is handled, the device will enter the sleep mode again. Example: 0000,A73,2 Reply: 353358017784062,A73,OK 5.4.4 Setting the SMS Time Zone – B35 SMS sending: 0000,B35,SMS minute SMS responding: IMEI,B35,OK Description: The default time zone of the tracker is GMT 0. This command is used to change the SMS time zone to the local time zone. The time zone of SMS reports is different from that of GPRS data packets. In addition, the GPS Log time zone is GMT 0. When SMS minute is 0, the time zone is GMT 0 (default time zone). When SMS minute is a value ranging from -32768 to 32767, set different time zones. Set the China time zone value to 480. Example: 0000,B35,480 Reponding: 353358017784062,B35,OK (set the Beijing time) For details about SMS commands, see the MEITRACK SMS Protocol. Copyright © 2015 Meitrack Group All rights reserved. - 11 - MEITRACK TC68S User Guide 5.5 Configured on a Computer This section describes how to use Meitrack Manager to configure the TC68S on a computer. Procedure: 1. Install the USB driver and Meitrack Manager. 2. Connect the TC68S to a PC with a USB cable. 3. Run Meitrack Manager, and start the TC68S. Meitrack Manager will automatically detect the tracker port number and read its parameters. For details about MEITRACK Manager, see the MEITRACK Manager User Guide. 5.6 Tracking System Visit obd.trackingmate.com, and use the following account to log in to the GPS tracking system OBD II edition: User name: IMEI number (15 digits; obtained from the tracker label) Copyright © 2015 Meitrack Group All rights reserved. - 12 - MEITRACK TC68S User Guide Password: 0000 (default password; you can change it later) 6 Installing the Device The TC68S is a plug-and-play device without wiring. After the device is plugged into the vehicle OBD II connector, the device will beep once, and all indicators will blink, which indicates that the device is installed successfully. Note: Ensure that the device is firmly connected to the vehicle connector. 6.1 Plugging the Device Into the Vehicle Connector 6.2 (Optional) Installed by Extension Cord The extension cord is an optional accessory. If you purchase this accessory, use this method to install the device. Installing by extension cord is a better choice on the condition of narrow installation space, weak GPS signal, or for hidden purpose. Perform the following operations to install the device: 1) Stick two small suede Velcro to the labeled device surface and the connected surface of the extension cord. 2) Plug the male side of the extension cord to the vehicle OBD II connector. 3) Find a hidden place under the dashboard, and stick the big Velcro to the vehicle. 4) Attach the device with Velcro to the Velcro of the vehicle. Note: You can also use other ways such as cable ties to secure the device when there is enough space in the vehicle. Copyright © 2015 Meitrack Group All rights reserved. - 13 - MEITRACK TC68S User Guide If you have any questions, do not hesitate to email us at [email protected]. Copyright © 2015 Meitrack Group All rights reserved. - 14 -