1
INTREPID User Manual
Library | Help | Top
GDADS data administration (D04)
1
| Back |
GDADS data administration (D04)
Top
The main tool used by the data administrator for the maintenance of the GDADS
database is the Database Manager (Sections "Database Manager User Interface" to
"Adding 'Country' and 'Map Sheet' Records"). Two other interfaces, Map Display and
List Display, allow the user to view and query the database contents (below).
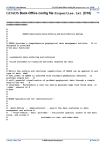
Map Display User Interface
GDADS default user interface is its Map Display. In order to return to Map Display
at any time, click the Map Display button on the lower right of the interface.
Map Display is a map view of the surveys stored in the GDADS database, together
with one of a series of standard map sheets, and overlain with a 'country' outline.
Surveys are rendered onto the display as filled polygons. The interface allows a
survey (or a map sheet) to be selected, and to query the properties of the selected
object. There are a number of display controls, such as zooming in & out, panning,
and reset. A database button opens a dialog box which is used to control the contents
of the display—which tables of the database are displayed. Map Display's controls are
briefly documented in the following list.
Note that there is a different version of Map Display in the GDADS Front-Office. In
the Front-Office the aim is to provide a simple and highly intuitive interface for a
GDADS customer-user, with no data administrative capability. See "Map Display
User Interface" for a detailed description of the Front-Office Map Display.
1
2
3
4
5
6
7
8
9
10
11
Library | Help | Top
© 2006 Intrepid Geophysics
| Back |
INTREPID User Manual
Library | Help | Top
GDADS data administration (D04)
2
| Back |
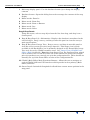
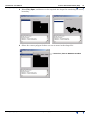
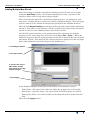
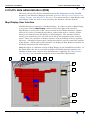
1
Main map display panel. Use the database button (2) to change the display
contents
2
Database button. Opens the dialog box used to manage the contents of the map
display
3
Mouse modes: Zoom In
4
Mouse mode: Zoom Out
5
Mouse mode: Zoom to Extents
6
Mouse mode: Pan
7
Mouse mode: Select
Drag & Drop Panels
Using the mouse, select a map object from the list, then drag, and drop it on a
chosen panel.
8
Drag & Drop Panel: (i) = Information. Displays the database's metadata for the
selected object. Drag a survey, and drop it onto this panel to view the survey's
main specifications.
9
Drag & Drop Panel: Image View. Drag a survey, and drop it onto this panel to
view the survey's main ('for sale') image datasets. This image view is made
available in the Back-Office, but is primarily designed as the Front-Office Image
View tool, for use by GDADS customer-users. See "Image View (GDADS FrontOffice) (D09)" for details. Note that from Image View, the Purchase Data wizard
can be started, but it could fail unless all of the commercial details (for example,
prices for products) are correctly set up in the configuration file. These details are
normally set up in the Front-Office version of the configuration file.
10 GDADS (Back-Office) Main Functions Buttons. Allows the user to navigate to
each of GDADS' different GUI interfaces which provide its four primary (BackOffice) functions.
11 Status Panels: Latitude & Longitude feedback from current mouse position in the
map panel.
Library | Help | Top
© 2006 Intrepid Geophysics
| Back |
INTREPID User Manual
Library | Help | Top
GDADS data administration (D04)
3
| Back |
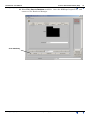
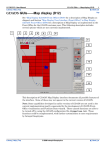
List Display User Interface
An alternative view of the GDADS database is presented in the List Display. As with
Map Display, the user can query the database for information about the listed
surveys. Click the List Display button on the lower right of the interface to open this
tool. All surveys are simply listed, using a thumbnail graphic, which shows each
survey's boundary outline. Like Map Display, this function is not extensively used in
the Back-Office, and is only briefly described.
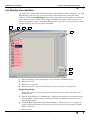
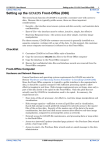
1
2
3
4
5
6
7
1
Main list display panel, listing the surveys in the GDADS database.
2
Menu Item: File
3
Menu Item: Options
4
Database button. Opens the dialog box used to manage the display list
Drag & Drop Panels
Using the mouse, select a map object from the list, then drag, and drop it on a
chosen panel.
Library | Help | Top
5
Drag & Drop Panel: (i) = Information. Displays the database's metadata for the
selected object. Drag a survey, and drop it onto this panel to view the survey's
main specifications.
6
GDADS (Back-Office) Main Functions Buttons. Allows the user to navigate to
each of GDADS' different GUI interfaces which provide its four primary (BackOffice) functions.
7
Status Panel.
© 2006 Intrepid Geophysics
| Back |
INTREPID User Manual
Library | Help | Top
GDADS data administration (D04)
4
| Back |
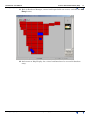
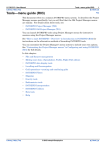
Database Manager User Interface
The administrative tools needed to maintain the database are found in GDADS'
Database Manager. The most common function is adding a new survey to the
database (Section "Adding a New Survey"). This requires two tables to be updated—
adding metadata to the SurveyInfo table, and the survey's boundary polygon to the
Outlines table.
As noted in Section "Tables in the GDADS Database" in GDADS database (D03), the
GDADS database has several other tables, such as a 'country' table, and a series of
tables for each of standard map sheets scales. Typically these tables are set up once,
and need no further updating or editing. The process is done through the Database
Manager (see "Adding 'Country' and 'Map Sheet' Records"). This initial setup is often
part of the customisation provided by Intrepid Geophysics.
Click the Database Manager button in the lower right of the interface, then click the
'database' button (
), and load the GDADS database.
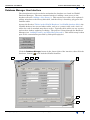
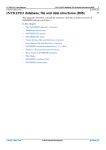
4
1
2
3
4
5
6
7
Library | Help | Top
© 2006 Intrepid Geophysics
| Back |
INTREPID User Manual
Library | Help | Top
GDADS data administration (D04)
5
| Back |
1
Main database field display panel. Select the 'tab' to display each of the useradministered tables.
2
Menu Item: File
3
Menu Item: Options
4
Database button. Opens the dialog box used to manage the display list
5
Region Outline (is not a Drag & Drop Panel—instead, click inside this panel).
Opens the Region Outline Import Tool. This is an important database
administrative tool, used in the initial setting up of map sheet tables of a GDADS
database. Allows the GDADS data administrator to import an Arc shape file
containing all of the map sheets for a given 'region' layer (for example, the 1:250k
series). See "Adding Multiple Map Sheets" for details.
6
GDADS (Back-Office) Main Functions Buttons. Allows the user to navigate to
each of GDADS' different GUI interfaces which provide its four primary (BackOffice) functions.
7
Status Panel.
Adding a New Survey
There are three components to data stored in GDADS:
•
Survey data—stored in a directory on the system's hard disk
•
Survey description—specifications describing the survey, stored in the database
•
Survey location—a survey boundary polygon, also stored in the database
These three components are linked together by a unique identifier, the surveyname.
Thus every survey must first be assigned a unique survey name. A surveyname
directory is created in GDADS ONLINE storage area, and all survey files are written
into that directory. A new record is added to GDADS database, containing brief
survey specifications for surveyname. A survey boundary polygon for surveyname
is also added to the database. Surveyname is the key which GDADS uses to link the
survey information and the location (boundary polygon) to actual data.
Checklist
Library | Help | Top
1
Collate the survey data and its documentation
2
QC. Check data quality, completeness and detail of documentation (Store quality
data)
3
Generate grids of all required 'for sale' products (** see note below—MUST be
'projected' grids)
4
GridMerge. Incorporate grids into country-wide (GridMerge) grid datasets (**
see note below)
5
Store the data in directory surveyname, with 'for sale' products organised within
subdirectories.
6
Generate a survey boundary polygon, in the specified Datum and Projection (* see
note below)
7
Add the surveyname records to the metadata and boundary polygon tables of the
GDADS database
8
Archive data
9
If non-confidential, copy data to the Front-Office computer system (for customeruser access)
© 2006 Intrepid Geophysics
| Back |
INTREPID User Manual
Library | Help | Top
GDADS data administration (D04)
6
| Back |
* Important—Boundary Polygons use the specified Datum and Projection.
The configuration file, Properties.txt specifies a Datum and Projection for the
GDADS database. That specified Projection would typically be 'GEODETIC'. GDADS
performs all of its 'map display' interface operations based on this specified Datum
and Projection, and so the country and map sheet polygons, and all survey boundary
polygons, must be defined in that Datum and Projection.
** Important—Grid Files used by GDADS must be 'Projected'.
All grids that are used by GDADS (for visualisation) cannot be GEODETIC, but must
be defined in terms of projected (real distance) coordinates (for example, UTM
coordinates). The reason for this is that GDADS' Purchase Data wizard determines
'how much' data has been purchased on the basis of the 'area of a grid', and those
areas must be defined in terms of some conventional unit of distance (rather than
'degrees' !). There are some implications regarding the Projection, units of distance,
the survey line spacing (specified for each survey in the GDADS database) and the
unit pricing for grids and line data (specified in the configuration file) which are
documented in Section "Customising 'Products for Sale'" in Setting up the GDADS
Front-Office (D06) and paragraph ("Commercial Requirements B" in Modifying the
GDADS database design (D16))
In terms of 'quantity for sale', GDADS can only compute an area. Thus it knows (from
the survey boundary polygon) the total area of grid data for sale, or, for a particular
map sheet, GDADS can calculate the area of the intersection of a given survey with
the specified map sheet. It has been noted elsewhere that a specific Datum and
Projection must be defined for a GDADS database (specified in the configuration file,
Properties.txt), and that all polygons used to define survey boundaries (and map
sheet boundaries) must be generated in terms of that specified Datum and Projection.
The specific Projection defines a unit of distance.
In brief, the grid files used by GDADS may be in any Datum and Projection, provided
that the Projection is not GEODETIC, but is an actual 'projection' onto a flat plane.
In fact, different grids may use a different Datum and Projection, provided that a
consistent 'unit of distance' is implied by each of the projections. Thus, individual
(small) survey grids might be gridded in various different UTM zones (different
Projections). Large grids—especially the country-wide GridMerge grids might use,
for example, an Albers Equal Area Projection.
Library | Help | Top
© 2006 Intrepid Geophysics
| Back |
INTREPID User Manual
Library | Help | Top
GDADS data administration (D04)
7
| Back |
Preparation
Gathering Required Information and Files
The process of loading a new survey into GDADS takes a few minutes. The
preparation—to ensure that quality data are stored—may take much longer!
An important first step is to collate all data, and may include:
•
Final data delivery file(s)
•
Associated format description and contractor's detailed specifications (readme)
files
•
Final report (as hard copy, or preferably as a document file)
•
Associated raw data files (diurnal records, for example)
Implicit in the collation of data is the process of checking for completeness. The data
administrator would typically have a series of quality control procedures to examine
the quality of the line data and gridded data delivered from the contractor or other
data source. This quality control process is fundamental to ensure the success of the
overall data management strategy which GDADS facilitates. (The old maxim
'garbage in, garbage out' applies).
During this collation and QC phase, the data administrator should note all of the
details that will be required when adding a new record to the GDADS database, such
as survey specifications.
INTREPID Data Import, Gridding and GridMerge
To provide the GDADS functions of image visualisation and delivery of data, GDADS
uses the data processing tools of INTREPID. Thus:
•
Geophysical line data: must be imported and stored as INTREPID (line) datasets.
•
Survey gridded data (used for visualisation): must be in INTREPID (ERMapper)
format
All grids used by GDADS must use 'projected' coordinates—the grids cannot be in the
'GEODETIC' (longitude and latitude) projection, but must be 'projected' onto some
flat plane. See the boxed note above for more details.
The visualisation of individual surveys in GDADS uses the individual grids of each
specific survey. However, when it comes to visualising the data for a selected map
sheet area, there could be two or more surveys (or none!) covering that selected sheet.
GDADS does not 'patch' together an image view of those individual surveys. Instead,
it displays image data for the selected area by extracting a subset from a special
country-wide merged grid which is prepared beforehand by the GDADS data
administrator.
These special 'country-wide' merged grids must be prepared for each type of data that
GDADS is required to display, such as magnetics, totalcount (radiometrics),
potassium. It is recommended that high quality merged grids are prepared using
INTREPID's GridMerge. Since the customer-user visualisation, and simple mapmaking use these merged grids, and the user can zoom in to view data in detail, it
follows that the merged grids should retain all of the high resolution detail that exists
in the best quality individual survey grids. Consequently, these merged grids could
be very large grid files!
Library | Help | Top
© 2006 Intrepid Geophysics
| Back |
INTREPID User Manual
Library | Help | Top
GDADS data administration (D04)
8
| Back |
Note that any (other) files can (also) be stored in a GDADS data archive. The
INTREPID format files are required for GDADS to be able to 'show' the data, but any
other files can be included in the archive as well. For example, you can include the
original contractor's 'located data tape' format or a Geosoft database format.
Prepare a Survey Boundary File (Arc shape file format)
When adding a new survey to the GDADS database, a survey boundary polygon file
will be needed. The required file is a standard Arc shape file, and must use the
defined Datum and Projection specified for the given GDADS database. The shape
file can be generated in any appropriate manner, such as digitising around a grid file
in ArcView. One way of generating this boundary polygon file using INTREPID is
described in "Creating a boundary polygon in GDADS (D17)". The importing of this
shape file is described in Section "Adding the Survey Boundary to the Database
('Outlines' Table)".
Organising the Data Files in GDADS ONLINE Disk Storage
In order for GDADS to function effectively in terms of allowing data visualisation,
and purchasing of data, it needs to know some details about:
•
What types of data are available for viewing
•
What the grid file names are for each of these types of data
•
Where those grid files can be found
•
Details about what grid and line datasets are available for sale
GDADS gets these details from the configuration file, Properties.txt (see
"Software Configuration (Part2) Configuration File Properties.txt" in Installing
GDADS (D02) and "GDADS Back-Office config file Properties.txt (D18)") and
associated fields in the GDADS database (see "GDADS database (D03)" and
"Modifying the GDADS database design (D16)"). These configuration details define a
systematic subdirectory structure, and file naming and file location conventions, as
documented here. Thus, an essential part of adding a new survey dataset into the
GDADS environment is creating certain required grid data files, naming those files
correctly, and organising them into a defined subdirectory structure.
The rules for this directory structure and naming conventions are best illustrated
with an example. Assume a fairly typical collection of airborne geophysical datasets,
containing the following types of data (for viewing, and for sale): magnetics,
radiometrics, em and gravity. Assume also that the for sale products for each of these
types can include line data and grids. Then:
•
The configuration file, Properties.txt, would contain the following entries:
GDADS.properties.buydata.products = magnetics,radiometrics,em,gravity
GDADS.properties.buydata.products.labels = Magnetics,Radiometrics,EM,Gravity
GDADS.properties.buydata.flavours = Grids,LineData
GDADS.properties.buydata.addons.radiometrics.options =
default,potassium,uranium,
thorium,totalcount
Library | Help | Top
© 2006 Intrepid Geophysics
| Back |
INTREPID User Manual
Library | Help | Top
GDADS data administration (D04)
9
| Back |
Note: radiometric.options defines further radiometrics grids which may be
visualised (and made into maps & GeoTiffs), and 'default' is a special case,
allowing a ternary radiometric plot if potassium, uranium and thorium are all
available.
•
The GDADS database would have 'CheckBox' type entries for each of these four
types of datasets.
•
The 'country-wide' grids (used for visualisation whenever the user selects a
standard map sheet area rather than a specific survey) must be named
magnetics, potassium, uranium, thorium, totalcount (the four radiometrics
grids), em and gravity. These grids must be located in the GDADS ONLINE data
directory.
•
For each survey dataset, all data are collated into their specific SurveyName
directory. Within each of those directories, the following subdirectory structure
must be used (depending, of course, on exactly what types of data exist for a given
survey, and whether both grid and line data are available):
ONLINE (GDADS Data Directory)
|
|--- Survey1_Directory
|
|---magnetics
|
|
|---linedata
|
|
\---grids
|
|---radiometrics
|
|
|---linedata
|
|
\---grids
|
|---...
|
|--- Survey2_Directory
Library | Help | Top
•
Within the linedata sub-directories will be the line data, stored as INTREPID
line datasets.
•
Within the magnetics \ grids subdirectory will be the magnetics grid, named
magnetics. There will typically be additional grids, such as DEM, 1VD, RTP.
These additional grids cannot be visualised within GDADS, but they are
automatically included in the data-delivery for purchased magnetics grid data.
© 2006 Intrepid Geophysics
| Back |
INTREPID User Manual
Library | Help | Top
GDADS data administration (D04)
10
| Back |
•
Within the radiometrics \ grids subdirectory will be the various
radiometrics grids, named totalcount, potassium, uranium and thorium (if
available). All of these grids can be visualised, and used for map making. If all
three of potassium, uranium and thorium are present, then there is a further
visualisation option, ternary radiometrics. There may be additional grids, (for
example k_cps, k_percent) These additional grids cannot be visualised within
GDADS, but they are automatically included in the data delivery for purchased
radiometrics grid data.
•
Similarly for em and gravity.
•
In addition to the above structured subdirectory requirements, there can be any
other directories, subdirectories and files of any type within the
SurveyName_Directory. None of these additional files can be visualised within
GDADS, and are not delivered with a data purchase. These additional directories
and files, however, are included in the archive of SurveyName_Directory.
To summarise by illustration, given the above configuration file entries, and
assuming a typical survey having both magnetics and radiometrics data, with line
data and grids available for sale, GDADS would expect the following subdirectory
structure and files:
ONLINE (GDADS Data Directory)
|
country-wide (GridMerge) files for magnetics, totalcount, potassium,
uranium,
|
thorium, em and gravity, used for visualisation and map-making.
|
|--- Survey1_Directory
|
|---magnetics
|
|
|---linedata
|
|
|
(INTREPID line dataset)
|
|
|---grids
|
|
|
files magnetics & magnetics.ers
|
|
|
(plus other magnetics derived files, such as 1VD, RTP, DEM, ...
)
|
|
|
(these latter not for visualisation, but all grids in this
directory
)
|
|
|
(would be delivered grid products in terms of data purchasing.
)
|
|
\---any_other_arbitrary_subdirectory(ies)
|
|
(any arbitrary files in here would be part of the archive, but
not
)
|
|
(data for visualisation, or delivered with data-sales products.
)
Library | Help | Top
© 2006 Intrepid Geophysics
| Back |
INTREPID User Manual
Library | Help | Top
GDADS data administration (D04)
11
| Back |
|
|
|
|---radiometrics
|
|
|---linedata
|
|
|
(INTREPID line dataset)
|
|
\---grids
|
|
files totalcount & totalcount.ers
|
|
files potassium & potassium.ers
|
|
files uranium & uranium.ers
|
|
files thorium & thorium.ers
|
|
(plus other radiometrics derived files, such as K_cps,
K_percent}
|
|
(these latter not for visualisation, but all grids in this
directory
)
|
|
(would be delivered grid products in terms of data purchasing.
)
|
|
|
\---any_other_arbitrary_subdirectory(ies))
|
|---another_arbitrary_subdirectory) All of these directories and
files are
|
|
arbitrary files, ...) included in the archive, but are not
|
\---yet_another_arbitrary_subdirectory) data for visualisation or
delivered
|
yet more arbitrary files, ...) with data-sales products.
|
|--- Survey2_Directory
|--- Survey3_Directory
|--- ...
Note the mixing together of the structured organised requirements, and other nonstructured parts of the directory tree. From an archiving viewpoint, anything may be
included, and everything will be archived. On the other hand, however, from a
visualisation and data sales viewpoint, GDADS expects to find specific files in specific
locations, and only those files can be visualised. If other grid files are present in the
grids subdirectory, those other grids will be delivered with data sales products, but
they cannot be viewed in GDADS visualisation.
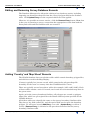
Adding Survey Specifications to the Database (SurveyInfo Table)
Having collated all of the data, and organised it in GDADS ONLINE disk storage area,
there are two tables of the database which must be updated. Enter the survey
specifications first (into the SurveyInfo table), and then import the survey's
boundary polygon into the Outlines table.
Choose Database Manager (lower-right corner of the GDADS interface) to open the
Database Manager. Click the 'database' button (
), and load the GDADS database.
The Database Manager shows each of the user-managed tables of the database, one
table per tab-page, in an automatic form view. Choose the SurveyInfo tab; you can
use the records navigation buttons ( |< < > >| ) to scroll through the SurveyInfo
records. To enter a new record, enter a new, unique surveyname (which must be the
same name as the directory containing that survey's data), and add correct entries to
all fields of the record. Then click the Add Entry button. You will be prompted to
confirm this.
Library | Help | Top
© 2006 Intrepid Geophysics
| Back |
INTREPID User Manual
Library | Help | Top
GDADS data administration (D04)
12
| Back |
WARNING 1: There is no clear distinction between Add Entry and Update Entry.
In adding a new record, it is not possible to start with a 'blank' record. Therefore do
use care to ensure that:
•
Correct data entries have been made to all fields of the new record
•
The Add Entry button is clicked (and not the Update Entry)
WARNING 2: Don't forget to also add a corresponding survey boundary to the
'Outlines' table !!!
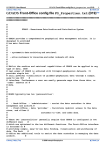
1. Load database
2. Choose
SurveyInfo
3. New unique
surveyname
4. Enter data
5. Add this new
entry to
database.
Library | Help | Top
© 2006 Intrepid Geophysics
| Back |
INTREPID User Manual
Library | Help | Top
GDADS data administration (D04)
13
| Back |
Adding the Survey Boundary to the Database ('Outlines' Table)
The addition of the survey boundary is simple. Prepare a shape file of the survey
boundary, which must be geo-registered to the Datum and Projection specified for the
GDADS database.
In the Database Manager, choose the OUTLINES tab; again, you can use the records
navigation buttons ( |< < > >| ) to scroll through the OUTLINES records. To enter a
new record, enter the same new surveyname (as used in the SurveyInfo record, and
which must be the same name as the directory containing that survey's data). The
next steps are not particularly intuitive:
1
Left-click in the existing polygon outline. This will open the DBShape Import
Tool.
2
Select menu File | Open
3
Browse to the shape file for the new survey being added.
The new shape will be displayed in the DBShape Import Tool. Note that a shape
file can contain multiple polygons, in which case the shape ID will be listed in the
Shape ID List (left-hand panel of the DBShape Import Tool). If there are more
than one, step through the list, and ensure that the correct polygon is selected and
displayed. (The process of creating a shape file described in "Creating a boundary
polygon in GDADS (D17)" generates polygons which encircle grid cells. Whilst the
process always generates a correct polygon which encloses the whole survey grid,
it can also generate one or two spurious polygons due to small, isolated pockets of
grid cells. Take care to select the correct polygon!). With the correct shape
selected and displayed:
4
Choose menu File | Save to Database and Exit
5
Even though this text is 'save to database...', there is still one further step! Back
in Database Manager, with the correct shape now displayed in OUTLINE:
Enter the correct surveyname in the Survey_Name field
Library | Help | Top
© 2006 Intrepid Geophysics
| Back |
INTREPID User Manual
Library | Help | Top
6
GDADS data administration (D04)
14
| Back |
Click the Add Entry button. You will be prompted to confirm this.
The newly added survey may be inspected visually by returning to GDADS Map
Display view of the database.
WARNING 1: Again, there is no clear distinction between Add Entry and
Update Entry. In adding a new record, it is not possible to start with a 'blank'
record. Therefore do use care to ensure that:
•
Correct data entries have been made to both fields of the record
•
The Add Entry button is clicked (and not the Update Entry)
Click the displayed
shape to open the
DBShape Import tool.
7
Click the displayed shape in order to open the DBShape Import Tool.
Select File | Open
Library | Help | Top
© 2006 Intrepid Geophysics
| Back |
INTREPID User Manual
Library | Help | Top
GDADS data administration (D04)
15
| Back |
8
Menu File | Open, and browse to the required Arc shape file containing the survey
boundary.
9
Select the correct polygon if there are two or more in the shape file!
Select File | Save to Database and Exit
Library | Help | Top
© 2006 Intrepid Geophysics
| Back |
INTREPID User Manual
Library | Help | Top
GDADS data administration (D04)
16
| Back |
10 Menu File | Save to Database and Exit closes the DBShape Import Tool, and
returns to the Database Manager
Click Add Entry
Library | Help | Top
© 2006 Intrepid Geophysics
| Back |
INTREPID User Manual
Library | Help | Top
GDADS data administration (D04)
17
| Back |
11 Back in Database Manager, ensure both input fields are correct, and click the Add
Entry button,
12 And return to Map Display for a visual confirmation of a successful database
entry.
Library | Help | Top
© 2006 Intrepid Geophysics
| Back |
INTREPID User Manual
Library | Help | Top
GDADS data administration (D04)
18
| Back |
Editing and Removing Survey Database Records
The Database Manager also allows the editing of any database entries, including
importing an alternative shape file into the survey's polygon field in the 'Outlines'
table. Click Update Entry once the required edits have been applied.
Likewise, it is possible to remove entries—click the Remove Entry button. Note that
in the case of removing a survey, ensure that the appropriate record from both the
SurveyInfo table and the Outlines table are removed.
Adding 'Country' and 'Map Sheet' Records
The GDADS database has several other tables which contain boundary polygon files,
and which are used in the Map Display.
'Country' typically has just one record, which contains the polygon shape file
boundary for the 'state' or 'country' that the GDADS database covers.
There are typically several 'map sheet' tables (for example, 50K, 100K, 250K). Each
of these tables contain a series of records, one record for each standard map sheet in
the given series.
Again, as for the (survey boundary) Outlines, all polygons are created as polygon
shape files, which are geo-registered to the Datum and Projection specified for the
GDADS database.
All of these tables are virtually the same as the (survey boundary) Outlines table.
They have a key field (called 'id'), and the special field used to store the boundary
polygon. To add a new record (Add Entry) or to edit ( Update Entry ) or delete a
record ( Remove Entry ) is identical to the procedure described for the (survey
boundary) Outlines table.
Library | Help | Top
© 2006 Intrepid Geophysics
| Back |
INTREPID User Manual
Library | Help | Top
GDADS data administration (D04)
19
| Back |
Adding Multiple Map Sheets
Since the loading of multiple map sheets is hardly practical if done one-at-a-time
(using the Add Entry button), the Database Manager provides a special tool for
loading a whole series of map sheet polygon shapes.
First create the Arc shape file, containing multiple polygons, one polygon for each
map sheet. (A shape file may contain any number of polygon shapes). These polygons
must be defined on the Datum and Projection specified for the GDADS database.
Then click the Region Outline panel button on the top-right of the Database Manager
interface. This opens a new interface, which is similar to the other shape file import
interfaces, but has some additional data entry fields to define.
Use the File button to browse to the polygon shape file containing the multiple
polygons for the entire map sheet series (or choose Menu File | Open ). When the
shape file is opened, the list of polygon shapes in the file is shown in the top-left panel
(the Shape ID List). The shape for the current selection is displayed in the top-right
panel, and information about the shape in the middle panel.
1. Click Region Outline
2. File Open button
3. Choose the correct
table name, and the
field names for the key
and the polygon.
4. Click Apply
In the Outline Database Field panel at the bottom of the interface, choose:
•
Table Name—the name of the table into which the polygons are to be loaded.
•
Field Name—typically 'shape'—the special field into which shapes are loaded.
•
Primary Key Name—the index number in the shape file will be loaded into this
field.
Then click the Apply button.
Library | Help | Top
© 2006 Intrepid Geophysics
| Back |