1
WORDFAST ANYWHERE®
USER MANUAL
Wordfast Anywhere version 1.4.8 ~ All rights reserved ©Wordfast LLC 2011
Manual translated / revised by Thomas Beavitt.
Table of Contents
Illustrations.............................................................................................................................. 3
Introduction............................................................................................................................. 5
Logging in to a WFA account.................................................................................................. 7
The workspace...................................................................................................................... 10
Preparation of the translation environment........................................................................ 10
Creating a translation memory........................................................................................... 10
Choosing an existing TM................................................................................................... 12
Uploading of a Wordfast Classic or Pro TM....................................................................... 14
Starting translation................................................................................................................ 16
Uploading a document to be translated............................................................................. 16
Segmentation.................................................................................................................... 18
Translating......................................................................................................................... 18
Main commands................................................................................................................ 20
Provisional segment. ........................................................................................................ 20
Note. ................................................................................................................................. 20
Copying the original segment. .......................................................................................... 21
Erasing the target segment................................................................................................ 21
Insertion of a special character like the non-breaking space.............................................. 21
Expanding a segment........................................................................................................ 21
Shrinking a segment.......................................................................................................... 22
Ending the translation. ...................................................................................................... 22
Revision of the translation................................................................................................. 23
Delivery of the translation.................................................................................................. 23
Placeables............................................................................................................................ 26
Terminology management (Glossary)................................................................................... 28
Creating a glossary............................................................................................................ 28
Selecting an existing glossary............................................................................................ 30
Uploading of a Wordfast Classic or Pro glossary............................................................... 31
Using a glossary................................................................................................................ 33
Adding terms to the glossary............................................................................................. 34
Wordfast Anywhere Manual
v 1.4.8
Fuzzy terminology recognition........................................................................................... 36
Bilingual file tools ................................................................................................................. 37
Downloading TXML file...................................................................................................... 37
Merging TXML files............................................................................................................ 38
Other downloads............................................................................................................... 40
Find / replace..................................................................................................................... 42
Analysing a text................................................................................................................. 45
Statistics............................................................................................................................ 46
Updating the TM................................................................................................................ 47
Concordance search.......................................................................................................... 47
Searching in a glossary..................................................................................................... 49
Alignment........................................................................................................................... 50
Advanced use....................................................................................................................... 52
Features and Shortcuts..................................................................................................... 52
WFA Setup........................................................................................................................ 53
General tab........................................................................................................................ 54
Configuring the TM ...........................................................................................................54
Configuration of the glossary.............................................................................................60
Sharing your TM and glossary...........................................................................................64
Using a shared TM and glossary........................................................................................65
VLTM.................................................................................................................................66
Machine translation............................................................................................................67
Other configuration settings...............................................................................................67
TM rules tab....................................................................................................................... 68
Shortcuts tab..................................................................................................................... 70
Segmentation tab.............................................................................................................. 71
Profile tab.......................................................................................................................... 73
Table of references............................................................................................................ 74
2
Wordfast Anywhere Manual
v 1.4.8
Illustrations
Fig. 1 - Login........................................................................................................................... 7
Fig. 2 – Login (Account creation).............................................................................................7
Fig. 3 – The workspace......................................................................................................... 10
Fig. 4 – File Menu................................................................................................................. 11
Fig. 5 - WFA Setup................................................................................................................ 11
Fig. 6 - Configuration of TM and glossaries...........................................................................12
Fig. 7 – Defining the languages of the TM.............................................................................12
Fig. 8 – File Menu................................................................................................................. 13
Fig. 9 – Configuring the TM...................................................................................................13
Fig. 10 - Existing TMs............................................................................................................ 14
Fig. 11 – Uploading a TM......................................................................................................14
Fig. 12 – Upload Menu item..................................................................................................16
Fig. 13 – Uploadable file definitions......................................................................................17
Fig. 14 – Document open in the WFA workspace..................................................................17
Fig. 15 – Translated segment................................................................................................18
Fig. 16 – Segment retrieved from the TM at 100% match.....................................................19
Fig. 17 - Tag.......................................................................................................................... 20
Fig. 18 - Note........................................................................................................................ 20
Fig. 19 – Note........................................................................................................................ 21
Fig. 20 – Segmentation error.................................................................................................22
Fig. 21 – Segmentation error corrected.................................................................................22
Fig. 22 - The Download Document File menu option.............................................................23
Fig. 23 - Outline..................................................................................................................... 24
Fig. 24 – File Menu............................................................................................................... 28
Fig. 25 – WFA Setup............................................................................................................. 29
Fig. 26 – Configuration of the glossary..................................................................................29
Fig. 27 – New glossary.......................................................................................................... 30
Fig. 28 – File Menu............................................................................................................... 30
Fig. 29 – WFA Setup............................................................................................................. 31
Fig. 30 – Configuration of the glossary..................................................................................31
Fig. 31 – Uploading a glossary..............................................................................................32
Fig. 32 - Appending a glossary..............................................................................................32
Fig. 33 - Display of terms in the glossary...............................................................................33
Fig. 34 – The glossary panel.................................................................................................34
Fig. 35 – Adding terminology.................................................................................................35
Fig. 36 – Downloading TXML file...........................................................................................37
Fig. 37 – Merging a TXML file...............................................................................................38
Fig. 38 – Merging TXML files................................................................................................39
Fig. 39 – Downloaded WFA document in Wordfast Classic...................................................40
Fig. 40 – Downloading bilingual file in .doc format.................................................................41
Fig. 41 – Downloading bilingual file in .txt format...................................................................42
Fig. 42 – Search / Replace (basic)........................................................................................43
Fig. 43 – Search / Replace (result)........................................................................................43
Fig. 44 – Search / Replace (advanced).................................................................................44
Fig. 45 – Search / Replace (result)........................................................................................44
Fig. 46 – Analysis Report......................................................................................................45
Fig. 47 – Analysis Report......................................................................................................45
Fig. 48 – Statistics menu item...............................................................................................46
Fig. 49 – Statistics................................................................................................................. 46
Fig. 50 – Check and Update TM menu item..........................................................................47
Fig. 51 – Concordance Search..............................................................................................48
Fig. 52 – Search result.......................................................................................................... 48
3
Wordfast Anywhere Manual
v 1.4.8
Fig. 53 – Searching in the glossary.......................................................................................49
Fig. 54 – Alignment Menu.....................................................................................................50
Fig. 55 – WFA Setup dialog box............................................................................................54
Fig. 56 – Configuring the TM.................................................................................................55
Fig. 57 – Creating a TM.........................................................................................................55
Fig. 58 – TM attributes.......................................................................................................... 56
Fig. 59 – Details of the TM....................................................................................................57
Fig. 60 – Deleting the TM......................................................................................................58
Fig. 61 – Uploading a TM......................................................................................................58
Fig. 62 – Merging a TM......................................................................................................... 59
Fig. 63 – Downloading a TM.................................................................................................60
Fig. 64 – Creating a glossary................................................................................................61
Fig. 65 – Details of the glossary............................................................................................62
Fig. 66 – Uploading a glossary..............................................................................................62
Fig. 67 – Merging glossaries.................................................................................................63
Fig. 68 – Sharing TM and glossary.......................................................................................64
Fig. 69 – Using a shared TM and glossary............................................................................65
Fig. 70 – VLTM...................................................................................................................... 66
Fig. 71 – Other configuration settings....................................................................................67
Fig. 72 – TM penalty rules.....................................................................................................69
Fig. 73 – Configuration of shortcuts.......................................................................................71
Fig. 74 - Segmentation rules.................................................................................................72
Fig. 75 – User Profile............................................................................................................. 73
4
Wordfast Anywhere Manual
v 1.4.8
Introduction
Wordfast Anywhere (WFA) is the online version of the popular Wordfast computer assisted
translation (CAT) program that provides much of the functionality of the Classic and Pro
desktop versions. Instead of being installed as a program on the user’s computer, WFA is
made accessible from Wordfast’s servers via a web browser, regardless of the operating
system used (Windows, Mac, Linux, etc.). Every effort has been made to ensure that the user
interface is as close as possible to the other Wordfast flavours: toolbars, icons, shortcuts and
working methods. A Wordfast Classic or Pro user should be able to use WFA with almost
zero assimilation time.
It is worth remarking that WFA is almost certainly the CAT program that integrates best with
the popular Mac operating system. Unlike Java-based, cross-platform programs – including
Wordfast Pro – that will run on the Mac but don’t integrate with system-wide tools such as
the built in Dictionary, WFA will run in Mac-native browsers such as Safari, thus giving you
access to the entire range of language and text handling tools that are built into the Mac OS
environment.
5
Wordfast Anywhere Manual
v 1.4.8
With WFA you can translate a wide range of both editable (TXT, DOC, DOCX, RTF, XLS,
PPT, ODT, HTML, TXML, MIF, INX, etc.) and non-editable (PDF, TIFF) documents. You
can store up ten current documents in your workspace, deleting your finished translations to
free up space and permit new documents to be uploaded.
You can also import the TMs (translation memories) of all the language pairs you work in.
Your memories will progressively expand as and when you translate. They are stored securely
and will not be shared or revealed without your authorisation. If you need a local copy, you
can download your TM to your computer at any time.
As is the case with other Wordfast flavours, you can add terms to your glossary as you
translate. You can also upload existing glossaries to your workspace, for all language pairs.
Here again, your glossaries are secure and will not be shared or revealed unless you
specifically invite a colleague. You can also download your glossary if you need a local copy.
The following instructions have been written for complete beginners. Having understood the
above comments, a Wordfast Classic or Pro user should have no difficulty in using WFA
intuitively.
6
Wordfast Anywhere Manual
v 1.4.8
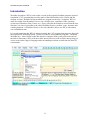
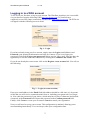
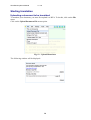
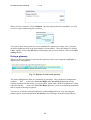
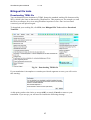
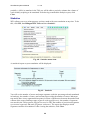
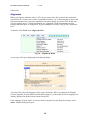
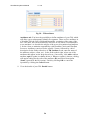
Logging in to a WFA account
To use WFA you first have to log in to an account. The Wordfast Anywhere site is accessible
via your browser from the following URL http://ww.freetm.com. To benefit from a
completely secure SSL (https) connection, use the URL https://ww.freetm.com. The WFA site
will appear with the following screen in front:
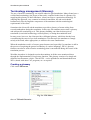
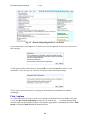
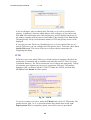
Fig. 1 - Login
If you have already setup your free account, simply enter the Login (email address) and
Password (your password) information and click on Connect. If you ever forget your
password, click on the Forgot your password? link to receive it by e-mail. You also have the
opportunity to read the terms and conditions by clicking the Conditions and Terms link.
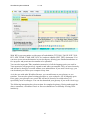
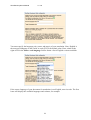
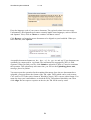
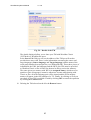
If you do not already have an account: click on the Register a new account link. You will see
the following:
Fig. 2 – Login (Account creation)
Enter your email address in the Email field (this address should be valid since it is by means
of this that you will receive communications from us, including your password if you forget
it). Now enter the password of your choice, which must have at least 5 characters and include
a numeral, in the Password field. Repeat the password in the Confirm password field.
Finally, click Create to create your account or Cancel to cancel your registration.
Next you will need to set up your account. This configuration is minimal, allowing you to
start translating immediately. You can always refine your configuration later.
7
Wordfast Anywhere Manual
v 1.4.8
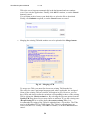
You must specify the language pair (source and target) of your translation. Since English is
the most used language in the world, its code (EN) is the default value. Enter a dash to the
right of EN in the Source code language field to obtain a list of English versions available:
If the source language of your document for translation is not English, enter its code. The first
letter will display the available languages and variants, for example:
8
Wordfast Anywhere Manual
v 1.4.8
Choose your source language and variant (if any). Then repeat for the target language.
Finally, click OK.
Note: machine translation (MT) is activated by default and will be used if your translation
memory has no translation to offer. To disable the MT, or for more details on how it works,
please see Machine translation.
Warning: Your connection will be suspended after a certain period of inactivity. If this
happens, simply re-enter your password.
9
Wordfast Anywhere Manual
v 1.4.8
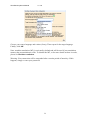
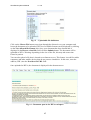
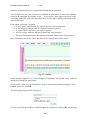
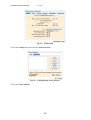
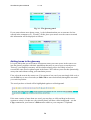
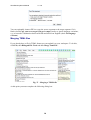
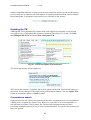
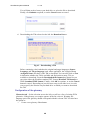
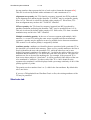
The workspace
Once you are connected to WFA, the workspace appears. This should look similar to the
following screenshot (depending on the browser, operating system or device used to access
WFA):
Menu
Toolbar
Logout
Translation Memory area
Glossary area
Document area
Status Bar
Fig. 3 – The workspace
The workspace can be modified at any point according to your requirements.
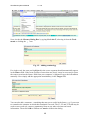
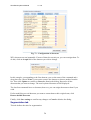
Preparation of the translation environment
Before beginning the translation of a document using a CAT tool, you must first have an
active Translation Memory (note: an initial TM was automatically set up when you created
your account; if you wish to start using it right away, please go to the next step, Selecting an
existing TM). The TM consists of a database, which will record each source language
segment (i.e. sentence, phrase) that you translate, together with the corresponding target
language segment. As it grows, this increasingly allows you to obtain translations of phrases
made previously that are the same or similar to the one you are currently translating.
Creating a translation memory
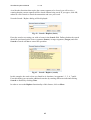
To create a translation memory, click on the File menu:
10
Wordfast Anywhere Manual
v 1.4.8
Fig. 4 – File Menu
And then on TMs and Glossaries:
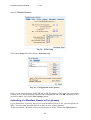
Fig. 5 - WFA Setup
Click on the Setup link:
11
Wordfast Anywhere Manual
v 1.4.8
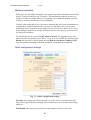
Fig. 6 - Configuration of TM and glossaries
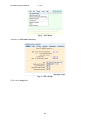
Click on the New TM button:
Fig. 7 – Defining the languages of the TM
There must be at least one TM for each language pair you translate. For the purposes of our
discussions below, we will use the French-English language pair. In the Source Language
field, enter FR. WFA will then propose several different French variants. In our example we
will use the France variant, or FR-FR. Now we will do the same for the target language: type
EN in the Target Language field. From the several variants proposed by WFA, select ENGB.
It is recommended that you have only one TM for each language pair. This way, you will
benefit from everything you have already translated in each pair. However, there may be
reasons for you to maintain different TMs in the same language pair. In this case, enter an ID
using up to 10 characters in the Assigned Name field. Then click OK. Returning to the
previous window, click on the Save settings button. Your TM has now been created.
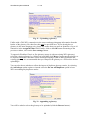
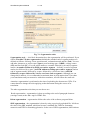
Choosing an existing TM
If you have already created a TM you can now start your translation. The last TM that you
12
Wordfast Anywhere Manual
v 1.4.8
used remains at your disposal until you change it. However, if you have multiple TMs,
whether because you are translating more than one language pair or because you decided to
create more than one TM per language pair, it will be necessary to select the TM to use for
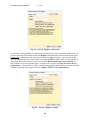
your translation, if different from the one used last time. To do this, click the File menu,
Fig. 8 – File Menu
then on TMs and Glossaries:
Fig. 9 – Configuring the TM
Click on the Setup link:
13
Wordfast Anywhere Manual
v 1.4.8
Fig. 10 - Existing TMs
In this example, the choice is between an EN>FR or FR>EN TM. Choose the one you need
and click on OK. Returning to the previous window, click on the Save settings button.
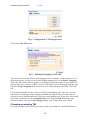
Uploading of a Wordfast Classic or Pro TM
If you already have a TM that you use with Wordfast Classic or Pro, you can upload it to
WFA. You can either upload it directly or add it to your existing TM.
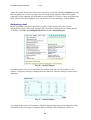
To directly upload a Wordfast Classic or Pro TM to WFA, you must click on the Upload
button.
Fig. 11 – Uploading a TM
The codes for source and target languages are written in the header of the TM file. If you
already have a TM in the same pair, make sure that you enter an identifier of up to 10
characters in the Assigned Name field. Finally, click on the OK button. Returning to the
previous window, click on the Save settings button.
14
Wordfast Anywhere Manual
v 1.4.8
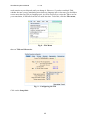
To import a TM from Wordfast Classic or Pro into an existing WFA TM, click on the Merge
button. The memory to import will already have predefined source and target languages codes
in the header of the TM. There may therefore be a conflict of languages between it and the
existing memory. If the languages are different, the merge operation will be rejected. By
default, the merge process will not take language variants into account. If you want to make
sure exactly the same variants are merged, tick the Check variant option.
You also have the option, in case there are identical source segments, to add always the TM
segments (Add always), or to not add duplicated segments from the TM (Do not add
duplicate). Finally, click on the OK button. Returning to the previous window, click on the
Save settings button.
This procedure is exactly the same if you have a TM from another CAT tool. However, check
first that this TM has been exported in the TMX format, the standard file format with
extension .tmx supported by all major CAT tool developers.
Depending on its size, uploading a TM may take some time. In this case, it can be run in the
background, allowing you to perform other tasks while you are waiting.
15
Wordfast Anywhere Manual
v 1.4.8
Starting translation
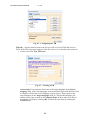
Uploading a document to be translated
To translate your document, you must first upload it to WFA. To do this, click on the File
menu:
Click on the Upload Document File menu option.
Fig. 12 – Upload Menu item
The following window will be displayed:
16
Wordfast Anywhere Manual
v 1.4.8
Fig. 13 – Uploadable file definitions
Click on the Choose File button to navigate through the directories on your computer and
locate the document to be uploaded. The list of available formats can be displayed by clicking
on the View allowed file formats link. Once your document has been located and is
displayed in the Browse a local file field, click the Submit button. The document will be
uploaded to WFA. Warning: depending on the size of the file, this may take some time.
Please be patient.
You can also upload a file that is located on an Internet server. This feature is useful for tablet
computers and other mobile devices that do not possess a hard drive. In this case, enter the
address (URL) into the Provide a file URL field.
Once uploaded to WFA, the document is displayed in the document area.
Fig. 14 – Document open in the WFA workspace
17
Wordfast Anywhere Manual
v 1.4.8
Before starting to translate, it is important to understand the concept of segmentation.
Segmentation
In order to be translated with a CAT tool, a document is divided into translation units (TUs),
also known as segments. This process is called segmentation. A segment is a text string that
ends with a terminator segment, usually the period (.), colon (:), question mark (?), or
exclamation mark (!) and also a paragraph or end of cell mark, a page break or a tab. This can
be modified, as you will see later. The advantage of segmentation is that the translation units
are presented to you one by one, without any danger of missing one. These segments form the
basis for the TUs that are saved in the TM, consisting of the source segment (to translate) and
the target segment (translated).
When you open a document on WFA, the first segment is coloured light blue, as in the picture
above.
Translating
To start the translation, you must first open the initial segment. To do this, click the first icon
on the left side of the toolbar
or use the Alt + Down shortcut1. When you do this, the
document area is transformed: a new toolbar is shown, the first segment is displayed in light
blue block, a grey block is placed just below it and the rest of your document is shown on the
rest of the page. The cursor is located in the grey block.
Translate the segment in the grey block
Fig. 15 – Translated segment
After translating this segment, you can continue with your translation. To move to the next
segment, click on the
icon on the segment toolbar2, or use the Alt+Down shortcut.
1
Details of keyboard shortcuts used by WFA and how to change them are given in the Features and Shortcuts
section on page 52
2
Since there are two toolbars, we will speak more often of the WFA-specific toolbar, which appears in the
18
Wordfast Anywhere Manual
v 1.4.8
Remember this shortcut, as you will use it for each segment you translate.
Note: WFA does not have its own spell checking functionality. However most browser / OS
combinations, including Firefox, Safari and Chrome, have their own spell checker – in some
cases it may be necessary for you to activate it.
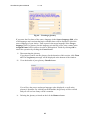
When a segment to be translated has no counterpart in the TM, the lower block has a grey
background. If WFA finds a segment in the TM that exactly matches the segment to be
translated, it places the translated segment in the lower block against a green background. If
WFA finds a segment in the TM that only corresponds approximately to the segment to be
translated – by default, those with a correspondence of 75% or more – it displays the
translation in the lower block against a yellow background.
Note that above the upper block, between the two blocks and after the lower block, there are
purple tags. The tag between the two blocs has the format <}0{>. This zero means that WFA
has not found any segment in the TM that corresponds to at least 75% of the segment to be
translated.
When the lower block has a green background, the tag has the format <}100{>, which means
that the match is 100%. When the lower block has a yellow background, the number in the tag
can be anywhere between 75 and 99, which is the percentage of correspondence between the
TM and the segment to be translated.
Fig. 16 – Segment retrieved from the TM at 100% match
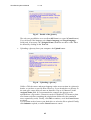
Before translating this new segment, pay attention to the tag <1>, which appears here at the
end. WFA is not a word processor and thus does not concern itself with a specific
representation of the document's formatting. You'll see no changes in size or typeface, no bold
or italic characters. Instead, this information is encoded and represented by what we call
"tags", e.g. <1>. By slowly passing your mouse over this tag you will see what it represents.
This tag is not to be translated, but it should be copied to the appropriate position in the target
segment. To copy it, click on it or use the
or
icons (shortcut Ctrl+Alt+Right and
Ctrl+Alt+Left) to navigate the source segment to the desired tag. A red frame indicates the
selected item. Then position the cursor in the target segment and click on the
icon
(Ctrl+Alt+Down). Alternative, drag the tag with the mouse from the source segment to the
document area. The top bar is the same as that used in Wordfast Classic, allowing users to translate without
becoming disoriented. However, the new bar is more specific to editing a segment, which is why it is referred to
as the "segment toolbar."
19
Wordfast Anywhere Manual
v 1.4.8
appropriate position in the target segment. Now translate the segment as before.
Fig. 17 - Tag
Now that you get the idea, you can continue to translate. Remember: to move from one
segment to the next, use Alt+Down. To return to the previous segment (to correct something
that you subsequently realised was mistaken), use Alt+Up.
Main commands
Provisional segment.
You may be unsure whether your translation of a segment is correct. To avoid having to
interrupt your translation process, you can mark the segment as provisional. It will be
identified by a yellow square at the beginning of the line. To mark a segment as provisional,
use the F10 key or
button.
When you have resolved any doubts, simply return to the marked segment and make your
corrections. Use Alt+Down ( ) or Alt-Up ( ) to validate the segment and erase the
yellow square.
Note.
You can also write a note to be attached to the segment for the duration of the translation (in a
similar manner to a Post-ItTM). You can use this to remind yourself of something important
about this segment or to pass information on to people who will have access to your
translation, such as reviewers. To write a note, click the
icon. The following text box will
be displayed:
Fig. 18 - Note
Write your note in the text box and click Save. You can cancel the operation by clicking
Cancel. In the case of an existing note, you can edit and validate it by clicking Save, or delete
it by clicking Remove.
A green square will be placed at the beginning of the segment to indicate that a note is
attached. By passing the mouse pointer over this square, you will see a rectangle containing
the text of the note.
20
Wordfast Anywhere Manual
v 1.4.8
Fig. 19 – Note
Copying the original segment.
Sometimes a segment contains very little to translate: for example, when it consists almost
entirely of proper names or is made up of a website address. In this case, it may be preferable
to copy the entire source segment to the target segment and make any adjustments there. To
do this, click on the
icon or use the shortcut Alt-Ins.
Erasing the target segment
Sometimes it is necessary to erase what you have just written in the target segment. The
easiest way to delete the target segment is to click the
icon or use the shortcut
Ctrl+Alt+X. Clicking on this icon a second time will retrieve the deleted segment.
Insertion of a special character like the non-breaking space
When you write in French, some characters must be accompanied by a non-breaking space:
e.g. before the colon, semicolon, exclamation mark, question mark, exclamation mark, before
and after quotes, thousands separators, and so on. In WFA, a non-breaking space is
represented by the symbol
. However, such spaces cannot be automatically handled in an
Internet browser as they are when using a text editor such as Word. Therefore it will be
necessary to add them manually. By default, a non-breaking space is inserted at the cursor
location by clicking on the
icon. Two other special characters can be inserted like the
curly quotes. You can configure these 3 special characters in WFA setup (see Pandora’s box).
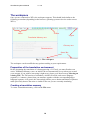
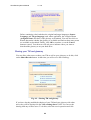
Expanding a segment
As we have seen, WFA considers that the segment is terminated when it encounters a segment
termination marker. However, in some cases this segmentation is in error. For example, when
WFA’s segmentation engine meets the following sentence:
On pense aux conseils de Prof. Jacques Lacan:.
it can interpret the segment as ending with Prof. because a full stop is used as an end of
segment marker. In this case we can command WFA to expand the segment, that is to say, to
append the subsequent segment to it.
21
Wordfast Anywhere Manual
v 1.4.8
Fig. 20 – Segmentation error
This is done with the Alt+Pg dn shortcut or the
icon on the Wordfast toolbar.
Fig. 21 – Segmentation error corrected
It is important to expand segments when the segmentation has not been performed correctly
because this will increase the chances of it corresponding with a translation memory segment.
For example, the segment On pense aux conseils de Prof. will have little chance of having a
similarity of over 75% with another. By contrast, if the sentence On pense aux conseils de
Prof. Jacques Lacan: is in the TM, when WFA encounters the source sentence On pense aux
conseils de Professeur Jacques Lacan, it will offer the existing translation, as it has 90%
similarity (it is only the word Professor that is not the same).
A segment cannot be expanded if it is terminated by an end of paragraph or end of cell
marker, a page break or a tab.
You should not have to expand all segments containing abbreviations that end with a full stop.
A comma-separated, modifiable list of common language-specific abbreviations is included in
WFA . This can be accessed and modified via the segmentation tab in the configuration dialog
box [case-sensitive, optional letters are enclosed in square brackets].
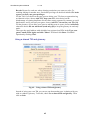
Shrinking a segment
If, on the other hand, two segments are erroneously displayed together due to an absence of an
end of segment marker, you can also shrink the segment with the shortcut Alt-Pg up or the
icon in the Wordfast toolbar.
Ending the translation.
If for any reason you want to stop translating, you have three choices: to close the translation
and validate the current segment in the TM (
or Alt+End), to close it without validating it
(
or Shift+Alt +End), or to clear the content of the target segment, together with any
attached note, by clicking on the
icon.
22
Wordfast Anywhere Manual
v 1.4.8
Revision of the translation
Once translated, the text should be revised. You can either download the translated document
immediately to view it in your favourite word processor or revise it in WFA. However,
WFA’s bilingual document display format may not always be optimal for revising purposes.
To toggle the display between the bilingual document, the original document and the
translated document, use the shortcut Ctrl+, (Ctrl+comma). A different display mode is
presented with each iteration. To confirm what you see in front of you, check the indicator on
the status bar: bilingual document (Bilingual), original document (Source) or translated
document (Target):
Please note: this shortcut does not alter the document in any way. It only changes the way that
it is displayed in a way that is more convenient for the task you are currently engaged in.
You can also view the document you are translating at any stage of completion in PDF
format. To do this, click on the
button.
Delivery of the translation
When the translation is finally complete, you must download the final document in order to be
able to deliver it. To do this, click File, then Download Document File.
Fig. 22 - The Download Document File menu option
If it so happens that you have not yet fully translated the document, you will receive this
message:
This is purely an advisory message, warning you if you have forgotten to translate a segment
or if there are provisional segments or notes. However it is quite possible that this is your
23
Wordfast Anywhere Manual
v 1.4.8
intention: sometimes there are segments that should not be translated.
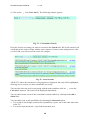
You can find out at any time if you have completed the translation, or how many segments
remain to be translated, by clicking on the
icon (outline) in the upper left corner of the
workspace. When the outline has been activated, its icon will be displayed pointing in the
opposite direction:
.
Each square represents a segment:
• A grey square indicates that the segment has not yet been translated
• A green square indicates that the segment has been translated
• A yellow square indicates a provisional segment
• An i in a square indicates that this segment has a note attached
• The pink background shows the segments currently loaded in the document area.
More information about the outline function can be found in the Outline section.
Fig. 23 - Outline
In this example, segments 1 to 5 have already been translated; the 2nd has a note, while the
4th has been marked as provisional.
If you wish to return to your document to verify or update non-translated segments, click
Cancel, otherwise click OK.
The following message will be displayed:
You can cancel the download by clicking Cancel or continue by clicking OK. At this point,
24
Wordfast Anywhere Manual
v 1.4.8
you also have the option to add a second document in PDF format to the downloading of the
document in its original format. To add the PDF-formatted document, tick the Add PDF file
box. This may take some time, so please wait. You can verify that this operation is taking
place: a series of small blue rectangles will display the progress in the status bar:
If the size of your document is less than 1 megabyte, you will receive the document in its
original format, otherwise it will be compressed to ZIP format (*.zip).
If you have requested the PDF file, both files – the original and the PDF – will be downloaded
together and compressed together in ZIP format (*. zip).
After you click on the OK button, Wordfast Anywhere prepares the data transfer and then
sends it to your browser. The browser will then inform you that it has received the data
according to its specific mode of operation. In some cases, a dialog box will pop up allowing
you specify where to save the file; however, this depends on the particular browser you use.
If nothing happens, check your browser’s downloads settings and / or repeat the process.
25
Wordfast Anywhere Manual
v 1.4.8
Placeables
A placeable is any term or expression contained in the source segment that is defined as such.
WFA provides shortcuts for inserting them into the target segment, thus both saving time and
reducing the potential for typing errors.
WFA predefines as placeables:
• Numbers
• Tags
• Words beginning with, or otherwise containing, capital (upper case) letters
• Words or phrases appearing in the source text that have matching items stored in the
Glossary (see p. 26, Terminology management (Glossary))
We have already seen how to copy tags. Given that a tag is a placeable, the procedure is the
same: to copy any placeable, simply select it with the
or
icons (shortcut
Ctrl+Alt+Right and Ctrl+Alt+Left).
You also have the possibility of clicking on any term in the source text, thus placing it under
focus and temporarily transforming it into a placeable. A red frame indicates the item
selected.
Next, position the cursor in the target segment at the point where the placeable should be
positioned or double-click (click and drag) to select the word (phrase) to be replaced and click
on the
icon (Ctrl+Alt+Down). The placeable is copied to the relevant position in the
target segment.
In this sentence, the placeable elements, selected by Ctrl+Alt+Right or
, are:
(starts with a capital letter)
(number)
(tag)
And, if necessary, any term may be designated as a placeable simply by clicking on it:
As you translate the text, you only want to place those elements that should not be translated:
26
Wordfast Anywhere Manual
v 1.4.8
At this point, you want to write ‘Chenjerai.’. However it may be faster and more efficient (as
well as reducing the possibility of error) to select the item using Ctrl+Alt+Right or
(or
even by simply clicking on it) and place it into the segment target with Ctrl+Alt+Down or
.
The following proper noun ‘Hove’ is also a placeable, so you can repeat the procedure.
Simply use the Tab key on your keyboard to advance from one placeable to the next (or
Shift+Tab to move in the opposite direction).
You can also use the Ctrl+Alt+Up shortcut or the
segment into placeables.
icon to transform terms in the source
For even greater efficiency, if you type a letter that begins a word or term in the source
segment and then successively press Tab, all words or terms beginning with that letter are
successively copied to the target segment. For example, in the above sentence, typing l
followed by Tab will copy ‘lyrique’ to the target. Each time you press the Tab key, the word
or term that has been copied to the target segment will be replaced by the next
word or term appearing in the source segment that begins with the same letter, i.e. ‘le’,
‘laisse’ and so on.
27
Wordfast Anywhere Manual
v 1.4.8
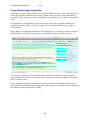
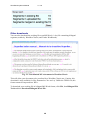
Terminology management (Glossary)
The use of incorrect terminology can ruin an otherwise good translation. Many clients have a
well-defined terminology (the jargon of the trade), compiled in the form of a glossary. By
supplying this glossary to their translators, clients can impose a particular terminology. In
adopting this approach, very common in technical translation, the end result should
harmoniously fuse the linguistic competence of the translator with the terminological
requirements of the client.
Sometimes the client will ask the translator to provide a glossary of terms arising from
research undertaken during the translation. In this case, the translator must create a glossary
and add specific terminology to it. This glossary building can either be done prior to
translation (in an initial terminology research phase), or during the translation itself.
In many cases, however, the client provides a bilingual glossary, which has already been
created during the course of previous translations. It is then up to the translator to comply
strictly with it and, where appropriate, to add his or her own contributions.
When the translation work is of a more general nature (and especially if a translator is still in
the process of acquiring the general vocabulary of a source language), WFA’s glossary
function can also be used to itemise terminology that is encountered during the course of the
translation process.
Wordfast Anywhere is designed to assist the translator in all the cases mentioned above
through the implementation of its glossary function. This glossary consists of a simple tabdelimited text document, which – like the TM – can be uploaded to and downloaded from
WFA, shared with other CAT programs, etc. as required.
Creating a glossary
Click on the File menu,
Fig. 24 – File Menu
then on TM and Glossaries :
28
Wordfast Anywhere Manual
v 1.4.8
Fig. 25 – WFA Setup
Click on the Setup link, then click the Glossaries tab:
Fig. 26 – Configuration of the glossary
Click on the New button:
29
Wordfast Anywhere Manual
v 1.4.8
Fig. 27 – New glossary
The glossary follows the same rules as the TM; that is to say, a similar setup process is
involved in defining the source and target language pair. For the purposes of all our
discussions below we will use the French- English language pair. First, you must specify the
language of the source document. In the Source Language field, enter FR. WFA will then
propose several different French variants. In this example, we will use the France variant, or
FR-FR. Now we will do the same thing for the target language: type EN in the Target
Language field. From the several variants proposed by WFA select EN-GB.
In general, translators use only one glossary per language pair. In this way, all the terms
relevant to a pair of languages are concentrated in a single glossary. However, you may have
good reasons for maintaining different glossaries in the same language pair (by subject area,
client, etc.). In this case, enter an ID of up to 10 characters in the Assigned Name field. Then
click OK. Returning to the previous window, click on the Save settings button. Your glossary
has now been created.
Selecting an existing glossary
Once you have created a glossary, it will always be available for you to use. However, if you
have multiple glossaries, whether because you are translating more than one language pair or
because you decided to create more than one glossary per language pair, it will be necessary
to select the glossary to use for your translation, if different from the one you used last time.
To do this, click on the File menu:
Fig. 28 – File Menu
30
Wordfast Anywhere Manual
v 1.4.8
then on TM and Glossaries:
Fig. 29 – WFA Setup
Click on the Setup link, then click the Glossaries tab:
Fig. 30 – Configuration of the glossary
Here you can choose between an EN-FR and an FR-EN glossary. Choose the one you need by
clicking on it (it will be displayed against a blue background) and click OK. Returning to the
previous window, click on the Save settings button.
Uploading of a Wordfast Classic or Pro glossary
If you already have a glossary that you use with Wordfast Classic or Pro, you can upload it to
WFA. You can either upload it directly or add it to your existing glossary.
To directly upload a Wordfast Classic or Pro glossary to WFA, click on the Upload button.
31
Wordfast Anywhere Manual
v 1.4.8
Fig. 31 – Uploading a glossary
Unlike with a TM, WFA cannot derive the source and target language information from the
header of the glossary file; therefore this must be specified here. If you already have a
glossary in the same language pair, please also ensure that you enter an identifier of up to 10
characters in the Assigned Name field. Finally, click on the OK button. Returning to the
previous window, click on the Save settings button.
To append a Wordfast Classic or Pro glossary (merge it with an existing WFA glossary),
select the existing glossary by clicking on it and then click Merge. Important: the glossary to
be imported must have the same source and target language codes as those defined in the
existing glossary. It is recommended that you compress the glossary to a .ZIP archive before
uploading it.
You can also choose whether to allow the import of duplicate glossary entries, by selecting
the Add always update option or instead select the Do not add duplicate option to have
WFA not adding any duplicate entries.
Fig. 32 - Appending a glossary
You will be asked to select the glossary to be uploaded (click the Browse button):
32
Wordfast Anywhere Manual
v 1.4.8
When you have located it, click on Submit. Once the glossary has been uploaded, you will
receive a report summarising the operation:
You will see how many terms have been submitted for upload, how many were rejected as
invalid or duplicates well as the total number of terms added . Close this dialog by clicking
Close. Finally, click on the OK button. Returning to the previous window, click on the Save
settings button.
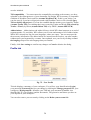
Using a glossary
Whenever WFA recognises a term from the glossary in the source segment it highlights it
against a blue background:
Fig. 33 - Display of terms in the glossary
The terms highlighted in blue are considered as placeables. They can thus be manipulated
with the
and
icons or the Ctrl+Alt+Right and Ctrl+Alt+Left shortcuts and by
clicking on them with the mouse or by typing their initial letter + Tab. The difference is that,
when you use the
icon or the Ctrl+Alt+Down shortcut, it is the corresponding translation
that is copied to the target segment.
You can see in advance what the translation of the highlighted items is by activating the
glossary panel (keyboard shortcut Ctrl+Alt+H or by selecting it from the Display Menu)
33
Wordfast Anywhere Manual
v 1.4.8
Fig. 34 – The glossary panel
If you want to know more about a term, i.e. the information that you or someone else has
entered in the comment or F1, F2 and F3 fields, place your mouse over the source term and
this information will be displayed as follows:
Adding terms to the glossary
It is quite likely that you will want to incorporate terms you come across in the source text
into the glossary together with their translations that arise as part of your research process.
This way, your linguist’s memory will be reinforced and you are less likely to have to
research the same word or phrase again in the future. WFA allows you to do this dynamically,
at any time and without exiting your translation process.
First, select the term in the source text. If it consists of one word, you can simply click on it or
use the Tab key to move forwards (or Shift+Tab to move backwards) through the text until
you reach its position.
The word you have selected will be highlighted against a red background.
If the term consists of more than one word, you may have to click and drag in the source
segment to select it. In this case, the selected phrase will have a blue background – use the
Copy command in your browser’s Edit menu to add it to your computer’s Clipboard.
34
Wordfast Anywhere Manual
v 1.4.8
Next, invoke the Glossary Dialog Box by typing Ctrl+Alt+T, selecting it from the Tools
menu or clicking the
icon.
Fig. 35 – Adding terminology
If a single word, the term you highlighted in the source segment should automatically appear
in the Source field. If the terms consists of more than one word, it may be necessary to paste
the source term into the Source field from your computer’s clipboard or type the information
manually. Now simply add the appropriate translation(s) in the Target field.
You can also add a comment – something that may prove useful in the future, e.g. if you want
to remember the situation in which this translation was used. The F1, F2 and F3 fields may be
used to store word role, context, grammatical form or any other relevant text-based
information. Then click OK to confirm or Cancel to dismiss the dialog.
35
Wordfast Anywhere Manual
v 1.4.8
Fuzzy terminology recognition
Each time you open a segment, Wordfast Anywhere checks for the presence in the glossary of
all words and terms contained in the source segment. This operation is called terminology
recognition. The recognised terms are highlighted in blue in the source segment, as discussed
above.
In establishing a correspondence between the terms of the source segment and the terms
found in the glossary, WFA will both recognise an exact match and attempt to recognise
fuzzy matches.
WFA employs a stemming algorithm for some languages (e.g. German) in order to recognise
different forms of the same word that may correspond to those listed in the glossary.
For example, in the above example WFA has recognised the infinitive verb ‘besuchen’ as
being related to the adjective (or past participle) ‘besucht’ due to the fact that the two words
share a common stem.
Fuzzy matching can also be established by using an asterisk in combination with the term.
This method overrides the stemming algorithm, allowing you to find all terms that begin with,
end with or contain a particular text string.
36
Wordfast Anywhere Manual
v 1.4.8
Bilingual file tools
Downloading TXML file
You can download your document in TXML format, the standard working file format used by
WFA, which is the same as that used by Wordfast Pro. This permits you, for example, to send
the file to a colleague for review using Wordfast Anywhere or Pro. Once reviewed and
corrected, you can upload it again.
To download your working file, click File, then Bilingual File Tools and then Download
Txml File:
Fig. 36 – Downloading TXML file
If your translation is incomplete or contains provisional segments or notes, you will receive
this warning:
At this point you have the choice to accept (OK) or cancel (Cancel) to return to your
translation. If you accept, you will need to consider the following message:
37
Wordfast Anywhere Manual
v 1.4.8
You can optionally instruct WFA to copy the source segment to the target segment if it is
blank (check Copy source to target if target is empty) and/or to ignore language variations,
e.g. to not make a distinction between British and American English (check No language
variants).
Merging TXML files
If you already have a file in TXML format you can upload it to your workspace. To do this,
click File, then Bilingual File Tools and then Merge Txml File :
Fig. 37 – Merging a TXML file
At this point you must complete the following dialog box:
38
Wordfast Anywhere Manual
v 1.4.8
Fig. 38 – Merging TXML files
By checking Merge an existing document, all documents that exist in your workspace will
be listed according to language pair, and you will have to choose which will be merged with
the file you intend to upload.
You can also set WFA to update the TM corresponding to the file you upload (check Update
or create a TM with a bilingual document). Check Merge an existing TM and choose
which TM to update from the list displayed. You will also need to determine whether, in the
case of identical source segments, new TUs should be added to existing ones (Keep existing
TUs) or whether they should replace them (Overwrite existing TUs). If, on the other hand,
you prefer to create a new TM, click on Create a new TM. At this point, you will have the
opportunity to give this new TM a name, if you have more than one TM for the same
language pair. Then click Upload to upload the file or Close to exit without doing anything.
Note that operations performed on the document are independent from memory-related
operations, allowing you to update only the document, or only the memory, or both.
If you have clicked Upload, you will receive the following message:
Click Browse to navigate through your directories and select your file, then click Submit to
perform the upload or Cancel to cancel the operation. After the merge operation has been
successfully performed, a report will appear showing how many segments were merged.
39
Wordfast Anywhere Manual
v 1.4.8
Other downloads
You can also download the working file as an MS-Word (*. doc) file containing bilingual
segments, usable by Wordfast Classic (and Trados Workbench).
Fig. 39 – Downloaded WFA document in Wordfast Classic
This will allow your document to be proofread by a Wordfast Classic user. Caution, this
download is only available for files formatted as .doc and .rtf. Unlike the TXML file, this
format cannot be imported into WFA.
To download your working file in bilingual MS-Word format, click File, then Bilingual File
Tools and then Download Bilingual Word File:
40
Wordfast Anywhere Manual
v 1.4.8
Fig. 40 – Downloading bilingual file in .doc format
If your translation is incomplete or contains provisional segments or notes, you will receive
this warning:
At this point you have the choice to accept (OK) or cancel (Cancel) to return to your
translation. If you accept, you will need to respond to the following message:
You have yet another downloading option: your translated file, in plain text format, without
any formatting. To do this, click File, then Bilingual File Tools and then Download
Unformatted Text File:
41
Wordfast Anywhere Manual
v 1.4.8
Fig. 41 – Downloading bilingual file in .txt format
If your translation is incomplete or contains provisional segments or notes, you will receive
this warning:
At this point you have the choice to accept (OK) or cancel (Cancel) to return to your
translation. If you accept, you will need to respond to the following message:
This is just to warn you that you are going to download your translated file without
formatting.
Find / replace
It is often necessary to locate a word or text string in a file that has been translated. For this
we use the Doc Search and Replace function, by clicking the
icon that appears third
from the right on the Wordfast toolbar, selecting the appropriate command from WFA’s Edit
menu or using the Shift+Ctrl+S keyboard shortcut:
42
Wordfast Anywhere Manual
v 1.4.8
As with other functions that require the current segment to be closed, you will receive a
warning that the current segment will be closed without being saved. If you agree, click OK,
otherwise click Cancel to cancel the transaction and save your work.
Next the Search / Replace dialog will be displayed:
Fig. 42 – Search / Replace (basic)
Enter the word or text string you wish to locate in the Search field. Define whether the search
should be performed on the source segments (Source) or target segments (Target) and click
Search to search or Close to cancel the operation.
Fig. 43 – Search / Replace (result)
In this example, the word online was found in six locations, in segments 1, 3, 5, 6, 7 and 8.
From this dialog you can make additional searches by entering different words and clicking
Search or dismiss by clicking Close.
In order to access the Replace functionality of this feature, click on More:
43
Wordfast Anywhere Manual
v 1.4.8
Fig. 44 – Search / Replace (advanced)
You now have the possibility of replacing the found word or text string with another term. To
do this, enter the replacement term in the Replace field and click on the Search button again.
Please note, replacements can only be performed on target segments. You can specify that
WFA distinguish the case of the search term (Case sensitive), that it mark as provisional any
segment in which the search term has been found (Mark found target as provisional ) or
that it add a note to all segments where a search term is replaced (Create a note for Every
replacement). You can also tell WFA to update all segments in the TM that correspond to the
segments replaced in the target document (Update TM for every replacement).
Fig. 45 – Search / Replace (result)
44
Wordfast Anywhere Manual
v 1.4.8
Again, the search for the term online has returned six results. By clicking on Replace you can
have the phrase on the Internet replace them in all the target segments where they appear.
Optionally, these segments will be marked as provisional or a can have a note associated with
them, and the TM can be updated. You can also choose to do nothing by clicking Close.
Analysing a text
Before providing a translation quotation, you may wish to analyse the source text to
determine the extent of the work required. WFA provides an analytical tool for this purpose.
To do this, click File, then Bilingual File Tools and then Analysis Report:
Fig. 46 – Analysis Report
Depending on the size of your document, the analysis may take several seconds or even
minutes. A progress message is displayed on the status bar. Then the analysis results will be
displayed:
Fig. 47 – Analysis Report
According to the number of repetitions (identical segments that appear more than once in the
document) or the percentage of segments that correspond either completely (100%) or
45
Wordfast Anywhere Manual
v 1.4.8
partially (<100%) to matches in the TM, you will be able to precisely estimate the volume of
work actually requiring to be translated. After having examined the analysis report, click
Close.
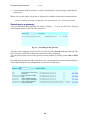
Statistics
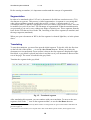
WFA allows you to see what progress you have made with your translation at any time. To do
this, click File, then Bilingual File Tools and then Statistics :
Fig. 48 – Statistics menu item
A statistical report on your translation will be displayed:
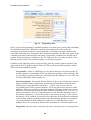
Fig. 49 – Statistics
You will see the number of source and target segments (with the percentage already translated
in brackets); the number of source and current target words; the number of source and target
tags and if there is any segmental discrepancy in terms of differences between the number and
content of the source and target tags (segments with tag difference); the number of segments
not stored in the TM (segments flagged not saved in TM); the number of provisional segments
(provisional segments) and notes (segments with notes). The report also displays which
segments remain to be translated. After viewing the statistics, click Close.
46
Wordfast Anywhere Manual
v 1.4.8
Another important indicator is always present on the status bar: it tells you on which segment
you currently are in relation to the total number of segments in the document. In this example,
the document has 16 segments in total and you are currently on the second:
Updating the TM
Although the TM is automatically updated with each segment you translate, it may be that
you wish to force a TM update thus replacing erroneous TM content. To do this, click File,
then Bilingual File Tools and then Check and Update TM:
Fig. 50 – Check and Update TM menu item
The following message will be displayed:
WFA shows the number of segments that will be updated in the TM. You have the option to
also check for any changes to the target before performing the update. Click the Update TM
button to confirm the update or Close to cancel.
Concordance search
Segments stored in the TM are retrieved only if they have a minimum level of correspondence
with the source segment (by default 75%). However, even if the level of correspondence is
not sufficient to produce a fuzzy match, the TM may still contain terms that you have
previously translated and wish to use in your current translation. To search in the memory you
have two options:
47
Wordfast Anywhere Manual
1) Click on the
v 1.4.8
icon (Ctrl+Alt+C). The following window appears:
Fig. 51 – Concordance Search
Enter the word or text string you want to research in the Search field. WFA will search for all
words that are the same or begin with the same sequence of letters as the string entered. After
you click OK, you will receive the result, for example:
Fig. 52 – Search result
All the TUs where the search term richtig appears are displayed; the term will be highlighted,
allowing you to see how you have translated it previously.
You can also select the word or text string with the mouse and then click on
Ctrl+Alt+C shortcut. The result will be displayed immediately.
or use the
You can edit or delete a term in the concordance search window by clicking on the edit or
delete links.
You can add to your search possibilities by choosing the Advanced option:
• Two words or text strings (search terms) separated by a space: one or the other must exist
in the TU
• Two terms separated by the + sign: both terms must exist
48
Wordfast Anywhere Manual
•
v 1.4.8
A term starting with an asterisk: a search is performed for all text strings containing the
search term.
When you use this option, a help line is displayed to remind you how this command works:
cat dog = cat OR dog | cat+dog = cat AND dog | *cat = bobcat OR cat | cat = cat OR cats OR catfish
Searching in a glossary
You can also search in the glossary. To do this, click the
Search menu option or the Ctrl+Alt+G shortcut:
icon or use the Tools / Glossary
Fig. 53 – Searching in the glossary
Type the source language word you wish to search for in the Search field and click OK. The
list of glossary entries that contain the search term will be displayed.
You can edit or delete a term in the glossary search window by clicking on the edit or delete
links.
By employing an asterisk in the search term, you can expand your search to find all glossary
entries that include the text string that the search term is made up of.
49
Wordfast Anywhere Manual
v 1.4.8
Other tools
Alignment
When you begin to translate with a CAT tool you may not be able to derive the maximum
benefit from it if you do not yet have a translation memory. Or, a client may have source and
target documents from a previous translation but cannot supply you with a TM. In this case,
you can quickly derive a TM by performing an "alignment" on the documents you have
already translated prior to using WFA for your translation work by using WFA’s alignment
tool.
To do this, click Tools, then Align your files :
Fig. 54 – Alignment Menu
A new page will open, displaying the following dialog:
You must first select the language of the source document. WFA is optimised for English,
German, Spanish, French, Italian, Dutch and Portuguese, so the codes for these languages are
already displayed in the drop-down menu on the left.
If the language of your choice is not one of those proposed by the drop-down menu, select
other. Another dialog will open:
50
Wordfast Anywhere Manual
v 1.4.8
Enter the language code of your source document. The regional variant is not necessary.
Unfortunately, the alignment tool cannot currently handle some languages, such as Chinese
and Japanese. Next, click on Choose to continue or Close to cancel.
Click Browse... to locate the source document to be aligned on your hard disk. When you
have done this, click Upload:
Acceptable document formats are .doc, .docx, .rtf, .xls, .ppt, .inx and .mif. Your document can
optionally be compressed in .zip format. The maximum size supported by WFA is 5000
segments. When you find your file, click Submit to upload it to WFA or Cancel to terminate
the operation. This upload may take some time, you will see the Uploading, please wait,
message, please be patient.
You must repeat the operation for the translated document. Once the two documents have
uploaded, you must choose the format of the TM; either TMX (which can be used on most
CAT tools) or TXT (the native format of Wordfast Classic). WFA can use either format. You
must also enter your email address, to which the WFA TM produced should be sent. Then
click Align. Do not expect a response on the site, the TM will be sent by email.
51
Wordfast Anywhere Manual
v 1.4.8
Advanced use
Features and Shortcuts
Function
Menu
Shortcut3
Starting the translation /
next segment
Edit / Open Next
Segment
Alt+Down
Previous segment
Edit / Open Previous
Segment
Alt+Up
Copy
Edit / Copy Source
Alt+Ins
Expand the segment
Tools / Expand
Segment
Alt+Page
Down.
Shrink the segment
Auto-translation
Tools / Shrink
Segment
Tools / Translate until
Fuzzy Match
Alt+Page Up.
Shift+Ctrl+
Page Down.
End of translation (1)
Edit / Close and Save
Segment
Alt+End
End of translation (2)
Edit / Close Segment
Shift+Alt+End
End of translation (3)
Previous placeable
Edit / Restore Original
Segment
Edit / Previous
Placeable
Next Placeable
Edit / Next placeable
Copy placeable
Edit / Copy Placeable
All placeables
Concordance
Glossary
TM Panel
Glossary Panel
Find / replace
Copy the previous TU
Copy the next TU
Copy TU
Force Search
Delete the TU
Erase target segment
Next word
Edit / Toggle
Placeable
Tools / Concordance
Search
Tools / Glossary
Search
Display / Show/Hide
TM Panel
Display / Show/Hide
Glossary Panel
Edit / Doc Search and
Replace
Edit / Copy Previous
TM Match
Edit / Copy Next TM
Match
Edit / Copy TM Match
Tools / Delete TU
Edit / Empty Target
Segment
Edit / Next Word
Alt+Del
Ctrl+Alt+
Left
Ctrl+Alt+
Right
Ctrl+Alt+
Down
Ctrl+Alt+Up
Ctrl+Alt+C
Ctrl+Alt+G
Icon
Explanation
Starts the translation by opening the currently selected
segment or closes the current segment and opens the
next.
Closes the current segment and opens the previous
segment.
Copies the source segment to the target segment
Expands the segment and permits you to extend beyond
the punctuation. Note: A segment cannot be expanded if it
is terminated by an end of the paragraph or end of cell
marker, a page break or a tab.
Allows you to return to the original text length after
expanding a segment to or reduce the size of a segment.
Automatically translates successive segments for as long as
exact matches are found in the translation memory.
Completes the translation in progress by closing the
segment and saving its contents to the TM
Completes the translation in progress by closing the
segment but not saving anything (neither document nor
TM)
Completes the translation in progress by deleting the
target segment, together with any note
Selects the previous placeable element in the source
segment.
Selects the next placeable element in the source segment.
Places the selected transposable element from the source
segment into the target segment, where the cursor is
located (or replaces highlighted text in target segment)
Transforms all the terms in the source segment into
placeables. If repeated, returns to the previous mode.
Performs a search in the TM and displays all segments
containing the search term.
Search in the glossary for the word or phrase selected in
the source segment
Ctrl+Alt+M
Opens or closes the TM panel
Ctrl+Alt+H
Opens or closes the Glossary panel
Opens the dialog to search / replace in the document
Alt+Left
Copies the next corresponding TU
Alt+Right
Copies the next corresponding TU
Shift+Alt+Ins
Copies the corresponding TU
Perform a direct search (without cache) in the TM
Ctrl+Alt
+Backspace
Ctrl+Alt+X
Tab
3
Deletes the Translation Unit selected in the TM panel
Toggle: Clears the target segment; Clears the tags;
Restores
Places the subsequent source word with letter + Tab
All these shortcuts can be modified according to your preference via the Tools/ Open Setup Dialog Box /
Shortcuts menu item.
52
Wordfast Anywhere Manual
Previous word
First segment of the page
Last segment of the page
Next Page
Previous page
First segment of document
Last segment of document
Provisional segment
Add to glossary dialog
Configuration
Hide the segment toolbar
v 1.4.8
Edit / Previous Word
Display / Move to
First Segment of
Screen
Display / Move to Last
Segment of Screen
Display / Move to
Next Screen
Display / Move to
Previous Screen
Display / Move to
First Segment of Doc
Display / Move to Last
Segment of Doc
Edit / Provisional
Segment
Tools / Glossary
Dialog Box
Tools / Open Setup
Dialog Box
Display / Show/Hide
segment toolbar
Shift+Tab
Places the preceding source word with letter+Shift+Tab
Home
Positions the cursor on the first segment of the page
End
Positions the cursor on the last segment of the page
PageDown
Position cursor on the next page
PageUp
Position the cursor on the previous page
Ctrl+Home
Positions the cursor on the first segment of the document
Ctrl+End
Positions the cursor on the last segment of the document
F10
Mark the segment to return to it later
Ctrl+Alt+T
Opens the dialog to add terminology to the glossary
Ctrl+Alt+W
Opens the WFA configuration dialog
Displays / hides the segment toolbar
Edit the source segment
Edit a note
Used to make minor corrections to the source segment
Allows you to create or edit a note
Forces the translation of the segment by Google
Translate / Microsoft Translator
Increases the height of the target segment for easier
viewing
Produces a list explaining all the buttons on the segment
toolbar
Inserts a nonbreaking space at the cursor position
Force MT
Increase the size of the
target segment
Explanation of buttons on
the segment bar
Non-breaking space
WFA Setup
The WFA Setup menu, which has been partially seen in the creation of TM and glossary, is
used to configure all the options and resources. It is accessible by the shortcut Ctrl+Alt+W or
the
icon or the Tools / Open Setup Dialog Box menu item.
53
Wordfast Anywhere Manual
v 1.4.8
Fig. 55 – WFA Setup dialog box
Five tabs are visible: General, TM rules, Shortcuts, Segmentation and Profile.
General tab
1. Use my TMs and glossaries. This facilitates the configuration of your TM and glossary.
a. To check if your glossary and TM are properly configured, click Test. A line showing
you their size and, if relevant, an error message, will be displayed at the bottom of the
window.
b. To set up your TM and glossary, click Setup. Another window opens, allowing you to
configure your TM (TMs) and your glossary (Glossaries).
Configuring the TM
54
Wordfast Anywhere Manual
v 1.4.8
Fig. 56 – Configuring the TM
TMs tab – On the selection area to the left you will see a list of TMs that exist in
WFA. If the TM you require appears in the list, select it. You also have the option to:
i. Create a new TM: New TM button.
Fig. 57 – Creating a TM
General tab. If you enter the first letter of the target language in the Source
language field, a list of all languages and versions that begin with that letter will
be displayed. Select the source language of your choice. Then repeat for the
target language in the Target language field. If a TM for this language pair
already exists, enter a name in the Assigned Name field in order to be able to
distinguish it. Finish by clicking OK or cancel the operation by clicking the
Cancel button.
55
Wordfast Anywhere Manual
v 1.4.8
Fig. 58 – TM attributes
Attributes tab. You have the possibility to define attributes of your TM, which
will allow you to subsequently identify its segments. There are five attributes in
a Wordfast TM: the first is fixed and immutable, consisting of the name of the
user. The other four can be defined by each user at will, but it is recommended
to use attribute 1 to describe the subject of the text to be translated and attribute
2 for the client, to maintain compatibility with Wordfast Classic and Wordfast
Pro users. Attributes consist of codes, usually 3 letters, followed by a brief
description. In the fields referred to as TM attribute 1 to 4, enter the name of
the attribute (subject, client, etc.). In the field on their right, select one of the
attributes that appear on the drop-down list or, if necessary, click add to add an
attribute, upd to update it or del to delete it. Whatever option is chosen, a dialog
will appear asking for the code of the attribute (ID) and a brief description
(Name, ignored for the Del option). Finish by clicking OK or cancel the
operation by clicking the Cancel button.
ii. View the details of your TM: Details button.
56
Wordfast Anywhere Manual
v 1.4.8
Fig. 59 – Details of the TM
The details displayed allow you to share your TM with Wordfast Classic
(VLTM tab) or Wordfast Pro users.
In the Server Url field you will see the address of the TM you will need to
provide these users with. There is also information concerning the source and
target languages (Source language and Target language) and the name of the
work group that has been assigned to you (Workgroup ID). These three pieces of
information, the URL, the languages and the ID of your TM, must be provided
to Wordfast Classic or Pro in order for them to be able to access the memory.
The name given to a memory with WFA (its Assigned Name), which serves to
partition a pair of languages, cannot be taken into account when sharing with
Classic or Pro: all of the language pair will be shared and the WFA memory
names will appear in the first attribute of a TU. Finally, by clicking on Test you
can check if your TM is available. Finish by clicking OK or cancel the operation
by clicking the Cancel button.
iii. Deleting the TM selected on the left: the Remove button.
57
Wordfast Anywhere Manual
v 1.4.8
Fig. 60 – Deleting the TM
The only two possibilities are to confirm (OK button) or cancel (Cancel button).
You can check if the language pair (Source language and Target language
fields) and, if necessary, the (Assigned Name), are those of the TM to be
deleted.
iv. Uploading a TM from your computer: the Upload button.
Fig. 61 – Uploading a TM
The codes for source and target languages are already set in the header of the
TM, so there is no need to specify them. However, if you already have a TM in
the same pair, ensure that you enter an identifier of up to 10 characters in the
Assigned Name field. It is recommended to compress the TM to be uploaded
into a .zip archive. The TM itself may in Wordfast TXT format or TMX. The
TM to be uploaded may not exceed 500,000 TUs. For large files, importing the
58
Wordfast Anywhere Manual
v 1.4.8
TM to the server happens automatically in the background and can continue
even if you exit the application. Finally, click OK to continue, or on the Cancel
button to cancel.
You will then need to browse your hard drive to select the file to download.
Finally, click Submit to upload, or on the Cancel button to cancel.
v. Merging the existing TM with another one to be uploaded: the Merge button.
Fig. 62 – Merging a TM
To merge two TMs, you must first choose an existing TM from the list.
The codes for source and target languages and, where applicable, the Assigned
Name of the existing TM you selected, will appear in grey. However you can
have WFA take into account the variations corresponding to those of the existing
TM by ticking the Check variant box. By selecting the relevant option from the
Update TM drop-down list you may choose to add new TUs to the existing ones
(Keep Existing TUs) or replace them (Overwrite existing TUs). It is
recommended to compress the TM to be uploaded into a .zip archive. The TMs
may be in Wordfast TXT or TMX format. The TM to be uploaded may not
exceed 500,000 TUs. Finally, click OK to continue, or on the Cancel button to
cancel.
59
Wordfast Anywhere Manual
v 1.4.8
You will then need to browse your hard drive to select the file to download.
Finally, click Submit to upload, or on the Cancel button to cancel.
vi. Downloading the TM selected on the left: the Download button.
Fig. 63 – Downloading a TM
Before continuing, check whether the original and target languages (Source
Language and Target language) and, where applicable, the Assigned Name
(Assigned Name) are those of the TM to download. You can also click on Test
to determine whether the TM is available and find out how many TUs are
available to download. From the Downloaded file format drop-down list you
can select either the Wordfast standard TXT format (Wordfast TM format) or
TMX (Standard TMX format). Finally, click OK to continue, or on the Cancel
button to cancel. Depending on your browser setup it will either save it or ask
you to specify the location on your hard drive to which you want to download
the TM.
Configuration of the glossary
Glossaries tab – In the selection area to the left you will see a list of existing WFA
glossaries. If the glossary you require appears in the list, select it. Warning: the
language pair of the glossary should correspond with the relevant TM. You also have
the option to:
i.
Create a new glossary: New button.
60
Wordfast Anywhere Manual
v 1.4.8
Fig. 64 – Creating a glossary
If you enter the first letter of the source language in the Source language field, a list
of all languages and versions that begin with that letter will be displayed. Select the
source language of your choice. Then repeat for the target language in the Target
language field. If a glossary for this language pair already exists, enter a name in the
Assigned Name field in order to be able to distinguish it. Finish by clicking OK or
cancel the operation by clicking the Cancel button.
ii. Disconnecting the glossary
If you do not want to use the glossary for the duration of this session, click Turn
off. The No glossary message will be displayed at the bottom of the window.
iii. View the details of your glossary: Details button.
You will see the source and target language codes displayed, as well as the
glossary's identifier. By clicking on the Test link, the glossary will be verified
and you will see how many words it contains.
iv. Deleting the glossary selected on the left: the Remove button.
61
Wordfast Anywhere Manual
v 1.4.8
Fig. 65 – Details of the glossary
The only two possibilities are to confirm (OK button) or cancel (Cancel button).
You can check if the language pair (Source language and Target language
fields) and, if necessary, the (Assigned Name) identifier are those of the TM to
be deleted by clicking on the Test link.
v. Uploading a glossary from your computer: the Upload button.
Fig. 66 – Uploading a glossary.
Unlike a TM, the source and target language codes are not written in a glossary's
header, so you have to specify them. However, if you already have a glossary in
the same pair, ensure that you enter an identifier of up to 10 characters in the
Assigned Name field. It is recommended to compress the glossary to be
uploaded into a Zip archive. Glossaries can be in Wordfast TXT format or plain
text format (each line containing the original term followed by the translated
term, separated by a tab). Finally, click OK to continue, or on the Cancel button
to cancel.
You will then need to browse your hard drive to select the file to upload. Finally,
click Submit to upload, or on the Cancel button to cancel.
62
Wordfast Anywhere Manual
v 1.4.8
vi. Merging the existing glossary with another one to be uploaded: the Merge
button.
Fig. 67 – Merging glossaries
To merge one glossary with another, you must first choose an existing glossary
from the list.
The codes for source and target languages and, where applicable, the Assigned
Name of the glossary to be uploaded, will be those of the existing glossary.
Make sure that the glossary to upload corresponds to the existing one because
there is no control possible over languages for glossaries and it is possible to
inadvertently mix them. It is recommended to compress the glossary to be
uploaded into a Zip archive. Glossaries can be in Wordfast TXT format or plain
text format (each line containing the original term followed by the translated
term, separated by a tab). Finally, click OK to continue, or on the Cancel button
to cancel.
You will then need to browse your hard drive to select the file to upload. Finally,
click Submit to upload, or on the Cancel button to cancel.
vii. Downloading the glossary selected on the left: the Download button.
63
Wordfast Anywhere Manual
v 1.4.8
Before continuing, check whether the original and target languages (Source
Language and Target language) and, where applicable, the Assigned Name
(Assigned Name) are those of the glossary to download. You can also click on
Test to determine whether the glossary is available and find out how many terms
are available to download. Finally, click OK to continue, or on the Cancel
button to cancel. Your browser will ask you to indicate where you want to
download the glossary to on your hard drive.
Sharing your TM and glossary
You can allow other users to share your TM as well as your glossary: to do this, click
on the Share/Revoke button. At that time you will receive the following:
Fig. 68 – Sharing TM and glossary
If you have already enabled the sharing of your TM and your glossary with other
users, they will be displayed in the Your existing shares field. You can revoke
sharing with any of these users. To do this, select the user in question and click
64
Wordfast Anywhere Manual
v 1.4.8
Revoke. Repeat for each user whose sharing permission you want to revoke. To
enabling sharing for another user, first define privileges in the block labelled To invite
a guest, set first your guest privileges.
For the TM: if you do not want your guest to delete your TUs from a segment having
an identical source, choose Add TUs, keep your TUs; this choice has the
disadvantage of creating duplicates for the same source segment. By contrast, to avoid
duplications, and if you trust your guest, choose Add TUs, Overwrite your TUs [O].
For the glossary: if you allow your guest to add his terms to yours, choose Add terms,
otherwise choose Do not add terms (read only) [R] to keep the glossary in read only
mode.
Then type the email address with which he has registered on WFA in the Type your
guest's email (WFA login) and click "Share" field and click Share. Finish the
operation by clicking Close.
Using a shared TM and glossary
Fig. 69 – Using a shared TM and glossary
Instead of using your own TM, you can use one that another user is sharing with you,
with or without a glossary. To do this, check Use a shared TM and glossary. Then
click on Join.
65
Wordfast Anywhere Manual
v 1.4.8
A list of colleagues, who are sharing their TM with you, as well as possibly their
glossary, is displayed. Select the email address of the colleague of your choice and
click Join. The information in the TM (and glossary) will be displayed at the top of
the window, together with the owner's email address. By clicking on the Test link the
TM and glossary will be verified and the number of TUs and glossary terms will be
displayed.
If you own your own TM server (Wordfast Server), or if you requested the use of a
specific TM server, you can configure this TM specific server. To do this, check Use a
specific TM server. The owner of the server will provide the instructions for
completing this dialog.
VLTM
WFA has access to the public TM server, which consists of segments offered by the
community of translators and is available to all under the name VLTM (Very Large
Translation Memory). The TM is unrestricted, free of charge and anonymous. To help
you translate your segment you can receive suggestions from your TM, machine
translation (MT, see below) and the VLTM. To enable the VLTM, check the Use
VLTM and click Details for other options.
Fig. 70 – VLTM
To specify a penalty (see below, under the TM rules tab), check VLTM penalty. The
penalty chosen, from 1 to 5, is specified from the drop-down menu on the right.
Export private TUs is a temporary option, reserved for recovery procedures.
66
Wordfast Anywhere Manual
v 1.4.8
Machine translation
WFA gives you the ability to translate each segment by online translation services like
Google Translate and Microsoft Translator. The translations proposed are not ever
likely to be fully acceptable. However, by making a few small adjustments, you will
be able to use them extensively in your translations.
Caution: when using this service, the source segments that will return a translation are
transmitted to Google and Microsoft. It is up to you whether or not to accept these
translations; these companies are not made aware of your choice. However, be aware
that sending the segments to Google and Microsoft may raise privacy issues between
you and your customers.
To activate this service, select Use MT when no match. The suggestions are only
made if no match is found in your TM or, if you use it, the VLTM. By clicking on the
Details link you will be able to check the tags Remove tags before sending to MT.
Tags are internal formatting codes that can interfere with machine translation.
Other configuration settings
Fig. 71 – Other configuration settings
Font Size: this setting only affects the font size on the screen, your document will
keep all its original layout unchanged. The available sizes are selected from the dropdown list.
Font Family: this setting only affects the fonts displayed on the screen, your
67
Wordfast Anywhere Manual
v 1.4.8
document will keep its entire original layout unchanged. You can specify a specific
font or a font family, for example Arial, Helvetica, Sans Serif (sans serif font, default)
or Times New Roman, Times, Serif (seriffed font).
Target segment selection: positions the mouse pointer at the opening of the segment,
with or without selection.
1. Cursor at start – no text selected, cursor positioned at the beginning of the
segment.
2. Cursor at end – no text selected, cursor positioned at the end of the segment.
This is the default setting.
3. Segment selected – The target segment is entirely selected.
Fuzzy Threshold in %: percentage of similarity required for a TU contained in the
TM to be suggested as a translation of the source segment. If several TUs meet this
criterion, the TU with the highest percentage will be offered. In this case you can
select the subsequent TUs with the
(Alt + Right) and
(Alt + Left) icons. The
default percentage (75%) is recommended for most translations, but in some cases it
may be appropriate to change it. For example, if you are translating short segments
containing only 3 words, a fuzzy threshold of 75% will only offer those TUs which are
identical (100%) and those where two words are identical, i.e. 66%, will never be
proposed.
Copy source when no match: if no TU is proposed by the TM and if machine
translation is not enabled, WFA will open an empty segment for you to type the
translation in. However, by modifying this setting (yes instead of no) WFA will copy
the source segment.
Display segment toolbar: Displays a toolbar specific to the editing of an open
segment. By default this toolbar is displayed (yes) but you can hide it by choosing no.
Plain text mode for mobile device: To use WFA on mobile devices that do not have
all the editing capabilities of a computer browser, it is necessary to use a cut down
editing mode containing only text. In this mode, the tags lose their colour and are just
text with no way of knowing what they represent.
Real time collaboration: If you share the same memory as another user and wish to
receive proposals from this memory in real time (that has just been validated by other
colleagues), activate this option, which negates the need for pre-emptive research and
the use of a data buffer. In this case, the search for the next segment is made when you
commit the current segment. This option has the disadvantage of delaying the opening
of the segment as it waits for all searches to be completed. It is not advisable to use the
VLTM in this case.
TM rules tab
68
Wordfast Anywhere Manual
v 1.4.8
Fig. 72 – TM penalty rules
Here you have the opportunity to establish penalties to be taken into account when calculating
the similarity between the TM and the segment to be translated. In other words, the
percentage of similarity is reduced, where applicable, according to the figure indicated for
each of the following rules. Some rules allow fractional reductions, but this only applies to the
calculation: the final reduction will be the sum of all penalties rounded to the nearest whole
number. If the percentage of similarity to the TU, reduced to the sum of the penalties, is less
than the specified Fuzzy Threshold percentage, it will not be proposed.
Penalties for the following rules are activated only if the box on their right is checked. They
apply only to the TUs proposed by the TM or VLTM, not from machine translation, which
has its own non-modifiable penalty.
Case penalty:: if there is a difference in case (upper and lower case) between the TU
and the segment to be translated, WFA can ignore this and show 100% similarity. But
you can assign a penalty of between 1 and 5 points for the difference in case. This rule
is selected by default with a penalty of 1.
Non literal penalty:: this penalty detects differences due to special characters such as
dashes, quotation marks, apostrophes, punctuation and whitespace characters (nonbreaking space, horizontal and vertical tabs, ...). There exist several codes for
representing each of these special characters. WFA can ignore these and show 100%
similarity; otherwise a penalty is calculated using the following method: every time a
difference is encountered, it adds the value of the first parameter (0.25, 0.50 or 0.75),
which by default is 0.50. The second parameter sets out what the minimum value of
the penalty is (default is 1). Since the penalty is necessarily an integer, if the value of
the penalty is 0.25 and there is only one in the segment to be translated, the minimum
is not reached. Finally, the third parameter sets the maximum penalty to be assigned,
even if the addition of all the differences of this rule exceeds that figure (10 by
default). This rule is selected by default with a minimum of 1 and a maximum of 10.
Tag penalty: this rule works exactly the same way as the previous one, but applied to
69
Wordfast Anywhere Manual
v 1.4.8
the tags (markers that represent the bits of code used to format the document <1>).
This rule is selected by default with a minimum of 1 and a maximum of 10.
Alignment user penalty: the TUs found in a memory imported into WFA produced
by an alignment tool and having the identifier "TALIGN!" may be assigned a penalty
from 1 to 10. This rule is selected by default with a penalty of 3. Please note, TUs
from an alignment may not have the "TALIGN!" identifier.
MT user penalty: the TUs found in a memory imported into WFA produced by
machine translation and having the identifier "MT!" may be penalised from 1 to 10.
This rule is selected by default with a penalty of 25. Please note, TUs from a machine
translation may not have the "MT!" identifier.
Multiple translation penalty: In the case of a source segment with multiple 100%
matches, i.e. several TUs having the same source segment but different translated
segments, a penalty may be applied to warn of a possible choice between translations.
This scenario is rare and no penalty is assigned by default.
Attribute penalty: attributes are identifiers that are associated with a particular TU at
the time that it is recorded in the memory. There are five possible attributes: the first is
fixed (it identifies the user who posted the TU), while the other four can be user
defined. In general, translators use attribute no. 1 to define the subject of the text to be
translated and the attribute no. 2 to define the client who owns the text. The other two
attributes are free to be used for anything else. For example, if the proposed TU is
from a text whose subject is "electronics", it will be penalised if the subject of the text
to be translated is "medicine." In other words if the TU is 100% identical to the
segment to be translated, it will be displayed with a percentage similarity of 98% if the
penalty applied is 2 points.
The penalty can be a number from 1 to 5, valid for the four attributes. By default this
rule is not active.
If you use a TM uploaded from Wordfast Classic or Pro, the existing attributes of the
TU may be penalised.
Shortcuts tab
70
Wordfast Anywhere Manual
v 1.4.8
Fig. 73 – Configuration of shortcuts
WFA shortcuts are not immutable. If some of them do not suit you, you can reassign them. To
do this, click on the upd link of the shortcut you wish to change.
In this example, corresponding to the first shortcut, you see the name of the command and a
drop-down list. Choose None if you want to remove the shortcut or choose another from the
list. Then click Update to confirm or Cancel to dismiss the dialog. Repeat for all the
shortcuts that you want to change. The new keyboard shortcuts will be displayed.
The last four commands have no shortcuts; however, you can assign shortcuts to them if you
wish.
If after modifying several shortcuts you want to return them to their original state, click
Restore default shortcuts.
Finally, click Save settings to confirm any changes or Cancel to dismiss the dialog.
Segmentation tab
This tab defines the rules for segmentation.
71
Wordfast Anywhere Manual
v 1.4.8
Fig. 74 - Segmentation rules
Segmentation style — this block determines how the segmentation will be performed. If you
choose Wordfast /Trados segmentation (default) the standard end-of-segment markers are
defined as follows: full stop, colon, question mark, exclamation mark and tab (Tab). You can
add other characters as well as space (Space), non-breaking space (NBSP), carriage return
(CR) and line feed (LF). You can add as markers: a number followed by an end of segment
marker (A number Followed by ESM year ends a segment – default), an end of segment
marker not followed by a space (An ESM without a trailing space ends a segment) and an
end of segment marker followed by a space followed by a lowercase letter (An ESM
followed by a space followed by a lower-case letter ends a segment). Although you can
change these markers, it is recommended to maintain them in such manner that if you share
your translations and your memories with other translators, all will follow the same rule.
Attention: segmentation is performed at the time of uploading the document to WFA. You
cannot therefore change the rules applying to that document during the course of its
translation.
The other segmentation rules that you can choose are:
Break segmentation - segmentation is done according to the end of paragraph character
(carriage return) or the <br> tag for HTML files.
Idiom segmentation – segmentation follows the rules of the software program Idiom.
SRX segmentation – the segmentation is done by using a previously uploaded file. It follows
the rules of the SRX standard, which has become a standard like TMX for formatting
memories and TBX for formatting glossaries. In the case of SRX segmentation, abbreviations
72
Wordfast Anywhere Manual
v 1.4.8
are also included.
TM compatibility – You must ensure the compatibility according to the memory you have
uploaded or the subsequent use of your documents. By default, WFA's memory is compatible
with that of Wordfast Classic and Pro (Assume Wordfast TM). If this is your choice, you
can also specify if you have old projects made with Wordfast Classic or Pro (check Legacy
TM created by old projects). You can also establish that the memory was created by Trados
(Assume Trados TM), even adding that it was created by Trados and Word (TM created by
Trados + Word); by Idiom (Assume Idiom TM) or by SDLX (Assume SDLX TM).
Abbreviations – Abbreviations end with a full stop, which WFA then interprets as an end of
segment marker. To avoid this, WFA allows you to create and manage a list of abbreviations.
While WFA already has lists for some languages, others are empty – the user must provide
the necessary information. The abbreviations are entered into the text box, one after another,
without spaces and separated by a comma. Once updated, save your list by clicking on Save
the language. Repeat for each language that you translate.
Finally, click Save settings to confirm any changes or Cancel to dismiss the dialog.
Profile tab
Fig. 75 – User Profile
This tab displays a summary of your workspace. You will see your identification (Login),
your password (Password) that you can change by clicking the Change password link, your
workgroup (Workgroup ID - identifies your TM) and your username (User ID – this
identifies the TUs you produce) and the documents, TM, glossaries and shares you have at
your disposal in your workspace.
You can also remove your account by clicking on the Delete your account link.
73
Wordfast Anywhere Manual
v 1.4.8
Table of references
A number followed by an ESM ends a
segment................................................72
Abbreviations...........................................73
Add always..............................................15
Add PDF file............................................25
Add TUs, keep your TUs.........................65
Add TUs, Overwrite your TUs [O].........65
Advanced.................................................48
Align........................................................51
Align your files........................................50
Alignment user penalty............................70
An ESM followed by a space followed by
a lower-case ends a segment................72
An ESM without a trailing space ends a
segment................................................72
Analysis Report.......................................45
Assigned Name...12, 14, 30, 32, 55, 57, 58,
62
Attribute penalty......................................70
Attributes.................................................56
Bilingual File Tools. .37, 38, 40, 41, 45, 46,
47
Break segmentation.................................72
Browse...............................................32, 39
Browse a local file...................................17
Case penalty.............................................69
Case sensitive..........................................44
Change password.....................................73
Check and Update TM.............................47
Check variant.....................................15, 59
Conditions and terms.................................7
Confirm password......................................7
Connect......................................................7
Copy source to target if target is empty...38
Copy source when no match....................68
Create a new TM.....................................39
Create a note for every replacement........44
Delete your account.................................73
Details................................................61, 66
Display segment toolbar..........................68
Do not add duplicated..............................15
Do not add terms (read only) [R].............65
Download.................................................63
Download Bilingual Word File...............40
Download Document File........................23
Download Txml File................................37
Download Unformatted Text File............41
Downloaded file format...........................60
Email..........................................................7
Export private TUs..................................66
File....13, 16, 23, 28, 30, 37, 38, 40, 41, 45,
46, 47
Font Family..............................................67
Font Size..................................................67
Forgot your password?..............................7
Fuzzy Threshold in %..............................68
General.....................................................55
Glossaries.....................................29, 31, 60
Glossary Dialog Box...............................35
Idiom segmentation.................................72
Keep existing TUs.............................39, 59
Login....................................................7, 73
Mark found target as provisional.............44
Merge...........................................15, 32, 63
Merge an existing document....................39
Merge an existing TM.............................39
Merge Txml file.......................................38
More.........................................................43
MT user penalty.......................................70
Multiple translation penalty.....................70
New..........................................................29
New TM.............................................12, 55
No language variants...............................38
Non literal penalty...................................69
Open Setup Dialog Box...........................53
Open Setup Dialog Box / Shortcuts.........52
Overwrite existing TUs.....................39, 59
Password..............................................7, 73
Plain text mode for mobile device...........68
Provide a file URL...................................17
Real time collaboration............................68
Register a new account..............................7
Remove tags before sending to MT.........67
Replace..............................................44, 45
Restore default shortcuts.........................71
Revoke.....................................................65
Save the language....................................73
Search................................................43, 49
Search and Replace..................................42
Segmentation style...................................72
Server Url................................................57
Setup......................................11, 13, 29, 31
Share/Revoke...........................................64
Source......................................................43
Source language...55, 57, 58, 60, 61, 62, 64
Source Language...............................12, 30
74
Wordfast Anywhere Manual
v 1.4.8
Source language code................................8
SRX segmentation...................................72
Standard TMX format.............................60
Statistics...................................................46
Submit......................................................33
Tag penalty..............................................69
target........................................................44
Target.................................................35, 43
Target language...55, 57, 58, 60, 61, 62, 64
Target Language................................12, 30
Target segment selection.........................68
TM and Glossaries.......................11, 28, 31
TM attribute.............................................56
TM compatibility.....................................73
TM rules..................................................66
TMs..........................................................55
TMs and Glossaries.................................13
To invite a guest, set first your guest
privileges.............................................65
Tools......................................35, 50, 52, 53
Turn off....................................................61
Type your guest’s email (WFA login) and
click \“Share\.......................................65
Update or create a TM with a bilingual
document.............................................39
Update TM...............................................47
Update TM for every replacement...........44
Update TM option...................................59
Upload...................................14, 31, 58, 62
Upload Document File.............................16
Uploading, please wait............................51
Use a shared TM and glossary.................65
Use a specific TM server.........................66
Use MT when no match...........................67
Use my TMs and glossaries.....................54
Use the VLTM.........................................66
User ID....................................................73
View allowed file formats.......................17
Wordfast TM format................................60
Wordfast/Trados segmentation................72
Workgroup ID..........................................73
Your existing shares................................64
75